

Page 1

Please read through the instruction manual before using this product.
Hobie Island
Spinnaker Kit
Instructions
®
Page 2
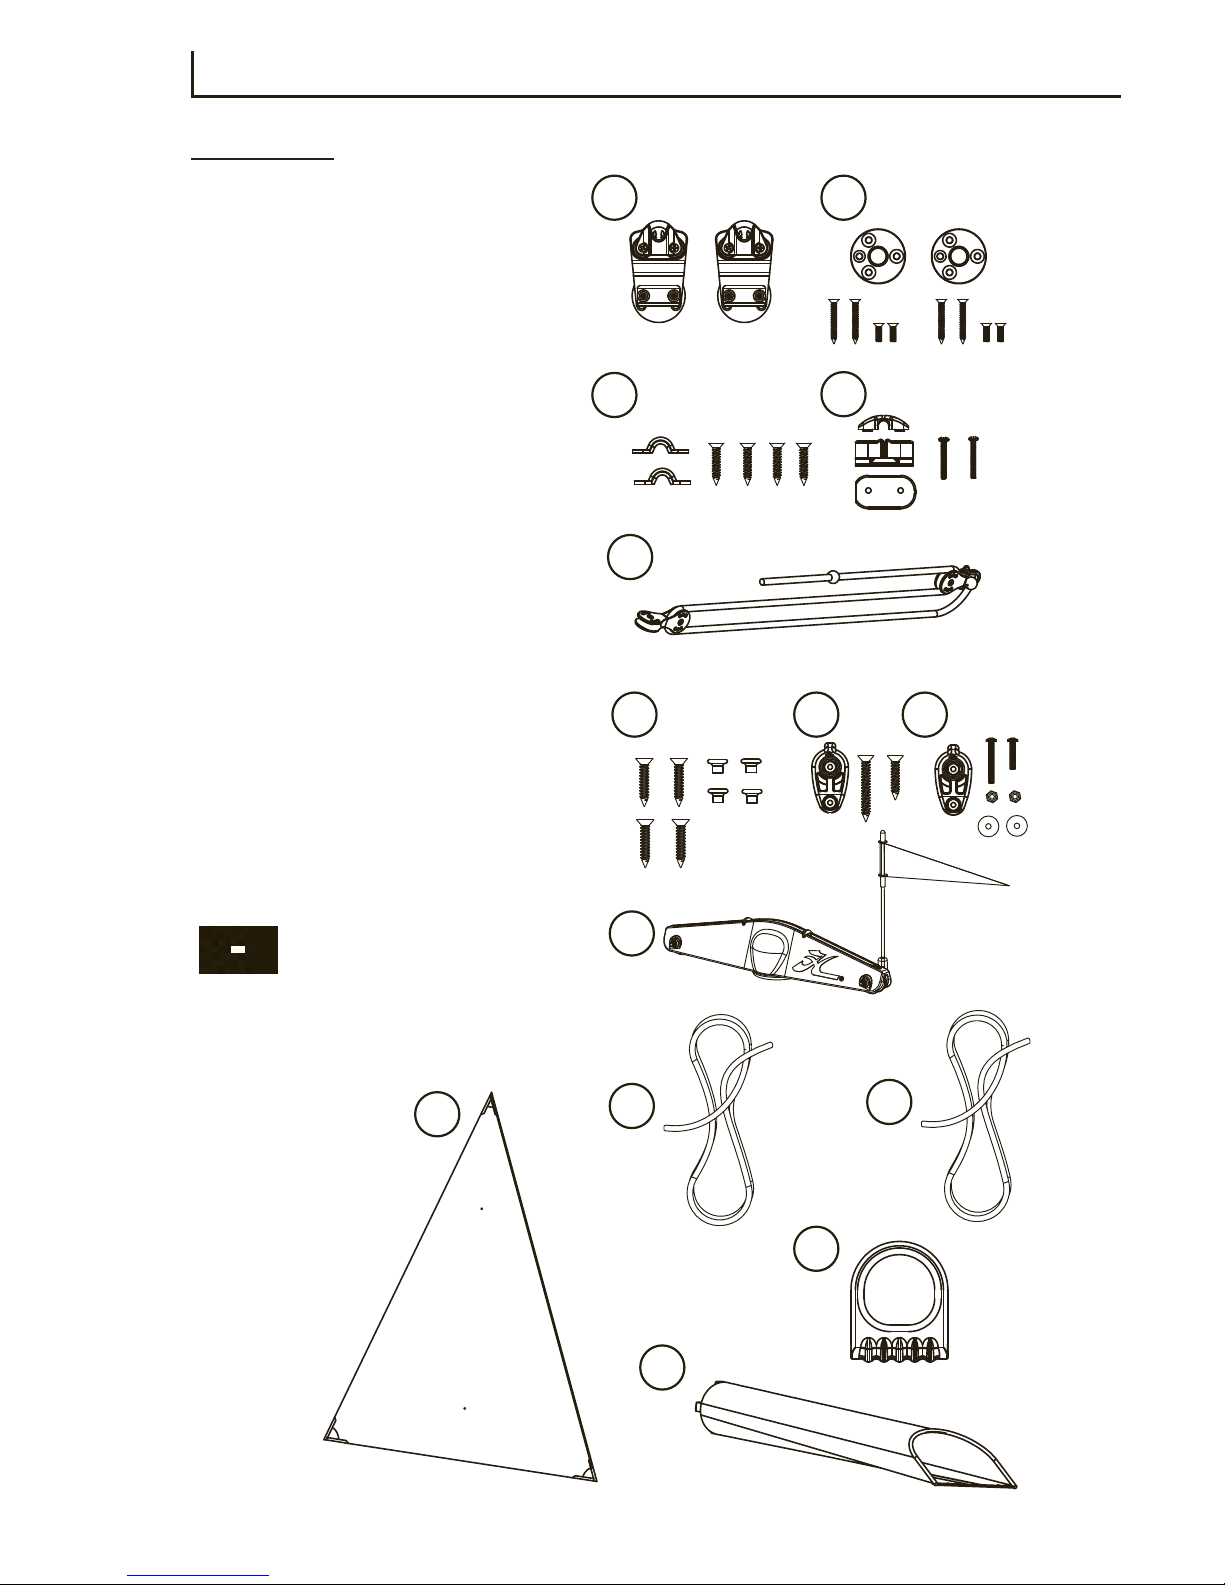
2
Components
1. Swivel Cam Cleat
2. Mount for Cleat w/ Hardware
3. Padeye w/ Hardware
4. Cam Cleat w/ Hardware
5. Bow Traveler Pulley Assembly
6. Eyelet Post w/Hardware
7. Block w/ Hardware, Tapped
8. Block w/ Hardware, Thru-Bolt
9. Mast Tip Rotator Assembly
10. Spinnaker
11. Spinnaker Halyard (Longer Line)
12. Spinnaker Sheet (Shorter Line)
13. Snuffer Hoop
14. Snuffer Bag
1
3
5
6 7
9
10
11
13
14
8
4
2
12
Please see video at
hobiecat.com/islandspinnaker
Online Video Installation
Page 3
3
Attaching Snuffer Hoop and Snuffer Sock
1
Hook the Snuffer Hoop
to the front right Aka
bar. The Snuffer Bag
should sit anywhere
between the center
and the far outside of
the aka bar. (FIG 1)
Stretch the straps on
the rear side of the
Snuffer Sock around
the rear Aka bar,
under the akas and
buckle to the front of
the Snuffer Hoop.
(FIG 2)
FIG 2
FIG 1
Page 4

4
2
Attach the shackle to the
bow of the kayak. (FIG 3)
Pull Traveler Pulley
towards the stern of the
kayak to stretch out the
Bow Pulley Line. (FIG 3)
Attaching Bow Pulley Line
FIG 3
Page 5
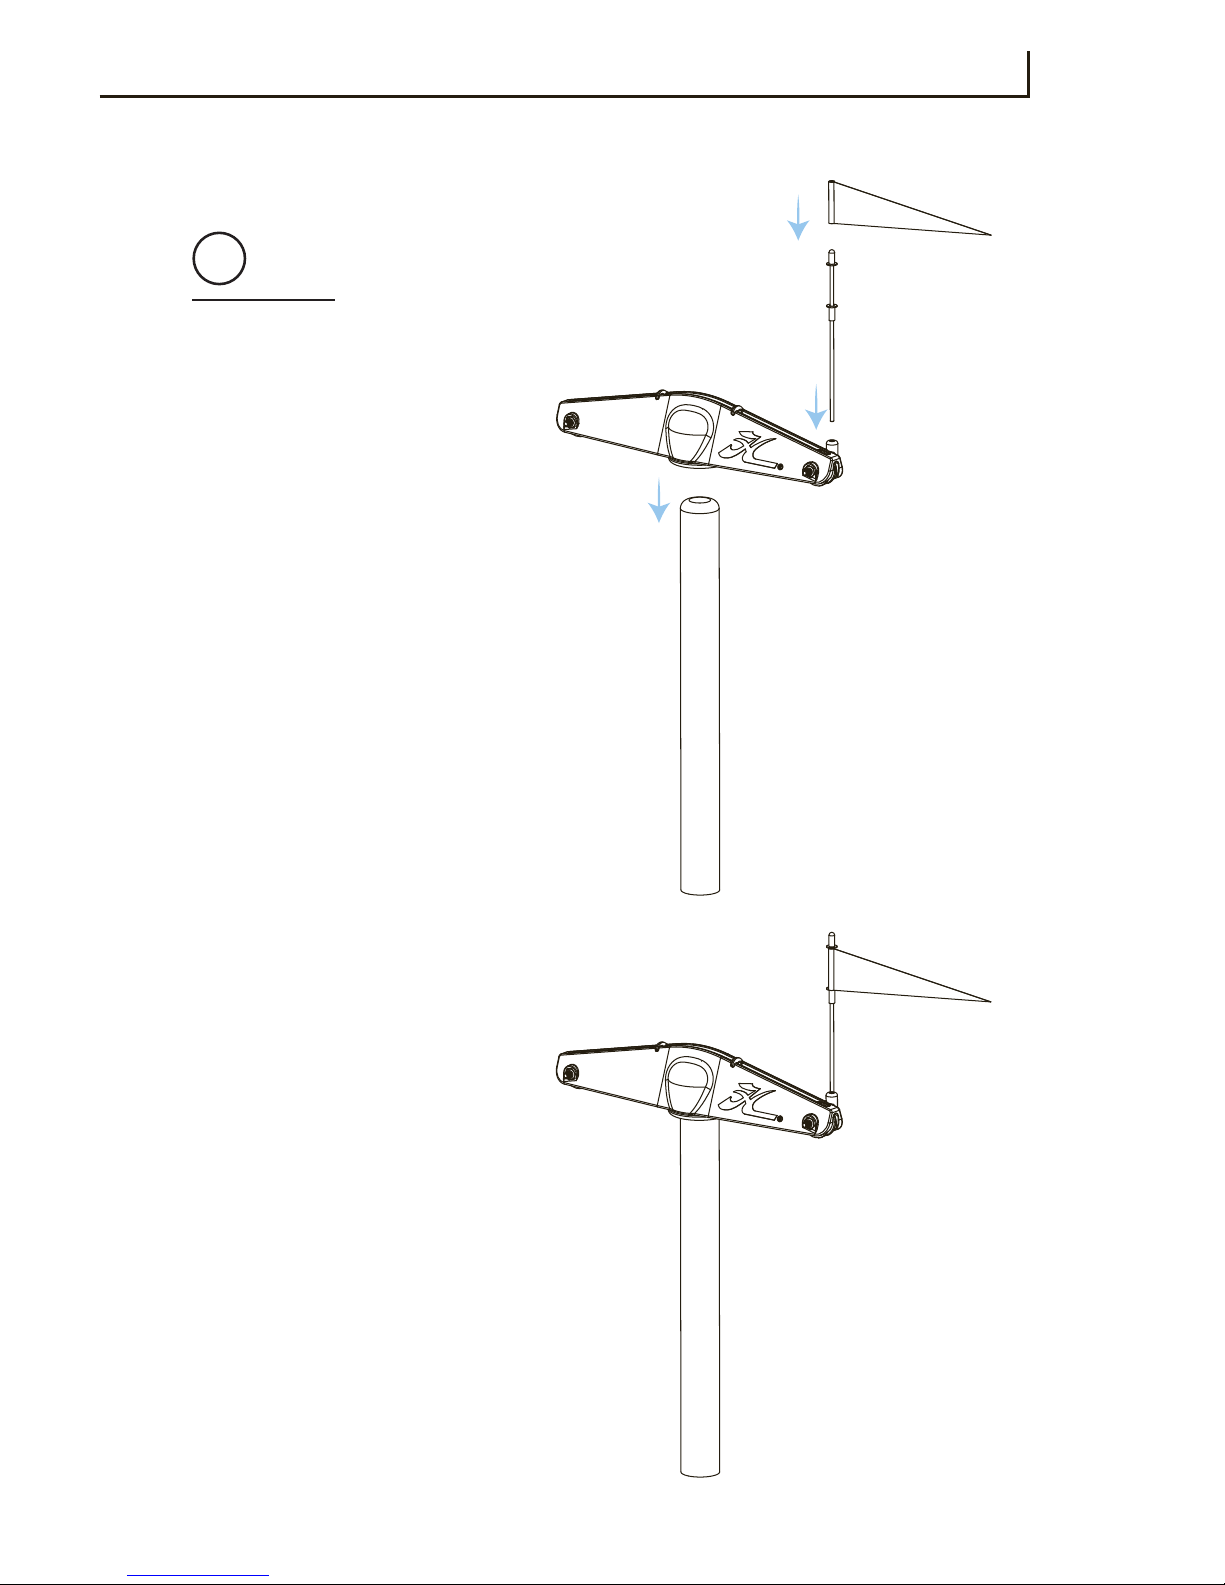
5
3
Install Tell Tale Post Assembly onto the Mast Tip
Rotator.(FIG 4)
Remove rubber cap and top
washer. Slide Wind Vane
onto Tell Tale Post. Slide
washer and rubber cap
back onto Tell Tale Post.
(FIG 4)
Press Mast Tip Rotator on
to the top of the mast. (FIG
5)
Lay mast on top of the left
trampoline with the Mast
Tip Rotator pointed towards
the stern of the kayak.
Assembling Mast Tip Rotator
FIG 4
FIG 5
Page 6

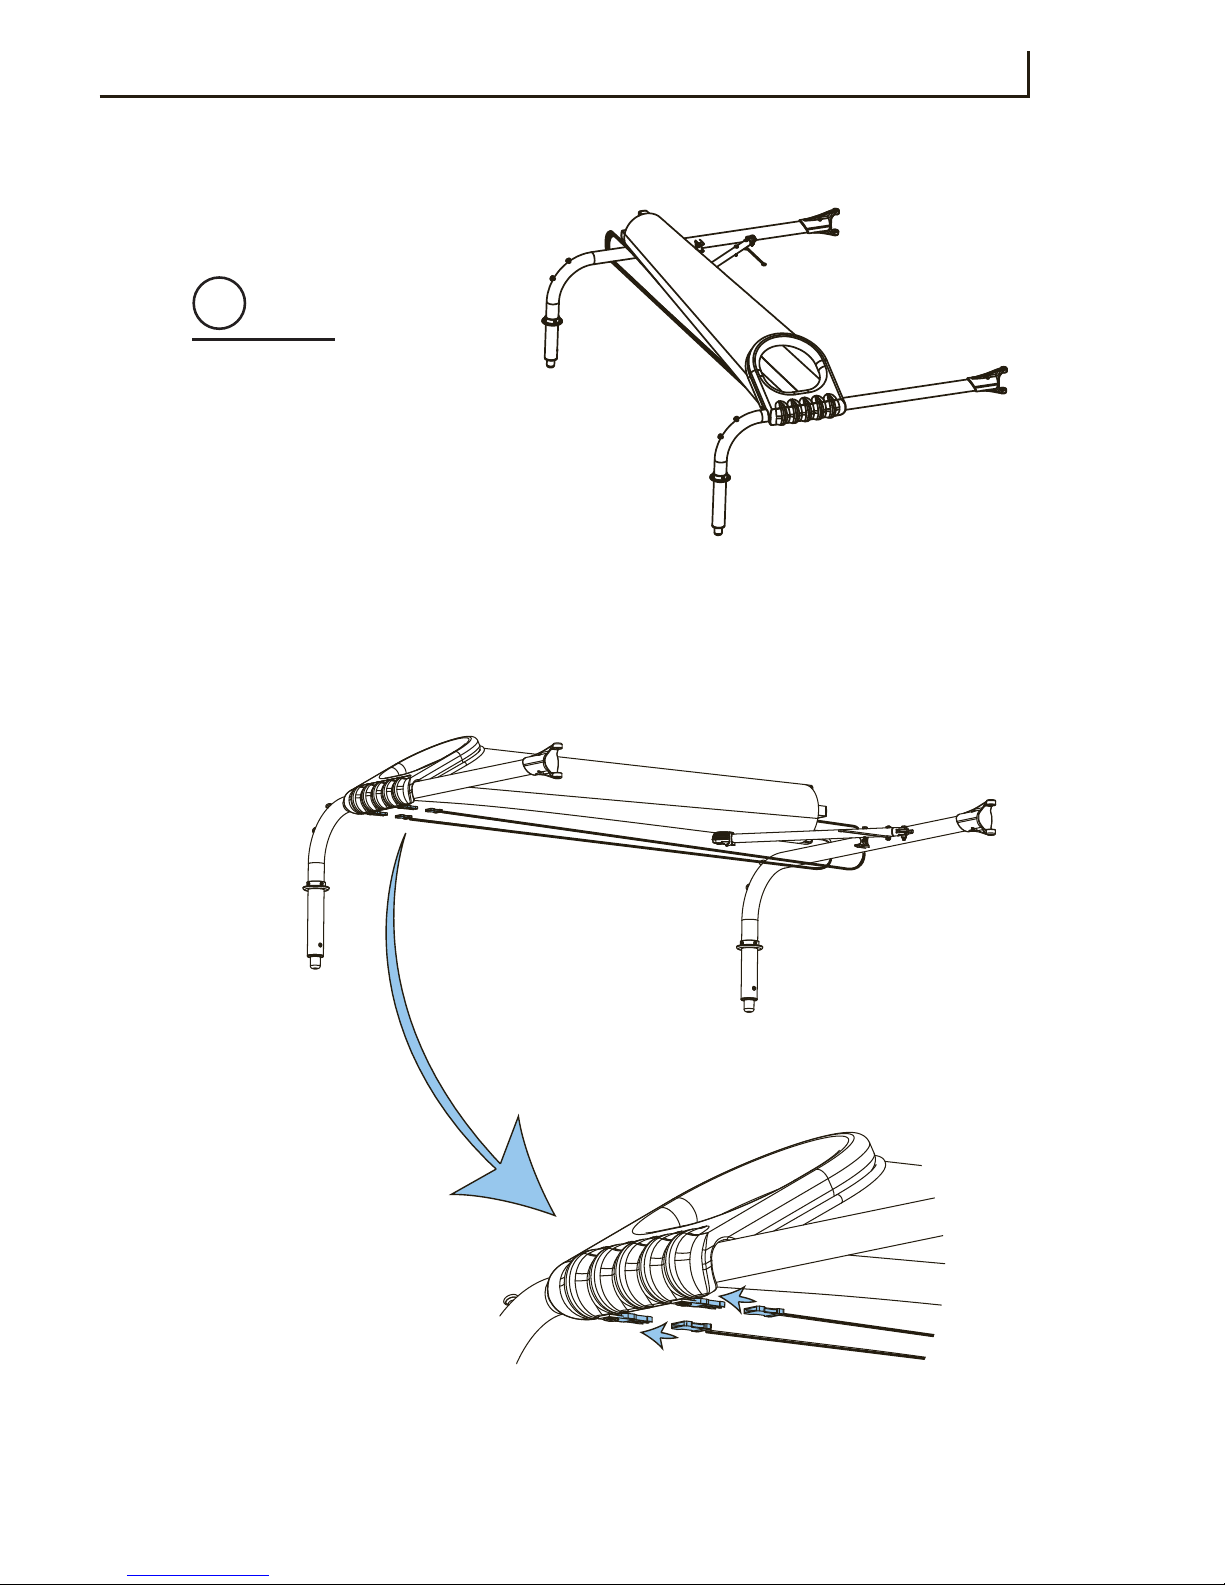
6
Installing Cam Cleats and Blocks
4
Mount the Hobie Cheek
Block on the top of the
Aka bar directly behind
the Snuffer Sock using the
provided 1’’ and 1.5’’ selfdrilling screws. The Cheek
Block should be oriented so
that the side with the pulley
is closest to the cockpit.
(FIG 6)
Use the provided 8-32
screws to mount the Harken Cam Cleat to the front
cross bar in the tapped
holes next to the other two
Harken Cam Cleats. (FIG 7)
FIG 6
FIG 7
Page 7

7
FIG 8
FIG 9
Mounting Swivel Cam Cleat and Mount
5
Hold Cheek Block on the
stern, starboard side of the
kayak just behind the metal
plate, drill holes using a
3/16’’ drill bit. (FIG 8)
Through bolt the 1’’ and
1.5’’ machine screws using
the provided washers and
nuts by reaching through
the rear hatch of the kayak.
(FIG 9)
Drill with 3/16
Thru-Bolt
Page 8

8
Mounting Swivel Cam Cleat and Mount
6
Hold mount where you
would like it on the rear
Aka bar making sure the
top of the mount is completely level. We recommend that the Swivel Cam
Cleat is mounted 4 inches
from inside end of the Aka
bar. (FIG 10)
Secure the Swivel Cam
Cleat Mount using the
provided 1.5’’ self-drilling
screw through the center
hole of the side with three
holes. Do not screw in any
other screws. (FIG 10)
Place the Swivel Cam Cleat
on top of the Mount with the
three holes lining up with
the three unused holes on
the mount. Screw in a 1.5’’
self-drilling screw through
the opposite center hole
on the top of the Swivel
Cam Cleat. This screw will
penetrate the Swivel Cam
Cleat, the mount, and go
into the Aka bar.
Screw in the other provided
5/8’’ screws into the two
remaining holes. (FIG 11)
4”
FIG 10
FIG 11
Page 9

9
7
Feed one end of the Halyard Line through each of
the grommets on the sail,
starting from the bottom
and ending at the top. Terminate the line at the top
grommet by using a figure
eight knot. (FIG 12)
Note: The Adventure Island
has two grommets in the
sail while the Tandem
Island has three
Feeding the Halyard Line through the kit
Knot
2
3
1
FIG 12
Page 10

10
8
Take the opposite nonterminated side of the
line and insert it into the
Snuffer Hoop, through
the Snuffer Sock, and out
of the back of the Snuffer
Sock through the grommet.
Feed the line through
the outside of the Hobie
Cheek Block so that the
pulley is on the inside
closest to the cockpit.
Feed the line through the
Cheek Block again and
towards the bow of the
kayak. (FIG 13)
Pull slack through the
system.
Feed line through the
back of the previously installed Harken Block on
the front cross bar and
pull through towards the
bow of the kayak. (FIG 14)
Feeding the Halyard Line through the kit
Route to Cam Cleat
From Spinniker
From Snuffer Bag
To Bow Traveler Pulley
FIG 13
FIG 14
Page 11

11
9
Feed line through the
Harken Traveler Pulley on
the Bow Pulley Line. (FIG
15 & 16)
Pull Halyard Line underneath the aka bars towards
the stern of the kayak. (FIG
17)
Feed line through the
Cheek Block at the stern of
the kayak. (FIG 17)
Attach Harken Single Pulley to the stern metal pad
eye of the kayak. (FIG 17)
Feed line through the
Harken Single Pulley at the
stern of the kayak. (FIG 17)
Feeding the Halyard Line through the kit
Bow Traveler Pulley Assembly
From Cam Cleat
Route Line Under Akas
Spinniker Halyard
To Backside of Mast Tip Rotator
Route Line Under Akas
FIG 15
FIG 16
FIG 17
Page 12

12
10
Feed line through Mast
Tip Rotator from backside (end with the Tell
Tale Post) and out the
front. Pull the slack
through. (FIG 18)
Raise mast while holding onto the end of the
Halyard Line.
Terminate the end of the
line on the head of the
sail with a bowline knot.
(FIG 19)
Tie Bow Pulley Line end
to grommet on the tack
of the sail using a bowline knot. (FIG 20)
Fully hoist sail until it
hits the stopper knot
on the Bow Pulley Line.
Adjust the stopper knot
based on personal preference of how high you
would like the sail to be.
Note: A lower spinnaker
sail is slightly faster but
a higher sail increases
visibility under the sail.
Feeding the Halyard Line through the kit
From Aft Block
T
o
S
p
i
n
n
a
k
e
r
H
e
a
d
Spinnaker Head
Spinnaker Tack
FIG 18
FIG 19
FIG 20
Page 13

13
11
Fold line directly in half,
feed through clew of
sail making a loop, and
feed both ends of Sheet
Line through the loop.
Pull until knot tightens.
(FIG 21)
Place each end of the
Sheet Line on opposite sides of the mast.
Feed each end through
the Swivel Cam Cleat
and terminate with a
figure eight knot about
6 inches from the end of
the Sheet Line.
Optional: If you would
like to make the Sheet
Line one continuous
line, feed each end
through each corresponding Cam Cleat,
around opposite sides
of the mast, and terminate onto the clew of
the sail using bowline
knots.
Line Routing Path
(FIG 22)
Installing Spinnaker Sheet Line
1
2
Head
Clew
Tack
FIG 21
FIG 22
Spinnaker Halyard
Spinnaker Sheets
Page 14

14
12
Eyelet Posts need to be
attached to the rear Aka
bar to allow for trimming of the sail. Use the
provided self-tapping
screws to attach the
Eyelet Posts to the
stern side of the Aka
bars. We recommend
that one Eyelet Post is
placed as far back as
possible on the Aka bar
and the other is placed
directly in the middle of
the Cam Cleat and the
furthest out Eyelet Post.
Do this for both rear
Aka bars.
(FIG 23)
Optional: Attaching Pad
Eyes
If you are having problems with the Halyard
Line snagging on the
kayak, two Pad Eyes are
included to fix this problem. We recommend
installing these Pad
Eyes 2” directly under
the each aka bar to reduce the friction of the
Halyard Line dragging
on the bottom of the Aka
bar. (FIG 24)
Eye Post and Pad Eye Install
1
2
Head
Clew
Tack
FIG 23
FIG 24
Page 15

15
This spinnaker works best between a broad reach and downwind run.
Do not use on beam reach or close hauled. (FIG 25)
To hoist the spinnaker, pull on halyard line from the front of the cockpit and cleat off on the Harken block on the front crossbar.
To douse the spinnaker, release the lines from the Harken block and
pull from the line exiting the snuffer bag.
Do not use the spinnaker in strong winds beyond your ability level.
If wind is increasing, douse the spinnaker before it gets too strong.
When using the spinnaker be aware of your surroundings as the
spinnaker will reduce visibility.
When tacking and jibing with the spinnaker, furl the main sail in half
way to avoid it getting tangled.
Depending on your batten length and tension, you may need to cut 1-2”
off of the top batten to avoid snagging the halyard line during furling.
Spinnaker Use
THIS AREA
WIND
Downwind Run = Wing on Wing
Close Hauled
Beam Reach
Broad Reach
Close Hauled
Beam Reach
Broad Reach
CAN'T SAIL IN
Saftey Precautions
Page 16

PN AI 72020350
PN TI 72020351
REV 180313
Hobie Cat Company
Holding Company
Oceanside, California, USA
1-800-HOBIE-49
hobie.com
Hobie Cat Australasia
Subsidiary
Huskisson, New South Wales, Australia
1-800-4-HOBIE
hobie.com
Hobie Cat Europe
Subsidiary
Toulon, France
+33 (0) 494 08 78 78
hobie.com
Hobie Kayak Europe
Independent Distributor
Stellendam, The Netherlands
+31 (0) 187 499 440
hobie.com
Hobie Cat Brasil
Independent Distributor
Porto Belo, Santa Catarina, Brazil
+55 (21) 3942 6815
hobie.com
 Loading...