

Page 1
Hobie Inflatable Kayaks
Instruction Manual
Hobie Mirage i12s
Page 2
Welcome to the Hobie Way of Life
Thank you for choosing a Hobie Mirage Inflatable Kayak. As a member of the
Hobie way of life, you are now on the road to pure adventure in pedaling and
paddling. This owner’s manual is designed to help you get maximum enjoyment
from your new Hobie kayak. But more important, it is designed to help you use
it safely. The content of this manual covers all inflatable Mirage kayaks.
1
Page 3
About the Design of your Kayak
Hobie Mirage i14t w/ Sail
Sit-on-top Cockpit
Hobie Mirage kayaks are open-top cockpit designs. This
allows the kayaker to enter and exit the kayak easily from
the shore, dock or water. Scupper hole(s) make the kayak
self-bailing. The design also eliminates the need to perform
an “Eskimo roll” (advanced kayak technique).
Scupper Hole(s)
Drain holes (scuppers) in the cockpit or cargo well will allow
any water that enters the cockpit to immediately flow back
out.
Patented Inflatable Hull Design
The Hobie Mirage Inflatable line of kayaks uses a patent
pending drop stitch construction to give performance that is
comparable to a hard shell kayak. The black material along
the bottom is stretched tightly to give you a fair hull shape
for maximum performance. It is important to know that the
bottom surface creates a bilge area inside the kayak that
can collect water if punctured, but the kayak will not sink.
See the draining instructions later in this manual.
Maneuverability
All Inflatable Mirage Kayaks come with the (patented) Twist
and Stow rudder system which comes pre-installed by our
factory. This new rudder is designed to flip out of the way
during land transport. It has an optional larger rudder blade
for more turning authority with the kayak sailing option.
Durable PVC Construction
Hobie Inflatable kayaks are made from a durable PVC to
continue Hobie’s tradition of quality, long-lasting products
that will give you years of enjoyment.
HOBIEKAYAKS.COM
2
Page 4
Inflating Your Hobie Mirage Kayak
Follow the instructions below for valve operation and correct
inflation and deflation procedures.
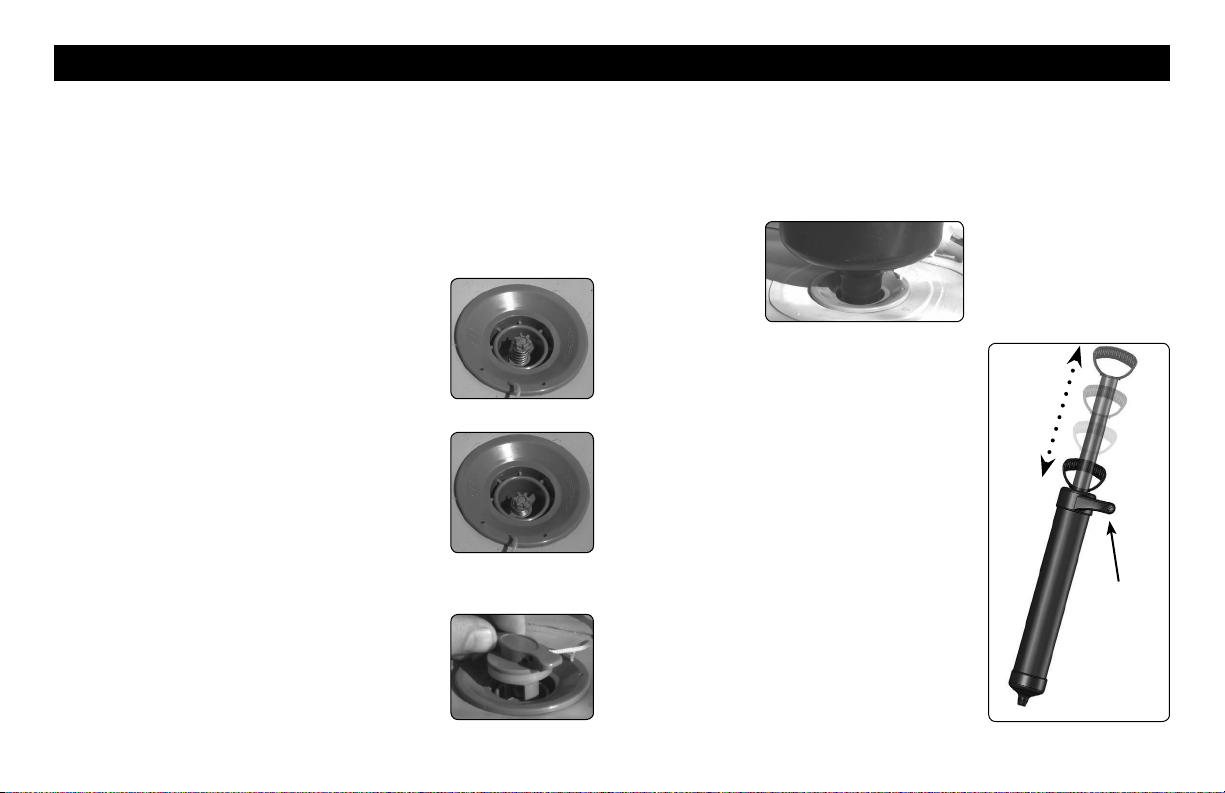
Valve Operation Your kayak is equipped with three different chambers that need to be inflated. All of the valves are
located near the rear of the boat. There is one valve on each
of the tube sides and one valve on the floor.
To close off the valve for inflation, make
sure that the center valve pin is in the "up"
position. If it is in the "down" position,
press down on the valve pin and turn it
counterclockwise until it pops up.
To open the valve for deflation, press
down on the valve pin and turn it clockwise so it locks down. Be careful of any
sand or debris around the valve area
when deflating as small particles could
become airborne with the release of air
pressure!
Always lock the valve cover over the
valve stem when in use. This will prevent
accidental air release and entrance of any
particles into the air chambers.
Kayak Inflation Steps
1. Make sure that all of the valves are in the closed position
(valve pin up) so they hold the air inside the tubes.
2. Open up the forward hatch on the firewall.
3. Press the pump nozzle into the valve receptacle.
4. Start pumping air into the kayak
chamber by sliding the pump piston
in and out. Start by inflating the floor
first, then the tube sides. If you can
pick up one end of the kayak with the
other end on the ground and the kayak
does not buckle, the floor is properly
inflated. The tube sides should be
inflated until all wrinkles are smoothed
out of the exterior surfaces.
Tip: If the pump piston starts to
squeak, apply some spray silicone on
the piston shaft.
Hold
pump
here
3
Page 5

Kayak Deflation Steps
1. Open up the forward hatch on the firewall.
2. Clear any water or debris out of the valve areas.
3. Slowly press down on the valve stem to start letting air out
of the kayak. There will be an initial burst of air, but that will
slow down very quickly. Once the air flow has slowed down,
press the valve stem all the way down and turn it clockwise
to lock it into the "open" position.
4. Follow this same procedure with all of the chambers.
Inflation Tips and Precautions
· The boat can be inflated either with our hand pump or an
electric pump. The electric pump can inflate the boat to a
moderate pressure and save a lot of time with about 90%
of the required air volume. You will need to use your hand
pump to inflate the chambers to the correct pressure.
· Do not use an air compressor. Damage to your boat
caused by over inflation from an air compressor is not covered by your warranty.
· After 2 or 3 days there may be a small decrease of pressure due to temperature change. If so, add a few pumps of
air to each chamber.
· Before undertaking a long trip, inflate the boat for a full 24
hours to be sure all chambers are completely airtight.
If you are seeing a consistent decrease in air pressure, follow the instructions for leak detection in the kayak repair
section of this manual.
· Do not over-inflate the kayak. A pressure of 3-5 PSI is
adequate if you have a pressure gauge. The easiest gauge
of a good working pressure is to have the chambers inflated
to a firm pressure when you press on them.
· Do not pump to a high pressure and let the kayak sit out
in the sun. If the kayak is going to be in a warm environment, slightly under-inflate the chamber and allow the heat
from the sun to increase the internal chamber pressure.
When kayaking, the colder temperature of the water may
cause a slight loss in chamber pressure. It is a good idea
to carry a pump with you so that you can add some air to
the chambers if necessary.
· If you notice that the bow area is sunken in when inflating, make sure that the forward Twist&Seal Hatch is open to
prevent a vacuum from building inside the bilge area.
HOBIEKAYAKS.COM
4
Page 6
Kayak Features
Bilge Draining
As mentioned earlier,
it is important to know
that there is a bilge
area between the bottom surface the tubes.
If water collects in this
area the kayak will feel
heavy and you will hear water sloshing around; it will need
to be drained. On the right corner of the firewall is a drain
plug. Simply lift up the kayak and rotate it toward the drain
hole to drain the kayak. To prevent moisture build-up in the
kayak, leave the front hatch open to allow the interior to get
fresh air and dry.
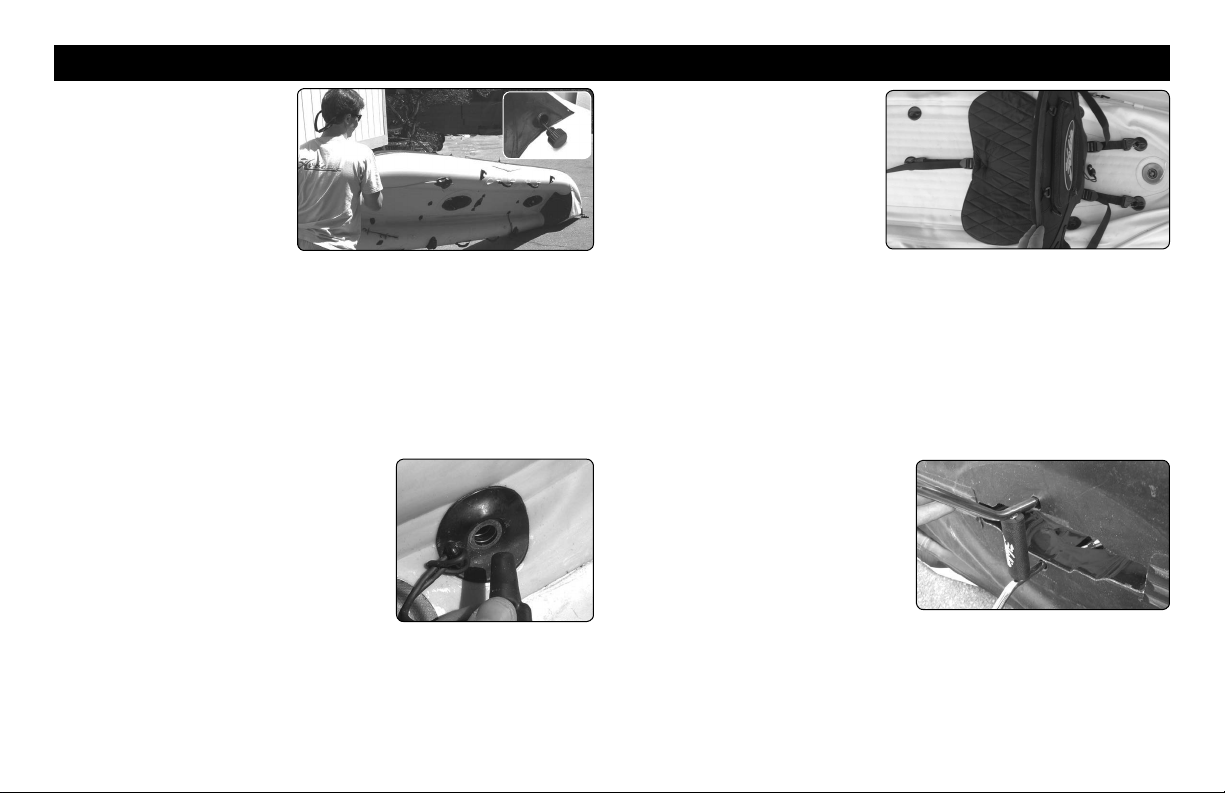
Seat Adjustment
To hold the seatback to
the floor of the kayak,
there are three padeyes
that are used as anchor
points. Notice that there
are three lengths of webbing with hooks on the
end. Clip those to the padeyes and tighten up the webbing
straps to hold the seat securely in place. This webbing system allows you to adjust the fore and aft location of the seat
to accommodate both tall and short paddlers in addition to
the adjustment of the pedals on the drive.
Rear Draining Scuppers
Located just behind the seat on the
i12s and behind the rear most seat
on the i14t are two draining scuppers. These will allow any water to
drain if it collects near your seat bottom. Pull the plug out of the tube to
allow water to drain. If you have the
kayak loaded heavily with passengers and gear, you may want the plug in the tube to prevent
water from surging up into the kayak.
Plug in Cart
To make transportation from
your car to the water a breeze,
there are transport wheels
available. The two prongs of
the cart plug into two receivers located on the bottom of
the plastic Mirage well. The
cart scuppers are designed to handle relatively light loads
and smooth rolling. Rough terrain and jumping over curbs
could result in damaging the Mirage well.
5
Page 7

Rudder Operation
Steering Operation and Adjustment
On the left side of the
kayak is a steering
handle which turns the
rudder left and right.
When in use, place
your hand on the disk
and rotate the tab left
and right to turn the
rudder.
The left steering control
line is tied off
at the screw
here.
Up/Down Rudder Control
Located just to the right of the seat are two T-handles which
control the up and down motion of the rudder. Pull on the red
handle to raise the rudder and the green handle to lower the
rudder. Once the rudder is in the desired position, run the
black line into the cleat to hold it in position.
The right steering
control line passes
up through the hole
here and is tightened down with
the small screw
alongside it.
6
Page 8

Hobie Mirage Drive
Drive Assembly
The Hobie Mirage Drives for the inflatable kayaks have the
pedal cranks removed from the drums and can be done in
the future for more compact packing. The following steps will
guide you in how to install the pedal cranks.
1. Locate the pedal that has a
number followed by the letter "R"
on the backside of the pedal. This
is the right pedal. Squeeze the
adjuster handle and slide the end
of the pedal crank into the slot on
the right drum.
2. Align the hole in the crank
so that you can slide the bolt all
the way through the outer part
of the drum and the crank. Use
the wrench provided with this kit
to thread in the bolt. Tighten the
bolt so that it is snug, but not so
tight that it prevent the crank from
moving back and forth to allow for
adjustment.
3. Follow this same procedure with the left pedal.
Drive Installation/Removal
1. Insert the Hobie Mirage Drive into the
opening of the hull in front of the seat
location so it is facing forward. The front
of the Mirage Drive can be determined by
the location of the fin masts. The forward
edge is illustrated to the right.
2. As you drop the drive straight
down into the hole, it will automatically lock into place when the spring
loaded cams snap over the steel
Mirage drum shaft. Pull up on the
drive when you think it is installed
just to make sure that the cams are
securely locked.
3. To remove the drive from the
kayak, flip back the locking cam on
both sides of the Mirage Drive and
pull the drive out.
Stainless
Steel Masts
FORWARD
7
Page 9

Pedal Adjustment
The pedals of the Hobie Mirage Drive are adjustable to
accommodate different leg lengths of kayakers. To adjust
the pedals:
1. Squeeze the adjuster handles
located on the pedal cranks.
2. Keeping the adjuster handle
squeezed, move the pedal crank to
the most comfortable position. Like
a bicycle, it is best to adjust the pedals so your legs do not fully extend
and knees lock. Make sure that the
metal pin on the crank fully engages
the adjustment hole. The pin from the right and left pedals
should be in the same adjustment number hole on both
drums
Cable Adjustments
Determining if adjustment is needed...
Occasionally the cables may need to be
B
re-tightened. The cables should be kept
taut; however, the front chain should be a
little tighter than the rear chain. Push with
your thumbs at the points marked "A"
with moderate pressure (see the image
A
A
to the right). The side of the chain should
not go beyond the inside edge of the
drum casting.
Drum Casting
When turning the cable adjusting nuts, use a 7/16 inch openend wrench, only giving it one half a turn at a time, then do
the same to the remaining three nuts. Re-check the tension
and adjust accordingly.
Washing
After using in salt water or dirty water, wash the Hobie Mirage
Drive with fresh water. Allow to dry, then spray metal parts
(nuts, chains, cable ends, etc..) with WD-40™ or equivalent.
HOBIEKAYAKS.COM
Note: Keep the pedal shafts and masts parallel. When the
shafts are together, both masts must be straight down. The
idler pulley cable (see item "B" in the illustration above) will
be tightened automatically when the front chain assembly is
tightened.
8
Page 10

Kayak Folding Steps
The kayak storage bag is a travel design to allow you to get your kayak into the bag as easily as possible with minimal folds.
Follow the diagrams below for the best folding procedures of the tandem and single inflatable kayaks. To make it easier to
get the kayak into the roller bag, place the open bag underneath the kayak prior to folding. The dotted line in the top pictures
shows where approximately the roller wheels on the bag should be underneath the kayak. The rest of the length of the bag
will run toward the bow of the kayak.
i9S
i12s
i14t
9
Page 11

Easy-Load Kayak Storage Travel Bag
Place the folded
1
kayak over the bag
so the bottom rub
rail runs with the
length of the bag.
Pull the corners of
the bag up around
the side of the
kayak.
Clip the three buck-
2
les with webbing
and cinch up the
straps to compress
the bag around the
kayak.
Flip the long flap over
3
and clip and cinch
the straps that run
over the flap.
You kayak is ready to
4
roll away. Shown to
the left is the closed
bag with an optional
accessory storage
bag clipped to the
front using the extra
strap on the bag.
This small storage
bag can hold your
Mirage drive, 4-piece
paddle and pump.
HOBIEKAYAKS.COM
10
Page 12

Basic Kayak Information
Hobie Mirage i12s
Basic Kayak Features
The front of the boat is the “bow” and the rear is the “stern”.
When looking forward to the bow, the left side of the boat is
“port” and the right side is “starboard”. The hull ID number
can be found on the bottom of the boat, at the stern.
Recommended Equipment for Specific Types of Pedaling
and Paddling
Basic Boating: Life Jacket, Paddle, Paddle Leash, Backrest,
Safety Whistle, Filled Water Bottle, Appropriate Safety
Equipment.
Longer Distance Touring: Dry Bags, Chart, Compass, GPS,
Addition Water.
Additional Equipment for Diving: Dive Flag, Anchor.
Fishing: Fishing Rod Holder, Gear Bags, Anchor.
Safety
Inside the cockpit are scupper hole(s) that go all the way
through the boat. These scuppers allow the boat to drain.
Your particular model may have hatches that allow access to
the inside of the boat for gear storage.
Alongside the cockpit are a series of small “U” straps, called
padeyes. These are used to attach accessories such as
backrests.
Located in the front area of the i12S and i14T is an internal
storage area to keep things under cover and away from
spray.
Paddle/pedal sports can be dangerous and physically
demanding. The user of this product should understand that
participating in kayaking may involve serious injury or death.
Observe the following safety standards when using this
product. These are basic safety rules that all boaters should
follow. Always use common sense and follow all safety rules
at all times.
11
Page 13

Safety Checklist
· To avoid damage to the Hobie Mirage Drive, push either pedal
completely forward before beaching or in shallow water. Use small,
partial pedal strokes with one pedal nearly all the way forward until
there is adequate water depth for the Mirage Drive to have complete clearance in the water.
· Consult your physician prior to beginning paddle/pedal sports.
· Always carry the paddle provided with the boat.
· Obtain paddle/pedal sports instructions from your dealer specific
to this type of craft.
· Obtain certified first aid training and carry first aid and rescue/
safety equipment.
· Always wear a Coast Guard approved personal flotation device.
· Wear a helmet where appropriate.
· Dress appropriately for weather conditions; cold water and/or
weather can result in hypothermia.
· Check your equipment prior to each use for signs of wear or failure.
· Never pedal or paddle alone.
· Always tie a leash to your paddle.
· Do not pedal or paddle in flood conditions.
· Care must be made to ensure that the access hatches on your
kayak remain closed while on the water. Water can enter a hatch
that is left open and possibly flood the hull making the boat unstable or causing inadequate flotation for the passenger(s).
· Be aware of appropriate river water levels, tidal changes, dangerous currents, obstacles in and above the water and weather
changes.
· Scout unfamiliar waters; portage where appropriate.
· Do not exceed your paddling/pedaling ability; be aware of your
limitations.
· Hobie Kayaks were not designed for fast moving water.
· Follow the manufacturer’s recommendations for use of this prod-
uct.
· If additional outfitting is added to this craft, use manufacturerapproved materials only; do not impair entry or exit access.
· Read owner’s information package prior to using this product.
· The user of this product acknowledges both an understanding
and assumption of the risk involved in paddle/pedal sports.
· When paddling in a new area, check with the locals regarding currents, shoreline conditions and weather patterns.
Plan an “escape route” -- an alternative place to get off the
water should environmental conditions dictate. Beware of
offshore winds that may make it difficult to return to shore.
· DO NOT use alcohol or mind-altering drugs prior to or while using
this product.
The Shakedown Cruise
As with any new product, it is important that you become familiar
with the craft and all its features. It is also important to determine
if the kayak is sound before long trips. We recommend that you
do what we call a “shakedown cruise” when the kayak is new,
after shipping or transport, before long trips and after installing any
through hull fittings. This test is typically done in shallow, calm
conditions where you can familiarize yourself with the boat or test
the boat before taking any long trips into open water. Things you
should check or practice are:
· Rudder Operation
· Mirage Adjustment
· Getting in and out of the kayak from a capsized state
· Drain plug locations to make sure they are properly installed
· Closing the hatches properly
· Taking the kayak sail down on the water (if applicable)
HOBIEKAYAKS.COM
12
Page 14

How to Perform a Self Rescue
If you fall out of your boat, don’t panic. Stay with the boat.
You should be wearing a life jacket which will keep you afloat.
There are many ways to get back up on the boat.
If your kayak turns over with the kayak sail up, it can be very
difficult to turn the kayak over by rolling just the kayak. Make
sure that the mainsheet is loose so that the sail is free to
move around.
If the boat is upside-down, it will need to be turned over. To do
this, reach across the bottom of the boat and grab the scupper hole or Hobie Mirage Drive and pull the boat upright.
Position yourself so your head is near the cockpit area of the
boat and you are facing the boat. You will want to be between
the seat and the footwell areas of the boat.
Reach across the boat to the far edge with one hand. Place
the other hand on the near-side rail, then kick with your feet,
pulling yourself up and onto the boat, so your belly is across
the center line of the boat. (Your belly should end up between
the footwells and the seat.)
Next, roll over onto your backside toward the seat, which
should place your backside in the seat. Sit up, swing your
feet into the footwells and you’re ready to go.
The key to this method is to keep your center of gravity low
and near the centerline of the boat. Your body and head
should stay close to the boat.
CAUTION: While righting the Hobie Mirage or climbing back
aboard, stay clear of the pedals, pedal shafts, sails and
adjustment straps. Avoid being hit by them or getting them
hooked on your life jacket.
Pedaling
First adjust the pedals to accommodate your size as shown
a few pages back. Adjustments can be made for a variety of
leg lengths. Adjust the pedal positions equally. Sit with one
pedal all the way forward so your knee stays slightly bent
when your leg is fully extended. Then simply pedal back
and forth to propel the boat forward. For pedaling in shallow water, partial strokes with one pedal forward and one aft
allow for retraction of the sails in shallow water. When there
is adequate water for clearance of the fins, full strokes can be
used. For additional speed you can paddle as well as pedal.
Before beaching or launching, push one pedal completely
forward to retract the Hobie Mirage Drive fins up against
the hull and kick up the rudder by flipping the lever on the
right side of the boat to the forward (rudder up) position. To
take off from the beach, push out to deeper water or paddle
out before putting the rudder down and pedaling the Mirage
Drive.
If launching from a rocky or wavy shore and to avoid damage
to your Mirage Drive, paddle into deeper water before installing it. (Be sure to tether the Mirage Drive to your kayak when
it is not installed.) You may also prefer to remove the drive
before beaching.
13
Page 15

HOBIEKAYAKS.COM
Paddling
You can choose to paddle, pedal or combine the two. These
guidelines will help you to get started.
To start, sit in your kayak. Your backside should be all the
way back in the seat and your knees comfortably bent. To
find the proper footwell, straighten your legs all the way out
and then bring them back one “well”. If your legs are too
outstretched, you may experience strain on your lower back.
If your knees are bent too much, you may end up knocking
your kneecaps while paddling.
For proper hand placement on your paddle, start with your
hands about a shoulder’s width apart and centered. If you
place the center of the paddle on top of your head, your
elbows should form slightly less than a 90 degree angle.
There should be an equal amount of paddle shaft beyond
each of your hands.
Some paddles may have the blades offset, or “feathered”,
at some degree from parallel. A feathered paddle presents
less surface area for the wind to catch as that blade moves
forward through the air. Some paddles have a flattened spot
along the paddle shaft that will help keep your “control” hand
in a fixed position. However, a special technique must be
used to get each blade in the water. If the paddle is righthand controlled (when the right blade is held vertical, the left
blade “scoop” is pointed mostly up), the right hand will stay
tight and the left hand loose. To learn the process, hold the
paddle tight in your right hand and loose in your left. Using
the right hand, rotate the paddle blade back and forth; it
should spin in your left hand. Now take a stroke on your right,
then cock your right wrist back (left hand staying loose and
somewhat open) and take a stroke on your left. If using a
left-hand control paddle, reverse the process. The left hand
stays tight and the right hand loose.
The basic paddle stroke will give you forward power. Place
a paddle blade in the water near your toes. Pull the paddle
blade back alongside the boat to approximately your hip area
while your opposite hand and paddle blade move forward.
Then lift the first paddle blade out of the water while lowering
the second blade into the water and take a stroke with the
other side.
If you pull the paddle out and away from the hull in an arc, it
will force the bow of the boat to swing away from the paddle
blade. This is called a “sweep stroke” and is used to turn the
boat.
Relax your hands when paddling; a tight grip is not necessary! Sit with good posture while keeping your torso vertical.
For greater efficiency use not only your arms, but your torso
and shoulders as well. Start out easy until you get the feel of
the paddle and the steering strokes.
14
Page 16

Mirage Scupper Plug
You Hobie Mirage kayak is shipped with a Mirage Cassette
Plug. The plug is provided as standard equipment in the
Mirage Kayak package and is used to fill the space where the
Mirage Drive fits into the hull. It is inserted when the Mirage
Drive is removed to provide added safety and to “fair” the
bottom of the hull when paddling.
To install the cassette plug, simply place the plug in the hole for
the Mirage Drive mechanism and
allow the cams to lock over the
knobs on the side. To remove the
plug, flip back the cam knobs and
pull the plug out.
Storing Your Hobie Kayak
Hobie has chosen PVC to provide superior protection from
ultraviolet light. However, to ensure extra years of flexibility and bright colors, avoid storing the boat where it will be
exposed to weather or in direct sunlight. Please review the
following list for storage and kayak care tips.
· Before storing, hose off the kayak and let it dry completely to prevent mildew buildup.
· Do not use harsh chemicals for cleaning.
· Most dirt can be removed with a mild soap and fresh
water. Soft Scrub ® works exceedingly well.
· You may store the kayak inflated or deflated. If you
deflate the kayak, we recommend that you store it in the
protective roller bag that comes with the kayak.
· If storing the kayak outdoors, raise it up off the ground
and cover it with a tarp to prevent exposure to sunlight, tree
droppings and rain.
· We do not recommend hanging the boat.
· Do not store in extreme conditions (i.e. above 150F or
below -10F)
· Store in a clean, dry place.
· If you plan to store the kayak in the bag for long periods
of time, and to prevent creasing of the material, we recommend slightly loosening the cinching straps.
15
Page 17

HOBIEKAYAKS.COM
Transporting Your Hobie Kayak
The most compact and common way to transport your kayak
is to deflate it and place it inside the storage travel bag
provided with the kayak. Follow the folding instructions on
pages 9 and 10.
Another way to transport your Hobie kayak is on a roof rack
purchased from your dealer. This normally involves a set
of crossbars that attach to the car via the rain gutters or
adapter clips mounted to the door frame. They come with
a wide variety of attachments from kayak saddles to stackers. The racks can be used without the attachments but the
racks should be padded. To help prevent distortion, place
the kayak, cockpit side down, on top of the rack. It is best
if the crossbars contact the cockpit sides and not the deck
areas. Straps can then be laid across the boat and tied to the
bars. Saddles cradle the boat and often come with their own
straps. Stackers allow multiple boats to be placed on their
sides without falling over.
An alternative to a traditional rack systems is a soft rack. It
tends to be less expensive and will work with most cars. It
has pads mounted on straps that sit between the kayak and
the roof of your car. Some styles have a strap that wraps
around the kayak and others strap the pad to the roof. To tie
the boat to the car, straps are run through the car doors and
the boat is tied to the roof as well as the bumpers, front and
rear. Over-tightening the straps may cause dents in the roof
of the car. Be sure to consult your owner’s manual for the car
and roof rack system to ensure compliance with all recommendations, precautions and specifications.
A line run from the bow and stern of the boat to each
bumper is required. If your bumpers do not have a gap
to pass a rope around, look underneath. There should be a
loop of metal, which is used by car transports such as tow
trucks.
Many people like to use the Mirage Drive well to tie the boat
to the car. This helps prevent the boat from sliding back and
forth or the tie-down rope from slipping off the kayak. This is
a perfectly acceptable method for tying the boat down.
IMPORTANT NOTE: When tying to your roof rack, a
decrease in tube pressure could loosen the tie downs. Make
sure that it is secured in such a way that it cannot move if you
lose air in the chambers.
About PVC
Continuing Hobie’s tradition of offering the latest in technology at an affordable price, your new kayak is made from a
durable PVC. This material will give you years of enjoyment
with minimal care and maintenance. If a tear or puncture
does occur, PVC is very easy to repair.
16
Page 18

Kayak Leak Detection and Repair
Hobie kayaks are made from very durable PVC but may, on
occasion, require minor repairs. Repairs are easily done with
your included patch kit. Read the following paragraphs for
leak detection and repair tips.
Air Leak Detection
If you are losing air pressure, not caused by colder temperatures, check the boat for leaks, starting with the valves. A
leaking valve is rare, but if you do find a leak we can send
you a replacement valve. To locate a leak, we recommend
mixing soap and water in a spray bottle. Spray around the
valve. If you see bubbles forming, check your valve seating
and base and be sure the valve insert is screwed tight. If you
continue to have problems it's probably time to order new
valves. Replacement of the whole valve can be done with a
simple tool that comes with the replacement valve.
If the boat is losing air and all the valves are good, you probably have a small puncture. Small punctures can be repaired
easily and permanently. Spray around the inside and outside
of the hull until air bubbles mark the position of the leak. If
you do not find air bubbles, inflate the boat to maximum air
pressure and try to listen to find the leak. If you can narrow the area down, return with a spray bottle to identify the
source of the leak.
Punctures less than 1/8"in size can be repaired simply without a patch. Deflate your boat, then clean and dry the area
to be repaired. Apply a small drop of glue to cover the puncture, and let dry 12 hours. If you need to get on the water
sooner, let dry 30 minutes and then inflate the boat, inflating
the compartment with the repair only 3/4 full. This repair
might not be permanent so add a drop again at a later time
to make it permanent.
Small Repairs
Your boat comes with a repair kit as standard equipment. If
you no longer have your repair kit, you can order a new one
from your dealer. Cut a piece of repair material large enough
to overlap the damaged area by approximately 1/2", and
round off the edges. Apply glue to the under side of the patch
and around the area to be repaired. Too much glue will interfere with a proper repair. Allow adhesive to become tacky
for 2-4 minutes, and then place patch on the damaged area.
Use a weight to apply 3-5 lbs. of pressure for 12 hours. After
patch has dried, apply glue around the edges for a complete
seal (dry for 4 hours).
Large or Difficult Repairs
If you have a difficult repair, give our office a call and we will
advise you on the best way to repair it.
17
Page 19

Warranty Information
Hobie provides a limited two year hull warranty.
Your warranty registration card is packaged with this owner’s manual and should be completed and returned to Hobie Cat within 30 days of the date of
purchase. If you have problems with your boat, contact your dealer first. If you need further assistance, contact Hobie Cat. To help process any warranty
problems, please complete your warranty card and give it to your dealer or mail it directly to Hobie Cat.
Hobie warrants each kayak to be free from defects in materials and workmanship for the period listed below. For retail customers in the United States, U.S.
possessions and Canada, Hobie will repair or, at its discretion, replace defective parts.
The warranty period for the hull is two years and two year for the Hobie Mirage Drive, rudder, seat and paddle.
This warranty does not cover:
• Normal
•
•
•
•
• Damage
•
•
•
To Obtain Warranty Service: Within 30 days of discovering a defect, take your boat, along with the proof of purchase (sales receipt) to the authorized Hobie
dealer from whom you purchased your boat, unless you have moved or are traveling. In that case, take it to the nearest authorized Hobie Kayak Dealer.
Implied Warranties: Any implied warranties, including implied warranty of merchantability and fitness for a particular purpose, shall be no longer than the
duration of this express warranty. Some states do not allow limitations on how long an implied warranty lasts, so the above limitations may not apply to you.
Hobie makes no express warranties in addition to this limited warranty. Hobie Dealers have no authority to make warranties on behalf of Hobie Cat Company
in addition to, or inconsistent with, those stated herein.
wearanddiscoloration.
Damage
Damage
Impact
Damagecausedbymooringorstoringboatinwater.
Transportationof
Any
Any
limitation of incidental
causedbyabuseorfailuretoperformnormalmaintenance.
causedbyhittingsubmergedobjectsorbeachingwithoutretractingorremovingtheMirageDriveandrudder
andweardamageonMirageDrivesails.
causedbyalterationsormodifications.
boatorpartstoHobieoritsdealers.
boatusedasarentalorplacedincommercialservice.
otherconsequentialdamage,incidentaldamagesorincidentalexpenses,includingdamagetoproperty.Somestatesdonotallowtheexclusionor
or consequential damages, so the above limitation may not apply to you.
.
To the extent any provision of this warranty is prohibited by Federal, State or Municipal law and cannot be preempted, it shall not be applicable. This warranty
gives you specific legal rights.
18
Page 20

Hobie Cat Company
Oceanside, California, USA
1-800-HOBIE-49
hobiecat.com
Hobie Cat Australasia
Huskisson, New South Wales Australia
1-800-4-HOBIE
hobiecat.com.au
Hobie Kayak Europe
Stellendam, The Netherlands
+31(0)187 499 440
hobie-kayak.com
Mirage Inflatable Kayaks
PN 95000
REV 120807
 Loading...