

Page 1
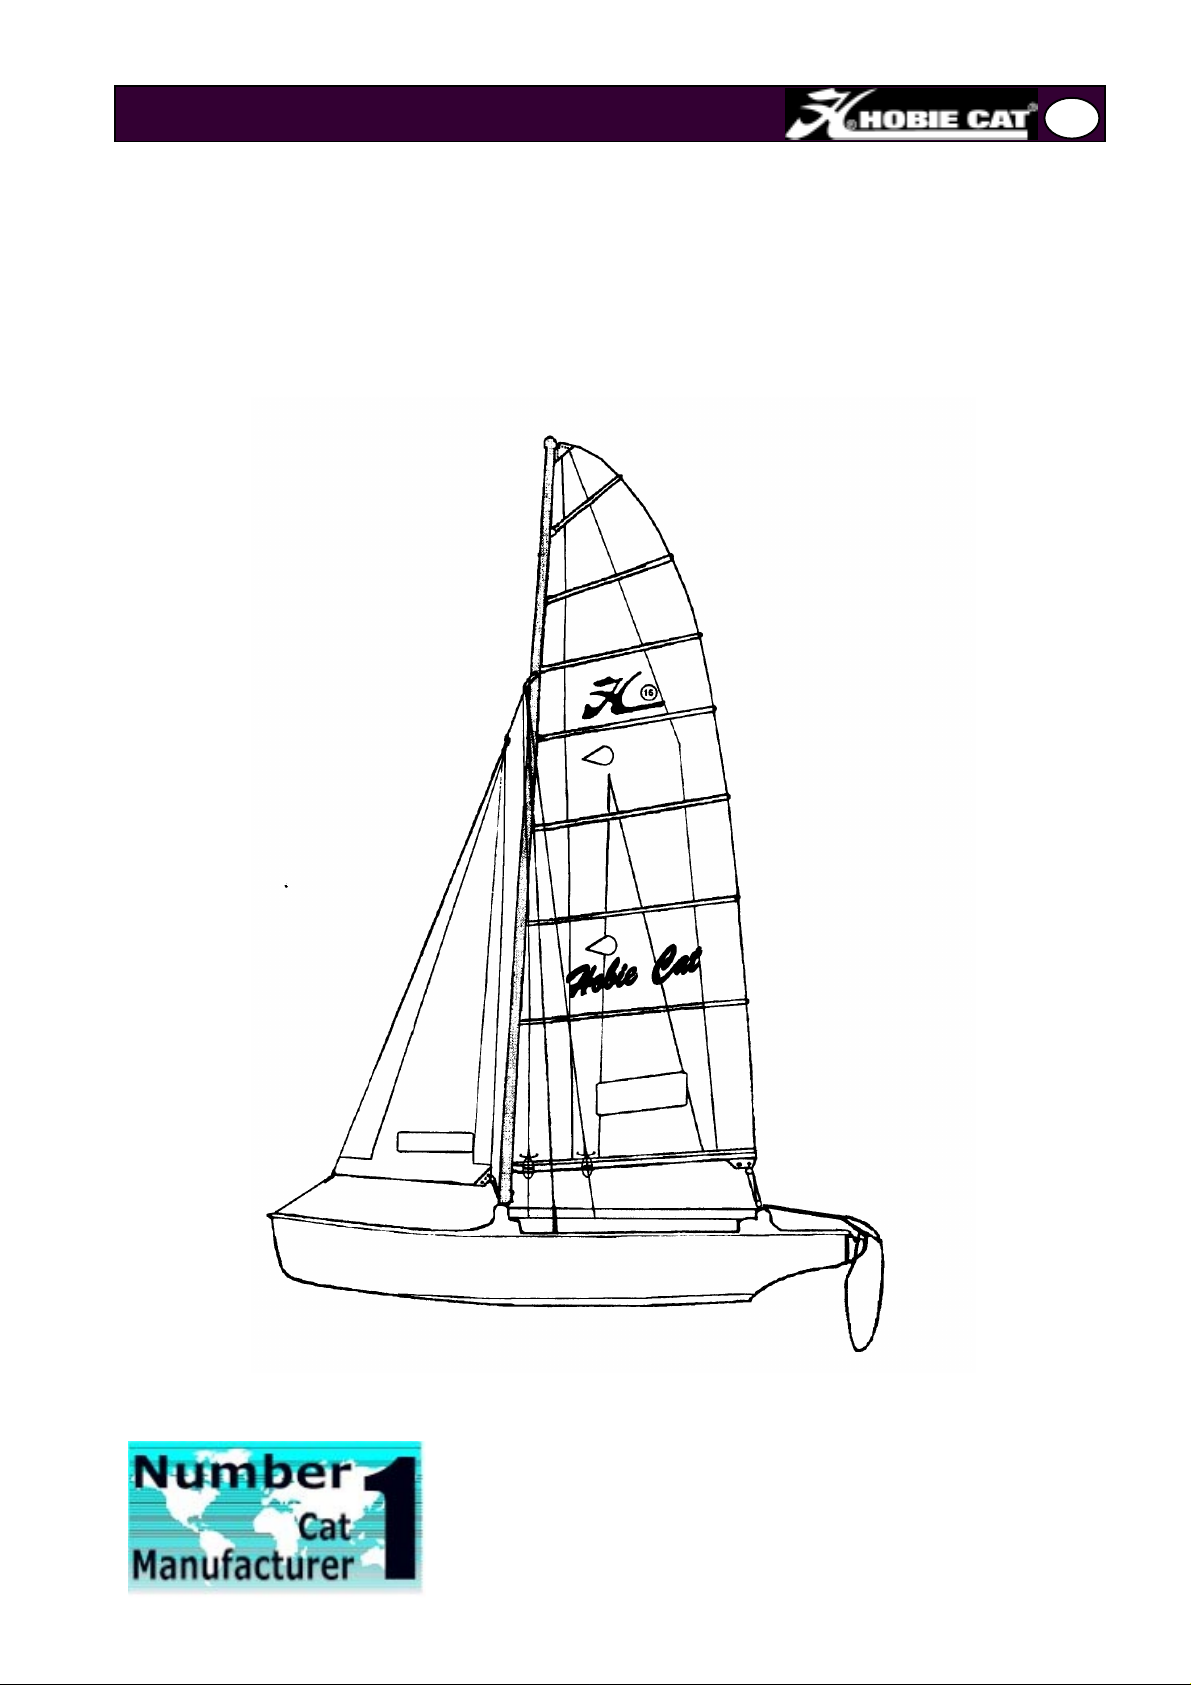
ASSEMBLY MANUAL
MANUEL D’ASSEMBLAGE
AUFBAUANLEITUNG
15
HOBIE CAT EUROPE
ZI Toulon Est, BP 250
83078 Toulon cedex 9, France
Tel : +33 (0)494 08 78 78 - Fax : +33 (0)494 08 13 99
Email : hobie.cat@wanadoo.fr - http://www.hobie-cat.com
• 1
Page 2
15
ASSEMBLY MANUAL
MANUEL D’ASSEMBLAGE
AUFBAUANLEITUNG
TABLE OF CONTENT
SOMMAIRE
INHALT
Frame/Cadre/
Trampoline & side bars/trampolin et bar r e la-
térale/Trampoline u. seitenholme................ 4
Wires and mast/Gréement et mât
/
Die Takelage
Rudder assembly/Gouvernail/
Ruderanlage
Jib/Foc/Fock...............................................9
Mainsail/Grand-voile/
Mainsheet system/Palan de GV
Großschotsystem
Main traveller/Chariot de GV
Großsegeltraveller
Safety Tips/Conseils de sécurité..............13
Rahmen
..............................................5
...............................................7
................................3
Großsegel
......................................11
....................................12
...............10
CAUTION - DANGER
ALUMINIUM MAST
STAY CLEAR OF OVERHEAD WIRES
ATTENTION - DANGER
MAT ALUMINIUM
RESTER EN DEHORS DES LIGNES
ELECTRIQUES
ACHTUNG - GEFAHR
ALUMINIUM MAST
LEBENSGEFAHR MIT
HOCHSPANNUNGSLEITUNGEN
• 2
It is advisable to assemble the Hobie Cat 15 with Two people.
Il est recommandé d’assembler le Hobie Cat 15 avec deux personnes.
Page 3
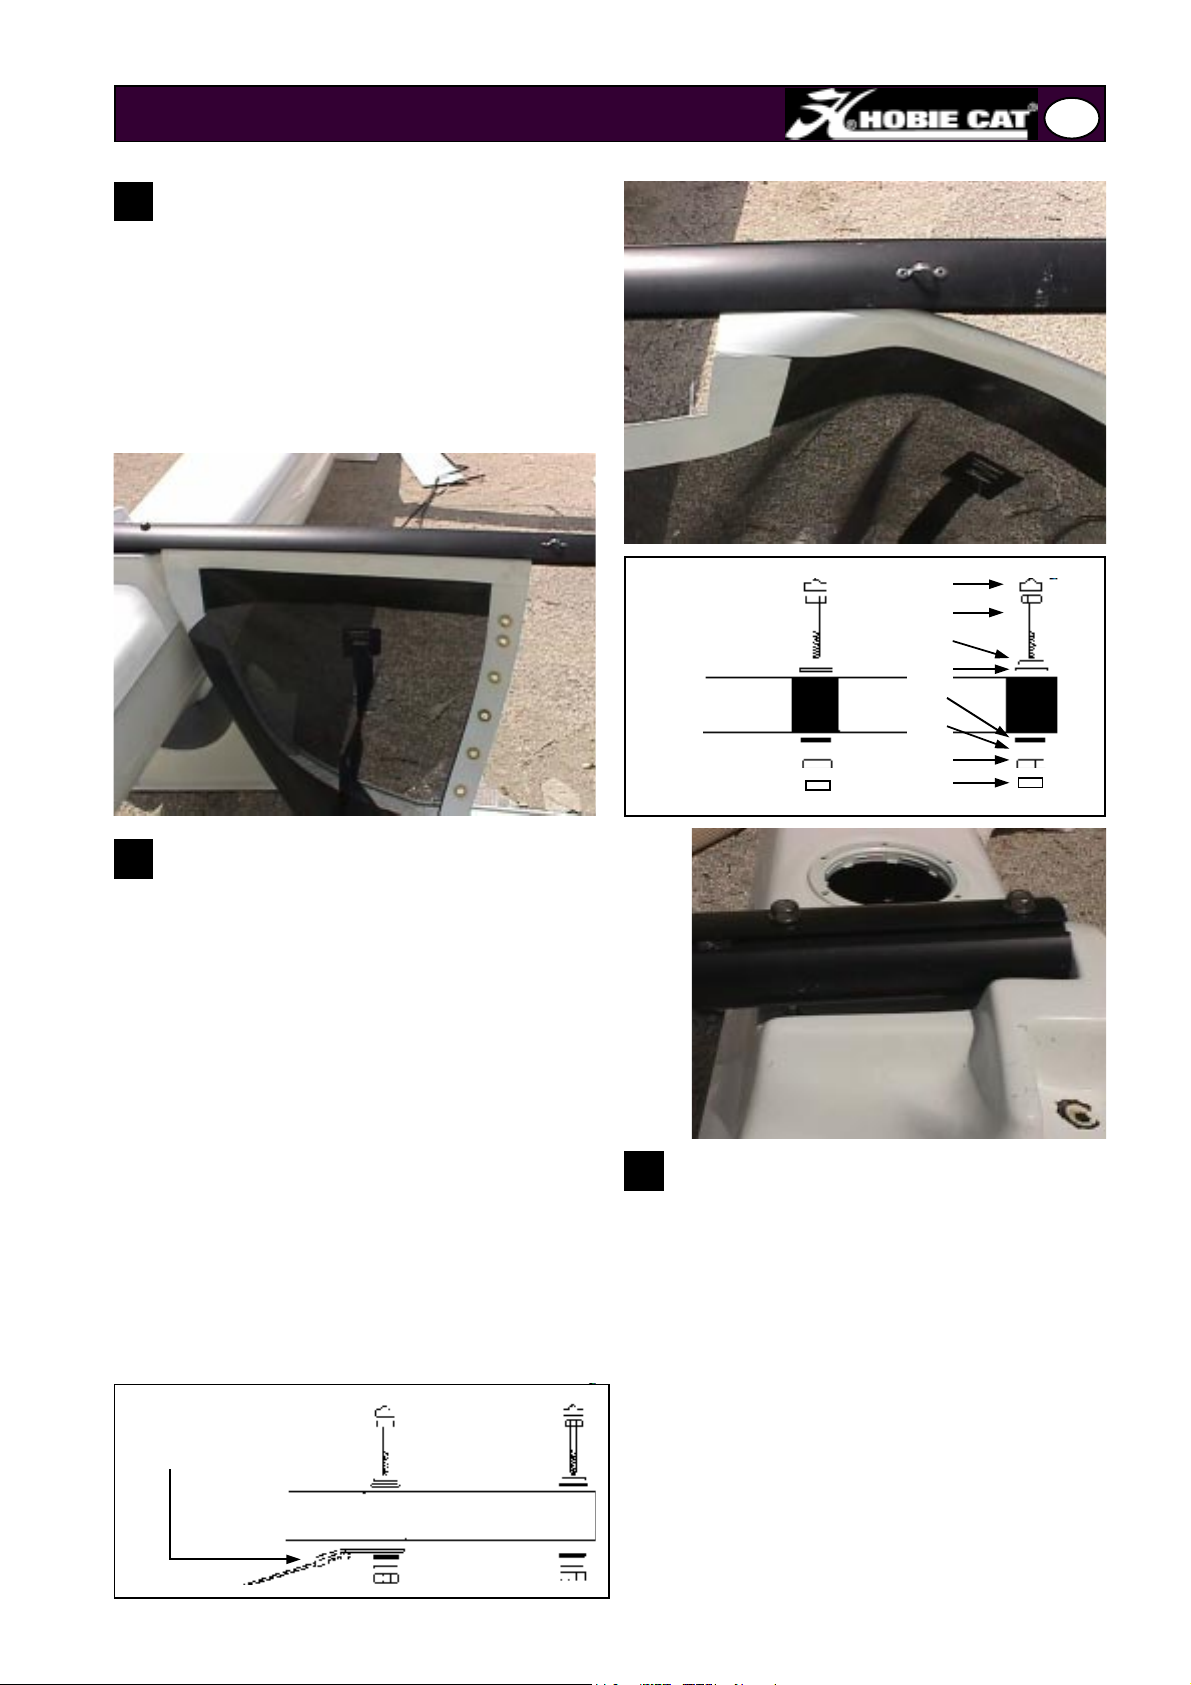
)UDPH&DGUH5DKPHQ
Set the hulls in parallel (the frame will be
1
very difficult to attach to the hulls if they are
misaligned). Feed the trampoline halves into the
rear crossbar.
Mettre les coques parallèles. Glisser les trampolins
gauche et droit dans la traverse arrière.
Legen Sie beide Rümpfe parallel zueinander. Führen
Sie die Trampolinhälften in die dafür vorgesehene
15
Place the rear crossbar on the hulls and in-
2
sert the 4 bolts (2) + stainless washer (3) +
nylon washer (4), through the bar and the hull. Inside the hull (access through the inspection
ports) place the waterproof washer (5) + stainless
washer (6) + nut (7) and the nylstop nut (8). Do
not tighten the bolts up.
Positionner la traverse arrière sur les coques et
mettre les 4 vis (2) + rondelles inox (3) + rondelles
plastiques (4) à travers la traverse puis la coque (voir
dessin ci-contre).A l’intérieur de la coque (accès par
les trappes de visite), mettre la rondelle d’étanchéité
(5), la rondelle inox (6), l'écrou simple (7) et l'écrou
indessérable (8) sans les serrer à fond.
Setzen Sie den Achterholm in die dafür vogesehenen
Holmaufnahmen ein und ziehen Sie die Bolzen wie
auf Bild 2 gezeigt an. Im Innern des Holmes (leicht
durch den Luckendeckel zugängig) werden die Abdichtungscheibe (5), die inox scheibe (6), die einfache Mutter (7) und die Nylstop Mutter (8) aufges-
Dolphin striker
Martingale
Unterzug
Front crossbar/Traverse avant/
Vorderholm
Rear crossbar
Traverse arrière
Achterholm
1
2
3
4
5
6
7
8
Feed the lacing strip into the front crossbar.
2
Place the front crossbar on the hulls and
proceed the same way as for the rear crossbar.
Do not forget the tensioner rod fastening. Now,
tighten all the bolts.
Passer la bande avant de trampolin dans la traverse
avant. Positionner la traverse avant sur les coques
en procédant comme pour la traverse arrière (voir
dessin ci-dessus), en n'oubliant pas les ferrures inox
de maintien de la martingale. A présent, serrer toutes
les vis de fixation des traverses.
Führen Sie das vordere Trampolinteil in die Öffnung
im Vorderholm. Setzen Sie den Vorderholm in die
Holmaufnahmen ein und montieren Sie die Schrauben genauso wie bei der hinteren Einrichtung. Vergessen Sie nicht die Unterzug-Verbindung. Nun, können Sie alle Schrauben festziehen.
• 3
Page 4
15
Feed the trampoline halves into the side bars
1
and fix the bars as follows : bolt + stainless washer, through the bar and the hull, then the waterproof washer + stainless washer + nut. Once all the
bolts are tightened, install the caps.
Glisser le trampolin dans les barres latérales, puis monter les barres latérales comme suit : vis + rondelle inox,
passer au travers de la barre puis de la coque, rondelle d’étanchéité, rondelle inox, écrou. Une fois les vis serrées, mettre les bouchons.
Führen Sie das Trampolin in die Seitenholme. Dann, setzen Sie die Seitenholme wie folgt : Schraube, inox
Scheibe, durch den Holm, durch den
Rumpf, Abdichtungscheibe, Inox
Scheibe und Mutter. Bringen Sie die
Schutzkappen auf allen Schrauben an.
7UDPSROLQH6LGHEDUVEDUUHVODWpUDOHV
X6HLWHQKROPH
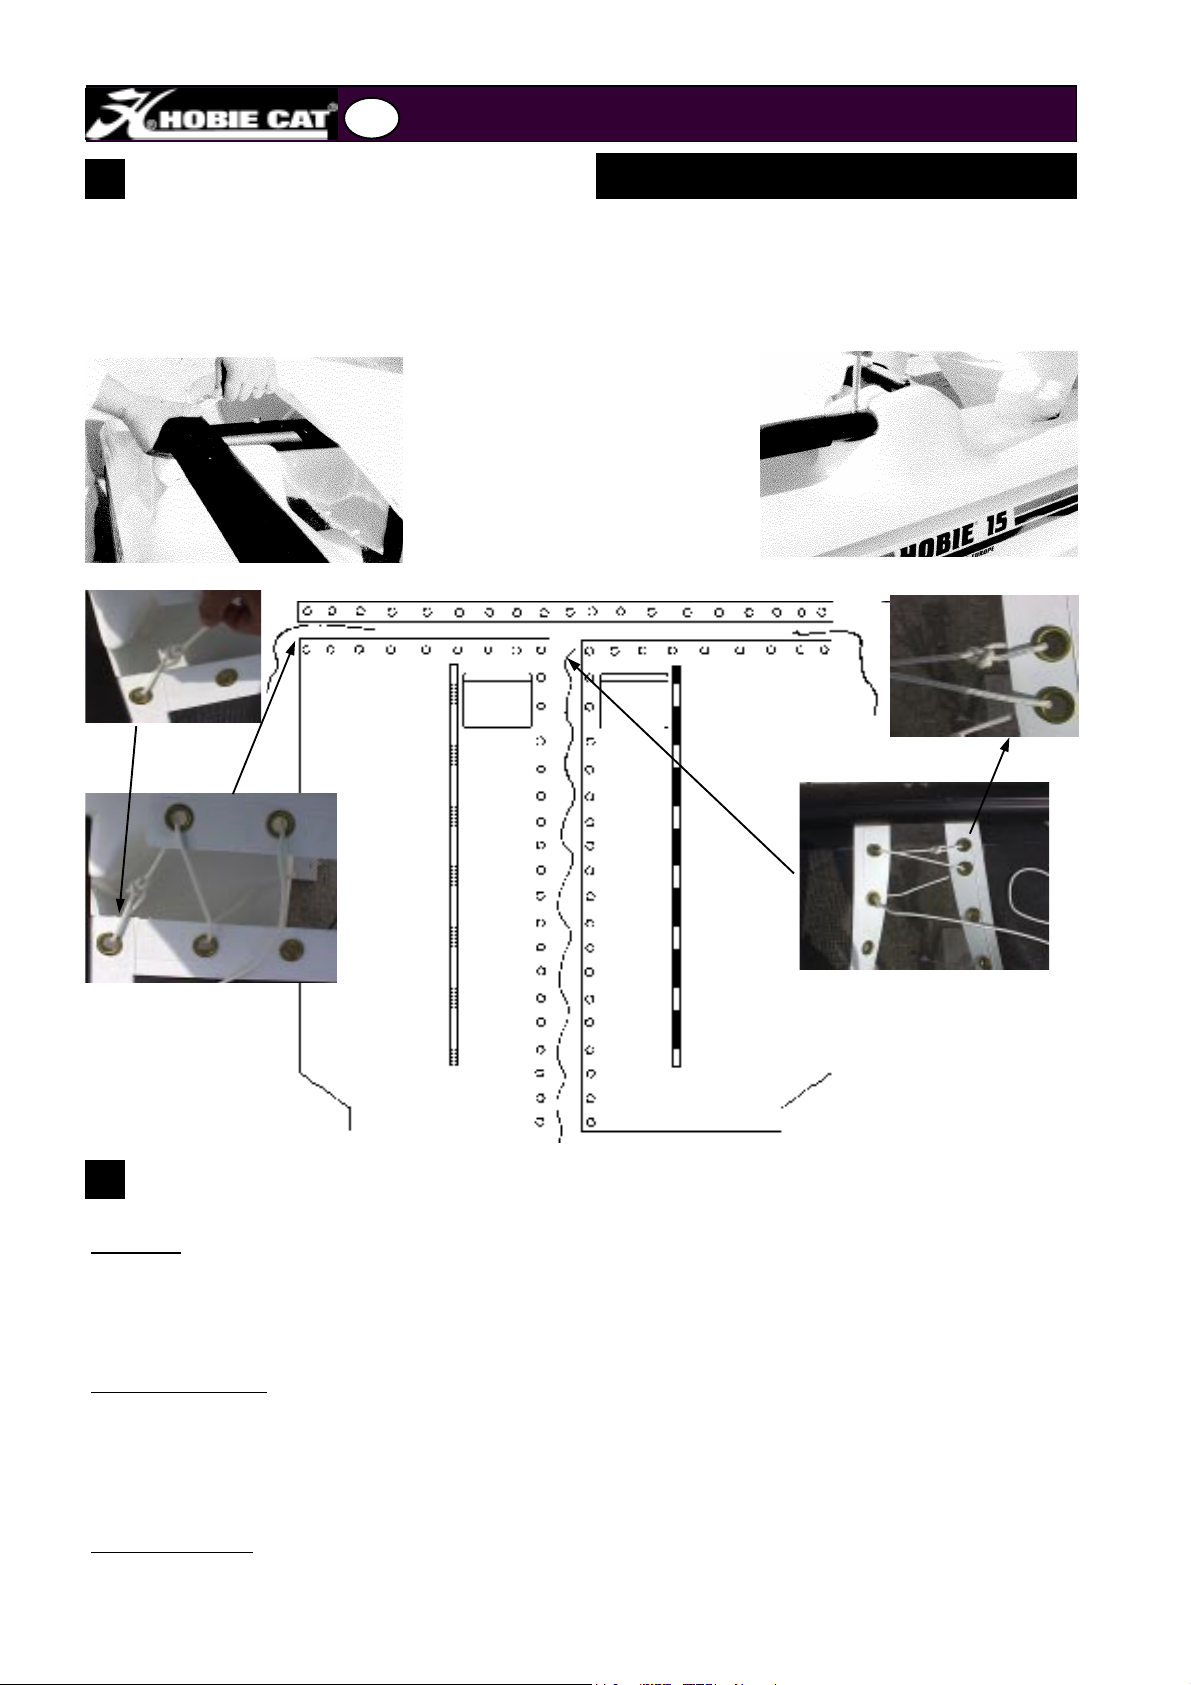
Use the longer white lacing line of 5 mm to lace the trampolin in the middle and the two shorter la-
2
cing lines for both of the sides. With use, the trampoline will stretch and require periodic retightening.
CAUTION
sure of the mast. It is most important to tighten it properly, otherwise the aluminium profile of the
crossbar would not be able to resist.
Lacer le trampolin en utilisant les cordages de 5mm blancs, le plus long pour le centre, les deux autres pour les
côtés. Avec le temps, le trampolin a tendance à se relâcher et doit être retendu périodiquement.
TRES IMPORTANT
toute la pression du mât. Il est primordial de bien la tendre car le profil aluminium de la traverse ne résisterait
pas.
Die Mittlere Trampolinleine (längere Leine) wird von hinten nach vorn verschnürt und nach und nach gespannt.
Die vorderen Leinen (kurzen Leinen) werden von außen nach innen verschnürt und nach und nach gespannt.
Die Leine müssen von Zeit zu Zeit nachgezogen werden, da sie sich beim Segeln etwas recken.
SEHR WICHTING
gelöst hat. Falls diese lose ist, müssen die Muttern auf beiden Seiten am Ende der Stange angezogen werden.
: Tighten the dolphin striker once the trampoline is fixed. This part supports the whole pres-
: Tendre la martingale une fois que le trampolin est serré. C’est cette pièce qui supporte
: Nach dem Aufziehen des Trampolins muss überprüft werden, ob sich die Unterzugstange
• 4
Page 5

:LUHVDQGPDVW&lEOHVHWPkW'LH7DNHODJH
15
Main halyard
1
Take the main halyard (at the top of the mast) and at-
tach it to the halyard rope (white rope with blue points, Ø
5mm, length around 8m). Then take the other end of the
halyard down to the bottom of the mast and attach it to
the other end of the rope.
Drisse de grand-voile
Délover la drisse cable de GV (en haut du mât) et accrocher à
la cosse la drisse cordage (cordage blanc points bleus, diamètre 5 mm et d’une longueur d’environ 8 m), puis descendre
l’autre côté de la drisse cable jusqu’en bas du mât et l’attacher avec l’autre côté de la drisse cordage.
Das Großfall
Befestigen Sie das Großfall-Kabel an der Leine (weiße Leine
mit blauen Punkte Ø 5 mm, Länge 8 m). Dann, lassen Sie das
andere Ende des Falls-Kabels herunter bis unterhalb des
Mastes und befestigen Sie es an dem anderen Ende der
Leine.
Wire assembly
2
Insert the forestay into the shackle (8 mm) of the
mast tang, ensuring that the pigtail is between the forestay and the mast. Then, connect
the two shrouds, the first trapeze wire set and the second trapeze wire set to the shackle. Insert the shackle pin through the shackle, the second trapeze wire and the mast
tang. Tighten the shackle pin with pliers. (see drawing above).
WIRES
CABLES
KABEL
Mast Tang/Capelage/
Mast-Beschlag
T
r
a
p
S
h
r
o
u
d
/
H
a
Etai
Forestay
Vorstag
e
z
e
T
r
a
p
e
z
e
u
b
a
n
/
W
a
n
t
e
n
Montage cable
Passer l’étai dans la manille de capelage (manille lyre 8 mm) en gardant l’estrope (petit bout de
cable) entre l’étai et le mât. Passer ensuite les deux haubans de part et d’autre de l’étai dans la
manille, puis de même avec le premier jeu de cable trapèze, et positionner les cables du 2ème
jeu de trapèze de part et d’autre de la ferrure de capelage. Positionner la manille et passer le
manillon au travers de la manille, du 2ème jeu de trapèze et du capelage et serrer fortement le
manillon pour le bloquer (voir dessin).
Die Takelage
Schieben Sie das Vorstag auf den Mast schäkel (8 mm). Achte darauf, daß das Pigtail zwischen dem Vorstag und dem Mast liegt. Dann Schieben Sie die Drahtkauschen wie in der Abbildung zu sehen auf den
großen Mastschäkel. Dann befestigen Sie den Schäkel an der Masthalterung. Achte darauf, daß die Trapezdrähte außen
liegen.
Bridles
3
Use the small shackle (Ø 6 mm) to connect the bridles (at the front of the
hulls) to the stay adjuster.
Brides
Délover les brides à l’avant des coques et les relier avec la latte universelle et la
manille lyre de 6 mm.
Hanepot
Benutzen Sie den kleinen Ringschäkel (Ø 6mm), um die Hanepotdrähte and das Locheisen zu befestigen.
Jib Halyard
4
Attach the small jib block to the pigtail and then connect the two blocks
as shown on the design with the jib halyard rope (white rope with red
points, length 20 m). Then, take the small block down and attach it at the bottom of the mast. For the jib furler assembly see part guide on page 14.
Drisse de foc
Fixer la poulie drisse de foc (grande) à l’estrope, puis faire un palan avec la poulie drisse de foc (petite) et la drisse cordage (blanche point rouge longueur environ 20 m). Descendre la petite poulie jusqu’en bas du mât et l’attacher. Pour le
montage avec enrouleur, voir éclaté page 14.
Pigtail/Estrope/
Jib/Foc/
Pigtail
Fock
Fockfall
Befestigen Sie den großen Fockfallblock am Pigtail, und dann befestigen Sie die beiden Fockfallblöcke wie auf dem Bild
gezeichnet. Benutzen Sie die Fockfallleine (weiße Leine mit roten Punkte, länge 20 m). Lassen Sie den kleinen Block herunter und befestigen Sie ihn am unterhalb des Mastes. Um den Rollfock-System einzusetzen, sehen Sie die Explosionszeichnung S. 14.
• 5
Page 6

15
STEPPING THE MAST
5
MONTAGE DU MAT /
Place the teflon chip in the bottom of the mastbase cup on
the front crossbar. Fasten shroud adjusters to wire shrouds
and to chain plates on sidebars. Use top hole of adjuster for
the time being. Place base into cup on crossbar and step the
mast while fastening the forestay into bridle adjuster (use top
hole).
Mettre le coussinet de mât dans l’emplanture de mât en le mettant
en forme. Fixer les haubans sur chaque coque avec les lattes universelles en utilisant le trou le plus haut (pendant le mâtage).
Coincer la base de mât dans l’emplanture, puis dresser le mât et
accrocher l’étai au trou le plus haut de la latte universelle des brides.
Legen Sie die Teflonscheibe in die Pfanne am Vorderholm. Befestigen Sie die Wanten im obersten Loch der
Locheisen (nur beim Setzen des Mastes).Setzen Sie den Mast mit dem Mastfuß in die Pfanne des Vorderholms, heben Sie den Mast und dann befestigen Sie das Vorstag am Locheisen des Hahnepots, zuerst am
obersten Loch!
MAST SETZEN
:LUHVDQGPDVW&lEOHVHWPkW'LH7DNHODJH
Attach the wire shrouds in the fifth hole starting from the
6
top of the shroud adjusters. Make sure the mast is held by
the trapeze wires otherwise it will fall down.
Descendre les haubans d’un côté puis de l’autre au 5ème trou en partant du haut des lattes universelles. (ATTENTION: bien maintenir le
mât à l’aide des trapèzes pour ne pas qu’il tombe).
Befestigen Sie die Wanten im fünften Loch der Locheisen. Passen Sie
auf ! der Mast soll durch die Trapezdrähte stabilisiert werden, so daß
er fällt nicht.
TRAPEZE ASSEMBLY
7
MONTAGE DES TRAPEZE/
Take the shock cord and pass it beneath the trampoline
frame from the port trapeze line to the starboard line. Attach the trapeze lines to each end with a bowline knot.
TRAPEZ SETZEN
Attach the rope locks on the line, pass the end of the line through the trapeze wire. Attach the J&H
handle with a bowline knot. Do the same thing on the other side.
Prendre le sandow avec les boucles à chacune des deux extrémités et le passer par dessous à travers les
trous du trampolin. Fixer les cordages de trapèze à chaque extrémité à l’aide d’un noeud de chaise.
Passer le double anneau sur la corde, faire passer l’extrémité de la corde à travers l’anneau du cable de trapèze. Fixer la poignée J&H avec un noeud de cabestan. Refaire la même chose de l’autre côté.
Nehmen sie zuerst das Trapezgummi mit den Ösen an beiden Enden und führen Sie es von unten durch die
Löcher im Trampolin. An den Enden werden die kurzen Leinen mit Hilfe eines Pa lstecks befestigt.
Führen Sie den Trapezstopper auf die Leine, dann das Ende durch die Öse an den Trapezdrähten die vom
Mast kommen. Am Ende wird der Trapezknochen festgknotet. Dies wird auf beiden Seiten ausgeführt.
• 6
Page 7

5XGGHU$VVHPEO\*RXYHUQDLO5XGHUDQODJH
15
RUDDER ASSEMBLY
1
Identify the right rudder assembly
RUDDER ASSEMBLY/TÊTE DE GOUVERNAIL
RUDERKOPF
(green sticker) and the left one (red sticker). They must not be reversed. Slip
the rudder pin down through the casting and gudgeons. Insert the Split pin
in the hole of the rudder pin so that it
prevents it falling down. Do the same
thing on the opposite side. Make sure
that the plastic cam has the nose up as
indicated on the drawing.
TETE DE GOUVERNAIL
Repérer le gouvernail droit (point vert) et
le gauche (point rouge). En aucun cas les
pièces marquées ne doivent être inver-
Upper casting
Casting supérieur
Oberes Rudergehäuse
Plastic cam
Came de safran
Rudernock
Rudder blade
Lame de safran
Ruderblatt
Tiller arm
Bras de gouvernail
Ruderarm
Lower Casting
Casting
inférieur
Unteres
Gehäuse
Gudgeon
Fémelot
Ruderbeschlag
sées. Glisser l’aiguillot à travers le fémelot
et la tête de gouvernail jusqu’à ce qu’il dépasse. Insérer la goupille dans le trou de
l’aiguillot de manière à empêcher celui-ci
de retomber. Répéter cette étape pour
Split ring
Anneau brisé
Ringsplint
l’autre gouvernail.
ATTENTION : La came de safran doit
avoir le nez en l’air comme indiqué sur le
dessin.
RUDERKOPF
Die Teile der Ruderanlage sind mit roten
DRAINING PLUG
BOUCHON D'AERATION
DICHTUNG ABLAßSCHRAUBE
Rudder screw
Vis de safran
Ruderschraube
Rudder pin
Aiguillot
Ruderbolzen
(links) und grünen (rechts) Schildern gekennzeichnet. Es dürfen auf keinen Fall verschieden gekennzeichnete Teile vermischt werden. Scheiben Sie
den Ruderbolzen durch den Ruderkopf und die Beschläge am Heck, sodaß das kleine Loch oben ein Stück herausguckt. Stecke den Splint in das Ruderbolzenloch und verbiege ihn, damit das Herausfallen des Ruderbolzens verhindert wird.
Achte darauf, daß die Rudernock mit der Nase nach oben zeigt, wie auf der Abbildung zu sehen.
ADJUSTING SCREW
2
This screw allows for readjustment of the
rudder blades. The two blades must be parallel.
VIS DE REGLAGE
La vis de réglage permet d'ajuster le parallélisme
des lames de safrans. Les deux lames doivent
être parallèles.
SCHRAUBEN ZUM JUSTIEREN DER RUDER
Mit dieser Schraube kann der Winkel der Ruder
zueinander verstellt werden. Die Ruderblätter
• 7
Page 8

15
58''(5*289(51$,/58'(5
Barre d’accouplement & stick/Tiller crossbar and extension/
Anlenkstange u. Pinne
TILLER SYSTEM
3
Attach the tiller crossbar (1)
to the tiller arm (2). Pay attention
to the left and right side. Insert
1
2
the screw as shown on the drawing. Repeat the same operation
on the other side.
BARRE D’ACCOUPLEMENT
Relier la barre d’accouplement (1)
au bras de gouvernail (2)
(ATTENTION : respecter le sens).
Pour ce faire : insérer la vis à travers la demi-bille, barre, rondelle
néoprène, etc... comme indiqué sur
le dessin. Répéter l'opération de
l'autre côté.
ANLENKSTANGE
Verbinden Sie nun die Anlenkstange (1) mit dem Ruderarm (2). Hierzu wird die Schraube durch eine Unterlegscheibe, die Kunststoffhalbkugel, etc.. gesteckt (sehen Sie die Abbildung). Wiederhole die schritte auf der
anderen Seite der Anlenkstange.
Tiller extension
4
Attach the stick by slipping the pin through the
violin screw in the middle of the tiller crossbar.
Stick
Le stick se fixe à l'aide d'un axe passé à travers la vis
violon se trouvant sur la barre d'accouplement.
Die Pinne
Die Pinne wird mit einem Bolzen und dem SIcherungsring auf der Halterung der Anlenkstange befestigt.
• 8
Page 9

-LE)RF)RFN
Attach the jib halyard block (small) to the head
1
of the jib and the jib tack to the clevis pin on the
forestay adjuster. Raise the jib with the halyard, tension the line and then secure it around the cleat at
the base of the mast. Shackle the jib clew blocks to
the center hole of the jib clew plates.
Attacher la têtière de foc à la poulie drisse de foc (petite)
et le point d’amure à la latte universelle en utilisant l’axe
percé.
Hisser le foc à l’aide de la drisse de foc et attacher celleci au taquet de drisse (le taquet blanc apposé sur l’avant
du mât en bas). Faire attention de donner une bonne
tension à la drisse de foc pour rigidifier le gréement. Attacher les poulies de point d’écoute de foc à l’aide de la
manille lyre de 4 mm au point d’écoute de foc (utiliser le
trou du milieu).
Schäkeln Sie den Kopf der Fock am Fockfall-Block.
Schäkeln Sie den Hals der Fock in den Vostagsspanner
am Hahnepot ein. Ziehen Sie das Segel mit dem Fall
hoch und belegen Sie das Fockfall auf der Klampe am
Mast. Schäkeln Sie die Vorschotblöcke and das Schothorn der Fock (in das mittlere Loch)
15
Jib sheet system : Tie one end of the jib sheet around the clevis pin in one of the jib sheet blocks
4
on the front crossbar. Lead it through the clew block and back through the cam cleat. Lead the free
end of the jib sheet to the opposite jib sheet block. Route it identically to the first side, but in reverse
order.
Ecoute de foc en circuit fermé
bleu à points blancs diamètre 8 mm, longueur environ 10 m) à la poulie de foc
fixée à la traverse AV. Passer au travers de la poulie de point d’écoute de foc
en allant du haut vers le bas, revenir et passer dans la poulie de foc (dans le
réa puis au travers du taquet coinceur). Passer ensuite dans l’autre poulie de
foc (dans le taquet coinceur puis au travers du réa). Passer dans la deuxième
poulie point d’écoute de foc (de bas en haut) puis retourner et arrêter l’écoute
à la poulie de foc.
Fockschot : Befestigen Sie das Ende der Fockschot am ersten Fockblock auf
dem Vorderholm. Führen Sie das andere Ende der Leine durch den ersten
kleinen Block und zurück unter der Rolle des Blockes durch die Curryklemme.
Weiter hinter dem Mast vorbei, durch zum zweiten Block auf dem Vorderholm,
zum kleinen Schothorn-Block und zurück zum zweiten Fockblock des Vorderholmes. Das Ende wird mit einem Achtknoten gesichert.
: attacher une extrémité de l’écoute (cordage
• 9
Page 10

15
Insert each batten into its respective pocket and thread the batten ties (see drawing).
1
Insérer toutes les lattes dans la grand-voile et les tendre à l’aide des garcettes (voir photos).
Einführen alle Segellatten, in der Segeltaschen und versichern und spannen mit Lattenbändsel (siehe Foto)
Attach the halyard shackle to the head of the sail and feed the full (leading
2
edge) into the opening in the mast track. Continue pulling the halyard and
feeding the sail into the track until it reaches the top.
0DLQVDLO*UDQGYRLOH*URVHJHO
Fixer la têtière à la drisse de GV à l’aide de la manille longue (déjà sur la drisse) et hisser la GV en tirant sur la drisse cordage en guidant bien la voile dans la ralingue.
Bringen Sie nun den Schäkel des Großfalls am Kopf des Großsegels an und führen
Sie das Vorliek beim Heißen des Segels in die Mastnut ein.
When the sail is all the way up, pull the halyard forward sufficient
3
for the stop sleeve to clear the halyard hook. Once the sleeve is
past the hook, position the halyard so that the sleeve will engage the
hook when you release tension. That done, secure the halyard to the
mast cleat at the bottom of the mast and put the excess line in the
tramp pocket with the jib halyard.
Une fois la voile en haut, passer la drisse cable de GV au milieu du hook
fixé en haut sur l’avant du mât, et doucement redescendre la GV jusqu’à ce
que l’arrêt du cable se coince sur le hook. Attacher la drisse cordage au taquet de drisse (taquet blanc sur le côté du mât en bas) sans la tendre, et
mettre le reste de la drisse dans la poche réservée à cet erffet sur le trampolin avec la drisse de foc.
Wenn das Segel ganz oben ist können Sie die Preßhülse am Grossfall unter den Haken Klemmen. Das lose Ende belegen Sie es ohne Spannung an
der Klampe steuerbord am Fuß des
Mastes.
• 10
Page 11

0DLQVKHHW3DODQGH*9*URVFKRW
Attach the upper block to the main hook and attach
the hook into the middle hole of the main clew plate.
Attach the ratchet block to the traveller car on the
rear crossbar with the clevis pin and lock ring provided. Check that the two blocks are facing each
other. Take the mainsheet, run the free end through
the cam cleat of the ratchet block and tie a figure of
eight knot to secure the line. Then the installation is
as follows :
...up to front sheave from left to right
...down to right sheave from front to rear
...up to middle sheave from right to left
...down to left sheave from front to rear
...up to rear sheave from left to right
...down to middle sheave from rear to front
and back to the cleat on the block.
Run the free end of the mainsheet through the cam cleat on the aft crossbar, the traveler car, and the
dead eye behind the cam cleat. Tie a figure of eight knot to secure the line.
15
Fixer la poulie à l’aide d’une manille au crochet de
grand-voile et attacher celui-ci au trou du milieu du
point d'écoute. La poulie winch sera fixée à l’aide
d’une manille sur le chariot qui se trouve sur la traverse arrière. Bien s’assurer que les poulies se font
face. Prendre ensuite l’écoute de GV, passer une extrémité dans le pontet de la poulie winch et faire un
noeud en huit, le circuit est ensuite le suivant
...en haut réa avant de gauche à droite
...en bas réa droite d’avant en arrière
...en haut réa milieu de droite à gauche
...en bas réa gauche d’avant en arrière
...en haut réa arrière de gauche à droite
...en bas réa milieu d’arrière en avant
et retour au taquet sur la poulie.
Le morceau libre de l’écoute de GV sera passé dans
la tourelle sur la traverse, entre les deux réas.....dans
le chariot.......et dans le pontet derrière la traverse où
il sera fixé par un noeud en huit.
Der große Block wird zuerst mit einem Schäkel am
Großsegel-Haken befestigt. Der Grosßsegel-Haken
wird selbst am mittleren Loch des Schothorns befestigt. Der große Block mit der Curryklemme wird unten
am traveller auf dem Beam mit einem Schäkel befestigt, darauf achten daß die Blöcke verdreht (90°)
zueinander stehen. Nun nehme man das große dicke
Seil (die Großschot) und mache einen Achtknoten
hinterdem Bügel über der Curryklemme des unteren
Blockes. Von hier get das Tau :
...zur vorderen oberen Rolle, links nach
rechts...
...zur rechten unteren Rolle, vorne nach hin-
ten...
...zur mittleren oberen Rolle, rechts nach
links...
...zur linken unteren Rolle, vorne nach hinten...
...zur hinteren oberen Rolle, links nach
rechts...
• 11
Page 12

15
Take the cylinder out of the upper part.
Oter le cylindre et la partie supérieure.
&KDULRWGH*90DLQWUDYHOOHU*UR7UDYHOOHU
Take the traveller car CCT and dismount it out by
removing the pin and the split ring. Slide the bearing cylinger out by pressing the end of the plastic part.
Prendre le chariot CCT et le démonter complètement
en enlevant l’axe et l’anneau brisé dans un premier
temps. Sortir le cylindre en le glissant latéralement,
en exerçant une pression à l’extrémité de la partie
plastique.
Nehmen sie den Traveller und zerlegen Sie ihn. Entfernen Sie dazu zunächst den Ringsplint und den
Bolzen. Nehmen Sie den Zylinder heraus. Drücken
Sie dazu auf die Enden des Plastikteils.
Entfernen Sie den Zylinder und die Doppelrolle.
Reassemble the traveller car in a reverse manner,
i.e. : fit in the upper part, slide the cylinder and
place the pin and the split ring.
Split the plastic slide in two parts and insert each
one in the track of the rear crossbar.Slide them
one over the other until they fit together
Séparer la glissière plastique en deux parties distinctes et les glisser alternativement dans le rail de la
traverse arrière, les coulisser l’une sur l’autre puis les
réemboîter.
Nehmen Sie die beiden Teile des Plastik-
gleitstücksaus-einander, und führen Sie sie nacheinander in die Gleitschiene des Achterholms ein.
Remonter le chariot en inversant l’ordre initial, soit :
encastrer la partie supérieure, glisser le cylindre en
ayant eu soin d’exercer une pression à l’extrémité de
la glissière, puis glisser l’axe et l’anneau brisé.
Schieben Sie die Hälften wieder zu-sammen.
Bauen Sie den Traveller in umgekehrter Reihenfolge wieder zusammen. Oberes Teil einsetzen, Metallzylinder
über den Plastikzylinder schieben, Bolzen mit Ringsplint sichern.
• 12
Page 13

6DIHW\WLSV6pFXULWp
CAUTION / SAFETY TIPS
A LIRE AVANT DE PARTIR
15
♦ Whether on land or on the water, watch for
overhead power lines . Contact with power
lines can cause serious injury or death.
♦ DO NOT
hol and/or drugs
♦ Only sail in conditions in which you feel com-
fortable and where you feel confident that you
can safely sail the boat. Never go out in
conditions beyond your ability .
♦ Everyone on board should wear a life jacket
at all times .
♦ If you are in the water, remain in contact with
the boat, even if it is capsized. A sailboat can
drift away faster than a person can swim.
♦ Never sail without a righting line.
♦ Wear appropriate clothes
dry suit in cold weather or cold water condi-
tions.
♦ Remain seated
sail while under the influence of alco-
. Wear a wet suit or
while sailing.
♦ A terre ou sur l’eau, rester toujours éloigné
des fils électriques . Le contact du mât avec
des fils électriques peut entraîner de graves
blessures, voire la mort.
♦ NE PAS
cool ou des drogues.
♦ Naviguez toujours dans des conditions confor-
tables où vous vous sentez à l’aise et en sécurité. Ne jamais naviguer dans des
tions dépassant vos compétences .
♦ Tout le monde à bord doit porter en
nence un gilet de sauvetage .
♦ Si vous tombez à l’eau, restez en contact avec
le bateau, même s’il a chaviré. Un voilier dérive plus vite qu’une personne qui nage.
♦ Ne jamais prendre la mer sans bout de redres-
sement.
♦ Portez des vêtements appropriés
une combinaison sèche ou combi néoprène
dans les eaux froides ou s’il fait froid.
naviguer si vous avez absorbé de l’al-
condi-
perma-
. Portez
♦ Learn the right of way rules
doubt, give way to others.
♦ When not sailing, always keep the boat
ted into the wind whether in the water of on
the beach.
♦ Read the instruction manual carefully.
♦ Make sure everyone on the boat reads and
understnads these safety instructions .
ALWAYS
before launching your catamaran
check that the drain plugs are screwed in
and when in
poin-
♦ Restez assis
♦ Apprendre les règles de priorité en mer
dans le doute, laissez passer les autres.
♦ Si vous n’êtes pas en train de naviguer, tou-
jours toujours orienter le bateau le nez au
vent qu’il soit sur l’eau ou sur la plage.
♦ Lire attentivement ce manuel.
♦ S’assurer que tout le monde à lu et
pris ces règles de sécurité.
♦ TOUJOURS vérifier que les bouchons sont
bien enfoncés dans les coques avant de
mettre votre catamaran à l’eau.
pendant la navigation.
, et
com-
• 13
 Loading...