

Page 1
Instruction
14 Megapixel High Definition Split-Type DVR
Page 2

Catalog
Notice……………………………………………………………1
Start Guide
1 Accessory Diagram…………………………………………3
2 Function Diagram………………………………………5
3 Micro SD Insert and Plug in………………………………9
4 Power ON/OFF……………………………………………10
5 Date / Time Setting ………………………………………11
Operation Guide
1 Function Setting Menu……………………………………12
■ Record Menu Setting………………………………15
■ Photo Menu Setting…………………………………16
■ System Setting Menu………………………………17
2 Record………………………………………………………19
Page 3

3 Photo…………………………………………………………22
4 Playback……………………………………………………23
■ Playback Operation…………………………………23
■ Playback Manual……………………………………24
■ Playback Setting Manual…………………………25
5 Indicator Light……………………………………………25
Other Special Function
1 Connect to the Computer………………………………26
2 Connect to Aircraft Remote Controller Receiver……27
Basic Specification…………………………………………28
Page 4

1
Notice
> Warning
● Keep from moisture to avoid fire hazard, electric
shock and damage.
● Only use the recommended accessory.
● Do not disassemble, there is no maintainable parts
inside the machaine.
Page 5

2
> Attention
● Certain frequency electromagnetic field may affect
the image and sound.
● If transfer data failed by static or electromagnetic,
disconnect and restart, re-link the cable (USB etc.).
● Do not install the device in the confined container
to avoid any fire hazard and damage.
● Do not close the device to the fire.
● Built-in battery is for video saving. If system halted,
disconnect the external power source 30seconds,
system will reset automatically.
● Due to the split-type, hot removal and insertion
between the camera and host is not allowed. Before
power on, connect the camera and host first.
Page 6

3
Start Guide
> Accessory Diagram
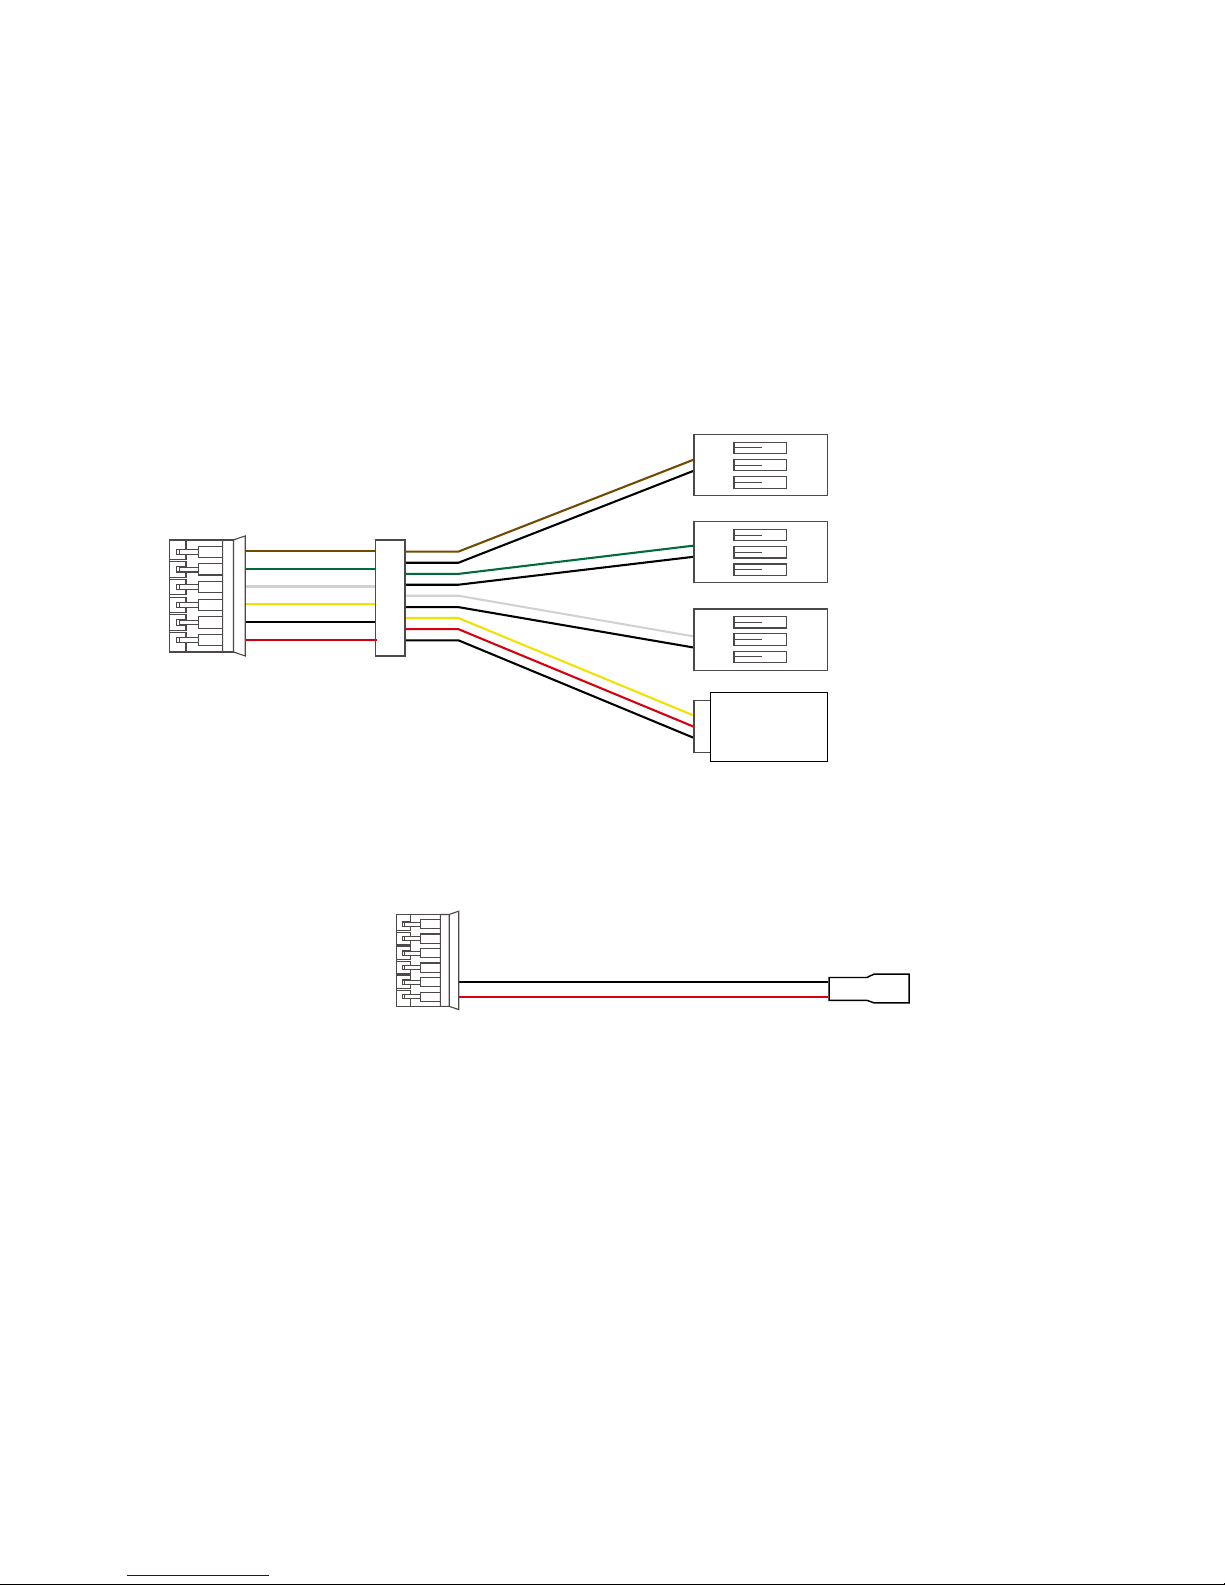
USB Cable
Page 7
4
6P Multi-function Cable
6PDC Cable
DC_IN / VIDEO_OUT
AUDIO_OUT
MOVIE_PPM_IN
PHOTO_PPM_IN
Page 8
5
> Function Diagram
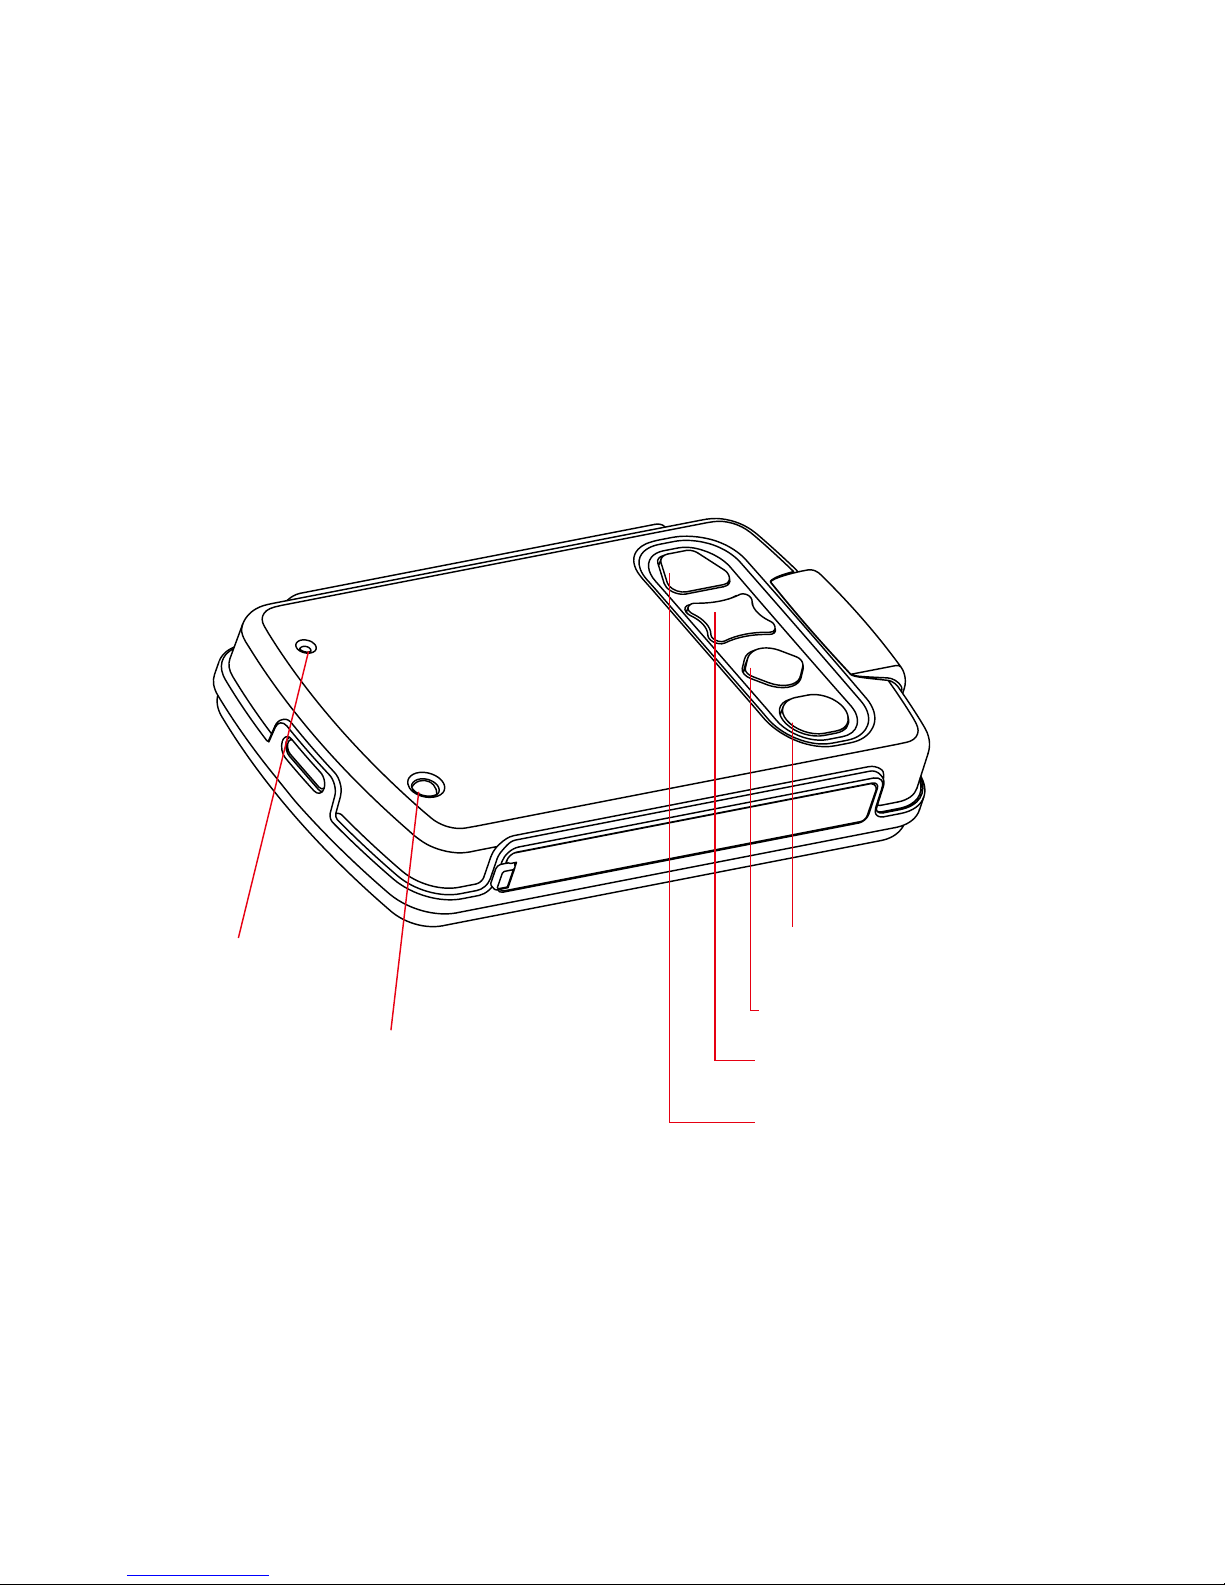
Record Button
Photo Button
Playback Button
Manual Button
Microphone
LED Indicator
Page 9
6
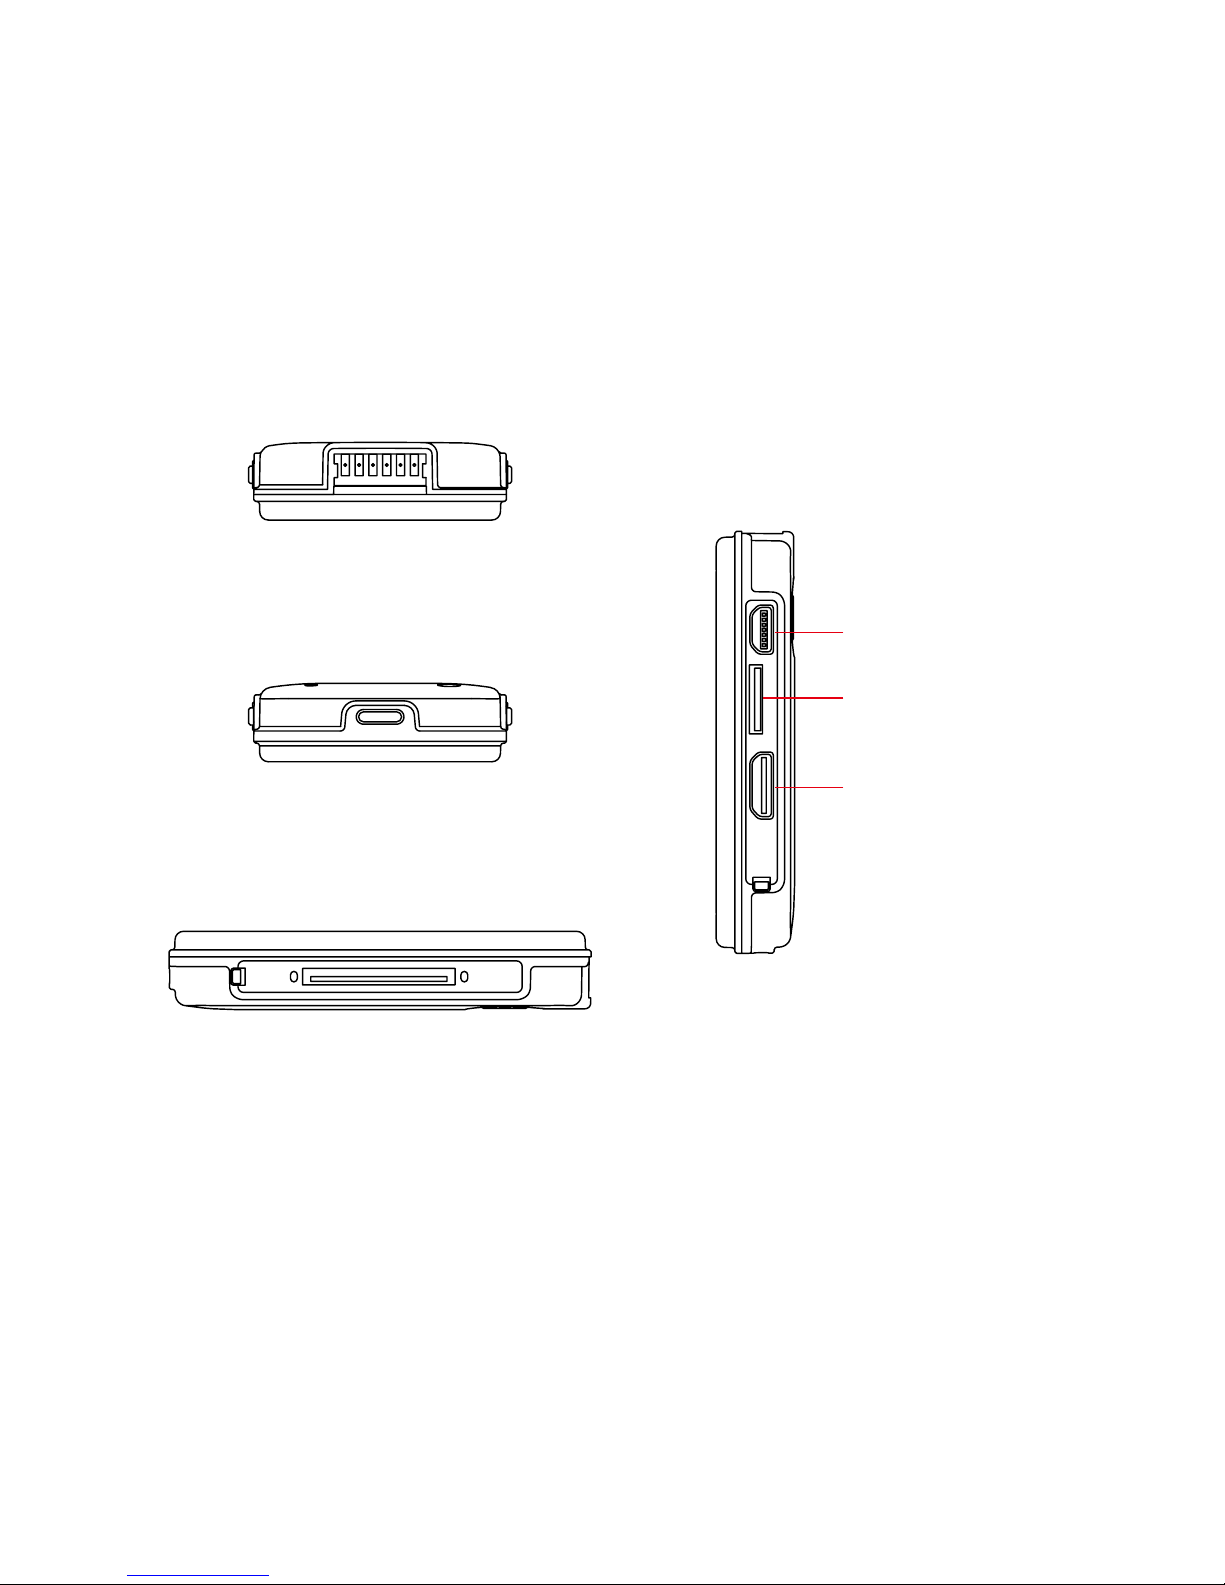
USB Cable Port
Micro SD Port
HDMI Port
6P Multi-function Port
Camera Port
LCD Scree Socket
Page 10

7
LCD Screen
LCD Screen Plug
VolumeVolume+
Speaker
LCD Screen
ON/OFF
Page 11
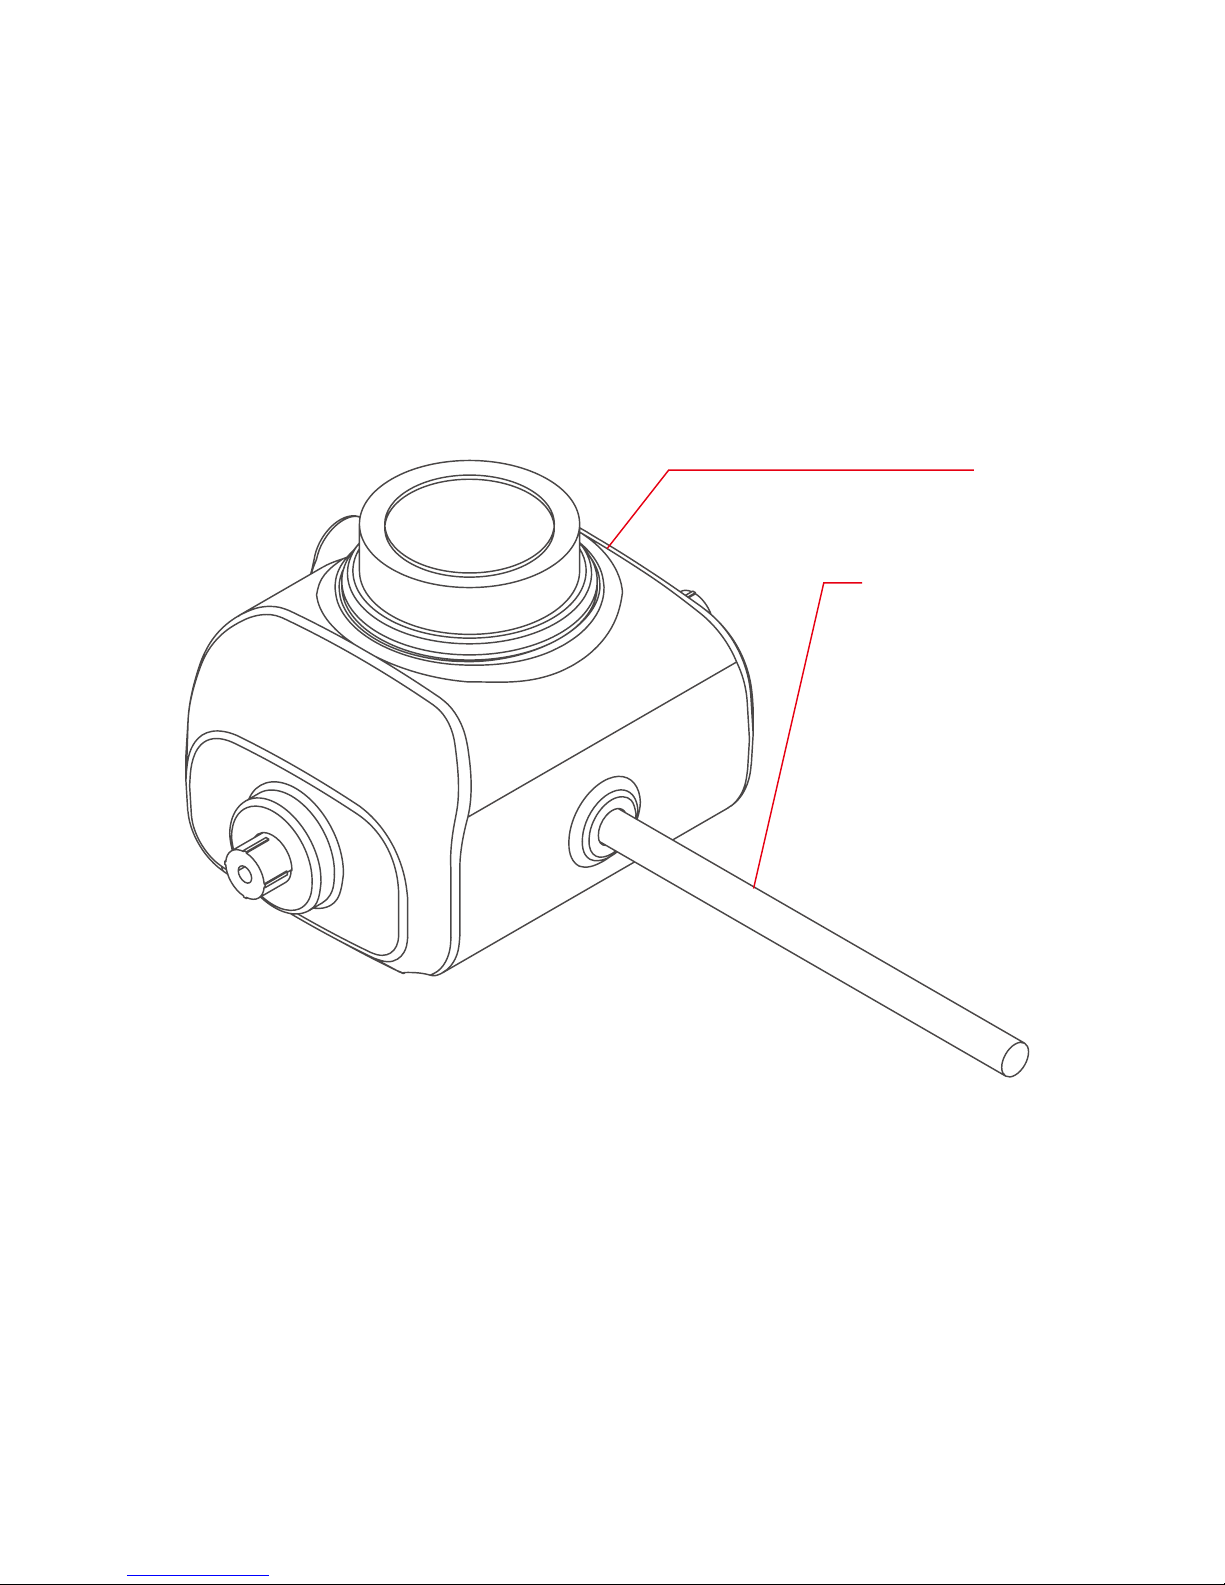
8
Screen
CameraCable
Page 12

9
> Micro SD Insert and Plug in
Insert the Micro SD
Follow the arrow direction, insert the Micro SD Card,
keep the gold contact facing down, push into the card
with 'click' sound.
Page 13

10
Take Out the MicroSD
● When record and playback, do not take out the
Micro SD Card.
● Press the Micro SD inward with 'click' sound, then
take out the card.
> Power ON/OFF
The device is auto start up when power on, auto save
when power off. Can work with 3-6S( 12V-25V) battery
directly, also can input 5V voltage from USB port.
Page 14

11
● During the first-use, set the date and time to
guarantee the documents on the right date and time.
Continuously Press "M" to Menu to choice" "
p r e s s " "to the date 2008/01/01 00:00 (year/
month/day/hour/minute), press "OK " to begin setup.
> Date/Time Setting
● First use, keep the device on-state for 24 hours. It
could make full charge of built-in battery which is used
for time and power off retention
"M" : Item select
" " : adjust the figure
"OK " : confirm and quit
Page 15

12
Press "M" to Menu, choose "record /photo /setting
" by "M", then press "OK " to sub-menu setting
inter-surface .
Press " " to choose sub-menu, then press
"OK " to lower sub-menu.
Press " " to choose sub-menu, then press
"OK "
to confirm the setting, at last press "M" to quit to main
menu.
> Function Setting Menu
Operation Guide
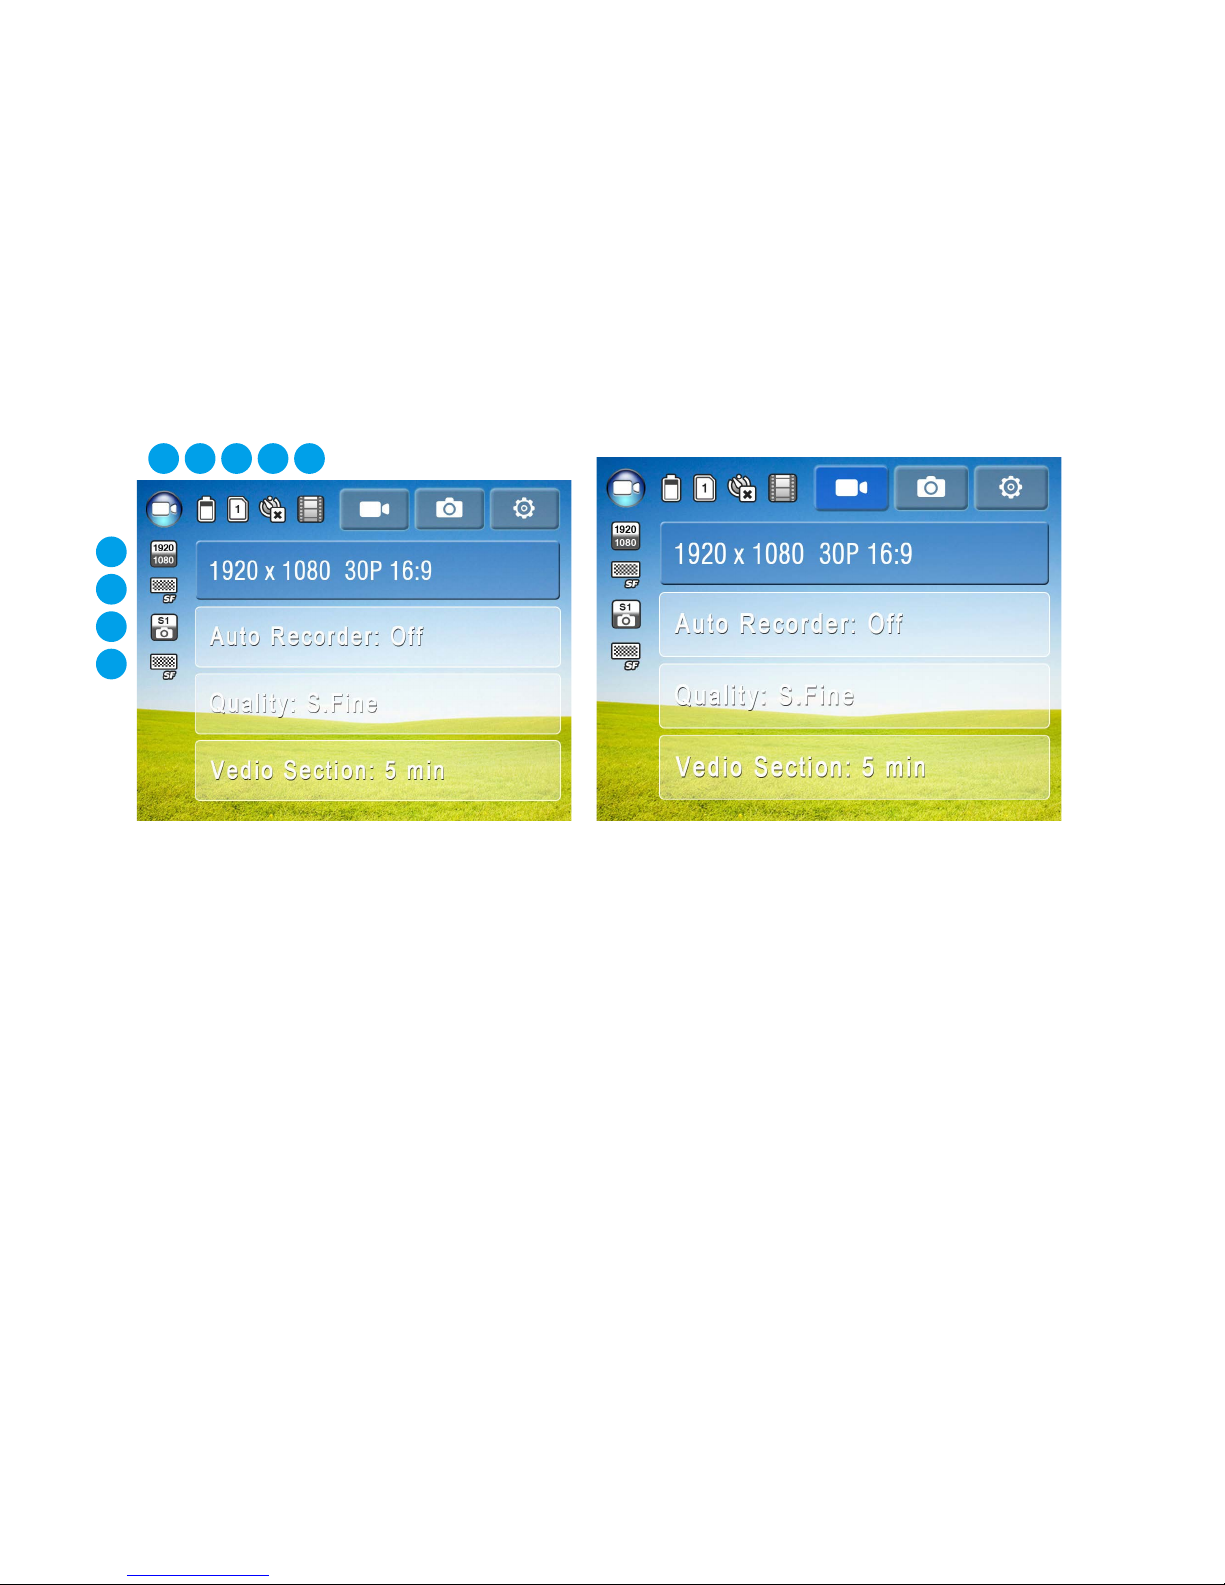
The operation above refer to the following picture:
Page 16
13
① Photo Quality : S.Fine, Fine, Normal
②
Photo Size : 14M,16M
③ Video Quality : S.Fine, Fine, Normal
④ Video Size : 1920*1080 30p 16:9;1280*720 60p 16:9;
1280*720 30p 16:9; 848*480 60p 16:9;848*480 30p 16:9;
5
4
1
2
3
6 7
8
9
Page 17
14
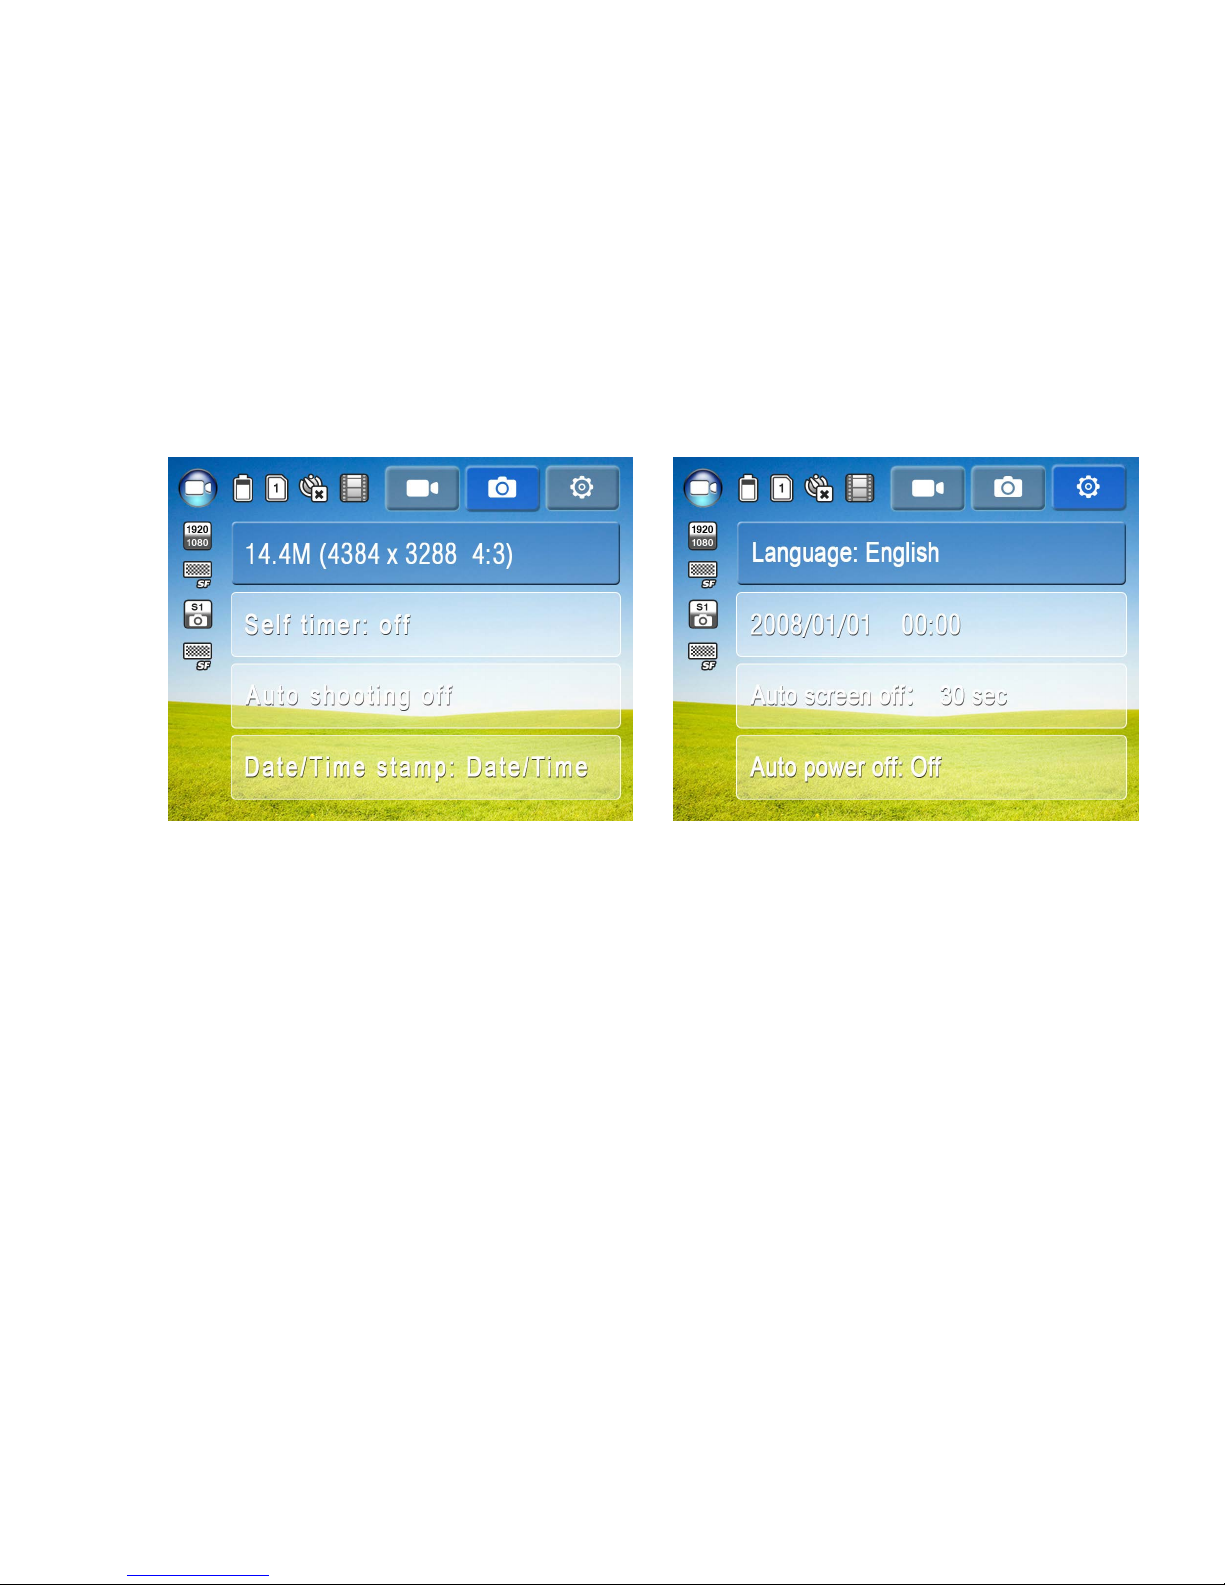
⑤ Mode : Video/Photo, Thumbnail, Playback
⑥ Battery Volume
⑦ Sd Card Volume / Micro SD
⑧ Self Time : Off, 3sec, 5sec ,10sec
⑨ Rec Lapse : Normal record, rec lapse off, rec lapse 1sec,
rec lapse 5sec, rec lapse 30sec
Page 18

15
1. Record Menu Setting Item
Video Size
1080P 30P/720P 60P/720P 30P/480P
60P/480P 30P
Auto-Record ON / OFF
Video Quality High / Middle / Low
Video Section 5 min /10 min /15 min /OFF
Watermark
/ Postmark
OFF / Time / Date / Time and Date
Time-Lapse
Record
OFF/ 1 sec/ 5 sec/ 30 sec
Loop Video ON / OFF
Page 19
16
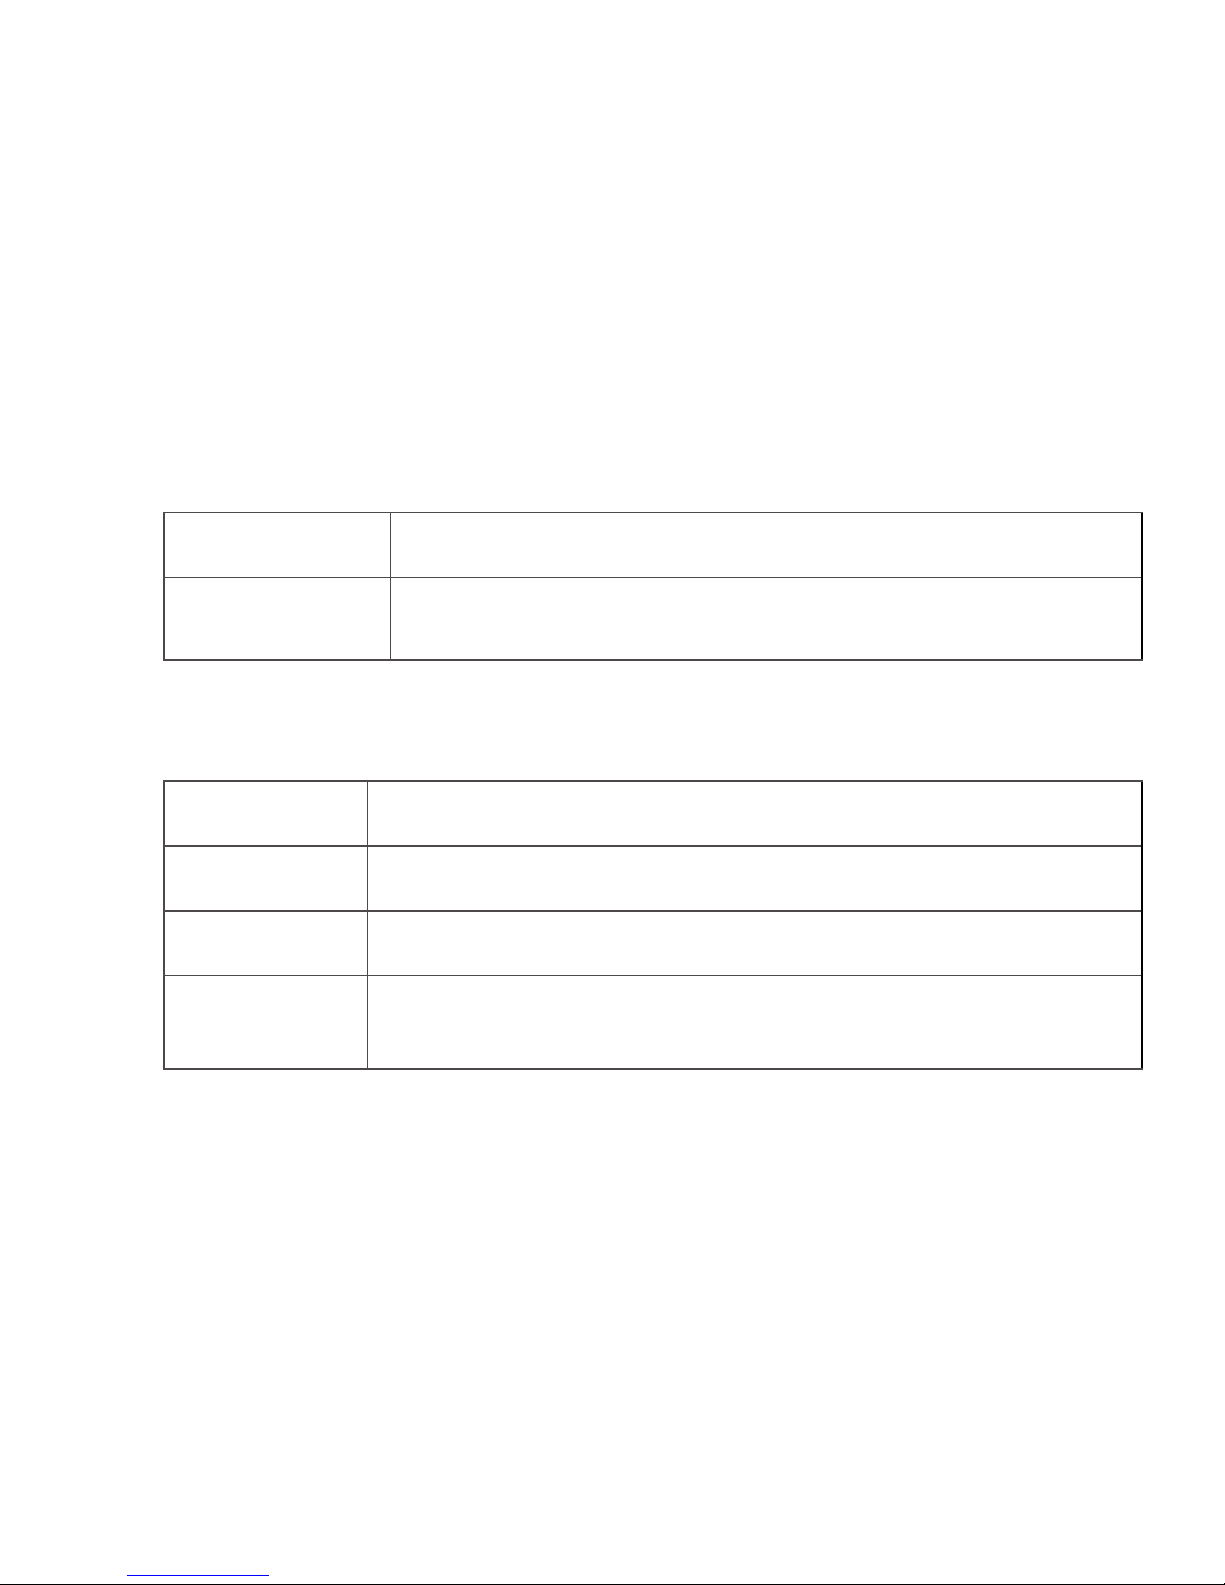
2. Photo Menu Setting Items
Photo Size 14.4M(4384*3288 4:3)/16M(4608*3456 4:3)
Delay Photo OFF/ 3/ 10/ 20/ 30/ 60 sec
Self-Timer OFF/ 3/ 5/ 10 sec
Watermark/
postmark
OFF/ Time/ Date/ Time and Date
Microphone ON / OFF
Microphone
Volume
30P/ 70P/ 100P
Page 20

17
3. System Setting Menu Items
Language Setting
Simplified Chinese/ English/
Japanese/ Portuguese/Germany
Date/ Time Setting
2008/01/01 00:00 (Year/Month/Day/
Hour/Minute)
Auto Screen Off 30sec/ 1/ 3/ 5 min
Auto Power-Off OFF/ 3/ 5/ 10 min
Image Rotation
Standard /
180
O
File No. Reset / Continuous
Page 21
18
Notification Tone ON / OFF
Indicating Light ON / OFF
Formatting 30P/ 70P/ 100P
Default Setting
USB Port Mobile HDD/ Camera/ Power supply
Version Information
Page 22

19
> Record
1. Record :
● Press " " to start the record, " ● " on the top of
screen and the moving time shown.
● The auto-save of video file is in accordance
with the setting time of video segmentation in the
record menu; for example: the setting time of video
segmentation is 10 minutes, once the recording time
reached 10 minutes, the system will save the file
automatically and then keep going. The name of files
will be named incrementally.
● If turning off the video segmentation, the video will
be segmented when the file reaches to 4G.
Page 23

20
2. Auto Record :
● When the device power on and start, it will access
to the recording mode automatically.
● Under the recording mode, the setting of recording
menu is the same with the setting before start.
3. Time Lapse Record:
● In the time lapse record, the record icon “ ”
of standby image will response to the setting time
lapse record.
● The function is suitable for the micro-variation
scenery, such as the blossom of flowers and the
growth of plants. The size of file under this mode
possesses small storage space. Playback needs the
professional player to single-frame play and slow
forward.
Page 24

21
4. Record Loop :
● In the loop record, the record icon “ ” of
standby image will response to the setting time lapse
record.
● In the loop record, there is no need to replace the
memory card for long time record, the recording is
between normal record and auto record mode.
● Once the memory card is full, the system deletes
the earliest file.
● Under the loop record mode, recommended the
video segmentation did not set to off to guarantee that
the system deletes the earliest file when the memory
card is full.
Page 25

22
> Photo
1. Normal Photo Mode :
Press once to take one picture. During taking
photo, the photo icon changes with the photo
modes.
2. Delay Photo :
Setting the camera aperture and adjusting the delayed
time, the photo icon changes with the setting. Then
press , the system will finish taking the pictures
under the delayed time.
3. Auto Photo :
Under the auto photo mode, the photo icon will turn to auto
indicator, then press the button , the system will take the
pictures continuous according to the setting time, then press
to stop taking.
Page 26

23
> Playback
1. Playback Operation
Under the preview mode, press "OK " to preview
thumbnail inter-surface.
● Playback Preview :
Quit the Playback Mode: Long Press M
Access to Playback Menu: Press M
File Select: Press " "
Play: Press "OK"
● File Play :
Pause/Resume: Press "OK "
Stop: Press "M"
Previous: Press " "
Next: Press " "
Page 27

24
● Playback Menu
Confirm: press "OK "
Up: Press " "
Down: Press " "
Quit: Press "M"
2. Playback Menu
Play Menu Single/ Full/ Single Cycle/ Full Cycle
PowerPoint ON / OFF
PowerPoint Mode Fade-Out / Floating
File Delete
The Current File Delete / All the File
Delete
Page 28

25
> The Indicator
● Under the normal working, the indicator long light.
● When recording/taking photo, the indicator turn
long light to flash, after accomplished, it is back to
long light.
● There is the on/off select of indicator in the menu,
the indicator could be ON or OFF.
3. Playback Setting Menu:
● Same with the main menu setting items.
Page 29

26
Other Special Function
> Connect to the Computer
● Before connecting to the computer, set the power
supply/mobile HDD/camera.
● If selecting the power supply mode, the device is
charged through USB cable with computer.
● After selecting mobile HDD mode, computer could
visit the memory card through USB cable and operate.
● After selecting the camera mode, the image shot
by the device could be displayed on the computer.
Before selecting the computer camera, please install
the drive of device camera.
Page 30

27
> Connect to Aircraft Remote Controller Receiver
● Connect to the aircraft remote controller receiver
by the dedicated tail circuit. The connection could take
photo or make record to the device in the air.
● The test of the function on FUTABA system is
passed.
Page 31

28
Basic Specification
Item Content
Image Sensor 1/2.3 COMS 14 megapixels
Camera
Lens F+2.8 FOV:150° up and down:
90°
Exposure Control Automatic
White Balance Automatic
Photo
Format: JPEG pixel 14.4M (4384*3288
4:3) / 16M (4608*3456 4:3)
Page 32

29
Image
Format H.264 compressed format size
16:9 1920*1080 30 frame/second,6:
9 1280*720 60 frame / second,16:
9 1280*720 30 frame / second 16:
9,848*480 60 frame / second,16:9
848*480 30 frame / second.
Storage Max Micro SD Card: 32GB
LCD 2.0″ TFT LCD Pixel:960*240
Multi-Function Port
Multi-function USB port ( compatible
with mini USB Plug ) , mini HDMI port,
30P LCD pin port, 6P multi-function tail
circuit port.
 Loading...