

Page 1
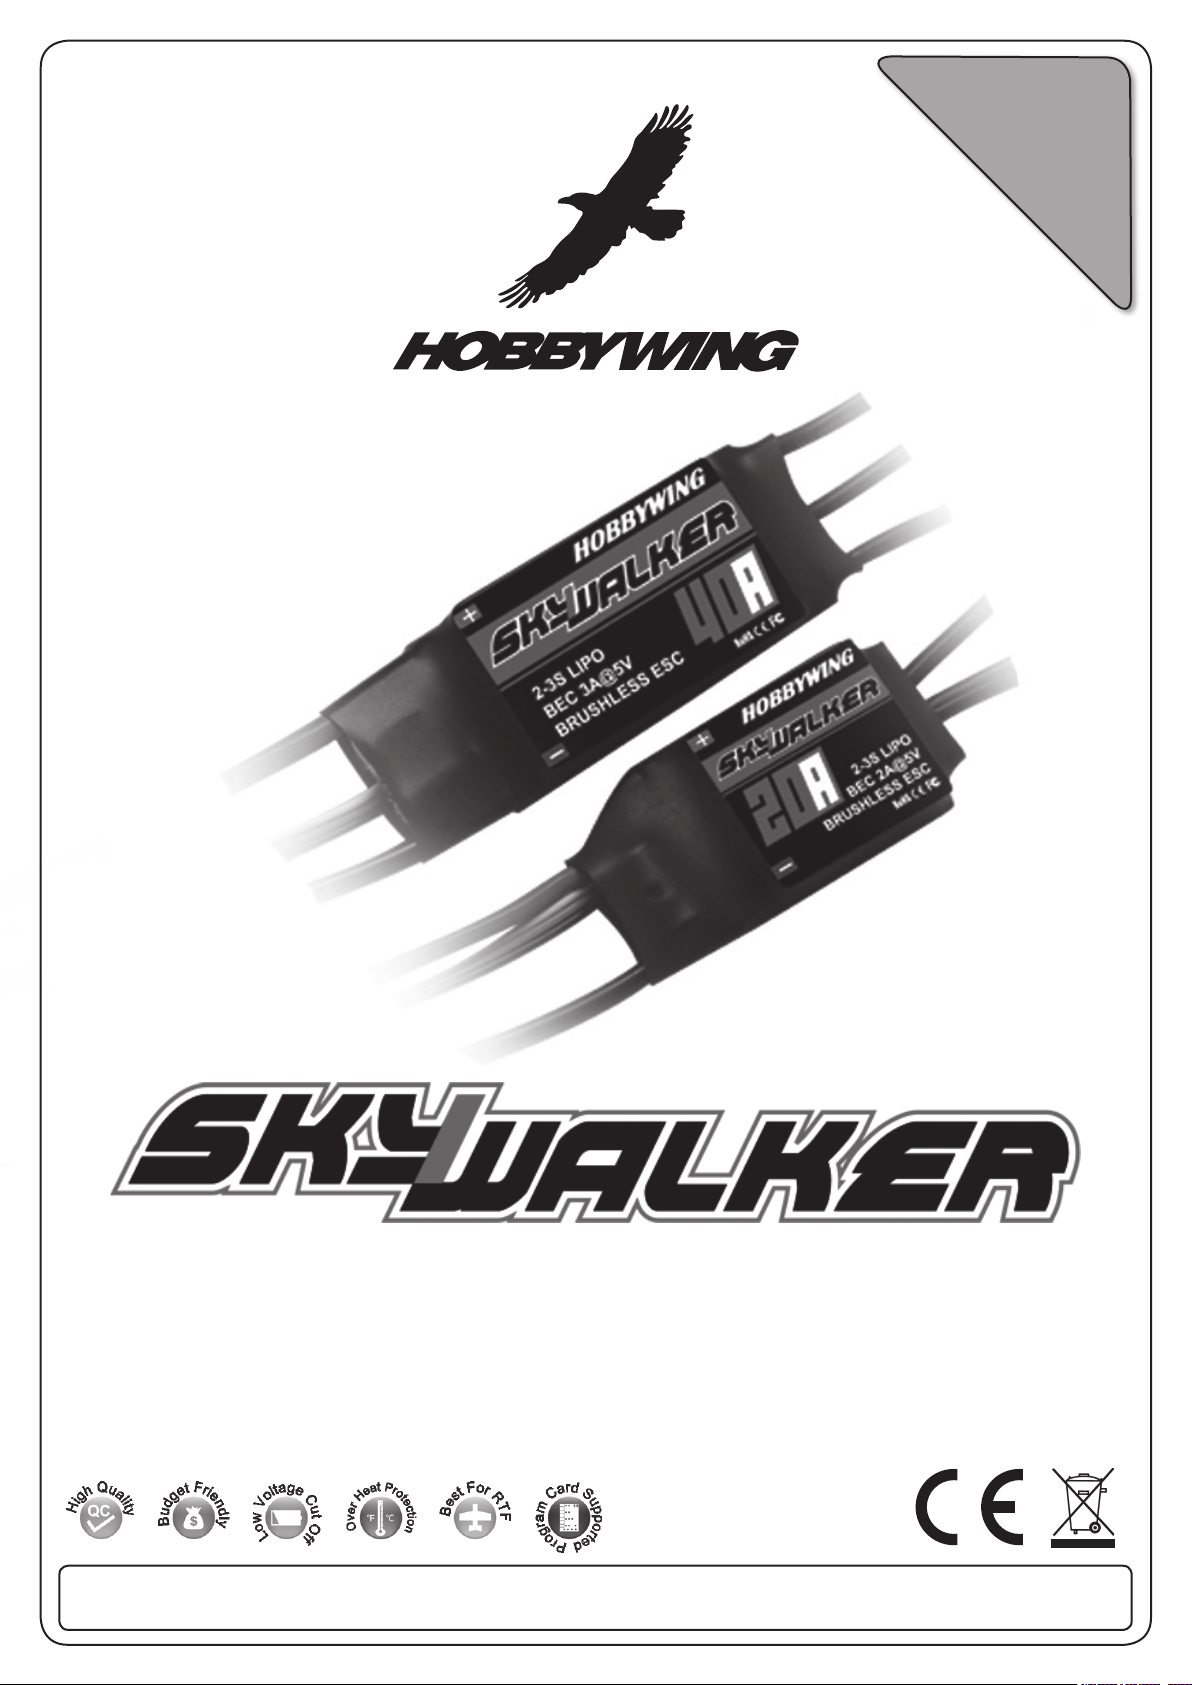
Best.-Nr. 80060020 (40A)
Best.-Nr. 80060010 (20A)
Ein Qualitätsprodukt aus dem Hause
für Modellsportler ab 14 Jahren.
Produkt ist kein
Spielzeug, geeignet
Dieses
Bedienungsanleitung
Instruction Manual
manuale d'istruzione
Wichtiger Hinweis:
Nur geeignet für HOBBYWING Regler: Skywalker 20A & Skywalker 40A
Page 2
Vielen Dank für den Erwerb dieses Flugreglers (ESC). Hochleistungsantriebe für RC Modelle sind sehr gefährlich, bitte lesen
Sie diese Anleitung sorgfältig durch. Weiterhin haben wir keinen Einfluss auf korrekte Verwendung, Anschluss,
Programmierung oder Wartung des Artikels, daher können wir keine Haftung bei Beschädigungen, Verlust oder Kosten durch
Verwendung dieses Artikels übernehmen. Alle Ansprüche aufgrund von Fehlbedienung, Fehlprogrammierung usw., werden
abgelehnt. Wir übernehmen keine Haftung für Verletzungen, Beschädigungen oder Zerstörung die aus Folgeschäden unseres
Artikels auftreten. Soweit unter den Garantiebedingungen geregelt übernehmen wir einen maximalen Wertersatz in Höhe des
Rechnungsbetrags des Artikels.
Features:
1. Qualitativ hochwertige Bauteile für maximale Leistung und Haltbarkeit.
2. Unterspannungsschutz / Überhitzungsschutz / Überwachung des Sendersignals.
3. 3 Anlauf-Modi: Normal / Soft / Super-Soft, kompatibel für Flugzeuge und Helikopter.
4. Gaswegausschlag kann passend für alle Fernsteuerungen eingestellt werden.
5. Weiche, lineare und präzise Gasannahme.
6. Maximale Motordrehzahl: 210000 U/M (2 Pole), 70000 U/M (6 Pole), 35000 U/M (12 Pole).
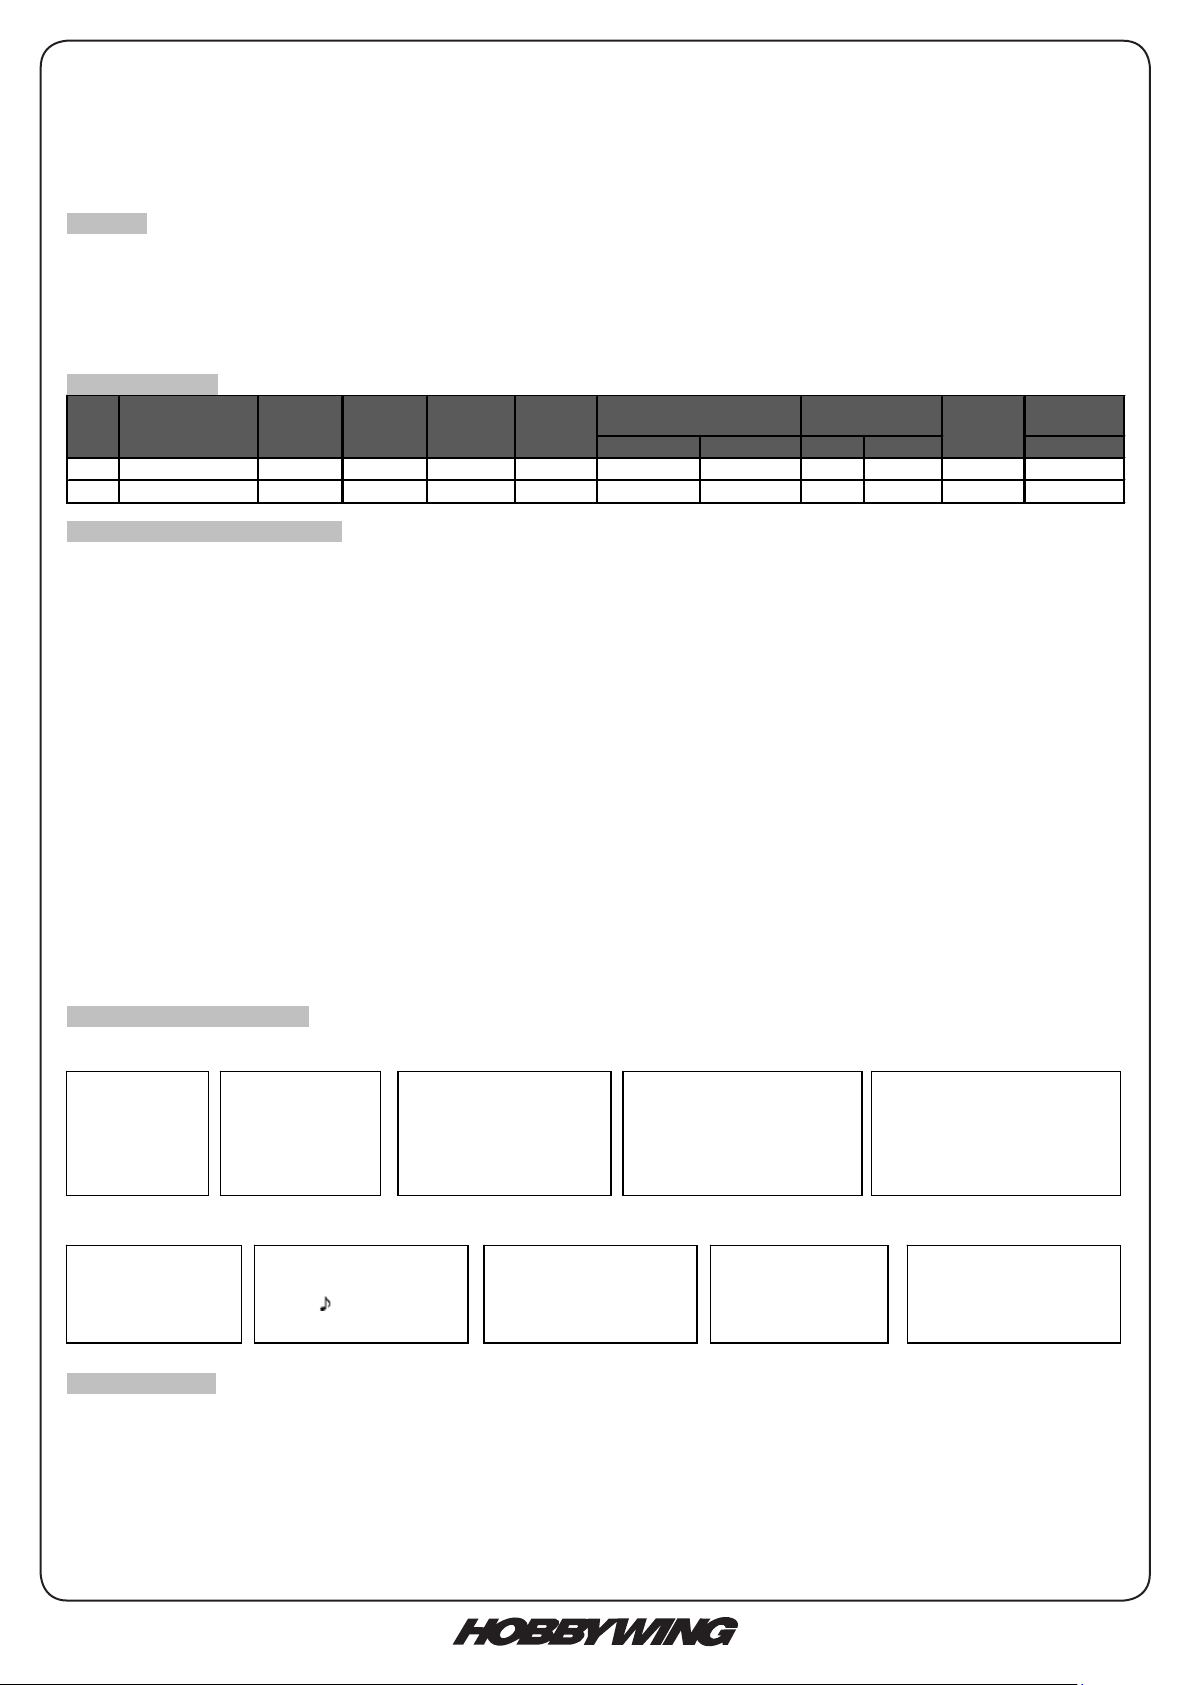
TechnischeDaten:
Größe
2S Lipo 3S Lipo Lipo NiMH L*B*H
20A Skywalker-20A 20A 25A Linear 5V/2A 5 Servos 4 Servos 2-3S 5-9 19g 42*25*8
40A Skywalker-40A 40A 55A Linear 5V/3A 5 Servos 4 Servos 2-3S 5-9 35g 68*25*8
Gewicht
Zellenzahl
Typ Model
Dauer-
strom
max.
Strom
(>10s)
BEC
Mode
BEC
Leistung
BEC Leistungsfähigkeit
Programmierbare Einstellungen:
1. Bremse:Aktiv / Deaktiviert
2. Akku Typ:Lipo / NiMH
3. Unterspannungsschutz (Cut-Off Mode): Soft Cut-Off (Schrittweiser Verringerung der Leistung) /Cut-Off (Sofortiger Stillstand)
4. Abschaltspannung für Unterspannungsschutz (Cut-Off Threshold):Tief / Mittel / Hoch
1) Bei Lithium Akkus, wird die Zellenzahl automatisch kalkuliert. Tief / Mittel / Hoch Abschaltspannung für jede Zelle
beträgt: 2.85V/3.15V/3.3V. Zum Beispiel: Für einen 3S LiPo, bei “Medium” Abschalteinstellung, beträgt die
Abschaltspannung: 3.15*3=9.45V
2) Bei NiMH Akkus, Tief / Mittel / Hoch Abschaltspannung beträgt 0%/50%/65% der Ausgangsspannung (z.B. der
Nennspannung des Akkupacks), und 0% entspricht des deaktivierten Unterspannungsschutz. Zum Beispiel: Für einen
10 Zellen NiMH Akku, Spannung nach dem laden beträgt 1.44*6=8.64V, bei “Mittel” Einstellung, beträgt die
Abschaltspannung: 8.64*50%=4.32V。
5. Start Mode:Normal /Soft /Super-Soft (300ms / 1.5s / 3s)
Normal Mode ist passend für jegliche Flugzeuge. Soft oder Super-soft Mode ist passend für Helikopter. Die erste Anlaufen im Soft
und Super-Soft Mode ist langsamer, es benötigt 1.5 Sekunden für Soft Start oder 3 Sekunden bei Super-Soft Start vom ersten
Anlaufen bis Vollgas. Wenn das Gas komplett zurückgenommen wurde (Gashebel in tiefster Position) und innerhalb von 3
Sekunden nach dem ersten Gas geben wieder betätigt wird (Gashebel in Vollgasposition), wird der wiederholte Gas stoß
vorübergehend im Normal Mode durchgeführt um die Möglichkeit eines Absturzes durch zu langsame Gasreaktion zu vermeiden.
Diese Sonderfunktion ist speziell beim Kunstflug hilfreich wo schnelle Gasreaktionen notwendig sind.
6. Timing:Low / Medium / High,( 3.75°/15°/26.25°)
Gewöhnlich ist eine tiefe (low) Einstellung bei den meisten Motoren passend. Für mehr Drehzahl kann eine höhere (High) Timing
Einstellung gewählt werden.
Verwendung des Flugreglers
WICHTIG!
Aufgrund von verschiedenen Gaswegen bei verschiedenen Fernsteuerungen, bitte kalibrieren Sie den Gasweg vor dem Flug!
Einstellung des Gasweg: (Der Gasweg sollte bei jedem Wechsel der Fernsteuerung neu eingestellt werden)
Normales Start Prozedere:
Schutzfunktionen
1. Anlauf Fehlerschutz: Falls der Motor nicht innerhalb von 2 Sekunden nach Gashebelbewegung anläuft, schaltet der Regler die
Gasfunktion weg. In diesem Fall MUSS der Gashebel in die tiefste Position zurück gestellt werden. (Solch eine Situation tritt
folgendermaßen auf: Die Verbindung von Regler und Motor ist nicht stabil, der Propeller oder Motor ist blockiert, das Getriebe ist
beschädigt, etc.)
2. Überhitzungsschutz: Wenn die Temperatur des Reglers über 110°C steigt, reduziert der Regler die ausgegebene Leistung.
3. Verlust des Sendersignals: Der Regler reduziert die ausgegebene Leistung wenn das Sendersignal für 1 Sek. ausfällt, weiterer
Verlust für 2 Sek. führt zur Abschaltung der ausgegebenen Leistung.
Gashebel auf
dieses tiefste
Position, Sender
einschalten.
Akku mit Regler
verbinden, Sonderton
wie “
123” bedeutet
Stromversorgung OK.
Nach dem
Selbsttest, ertönt
ein langer
“beep-----” Ton.
Gashebel zum Starten
des Motors nach oben
bewegen.
Mehrere “beep-” Töne
sollten zu hören sein
um die Li-Zellenzahl
anzugeben.
Sender
einschalten
und Gashebel
auf Vollgas
stellen.
Akku mit dem
Flugregler
verbinden und
ca. 2 Sek.
warten.
Ein ”Beep-Beep-” Ton
sollte zu hören sein,
dies Bestätigt die
Einstellung der
Vollgasposition.
Stellen Sie den Gashebel
auf die tiefste Position,
mehrere “beep-” Töne
sollten zu hören sein und
zeigt die Zellenanzahl an.
Ein langer “Beep-” Ton
sollte zu hören sein, dies
Bestätigt die Einstellung der
tiefsten Position des
Gashebel.
Seite 2
www.hobbywing.com.de
SKYWALKER Serie
Page 3
Fehlerbehebung
Fehler Mögliche Ursache Lösung
Nach dem Einschalten arbeitet der Motor
nicht, keine Töne sind zu hören
Nach dem Einschalten arbeitet der Motor
nicht, folgender Warnton ist zu hören:
“beep-beep-, beep-beep-,beep-beep-”
(jeder “beep-beep-” hat einen Intervall
von ca. 1 Sekunde)
Nach dem Einschalten arbeitet der Motor
nicht, folgender Warnton ist zu hören:
“beep-, beep-, beep- ”(jeder “beep-” hat
einen Intervall von ca. 2 Sekunden)
Nach dem Einschalten arbeitet der Motor
nicht, folgender Warnton ist zu hören:
“beep-, beep-, beep-” (jeder “beep-” hat
einen Intervall von 0.25 Sekunden)
Nach dem Einschalten arbeitet der Motor
nicht, folgender Warnton“
” ist zu
hören nach 2 beep Tönen (beep-beep-)
Motor dreht in die verkehrte Richtung Die Verbindung zwischen Motor
Die Verbindung zwischen Regler
und Akku ist nicht korrekt
Eingangsspannung ist nicht
normal, zu hoch oder zu tief.
Gassignal ist irregulär Prüfen Sie Sender und Empfänger
Der Gashebel ist nicht in der
Neutral (tiefste) Position
Gasweg ist umgekehrt, Regler
schaltet in Programmiermodus.
und Regler muss geändert
werden.
Überprüfen Sie die Verbindung.
Tauschen Sie die Stecker aus.
Prüfen Sie die Spannung des Akkupack.
Prüfen Sie das Anschlusskabel von Regler und
Empfänger
Bewegen Sie den Gashebel in die tiefste Position
Stellen Sie die Gaslaufrichtung korrekt ein
Tauschen Sie zwei Verbindungskabel zwischen
Motor und Regler wahllos untereinander aus.
Programmieren des Reglers mit dem Sender (4 Schritte):
Hinweis: Bitte beachten Sie das die Gaskurve auf 0%, der
Gashebel auf Neutralposition und Gasauschlag auf 100% steht.
1. Programmiermodus starten
2. Programmpunkt wählen
3. Einstellung des Programmpunkts (Wert)
2. Programmpunkt auswählen:
Nach dem Starten des Programmiermodus hören Sie 8 Töne in
einer Schleife mit folgender Sequenz. Wenn Sie den Gashebel
innerhalb von 3 Sek. in die Neutralstellung bringen nachdem Sie
4. Programmiermodus verlassen
einen Ton gehört haben, wird dieser Punkt ausgewählt.
1. Programmiermodus starten
1) Sender einschalten, Gashebel auf Vollgas
stellen, Akku mit Regler verbinden
2) 2 Sekunden warten, es sollte ein Tön wie
“beep-beep-” zu hören sein.
3) Weitere 5 Sekunden warten, Sonderton wie
“
” sollte zu hören sein. Dies bestätigt
das Starten des Programmiermodus
1. “beep” Bremse (1 kurzer Ton)
2. “beep-beep-” Akku Typ (2 kurze Töne)
3. “beep-beep-beep-” Unterspannung (3 kurze Töne)
4. “beep-beep-beep-beep-” Abschaltspannung (4 kurze Töne)
5. “beep-----” Start Mode (1 langer Ton)
6. “beep-----beep-” Timing (1 Lang 1 Kurz)
7. “beep-----beep-beep-” zurück auf Werk (1 Lang 2 Kurz)
8. “beep-----beep-----” Verlassen (2 Lange Töne)
3. Einstellung des Programmpunkts (Wert):
Sie hören verschiedene Töne in einer Schleife. Stellen Sie den Wert nach Ton ein durch
4. Programmierung Ende
Es gibt 2 Wege den Modus
bewegen des Gashebels auf Vollgas. Danach ertönt ein Sonderton “
” welcher die
Auswahl bestätigt und speichert. (Halten des Gashebels auf Vollgas bringt Sie zurück zu
Schritt 2 und Sie können einen anderen Punkt auswählen. Das bewegen des Gashebels
innerhalb von 2 Sek. in Neutralposition führt zum Verlassen des Programmiermodus.)
To n
Punkt
Bremse
Akku Typ
Abschaltung
Abschaltschwelle
Start Mode
Timing
“beep-”
1 kurzer Ton
Aus Ein
Lipo NiMH
Soft-Cut Cut-Off
Low Medium High
Normal Soft Super soft
Low Medium High
“beep-beep-”
2 kurze Töne
“beep-beep-beep”
3 kurze Töne
SKYWALKER Serie
zu verlassen:
2. In Schritt 3, nach dem
Sonderton “
Gashebel innerhalb 2
Sek. in Neutralstellung
bringen.
3. In Schritt 2, nach Ton
“beep-----beep-----”
(z.B. Punkt #8),
Gashebel innerhalb von
3 Sek. in Neutralstellung
bringen.
www.hobbywing.com.de
”,
-
Seite 3
Page 4

Sicherheitshinweise zu Lithium-Polymer-Akkus und Ladegeräten
1. Allgemein
• Lithium-Polymer (kurz: LiPo) Akkus bedürfen besonderer Aufmerksamkeit
• Fehlbehandlung bei Ladung und Entladung können zu Feuer, Rauchentwicklung, Explosionen und Vergiftung führen.
• Die Nichtbeachtung von Anleitungs- und Warnhinweisen kann zu Leistungseinbußen oder sonstigen Defekten führen.
• Die unsachgemäße Lagerung bei zu hohen oder zu niedrigen Temperaturen kann die Kapazität verringern.
2. Ladung
• LiPo-Akkus stets nur auf einer nicht brennbaren, hitzebeständigen und nicht leitenden Unterlage laden.
• Leicht entzündliche Gegenstände von der Ladeanordnung fernhalten.
• Ladevorgang stets nur unter Aufsicht.
• Nur das beiliegende oder ein von uns ausdrücklich zur Ladung des Akkus dieses Modells freigegebenes Ladegerät verwenden.
• Spannungen von über 4,20 V pro Zelle führen zu dauerhafter Beschädigung der Zelle und können Feuer, Rauchentwicklung und Explosion zur
Folge haben.
• Akku nicht verpolen! Andernfalls laufen anormale chemische Reaktionen ab, die den Akku zerstören und sogar zu Feuer, Rauchentwicklung oder
Explosion führen können.
3. Entladung
• Der Entladestrom darf die vom Akkuhersteller vorgegebene C-Rate NICHT(!) überschreiten.
• Nicht unter 2,5 V pro Zelle entladen, andernfalls wird Zelle dauerhaft geschädigt.
• Betrieb sofort einstellen, wenn Leistung des Modells stark abfällt.
• Kurzschlüsse und hohe Temperaturen (max. 70°C) vermeiden, da sonst Gefahr der Selbstentzündung des Akkus.
4. Beschädigung des Gehäuses und der Folie
• Gehäusefolie vor Beschädigung durch scharfe Gegenstände schützen.
• Beschädigungen der Folie machen den Akku unbrauchbar
• Akku verformsicher in das Modell einbauen, auch im Falle eines Absturzes oder Crashs
• Temperaturen über 70°C können das Gehäuse beschädigen, so dass Elektrolyt austreten kann. In diesem Fall wäre der Akku unbrauchbar und zu
entsorgen.
5. Beschädigte Zellen
• Keine Weiterverwendung von beschädigten Zellen !
• Kennzeichen beschädigter Zellen: Verformung, beschädigte Folie, Geruch oder Auslauf von Elektrolyten
• Gesetzliche Entsorgungsvorschriften (Akku = Sondermüll) beachten
6. Warnhinweise
• Nicht ins Feuer werfen !
• Nicht in Flüssigkeiten jeglicher Art eintauchen; jeglichen Kontakt mit Flüssigkeiten vermeiden.
• Außerhalb der Reichweite von Kindern lagern.
• Akku nicht demontieren, Gefahr von Feuer, Rauch und Explosion sowie Verätzungen.
• Jeglichen Kontakt mit Elektrolyt vermeiden. Sofern doch Kontakt aufgetreten sein sollte, sofort mit viel frischem Wasser abspülen und den Arzt
konsultieren.
• Bei Nichtbenutzung des Modells den Akku immer entnehmen und vor Inbetriebnahme rechtzeitig auaden.
• Lagerung nur auf einer hitzebeständigen, nicht brennbaren und nicht leitenden Unterlage.
• Tiefentladene Akkus nicht weiter verwenden.
7. Garantieausschluss
• Da durch uns die richtige Ladung und Entladung des Akkus nicht überwacht werden kann, wird jegliche Garantie vorsorglich ausgeschlossen.
8. Haftungsausschluss
• Da wir weder die Einhaltung der Montage- und Betriebsanleitung in Zusammenhang mit dem Modell, noch die Bedienung und Methoden bei
Installation, Betrieb, Verwendung und Wartung des Modells nebst zugehöriger Elektronik überwachen können, übernehmen wir keinerlei Haftung
für Verluste, Schäden oder Kosten, die sich aus der fehlerhaften Verwendung und dem Betrieb ergeben oder in irgendeiner Weise damit zusammenhängen.
• Ausdrücklich lehnen wir auch jegliche Folgeschäden, die sich im Zusammenhang mit Installation, Betrieb, Verwendung und Wartung des Modells
ergeben, ab.
• Soweit vom Gesetzgeber nicht anders vorgeschrieben, ist unsere Verpichtung zur Leistung von Schadenersatz – gleich aus welchem Rechtsgrund – auf den Rechnungswert der an dem schadenstiftenden Ereignis unmittelbar beteiligten Warenmenge begrenzt. Dies gilt nicht, sofern wir
nach zwingenden gesetzlichen Vorschriften wegen Vorsatz oder grober Fahrlässigkeit unbeschränkt haften.
HOBBYWING im Vertrieb der KYOSHO DEUTSCHLAND GMBH
Nikolaus-Otto-Straße 4
D-24568 Kaltenkirchen
Germany
Seite 4
www.hobbywing.com.de
SKYWALKER Serie
Page 5

Garantiebedingungen
§ 1 Garantieerklärung
(1) Wir übernehmen die Garantie, dass bei den Modellen und Bauteilen der Firma Hype während der Garantiefrist (§ 4) keine Fabrikations- oder
Materialmängel zu Tage treten.
(2) Diese Garantie gilt nur gegenüber Kunden, die ein Modell oder Bauteil der Firma Hype bei einem autorisierten Fachhändler in der Bundesrepublik
Deutschland gekauft haben. Die Garantie ist nicht übertragbar.
§ 2 Ausschluss der Garantie
(1) Keine Garantie besteht auf Verschleißteile wie Reifen, Felgen, Lager, Glühkerzen, Kupplungen, Lackierungen etc.
(2) Die Garantie ist ferner ausgeschlossen, wenn
- unzulässiges Zubehör verwandt worden ist oder Tuning- oder Anbauteile, die nicht aus dem Hype-Lieferprogramm stammen oder nicht von der
Firma Hype ausdrücklich als zulässiges Zubehör deklariert worden sind. Es obliegt dem Käufer, sich bei seinem Hype-Fachhändler diesbezüglich
zu informieren.
- dritte Personen, welche nicht von der Firma Hype zu Service-Leistungen autorisiert wurden, Reparaturversuche oder sonstige Eingriffe in den
Gegenstand vorgenommen haben,
- die Bauanleitung oder Bedienungsanleitung missachtet, das Modell baulich verändert oder zweckentfremdet wurde oder
- der Fehler auf lokale Verhältnisse des Kunden zurückzuführen ist.
§ 3 Hinweis auf gesetzliche Rechte
(1) Diese Garantie wird von uns freiwillig und ohne gesetzliche Verpichtung übernommen.
(2) Wir weisen Sie darauf hin, dass Ihnen auch gesetzliche Rechte zustehen, wenn die von Ihnen gekaufte Sache bei Übergabe an Sie mangelhaft
ist. Diese gesetzlichen Mängelrechte richten sich ausschließlich gegen Ihren Verkäufer, d.h. Ihren autorisierten Hype-Fachhändler. Nach dem Gesetz
können Sie von Ihrem Verkäufer in erster Linie entweder die Reparatur der mangelhaften oder die Lieferung einer neuen Sache verlangen. Hierfür
können Sie dem Verkäufer eine angemessene Frist setzen. Kommt der Verkäufer Ihrem Verlangen nicht nach, können Sie nach Ablauf der Frist den
Vertrag rückabwickeln, d.h. die Sache zurückgeben und den Kaufpreis herausverlangen, oder eine angemessene Herabsetzung des Kaufpreises
verlangen. Möglicherweise stehen Ihnen auch Schadensersatzansprüche zu, insbesondere, wenn der Verkäufer den Mangel kannte oder infolge von
Fahrlässigkeit nicht kannte.
(3) Die gegen die Firma Hype bestehenden Rechte aus dieser Garantie bestehen zusätzlich zu Ihren gesetzlichen Rechten und schränken diese
Rechte in keiner Weise ein.
§ 4 Dauer der Garantie
(1) Die Garantiefrist beträgt zwei Jahre und beginnt mit dem Tag des Kaufes bei Ihrem autorisierten Hype-Fachhändler.
(2) Von uns erbrachte Garantieleistungen führen nicht zu einem Neubeginn oder einer Verlängerung der Garantiefrist.
§ 5 Rechte aus der Garantie
(1) Liegt ein Garantiefall vor, werden wir die defekten Teile nach unserer Wahl austauschen oder reparieren. Austauschteile gehen in das Eigentum
der Firma Hype über.
(2) Die Garantieleistungen werden von der Firma Hype Serviceabteilung vorgenommen.
(3) Die Material- und Arbeitskosten tragen wir. Falls das Gerät zum Zwecke der Prüfung und Reparatur transportiert wird, geschieht dies auf Ihre
Gefahr und Ihre Kosten.
(4) Weitergehende Ansprüche gegen uns, insbesondere auf Rückabwicklung des Vertrags, Herabsetzung des Kaufpreises oder Schadensersatz,
bestehen aus dieser Garantie nicht.
§ 6 Geltendmachung der Garantie
(1) Garantieansprüche sind unverzüglich nach Feststellung eines Material- oder Herstellungsfehlers bei einem autorisierten Hype-Fachhändler
oder bei der Firma Hype, Serviceabteilung, Nikolaus-Otto-Straße 4, 24568 Kaltenkirchen, geltend zu machen. Für Defekte, die auf eine verzögerte
Geltendmachung der Garantie zurückzuführen sind, übernehmen wir keine Garantie.
(2) Zur Geltendmachung der Garantie ist die Vorlage eines Garantiebelegs und des beanstandeten Modells oder Bauteils erforderlich. Als Garantiebeleg
gilt der Servicebegleitschein sowie auch der Verkaufsbeleg, wenn auf dem Verkaufsbeleg der Modelltyp mit der Bestellnummer vom autorisierten
Hype-Fachhändler vermerkt ist und der Verkaufsbeleg mit Stempel, Datum und Unterschrift des Fachhändlers gegengezeichnet ist.
(3) Modelle bzw. Teile sind in gereinigtem Zustand einzusenden (z.B. auch Benzintank völlig entleeren). Wir behalten uns vor, ungereinigte Teile auf
Ihre Kosten zurückzusenden.
(4) Stellt sich nach einer Prüfung des beanstandeten Modells oder Bauteils heraus, dass kein Garantiefall vorlag, sind wir berechtigt, den geleisteten
Arbeitsaufwand nach unseren allgemeinen Stundensätzen, mindestens jedoch eine Aufwandspauschale in Höhe von € 8.50, zu berechnen.
SKYWALKER Serie
www.hobbywing.com.de
Seite 5
Page 6

Thanks for purchasing our Electronic Speed Controller (ESC). High power system for RC model is very dangerous, please read
this manual carefully. In that we have no control over the correct use, installation, application, or maintenance of our products,
no liability shall be assumed nor accepted for any damages, losses or costs resulting from the use of the product. Any claims
arising from the operating, failure or malfunctioning etc. will be denied. We assume no liability for personal injury, property
damage or consequential damages resulting from our product or our workmanship. As far as is legally permitted, the
obligation to compensation is limited to the invoice amount of the affected product.
Features:
1. Use top quality components to get strong current endurance.
2. Low voltage cut-off protection / over-heat protection / throttle signal loss protection.
3. 3 start modes: Normal / Soft / Super-Soft, compatible with fixed-wing aircraft and helicopter.
4. Throttle range can be configured to be compatible with all transmitters.
5. Smooth, linear and precise throttle response.
6. Maximum motor speed: 210000 RPM (2 poles), 70000 RPM (6 poles), 35000 RPM (12 poles).
Specifications:
Size
2S Lipo 3S Lipo Lipo NiMH L*W*H
20A Skywalker-20A 20A 25A Linear 5V/2A 5 servos 4 servos 2-3S 5-9 cells 19g 42*25*8
40A Skywalker-40A 40A 55A Linear 5V/3A 5 servos 4 servos 2-3S 5-9 cells 35g 68*25*8
Weight
Battery Cell
Class Model
Cont.
Current
Burst
Current
(>10s)
BEC
Mode
BEC
Output
BEC Output Capability
Programmable Items:
1. Brake Setting:Enabled / Disabled
2. Battery Type:Lipo / NiMH
3. Low Voltage Protection Mode(Cut-Off Mode): Soft Cut-Off (Gradually reduce the output power) /Cut-Off (Immediately stop the
output power)
4. Low Voltage Protection Threshold(Cut-Off Threshold):Low / Medium / High
1) For lithium battery, the battery cell number is calculated automatically. Low / medium / high cutoff voltage for each cell is:
2.85V/3.15V/3.3V. For example: For a 3S Lipo, when “Medium” cutoff threshold is set, the cut-off voltage will be:
3.15*3=9.45V
2) For NiMH battery, low / medium / high cutoff voltages are 0%/50%/65% of the startup voltage (i.e. the initial voltage of
battery pack), and 0% means the low voltage cut-off function is disabled. For example: For a 10 cells NiMH battery, fully
charged voltage is 1.44*6=8.64V, when “Medium” cut-off threshold is set, the cut-off voltage will be:8.64*50%=4.32V。
5. Startup Mode:Normal /Soft /Super-Soft (300ms / 1.5s / 3s)
Normal mode is suitable for fixed-wing aircraft. Soft or Super-soft modes are suitable for helicopters. The initial acceleration of the
Soft and Super-Soft modes are slower, it takes 1.5 second for Soft startup or 3 seconds for Super-Soft startup from initial throttle
advance to full throttle. If the throttle is completely closed (throttle stick moved to bottom position) and opened again (throttle stick
moved to top position) within 3 seconds after the first startup, the re-startup will be temporarily changed to normal mode to get rid of
the chance of a crash caused by slow throttle response. This special design is suitable for aerobatic flight when quick throttle
response is needed.
6. Timing:Low / Medium / High,( 3.75°/15°/26.25°)
Usually, low timing is suitable for most motors. To get higher speed, High timing value can be chosen.
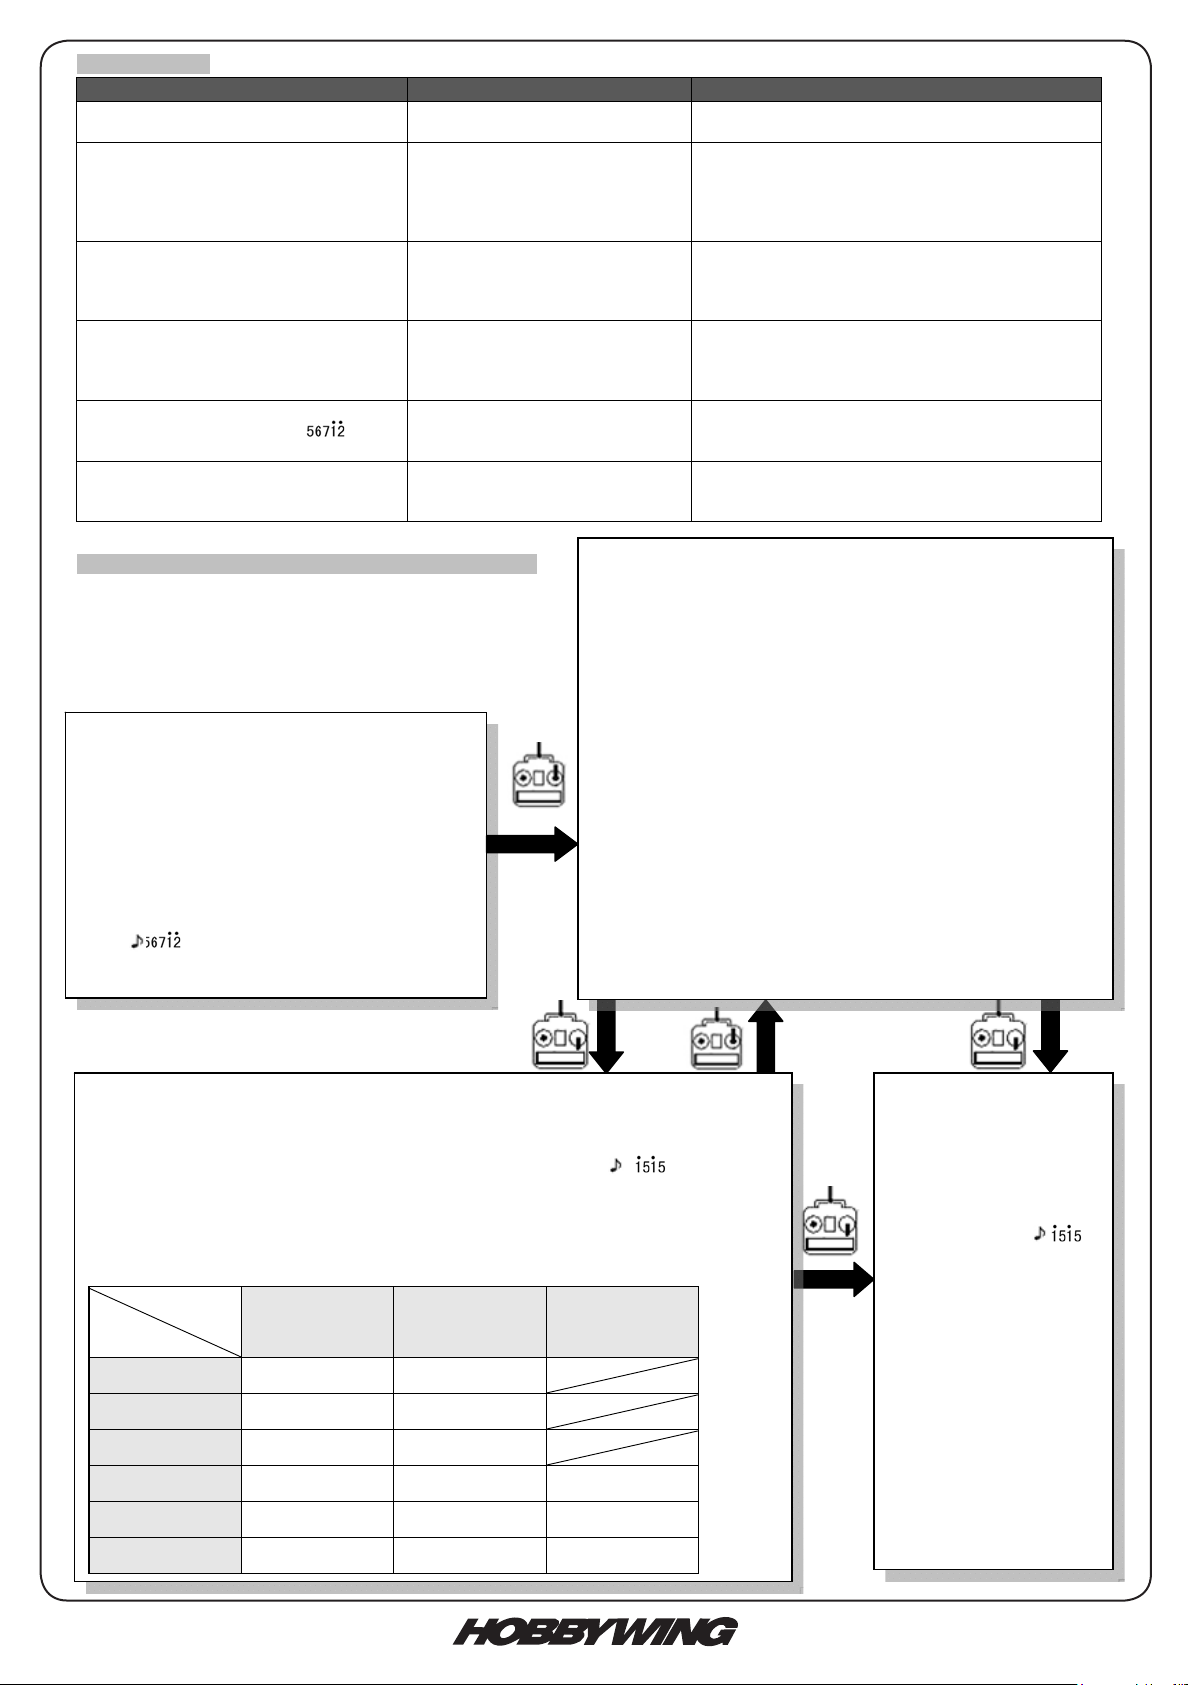
Begin To Use Your New ESC
IMPORTANT! Because different transmitter has different throttle range, please calibrate throttle range before flying.
Throttle range setting: (Throttle range should be reset whenever a new transmitter is being used)
Normal startup procedure:
Protection Function
1. Start up failure protection: If the motor fails to start within 2 seconds of throttle application, the ESC will cut-off the output power. In
this case, the throttle stick MUST be moved to the bottom again to restart the motor. (Such a situation happens in the following
cases: The connection between ESC and motor is not reliable, the propeller or the motor is blocked, the gearbox is damaged, etc.)
2. Over-heat protection: When the temperature of the ESC is over about 110 Celsius degrees, the ESC will reduce the output power.
3. Throttle signal loss protection: The ESC will reduce the output power if throttle signal is lost for 1 second, further loss for 2 seconds
will cause the output to be cut-off completely.
Move throttle stick
to bottom position
and then switch
on transmitter.
Connect battery pack
to ESC, special tone
like “
123” means
power supply is OK
When self-test is
finished, a long
“beep-----” tone
should be emitted
Move throttle stick
upwards to go flying
Several “beep-” tones
should be emitted to
present the amount of
lithium battery cells
Switch on the
transmitter,
move throttle
stick to the
top position
Connect battery
pack to the
ESC, and wait
for about 2
seconds
The “Beep-Beep-” tone
should be emitted,
means the top point of
throttle range has been
confirmed
Move throttle stick to the
bottom position, several
“beep-” tones should be
emitted to present the
amount of battery cells
A long “Beep-” tone should
be emitted, means the
lowest point of throttle
range has been correctly
confirmed
Seite 6
www.hobbywing.com.de
SKYWALKER Serie
Page 7

Trouble Shooting
Trouble Possible Reason Action
After power on, motor does not work, no
sound is emitted
The connection between battery
pack and ESC is not correct
Check the power connection.
Replace the connector.
After power on, motor does not work,
such an alert tone is emitted:
“beep-beep-, beep-beep-,beep-beep-”
(Every “beep-beep-” has a time interval
of about 1 second)
Input voltage is abnormal, too high
or too low.
Check the voltage of battery pack
After power on, motor does not work,
such an alert tone is emitted:
“beep-, beep-, beep- ”(Every “beep-” has
a time interval of about 2 seconds)
Throttle signal is irregular Check the receiver and transmitter
Check the cable of throttle channel
After power on, motor does not work,
such an alert tone is emitted:
“beep-, beep-, beep-” (Every “beep-” has
a time interval of about 0.25 second)
The throttle stick is not in the
bottom (lowest) position
Move the throttle stick to bottom position
After power on, motor does not work, a
special tone “
” is emitted after 2
beep tone (beep-beep-)
Direction of the throttle channel is
reversed, so the ESC has entered
the program mode
Set the direction of throttle channel correctly
The motor runs in the opposite direction The connection between ESC and
the motor need to be changed.
Swap any two wire connections between ESC and
motor
Program the ESC with your transmitter (4 Steps):
Note: Please make sure the throttle curve is set to 0 when the
throttle stick is at bottom position and 100% for the top position.
1. Enter program mode
2. Select programmable items
3. Set item’s value (Programmable value)
4. Exit program mode
1. Enter program mode
1) Switch on transmitter, move throttle stick to top
position, connect the battery pack to ESC
2) Wait for 2 seconds, the motor should emit
special tone like “beep-beep-”
3) Wait for another 5 seconds, special tone like
“
” should be emitted, which means
program mode is entered
4. Exit program mode
There are 2 ways to exit
program mode:
2. In step 3, after special
tone “
”, please
move throttle stick to
the bottom position
within 2 seconds.
3.
In step 2, after tone
“beep-----beep-----”(ie.
The item #8), move
throttle stick to bottom
within 3 seconds.
3. Set item value (Programmable value):
You will hear several tones in loop. Set the value matching to a tone by moving throttle stick
to top when you hear the tone, then a special tone “
” emits, means the value is set
and saved. (Keeping the throttle stick at top, you will go back to Step 2 and you can select
other items; or moving the stick to bottom within 2 seconds will exit program mode directly)
To n es
Items
“beep-”
1 short tone
“beep-beep-”
2 short tones
“beep-beep-beep”
3 short tones
Brake
Off On
Battery type
Lipo NiMH
Cutoff mode
Soft-Cut Cut-Off
Cutoff threshold
Low Medium High
Start mode
Normal Soft Super soft
Timing
Low Medium High
2. Select programmable items:
After entering program mode, you will hear 8 tones in a loop with
the following sequence. If you move the throttle stick to bottom
within 3 seconds after one kind of tones, this item will be selected.
1. “beep” brake (1 short tone)
2. “beep-beep-” battery type (2 short tone)
3. “beep-beep-beep-” cutoff mode (3 short tone)
4. “beep-beep-beep-beep-” cutoff threshold (4 short tone)
5. “beep-----” startup mode (1 long tone)
6. “beep-----beep-” timing (1 long 1 short)
7. “beep-----beep-beep-” set all to default (1 long 2 short)
8. “beep-----beep-----” ex i t (2 lo n g tone)
Note: 1 long “beep-----” = 5 short “beep-”
SKYWALKER Serie
www.hobbywing.com.de
Seite 7
Page 8

IMPORTANT SAFETY INSTRUCTIONS AND WARNINGS FOR
LITHIUM-POLYMER-BATTERIES
1. General Guidelines and Warnings
• LiPo batteries are NOT charged as you receive them. They contain approximately 50% of a full charge as recommended for
shipment and long term storage .
• Use Lithium Polymer specic chargers only. Do not use a NiCd or NiMh charger - Failure to do so may cause a re, which may
result in personal injury and property damage.
• Never charge batteries unattended. When charging LiPo batteries you should always remain in constant observation to monitor
the charging process and react to potential problems that may occur.
• Some LiPo chargers on the market may have technical deciencies that may cause them to charge LiPo batteries incorrectly. It is
solely the responsibility of the user to assure that the charger used works properly.
• If at any time you witness a battery starting to balloon or swell up, discontinue the charging process immediately. Disconnect the
battery and place it in a safe observation area for approximately 15 minutes. Continuing to charge a battery that has begun
to swell will result in re.
• Battery observation should occur in a safe area outside of any building or vehicle and away from any combustible material.
The middle of a cement driveway is a good example of a safe observation area.
• Shorts can cause res! If you accidentally short the wires, the battery must be placed in a safe area for observation for
approximately 15 minutes. Additionally, be mindful of the burn danger that may occur due to a short across jewelry (such as
rings on your ngers).
• Chemical reactions are not instantaneous, a battery that has been shorted may not ignite for 10 minutes.
• All crash batteries, even if not deformed, should be placed in a safe area for observation for at least 15 minutes.
• If for any reason you need to cut the terminal wires, cut each wire separately, ensuring the wires do not become shorted
across the cutting tool.
2. Charging Process
• Make a visual inspection of the pack. Checking for any damaged leads, connectors, broken/cracked shrink covering, pufness
or other irregularities.
• Before installing or changing the connector, check the voltage of the pack using a digital voltmeter. All new packs ship at
approximately 3.80V to 3.9V per cell. For example: A 2S pack should read approximately 7.60V to 7.8V, A 3S pack should read
approximately 11.40V to 11.7V etc
• If any damage to the pack or leads is found, or the voltage is signicantly less for your pack than specied above, do not
attempt to charge or y the pack; contact AG Power directly as soon as possible.
• Never charge batteries unattended.
• Charge in an isolated area, away from ammable materials.
• Let the battery cool down to ambient temperature before charging.
• Do not charge battery packs in series. Charge each battery pack individually. Overcharging of one or the other battery may
occur resulting in re
• When selecting the cell count or voltage for charging purposes, select the cell count and voltage as it appears on the battery
label. Selecting a cell count or voltage other than the one printed on the label may result in overcharging and re. As a safety
precaution, please conrm that the information printed on the battery is correct. For example: If a battery label indicates that it is
a 3 cell battery (3S), it's voltage should read between 11.4 and 11.7 volts. This battery must be charged as a 3 cell battery
(peak of 12.6V).
• You must check the pack voltage after each ight before re-charging. Do not attempt to charge any pack if the unloaded
individual cell voltages are less than 3.3V. For example: Do not charge a 2-cell pack if below 6.6V Do not charge a 3 cell pack
if below 9.9V
• NORMAL CHARGING: The charge rate should not exceed 1C (one times the capacity of the battery, unless otherwise noted*).
Higher setting may cause problems which can result in re. For example: Charge a 730 mAh battery at or below 0.73Amps.
Charge a 5000 mAh battery at or below 5Amps.
3. Storage & Transportation
• Store batteries at room temperature
• If storing longer than a couple of weeks; batteries should be stored at 3.8V/cell to 3.9V/cell (approximately 50% charged).
• Do not expose battery packs to direct sunlight (heat) for extended periods.
• When transporting or temporarily storing in a vehicle, temperature range s should be greater than 5c but no more than 35c
• Storing Lipo batteries at temperatures greater than 40c for extended periods of time (more than 2 hours) may cause damage
to battery and possible re.
4. Caring for Battery
• Only charge a LiPo battery with a good quality Lithium Polymer charger. A poor quality charger can be dangerous!
• Set voltage and current correctly (failure to do so can cause re).
• Please check pack voltage after the rst charge. For example; a 2 Cell battery should measure 8.4V (8.30 to 8.44), a 3 cell
battery should measure 12.6V (12.45 to 12.66).
• Do not discharge a battery to a level below 3V per cell under load. Discharging below 3V per cell can deteriorate battery
performance. Be sure to set your ESC for the proper cut off voltage (6.0V cut off for 2S packs, 9.0V cut off for 3S packs, etc).
• Use caution to avoid puncture of the battery. Puncturing a LiPo battery may cause a re.
• Always allow a battery to cool down to ambient temperature before re-charging.
Batteries that lose 20% of their capacity must be removed from service and disposed of properly. Discharge the battery to 3V/Cell, making sure
output wires are insulated, then wrap battery in a bag for disposal.
Seite 8
www.hobbywing.com.de
SKYWALKER Serie
Page 9

§ 1 Warranty
(1) We guarantee that there will be no production or material errors on Hype items during the guarantee period (§ 4)
(2) The guarantee is valid for customers who bought Hype items over an authorized dealer. This guarantee cannot be transferred to another person.
§ 2 Exclusion of warranty
(1) We do not grant any warranty on wastage parts like tires, wheels, bearings, glow plugs, clutch systems, paintings etc.
(2) We also do not grant any warranty, if
- non authorized accessory parts are used in the model, that are not produced by Hype or that are not clearly approved from Hype.
- a third party, that is not authorized by Hype tries to repair or to modify the product.
- the user disregards the instruction manual or modies the model in a damaging way.
- the error occurs because of local conditions where the model is used.
§ 3 Notication of legal rights
(1) We grant this warranty on our products although we are not forced by law to do so.
(2) Please note that you have also legal rights if an item is faulty when you buy it. In case of defects and a warranty claim you have to contact your local
Hype dealer. According to the law you can ask your dealer to replace or to repair the faulty item. You can mention the dealer a reasonable deadline
to do so. In case he does not manage within such a time period you can return the product to him and get your money back from him.
(3) Your rights against the company Hype are additionally to your legal rights.
§ 4 Period of warranty
(1) We grant you a 2 years warranty on all Hype products. This period starts when you buy the item at your local hobby shop.
(2) In case of service feature the warranty period does not get extended.
§ 5 Your warranty rights
(1) In case of warranty claim we will replace or repair the defective parts. The defective parts are property of Hype.
(2) The warranty adjustment will be executed by the Hype service department.
(3) We will cover the costs for material and man power. The risk and the costs of transportation are covered by the customer.
(4) There are no further claims like annulling the sales contract, price reduction or compensation against us.
§ 6 Assertion of warranty claims
(1) Any warranty claims have to be notied immediately after realizing an error. This can be done by your local hobby shop or directly to Hype, service
department, Nikolaus-Otto-Straße 4, 24568 Kaltenkirchen, Germany. We do not cover any consecutive faults that occur because of a delayed notication.
(2) For the assertion of a warranty claim you have to send us the defective part and a hardcopy of your invoice with the date of purchase.
(3) All defective items have to be returned in a cleaned condition. Fuel tanks must be empty! In case parts are heavily contaminated we will return
the parts on your costs!
(4) in case the returned item is not defective and that there is no claim of warranty, we will charge you 8,50€ for our labor costs.
SKYWALKER Serie
www.hobbywing.com.de
Seite 9
Page 10

Grazie per aver scelto questo regolatore di giri. Leggete attentamente le istruzioni, i dispositivi ad alta corrente possono
essere pericolosi. Non ci possiamo assumere responsabilità circa la corretta installazione , il corretto utilizzo e mantenimento
del prodotto. Per i motivi sopra menzionati, non accetteremo richieste di risarcimento per malfunzionamento. Non ci
assumiamo responsabilità per danni creati a persone o oggetti, usando il nostro prodotto. Qualsiasi risarcimento legale sarà
limitato all’eventuale rimborso del prezzo d’acquisto del solo regolatore.
Caratteristiche:
1. Componentistica di altissima qualità.
2. Low voltage cut-off (spegnimento a basso voltaggio) / protezione contro surriscaldamento / protezione contro perdita segnale
radio
3. 3 diversi modi di partenza: Normale / Soft / Super-Soft, compatibili con aeromodelli e elicotteri.
4. La curva del gas può essre configurata in modo da risultare compatibile con tutti i trasmettitori.
5. Regolazione dei giri lineare, morbida e precisa
6. Velocità max del motore: 210.000 giri/min. (2 poli), 70.000 giri/min (6 poli), 35.000 giri/min (12 poli).
spedifiche:
Dimensioni
2S Lipo 3S Lipo Lipo NiMH L*W*H
20A Skywalker-20A 20A 25A Linear 5V/2A 5 servos 4 servos 2-3S 5-9 cells 19g 42*25*8
40A Skywalker-40A 40A 55A Linear 5V/3A 5 servos 4 servos 2-3S 5-9 cells 35g 68*25*8
Peso
N° di celle
Classe Modello
Corrente
di lavoro
Corrente
di picco
(>10s)
Modo
BEC
Uscita
BEC
Capacità dell'uscita BEC
Funzioni programmabili:
1. freno:Enabled (attivato) / Disabled (disattivato)
2. tipo batteria:Lipo / NiMH
3. Modo di protezione per bassa tensione (Cut-Off Mode): Soft Cut-Off (riduce gradualmente la potenza) /Cut-Off (interrompe di
colpo la potenza)
4. Soglia di protezione per bassa tensione/soglia di spegnimento: Low / Medium / High
1) Per le batterie al litio, il numero di celle viene rilevato automaticamente. Il voltaggio di spegnimento (low
voltage cutoff) Low / medium / high per ogni cella è : 2.85V/3.15V/3.3V. Esempio: Per una Lipo 3S, attivando il
“Medium” cutoff, the il la tensione di spegnimento sarà: 3.15•3=9.45V
2) Per le batterie NiMH, il voltaggio di spegnimento (cutoff voltage) low / medium / high è 0%/50%/65% del
voltaggio iniziale. (ovvero il voltaggio iniziale del pacco batteria), e 0% significa, che la funzione low voltage cut-off
function è disattivata. Esempio: per una batteria NiMH a 10 celle che è totalmente carica, la tensione di spegnimento
è 1.44*6=8.64V. Quando il “Medium” cut-off threshold è attivato, la tensone di spegnimento sarà:8.64•50%=4.32V.
5. Modo di partenza:Normale /Soft /Super-Soft (300ms / 1.5s / 3s)
Il modo normale è adatto per aeromodelli. Quelli Soft oppure Super-soft sono adatti per elicotteri. L’accelerazione iniziale del Soft e
Super-Soft mode è più lenta, ci vogliono 1,5 secondi per il soft start up e 3 secondi per super soft startup, dal primo movimento
dello stick fino alla piena accelerazione. Se il motore è al minimo (stick motore giù) e si accelera di nuovo (stick motore portato in
su) entro 3 secondi dopo il primo avviamenot, l'avviamento successivo sarà temporaneamente modificato nel modo normale per
eliminare il rischio di un incidente causato da una risposta lenta del motore. Questa speciale caratteristica è utile per il volo
acrobatico, quando occorre una risposta veloce del motore.
6. Timing (anticipo): Basso / Medio / Alto,( 3.75°/15°/26.25°)
Normalmente, un anticipo basso (low timing) è adatto per tutti I motori. Per avere maggiore velocità, potete selezionare High
timing (anticipo alto).
Iniziare ad usare il regolatore di giri
Importante! Poiché le varie trasmittenti hanno una differente risposta del gas, prima di volare calibrate la curva della vostra tx.
Impostazione della curva del gas: (la curva del gas dev'esserei reipostata quando si cambia trasmittente.
Procedura normale di avviamento:
Funzioni di protezione
1. Protezione per mancata partenza: se il motore non parte entro 2 secondi dal movimento dello stick della radio, il regolatore
interrompe l’alimentazione. In questo caso lo stick motore DEVE essere portato in posizione minima di nuovo prima di far ripartire
il motore. (Possibili ragioni per questo possono essere: il collegamento tra regolatore e motore non è affidabile, l’elica o il motore
sono bloccati, la trasmissione è danneggiata ….)
2. Protezione contro il surriscaldamento: se la temperatura del regolatore supera i 110 °C, il regolatore diminuirà la potenza erogata.
3. Perdita segnale radio: Il regolatore riduce la potenza se perde il segnale per un secondo, oltre il secondo spegne tutto
completamente.
portare lo stick
motore in posizione
giri minimi e poi
accendere la TX
Collegare la batteria al
regolatore, sentirete una
melodia“ 123” a conferma
che l’alimentazione è ok
Quando l’autotest
è terminato,
sentirete un
“beep-----” lungo
Muovere lo stick del
motore in su per volare
Sentirete vari “beep”
pari al numero di celle
collegate
Accendere la
TX, portare lo
stick motore in
posizione max.
accelerazione
collegare la
batteria al
regolatore e
attendere 2
secondi
Sentirete un beep
beep, a conferma che
il punto massimo di
accelerazione è stato
calibrato.
Portare lo stick motore in
posizione minimo motore,
sentirete tanti “beep”
quante quelle sono
collegate
Ora sentirete un beep
lungo, a conferma che il
punto di motore al minimo
è stato calibrato
Seite 10
www.hobbywing.com.de
SKYWALKER Serie
Page 11

Problemi e soluzioni
problema Possibile motivo Da fare
Dopo l'accensione, motore non va, non
si sente nessuno suono
La connessione tra batteria e
regolatore non è ok
Controllare collegamento, sostituire connettore
Dopo l’accensione motore non va e si
sente “beep-beep-, beep-beep-,beepbeep-”
(tra ogni “beep-beep-” c’è circa un
secondo)
Latensione d'ingress onon è
normale: o troppo alta o troppo
bassa
Controllare il voltaggio del pacco batteria
Dopo l’accensione il motore non va e si
sente “beep-, beep-, beep- ”(tra ogni
beep passano 2 secondi)
Il segnale radio del motore è
irregolare
Controllare ricevente e radio
Controllare il cavetto del canale motore
Dopo l’accensione il motore non va e si
sente “beep-, beep-, beep-” (tra ogni
“beep-” c’è un intervallo di 0.25 secondi)
Lo stick motore non è nella
posizione minima (in basso)
Portare lo stick motore nella posizione inferiore
Dopo l’accensione il motore non va e si
sente un suono speciale“
” dopo
due beep (beep-beep-)
La direzione del canale del
motore è invertita, e il regolatore è
entrato nel menu programmazione
Correggere la direzione del canale del motore
Il motore ruota in direzione opposta Il collegamento tra regolatore e
motore deve essere scambiato
scambiare due sole connessioni su tre tra
regolatore e motore (non importa quali)
Programmare il regolatore con la radio (4 passi):
Nota: accertarsi che la curva del motore è impostata a 0
quando lo stick è in posizione minima e al 100% quando è in
posizione motore al massimo.
1. Entrare nel modo programmazione
2. Selezionare le funzioni programmabili
3. Programmare i valori
4. Uscire dal menu programmazione
1. Entrare nel menu “programmazione”
1) Accendere TX, portare stick motore in
alto, collegare la batteria al regolatore
2) Attendere 2 secondi, il motore
dovrebbe fare “beep-beep-”
3) Attendere altri 5 secondi, sentirete un
suono speciale “
” a conferma del fatto
che siete entrati nel menu programmazione
4. uscire dalla
programmazione
Ci sono due modi:
1. Nel passo 3, dopo il
suono speciale
”,
muovere lo stick in
basso entro 2 secondi.
2. Nel passo 2, dopo “beep-
----beep-----”(p.es.
funzione #8), muovere lo
stick in basso entro 3
secondi.
2. selezionare le funzioni programmabili:
Una volta entrati nel menu programmazione, sentirete in fila questi
8 suoni. Muovendo lo stick radio in basso entro 3 secondi dopo
aver sentito un certo suono , selezionerete questa funzione:
1. “beep” freno (1 tono corto)
2. “beep-beep-” tipo batteria (2 toni corti)
3. “beep-beep-beep-” modo cutoff (3 toni corti)
4. “beep-beep-beep-beep-”soglia di cutoff (4 toni corti)
5. “beep-----” modo partenza (1 tono lungo)
6. “beep-----beep-” anticipo (1 lungo 1 corto)
7. “beep-----beep-beep-” ritorna al default (1 lungo 2 corti)
8. “beep-----beep-----” exit (2 lunghi)
Note: 1 beep lungo -----” = 5 beep corti”
3. Selezionare I valori delle varie funzioni:
Sentirete vari suoni in fila. Per selezionare un valore, dovrete muovere lo stick radio in alto
quando sentite il rispettivo suono; un suono speciale “
” conferma che è stata salvato
e confermato. (mantenendo lo stick in alto, tornerai al passo 2 e potrai selezionare altre
funzioni; oppure se porti lo stick in basso entro 2 secondi esci dal programma)
beep
funzioni
“beep-”
1 corto
“beep-beep-”
2 corti
“beep-beep-beep”
3 corti
freno
Off On
Tipo batteria
Lipo
NiMH
Cutoff mode
Soft-Cut Cut-Off
Soglia di cutoff
Bassa Media Alta
Modo partenza
Normal Soft Super soft
Anticipo
Basso Medio Alto
SKYWALKER Serie
www.hobbywing.com.de
Seite 11
Page 12

INFORMAZIONI IMPORTANTI SULLE BATTERIA AI POLIMERI DI LITIO
CONTENUTI IN QUESTA CONFEZIONE
1. Informazioni generiche
• le batterie ai polimeri di litio (breve= LiPo) vanno trattate con particolare delicatezza e attenzione
• la carica e scarica errata può avere come conseguenza che la batteria s'inamma, esplode o sviluppa fumo
• l'uso errato può danneggiare la batteria irremediabilmente
• la conservazione errata a temperature troppo alte o troppo basse può ridurre la capacità o danneggiare le batterie
2. La ricarica
• appoggiare su un fondo resistente al fuoco
• tenere lontano da oggetti facilmente inammabili
• non abbandonare mai la batteria in carica.
• usare esclusivamente il caricabatterie incluso nella confezione
• voltaggio superiori a 4,20 V per cella danneggiano la batteria e la possono far inammare o esplodere.
• non invertire la polarità, altrimenti potrebbe esplodere
3. scarica
• la corrente di scarica non deve superare 8C (=8 volte la capacità nominale)
• non scaricare al di sotto di 2,5 V per cella
• spegnere subito se le prestazioni del modello dovessero diminuire vistosamente
• evitare corti circuiti e temperature elevate (70°C massimo), altrimenti la batteria si autoincendia.
4. Danno alla cassa e alla pellicola di rivestimento
• non danneggiare la pellicola.
• se la pellicola è danneggiata, non usare più la batteria
• montare la batteria in maniera tale che non si deforma
• temperature sopra 70°C possono danneggiare la cassa; in quest caso smaltire la batteria e non usarla più
5. batterie danneggiate
• non usare batterie danneggiate
• come si riconoscono celle danneggiate: deformazione, pellicola rotta, odore strano, fuoriuscita dell'elettrolyt
• smaltire secondo le regole del paese d'utilizzo
6. Attenzione
• non gettare in fuoco aperto
• non immergere in liquidi
• conservare fuori la portata di bambini
• NON APRIRE (SMONTARE) LA BATTERIA
• evitare il contatto con l'elettrolyt, nel caso di contatto consultare immediatamente un medico e sciacquare con acqua
• quando non usate il modello, rimuovere la batteria
• conservare la batteria solo su una fondo NON inammabile
• batterie troppo scariche non possono essere riutilizzate.
7. No Garanzia
• poichè NON è possibile vericare l'utilizzo corretto della batteria, la batteria NON è coperta da garanzia
8. Responsabilità
• Poiché non è possibile vericare che le indicazioni delle istruzioni siano state rispettate da parte dell'utente, né che ne sia stato fatto l'uso proprio
seguendo questo manuale, non possiamo essere ritenuti responsabili per perdite, danni o costi derivanti dall'uso non adatto.
• Decliniamo espressamente anche la responsabilità per danni conseguenti all'installazione, l'uso, l'utilizzo e la manutenzione del modello.
HOBBYWING distribuita da KYOSHO DEUTSCHLAND GMBH
Nikolaus-Otto-Straße 4
24568 Kaltenkirchen
Germany
Seite 12
www.hobbywing.com.de
SKYWALKER Serie
Page 13

1. Dichiarazione di garanzia
1) Per il periodo di tempo di cui al § 4, i modellini e i componenti di KYOSHO Deutschland GmbH sono coperti da garanzia per i difetti di fabbricazione o dei materiali.
2) Tale garanzia si applica solo nei confronti dei clienti che hanno acquistato un modellino o un componente di KYOSHO Deutschland GmbH
presso un rivenditore autorizzato KYOSHO nella Repubblica Federale Tedesca e in Italia. La garanzia non è trasferibile.
2. Esclusioni dalla garanzia
1) La garanzia non copre le parti soggette a normale usura quali pneumatici, cerchi, cuscinetti, candele, giunti, verniciature, ecc.
2) La garanzia, inoltre, decade:
- In caso di utilizzo di accessori non autorizzati o di componenti per il tuning o l’integrazione non provenienti dalla gamma di fornitura KYOSHO o
non dichiarati espressamente da KYOSHO Deutschland GmbH come “accessori autorizzati”. E’ compito dell’acquirente informarsi a tale proposi-
to presso il rivenditore KYOSHO di ducia.
- In caso d’inosservanza delle istruzioni d’uso e di montaggio, esecuzione di modiche costruttive sul modellino o impiego dello stesso per scopi
diversi da quelli previsti, oppure
- Se il difetto è riconducibile a condizioni locali del cliente.
3. Nota sui diritti di legge
1) Questa garanzia viene concessa volontariamente e in assenza di obblighi di legge.
2) Segnaliamo all’acquirente la possibilità di esercitare i diritti previsti dalla legge in caso di difettosità dell’oggetto acquistato al momento della
consegna. Tali diritti di reclamo previsti dalla legge devono essere esercitati esclusivamente tramite il venditore, ossia il rivenditore autorizzato
KYOSHO. Ai sensi di legge, in primo luogo è possibile richiedere al rivenditore la riparazione dell’oggetto difettoso o la consegna di un nuovo
oggetto. A tale scopo, si può concedere al rivenditore un periodo di tempo adeguato. Se il rivenditore non adempie alla richiesta, una volta
scaduto il termine è possibile recedere dal contratto, ossia restituire l’oggetto e richiedere la restituzione del prezzo pagato, oppure richiedere
un’adeguata riduzione del prezzo d’acquisto. Si può anche richiedere il risarcimento dei danni, in particolar modo se il rivenditore era a conoscenza del difetto o non ne era a conoscenza per una sua negligenza.
3) I diritti esercitabili nei confronti di KYOSHO Deutschland GmbH ai sensi della presente garanzia sussistono in aggiunta ai diritti spettanti per
legge e non limitano in alcun modo questi ultimi.
4. Durata della garanzia
1) La garanzia ha una durata di due anni a decorrere dalla data dell’acquisto presso il rivenditore autorizzato KYOSHO.
2) L’esecuzione di prestazioni in garanzia non comporta una nuova decorrenza del termine né una proroga della garanzia.
5. Diritti derivanti dalla garanzia
1) In caso di richiesta di prestazioni in garanzia, possiamo scegliere se sostituire o riparare la parte difettosa. Le parti sostituite divengono di
proprietà di KYOSHO Deutschland GmbH.
2) Le prestazioni in garanzia vengono eseguite dalla divisione assistenza di KYOSHO Deutschland GmbH.
3) I costi dei materiali e della manodopera sono a nostro carico. Se l’oggetto viene trasportato a scopo di verica e riparazione, il trasporto avviene a spese e a rischio del cliente.
4) Questa garanzia non dà adito ad ulteriori diritti nei nostri confronti, con particolare riferimento alla rescissione del contratto, alla riduzione del
prezzo d’acquisto o al risarcimento di eventuali danni.
6. Esercizio della garanzia
1) I diritti di garanzia devono essere esercitati immediatamente al momento dell’accertamento di un difetto del materiale o di fabbricazione, presso un rivenditore autorizzato KYOSHO o presso KYOSHO Deutschland GmbH, Serviceabteilung, Nikolaus-Otto-Straße 4, 24568 Kaltenkirchen.
La nostra garanzia non copre i difetti riconducibili ad un ritardato esercizio della stessa.
2) Per l’esercizio della garanzia si devono presentare un documento di garanzia e il modellino o componente oggetto della contestazione. Per
documento di garanzia s’intende l’apposito modulo accompagnatorio per la richiesta di assistenza, oppure lo scontrino scale, purché rechi
l’annotazione del tipo di modellino e il numero d’ordine del rivenditore KYOSHO autorizzato e sia munito di timbro, data e rma del rivenditore.
3) I modellini e i componenti inviati devono essere puliti (svuotare completamente il serbatoio della benzina, ecc.). Ci riserviamo il diritto di rispedire al mittente, a sue spese, i componenti non puliti.
4) Qualora, a seguito di una verica del modellino o del componente oggetto di contestazione, dovesse emergere che non sussistono i presupposti per un intervento in garanzia, siamo autorizzati ad addebitare al cliente le ore di lavoro impiegate, alle nostre consuete tariffe orarie e
comunque per un importo forfettario minimo di Eur 8,50.
SKYWALKER Serie
www.hobbywing.com.de
Seite 13
Page 14

Notizen / Notes / Note
Seite 14
www.hobbywing.com.de
SKYWALKER Serie
Page 15

Notizen / Notes / Note
SKYWALKER Serie
www.hobbywing.com.de
Seite 15
Page 16

10/2011
Copyright by Hobbywing Technology Co.,Ltd
Technische Änderungen sind ohne vorherige Ankündigungen möglich! Jeder Nachdruck,
auch auszugsweise, bedarf unserer ausdrücklichen, schriftlichen Genehmigung.
Hype • Nikolaus-Otto-Str. 4 • D-24568 Kaltenkirchen
helpdesk@hype-rc.de • www.hype-rc.de • Helpdesk: 04191-932678
 Loading...