

Page 1
Instructions Manual
Caution: Please read the manual carefully before installation. This product is not
a toy. Please seek assistance from people with RC model experience for the
assembly and fl flying. This product is not a toy. Please seek assistance from
people with RC model experience for the assembly and fl flying
1
Page 2

The Wargo Signature MX2 is the next step of my goal to provide a line
of perfect 3D and aerobatic training aircraft. I have dedicated a lot of
my flying career to teaching 3D aerobatics and helping pilots learn how
to become better pilots. I have also dedicated myself to trying to develop
the ideal transition and training 3D plane. I am proud to offer you the
Wargo MX2. It is a foam aircraft that is stiffer and precise with a short
moment to improve your 3D, Tumbling and precision flying. The Wargo
MX2 is perfect to take a pilot from sport flying to confidently flying 3D
aerobatics. Michael has dedicated much of his career to aerobatic
training and teaching 3D aerobatics and trying to find the ideal foamy
to take pilots to the next level. The result is a phenomenal plane that
will hover, harrier and tumble incredibly well. Any accomplished 3D pilot
will love this plane because it will satisfy the most discriminating pilot. It
will perform maneuvers ultra-light foamies cannot because it has a bit
better ability to carry momentum and perform more high-energy and
tumbling type of maneuvers. The Wargo MX2 is a blast to fly, and is
small and light enough to fly anywhere and transport just as easily.
I hope you enjoy flying your new plane as much as I enjoy it.
Happy Flying!
1
Page 3
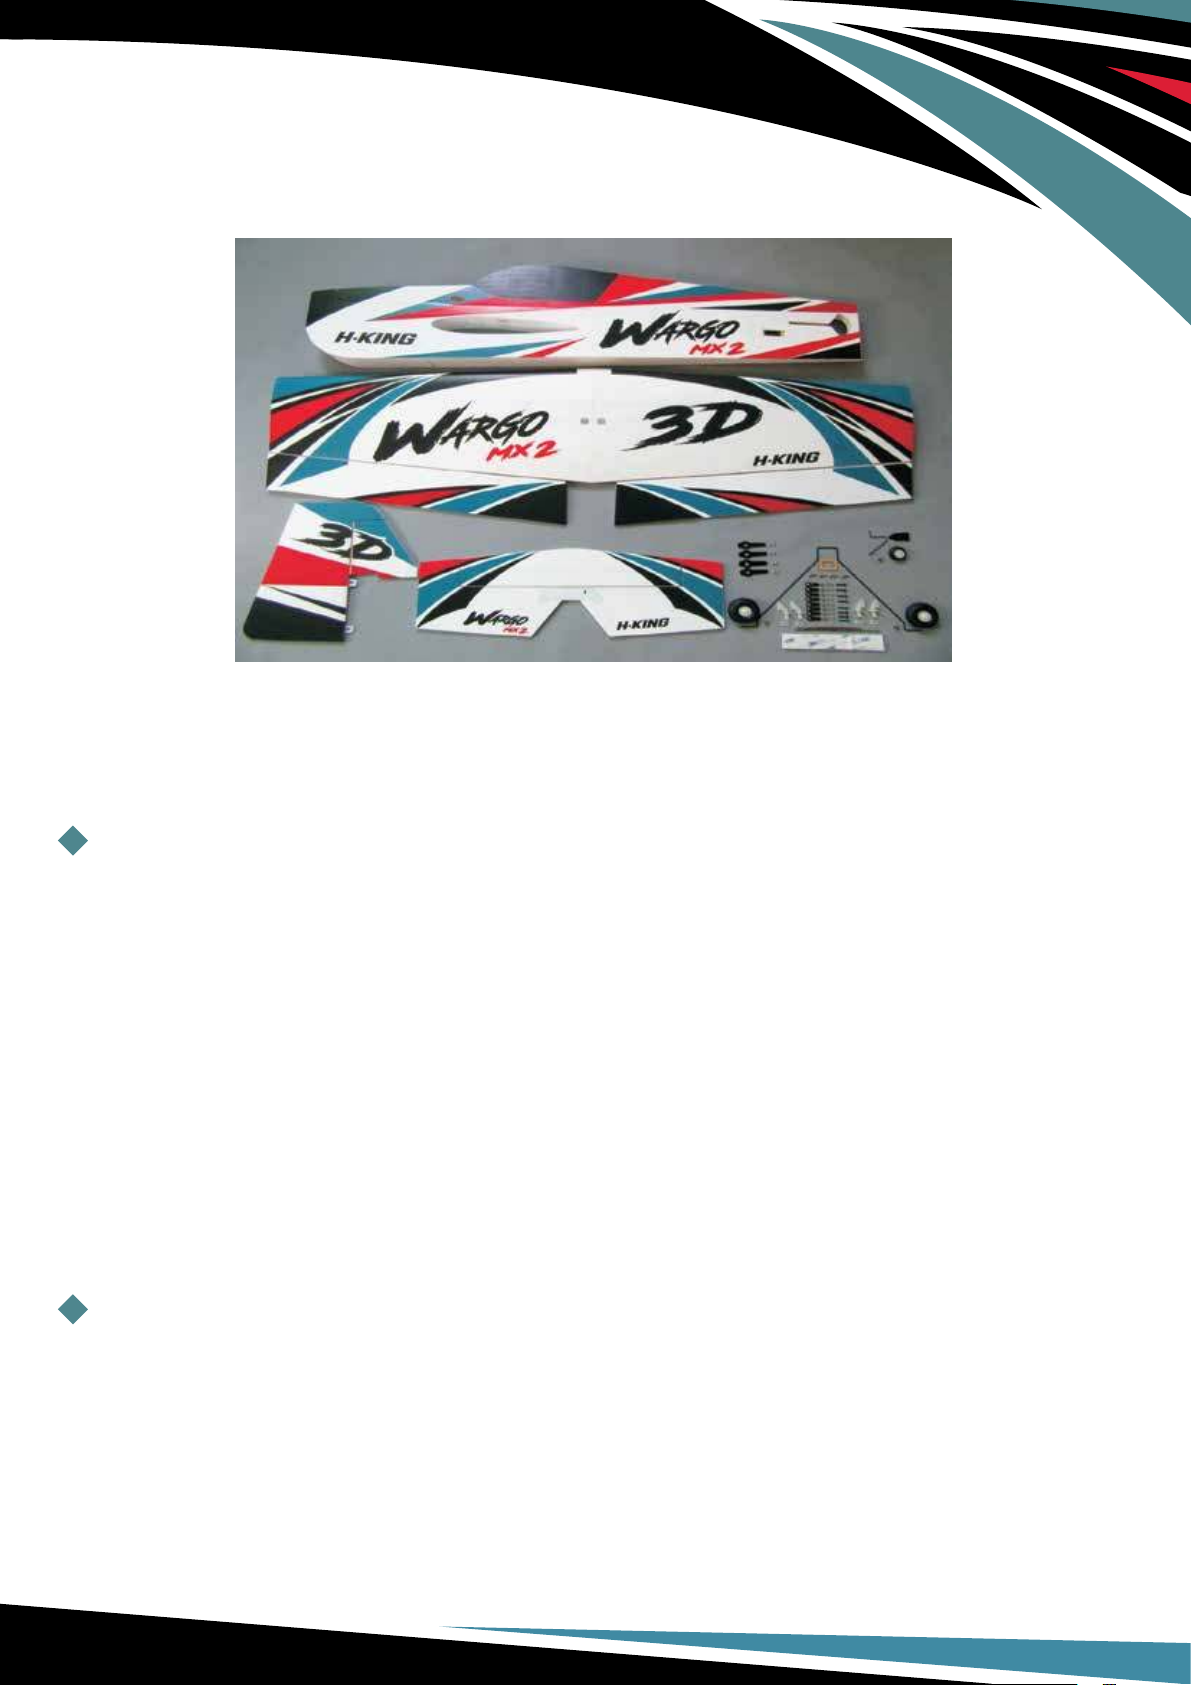
Open the package and check the contents carefully. If you have found any missing/
damaged parts, please contact our customer service for help.
Product Specifications:
Wingspan: 955mm
Length: 983mm
Wing area: 24 dm2
Brushless motor: 2216 2217 2834 (KV 1250)
ESC: 30 A with BEC
Propeller: 10 x 4.7
Lithium battery: 3s (1000 to 1500 mAh) 25c battery Servos: 9g plastic gear x 4
Total weight: about 630 g (including a 3s1000 mAh 25c battery)
Center of Gravity: 75mm from the wing's leading edge.
Reference Power Configuration:
Brushless motor: 2216 2217 2834 (KV 1250)
ESC: 30 A
Propeller: 10 x 4.7
Lithium battery: 3s (1000 to 1500 mAh) 25c battery
2
Page 4

Control Surface Deflections:
Ailerons: high rates: 40 degrees, low rates: 25 degrees
Elevator: high rates: 45 degrees, low rates: 25 degrees
Rudder: high rates: 45 degrees, low rates: 25 degrees
Flight Precautions:
1. Do not fly in bad weather with poor visibility.
2. Do not fly near crowds, high - voltage lines or in areas with strong electromagnetic
interference.
3. Do not fly near tall buildings, trees, street lights or other obstructions.
4. If you are flying for the first time, please fly under the guidance of an experienced
person.
5. Remember, a model airplane is not a toy and you are solely responsible for it.
Storage Precautions:
1. Remove the battery before storing the model to prevent the risk of explosion or
combustion.
2. Do not put objects on the model - hang it up if possible.
Note: Due to continuous improvement of this product, the instruction manual and the product
will be revised without any notice.
3
Page 5
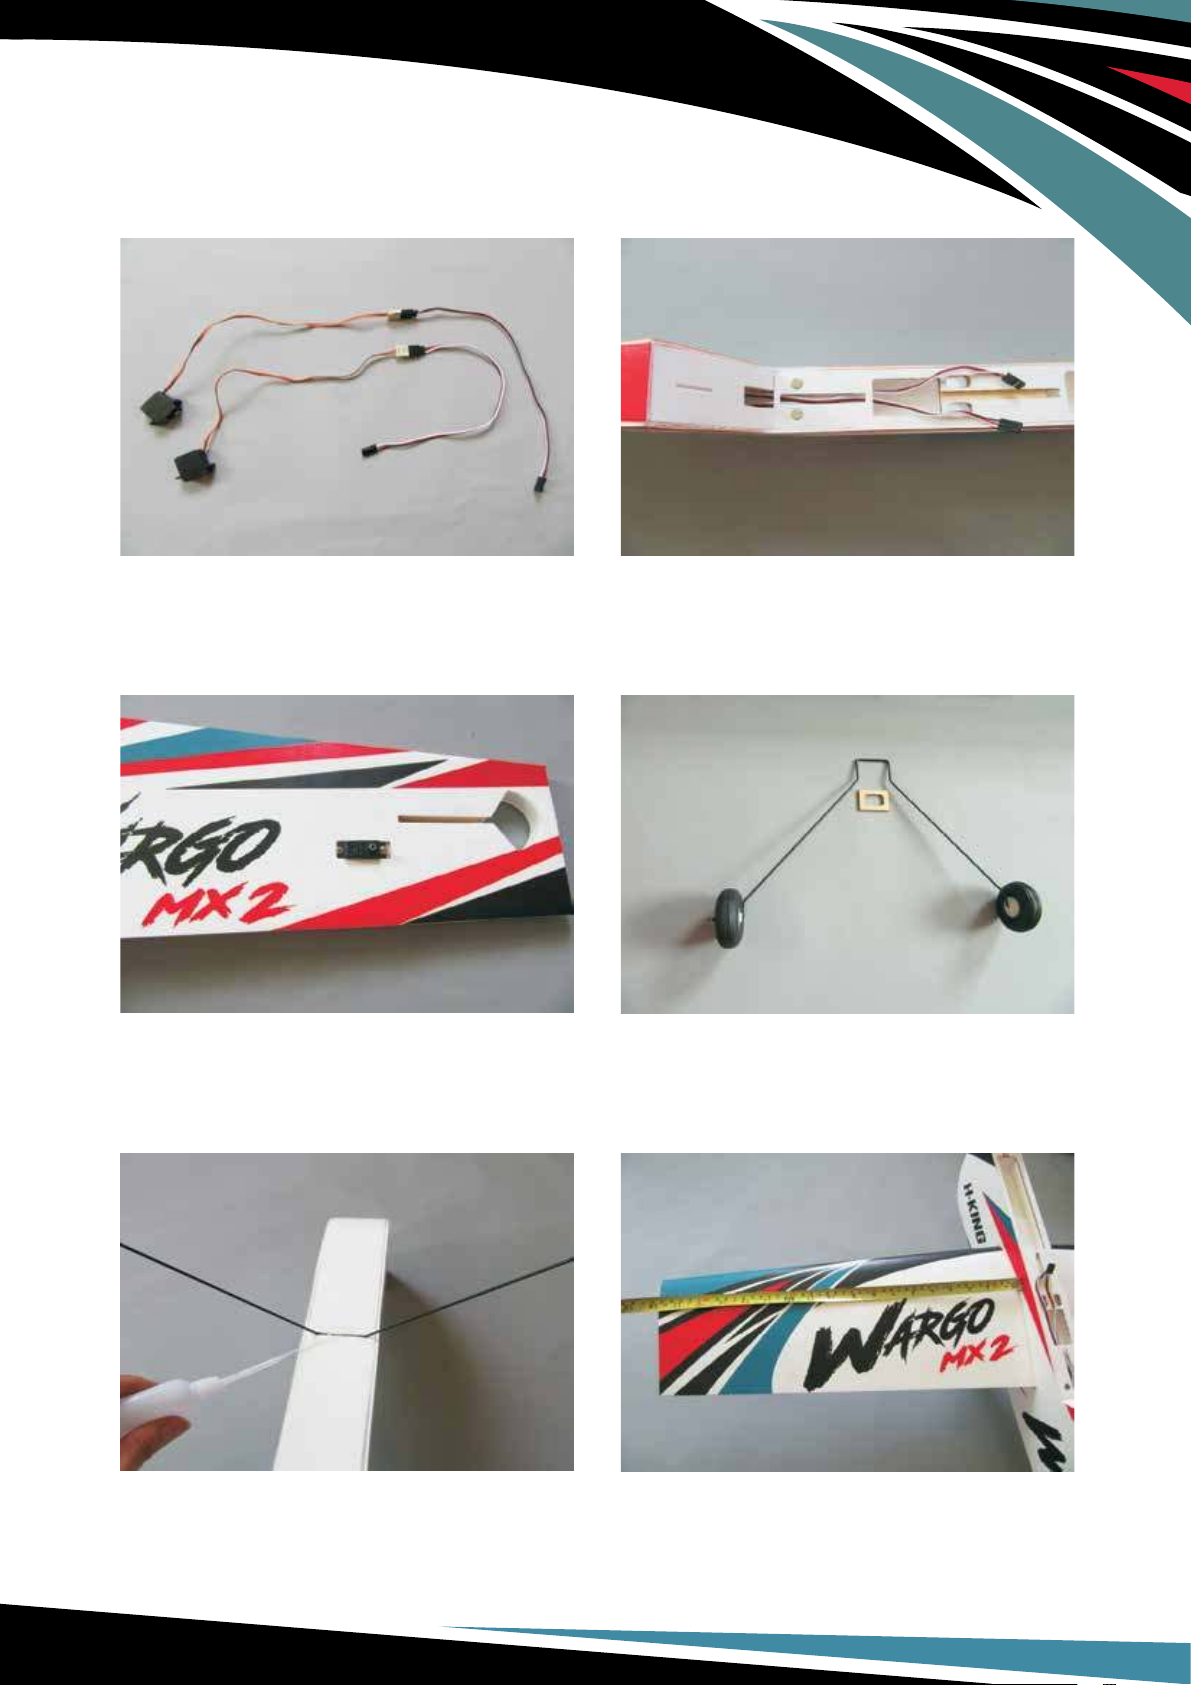
1. Connect servo extension leads to the elevator
and rudder servo cables.
2. Feed the elevator and rudder servo cables
through the inside of the fuselage.
3. Install the rudder elevator and servos into the
airframe.
5. Insert the landing gear and landing gear plate
into the landing gear slot in the fuselage and use
thin CA glue to secure.
4. Find the landing gear and install the wheels.
6. Carefully insert the wing into the fuselage.
Measure to ensure that both front and rear of the
wing are evenly spaced on both sides of the
fuselage.
4
Page 6
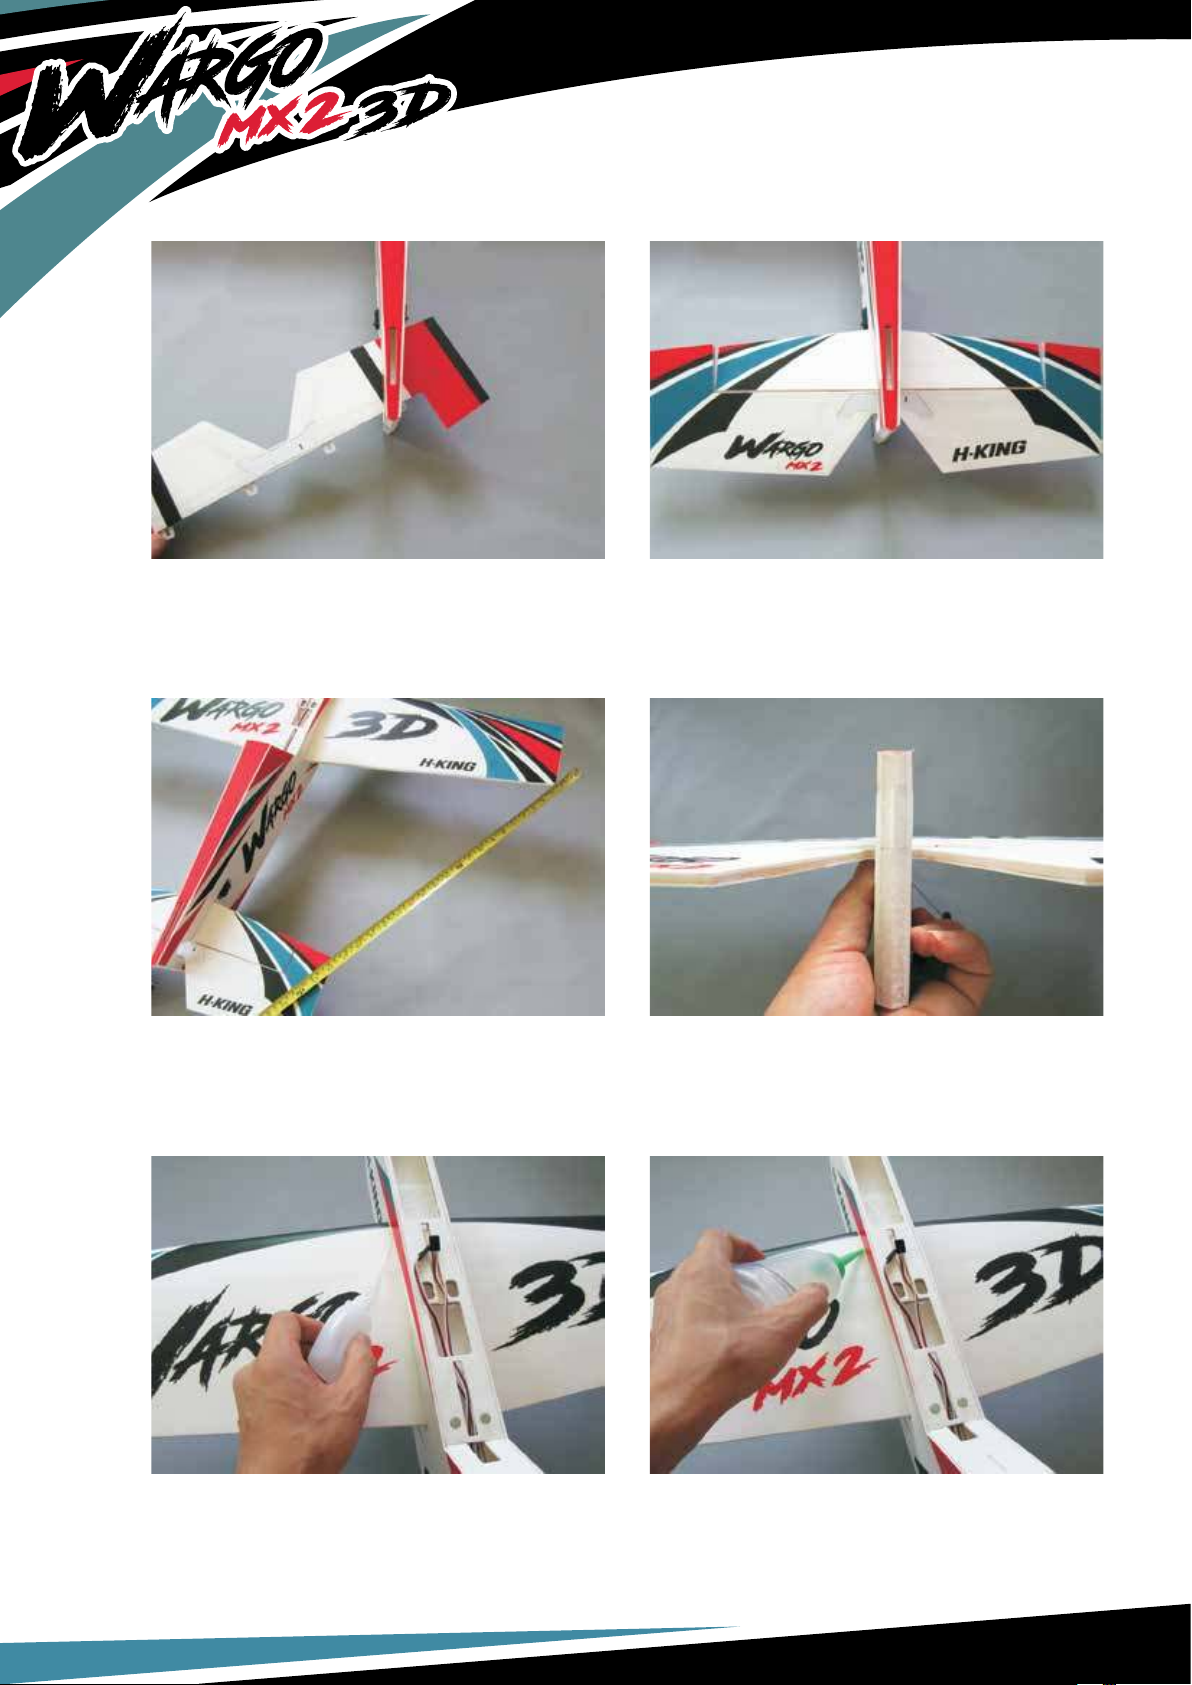
7. Carefully insert the elevator into the fuselage,
noting that the elevator needs to be flipped
upside down and back-to-front when inserted.
Once it is fully inserted, you can flip it over.
8. Carefully insert the horizontal stabiliser into
the fuselage. Insert the elevator hinges into the
horizontal stabiliser. Measure to ensure that the
horizontal stabiliser is evenly spaced
on both sides of the fuselage.
9. Ensure that the distance on both sides
between the main wing and the horizontal
stabiliser is the same as shown.
Ensure that the horizontal stabiliser remains
evenly spaced on both sides of the fuselage.
11. Ensure that the main wing is correctly located
and use thin CA glue to attach the wing to the
fuselage.
Note: Do not use too much thin CA glue, as it
might eat the polystyrene wing core.
10. Ensure that the horizontal stabiliser and the
main wing are parallel to each other and are at
right angles (90 degrees) to the fuselage.
Use wedges if required.
12. Use a suitable foam glue to reinforce the
wing to fuselage join on both sides top and
bottom.
5
Page 7
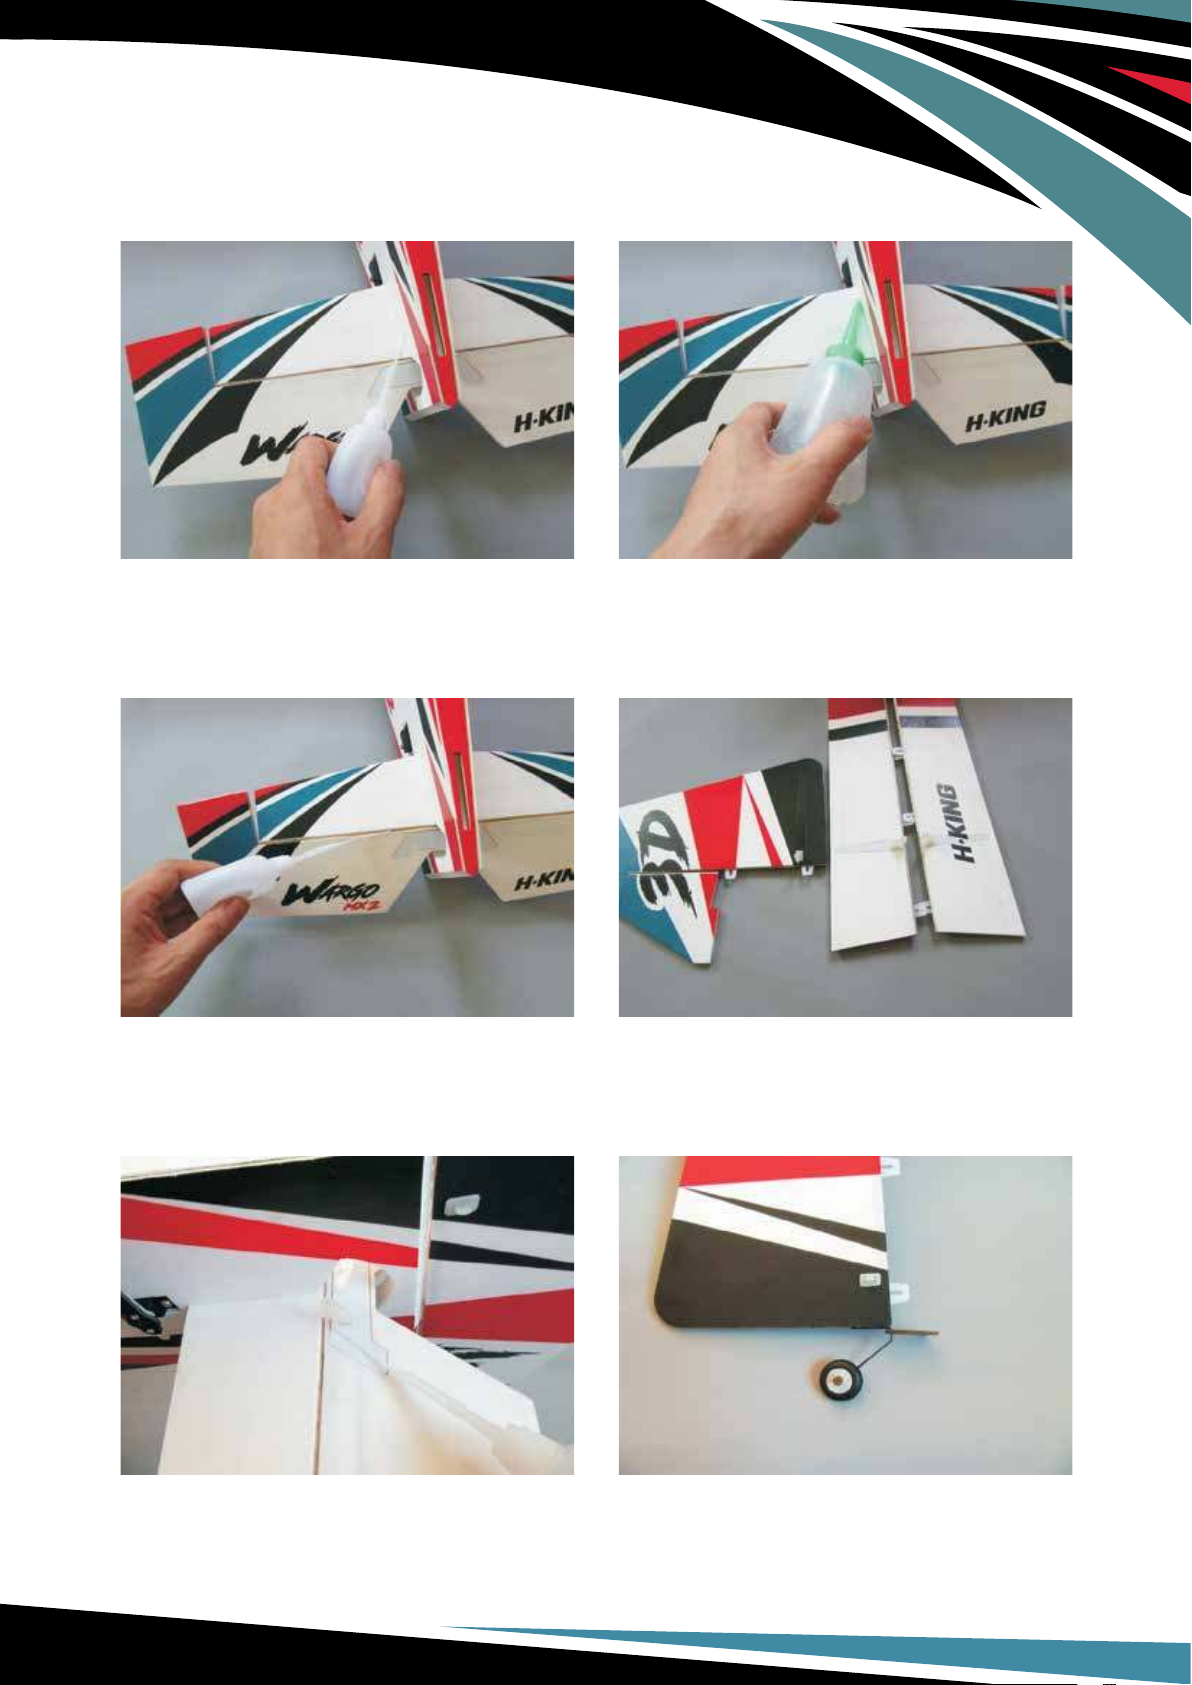
13. Use a small amount of thin CA glue to attach
the horizontal stabiliser to the fuselage.
Note: Do not use too much thin CA glue, as it
might eat the Depron foam core.
14. Use a suitable foam glue to reinforce the
horizontal stabiliser to fuselage join on both
sides top and bottom.
15. Adjust the elevator so there is a hinge gap of
about 1mm and it is evenly spaced on both
sides of the fuselage.
Use thin CA glue to attach the elevator hinges to
the horizontal stabiliser hinge slots.
17. Use thin CA glue to attach the elevator
control horn. Install the control horn plate on the
other side of the elevator.
16. Use thin CA glue to attach the aileron and
rudder control horns.
Install the control horn plate on the other side of
the rudder.
18. Install the tail wheel as shown, ensuring that
the tail wheel wood bracket can rotate on the
wire.
6
Page 8
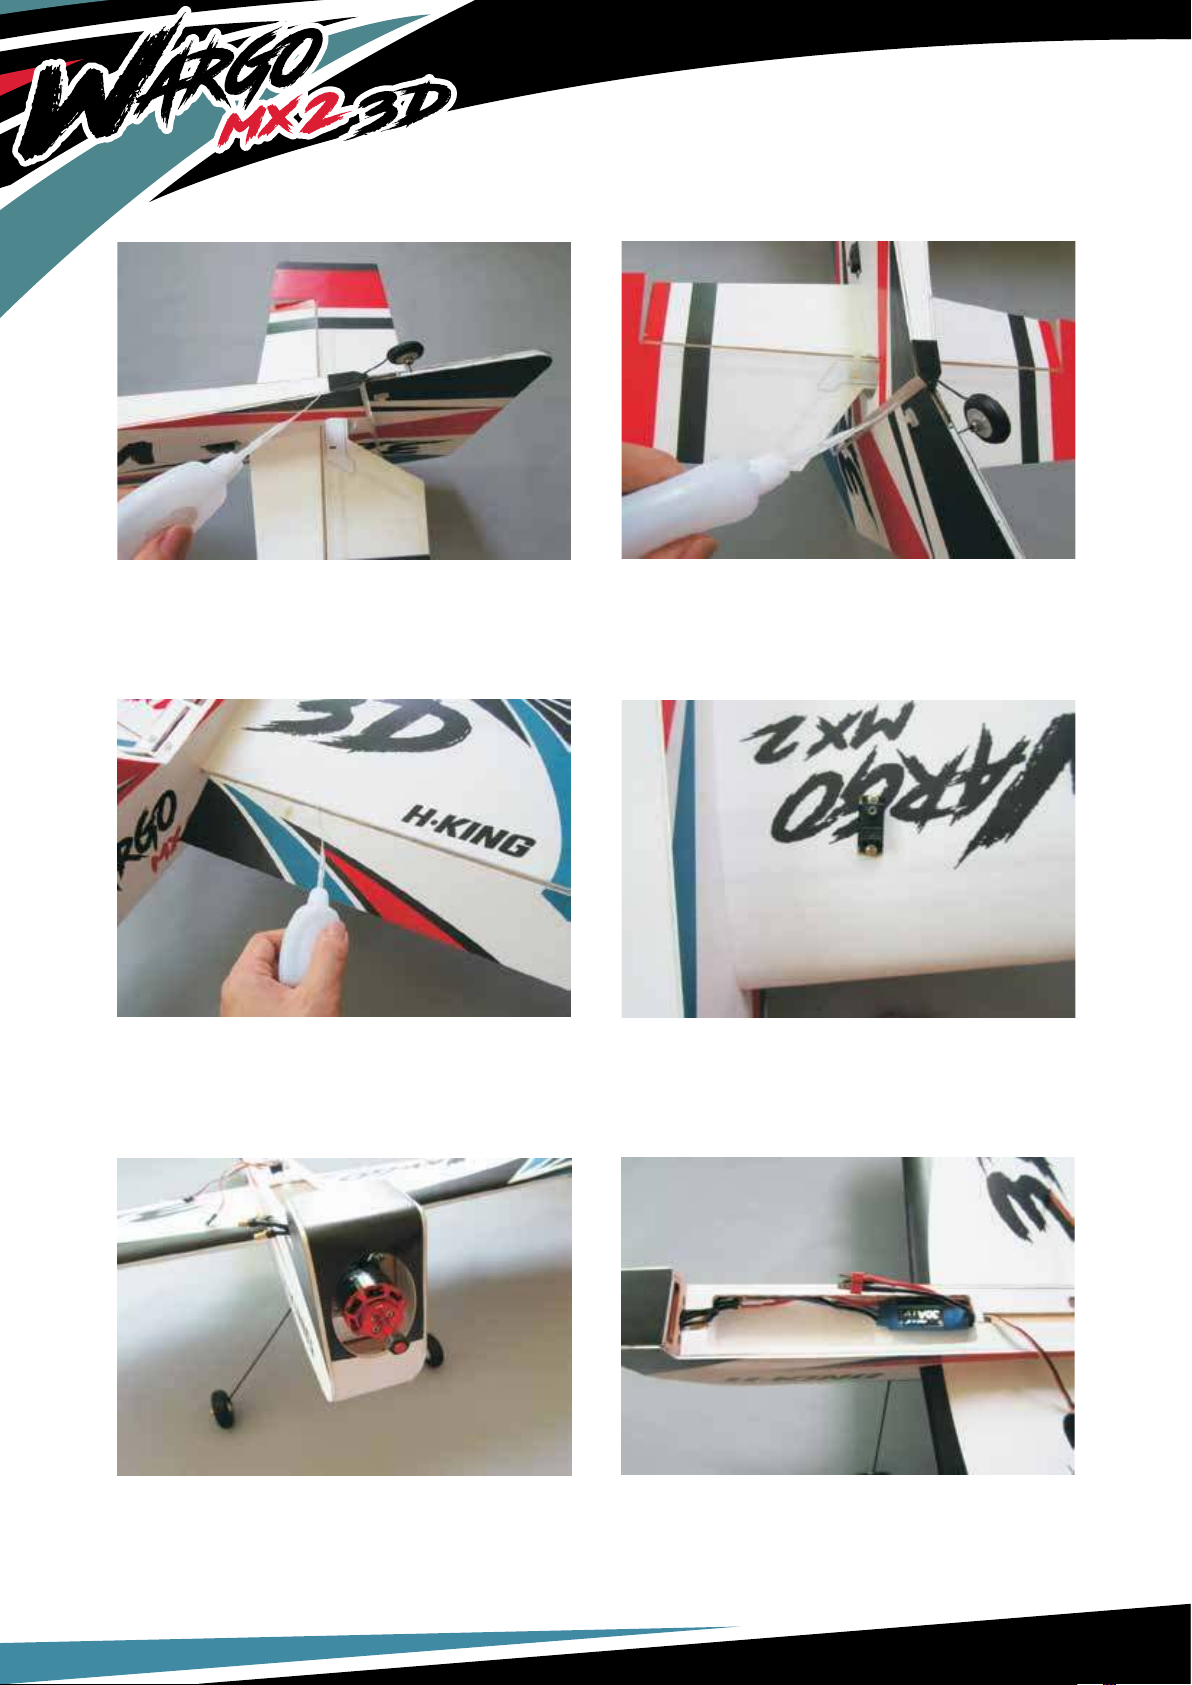
19. Insert the rudder hinges into the tail, leaving
a hinge gap of about 1mm.
Adjust the height of the rudder so that the tail
wheel can rotate freely. Use thin CA glue to
attach the tail wheel wood bracket.
20. Ensure that there is a rudder hinge gap of
about 1mm to allow it to movefreely. Use thin CA
glue to attach the rudder hinges to the horizontal
stabiliser hinge slots.
21. Insert the aileron hinges into the main wing,
leaving a hinge gap of about 1mm. Use thin CA
glue to attach the aileron hinges to the main
wing.
Repeat for the other aileron.
23. Install the motor using 4 wood screws.
Ensure the motor rotates smoothly.
22. Install the aileron servos and feed each
servo cable end through the wing.
24. Install the electronic speed controller (ESC).
Connect the motor to the speed controller.
7
Page 9
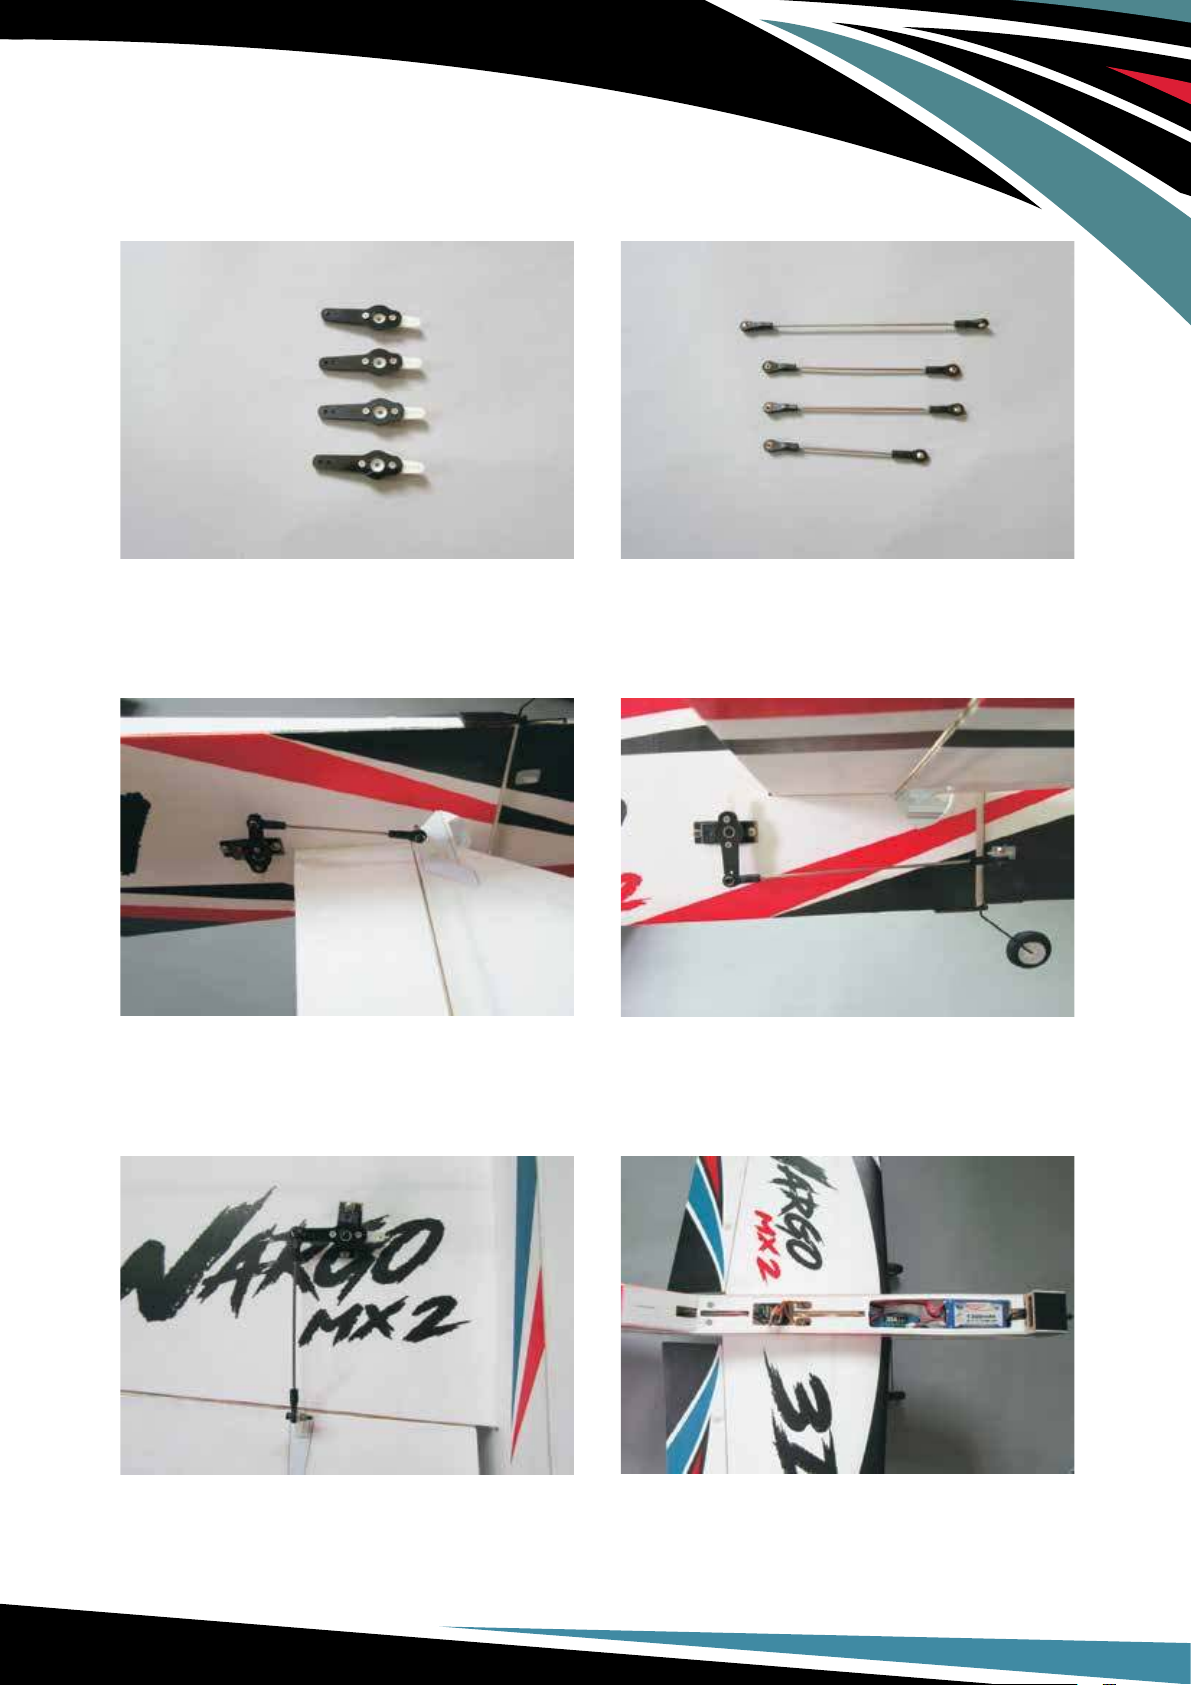
25. Install the extended rocker arm asshown. 26. Install all ball heads as shown.
27. Setup the elevator linkages as shown. 28. Setup the rudder linkages as shown.
29. Setup the aileron linkages as shown. 30. Install a receiver. Connect all 4 servos and
the ESC to the receiver. Turn on your radio and
attach a battery to the ESC.
Note: Do not install a prop onto the motor at this
moment until all the control surfaces have been
well adjusted and ESC has been well calibrated.
8
Page 10

Setup Tips & Tricks
Travel Settings:
Each Flight control must be set to its physical limits. This means as far as it will go, but
no farther than it has to. You set this by selecting the servo, fully deflect the surface with
the transmitter, then increase (or occasionally decrease) the percentage to where the
flight surface will not travel any further. Then simply back off a click or two and you are
done. Then, simply deflect it in the opposite direction and repeat the process. This
must always be done for Rudder, ailerons, flaps and elevators. Your travel/end point
settings must be above 100% to achieve full performance from each servo.
Rates and Exponential:
All rates at 100% for full 3D flying. I suggest your expo settings for full 3D will be 60%
as a starting point. Adjust to your preference after flying.
My personal settings:
I use a little trick where I put the stick at one third and set to where when I switch
between rates the surface hardly changes. Obviously at the end points it is an enormous
difference.
My personal expo settings for low rates is in the 20% range for an aerobatic plane and
half that for a war bird, and in the 60% to 70% range for high rates for 3d and near 40%
for warbirds. Again, this is highly dependent on the plane and this is a general guideline
only, and is my personal preference.
9
Page 11

10
Page 12
 Loading...