

INSTRUCTION MANUAL
CAUTIONS:
This radio control model is not a toy! it is a technical
equipment,you must pay attention to the flying environment
and correct operation. Teenagers must fly with guardian.
Learner must fly with the experienced pilot
.
TECHNICAL DESCRIPTION
Wing Span: 1400mm ( 55.12")
Length: 1060mm ( 41.7")
Flying Weight: 1300g
Battery: 11.1V/1800mAh/20C
Motor: Brushless 850KV
ESC: 30A Brushless ESC
For users aged 14 or over

PROTECT YOUR MODEL , YOURSELF &
OTHERS . . . FOLLOW THESE IMPORTANT
SAFETY PRECAUTIONS
1. Your airplane should not be considered a toy, but rather a sophisticated
working model that functions very much like a full - size airplane.
Because of its performance capabilities,the plane, if not assembled and
operated correctly, could possibly cause injury to yourself or spectators
and damage property.
2. You must assemble the model according to the instructions.Do not alter
or modify the model, as doing so may result in an unsafe or unflyable
model.In a few cases the instructions may differ slightly from the photo.
In those instances the written instructions should be considered as
correct.
3. If you are not an experienced pilot or have not flown this type of model
before, we recommend that you get the assistance of an experienced
pilot in your R/C club for your first flights. If you are not a member of a
club, your local hobby shop has information about clubs in your area
whose membership includes experienced pilots.
4. While this kit has been flight tested to exceed normal use, if the plane
will be used for extremely high stress flying, such as racing, or if an
engine larger than one in the recommended range is used, the modeler
is responsible for taking steps to reinforce the high stress points and/ or
substituting hardware more suitable for the increased stress.
We , as the kit manufacturer , provide you with a top quality ,
thoroughly tested kit and instructions, but ultimately the quality and
flyability of your finished model depends on how you build it ;
therefore,we cannot in any way guarantee the performance of your
completed model, and no representations are expressed or implied
as to the performance or safety of your completed model.
1

1 KIT CONTENTS
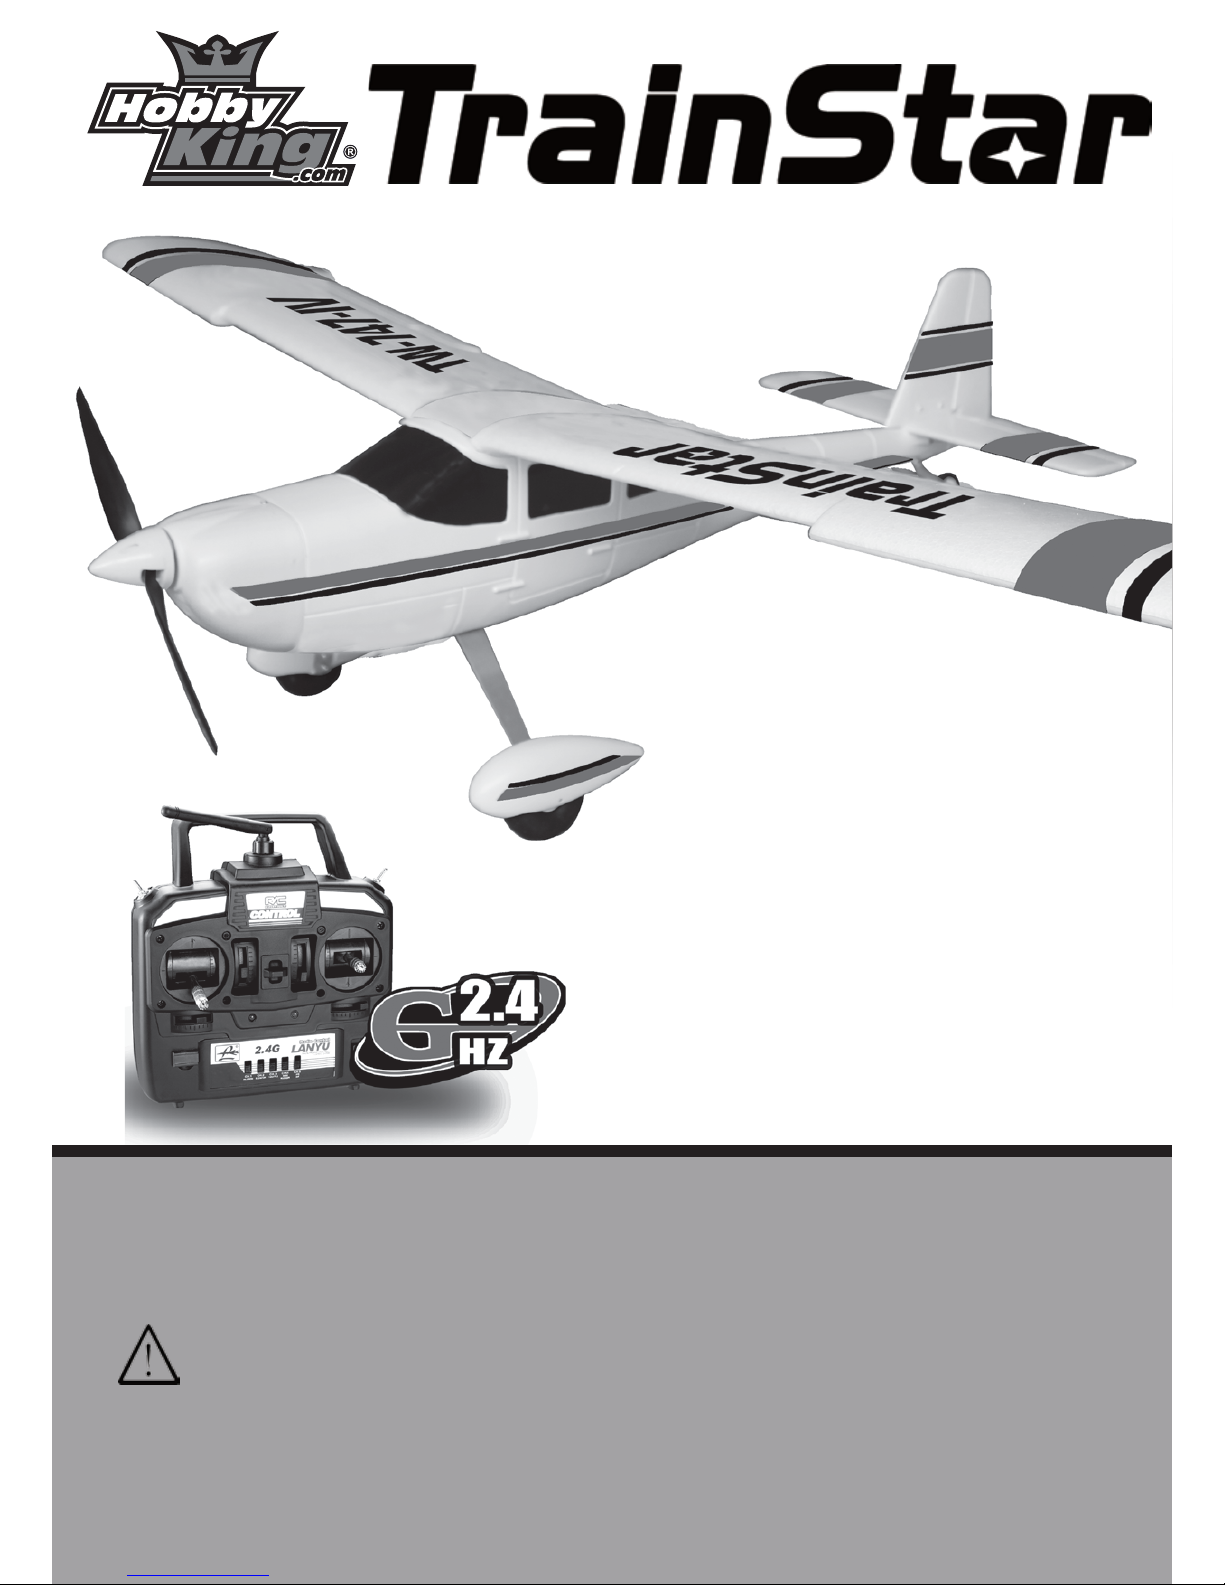
2 ASSEMBLE THE MODEL
1. Install all the servo horn by screw.
2. Insert the linker to the corresponding hole of the tail.
2
3. Put the horizontal tail onto the tail of the fuselage.
4. Insert the linker to the corresponding hole of stabilizer and fix it
with screw.
6. Connect the clevis to the servo horn of the tail.
5. Install the vertical tail onto the horizontal tail and fix it with screw.
3

7.Insert the push rod to the linker of the tail wheel.
9
. Install the motor to the front of the fuselage by screw and connect the
plug.
8.
Connect the tail wheel to the servo horn by the metal fixture and
install it on the tail by screw.
4

10. Install the cowling to the fuselage by screw.
11. Install the wheels to the main landing gear with wheel cover by crew.
5

12.
Install the main landing gear to the corresponding place under the
fuselage and fix it by the plastic cover.
13.
Insert the connection pipe into the main wing and connect both
part together.
6

14.
Put the main wing onto the fuselage and fix it with a plastic cover by screw.
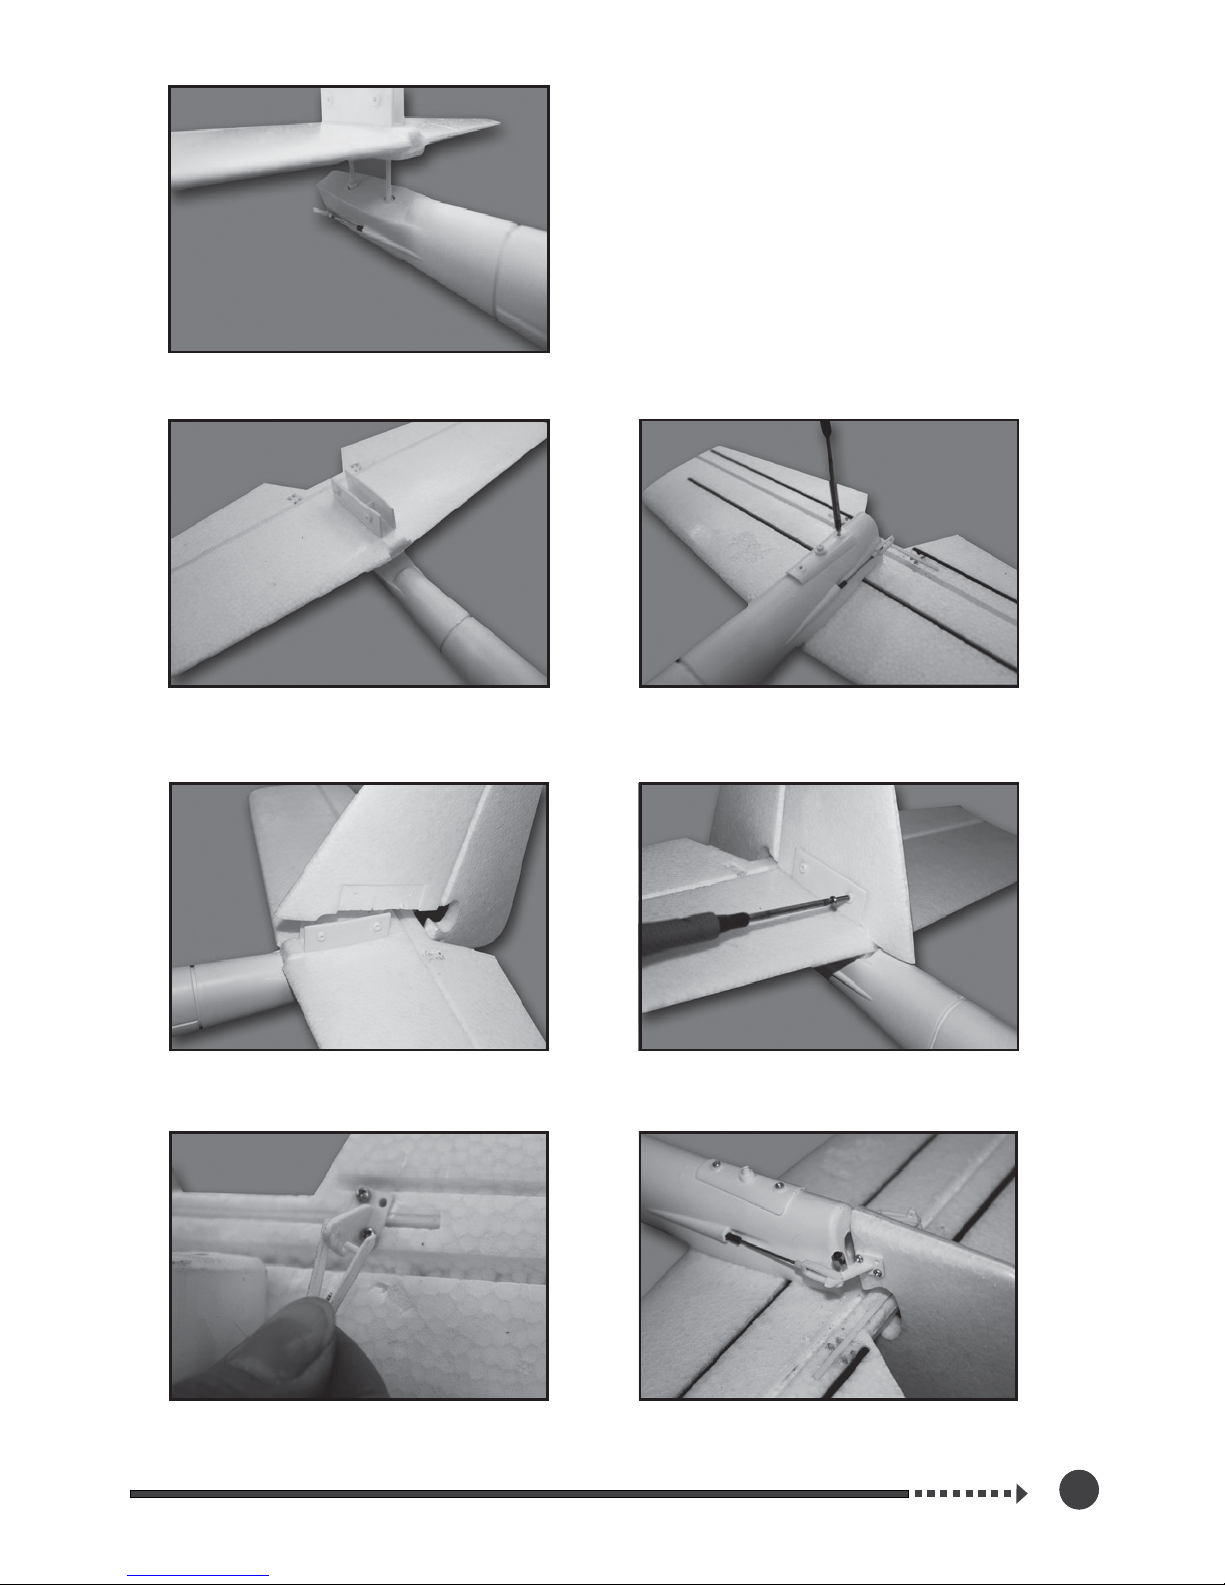
16. Pick up a shaft fixture suitable for the motor shaft and install it to the propeller.
15.
install the servo arm to the aileron servo and connect the push rod
to the servo horn.
17. Insert the motor shaft to the spinner pedestal.
7
18.
Insert the motor shaft to the propeller and make sure the concavity of
the propeller face toward the tail and fix it by washer and nut.
19. Install the spinner with two screw.
20. The plane full assembled as shown in the figure.
Adjust the Trim Settings
8
Tip: Use the trim sliders on the transmitter
to adjust the control surfaces. Make
sure they are the same level to avoid
erratic flight characteristics . If you
cannot get the surfaces level , adjust
the length of the clevis and re-attach
them to the servo horn.

3
CENTER OF GRAVITY
The ideal C.G.position is 58±5 mm behind the leading edge measured
at where the wing meets the fuselage . In order to obtain the C.G.
Specified ; add weight to the fuselage or move the battery position.
Check the C.G. before flying.
The C.G. (Center of Gravity) is the location on the wings, measured
back from the leading edge on both sides of the fuselage, where the
model balances. In addition to the control surface throws, the C.G.
has a GREAT effect on the way the model flies. If the C.G. is too far
aft (tail heavy), the model will be too responsive and difficult to
control. If the C.G. is too far forward (nose-heavy), the model will
be too stable and not responsive enough. Follow the instructions
to make sure the model is balanced properly and the C.G. is in the
correct location.
9

Charge the Battery
Battery Charging Precautions
Be certain to refer to the instructions that accompany the charger to properly
and safely charge the battery that goes in the model and powers the moter
and controls. Read and follow the battery charging precautions that follow.
1. Be careful to avoid overcharging the battery!
2. Remeber to check the temperature of the battery during the charge. The
batteries should not get hot. If they do, unplug them from the charger.
3. If you use a
different
battery charger,charge this
battery pack
at a
maximum
charge rate of
1.8
amps. A
higher charge
rate will charge the battery pack
too quickly and heat up the wires.
4.
A properly-cared-for
battery pack will last a long time. If the battery pack
is continually overcharged or charge at too high of a rate, the life of the
battery pack will be shortened.
5. Make sure the battery leave away from combustibles while charging
.
6. Don’t leave the battery unattended while charging.
CHARGE THE BATTERY
4
Safety Caution:
Unplug the battery and charger when the battery surface becomes
warm.Can not put the battery insert the plane when it is charging!!
WARNING: Misuse or malfunction may overheat
the battery and charger, resulting in personal
injury or damage to surroundings.
10

2.4G Control System Instruction
Bind the receiver:
1.Turn the throttle to the bottom.
2.Turn on the transmitter.
3.Connect the battery of the receiver.
4.Push the code switch of the receiver. (the LED of the receiver will shine quickly)
5.The LED will light without interrupted. (means the code matching succesfully)
11
Rudder
Elevator
(↑↓)
(↑↓)
Motor trimmer
(← →) Rudder
Rudder trimmer
Aileron trimmer
Aileron
Rudder
Commingle control switch (it can
realize the mode transform of “V”
model triangle wing).The CH1
controls with the Ch2 passage mix
Motor
E levator
Aileron (← →)
Mode 2 (Right throttle)
Motor
Elevator
Aileron
ON
Elevator trimmer
Caution light of low power
Crystal
Transmitting antenna
Handle
Motor trimmer
(↑↓) Motor
Power LED
Power switch
Elevator (↑↓)
(← →) Rudder
Rudder trimmer
Motor
Commingle control switch (it can
realize the mode transform of “V”
model triangle wing).The CH2
controls with the Ch3 passage mix
Aileron trimmer
Aileron (← →)
Mode 1 (left throttle)
5
Precautions:
Pls make sure the throttle stick is on the down position then bind the reciever.
Before you connect the battery of the plane, pls leave away the propeller,
before the receiver bind the transmitter it may cause the propeller run automaticly.
Motor trimmer
CHECK THE CONTROL SURFACE AND CHANNEL
CONDITION
6
Before trying to fly the airplane , please carefully check to make sure the transmitter and the
servos work normally. CAUTION: Make sure that you must turn on the transmitter firstly and
then you can connect the battery plug. If you want to turn off the transmitter you must ensure
that the battery of the plane must be cut off first.
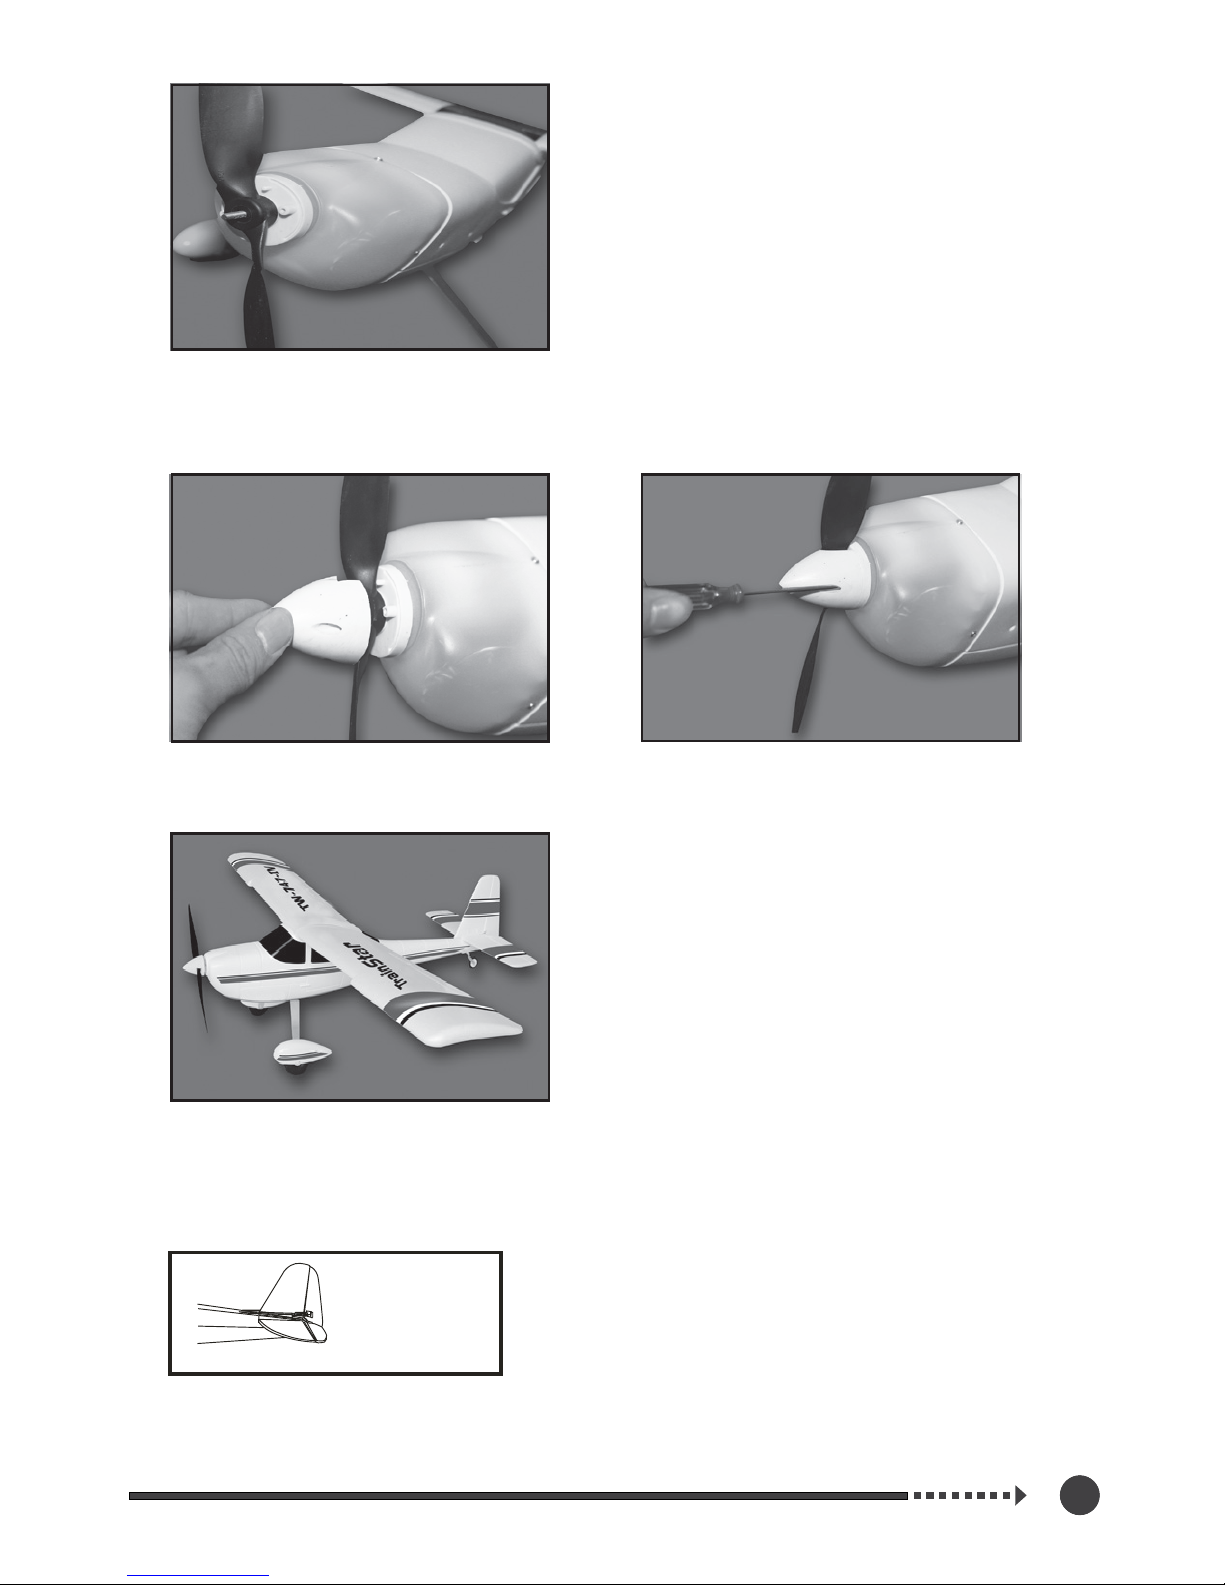
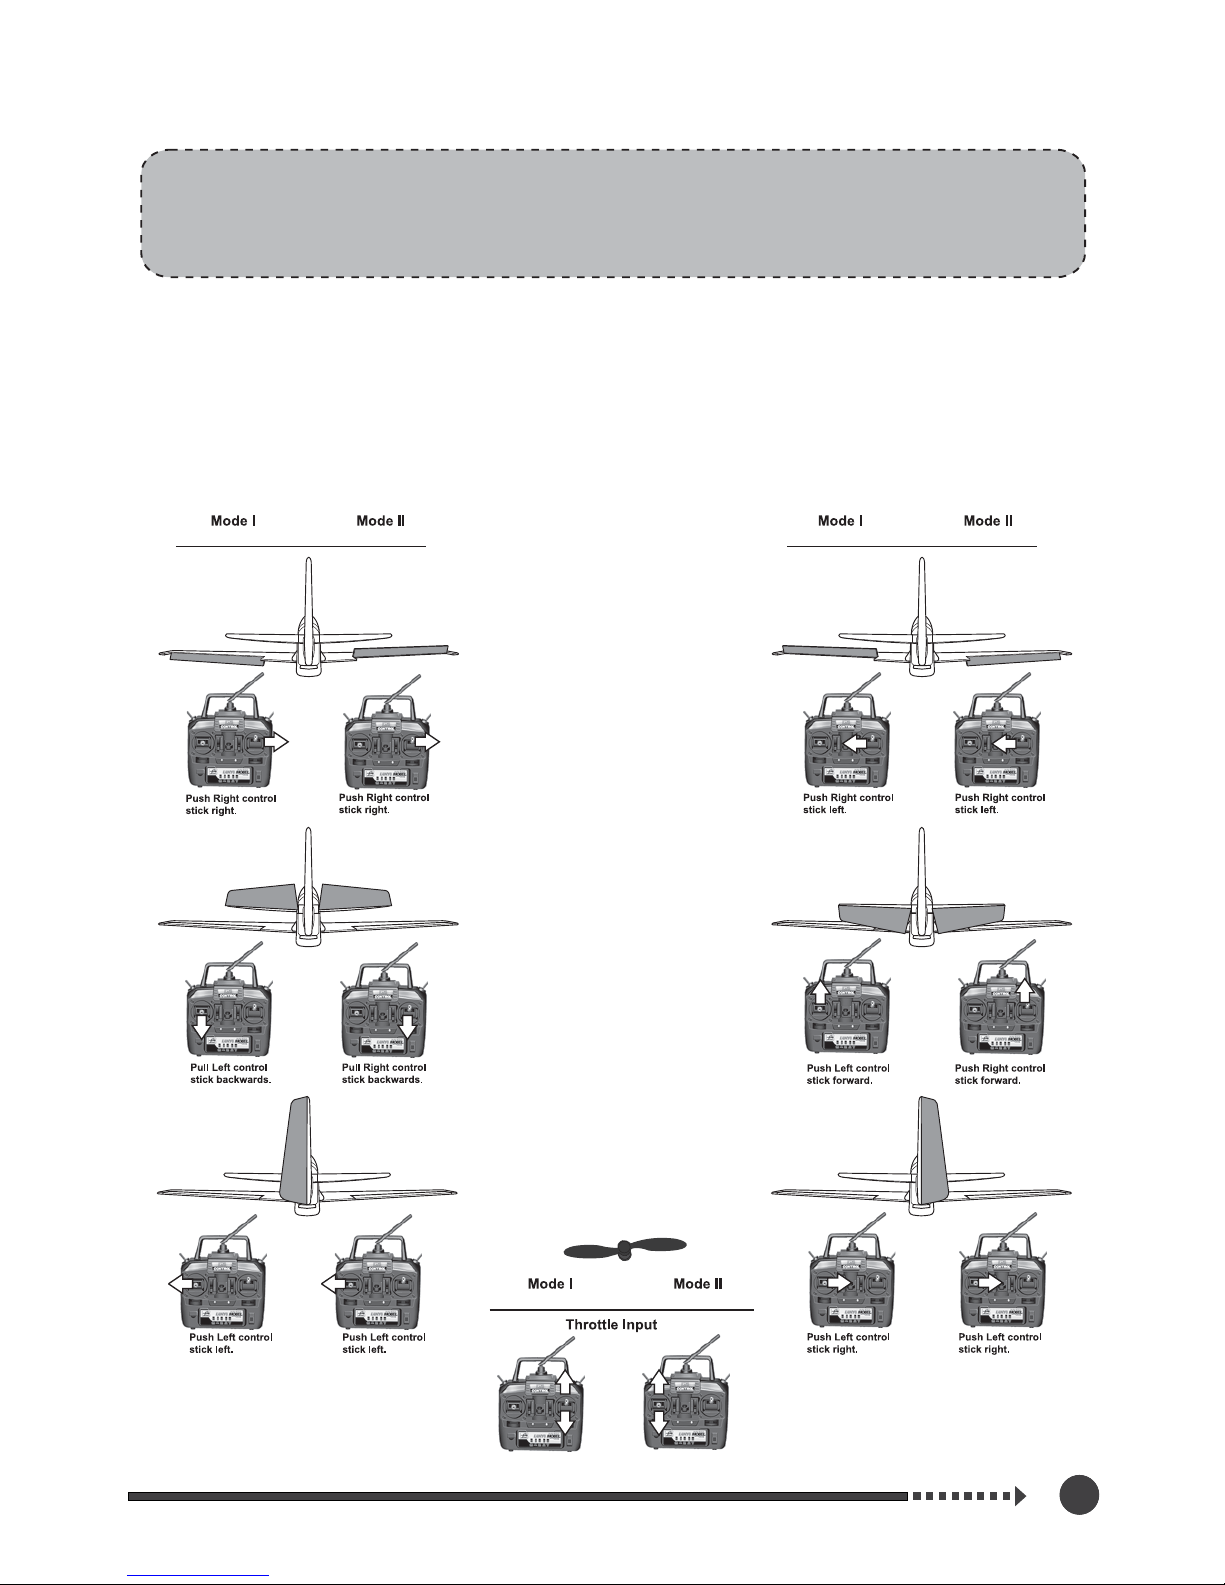
Mode 1 vs. Mode 2
Depending on which region of the world you are in, you will either use a Mode 1 orMode 2 transmitter.
The difference between the two modes deals with the throttle anddirectionnal inputs of the control sticks.
Mode 2 transmitters have the throttle control on the left stick and the directional controls on the right
stick. Mode1 transmitters havethe inputs reversed with throttle on the right and directionnal control on
the left. Theillustrations below detail the stick inputs for both Mode 2 transmitters
12
(Right Throttle) (Left Throttle) (Right Throttle) (Left Throttle)
(Right Throttle) (Left Throttle)

Know Your Frequency
Perform a Range Check
CAUTION: The transmitter used to control your plane transmits signalson
one of several frequencies that are available. To find out your frequency
(or “channel”), look on the transmitter, If your “channel” happens to be the
same as another model that is being flown nearby
(even within afew miles)
,
one or both models will crash. Know your frequency and be aware of the
frequency
of other models that are flying
nearby- especially
if you are flying
at a radio control flying site. All flying sites have some sort of frequency
control system to avoid this kind of interference, so learn how to use their
frequency control system. Never turn on your transmitter until you are
certain that you will be the only one operating on your frequency.
As a precaution, an operational ground range test should be performed
before the first flight each time out. performing a range test is a good way
to detect problems that could cause loss of control such as low batteries,
defective or damaged radio components or radio
interference
.This usually
requires an assistant and should be done at actual flying site you will be
using.
First turn on the transmitter. Then, install the fully charged battery into the
fuselage and hold it in place with the hook-and-loop strap. Connect the
battery and install the hatch.
With the antenna on the transmitter collapsed ( not extended ), begin
walking away from the
model operating the
controls in a
predictable pattern
(for example: Up, then down elevator. Right, then left aileron. Right, then
left rudder). While moving the control surfaces, also vary motor rpm.
Have your assistant alert you if the controls fail to respond or if they move
suddenly or erratically. You should be able to maintain control up to a
distance of approximately100’ [30m].
Remember, use care not to “bump” the throttle stick.
Otherwise, the propeller will turn, possibly causing damage
or injury.
13

If the controls respond erratically or if anything else seems wrong, make
certain all the servo wires are securely connected to the receiver and that
the transmitter and receiver batteries are fully charged. If you cannot find
a mechanical problem with the model, it is slightly possible that there is
radio interference somewhere in the area. One option would be to try
another range check at an alternate flying site.
After the range check, fully extend the antenna.
Monitor and limit your flight time using a timer such as the one on your
wrist watch. When the batteries are getting low you will usually notice a
performance drop before the ESC cuts off moter power, so when you
notice the plane flying slower you should land. Often ( but not always! ),
power can
be briefly
restored after the motor
cuts off by holding
the throttle
stick all the way down for a few seconds.
To avoid an unexpected dead-stick
landing
on your first
flight set your timer
to
a conservative 4
munutes.
When
the alarm sounds you should land your
model.
When you learn how much flight time you are getting you can adjust your
timer accordingly. Always be consservative so the moter won’t quit
unexpectedly and you will have enough battery to land under power.
Take Off
Until you have become comfortable with flying your plane ,
do not fly if the wind speed is greater than 10 mph [ 16
kilomoters/hr].
Don’ t forget to fully extend the transmitter antenna.
One final check befor takeoff : always double - check the flight
control response to your inputs from the transmitter before
every flight . Be certain the ailerons, elevator and rudder respond
correctly
and
that none of the
controls have
inadvertently
become reversed.
14

ROG (rise off ground) Take off
Hand-Launch
If the surface is smooth ( such as paverment or blacktop ) the plane can
take off from the ground. But most grass is probably too tall, so if flying
from grass the model will have to be hand launched.
Once you have reached a safe flying speed at a comfortable altitude
(approximately 50’ [15m] ), work the controls as necessary to establish a
gentle turn away from the runway.
Until you have become efficient at flying your plane, always use an
assistant to hand-launch your model.
Have your assistant hold the model by the bottom of the fuselage. When
both of you have signaled “ready”, advance the throttle to full power. Your
assistant should run a few steps with the plane held high above his head,
and then give the model a swift, but controlled toss at a level, or slightly
nose - up attitude.Initially, the model will gently ascend, but within a few
seconds it will reach enough speed to climb. Gently add “ up ” elevator to
establish the climb.
Once you have reached a safe flying speed at a comfortable altitude
( approximatily 50’ [15m] ), work the controls as necessary to establish a
I
f taking off from the ground, place the model on your “runway” with the
nose pointing into the wind -- this will reduce the ground speed that must
be reached and automatically provide “ heading assist ” making steering
and takeoff easier. Slowly advance the throttle , adding rudder correction
as needed to keep the model rolling straight. When the plane becomes
“ light ” continue to apply throttle until you are at full power all this will
happen in a few seconds. When sufficient liftoff speed has been reached,
gradually apply “up ” elevator allowing the model to leave the ground. Do
not “yank” up on the stick-rather, be smooth and allow the plane to
eatablish a gentle climb.
15

gentle turn away from the runway.
One thing to remember is that, when the plane is flying away from you,
moving the aileron stick to the right will make the plane bank to your right.
However, when the model is flying toware you, moving the aileron stick to
the right will make the plane move to your left. Of course, the plane is still
responding the same way, it’s just that your orientation has reversed. This
must be kept in mind while learning to fly ( and is also a good reason to
take flight lessons from an experienced pilot!).
To establish a turn, “ up” elevator( pulling back on the stick ) is usually
required along with aileron input to get the model into a bank. To stop the
turn, apply a small amount of opposite aileron.
Once you get the plane into the air and have climbed to a comfortable
altitude, the first “order of business” will be to “trim” the model for straightand -level flight. The model flies best at approximately 3/4-throttle. Adjust
the trims on the transmitter to make minor control surface adjustments as
necessary until the plane will fly straight without any control inputs. Often,
your assistant can reach over and adjust the trims for you.
Remember to keep the model high enough to give yourself time to make
corrections, but don’ t let it get too far away. Otherwise, it will be difficult to
detect its attitude and which way it is going.
One
final check before landing:see how the model will react when it’s time
to land and you cut the power. To do this, while still at altitude, cut the
motor power. The model should establish a gentle, downward glide path.
This is how the model will react when it’s actually time to land. Add power
and
climb back
up to your original
altitude.Try again
, this time adding flaps.
To climb, add throttle and immediately take the flaps back out. Practice a
few of these “ climb and glides ” to judge how far out you will need to be
when its time to land.
Flying
16

Fly in spacious ground without obstacles and boscage.
FLIGHT WARNING
Landing
To land, fly down - wind past the landing area . Gently turn into the wind,
add flaps
and reduce the
throttle so that the airplane initiates an
ascending
glide path. If necessary, add power to extend the glide path to reach the
runway. As the model approaches and loses altitude, gradually and
proportionally add “ up ” elevator to control the glide path and altitude.
Continue
to apply elevator
until the mode
l touches
down at which
time you
should
be
holding full
, or nearly full up elevator.
This
will cause the airplane
to slow and settle to the ground.
Later,once you have become more experienced with your plane, you can
cruise around and perform slow “ fly-bys ” with the flaps extended.
Disconnect the battery and remove it from the airplane. Then, turn off the
transmitter. Allow the battery to cool before recharging, or allow the motor
to cool before installing another battery for the next flight. Inspect the
airplane to make sure nothing has become loose or damaged.
CAUTION: If, during a rough landing, the propeller becomes
jammed and cannot rotate, the battery andspeed control
will become very hot if you attempt to add power .
Immediately move the throttle down to stop the motor . If
you fail to do this, the motor, speedcontrol and/or battery
will be damaged.
AFTER FLIGHT
7
17

Never fly near the signs below:
Highway, railway, high tension line, crowed people, Flying Area,and residential area.
The best wind speed for fllght is 0-2m/s. As a visual reference, the flag at the
flying fleld or the flag on the transmltter antonna will be below a 45 degree angle.
1. Before flying, test the transmitter to make sure its functions work
normally in a reasonable control range.
2. Please inform each other the control frequency to avoid interference.
3. Never cut short the receiving antenna to avoid impairing the effective
control range.
4. Keep the transmitter antenna fully extended during flying.
5. Choose a safe Flying environment to avoid body injuries and property
damages.
6. If the red indicator on the transmitter starts to flash, it means the battery
power in the transmitter has become insufficient. Please replace the
batteries in time to ensure safety.
7. Always turn the transmitter on first and off last to avoid an out control
model.
0 m/s
(windless) 1-2
m/s 5m/s
above
ON
ON
ON
18
 Loading...