

Page 1
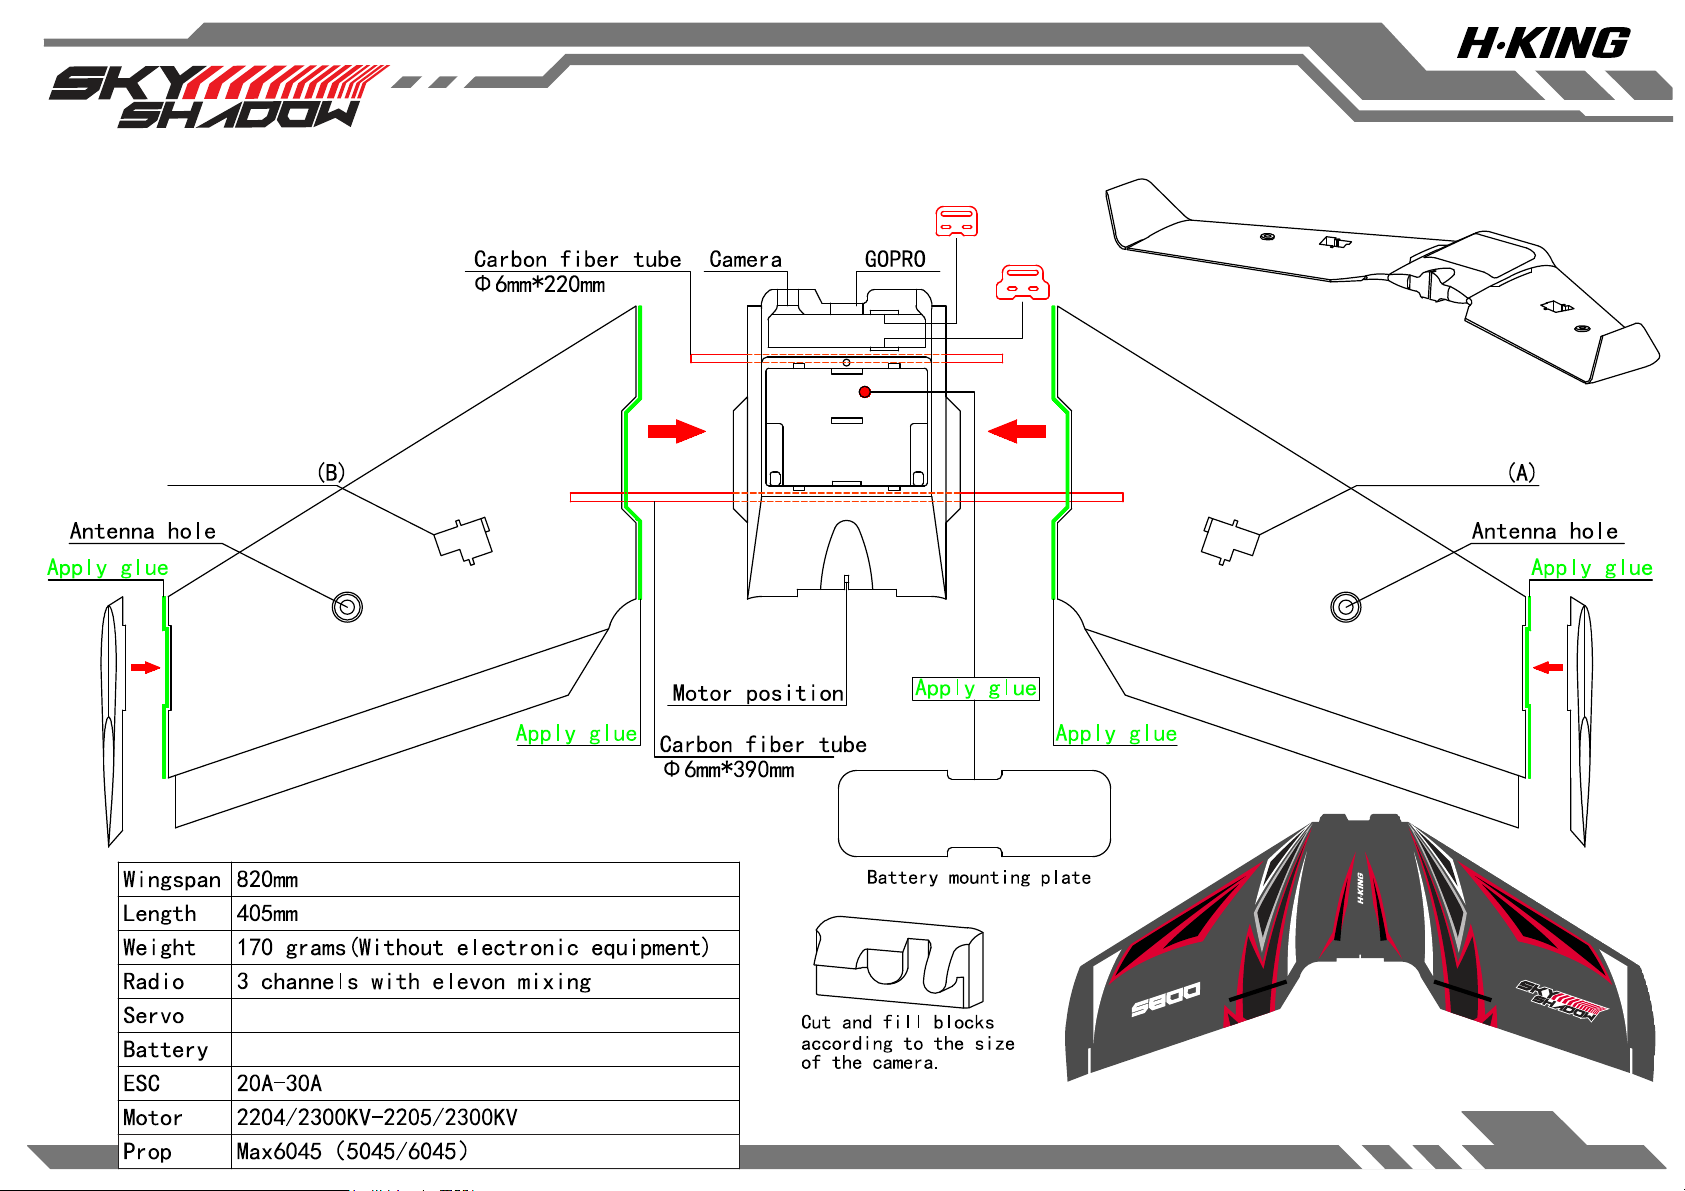
Assembly Schematic
FPV Flying Wing
servo cutoutservo cutout
Parameter Table
9 grams x 2 pcs
1500-1800 mAh 3S 40C-60C
Position and apply the decals as shown
This is not a toy.
Age recommendation: not suitable for children under 14 years old.
1
Page 2
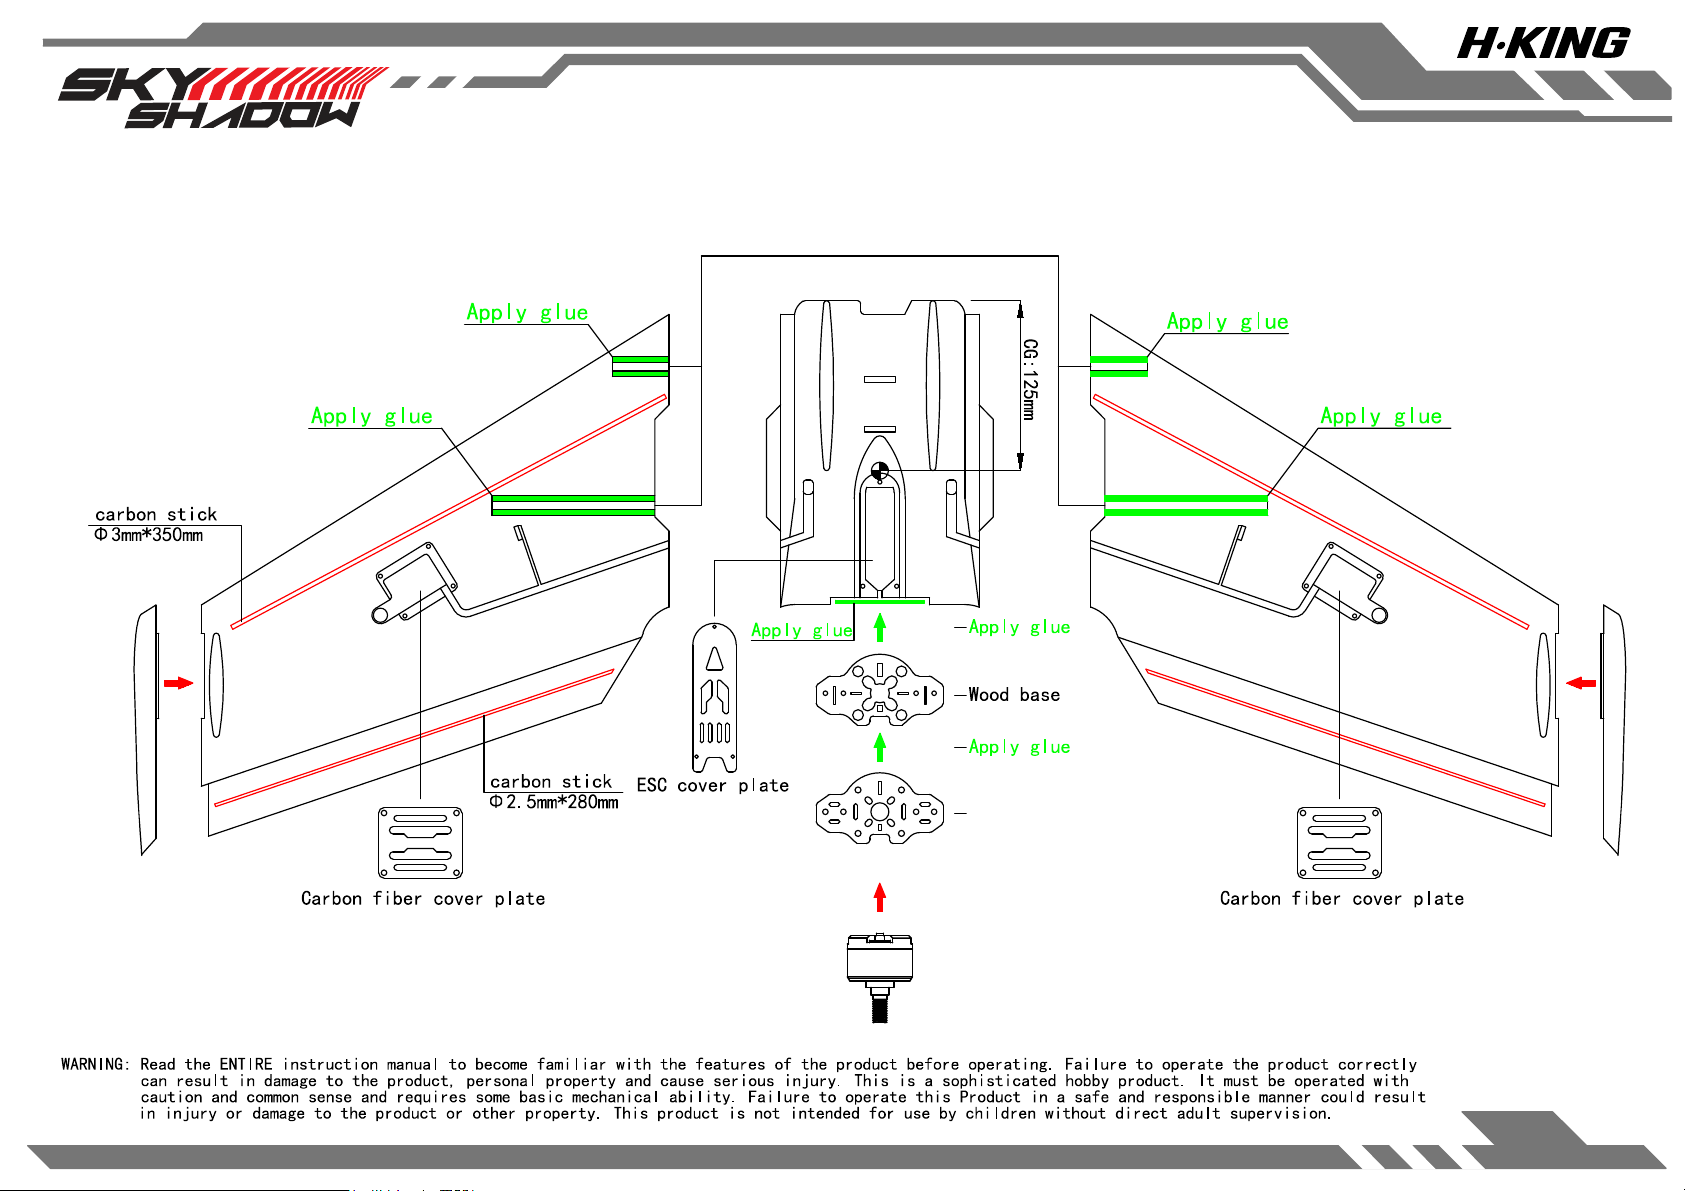
FPV Flying Wing
Assembly Schematic
Please glue the top cover before
loading the carbon fiber tube
Carbon fiber motor mounting plate
2
Page 3
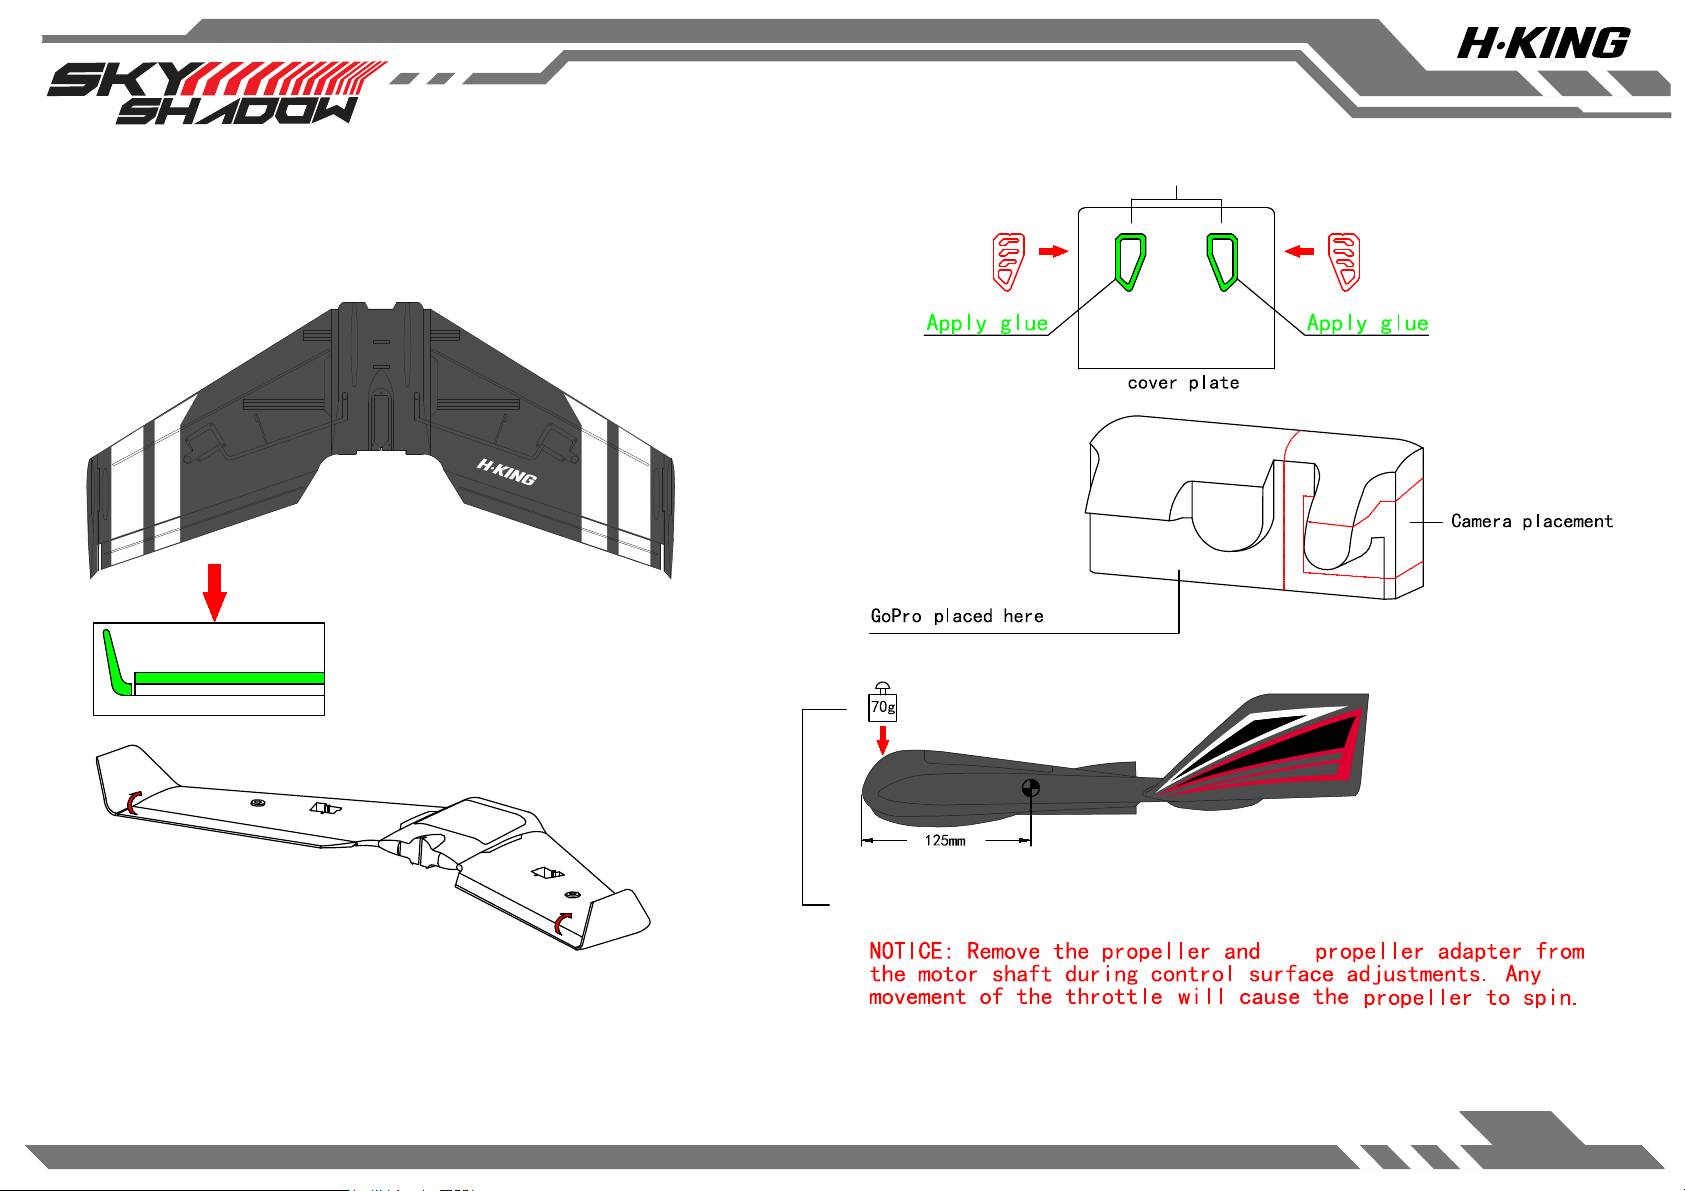
Assembly Schematic
FPV Flying Wing
Cut the fill blocks according to the size of the camera.
Cooling holes
The elevons should have a slight upward deflection,
when the controls are neutral.
Need to add 70 grams of weight in the nose when a GOPRO camera is not installed
the
This is not a toy.
Age recommendation: not suitable for children under 14 years old.
3
Page 4
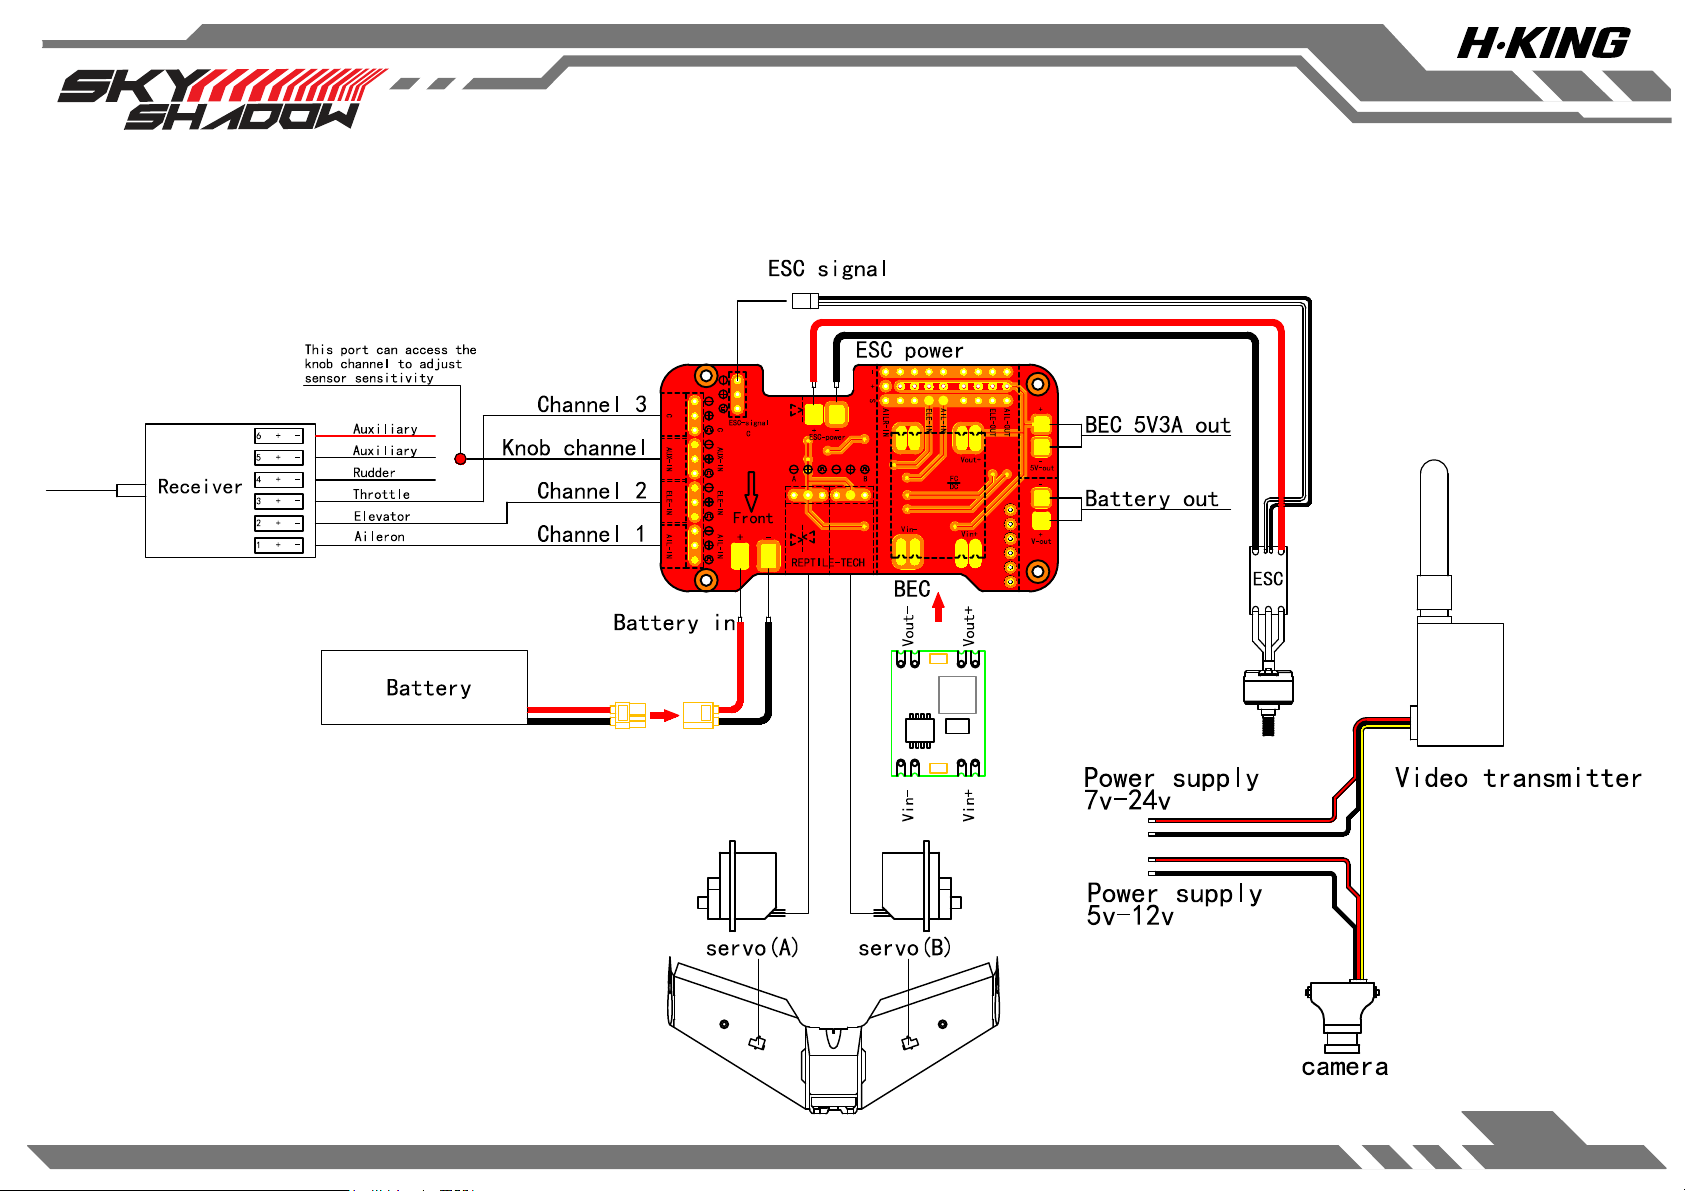
FPV Flying Wing
PCB for PNP
4
Page 5
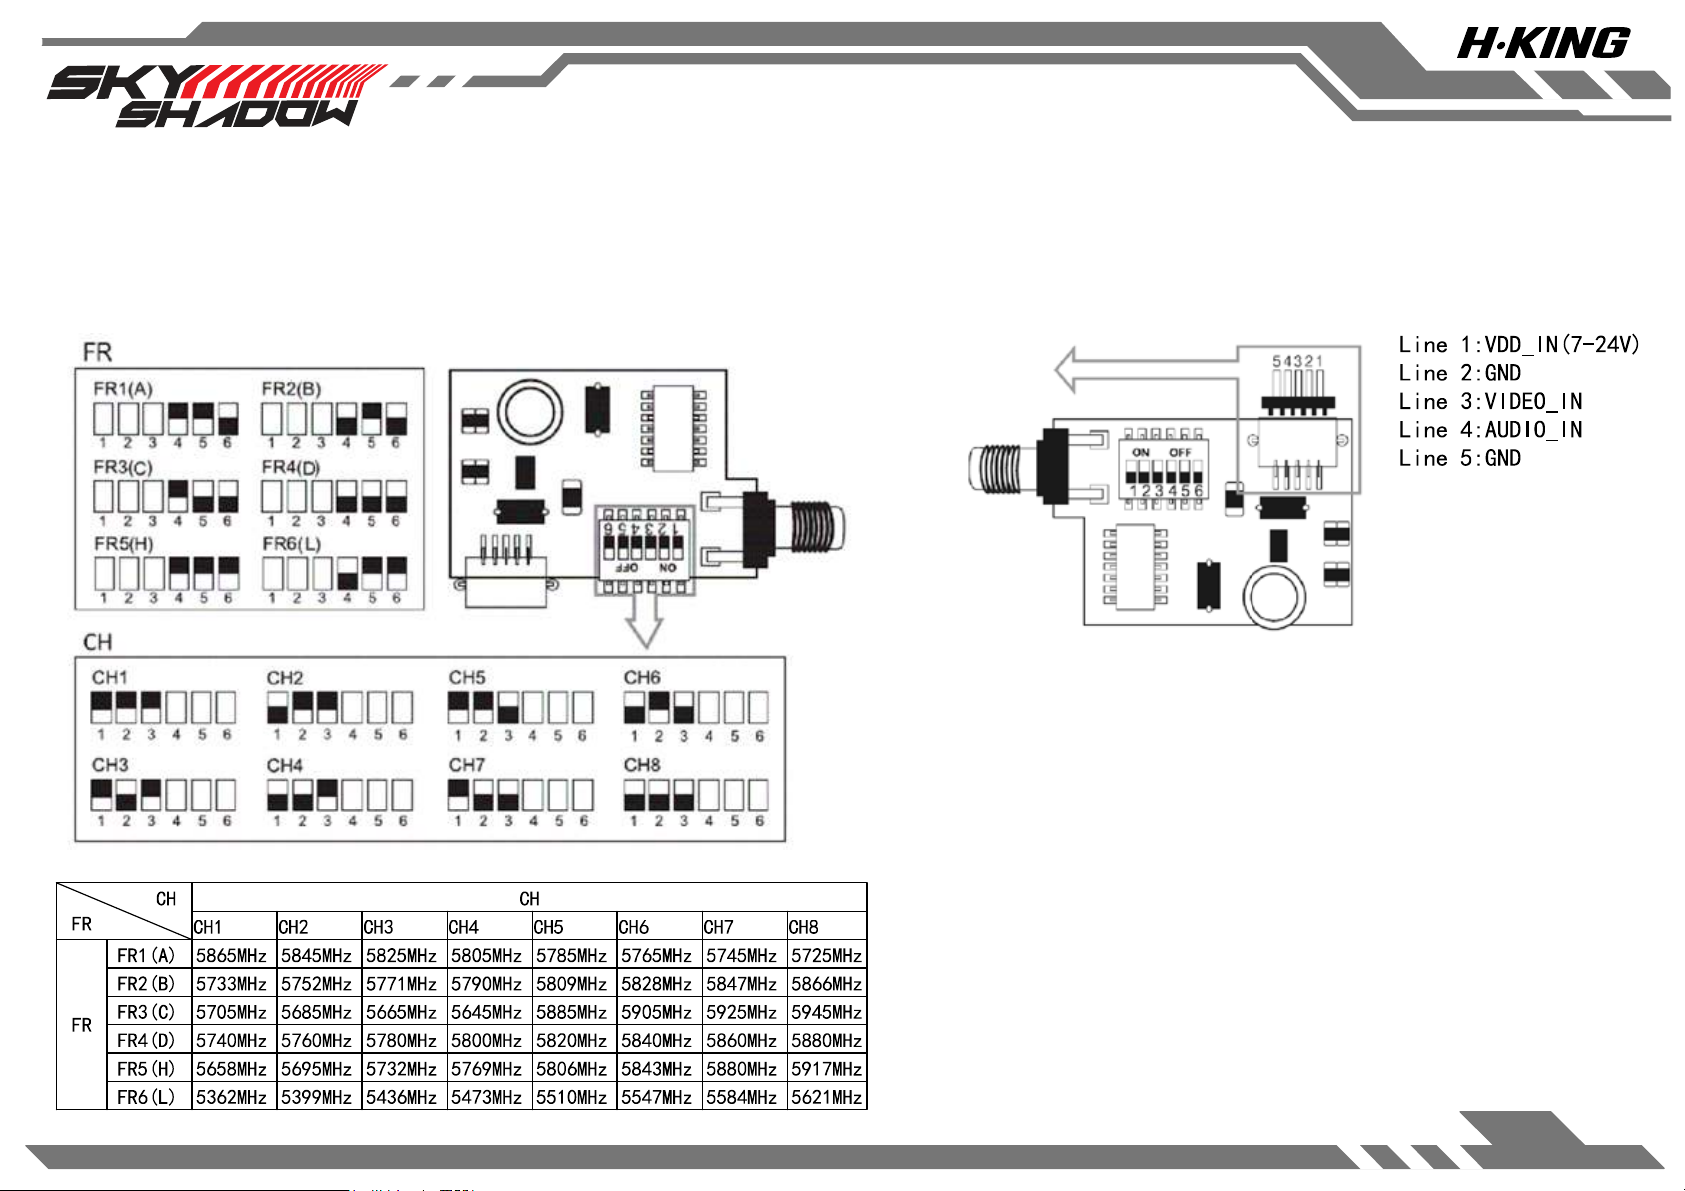
MODE: TX200
FPV Flying Wing
PRODUCT SPECIFICATION
5
Page 6
Flight Controller Manual
VERY IMPORTANT:The Controller has to re-learn center position after
installation,or replacing a new radio system, or making a trimming(or
Sub-Trim)change within the transmitter, otherwise the servos may move to one
side automatically when switching to hold mode.To do this,just quickly flip the
flight mode switch twice between rate mode and hold mode within 1 second!
Features
1.Four Model Types supported: single aileron, dual ailerons , flapperons, delta and
vtail.
2.Three Flight Modes supported:
a. Rate Mode ,Rate Mode for offset correction.
b. Hold Mode ,HOLD mode for attitude hold
c. Gyro Off Mode,transsmiter control the plane directly.
3.Two kinds of Gain Control Method supported:Master Gain from the radio,
Independent Axis Gain from the Variable resistor on the Controller board.
g superior algorithm, Bring a more comfortable and more sensitive sense of
4.Usin
control .
Specifications
1. Voltage Range:5-6V DC. (Do Not Use Dry Cell!)
2. Dimensions:40mm x 25mm.
3. Weight:6.5g.
Packing List
1. Flight Controller board 2. manual
Status LED Description
LED OFF:Flight Controller in Gyro Off Mode.
LED ON:Flight Controller in Rate Mode.
LED flash: Flight Controller in Hold Mode.
WARNING: PLEASE READ THE FOLLOWING STEPS VERY CAREFULLY
BEFORE YOU START TO INSTALL A NEW PLANE!
Step 1:Mounting
The board need to be firmly mounted near the center of the gravity of the plane by
using the double-tape provide.Please make sure the longer side of the board is along
with the heading direction.After mounting ,please check again if the board is attached
firmly in the plane.
Step 2:Model Type Selection
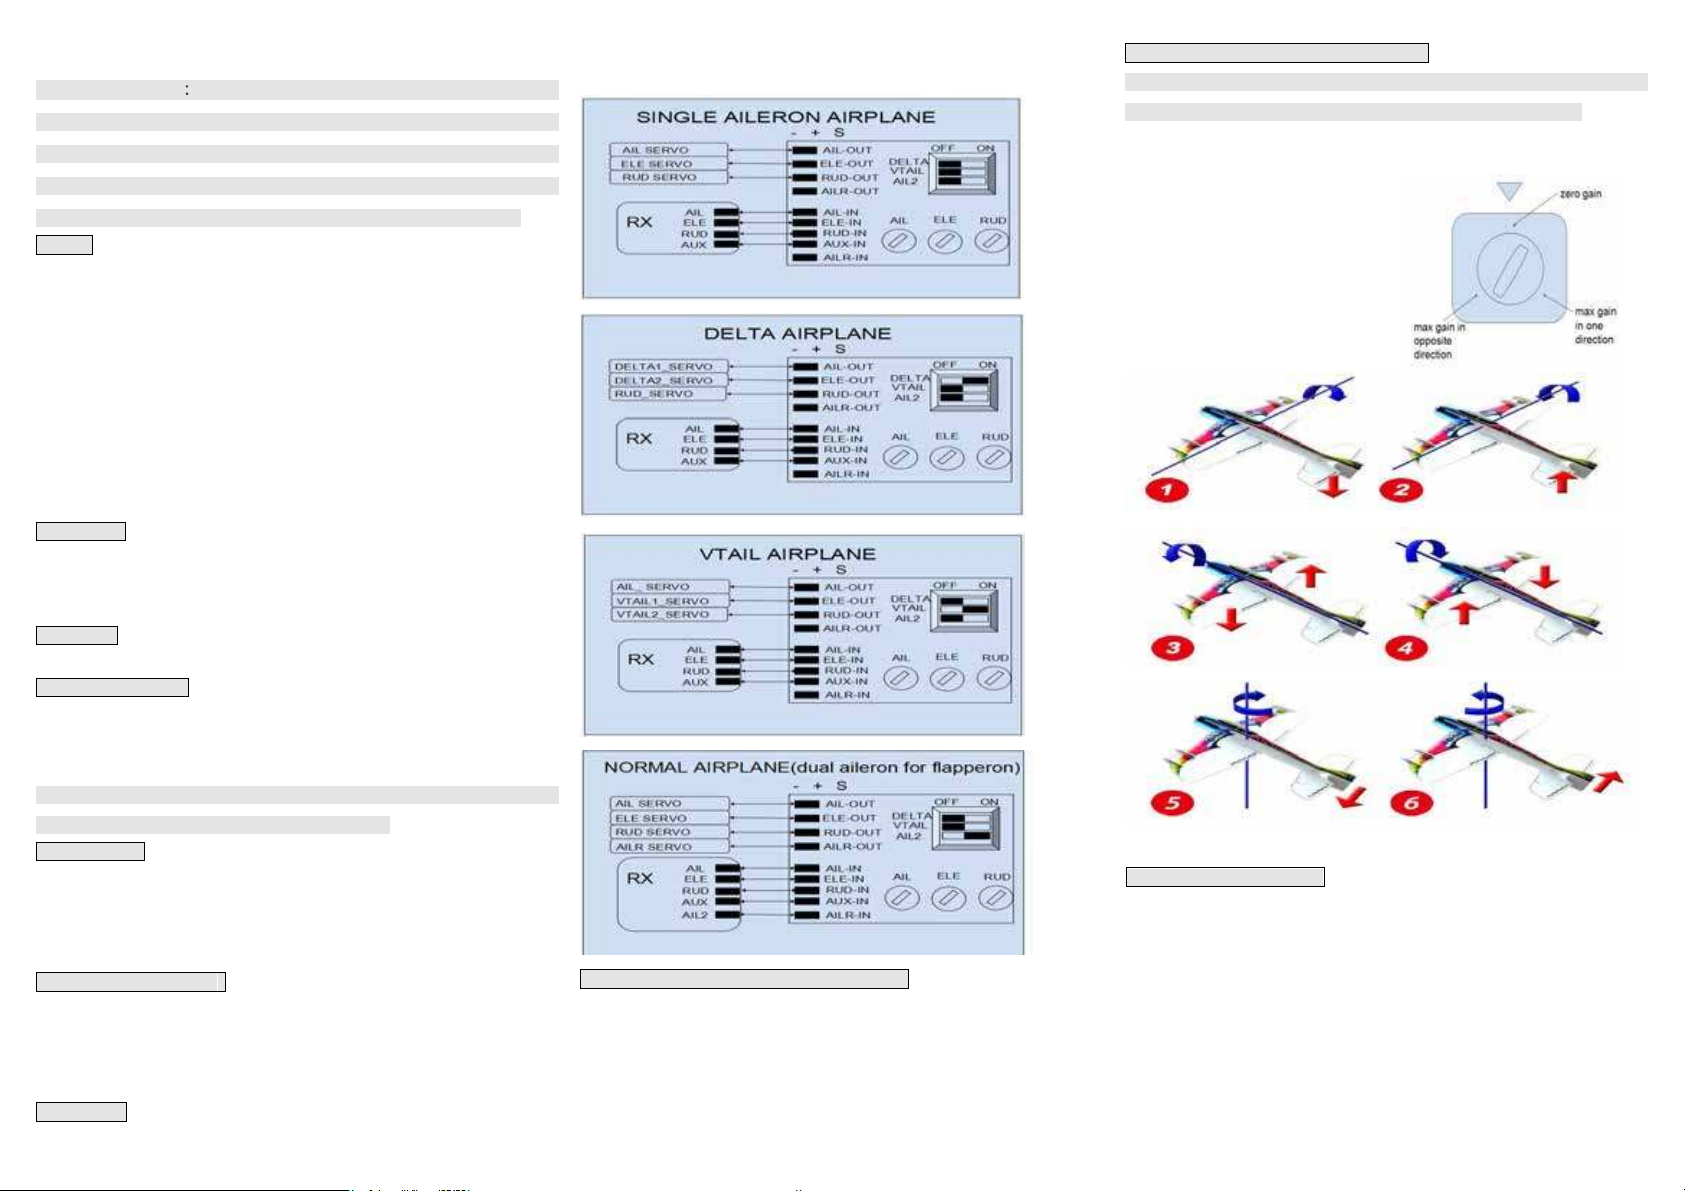
The DIP switches set the WING mode,Please match the type of your aircraft with
Normal Airplane(single aileorn),Normal Airplane(dual aileron for flapperon),
Delta-wing (Flywing-wing)and V-tail according the pictures 1 to 4. if you change any
DIP switch settings, power cycle the device to enable the new setting to take effect.
Step 3:Wiring
Please connect the control board and the radio receiver using wires provide according
the pictures 1 to 4.Pay attention to the color of wires to avoid anti-plug.
Pic 1
Pic 2
Pic 3
Pic 4
Step 4:Switch and Master Gain Channel Configure
Assign a 3-
switching the flight mode in flight.When use a 2-pos swtich,you can only switch
between Rate Mode and Hold Mode,So you can not switch to Gyro Off Mode.It will
be set to Rate Mode by default if switch channel is not connected to the board. If
your transsmiter has Travl Adjust Function(End Point Adjust Function),you can
change the switch channel’s End Point to change Master Gain.
pos switch to the channel which connected the pins”IN-4”
(AUX-IN) for
Step 5:Gyro direction and Gyro Gain configure
Befor flight, you have to verfy that the gyro compensation direction is OK,
otherwise, it could lead to losing control or even crash during the flight!
the VR gain POTs on the Flight control the correction gain and direction for each of
the pitch (ELE), roll (AIL) and yaw (RUD) axis.
5 o'clock = max gain in one direction
12 o'clock = zero gain
7 o'clock = max gain in opposite direction
To perform the examination,power on the
board,pick the plane up and check it by
following the six ste
ps below:
For your first flight, the recommand gain value is 2/10 o'clock!
Step 6: re-learn center position
Quickly flip the flight mode switch three times between rate mode and hold mode
within 1 second!
 Loading...