

V 1 . 0
The user manual

GH3-3D User Instructions V1.0
目录 Contents
一、简介 Brief Introduction:
2
二、物品清单 Item List:
2
三、云台安装 Gimbal Assembly:
3
四、特性 Product Features:
3
五、设置 Settings:
4
1、安装驱动和下载调参软件 Install the driver and download the GUI:
4
2、用户调参界面 User Configuration Interface
5
3、固件升级 Firmware Update
7
六、云台供电系统 Gimbal Power Supply System
7
七、云台测试 Gimbal Test
8
八、云台校准 Gimbal Calibration
9
1

一、简介 Brief Introduction :
2
GH3-3D是为航拍爱 好者研发的针对gopro Hero3相机研 制 的三轴无刷云台 ,云台框架采用高 强度
的工程 塑胶材料,在保证 云台强度足够的同 时,大大减轻了 云台的重量。云台 的整体设计小巧 便携、安
装简易。GH3-3D塑胶三轴云 台 使用高速的32位处理器 、高精度传感器和优秀 的控制算法,拍出高 效 稳
定的画面。
The GH3-3D 3 Axis Brushless Gimbal is designed for the aerial photography hobbyist, using the GoPro Hero3
and 4. Its gimbal framework is composed of engineered polycarbonate, which can support enough strength
and greatly reduce the weight of the gimbal. The overall design is compact, convenient and easy to install.
The GH3-3D 3 Axis Brushless Plastic Gimbal uses high-speed 32-bit MCU, a high-precision sensor and
excellent control algorithm, which can ensure high-quality and stable videos.
二、物品清单 Item List:
1、云台×1 Gimbal
免调试 三 轴无刷云台集成 系统,采用减震球 一体化设计,减少
飞机的高 频 振动对云台的影响。内置 控 制板、IMU模块和 电 机
电源线,使得云台外观更加整洁。
Commissioning – free three axis gimbal system with integrated
design of shock absorption balls, reduce the influence from highfrequency vibration of aircraft to gimbal. Built-in control board,
IMU module and motor power line make the gimal compact.
2、上减震板×1 Top shock absorption plate
先把4个减震球安装在上减震板上,再把上减震板固定在飞机上。
Mount 4 shock absorption balls on the shock absorption plate,
then install the shock absorption plate on the aircraft.
3、配件盒×1 Accessories pack
配件盒内有防脱落件、螺丝包、图传板和各类连接线配件。
There are anti-drop kits, screws, FPV board and all the wires in the pack.
防脱落件×4 anti-drop kits
相机固定件×1 Camera fix kit
螺丝包Screws
M2.5×6:用于锁紧相机到云台
for locking camera on gimbal
M3×8:用于安装减震装置到飞行器上
for install shock absorption device On the flight vehicle

3
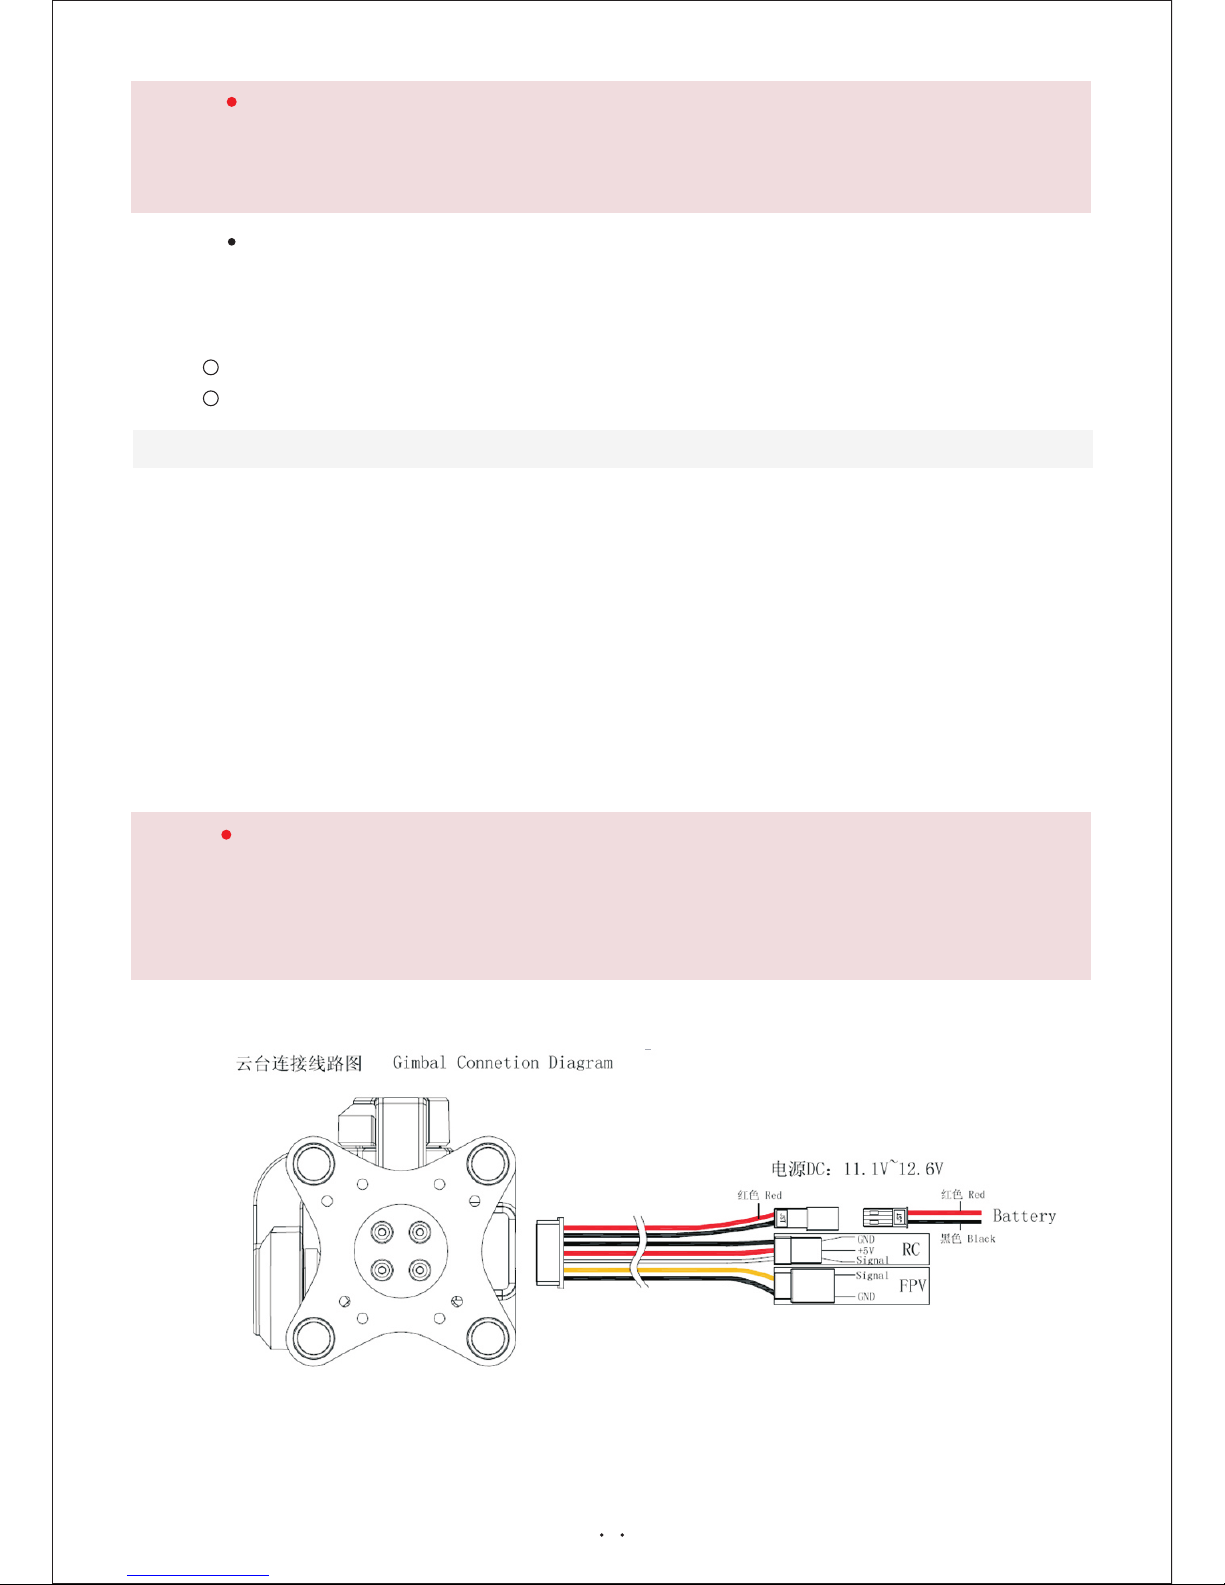
电源信号排线×1 wire for power and signal
源信号排线一头是7PIN接头,另外一边是由JST接
头和杜邦线组成,红黑的JST接头是接电源,杜邦线
连接图传和遥控。
One end is 7PIN connector,and the other end is
JST and Dupont Line. Red and black JST is for
power, and Dupont Line is for FPV and remote
control.
图传连接套件×1 FPV connection set
图 传 连 接 套 件 包 括 USB连 接 板 和 2PIN连 接 线 ,
USB连接板连接gopro Hero3的USB接口,2PIN连
接线连接云台主控板和USB连接板。
Includes USB connection board and 2PIN connection wires.
USB connection wire is to Connect to the USB port of gopro
Hero3. 2PIN connection wire is to connect main control board
of gimbal and USB connection board.
三、云台安装 Gimbal Assembly:
1、云台×1 Gimbal
安装图 Gimbal Assembly Guide
1 2
3
4
防坠落卡扣(母)4pcs
Anti dropping buckle (female)
防坠落卡扣(公)4pcs
Anti dropping buckle (Male)
杯头内六角螺丝(M3X7)8PCS
Hexagon socket head cap screws(M3x7)
安装云台悬挂钩
安装精灵2机架
Install on phantom 2
杯头内六角螺丝(M2.5X6)2PCS
Hexagon socket head cap screws(M2.5x6)
Install gimbal hanger

用户使用F PV时 须接上图传板和2 P连接线,图传板USB接 口与Gopro H ero3的U SB接
口连 接 ,2P连接线 连接云台 主控板和 图 传板, 通 过内部走 线到云台 顶部输出 图 传接口 ,
图传接口与图传发射端连接。
(用户不适用FPV时,可不接图传板和2 P连接线)
When using FPV, attach FPV board with a 2p cable. Link up USB connector on FPV board
with the Gopro Hero3 cable. Also connect 2p cable with Gimbal main control board and FPV
board. Through internal alignment to the Gimbal top (the output FPV interface), FPV
connector connects with FPV transmission port. (unnecessary to connect FPV board with 2p
cable with FPV is not in use).
图传板连接图
FPV Connection Guide
4
规格参数 specification
工作电压 (Working Voltage) :
工作电流 Working Current ( ):
俯仰角范围 Pitch angle range ( ):
横滚角范围 Roll angle range ( ):
3S锂电 3S LiPo Battery
500~600mA
(向上)-48°~+ 95°(向下) (up) -48°~+ 95°(down)
(向左)-35°~+ 35°(向右) (left) -35°~+ 35°(right)
航向角范围 Yaw angle range ( ):
(左旋left)-45°~+45°(右旋right)
云台重量 Weight ( ):
168G(不含gopro相机without Gopro)
云台尺寸 Dimension ( ):
云台工作温度范围 Working temperature ( ):
控制精度 Control Accuracy ( ):
适用拍摄设备 Application ( ):
87.3mm×80mm×94.4mm
-10℃~70℃
0.1°
银色和黑色 Silver and Black GoPro3,GoPro3+
四、特性 Features:
五、设置 Settings:
1、安装驱动和下载调参软件 Install the driver and download the GUI:
(1)根据电脑系统选择合适的PL2303驱动。
Select the appropriate PL2303 drive based on computer system.
(2)下载调参软件,无需安装。
Download the parameter adjusting software without installation.
(3)先通过USB线连接云台和电脑,再打开GUI。
Connect the Gimbal with the computer by USB first, and then open GUI.
(4)选择正确的电脑串口,连接GUI。
Select correct serial port, and connect with GUI.

5
2、用户调参界面 User Configuration Interface
1
2
3
4
5
GUI版本号 GUI Version No.
1
2
菜单栏 Manu Bar
3
文件:保存参数和导入参数 File: Save Parameter
语言:选择中文或 English Language: Chinese or English
固件更新:云台固件升级 Firmware update: gimbal firmware update
4
基础设置Basic Settings.
PID设置:
横滚、俯仰和航向PID设置
P,I,D – PID regulation parameters for all axes. .
P-“P”为响应外部干扰的反应。提高这个数值,将提升云台对外部干扰的反应,如果“P”值过高时,
该轴的会开始振荡。如果有振动传到陀螺仪传感器,这些震荡将会越来越大。如果出现振荡时,提
高1或2个单位的“D”参数,然后再次尝试提高“P”值。
P – describes the power of disturbance response. Higher values means a stronger response
reaction to external disturbance. Raise this value until the stabilization quality of fast disturbances
will be adequate. If the “P” value is too high, oscillations of the axis will start to be present. These
oscillations will get worse if there are vibrations that reach the IMU sensor board. If oscillations
occur, raise the “D” parameter by 1 or 2 units, and then try to raise the “P" value again.
D - “D”值为反应速度。该值有助于消除低频振荡。 “D ”值太高,可能会导致高频率的振荡,特别
是当IMU传感器处在震动中。
D – The “D” value reduces the reaction speed. This value helps to remove low-frequency
oscillations. A “D” value that is too high can cause high-frequency oscillations, particularly, when
the IMU sensor is exposed to vibrations.
I-“I”值为云台的移动速度,增加这个值来加快云台运动;
I – The “I” value changes the speed at which the gimbal moves to incoming RC commands and to
move the gimbal back to neutral. Low values result in a slow and smooth reaction to RC
commands and to getting back to neutral. Increase this value to speed up the Movement.

6
电机设置:Motor Settings
横滚、俯仰和航向电机功率和方向设置
Motor power and direction regulation parameters for all axes
功率是最大电压提供给电机(0 - 255,其中255表示电池电压)根据电机特性选择此参数。
Power-maximum voltage supplied to the motors (0 - 255, where 255 means full battery voltage).
Choose this parameter according to your motor characteristics.
注意 caution:
1、电机不可以过热!电机如果在80℃以上磁铁会损坏。
Motors should not get too hot! Motor temperatures of over 80С will cause permanent damage to
motor magnets.
2、电机功率过小会因为无力而影响云台的稳定性。
A Power value that is too low will not provide enough force for the motor to move the gimbal and
stabilize the camera adequately. A low power value will be most noticeable in windy conditions,
when the gimbal is not well balanced, or if the gimbal suffers from mechanical friction. Slowly
lower the Power parameter to find its optimal value. Find the lowest value that still provides
good stabilization and adequate holding torque.
3、提高功率等于提高PID设置“P”值。如果提高功率值,你应该重新调整您的PID值。
Raising the power equals raising the “P” value of PID settings. If you raise the POWER value,
you should re-tune your PID values as well.
高级:Advanced Settings
横滚和俯仰自定义初始角度、陀螺仪权重、云台跟随速度和死区。
Pitch and roll custom angle, gyroscope weights, gimbal follow speed and follow dead.
自定义角度:使得相机始终保持这个角度拍摄。
Custom angle: to make sure camera keeps this angle shooting.
陀螺仪权重:配置陀螺仪在计算角时的权重,当慢速飞行时,陀螺仪权重应设置较小的数值,当飞行
的加速度较大时,陀螺仪权重应设置较大的数值,以减少外界加速度对角度计算的影响。建议值
100~150。
Gyroscope weights: configurate gyroscope weights when calculating angle. When flying in low
speed, gyroscope weights should be set in smaller value. When flying fast, gyroscope weights
should be set in bigger value to reduce the influence from outside acceleration to angle calculation.
Proposed value is 100~150.
云台跟随速度和死区:航向跟随模式下的跟随速度和死区范围。
Follow speed and follow dead: range of follow speed and follow dead under course following pattern.
遥控设置:RC Settings
遥控控制的角度范围、遥控模式选择
Range of control angle. Control mode selection.
运行模式:Running mode:
正常三轴模式:航向轴始终向正前方。(解锁时航向轴与飞行器方向一致)
Normal three-axis Mode: Heading axis faces to the right ahead throughout.
航向跟随模式:当飞行器旋转角度大于航向轴死区时,航向轴跟随飞行器旋转。
Follow YAW: heading axis will rotate with aircraft when rotate angle of aircraft is bigger than deadband of heading axis.
7
注意 caution:
使用遥控控制时不能选择估算
Estimate: It is good to improve the stability when pitch axis is in big angle by estimating angle.
Suggest using this mode when the angle of inclination of aircraft is too big.
按照下面顺序进行固件升级,否则导致固件升级失败和云台工作异常
3.1 计算机连接互联网
3.2 三轴云台与电脑通过micro USB线连接,升级完成前不要断开micro USB连接线
3.3 打开云台调参软件并且选择正确的com端口
3.4 点击“固件更新”,在弹出新窗口后点击“获取版本”获取最新的固件版本,点击“更新固件”等待
固件更新完成提示
Please follow this sequence to update firmware, or it may cause failure or abnormal.
3.1 Computer connected to the Internet
3.2 Gimbal connected to computer by micro USB. Do not switch off micro USB before update finishes.
3.3 Open Configuration software and then select the right com port.
3.4 Click ‘firmware update’; get the latest update version by click ‘get version’ after seeing the new
window. Click ‘firmware update’ and wait for the tip to tell update finishes.
普通:
电脑串口选择、连接、断开、校正、读取和写入;固件版本号和当前温度。
General: serial port on computer selection, connect, disconnect, calibrate, read and write;
version and current temperature
GUI版本号 GUI Version No.
5
状态显示Status display
6
3、固件升级 Firmware update
注意 caution:
(1)Do not switch off micro USB before update finishes.
(2)If there is abnormal in this process, please repeat steps above and update again.
(1) 更新过程请勿插拔micro USB连接线
(2) 在更新过程中出现异常,重复以上步骤,重新更新固件
六、云台供电系统 Gimbal Power Supply System

8
(1)、GH3-3D塑胶三轴无刷云台只需连接3S锂电便可独立工作,内置BEC模块,可给接收机供电。
Gimbal RC connection has BEC output, by which the receiver can be individually powered.
七、云台测试 Gimbal Test
1、云台水平稳固安装到飞行器上,相机安装在云台上,使相机镜头的朝向与机头朝向一致。
2、正确连接遥控线,若需要连接图传,把图传模块连接相机和云台,再把图传连接线连接图传。
3、打开遥控器,给云台上电,等待云台自检。初始化完成,云台相机与机头保持一致,横滚轴和俯仰轴保持水平。
拨动遥控器上用于控制云台PITCH轴的开关,观察云台PITCH轴的转向是否与您设置的一致,如果不一致,请检
查连接线和遥控设置。
4、测试完毕,断开云台电源。
1. Install gimbal on aircraft horizontally, and mount camera on gimbal. Please make sure the orientations
of camera and aircraft are the same.
2. Connect the RC wires correctly. If need a FPV, please connect the FPV module to camera and gimbal,
and then connect the FPV wire to FPV.
3. Turn on radio, power gimbal and wait for self-checking of gimbal. After initialization is completed, make
sure the orientations of camera and aircraft are the same and pitch and toll axes are horizontal. Slide the
switch to control pitch axis on radio. Check if the rotation direction is the same as your setting. If not,
please check the connections and radio settings.
4.Test finished, switch off the power.
当接收机有除了云台以外的其他电源供电时,必须挑出RC连接的红色线,否则会烧坏接收机。
When the aircraft shares a receiver with the gimbal (individual UBEC, or ESC with UBEN supplying
power to the receiver), in order to avoid burning out the receiver, you must cut the red 5V wire
(where the Gimbal supplies power to the receiver). But if the receiver has no power supply from the
ESC or UBEC, do not cut the red 5V wire.
注意 caution:
(1)请先安装相机到云台上,再通电。
(2)上电时YAW轴必须和机头方向一致,上电时的YAW轴方向就是上电后正常工作的方向。
(3)上电时必须保持静止,等待初始化完成后,云台正常工作。
(4)上电后正常工作时出现ROLL轴和PITCH轴偏离水平位置、YAW轴出现偏转等情况时,云台断电,连接GUI重
新校准陀螺仪
(1)
(2) Adjust the gimbal YAW axis and plane YAW axis to the same angle. The direction of YAW when
powering is the direction of normal working after powering.
(3) Do not move the Gimbal while Gimbal is powering on (or resetting).
(4) If pitch axis and roll axis are not horizontal or Yaw axis drifts obviously, please power off the gimbal, and
connect GUI to calibrate gyro again.
Please install Gopro camera with Gimbal before powering the Gimbal.
注意 caution:

八、云台校准 Gimbal Calibration
1、点击端口选择的下拉列表框,选择正确的电脑串口。
2、点击“连接”。
3、先把云台放置在水平位置(横滚和俯仰),点击“校正”,等待“校正成功”
点击“写入”,在这过程一定保持静止。等待“写入成功”
4、点击“断开”校准完成。
5、断开USB线,云台航向轴处于正前方,给云台上电,观察各轴是否处于水平位置,否则就重新校准。
1. Click port to select the right port of computer.
2. Click‘connect’.
3. Keep the gimbal horizontal (pitch and roll), and click ‘calibrate’ and wait ‘calibration successfully’.
Click ‘write’ and please keep gimbal static during this period. Wait ‘write successfully’.
4. Click ‘disconnect’. Calibration finished.
5. Disconnect USB. YAW axis is at right ahead. Power gimbal. Check if all axes are at horizontal position. Or
recalibrate.
9
 Loading...