

Page 1

DC-3/C-47
Please read this manual carefully before operating this plane.
Page 2
Read this instruction manual fully so as to become completely familiar with the features of
this product before operating. Failure to operate this product correctly could result in
damage to the product, personal property and cause serious injury. This is a sophisticated
hobby product and is NOT a toy. It must always be operated with caution, common sense
and some basic mechanical ability. This manual provides instructions as the the assembly,
safe operation and maintainence of this hobby product. It is highly reccommneded that you
follow and read fully the instructions and warnings stated in this manual including safety,
assembly, set-up and flying guidelines in order to operate this product correctly and avoid
damage or serious injury.
As the user of this product you and you alone are responsible for operating it in a manner
that does not endanger yourself and others around you or result in damage to the product or
property of others. This product is operated via a radio controlled system that in some cases
can be subject to interference from sources outside of your control. Interference may result
in a momentary loss of control so it is always recommended that this product be used in a
suitably open outdoors space.
- This is a radio controlled flying model and as such must always be flown with caution and
care. This is not a toy.
- The
C-47
is designed for intermediate to advanced pilots.
- Alway great caution when using the recommended battery to power this product.exersise
For full safety notes and operating procedures, please see information provided by your
battery supplier.
- Take great care when connecting/disconnecting the battery. See battery supplier for full
safty procedures.
- Never power up the model in confined spaces and always keep the prop clear of
obstructions.
- This product is not a toy. Children must be accompanied by an adult at all times if operating
this product.
- Only fly this model in an open area away from crowds, people, buildings, tree's, power lines
and obstructions.
- Always put safety first when operating this model and consider the warnings stated above.
- The supplier/manufacturer accepts no responsibility for damage or injury caused through
the use of the product. Not suitable for children under the age of 14. THIS IS NOT A TOY.
Page 3

CONTENTS
*Specification ........................................................................................................
*Spare parts listing .............................................................................................
*Assembly .......................................................................................................
*CG location .............................................
*Trouble shooting ................................................................................................12...
*Model flying precautions .........................................
*Pre-flight checks ..................................................................................................
....................................
......
........................................
..........................
03-10
01
02
11
13
14
Page 4
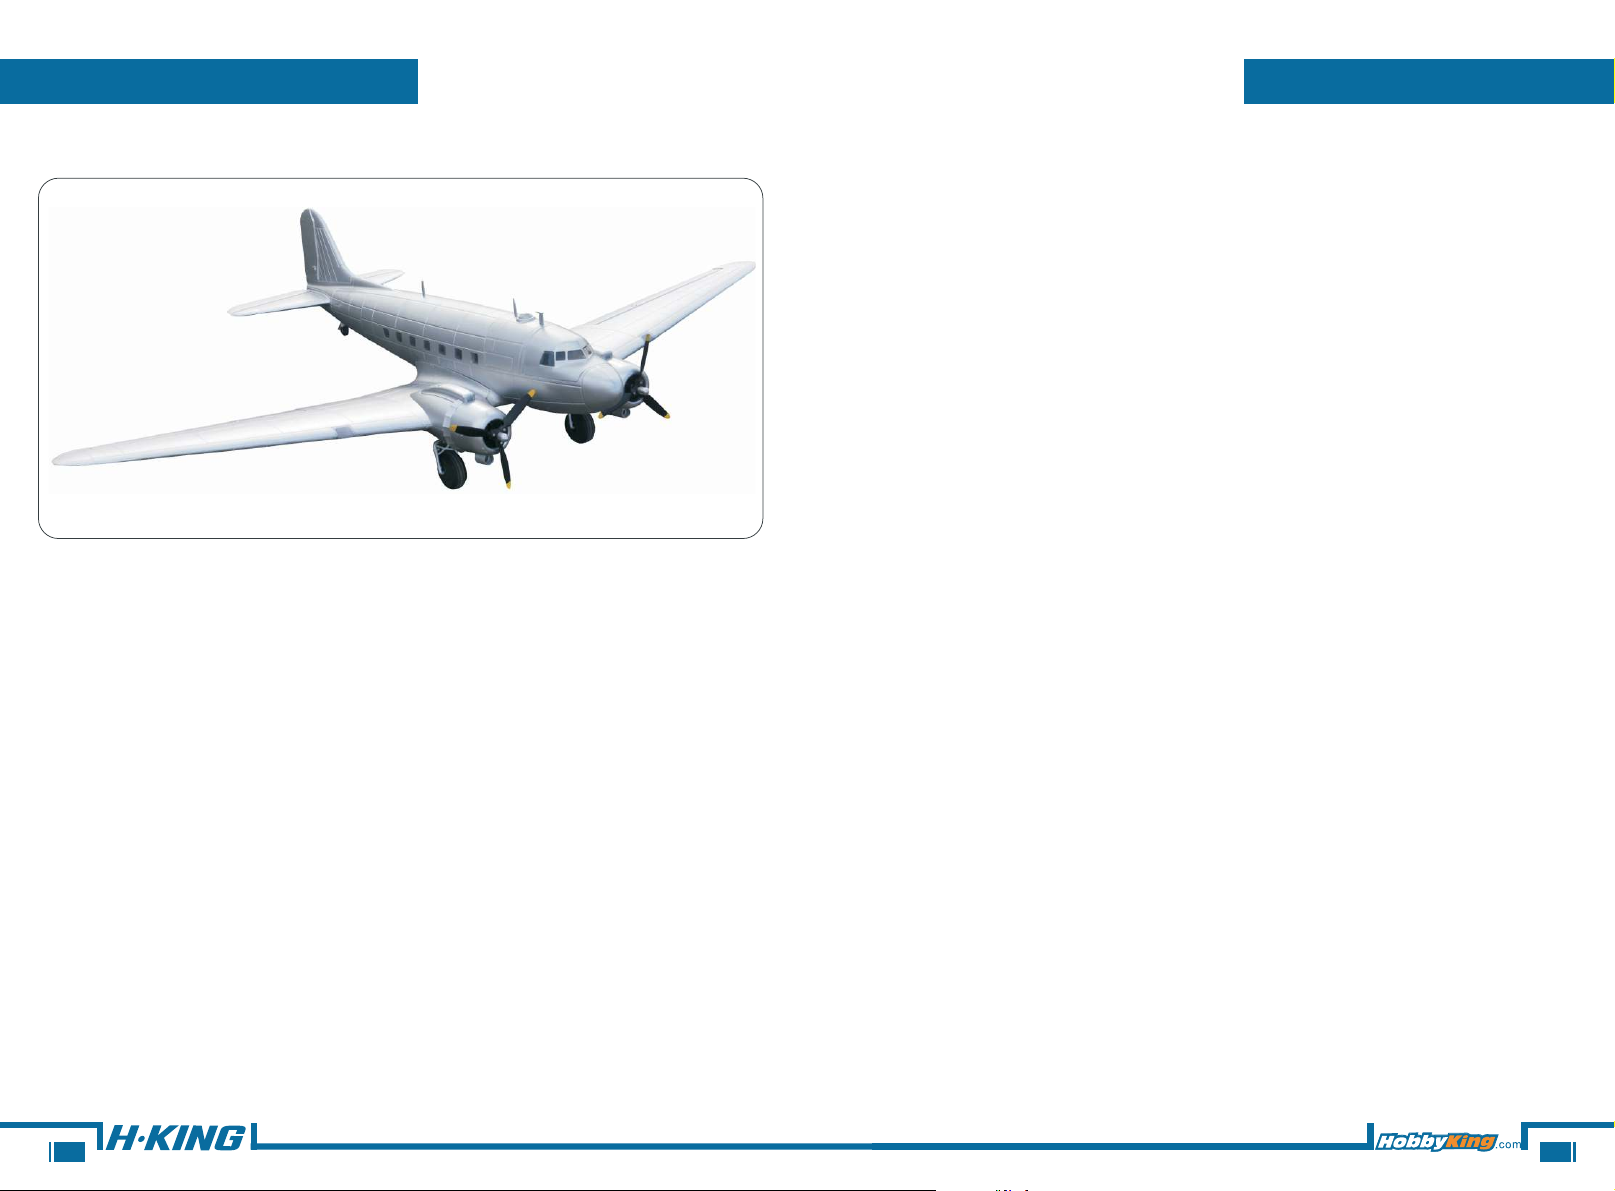
SPECIFICATION:
Length:1103mm
Flying weight:1700g
Wingspan:1600
Servos:9G servos x 6pcs 25G x 2pcs
Motor:Brushless Motor 2215 Out runner KV960
Battery:14.8V-3300mAh 25C LiPo Battery
ESC:20A x 2
mm
PRE-FLIGHT CHECKS:
1. Always range check your model before any flight. Follow your radio manufacturers
guidelines for performing this check.
2. Check all screw and mounting points are firmly secured, including control horns and
clevises.
3. Only fly with fully charged batteries. Failure to do so could result in loss of control,
damage to the model and property
charged.
4. With the model powered up check that all surface are free from damage, moving
in the correct directions and freely with stick input.
5. Inspect the model and prop for any damage that may have occurred during transit
and listen for any unusual sound from the electronics when powered up. If in
doubt, do not fly.
6. With the model held securely and the prop free of obstructions, increase the throttle
just slightly to confirm the rotation of the prop is correct. The model should want to
pull straight forward with throttle.
7. If this is your first flight with the model double check that the CG is at the correct
position. If not, adjust battery position inside model accordingly.
8. If you are an inexperienced model pilot seek the help and assistance of an
experienced pilot to perform these final checks and to test fly the model for you.
around you. Make sure your batteries are fully
01
14
Page 5
MODEL FLYING PRECAUTIONS:
- Select your flight area carefully. Always choose an open space that is unobstructed
from trees and buildings and away from crowed area. Avoid flying in area with
roads, and water near by or within close proximity to full size air traffic.
SPARE PARTS LISTING:
- Do not fly this model in poor weather. High winds, low visibility, inclement
temperatures, rain and storms are to be avoided.
- Never attempt to catch this model whilst in flight. Even a slow moving model can
cause harm to yourself and risks damage to the model.
- This model is recommended for children no younger than 14 years old. All children,
no matter what age, should always be supervised by a capable and responsible
adult when operating this model.
- Always unplug your model battery when not in use. Never leave the battery installed
in the model.
- Please remember to keep clear of the propeller at all times when your flight battery is
connected.
- Before flying, always turn ON your transmitter first then plug your flight battery into
the model.
- After flying, always unplug your battery first then turn OFF your radio transmitter.
- Exercise caution when charging your batteries and follow in full your battery
manufacturers safety guideline when doing so.
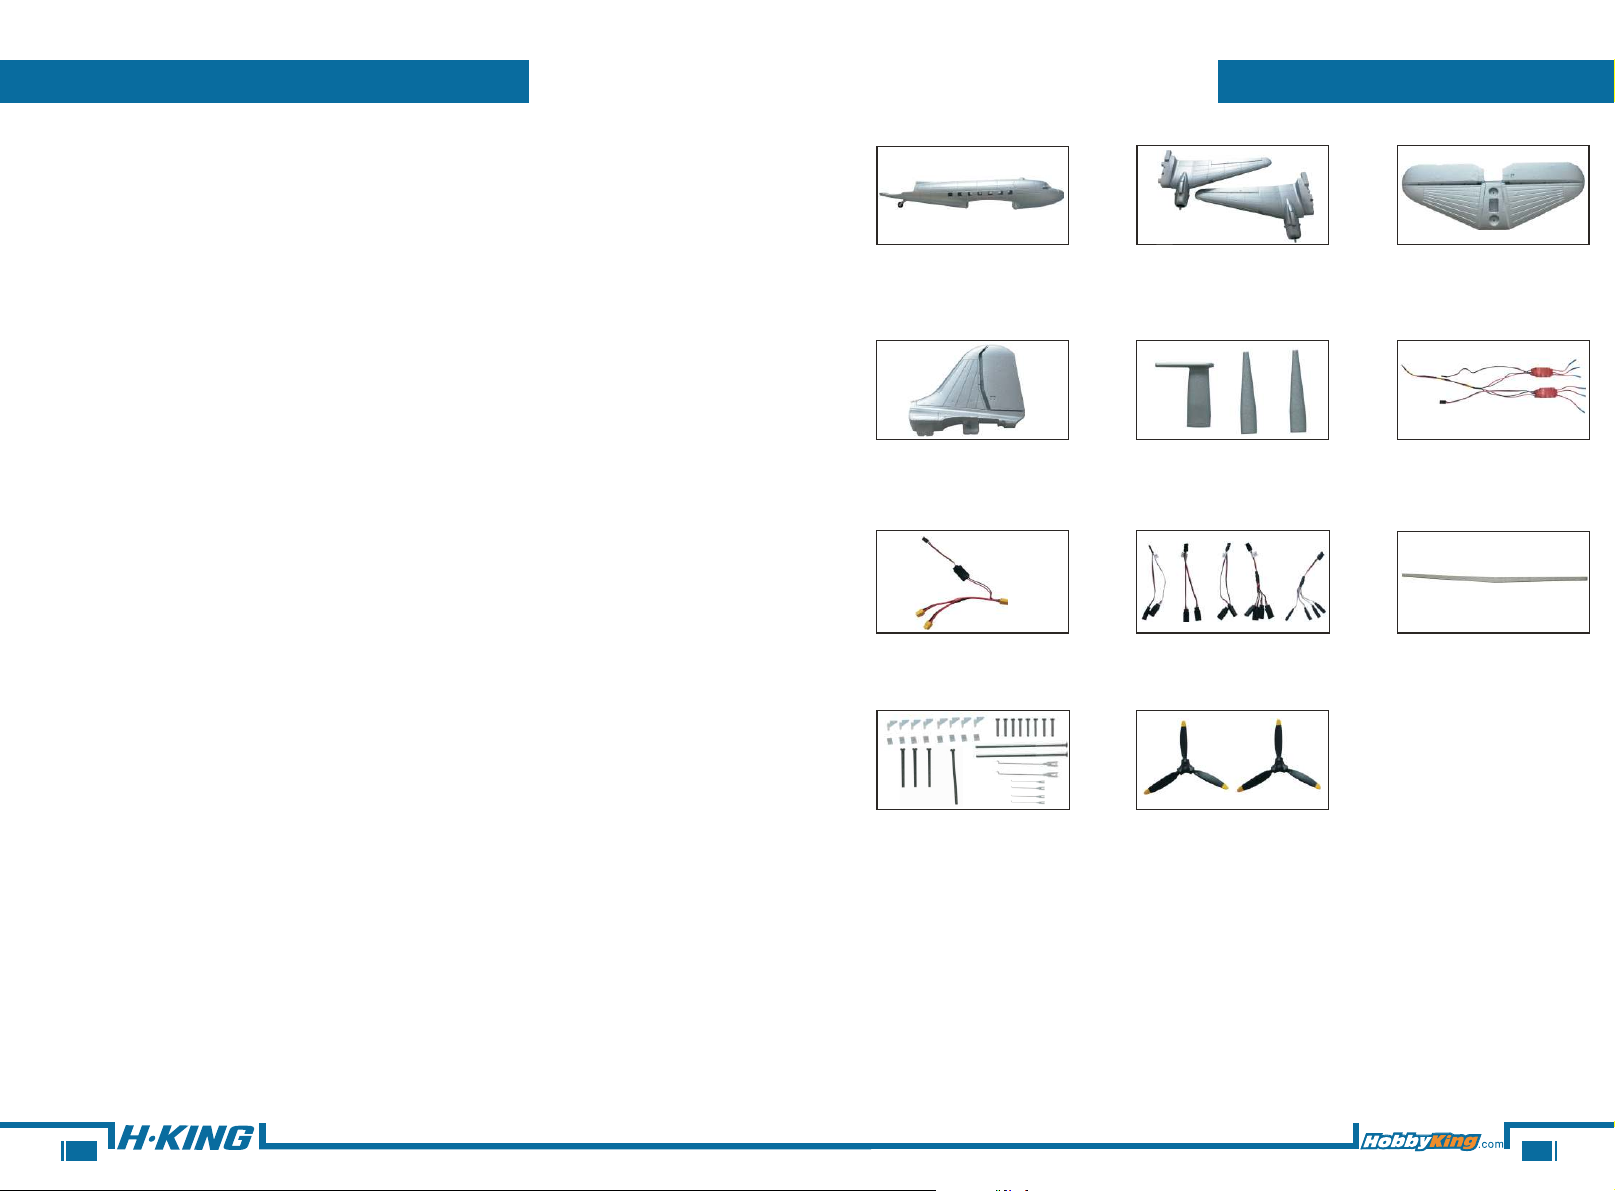
Fuselage
DC-3:9306000152-0
C-47:9306000141-0
Vertical Stab
DC-3:9306000155-0
C-47:9306000144-0
ESC Y-lead
9306000147-0
Control Parts
9306000150-0
Main Wing
DC-3:9306000153-0
C-47:9306000142-0
Antennas
DC-3:9306000156-0
C-47:9306000151-0
Y-line
9306000148-0
Propeller
9306000145-0
Horizontal Stab
DC-3:9306000154-0
C-47:9306000143-0
ESC
9306000146-0
Wing Spar
9306000149-0
13
02
Page 6
ASSEMBLY:
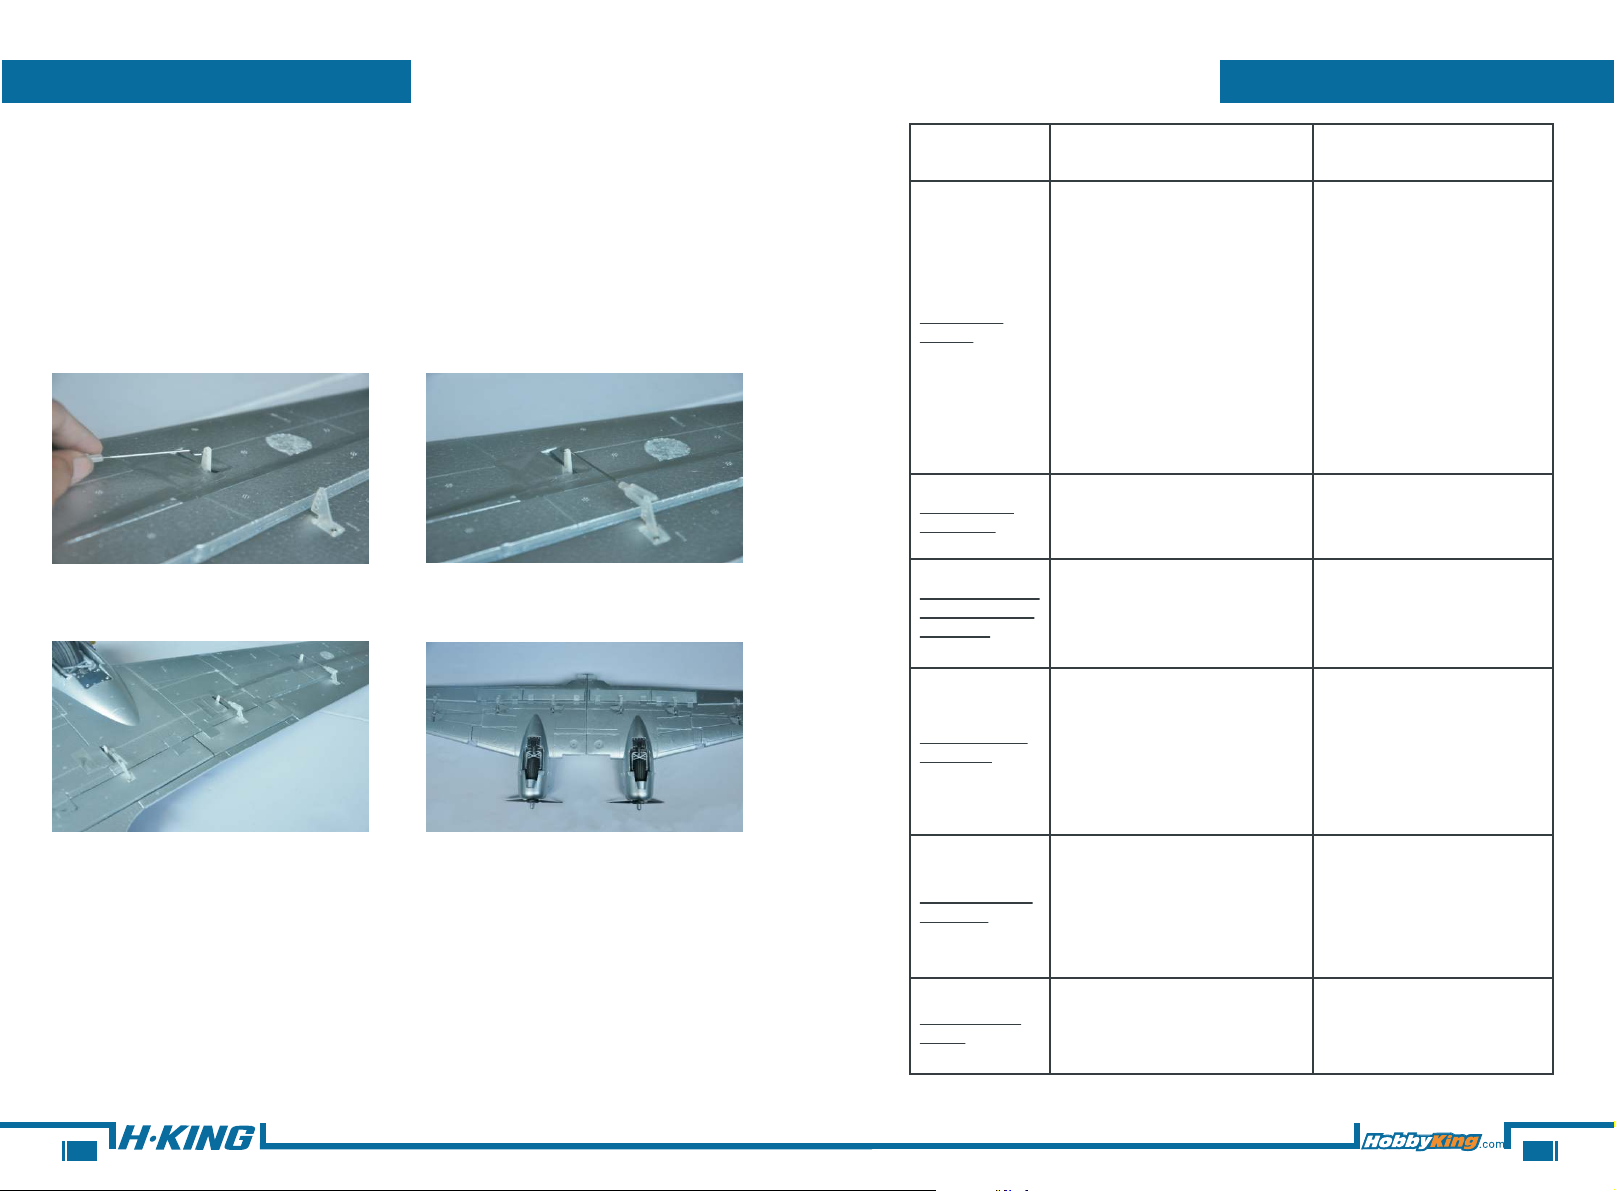
1.Locate aileron control horns and push rods.Install the aileron control
horn using the screws and screw driver.Now connect the pushrod to the
aileron servo horn as shown.Locate flap control horns and push rods.
Install the flaps control horn using the screws and screw driver.Now
connect the pushrod to the flap servo horn as shown.Repeat this step
for the remaining wing panel.
TROUBLE SHOOTING:
ProblemCauseSolution
1.Charge the batteries.
2. Install a full charged battery.
Motor does
not turn
1. Battery is not fully charged.
2. Transmitter battery low.
3. Motors not connected.
4. The motor is damaged.
5. Reciever is not bound to Tx.
6. ESC in set-up mode.
3. Check for connection
between the ESC and
motor.
4. Replace motor.
5. Consult Radio manual and
go through bind procedure
again.
6. Hold model and move
throttle to full postion then
back down to idle.
Model moves
backwards
Control surfaces
not moving with
stick input
Model does not
fly straight
Model does not
climb well
Limited Radio
Range
1. Props installed on the
wrong motors.
1. The servo lead is connected
to Rx incorrectly.
2. The servo is damaged.
1. Control surfaces not centered.
2. CoG is not in the correct position.
1. The battery is not fully charged.
2. Elevator servo is reversed.
3. CG too far backwards.
1. Transmitter/Receiver batteries
are flat.
1. Swap the props around.
1. Make sure the servo leads
are connect properly.
2. Replace servo.
1. Adjust the trims on the
transmitter.
2. Re-possition lipo as
suggested.
1. Charge the battery.
2. Change servo direction
via Tx.
3. Move battery forwards.
1. charge/replace batteries.
03
12
Page 7
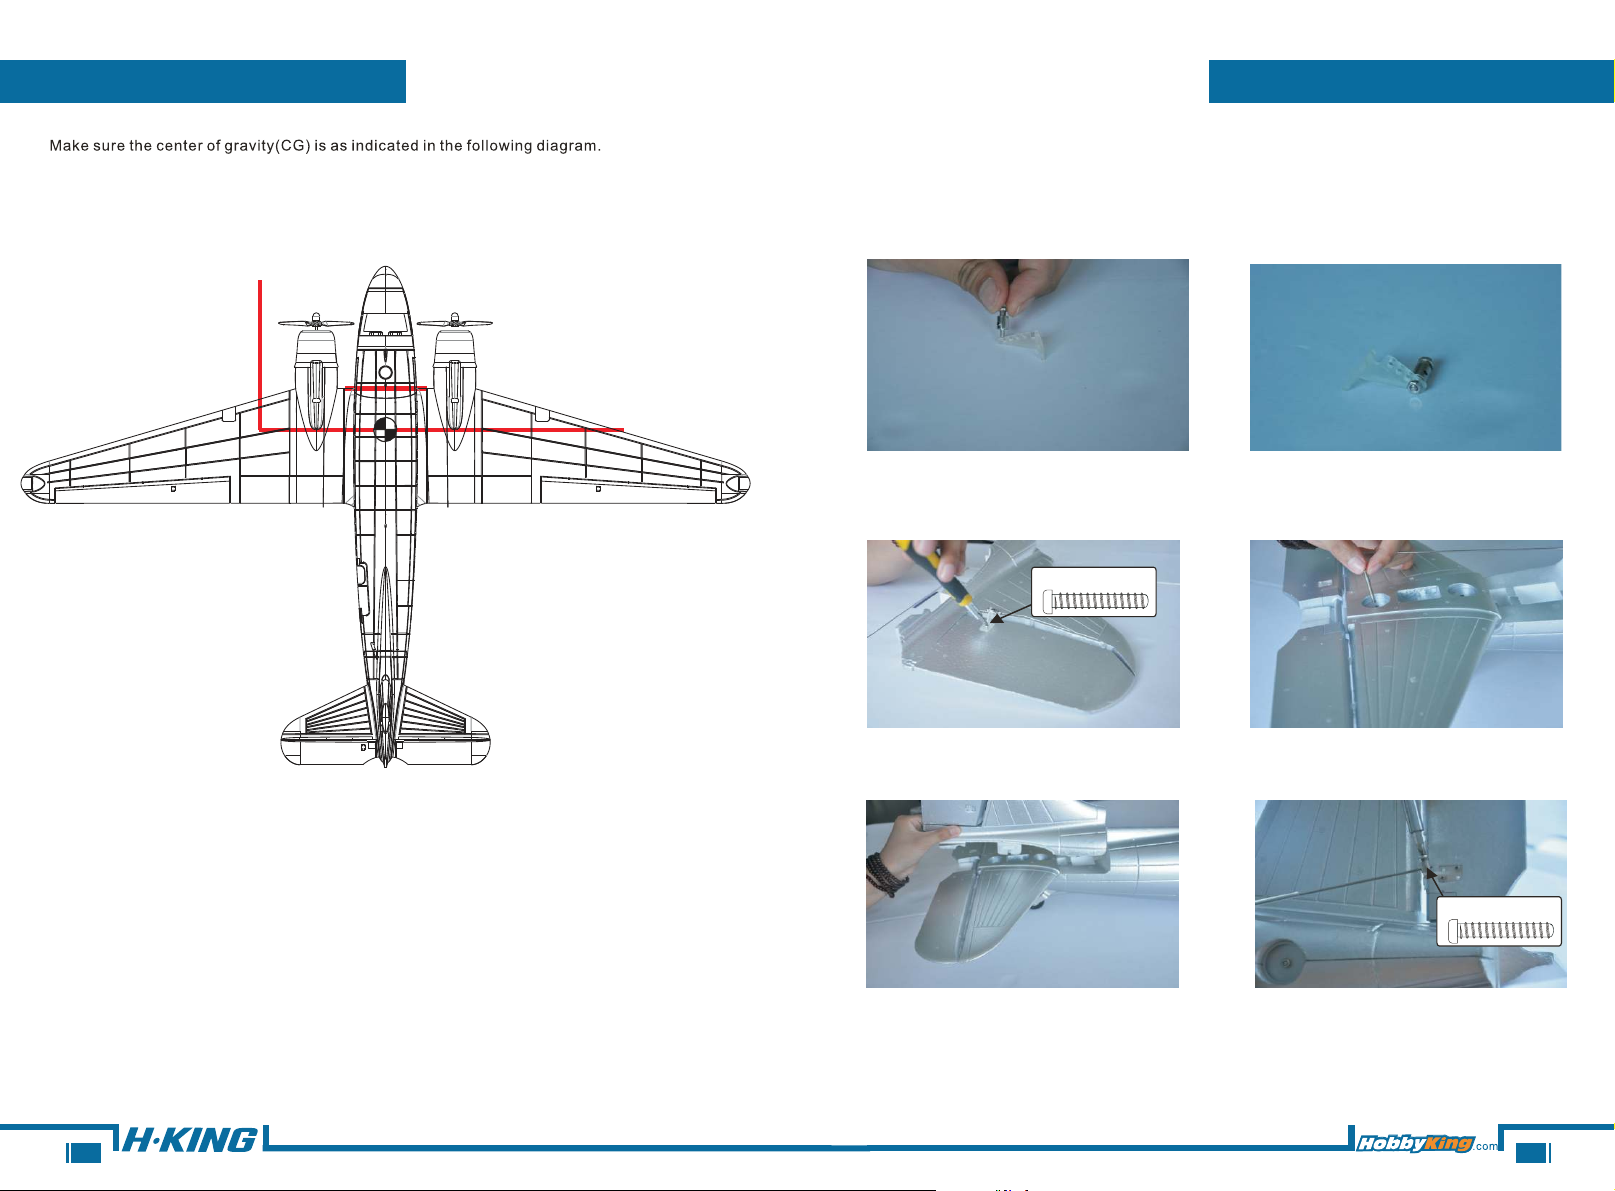
CG LOCATION:
90MM
ASSEMBLY
2.Locate the vertical stab and install the rudder control horn as
shown.Locate the horizontal stab into the fuselage using the
provided machine screws.Then Install the elevator control horn as
shown.Tail assembly is now complete.
CG
PB1.7X15mm
PM3.0X5mm
11
04
Page 8
ASSEMBLY
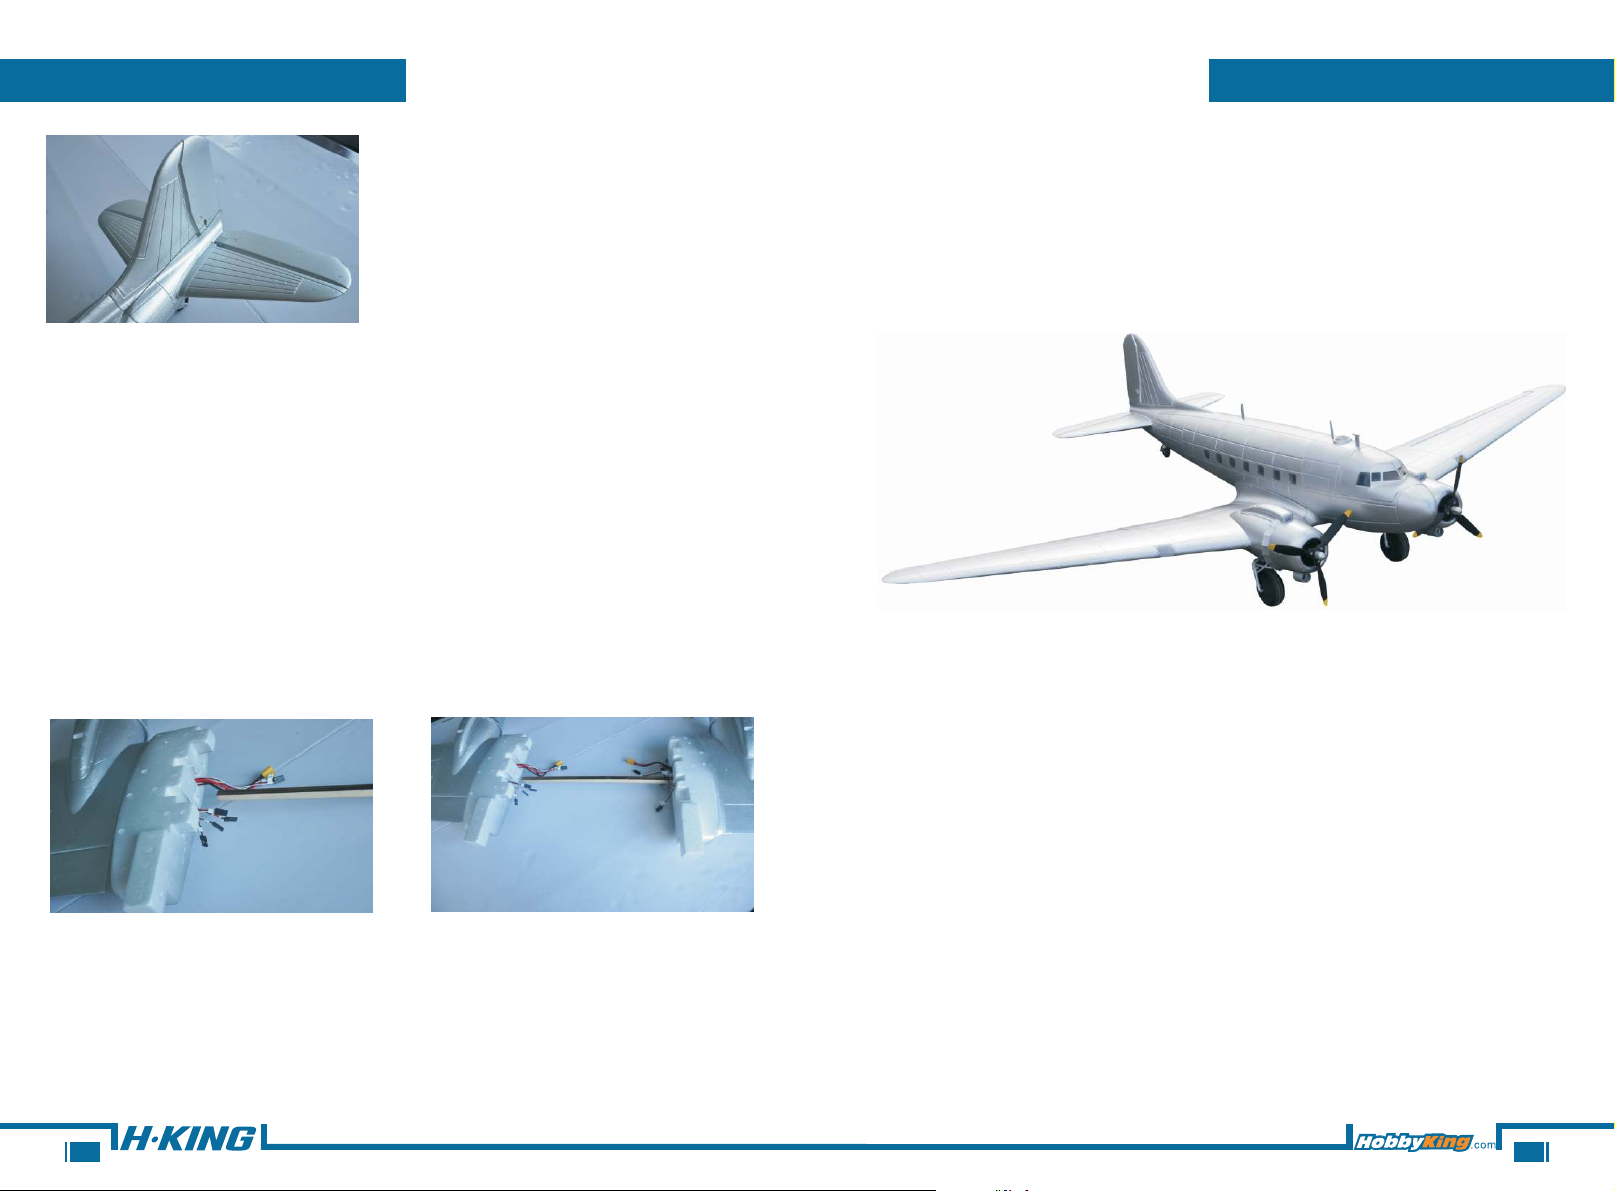
3.Locate the plywood wing spar and glue it into either one of the
wing panels.Push the spar into the wing until the center of the
spar meets the edge of wing panel as shown.Apply some glue to
this same edge and the exposed portionof the spar.Now push the
remaining panel fully onto the spar untilboth sides meet,ensuring
both wing halves are completely aligned with one another at the
center and that all wires are pulled neatly through to the top of the
wing.It is recommended that you do a dry assembly of all parts first.
ASSEMBLY
Assembly of your C-47 is complete.
Now perform a final check on all screws, bolts and components,
ensuring all are secure and firmly in place.
05
10
Page 9
ASSEMBLY
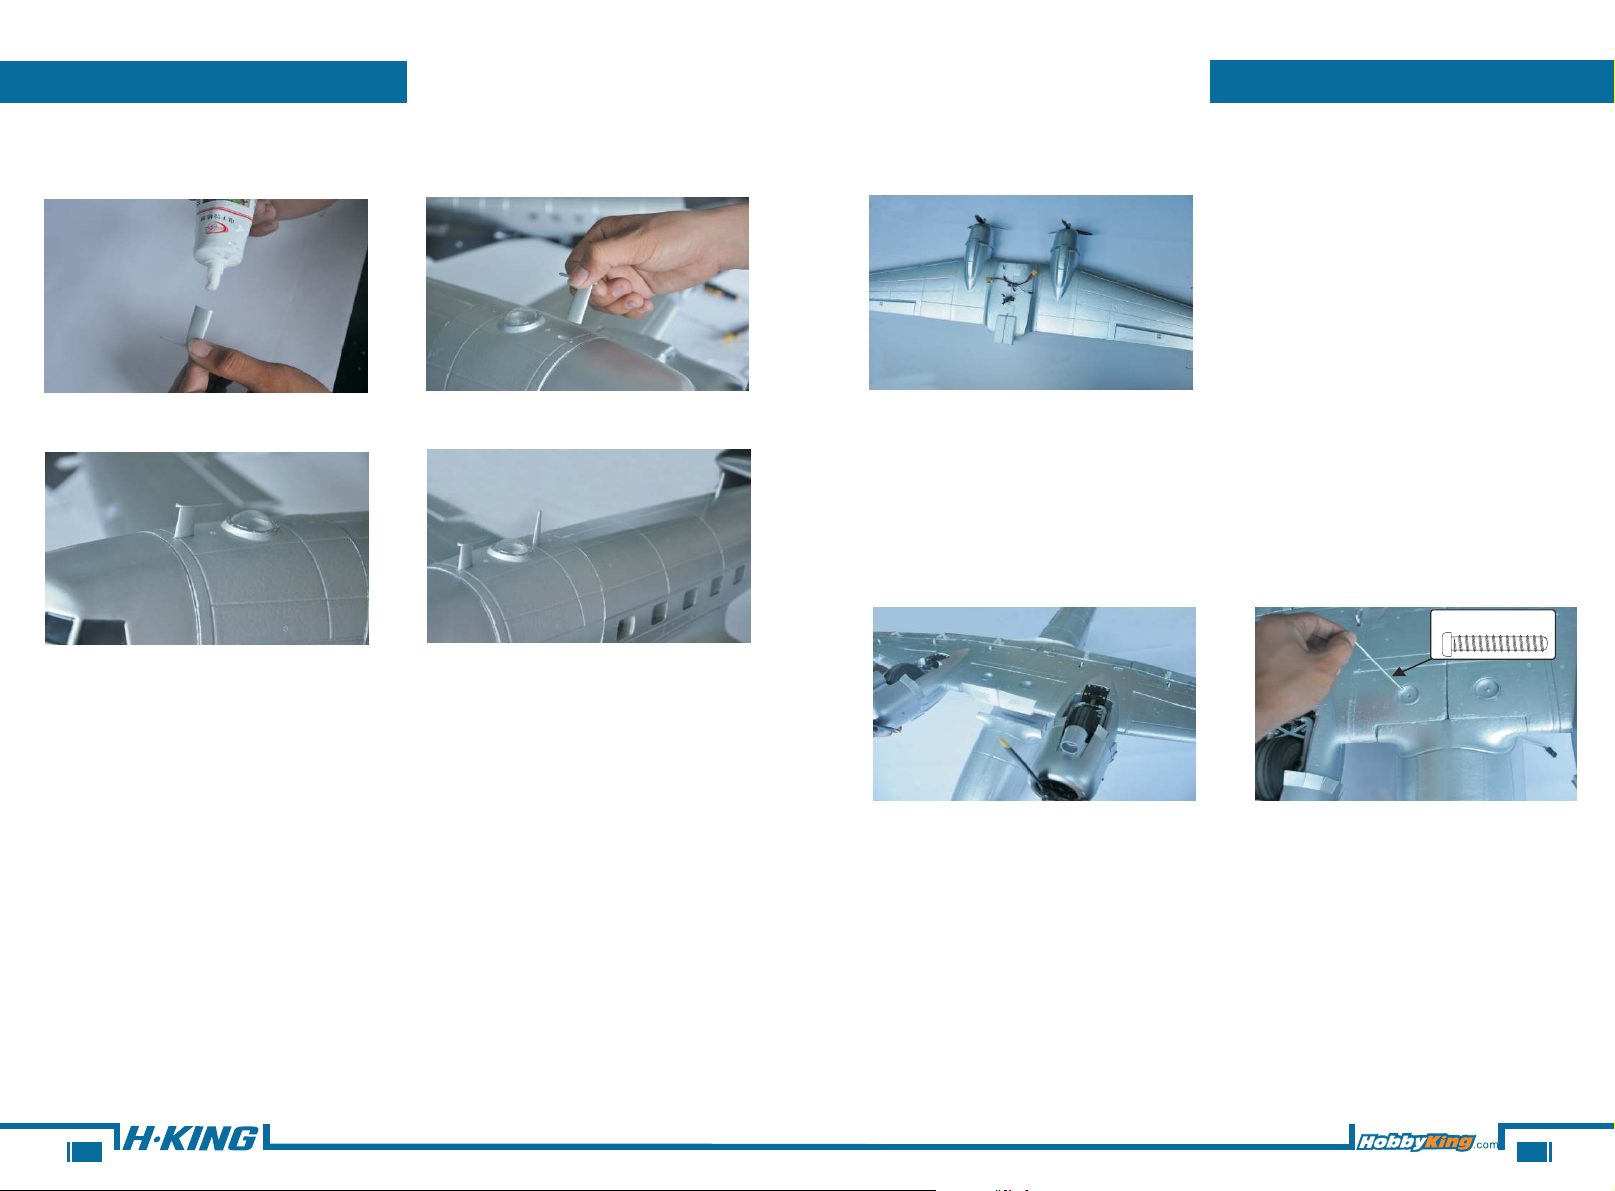
7.Glue the three antennas into the right place as shown.
ASSEMBLY
4.Attach the completed wing up to the underside of the fuselage and
fix it using the to provided PM3.0X75mm machine screws.
PM3.0X75mm
09
06
Page 10
ASSEMBLY
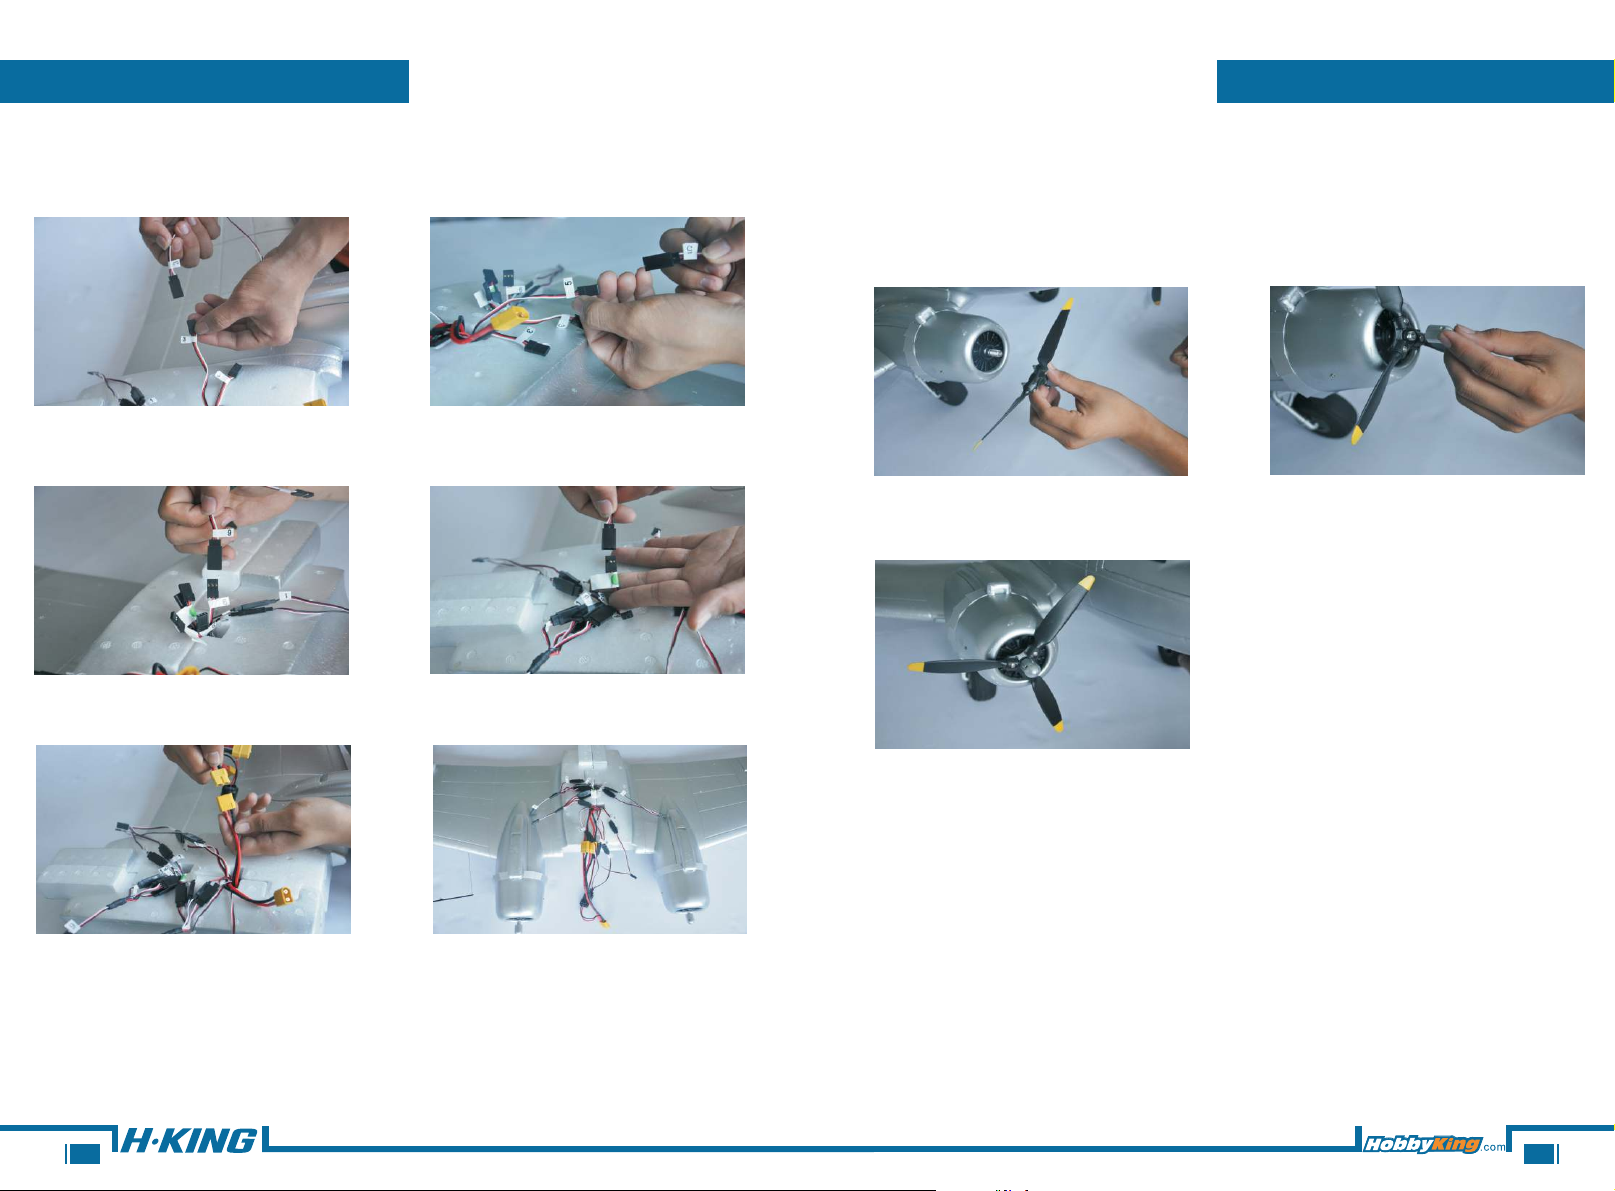
5.Locate all numbered servo Y-leads and connect to their
corresponding servo leads as shown.
ASSEMBLY
6.Once you have established propeller orientation,attach each prop
to the prop shafts with the provided spinner nut. Be sure to double
check that each blade retaining bolt is secure and all blades are
at an equal distance from one another.
07
08
 Loading...