

Page 1
OPERATING MANUAL
Page 2
CATALOG
★Introduction
★Safety precautions!
★Charge Mode and Warning
★Safety Instruction of Ni-MH Battery
★Assembling steps for Decathlon
★Speed controller operation
★Spare parts list
★Center of Gravity Check
★Trouble shooting
03
06
07
04
08
12
14
13
14
Page 3
Main Technology Parameter
Standard version
Safety precautions
1、Do not fly outside in the thunderstorm, rainy and strong winds.
2、Do not fly nearby the airport, railway, road, power lines.
3、Do not fly where there are crowds of people.
4、Do not fly where the same frequency model plane is flying or there are other electric
waves nearby.
5、Make sure the model plane and control system are under normal condition before flying.
6、Use our company's quality accessories to replace the broken one.
-3 -
Th a nk you for pur c hasing th e R / C model Dec a t hlon. To ge t i t t o p erform pe r fectly,
please re a d this intr o d uctio n t h o rough l y b e fore ope r ating.
Introduction
Wing spa n:9 70m m
Leng th:77 0 mm
Flig ht we i ght:6 3 0g
Moto r Type:4 0 0
Batt ery:N i -MH 9 . 6V1 0 00M A H
Radi o Con t rol: 4 C h
Freq uen c y Mod u lat i on:FM
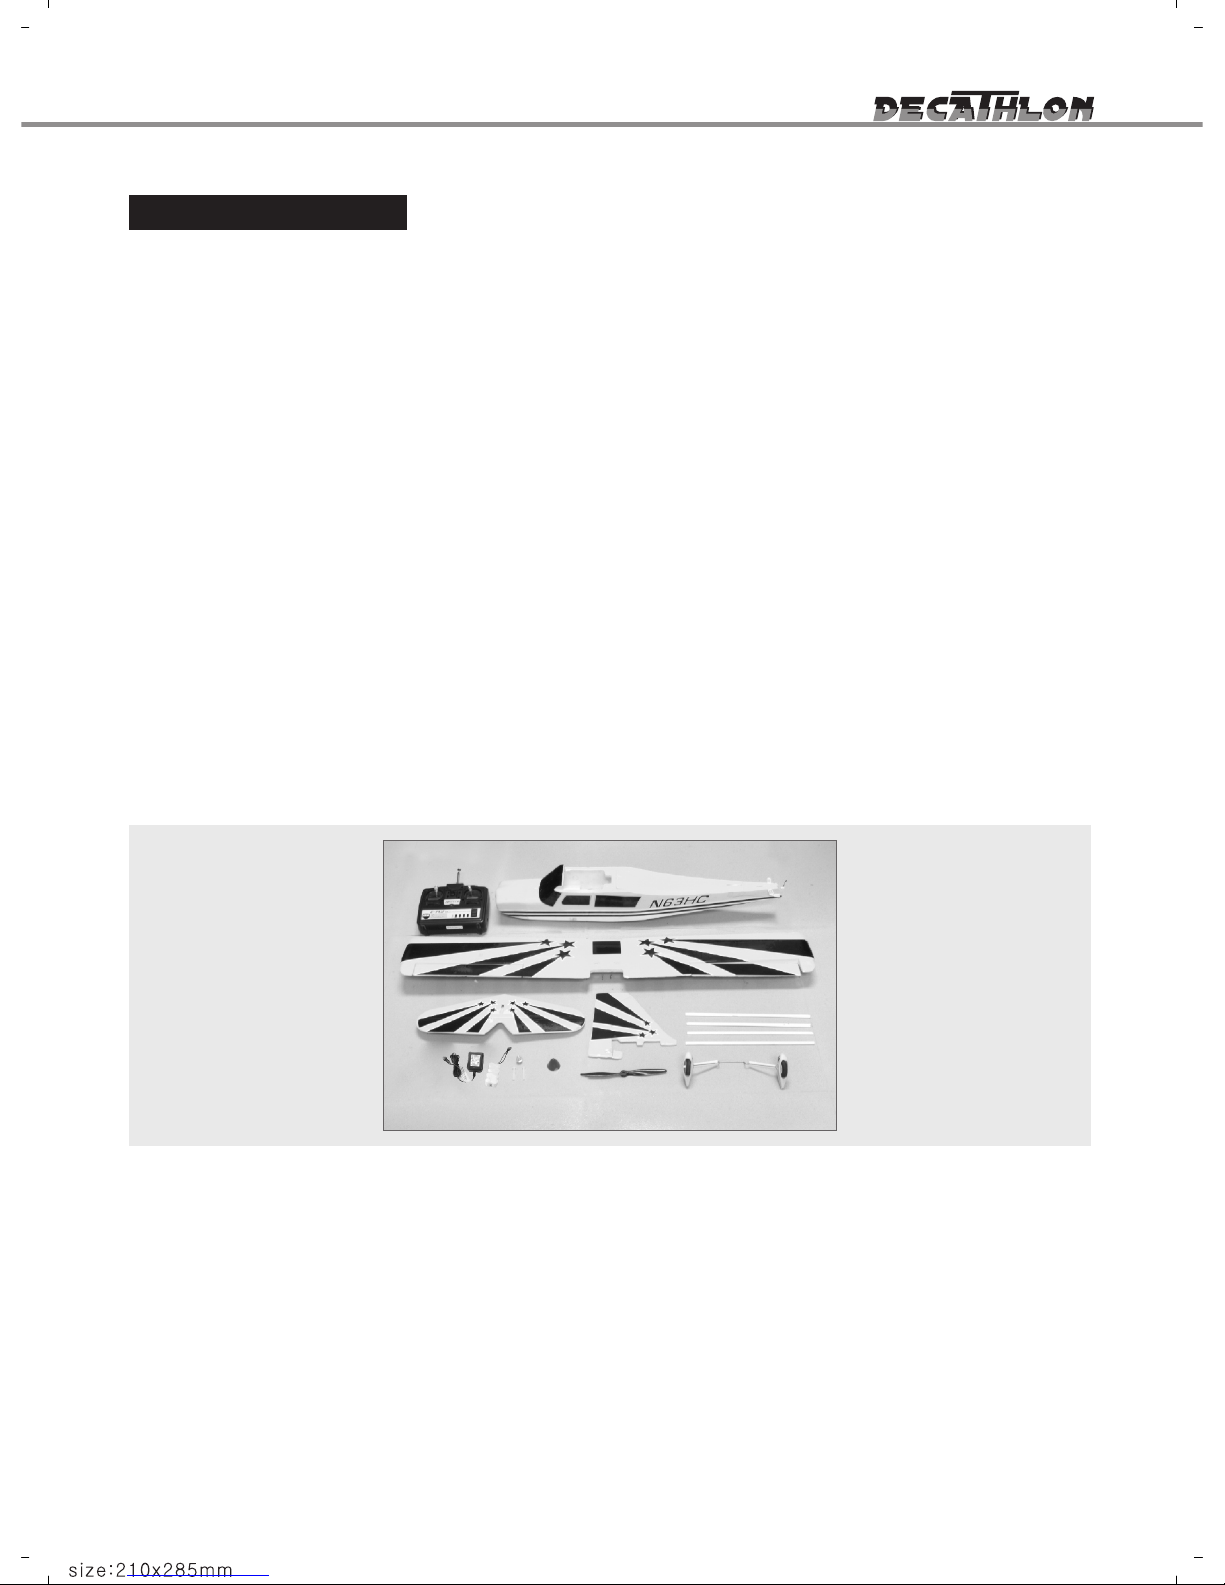
Included parts:
Fuselage、Main wing、Stabilizer、Vertical tail wing、Main landing gear、Battery、
Charger、Accessory、Propeller、Manual、Spinner
Page 4
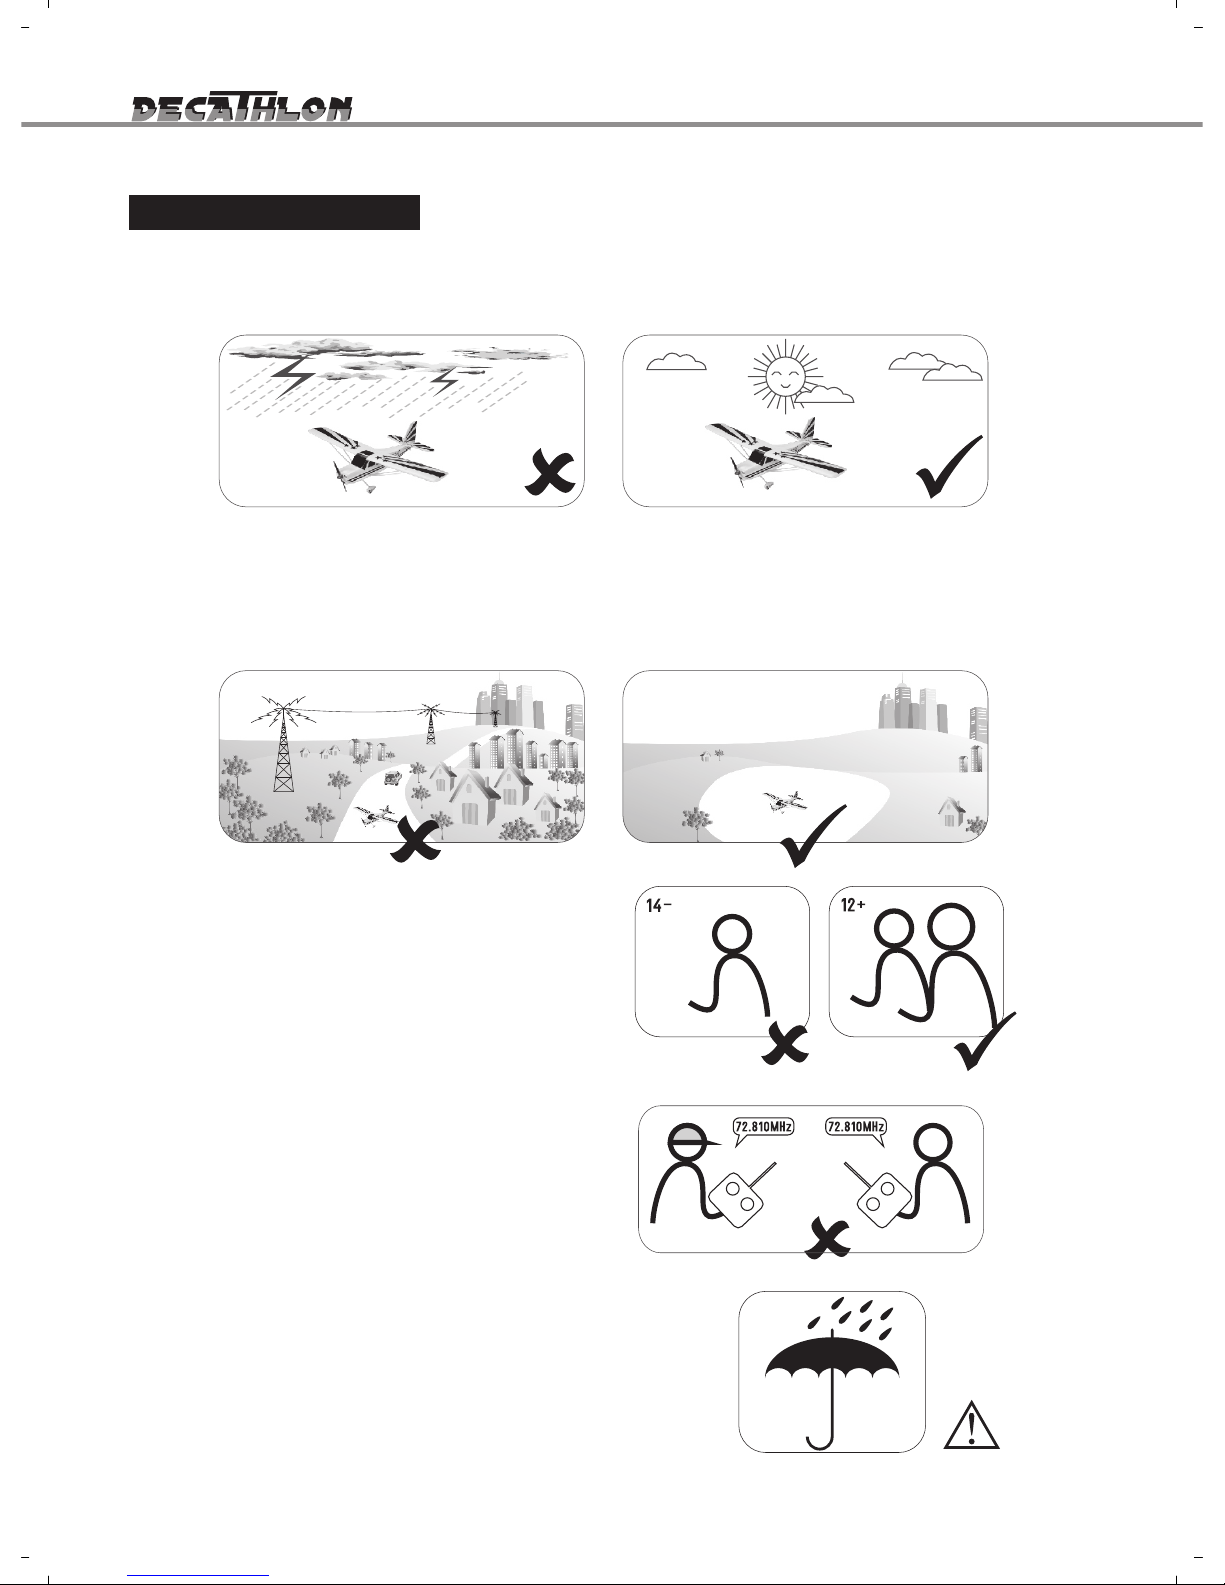
1) Do no t fly i n S tro n g win d o r bad w e ath e r.
2) N ever f l y the mo del i n crow d ed ar e as, w h ere th ere ar e l ots of p e opl e , aut o mob i les
on t he r oad and pow er l ine s ov e r h e ad. Al s o n ot t o f l y a r oun d t h e a i rpo r t. P lea se m ake
your sel f en o ugh roo m f o r th e flyin g an d opera t ing , as th e pl ane can tra v el at high rat e s
of spee d . Re mem b er you are res pons ibl e fo r th e s a fet y of oth e rs.
Plea se re a d thi s s ect i on un t il yo u f ull y u nde r sta n d!
3) C h ild r en un d er th e a ge of 1 2 ,
shou ld ha v e an ad ult gu ide . Not
reco mme n d fo r the chil d ren und e r
the age of 14.
Safety precautions!
-4 -
4) Plea s do not fl y in the sa m e ar ea
with si m ila r fr e que n cy ,or tha t ca n
caus e cr ash .
5) Neve r le a ve the cha r ger in wet con d iti o ns.
Novice
Novice Expert
Page 5
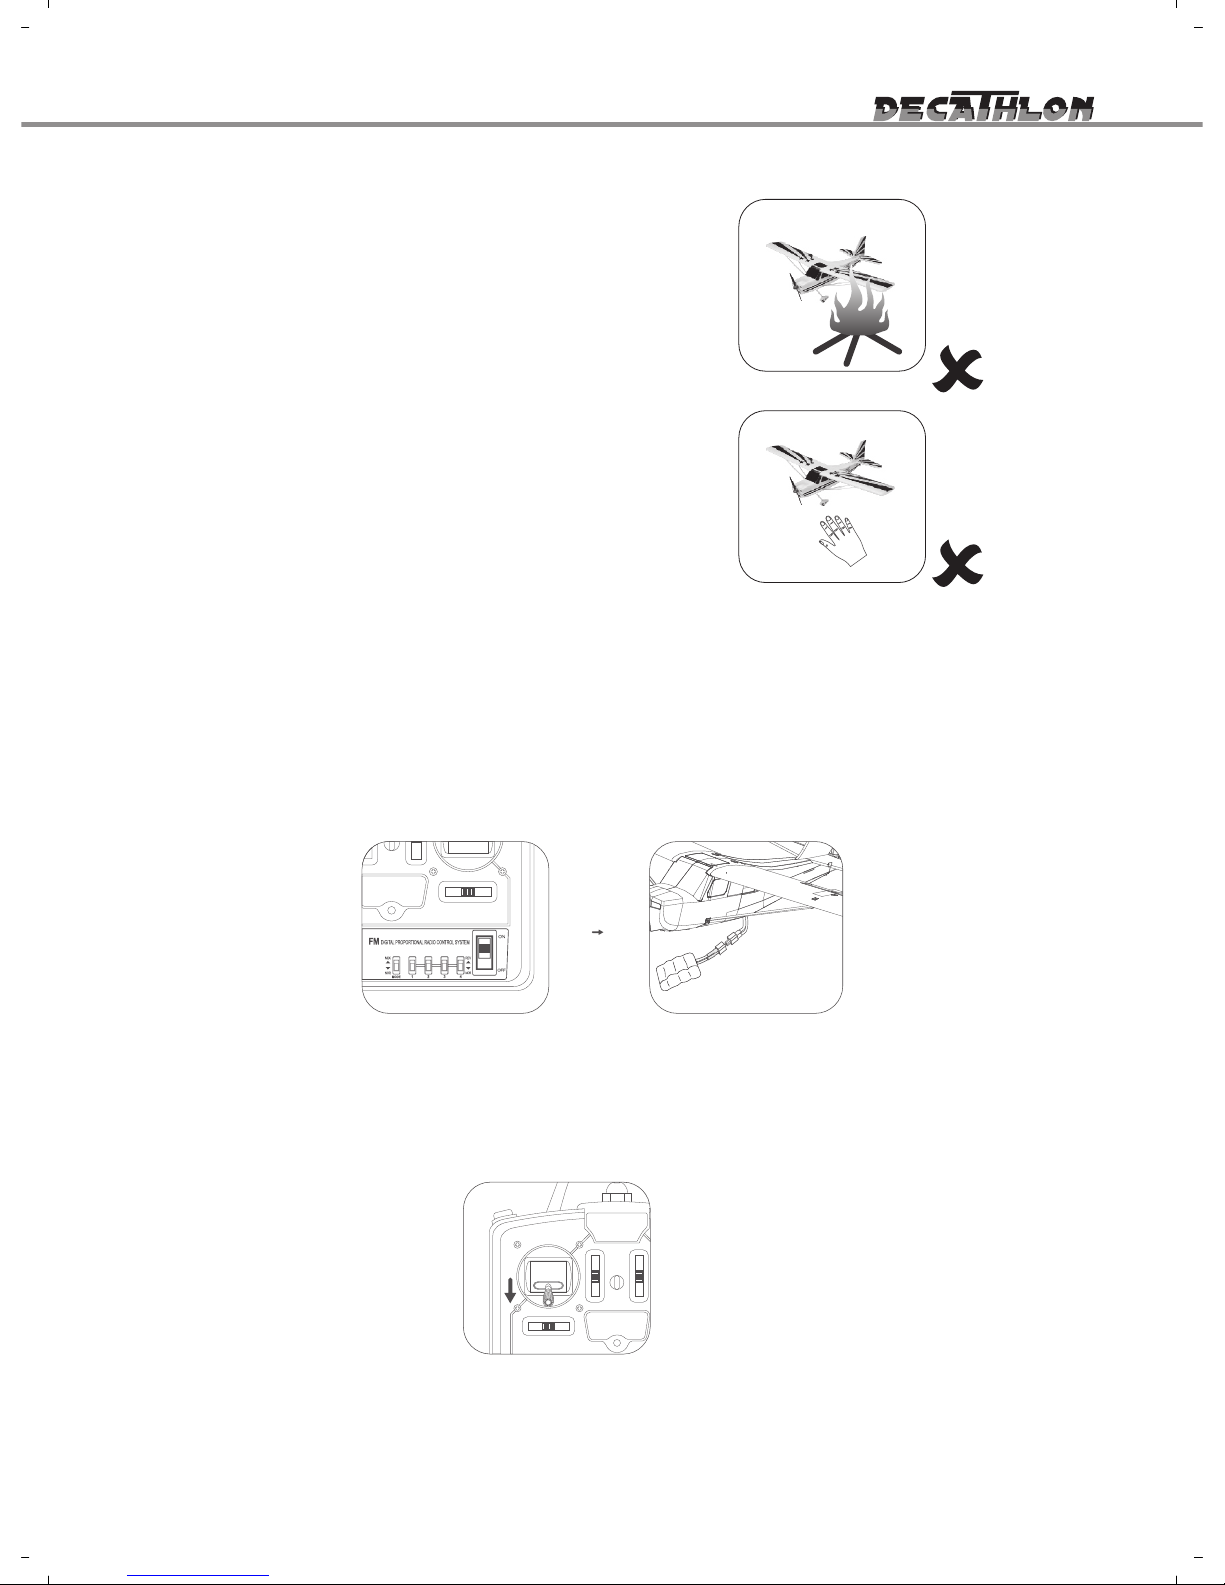
6) The Decathlon is made from PA and polythene
w h i ch a r e t i n d er . W he n i t m e e t s t h e h e a t ,
transfi g uration can easily happen, so yo u mus t
keep yo u r De cat h lon aw a y fr om hea t .
7) Do not attempt to catch the Decathlon while it
is flying.
8) Ne v er l e av e th i s sy s te m una tt en d e d a ro u nd c h i l dr en wi th ba tt er y i n the u n i t , as
in j ur y ca n b e c au se d d ue to c h il dr en tu rn in g o n the t r an sm it t e r o r t he pl an e.
9) D u r i n g th e pr ep ar a t i o n f o r t h e f l i gh t, p le as e re m e m b e r to t u r n on t h e t r a n s mi tt e r
befo re conn e cti n g the batt e ry pack .
10 ) Cl ose th e th r ott l e on th e tr ans m itt er befo r e co nne c tin g ba tte r y ot her wise th e mo t or
may ope r ate . The tur ning pr o pel l er may cau s e in jur y.
-5 -
Page 6
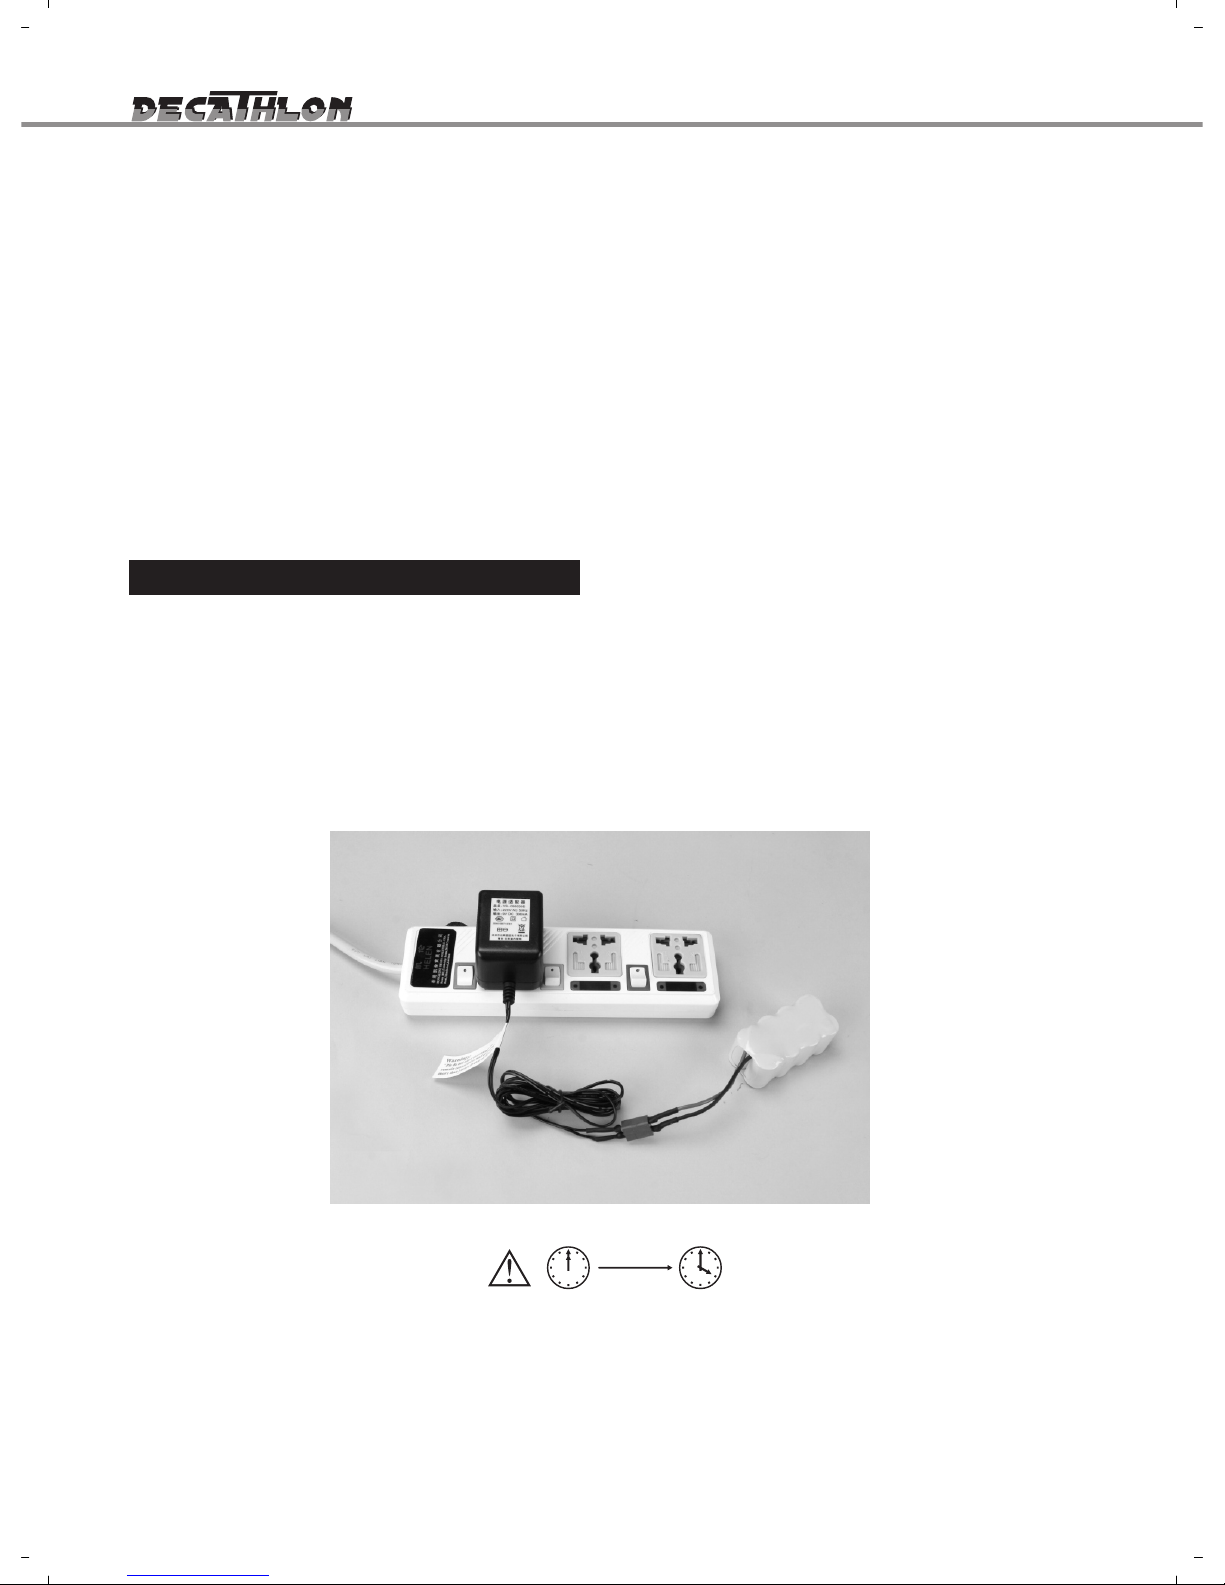
-6 -
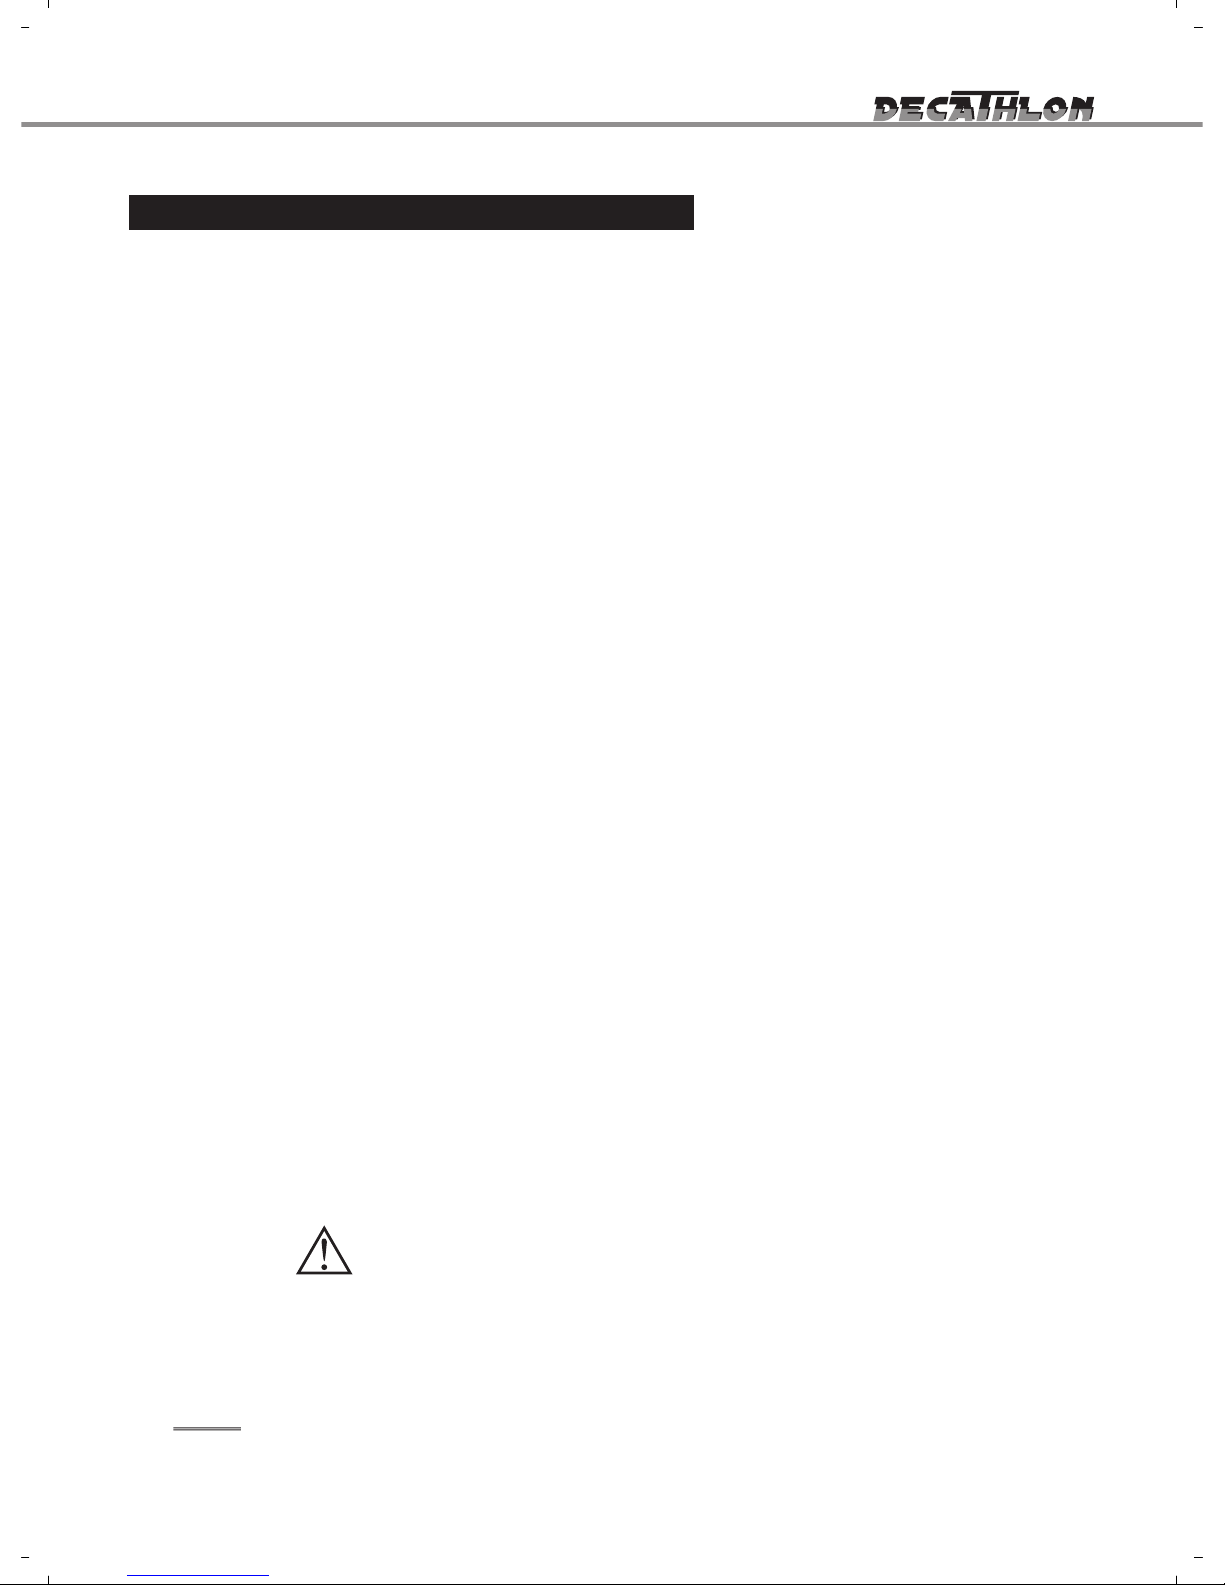
Charge the power battery with outfit charger in 3 to 4 hours. Battery will be a little warm after
charging. In order to avoid battery damage or fire insurance, do not charge the battery overtime.
Battery in charging should be put away from tinder and under supervision to make sure safety.
★ Ni-mh battery Charger
Charge Mode and Warning
Statement
1、The R/C plane is not a toy, it is suitable for the experienced operator. You must ensure it
operated safely and do not harm others.
2、Installation must follow the instruction book. Make sure you keep your body (head, finger,
etc) away from the propeller at all times. Otherwise it can cause injury you or damage the model.
3、Customer must be responsible for the proper operation of the plane. Our company and
dealer won't pay for any loss owing to the inappropriate operation.
Page 7
CAUTION
Safety Instruction of Ni-MH Battery
-7 -
1. Never c h arge the b a ttery at m o re than 1 amp.
2. Never d i scharge t h e battery a t more than 5c and n e v e r take t h e voltage l o w er than 9 v as
this w i l l damage t h e battery.
3. For f u l l flight t i m e to be a c hieved pl e a s e cycle t h e cells t h r ough thre e flights.
. 4 Never char g e the batt e r y on a c a r pet floor, this ca n cause a f i re!
01. Batteries should be charged prior to use.
02. When using a new battery for the first time or after long term storage, please fully charge the
battery before use.
03. Use the correct charger for Ni-Cd or Ni-MH batteries.
04 .Do not reverse charge batteries.
05. Do not short circuit batteries, permanent damage to batteries may result.
06. Do not incinerate or mutilate batteries, may burst or release toxic material.
07. Do not solder directly to cells or batteries.
08. Do not subject batteries to adverse condition such as extreme temperature, deep cycling
and excessive Overcharge/overdischarge.
09. Store batteries in a cool dry place.
10. Do not mix up this battery with other brands such as alkaline Zinc battery。
11. Do not mix new batteries in use with semi-used batteries, overdischarge may occur.
12. Avoid batteries being used in an airtight compartment. Ventilation should be provided inside
the battery compartment; otherwise batteries may generate hydrogen gas, which could
cause an explosion if exposed to an ignition source.
13. When connecting a battery pack to a charger, ensure correct polarity.
14. If find any noise, excessive temperature or leakage from a battery, please stop its use.
15. When the battery is hot, please do not touch it and handle it, until it has cooled down.
16. Do not remove the outer sleeve from a battery pack nor cut into its housing.
17. When find battery power down during use, please switch off the device to avoid
overdischarge.
18. When not using a battery, disconnect it from the device.
19. Unplug a battery by holding the connector itself and not by pulling at its cord.
20. After use, if the battery is hot, before recharging it, allow it to cool in a well-ventilated place
out of direct sunlight.
21. Never put a battery into water or seawater.
22. During long term storage, battery should be charged and discharged once every half a year.
23. Do not attempt to take batteries apart or subject them to pressure or impact. Heat may be
generated or fire may result. The alkaline electrolyte is harmful to eyes and skin, and it may
damage clothing upon contact.
24. Keep away from children. If swallowed, contact a physician at once.
Page 8
Assembling steps for Decathlon
-8 -
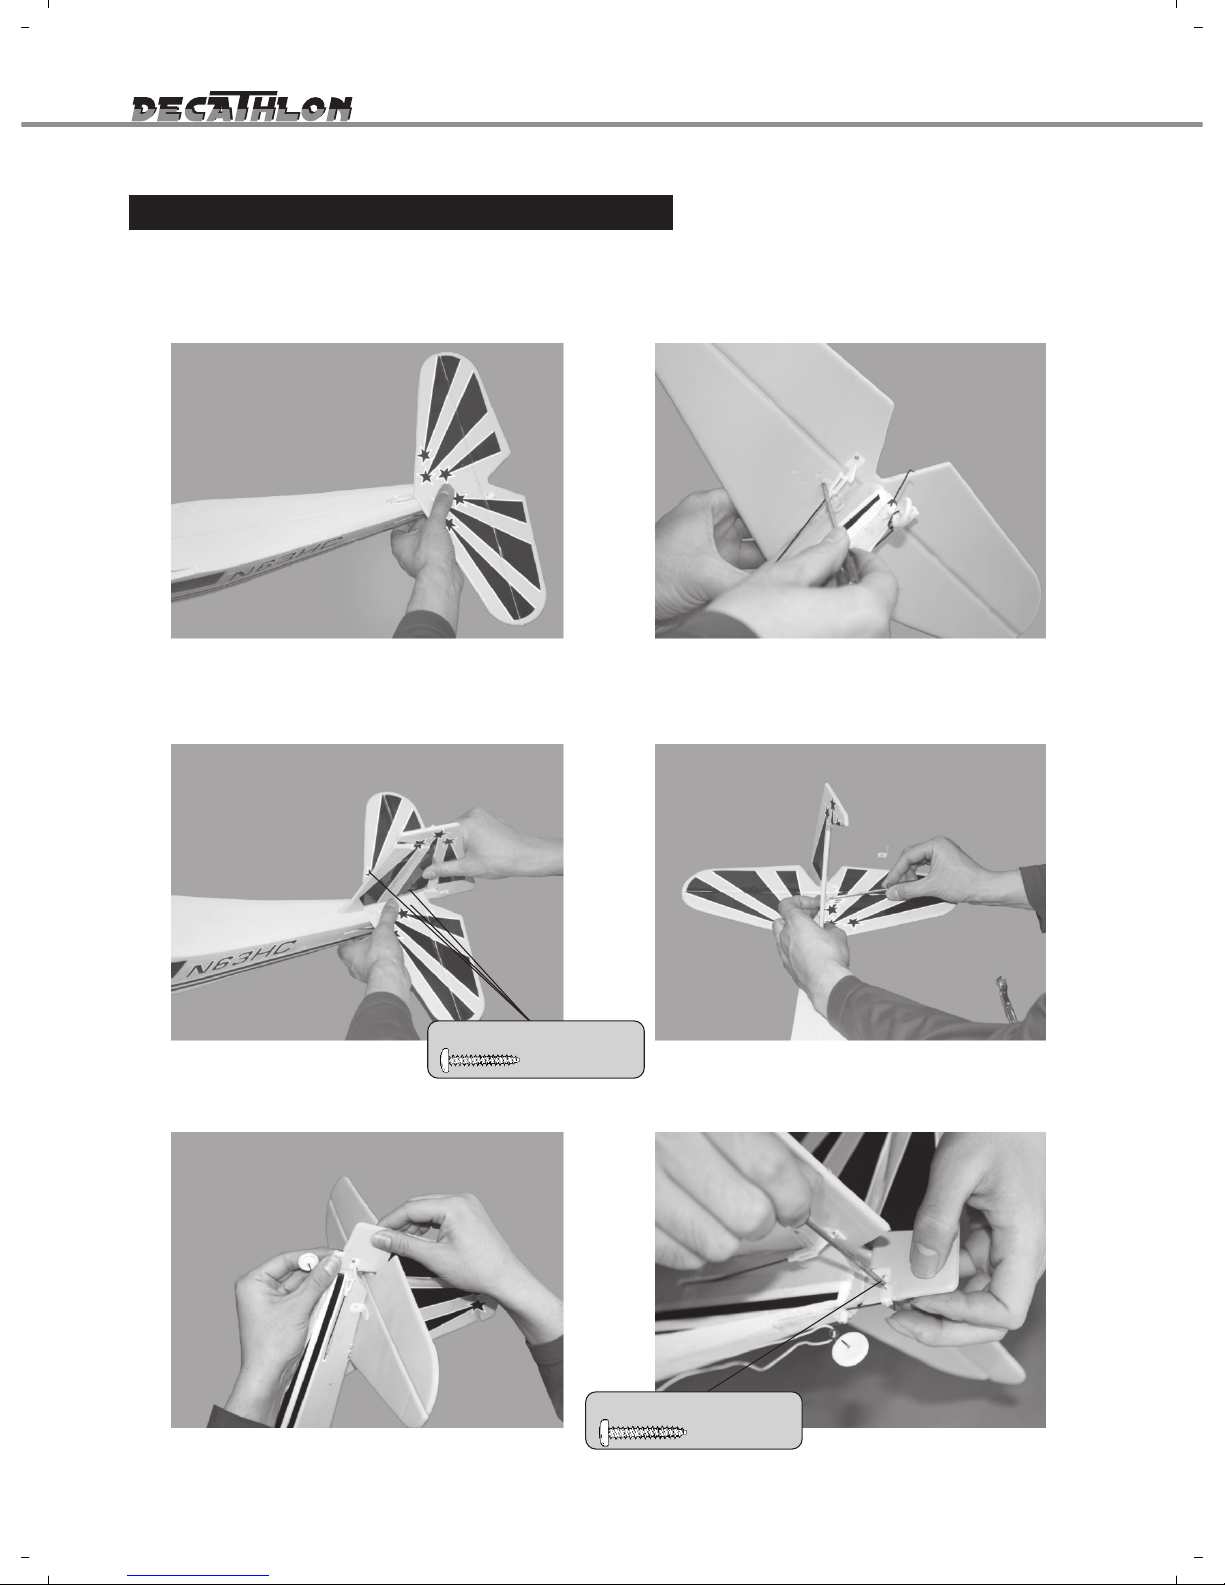
1、Put the horizontal stab on the designated place of fuselage, fix it with screws as shown
in the following pictures.
2、 Put the vertical stab on the designated place of the fuselage, fix it with screws as shown
in the following pictures.
3、Fix tail wheel and linkage plastics of rudder with screws as shown in the following pictures.
¢1.7X7XD3MM
¢1.7X10XD3MM
………… 3
………… 1
Page 9
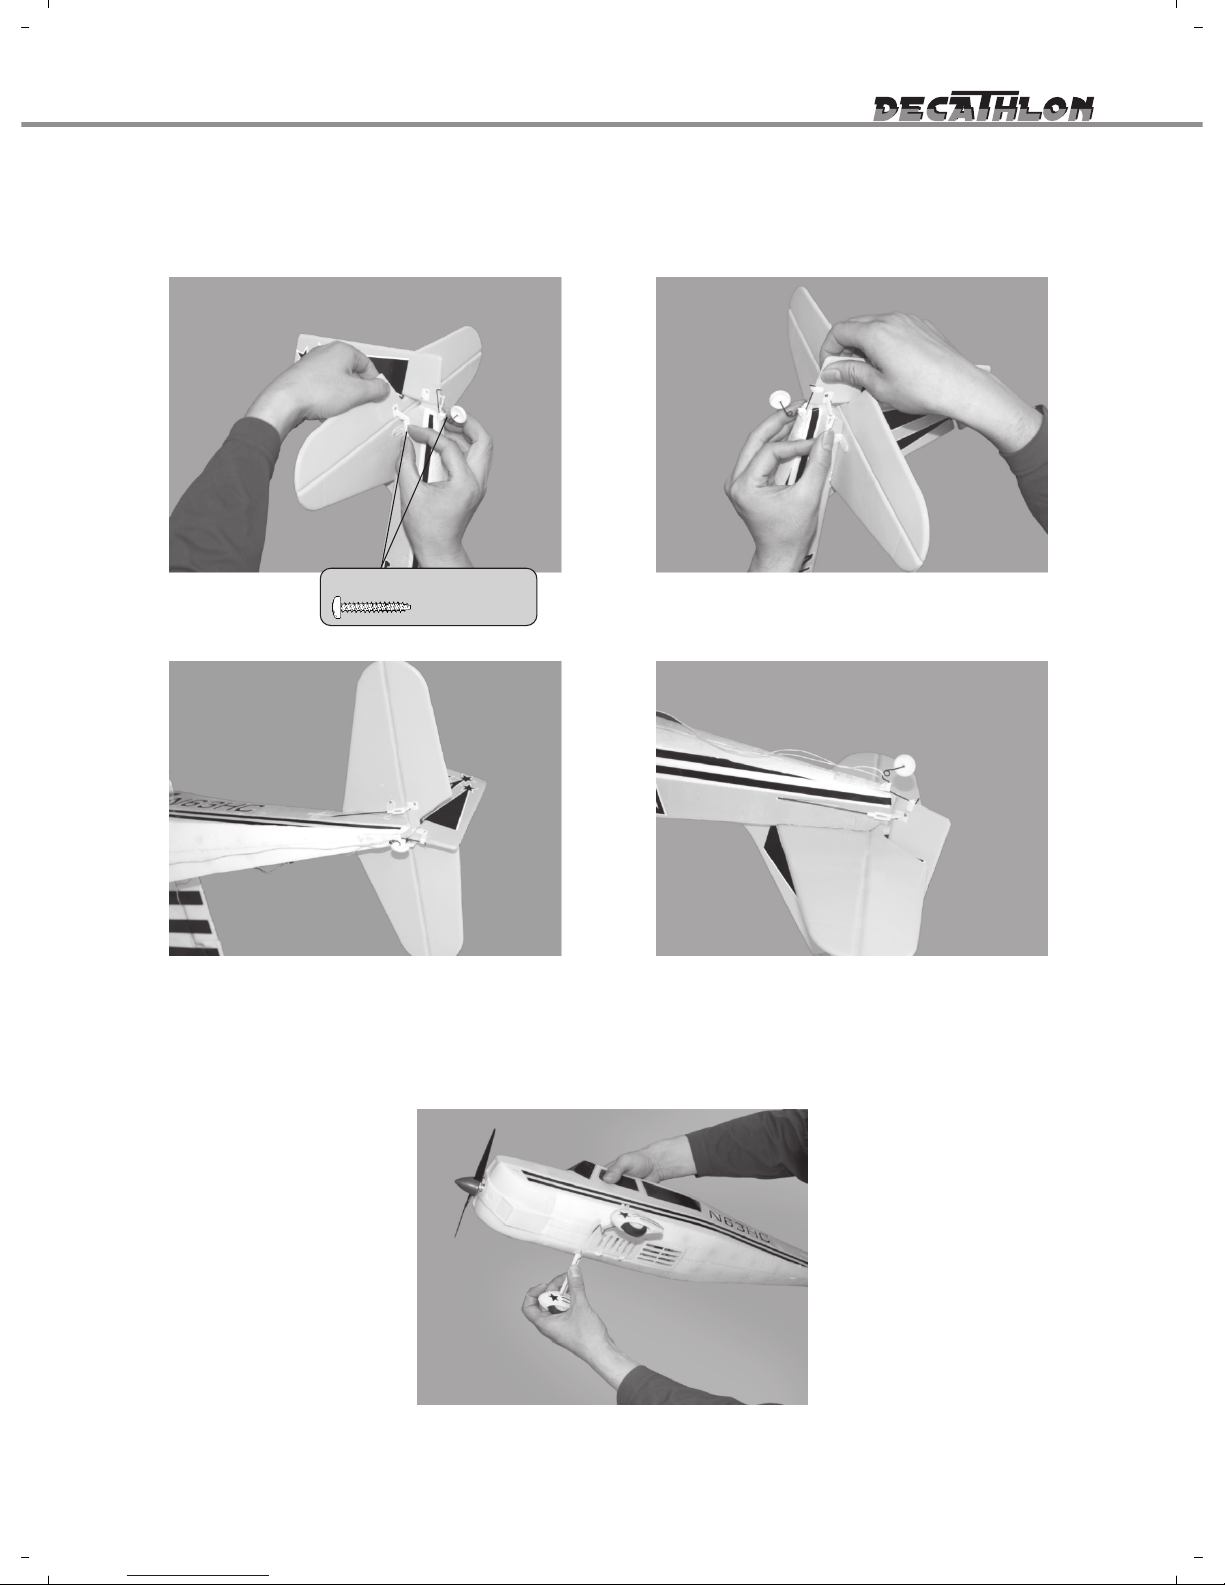
5. I n s e r t main landing gear se t as shown in the fo l l o w i n g picture.
-9 -
4、Fasten th e clevis as shown in the following pictures.
¢1.7X8XD3MM
………… 2
Page 10
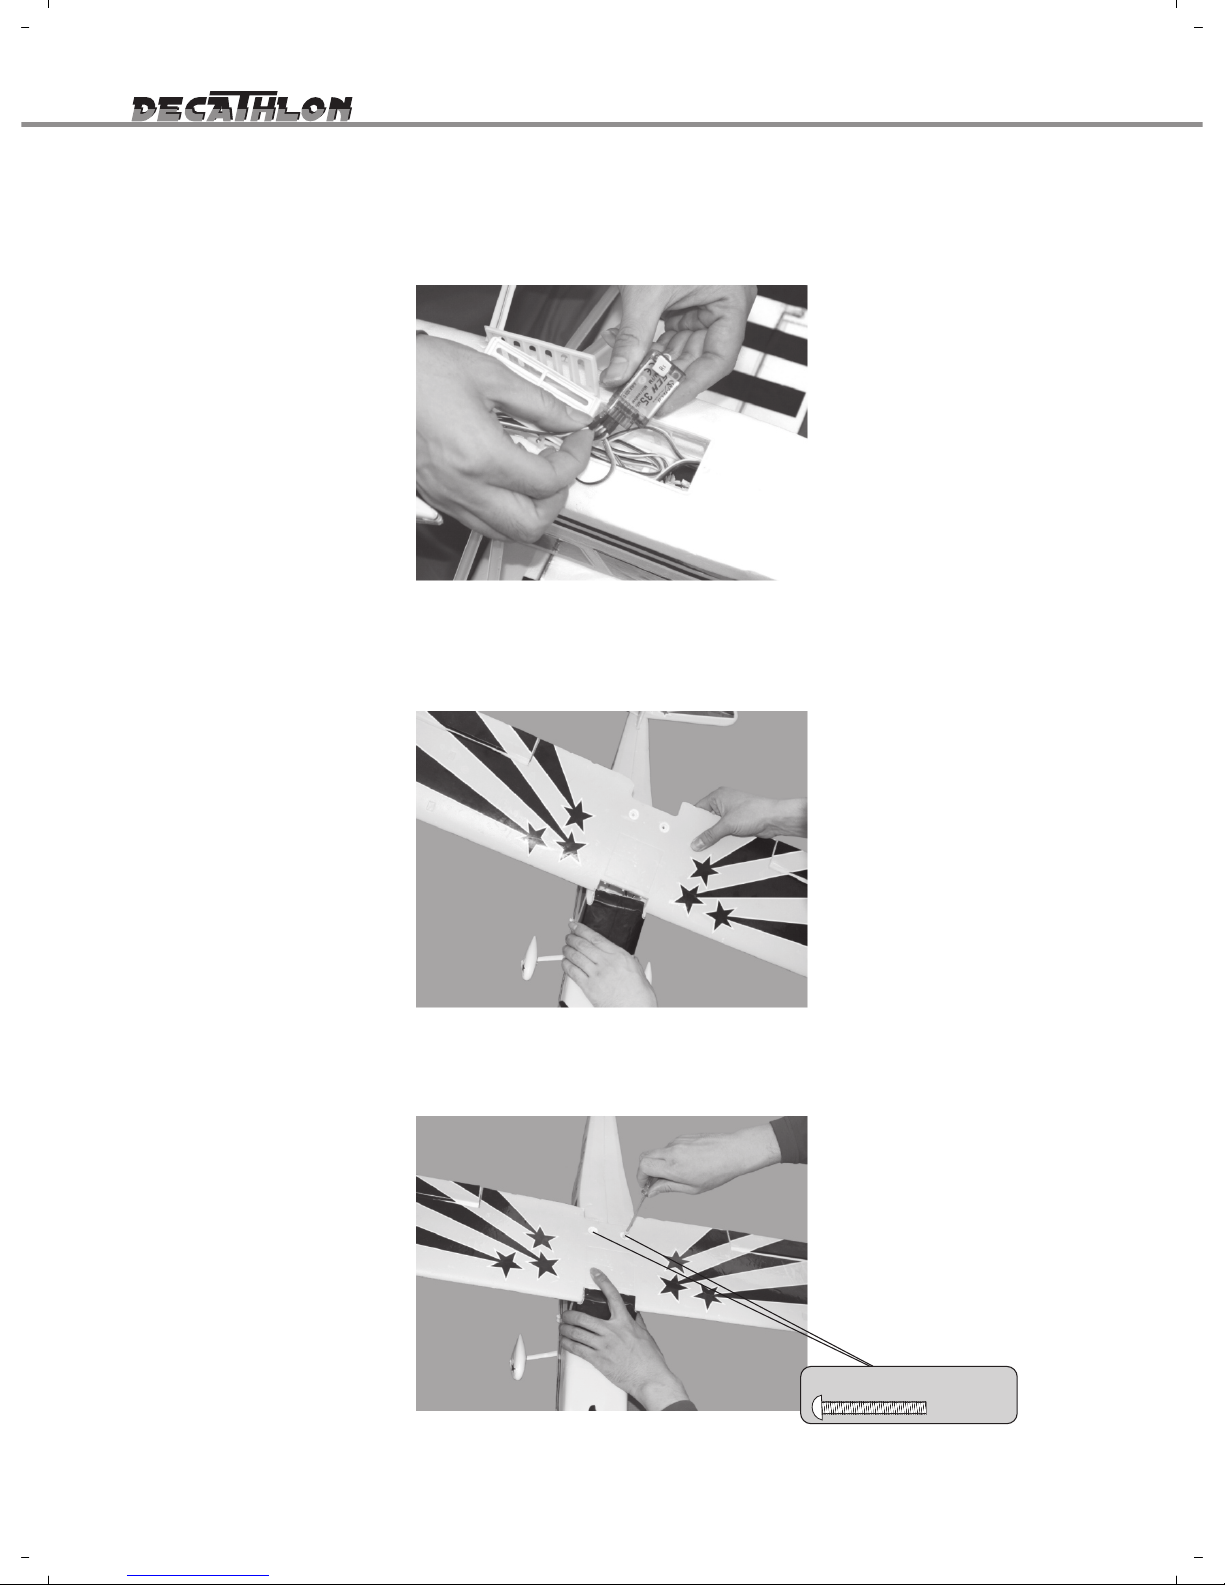
8、Use th e plasti c screw to fasten the main wi ng to the fuse lage as shown in the following
pi cture.
7、Insert ma i n wing into the fu s e l a g e ho r i z o n t a l l y as shown in th e following picture.
6、 Plug co r d of servo in the wing into the 1st ch of Receiver as sh o wn in the following
picture.
-1 0 -
¢4X30MM
……… 2
Page 11
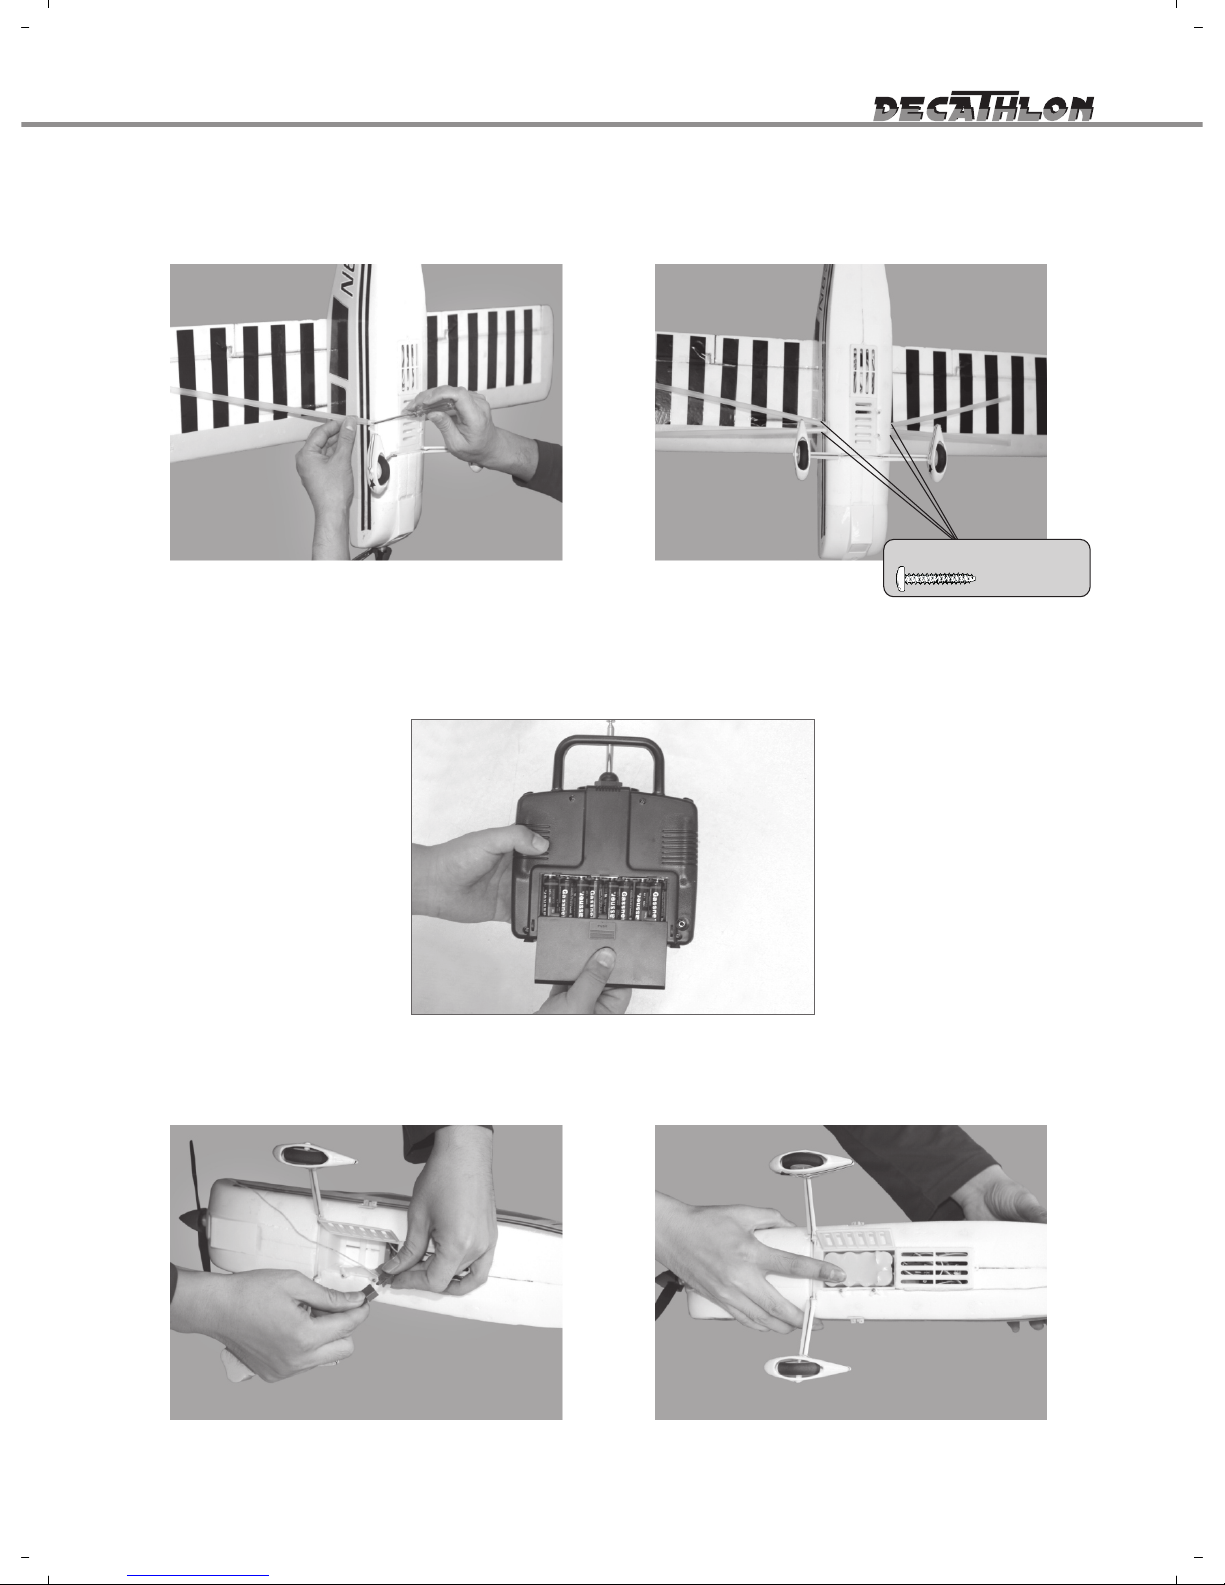
10、Make sur e t h e back swit c h o n the trans m itter is off and t h a t batteri e s are prope r l y
arrange d . B efore tur n i ng on, ple a s e positio n t h e throttl e o n i dle.
11、Plug the we l l -charge d b a ttery in t o t he connec t o r in the fuse l a ge, after b a ttery are
well arra n g ed, close t h e b attery co m partmen t c o ver.
9、Put on the wi n g s upport as s h o wn in the fol l owing pic t u res.
-1 1 -
¢1.4X6XD2.5MM
………… 4
Page 12
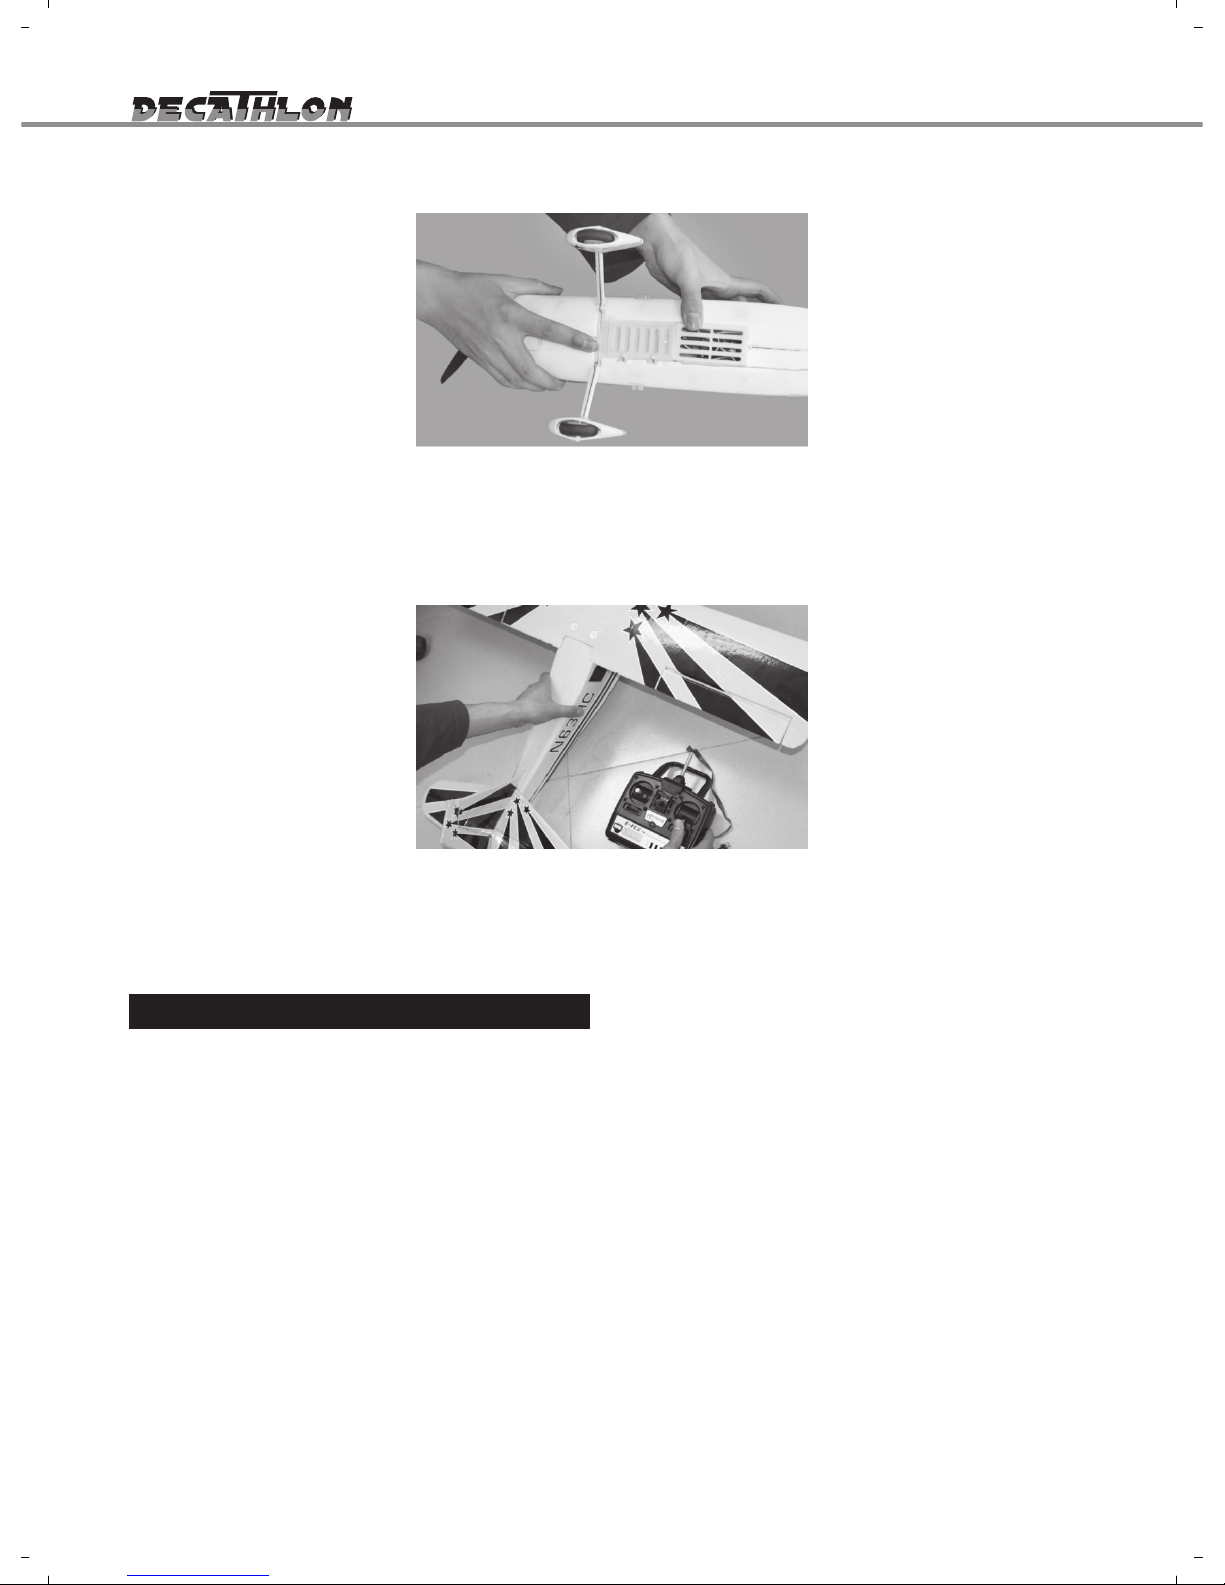
12、 Test to i n sure no r m a l functio n i n g of the j o y s t ick. Wh i l e testing the p ower, f i rmly
secure the airplane in place so that it will not move. Be certai n th a t n o b o d y o r t h i ngs come
near the sp i n ning prop e l ler.
-1 2 -
When the b a t t e r y voltage i s lower th a n s afety volta g e , the speed c o n t r oller can a u t o - cut the
power to the motor but still k eep su pply ing po wer fo r receiver & servo.
Speed controller operation
Turn on the transmitter firs t, the n conn ect ba tter y.
Keep the throttle sti ck at the lowest lev el for at least one second, th en you are able to open the
throttle and the motor will respond. This is a safety feature. If the motor does not work , ple ase rese t
the controller by discon nect ing th e batt ery an d repeating steps ① and ②.
①
②
③
Page 13
-1 3 -
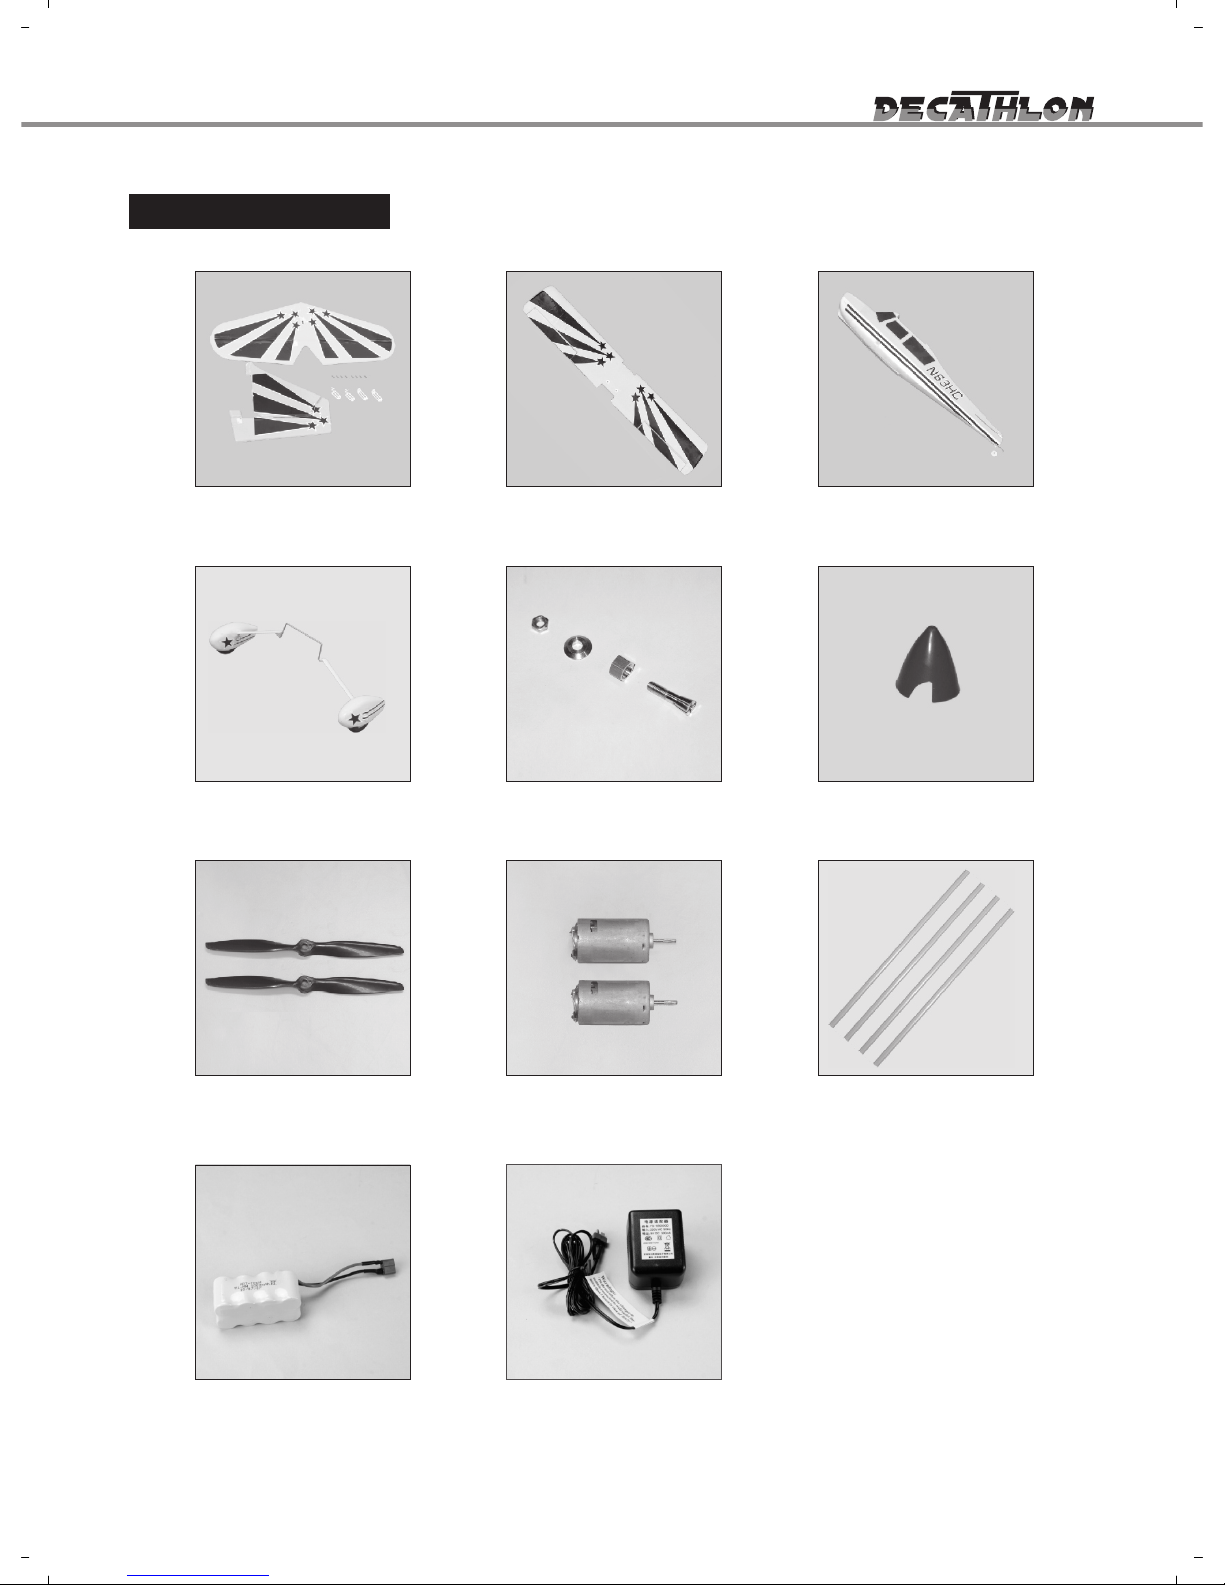
Spare parts list
No:5G011
Main wing set
No:54061
Propeller
No:5G021
Tail wing set
No:3A021
Motor with gear box
No:5G071
Main wing holder
No:5G031
Fuselage
No:54071
Propeller Spinner
No:5G041
Landing gear
Item:54081
Propeller Adapter
No:3F011
Ni-MH battery
No:36031
Ni-MH battery Charger
Page 14
-1 4 -
Phen omenon
Prob lem
How to s olve
Motor does
not run
1.Battery in plane is not fully charged.
2.Did not push the start swit ch
on the fuselage.
3.The battery in the transm itte r
is not full.
4.The circuit in the model has been
damaged due to crash.
1.Charge the battery.
2.Push the start switch on
the fuselage.
3.Install new dry cells.
4.Contact the distribu tor
Cannot fly
straight
1.The rudder is not centred .
2.The main wing has not been
installed on the fuselage center.
1.Adjust the rudder trim on
the transmitter.
2.Reinstall the main win g.
Cannot climb
1.The battery is not fully charged.
2.The elevator is angled downward.
1.Charge the battery.
2.Adjust the elevator trim on
the transmitter.
Control distance
is limited
1.The batteries in the transmitter
are running flat.
2.The antenna of transmi tter
has not been completely
extended.
1.Install new dry cells.
2.Completely extend the
antenna of the transmitter.
Troub le shoo ting
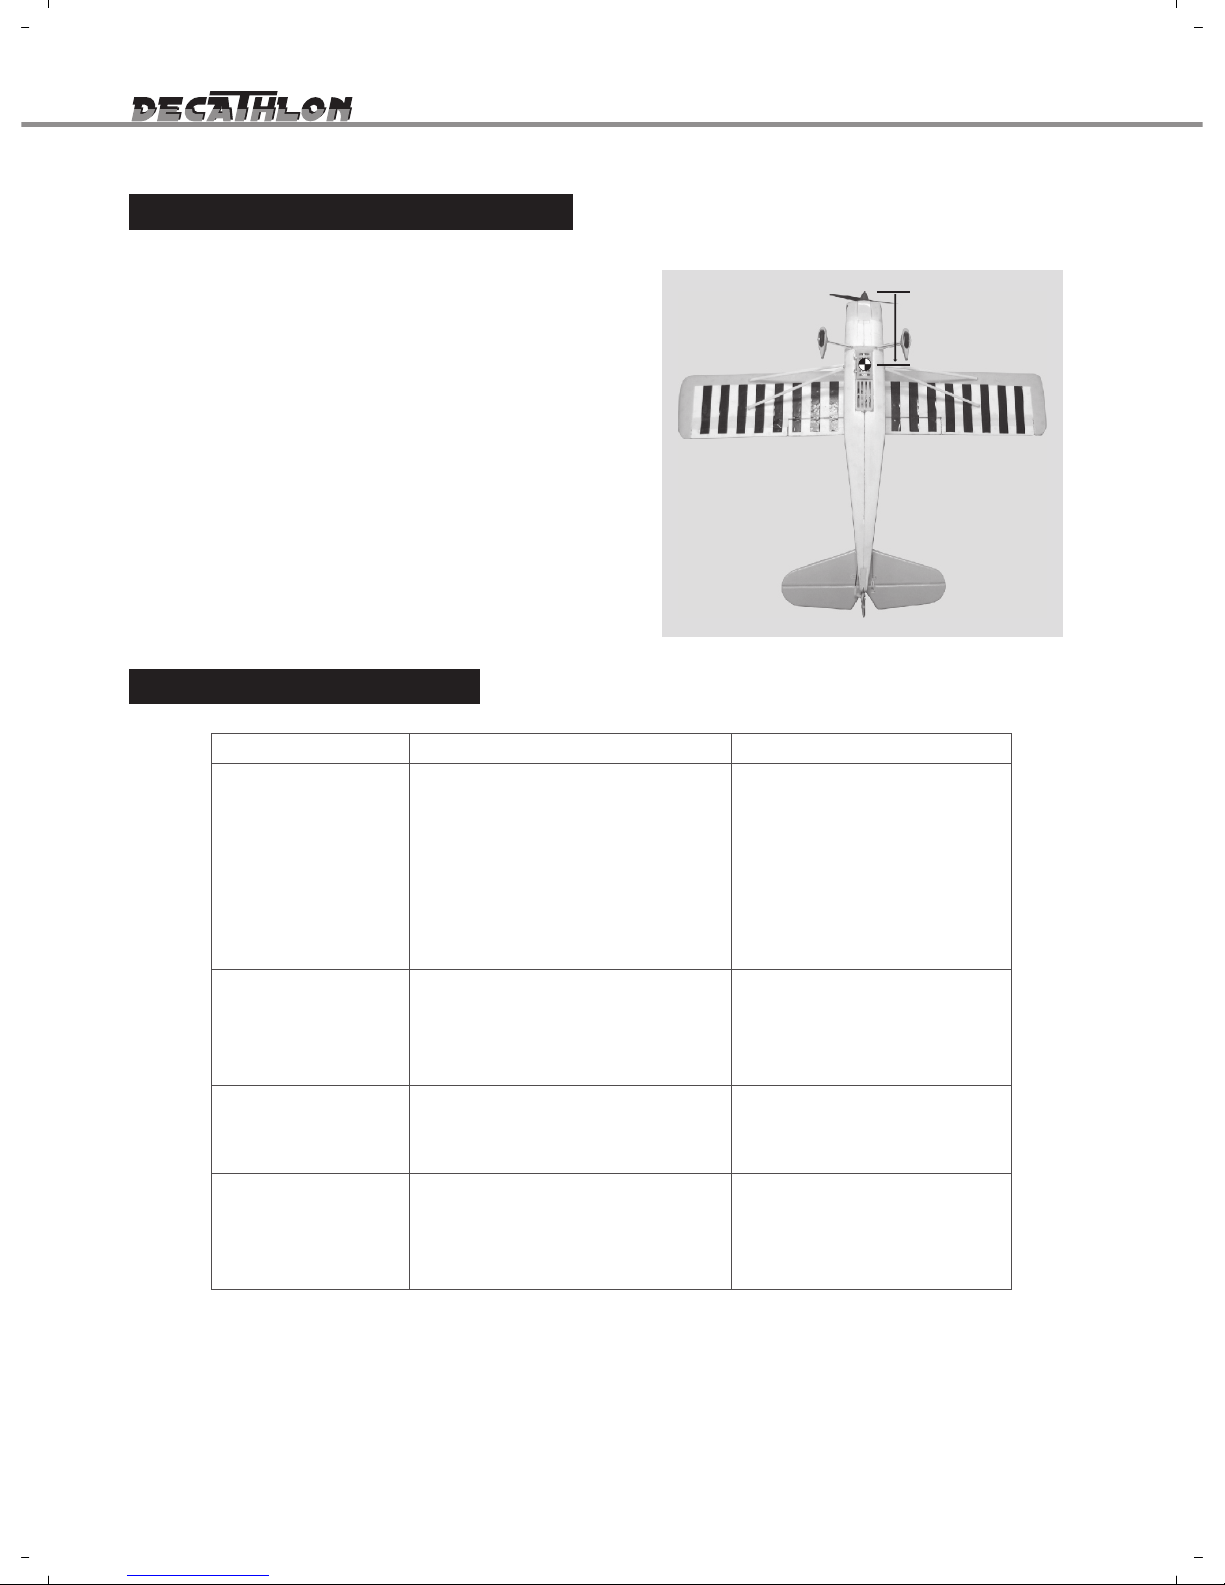
Cente r of Gravity Check
1 4
9 / inch~10 / inch
2 5
Please check the CG before heading to the
flying fileld. The center of gravity for your
Decathlon should fall within the range as
indicated by the arrows. For your initial flights,
we suggest that you balance the model toward
the front fo the wing. After you become more
familiar with the airplane, you can move the
CG more aft.However,under no circumstances
should the CG fall behind(toward the rudder)
the rear mark.If necessary, adjust the CG by
moving your receiver or adding weight to the
nose or tail of the airplane.
2009 .1 0
The r e wi ll b e no n oti c e of cha nge s an d imp rov e me n ts m a de t o th i s m a nua l
It i s fo r bid d en t o co p y t h e co n te n t of any p art of t his m anu al w i tho ut w r itt en p e rmi ssi o n.
Page 15

 Loading...