

Hobby Cat 16, 16 Club, 16 Race, 16 Classic Easy Assembly Manual

1
HOBIE CAT 16
HOBIE CAT EUROPE
ZI Toulon Est, BP 250
83078 Toulon cedex 9, France
Tel : +33 (0)494 08 78 78 - Fax : +33 (0)494 08 13 99
Email : info@hobie-cat.net - http://www.hobie-cat.net
Photo Pierrick Contin Last Update : January 2008
ASSEMBLY MANUAL
HOBIE CAT 16
Easy, Classic, Club & Race
2
HOBIE CAT 16
TABLE OF CONTENT
Part description....................................2-3
Hull assembly .........................................4
Trampoline..............................................5
Rudder assembly....................................6
Tiller crossbar & extension .....................6
Gudgeon bushings..................................7
Mast preparation.....................................8
Stepping the mast...................................9
Shrouds & trapeze................................10
Mainsail traveller...................................11
Mainsail.................................................12
Gooseneck & boom (except Race).......13
Boom & cunningham (Race only).........14
Mainsheet system.................................15
Jib....................................................16-17
Race jib halyard / Righting....................18
Jib furling assembly (option).................19
Spinnaker kit classic.............................20
Spinnaker kit trumpet soft.....................21
Before sailing........................................22
Safety advices ......................................23
Tools required
• One pair of pliers
• One rubber mallet
• 1 flat screwdriver
• 2 wrenches #17 and #10
•
1 driller with a #10 auger
It is recommended to be two people to assemble
your Hobie Cat.
Liste des Pièces
PART DESCRIPTION
Hulls (2)
Front crossbar
Rear crossbar
Side bars (2)
Mast (with mast step link)
Boom (except HC16 Easy)
Trampoline
Wire bag
Rig bag
Rope bag
Rudder assemblies (2)
Tiller crossbar
Tiller extension
Mainsail + battens (7)
Jib
Spinnaker kit (option)
CAUTION—DANGER
ALUMINIUM MAST - WATCH FOR
OVERHEAD ELECTRIC WIRES
Part description
3
HOBIE CAT 16
Part description
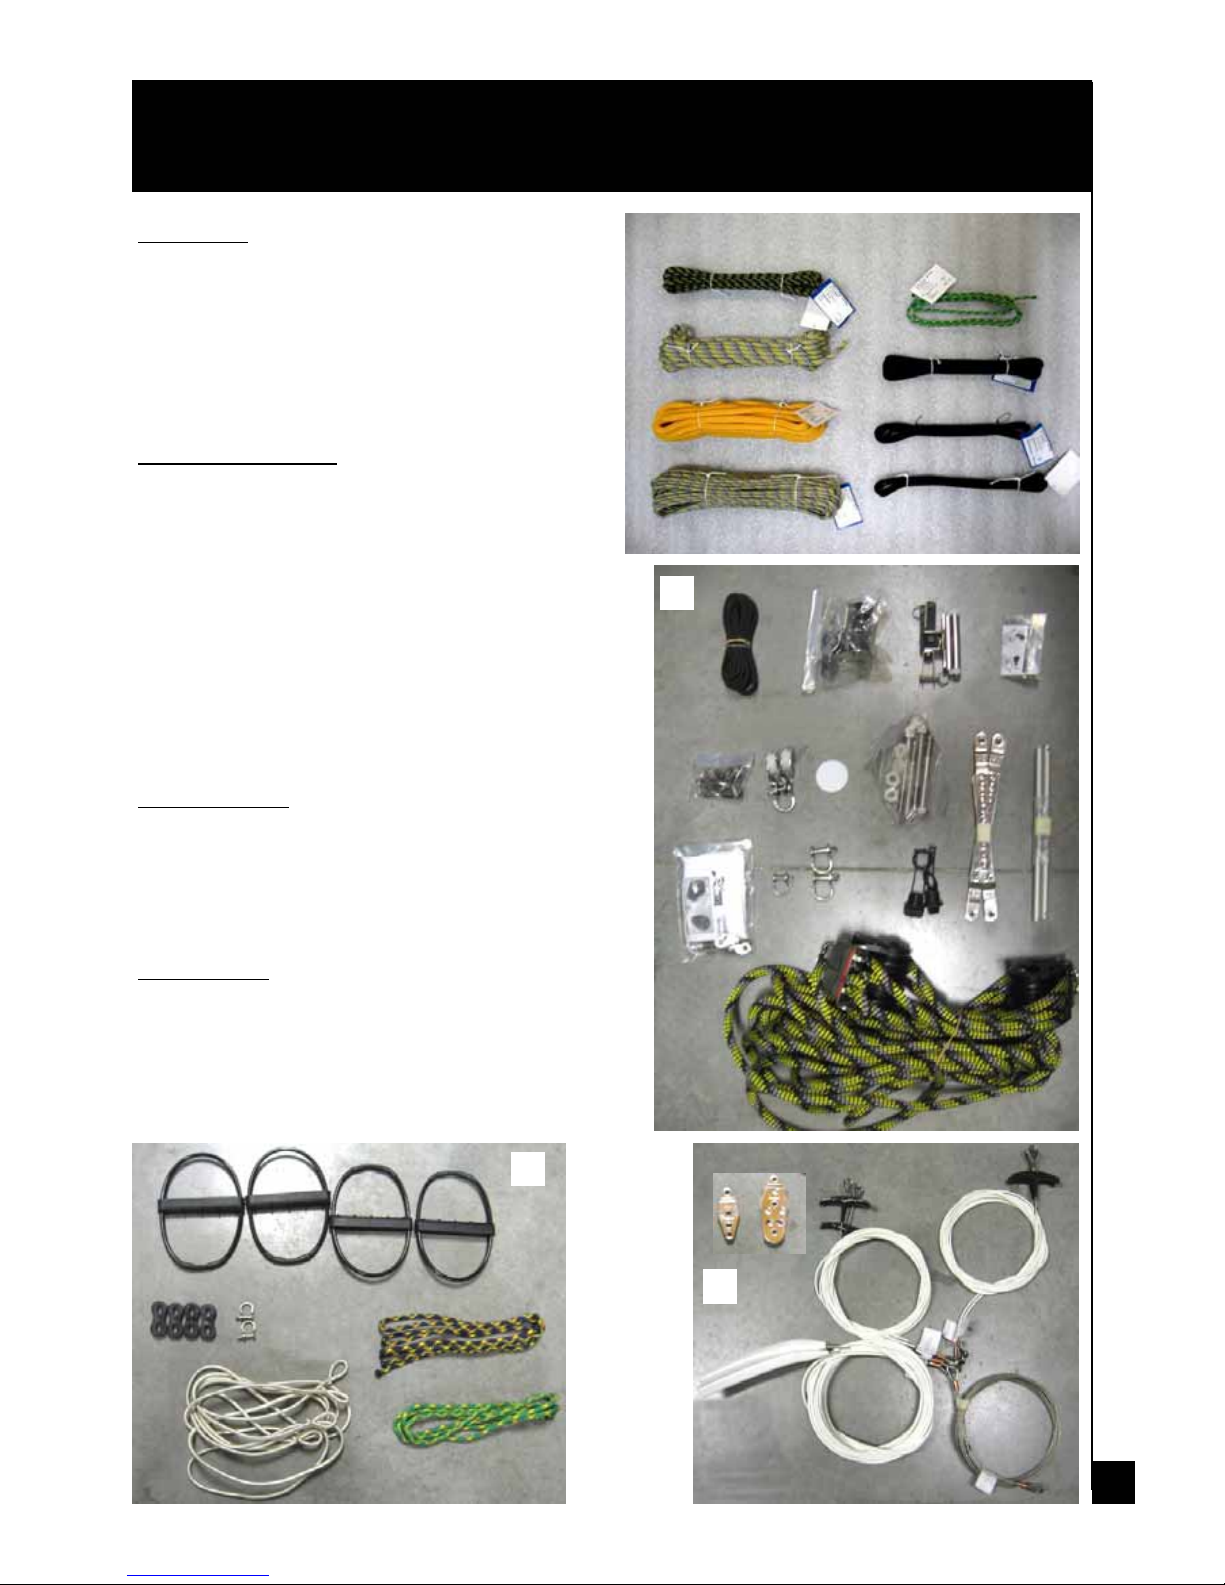
HC16 Ropes
1. Main halyard rope
2. Jib sheet
3. Righting line
4. Jib halyard rope
5. Tack line
6. Trampoline side line
7. Trampoline rear line
Wires and rig (photo1)
1. 2 Stay adjusters + toggles
2. Stay adjuster + 2 shackles
3. Additional stay adjuster (for 16 Race)
4. 4 Pylon screws + 4 Pylon nuts
5. Tiller connection kit (except 16 Race)
6. 2 Pins
7. 2 jib sheet blocks + shackle
8. Teflon washer
9. 4 Cutter pins
10. 2 Plugs + washers
11. Gooseneck
12. CCT LE Traveller (SSI for 16 Race)
13. Mainsheet system (mounted)
Trapeze (Photo 2)
1. 4 Trapeze handles (2 for Easy & Classic models)
2. 4 adjusting rope locks (2 for Easy & Classic models)
3. 2 shackles
4. 2 Trapeze shock cords (1 for Easy & Classic models)
5. 2 trapeze lines
Wires (Photo 3)
1. Big jib halyard blocks
2. Small jib halyard block
3. 2 sets of trapeze (1 for Easy & Classic models)
4. 2 shrouds
5. Forestay + pigtail + 8 mm shackle
1
3
2

4
HOBIE CAT 16
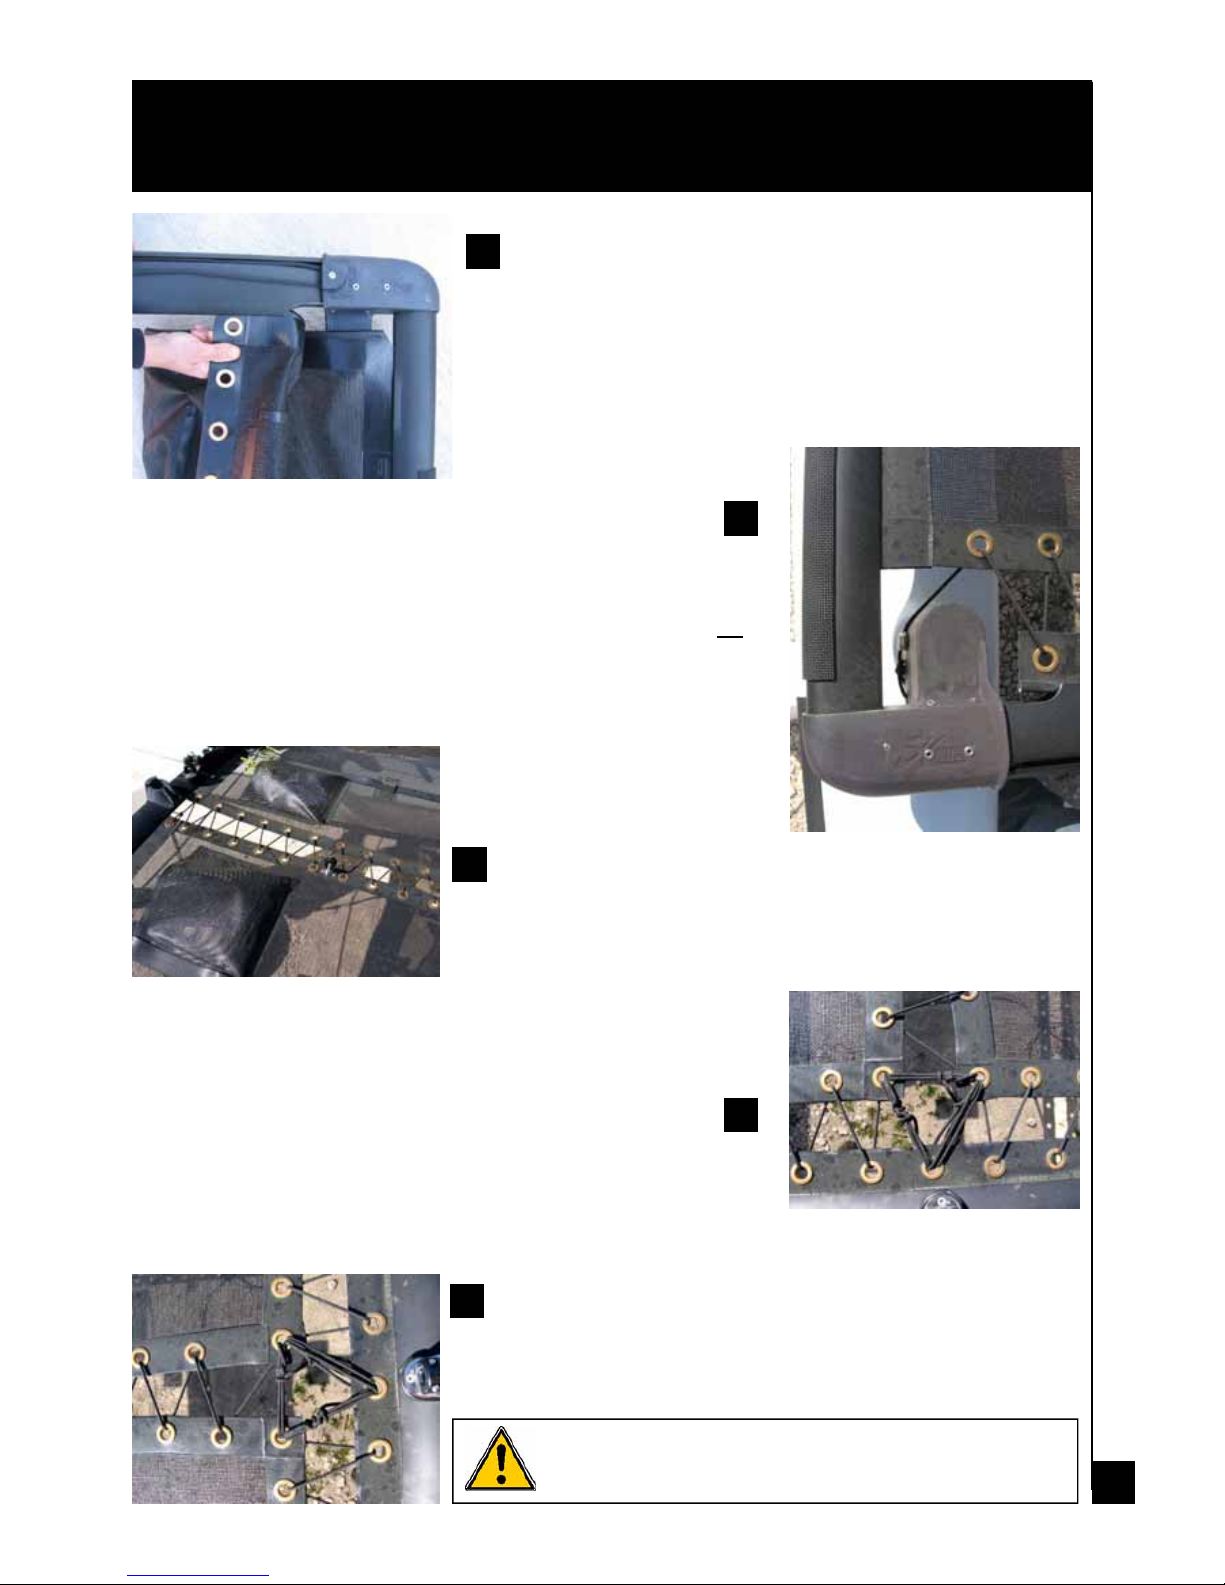
Insert the sidebars in their slots on the front crossbar. The flared portion
of the sidebar track must be forward and facing inward. Fit in the rear
crossbar onto the rear of the hulls and on the other end of each sidebar.
Hull assembly
Position the hulls parallel (2 meters apart) and check the left from the right hull (anti-skid on the deck towards the outside). Start each corner casting onto the pylon just to get them together. Use the soft mallet.
1
2
Once the frame is assembled and fitted onto the hulls, drive each corner
casting down onto the pylon until the bolt holes line up. Strike the casting
directly over the pylon only. Use the soft mallet only.
3
Once the frame is definitely adjusted, we strongly recommend to redrill
each bolt passage with an auger of 10 in order to ease the fitting of the
bolts (drill alternatively each side of the pylon).
4
Install the four pylon bolts and nuts, with the nuts inboard.Tighten securely, but do not over-torque.
TIP
: do not hesitate to file off the top of the pylons. This willavoid grip-
ping and jamming when you fit the frame.
5
5
HOBIE CAT 16
Trampoline
Tie each aft lacing line to the aft corner casting as follows : Startwith
an 8 knot at one end of the line which you will block into the inferior
hole of the rear casting (behind the crossbar fitting). Then, pass the line
through the grommet on the side of the trampoline (from underneath),
then in the rear trampoline strip (from above). After 3 or 4 laces, tempora-
rily tie it at the aft end. Repeat the same operation on the other side. NB
:
Make sure you passe the line above the crossbar binding nut to avoid
friction during sailing.
Insert trampoline half into the flared sidebar track so that the grom-
mets are running down the center and across the back. Posi-tion
the forward edge even with the forward crossbar. Insert the forward
edge of the trampoline into the front cross bar track adjacent to the corner casting and slide it all the way to the center. Repeat this operation
for the opposite side. Install the aft lacing strip by feeding the larger
bead into the track in the aft crossbar. Make sure it is centered.
NB : The hiking straps should be on top.
1
2
Tie the center lacing line. Start with a bowline knot. Lace the line back
and forth taking up slack as you go. When lacing go through the
grommets over/under.
3
Stop the central lacing by a triangle. Use the central grommet on the
rear trampoline stripe. Make a key at the end.
4
Temporarily tie off the line at the aft end, then remove slack again by
working it out front to back. Lace the two aft lines simultaneously in
the same manner.
5
NB : As the boat is used, it will be necessary to periodical-
ly retighten the lines.
6
HOBIE CAT 16
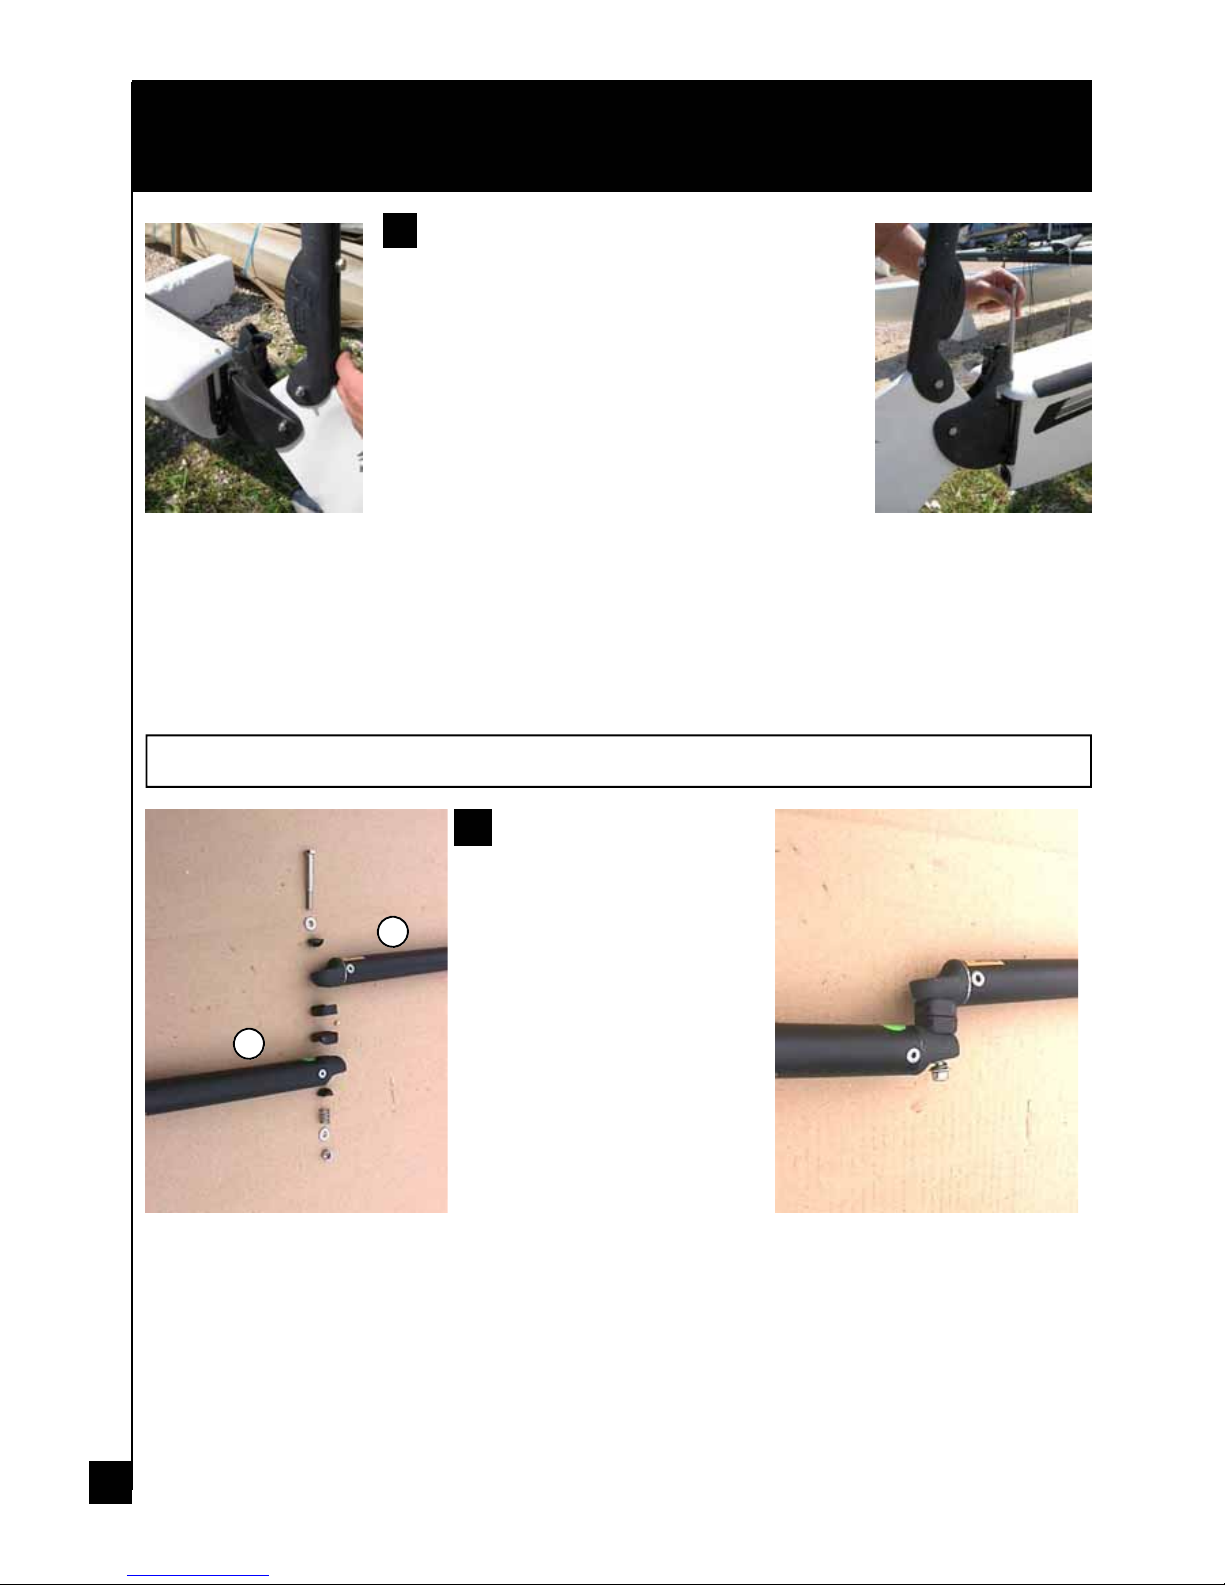
Rudder Assembly
RUDDER ASSEMBLY
Identify the right rudder assembly (green sticker)
and the left one (red sticker). They must not be
reversed. Slip the rudder pin down through t he
casting and gudgeons. Insert the split pin in the
hole of the rudder pin so that it prevents it from
falling down. Do the same thing on the opposite
side.Make sure that the plastic cam has the nose
up as indicated on the drawing.
TILLER SYSTEM
Attach the tiller crossbar (1) to
the Rudder arm (2). Pay attention
to the left and right side. Insert
the screw as shown on the photo.
Repeat the same operation on
the opposite side.
1
Tiller crossbar and extension (Easy, Classic & Club models)
2
1
2
7
HOBIE CAT 16
Rudder Assembly
Attach the stick by slipping the pinthrough the violin screw in themiddle of the tiller crossbar.
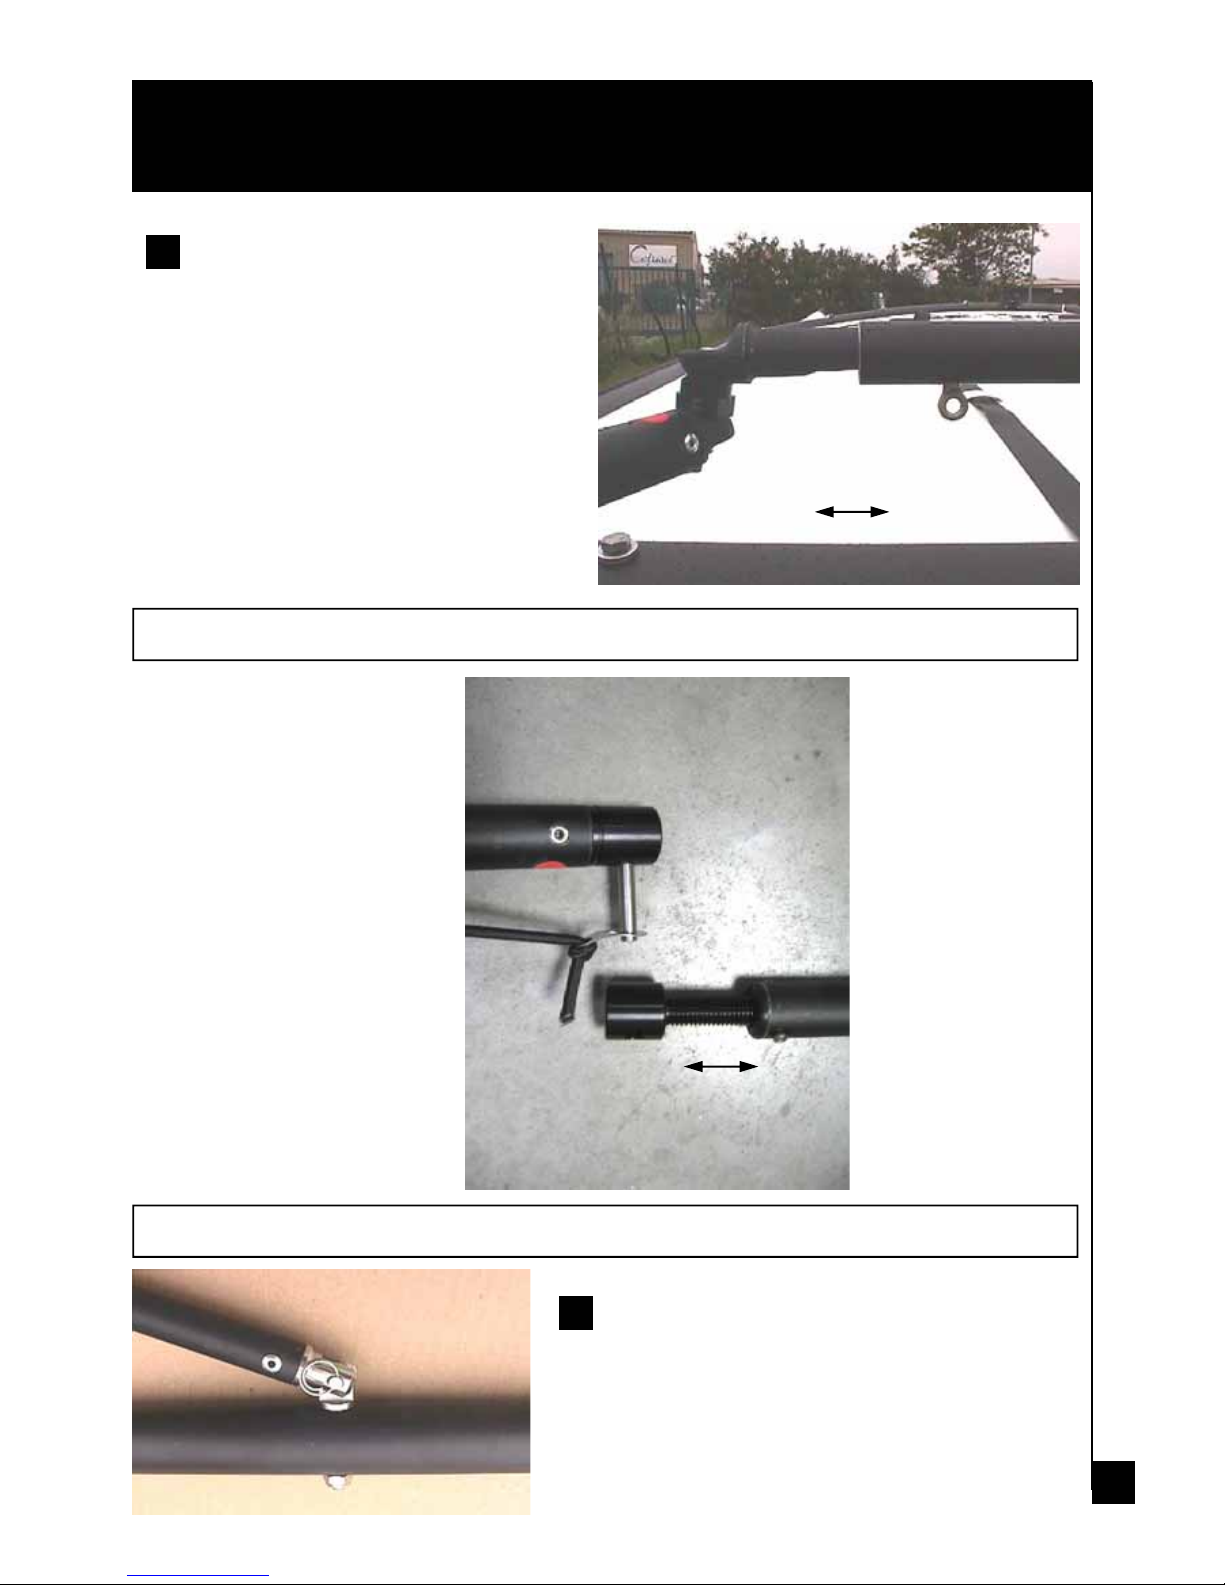
The two rudder blades must be parallel or slightly turned inside (3-4 mm). To do this it is necessary to adjust the length of the tiller crossbar.
The screw under the tiller crossbar allows for
this adjustment. Unscrew it and you can move
the bar inside or outside. Once the rudder blades are well trimmed, do not forget to retighten
the screw.
3
4
Tiller crossbar (Race model)
Tiller crossbar
Rudder arm
Tiller extension (all models)
 Loading...