

Page 1
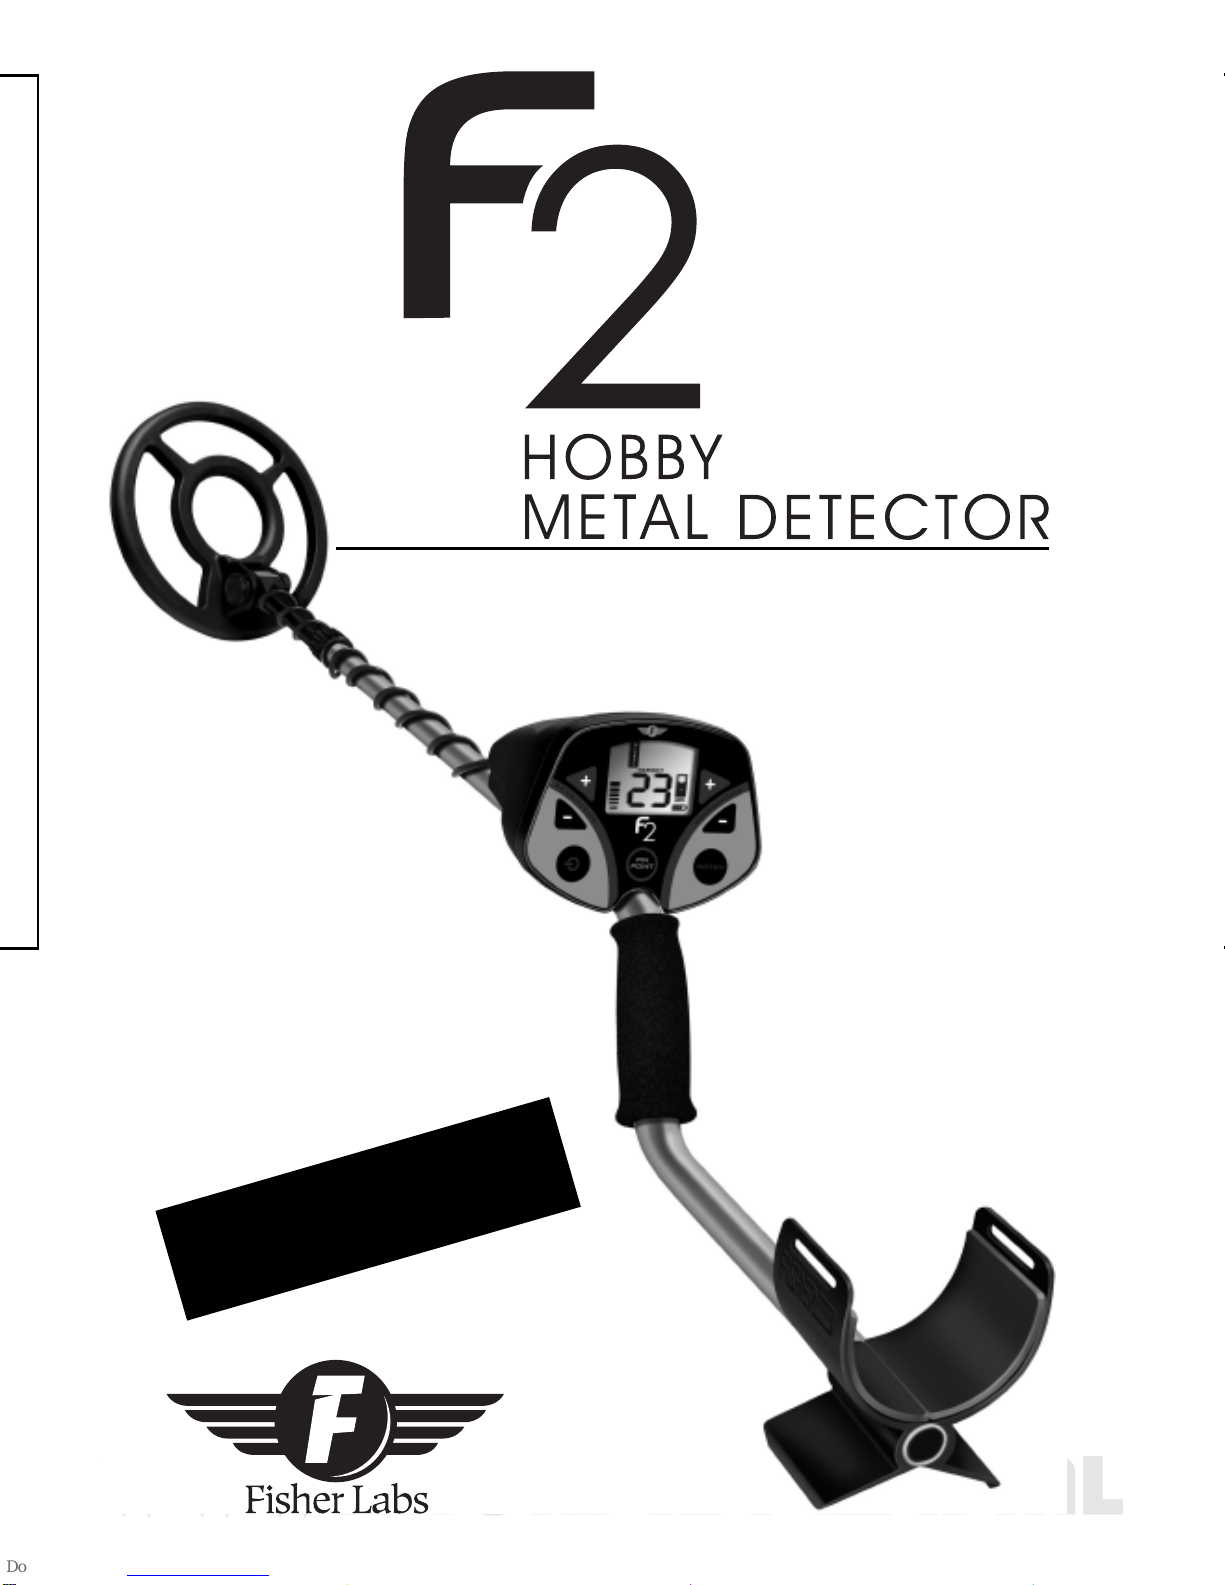
OPERATING
MANUAL
Use ALKALINE
Batteries ONLY
Page 2
2
2
TABLE OF CONTENTS
SSeettttiinngg UUp
p
. . . . . . . . . . . . . . . . . . . . . . . . . . . . . . . . . . . . . . .
3
3
BBaatttteerriiees
s
. . . . . . . . . . . . . . . . . . . . . . . . . . . . . . . . . . . . . . . . .
4
4
HHeeaaddpphhoonnee JJaacckk .. .. .. .. .. .. .. .. .. .. .. .. .. .. .. .. .. .. .. .. .. .. .. .. .. .. .. .. .. .. .. .. ..4
4
QQuuiicckk--SSttaarrtt DDeemmo
o
. . . . . . . . . . . . . . . . . . . . . . . . . . . . . . .
55--6
6
CCoonnttrrooll PPaanneell .. .. .. .. .. .. .. .. .. .. .. .. .. .. .. .. .. .. .. .. .. .. .. .. .. .. .. .. .. .. .. .. .. .. ..77--9
9
SSeennssiittiivviittyy .. .. .. .. .. .. .. .. .. .. .. .. .. .. .. .. .. .. .. .. .. .. .. .. .. .. .. .. .. .. .. .. .. .. .. ..7
7
DDiissccrriimmiinnaattiioonn CCoonnttrrooll .. .. .. .. .. .. .. .. .. .. .. .. .. .. .. .. .. .. .. .. .. .. .. .. ..8
8
PPiinnppooiinntt .. .. .. .. .. .. .. .. .. .. ..
.. .. .. .. .. .. .. .. .. .. .. .. .. .. .. .. .. .. .. .. .. .. .. .. .. ..9
9
NNoottcchh .. .. .. .. .. .. .. .. .. .. .. .. .. .. .. .. .. .. .. .. .. .. .. .. .. .. .. .. .. .. .. .. .. .. .. .. .. .. ..9
9
44--TToonnee AAuuddiioo SSyysstteemm .. .. .. .. .. .. .. .. .. .. .. .. .. .. .. .. .. .. .. .. .. .. .. .. .. .. .. .. ..110
0
DDeepptthh aanndd TTaarrggeett DDiissppllaayy .. .. .. .. .. .. .. .. .. .. .. .. .. .. .. .. .. .. .. .. .. ..1111--112
2
TTaarrggeett RReeaaddoouutt TTaabbllee .. .. .. .. .. .. .. .. .. .. .. .. .. .. .. .. .. .. .. .. .. .. .. ..112
2
SSeennssiittiivviittyy AAddjjuussttmmeennt
t
. . . . . . . . . . . . . . . . . . . . . . . . . . . . .
113
3
EElleeccttrroommaaggnneettiicc I
I
nntteerrffeerreennccee .. .. .. .. .. .. .. .. .. .. .. .. .. .. .. .. ..113
3
SSeevveerree GGrroouunndd CCoonnddiittiioonnss .. .. .. .. .. .. .. .. .. .. .. .. .. .. .. .. .. .. .. ..113
3
SSeeaarrcchh TTeecchhnniiqquuees
s
. . . . . . . . . . . . . . . . . . . . . . . . . . . . . . .
114
4
TTaarrggeett VVeerriiffiiccaattiioonn .. .. .. .. .. .. .. .. .. .. .. .. .. .. .. .. .. .. .. .. .. .. .. .. .. .. ..114
4
PPiinnppooiinnttiinngg wwiitthh mmoottiioonn mmooddeess .. .. .. .. .. .. .. .. .. .. .. .. .. .. .. ..114
4
TTaarrggeett PPiinnppooiinnttiinngg ((NNoo mmoottiioonn)
)
. . . . . . . . . . . . . . . . . . . . .
115
5
CCooiill DDrriifftt .. .. .. .. .. .. .. .. .. .. .. .. .. .. .. .. .. .. .. .. .. .. .. .. .. .. .. .. .. .. .. .. .. .. .. .. .. .. .. ..110
0
TARGET PINPOINTING
After you have identified a target using a motion mode of detection,
press to identify the target’s exact location. This technique can
yield more information about the target’s shape and size and also find
its exact location to facilitate excavation.
UUssi
i
11.
.
22.
.
33.
.
Page 3
3
3
SETTING UP
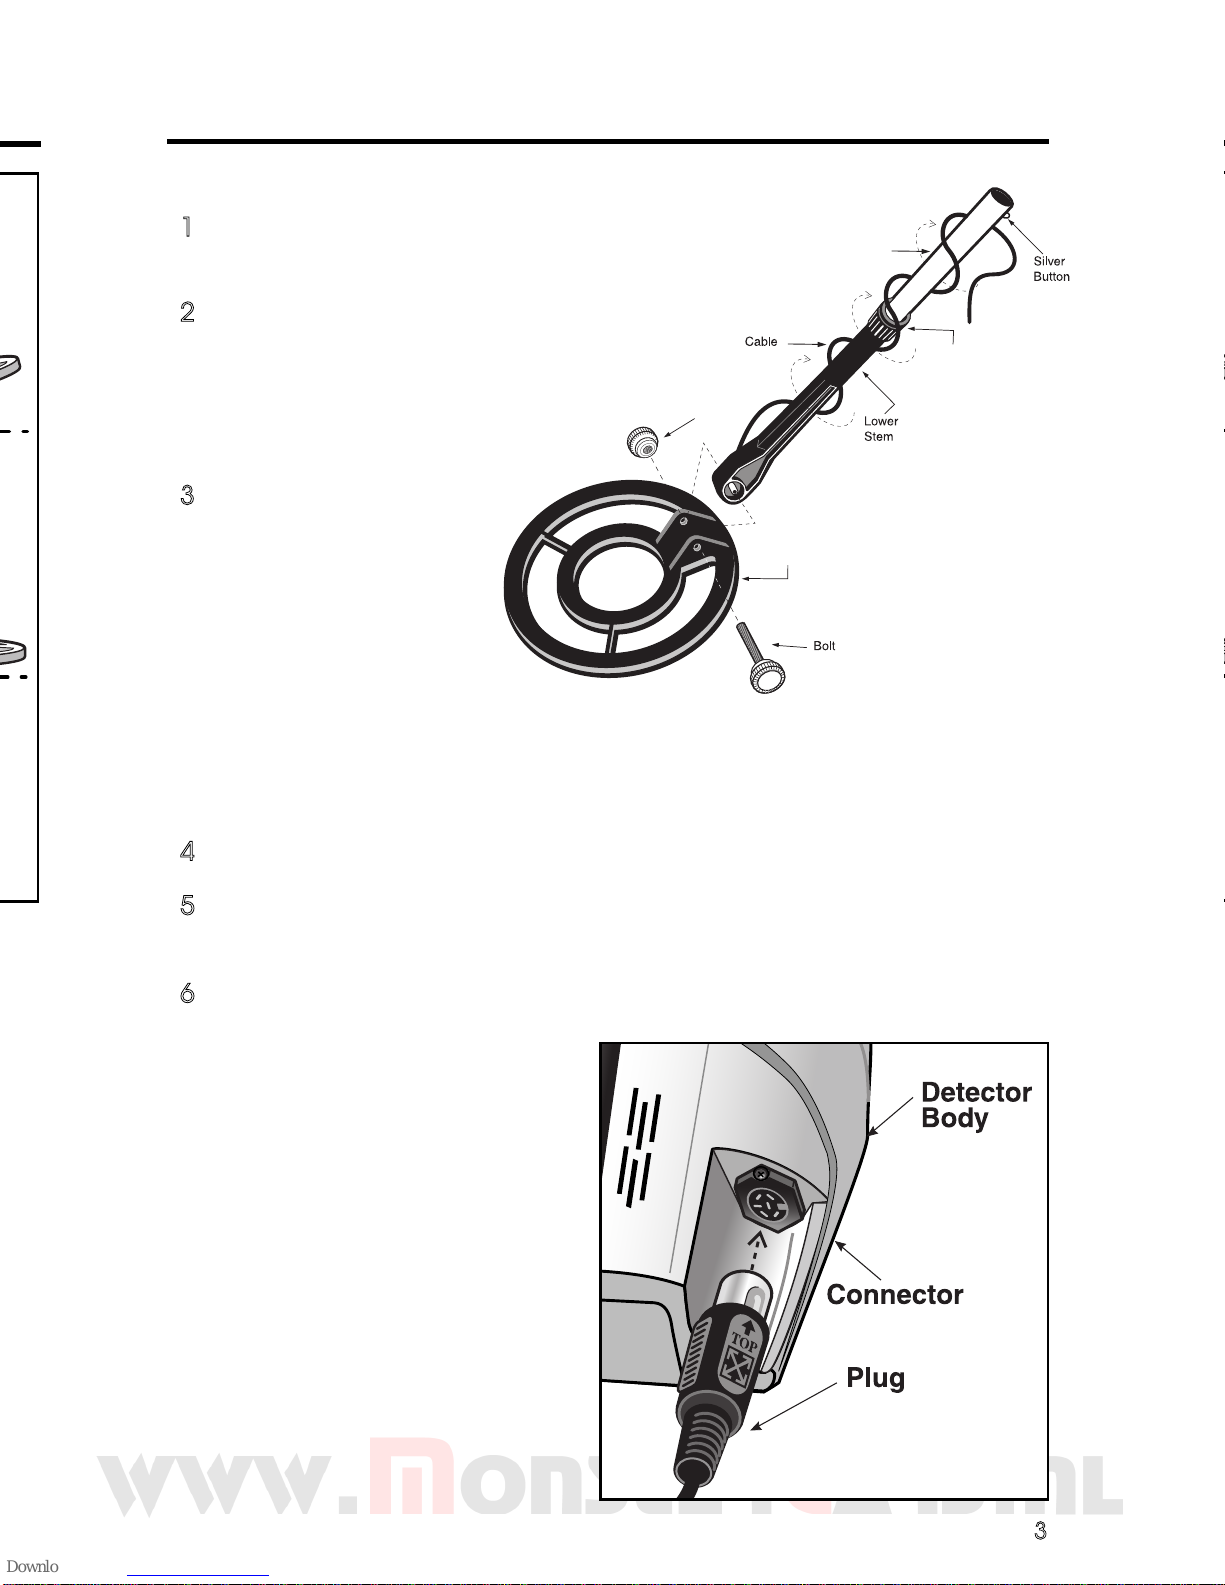
No tools required.
l
1
1
Insert the lower stem (plastic tube) into the
middle stem.
l
2
2
Position the lower stem with the silver
button toward the back.
Using the bolt and knurled knob,
attach the search coil to the
lower stem.
l
3
3
Press the button on
the middle stem,
and slide the
lower/middle stem
assembly into the
upper s-shaped
stem.
Adjust the stem to a length that lets you maintain a comfortable
upright posture, with your arm relaxed at your side, and the search
coil parallel to the ground in front of you.
l
4
4
Wind the cable securely around the stems.
l
5
5
Insert the plug into the matching connector on the right underside of
the detector body. Be sure that the key-way and pins line up correctly.
l
6
6
After the stem length is adjusted to your height, tighten the two
locking collars to stabilize the stems.
Arm Rest Adjustment
If you wish to change the position
of the arm rest, remove the screw
and move the arm rest to one of
the alternate hole locations.
Caution: Do not force the plug in.
Excess force will cause
damage.
To disconnect the cable,
pull on the plug.
Do not pull on the cable.
Searchoil
Knurled Knob
Middle Stem
Locking
Collar
Page 4
4
4
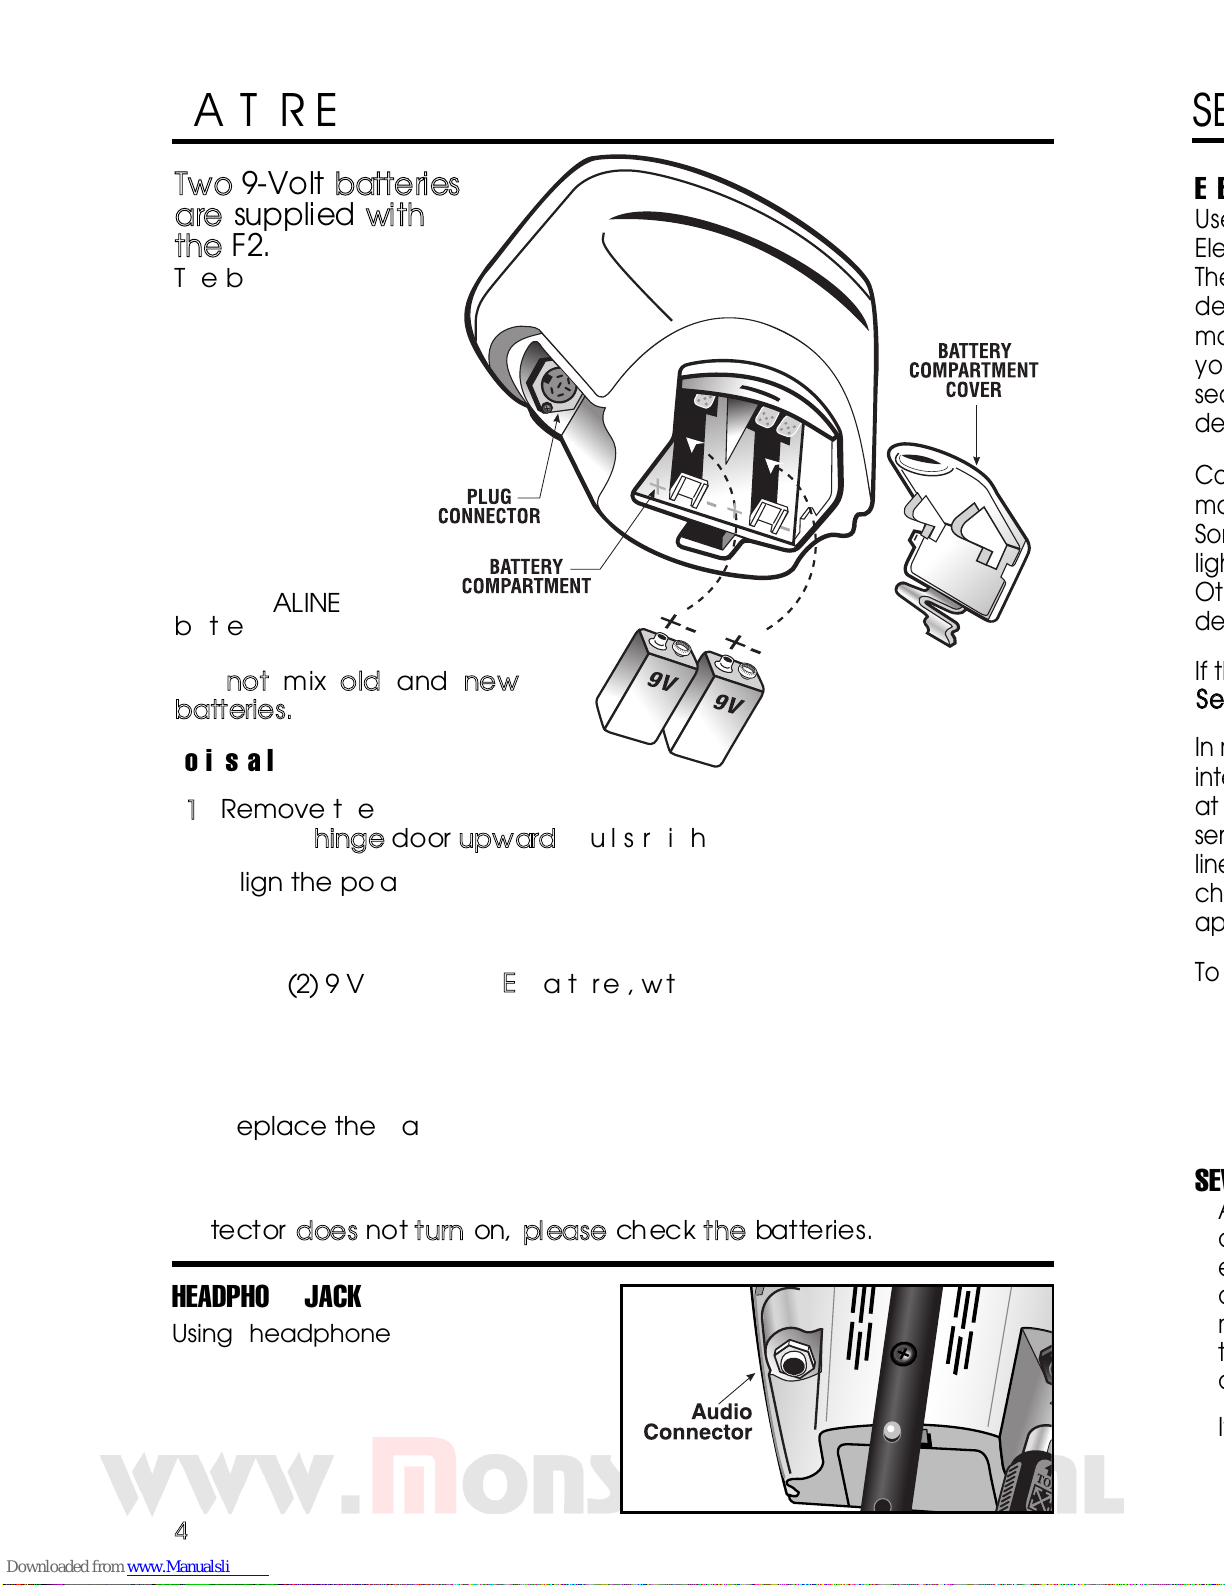
TTwwoo 99--VVoolltt bbaatttteerriiees
s
aarree ssuupppplliieedd wwiitth
h
tthhee FF22.
.
The batteries have
been inserted
backwards in the
compartment for
storage during
transportation.
Please remove
batteries, turn them
around, and install
correctly.
Use
AALLKKAALLIINNE
E
batteries only.
DDoo nnoott mmiixx oolldd aanndd nneew
w
bbaatttteerriieess.
.
To install the batteries:
l
1
1
Remove the battery cover by disengaging the clip at the back.
DDoo nnoott hhiinnggee ddoooorr uuppwwaarrd
d
; pull straight back
l
2
2
Align the polarity of the batteries correctly, with the positive "+"
toward the coil plug connection, as indicated by the + indicator
on the housing.
l
3
3
Insert (2) 9-Volt
AALLKKAALLIINNE
E
batteries, with the contacts pointed inward,
and press down on the back of the batteries to snap them into place.
Some brands of batteries will require moderate force to clear the
retaining tabs.
l
4
4
Replace the battery door.
Most metal detector problems are due to improperly installed
batteries, or the use of non-alkaline or discharged batteries.
IIff tthhe
e
ddeetteeccttoorr ddooeess nnoott ttuurrnn oonn,, pplleeaassee cchheecckk tthhee bbaatttteerriieess..
BATTERIES
ELECTROMAGNETIC INTERFERENCE
Use the Sensitivity Control is to eliminate
Electromagnetic Interference (EMI).
The F2 metal detector is an extremely sensitive
device; the search coil creates its own
magnetic field and acts like an antenna. If
your detector beeps erratically when the
search coil is motionless, the unit is probably
detecting another electromagnetic field.
Common sources of EMI are electric power lines, both suspended and buried,
motors, and household appliances like computers and microwave ovens.
Some indoor electronic devices, such as dimmer switches used on household
lighting, produce severe EMI and can cause the detector to beep erratically.
Other metal detectors also produce their own electromagnetic fields; so if
detecting with a friend, keep two metal detectors at least 20 feet apart.
If the detector beeps erratically,
SSeen
n
In most urban environments, you should be able to search without chatter from
interference at the default sensitivity setting (default setting is the sensitivity level
at power-up, 4 bars), or at one level reduced from default. At maximum
sensitivity, the F2 will “chatter” in proximity to underground or overhead power
lines, or to indoor or outdoor electrical devices. In fact, if you notice rapid
chatter with the searchcoil near the ground, you may be able to trace the
approximate location of the underground power lines by following the chatter.
To manage chatter, which is most likely from electrical interference:
SEVERE GROUND CONDITIONS
A secondary use for the Sensitivity Control is to reduce false detection signals
caused by severe ground conditions. While the detector contains circuitry to
eliminate the signals caused by most naturally occurring ground minerals, 100%
of all ground conditions cannot be anticipated. Highly magnetic soils found in
mountainous and gold-prospecting locations can cause the detector to emit
tones when metal objects are not present. High saline content soils and sands
can sometimes cause the detector to beep when no metal target is present.
If the detector emits false, non-repeatable, signals, REDUCE THE SENSITIVITY.
SENSITIVITY ADJUSTMENT
HEADPHONE JACK
Using headphones (not supplied)
with your metal detector makes it
easier to identify subtle changes in
the threshold levels for better
detection results, and also reduces
drain on the batteries. Any stereo
headphone with 1/4” jack will work.
Page 5
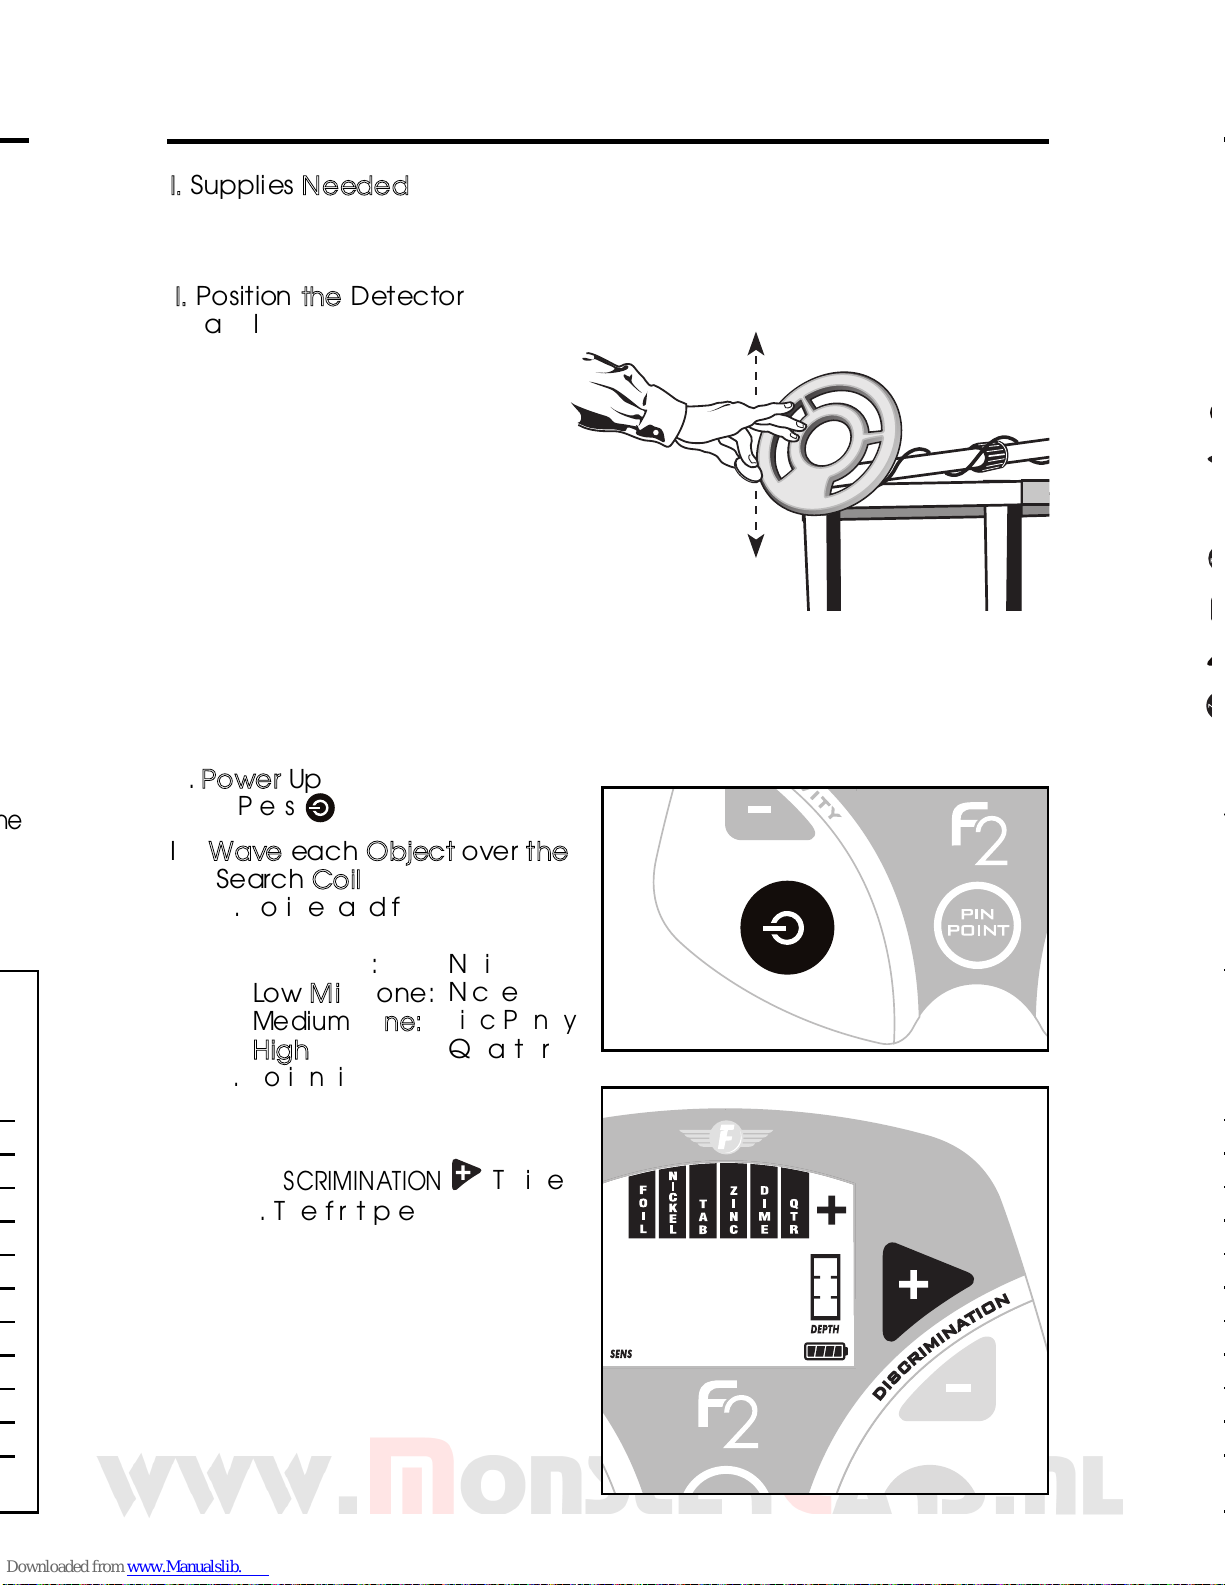
QUICK-START DEMONSTRATION
II.. SSuupppplliieess NNeeeeddeed
d
• A Nail • A Quarter
• A Zinc Penny (dated after 1982) • A Nickel
IIII.. PPoossiittiioonn tthhee DDeetteeccttoor
r
a. Place the detector on a
table, with the search
coil hanging over the
edge. (or better, have a
friend hold the detector,
with the coil off the
ground).
b
. Keep the searchcoil
away from walls, floors,
and metal objects.
c. Remove watches, rings
and other jewelry or metal objects from hands and wrists.
d. Turn off appliances or lights that cause electromagnetic
interference.
e. Pivot the search coil back toward the detector body.
IIIIII.. PPoowweerr UUp
p
Press .
IIVV.. WWaavvee eeaacchh OObbjjeecctt oovveerr tthhee
SSeeaarrcchh CCooiil
l
a.Notice a different tone for
each object.
LLooww TToonnee:
:
Nail
LLooww MMiidd TToonnee:
:
Nickel
MMeeddiiuumm TToonnee:
:
Zinc Penny
HHiigghh TToonnee:
:
Quarter
b.Motion is required. Objects
must be in motion over the
search coil to be detected.
VV.. PPrreessss DDIISSCCRRIIMMIINNAATTIIOON
N
Twice
a. The first press illuminates
all target icons.
b. The second press turns
off the “IRON” icon.
Quick-Start Demo continued
on next page
5
5
e
e
Page 6
6
6
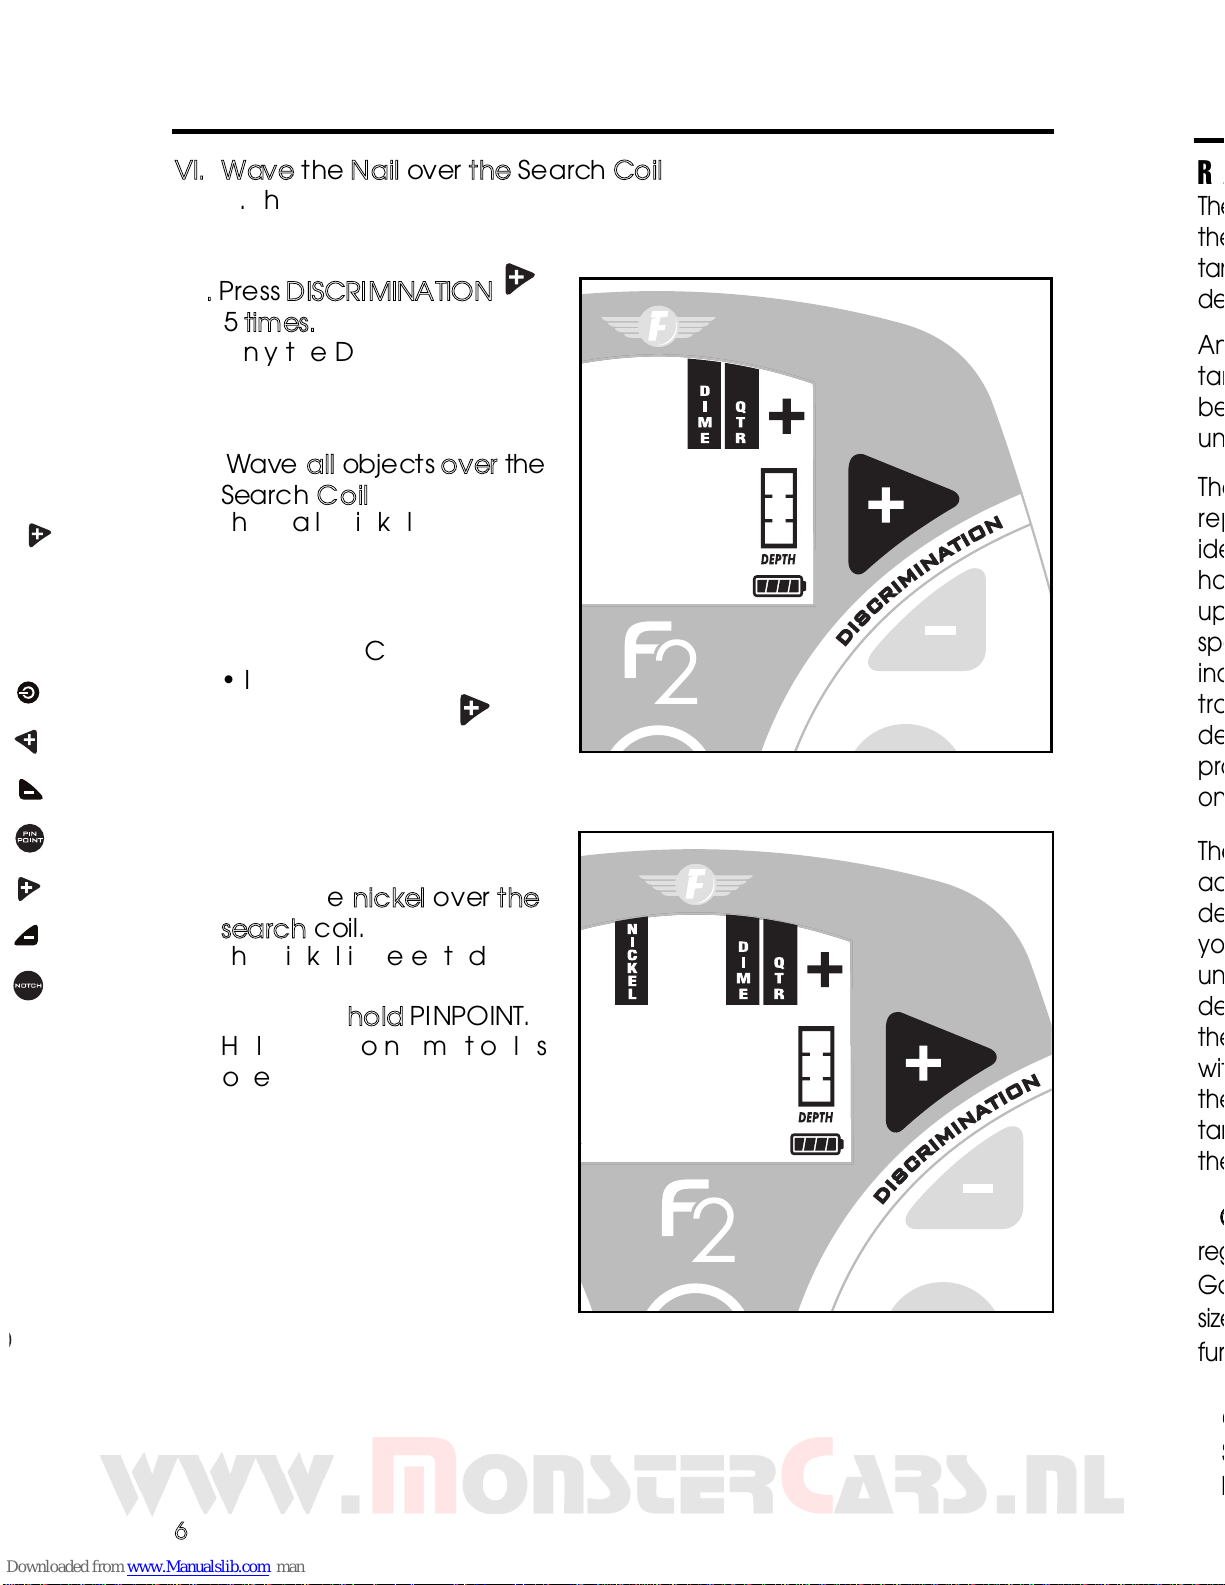
VVII..WWaavvee tthhee NNaaiill oovveerr tthhee SSeeaarrcchh CCooiil
l
a. The Nail will not be detected.
b.
The Nail has been "Discriminated Out."
VVIIII.. PPrreessss DDIISSCCRRIIMMIINNAATTIIOONN
55 ttiimmeess.
.
Only the Dime, Quarter
and + icons will remain
illuminated.
VVIIIIII.. WWaavvee aallll oobbjjeeccttss oovveerr tthhe
e
SSeeaarrcchh CCooiil
l
The Nail, Nickel and Penny
will not be detected.
The quarter will be
detected with a high tone.
IIXX.
.
• Press NOTCH
• Immediately press
DISCRIMINATION
• Press NOTCH
again
• The “Nickel” icon is again illuminated.
• You have “Notched In”
the nickel
XX..WWaavvee tthhee nniicckkeell oovveerr tthhe
e
sseeaarrcchh ccooiill..
The nickel is detected.
XXII..PPrreessss aanndd hhoolldd PPIINNPPOOIINNTT.
.
Hold a coin motionless
over the search coil.
• All Metal objects are
now detected.
•
One monotone sound
indicates the presence of
any type of metal.
•
Depth is indicated in
inches. Move a coin
toward & away from the
search coin. Watch the
depth indicator change.
QUICK-START DEMONSTRATION
(continued)
DEPTH AND TARGET DISPLAY
READING THE DISPLAY
The Liquid Crystal Display (LCD) shows
the PROBABLE identification of the
targeted metal, as well as the PROBABLE
depth of the target, in inches.
An arrow will illuminate under the
target category where an object is
best classified, and stay illuminated
until another target is identified.
The detector will normally register a
repeating, unchanging target
identification when a buried target
has been located and identified. If,
upon repeated passes over the same
spot, the target identification reads
inconsistently, the target is probably a
trash item, oxidized metal, or too
deep to be classified accurately. With
practice, you will learn to unearth
only the more repeatable signals.
The segment identifications are highly
accurate, when detecting the objects
described on the label. However, if
you register in a given category for an
unknown buried object, you could be
detecting a metallic object other than
the object described on the label, but
with the same metallic signature. Also,
the greater the distance between the
target and the coil, the less accurate
the target identification.
GGO
O
register on the left side of the LCD scale.
Gold will register depending upon its
size. The smaller the gold object, the
further to the left it will register.
G
G
SSm
m
Iron or Foil.
Page 7
7
7
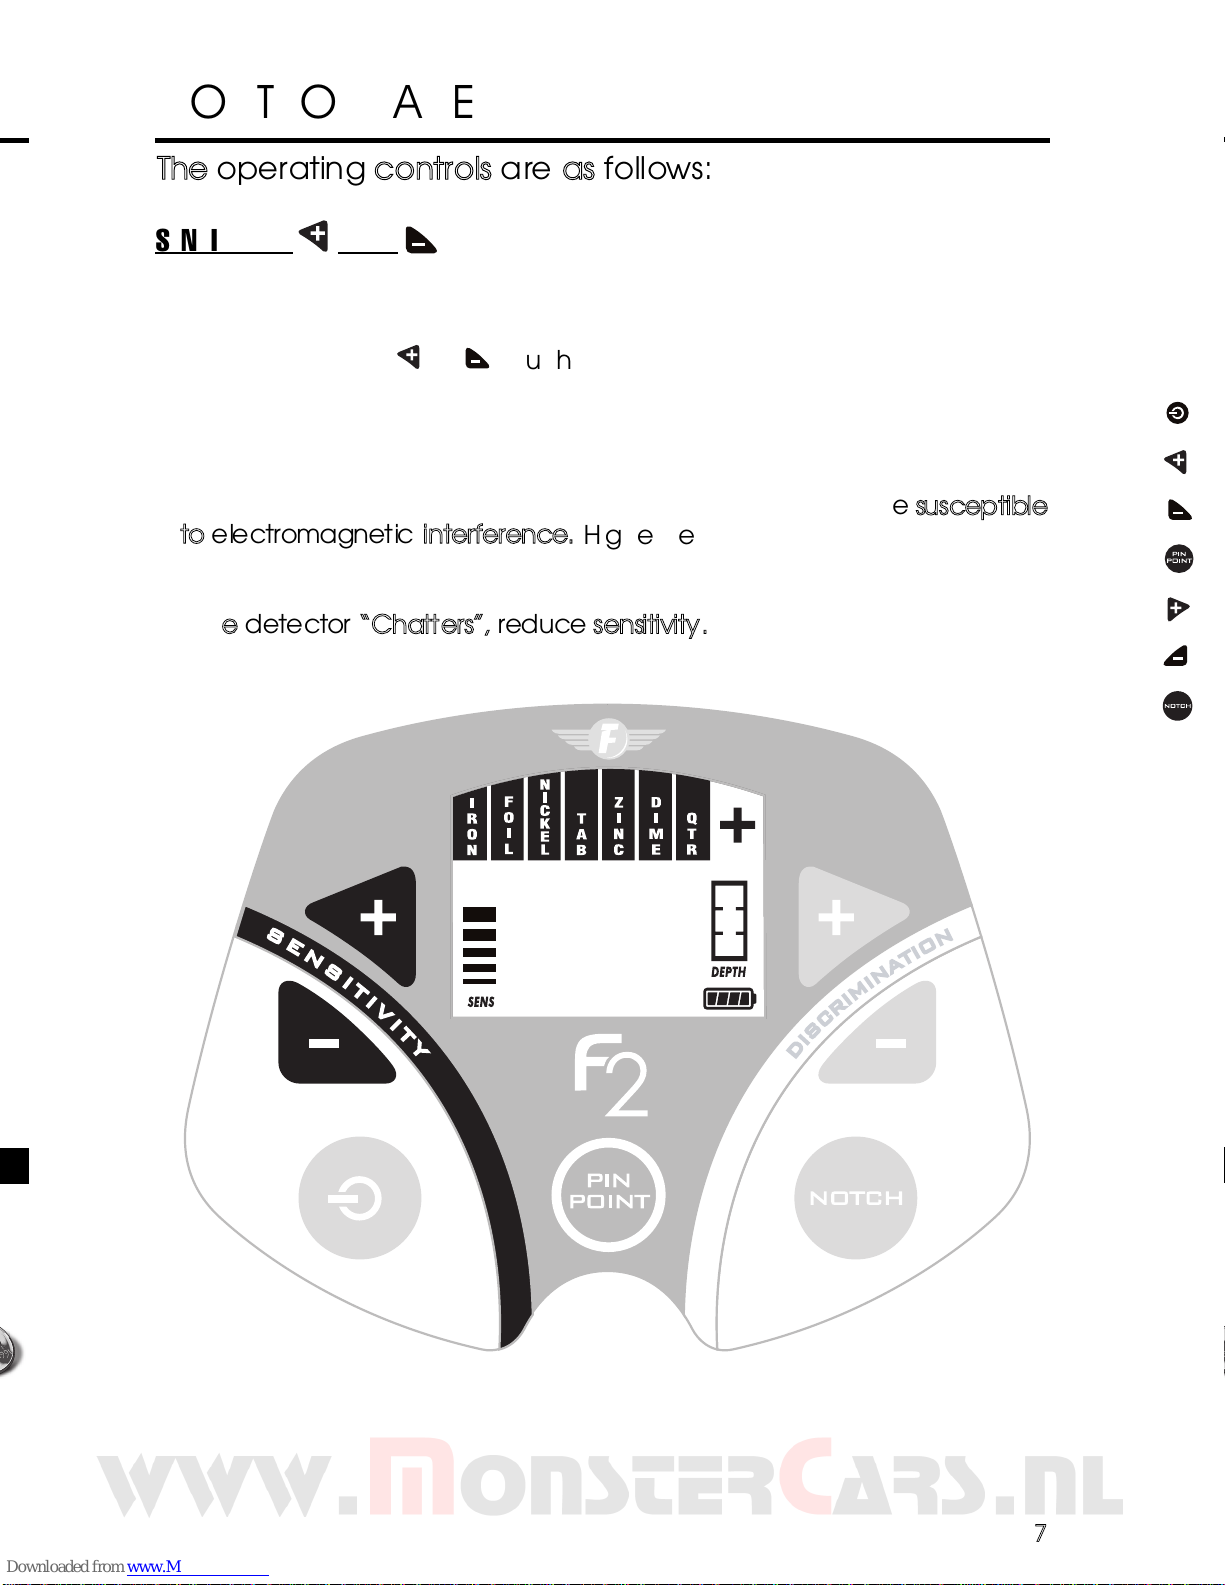
TThhee ooppeerraattiinngg ccoonnttrroollss aarree aass ffoolllloowwss:
:
SENSITIVITY
AND
These controls change the detector’s sensitivity; higher settings enable
detection of deeper targets. At power-up, the detector is pre-set to 75%
of maximum sensitivity. At minimum, the sensitivity is 35% of maximum. With
each press of the
oor
r
touch pads, the sensitivity level is displayed on
the bar graph on the left of the display. Upon reaching the minimum or
maximum sensitivity setting, the detector will beep twice.
While higher levels of sensitivity enable detection of deeper targets,
operation at high levels of sensitivity make the detector
mmoorree ssuusscceeppttiibblle
e
ttoo eelleeccttrroommaaggnneettiicc iinntteerrffeerreennccee..
Higher sensitivity settings can also lead
to false signals in difficult ground conditions. Use lower sensitivity settings
to suppress interference or false signals from soil minerals when necessary.
IIff tthhee ddeetteeccttoorr ““CChhaatttteerrss””,, rreedduuccee sseennssiittiivviittyy.
.
CONTROL PANEL
Page 8
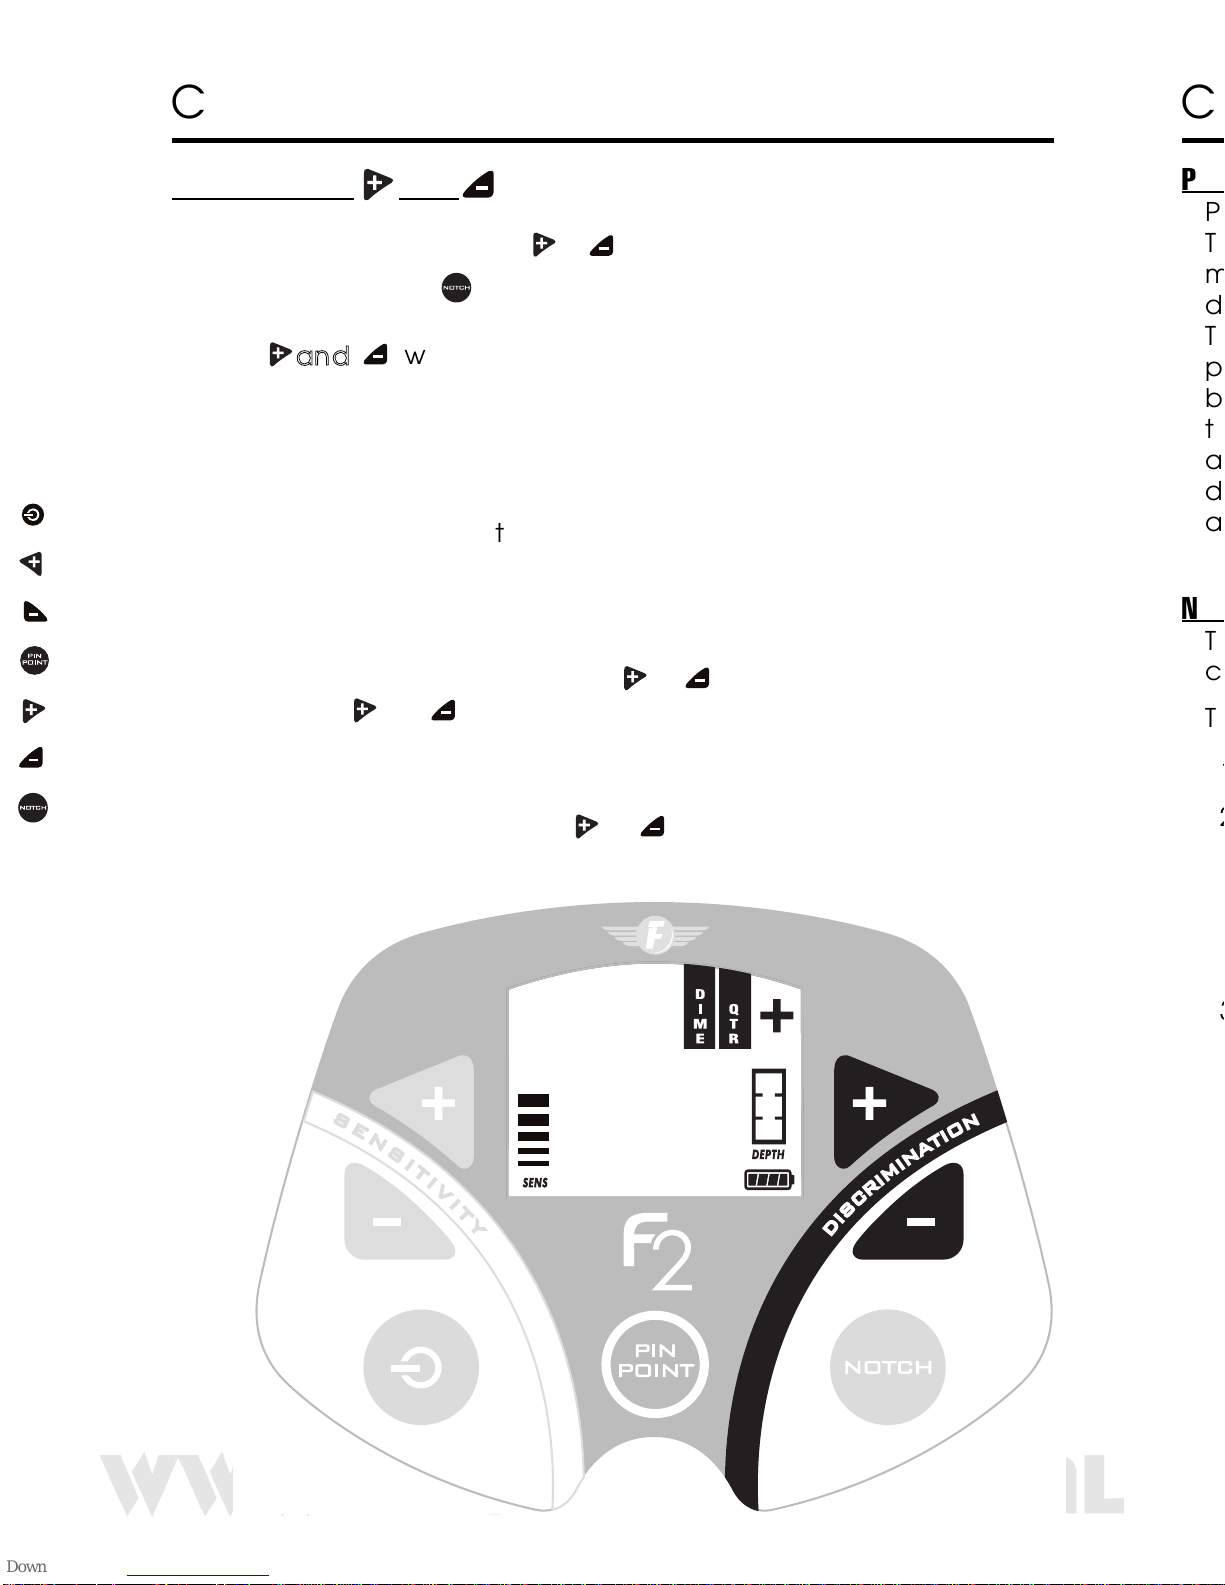
DISCRIMINATION AND
Press DISCRIMINATION or at any time (other than immediately
after pressing ) to adjust the target discrimination level.
aanndd
will increase or decrease the level of discrimination.
Each press of the pads will cause a target icon to appear or
disappear on the display. When an icon is not illuminated, the
corresponding target category will be eliminated from detection.
No audible tone nor target-icon will appear when the searchcoil
passes by an object in a category which is not illuminated.The
Dime, Qtr, and
+
+
target categories cannot be eliminated from
detection.
While searching, the only target category icons visible are those
indicating detected targets; no more than one is visible at a
time while searching. In order to display the discrimination
status, press either the DISC or key. The first press of either
DISC or displays the current discrimination status
(eliminated target categories are not displayed — all accepted
target categories are illuminated).
This first key press does not change the discrimination status;
each subsequent DISC or will change the discrimination
setting, with icons either disappearing or reappearing.
8
8
CONTROL PANEL
PINPOINT
Press and hold to activate this feature
This is a static detection mode; no coil
motion over the target is required to
detect metal while pinpoint is depressed.
This feature is most effective for
pinpointing the exact location of small
buried objects. Reduced sensitivity, and
thus a smaller search field, can be
achieved by pressing the pad while an object is in the coil’s
detection field. The greatest sensitivity to large, deeply-buried objects is
achieved with this mode.
NEW
CONTROL PANEL
NOTCH
This control allows you to selectively include or exclude target
categories from detection.
To use the
11.
.
22.
.
33.
.
Practice by pressing the pad in conjunction
with the
function will quickly become obvious.
Page 9
9
9
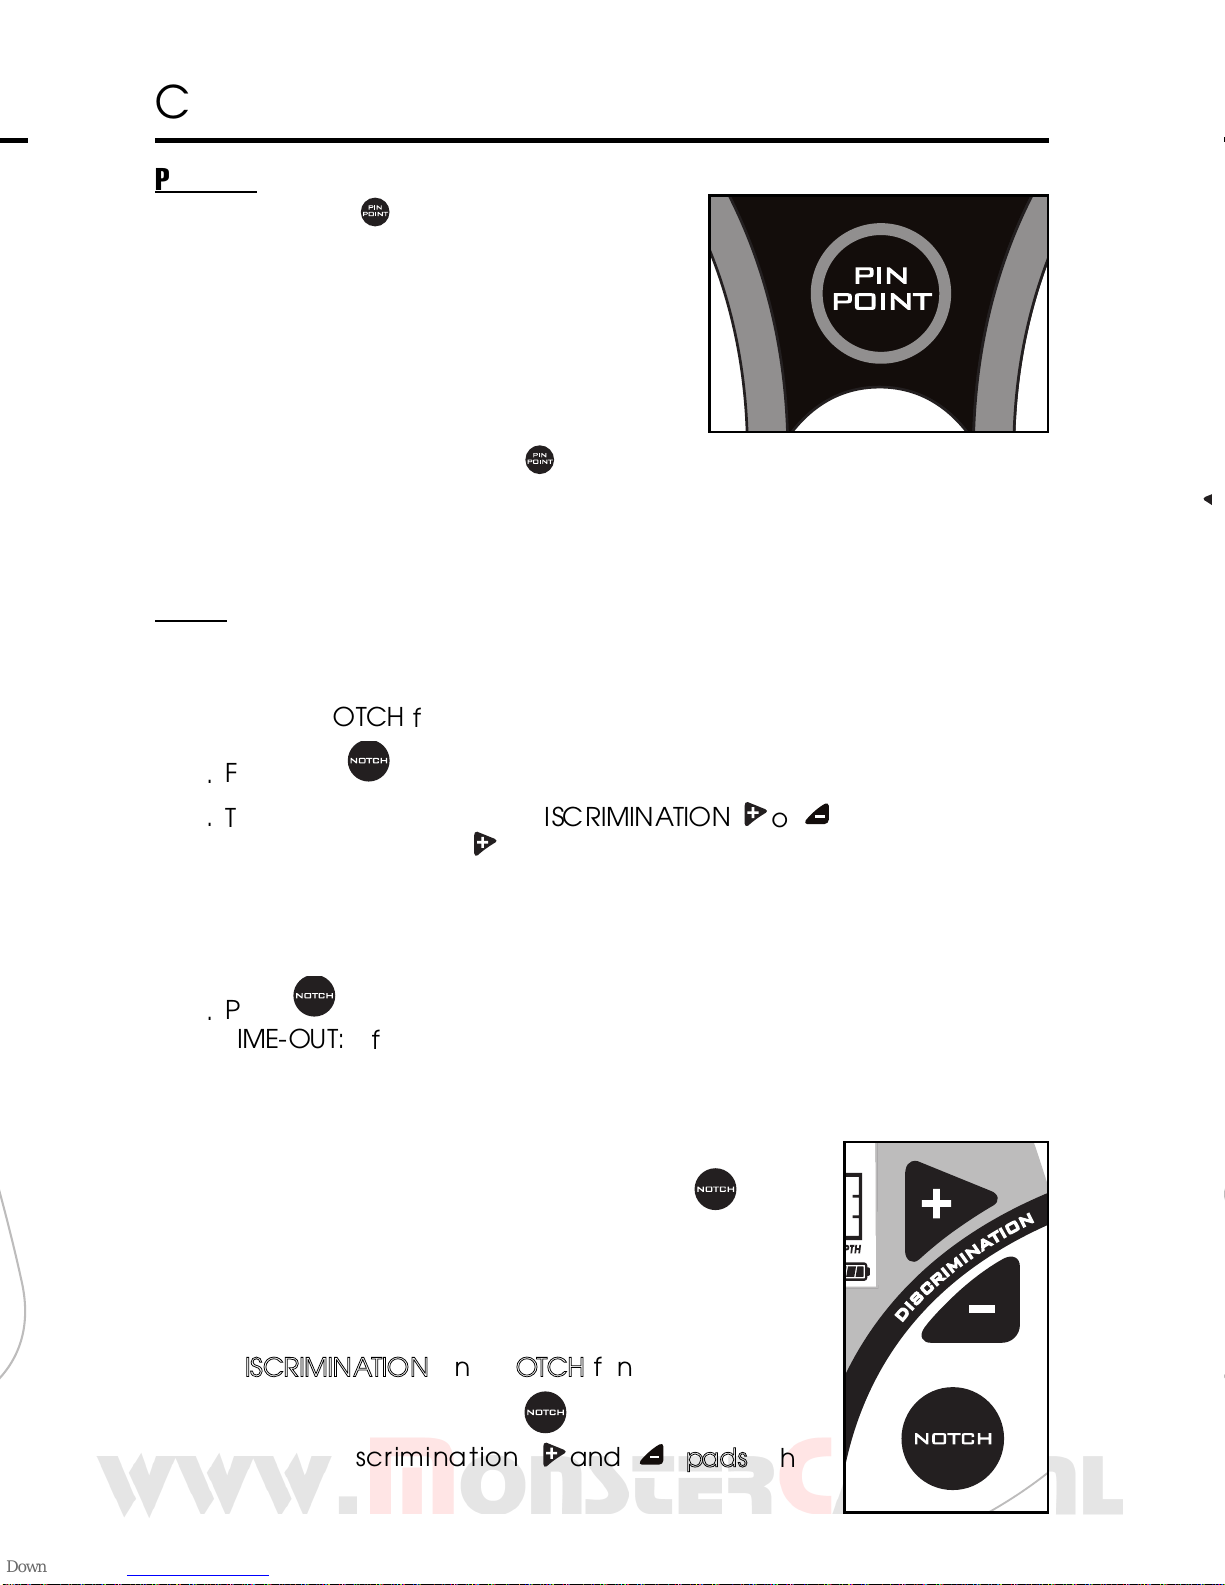
PINPOINT
Press and hold to activate this feature
This is a static detection mode; no coil
motion over the target is required to
detect metal while pinpoint is depressed.
This feature is most effective for
pinpointing the exact location of small
buried objects. Reduced sensitivity, and
thus a smaller search field, can be
achieved by pressing the pad while an object is in the coil’s
detection field. The greatest sensitivity to large, deeply-buried objects is
achieved with this mode.
NEW
CONTROL PANEL
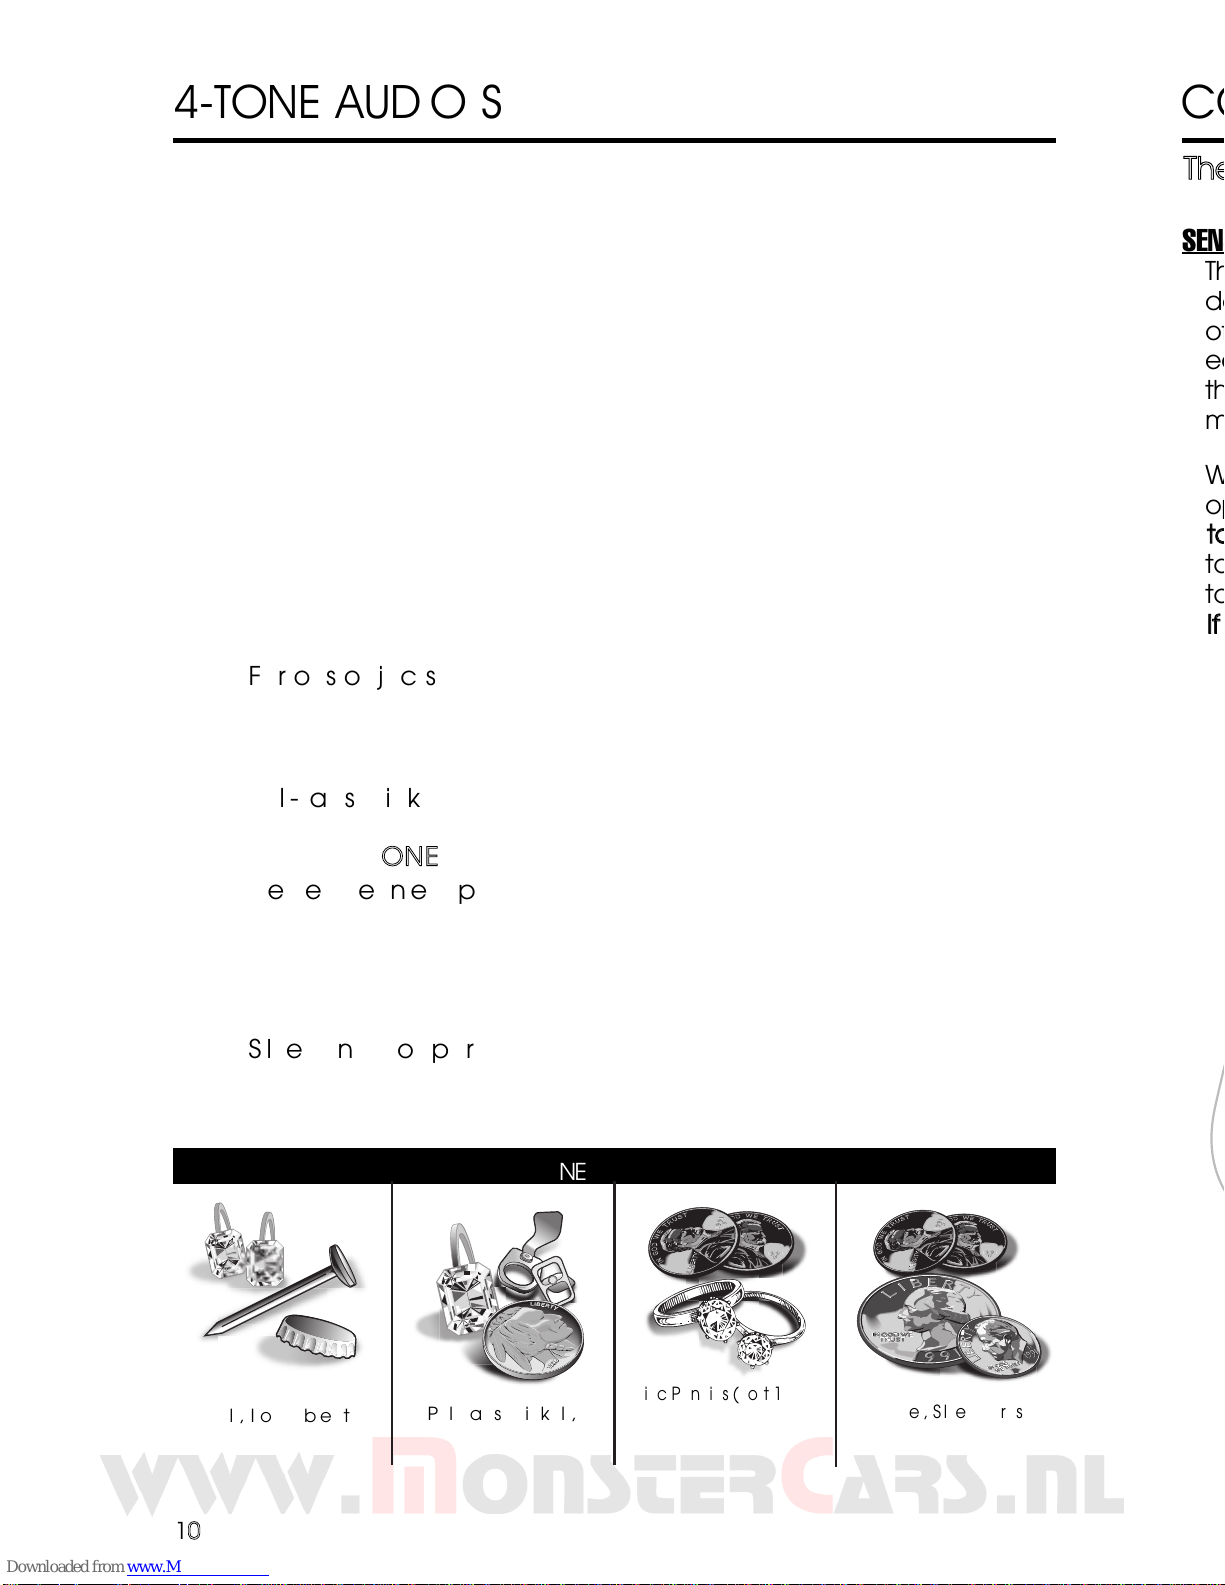
NOTCH
This control allows you to selectively include or exclude target
categories from detection.
To use the
NNOOTTCCH
H
feature.
11.
.
First press .
22.
.
Then immediately press
DDIISSCCRRIIMMIINNAATTIIOON
N
or .
Each press of DISC will change the status of a target category
(starting with iron, from left to right). If an icon was previously
illuminated, indicating inclusion, then it will disappear, indicating
that it is now eliminated from detection. If an icon was previously
turned off, then it will reappear, indicating inclusion.
33.
.
Press a second time to save your notch setting.
TTIIMMEE--OOUUTT::
if you do not press NOTCH after several seconds, the
detector will beep twice and return to normal operation, without
changing the notch setting.
Only one category can be notched at a time.
To program multiple notches, press again
and change another target
category.
You may program any combination of detected
and eliminated target categories using the
DDIISSCCRRIIMMIINNAATTIIOON
N
and
NNOOTTCCHH
functions.
Practice by pressing the pad in conjunction
with the
DDiissccrriimmiinnaattiioon
n
aanndd
ppaadds
s
; their
function will quickly become obvious.
Page 10
TThhe
e
SENSITIVITY
These controls change the detector’s sensitivity; higher settings enable
detection of deeper targets. At power-up, the detector is pre-set to 75%
of maximum sensitivity. At minimum, the sensitivity is 35% of maximum. With
each press of the
the bar graph on the left of the display. Upon reaching the minimum or
maximum sensitivity setting, the detector will beep twice.
While higher levels of sensitivity enable detection of deeper targets,
operation at high levels of sensitivity make the detector
ttoo
to false signals in difficult ground conditions. Use lower sensitivity settings
to suppress interference or false signals from soil minerals when necessary.
IIff tth
h
CONTROL PANEL
110
0
4-TONE AUDIO SYSTEM
While the LCD (Liquid Crystal Display) is very accurate in identifying
buried objects, the user in the field does not always maintain the
display screen in his field of vision. Therefore, we have incorporated an
audio feedback mechanism to alert the user to the nature of buried
objects. This audio feedback system first alerts the user to the presence
and classification of objects, whose nature and location can be
confirmed using the LCD display.
The 4-tone audio target identification system functions only in the motion
modes of operation. The detector must be in the DISCRIMINATION
mode, as indicated on the display. In PINPOINT mode, the detector will
emit only a monotone sound.
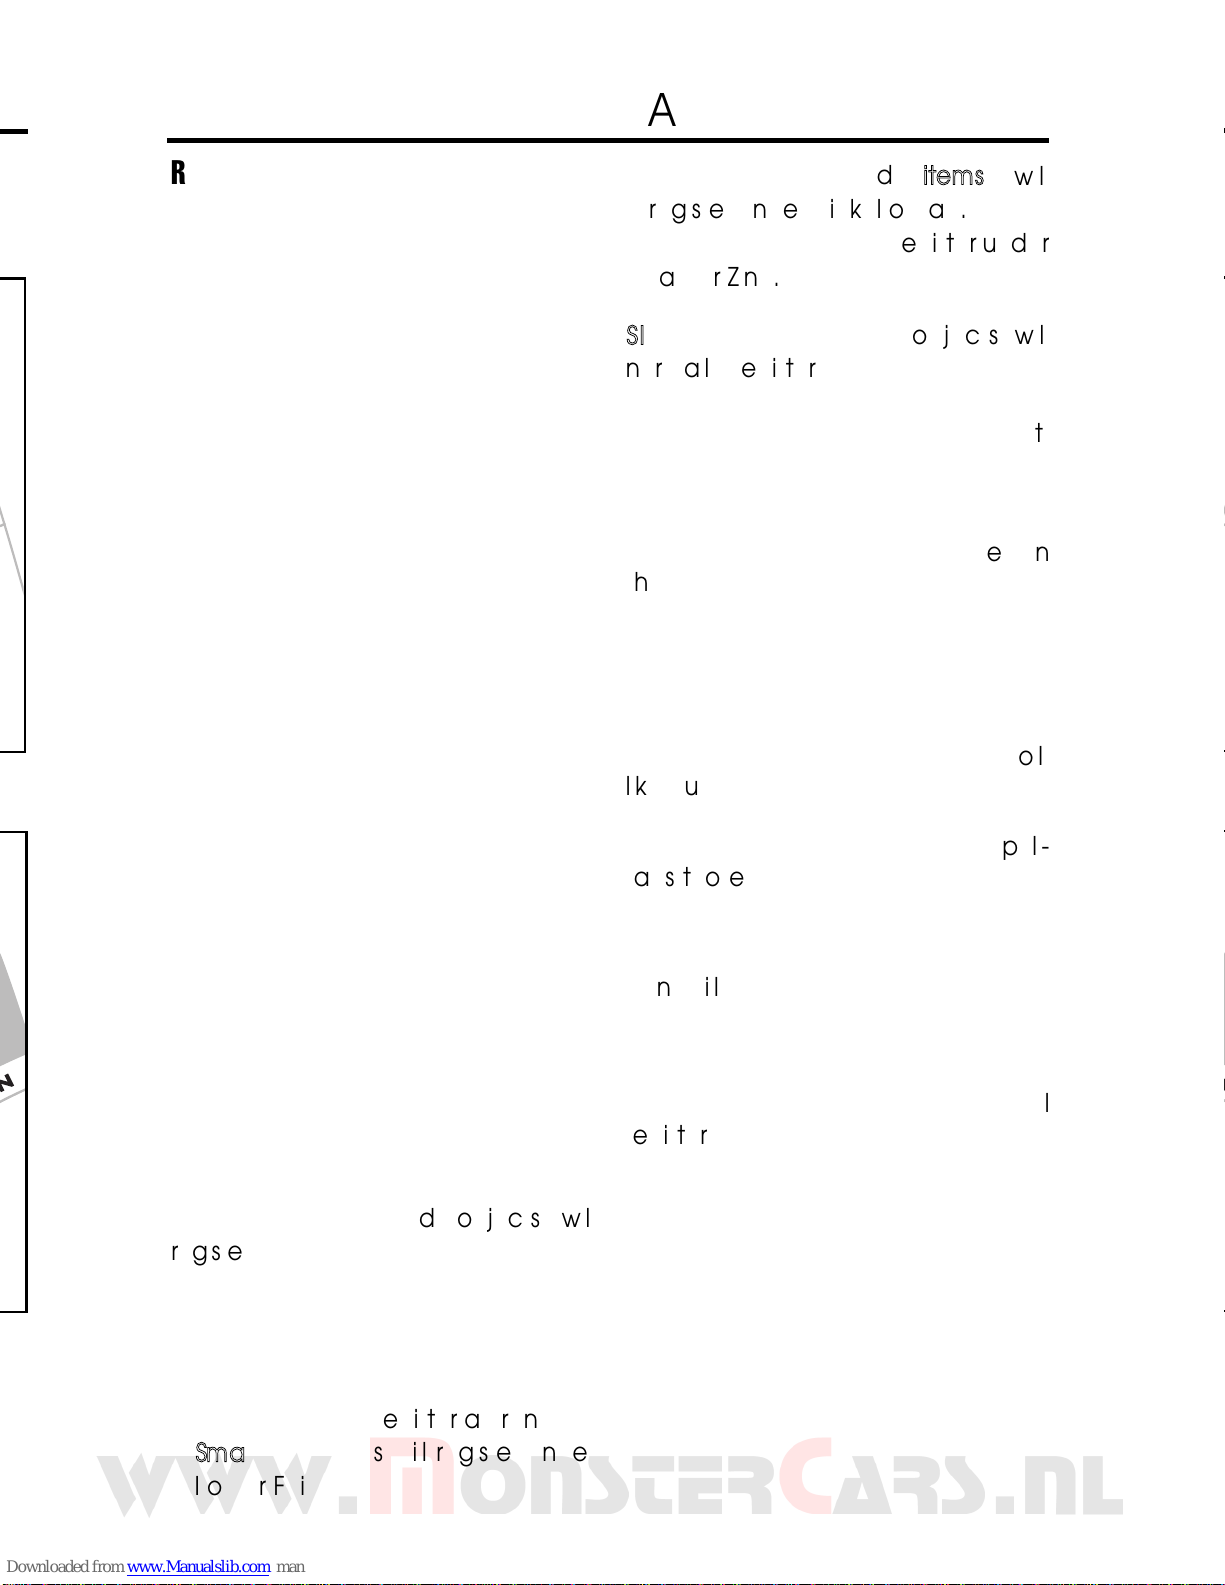
The detector can sound four different tones, depending on the object
detected.
LLOOWW TTOONNE
E
Ferrous objects, such as iron and steel, will induce a low tone.
The smallest gold objects can also induce a low tone.
LLOOWW--MMIID
D
Pull-Tabs, nickels & smaller gold
MMEEDDIIUUMM TTOONNE
E
Newer pennies (post-1982), larger gold objects, zinc, and small
brass objects, will induce medium tones. Many recent vintage
non-U.S. currencies will induce medium tones.
HHIIGGHH TTOONNE
E
Silver and copper coins, larger brass objects and older pennies
(pre-1982), will induce high tones. Quarters, dimes and other
precious coins fall into this category.
Audio Target Identification (ATI) classifies metals into four categories.
LLOOWW TTOONNE
E
Nails, Iron Objects,
& Smallest Gold Objects
LLOOWW--MMIIDD TTOONNE
E
Pull Tabs, Nickels,
& Smaller Gold
MMEEDDIIUUMM TTOONNE
E
Zinc Pennies (Post 1982),
Larger Gold Objects
HHIIGGHH TTOONNE
E
Copper, Silver & Brass
Copper Pennies (Pre 1982)
Page 11
111
1
DEPTH AND TARGET DISPLAY
READING THE DISPLAY
The Liquid Crystal Display (LCD) shows
the PROBABLE identification of the
targeted metal, as well as the PROBABLE
depth of the target, in inches.
An arrow will illuminate under the
target category where an object is
best classified, and stay illuminated
until another target is identified.
The detector will normally register a
repeating, unchanging target
identification when a buried target
has been located and identified. If,
upon repeated passes over the same
spot, the target identification reads
inconsistently, the target is probably a
trash item, oxidized metal, or too
deep to be classified accurately. With
practice, you will learn to unearth
only the more repeatable signals.
The segment identifications are highly
accurate, when detecting the objects
described on the label. However, if
you register in a given category for an
unknown buried object, you could be
detecting a metallic object other than
the object described on the label, but
with the same metallic signature. Also,
the greater the distance between the
target and the coil, the less accurate
the target identification.
GGOOLLDD TTAARRGGEETTS
S
Gold objects will
register on the left side of the LCD scale.
Gold will register depending upon its
size. The smaller the gold object, the
further to the left it will register.
GGoolldd ffllaakkees
s
will register as Iron
SSmmaallll ggoolldd iitteemmss
will register under
Iron or Foil.
MMeeddiiuumm--ssiizzeedd ggoolldd iitteemmss
will
register under Nickel or Tab.
LLaarrggee ggoolldd iitteemms
s
will register under
Tab or Zinc.
SSIILLVVEERR TTAARRGGEETTSS:
:
Silver objects will
normally register to the right of the
scale, under Dime, Qtr, or
+
+
,
depending on the size of the object.
The larger the object, the farther to
the right it will register.
IIRROONN:
:
Ferrous objects will register on
the far-left side of the target
identification scale.
Objects in this category could be
worthless scrap, or a more valuable
iron relic.
FFOOIILL::
Small pieces of aluminum foil,
like gum wrappers, will register here.
NNIICCKKEELL::
Nickels and most newer pulltabs(those that stay attached to the
can) will register here.
TTAABB:
:
Pull-tabs from older beverage
cans will register here. Few newer pulltabs will also register here. Many gold
rings will also register here.
ZZIINNCC:
:
Newer pennies (post-1982) will
register here. Many non-U.S. coins of
recent vintage may also register here.
Page 12
QUICK-START DEMONSTRATION
II.. SSu
u
IIII.. P
P
a. Place the detector on a
b
c. Remove watches, rings
d. Turn off appliances or lights that cause electromagnetic
e. Pivot the search coil back toward the detector body.
IIIIII.. P
P
IIVV..
VV.. P
P
Quick-Start Demo continued
on next page
112
2
DEPTH AND TARGET DISPLAY
DDIIMMEE:
:
Dimes and pre-1982 pennies will
register here. Older, pre-1982, pennies
are composed of copper, which has a
metallic signature similar to a dime. Most
copper coins will register here. Steel
washers, with an outside diameter similar
to a dime, may also register here.
QQTTRR:
:
Quarters, “Sacawegea Quarters” &
“Susan Q. Anthony Dollars” register here.
+
+
:
:
Half-Dollar coins and Silver Dollars
register here. Very large iron objects like
Sewer Lids will also register here.
CCaauuttiioonn:
:
The target indications are
visual references. Many other types of
metal can fall under any one of these
categories. While the F2 will eliminate
or indicate the presence of most
common trash items, it is impossible to
accurately classify ALL buried objects.
DEPTH INDICATOR: (in pinpoint mode)
The Depth Indicator is calibrated to
coin-sized objects. It indicates the
depth of the target, in inches. Large
and irregularly-shaped objects will
yield less reliable depth readings
When passing over an object, the depth
indicator will light up and stay
illuminated while an object is in the field
of detection. the depth indicates the
distance, in inches from the center of
the search coil to the target.
2 DIGIT TARGET INDICATOR
The 2-digit target indicator, in the middle
of the LCD display, provides a specific
target value to help identify buried
targets more accurately. With practice in
the field, you will learn to associate target
values with the probable identification of
buried objects. The target value can vary
each time the coil passes over the
target, depending upon the angle of the
object and the distance from the coil.
AAss aa ssttaarrttiinngg ppooiinntt,, rreeffeerr ttoo tthhe
e
ttaabbllee bbeellooww.
.
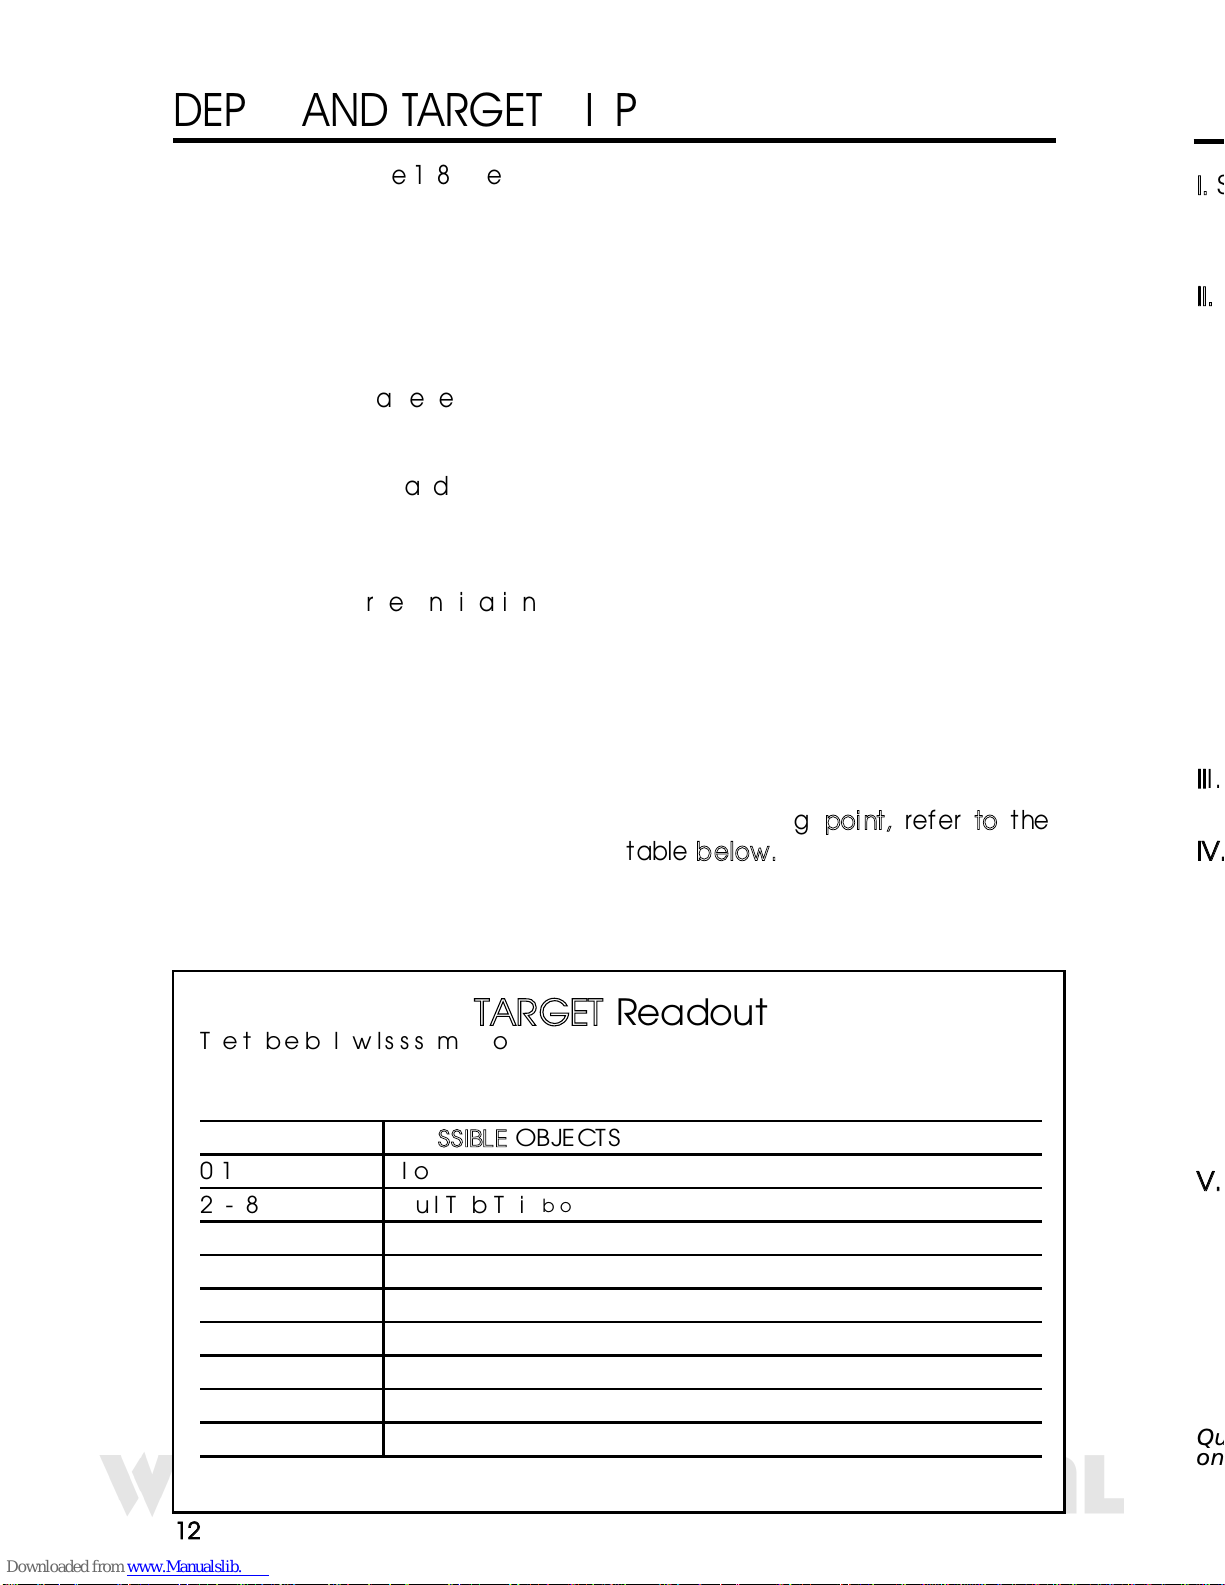
TTAARRGGEETT RReeaaddoouut
t
The table below lists some common approximate target value equivalents. With
experience in the field, you will recognize many types of metals by their numeric
value.
TTYYPPIICCAALL VVAALLUUE
E
PPOOSSSSIIBBLLEE OOBBJJEECCTTS
S
0-15 Iron
25-28 Pull-Tab Tail
(broken off)
28-32 Nickel
36-42 Pull-Tab (old type)
58-62 Zinc, Penny
68-72 Dime & Wheat Cent
78-83 Quarter
86-90 Half Dollar
91-95 Silver Dollar
Page 13
e
e
113
3
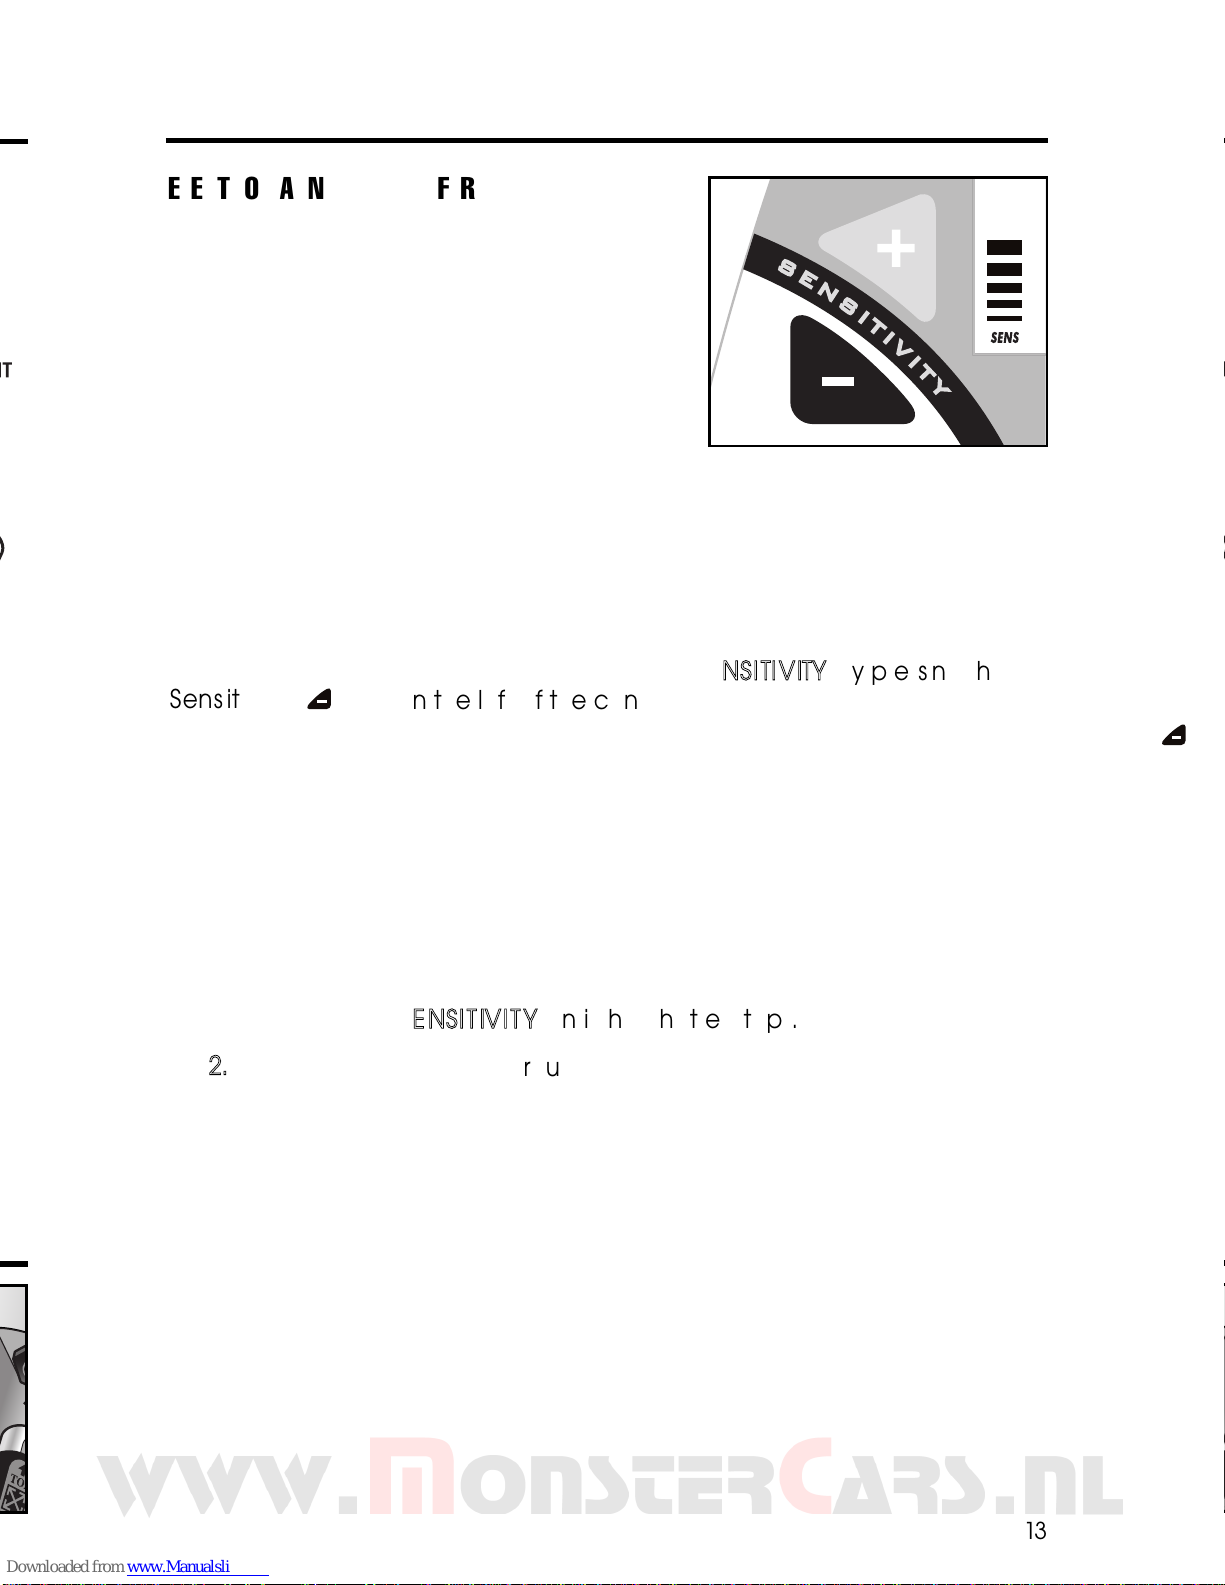
ELECTROMAGNETIC INTERFERENCE
Use the Sensitivity Control is to eliminate
Electromagnetic Interference (EMI).
The F2 metal detector is an extremely sensitive
device; the search coil creates its own
magnetic field and acts like an antenna. If
your detector beeps erratically when the
search coil is motionless, the unit is probably
detecting another electromagnetic field.
Common sources of EMI are electric power lines, both suspended and buried,
motors, and household appliances like computers and microwave ovens.
Some indoor electronic devices, such as dimmer switches used on household
lighting, produce severe EMI and can cause the detector to beep erratically.
Other metal detectors also produce their own electromagnetic fields; so if
detecting with a friend, keep two metal detectors at least 20 feet apart.
If the detector beeps erratically,
RREEDDUUCCEE TTHHEE SSEENNSSIITTIIVVIITTY
Y
by pressing the
SSeennssiittiivviitty
y
Pad on the left of the control panel.
In most urban environments, you should be able to search without chatter from
interference at the default sensitivity setting (default setting is the sensitivity level
at power-up, 4 bars), or at one level reduced from default. At maximum
sensitivity, the F2 will “chatter” in proximity to underground or overhead power
lines, or to indoor or outdoor electrical devices. In fact, if you notice rapid
chatter with the searchcoil near the ground, you may be able to trace the
approximate location of the underground power lines by following the chatter.
To manage chatter, which is most likely from electrical interference:
11..RREEDDUUCCEE tthhee SSEENNSSIITTIIVVIITTY
Y
until the chatter stops.
22..
Try sweeping it over the ground.
If the F2 chatters while held still, or held up in the air, it may be much
quieter when sweeping over the ground.
SEVERE GROUND CONDITIONS
A secondary use for the Sensitivity Control is to reduce false detection signals
caused by severe ground conditions. While the detector contains circuitry to
eliminate the signals caused by most naturally occurring ground minerals, 100%
of all ground conditions cannot be anticipated. Highly magnetic soils found in
mountainous and gold-prospecting locations can cause the detector to emit
tones when metal objects are not present. High saline content soils and sands
can sometimes cause the detector to beep when no metal target is present.
If the detector emits false, non-repeatable, signals, REDUCE THE SENSITIVITY.
SENSITIVITY ADJUSTMENT
Page 14
SETTING UP
No tools required.
l
1
1
l
2
2
l
3
3
l
4
4
l
5
5
l
6
6
Arm Rest Adjustment
If you wish to change the position
of the arm rest, remove the screw
and move the arm rest to one of
the alternate hole locations.
Caution: Do not force the plug in.
Searchoil
Knurled Knob
Middle Stem
Locking
Collar
114
4
SEARCH TECHNIQUES
(in DISC mode)
TTaarrggeett VVeerriiffiiccaattiioon
n
After detecting a target, do the
following:
11.
.
Walk around the target in a
circle.
22.
.
While circling the target,
continue sweeping the
searchcoil across the target.
33.
.
Sweep once every 30° or 40° of
the circle.
If the tone does not change
and the target ID value is
consistent as you circle the
target, you can be highly
confident of the target’s
identification.
If the tone or target ID
changes as you circle the
target, you may have multiple
targets or an irregularly shaped
object.
If the tone completely
disappears at different angles,
the target may be trash or a
low-value metal.
If you are new to the hobby, dig all targets. With practice in the
field, you will soon identify audible and visual target feedback with
certain types of metal objects.
PPiinnppooiinnttiinngg iinn mmoottiioonn ((nnoott ppiinnppooiinntt)) mmooddee:
:
11.
.
Sweep over target in narrowing side-to-side pattern
22.
.
Take visual note of spot on ground where “beep” occurs.
33.
.
Step 90° to the side of the target
44.
.
Sweep coil over same area, at 90° to 1st sweep pattern.
55.
.
This pinpoints the target location with an “X”
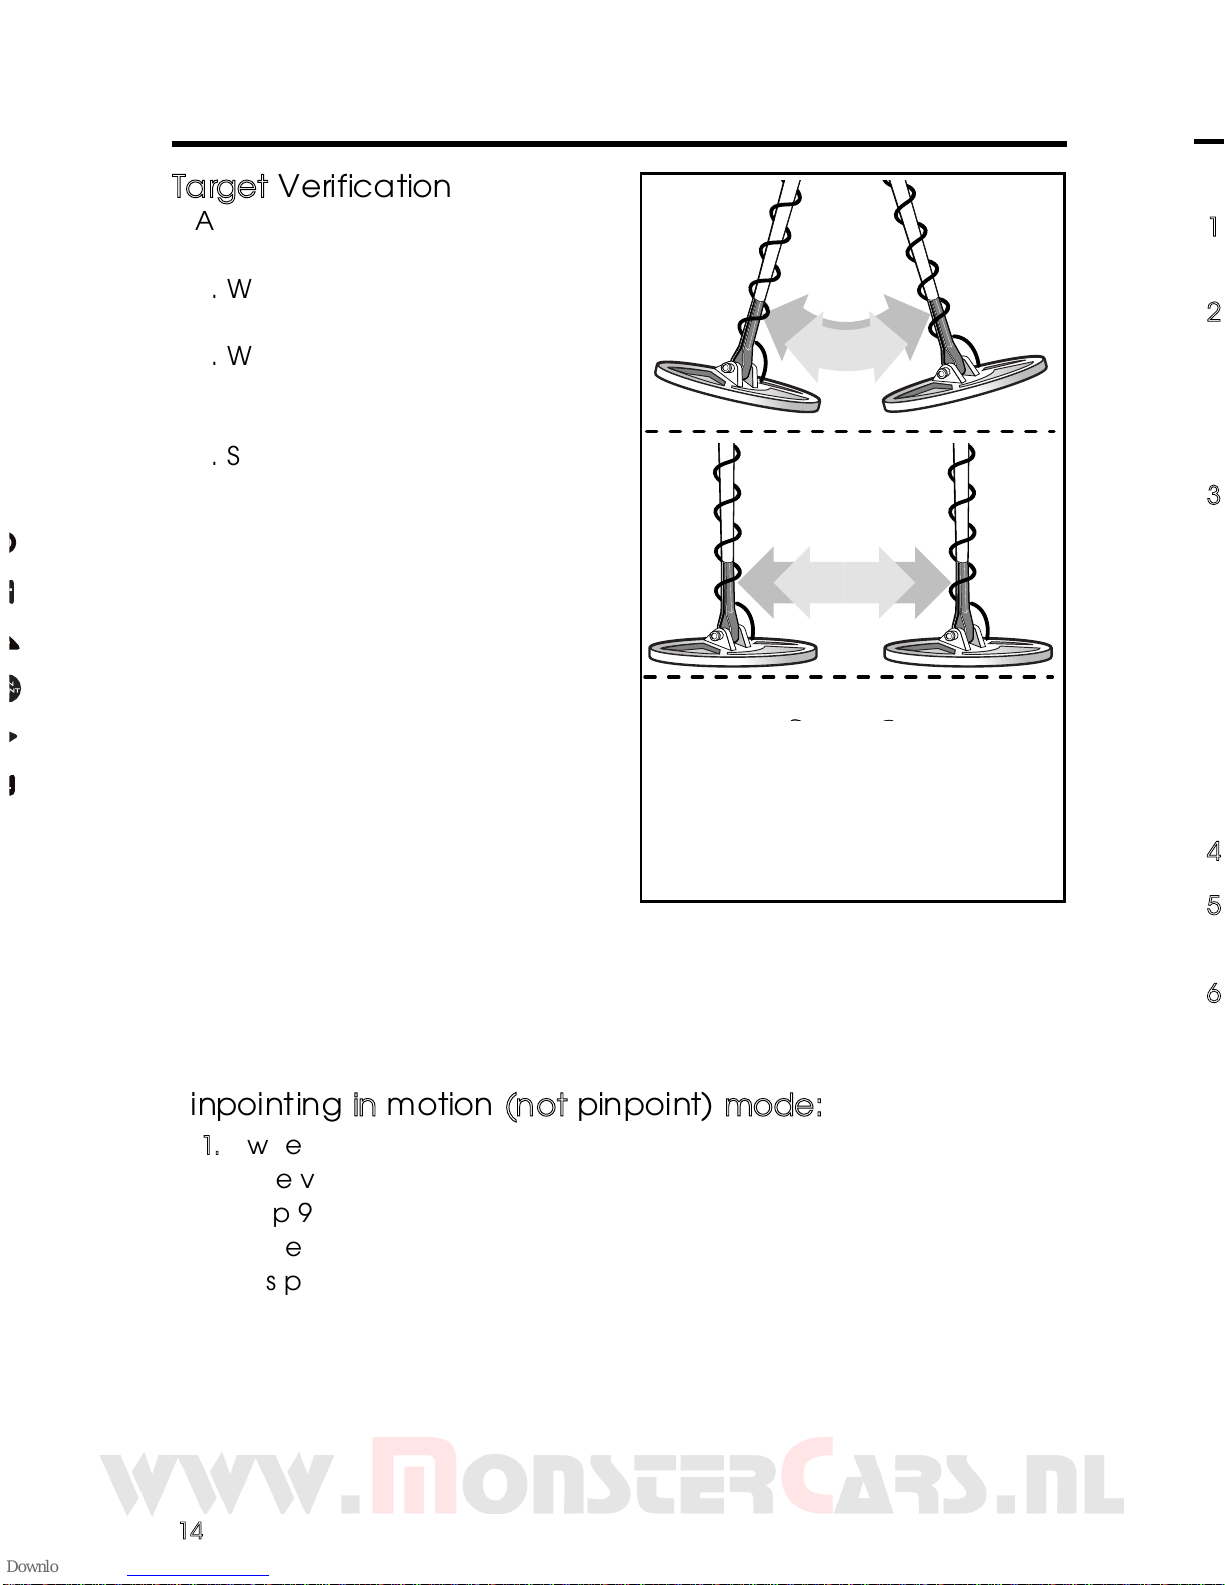
COIL MOVEMENT
When swinging the coil, be
careful to keep it level with
the ground about 1/2 inch
from the surface. Never swing
the coil like a pendulum.
WRONG
CORRECT
Page 15
115
5
TARGET PINPOINTING
(no-motion PINPOINT mode)
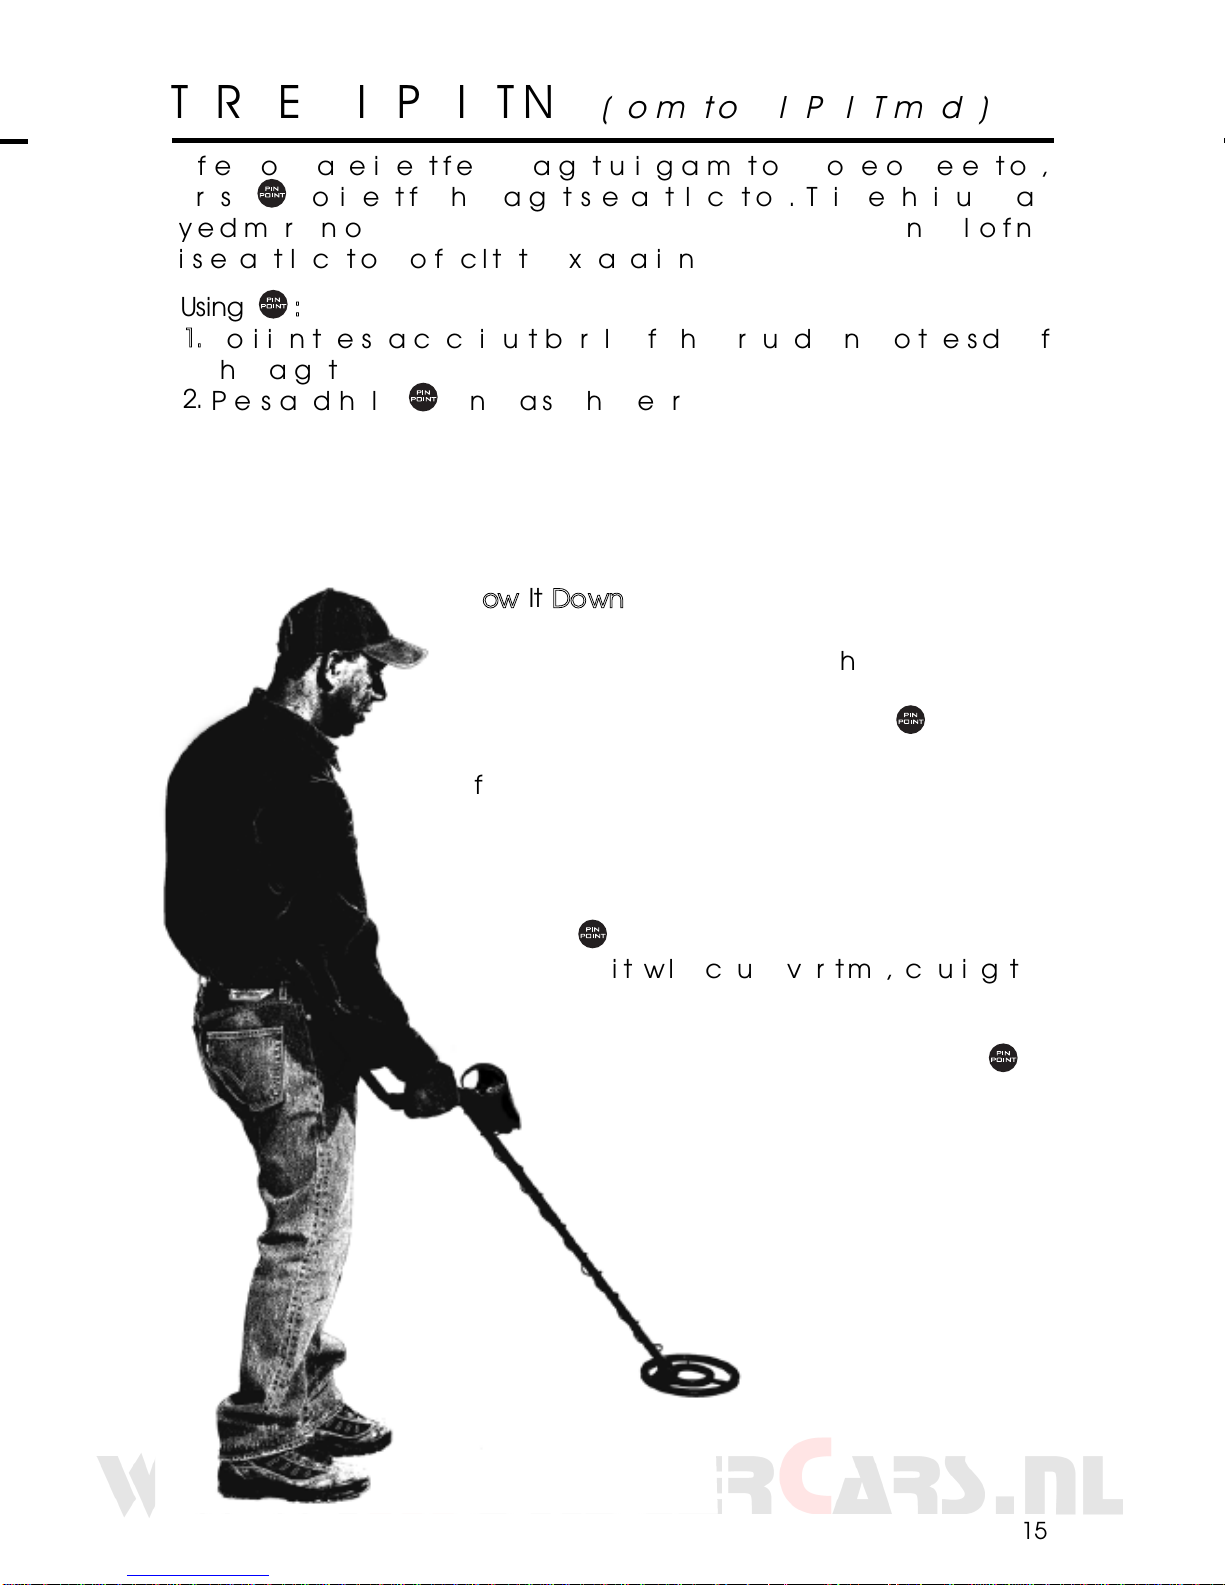
After you have identified a target using a motion mode of detection,
press to identify the target’s exact location. This technique can
yield more information about the target’s shape and size and also find
its exact location to facilitate excavation.
UUssiinngg
:
:
11.
.
Position the searchcoil just barely off the ground, and to the side of
the target.
22.
.
Press and hold and raise the searchcoil about 2 inches. Lifting
the searchcoil away from the ground makes the ground signal go
negative, so the machine is silent.
33.
.
Now move the searchcoil slowly across the target, and you can
locate it by the sound. The target is located directly under where
the sound is loudest.
NNaarrrrooww IItt DDoowwnn:
:
11..
To narrow the response further, position the
center of the searchcoil near the center of the
response pattern, but not directly over the center.
22..
Release, then press and hold again again.
33.
.
Repeat this narrowing procedure to narrow the
field of detection further.
NNoottee::
Depth indication is less accurate after
narrowing.
COIL DRIFT
If you keep depressed for continuous searching,
realize that drift will occur over time, causing the
detector to gain or lose sensitivity. Periodic
retuning of the detector is required to
minimize drift; release and press to
retune.
Page 16

55--YYEEAARR LLIIMMIITTEEDD WWAARRRRAANNTTY
Y
The F2 metal detector is warranted against defects in materials and
workmanship under normal use for five years from the date of purchase
to the original owner.
Damage due to neglect, accidental damage or misuse of this product is
not covered under this warranty. Decisions regarding abuse or misuse of
the detector are made solely at the discretion of the manufacturer.
Proof of Purchase is required make a claim under this warranty.
Liability under this Warranty is limited to replacing or repairing, at our
option, the metal detector returned, shipping cost prepaid to Fisher Labs.
Shipping cost to Fisher Labs is the responsibility of the consumer.
To return your detector for service, please first contact Fisher Labs for a
Return Authorization (RA) Number. Reference the RA number on your
package and return the detector within 15 days of calling to:
Fisher Labs
1465-H Henry Brennan Dr.
El Paso, TX 79936
Phone: 915-225-0333 ext.118
Warranty coverage does not include the cost of transporting the
detector back to an owner who is located outside of the United States of
America.
1465-H Henry Brennan, El Paso, TX 79936 • (915) 225-0333
Copyright© 2007
All rights reserved, including the right to reproduce this book, or parts thereof, in any form.
Fisher®is a registered trademark of Fisher Research Labs
www.fisherlab.com
 Loading...