

Page 1
READ THESEREAD THESE
INSTRUCTIONSINSTRUCTIONS
BEFOREBEFORE FLYING ! FLYING !
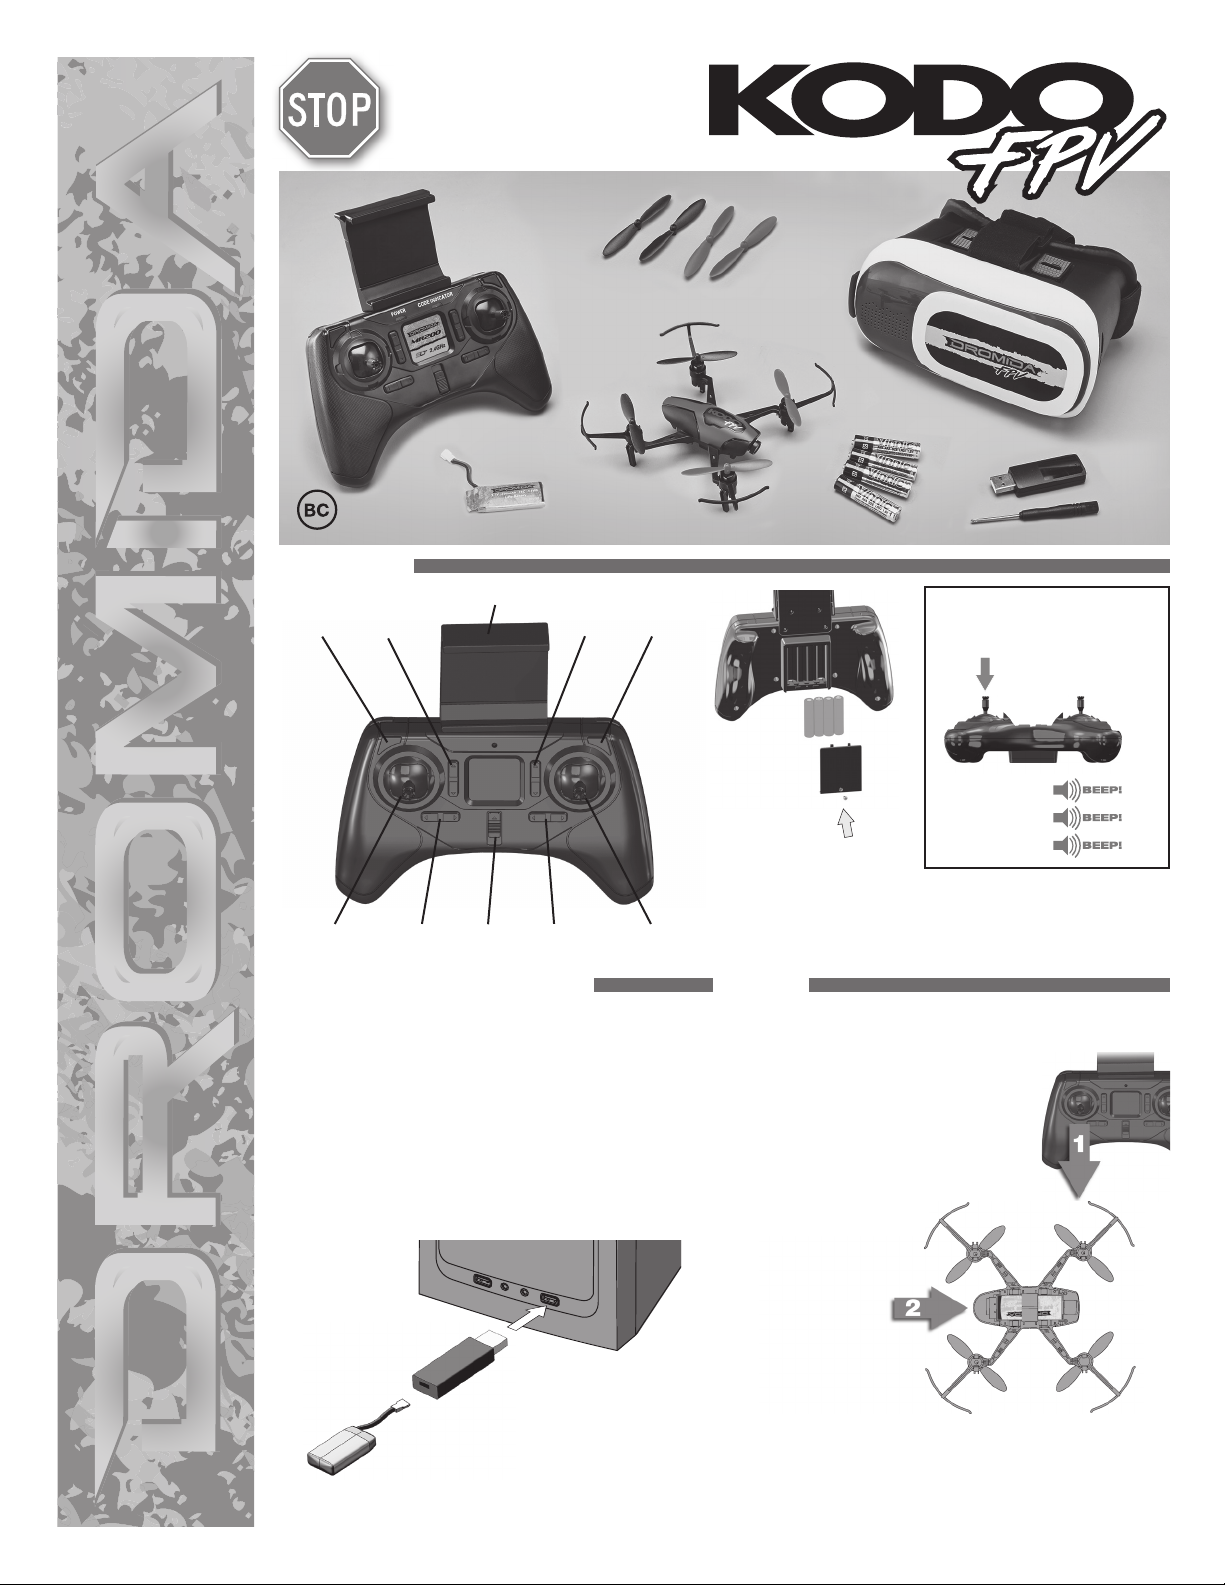
Controller
Spare Blades
(2 black, 2 red)
KODO™ Drone
™
FPV Headset
4 AAA Batteries
USB
Charger
Flight Battery
CONTROLLER
Picture
Button
Throttle/Rudder
Throttle
Trim
Stick
Rudder
Trim
Phone Holder
Elevator
Trim
ON/OFF Aileron
Trim
Video
Button
Aileron/Elevator
Stick
CHARGING the FLIGHT BATTERY
Plug charger into USB port or AC adapter (DIDP1125 not included)
as shown and connect the battery. The red LED will flash slowly
while the battery is charging. The LED will be steady when the
battery is fully charged.
• NEVER leave the battery unattended while charging.
• DO NOT allow the USB port to power down while the charger
is connected to the battery.
• ALWAYS unplug the charger from the USB port and the
battery when charging is complete.
• The battery connector will only fit in one way.
Screwdriver
SENSITIVITY ADJUSTMENT
Push down on the left stick to
change the sensitivity
of the controls.
Lowest (Default)
x2
x3
Remove the screw on
the battery compartment
cover. Take the cover off
and insert 4 AAA batteries.
Replace cover, securing
with the screw.
Moderate
Maximum
• Do not mix old and new batteries.
• Do not mix alkaline, standard, or
rechargeable batteries.
SETUP
Your KODO FPV comes with a Power-On Fail-Safe. This ensures that
the motors will not start until the KODO has detected the controller.
1. Turn on the controller with the throttle
at its lowest position.
2. Connect the battery to the KODO
FPV and place it on a level surface.
Listen for two beeps. The red LED at
the back of the quadcopter will start
ashing slowly.
3. Move the throttle to its highest position. Listen for a beep.
4. Move the throttle back to its lowest position. Listen for three
beeps.
The KODO FPV’s motors are now armed and the quad is ready to
y. The red LED on the KODO FPV will become steady.
Page 2
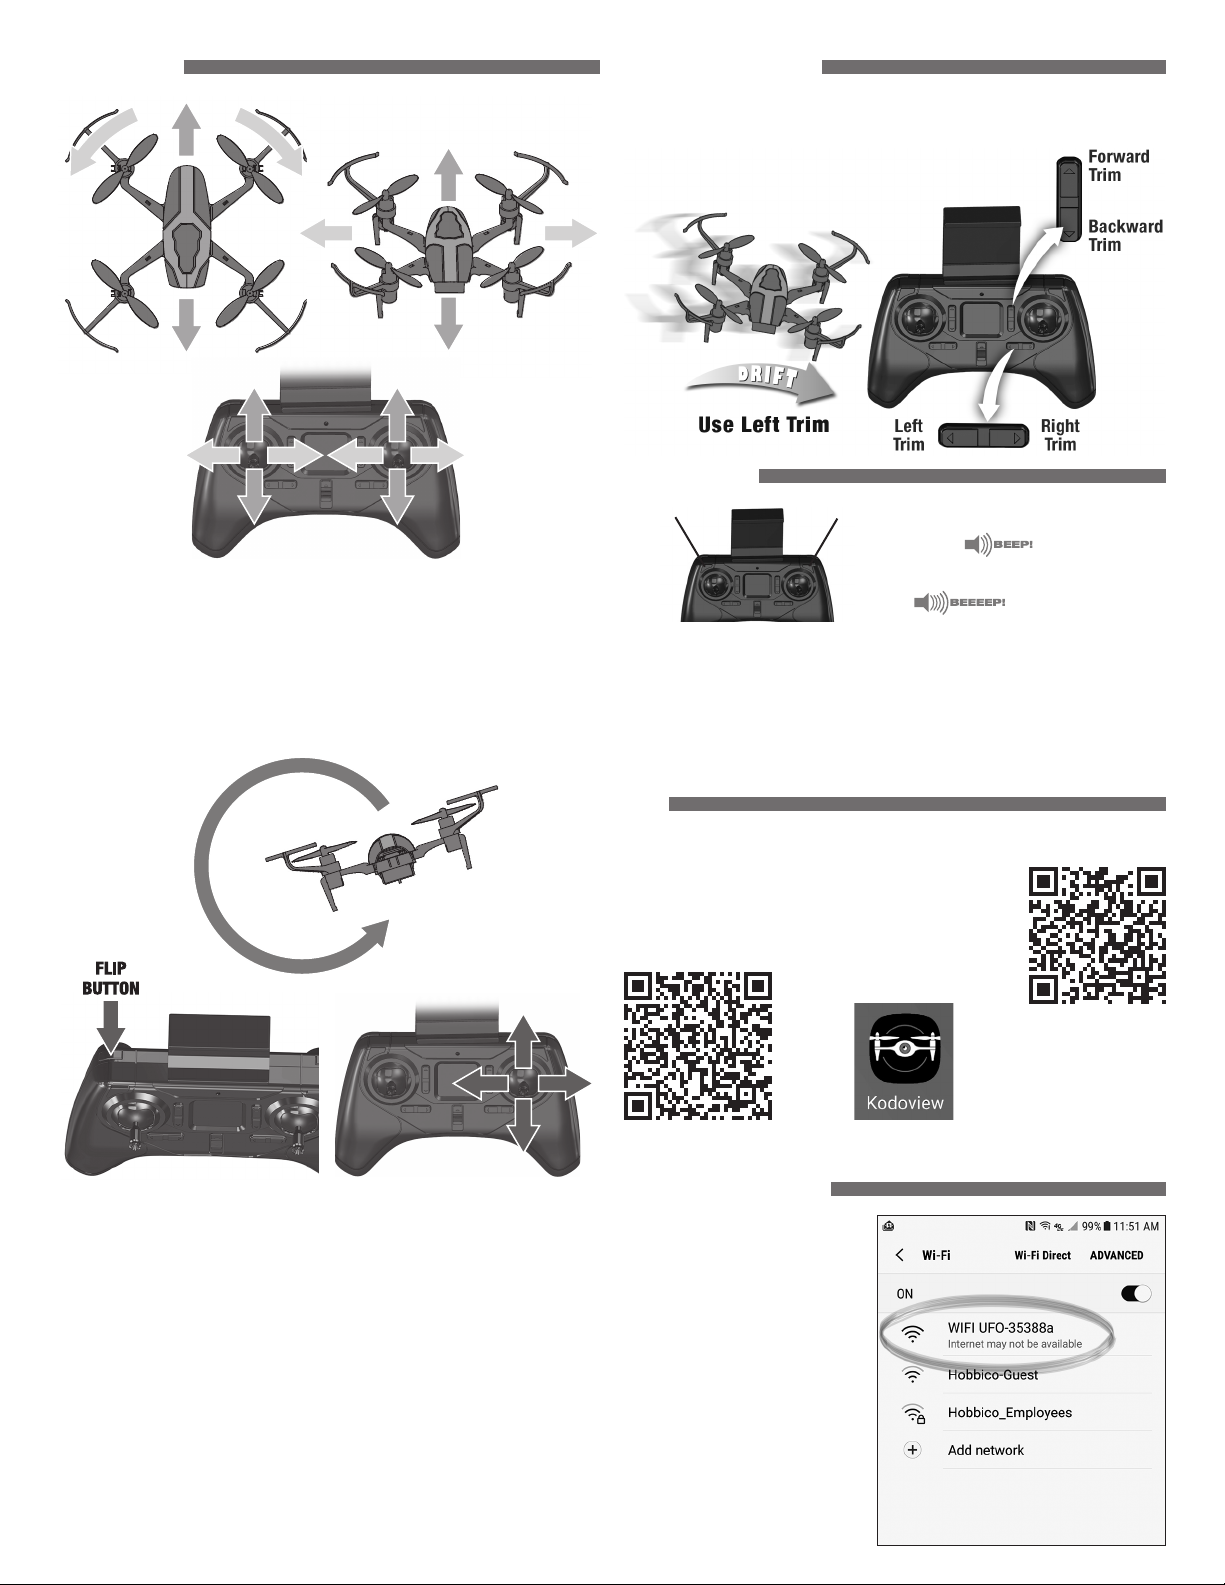
HOW to FLY
D
BB
CC
A
CORRECTING DRIFT
It is normal for the KODO FPV to drift slightly. However, if it drifts in any direction
consistently, press the trim button that is opposite the movement as many times
as needed to eliminate the drift.
D
A
CCBB
A
Basic Flight
The controls are very sensitive and small stick movements should be used to the
control the quadcopter. If you get into trouble and see that the KODO FPV is going
to crash, move the throttle to its lowest position immediately.
The LED on the KODO FPV will flash slowly when the battery voltage is getting
low. Land as soon as possible and unplug the battery. Always recharge the
battery or batteries before storing the KODO FPV.
Advance the throttle slowly until your KODO FPV rises into the air.
E
A
D
D
FPV CAMERA
Picture Button Video Button
Press the picture button to capture a
photo.
Press the video button to start a video.
The video button must be pressed again to stop and save the video on the card.
The picture button will not operate while the camera is recording a video.
The FPV Camera can capture still photos and videos from the FPV feed going to your
mobile device. The images will be stored in the Gallery in the app and also in your
mobile device Photo Gallery. A photo can be captured while a video is being recorded.
The camera angle can be adjusted from straight ahead to about 70° down.
APP
The KODO FPV will link to an app on your iOS/Android based mobile device so the
KODO can be flown in the FPV mode.
To download the app, use the QR code or open the App
Store or Play Store on your device and enter “Hobbico”
as a search term. Select the KodoView app.
E
EE
E
Flips Press the flip button and release it when the controller beeps. Move the
right stick in any direction and release it when the KODO starts to flip.
The red LED on the KODO FPV will flash when the battery voltage is getting low.
Land as soon as possible and charge the battery. The battery must be charged
before it is stored. The battery must not be connected to the KODO FPV or the
charger when stored. ALWAYS disconnect the battery when it’s not in use!
iOS
Android
LINKING TO THE APP
With the KODO turned on, open the
Wi-Fi settings on your device and
select the “UFO-…..” network
2
Page 3
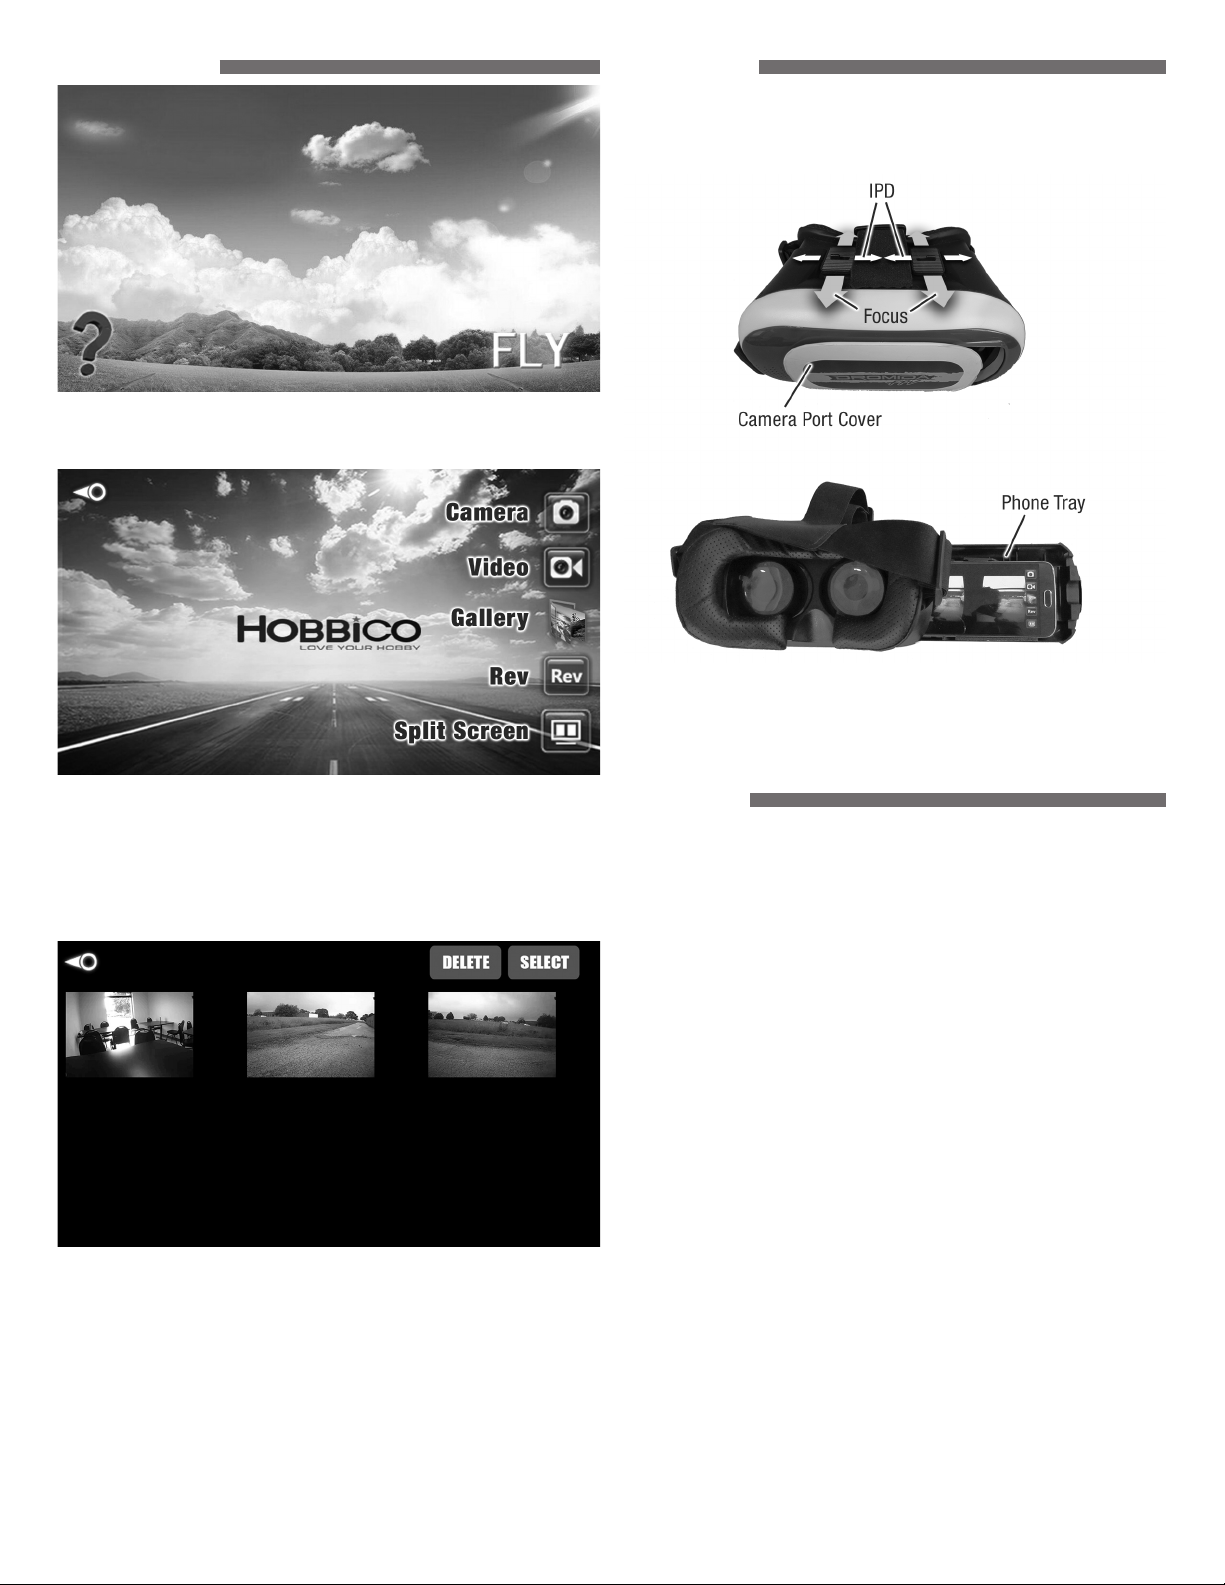
APP CONTROLS
Tap the FLY button to connect to the FPV camera.
Tap the “?” button to view the help screens.
VR HEADSET
The VR Headset uses your smartphone to provide a more immersive image. The
focus and the Interpupillary distance (IPD) can be adjusted. The headset also has
a camera port that can be opened if you have an app that needs to overlay images
onto the scene from the camera.
Camera Button – Tap to capture a photo. A photo cannot be captured while
a video is being recorded.
Video Button – Tap to start /stop a video. While the video is being recorded, a
timer will be visible in the lower left corner of the screen.
Gallery Button – Tap to view photos and videos stored by the app. Open the
storage folder and tap on the thumbnail to view the image/video.
To delete an image/video
● Tap the Select button.
● Tap on the files to be deleted.
● Tap on the Delete button.
REV Button – Tap on this button to invert the image.
Split Screen Button – This button changes the display to a split screen view
so your device can be used with the VR Headset.
The headset has a camera tray that must be removed before the smartphone can
be installed. The tray can hold most smartphones, but does not have room for a
phone with a thick case. The phone should be linked to the KODO FPV and the app
set to the split screen mode before it is installed in the tray.
FLYING FPV
Your phone can be mounted in the holder on the controller or inserted in the VR
headset for a more immersive feel.
The range of the FPV camera is about 50 feet indoors, but may be less if the location
has a lot of electromagnetic interference or metal objects in the walls.
If you are new to FPV, start by flying line of sight until you can maneuver the drone
without having to think about which control to use. Practice by keeping both sticks
centered and making quick stick movements to maneuver the KODO FPV.
When you are ready to start FPV, we recommend that a spotter be available to
tell what the drone is doing. Master each of the following steps before moving to
the next one.
Step 1
● Take o f f.
● Hover at about 3 feet.
● Move a few inches to the right in any direction and return to the hover point.
Repeat moving left, forward, and backward.
● Slowly land.
The goal is to get used to the view from the camera, the sensitivity of the controls,
and judging your height.
Step 2
● Take o f f.
● Fly slowly (about 10 feet away.)
● Turn around and return to the launch point.
● Slowly land.
The goal is to maintain your height until you are ready to land.
3
Page 4

Step 3
● Set up a course.
Keep it simple at first. When you can fly while maintaining your altitude, set up a
course with gates or obstacles at different heights.
The goals are to fly the entire course while maintaining the altitude and increase
your speed around the course.
BLADE GUARD REPLACEMENT
1. Carefully pry off the blade using a flat
head screwdriver. NOTE: Do one corner
at a time so you don’t accidentally mix
up the blades.
2. Pull the blade
guard up and off
the motor housing.
Install the new
guard and replace
the rotor blade.
MOTOR REPLACEMENT
1. Remove the rotor blade from the motor.
2. Remove the blade guard from the motor housing.
3. While holding the motor locking tab open, place the motor shaft on a solid surface
and push down on the arm to force the motor up and out of the motor housing.
4. Remove the wires from the brackets on the arms and unplug the assembly from
the control board.
5. Before installing the new motor, make sure that the wires are the same color and
are installed in the same positions in the connector.
BLADE REPLACEMENT
NOTE: Rotor blades must be installed as shown.
Carefully pry off the
•
blade using a at head
screwdriver.
Rotor blades are marked
•
with an A or B.
Yellow rotor blades are
•
front and black are rear.
Match the A and B
•
blades to this drawing
to ensure that the
replacement blades are
in the correct locations.
SENSOR CALIBRATION
It is normal for the KODO FPV to
require minor corrections while
hovering. If the quad has a strong
tendency to drift in one direction, the
sensors may need calibration.
1. Power up and link the controller
and the KODO FPV.
2. Place the quad on a level surface.
3. Hold both sticks in the lower right
corners. When the LED on the quad
starts to ash rapidly, release the
sticks but do not move the KODO
FPV until the LED is steady again.
TROUBLESHOOTING
PROBLEM: KODO will not stay level or drifts while hovering.
SOLUTION: (1) Calibrate the sensors – see the Sensor Calibration section.
(2) Check the rotor blades and motors for damage. A common
PROBLEM: Red controller LED light flashes after linking.
SOLUTION: Replace with new AAA batteries.
PROBLEM: The KODO FPV will not respond to the controller.
SOLUTION: (1) Relink the controller and the KODO FPV.
PROBLEM: Unable to flip but the KODO flies.
SOLUTION: Battery voltage is low and needs to be charged.
PROBLEM: Will not take off.
SOLUTION: (1) Check the rotor blades for proper installation.
PROBLEM: Drone is shaking.
SOLUTION: Check the canopy, chassis, motors and rotor blades for damage.
problem is lint wrapped around the motor shaft.
(2) Make sure the flight battery is fully charged.
(2) Battery is not fully charged.
(3) Check motors and props for damage.
SAFETY PRECAUTIONS
Follow these safety precautions when operating this or any model drone.
Adult supervision required.
•
Do not touch the spinning blades or fly over people or animals.
•
Keep your face and body as well as all spectators away from the rotors
•
whenever the battery is connected.
Stay clear of buildings, trees and power lines. AVOID flying in or near crowded
•
areas. DO NOT fly close to people, children or pets.
Maintain a safe pilot-to-drone distance while flying.
•
Your KODO drone should not be considered a toy, but rather a small, working
4
•
Page 5

model. If not operated correctly, the model could possibly cause injury to you
or spectators and damage to property.
Do not alter or modify the model, as doing so may result in an unsafe or
•
unflyable model.
You must check the operation of the model before every flight to ensure that
•
the model has remained structurally sound.
CAUTION: Changes or modifications to this product not expressly approved by
the party responsible for compliance may void the user’s authority to operate
the equipment.
BATTERY WARNINGS
This product is equipped with a rechargeable LiPo battery.
Please pay attention to the following cautions for safe use:
ALWAYS KEEP OUT OF REACH OF CHILDREN AND ANIMALS.
•
ALWAYS recycle or dispose of LiPo batteries properly.
•
Parental guidance is recommended when installing batteries.
•
Land your model immediately when the LEDs flash to indicate that the
•
battery power is low. Recharge the battery before attempting another flight.
A dangerous situation can occur when attempting to recharge an overdischarged battery!
Before turning off the transmitter, ALWAYS unplug your battery from the
•
quadcopter after use.
NEVER store your quadcopter with the battery plugged into the quadcopter.
•
NEVER disassemble, allow puncture (eg: animal bite) or modify the battery
•
pack in any way.
Over-charging, using an incompatible charger, charging a damaged battery,
•
can result in a catastrophic failure resulting in the battery swelling, emitting
smoke, and/or catching FIRE!
DO NOT charge your battery if it becomes swollen or hot. Let the battery
•
cool and recycle it.
NEVER use a common household fire extinguisher on a LiPo fire. If a Class
•
“D” extinguisher is not available, keep a supply of sand accessible when
charging. Dumping sand on the battery will extinguish a LiPo chemical fire.
NEVER allow the batteries to become wet.
•
NEVER put batteries in the pocket of any clothing.
•
Only use the included charger or a charger designed for LiPo batteries to
•
charge the flight battery.
DO NOT attempt to use the included charger with NiCd or NiMH
•
battery packs.
NEVER attempt to charge LiPo cells with a charger set to another
•
battery type.
NEVER charge inside a vehicle.
•
DO NOT leave the charger unattended while charging.
•
ALWAYS place a battery being charged on a fireproof surface.
•
Disconnect the battery and unplug the charger immediately if either
•
becomes hot! However, it is normal for the charger to get warm.
NEVER allow the battery temperature to exceed 140° F [60° C].
•
Disconnect the battery from the charger and carefully move the battery to a
•
fireproof location if the battery begins to swell or smoke!
ALWAYS disconnect the battery and remove the charger from the USB port
•
when not in use.
It is best to store your batteries inside a metal container in a cool, dry
•
location at 1/2 charge (3.7V per cell). Storing a fully discharged battery may
cause irreversible damage to the battery.
DO NOT dispose of battery into fire or heat.
•
DO NOT use or store the battery near an open
•
fire or heater.
DO NOT strike, pierce or throw the battery
•
against a hard surface.
For more information about LiPo batteries,
please read the document at
www.dromida.com/lipos.php
FCC STATEMENT AND ISEDC NOTICE
1. This device complies with Part 15 of the FCC Rules
Operation is subject to the following two conditions:
(1) This device may not cause harmful interference, and
(2) This device must accept any interference received, including interference
that may cause undesired operation.
2. Changes or modifications not expressly approved by the party responsible for
compliance could void the user’s authority to operate the equipment.
Remark: This device is in accordance with the digital device grade B limitation and
the 15th regulation of FCC. This limitation requires reasonable anti-interference
protection around the residence. The device can transmit radio waves during
use and can interrupt the mobile communication without proper installment.
Interruption will occur for special device. If the device does interrupt the radio or
television, please turn the device off and then turn it on to adjust. Below are some
resolutions for your reference:
Move the receiving antenna.
•
Enlarge the distance between the device and receiver.
•
Try to not connect the device and the receiver on the same circuit.
•
Ask for professional help from experts.
•
3. This digital apparatus does not exceed the Class B limits for radio noise
emissions from digital apparatus set out in the Radio Interference Regulations of
ISEDC
NOTE: THE MANUFACTURER IS NOT RESPONSIBLE FOR ANY RADIO OR
TV INTERFERENCE CAUSED BY UNAUTHORIZED MODIFICATIONS TO THIS
EQUIPMENT. SUCH MODIFICATIONS COULD VOID THE USER’S AUTHORITY TO
OPERATE THE EQUIPMENT.
90-DAY LIMITED WARRANTY
Dromida® guarantees this kit to be free from defects in both material and
workmanship at the date of purchase. This warranty does not cover any
component parts damaged by use or modification. In no case shall Dromida’s
liability exceed the original cost of the purchased kit. Further, Dromida reserves
the right to change or modify this warranty without notice. In that Dromida has no
control over the final assembly or material used for final assembly, no liability shall
be assumed nor accepted for any damage resulting from the use by the user of
the final user-assembled product. By the act of using the user-assembled product,
the user accepts all resulting liability. If the buyer is not prepared to accept the
liability associated with the use of this product, the buyer is advised to return this
kit immediately in new and unused condition to the place of purchase. To make a
warranty claim, go to dromida.com/support.
FCC ISEDC PRECAUTIONS
ISEDC RSS WARNING
This device complies with licence-exempt RSS standard(s).
Operation is subject to the following two conditions: (1) this device may not
cause interference, and (2) this device must accept any interference, including
interference that may cause undesired operation of the device.
Le présent appareil est conforme aux
Le présent appareil est conforme aux
appareils radio exempts de licence.
appareils radio exempts de licence.
L'exploitation est autorisée aux deux conditions suivantes:
L'exploitation est autorisée aux deux conditions suivantes:
(1) l'appareil ne doit pas produire de brouillage, et
(1) l'appareil ne doit pas produire de brouillage, et
(2) l'utilisateur de l'appareil doit accepter tout brouillage radioélectrique subi, même
(2) l'utilisateur de l'appareil doit accepter tout brouillage radioélectrique subi, même
si le brouillage est susceptible d'en compromettre le fonctionnement.
si le brouillage est susceptible d'en compromettre le fonctionnement.
5
ISEDCISEDC
CNR d'IS E D C applicables aux
Page 6

ISEDC Radiation Exposure Statement:
This equipment complies with ISEDC RF radiation exposure limits set forth for an uncontrolled environment.
This transmitter must not be co-located or operating in conjunction with any other antenna or transmitter.
For Quadcopter:This equipment should be installed and operated with minimum distance 20cm between the radiator& your body.
Cet appareil est conforme aux limitesd'exposition de rayonnement RF ISEDC établiespour un environnement non contr?lé.
Cetémetteur ne doit pas être co-implanté oufonctionner en conjonction avec toute autreantenne ou transmetteur
pour quadcopter:Cet équipement doit être installé et utiliséavec une distance minimale de 20cm entre leradiateur & votre corps.
DECLARATION OF CONFORMITY
Product:
Item number:
Equipment class: 1
Hobbico, Inc.
2904 Research Road
Champaign, IL USA 61826
The associated regulatory agencies of the following countries recognize
the noted certi cations to this product as authorized for sale and use.
WiFi Camera Kodo FPV
DIDE0016
DIDE0016
FCC RADIATION EXPOSURE STATEMENT
This equipment complies with FCC radiation exposure limits set forth for an
uncontrolled environment.
This transmitter must not be co-located or operating in conjunction with any
other antenna or transmitter.
For Quadcopter:This equipment should be installed and operated with minimum distance 20cm between
the radiator& your body.
REPLACEMENT PARTS
2
4
3
1
2
1
7
6
5
6
5
9
Part
DIDE1277 1 Rotor Blade Set
Black & Red (4)
DIDE1553 2 Blade Guard Set (4)
DIDE1559 3 Upper Body
3 Lens Housing top
3 Lens Housing bottom
3 Lens frame
DIDE1555 4 Frame
DIDE1556 5 Motor CCW R/F L/R (2)
DIDE1557 6 Motor CW L/F R/R (2)
DIDM1558 7 Control board
7 Dampers
DIDZ1560 8 Camera board
DIDZ1559 8 Lens
DIDE1550 9 Battery
DIDE1552 10 Transmitter
DIDE1511 11 USB Charger
No.
Key
No. Description
8
6
Page 7

ALSO AVAILABLE
Instant FPV.
Vusion 250 Extreme FPV Race Pack
The revolutionary Vusion 250 Extreme FPV Race Pack blends innovation and convenience with the ultimate First Person View
racing drone. It’s the first – and only – injection-molded RTF 250-size racing drone to come with all essential FPV equipment
installed. Everything’s designed to work seamlessly together, for the ultimate flying experience!
● 100% complete and Ready-to-Fly FPV Race Pack – no
soldering, assembly or kit-bashing required.
● The first – and only – injection-molded racing drone
designed with FPV in mind.
● A quality LCD monitor and FPV goggles provide pilots
with an immersive First Person View flying experience.
● 200mW video transmitter* uses 5.8GHz technology so
pilots can watch flights in real time, without latency.
The video transmitter features eight Raceband
channels reserved for pro FPV racing.
● Modular, injection-molded construction adds impact
resistance. Pieces insert and bolt on so pilots can be
up and running in no time.
● A micro memory card slot makes it possible to transfer
flying footage from the on-board 600TVL FPV camera
without sacrificing video quality. Compatible with
cards up to 32GB capacity.
● A 3S LiPo battery, AC charger and “AA” batteries
round out the RTF package.
Turn your house upside down!
RISE Vusion House Racer 125 FPV
RISE0200
Get “up close and personal” with everything from the change in your sofa to those cobwebs in your ceiling fan. Explore every
nook and cranny of your kitchen. Turn pillows and towels into an instant obstacle course. Zip and flip through every corner of
every room. With the Vusion House Racer, there are no limits.
● 100% Ready-to-Fly Vusion House Racer Indoor FPV
Drone.
● 600TVL FPV video camera.
● 25mW VTX 40-channel, 5-band.
● Tactic FPV-RM2 40-channel 5.8GHz FPV monitor with
4.3’ LCD and external antenna (LXGHAM).
● Tactic FPV-G1 goggles (LXGHAR).
● RISE J2000 2.4GHz 6-channel radio system with Auto-
Flip button and monitor holder.
● USB charger.
● (3) Flight modes: two gyro-assisted Stability Modes
for beginners and Rate Mode for more advanced
maneuvers.
● 1S 3.7V 650mAh LiPo battery delivers 6-8 minutes of
flight time.
● (4) “AA” alkaline batteries.
● Extra blades.
● Screwdriver.
● Instruction manual.
RISE0207
7
Page 8

®
company
™
dromida.com
DIDE0016© 2017 Dromida, a Hobbico
 Loading...