

Page 1
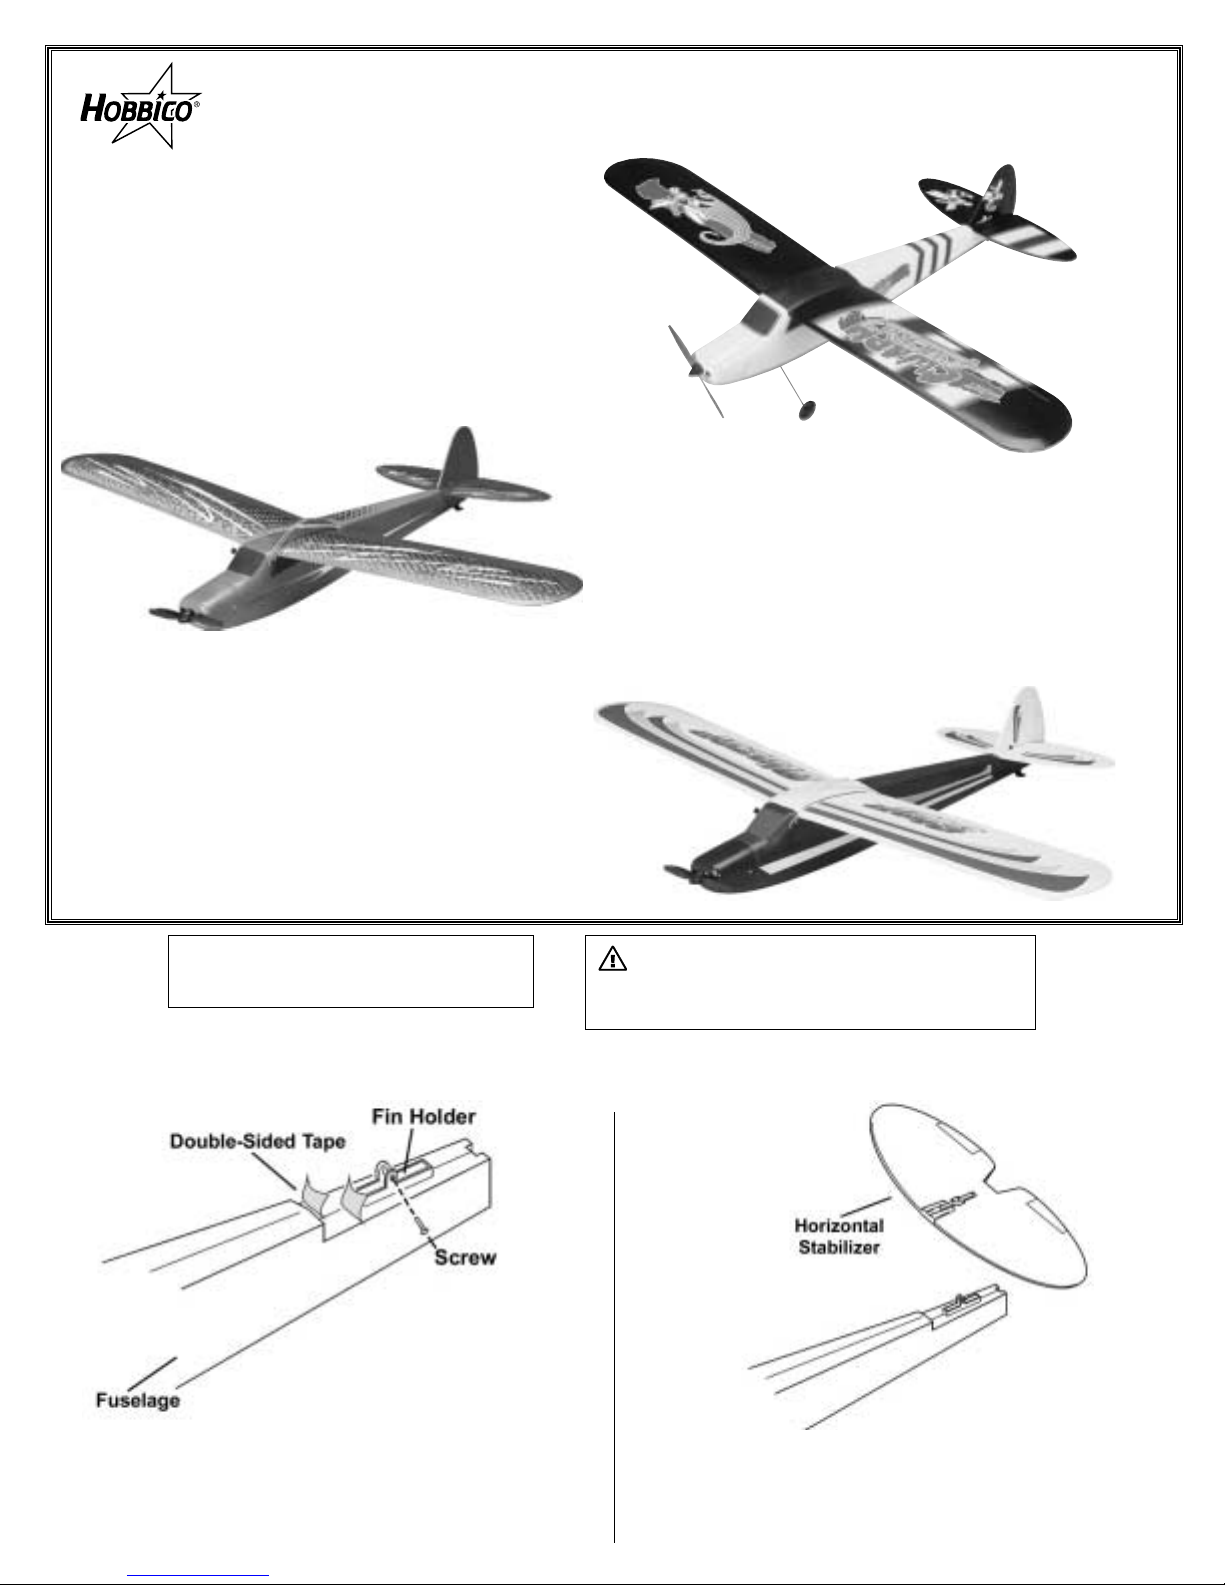
Step 1. Remove the screw from the fin holder at the back
of the
fuselage using a small Phillips screwdriver. Remove
the
backing from the adhesive strips at the top rear of
the fuselage.
Step 2. Carefully slide the horizontal stabilizer ov er the fin
holder with the decal side up. Firmly press the stabilizer
onto the adhesive tape.
WARNING: Read ALL instructions carefully.
Improper use of this product may result in
personal injury or damage to the public.
WARNING:
CHOKING HAZARD – Small parts.
Not recommended for children under 3 years.
Recommended for ages 10 and up.
Use with adult supervision.
Assembly and Operation Manual for the
Swarm, Sky Pilot or Star Blazer
Champaign, IL 61826
Swarm (HCAA0300) Replacement Parts
HCAA3350 Complete Wing Set HCAA3356 Decal
HCAA3352 Complete Tail Set HCAP9905 Charger
HCAA3354 Fuselage HCAQ3270 Propeller (2)
HCAQ3272 Landing Gear
Sky Pilot (HCAA0301) Replacement Parts
HCAA3370 Complete Wing Set HCAP9905 Charger
HCAA3371 Complete Tail Set HCAQ3300 Propeller (2)
HCAA3372 Fuselage HCAQ3302 Landing Gear
Star Blazer (HCAA0302) Replacement Parts
HCAA3380 Complete Wing Set HCAP9905 Charger
HCAA3381 Complete Tail Set HCAQ3300 Propeller (2)
HCAA3382 Fuselage HCAQ3302 Landing Gear
*Requires 6 “C”Alkaline Batteries (not included), and Phillips Screwdriver
ASSEMBLING YOUR SWARM, SKY PILOT OR STAR BLAZER
Page 2
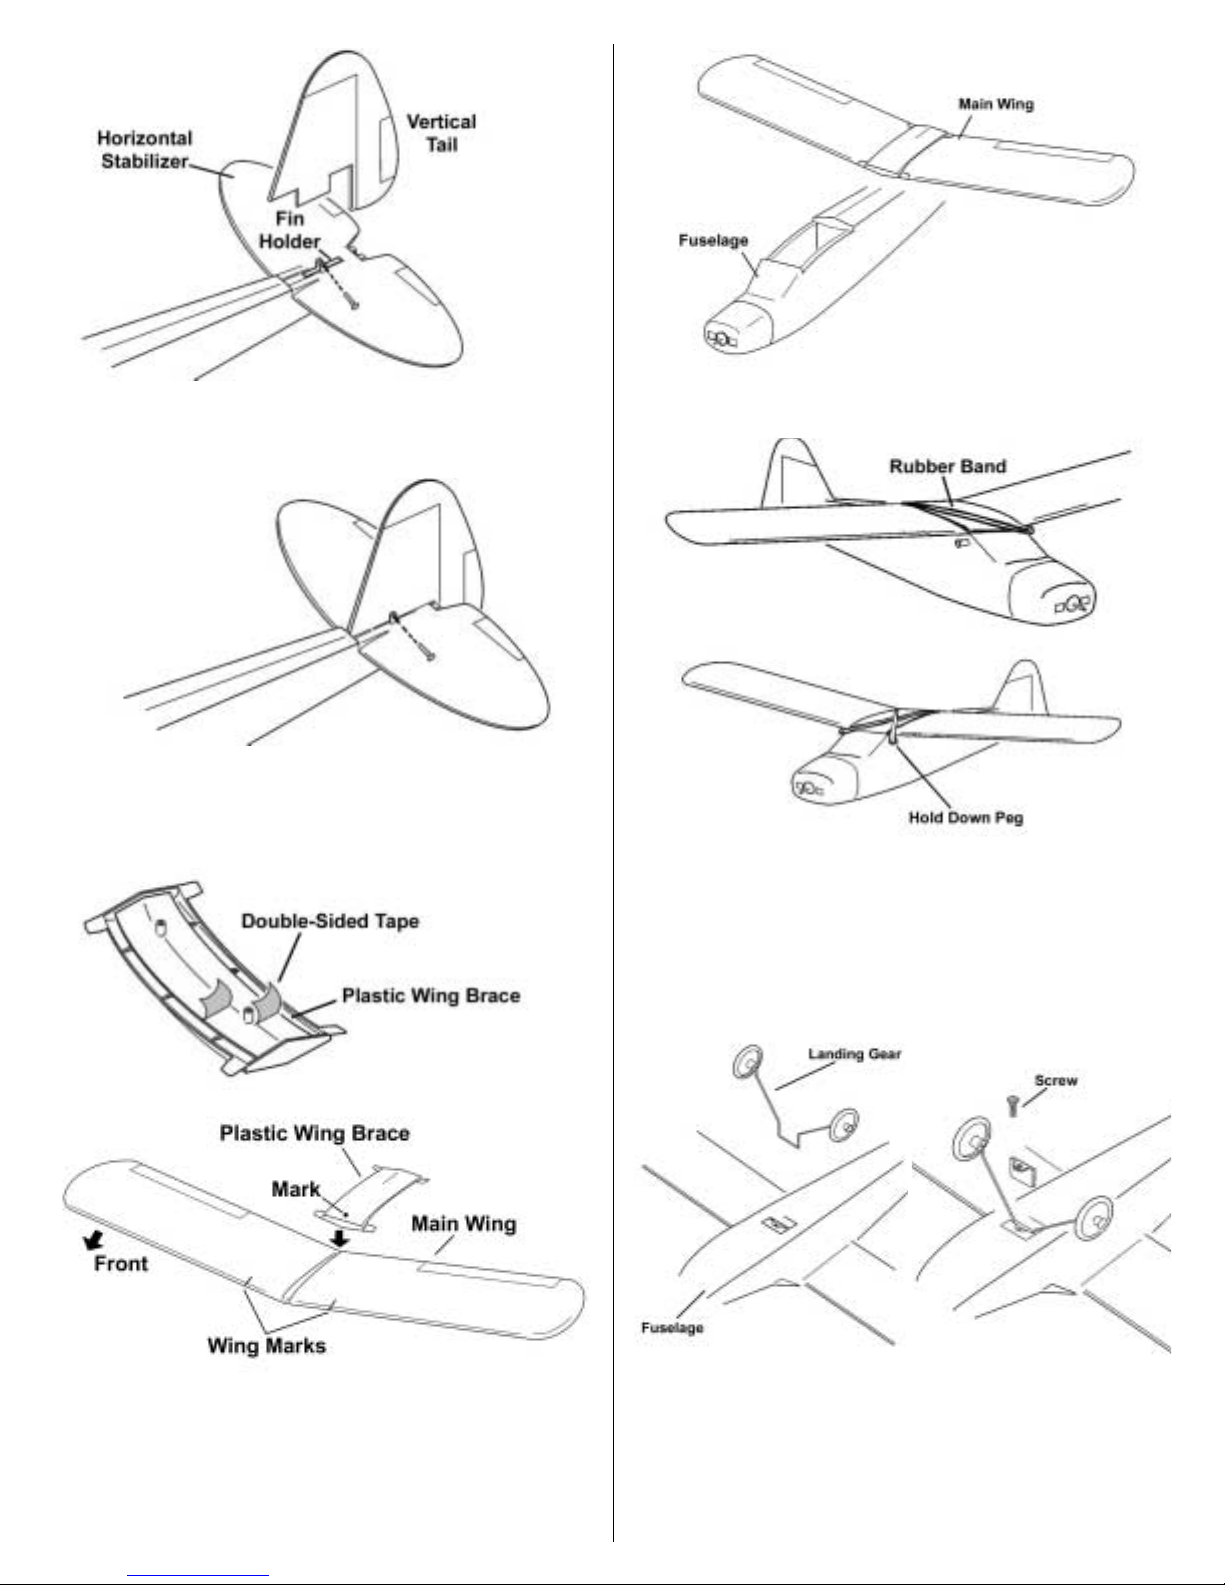
Step 3. Hold the vertical fin near the bottom and press it
into the fin holder. It must fit snug against the
horizontal stabilizer.
Step 4. Use the screw removed in step 1 to secure the
vertical fin. The screw goes into the thin side of the fin
holder, and threads into the thicker side.Do not overtighten the screw, as it could break the fin holder.
Step 5. Check the alignment of the plastic wing brace
before removing the backing paper from the adhesive
tape. The front of the wing brace is mar ked and this will
go towards the front of the main wing (see diagram).Test
fit the part. The wing brace must line up with the wing
marks on the main wing.
Step 6. Place the wing onto the fuselage. Align the wing
brace with the fuselage.
Step 7. Attach a rubber band to one of the rear pegs, and
stretch it to the opposite front peg.Repeat the process so
there are two rubber bands going from the right rear peg
to the left front peg, and two from the left rear peg to the
right front peg.The rubber bands should criss-cross.
Step 8. Remove the screw from the landing gear holder
using a small Phillips screwdriver.Then, remov e the landing gear holder. Slide the landing gear into the opening.
Slide the landing gear holder back into the opening, and
replace the screw. Do not tighten the screw to tight, it
could strip the plastic.
Page 3

CHARGING YOUR SWARM, SKY PILOT OR
STAR BLAZER
Attention:Read all instructions before using this charger .
1.
Do not mix old and new batteries.
2.
Do not mix alkaline, standard (carbon zinc), or NiCd
(nickel-cadmium) rechargeable batteries.
3.
Do not use rechargeable batteries in this charger.
4.
Exhausted batteries are to be removed from the charger.
Charger requires 6 “C-Cell alkaline”batteries.Batteries must
be placed in the proper direction in the charger. Follow the
diagram in the charger for placing the batteries.
Before charging your airplane on board NiCd battery,
make sure the on/off switch is in the "OFF" position.Insert
the charger into the charge socket on the bottom of the
airplane fuselage.The charger will only fit into the socket
one way, so match the tab on the charger with the notch
in the charge socket. Charge for 30 seconds by pressing
the charge button down. The charger will not charge
unless the button is pressed. DO NOT OVER-CHARGE
THE BATTERY. THIS WILL SHORTEN THE BATTERY
LIFE SIGNIFICANTLY.
When charging is complete, remove the charger from
the airplane.
FLIGHT TESTING Y OUR AIRPLANE
(MUST BE DONE BEFORE FLYING)
It is important to adjust the “trim” of your electric free flight
airplane correctly. The airplane should climb and
turn efficiently.
Step 1. Using a hobby knif e , carefully cut along the slot at
the top and bottom of the rudder trim tab, and along the
sides of the elevator trim tabs.
Step 2. With the motor off, grasp the airplane by the fuselage and gently toss the airplane into the wind. It should
glide straight ahead and settle gently to the ground.See the
above diagram.If y our plane crashes (A) or stalls (B), f ollo w
the steps below until you have a correct flight path (C).
A = Crash.Bend the elev ators upward slightly 1/16" [1-2mm].
B = Stall and crash.
Bend the elevators down slightly 1/16" [1-2mm].
C = Correct flight path.
Page 4

To make your plane turn, follow the steps below:
D= To turn left, bend the rudder slightly to the left.
E= To turn r ight, bend the rudder slightly to the r ight.
Step 3. Repeat step 2 until your airplane glides well.
SAFETY RULES
Flying Y our Airplane
CAUTION! ALWAYS LAUNCH THE AIRPLANE AWAY
FROM PEOPLE AND OBSTACLES
•
NEVER POINT THE AIRPLANE AT ANYONE OR ANYTHING
•
ALWAYS LAUNCH SKYWARD
•
DO NOT LAUNCH INDOORS
•
ALWAYS KEEP FINGERS AND OBJECTS AWAY
FROM THE PROPELLER WHEN RUNNING
Choose an open field, free of trees and other obstacles.
Hold the airplane in your hand over your head and switch
on the motor with your other hand.Toss the air plane into
the wind, keeping the main wing level.
The airplane should climb gently and turn gradually. If it
stalls and crashes, adjust the elevator.It if does not turn,
bend the rudder slightly to the left or right. Refer to “Flight
Testing Your Airplane” section for details.
IMPORT ANT THINGS TO REMEMBER WHEN YOU ARE
FLYING YOUR ELECTRIC FREE FLIGHT AIRPLANE
•
The most important thing that deter mines how well your
airplane flies is how well you have trimmed it.
•
Because it can fly high and far you must be in a large area
away from houses, streets, trees and overhead wires.
•
Closely inspect your airplane after each flight. Make
sure the wing is not broken and is securely attached to
the fuselage.Make sure the tail parts are not cracked or
broken. See the repair/replace section for details.
•
Always throw the electric free flight airplane into the
wind. Do not fly the airplane if it is too windy.
•
Never charge your batteries for more than 30 seconds.
If you do, you may overheat the batteries in the airplane
or your charger and damage them.
REPAIR/REPLACE
If the fuselage is cracked or damaged, apply white glue
and cellophane tape and let it dry overnight. To replace
the tail section, remove the vertical fin by removing the
screw in the fin holder. To remove the stabilizer, run it
under warm water to soften the glue on the tape. Gently
pull the stabilizer away from the fuselage. Carefully
remove any remaining foam or tape with a hobby knife.
Warning:Do not use super glue.It will damage the foam.
If the wing or tail becomes damaged, apply cellophane
tape over the damaged areas.
WARRANTY
Please inspect all parts carefully before starting assembly!
If any parts are missing, broken or defective , or if you have
any questions about the assembly or flying of this airplane,
please call us at (217) 398-8970, and we’ll be glad to help.
Hobbico, Inc., guarantees this kit to be free from defects in
both material and workmanship at the date of purchase.
This warranty does not cover any components parts damaged by use or modification.In no case shall Hobbico’s liability exceed the original cost of the purchased kit.Further,
Hobbico reserves the right to change or modify this warranty without notice.
In that Hobbico has no control over the final assembly, no
liability shall be assumed nor accepted for any damage
resulting from the use by the user-assembled product. By
the act of using the user-assembled product, the user
accepts all resulting liability.
HCAZ3106 for HCAA0300, HCAA0301, HCAA0302© Copyright 2001 V1.0
 Loading...