

Page 1
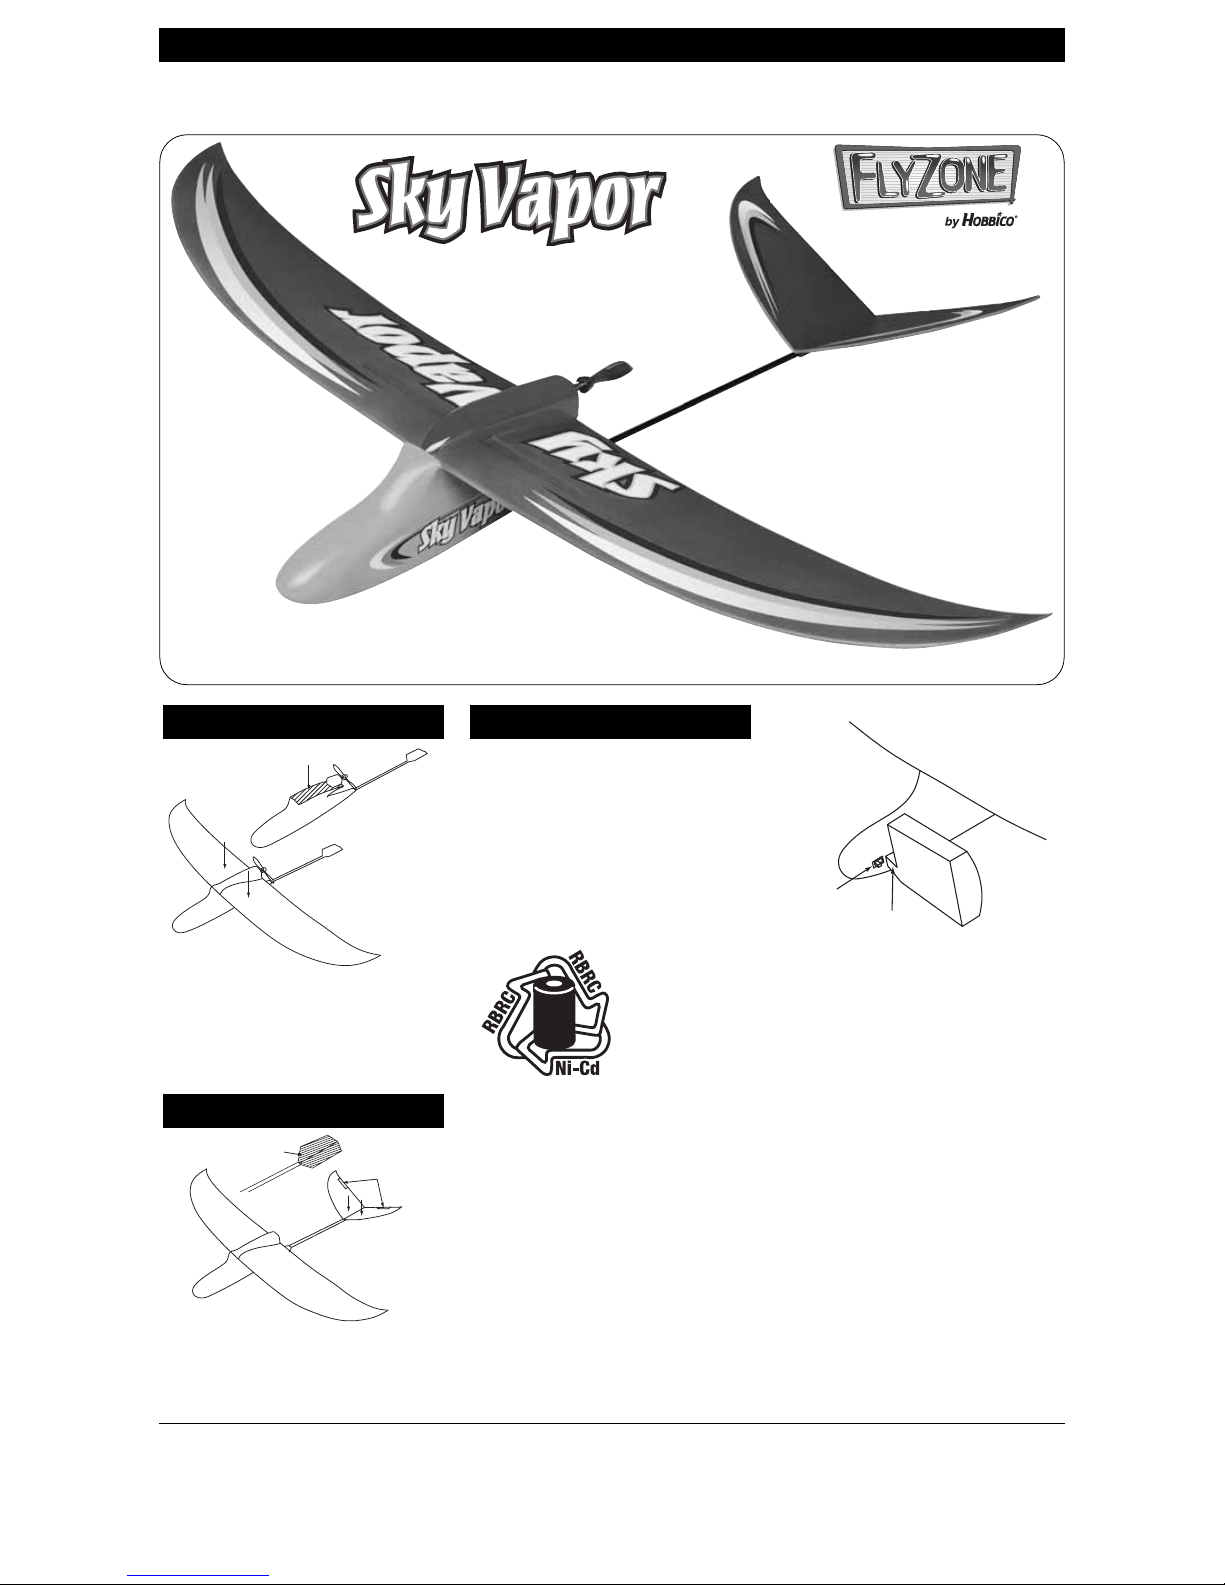
1.Remove the backing paper from the doublesided tape on the fuselage.
2.Attach the main wing to the top of the fuselage
by lining it up along the centerline and directly
behind the ridge on the front of the fuselage.The
back of the canopy will slide over the motor shaft.
1. Remove the backing paper from the plastic
tail bracket at the end of the tail boom.
2. Attach the tail to the fuselage with the
ruddervators towards the back.
1. Remove the back cover of the charger by
removing the screws and install 4 “AA”
batteries according to the diagram in the
charger. Put the cover back on the charger
and reinstall the screws. CAUTION: Do not
use rechargeable (nickel cadmium) batteries.
Do not mix old and new batteries. Do not
mix alkaline, standard (carbon zinc), or
rechargeable (nickel cadmium) batteries.
Attention: The Sky
Vapor is powered
by a rechargeable
battery. At the end
of the battery’s
useful life, under
various state and
local laws, it may be
illegal to dispose of
the battery into the municipal waste system.
Check with your local solid waste officials for
details in your area for recycling options or
proper disposal. Warning: This product
contains a chemical known to the state of
California to cause cancer and birth defects or
other reproductive harm.
2. Before charging your free flight Sky Vapor,
make sure the “on-off” switch is in the “off”
position.(The “off” position is towards the front
of the plane.)
3. Insert the charger into the charge socket on
the side of the Sky V apor.The charger will only
fit one way so match the tab on the charger
with the notch on the charge socket.
4. Press and hold the button on the charger to
charge the airplane. On the first charge, only
charge the Sky Vapor for 15 seconds. For
longer flights, you may increase the charge
time up to 60 seconds.
5. Never charge the Sky Vapor for more than 60
seconds. If you do, you may overheat the
batteries in the Sky Vapor or the charger and
damage them.
6. When charging is complete, remove the
charger from the Sky Vapor.
CAUTION: Keep fingers, face, clothing
and other objects away from the propeller
when running.
On/Off
Switch
Charge
Connector
CHARGING
INST ALL THE T AIL
INST ALL THE WING
ASSEMBLY OF YOUR ELECTRIC FREE-FLIGHT SKY VAPOR
WARNING:Read instructions carefully! Improper use of this product may result in personal injury or damage to the public.
WARNING:Choking hazard - Small parts. Do not allow children under age 3 to play with the Sky Vapor.The model contains small
parts which could accidentally be swallowed and cause suffocation.Use with adult supervision.
Replacement Parts
HCAP9904 Charger 2 AA
HCAQ3304 Propeller (2)
Copyright © 2004 HCAZ1196 for HCAA0315
Requires 4 “AA”Alkaline Batteries (Not Included)
HCAA0315
WARRANTY
Hobbico, Inc.guarantees this kit to be free of defects in both material and workmanship at the date of purchase.This warranty does not cover any component parts
damaged by use or modification. In no case shall Hobbico’s liability exceed the original cost of the purchased kit.Further, Hobbico reserves the right to change or
modify this warranty without notice.In that Hobbico has no control over the final assembly , no liability shall be assumed nor accepted for any damage resulting from
the use of the final user-assembled product. By the act of using the user-assembled product the user accepts all resulting liability. If the buyer is not prepared to
accept the liability associated with the use of this product, the buyer is advised to immediately return this kit in new and unused condition to the place
of purchase. Please inspect all par ts carefully before starting assembly! If any parts are missing, broken, or defective, or if you have any questions about
assembly or flying of this airplane, please call us at (217) 398-8970, and we’ll be glad to help.
™
™
Remove Tape
Backing
Remove Tape
Backing
Ruddervators
Page 2

1. It is important to adjust, or “trim”, your electric free flight Sky Vapor correctly.
2. Before launching the Sky Vapor, grasp the airplane fuselage and with the motor off, gently toss the Sky Vapor into the wind.
It should glide straight ahead and settle gently to the ground. See the diagram below.
A = Dive.Bend both ruddervators up slightly.
B = Stall. Bend both rudder vators down slightly.
C = Correct flight path.
D = To tur n left, bend the right r udder vator up slightly.
E = To tur n right, bend the left r udder vator up slightly.
3. Repeat step 2 until your airplane glides well.
C
B
A
SAFETY RULES
• ALWAYS LAUNCH THE AIRPLANE AWAY
FROM PEOPLE AND OBSTACLES
• NEVER POINT THE AIRPLANE AT
ANYONE OR ANYTHING
• ALWAYS LAUNCH SKYWARD
• DO NOT LAUNCH INDOORS
1. Choose an open field, free of trees, power
lines and other obstacles. Hold the Sky Vapor
in your hand over your head and switch on the
motor with your other hand. Toss the Sky
Vapor into the wind, keeping the wing level.
2.The Sky Vapor should climb gently and turn
gradually. If it stalls and crashes or does not
turn, adjust the ruddervators. Refer to
“TRIMMING YOUR ELECTRIC SKY VAPOR”
for details.
IMPORT ANT THINGS TO REMEMBER
WHEN YOU
ARE FLYING YOUR ELECTRIC
FREE FLIGHT SKY VAPOR
The most important thing that determines how
well your Sky Vapor flies is how well you have
trimmed it.
Because it can fly high and far, you must be in a
large area away from houses, streets, trees and
overhead wires.
Closely inspect your airplane after every flight.
Make sure the wing and tail are not broken and
that they are securely attached to the fuselage
and tail bracket.
Always throw the electric free flight Sky Vapor
into the wind. Do not fly the airplane if it is
too windy.
Never charge your airplane for more than 60
seconds. If you do, you may overheat the
batteries in the Sky Vapor or your charger and
damage them.
REP AIR:If the fuselage, wing or tail is cracked or
damaged, apply white glue and cellophane tape
and let dry overnight. To replace the tail section,
run it under warm water to soften the glue.Gently
pull the tail section away from the tail bracket.
Carefully remove any remaining foam or glue
with a hobby knife. Replacement tail sections
should be attached using white glue.
WARNING: Do not use super glue. It will
damage the foam. If the wing or tail becomes
damaged, apply cellophane tape over the
damaged area.
Hobbico, Inc.
Champaign, IL 61826
TRIMMING YOUR ELECTRIC FREE-FLIGHT SKY VAPOR (must be done before flying)
FLYING YOUR ELECTRIC FREE-FLIGHT SKY VAPOR
Down
Down
Up
Up
Up
Up
A
Dive
Stall
Right T urn
Left T urn
E
D
B
E
D
 Loading...