

Page 1

IMPORTANT: Please read all instructions thoroughly before operating your vehicle.
Instructions
for Nintendo Kart Series
·
Adult supervision is recommended.
·
Do not allow children under age 3 to play with the R/C
MicroSizers Nintendo Kart or radio transmitter. The model
contains small parts which could accidentally be swallowed and
cause suffocation.
·
Keep hair, loose clothing, face and fingers away from the tires
and wheels while the model is running.
·
The transmitter’s antenna could also cause injury if played with
violently or looped around the neck.
·
Never operate your R/C MicroSizers Nintendo Kart on streets
or in any areas where full-size vehicles are.
·
Do not pick up your R/C MicroSizers Nintendo Kart when it is
in motion.
·
The R/C MicroSizers Nintendo Kart is designed for indoor use
only. Outdoor use may lead to failure due to dirt and dust.
·
Do not run your R/C MicroSizers Nintendo Kart on rugs or
carpeting. The fibers may become tangled in the model and
cause damage or failure.
·
Never charge, run or store your R/C MicroSizers Nintendo Kart
in a location subject to high temperatures, low temperatures or
high humidity. Do not store in direct sunlight.
·
To avoid electronic malfunction, do not allow the kart to become
wet. Short circuits will produce a very strong electrical current.
Should your R/C MicroSizers Nintendo Kart become wet, stop
using it immediately.
·
Never attempt to disassemble or solder the model.Do not put it
into fire.
·
Do not drop your R/C MicroSizers Nintendo Kart from high places.
Box Contents
General Safety Precautions
R/C MicroSizers Nintendo Mario and Yoshi Kar ts are recommended for ages 8 and older. To ensure the safety and fun of young
modelers, please follow these operating instructions and general safety rules:
™
by
Nintendo®Mario™& Y oshi®Karts
*One kart per kit*
R/C MicroSizers Service Center
We’re eager to help you get the most enjoyment from your R/C MicroSizers Nintendo Kart. If you have any problems with assembly
or operation, please do not return your model to the store. Check our website first. Many easy solutions are available there 24 hours
a day, 7 days a week.
www.microsizers.com
Or, call the R/C MicroSizers Service Center at 1-866-HOBBICO (1-866-462-2426), Monday through Friday, 9:00 a.m. - 4:00 p.m.
Central Time.We’ve backed your model by a 90-day satisfaction guarantee, so you can be confident of its quality. Happy driving!
Turtle Shell (red)
Main Body
Turtle Shell (green)
Mushroom
Transmitter Accessory Sheet
Banana Pylons (5)
Page 2
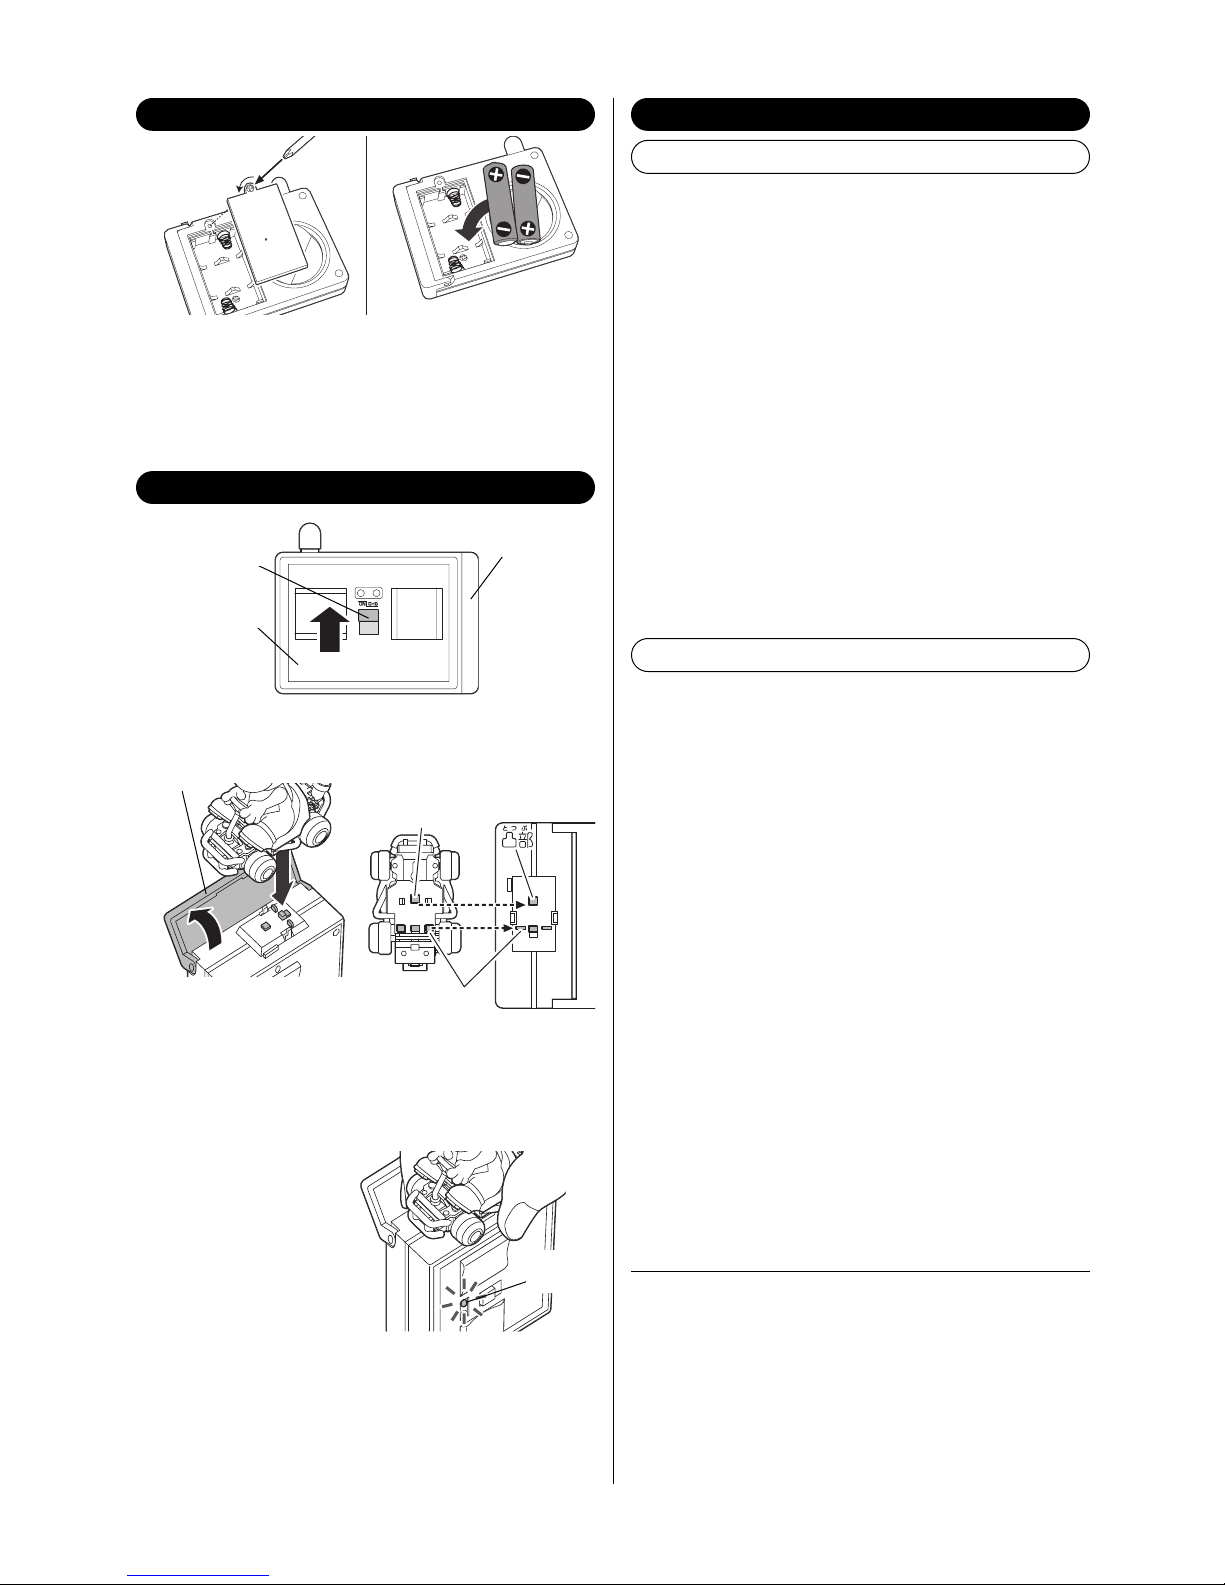
How to install the batteries
➋ Open the cover on the right side of the transmitter. Position the
kart with the figure facing up, as shown.The nose of the kart should
be nearly even with the top of the transmitter. Align the tab with the
notch in the kart chassis and snap the vehicle onto the charger
➊ Remove the battery cover screw with a Phillips screwdriver.
➋ Install your batteries with the correct polarity.
This transmitter requires 2 "AA" alkaline batteries. Never use
other types of batteries.
➌ Replace the battery cover and tighten the screw.
How to charge the kart
➊ Set the transmitter switch to ON.
ON
/OFF
SWITCH
T
RANSMITTER
CHARGER
DOOR
➌ The metal contacts on
the model and the charger
must make contact. While
charging, keep pressing
the chassis against the
transmitter and make sure
the CHG light is on.
➍ The LED (CHG) on the front of the transmitter will light for 45
seconds.When it goes out, the battery has completed charging.
☞
If the model is attached before the transmitter is switched
on, it will not charge.
Kart Battery Care
Transmitter Battery Care
Important Battery Information
CHARGE
LED
CHARGER
COVER
·
If your kart has been unused for a long period or you are
charging its built-in battery for the first time, the battery may
not charge to full capacity. This does not indicate battery
failure. Recharging and running the model 4 or 5 times will
gradually lengthen run times.
·
Fully discharge the battery by running the kart before recharging.
·
Charge the battery only when the kart is NOT running.To prevent
overcharging, never recharge a battery which has already been
fully charged.This will not increase running speed.
·
Recharge the battery only with the transmitter’s built-in charger.
·
If the chassis becomes warm, let it cool before running again.
A rechargeable battery has been built into the main body of the
kart. Using the battery incorrectly will cause it to leak, rupture or
ignite. Follow these precautions:
·
Never use rechargeable batteries, such as NiCds, in
the transmitter.
·
Do not mix different types of batteries, or old and
new batteries.
·
When changing batteries, replace ALL of the old batteries with
new ones.
·
Make sure the batteries are installed with the correct polarity
as shown in the battery compartment.
·
Do not charge or disassemble your transmitter batteries.
Never allow them to become hot or to burn. To avoid shortcircuits, avoid getting them wet.
·
If liquid from inside the batteries contacts your skin or clothes,
wash them with water. If leaked battery fluid gets into your
eyes, flush them immediately with cool water and seek
medical attention. Do not rub eyes.
·
You can race about 50 times with new AA alkaline batteries.
Always use AA alkaline batteries.If improper batteries are used in the
transmitter, they ma y become hot, leak and ma y rupture.Follow these
precautions:
This product uses a NiCd battery.NiCd batteries are recyclable,
and a valuable resource.To dispose of the battery, remove it and
take it to a recycling center.
This device complies with Part 15 of the FCC rules. Operation is
subject to the following two conditions:(1) This device may not cause
harmful interference, and (2) this device must accept interference
received, including interference that ma y cause undesired operation.
The manufacturer is not responsible for any radio or TV interference
caused by unauthorized modifications to this equipment. Such
modifications could void the user’s authority to operate the
equipment. Meets Canada 210 requirements.
Carrier Frequency: 27.145MHz Power: 2µV/m
Carrier Frequency: 49.860MHz Power: 4µV/m
Page 3

How to drive
After running
ANTENNA
➊ Gently pull up the antenna
by hand.Never attempt to extend
the antenna by turning or
pushing the dial on the back of
the transmitter.
➋ Turn on the transmitter switch.
Throttle (left toggle control) - Move the kart forward by pushing up,
or reverse by pushing down.
Steering Wheel (right toggle control) - Steer the front tires left or
right by pushing the right toggle control.
By operating the toggle controls on both the right and left
simultaneously, the kart can move forward-right, forward-left,
reverse-right, or reverse-left.
☞
To run two karts together, each must be on a different
frequency.
➊ Turn the winder on the back of the transmitter to store the
antenna. Do not force the antenna back inside the transmitter
by hand.
➋ Switch the transmitter off. Always turn the switch off when not
in use to extend your battery life.
☞
If the kart does not go
straight when pushing the left
toggle control up, move the
trim lever on the bottom of
the chassis to the left or right
to make adjustments.
ON/O
FF
SWITCH
ON/OFF
SWITCH
ANTENNA WINDER
STRAIGHT LINE
TRIM CONTROL
THROTTLE
CONTROL
STEERING
CONTROL
How to change the drive motor
HEATSINK
MICROSNAP
MOTOR
M
UFFLER
First, remove the muffler from the back of the kart. Then, open
the heat sink as shown to reach the motor.
Troubleshooting
KART DOES NOT RUN
KART DOES NOT OPERATE PROPERLY
KART MOVES UNCONTROLLABLY
Transmitter battery capacity is low, or no
batteries have been installed.
Transmitter is not switched on.
Model is not assembled correctly.
Radio signals don't seem to reach the model.
Motor/battery life has expired.
Is there dust on the tires and/or wheels?
Is the trim lever in a straight position?
Are you driving on a rug?
Interference from reflected radio waves
Are you running with another kart on the
same radio frequency?
Install two brand-new "AA" alkaline
batteries (they MUST be alkaline).
Move the switch of the transmitter to "ON".
Then, charge the kart and race.
Reassemble it correctly, paying close
attention to the instruction steps.
Fully extend the antenna.Maximum range
is 8 to 10 feet [2.4-3.0m].
Replacement motors are sold separately.
Remove dust/lint from the tires and wheels.
Adjust the trim lever until the kart moves
straight ahead.
R/C MicroSizers Nintendo Karts are not
intended for running on rugs or carpets.
Turn off electronic devices or move to a
different location.
Each kart must be on a different frequency.
Symptom Probable cause Correction
Page 4

Place items as shown, and begin the game from the start marker.
Race through the banana pylons to reach the mushroom. Keep
track of your times and beat your best record!
Challenging Games for Your Karts!
Entire Contents © Copyright 2003 V1.0 Printed in China HCAZ0425 for Nintendo Kart Series
Coins
10 points
20 points
50 points
Turtle Shell
60 points
Mushroom
80 points
Star
100 points
Game 1: Race for the Mushroom
Take turns with your opponent. One hides the Turtle Shell,
Mushroom and Star under boxes, and places them as shown.
The other crashes into a box and earns the number of points
assigned to the object underneath. Each player gets four turns.
The winner is the one who earns the most total points! Each
item’s point value is shown in the upper right.
Game 3: Treasure Hunt
Let’s go bowling! Place coins as shown, set your Kart at the start
point, and dash toward the coins.Each player gets ten turns.The
winner is whoever gains the most points by knocking over coins
and earning their point value. Tip: Position your Kart carefully at
the start point! If a Kart stops or runs backwards, it is disqualified.
Game 4: Coin Bowling
Place items as shown.Begin the game at the start marker.Push the
Turtle Shell to the goal marker, sneaking through the Rival Karts.
Players who don’t follo w the path shown by the arro w are disqualified.
Game 2: Turtle Shell Game
How to assemble accessories
➊ Cut out the box from its
cardboard sheet.
➋ Fold it as shown and
secure the sides by inserting
the flap into the slot.
➊ Cut out the rival kart from the cardboard sheet.
➋ Fold it as shown, and insert the flap to hold the sides together.
Assemble star and coins the
same way as the rival karts.
Boxes
Rival Karts
Star and Coin Tri-folds
➌ Tuck in the top cover flap
as shown.
SLOT
FLAP
FOLD
TAB
 Loading...