

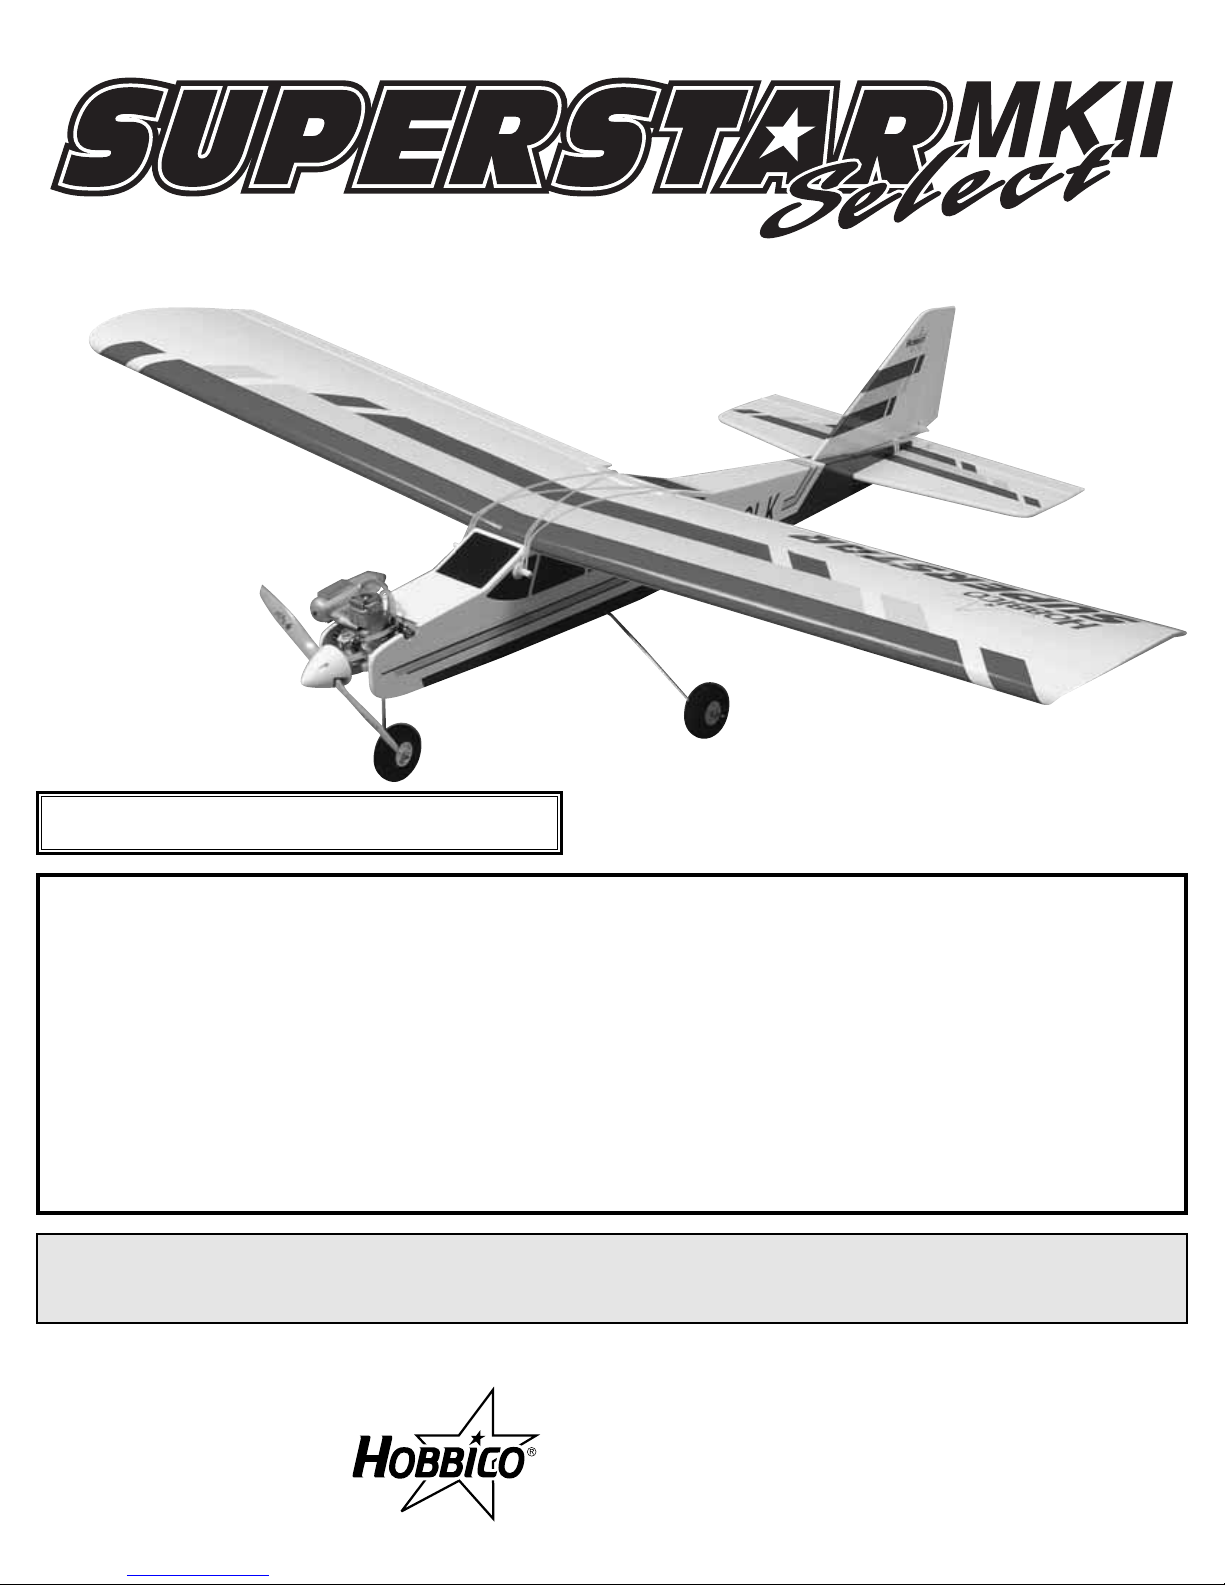
Page 1
Champaign, Illinois
(217) 398-8970, Ext. 5
airsupport@hobbico.com
READ THROUGH THIS MANUAL BEFORE STARTING CONSTRUCTION. IT CONTAINS IMPORTANT
INSTRUCTIONS AND WARNINGS CONCERNING THE ASSEMBLY AND USE OF THIS MODEL.
WARRANTY
Hobbico®guarantees this kit to be free from defects in both material and workmanship at the date of purchase.This warranty
does not cover any component parts damaged by use or modification.In no case shall Hobbico's liability exceed the original cost
of the purchased kit. Further, Hobbico reserves the right to change or modify this warranty without notice.
In that Hobbico has no control over the final assembly or material used for final assembly, no liability shall be assumed nor
accepted for any damage resulting from the use by the user of the final user-assembled product. By the act of using the userassembled product, the user accepts all resulting liability.
If the buyer is not prepared to accept the liability associated with the use of this product, the buyer is advised to return this kit
immediately in new and unused condition to the place of purchase.
HCAZ3040 for HCAA60**, HCAA61**, HCAA62** V1.0 © Copyright 2003
See more of our products at
www.hobbico.com
Wingspan: 60 in [1525mm]
Wing Area: 660 sq in [43 dm2]
Weight: 5.5 lbs [2490 g]
Wing Loading: 19 oz/sq ft [58 g/dm2]
Length: 49 in [1245mm]
Radio: Futaba 4VF
Engine: O.S. 40 LA (.40 cu in [6.5cc] two-stroke)
™
THIS MANUAL IS FOR THE FOLLOWING PRODUCTS:
HCAA60**, HCAA61** and HCAA62**
Page 2
Congratulations and thank you for purchasing the Hobbico
SuperStar MKII .40 Select. You've made the right decision by
purchasing a “real” model airplane with a .40-size engine and a
4-channel radio. Once assembled and set up, there will be no
fiddling with a temperamental engine or constant troubleshooting
to figure out how to get the model to fly. Under the guidance of a
flight instructor, all you'll have to do is concentrate on learning to
fly. And after you've mastered the SuperStar MKII, the engine
and radio may be installed in your next model!
There are two parts to this manual. The first par t, Assembly,
guides you through a few simple steps to put the model
together. The second part, Setup, takes you through initial
adjustments and flight preparation. Do not overlook any of the
important setup procedures and follow the instructions all the
way to the end. Anything skipped in the shop will have to be
done at the field, which will take up some of your flight time.
1.Your SuperStar MKII .40 Select should not be considered a
toy, but rather a sophisticated, working model that functions
very much like a full-size airplane. Because of its performance
capabilities, the SuperStar MKII .40 Select, if not assembled
and operated correctly, could possibly cause injury to yourself
or spectators and damage to property.
2.You must assemble the model according to the instructions.
Do not alter or modify the model, as doing so may result in an
unsafe or unflyable model. In a few cases the instructions may
differ slightly from drawings or sketches. In those instances the
written instructions should be considered as correct.
3.You must check the operation of the model bef ore every flight
to insure that all equipment is operating and that the model has
remained structurally sound. Be sure to check clevises or other
connectors often and replace them if they show any signs of
wear or fatigue.
Before starting to build, inspect the parts in this kit to make sure
they are of acceptable quality.If any parts are not of acceptable
quality, or if you need assistance with assembly, contact:
Hobbico Product Support
Phone: (217) 398-8970, Ext. 5
Fax: (217) 398-7721
E-mail: airsupport@hobbico.com
When ready to fly, you'll need the
equipment to fuel the plane and
start the engine. Perhaps you've
already made arrangements with
the R/C club or your flight instructor
to borrow their equipment, but
eventually you'll want to get your
own.Refer to the side panel on the
kit box cover for information on the
Hobbico ARF/RTF Field Pack
(HCAP5115). This Field Pack
contains the items you will need to go flying except for 10%
Nitromethane Glow Fuel.
The items contained in the field pack above are:
❏ Hobbico Hand-Crank Fuel Pump (HCAP3015)
❏ Hobbico HOT SHOT
™
2 Glow Starter (HCAP2520)
❏ Hobbico Safety Stick Engine Starter (HCAP3335)
❏ Hobbico Recoil Fuel Tubing (HCAP2200)
❏ Great Planes
®
Silicone Field Tubing (GPMQ4131)
❏ Great Planes Fuel Can Fittings Set (GPMP4155)
❏ Top Flite
®
Power Point®10x6 Propeller (TOPQ5085)
❏ Hobbico 4-Way Wrench (HCAP2550)
❏ O.S.
®
Max #A3 Glow Plug (OSMG2690)
❏ Field Tote
You will also need a standard flat screwdriver, a Phillips
screwdriver and a set of common household pliers for
assembly and maintenance.
Field Equipment
We, as the kit manufacturer, provide you with a top quality
kit and instructions, but ultimately the quality and flyability of
your finished model depends on how you prepare it;
therefore, we cannot in any way guarantee the performance
of your completed model and no representations are
expressed or implied as to the performance or safety of y our
completed model.
Protect Your Model,Yourself and Others
Follow these Important Safety Precautions
The best thing you can do to insure success is to find a flight
instructor who will inspect your model for airworthiness and
provide flying lessons. It cannot be stated strongly enough
that, if you do not already know how to fly an R/C airplane,
you will probably not be able to fly this model by yourself. It
may appear to be easy, but ov er-controlling and disorientation
quickly overcome inexperienced fliers, swiftly ending their first
flight.Many have tried to teach themselves, b ut most become
discouraged and end up quitting the hobby, or destroy se v er al
models before they are ab le to solo.If you haven't y et done so,
contact the local hobby shop and ask them to introduce
you to an instructor or an R/C club representative.If there
is no club or experienced R/C pilot nearby, it would be worth
even a long drive to find one–if only f or just a f ew flight lessons
(then you'll have an idea of what to expect).
If there is no hobby shop in your area, contact the AMA
(Academy of Model Aeronautics), the governing body of model
aeronautics. The AMA can direct you to the closest R/C club
whose membership should have qualified flight instructors.
With the added benefit of insurance coverage provided by the
AMA, most clubs require AMA membership to fly at their field.
Academy of Model Aeronautics
5151 East Memorial Drive
Muncie, IN 47302-9252
Tele. (800) 435-9262
Fax (765) 741-0057
Or via the Internet at: http://www.modelaircraft.org
Introduction
2
Page 3
Charge the Batteries
❏ 1. In the fuselage (fuse), connect the plug from the battery
pack, labeled “BATTERY 1”, to the plug from the on/off switch,
labeled “BATTERY 2.”
❏ 2. As shipped, the rechargeable batteries in the SuperStar
MKII are only partially charged. If you wish to begin assembly
right away, go ahead and do so. If the batteries quit while
performing the Setup procedures (beginning on page 4), they will
have to be charged at that time for 16 hours. If you don't plan to
begin assembly now, go ahead and charge the batteries for 10
hours now. To do so, connect the receiver charge cord coming
from the charger to the connector coming from the on/off switch
in the fuse labeled “CHARGE”. Connect the other charge cord
directly to the transmitter.After the “Setup”procedures have been
performed, recharge the batteries for 10 hours.Fully discharged
batteries will require approximately 16 hours to fully charge. In
any case, the batteries mustbe charged before you go flying.For
additional battery charging information refer to the Futaba
instruction manual included with this kit.
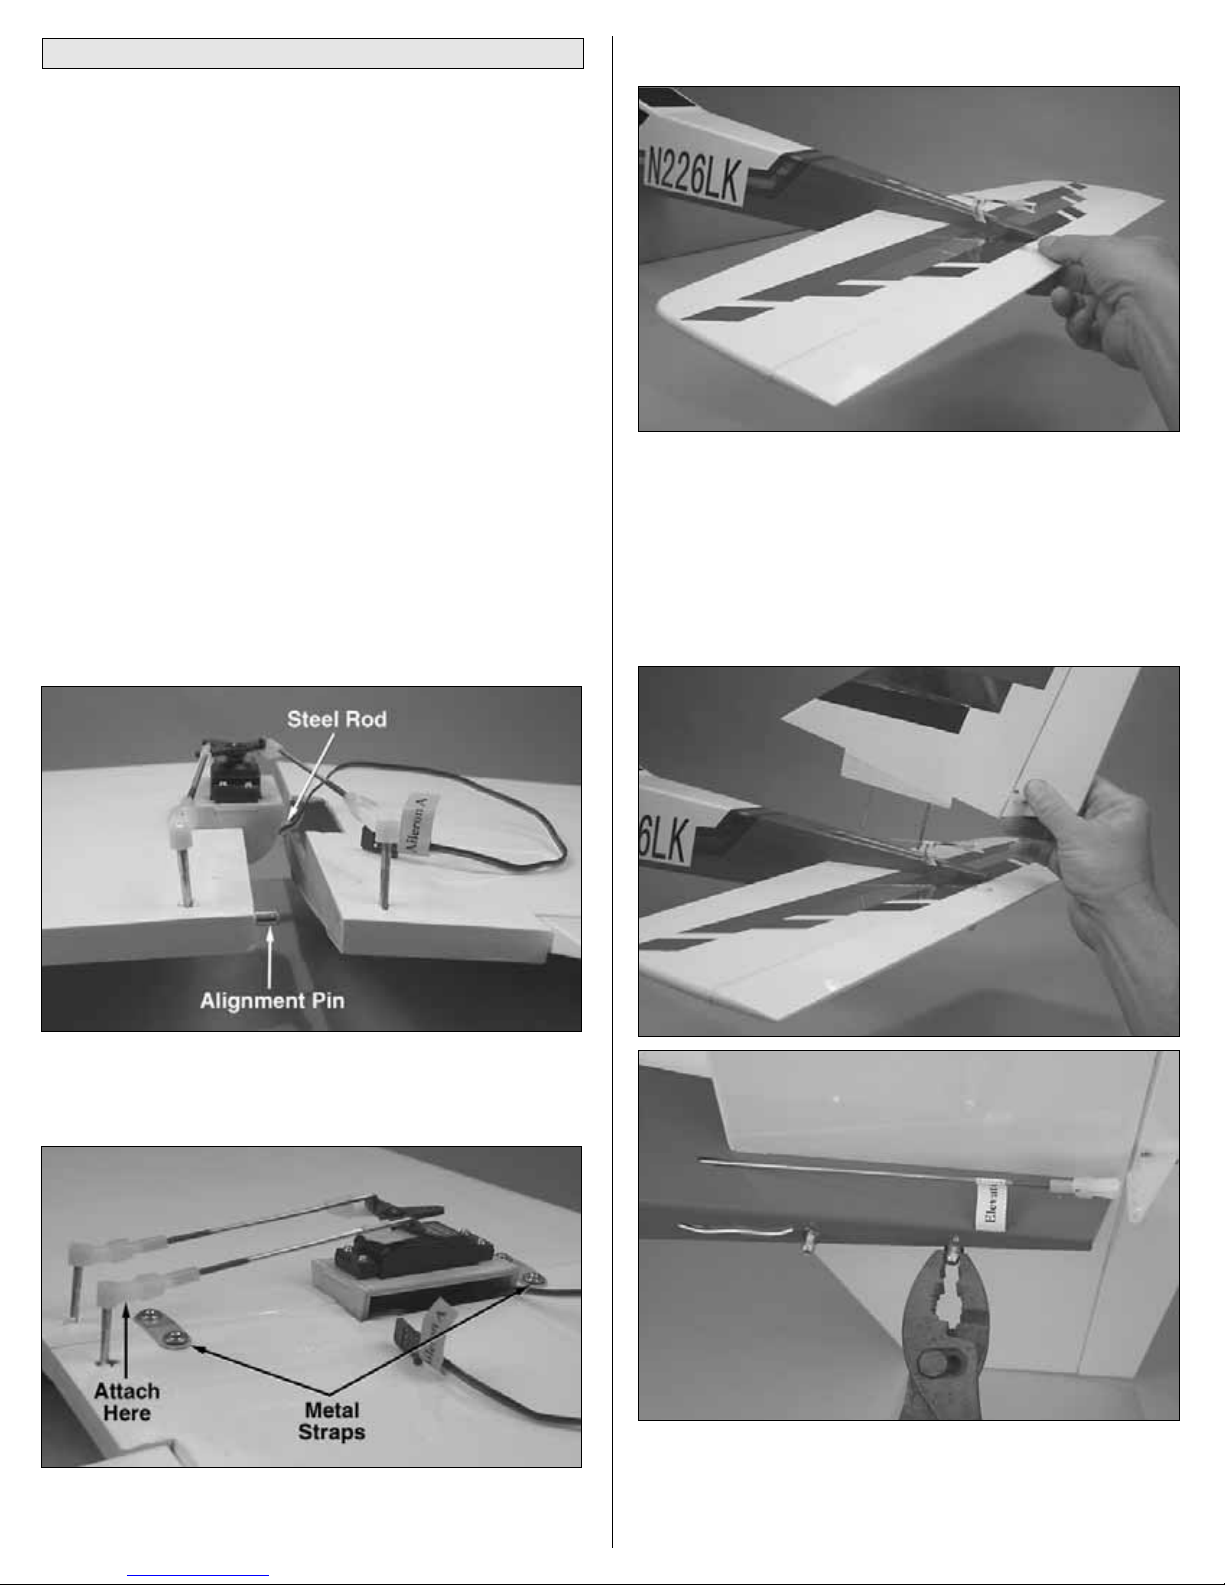
Assemble the Wing
❏ 1.Note the metal alignment pin in right wing half. Insert the
steel rod into the wing. Then, slide both halves together,
aligning the pin in the trailing edge.
❏ 2.Use the two metal straps and four 3 x 6mm screws to hold
the wing halves together .Connect the one unattached pushrod
to the torque rod horn with the clevis and clevis retainer.
Assemble the Fuselage
❏ 1. Inser t the stabilizer (stab) into the fuse.
❏ 2.Insert the fin into the stab, guiding the metal rods through
the holes in the stab and the bottom of the fuse. Secure the fin
and stab with a flat washer and a 3mm locknut. Be certain to
tighten the nuts securely, but do not over tighten so as to
damage the bottom of the fuse.
Assembly
3
Page 4

❏ 3. Connect the elevator pushrod to the fourth hole out from
the base of the control horn on the elevator control horn.
Connect the rudder pushrod to the second hole out from the
base of the rudder control horn.
❏ 4. Inser t the main landing g ear wires into the holes in the
landing gear blocks in the bottom of the fuselage. Secure the
gear with two nylon straps and four 2.5 x 12mm screws.
❏ 5. Insert the wood dowels into the fuselage. Note that one
is longer and is placed toward the front of the model. Secure
the dowels with a plastic dowel cap and a 3 x 4mm screw on
each end.
❏ 6. Fit the spinner back plate, followed by the prop, prop
washer and prop nut, on the engine.Use a 10mm wrench or a
crescent wrench to securely tighten the prop nut.
❏ 7. Fit the spinner cone to the backplate, then use a #1
Phillips screwdriver to tighten the spinner screws.Be careful to
tighten these screws all the way but do not over-tighten as the
plastic material can strip out rather easily.
Check the Control Directions
❏ 1. Connect the aileron servo plug labeled “AILERON A” to
the plug labeled “AILERON B” coming from the receiver inside
the fuselage.T empor arily mount the wing to the fuselage with a
couple of rubber bands.
❏ 2.Turn on the transmitter, followed b y the receiv er.(The goal
is to never have the receiver on by itself.When turning off the
system, turn off the receiver first, then the transmitter.)
Now the plane is assembled, but there are a few things that
must be done before it will be ready to fly .Y ou m ust carefully
perform all of the following Setup procedures.
If you have not yet charged the batteries, you may continue
with the setup procedures.Howev er, if you have not charged
the batteries at this time it is important that you read and
follow the information at the beginning of the “Assembly”
section of this manual.
Setup
4
Page 5

❏ 3. Move the aileron control stick on the transmitter as shown
to be certain the ailerons respond in the correct direction. Check
the remaining controls in the same manner and if any of the
controls move the wrong way, use the servo reversing switches
on the transmitter to make the controls respond correctly. If
necessary, refer to the instructions in the Futaba instruction
manual to identify and operate the reversing switches.
Note that pulling the elevator stick back moves the elevator up
which, in flight, pushes the tail down, thus raising the nose of
the plane to climb.
Also note that pushing the rudder stick to the left moves the
rudder and the nose wheel to the left which, in flight, pushes
the nose to the left, thus turning the airplane to the left and
while on the ground, steering the nose to the left.
Center the Controls
The control surfaces (ailerons, elevator, rudder) are to be
centered when the control sticks and trims are centered.Here's
how to do it:
❏ 1. Do the elevator first. With the transmitter and receiver
on, center the aileron, elevator and rudder trim levers on
the transmitter.
❏ 2. View the elevator and stab from the end.If the elevator is
not centered with the stab (as shown in the photograph abov e),
disconnect the clevis from the elevator horn. Holding the end of
the pushrod with pliers, screw or unscrew the clevis as
necessary until the elevator will be centered when reconnected
to the pushrod.
❏ 3. Center the rudder and both ailerons the same way. When
finished, be certain to reconnect all the clevises with the retainers.
Note:We strive to maintain constant quality control in order
that your new SuperStar MKII Select will be pre-adjusted
properly. Please be sure to check these adjustments on
your airplane as instructed below in order to guarantee that
your first flight will be a pleasant experience.
5
Page 6

❏ 4. Center the nose wheel by adjusting the pushrod in the
screw-lock pushrod connector on the rudder servo.
Adjust the Throttle
The throttle is to be set up so that when the throttle stick is all the
way down and the throttle trim lever is all the way up, the
carburetor barrel will be
nearly
closed and the engine will run at a
low RPM (“idle”).This will allow the engine to keep running when
the throttle stick is pulled all the way do wn (tow ard you) f or landing.
When it istime to shut the engine off after landing, move the trim
lever down to close the carburetor barrel the rest of the way.
❏ 1.With the transmitter and receiver on, move the throttle trim
lever and the throttle stick all the way down.
❏ 2. Observe the opening in the carburetor. If the carburetor is
fully closed, proceed to step 3. If the carburetor is nearly, but
not fully closed, loosen the screw on the screw-lock connector
on the throttle servo arm and move the pushrod forward until
the carburetor is closed. Securely tighten the screw.
❏ 3. Move the throttle trim lever all the way up, but leave the
throttle stick all the way down.
Now
the carburetor should be
partially open about 1/32" to 1/16" [1 to 2mm].
❏ 4. Move the throttle stick all the way up. The carburetor
should be fully open.
❏ 5. If you are not able to achieve these settings, more or less
movement may be required from the throttle pushrod. This is
done by relocating the clevis on the carburetor ar m to the other
hole, or by relocating the pushrod connector on the servo arm to
another hole. From the factory, the connector on the servo arm
should be in the third hole out from the center and the clevis on
the carburetor should be in the hole closest to the screw.
6
Page 7

Set the Control Throws
The control throws are a measure of how far the flight controls
move up and down (or from side to side). If the controls move
too much, the plane will respond too quickly and be difficult to
control. Due to the great effect the control throws have on the
way a model flies, the control throws must be checked.
❏ 1. Start with the elevator. Turn on the transmitter and
receiver. Holding a ruler up to the trailing edge of the elevator,
move the elevator all the way up using the control stick on the
transmitter. Measure the distance the elevator moves up. Also
move the elevator down and measure the distance. As shown
in the chart that follows, the elevator should move 1/2" [13mm]
up and 1/2" [13mm] down. If the elevator moves up or down
more than 1/2" [13mm], the control throw must be decreased
by connecting the pushrod to a hole further out on the elevator
control horn, or by connecting the pushrod to a hole further in
on the elevator servo arm (as shown in the sketch belo w).If the
elevator doesn't move up and down enough, the control throw
may be increased by relocating the pushrods the opposite as
described above.
❏ 2. Measure and if necessary, adjust the aileron and rudder
control throws the same way.
Identify Y our Model
Whether you fly at an R/C club or somewhere on your o wn, y ou
should have your name, telephone number and address in or
on your model so it can be identified and returned in case it
lands somewhere away from the flying site. Fill out the I.D. tag
found in the back of the manual and use spr a y adhesiv e or tape
to stick it in the model.
Balance the Model
This important step may also be referred to as “chec king the C.G.”
(center of gravity).Do not disregard this step. The C.G.can have
an even greater eff ect on how a model flies than the control throws .
If the model has too much weight in the nose (“nose-heavy”), it
could be difficult to takeoff and land and lose some of its selfcorrecting tendencies.If the model has too much weight in the tail
(“tail-heavy”), the controls may be too sensitiv e, making the model
too difficult to control–especially for an inexperienced pilot!
❏ 1.T ak e the wing off the fuselage.Use a felt-tip pen to mark a line
on the bottom of the wing to note the balance point located 3-5/8"
[92mm] back from the leading edge as shown in the photo.
❏ 2.Mount the wing on the fuse with four rubber bands. Lift the
model on both sides of the fuselage with your fingertips on the
line on the bottom of the wing.
❏ 3.With your fingers on the line, if the plane will rest level, the
C.G. is good. Proceed to the checklist in the following section.
If the tail drops, add weight to the nose until the plane balances.
If the nose drops the plane is nose heavy and will require
sticking weight on the tail to balance.
More
Movement
Less
Movement
Moving the pushrod outward on the servo
arm results in more pushrod movement.
More
Throw
More
Throw
Moving the pushrod inward on the
control horn results in more throw.
More
Throw
Control Throws
Elevator 1/2" [13mm] up 1/2" [13mm] down
Ailerons 5/16" [8mm] up 5/16" [8mm] down
Rudder 1" [25mm] right 1" [25mm] left
7
Elevator
1/2" [13mm]
1/2" [13mm]
Page 8

If additional weight is required to balance the plane, purchase
Great Planes Self Adhesive Lead Weights (GPMQ4485). If
adding tail weight, stick the weight to the side of the fuse under
the stab.If adding nose weight, stick the weight to the inside of
the fuselage side next to the engine.
❏ 4. If you found it necessary to add weight, recheck the C.G.
after adding the weight.
Ten-Point Checklist
Now it's time to do a final check before taking the model to the
field. These checks are best done in the peace and comfort of
your own shop, so take the time now to make certain your
model is ready.
❏ 1. Use a 1/16" hex wrench to check to see that the screws
on all the wheel collars that hold the wheels on are secure.
❏ 2. Be certain the silicone retainers on all the nylon clevises
are in position.
❏ 3. Make cer tain the elevator, rudder and ailerons respond in
the correct directions.
❏ 4. Make certain the wing is securely joined with the metal
straps and the metal rod.
❏ 5. Check to see that the nuts that hold the fin and stab in
position are present and secure.
❏ 6. Inspect the r ubber bands that hold the wing on and make
sure they are in good condition.
❏ 7.Make certain the propeller and propeller spinner are secure.
❏ 8. Make certain you have balanced the model according to
the instructions.
❏ 9. Check to see that the screws that hold the servo arms to
the servos are present and secure.
❏ 10. Make certain you have filled out the I.D. card and placed
it inside the model.
Charge the Batteries
If you haven't already done so, refer to the instructions in the
Assembly section on page 3 and charge the batteries overnight
the night before you go flying.
Gather Y our T ools
In addition to the engine starting equipment mentioned near the
beginning of the manual, you should start a collection of tools
that may be required for adjustments and maintenance at the
flying field. Following is a list of the most recommended items.
Tools:
• #1 Phillips screwdriver • Pliers
• #2 Phillips screwdriver • Hobby knife
• 5/16" (or 8mm) socket wrench (for glow plug)
• 1/16" hex wrench (for wheel collars)
• 10mm wrench or crescent wrench (for propeller nut)
Spare parts:
• 10 x 6 propellers • Glow plug
• #64 rubber bands (stored in container with talcum
powder or kitty litter)
Flight preparation is to be done at the flying field.
BE CERTAIN YOUR FLIGHT INSTRUCTOR PERFORMS
THESE FOLLOWING CHECKS WITH YOU.
Check the Controls
❏ 1.Get the frequency clip from the frequency control board at
your flying site.
❏ 2.Mount the wing to the fuselage with the #64 rubber bands
supplied with this kit. Twelve rubber bands are suggested. Be
certain the final two are “crisscrossed,” thus ensuring that the
others remain secure.
❏ 3. Turn on the transmitter and receiver. One at a time,
operate each control on the airplane using the sticks on the
transmitter. Make certain each control is responding correctly.
This must be done before every flight.There are several types
of malfunctions that can be discovered by performing this
elementary task, thus saving your model!
IMPORTANT!!! Your radio control system tr ansmits a signal on
a certain frequency.Be certain you know what the frequency is.
This is expressed as a two-digit number (42, 56, etc.) and can
be found on the container the transmitter came in and is also
located on the transmitter. There are several different
frequencies, but there is still a chance that someone else at the
flying field may be on the same frequency as you.If you turn on
your transmitter while that person is flying, a crash will result.
NEVER turn on your transmitter until you ha ve permission from
your instructor and until you have possession of the frequency
clip used for frequency control at the flying site.
IMPORTANT!!!
Flying a model with too few rubber bands can be dangerous.
If the wing momentarily lifts from the fuselage and acts as
though a large amount of “up” elevator has suddenly been
applied because there are not enough rubber bands or they
are too weak, internal structural damage may result. Even
worse, the wing could actually detach from the fuselage
resulting in a crash.If the model exhibits any tendencies that
indicate there are not enough rubber bands, immediately
reduce power, land and closely inspect the model for
damage. If no damage is found, add more rubber bands.
Flight Preparation
8
Page 9

Range Check the Radio
A range check must be performed before the first flight of a
new model.It is not necessary to do a range check before e v ery
flight (but is not a bad idea to perform a range check before the
first flight of each day).A range check is the final opportunity to
reveal any radio malfunctions and to be certain the system has
adequate operational range.
❏ 1.Turn on the transmitter and receiver.Leave the transmitter
antenna all the way down. Walk away from the model while
simultaneously operating the controls.Have an assistant stand
by the model and tell you what the controls are doing to confirm
that they operate correctly. You should be able to walk
approximately 100 [30m] feet from the model and still have
control without any “glitching” or inadvertent ser vo operation.
❏ 2. If everything operates correctly, return to the model and
start the engine. Perform the range check with your assistant
holding the plane with the engine running at various speeds. If
the servos chatter or move inadvertently, there may be a
problem. Do not fly the plane! With the assistance of your
instructor, look for loose servo connections or binding pushrods .
Also be certain you are the only one on your frequency and that
the battery has been fully charged.
The following flying instructions are in no way an endorsement
for learning to fly on your own, but are printed so you can know
what to expect and what to concentrate on while learning under
the tutelage of your instructor.Fur ther, these flight instructions
may be referenced once you begin flying on your own.
Taxiing
Before the model is ready for takeoff, it must first be set up to
roll straight down the runway.With the engine running at a low
idle, place the plane on the runway and, if your flying field
permits, stand behind the model. Advance the throttle just
enough to allow the model to roll. If the model does not roll
straight down the runway, shut the engine off and adjust the
nose gear pushrod as necessary. Do not use the rudder trim to
correct the nose wheel because this will also affect the rudder.
Note: Crosswinds may affect the direction the model rolls, so
this test should be done in calm conditions, or with the model
facing directly into the wind.
Takeoff
If possible, takeoff directly into the wind. If you are
experienced, taking off in a crosswind is permissible (and
sometimes necessary–depending upon the prevailing wind
conditions and runway heading). Taking off into the wind will
help the model roll on a straight path and also reduces ground
speed for takeoff. Taxi the model onto the runway or have an
assistant carry it out and set it down pointing into the wind
down the runway. When ready, gradually advance the throttle
while simultaneously using the left stick (rudder/nose wheel) to
steer the model. Gain as much speed as the runway and flying
site will practically allow before gently applying up elevator,
lifting the model into the air.A good method to remember is to
apply pressure to the sticks rather than pulling or pushing on
them.Be ready to make immediate corrections with the ailerons
to keep the wings level and be smooth on the elevator stick,
allowing the model to establish a gentle climb to a safe altitude
before making the first turn (away from yourself). Do not “yank”
back the elevator stick forcing the plane into too steep of a
climb which could cause the model to quit flying and stall.
Flight
Once airborne, maintain a steady climb and make the initial turn
away from the runway. When at a comfortable, safe altitude
throttle back to slow the model, thus giving you time to think and
react. The SuperStar MKII .40 Select should fly well at half or
slightly less than half-throttle. Adjust the trims so the plane flies
straight and level.After flying around for a while and while still at
a safe altitude with plenty of fuel, practice slow flight and e xecute
practice landing approaches by reducing the throttle further to
see how the model handles when coming in to land. Add power
to see how the model climbs as well.Continue to fly around while
learning how the model responds. Mind your fuel level, but use
this first flight to become familiar with the model before landing.
Landing
When ready to land, pull back the throttle stick fully while flying
downwind just before making the 180-degree turn toward the
runway. Allow the nose of the model to pitch downward to
gradually bleed off altitude. Continue to lose altitude, but
maintain airspeed by keeping the nose down while turning.
Apply up elevator to level the plane when it reaches the end of
the runway and is about five to ten feet off the ground. If the
model is too far away, carefully add a small amount of power to
fly the model closer. If going too fast, smoothly advance the
throttle and allow the model to gain airspeed, then apply
elevator to climb-out and go around to make another attempt.
When finally ready to touch down, continue to apply up elev ator,
but not so much that the airplane will climb.Continue to apply up
elevator while the plane descends until it gently touches down.
Remember, it is assumed that your instructor
is operating the model for you.
IMPORTANT: If you do insist on flying on your own, you
must be aware of your proximity to R/C club sites. If there is
an R/C site within six miles of where you are flying and if you
are operating your model on the same frequency and at the
same time as somebody else, there is a strong possibility
that one or both models will crash due to radio interference.
There is great potential for an out-of-control model to cause
property damage and/or severe personal injury. We
strongly urge you to fly at a R/C club site where frequency
control is in effect so you can be assured y ou will be the only
one flying on your channel.
Flying
9
Page 10

10
After you have landed and shut the engine off , adjust the pushrods
on the ailerons, elevator and rudder as necessary so the trim
levers on the transmitter may be returned to center (this will not be
required on any of the controls that did not need trim adjustments).
Maintenance Tips
❏ 1. After flying for the day, don't forget to use your fuel pump
to drain excess fuel from the tank.
❏ 2. Do not reuse torn or oily rubber bands. Purchase spare
rubber bands (HCAQ2020, 1/4 lb.box). After flying, oily r ubber
bands should be stored in a container with talcum powder or
kitty litter.This will absorb oil and keep the rubber bands fresh
for the next flying session.
❏ 3. After each day's flying, use spray cleaner and paper
towels to thoroughly clean the model.
❏ 4.The SuperStar MKII Select is factory-covered with Top Flite
MonoKote film.Should repairs ever be required, MonoKote can
be patched with additional MonoKote purchased separately.
MonoKote is packaged in six-foot rolls, but some hobby shops
also sell it by the foot. If only a small piece of MonoKote is
needed for a minor patch, perhaps a fellow modeler would give
you some. MonoKote is applied with a model airplane covering
iron, but in an emergency a regular iron could be used. A roll of
MonoKote includes full instructions for application.
Ordering Replacement Parts
To order replacement parts for the SuperStar MKII .40 Select,
use the order numbers in the Replacement Parts List that
follows. Replacement par ts are available only as listed. Not all
parts are available separately (an aileron cannot be purchased
separately, but is only available with the wing kit). Replacement
parts are not available from Product Support, but can be
purchased from hobby shops or mail order/Internet order firms.
Hardware items (screws, nuts, bolts) are also available from
these outlets. If you need assistance locating a dealer to
purchase parts, visit www.greatplanes.com and click on
“Where to Buy. ”If this kit is missing parts, contact Great Planes
Product Support.
Replacement Parts List
Order Number Description How to purchase
Missing pieces...................................Contact Product Support
Instruction manual.............................Contact Product Support
Plans.....................................................................Not available
For the following items, contact your hobby supplier:
HCAA60** (Blue, Red,Yellow)
HCAA3726 .......Wing Set
HCAA3727 .......Fuse Set
HCAA3728 .......Tail Set
HCAA3708 .......Landing Gear Set
HCAA61** (Red, Blue, Chrome)
HCAA3730 .......Wing Set
HCAA3731 .......Fuse Set
HCAA3732 .......Tail Set
HCAA3708 .......Landing Gear Set
HCAA62** (Yellow, Red, Orange)
HCAA3733 .......Wing Set
HCAA3734 .......Fuse Set
HCAA3735 .......Tail Set
HCAA3708 .......Landing Gear Set
Page 11

11
Hobbico®Avistar™40 MkII AWARF®(HCAA2016)
The Avistar 40 MkII gives pilots who have already mastered trainers an easy way to move up. Its semi-symmetrical airfoil offers the agility needed
to experiment with basic aerobatics, while its high-wing design provides the in-flight stability and predictable handling of a trainer.
Almost all of the assembly work is done for you.Major sections are professionally factory-built of wood f or strength and easy repairability, then skillfully
covered in Top Flite
®
MonoKote®- the world's #1 film covering! You can be flying just 15-20 hours after you open the box. An extensive package of
Great Planes-brand hardware - including a fuel tank, engine mount, spinner, wheels and pushrods - is not only included but largely installed for your
convenience.Photo-illustrated instr uctions pave the way for rapid progress through the last few assembly steps to that fantastic first flight!
If you don’t have a lot of time to spare, Hobbico also offers the Avistar 40 Select. You can complete ALL assembly within 20 minutes, using a
screwdriver and pliers.Hobbico has already installed a 4-channel Futaba®4VF radio system and mounted a powerful O.S.®.40 LA engine in the
nose, with the fuel tank and lines in place and connected. And that's not all: the preassembled, all-wood fuselage, wing halves and tail fins come
skillfully precovered in MonoKote®film.
(HCAA16**)
Top Flite®Power Point®Wood Propellers (TOPQ5000-5200)
• Lighter, quieter, and more efficient than ever!
• More thrust for greater power.
• Swept tip design reduces noise.
The strict quality control used when manufacturing Power Point props ensures symmetric pitch: at
any given point on one blade, the pitch will exactly match the pitch at the same point on the opposite
blade.This accuracy reduces prop vibration and boosts thrust at any rpm.Combined with a new airfoil
design and the "Pow er Point" tip, these props are a top choice for modelers of ev ery skill lev el.Lighter
than maple props of the same size, these fuelproofed beechwood props reduce rotational mass,
letting your engine produce more power with less work.Wood construction also makes Power Point
props stiffer than nylon, so they perform predictably throughout the full rpm range.
Hobbico®TorqMaster™90 Starter
(HCAP3200)
With an easy press, you unleash enough
torque to start engines up to .90 cu. in.
Features aluminum cone, silicone insert,
5', self-coiling cord w/alligator clips and a
2-year warranty.
Hobbico®Ultra-Tote™ARH
(Almost Ready to Haul)
Field Box (HCAP5025)
If your plane comes almost ready-to-fly, why
shouldn't your field box come ready to use, too?
Prebuilt and prepainted, the sturdy plywood
Ultra-Tote ARH can be put together quickly
using just a screwdriver. With its large drawer,
cradle, 12V battery compartment and onegallon fuel jug shelf, It can hold all the gear you
need for a full day of flying.Painted yellow; field
equipment and decal shown not included.
Wingspan: 59 in (1500mm)
Wing Area: 602 sq in (39dm
2
)
Flying Weight:5.0 lb (2270g)
Wing Loading: 19 oz/sq ft (58g/dm2)
Length: 48 in (1220mm)
Requires: 2-stroke .40 cu in (6.5cc) engine
& 4-Channel radio w/4 servos
Other Items Available from Hobbico
Page 12

BUILDING NOTES
Kit Purchased Date: _______________________
Where Purchased: _________________________
Date Construction Started: __________________
Date Construction Finished: _________________
Finished Weight: __________________________
Date of First Flight: ________________________
FLIGHT LOG
 Loading...