

Page 1
Wingspan:
Length:
Weight:
Wing Area:
23 in (584 mm)
17 in (4 32 mm)
2.8 –3.0 oz (79 –85 g)
2
66.5 in
(4.3 dm2)
®
ASSEMBLE ONLY WITH ADULT SUPERVISION This product is suitable only for people of 14 years and older.
Please read through this instruction booklet to THOROUGHLY familiarize yourself with the assembly and ight characteristics of this airplane prior
to assembly. Please inspect all parts carefully before starting assembly! If any parts are missing, broken or defective, or if you have any questions
about the assembly or ying of this airplane, please call us at (217) 398-8970 and we’ll be glad to help.
WARRANTY Flyzone
warranty does not cover any component parts damaged by use or modication. In no case shall Flyzone’s liability exceed the original
cost of the purchased kit. Further, Hobbico, Inc. reserves the right to change or modify this warranty without notice. In that Hobbico, Inc.
has no control over the nal assembly or material used for nal assembly, no liability shall be assumed nor accepted for any damage
resulting from the use by the user of the nal user-assembled product. By the act of using the user-assembled product, the user accepts
all resulting liability. If the buyer is not prepared to accept the liability associated with the use of this product, the buyer is advised
to return this kit immediately in new and unused condition to the place of purchase. To make a warranty claim contact
www.yzone.com/support
Boeing Company. The appearance of U.S. Department of Defense (DoD) visual information does not imply or constitute DoD endorsement.
®
guarantees this kit to be free from defects in both material and workmanship at the date of purchase. This
Douglas DC-3™ airliner and Douglas C-47 Skytrain™ – Produced under license. Boeing, Douglas DC-3,
Douglas C-47 Skytrain, the distinctive Boeing logos, product markings and trade dress are trademarks of The
WARNING!
all safety precautions as outlined in this instruction manual.
© 2018 Flyzone
This product includes a lithium polymer (LiPo) battery. Improper handling may result in FIRE! You are responsible for following
®
A Hobbico company. DC-3 FL ZA 2420 C-47 FLZ A2430
Page 2
Although the DC-3/C-47 is designed to be easy to fly, it is
not for the first-time pilot. We strongly recommend getting
assistance from an experienced pilot for your first flights. If
you’re not a member of an R/C club, your local hobby shop
has information about clubs in your area whose membership
includes experienced pilots. You can also contact the National
Academy of Model Aeronautics (AMA) which has over 2,500
chartered clubs across the country. Instructor training
programs and insured newcomer training are available
through any of these clubs. www.modelaircraft.org
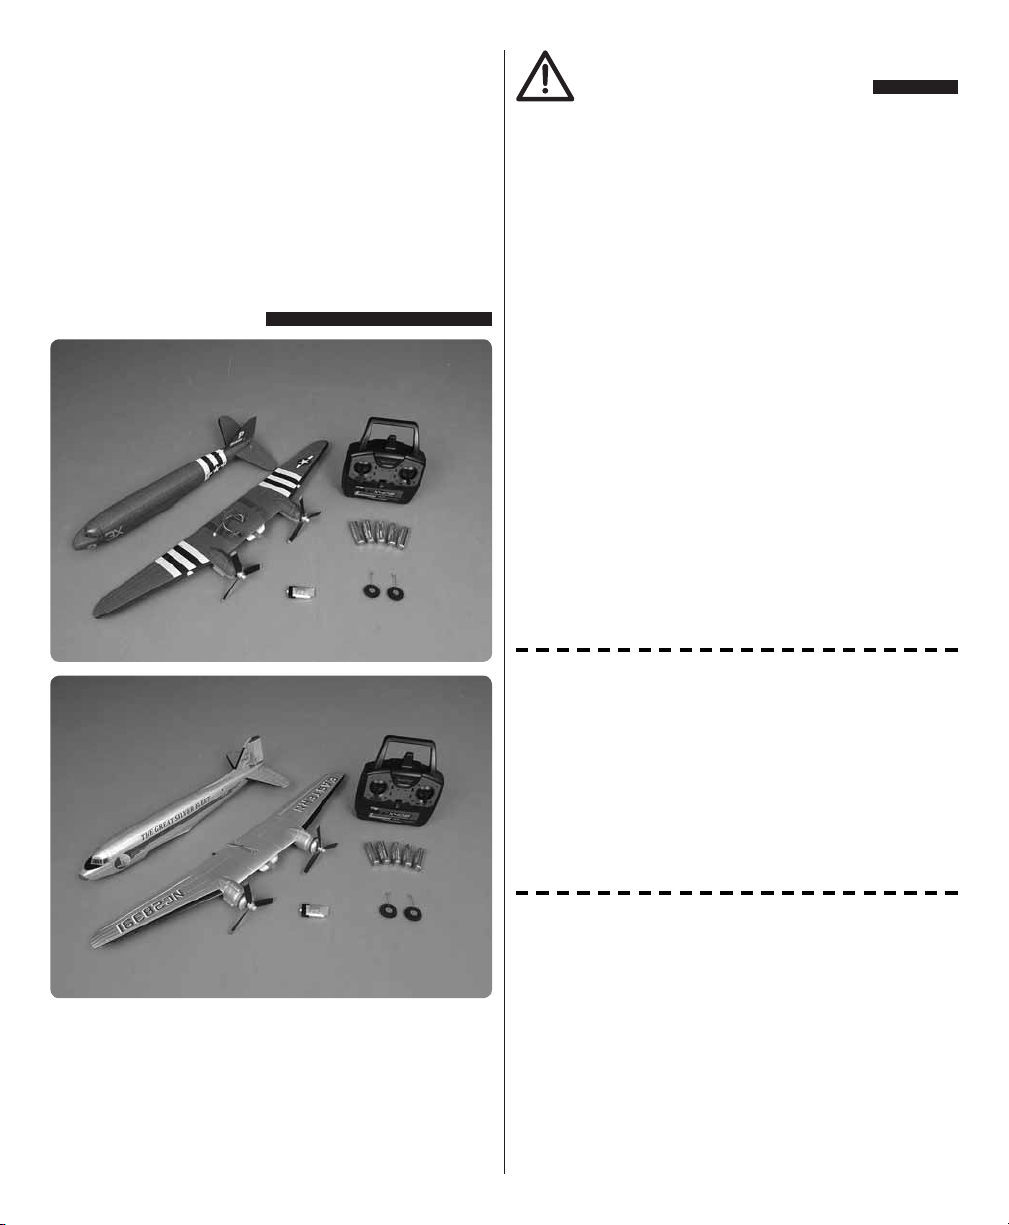
INCLUDED ITEMS
SAFETY PRECAUTIONS
Your DC-3/C-47 should not be considered a toy, but rather a
sophisticated, working model that functions very much like
a full-size airplane. Because of its performance capabilities,
the DC-3/C-47, if not assembled and operated correctly,
could possibly cause injury to yourself or spectators and
damage to property.
1. Operate the plane according to the instructions. DO NOT
alter or modify the model. If you make any modifications,
you void the warranty.
2. Tes t the operation of the model before each flight to
ensure that all equipment is operating properly and that
the model remains structurally sound.
3. Fly only indoors or outdoors on very calm days (with wind
speeds less than 5mph) and in large open areas free of
trees, people, buildings, or any other obstacles.
WARNING! A spinning propeller has the potential to cause
serious and permanent injury to yourself and others.
WARNING! Keep hands clear of the propeller when handling
the aircraft. Make sure the aircraft is held securely until the
battery has been disconnected.
Check the parts against those shown. If any parts are
damaged or missing, please contact www.flyzone.com/
support
ALWAYS securely restrain the plane when the motor batteries
are connected.
ALWAYS remove the motor batteries from the plane
when charging.
ALWAYS switch on the transmitter rst, then plug the LiPo
batteries into the plane.
ALWAYS unplug the motor batteries rst before switching
off the transmitter.
NEVER use rechargeable (NiCd) batteries in the Tactic TTX403.
NEVER mix old and new batteries in the Tactic TTX403.
NEVER mix alkaline and standard (carbon-zinc) batteries.
NEVER touch the motor during or right after operation. The
motor gets HOT!
NEVER switch off the transmitter with the motor batteries
plugged in.
NEVER reach through the arc of the propeller when plugging
the battery into the ESC.
2
Page 3

LITHIUM BATTERY WARNING!
This product uses a lithium polymer (LiPo)
battery. Improper handling could result in FIRE!
A lithium battery re has the potential to ignite
surrounding areas and may cause property damage or
cause personal injury.
For safe LiPo handling, follow all of these guidelines:
MOST IMPORTANT! Never leave the battery or charger
unattended during charging or discharging.
WARNING: Read the entire instruction manual before
charging your motor battery. Failure to follow the instructions
could cause permanent damage to the battery and its
surroundings and cause bodily harm!
ALWAYS follow the charging ins tructions in this manual when
charging your LiPo batteries. LiPo batteries can cause serious
damage or re if misused.
ALWAYS use a LiPo-approved charger if not using the built-in
charger in the Tactic TTX403 transmitter.
ALWAYS set the charger’s output volts to match the battery
volts if not using the built-in charger in the Tactic TTX403
transmitter.
ALWAYS charge a LiPo battery in a reproof location away
from combustible materials.
A LWAYS store and transport LiPo batteries in a reproof
container away from combustible materials.
ALWAYS KEEP OUT OF THE REACH OF CHILDREN.
ALWAYS keep LiPo batteries out of the reach of animals. A
punctured battery may cause a re.
ALWAYS disconnect the battery after the charge is complete.
ALWAYS keep a supply of sand accessible when charging
a LiPo battery. Dumping sand on the battery will assist in
extinguishing a LiPo chemical re.
ALWAYS remove the battery from the plane after a crash. Set
it aside in a safe location for at least 20 minutes. If the battery
is damaged in the crash, it could catch re. If the battery
starts to swell, quickly move the battery to a safe location,
preferably outside away from combustible material. Place it
in a bucket, covering the battery with sand. Never use water
to try and put out a LiPo re.
NEVER charge or use a battery that is deformed, bent, crushed,
swollen, or has any type of visible damage.
NEVER use a NiCd/NiMH charger to charge a LiPo battery.
NEVER charge in excess of 4.20V per cell.
NEVER charge at currents greater than 1C unless the bat tery
is rated for a higher charge rate.
NEVER trickle-charge a LiPo battery.
NEVER allow the battery temperature to exceed 140 degrees
F (60 degrees C).
NEVER disassemble or modify the pack wiring in any way or
puncture the cells, as this may result in a re.
NEVER discharge below 2.7V per cell.
NEVER charge the battery or set the charger on combustible
materials.
NEVER charge the battery inside a vehicle or in a location
that could be damaged in the event of a LiPo re.
NEVER put a LiPo battery in the pocket of any clothing.
NEVER charge the batteries in the plane. Disconnect the
batteries and remove them from the plane immediately after
landing.
NEVER allow the battery to short circuit by touching exposed
wires together. This may cause a re.
NEVER operate or store batteries below 40˚F or above 110˚F
(4-43˚C)
LITHIUM POLYMER BATTERY RECYCLING
ATTENTION: The product you have purchased is powered
by a rechargeable battery. At the end of the battery’s useful
life, under various state and local laws, it may be illegal to
dispose of this battery into the municipal waste system.
Check with your local solid waste officials for details in your
area for recycling options or proper disposal.
WARNING: This product contains a chemical known to
the State of California to cause cancer.
3
Page 4
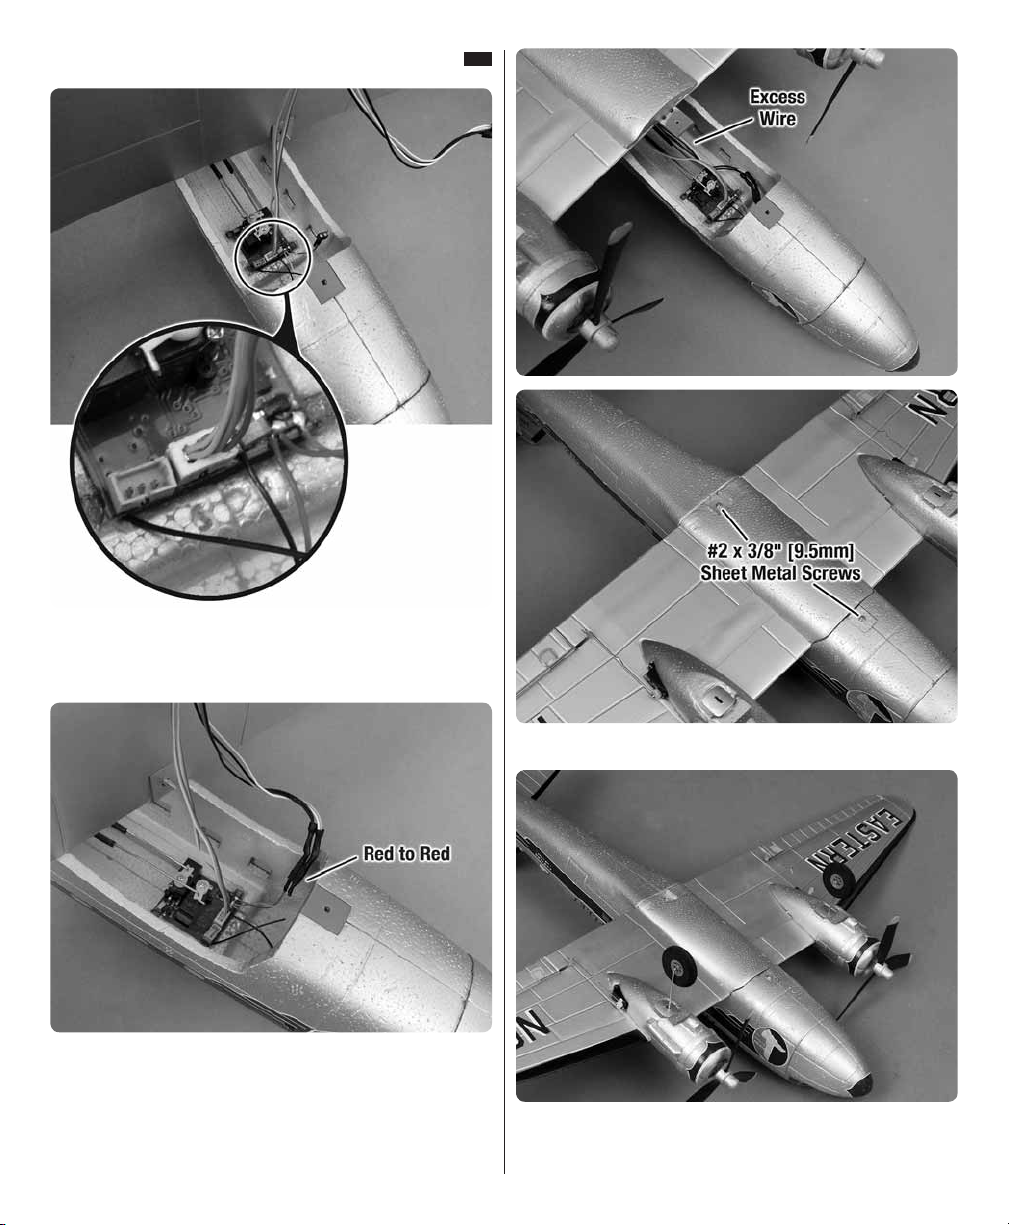
ASSEMBLE THE MICRO DC-3/C-47
1. Plug the white micro connector from the aileron servos
on the wing into the receiver board. Be careful to plug the
connector in correctly.
2. Connect the motor lead.
3. Attach the wing.
4. Insert the main landing gear. NOTE: The strut goes to the
front of the slot.
4
Page 5

PREPARE THE TTX403 TRANSMITTER
For more information on the Tactic Radio System included
with the Micro DC-3/C-47 RTF visit www.tacticrc.com
Leave the
TTX403
switched off.
CHARGE THE 3.7V 250mAh LiPo BATTERY
Do not use the charge feature while flying the Micro
DC-3/C-47!
Leave the TTX403
switched off.
Push down and
slide to open the
charger cover.
Push and slide
to remove the
battery door.
Install (5) “AA” batteries.
Flight Battery
Insert battery to
charge. Make sure
the battery plug is
oriented properly
before inserting.
Illuminated green
light indicates
charging. (It may be
necessary to cycle
the on/off switch
to begin charging.)
When the LED goes
out, charging is
complete.
5
Page 6

TTX403 FUNCTIONS
Throttle/Rudder
Leave the left stick
(throttle control) in
the minimum position
during linking.
Rudder Trim
Throttle Trim
Power Switch
Illuminated red light
indicates the TTX403
is powered and transmitting.
Aileron/Elevator Control
Elevator Trim
Aileron Trim
TRIM ADJUSTMENT
Full extent .................. Centered ................. Full extent
Constant «beep» .........Single «beep» .........Constant «beep»
LINKING TO MICRO TX-R AIRCRAFT
Micro RTF aircraft includes a receiver that auto-links to a
Tactic transmitter. Once the receiver is powered on, it will link
automatically to a present and compatible Tactic SLT 2.4GHz
signal. Please follow these steps to safely link your transmitter
and aircraft the rst time. Be careful of the propeller at all
times. A spinning prop is dangerous and may cause personal
and property damage.
1. Always power on the transmitter rst.
2. Make sure the throttle stick is down and the
transmitter is within 2' [600 mm] of the plane.
3. Plug in the battery to the aircraft.
4. Wait a few seconds, then move the right stick. The
elevator and aileron should move. If they do not, go
back to step one and try again.
HELPFUL TIP: If you are going to y with a group, pre-link
your transmitter and receiver prior to arriving at the ying
location.This must be done in an environment free of Tactic
SLT 2.4 GHz signals. Pre-linking ensures that familiarity is
established between your transmitter and receiver. Familiarity
guarantees that as long as your transmitter is powered rst,
your receiver will link to your transmitter regardless of the
other compatible signals in the environment.
INSTALLATION AND REMOVAL OF
THE LIPO BATTERY
Keep hands clear of the propellers during battery
installation and removal.
1. Power on the transmitter and move the throttle stick to 0%.
2. Remove the nose cone. Use two fingers to secure the
connector during battery installation and removal.
6
Page 7

3. Press the battery into place to secure. 4. Replace the nose cone.
Disconnect and remove the battery after each flight by holding
the battery lead with two fingers and removing the battery
from the lead with the other hand. Do not yank or jerk the
battery from the aircraft. This could dislodge the RX board
from the Micro DC-3/C-47.
CHECK THE CONTROL SURFACE DIRECTION
Right stick moves left, left aileron
moves up and right aileron moves
down, causing the aircraft to
bank to the left.
Left stick moves left,
rudder moves left, causing
the aircraft to yaw left.
Tailwheel points right.
Right stick moves down, elevator moves up
causing the aircraft’s nose to pitch up.
7
Page 8

CENTER THE CONTROL SURFACES
Aileron TrimAileron Trim
Aileron
Aligned with
Wing
Aileron
Aligned with
Wing
Elevator Trim
Elevator Trim
Rudder Trim
Rudder Trim
1. Before flight, center the aileron control surface with the
aileron trim adjustment.
4. To alter the center position of the aileron and elevator
control throws, follow these steps. Center the trim on the
transmitter, then unplug the battery from the model before
attempting to mechanically adjust the linkages.
Alter the Control Surface Center Position
REVERSE THE CONTROL THROWS
If you ever need to reverse the control throws, follow this
simple procedure.
Press and hold one of the
corresponding control
surface trim buttons and
cycle the power off and
then on to reverse any
control surface direction.
Hear a «Beep Beep Beep»
sound.
CAUTION: Unplug the battery in the model before
attempting to reverse the control throws.
2. Before flight, center the elevator control surface with the
elevator trim adjustment.
3. Before flight, center the rudder control surface with the
rudder trim adjustment.
ARM THE MOTORS
Keep hands and onlookers clear of propeller during
arming and operation.
1. Switch on the transmitter and position the throttle control
stick in the low or minimum position. Plug the battery into plane.
8
Page 9

CHOOSE A FLYING FIELD
The flying field you choose is very important and should be
a large, open grass field. There should not be any vehicles,
buildings, power lines, trees, large rocks or anything else that
your model can crash into.
2. While holding the model by the tail, raise the throttle control
stick to the maximum or high position. Hear a «Beep» sound.
3. Return the throttle control stick to the minimum position.
Hear «Beep Beep» sound. The motors are now armed and
the propellers will operate if the throttle stick is raised.
100 f t
100 f t
Control may be lost if the airplane is more than 500
feet [150 meters] from the transmitter.
100 f t
100 f t
CHOOSE A GOOD DAY TO FLY
Very Light
Wind
Calm weather with either no wind or wind speed of 3–5 mph
[5–8 kph] is suitable for flying.
Strong
Wind
RANGE CHECK
With the transmitter powered and the battery plugged into
the Micro DC-3/C-47, walk 50’ [15m] from the aircraft and
check the control functions for proper and smooth operation.
50' [15m]
9
Page 10

FLYING THE MICRO DC-3/C-47
If at anytime during operation, the controls or propellers
become jammed or unresponsive, immediately reduce the
power to the propellers and land. Fix the problem before
attempting to fly.
stick back slightly to raise the nose of the model and slow
the landing speed to “flair” for landing. Unplug the battery
from the model and switch off the transmitter. Allow the
motors to cool between flights.
PROPELLER REPLACEMENT
Take off (or hand launch) heading directly into the wind.
NOTE: If you hand launch, you can remove the main landing
gear by gently pulling the landing gear wires straight out
of the mounts.When flying without landing gear, land on
grass only to minimize damage to the motor nacelles and
fuselage. Cut power to the motors completely just before
the propellers touch the ground to prevent any damage.
WARNING: The tail wheel cannot be removed.
Hand launch with throttle set at ¾ to full power, wings level
and with a slight toss (it is not necessary to aggressively
throw this model to hand launch it).
Once in the air, gain altitude to allow yourself sufficient
reaction time to make a correction during flight. Once you’re
comfortable, adjust the aileron and elevator trims one click
at a time so that the Micro DC-3/C-47 flies straight and level
with the control sticks centered.
Concentrate on using small aileron control inputs so the
model turns without banking the wings excessively. A slight
amount of up elevator may be necessary to maintain altitude
going into a turn and the elevator will need to be returned to
neutral when coming out of a turn to avoid gaining altitude.
It’s recommended that you attempt to land before the motors
lose power and don’t have enough voltage to maintain
altitude or the low-voltage cut-off stops the motors. Always
land directly into the wind if possible. Gradually reduce
power when you are close to the landing spot. When close
to the ground and about to touch down, pull the elevator
To replace the propellers, first make sure the battery is
unplugged. Remove the spinner by gently wiggling it and
breaking the glue joint that holds the spinner in place on
the propeller.
Gently and carefully hold the motor shaft with needle nose
pliers or a hemostat to keep it from rotating and gently
unscrew the propellers from the shafts. As shown in the
picture, the left propeller unscrews clockwise and the right
propeller unscrews counterclockwise. BE SURE you replace
the propeller with the same rotating direction propeller!
The spinner can be glued back on the propeller with a
small amount of aliphatic (white) glue. Allow the glue to dry
sufficiently before flying the model. Gently pull on the spinner
to make sure it is really glued to the propeller.
10
Page 11

REPAIRS
Repairs can be made to the Micro DC-3/C-47 by using the
following items:
● Thick Foam Safe CA (for parts adhesion),
GPMR6072
● Foam safe CA accelerator, GPMR6035
● Formula 560 canopy glue, PAAR3300
● Two sets of needle nose pliers or hemostats,
HCAR0625
● Hobby Knife (#11 blade), RMXR6900
● Clear tape
REPLACEMENT PARTS
To order replacement parts for the Micro DC-3/C-47, use
the order numbers in the list below. Replacement parts
are available only as listed. Replacement parts are not
available from Product Support, but can be purchased from
hobby shops or mail order/Internet order firms. If you need
assistance locating a dealer to purchase parts from, contact:
www.flyzone.com/support
Stock No. Description
TACL1424 Tactic TR1424 4-Channel SLT
Rx/ESC/Servo Combo
TACJ2403 Tactic TTX403 4-Channel SLT Mini Transmitter
ONXP1640
FLZA6244 1S LiPo Charger
FLZA6572 Flyzone Propeller Set Left/Right
FLZA6573 Flyzone Spinner Set Left/Right
FLZA6575 Motor Set (L&R)
FLZA6576 Aileron Servo Set
FLZA6578 Gearbox Parts Set (1 set)
FLZA6680 Fuselage Micro DC-3
FLZA6681 Wing Micro DC-3
FLZA6682 Tail Surface Set Micro DC-3
FLZA6683 Nacelle Set Micro DC-3
FLZA6684 Nose Cone Micro DC-3
FLZA6688 Fuselage Micro C-47
FLZA6689 Wing Micro C-47
FLZA6690 Tail Surface Set Micro C-47
FLZA6691 Nacelle Set Micro C-47
FLZA6692 Nose Cone Micro C-47
FLZA6694 Hardware Set
FLZA6695 Wheels Landing Gear
Optional Parts
TACJ2660 Tactic TTX660 6-Channel Computer Transmitter
1S 3.7V 250mAh Battery
GLOSSARY
● Center of Gravity (C.G.): Point at which the aircraft must
balance in order to fly properly.
● Ailerons: The flight control on the airplane that controls
the ability of the airplane to bank left and right.
● Elevator: The flight control that controls pitch attitude. By
adding power and pitching up, you can make the model
climb or loop.
● Rudder: The flight control that controls the yaw (turning
left or right).
● Throttle: The flight control that varies the speed of the
motor/propeller.
● Glide Slope: The proper path for an airplane approaching
a landing strip.
● Lithium Polymer (LiPo) Battery: Rechargeable battery
which is used to power the airplane. LiPo batteries are lighter
and smaller than most other types of rechargeable batteries.
● Receiver (Rx): The unit in the aircraft that receives the
signal from the transmitter to provide the input to the servos.
● Servo: The device on the model that moves the flight
controls.
● Transmitter (Tx): The hand-held unit that sends the
signals to the control unit, or receiver (RX), in the aircraft.
FCC AND ETSI
FCC REQUIREMENT
(1) This device may not cause harmful interference.
(2) This device must accept any interference received,
including interference that may cause
undesired operation.
NOTE: The manufacturer is not responsible for any radio or
TV interference caused by unauthorized modifications to
this equipment. Such modifications could void the user’s
authority to operate the equipment.
CE COMPLIANCE INFORMATION FOR THE EUROPEAN UNION
Instructions for Disposal of Waste Equipment
by Private Users in the European Union: This
symbol on the product or its packaging indicates
this product must not be disposed of with other
11
This device complies with part 15 of the FCC
rules. Operation is subject to the following
two conditions.
Page 12

household waste. Instead, it is the user’s responsibility to
dispose of their waste equipment by handing it over to a
designated collection point for the recycling of waste
electrical and electronic equipment. The separate collection
and recycling of your waste equipment at the time of disposal
will help to conserve natural resources and ensure that it
is recycled in a manner that protects human health and the
environment. For more information about where you can
drop off your waste equipment for recycling, please contact
your local city office, your household waste disposal service
or location where you purchased the product.
Declaration of Conformity:
Product: Tactic TTX403 2.4GHz 4-Channel Tx/Rx
Item number: TACJ2403, Equipment class: 1
Tactic TTX403 transmitter and Tactic TR1424
receiver: The objects of the declaration described here are in
conformity with the requirements of the specifications listed
below, following the provisions of the European 2006/95/
EC Low Voltage Directive:
EN 60950-1:2006 Safety
The objects of the declaration described here are in conformity
with the requirements of the specifications listed below,
following the provisions of the European R&TTE directive
1995/5/EC:
ETSI EN 300 328 V1.7.1 Technical requirements for
radio equipment
ETSI EN 301 489-1 V1.8.1, 301 489-17 V1.3.2 General
EMC requirements for radio equipment
Tactic
Hobbico, Inc.
2904 Research Road
Champaign, IL USA 61826
The associated regulatory agencies of the following
countries recognize the noted certifications to this product
as authorized for sale and use.
UK DE DK BG SE FI FR
EE LV LT PL CZ SK HU
RO SI AT IT ES PT IE
NL LU MT CY GR
12
 Loading...