

Hobart Food Machines SP-600 Service Manual
SUPERVISOR
MANUAL
SP600 ML-028945
SP600P ML-028946
SP600 & SP600P
F-34349 (June 2001)


SP600 Scale System
SP600
Supervisor Manual
Table of Contents
Introduction
Introduction ...........................................................................................................................1-2
FCC Note ................................................................................................................................1-3
Verify Correctness of Weight & Price...................................................................................1-3
Supervisor Manual Overview...............................................................................................1-3
How to Use This Manual.......................................................................................................1-4
General Information
General Information .............................................................................................................2-2
Electrical Connections ...........................................................................................................2-2
Communication Connections................................................................................................2-2
Resetting and Operating........................................................................................................2-3
Using the Keypad...................................................................................................................2-3
Accessing Supervisor Mode..................................................................................................2-4
Using Function Codes............................................................................................................2-4
Scale Setup
Setting Up Your Scale............................................................................................................3-2
Configuring the Time Format ...............................................................................................3-2
Configuring the Date Format................................................................................................3-2
Setting the Date/Time............................................................................................................3-4
Configuring the Scale ID & Store Information....................................................................3-4
Assigning the Scale ID........................................................................................................3-4
Setting Up the Store Name.................................................................................................3-5
Assigning the Store ID .......................................................................................................3-5
Configuring the Weight Symbol & Tare Suffix...................................................................3-6
Configuring the Weight Separator........................................................................................3-6
Configuring the Monetary Symbol & Separator..................................................................3-7
Setting the Display Time.......................................................................................................3-8
Using Operator Identification...............................................................................................3-9
Assigning an Operator ID.....................................................................................................3-9
Configuring the Scale to Accumulate Operator Totals....................................................3-11
Printing Operator Information on a Label.......................................................................3-12
Printing an Operator Access Report ................................................................................3-12
Deleting Operator IDs......................................................................................................3-12
Setting Up Speedkeys..........................................................................................................3-13
Adding a Speedkey..........................................................................................................3-13
Printing a Speedkey Overlay ...........................................................................................3-14
Deleting a Speedkey.........................................................................................................3-15
i © Hobart Corporation, 2001

SP600 Scale System
Classes & Products
Overview................................................................................................................................4-2
Working with Classes............................................................................................................4-2
Using the Hobart Recommended Class Structure.............................................................4-2
Adding a Class ...................................................................................................................4-5
Updating a Class ................................................................................................................4-6
Deleting a Class..................................................................................................................4-6
Working with Products..........................................................................................................4-7
Using an EAN Barcode ......................................................................................................4-7
Configuring EAN...............................................................................................................4-8
Adding a PLU (EAN).........................................................................................................4-9
Updating a PLU (EAN)....................................................................................................4-12
Using a UPC Barcode.......................................................................................................4-15
Adding a PLU (UPC) .......................................................................................................4-15
Updating a PLU (UPC) ....................................................................................................4-20
Updating the Price - ONLY!.............................................................................................4-22
Reviewing a Product........................................................................................................4-22
Printing PLU Files............................................................................................................4-23
Deleting a PLU .................................................................................................................4-23
Working with Support Files................................................................................................4-24
Special Messages..............................................................................................................4-24
Creating a Special Message.............................................................................................4-24
Editing a Special Message...............................................................................................4-25
Copying and Editing a Special Message...........................................................................4-25
Using a Special Message.................................................................................................4-26
Printing Special Messages ..............................................................................................4-26
Deleting a Special Message .............................................................................................4-27
Expanded Text .................................................................................................................4-27
Creating Expanded Text .................................................................................................4-28
Editing Expanded Text...................................................................................................4-28
Copying and Editing Expanded Text...............................................................................4-29
Using Expanded Text.....................................................................................................4-30
Printing Expanded Text .................................................................................................4-30
Deleting Expanded Text .................................................................................................4-31
Modes of Operation
Setting Up Operator Mode....................................................................................................5-2
Wait on a Customer Mode (Default).....................................................................................5-2
PrePack Mode.........................................................................................................................5-2
Additional PrePack Options ..............................................................................................5-3
Accumulate Items Mode........................................................................................................5-4
Setting Up Automatic PLU Lookup......................................................................................5-6
Setting What the Operator Can Override.............................................................................5-6
ii

SP600 Scale System
Labels
Working with Labels .............................................................................................................6-2
Label Stock Styles..................................................................................................................6-2
Butt Cut Labels...................................................................................................................6-2
Continuous Labels .............................................................................................................6-3
Listing Paper ......................................................................................................................6-3
Loading Labels.......................................................................................................................6-4
Label Types ............................................................................................................................6-5
Setting Up the Label..............................................................................................................6-6
Selecting Fields to Print (Selecting Date Line Options) .....................................................6-6
Printing a Header...............................................................................................................6-8
Printing the Product Description.......................................................................................6-9
Printing the Store Name...................................................................................................6-11
Printing Expanded Text ...................................................................................................6-12
Printing a Bar Code..........................................................................................................6-14
Printing the Weight..........................................................................................................6-14
Printing the Unit Price .....................................................................................................6-15
Printing the By Count Quantity.......................................................................................6-15
Printing the Product Life..................................................................................................6-16
Printing the Weight Symbol.............................................................................................6-17
Label Formats.......................................................................................................................6-18
Using 32 mm (1.25 in.) Labels ..........................................................................................6-18
Using 44 mm (1.75 in.) Labels ..........................................................................................6-20
Using 57 mm (2.25 in.) Labels ..........................................................................................6-21
Using 76 mm (3.0 in.) Labels............................................................................................6-23
Using Continuous Labels.................................................................................................6-25
Using Label Formats in Accumulate Items Mode ...........................................................6-26
Using Loadable Labels (RAM Labels) .............................................................................6-32
Totals
Working with Totals..............................................................................................................7-2
Production Totals...................................................................................................................7-2
Viewing Production Totals ................................................................................................7-2
Printing Production Totals.................................................................................................7-3
Clearing Production Totals ................................................................................................7-4
Operator Totals ......................................................................................................................7-4
Viewing Operator Totals....................................................................................................7-5
Printing Operator Totals ....................................................................................................7-5
Clearing Operator Totals....................................................................................................7-6
Backup or Restore
Backup or Restore (Read or Write)........................................................................................8-2
Backing Up to a Disk (Writing).............................................................................................8-3
Restoring from a Disk (Reading)..........................................................................................8-4
Backing Up or Restoring with MiniNet ...............................................................................8-5
Scanning for Bad Records .....................................................................................................8-7
iii

SP600 Scale System
Appendix
Function Codes .....................................................................................................................A-2
Determining the By Count Method...................................................................................A-12
Troubleshooting..................................................................................................................A-14
Service Functions................................................................................................................A-18
Checking ROM & RAM .....................................................................................................A-18
Checking Master ROM....................................................................................................A-18
Checking Slave ROM ......................................................................................................A-18
Checking Master RAM....................................................................................................A-19
Checking Slave RAM ......................................................................................................A-19
Checking the Display .........................................................................................................A-19
Checking the Numeric Display.......................................................................................A-19
Checking the Alpha Display...........................................................................................A-20
Testing the Keyboard .........................................................................................................A-20
Monitoring Sensors ............................................................................................................A-21
Printing Test Labels............................................................................................................A-22
Checking the EEP CRC.......................................................................................................A-22
Printing the Scale Configuration.......................................................................................A-22
Checking the Calibration ...................................................................................................A-23
Checking the Scale Counts.................................................................................................A-23
Testing the Communication Ports .....................................................................................A-23
Testing the Real Time Clock..............................................................................................A-24
Checking Country ROM.....................................................................................................A-24
iv

Chapter One: Introduction
♦ Introduction
♦ FCC Note
♦ Verify Correctness of Weight & Price
♦ Supervisor Manual Overview
♦ How to Use This Manual
SP600 Scale System
1-1 Introduction
SP600 Scale System
SP600 & SP600P
Scale Printer System
SAVE THESE INSTRUCTIONS
Introduction
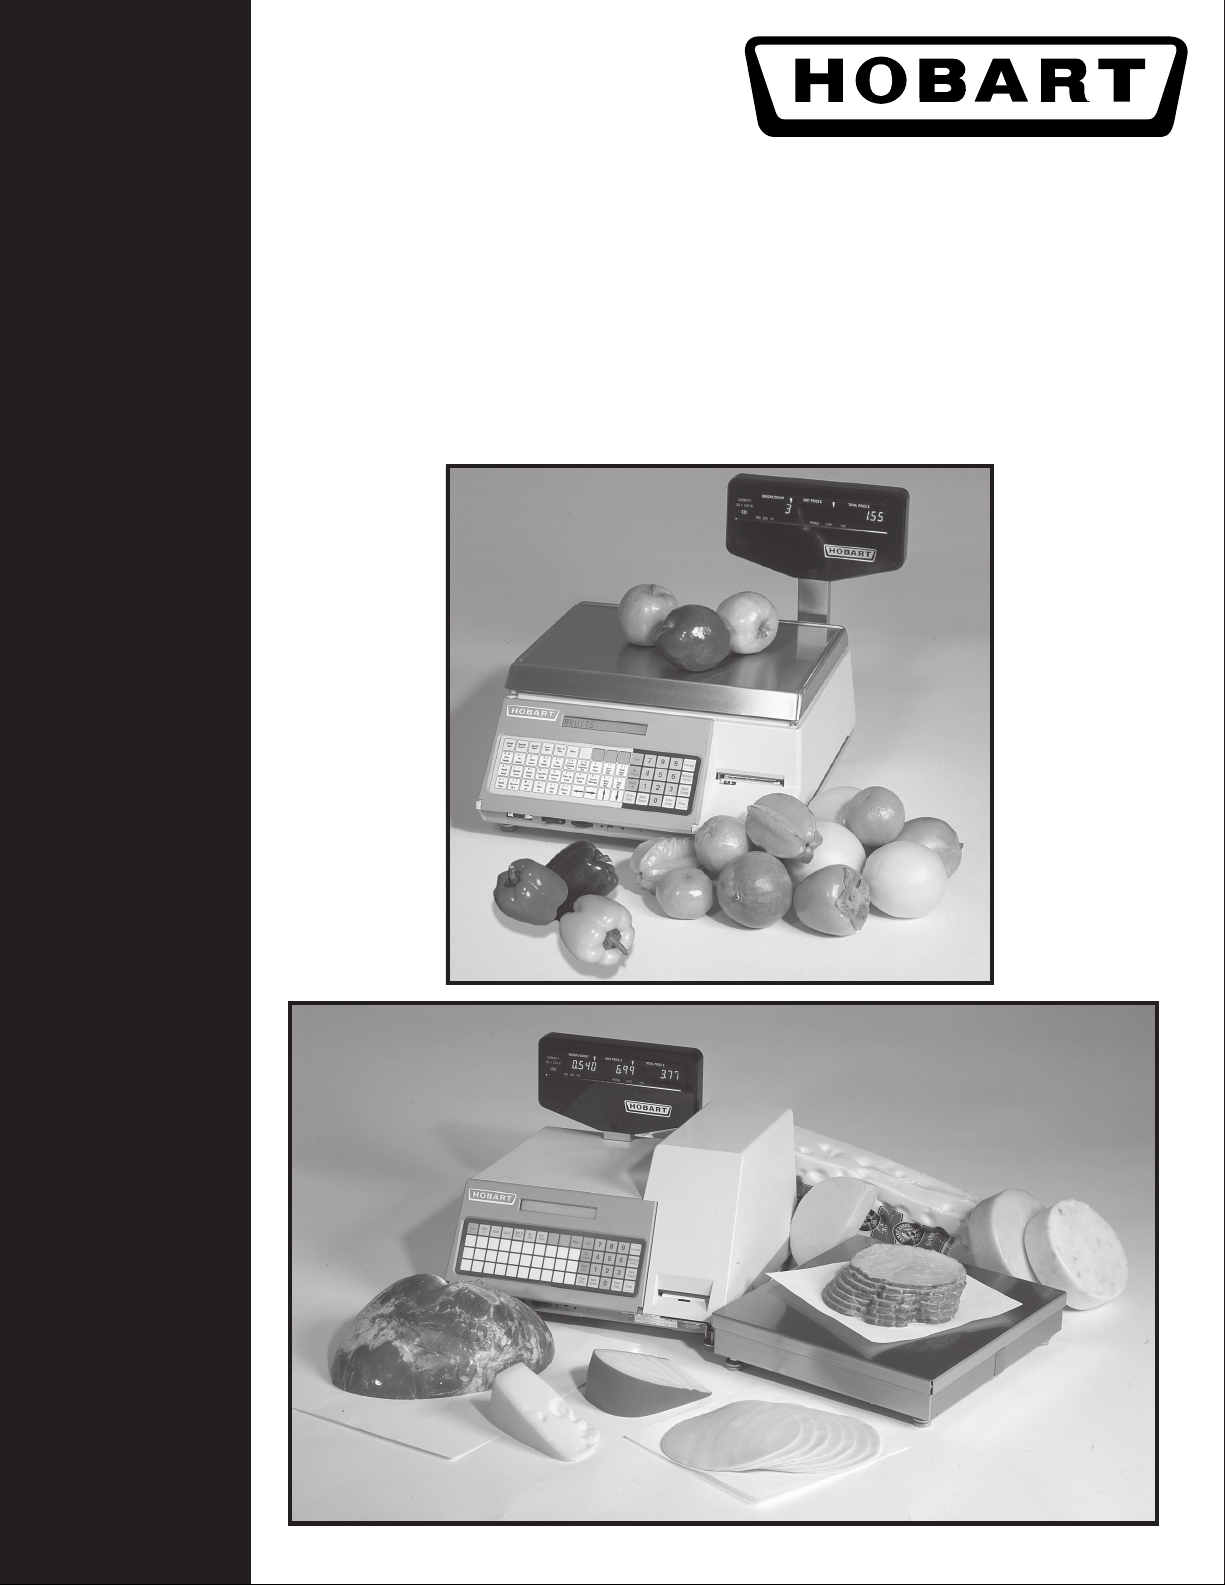
The SP600/SP600P Scale Printer System prints
merchandising labels used to identify price and to code a
variety of supermarket items. EAN or UPC barcode,
description, weight, unit price, total price, packed-on date,
sell by date, and use by date are some of the fields available
on labels. Expanded Text and Special Message fields enable
the SP600 to provide cooking instructions, ingredients
and/or special, promotional information.
The elevated display enables both customer and operator to
view numeric transaction data: Weight, Unit Price and Total
Price for the item.
The SP600P can be used as a label printer (if used without a
weigher) or a prepack scale (if connected with a model SPS
or CSWS scale).
When the system is disconnected, memory is maintained by
batteries for a minimum of 100 hours. The batteries
automatically charge when the system is connected to AC
power, whether the scale is in Reset or Operate mode.
Introduction 1-2

SP600 Scale System
FCC Note
Verify Correctness of
Weight & Price
This equipment has been tested and found to comply with
the limits for a Class A digital device, pursuant to Part 15 of
the FCC Rules. These limits are designed to provide
reasonable protection against harmful interference when the
equipment is operated in a commercial environment. This
equipment generates, uses, and can radiate radio frequency
energy and, if not installed and used in accordance with the
instruction manual, may cause harmful interference to radio
communications. Operation of this equipment in a
residential area is likely to cause harmful interference, in
which case the user will be required to correct the
interference at his own expense.
Verification of information on labels should be made
routinely. Check the multiplication of price-per-kilogram
(lb) times weight, and check the indicated weight against
printed weight. Weigh the same package several times to
verify consistency. Keep in mind that some packages which
weigh near the middle of the 0.005 kg (0.01 lb.) increment
will normally vary up or down by 0.005 kg (0.01 lb.) Greater
variation than 0.005 kg (0.01 lb.) indicates a need for
adjustment of the system. In such cases, or whenever
necessary, contact your authorized Hobart Service
representative.
Supervisor Manual
Overview
This manual will use the following methods to explain
keystrokes and data entry procedures:
♦ The word PRESS means to press a key on the Control
Panel.
♦ The word TYPE means to press a series of keys on the
control panel and press [ENTER].
♦ The word ENTER means to press the [ENTER] key on
the Control Panel.
♦ Words in uppercase enclosed in brackets (for example
[ENTER]) represent specific keys.
The following special instructions are used in the manual:
☛ Note
A note is information that you need to know, but it is not an
actual step in the procedures.
1-3 Introduction
SP600 Scale System
How to Use This Manual
✎ Tip
A tip is additional information that may be useful when you
are using the scale system.
Look At This
Look At This is information to alert you that you may be
doing something that will permanently alter your scale
system.
Refer to the following sections for information about using
the SP600/SP600P Scale Printer System.
♦ Chapter One: Introduction
♦ Chapter Two: General Information
♦ Chapter Three: Setting Up Your Scale
♦ Chapter Four: Working with Classes/Products
♦ Chapter Five: Setting Operator Mode
♦ Chapter Six: Working with Labels
♦ Chapter Seven: Working with Totals
♦ Chapter Eight: Backup or Restore
♦ Chapter Nine: Appendix
Introduction 1-4

Chapter Two: General Information
♦ General Information
♦ Electrical Connections
♦ Communication Connections
♦ Resetting and Operating
♦ Using the Keypad
♦ Accessing Supervisor Mode
♦ Using Function Codes
SP600 Scale System
2 - 1 General Information
SP600 Scale System
RS-232 PORT
VIEW ANGLE CONTROL
RESET/OPERATE
SWITCH
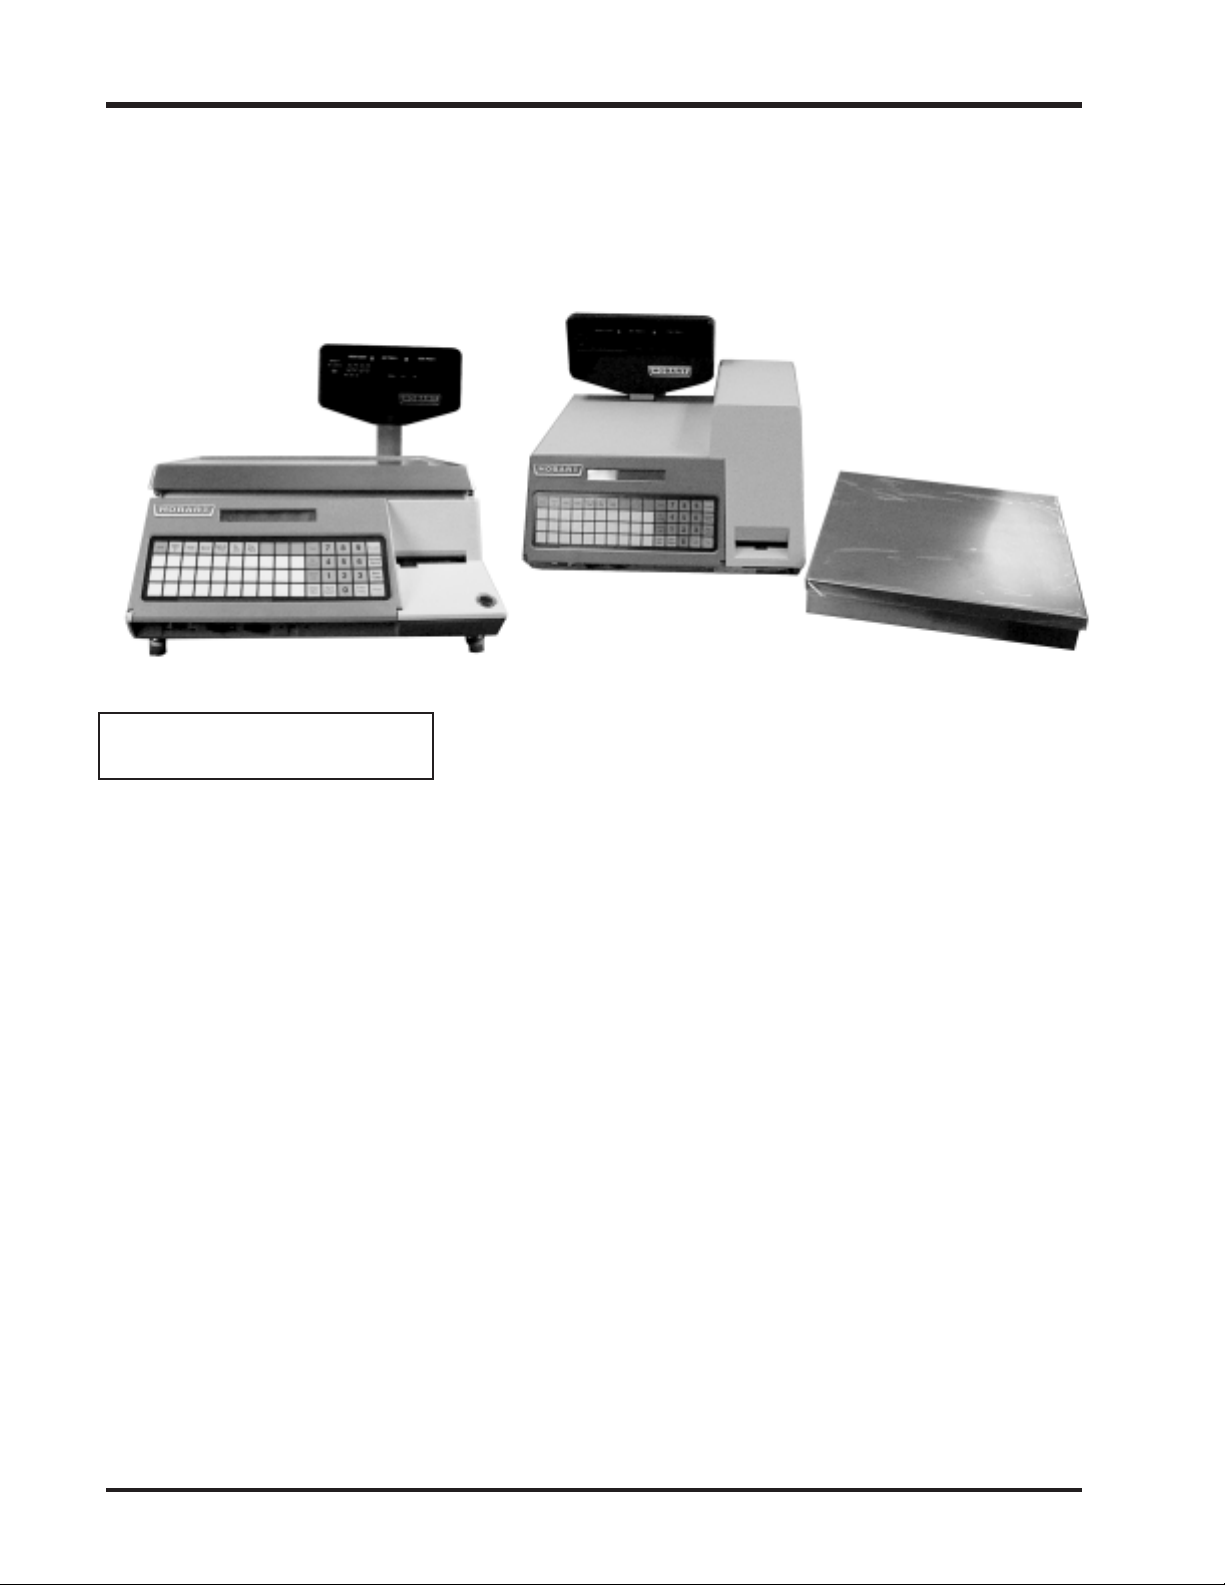
General Information
The SP600 Scale Printer System is perfect for your over-thecounter weighing applications or for use in backroom meat
applications with the Hobart TWS, HWS or NSW wrapping
machines. This weighing system can handle a broad variety
of products for meat, deli, bakery, produce, fish and cheese
departments.
The scale’s memory is expandable from 0.5 MB to 2.5 MB,
enabling the scale to store information on thousands of
products.
The SP600 Scale System should be installed or moved only
by qualified Hobart-trained service technicians. It can
operate in a temperature range from 32
40
˚C).
˚F to 104˚F (0˚C to
Electrical Connections
Communication
Connections
General Information 2 - 2
The power cord receptacle is located under the SP600 base,
toward the back. The power cord is connected to 120/220 V.,
60/50 Hz., single phase electrical power. Once the SP600 is
plugged in, the system is powered up.
Look At This
Connecting to a power source with a different voltage or
frequency than the scale is configured for may cause
SEVERE damage to the scale.
In addition to the power cord, there is an RS-232 port at the
front of the scale. This port can be used with the Hobart
Disk Player/Recorder or the Hobart External Disk Drive.
SP600 Scale System
Resetting and
Operating
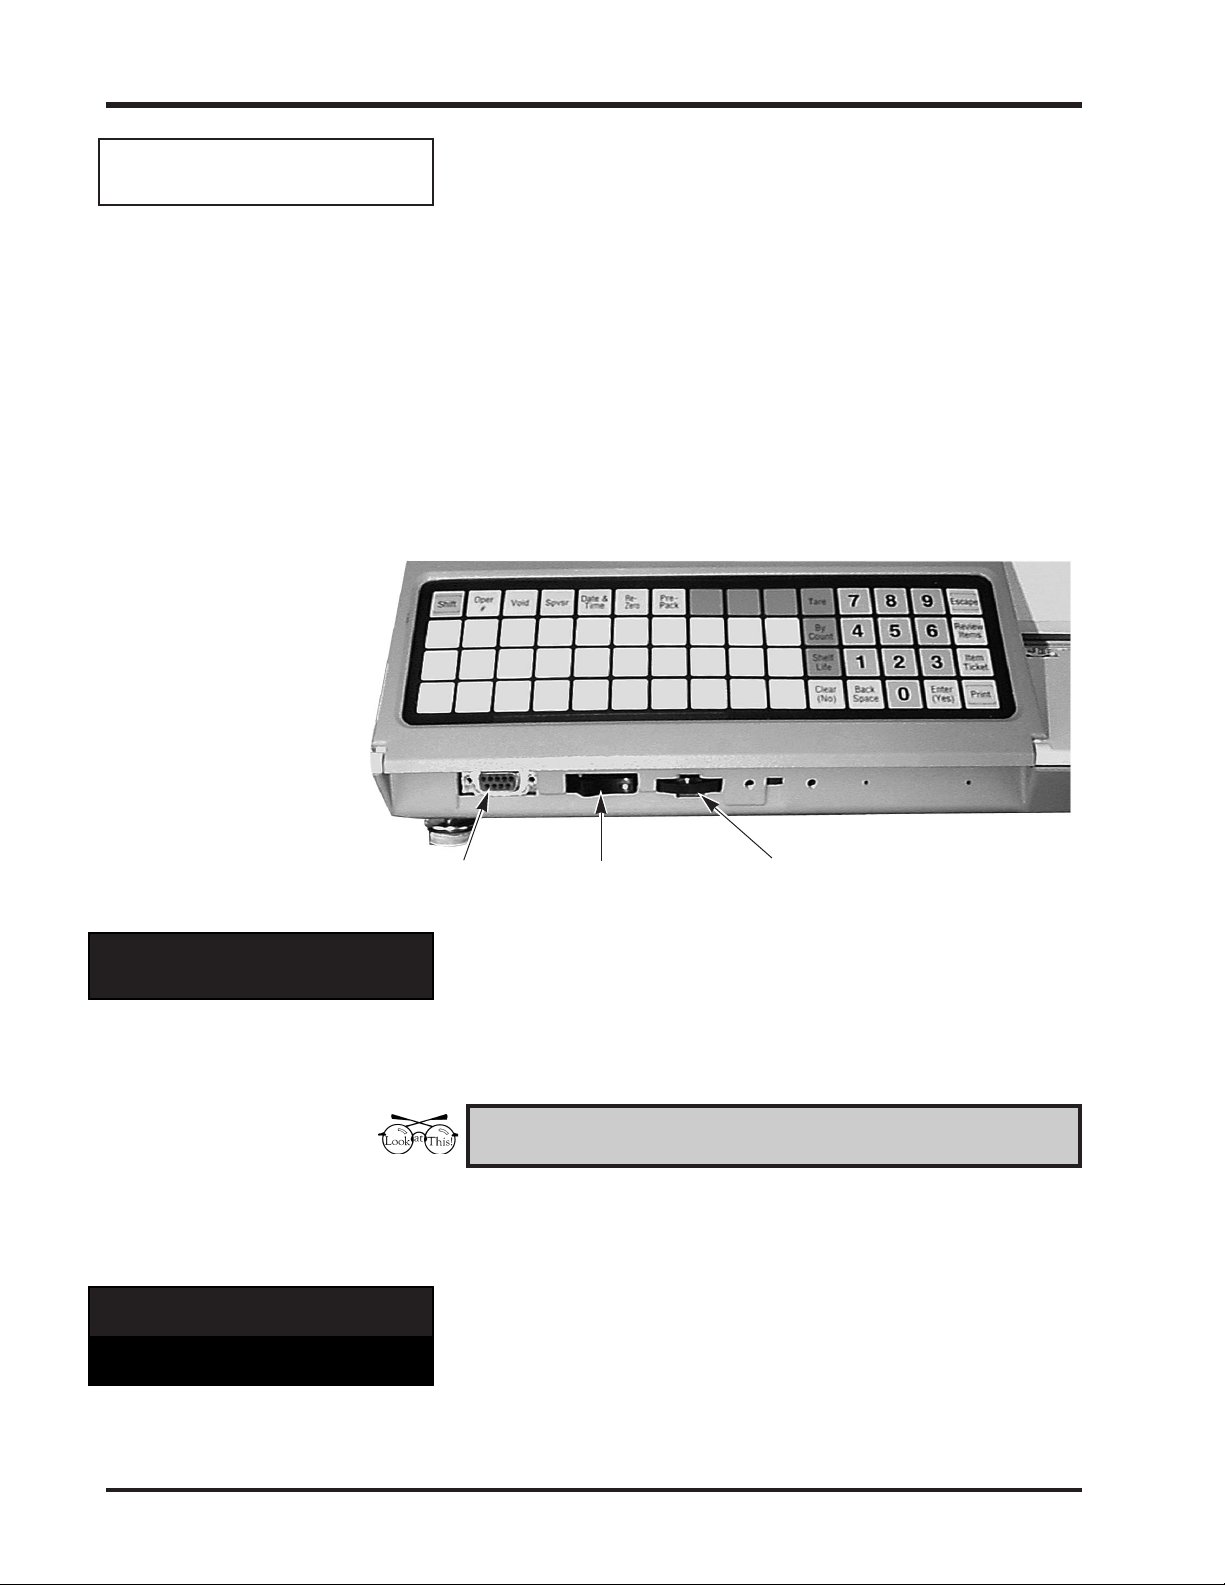
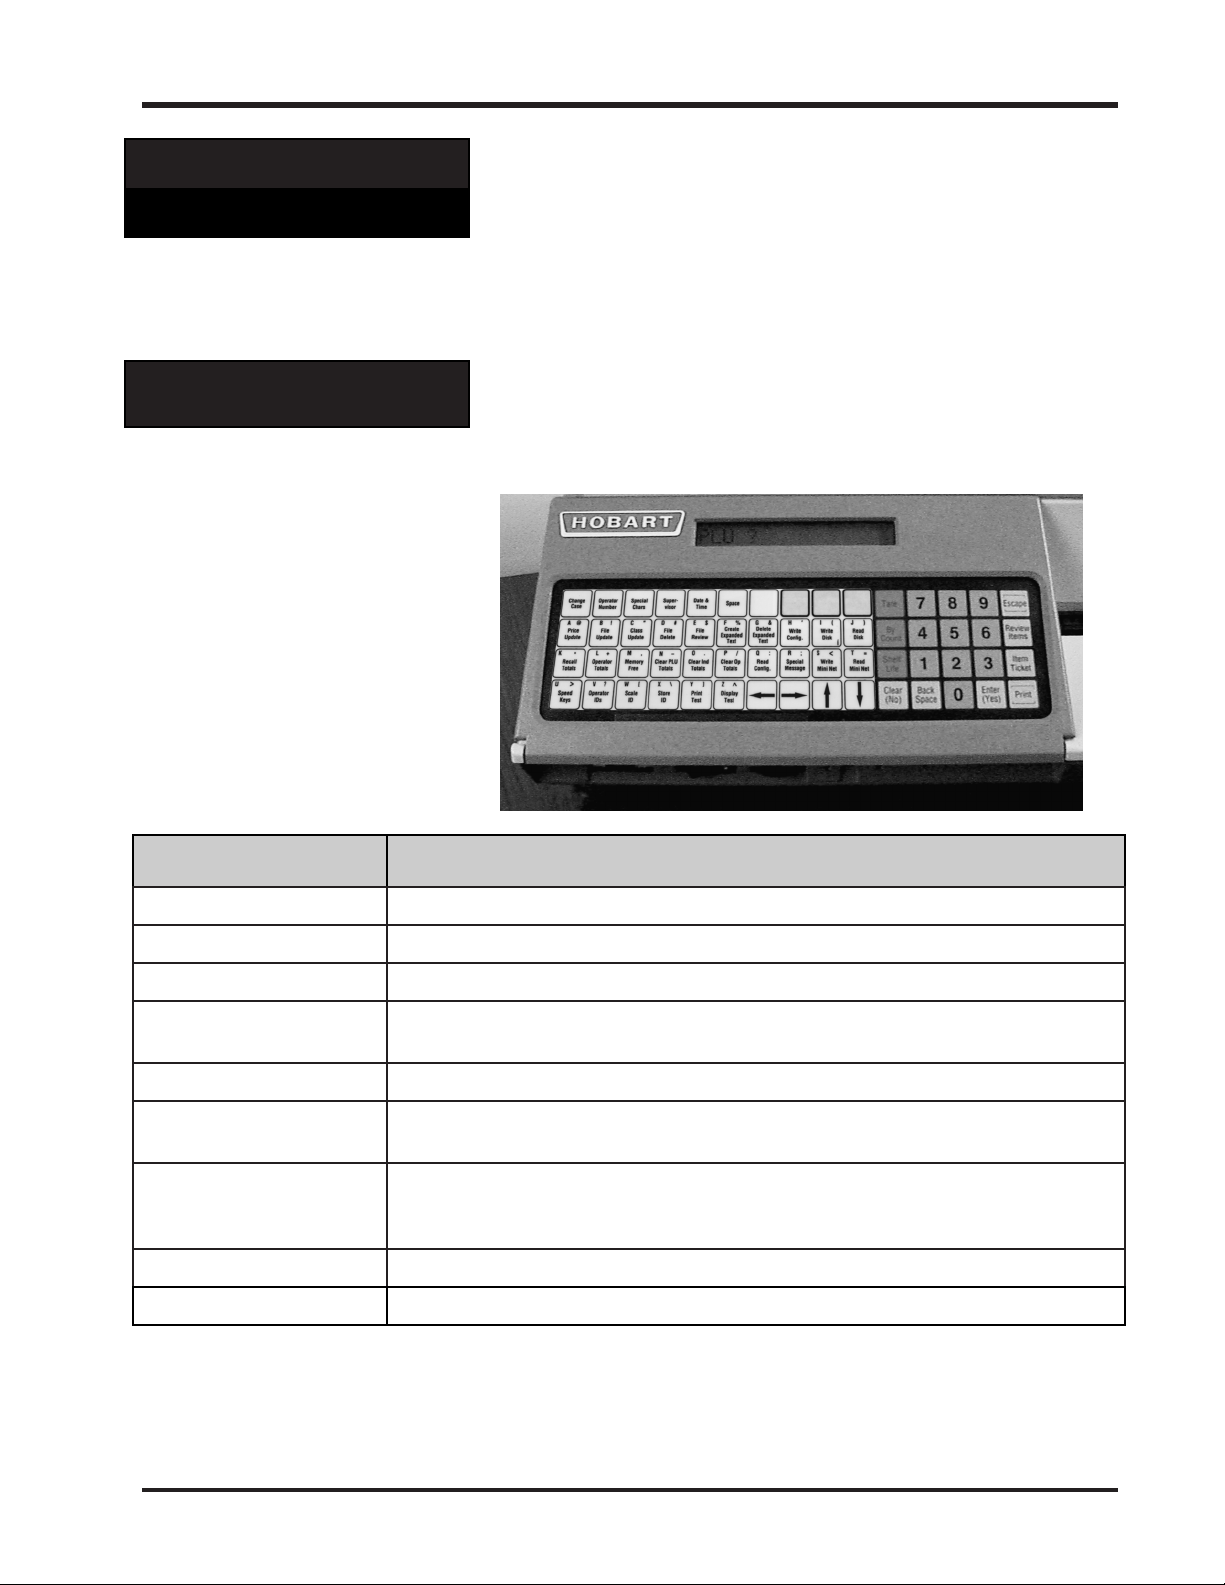
Using the Keypad
Shown with Supervisor
overlay installed.
The SP600 Scale has power when it is plugged in. Flip the
RESET/OPERATE switch, located on the front of the
system, to switch between reset mode and operate mode.
If you have modified your scale configuration, you must
reset the scale to activate the changes.
The SP600 Scale keypad enables you to enter information
into a field. Refer to the following table for specific key
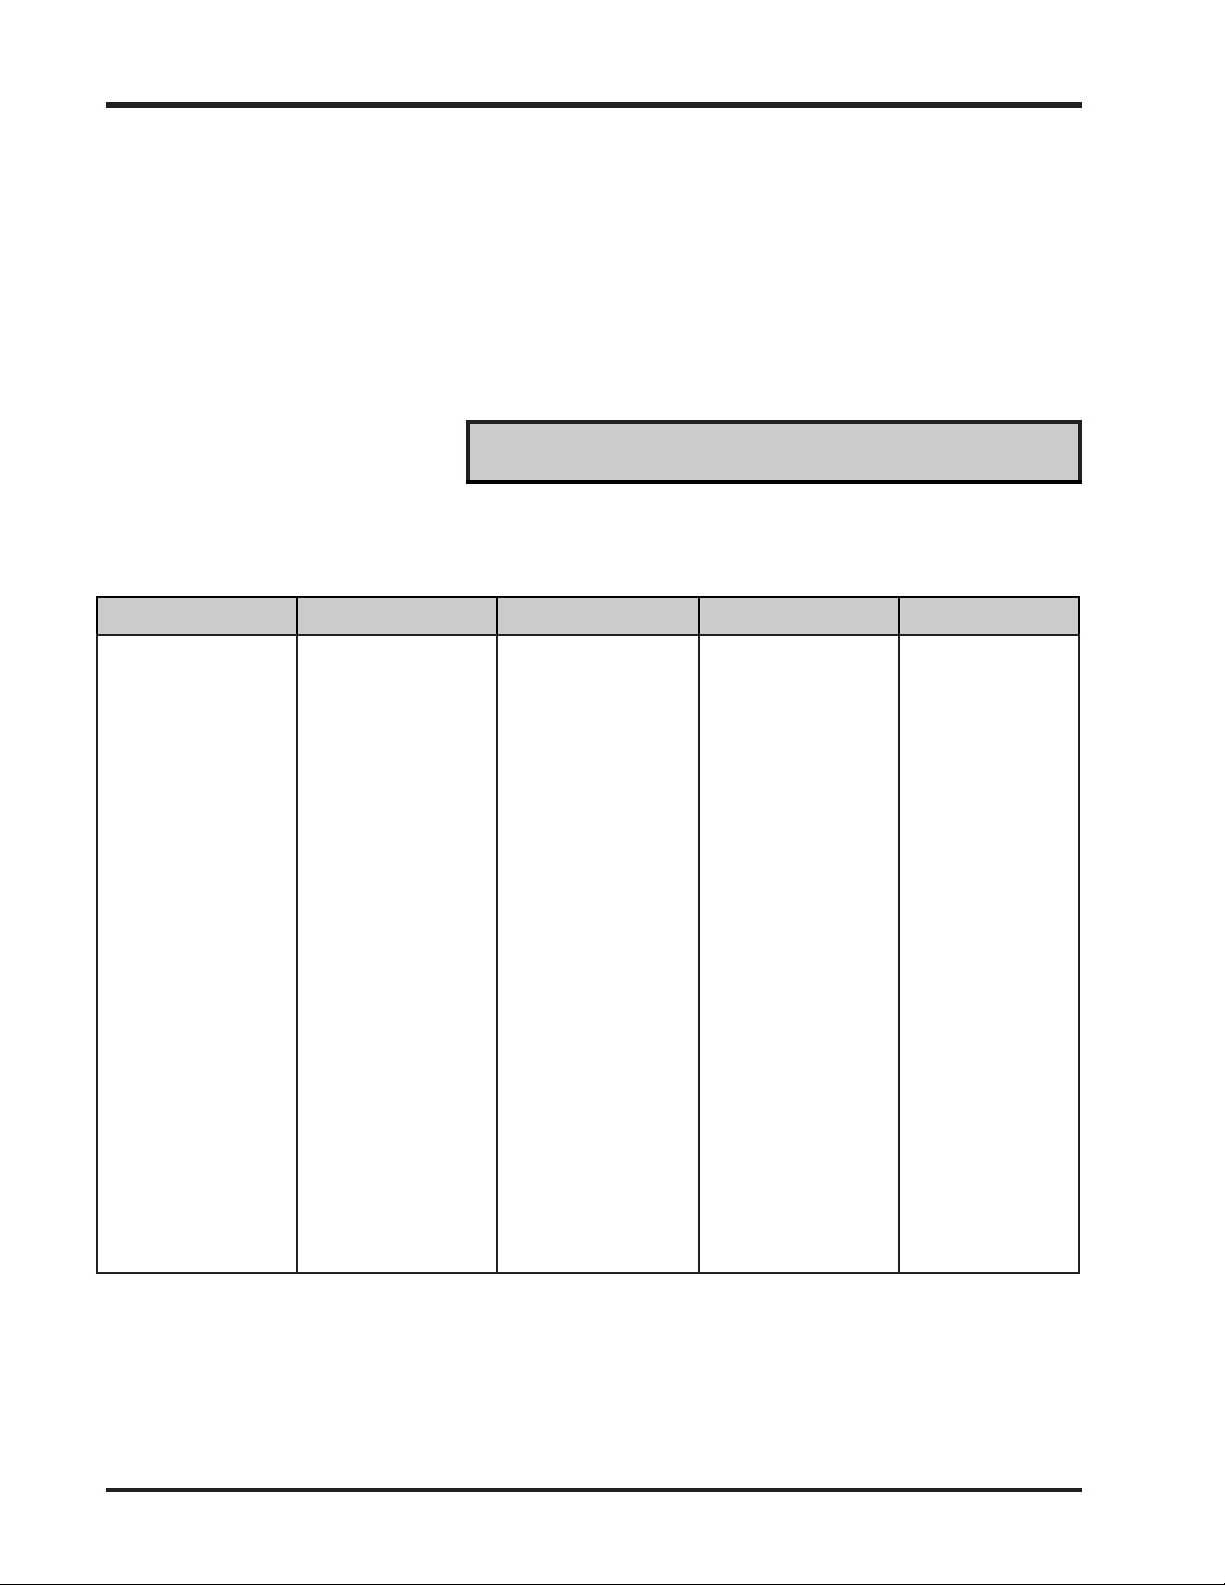
descriptions.
Key/Highlight Function
Numeric Keypad (0-9) Enables you to enter numeric data.
Backspace Removes the last character when entering data.
Clear Clears data or printer errors. Also used to answer No to many prompts.
Escape Returns you toward the Function Code prompt when in Supervisor Mode.
-- OR -- Returns you to Operator Mode from the Function Code prompt.
Print Enables you to print a label or group of labels.
Enter Enables you to accept the selected data and advance to the next field or screen.
Also used to answer Yes to many prompts.
Arrow Keys UP and DOWN Arrow Keys enable you to move the cursor from field-to-field or
LEFT and RIGHT Arrow Keys enable you to move the cursor from character-tocharacter within a field.
Supervisor Enables you to access the Supervisor Menu.
Alpha Characters* Enable you to enter uppercase or lowercase alpha characters while in a text field.
2 - 3 General Information
SP600 Scale System
Key/Highlight Function
Special Chars. 1* Press this key to type a special character (found in the upper right corner of each
alpha-key). You must press Special Chars. for each Special Character you type.
Change Case* Enables you to switch between uppercase or lowercase.
Space* Enables you to type (add) a space between words or characters.
Special Chars2* PRESS this key to type a special character (found in the lower right corner of
each alpha-key). You must press Special Chars. for each Special Character you
type.
*Only available in Supervisor Mode.
Accessing Supervisor
Mode
Using Function Codes
You can access Supervisor Mode from the PLU? prompt.
To access Supervisor Mode:
1. PRESS [SUPERVISOR]. If a Secret ID is set up, enter your
Secret ID. The Function Code prompt displays.
2. From the Function Code prompt (Supervisor Mode), you
can do any of the following:
• Type the two-digit function code.
-- OR --
• Press the [UP ARROW (ÇÇÇÇ)] or [DOWN ARROW
(ÈÈÈÈ)] keys to scroll through the function codes. PRESS
[ENTER] when the function you want displays.
-- OR --
• Press a key from the Supervisor Overlay to select a
scale function.
-- OR --
• PRESS [ESCAPE] to return to the PLU? prompt
(Operator Mode).
Detailed procedures of how to use the supervisor functions
follow throughout this manual.
Use function codes to access any function in the system. A
function code is a number that represents a specific option
in the system. For example, the function code to update a
file is 10. Refer to the Appendix for a detailed list of function
codes and what each one does.
Look At This
Certain countries may not be able to access Function Codes
50 through 53 & 55. To configure these options, contact your
Hobart Service representative.
General Information 2 - 4

Chapter Three: Scale Setup
♦ Setting Up Your Scale
♦ Configuring the Time Format
♦ Configuring the Date Format
♦ Setting the Date/Time
♦ Configuring the Scale ID & Store Information
♦ Assigning the Scale ID
♦ Setting Up the Store Name
♦ Assigning the Store ID
♦ Configuring the Weight Symbol and Tare Suffix
♦ Configuring the Weight Separator
♦ Configuring the Monetary Symbol & Separator
♦ Setting the Display Time
♦ Using Operator Identification
♦ Assigning an Operator ID
♦ Configuring the Scale to Accumulate Operator Totals
♦ Printing Operator Information on a Label
♦ Printing an Operator Access Report
♦ Deleting Operator IDs
♦ Setting Up Speedkeys
♦ Adding a Speedkey
♦ Printing a Speedkey Overlay
♦ Deleting a Speedkey
SP600 Scale System
3 - 1 Scale Setup

SP600 Scale System
p
Setting Up Your Scale
Configuring the Time
Format
Before you can begin setting up your classes, products, etc.,
you should set up your scale to specify how it will operate
on a daily basis.
This section ex
such as:
♦ the Time Format
♦ the Date Format
♦ the actual Date & Time
♦ the Scale ID & Store Information
The SP600 scale system enables you to configure the scale
clock for either 12- or 24-hour mode.
To set the time format:
1. PRESS [SUPERVISOR]. If a Secret ID is set up, enter
your Secret ID. The Function Code prompt displays.
2. TYPE 53 and PRESS [ENTER]. The Baud Rate prompt
displays.
3. PRESS [UP ARROW (ÇÇÇÇ)] or [DOWN ARROW (ÈÈÈÈ)] until
you see the 12 Hour Cloc prompt.
4. PRESS [CLEAR] to toggle between ON/OFF. Select ON
to use 12 hour mode -- OR -- select OFF to use 24-hour
mode.
5. PRESS [ENTER] to save changes and return to the
Function Code prompt.
lains how to set up general scale information,
Configuring the Date
Format
You can configure eight different date formats which
include the separator.
To set the date format:
1. PRESS [SUPERVISOR]. If a Secret ID is set up, enter
your Secret ID. The Function Code prompt displays.
2. TYPE 53 and PRESS [ENTER]. The Baud Rate prompt
displays.
3. PRESS [UP ARROW (ÇÇÇÇ)] or [DOWN ARROW (ÈÈÈÈ)] until
you see the Date format? prompt.
4. Refer to the following table for available formats.
Scale Setup 3 - 2
SP600 Scale System
Set to this
Number
To Print this Format
0 24 Jan 97 (Day Month Year)
[separators are two spaces]
1 Jan 24,97 (Month Day, Year)
[separators are one space and one
comma]
2 24/01/97 (Day/Month/Year)
[separators are two forward slashes]
3 01/24/97 (Month/Day/Year)
[separators are two forward slashes]
4 24 Jan 1997 (Day Month Year)
[separators are two spaces]
5 Jan 24, 1997 (Month Day, Year)
[separators are one space and one
comma]
6 24/01/1997 (Day/Month/Year)
[separators are two forward slashes]
7 01/24/1997 (Month/Day/Year)
[separators are two forward slashes]
☛ Note
The scale display defaults to display the date separated by
dashes (i.e., 01-24-97). Depending on the configuration, the
date might print with spaces or backslashes as separators.
☛ Note
The scale will display the two (2) least significant digits of
the year, regardless of configuration settings.
☛ Note
Julian Dates can be configured in the SP600. Contact your
Hobart Service Representative.
3 - 3 Scale Setup
SP600 Scale System
Setting the Date/Time
Set the date and time to specify the accurate date and time.
To set Date/Time:
1. From the PLU? prompt, PRESS [DATE & TIME]. The
system date displays. Be aware that the first time you
power up the scale, you are prompted for the Date and
Time, not for a PLU.
2. PRESS [CLEAR] to clear any existing data; 00-00-00
displays.
3. TYPE the month, day and year or day, month and year
depending on your configuration.
4. PRESS [ENTER] to accept the date and move to the time
prompt.
5. PRESS [CLEAR] to clear the existing time.
6. TYPE the hour and minute.
7. PRESS [ENTER]. If the clock is set to 12-hour mode, the
AM? Prompt displays.
8. PRESS [CLEAR] to indicate PM --OR-- [ENTER] to
indicate AM.
☛ Note
Configuring the Scale
ID & Store Information
Assigning the Scale ID
To allow the operator to change the date/time, select ON at
the Op Edit Date prompt in Function Code 51.
The Scale ID & Store Information option enables you to
assign the Store Number, Scale ID and Store Name to your
scale.
Assign the Scale ID to help distinguish between scales in a
department or store. This is an arbitrary number that you
can assign according to your specific needs.
To set up the Scale ID:
1. PRESS [SUPERVISOR]. If a Secret ID is set up, enter
your Secret ID. The Function Code prompt displays.
2. TYPE 88 and PRESS [ENTER] or PRESS [SCALE ID
The Scale ID prompt displays.
3. TYPE the Scale ID number and PRESS [ENTER]. This
number can be any number from 0 to 99. You
automatically return to the Function Code prompt.
Scale Setup 3 - 4

SP600 Scale System
Setting Up the Store Name
Use the following procedures to enter your store name into
the scale. If a store name is set up, it will always be printed
on the label.
To set up the store name:
1. PRESS [SUPERVISOR]. If a Secret ID is set up, enter
your Secret ID. The Function Code prompt displays.
2. TYPE 89 and PRESS [ENTER]. The Store Name prompt
displays. If this is the first time you have accessed this
function Record Not Found displays and then the display
clears.
3. TYPE the store name, or information you may want in
the Store Name field of the label. Use the [DOWN
ARROW (ÈÈÈÈ)] to move to the second line of store name, if
applicable.
4. PRESS [ENTER].
☛ Note
You can specify the number of lines and characters through
Function Code 52. For detailed procedures, refer to Working
with Labels.
Assigning the Store ID
Assign the Store ID to help distinguish between stores in a
chain. This is an arbitrary number that you can assign
according to your specific needs.
To set up the Store ID:
1. PRESS [SUPERVISOR]. If a Secret ID is set up, enter
your Secret ID. The Function Code prompt displays.
2. TYPE 90 and PRESS [ENTER] or PRESS [STORE ID]. The
Store ID prompt displays.
3. TYPE the Store ID number and PRESS [ENTER]. This
number can be any number from 0 to 999999. You
automatically return to the Function Code prompt.
3 - 5 Scale Setup

SP600 Scale System
Configuring the
Weight Symbol & Tare
Suffix
Configuring the
Weight Separator
When you select a weight system, a 2 character weight
symbol is automatically determined (lb. for Avoirdupois or
kg. for Metric). However, a 1 character suffix can be created,
for both the weight and tare, using any character that can be
entered from the keyboard.
To configure the weight symbol suffix:
1. PRESS [SUPERVISOR]. If a Secret ID is set up, enter
your Secret ID. The Function Code prompt displays.
2. TYPE 52 and PRESS [ENTER]. The Desc Lines prompt
displays.
3. PRESS [UP ARROW (ÇÇÇÇ)] or [DOWN ARROW (ÈÈÈÈ)] until
you see the Wt suffix prompt.
4. TYPE the character you want to use as the weight suffix.
5. PRESS [DOWN ARROW (ÈÈÈÈ)] until you see the Tare
suffix prompt.
6. TYPE the character you want to use as the tare suffix.
7. PRESS [ENTER] to save changes and return to the
Function Code prompt.
To configure the weight delimiter:
1. PRESS [SUPERVISOR]. If a Secret ID is set up, enter
your Secret ID. The Function Code prompt displays.
2. TYPE 52 and PRESS [ENTER]. The Desc Lines prompt
displays.
3. PRESS [UP ARROW (ÇÇÇÇ)] or [DOWN ARROW (ÈÈÈÈ)] until
you see the WComma/Point prompt.
4. PRESS [CLEAR] to toggle between ON/OFF. The
default is ON.
• Select ON, to use a comma.
• Select OFF, to use a point.
5. PRESS [ENTER] to save changes and return to the
Function Code prompt.
Scale Setup 3 - 6

Configuring the
Monetary Symbol &
Separator
SP600 Scale System
A three-character monetary symbol can be stored in the
scale configuration. You can use any character available on
the keyboard. The symbol will always precede the price.
To configure the monetary symbol prefix:
1. PRESS [SUPERVISOR]. If a Secret ID is set up, enter
your Secret ID. The Function Code prompt displays.
2. TYPE 52 and PRESS [ENTER]. The Baud Rate prompt
displays.
3. PRESS [UP ARROW (ÇÇÇÇ)] or [DOWN ARROW (ÈÈÈÈ)] until
you see the Money Symbol prompt.
4. TYPE the character(s) you want to use as the monetary
symbol.
5. PRESS [UP ARROW (ÇÇÇÇ)] or [DOWN ARROW (ÈÈÈÈ)] until
you see the Comma/Point prompt.
6. PRESS [CLEAR] to toggle between ON/OFF. The
default is ON.
• Select ON, to use a comma to delimit the whole and
fractional digits.
• Select OFF, to use a point to delimit the whole and
fractional digits..
7. PRESS [ENTER] to save changes and return to the
Function Code prompt.
☛ Note
The SP600 offers the ability to change the location of the
decimal point or comma and to change the number of price
digits.
Unit Price is determined by two configurations: Unit Digits
and Price Decimal. These are used with the following
restrictions:
• Unit Digits is limited to a value between and including 3
and 6.
• Price Decimal is limited to a value between and
including 0 and 3.
The Monetary Separator determines which separator a
decimal point or comma displays and prints.
Total Price is determined by the two configurations: Total
Digits and Price Decimal. These are used with the following
restrictions:
• Price Digits is limited to a value between and including
3 and 7.
• Price Decimal is limited to a value between and
including 0 and 3.
The Monetary Separator determines which separator, a
decimal point of a comma, displays and prints.
These options are configurable by a trained Hobart Service
Representative, only. Contact your local office for details.
3 - 7 Scale Setup

SP600 Scale System
Setting the Display
Time
Set the display time to adjust the time duration between
visual prompts. You can enter 0 to 3000, which is equal to
0 to 3 seconds.
To set the display time:
1. PRESS [SUPERVISOR]. If a Secret ID is set up, enter
your Secret ID. The Function Code prompt displays.
2. TYPE 51 and PRESS [ENTER]. The Bycnt Metho prompt
displays.
3. PRESS [UP ARROW (ÇÇÇÇ)] or [DOWN ARROW (ÈÈÈÈ)] until
you see the Disply Time prompt.
4. TYPE the setting you want. The factory setting is 500,
which is equal to
5. PRESS [ENTER] to save changes and return to the
Function Code prompt.
1
/2 second.
Scale Setup 3 - 8
SP600 Scale System
Using Operator
Identification
Assigning an Operator ID
Set up an operator’s ID to limit or grant the operator’s access
to various scale Supervisor functions. The operator’s
identification number provides security within each
department, enhancing the integrity of the scale files.
By configuring the scale to prompt the operator before each
transaction, the identification numbers enable you to
accumulate totals and track the operator’s productivity.
This number will often be referred to as a Secret ID. Be
aware that Operator ID and Secret ID are the same.
This section explains how to:
♦ assign an Operator ID
♦ configure the scale to accumulate operator totals
♦ print an operator access report
♦ delete an Operator ID
The Operator ID option enables you to assign a numeric
code that identifies a specific scale operator. When you
assign the Operator ID, you also assign an access code
which specifies the Supervisor functions the operator is
authorized to perform in the scale. A complete explanation
of access levels can be found later in this chapter.
☛ Note
If there is more than one operator, you must assign at least
one person with access level 5 in order to maintain the
Operator ID file. This ID should be set up first.
✎ Tip
Be aware that once you have an ID in the system, you will
always be prompted for the ID to access the Supervisor
Mode.
3 - 9 Scale Setup
SP600 Scale System
y
To assign an Operator ID:
1. PRESS [SUPERVISOR]. If a Secret ID is already set up,
enter
our secret ID. The Function Code prompt displays.
2. TYPE 34 and PRESS [ENTER] or PRESS [OPERATOR
IDs]. The Operator ID prompt displays.
3. TYPE the Operator ID number and PRESS [ENTER]. This
can be any number between 1 and 9999. The ID number
displays with the Access prompt.
4. TYPE the access code for the operator. Refer to the
following table for the access level of the functions you
want.
☛ Note
Remember, if you select an upper level access code, you can
access all functions from lower levels. Level 1 is for basic
scale operations only; no access to any Supervisor Functions.
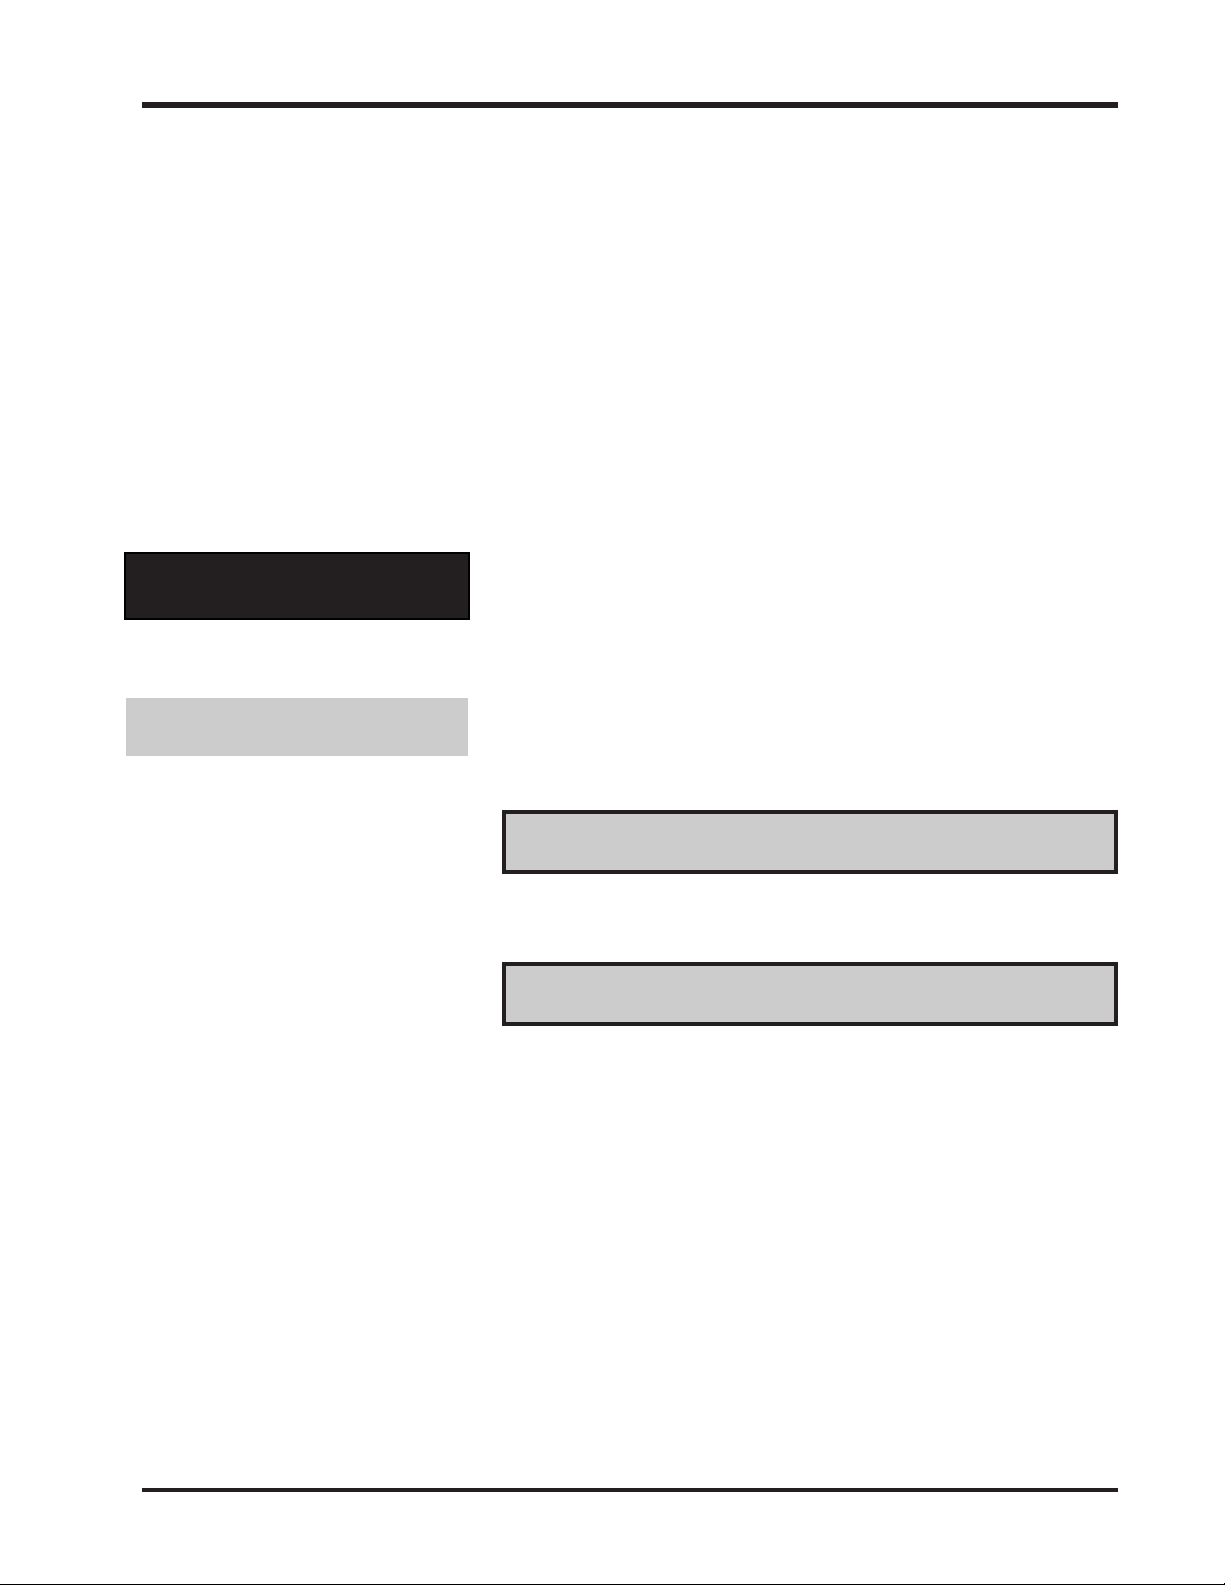
File Maintenance Totals Scale Setup Scale Service Configuration
Price Update (4)
File Update (4)
Class Update (4)
File Delete (4)
File Review (2)
Special Message (4)
Expanded Text (4)
Del Expanded Text
(4)
Write Disk (2)
Read Disk (2)
Write Config (2)
Read Config (2)
Bad Record Scan (2)
Write Mini (2)
Read Mini (2)
Delete All (5)
Recall of Tot (3)
Operator Totals (3)
Clear PLU Tot (3)
Clear Ind Totals (3)
Clear Op Totals (3)
Def Speed Key (2)
Operator ID (5)
Scale ID (3)
Store Name (3)
Store ID (3)
Master ROM Check
(5)
Slave ROM Check
(5)
Master RAM Check
(5)
Slave RAM Check
(5)
Numeric Display (5)
Alpha Display (5)
Keyboard Test (5)
Monitor Sensors (5)
Prt Test Label (5)
EEP CRC Check (5)
Print Config (5)
Calibration Date (5)
Scale Counts (5)
Communications (5)
Misc Config (5)
Text Config (5)
Comm Config (5)
Print Config (5)
Memory Free (2)
Scale Setup 3 - 10
Real Time Clock (5)

SP600 Scale System
y
5. After you have typed the access code, PRESS [DOWN
ARROW (ÈÈÈÈ)] to access the first line of description.
PRESS [DOWN ARROW (ÈÈÈÈ)] again to access the second
line of description. Each Operator ID can have up to two
lines of description, 10 characters per line.
6. PRESS [ENTER] to save the Operator ID and return to
the Operator ID prompt.
7. PRESS [UP ARROW (ÇÇÇÇ)] or [DOWN ARROW (ÈÈÈÈ)] to
move to the previous or next Operator ID.
-- OR --
TYPE another number and PRESS [ENTER] to add or
review another Operator ID.
-- OR -PRESS [ESCAPE] to return to the Function Code prompt.
Configuring the Scale to
Accumulate Operator Totals
Although you have assigned access levels for each operator,
you must configure the scale to accumulate the totals, if you
want to collect Operator Totals.
To configure for Operator Totals:
1. PRESS [SUPERVISOR]. If a Secret ID is already set up,
enter
2. TYPE 51 and PRESS [ENTER]. The Bycnt Metho prompt
displays.
3. PRESS [DOWN ARROW (ÈÈÈÈ)] until the Op Sign On
prompt displays.
4. Turn the option ON. (PRESS [CLEAR] to toggle between
ON and OFF.) Turn this on so the scale will prompt the
Operator for an ID to begin using the scale.
5. PRESS [DOWN ARROW (ÈÈÈÈ)] until the OP Totals prompt
displays.
6. Turn the option ON. (PRESS [CLEAR] to toggle between
ON and OFF.) Turning this on enables the scale to
accumulate and save the Operator Totals.
7. PRESS [ENTER] to save changes and return to the
Function Code prompt.
our secret ID. The Function Code prompt displays.
☛ Note
To accumulate the most accurate Operator Totals, you
should also turn the Forced Logon option on. When used in
conjunction with Op Sign On, the scale prompts the operator
for an ID each time the operator wants to access a PLU.
To access the Forced Logon option:
A. From the Op Sign On prompt, PRESS [DOWN ARROW
(ÈÈÈÈ)] until the Forced Logon prompt displays.
B. Turn the option ON. (PRESS [CLEAR] to toggle between
ON and OFF.)
3 - 11 Scale Setup
SP600 Scale System
Printing Operator
Information on a Label
The scale can be configured to print the Operator Name or
Operator ID number on a label. Select a Date Line Option
which contains the Operator field. The options which
contain Operator fields are 4, 8, 9, and 10. (Refer to Setting
Up the Date Line Options for detailed procedures.)
Your scale can be configured to print either the ID number
or the name but it will not print both.
☛ Note
When the Forced Logon option is used in conjunction with
Op Sign On the scale prompts the Operator for an ID each
time they want to access a PLU.
To access the Forced Logon option:
A. From the Function Code prompt, TYPE 51 and PRESS
[ENTER]. The Bycnt Metho prompt displays.
B. PRESS [DOWN ARROW (ÈÈÈÈ)] until the Forced Logon
prompt displays.
C. Turn the option ON. (PRESS [CLEAR] to toggle between
ON and OFF.)
Printing an Operator Access
Report
Deleting Operator IDs
Print a list of Operators’ access information. You may want
to do this to verify the IDs and access codes which exist in
the system. You must use continuous label stock or listing
paper.
To print an Operator access report:
1. PRESS [SUPERVISOR]. If a Secret ID is set up, enter your
Secret ID. The Function Code prompt displays.
2. TYPE 34 and PRESS [ENTER] or PRESS [OPERATOR
IDs]. The Operator ID prompt displays.
3. PRESS [PRINT] to print all Operator IDs.
4. PRESS [ESCAPE] to return to the Function Code prompt.
Delete an Operator ID to permanently remove it from the
system.
☛ Note
Although you delete an operator, the totals for that operator
will remain in the scale until you delete the totals.
Scale Setup 3 - 12
SP600 Scale System
To delete an Operator ID:
1. PRESS [SUPERVISOR]. If a Secret ID is set up, enter your
Secret ID. The Function Code prompt displays.
2. TYPE your Operator ID (if required) and PRESS
[ENTER]. The Function Code prompt displays.
3. TYPE 34 and PRESS [ENTER] or PRESS [OPERATOR
IDs]. The Operator ID prompt displays.
4. TYPE the Operator ID number that you want to delete
and PRESS [ENTER]. The ID number displays followed
by the Access Code.
5. TYPE 0 (zero) for the access code and PRESS [ENTER].
Deleted flashes followed by the Operator ID prompt.
6. PRESS [UP ARROW (ÇÇÇÇ)] or [DOWN ARROW (ÈÈÈÈ)] to
move to the previous or next Operator ID. -- OR -- PRESS
[ESCAPE] to return to the Function Code prompt.
Setting Up Speedkeys
Adding a Speedkey
Speedkeys are used to quickly access the fastest-moving
items with minimal keystrokes or to quickly access an
operator ID. Different Speedkeys can be assigned for each
scale, even if they are within the same department.
Speedkeys enable operators to enter a PLU number or log
onto a scale by pressing a single key. SP600 scales offer 30
Speedkeys.
☛ Note
Before you can add an Operator ID as a Speedkey, you must
turn on the Op Sign On option (in Function Code 51).
Note
If you assign a PLU number that does not exist in the
system, the message RECORD NOT FOUND flashes
followed by the Key prompt. This is telling you that the PLU
is assigned to the Speedkey, but you must add the PLU
record to the database.
To add a Speedkey:
1. PRESS [SUPERVISOR]. If a Secret ID is set up, enter your
Secret ID. The Function Code prompt displays.
2. TYPE 30 and PRESS [ENTER] or PRESS [SPEED KEYS].
The Key prompt displays.
3 - 13 Scale Setup

SP600 Scale System
3. PRESS a key on the keyboard. Keys which can be
assigned as Speedkeys are [A] to [Z] and the arrow keys.
The Key prompt is now followed by the letter you
selected and the PLU prompt.
4. To assign a PLU to this Speedkey, TYPE the PLU
number.
-- OR --
To assign an operator ID to this Speedkey, PRESS
[OPERATOR NUMBER] and enter the ID number.
5. PRESS [DOWN ARROW (ÈÈÈÈ)]. The Description prompt
displays the description for the PLU or Operator ID,
which Speedkey represents.
6. PRESS [ENTER] to save the Speedkey and return to the
Key prompt.
7. PRESS [ESCAPE] to return to the Function Code prompt.
Printing a Speedkey Overlay
Print a Speedkey overlay to place over the bottom 3 rows of
keys on the keyboard (replacing the Supervisor overlay).
You must have continuous label stock or listing paper
loaded before you can print a Speedkey overlay. If you are
using continuous label stock, remember to load the label
stock so that the backing paper remains attached.
To print a Speedkey overlay:
1. PRESS [SUPERVISOR]. If a Secret ID is set up, enter your
Secret ID. The Function Code prompt displays.
2. TYPE 30 and PRESS [ENTER] or PRESS [SPEED KEYS].
The Key prompt displays.
3. PRESS [PRINT].
✎ Tip
You can change the size that the Speedkeys print on the
Speedkey overlay through Function Code 51.
To change the size:
A. From the Function Code prompt TYPE 51 and PRESS
[ENTER]. The Bycnt Metho prompt displays.
B. PRESS [DOWN ARROW (ÈÈÈÈ)] until the SpeedKeySize
prompt displays.
C. TYPE 0 to 3 and PRESS [ENTER] to increase or decrease
the Speedkey size. Each number increases/decreases the
width of the Speedkeys by approximately 2 mm.
Scale Setup 3 - 14

SP600 Scale System
Deleting a Speedkey
Delete a Speedkey to permanently remove it from the
system.
To delete a Speedkey:
1. PRESS [SUPERVISOR]. If a Secret ID is set up, enter your
Secret ID. The Function Code prompt displays.
2. TYPE 30 and PRESS [ENTER] or PRESS [SPEED KEYS].
The Key prompt displays.
3. PRESS the Speedkey on the keyboard. The Speedkey and
its assignment display.
4. PRESS [CLEAR] followed by [ENTER]. Key Deleted
flashes followed by the Key prompt.
5. PRESS [ESCAPE] to return to the Function Code prompt.
3 - 15 Scale Setup

 Loading...