

Page 1
HLX Scale System
with GCD
Supervisor Manual
ML-29334
ML-29335
ML-29336
ML-29337
701 S. RIDGE AVENUE
TROY, OHIO 45374
www.hobartcorp.com
F-35548 Rev. A (June 2013)
Page 2

Page 3

HLX Scale System with GCD Supervisor Manual
TABLE OF CONTENTS
Chapter 1: Introduction. . . . . . . . . . . . . . . . . . . . . . . . . . . . . . . . . . . . . . . . . . . . . . . . . . . . . . . . . . . . . . .1-1
Welcome. . . . . . . . . . . . . . . . . . . . . . . . . . . . . . . . . . . . . . . . . . . . . . . . . . . . . . . . . . . . . .1-2
Verify Correctness of
Weight & Price . . . . . . . . . . . . . . . . . . . . . . . . . . . . . . . . . . . . . . . . . . . . . . . . . . . . . . . . .1-2
FCC Note . . . . . . . . . . . . . . . . . . . . . . . . . . . . . . . . . . . . . . . . . . . . . . . . . . . . . . . . . . . . .1-3
How to Use This Manual. . . . . . . . . . . . . . . . . . . . . . . . . . . . . . . . . . . . . . . . . . . . . . . . .1-3
Chapter 2: Understanding the System . . . . . . . . . . . . . . . . . . . . . . . . . . . . . . . . . . . . . . . . . . . . . . . . . . .2-1
Electrical Connections . . . . . . . . . . . . . . . . . . . . . . . . . . . . . . . . . . . . . . . . . . . . . . . . . . .2-2
Communication Connections . . . . . . . . . . . . . . . . . . . . . . . . . . . . . . . . . . . . . . . . . . . . . .2-2
Display Console . . . . . . . . . . . . . . . . . . . . . . . . . . . . . . . . . . . . . . . . . . . . . . . . . . . . . . . .2-3
Supervisor Mode Overview . . . . . . . . . . . . . . . . . . . . . . . . . . . . . . . . . . . . . . . . . . . . . . .2-4
Shutting Down the System . . . . . . . . . . . . . . . . . . . . . . . . . . . . . . . . . . . . . . . . . . . . . . . .2-5
Power Button . . . . . . . . . . . . . . . . . . . . . . . . . . . . . . . . . . . . . . . . . . . . . . . . . . . . . . . . . .2-6
Help . . . . . . . . . . . . . . . . . . . . . . . . . . . . . . . . . . . . . . . . . . . . . . . . . . . . . . . . . . . . . . . . .2-6
Chapter 3: Setting Up Your System . . . . . . . . . . . . . . . . . . . . . . . . . . . . . . . . . . . . . . . . . . . . . . . . . . . . .3-1
Setting Up Store Information . . . . . . . . . . . . . . . . . . . . . . . . . . . . . . . . . . . . . . . . . . . . . .3-3
Setting Up Scale Operation . . . . . . . . . . . . . . . . . . . . . . . . . . . . . . . . . . . . . . . . . . . . . . .3-4
Updating GCD Content . . . . . . . . . . . . . . . . . . . . . . . . . . . . . . . . . . . . . . . . . . . . . . . . .3-18
Setting Up Flashkeys . . . . . . . . . . . . . . . . . . . . . . . . . . . . . . . . . . . . . . . . . . . . . . . . . . .3-23
Setting Up Label Types . . . . . . . . . . . . . . . . . . . . . . . . . . . . . . . . . . . . . . . . . . . . . . . . .3-36
Setting Up Operator ID’s . . . . . . . . . . . . . . . . . . . . . . . . . . . . . . . . . . . . . . . . . . . . . . . .3-45
Updating Firmware. . . . . . . . . . . . . . . . . . . . . . . . . . . . . . . . . . . . . . . . . . . . . . . . . . . . .3-56
Email. . . . . . . . . . . . . . . . . . . . . . . . . . . . . . . . . . . . . . . . . . . . . . . . . . . . . . . . . . . . . . . .3-59
Automatic Updates . . . . . . . . . . . . . . . . . . . . . . . . . . . . . . . . . . . . . . . . . . . . . . . . . . . . .3-60
Setting Up Product Default Values . . . . . . . . . . . . . . . . . . . . . . . . . . . . . . . . . . . . . . . .3-62
Running a Configuration Report . . . . . . . . . . . . . . . . . . . . . . . . . . . . . . . . . . . . . . . . . .3-66
Weigh Types. . . . . . . . . . . . . . . . . . . . . . . . . . . . . . . . . . . . . . . . . . . . . . . . . . . . . . . . . .3-67
Chapter 4: Setting Up the Database . . . . . . . . . . . . . . . . . . . . . . . . . . . . . . . . . . . . . . . . . . . . . . . . . . . . .4-1
Understanding the Database . . . . . . . . . . . . . . . . . . . . . . . . . . . . . . . . . . . . . . . . . . . . . . .4-2
Setting Up Classes . . . . . . . . . . . . . . . . . . . . . . . . . . . . . . . . . . . . . . . . . . . . . . . . . . . . .4-10
Setting Up Products . . . . . . . . . . . . . . . . . . . . . . . . . . . . . . . . . . . . . . . . . . . . . . . . . . . .4-14
Modifying Product Information . . . . . . . . . . . . . . . . . . . . . . . . . . . . . . . . . . . . . . . . . . .4-25
Setting Up Support Files. . . . . . . . . . . . . . . . . . . . . . . . . . . . . . . . . . . . . . . . . . . . . . . . .4-31
Chapter 5: Merchandising Programs . . . . . . . . . . . . . . . . . . . . . . . . . . . . . . . . . . . . . . . . . . . . . . . . . . . .5-1
Setting Up Your Scale for
Merchandising Program . . . . . . . . . . . . . . . . . . . . . . . . . . . . . . . . . . . . . . . . . . . . . . . . . .5-2
Setting Up For a Specific PLU . . . . . . . . . . . . . . . . . . . . . . . . . . . . . . . . . . . . . . . . . . . . .5-3
F-35548 Rev. A (June 2013) i Table of Contents
Page 4

HLX Scale System with GCD Supervisor Manual
Chapter 6: Configuring a Barcode . . . . . . . . . . . . . . . . . . . . . . . . . . . . . . . . . . . . . . . . . . . . . . . . . . . . . .6-1
Understanding EAN Configuration . . . . . . . . . . . . . . . . . . . . . . . . . . . . . . . . . . . . . . . . .6-2
Setting Up Your System for EAN
Barcodes . . . . . . . . . . . . . . . . . . . . . . . . . . . . . . . . . . . . . . . . . . . . . . . . . . . . . . . . . . . . . .6-7
Chapter 7: Using Transactions . . . . . . . . . . . . . . . . . . . . . . . . . . . . . . . . . . . . . . . . . . . . . . . . . . . . . . . . .7-1
Understanding Transactions . . . . . . . . . . . . . . . . . . . . . . . . . . . . . . . . . . . . . . . . . . . . . . .7-2
Configuring Transaction Types . . . . . . . . . . . . . . . . . . . . . . . . . . . . . . . . . . . . . . . . . . . .7-3
Viewing Transactions. . . . . . . . . . . . . . . . . . . . . . . . . . . . . . . . . . . . . . . . . . . . . . . . . . . .7-5
Voiding Transactions . . . . . . . . . . . . . . . . . . . . . . . . . . . . . . . . . . . . . . . . . . . . . . . . . . . .7-9
COMM Interface Settings . . . . . . . . . . . . . . . . . . . . . . . . . . . . . . . . . . . . . . . . . . . . . . .7-11
Chapter 8: Backup & Restore. . . . . . . . . . . . . . . . . . . . . . . . . . . . . . . . . . . . . . . . . . . . . . . . . . . . . . . . . .8-1
Understanding the Backup & Restore Functions . . . . . . . . . . . . . . . . . . . . . . . . . . . . . . .8-2
Using the Import Function . . . . . . . . . . . . . . . . . . . . . . . . . . . . . . . . . . . . . . . . . . . . . . . .8-3
Using the Backup Function . . . . . . . . . . . . . . . . . . . . . . . . . . . . . . . . . . . . . . . . . . . . . . .8-5
Using the Restore Function . . . . . . . . . . . . . . . . . . . . . . . . . . . . . . . . . . . . . . . . . . . . . . .8-6
Using the Merge Function . . . . . . . . . . . . . . . . . . . . . . . . . . . . . . . . . . . . . . . . . . . . . . . .8-8
Running a Record Scan . . . . . . . . . . . . . . . . . . . . . . . . . . . . . . . . . . . . . . . . . . . . . . . . . .8-9
Wireless Profiles. . . . . . . . . . . . . . . . . . . . . . . . . . . . . . . . . . . . . . . . . . . . . . . . . . . . . . .8-10
Chapter 9: Setting Up COOL . . . . . . . . . . . . . . . . . . . . . . . . . . . . . . . . . . . . . . . . . . . . . . . . . . . . . . . . . .9-1
Understanding COOL. . . . . . . . . . . . . . . . . . . . . . . . . . . . . . . . . . . . . . . . . . . . . . . . . . . .9-2
Setting Up COOL For Operator Use . . . . . . . . . . . . . . . . . . . . . . . . . . . . . . . . . . . . . . . .9-3
Appendix A . . . . . . . . . . . . . . . . . . . . . . . . . . . . . . . . . . . . . . . . . . . . . . . . . . . . . . . . . . . . . . . . . . . . . . A-1
Using the Text Editor . . . . . . . . . . . . . . . . . . . . . . . . . . . . . . . . . . . . . . . . . . . . . . . . . . . A-2
Label Information. . . . . . . . . . . . . . . . . . . . . . . . . . . . . . . . . . . . . . . . . . . . . . . . . . . . . . A-5
Network Information . . . . . . . . . . . . . . . . . . . . . . . . . . . . . . . . . . . . . . . . . . . . . . . . . . . A-7
Configure Windows Mode . . . . . . . . . . . . . . . . . . . . . . . . . . . . . . . . . . . . . . . . . . . . . . . A-8
Calibrate the Touch Screen . . . . . . . . . . . . . . . . . . . . . . . . . . . . . . . . . . . . . . . . . . . . . A-10
Glossary of Common Terms . . . . . . . . . . . . . . . . . . . . . . . . . . . . . . . . . . . . . . . . . . . . A-12
Index: . . . . . . . . . . . . . . . . . . . . . . . . . . . . . . . . . . . . . . . . . . . . . . . . . . . . . . . . . . . . . . . . . . . . . . . . . . . . I-1
Java is a trademark of Sun Microsystems, Inc.
Copyright 2007 General Software Inc. All Rights Reserved
Hobart, A division of ITW Food Equipment Group LLC 2007
Table of Contents ii F-35548 Rev. A (June 2013)
Page 5

HLX Scale System with GCD Supervisor Manual
Chapter 1: Introduction
Welcome . . . . . . . . . . . . . . . . . . . . . . . . . . . . . . . . . . . . . . . . . . . . . . . . . . . . . . . . . . . . . . . . . . . . . . . . . . . . . . . . . . 1-2
FCC Note . . . . . . . . . . . . . . . . . . . . . . . . . . . . . . . . . . . . . . . . . . . . . . . . . . . . . . . . . . . . . . . . . . . . . . . . . . . . . . . . . 1-3
Verify Correctness of Weight & Price . . . . . . . . . . . . . . . . . . . . . . . . . . . . . . . . . . . . . . . . . . . . . . . . . . . . . . . . . . . 1-2
How to Use This Manual . . . . . . . . . . . . . . . . . . . . . . . . . . . . . . . . . . . . . . . . . . . . . . . . . . . . . . . . . . . . . . . . . . . . . 1-3
Online Viewing. . . . . . . . . . . . . . . . . . . . . . . . . . . . . . . . . . . . . . . . . . . . . . . . . . . . . . . . . . . . . . . . . . . . . . . . . . . 1-3
Manual Terminology . . . . . . . . . . . . . . . . . . . . . . . . . . . . . . . . . . . . . . . . . . . . . . . . . . . . . . . . . . . . . . . . . . . . . . 1-4
Important Information . . . . . . . . . . . . . . . . . . . . . . . . . . . . . . . . . . . . . . . . . . . . . . . . . . . . . . . . . . . . . . . . . . . . . 1-4
Supervisor Manual Overview. . . . . . . . . . . . . . . . . . . . . . . . . . . . . . . . . . . . . . . . . . . . . . . . . . . . . . . . . . . . . . . . 1-5
F-35548 Rev. A (June 2013) 1-1 Introduction
Page 6
HLX Scale System with GCD Supervisor Manual
HLX Scale System with GCD
SAVE THESE INSTRUCTIONS
Introduction
Welcome The HLX Scale System is perfect for your over-the-counter
The following selections are available in this chapter:
We lco me
Verify Correctness of Weight & Price
FCC Note
How to Use This Manual
weighing applications. This weighing system can handle a broad
variety of products for deli, produce, seafood and cheese departments. It enhances your merchandising capabilities with multiple
fonts, graphics and label types.
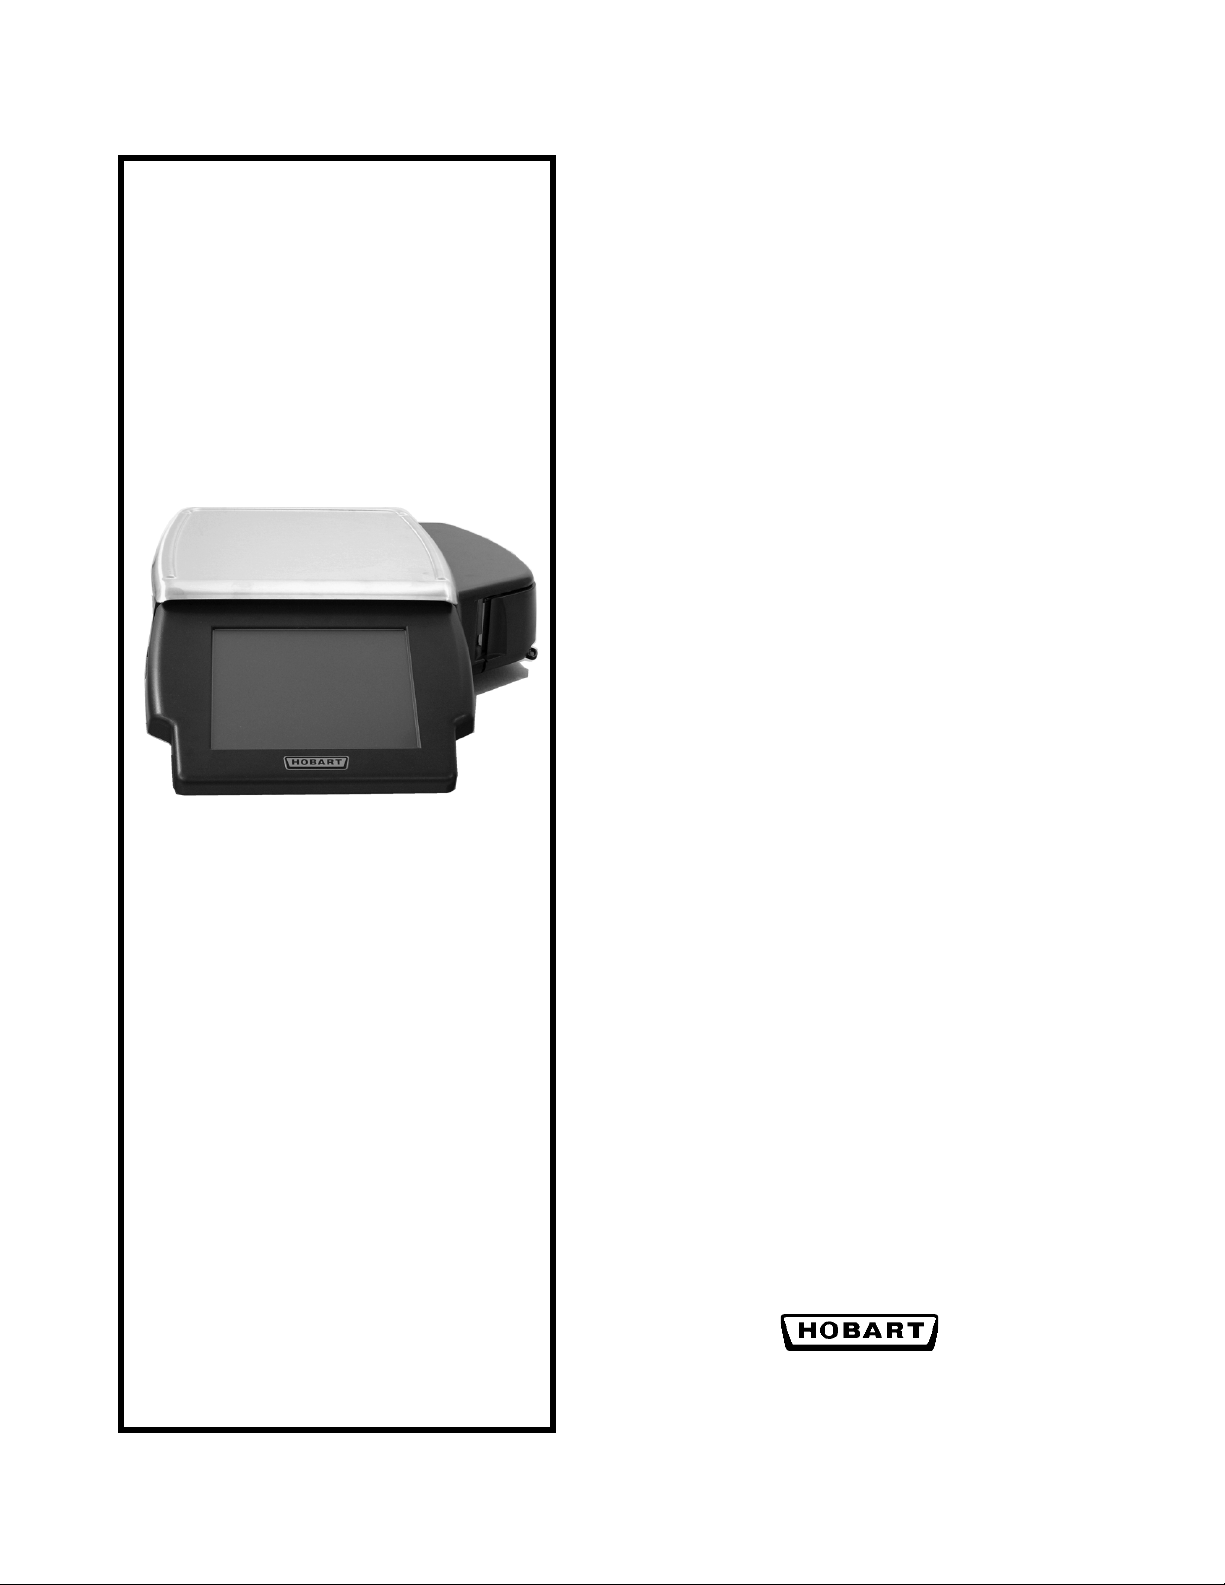
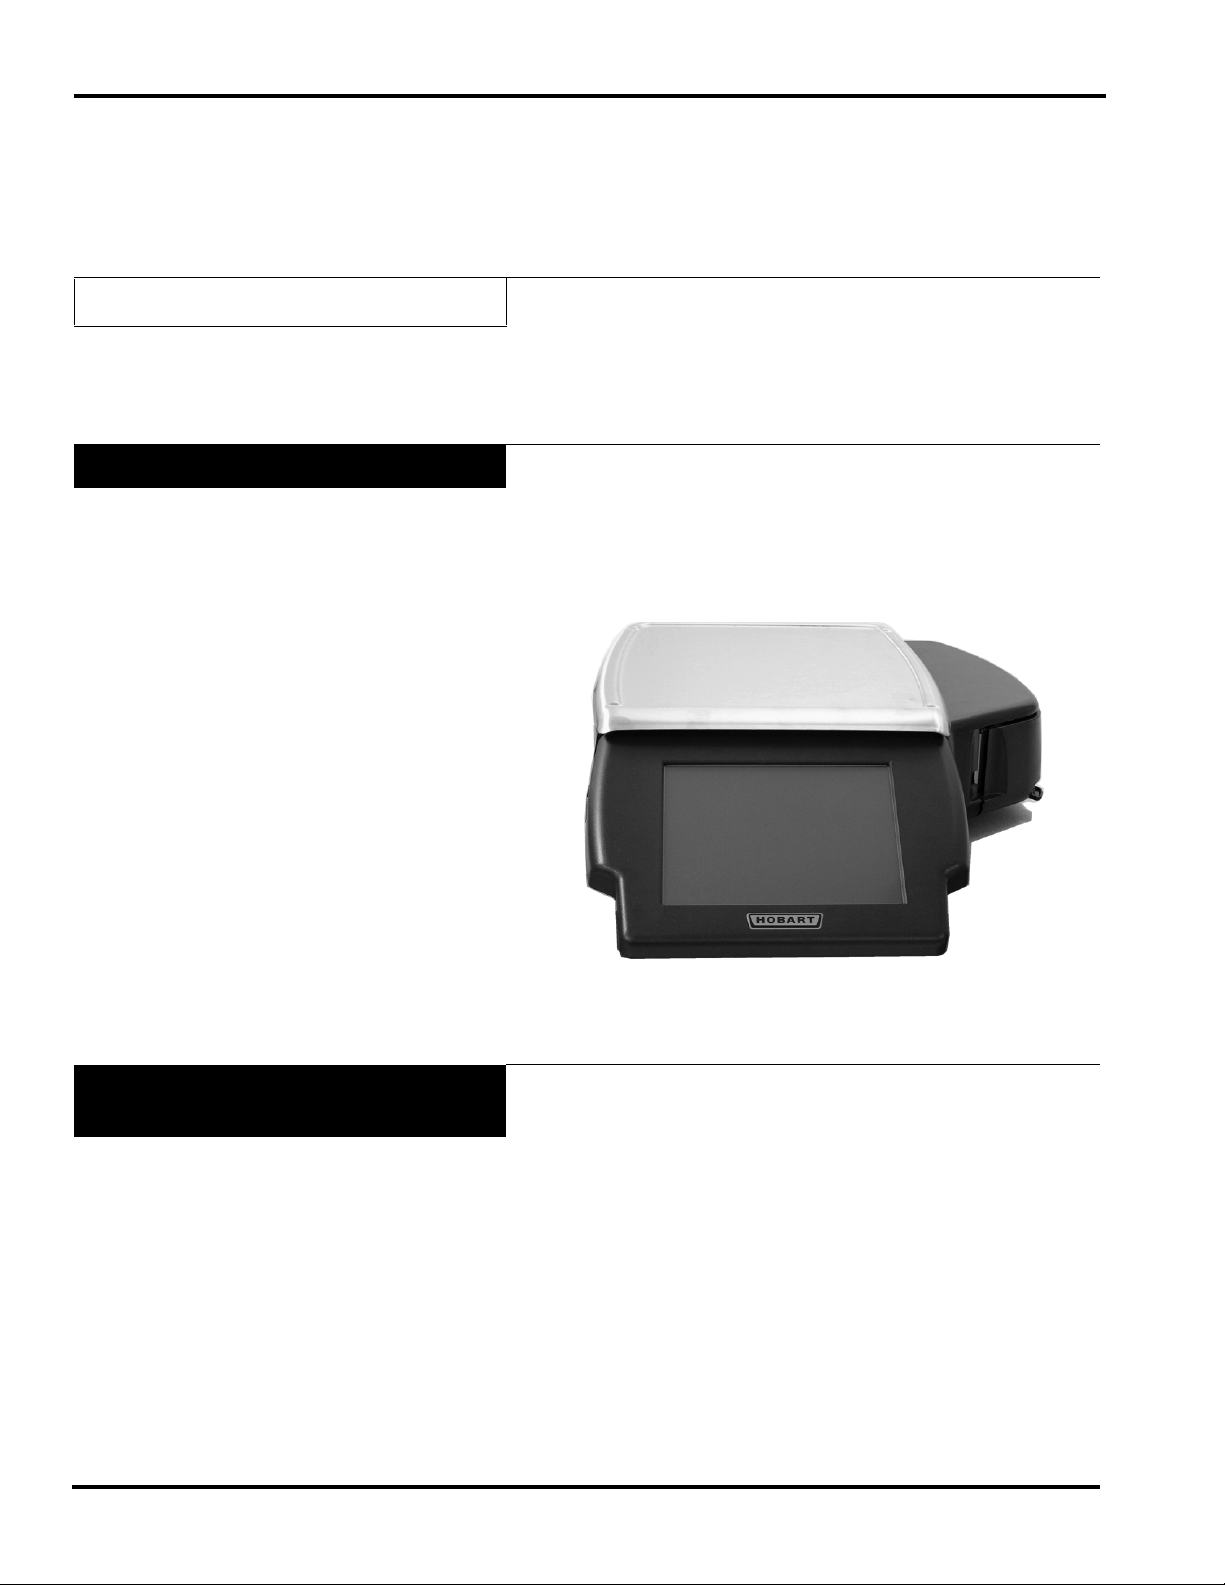
HLX Scale System
All necessary operator data appears on the touch screen.
Verify Correctness of
Weight & Price
Introduction 1-2 F-35548 Rev. A (June 2013)
Routinely verify label information. Check the multiplication of
price per pound times weight, and check the scale weight against
printed label weight. Weigh the same package several times to
verify outcome consistency. Packages that weigh near the middle
of the 0.005 lb increment will normally vary up or down by
0.005 lb. Variation greater than 0.005 lb indicates the need for
weigher adjustment. In such a case, or whenever necessary, contact your local Hobart Service Representative.
Page 7
FCC Note
HLX Scale System with GCD Supervisor Manual
This equipment has been tested and found to comply with the
limits for a Class A digital device, pursuant to Part 15 of the FCC
rules. These limits are designed to provide reasonable protection
against harmful interference when the equipment is operated in a
commercial environment. This equipment generates, uses and can
radiate radio frequency energy and, if not installed and used in
accordance with the instruction manual, may cause harmful interference to radio communications. Operation of this equipment in
a residential area is likely to cause harmful interference, in which
case, the user will be required to correct the interference at their
own expense.
Note
NO MODIFICATIONS: Modifications to this device shall not
be made without the written consent of ITW Food Equipment
Group. Unauthorized modifications may void the authority
grated under Federal Communications Commission Rules
permitting the operation of this device.
How to Use This Manual
Online Viewing
Hobart uses specific formats throughout the manuals for you to
easily identify key selections. These formats are described in the
following topics:
Online Viewing
Manual Terminology
Important Information
Supervisor Manual Overview
If you are viewing this manual online or from a CD, you have the
advantage of using the cross-referencing feature that is built into
the document. Links are shown in italicized text and are crossreferenced.
For example, the text may say:
Appendix A
When you move your mouse directly over the text, the cursor
changes to a pointing hand. This indicates a cross-reference. If
you click on this text, you will be taken to that section of the
document.
Use the back arrow on the top of your screen to return to your
starting point.
F-35548 Rev. A (June 2013) 1-3 Introduction
Page 8
HLX Scale System with GCD Supervisor Manual
Manual Terminology
This manual uses the following terminology for keystrokes and
data manipulation procedures:
• The word TYPE means to touch a series of keys on the
Operator Screen Numeric Keypad or the Operator Screen
Alpha Keyboard.
• The word TOUCH means to activate an entry shown on the
Operator Display screen.
• The word SELECT means to choose one item from a list
brought up on the Operator Screen.
The following special instructions are used in the manual:
Note
A Note is information that you need to know, but is not an actual
step in the process.
Tip
Important Information
A Tip is additional information that may be useful when you are
using the system.
Look At This
Look At This is information to alert you that you may be doing
something that will permanently alter your system.
The following warning is provided for your protection.
WARNING
FLUORESCENT LAMP IN DISPLAY PANEL CONTAINS A
SMALL AMOUNT OF MERCURY. PLEASE DISPOSE OF
ACCORDING TO LOCAL, STATE, OR FEDERAL LAWS.
Introduction 1-4 F-35548 Rev. A (June 2013)
Page 9
Supervisor Manual
Overview
HLX Scale System with GCD Supervisor Manual
Refer to the following sections for information on setting up and
using the HLX Scale System.
Chapter 2: Understanding the System explains the HLX
Scale System, including electrical and communication connections and mechanical features.
Chapter 3: Setting Up Your System tells you how to create
and/or edit important system information in the HLX Scale
System, such as: operator data, label information, scale operation and communications, store information, etc.
Chapter 4: Setting Up the Database is where you define your
products and classes, then learn how to maintain them.
Chapter 5: Merchandising Programs describes how to prop-
erly set up and maintain your in-store discount program(s),
such as Frequent Shopper.
Chapter 6: Configuring a Barcode tells you how to configure
an EAN13 barcode.
Chapter 7: Using Transactions tells you how to use the
Transactions function for reporting purposes.
Chapter 8: Backup & Restore is where you find the steps to
save your data to a backup file or restore your data.
Chapter 9: Setting Up COOL explains COOL (Country of
Origin Labeling) and how to set up COOL text.
Appendix A provides you with detailed information on sub-
jects that are briefly covered in the manual.
The Index provides an alphabetical listing of the topics in this
manual and their corresponding page numbers.
F-35548 Rev. A (June 2013) 1-5 Introduction
Page 10

HLX Scale System with GCD Supervisor Manual
Introduction 1-6 F-35548 Rev. A (June 2013)
Page 11

HLX Scale System with GCD Supervisor Manual
Chapter 2: Understanding the System
Electrical Connections . . . . . . . . . . . . . . . . . . . . . . . . . . . . . . . . . . . . . . . . . . . . . . . . . . . . . . . . . . . . . . . . . . . . . . . 2-2
Communication Connections . . . . . . . . . . . . . . . . . . . . . . . . . . . . . . . . . . . . . . . . . . . . . . . . . . . . . . . . . . . . . . . . . . 2-2
Display Console . . . . . . . . . . . . . . . . . . . . . . . . . . . . . . . . . . . . . . . . . . . . . . . . . . . . . . . . . . . . . . . . . . . . . . . . . . . . 2-3
Supervisor Mode Overview . . . . . . . . . . . . . . . . . . . . . . . . . . . . . . . . . . . . . . . . . . . . . . . . . . . . . . . . . . . . . . . . . . . 2-4
Accessing Supervisor Mode. . . . . . . . . . . . . . . . . . . . . . . . . . . . . . . . . . . . . . . . . . . . . . . . . . . . . . . . . . . . . . . . . 2-4
Understanding the Supervisor Menu . . . . . . . . . . . . . . . . . . . . . . . . . . . . . . . . . . . . . . . . . . . . . . . . . . . . . . . . . . 2-4
Shutting Down the System . . . . . . . . . . . . . . . . . . . . . . . . . . . . . . . . . . . . . . . . . . . . . . . . . . . . . . . . . . . . . . . . . . . . 2-5
Power Button . . . . . . . . . . . . . . . . . . . . . . . . . . . . . . . . . . . . . . . . . . . . . . . . . . . . . . . . . . . . . . . . . . . . . . . . . . . . . . 2-6
Help. . . . . . . . . . . . . . . . . . . . . . . . . . . . . . . . . . . . . . . . . . . . . . . . . . . . . . . . . . . . . . . . . . . . . . . . . . . . . . . . . . . . . . 2-6
Describe This Page. . . . . . . . . . . . . . . . . . . . . . . . . . . . . . . . . . . . . . . . . . . . . . . . . . . . . . . . . . . . . . . . . . . . . . . . 2-6
Questions . . . . . . . . . . . . . . . . . . . . . . . . . . . . . . . . . . . . . . . . . . . . . . . . . . . . . . . . . . . . . . . . . . . . . . . . . . . . . . . 2-7
About Hobart HLX. . . . . . . . . . . . . . . . . . . . . . . . . . . . . . . . . . . . . . . . . . . . . . . . . . . . . . . . . . . . . . . . . . . . . . . . 2-7
F-35548 Rev. A (June 2013) 2-1 Understanding the System
Page 12
HLX Scale System with GCD Supervisor Manual
Understanding the System
The HLX Scale System operates on the Microsoft Windows XP
Embedded operating system. If configured, you can access the
Windows desktop to use the features provided with operating
system. Contact you network administrator with any questions
regarding the use of Windows.
The HLX Scale System can store information on thousands of
products. Retail store information required for product handling
and processing, such as PLU number, UPC number, Pricing, Tare
and Shelf Life are included. Consumer information describing
products, such as NutriFacts, Safe Handling, Expanded Text,
Health Tips, Meal Planners, Recipes, Cooking Instructions and
Merchandising Graphics are also included.
Look At This
The scale should be installed and/or moved only by a qualified
Hobart Service Technician. The system can operate in a temperature range from 14°F to 104°F (-10°C to 40°C).
Electrical Connections
Communication Connections
The following topics are explained:
Electrical Connections
Communication Connections
Display Console
Supervisor Mode Overview
Shutting Down the System
Power Button
Help
A power cord is located on the bottom of the scale. Electric
power of 120 V., 60 Hz, 1 phase (2-wire plus ground) is required.
There are several ports that can be configured:
• 2 Type A USB 2.0 Ports
• RJ-45 Jack for an Ethernet Connector (TCP/IP)
–OR–
• Wireless TCP/IP (optional)
Understanding the System 2-2 F-35548 Rev. A (June 2013)
Page 13
Display Console
Attributes Functions
HLX Scale System with GCD Supervisor Manual
The Display Console is a touch screen that enables you to enter
information and move through the display screens.
Menu Buttons The menu buttons on the Supervisor Menu are used to access the drop-down menus,
which show the subcategories of data available for selection.
Check Box A check box enables or disables optional functions. A check mark or circle appears in
the box when a function is enabled.
Text Box A text box is a field into which you enter data.
Grayed Field A grayed field indicates the field is not available for the current screen or transaction.
Flashing Cursor The flashing cursor in a text box indicates that the field is currently activated and is
available for data entry.
Light Blue Highlighted
Drop-Down Menu
A drop-down menu, shown in light blue, indicates the menu has been activated and a
subcategory can be selected.
Flashkeys The Flashkeys provide quick access to frequently used products and functions.
Numeric Keypad The numeric keypad appears on the screen when numeric data is to be entered.
Alpha Keyboard The alpha keyboard appears on the screen when alpha data is to be entered.
Page – of – On some of the screens, there may be additional pages available. This is shown to you
by showing a Page – of – drop-down menu in the top right corner.
F-35548 Rev. A (June 2013) 2-3 Understanding the System
Page 14
HLX Scale System with GCD Supervisor Manual
Supervisor Mode Overview
The purpose of Supervisor mode is so you, the supervisor, can set
up parameters to oversee and manage the operation of the HLX
Scale System according to your business preferences. It can be
password-protected, so only those who are supposed to be
making these types of changes will be allowed to do so.
Accessing Supervisor Mode
Understanding the Supervisor
Menu
Supervisor Mode can be accessed from the console or from a
computer. To access the Supervisor Mode remotely, the HLX
Scale System and computer must be configured. Contact your
local network administrator for assistance if necessary and See
Appendix A
for more information about Setting Up Remote
Access.
If Supervisor Mode is password-protected, then you will need an
operator ID with Supervisor permission (see Setting Up Operator
ID’s).
Once remote hookup has been established:
To enter Supervisor Mode:
1. From the Main Menu, TOUCH System.
2. From the System Menu, TOUCH Supervisor Mode. You
should now be in the Supervisor Mode. (login may be
required)
The Supervisor Menu is the starting point for any Supervisor
task. From this point, you can choose a menu option by
TOUCHING a menu button on the Supervisor Menu. The
instructions for how to use Supervisor mode to set up the HLX
Scale System are detailed in later chapters.
Understanding the System 2-4 F-35548 Rev. A (June 2013)
Page 15
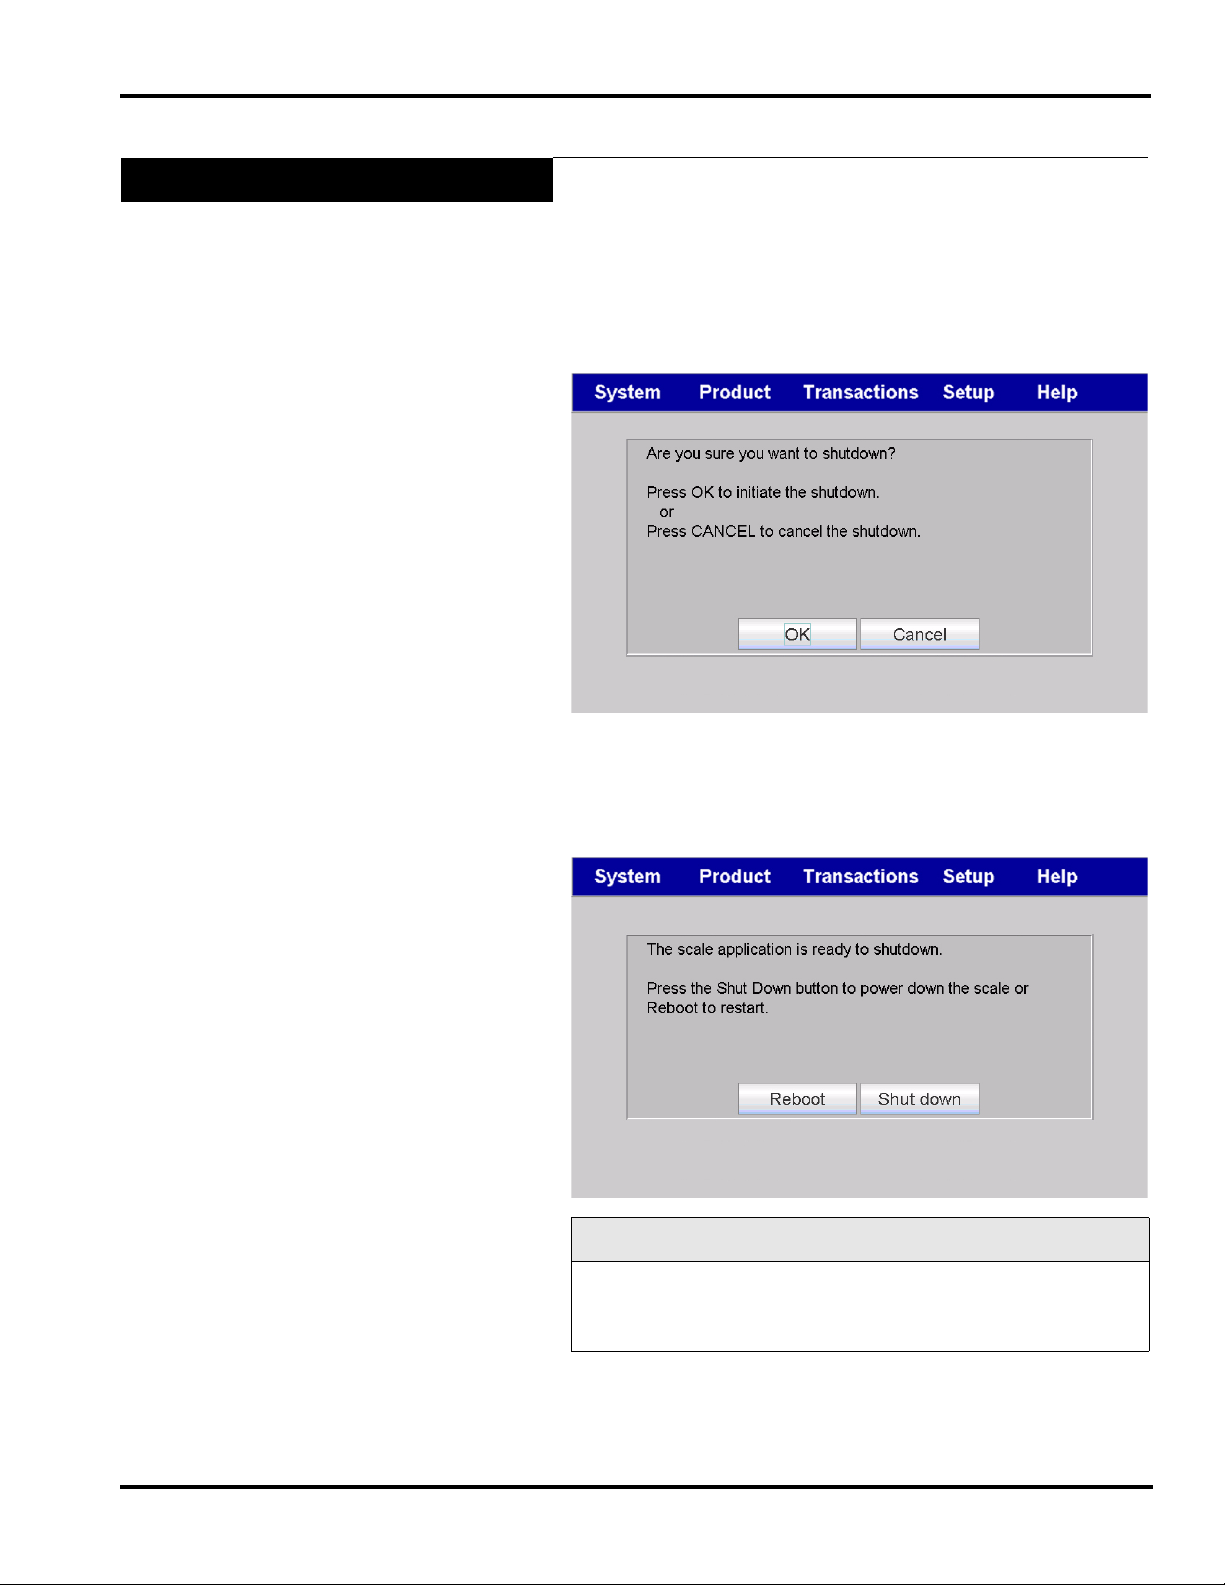
Shutting Down the System
HLX Scale System with GCD Supervisor Manual
The Shutdown feature is designed to stop all internal functions.
Shutdown is required before power can be disconnected from the
system.
To Shutdown the System:
1. From the Main Menu, TOUCH System.
2. From the System Menu, TOUCH Shutdown. A screen will
appear and ask, “Are you sure you want to shutdown?”
3. TOUCH OK.
4. When the sytem is ready to shutdown, a screen will appear
and say, “The scale application is ready to shutdown. Press
the Shut Down Button to power down the scale or Reboot to
restart.” TOUCH Shut Down.
Look At This
Shutdown may take a few minutes to complete depending on the
size of the database in the scale. DO NOT disconnect power to
the system during shutdown.
5. Wait for Windows to shutdown (the screen will go black).
Unplug scale.
F-35548 Rev. A (June 2013) 2-5 Understanding the System
Page 16
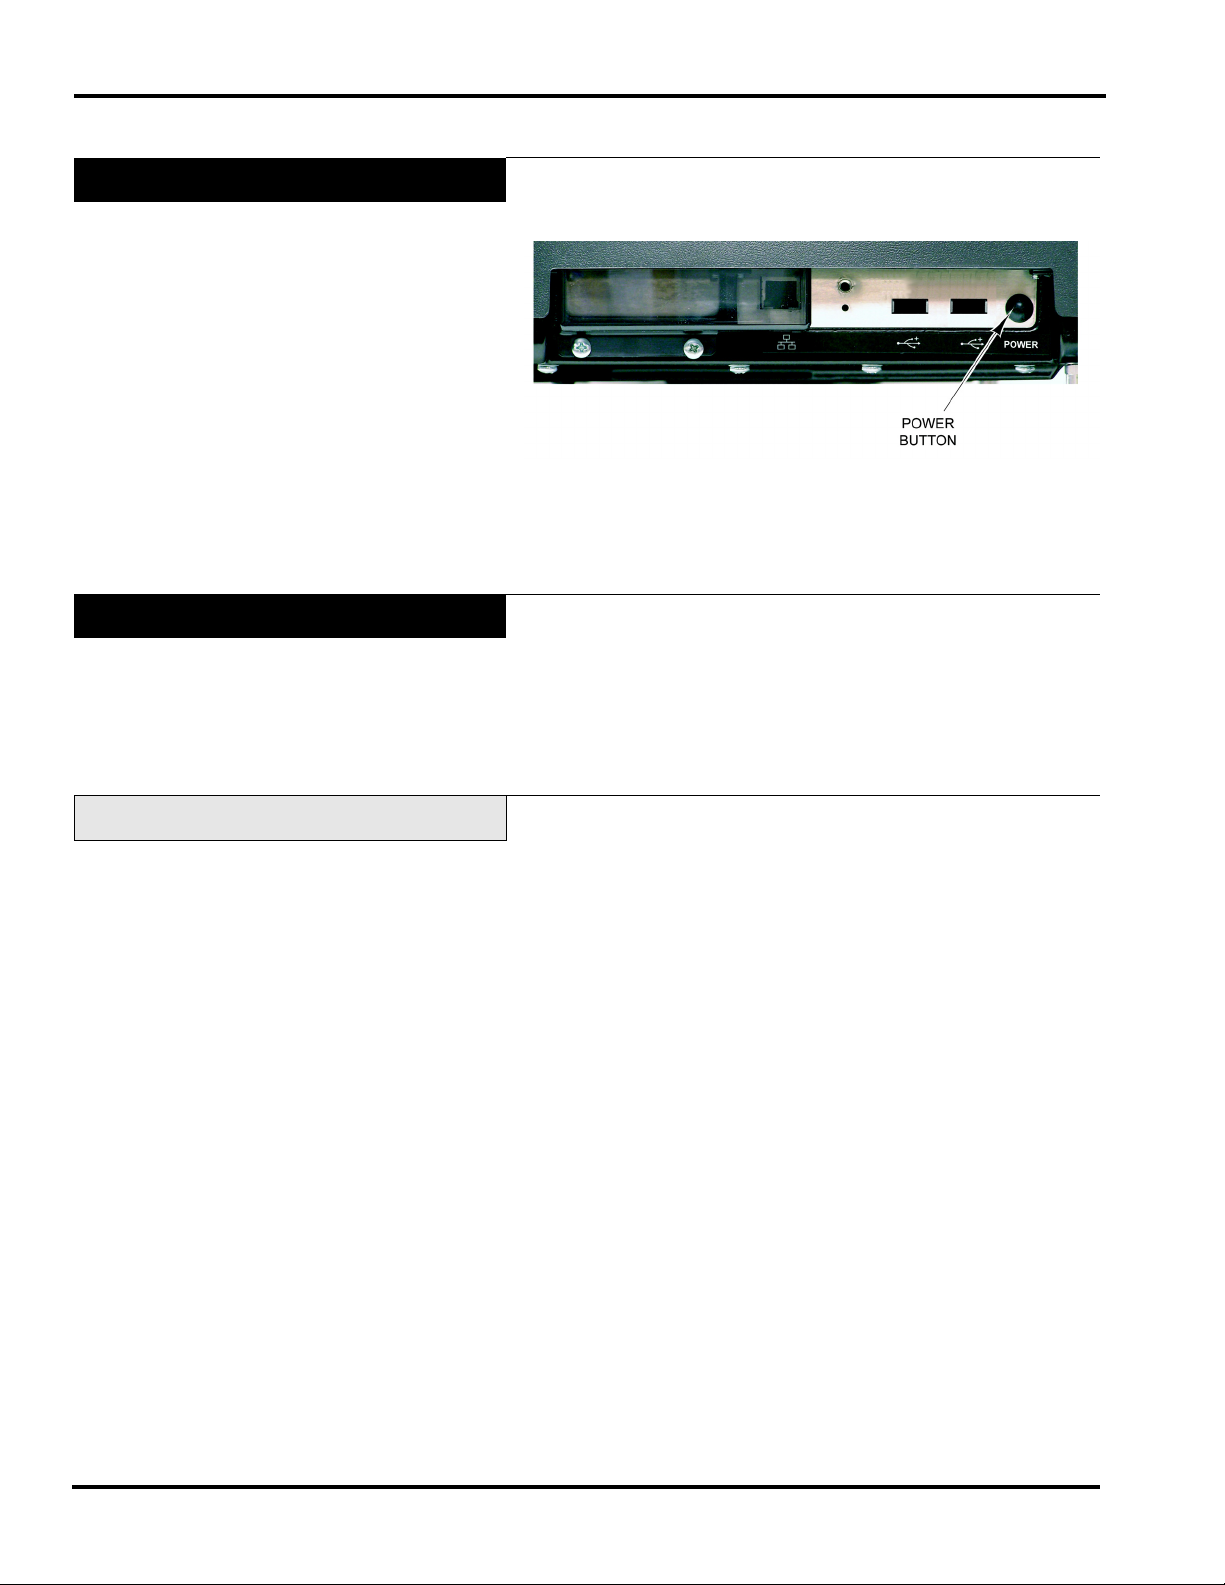
HLX Scale System with GCD Supervisor Manual
Power Button
Located on the left side of the scale is the Power Button. In the
unlikely event the scale stops responding, use the Power Button
to reboot the scale.
• Press the on/off (power) switch for 2 seconds and it will
cause an orderly shutdown of Windows.
• Press the on/off (power) switch when the scale is off and it
will power on.
Help
Describe This Page
The HLX Scale System is equipped with context-sensitive Help
Screens to assist you in quick, efficient scale operation. The Help
function has the following levels of assistance:
Describe This Page
Questions
About Hobart HLX
Describe This Page gives you a brief description of the screen
you came from, including notes to help you process the transaction better.
To view Describe This Page:
1. From any screen, TOUCH Help.
2. From the Help Menu, TOUCH Describe This Page. You
should now be on the Describe This Page Screen.
3. TOUCH Done to return to the page being described.
Understanding the System 2-6 F-35548 Rev. A (June 2013)
Page 17
Questions
HLX Scale System with GCD Supervisor Manual
Using the Questions screen will allow you to browse through frequently asked questions. Use the slide bar on the touch screen to
scroll through the questions.
To view Questions:
1. From the Main Menu, TOUCH Help.
2. From the Help Menu, TOUCH Questions. You should now
be on the Questions Screen.
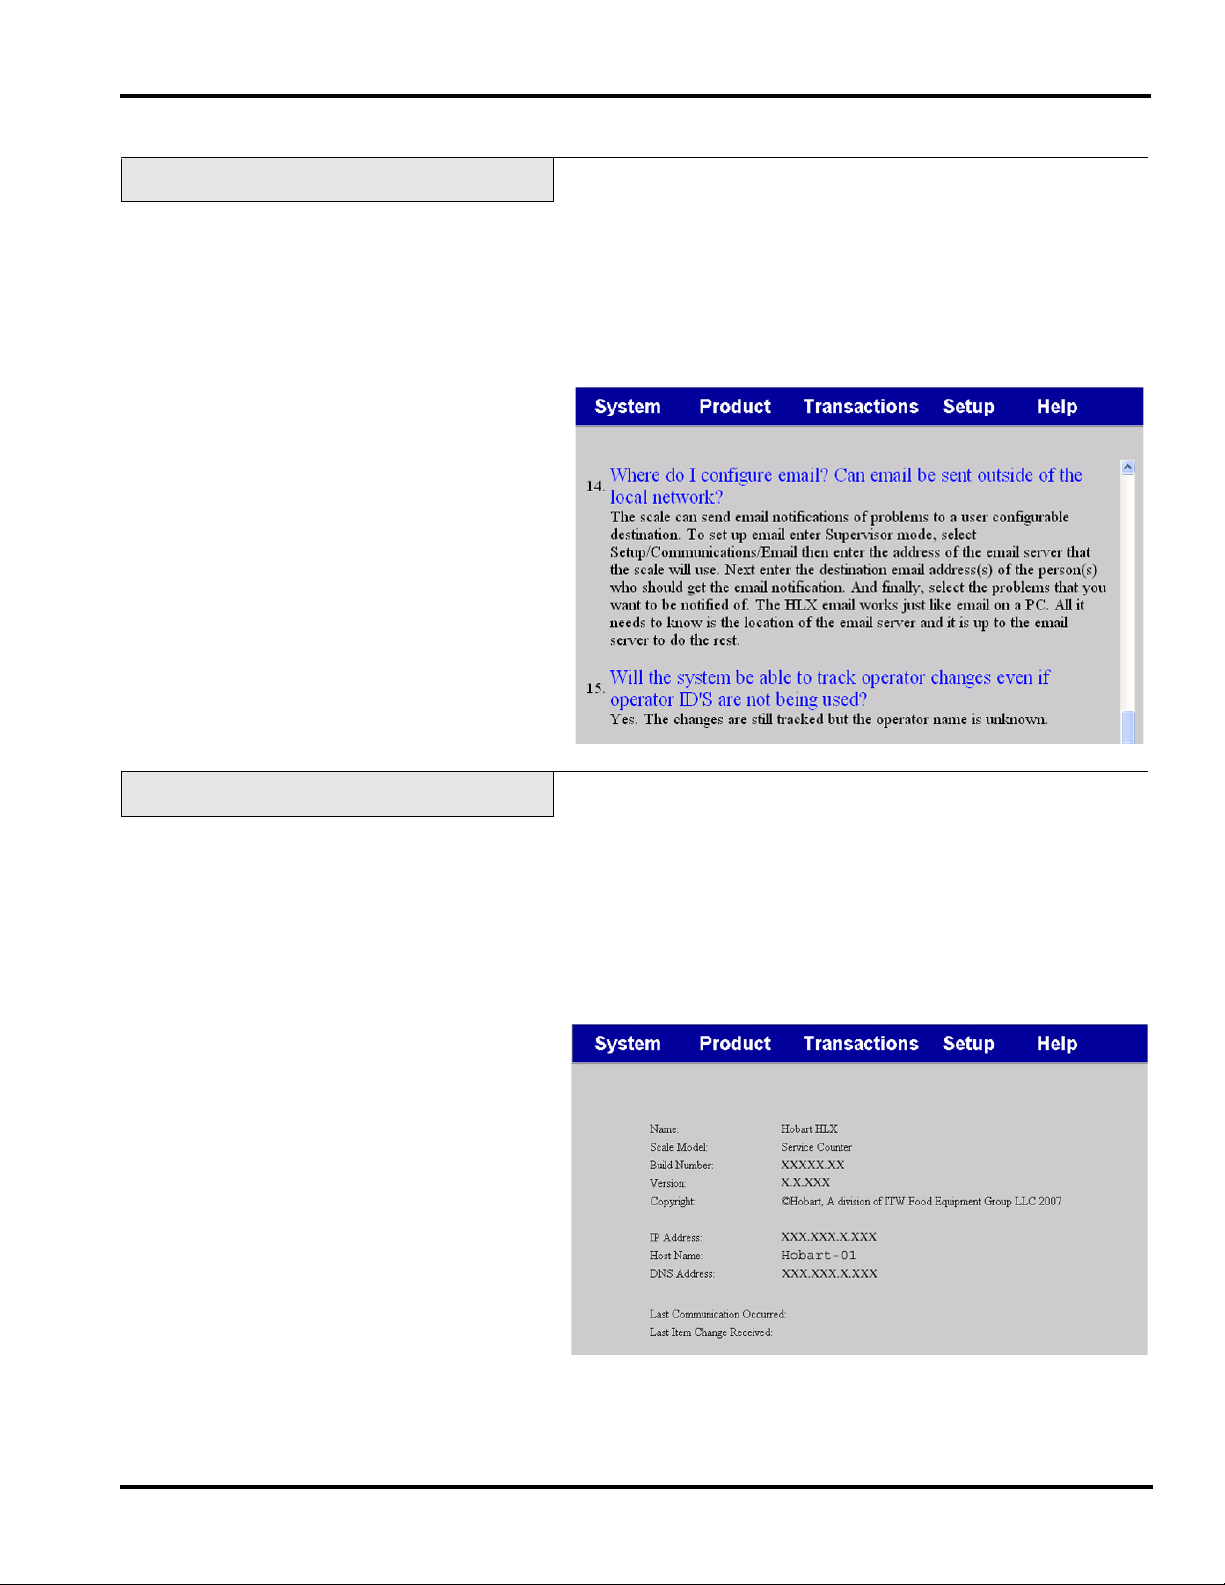
About Hobart HLX
The About Hobart HLX screen is a view-only screen and shows
you the scale name, scale model, build number, version,
copyright, IP address, host name, DNS address, last
communication occurred and last item change received.
To view About Hobart HLX:
1. From the Main Menu, TOUCH Help.
2. From the Help Menu, TOUCH About Hobart HLX. You
should now be on the About Hobart HLX Screen.
F-35548 Rev. A (June 2013) 2-7 Understanding the System
Page 18

HLX Scale System with GCD Supervisor Manual
Understanding the System 2-8 F-35548 Rev. A (June 2013)
Page 19

HLX Scale System with GCD Supervisor Manual
Chapter 3: Setting Up Your System
Setting Up Store Information . . . . . . . . . . . . . . . . . . . . . . . . . . . . . . . . . . . . . . . . . . . . . . . . . . . . . . . . . . . . . . . . . . 3-3
Setting Up Scale Operation . . . . . . . . . . . . . . . . . . . . . . . . . . . . . . . . . . . . . . . . . . . . . . . . . . . . . . . . . . . . . . . . . . . 3-4
Viewing Scale Statistics . . . . . . . . . . . . . . . . . . . . . . . . . . . . . . . . . . . . . . . . . . . . . . . . . . . . . . . . . . . . . . . . . . . . 3-4
Setting Up Normal Scale Operation. . . . . . . . . . . . . . . . . . . . . . . . . . . . . . . . . . . . . . . . . . . . . . . . . . . . . . . . . . . 3-5
Table of Normal Scale Operation (Page 1 options) . . . . . . . . . . . . . . . . . . . . . . . . . . . . . . . . . . . . . . . . . . . . . 3-6
Table of Normal Scale Operation (Page 2 options) . . . . . . . . . . . . . . . . . . . . . . . . . . . . . . . . . . . . . . . . . . . . . 3-8
By Count Calculation Method . . . . . . . . . . . . . . . . . . . . . . . . . . . . . . . . . . . . . . . . . . . . . . . . . . . . . . . . . . . . . 3-9
Table of Normal Scale Operation (Page 3 options) . . . . . . . . . . . . . . . . . . . . . . . . . . . . . . . . . . . . . . . . . . . . 3-11
Table of Normal Scale Operation (Page 4 options) . . . . . . . . . . . . . . . . . . . . . . . . . . . . . . . . . . . . . . . . . . . . 3-12
Delete All Files. . . . . . . . . . . . . . . . . . . . . . . . . . . . . . . . . . . . . . . . . . . . . . . . . . . . . . . . . . . . . . . . . . . . . . . . . . 3-13
Printer Settings . . . . . . . . . . . . . . . . . . . . . . . . . . . . . . . . . . . . . . . . . . . . . . . . . . . . . . . . . . . . . . . . . . . . . . . . . . 3-14
Marquee . . . . . . . . . . . . . . . . . . . . . . . . . . . . . . . . . . . . . . . . . . . . . . . . . . . . . . . . . . . . . . . . . . . . . . . . . . . . . . . 3-15
Graphical Customer Display . . . . . . . . . . . . . . . . . . . . . . . . . . . . . . . . . . . . . . . . . . . . . . . . . . . . . . . . . . . . . . . 3-17
Updating GCD Content . . . . . . . . . . . . . . . . . . . . . . . . . . . . . . . . . . . . . . . . . . . . . . . . . . . . . . . . . . . . . . . . . . . . . 3-18
Updating GCD Content Via USB. . . . . . . . . . . . . . . . . . . . . . . . . . . . . . . . . . . . . . . . . . . . . . . . . . . . . . . . . . . . 3-18
Updating GCD Content Via FTP . . . . . . . . . . . . . . . . . . . . . . . . . . . . . . . . . . . . . . . . . . . . . . . . . . . . . . . . . . . . 3-19
Setting Up a Playlist . . . . . . . . . . . . . . . . . . . . . . . . . . . . . . . . . . . . . . . . . . . . . . . . . . . . . . . . . . . . . . . . . . . . . . 3-21
Setting Up Flashkeys . . . . . . . . . . . . . . . . . . . . . . . . . . . . . . . . . . . . . . . . . . . . . . . . . . . . . . . . . . . . . . . . . . . . . . . 3-23
Sample Flashkey Configuration . . . . . . . . . . . . . . . . . . . . . . . . . . . . . . . . . . . . . . . . . . . . . . . . . . . . . . . . . . . . . 3-24
Adjusting the Flashkey Grid. . . . . . . . . . . . . . . . . . . . . . . . . . . . . . . . . . . . . . . . . . . . . . . . . . . . . . . . . . . . . . . . 3-26
Adding/Deleting Flashkeys . . . . . . . . . . . . . . . . . . . . . . . . . . . . . . . . . . . . . . . . . . . . . . . . . . . . . . . . . . . . . . . . 3-29
Specials. . . . . . . . . . . . . . . . . . . . . . . . . . . . . . . . . . . . . . . . . . . . . . . . . . . . . . . . . . . . . . . . . . . . . . . . . . . . . . . . 3-32
Categories. . . . . . . . . . . . . . . . . . . . . . . . . . . . . . . . . . . . . . . . . . . . . . . . . . . . . . . . . . . . . . . . . . . . . . . . . . . . . . 3-34
Setting Up Label Types. . . . . . . . . . . . . . . . . . . . . . . . . . . . . . . . . . . . . . . . . . . . . . . . . . . . . . . . . . . . . . . . . . . . . . 3-36
Understanding Label Types and Label Terms . . . . . . . . . . . . . . . . . . . . . . . . . . . . . . . . . . . . . . . . . . . . . . . . . . 3-36
Understanding Label Stock . . . . . . . . . . . . . . . . . . . . . . . . . . . . . . . . . . . . . . . . . . . . . . . . . . . . . . . . . . . . . . 3-37
Understanding Label Sizes. . . . . . . . . . . . . . . . . . . . . . . . . . . . . . . . . . . . . . . . . . . . . . . . . . . . . . . . . . . . . . . 3-37
Understanding Label Types . . . . . . . . . . . . . . . . . . . . . . . . . . . . . . . . . . . . . . . . . . . . . . . . . . . . . . . . . . . . . . 3-38
Understanding Label Families . . . . . . . . . . . . . . . . . . . . . . . . . . . . . . . . . . . . . . . . . . . . . . . . . . . . . . . . . . . . 3-38
Using the Labels Menu. . . . . . . . . . . . . . . . . . . . . . . . . . . . . . . . . . . . . . . . . . . . . . . . . . . . . . . . . . . . . . . . . . . . 3-38
Selecting Fields to Print on a Label . . . . . . . . . . . . . . . . . . . . . . . . . . . . . . . . . . . . . . . . . . . . . . . . . . . . . . . . 3-39
Setting Up Label Text Names . . . . . . . . . . . . . . . . . . . . . . . . . . . . . . . . . . . . . . . . . . . . . . . . . . . . . . . . . . . . 3-40
Viewing Label Types . . . . . . . . . . . . . . . . . . . . . . . . . . . . . . . . . . . . . . . . . . . . . . . . . . . . . . . . . . . . . . . . . . . 3-41
Using Label Graphics. . . . . . . . . . . . . . . . . . . . . . . . . . . . . . . . . . . . . . . . . . . . . . . . . . . . . . . . . . . . . . . . . . . 3-42
Using Custom Label Types . . . . . . . . . . . . . . . . . . . . . . . . . . . . . . . . . . . . . . . . . . . . . . . . . . . . . . . . . . . . . . . . 3-43
Adding a Custom Label Type. . . . . . . . . . . . . . . . . . . . . . . . . . . . . . . . . . . . . . . . . . . . . . . . . . . . . . . . . . . . . . . 3-44
Deleting a Custom Label Type . . . . . . . . . . . . . . . . . . . . . . . . . . . . . . . . . . . . . . . . . . . . . . . . . . . . . . . . . . . . . . 3-44
Setting Up Operator ID’s . . . . . . . . . . . . . . . . . . . . . . . . . . . . . . . . . . . . . . . . . . . . . . . . . . . . . . . . . . . . . . . . . . . . 3-45
Understanding Access Levels . . . . . . . . . . . . . . . . . . . . . . . . . . . . . . . . . . . . . . . . . . . . . . . . . . . . . . . . . . . . . . 3-45
Assigning Operator ID’s. . . . . . . . . . . . . . . . . . . . . . . . . . . . . . . . . . . . . . . . . . . . . . . . . . . . . . . . . . . . . . . . . . . 3-48
Assigning Operator ID’s Using RFID Option . . . . . . . . . . . . . . . . . . . . . . . . . . . . . . . . . . . . . . . . . . . . . . . . . . 3-49
Deleting Operator ID’s . . . . . . . . . . . . . . . . . . . . . . . . . . . . . . . . . . . . . . . . . . . . . . . . . . . . . . . . . . . . . . . . . . . . 3-51
Setting What Operators Can Modify . . . . . . . . . . . . . . . . . . . . . . . . . . . . . . . . . . . . . . . . . . . . . . . . . . . . . . . . . 3-52
Creating Operator Notes. . . . . . . . . . . . . . . . . . . . . . . . . . . . . . . . . . . . . . . . . . . . . . . . . . . . . . . . . . . . . . . . . . . 3-53
Shelf Life Expiration Note . . . . . . . . . . . . . . . . . . . . . . . . . . . . . . . . . . . . . . . . . . . . . . . . . . . . . . . . . . . . . . . . . 3-54
Viewing Operator Changes . . . . . . . . . . . . . . . . . . . . . . . . . . . . . . . . . . . . . . . . . . . . . . . . . . . . . . . . . . . . . . . . 3-55
Updating Firmware. . . . . . . . . . . . . . . . . . . . . . . . . . . . . . . . . . . . . . . . . . . . . . . . . . . . . . . . . . . . . . . . . . . . . . . . . 3-56
VIA FTP. . . . . . . . . . . . . . . . . . . . . . . . . . . . . . . . . . . . . . . . . . . . . . . . . . . . . . . . . . . . . . . . . . . . . . . . . . . . . . . 3-57
VIA USB Bulk Storage (USB Drive). . . . . . . . . . . . . . . . . . . . . . . . . . . . . . . . . . . . . . . . . . . . . . . . . . . . . . . . . 3-58
Email. . . . . . . . . . . . . . . . . . . . . . . . . . . . . . . . . . . . . . . . . . . . . . . . . . . . . . . . . . . . . . . . . . . . . . . . . . . . . . . . . . . . 3-59
Automatic Updates . . . . . . . . . . . . . . . . . . . . . . . . . . . . . . . . . . . . . . . . . . . . . . . . . . . . . . . . . . . . . . . . . . . . . . . . . 3-60
F-35548 Rev. A (June 2013) 3-1 Setting Up Your System
Page 20

HLX Scale System with GCD Supervisor Manual
Setting Up Product Default Values . . . . . . . . . . . . . . . . . . . . . . . . . . . . . . . . . . . . . . . . . . . . . . . . . . . . . . . . . . . . . 3-62
Product Default Values Screen Page 1 . . . . . . . . . . . . . . . . . . . . . . . . . . . . . . . . . . . . . . . . . . . . . . . . . . . . . . . . 3-62
Product Default Values Screen Page 2 . . . . . . . . . . . . . . . . . . . . . . . . . . . . . . . . . . . . . . . . . . . . . . . . . . . . . . . . 3-64
Product Default Values Screen Page 3 . . . . . . . . . . . . . . . . . . . . . . . . . . . . . . . . . . . . . . . . . . . . . . . . . . . . . . . . 3-65
Running a Configuration Report . . . . . . . . . . . . . . . . . . . . . . . . . . . . . . . . . . . . . . . . . . . . . . . . . . . . . . . . . . . . . . . 3-66
Weigh Types . . . . . . . . . . . . . . . . . . . . . . . . . . . . . . . . . . . . . . . . . . . . . . . . . . . . . . . . . . . . . . . . . . . . . . . . . . . . . . 3-67
Production Entry Mode. . . . . . . . . . . . . . . . . . . . . . . . . . . . . . . . . . . . . . . . . . . . . . . . . . . . . . . . . . . . . . . . . . . . 3-68
Accumulate Items Mode . . . . . . . . . . . . . . . . . . . . . . . . . . . . . . . . . . . . . . . . . . . . . . . . . . . . . . . . . . . . . . . . . . . 3-69
Setting Up Your System 3-2 F-35548 Rev. A (June 2013)
Page 21
Setting Up Your System
HLX Scale System with GCD Supervisor Manual
Before you can begin adding to your product database, you
should set up your system. This section explains:
Setting Up Store Information
Setting Up Scale Operation
Updating GCD Content
Setting Up Flashkeys
Setting Up Label Types
Setting Up Operator ID’s
Updating Firmware
Setting Up Product Default Values
Running a Configuration Report
Weigh Types
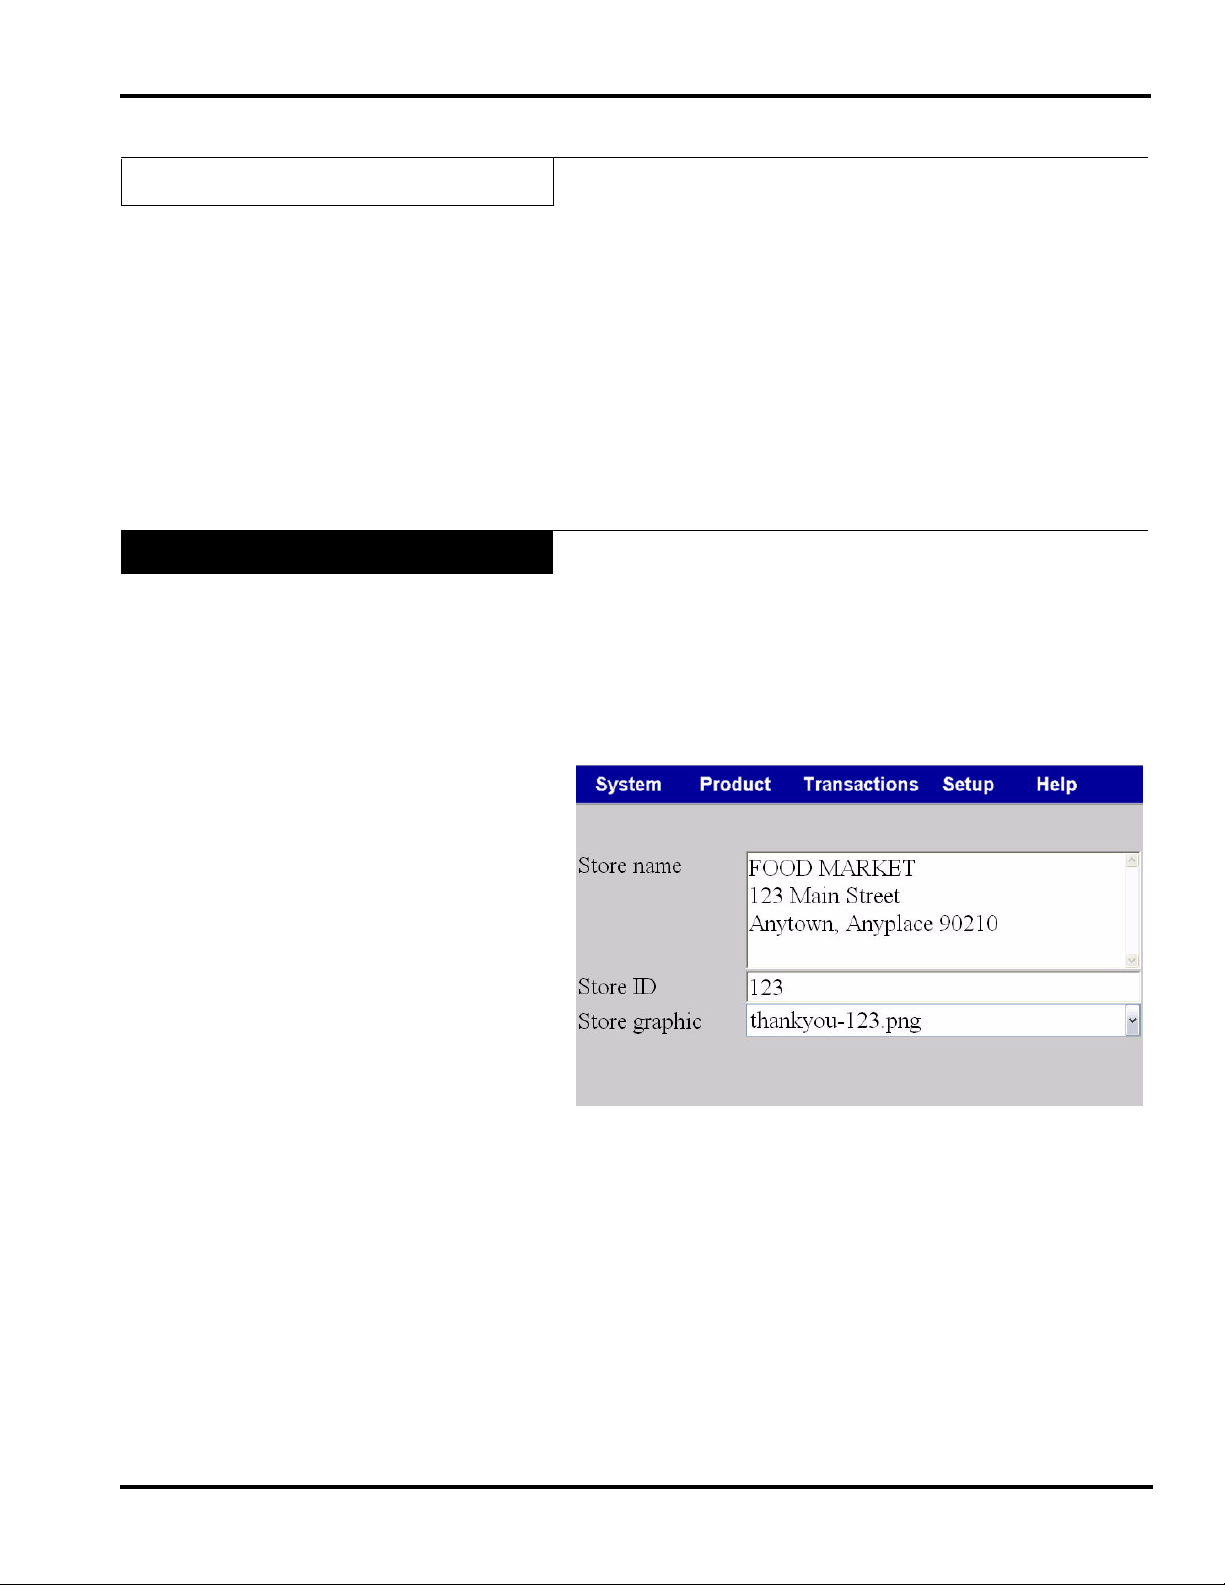
Setting Up Store Information
The Store Information option enables you to assign the Store
name, Store ID number and Store graphic to your system.
To set up the Store Information:
1. From the Supervisor Menu, TOUCH Setup.
2. From the Setup Menu, TOUCH Store Information. You
should now be on the Store Information Screen.
3. TOUCH the Store name field.
4. TYPE the Store name.
5. TOUCH the Store ID field.
6. TYPE the Store ID number and TOUCH Enter.
7. TOUCH the Store graphic field and SELECT the desired
Store graphic. This is the graphic that will print on the label
if the label type used has space for a store graphic.
8. Refer to the Table of Contents to perform your next
procedure, or return the scale to Operate mode.
F-35548 Rev. A (June 2013) 3-3 Setting Up Your System
Page 22
HLX Scale System with GCD Supervisor Manual
Setting Up Scale Operation
This section is where you determine how the scale works on a
daily basis. This information does not change per product, class
or label type, it remains constant.
Here you will learn the following:
Viewing Scale Statistics
Setting Up Normal Scale Operation
Delete All Files
Printer Settings
Marquee
Graphical Customer Display
Viewing Scale Statistics
This option allows you to view the basic statistics of the scale
such as the records in the Scale database.
To view the Statistics Screen:
1. From the Supervisor Menu, TOUCH Setup.
2. From the Setup Menu, TOUCH Scale Operations.
3. From the Scale Operations Menu, TOUCH Show Statistics.
You should now be on the Show Statistics Screen.
4. Refer to the Table of Contents to perform your next
procedure, or return the scale to Operate mode.
Setting Up Your System 3-4 F-35548 Rev. A (June 2013)
Page 23
Setting Up Normal Scale
Operation
HLX Scale System with GCD Supervisor Manual
Use the Set Up Normal Scale Operation option to specify the
types of Totals you wish to collect, plus other configuration
options, such as Operator Rezero Amount, Enable Auto Lookup,
etc.
Note
Not all screens shown in this section will be available with all
system configuration.
To set up Normal Scale Operation:
1. From the Supervisor Menu, TOUCH Setup.
2. From the Setup Menu, TOUCH Scale Operations.
3. From the Scale Operations Menu, TOUCH Normal Scale
Operation. You should now be on the Normal Scale
Operation Screen Page 1.
4. TOUCH the check box to select the desired function
–OR–TOUCH the desired field and select the desired
function. Use the following table to make your decisions.
F-35548 Rev. A (June 2013) 3-5 Setting Up Your System
Page 24
HLX Scale System with GCD Supervisor Manual
Table of Normal Scale Operation (Page 1 options)
Prompt Description Values
Display Product Notes Specifies whether product notes are
automatically displayed or not.
Enable COOL Tracking
Number
Collect Transactions,
COOL totals, and Opera-
Enables the use of COOL Tracking
numbers.
Specifies whether totals are collected or not.
tor Changes
Number of days to keep transaction
records.
Enable Auto Lookup Enables you to set the number of
digits required for the system to
automatically look up product
information.
Number of digits to begin Auto
Lookup.
Self service special lookup digit.
Checked Product notes are automati-
cally displayed.
Blank Product notes are not auto-
matically displayed.
Checked
Use of COOL Tracking
number on.
Blank
Use of COOL Tracking
number off.
Checked Totals are collected.
Blank Totals are not
collected.
Valu e R a n g e
1 to 15
Checked Auto lookup is turned on.
Blank
Auto lookup is turned off.
Value Range 1 to 6
Valu e R a n g e
None, 1 to 9
Enable DB Compress
Enables you to set the time for the
system to automatically compress
the DataBase.
Compress time.
Check Database is compressed.
Blank Database is not compressed.
Value Range 1 to 12 AM or PM
Setting Up Your System 3-6 F-35548 Rev. A (June 2013)
Page 25
HLX Scale System with GCD Supervisor Manual
5. TOUCH the Page field and SELECT Page 2. You should
now be on the Normal Scale Operation Screen Page 2.
6. TOUCH the check box to select the desired function
–OR–TOUCH the desired field and select the desired
function. Use the following table to make your decisions.
F-35548 Rev. A (June 2013) 3-7 Setting Up Your System
Page 26
HLX Scale System with GCD Supervisor Manual
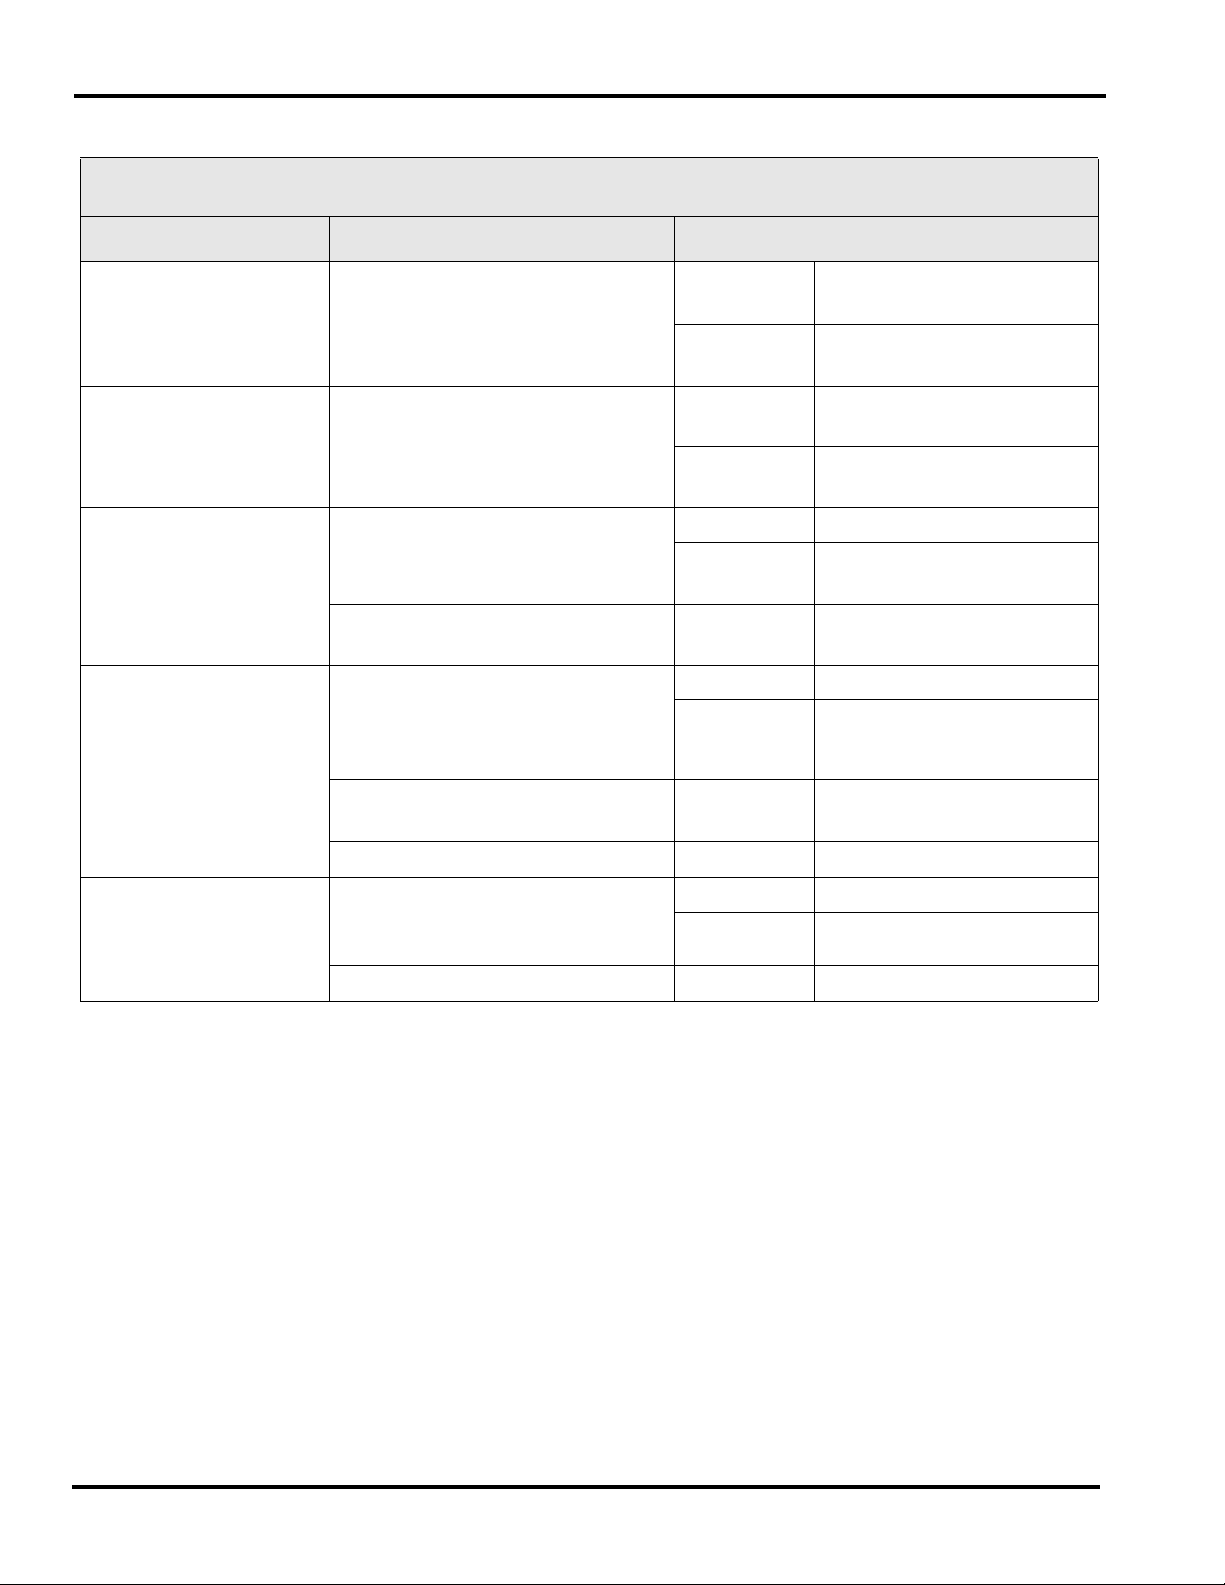
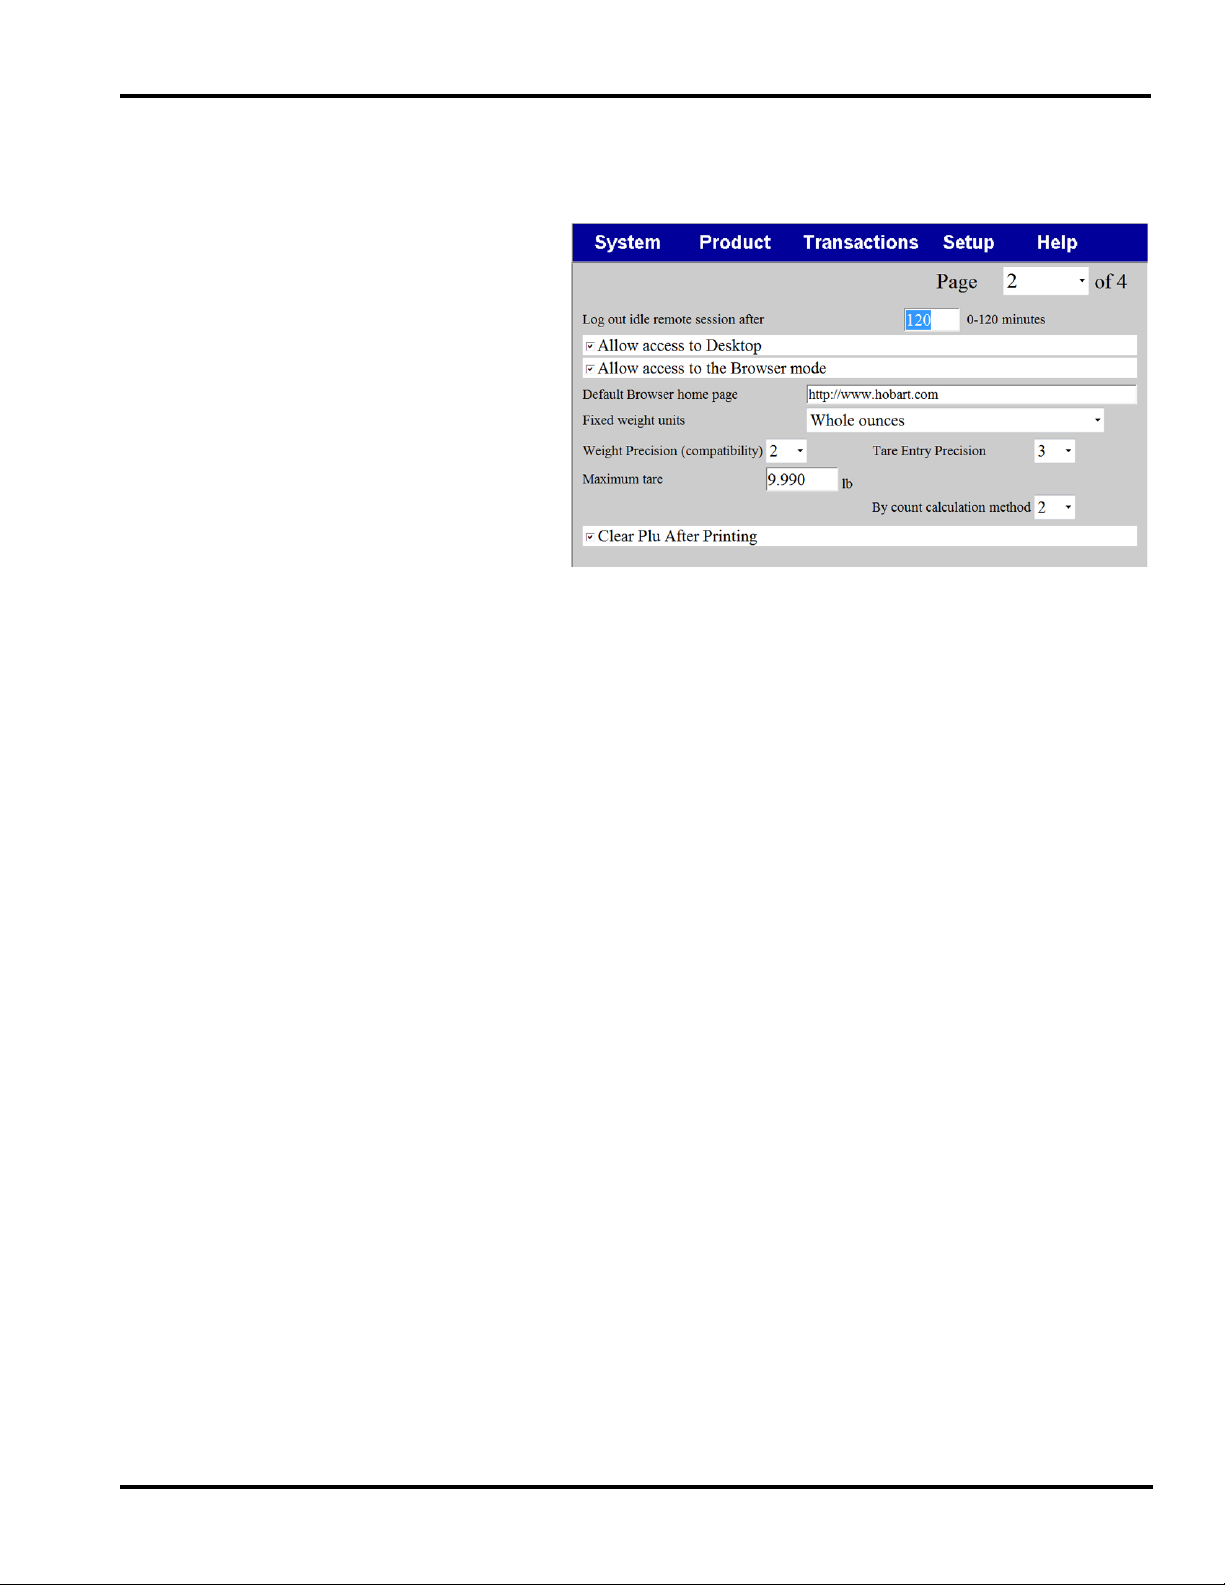
Table of Normal Scale Operation (Page 2 options)
Prompt Description Values
Log Out idle remote
session after
Allow access to Desktop Specifies whether desktop mode is
Allow access to the
Browser mode
Default Browser home
page
Fixed Weight Units Enables Fixed Weight amounts to be
Weight Precision
(compatibility)
Tare Entry Precision Determines how the tare is to be cal-
Enables you to determine the length
of time the scale will remain idle in
remote mode before the scale will
terminate the connection to that
browser session.
available to the operators.
Specifies whether web browsing is
available for use.
Enables you to set the Browser
home page to the desired address.
entered as whole or tenth ounces.
Enables you to set the number of
decimal places for read out and
weight amounts.
culated depending on the number of
decimal places allowed.
TOUCH the minutes field and TYPE the
number of minutes between 1-120. A value
of 0 equals infinite time.
Checked
Blank
Allows access to desktop.
Access to desktop functions
denied.
Checked Can browse the web.
Blank Browsing function not
available.
TOUCH the Default Browser home page
field and TYPE the address you desire.
Whole Ounces
Tenths of an Ounce
Va l ue
Range
Contact your local Hobart representative for
the correct tare setback value.
Va l ue
Range
2 or 3 decimal places.
2 or 3 decimal places.
Maximum Tare Determines the maximum tare value
allowed.
By count calculation
method
Clear PLU After Printing Specifies whether PLU will return
Determines how the By count is
calculated.
to Operator Start Screen after printing or not.
This value will vary depending on the use of
the scale.
See By Count Calculation Method later in
this chapter.
Checked
PLU will be cleared after
printing label. Scale will
return to Operator Start
Screen.
Blank
PLU will not be cleared after
printing label.
Setting Up Your System 3-8 F-35548 Rev. A (June 2013)
Page 27

HLX Scale System with GCD Supervisor Manual
By Count Calculation Method
The By count calculation method determines which of three
methods is used to calculate the total price for By count items
when less than the By count quantity is sold. The three methods
are described in the table below.
Tip
If you have entered an Exception Price, it will take precedence
over the By count calculation method selected.
By Count Calculation Methods
Method 1 If the discount is greater than $.01, the customer starts receiving the discount ($.01 per item)
sooner than on the last item purchased to complete the deal.
Example = 3/$1.00
Customer is charged $.34 for the first item, $.33 for the second and $.33 for the third.
Method 2 The customer receives the discount on the last item purchased to “complete the deal.” The
By count price is divided by the By count quantity and the answer is rounded up to the next
cent; the answer is multiplied by the quantity sold. If the By count quantity is sold, the bargain differential is subtracted so as not to exceed the By count price.
Method 3 In this formula, the division is performed last and the answer is carried to three decimal
places; any fraction is then rounded up to the next cent.
By count example The following is an example of the By count modes using these values:
By count quantity = 12, By count price = $2.09
Qty Method 1 Method 2 Method 3
1 .18 .18 .18
2 .36 .36 .35*
3 .54 .54 .53
4 .72 .72 .70*
5 .90 .90 .88
6 1.07* 1.08 1.05*
7 1.24* 1.26 1.22*
8 1.41* 1.44 1.40
9 1.58* 1.62 1.57*
10 1.75* 1.80 1.75
11 1.92* 1.98 1.92*
12 2.09 2.09* 2.09*
* Denotes that the discount was applied.
F-35548 Rev. A (June 2013) 3-9 Setting Up Your System
Page 28

HLX Scale System with GCD Supervisor Manual
7. TOUCH the Page field and SELECT Page 3. You should
now be on the Normal Scale Operation Screen Page 3.
8. TOUCH the check box to select the desired function
–OR–TOUCH the desired field and select the desired
function. Use the following table to make your decisions.
Setting Up Your System 3-10 F-35548 Rev. A (June 2013)
Page 29
HLX Scale System with GCD Supervisor Manual
Table of Normal Scale Operation (Page 3 options)
Prompt Description Values
Primary language and
country
Secondary language and
country
This sets the scales primary
language. Default is English (US).
This sets the scales secondary language.
Date format Specifies the way the date is dis-
played. December 31, 2008 is the
example used.
Hours format Specifies whether the scale will
keep time in 12 or 24 hour format.
Popup keypad style This set the style of numeric keypad
that appears when a numeric input is
required.
English (US)
Spanish (Mexico)
English (Canada)
French (Canada)
None
English (US)
Spanish (Mexico)
English (Canada)
French (Canada)
DE 31, 08
Dec 31, 08
08/12/31
12/31/08
31/Dec/08
31/12/08
08 DE 31
12 Hour
24 Hour
PC Keyboard (Default)
Telephone
Keyboard style This sets the style of alpha-numeric
keyboard that appears when alphanumeric input is required.
Enable Network
connectivity testing
QWERTY Keyboard (Default)
Numeric Keypad
Checked
Blank
Enable testing.
Disable testing.
F-35548 Rev. A (June 2013) 3-11 Setting Up Your System
Page 30

HLX Scale System with GCD Supervisor Manual
9. TOUCH the Page field and SELECT Page 4. You should
now be on the Normal Scale Operation Screen Page 4.
10. TOUCH the check box to select the desired function
–OR–TOUCH the desired field and select the desired
function. Use the following table to make your decisions.
Table of Normal Scale Operation (Page 4 options)
Prompt Description Values
Configure Display Fields
Use entire description
Number of chars This sets the number of characters
Enable Production Planning
Production Planning Frame
Specifies whether a certain function
will display to the operator when the
scale is in operate mode
The entire product description will
be printed on the flashkey. The
number of characters field will be
disabled when checked.
of the products description to be displayed when selected. The default is
50 characters.
This activates the link to the Host
server for receiving the PLU number and returning the Production
Planning Webpage.
Location to receive HTML Frame
data
Checked Specific function will display.
Blank Specific function will not display.
Checked Specific function will
Blank Specific function will not display.
Value Range 1 to 999
Checked Specific function will be Active. Fea-
Blank Specific function will not be Active
URL Web HTML frame location from
display.
ture still requires Product activation
Host Server
Production Planning Update
Setting Up Your System 3-12 F-35548 Rev. A (June 2013)
Location to send product specific
information
11. Refer to the Table of Contents to perform your next
URL For use with Host Server
procedure, or return the scale to Operate mode.
Page 31

Delete All Files
HLX Scale System with GCD Supervisor Manual
This option allows you to delete all of the files from the database.
To delete all files:
1. From the Supervisor Menu, TOUCH Setup.
2. From the Setup Menu, TOUCH Scale Operations.
3. From the Scale Operations Menu, TOUCH Delete all files.
You should now be on the Delete All Files Screen.
Look At This
WA R NI N G : This button will delete all memory from the
database. Make sure you have a good backup of your data before
proceeding.
4. TOUCH the Delete all files button.
5. Refer to the Table of Contents to perform your next
procedure, or return the scale to Operate mode.
F-35548 Rev. A (June 2013) 3-13 Setting Up Your System
Page 32

HLX Scale System with GCD Supervisor Manual
Printer Settings
This option allows you to test the print quality on labels.
To view Printer Settings:
1. From the Supervisor Menu, TOUCH Setup.
2. From the Setup Menu, TOUCH Scale Operations.
3. From the Scale Operations Menu, TOUCH Printer Settings.
You should now be on the Printer Settings Screen.
4. TOUCH Print contrast field and SELECT contrast level. The
higher the number, the darker the label.
Note
Use the lowest contrast level possible that allows for acceptable
print.
5. TOUCH the Test label pattern field and SELECT a test
pattern.
6. TOUCH Test Label to print a label with the selected contrast
and pattern selected.
7. Examine printed label and adjust contrast as required.
8. Refer to the Table of Contents to perform your next
procedure, or return the scale to Operate mode.
Setting Up Your System 3-14 F-35548 Rev. A (June 2013)
Page 33

Marquee
HLX Scale System with GCD Supervisor Manual
The marquee is the display viewed by the customer. It can be configured to show a greeting, in store specials or other information
while idle.
To set the Marquee:
1. From the Supervisor Menu, TOUCH Setup.
2. From the Setup Menu, TOUCH Scale Operation.
3. From the Scale Operation Menu, TOUCH Marquee. You
should now be on the Marquee Screen.
4. TOUCH the Display the Product Marquee Message check
box to enable the display of the product marquee.
5. TOUCH the Display the Product Description field and
SELECT number of times to display the product description.
6. TOUCH the Display the Permanent Marquee Message field.
You should now be on the Marquee Edit Screen.
7. Edit the marquee message by using the following table. The
preview screen will show the edits made to the marquee.
F-35548 Rev. A (June 2013) 3-15 Setting Up Your System
Page 34

HLX Scale System with GCD Supervisor Manual
Marquee Functions
Scroll This function will cause the following text to scroll right to left.
Frame This function will frame the following text in the center of the marquee window.
Blink This function will cause the following text to blink.
Roll This function will cause the following text to roll right to left.
Hold This function will hold the previous text before continuing.
Clear This function will clear the previous text before continuing.
Slow This function will cause the message to move slower than normal across the marquee.
Normal This function will cause the message to move at normal speed across the marquee
Quick This function will cause the message to move quickly across the marquee.
X-Quick This function will cause the message to move very quickly across the marquee.
Keyboard Use this to edit your marquee massage.
Setting Up Your System 3-16 F-35548 Rev. A (June 2013)
Page 35

Graphical Customer Display
HLX Scale System with GCD Supervisor Manual
The graphical customer display (GCD) is the display viewed by
the customer. It can be configured to show a slide show of image
files. Contact your local Hobart Representative for more information. The operator can be allowed to restart the GCD.
To allow operators to restart the GCD:
1. From the Supervisor Menu, TOUCH Setup.
2. From the Setup Menu, TOUCH Scale Operation.
3. From the Scale Operation Menu, TOUCH Graphical
Customer Display. You should now be on the Graphical
Customer Display Screen.
4. TOUCH the Seconds before customer display slideshow or
video begins when scale not in use field to adjust the wait
time.
5. TOUCH the Allow Operators to Reset the GCD check box to
enable the operators to use this function.
6. TOUCH the GCD Language to change language parameters.
7. SLIDE volume to desired level. Requires 1/8" connection to
jack for volume.
8. TOUCH the Allow Operators to Reset the GCD check box to
enable the operators to use this function.
9. TOUCH the Restart the GCD button to restart the GCD.
10. Refer to the Table of Contents to perform your next
procedure, or return the scale to Operate mode.
F-35548 Rev. A (June 2013) 3-17 Setting Up Your System
Page 36

HLX Scale System with GCD Supervisor Manual
Updating GCD Content
The HLX System provides multiple means to update the content
to be displayed on the Graphical Customer Display. The updates
can be performed through either USB bulk storage or through the
FTP/SFTP server. This enables the scale to update the playlist,
video, and images to be shown during idle operation.
Note
Playlist and media files must be in the same directory to update
all content.
Updating GCD Content Via USB
To update GCD media content via USB drive:
1. From the Supervisor Menu, TOUCH Setup.
2. From the Setup Menu, TOUCH Graphical Customer Display.
3. From the Graphical Customer Display Menu, TOUCH
Update GCD Media and then TOUCH Via USB bulk storage.
You should now be on the Graphical Customer Display
Update Via USB Screen.
4. Plug in a USB Drive
5. Press the button to update GCD Media content.
6. Select the directory that contains the updated file. Scale will
pull images and videos from directory. Playlist must be
identified.
7. Do not remove the USB drive until update has finished as
indicated.
8. Refer to the Table of Contents to perform your next procedure,
or return the scale to Operate mode.
Setting Up Your System 3-18 F-35548 Rev. A (June 2013)
Page 37

Updating GCD Content Via FTP
HLX Scale System with GCD Supervisor Manual
To update GCD media via FTP/SFTP:
1. From the Supervisor Menu, TOUCH Setup.
2. From the Setup Menu, TOUCH Graphical Customer Display.
3. From the Graphical Customer Display Menu, TOUCH
Update GCD Media and then TOUCH Via FTP. You should
now be on the Graphical Customer Display Update Via FTP
Screen.
4. To upgrade scale application via FTP or SFTP, TOUCH the
Server Host Name Field and type in server host.
5. Or to upgrade scale application via IP address, TOUCH the
Switch to IP address button field and TYPE the Server IP
address.
6. Choose either FTP or SFTP as active on server.
7. Enter credentials for download: User and Password.
8. Select the directory that contains the updated file. Scale will
pull images and videos from directory. Playlist must be
identified.
9. Select Playlist to be updated.
10. Do not disconnect power or network connection until update
has finished as indicated.
11. The HLX can be setup to automatically search for new
content on the media server at a specified time. To activate,
check flag and specify desired update time in fields.
F-35548 Rev. A (June 2013) 3-19 Setting Up Your System
Page 38

HLX Scale System with GCD Supervisor Manual
Look At This
The “Delete all Files” command through communication will
delete the FTP/SFTP configuration.
12. Refer to the Table of Contents to perform your next
Note
Errors in FTP/SFTP update are communicated through email
notification. See section Email for instructions.
procedure, or return the scale to Operate mode.
Formats Supported
The HLX with GCD enables for multiple formats to be utilized in
promotions. Listed below are formats available for each promotion content type.
• Top Section of Playlist defines the video content to be played
for promotions.
• Mpeg 4 and H.264 video types are supported.
• See table for Video specifications of formats.
• Video content will be stretched and shrunk to best fit
available screen area while maintaining aspect ratio.
Note
Video content beyond recommended resolution may impact
video performance.
• Bottom section of playlist defines slideshow content & playlist order.
• .jpg, .bmp, .gif, .tif, .png, and .exif formats are supported.
• Full screen images will have pixels 800 Width x 480
Height. Image content will be display in original pixel resolution (no stretching and shrinking.)
• Audio section of playlist defines audio files to be played in
conjunction with the slideshow presentation.
• .mp3 & .aac audio types are supported.
Setting Up Your System 3-20 F-35548 Rev. A (June 2013)
Page 39

HLX Scale System with GCD Supervisor Manual
Video Format Specification
File
File Type
H.264 .mp4 MPEG-4 Part 10H.264 4Mbps AAC 192 kbps 800 x 480 30
MP4 .mp4 MPEG-4 Part 14MPEG-4 3Mbps MP3 128 kbps 800 x 480 30
Extension Container
Video
Codec
Max
Bit rate
Audio
Codec
Max
Bit rate Resolution Frames/sec
Audio Format Specification Image Format Specification
Audio Codec Max Bit rate Image Type Max Resolution
AAC 192 kbps BMP, GIF, JPG, PNG, TIF,
MP3 128 kbps
Setting Up a Playlist
& Exif
The HLX with GCD enables for a playlist to be created during
idle time operation. The playlist can be created in a text file.
Listed below are instructions for playlist created as a text file:
1. All lines started with a "#" character are considered comments
only.
2. This files name must be a text only file saved with a filename
in Windows extended format using the extension of .txt;
<filename.txt>
3. The filename can only consist of the lower case characters a z, 0 - 9, and the special character "_" (underline).
4. The filename used to save a completed playlist should be the
filename configured in the scales you wish the playlist to be
applied to.
5. The total size of all files contained in this playlist cannot
exceed 1.5Gbytes. (System upgrade required to exceed
storage.)
6. All filenames used to describe video, image, or audio files
must be in Windows extended format only using lowercase
characters a - z, 0 - 9, and the special character "_"
(underline).
800 x 480
VIDEO Section
1. Make sure each video is preceded with the word video
followed with a unique number from 1 to 99 and surrounded
in brackets [].
F-35548 Rev. A (June 2013) 3-21 Setting Up Your System
Page 40

HLX Scale System with GCD Supervisor Manual
SLIDE SHOW Section
1. Make sure each slide show is preceded with the word
slideshow followed with a unique number 1 to 99 surrounded
by brackets [], and consisting of the following on separate
lines;
2. The audio filename to play during this slide show preceded
with the text "audio=". The time, in seconds, to display each
image in the slide show preceded with the text "delay=". The
filenames, one per line, of each image to be used in this slide
show listed in the order they are to displayed.
PLAY LIST Section
1. Make sure the first line is the word playlist surrounded by
brackets [].
2. List the previously defined video and slide shows in the
order they are to be played one per line.
Setting Up Your System 3-22 F-35548 Rev. A (June 2013)
Page 41

Setting Up Flashkeys
HLX Scale System with GCD Supervisor Manual
Flashkeys are designed to provide the operator quick and easy
access to various scale functions and frequently used PLU's. Use
this option along with categories and specials to make setup of
flashkeys more effective.
There are three different areas of the touch screen that support
flashkeys. They are the:
•Product Grid
• Start Screen Buttons
• Run Screen Buttons
The Product Grid is the main area of the touch screen when the
scale is in operate mode. The Start Screen Buttons are along the
right side of the touch screen when the scale is in operate mode.
The Run Screen Buttons are along the right side of the touch
screen when a PLU has been entered and the scale is on the Run
Screen.
Note
Graphics can be used with Flashkeys. Custom graphics need to
be loaded into the system before creating new Flashkeys. (See
Using the Import Function.)
Use the Flashkey Chart to determine the feature desired for each
flashkey. The following will be discussed:
Sample Flashkey Configuration
Flashkey Function Chart
Adjusting the Flashkey Grid
Adding/Deleting Flashkeys
Specials
Categories
Tip
When entering numbers or text you may find it more convenient
to use a USB mouse and/or keyboard rather than touching the
screen. This is especially useful when entering large amounts of
data or performing repetitive operations such as setting up labels
or flashkeys.
F-35548 Rev. A (June 2013) 3-23 Setting Up Your System
Page 42

HLX Scale System with GCD Supervisor Manual
Loins
BEEF
GroundAngus
PLU'sPLU'sPLU's
Loins
PORK
RibsHams
PLU'sPLU'sPLU's
POULTRY
TurkeyChicken
PLU'sPLU's
SPECIALS
Holiday SpecialsBBQ Specials
PLU'sPLU's
CATEGORIES
CATEGORIES
CATEGORIES
SUB-CATEGORIES
SUB-CATEGORIES
SUB-CATEGORIES
Sample Flashkey Configuration
The scale is designed to allow for multiple flashkey configurations. Flashkeys can be added or deleted as needed.
Before you begin, it is recommended that you plan out your flashkey configuration.
Below is a sample plan. This example is simple and is intended to
show a possible flashkey configuration. Contact your local
Hobart Representative for more information.
Setting Up Your System 3-24 F-35548 Rev. A (June 2013)
Page 43

HLX Scale System with GCD Supervisor Manual
Flashkey Function Chart
Action Results
None Nothing.
Select Product Specific PLU This function will take the operator to the Run Label Screen of
the PLU assigned to this flashkey.
Load Softkey Group Takes the operator to another set of flashkeys.
Load Category Takes the operator to another set of flashkeys containing sub-
categories and items that have been assigned to the specified
category.
Print Label A label will print if a product is entered and weighed.
Platter Tare Allows the operator to adjust the platter tare.
Cents Off Discount Allows the operator to apply Cents Off Discounts.
Percent Off Discount Allows the operator to apply Percent Off Discounts.
Reset Price Allows the operator to reset the price of a product to its original
value.
Change Screen Start Screen Takes the operator to the Main Startup Screen.
Search Takes the operator to Search Screen.
Operator Login This will logout the current operator and set the scale for the next
operator to login.
Label Data Takes the operator to the Label Data Screen.
Product & Shelf Life Takes the operator to the Product and Shelf Life Screen.
Printer Settings Takes the operator to the Printer Settings Screen.
Date & Time Takes the operator to the Date and Time Screen.
Total Types Takes the operator to the Total Types Screen.
Browse Web Takes the operator to the default internet web address, if avail-
able.
Operator login This will logout the current operator and set the scale for the next
operator to login.
Void Transaction This will void the last transaction made by the operator.
Load Specials Takes the operator to another set of flashkeys sorted by specials.
Store Applications Enter Applications URL, ability to include CGI parameters.
Production Planning FPP URL, ability to include CGI parameters.
Print New Shelf Life Label Prints a new shelf life label for the active PLU.
Print Multiple Labels Allows scale to print multiple labels for active PLU.
Change Language Enables screen to toggle from primary language to secondary
language.
F-35548 Rev. A (June 2013) 3-25 Setting Up Your System
Page 44

HLX Scale System with GCD Supervisor Manual
Adjusting the Flashkey Grid
To adjust the flashkey grid:
1. From the Supervisor Menu, TOUCH Setup.
2. From the Setup Menu, TOUCH Other Records.
3. From the Other Records Menu, TOUCH Flashkeys. You
should now be on the Flashkeys Screen.
Setting Up Your System 3-26 F-35548 Rev. A (June 2013)
Page 45

HLX Scale System with GCD Supervisor Manual
4. TOUCH the Feature field and SELECT the grid to adjust.
5. TOUCH the Group number field and TYPE the number to
create or edit.
6. TOUCH the H-space field and TYPE the value for the
horizontal spacing between flashkeys. The spacing has been
changed to 10 in the example.
7. TOUCH the V-space field and TYPE the value for the
vertical spacing between flashkeys. The spacing has been
changed to 10 in the example.
8. TOUCH + or – to add or delete the number of flashkey rows
or columns. In the example, two rows and columns have
been removed. The maximum number of rows and columns
is 16 x 16.
F-35548 Rev. A (June 2013) 3-27 Setting Up Your System
Page 46

HLX Scale System with GCD Supervisor Manual
9. After a flashkey is set, you can extend it vertically or
horizontally. See Adding/Deleting Flashkeys to set a
flashkey.
10. TOUCH the flashkey to modify.
11. TOUCH + or - next to Rspan to expand a flashkey into the
next row.
12. TOUCH + or - next to Cspan to expand a flashkey into the
next column.
13. TOUCH the Default group field and TYPE the flashkey
group number that you want to appear for this feature at
operator startup.
14. Refer to the Table of Contents to perform your next
procedure, or return the scale to Operate mode.
Setting Up Your System 3-28 F-35548 Rev. A (June 2013)
Page 47

Adding/Deleting Flashkeys
HLX Scale System with GCD Supervisor Manual
Since the possibilities for flashkey configurations are endless, this
section will explain the basic concept of setting up one flashkey.
To add or delete a flashkey:
1. From the Supervisor Menu, TOUCH Setup.
2. From the Setup Menu, TOUCH Other Records.
3. From the Other Records Menu, TOUCH Flashkeys. You
should now be on the Flashkeys Screen.
4. TOUCH the area of the grid that you want to assign a
flashkey function
–OR–TOUCH the flashkey that you want to delete.
5. TOUCH the Delete Cell
–OR–TOUCH Edit Cell. You should now be on the
Flashkey Edit Screen.
6. Use the Flashkey Function Chart to determine the function
you would like to assign to this flashkey area.
F-35548 Rev. A (June 2013) 3-29 Setting Up Your System
Page 48

HLX Scale System with GCD Supervisor Manual
Note
• As you modify the flashkey, the results will be displayed in
the main area of the touch screen.
• Some text colors display better with different background
colors.
7. TOUCH the Softkey image field and SELECT the graphic
you want displayed with this flashkey function.
8. TOUCH the Background color field and SELECT a color to
assign to this flashkey function.
9. TOUCH the Text color field and SELECT a color to assign
to the text of this flashkey function.
10. TOUCH Text alignment and SELECT the location of the text
on the flashkey.
Note
• Aligning text to the top will allow for five lines of text.
Alignment to the bottom or middle will allow for two lines
of text.
• Selecting a text alignment on ANY key in the product grid
will make ALL keys in that grid display that way.
11. TOUCH text and TYPE the text you want displayed on the
flashkey.
Setting Up Your System 3-30 F-35548 Rev. A (June 2013)
Page 49

HLX Scale System with GCD Supervisor Manual
12. TOUCH Done on the Supervisor Menu. You should now be
back on the Flashkeys Screen.
13. Verify the flashkey is in the location desired.
14. Adjust the size of the flashkey if necessary. See Adjusting the
Flashkey Grid.
Look At This
It is recommended that you test the flashkey function in
Operate mode. Verify that the flashkey performs the function it
was assigned. Refer to the Access PrePack System Operator
Manual.
15. Refer to the Table of Contents to perform your next
procedure, or return the scale to Operate mode.
F-35548 Rev. A (June 2013) 3-31 Setting Up Your System
Page 50

HLX Scale System with GCD Supervisor Manual
Specials
This option allows you to link specific PLU's to a type of special.
To set up the Specials:
1. From the Supervisor Menu, TOUCH Setup.
2. From the Setup Menu, TOUCH Other Records.
3. From the Other Records Menu, TOUCH Specials. You
should now be on the Specials Screen.
4. TOUCH the Special number field and TYPE the special
number.
5. If you are creating a new special number, you will see the
following screen. TOUCH OK.
–OR– If you are using an existing special number, proceed to
the next step.
Setting Up Your System 3-32 F-35548 Rev. A (June 2013)
Page 51

HLX Scale System with GCD Supervisor Manual
Note
Once you create your new special number, it will automatically
display in the table at the lower half of the screen. As you fill in
the Description field and the Graphic fields, this information
will also display.
6. TOUCH the Description field and TYPE the description of
the special.
Note
Custom graphics need to be loaded into the system before they
can be used with specials. See Using the Import Function.
7. TOUCH the graphic drop-down menu and SELECT the
graphic name for this special.
8. Refer to the Table of Contents to perform your next
procedure, or return the scale to Operate mode.
F-35548 Rev. A (June 2013) 3-33 Setting Up Your System
Page 52

HLX Scale System with GCD Supervisor Manual
Categories
This option is used to maintain category records in the scale.
Categories are a way to group products together for the purpose
of creating flashkeys to quickly look up products.
To set up the Categories:
1. From the Supervisor Menu, TOUCH Setup.
2. From the Setup Menu, TOUCH Other Records.
3. From the Other Records Menu, TOUCH Categories. You
should now be on the Categories Screen.
4. TOUCH the Category number field and TYPE the category
number.
5. TOUCH the Reporting category drop-down menu and
SELECT the reporting category. Master category (999999) is
the default.
6. TOUCH the Caption field and TYPE the Caption for the
category.
Setting Up Your System 3-34 F-35548 Rev. A (June 2013)
Page 53

HLX Scale System with GCD Supervisor Manual
Note
The background and text colors will be used on any flashkeys
created by this category.
7. TOUCH the Background color field and SELECT the color
for the category.
8. TOUCH the Text color field and SELECT the color for the
category text.
Note
• Custom graphics need to be loaded into the system before
they can be used with categories. See Using the Import
Function.
• The graphic chosen here ONLY applies to a flashkey used to
load this category NOT the items in the category (like the
background and text colors).
9. TOUCH the Flashkey graphic field and SELECT appropriate
graphic.
10. Refer to the Table of Contents to perform your next
procedure, or return the scale to Operate mode.
F-35548 Rev. A (June 2013) 3-35 Setting Up Your System
Page 54

HLX Scale System with GCD Supervisor Manual
Setting Up Label Types
The HLX Scale System gives you the flexibility to decide what
label types you will use and what will print on each label.
The following topics are explained in this section:
Understanding Label Types and Label Terms
Using the Labels Menu
Using Custom Label Types
Adding a Custom Label Type
Deleting a Custom Label Type
Additional information can be found in the Label Information
section of Appendix A
.
Understanding Label Types and
Label Terms
Hobart can supply you with various custom label types to fit your
organization's needs. The preloaded label types are stored in the
scale database and are referred to as Standard Label Types. You
can use Standard Label Types just as they are, or you can change
them to suit your needs (see Using the Labels Menu). You can
also have custom label types designed (see Using Custom Label
Type s).
The following is important information to know about labels and
label printing before you get started:
• The thermal printhead requires no ink or ribbon.
• Labels used for your transactions may be preprinted or
blank.
• Preprinted labels may be ordered with a customer logo,
store name, store address and/or other merchandising
information (in black and white or colors).
There are some terms you will need to be familiar with when
working with Hobart Standard Label Types. They are explained
in the next few paragraphs.
Understanding Label Stock
Understanding Label Sizes
Understanding Label Types
Understanding Label Families
Setting Up Your System 3-36 F-35548 Rev. A (June 2013)
Page 55

Understanding Label Stock
HLX Scale System with GCD Supervisor Manual
Label stock refers to the physical label paper. Labels come in a
variety of sizes, and each has its own function and purpose. The
HLX Scale System uses only Standard Die Cut Labels.
Die Cut Labels are cut so that each label is spaced for accuracy.
Because these are all the same size, they can be preprinted to create a more attractive label.
Tip
Hobart-approved labels can be purchased by contacting ITW
Label at 800-597-0971. ITW Label is the only provider of
Hobart-branded labels. These labels are highly recommended
because:
• Single-source reliability for all scales
• Less than 1/10 of 1% defect rate
• Accurate labels on every roll
• Highly resistant to heat and moisture
• Excellent preprint quality
Understanding Label Sizes
Label Lengths
" (38 mm)
1.5
1.75" (44 mm)
2.375" (60 mm)
3.0" (76 mm)
3.5" (89 mm)
4.0" (102 mm)
4.5" (114 mm)
5.0" (127 mm)
Labels are available in the following sizes for the HLX Scale
System. Some label lengths may require a Custom Label Type.
See Using Custom Labels for more information.
Widths
1.5"
(38 mm)
2.25"
(57 mm)
Label Lengths
6.5" (140 mm)
7" (178 mm)
7.5" (191 mm)
8" (204 mm)
8.5" (216 mm)
9" (228 mm)
9.5" (241 mm)
10" (254 mm)
Width
2.25"
(57 mm)
6.0" (152 mm)
F-35548 Rev. A (June 2013) 3-37 Setting Up Your System
Page 56

HLX Scale System with GCD Supervisor Manual
Understanding Label Types
The Label Type is the way the printing is laid out on the label.
Understanding Label Families
Using the Labels Menu
Label Families were designed to work with the default Label
Type settings (Standard Labels). The HLX Scale System automatically knows to search within the same Family for the nearest
label to what you are trying to print.
For example, you may have Label Type 14 selected (designed for
3.0" labels), but the label stock you are actually using is 1.75".
The HLX Scale System automatically searches the database for
the first 1.75" label in the Label Type 14 family. This feature
allows the use of nonstandard label lengths.
For a complete listing and description of all the labels contact
your local Hobart Representative.
The Labels Menu enables you to select and/or change your label
to suit your needs. The following topics are explained:
Selecting Fields to Print on a Label
Setting Up Label Text Names
Viewing Label Types
Using Label Graphics
Setting Up Your System 3-38 F-35548 Rev. A (June 2013)
Page 57

Selecting Fields to Print on a
Label
HLX Scale System with GCD Supervisor Manual
You have the ability to print the following special fields on a
label, providing the Label Type permits it:
• Sell By Date/Julian Sell By Date
• Packed-On Date/Julian Packed-On Date
• Product Life Date/Julian Product Life Date
• Unit Price
• By Count
• UPC/EAN Number and Barcode
• Currency Symbol
• Pre-Print Text Names
• Weight on a By Count
• 2nd UPC Check Digit
To change/edit the fields to print on a label:
1. From the Supervisor Menu, TOUCH Setup.
2. From the Setup Menu, TOUCH Labels.
3. From the Labels Menu, TOUCH Fields to Print. You should
now be on the Fields To Print Screen.
4. TOUCH the appropriate check box to choose the special
fields that you want to print on the label. A checked box will
print the field if the Label Type permits it.
5. Refer to the Table of Contents to perform your next
procedure, or return the scale to Operate mode.
Note
If you check the Weight on a By count check box, the weight on
a By count PLU will print in the Net Weight field when the By
count value is one.
F-35548 Rev. A (June 2013) 3-39 Setting Up Your System
Page 58

HLX Scale System with GCD Supervisor Manual
Setting Up Label Text Names
The Label Text Names option allows you to edit the Field Header
Names that print on labels - if the Label Type and Setup permit.
These include:
• Field 1: Packed On
• Field 2: Best Before
• Field 3: Sell By
• Field 4: Net Wt/Ct
• Field 5: Unit Price
• Field 6: Total Price
For complete list of all available fields that can print on a label,
contact your local Hobart Representative.
To set up/edit Label Text Names:
1. From the Supervisor Menu, TOUCH Setup.
2. From the Setup Menu, TOUCH Labels.
3. From the Labels Menu, TOUCH Label Text Names. You
should now be on the Label Text Names Screen.
4. TOUCH the field you wish to edit and TYPE the text you
wish to see on your label in the selected field.
Look At This
The new field name will not display on the Run screen. The
operator will see the original field name displayed. For example,
if you modify the text for Field 3 (Sell By) to say Freeze By, the
Run screen will still display Sell By, but the label will be printed
with the words Freeze By.
5. Refer to the Table of Contents to perform your next
procedure, or return the scale to Operate mode.
Setting Up Your System 3-40 F-35548 Rev. A (June 2013)
Page 59

Viewing Label Types
HLX Scale System with GCD Supervisor Manual
The Label Types option enables you to view available labels contained within your scale system. Remember, the Label Type is the
setup (layout) of the label.
Note
If you do not find the Label type you want, you can contact your
local Hobart Representative to order a Custom Label Type. See
Using Custom Label Types.
To view Label Types:
1. From the Supervisor Menu, TOUCH Setup.
2. From the Setup Menu, TOUCH Labels.
3. From the Labels Menu, TOUCH Label Types. You should
now be on the Label Types Screen.
4. TOUCH the Label type field and TYPE the label type you
wish to view.
5. To move through the available label types, TOUCH
Previous, or TOUCH Next.
6. Refer to the Table of Contents to perform your next
procedure, or return the scale to Operate mode.
Tip
The Label Type screen displays the label type number and the
label stock size required to print the label shown. The loaded
stock size is also displayed.
F-35548 Rev. A (June 2013) 3-41 Setting Up Your System
Page 60

HLX Scale System with GCD Supervisor Manual
Using Label Graphics
The Label Graphics option allows you to view the available
graphics that can be added to labels.
Note
• Hobart offers a variety of scale graphics. For additional
graphics, contact your local Hobart Representative.
• Graphics need to be added to the system before they can be
used, to add graphics, see Using the Import Function.
To use Label Graphics:
1. From the Supervisor Menu, TOUCH Setup.
2. From the Setup Menu, TOUCH Labels.
3. From the Labels Menu, TOUCH Label Graphics. You
should now be on the Label Graphic Screen.
4. TOUCH the Graphic name field and TYPE the Graphic
number or name you wish to view.
5. To move through the available Graphics, TOUCH Previous,
or TOUCH Next.
6. Refer to the Table of Contents to perform your next
procedure, or return the scale to Operate mode.
Setting Up Your System 3-42 F-35548 Rev. A (June 2013)
Page 61

Regular Label
Custom Label
Using Custom Label Types
HLX Scale System with GCD Supervisor Manual
Custom Label Types are designed to fit your specific merchandising needs. You select the fields that print and the location of each
field on the label.
Hobart offers a wide variety of Custom Label Type options. Use
the following example or create your own Custom Label Type
according to your merchandising needs.
Review the following subtopics for more information:
Adding a Custom Label Type
Deleting a Custom Label Type
F-35548 Rev. A (June 2013) 3-43 Setting Up Your System
Page 62

HLX Scale System with GCD Supervisor Manual
Adding a Custom Label Type
Custom Label Types are added through the Backup/Restore
function.
Deleting a Custom Label Type
Refer to Chapter 8: Backup & Restore
When following the directions in Chapter 8: Backup & Restore
for more information.
,
be sure to select only Label data when adding a Custom Label
Type.
You can only delete a Label Type from the scale that you added to
the database (e.g., Custom Label Type). Standard Label Types
cannot be deleted.
Look At This
Using this delete feature permanently removes your Custom
Label Type from the scale.
To delete a Custom Label Type:
1. From the Supervisor Menu, TOUCH Setup.
2. From the Setup Menu, TOUCH Labels.
3. From the Labels Menu, TOUCH Label Types. You should
now be on the Label Types Screen.
4. TOUCH the Label type field and TYPE the label type you
wish to remove.
5. Verify this is the correct label and TOUCH the Delete button
to remove the custom label type from the database. If the
Delete field is not active (grayed), then the Label type is
constant in the system and cannot be deleted.
6. Refer to the Table of Contents to perform your next
procedure, or return the scale to Operate mode.
Setting Up Your System 3-44 F-35548 Rev. A (June 2013)
Page 63

Setting Up Operator ID’s
HLX Scale System with GCD Supervisor Manual
The Operator ID option enables you to assign a numeric code that
identifies a specific operator. It allows you to change information
about that operator. You may also delete an operator from the
system. The following topics are covered in this section:
Understanding Access Levels
Assigning Operator ID’s
Assigning Operator ID’s Using RFID Option
Deleting Operator ID’s
Setting What Operators Can Modify
Creating Operator Notes
Shelf Life Expiration Note
Viewing Operator Changes
Understanding Access Levels
Within the HLX Scale System, a certain level of authority can be
assigned as a required minimum in order to use a particular function. This is the Access Level. When setting up operators and
their ID’s, you will need to determine what Access Level they
will be given.
Assigning an Access Level to an Operator ID gives you the ability to govern the amount of access your operators are allowed to
have to the Supervisor functions. For example, you may want to
allow your operators to make certain changes to PLU information
that can only be made in Supervisor mode. You can also prevent
an operator from accessing Supervisor mode completely. An
Access Level of 1 means the operator has no access to Supervisor
functions.
The following chart is grouped by Access Level and identifies the
functions associated with each.
Note
• Remember, whatever Access Level you select for an operator, then that operator can access all
For example, if you assign an operator to Access Level 7,
then he/she also has access to levels 6, 5, 4 and so on.
• You must assign at least one person with Access Level 9, if
Supervisor mode security is desired.
lower level functions.
F-35548 Rev. A (June 2013) 3-45 Setting Up Your System
Page 64

HLX Scale System with GCD Supervisor Manual
Access Level 1 (minimum) Function
No Access to Supervisor Functions
Access Level 2 Function
View/Modify Operator Note
View Scale Statistics
Change Printer Settings
Rezero Weigher
View Help Features
Access Level 3 Function
Backup/Restore from USB Drive
Record Scan
Access Level 4 Function
Change Unit Price
Access Level 5 Function
Change All Fields
Change a Reporting Class
View/Edit/Clear Class Totals
Create/Edit a Class
Delete Product/Class
Edit Label Types
Edit Store Information
Edit Shelf Life/Product Life
Setting Up Your System 3-46 F-35548 Rev. A (June 2013)
Page 65

HLX Scale System with GCD Supervisor Manual
Access Level 5 Function (Cont.)
Edit All Price Fields
Edit Label Graphics
Edit COOL Information
Edit Flashkeys, Specials, & Categories
Print Configuration Report
Edit Tare
Edit/Clear/View Product Totals
Edit/Clear/View Hourly Totals
Access Level 7 Function
Configure Totals Types
Set What the Operator Can Modify
Void Totals
Set E-mail
Access Level 9 (maximum) Function
Change Label Text Names
Set Fields to Print on a Label
Set Up Operator ID’s
Set Up Normal Scale Operation
Upgrade Firmware
Delete All Files
View Operator Changes
Access Desktop
F-35548 Rev. A (June 2013) 3-47 Setting Up Your System
Page 66

HLX Scale System with GCD Supervisor Manual
Assigning Operator ID’s
When you assign an Operator ID, you are providing a unique
identification number to the HLX Scale System for each of your
operators. Tied to this number is an Access Level code that
specifies the Supervisor functions which that particular operator
is authorized to perform in the scale. This is especially useful for
tracking purposes, such as monitoring your operators, if
necessary. Review Understanding Access Levels before
assigning operator ID’s.
To assign Operator ID's:
1. From the Supervisor Menu, TOUCH Setup.
2. From the Setup Menu, TOUCH Operators.
3. From the Operators Menu, TOUCH Configure Operators.
You should now be on the Configure Operators Screen.
4. TOUCH the Operator ID field and TYPE the new
Operator ID.
5. TOUCH the Access level field and TYPE the Access level
you wish to assign to the operator.
6. TOUCH the Operator name field and TYPE the name you
want assigned to this Operator ID.
7. TOUCH check box to enable Operators must login to run the
scale if this function is needed.
8. Refer to the Table of Contents to perform your next
procedure, or return the scale to Operate mode.
Setting Up Your System 3-48 F-35548 Rev. A (June 2013)
Page 67

Assigning Operator ID’s Using RFID
Option
HLX Scale System with GCD Supervisor Manual
The RFID option is used to allow an operator to login quickly and
easily to the scale system. The scale senses when an RFID tag is
in range. The RFID tag can be a wristband or other device.
RFID Tag (Wristband Style)
To assign Operator ID’s using RFID option:
1. From the Supervisor Menu, TOUCH Setup.
2. From the Setup Menu, TOUCH Operators.
3. From the Operators Menu, TOUCH Configure Operators.
You should now be on the Configure Operators Screen.
4. Position the RFID tag within 9 inches of the center of the
display screen. The Operator ID field and the Operator RFID
field will automatically fill in.
Note
The Operator ID will automatically fill in as the Operator RFID
number which can then be changed. The Operator RFID number
can not be changed since it is tied to the RFID tag.
F-35548 Rev. A (June 2013) 3-49 Setting Up Your System
Page 68

HLX Scale System with GCD Supervisor Manual
5. TOUCH the Operator ID field and TYPE the new Operator
ID.
6. TOUCH the Access level field and TYPE the Access level
you wish to assign to the operator.
7. TOUCH the Operator name field and TYPE the name you
want assigned to this Operator ID.
8. Refer to the Table of Contents to perform your next
procedure, or return the scale to Operate mode.
Setting Up Your System 3-50 F-35548 Rev. A (June 2013)
Page 69

Deleting Operator ID’s
HLX Scale System with GCD Supervisor Manual
When you delete an Operator’s ID, you will permanently remove
the ID from the scales database.
Note
When using the RFID option, the screen may appear different
however the steps to delete an Operator ID are the same.
To delete an Operator ID:
1. From the Supervisor Menu, TOUCH Setup.
2. From the Setup Menu, TOUCH Operators.
3. From the Operators Menu, TOUCH Configure operators.
You should now be on the Configure Operators Screen.
4. TOUCH the Operator ID field and TYPE the Operator ID
you wish to delete
–OR– TOUCH the Operator name in the list.
5. TOUCH the Delete button.
6. Refer to the Table of Contents to perform your next
procedure, or return the scale to Operate mode.
F-35548 Rev. A (June 2013) 3-51 Setting Up Your System
Page 70

HLX Scale System with GCD Supervisor Manual
Setting What Operators Can Modify
Use this feature to allow operators to change and modify various
functions of the HLX Scale System.
To set what Operators can modify:
1. From the Supervisor Menu, TOUCH Setup.
2. From the Setup Menu, TOUCH Operators.
3. From the Operators Menu, TOUCH Operators Can
Modify. You should now be on the Operators Can Modify
Screen.
4. TOUCH the check box of the field you want to make active
for operators to modify.
5. Refer to the Table of Contents to perform your next
procedure, or return the scale to Operate mode.
Setting Up Your System 3-52 F-35548 Rev. A (June 2013)
Page 71

Creating Operator Notes
HLX Scale System with GCD Supervisor Manual
An Operator Note provides a way to convey additional
information to the operators that they need to know when
operating the system.
Note
The Operator Note will appear on the Operator Screen when the
Operator logs on if the Operator Note has not been viewed
previously by the operator.
To create an Operator Note:
1. From the Supervisor Menu, TOUCH Setup.
2. From the Setup Menu, TOUCH Operators.
3. From the Operators Menu, TOUCH Operator Note. You
should now be on the Text Editor Screen. Refer to Using the
Text Editor in Appendix A
use the text editor.
for more information on how to
4. Refer to the Table of Contents to perform your next
procedure, or return the scale to Operate mode.
F-35548 Rev. A (June 2013) 3-53 Setting Up Your System
Page 72

HLX Scale System with GCD Supervisor Manual
Shelf Life Expiration Note
The Shelf Life Expiration Note is a note that is modified in
Supervisor Mode and is displayed to the Operator on the Shelf
Life Expiration Page in Operate Mode. Changing the note will
change what text is conveyed to an Operator when an item
expires. This text can be seen on the Operate Mode View Expiring Items Page. There are many different tasks that may be undertaken when an item expires and this note will indicate those tasks.
For example, Operators may be given instructions telling them to
make sample platters and signage to promote the soon to be
expiring products.
To create the Shelf Life Expiration note:
1. From the Supervisor Menu, TOUCH Setup.
2. From the Setup Menu, TOUCH Other Records.
3. From the Other Records Menu, TOUCH Shelf Life
Expiration. You should now be on the Shelf Life Expiration
Screen. Refer to Using the Text Editor in Appendix A
more information on how to use the text editor.
for
4. Refer to the Table of Contents to perform your next
procedure, or return the scale to Operate mode.
Setting Up Your System 3-54 F-35548 Rev. A (June 2013)
Page 73

Viewing Operator Changes
HLX Scale System with GCD Supervisor Manual
This function will allow you to view changes made by an operator, if permitted, based on access level assigned.
To view operator changes:
1. From the Supervisor Menu, TOUCH Setup.
2. From the Setup Menu, TOUCH Operators.
3. From the Operator Menu, TOUCH View Operator Changes.
4. Refer to the Table of Contents to perform your next
procedure, or return the scale to Operate mode.
F-35548 Rev. A (June 2013) 3-55 Setting Up Your System
Page 74

HLX Scale System with GCD Supervisor Manual
Updating Firmware
Updates to the Hobart scale application may be necessary from
time to time. Contact your Hobart Sales representative for more
information about updates to your HLX System.
Look At This
• It is recommended that before you update the HLX scale
application manually that you make a complete back up of
your scales database. See Chapter 8: Backup & Restore
more information.
• If you access your scale remotely as outlined in
Appendix A
files on your computer after each scale application upgrade.
Failure to do so could cause some scale functions not to
display correctly while using remote access. The files are
located at the following path. Show hidden files and folders
must be enabled to see path as shown.
C:\Documents and Settings\“username”\Application
Data\Sun\Java\Deployment\cache\javapi\v1.0\jar
The term “username” refers to the user name or log in name
used to access this computer. This will be unique for each
user. Each user will need to remove all files stored in the
directories under their user name. If you have any questions
about this function, contact your local network
administrator.
for
, you may need to manually delete the following
This section addresses how to set up the scale to do an automatic
or manual upgrade to the scale application.
VIA FTP
VIA USB Bulk Storage (USB Drive)
Setting Up Your System 3-56 F-35548 Rev. A (June 2013)
Page 75

VIA FTP
HLX Scale System with GCD Supervisor Manual
Upgrading the scale application via FTP will download required
files from a specified server. This option allows your scale system
to update the scale application automatically overnight. Contact
your local network administrator if necessary.
To upgrade scale application via FTP:
1. From the Supervisor Menu, TOUCH Setup.
2. From the Setup Menu, TOUCH Upgrade Firmware.
3. From the Upgrade Firmware Menu, TOUCH Via FTP. You
should now be on the Update Via FTP Screen.
4. To upgrade scale application via FTP, TOUCH the Server
Host Name Field and type in server host.
5. Or to upgrade scale application via IP address, TOUCH the
Switch to IP address button field and TYPE the Server IP
address.
6. For FTP Connection Setup, TOUCH the user field and
TYPE in the user name.
7. TOUCH the Password field and TYPE in the password.
8. TOUCH the Directory field and TYPE in the directory.
9. If you would like the scale to automatically search for new
firmware versions, TOUCH the check box.
10. Set the Daily search time.
11. If you do not wish to have an auto update with a set Daily
search time, TOUCH the Upgrade firmware now button.
12. Refer to the Table of Contents to perform your next
procedure, or return the scale to Operate mode.
F-35548 Rev. A (June 2013) 3-57 Setting Up Your System
Page 76

HLX Scale System with GCD Supervisor Manual
VIA USB Bulk Storage (USB Drive)
Updating firmware via USB bulk storage is upgrading your scale
application using files from a USB drive.
To upgrade scale application via USB bulk storage:
1. From the Supervisor Menu, TOUCH Setup.
2. From the Setup Menu, TOUCH Upgrade firmware.
3. From the Upgrade Firmware Menu, TOUCH Via USB bulk
storage. You should now be on the Update Via USB Bulk
Storage Screen.
4. To upgrade scale application via USB drive, follow the
instructions provided on the screen.
5. Refer to the Table of Contents to perform your next
procedure, or return the scale to Operate mode.
Setting Up Your System 3-58 F-35548 Rev. A (June 2013)
Page 77

Email
HLX Scale System with GCD Supervisor Manual
If your scale experiences technical problems, it could send an
Email to a designated individual regarding that problem. In order
to set up your scale to send the messages to the proper SMTP
Servers IP Address, do the following:
Note
Contact your Network Administrator to make sure this function
is available with your network.
1. From the Supervisor Menu, TOUCH Setup.
2. From the Setup Menu, TOUCH Communications.
3. From the Communications Menu, TOUCH Email. You
should now be on the Email Screen.
4. TOUCH the IP Address field and TYPE the SMTP Servers
IP Address in the Email Server IP Address field.
5. TOUCH the From: field and TYPE the email address from
who/which device is generating the alert.
6. TOUCH the To field and TYPE the email address to be
notified of alerts.
7. TOUCH the check boxes for the alerts you want active.
8. Refer to the Table of Contents to perform your next
procedure, or return the scale to Operate mode.
Note
Email must have valid addresses for both the To: and From: for
notifications to be sent.
F-35548 Rev. A (June 2013) 3-59 Setting Up Your System
Page 78

HLX Scale System with GCD Supervisor Manual
Automatic Updates
Each scale is either a stand alone scale, a primary scale, or a secondary scale. Each scale must be properly set up to be one of
these scale types.
Scale Type Description
Stand alone The scale does not receive automatic
Primary scale The primary coordinator for all automatic
Secondary scale Sends changes to the primary scale, and all
Primary server is the name of the scale where the secondary
scales receive their updates.
Primary server - only one of the following fields have to be filled.
• Host name - The actual host name of the primary scale on
• IP Address - The IP address of the primary scale on the
To set up Automatic Updates:
updates.
updates.
secondary scales are then automatically
updated.
the network.
network.
1. From the Supervisor Menu, TOUCH Setup.
2. From the Setup Menu, TOUCH Communications.
3. From the Communications Menu, TOUCH Automatic
Updates. You should now be on the Automatic Updates
Screen.
4. TOUCH the check box for the Scale Type.
5. TOUCH the check box for the Data Types and TOUCH
Save.
Setting Up Your System 3-60 F-35548 Rev. A (June 2013)
Page 79

HLX Scale System with GCD Supervisor Manual
Note
If the Primary scale check box is selected, the following screen
will display.
Note
If the Secondary scale check box is selected, the following
screen will display.
6. If the Secondary scale check box is used, TOUCH the Host
Name field and TYPE the host name – OR –
TOUCH the IP Address fields and TYPE the IP address.
7. Refer to the Table of Contents to perform your next
procedure, or return the scale to Operate mode.
F-35548 Rev. A (June 2013) 3-61 Setting Up Your System
Page 80

HLX Scale System with GCD Supervisor Manual
Setting Up Product Default Values
The entire set of Product Default Values information in the database is covered on three Product Default Value Screen pages.
Note
The fields that can be changed when you are working with
Products vary depending on the Product type (e.g., Random
weight or By count).
Product Default Values Screen
Page 1
The information on page 1 is related to your product.
These fields must be present in the Label type assigned in order
for them to print on the label.
Setting Up Your System 3-62 F-35548 Rev. A (June 2013)
Page 81

HLX Scale System with GCD Supervisor Manual
In This Field On Page 1 Enter This Information
Product type Random Wt. = An item that is weighed before it can be priced.
Fixed Wt. = An item priced by a predetermined weight.
By count = An item which is priced by the number of items per
purchase, rather than by weight (e.g., 3 for $1.00).
Fluid ounces = An item sold by a predetermined volume.
Description The name or description of the Product.
Remember that your label type and font size impact the number of characters available. Always set label type before filling description to
ensure accurate character count.
UPC number system The type of Universal Product Code used for this PLU. The type can be
01, 02, 04, 06, 07, 08 or 09. All are available for Fixed weight and 02 or
04 are available for Random weight.
EAN format string The series of characters that represent the data that will actually be in
the barcode, if the label type allows.
EAN prefix The default for 2-digit prefix for random weight, fixed weight, by count
or fluid ounce type product.
Tare The Tare value, which is the weight of the packaging for which the cus-
tomer does not pay (e.g., plastic wrap or a styrofoam tray).
NOTE: Fixed weight PLU’s do not have a tare value.
Proportional Tare Use the Proportional tare field for items such as candy wrapped individ-
ually, but sold in bulk.
Unit price This is the price per unit (Unit price) of a product. It can be 0.00 to
999.99. However, if the total price is greater than $99.99, the Barcode
does not print on the label unless you are using an EAN barcode.
Discount type Label will show discounted price, but the UPC displays regular price.
• Cents off – The discount or amount off of the Unit price.
• Discount price – The discounted unit price.
• Percent off – The percentage discount off of the Total price.
• Regular price – The normal unit price.
• Percent added – The percentage added to the Total price.
• Package discount – The amount discounted from the package
total price.
Gold, Silver and Bronze Levels This value is determined based on the Frequent Shoppers Program. It is
based on the amount of money the customer spends in the store. Gold
level shoppers will receive the highest discount. Gold level is the
default.
By count The quantity of items that make up the package.
Exception price (By count) The exception price of By count items, when the quantity purchased is
less than the normal quantity. For example, if the price is 3 for $1.00,
the exception price for 1 could be $0.39.
Fluid weight (Fluid ounces) The Fluid amount that is fixed for each product.
Forced Price or Forced Tare Check box to enable function; uncheck to disable.
F-35548 Rev. A (June 2013) 3-63 Setting Up Your System
Page 82

HLX Scale System with GCD Supervisor Manual
Product Default Values Screen
Page 2
The information on page 2 is related to your Product label. Refer
to Setting Up Label Types.
These fields must be present in the Label type assigned in order
for them to print on the label.
In This Field On Page 2 Enter This Information
Product type
Random Wt. = An item that is weighed before it can be priced.
Fixed Wt. = An item priced by a predetermined weight.
By count = An item which is priced by the number of items per
purchase, rather than by weight (e.g., 3 for $1.00).
Fluid ounces = An item sold by a predetermined volume.
Reporting class The Class to which another Class or Product reports its Totals
information.
Points An accumulation of points is obtained by being a part of the Frequent
Shoppers Program. The more money spent by a shopper, the more
points are accumulated.
Shelf life The number of days that a perishable product may stay on the shelf.
Product life The number of days before a perishable product should be consumed or
frozen (e.g., Use by, Freeze by or Best before).
Don’t Print check boxes Check box to not have packed on, sell by or best before print on label.
Setting Up Your System 3-64 F-35548 Rev. A (June 2013)
Page 83

HLX Scale System with GCD Supervisor Manual
Product Default Values Screen
Page 3
In This Field On Page 3 Enter This Information
The information on page 3 is related to your Product label. Refer
to Setting Up Your System for detailed instructions.
These fields must be present in the Label type assigned in order
for them to print on the label.
Product type
Random Wt. = An item that is weighed before it can be priced.
Fixed Wt. = An item priced by a predetermined weight.
By count = An item which is priced by the number of items per pur-
chase, rather than by weight (e.g., 3 for $1.00).
Fluid ounces = An item sold by a predetermined volume.
Label type The actual format of the label. It determines the size, orientation and
fields to print on the label.
Graphic 1 thru 4 Select the number or name of the graphic that is printed on the Product
label. Up to four graphics can be used if available for the selected label
type.
F-35548 Rev. A (June 2013) 3-65 Setting Up Your System
Page 84

HLX Scale System with GCD Supervisor Manual
Running a Configuration Report
The Configuration Report provides a convenient listing of the
current configuration set up in the scale system.
Note
Running a Configuration Report cannot be done remotely, but
must be run at the scale.
To run a Configuration Report:
1. From the Supervisor Menu, TOUCH Setup.
2. From the Setup Menu, TOUCH Configuration Report. The
Configuration Report will begin running and is printed out
on the printer.
3. TOUCH Done.
4. Refer to the Table of Contents to perform your next
procedure, or return the scale to Operate mode.
Setting Up Your System 3-66 F-35548 Rev. A (June 2013)
Page 85

Weigh Types
HLX Scale System with GCD Supervisor Manual
The System drop-down menu provides access to Production
Entry mode and Accumulate Items mode when enabled in
Supervisor. These modes can be activated through the System
drop-down menu or through a softkey programmed to toggle the
mode activation. The following section provides a look at the
procedures for successfully weighing items and printing labels
within each specific Weigh Type (mode of operation).
F-35548 Rev. A (June 2013) 3-67 Setting Up Your System
Page 86

HLX Scale System with GCD Supervisor Manual
Production Entry Mode
This mode enables you to enter several fixed weight PLU's and
the number of labels you want to print for each. For example,
Production Entry allows you to print 100 bread labels and 50
cupcake labels with one operation.
Tip
You may want to setup your scale to stream labels (print labels
without removing the backing paper from the label).
To Enable
To run in Production Entry Mode
: Enter Product PLU in the
scale. Scale will request the number of labels to be printed.
TOUCH Print to print labels.
Setting Up Your System 3-68 F-35548 Rev. A (June 2013)
Page 87

Accumulate Items Mode
HLX Scale System with GCD Supervisor Manual
Accumulate items mode enables you to print one label or a series
of labels for multiple PLUs. The scale can be configured to print
either Item Total Labels or Itemized Receipts.
To Configure
F-35548 Rev. A (June 2013) 3-69 Setting Up Your System
Page 88

HLX Scale System with GCD Supervisor Manual
When configured, you can print a label for each product and/or an
Item Total Label for all products. The Item Total Label contains
only the grand total and barcode. Refer to the following
examples.
To run in Accumulate Items Mode: Enter Product PLU in the
scale. Place product on scale. Choose "Add This Item". If another
item is to be included choose "Add Another Item". Repeat until
order is complete.
Operator can choose to "Show All" or choose "Print Label" to
print label and complete transaction.
Setting Up Your System 3-70 F-35548 Rev. A (June 2013)
Page 89

HLX Scale System with GCD Supervisor Manual
Chapter 4: Setting Up the Database
Understanding the Database . . . . . . . . . . . . . . . . . . . . . . . . . . . . . . . . . . . . . . . . . . . . . . . . . . . . . . . . . . . . . . . . . . . 4-2
Understanding the Product Changes Function . . . . . . . . . . . . . . . . . . . . . . . . . . . . . . . . . . . . . . . . . . . . . . . . . . . 4-2
Understanding the Product Changes Screens. . . . . . . . . . . . . . . . . . . . . . . . . . . . . . . . . . . . . . . . . . . . . . . . . . . . 4-3
Product Changes Screen Page 1. . . . . . . . . . . . . . . . . . . . . . . . . . . . . . . . . . . . . . . . . . . . . . . . . . . . . . . . . . . . 4-3
Product Changes Screen Page 2. . . . . . . . . . . . . . . . . . . . . . . . . . . . . . . . . . . . . . . . . . . . . . . . . . . . . . . . . . . . 4-5
Product Changes Screen Page 3. . . . . . . . . . . . . . . . . . . . . . . . . . . . . . . . . . . . . . . . . . . . . . . . . . . . . . . . . . . . 4-6
Product Changes Screen Page 4. . . . . . . . . . . . . . . . . . . . . . . . . . . . . . . . . . . . . . . . . . . . . . . . . . . . . . . . . . . . 4-7
Product Changes Screen Page 5. . . . . . . . . . . . . . . . . . . . . . . . . . . . . . . . . . . . . . . . . . . . . . . . . . . . . . . . . . . . 4-8
Product Changes Screen Page 6. . . . . . . . . . . . . . . . . . . . . . . . . . . . . . . . . . . . . . . . . . . . . . . . . . . . . . . . . . . . 4-9
Setting Up Classes . . . . . . . . . . . . . . . . . . . . . . . . . . . . . . . . . . . . . . . . . . . . . . . . . . . . . . . . . . . . . . . . . . . . . . . . . 4-10
Adding a Class . . . . . . . . . . . . . . . . . . . . . . . . . . . . . . . . . . . . . . . . . . . . . . . . . . . . . . . . . . . . . . . . . . . . . . . . . . 4-11
Editing a Class . . . . . . . . . . . . . . . . . . . . . . . . . . . . . . . . . . . . . . . . . . . . . . . . . . . . . . . . . . . . . . . . . . . . . . . . . . 4-12
Deleting a Class . . . . . . . . . . . . . . . . . . . . . . . . . . . . . . . . . . . . . . . . . . . . . . . . . . . . . . . . . . . . . . . . . . . . . . . . . 4-13
Setting Up Products . . . . . . . . . . . . . . . . . . . . . . . . . . . . . . . . . . . . . . . . . . . . . . . . . . . . . . . . . . . . . . . . . . . . . . . . 4-14
Adding a Product . . . . . . . . . . . . . . . . . . . . . . . . . . . . . . . . . . . . . . . . . . . . . . . . . . . . . . . . . . . . . . . . . . . . . . . . 4-14
Deleting a Product . . . . . . . . . . . . . . . . . . . . . . . . . . . . . . . . . . . . . . . . . . . . . . . . . . . . . . . . . . . . . . . . . . . . . . . 4-24
Modifying Product Information . . . . . . . . . . . . . . . . . . . . . . . . . . . . . . . . . . . . . . . . . . . . . . . . . . . . . . . . . . . . . . . 4-25
Modifying Prices . . . . . . . . . . . . . . . . . . . . . . . . . . . . . . . . . . . . . . . . . . . . . . . . . . . . . . . . . . . . . . . . . . . . . . . . 4-25
Changing the Unit Price. . . . . . . . . . . . . . . . . . . . . . . . . . . . . . . . . . . . . . . . . . . . . . . . . . . . . . . . . . . . . . . . . 4-25
Changing Price Fields . . . . . . . . . . . . . . . . . . . . . . . . . . . . . . . . . . . . . . . . . . . . . . . . . . . . . . . . . . . . . . . . . . 4-26
Modifying Shelf/Product Life . . . . . . . . . . . . . . . . . . . . . . . . . . . . . . . . . . . . . . . . . . . . . . . . . . . . . . . . . . . . . . 4-27
Modifying Tare. . . . . . . . . . . . . . . . . . . . . . . . . . . . . . . . . . . . . . . . . . . . . . . . . . . . . . . . . . . . . . . . . . . . . . . . . . 4-28
Modifying Class . . . . . . . . . . . . . . . . . . . . . . . . . . . . . . . . . . . . . . . . . . . . . . . . . . . . . . . . . . . . . . . . . . . . . . . . . 4-29
Renumbering a Product . . . . . . . . . . . . . . . . . . . . . . . . . . . . . . . . . . . . . . . . . . . . . . . . . . . . . . . . . . . . . . . . . . . 4-30
Setting Up Support Files. . . . . . . . . . . . . . . . . . . . . . . . . . . . . . . . . . . . . . . . . . . . . . . . . . . . . . . . . . . . . . . . . . . . . 4-31
Understanding Support Files . . . . . . . . . . . . . . . . . . . . . . . . . . . . . . . . . . . . . . . . . . . . . . . . . . . . . . . . . . . . . . . 4-31
Support File Functions . . . . . . . . . . . . . . . . . . . . . . . . . . . . . . . . . . . . . . . . . . . . . . . . . . . . . . . . . . . . . . . . . . 4-31
Setting Up Product Text . . . . . . . . . . . . . . . . . . . . . . . . . . . . . . . . . . . . . . . . . . . . . . . . . . . . . . . . . . . . . . . . . . . 4-32
Creating Expanded Text. . . . . . . . . . . . . . . . . . . . . . . . . . . . . . . . . . . . . . . . . . . . . . . . . . . . . . . . . . . . . . . . . 4-32
Using Expanded Text . . . . . . . . . . . . . . . . . . . . . . . . . . . . . . . . . . . . . . . . . . . . . . . . . . . . . . . . . . . . . . . . . . . 4-35
Copying and Editing Expanded Text . . . . . . . . . . . . . . . . . . . . . . . . . . . . . . . . . . . . . . . . . . . . . . . . . . . . . . . 4-37
Deleting Expanded Text. . . . . . . . . . . . . . . . . . . . . . . . . . . . . . . . . . . . . . . . . . . . . . . . . . . . . . . . . . . . . . . . . 4-39
Setting Up Nutrifacts . . . . . . . . . . . . . . . . . . . . . . . . . . . . . . . . . . . . . . . . . . . . . . . . . . . . . . . . . . . . . . . . . . . . . 4-41
Creating Nutrifacts. . . . . . . . . . . . . . . . . . . . . . . . . . . . . . . . . . . . . . . . . . . . . . . . . . . . . . . . . . . . . . . . . . . . . 4-41
Using Nutrifacts . . . . . . . . . . . . . . . . . . . . . . . . . . . . . . . . . . . . . . . . . . . . . . . . . . . . . . . . . . . . . . . . . . . . . . . 4-44
Copying and Editing Nutrifacts . . . . . . . . . . . . . . . . . . . . . . . . . . . . . . . . . . . . . . . . . . . . . . . . . . . . . . . . . . . 4-47
Deleting Nutrifacts. . . . . . . . . . . . . . . . . . . . . . . . . . . . . . . . . . . . . . . . . . . . . . . . . . . . . . . . . . . . . . . . . . . . . 4-50
F-35548 Rev. A (June 2013) 4-1 Setting Up the Database
Page 90

HLX Scale System with GCD Supervisor Manual
Setting Up the Database
Before you begin to use the HLX Scale System, you should consider how you want to set up the database to maximize the efficiency of your scale.The following topics explain how to set up
your database:
Understanding the Database
Setting Up Classes
Setting Up Products
Modifying Product Information
Setting Up Support Files
Understanding the Database
Understanding the Product
Changes Function
With the HLX Scale System’s flexible database, you can organize
your operation with Classes, Categories and Products. Classes are
groups of Products. Categories are a way to group products
together for the purpose of creating flashkeys. Products are any
commodities sold.
When you add, modify or delete a Class, Categories or Product,
the database is updated immediately. The database is designed so
that you can quickly and easily change one specific field or all
fields.
Before you begin working with Classes, Categories and Products,
you should consider how you want to set up your scale. Refer to
Chapter 3: Setting Up Your System
Please review the following topics:
for information.
Understanding the Product Changes Function
Understanding the Product Changes Screens
Whether you are setting up or updating the database with
Product-related information, you will use the Product changes
menu. You may add, change or delete Classes, PLU information
or Support Files.
The menus and screens of the Product changes function give you
the flexibility to access the PLU information without having to go
through every screen.
Setting Up the Database 4-2 F-35548 Rev. A (June 2013)
Page 91

Understanding the Product
Changes Screens
HLX Scale System with GCD Supervisor Manual
The entire set of PLU-related information in the database is covered on six Product Changes Screen pages.
Note
The fields that can be changed when you are working with
Products vary depending on the PLU type (e.g., Random weight,
Fixed weight or By count).
Product Changes Screen Page 1
The information on page 1 is related to your product.
These fields must be present in the Label type assigned in order
for them to print on the label.
F-35548 Rev. A (June 2013) 4-3 Setting Up the Database
Page 92

HLX Scale System with GCD Supervisor Manual
In This Field On Page 1 Enter This Information
Product number This is the PLU number used to represent a specific product.
Product type Random Wt. = An item that is weighed before it can be priced.
Fixed Wt. = An item priced by a predetermined weight.
By count = An item which is priced by the number of items per purchase, rather than by weight (e.g., 3 for $1.00).
Fluid ounces = An item sold by a predetermined volume.
Description The name or description of the Product.
Remember that your Label type and font size impact the number of
characters available. Always set Label type before filling description to
ensure accurate character count.
UPC type The type of Universal Product Code used for this PLU. The type can be
01, 02, 04, 06, 07, 08 or 09. All are available for Fixed weight and 02 or
04 are available for Random weight.
UPC number The UPC or vendor/product number that is used to identify the product.
This must match your front-end system for scanning.
Unit price This is the price per unit (Unit price) of a product. It can be 0.00 to
999.99. However, if the total price is greater than $99.99, the Barcode
does not print on the label unless you are using an EAN bar code.
Discount type Label will show discounted price, but the UPC displays regular price.
• Cents off – The discount or amount off of the Unit price.
• Discount price – The discounted unit price.
• Percent off – The percentage discount off of the Total price.
• Advertised price – The regular unit price.
• Percent added – The percentage added to the Total price.
• Package discount – The amount discounted from the package
total price.
Gold, Silver and Bronze Levels This value is determined based on the Frequent Shoppers Program. It is
based on the amount of money the customer spends in the store. Gold
level shoppers will receive the highest discount. Gold level is the
default.
Tare The Tare value, which is the weight of the packaging for which the cus-
tomer does not pay (e.g., plastic wrap or a styrofoam tray).
NOTE: Fixed weight PLU’s do not have a tare value.
Proportional Tare Use the Proportional tare field for items such as candy wrapped individ-
ually, but sold in bulk.
Vendor # (Fixed weight
The number that identifies the vendor that supplied the product.
Fluid ounces)
By count The quantity of items that make up the package.
Exception price (By count) The exception price of By count items, when the quantity purchased is
less than the normal quantity. For example, if the price is 3 for $1.00,
the exception price for 1 could be $0.39.
Fluid weight (Fluid ounces) The Fluid amount that is fixed for each product.
Forced Price or Tare check box Check box to enable function, uncheck to disable.
Setting Up the Database 4-4 F-35548 Rev. A (June 2013)
Page 93

Product Changes Screen Page 2
HLX Scale System with GCD Supervisor Manual
The information on page 2 is related to your Product label. Refer
to Setting Up Labels, for detailed instructions.
These fields must be present in the Label type assigned in order
for them to print on the label.
In This Field On Page 2 Enter This Information
Product number This is the PLU which is the number used to represent a specific
product.
Reporting class The Class to which another Class or Product reports its Totals
information.
Shelf life The number of days and/or hours that a perishable product may stay on
the shelf.
Product life The number of days and/or hours before a perishable product should be
consumed or frozen (e.g., Use by, Freeze by or Best before).
Points An accumulation of points is obtained by being a part of the Frequent
Shoppers Program. The more money spent by a shopper, the more
points are accumulated.
Don’t Print check boxes Check box to not have packed on, sell by or best before print on label.
Renumber TOUCH this button to change the PLU number of the current product.
Delete TOUCH this button to delete the current PLU from the database.
F-35548 Rev. A (June 2013) 4-5 Setting Up the Database
Page 94

HLX Scale System with GCD Supervisor Manual
Product Changes Screen Page 3
The information on page 3 is related to your Product label. Refer
to Setting Up Labels for detailed instructions.
These fields must be present in the Label type assigned in order
for them to print on the label.
In This Field On Page 3 Enter This Information
Product number This is the PLU which is the number used to represent a specific
product.
Label type The actual format of the label. It determines the size, orientation and
fields to print on the label.
Graphic 1 thru 4 Select from the list the number or name of the graphic that is printed on
the Product label. Up to four graphics can be used if available for the
selected label type.
Renumber TOUCH this button to change the PLU number of the current product.
Delete TOUCH this button to delete the current PLU from the database.
Setting Up the Database 4-6 F-35548 Rev. A (June 2013)
Page 95

Product Changes Screen Page 4
HLX Scale System with GCD Supervisor Manual
The information on page 4 is related to your Product label. You
can link Special messages, Product notes, Nutrifacts, Product
Marquee and Expanded text to one or more than one PLU.
See Setting Up Support Files for detailed procedures of how to
add, edit, copy and delete Special messages Product notes, Nutrifacts, Product Marquee and Expanded Text.
These fields must be present in the Label type you select in order
for them to print on the label.
In This Field On Page 4 Enter This Information
Product number This is the PLU which is the number used to represent a specific
product.
Expanded text Miscellaneous information, such as ingredients or cooking instructions.
Special message Special information, such as Today’s Feature or Buy One, Get One
Free.
Product note Special information about the current product. This information is for
the Operator only and will not print on the label.
Nutrifacts Nutrition information, such as serving size, calories, total fat and
vitamin content.
Product Marquee Special information to be displayed about this product on the marquee.
Renumber TOUCH this button to change the PLU number of the current product.
Delete TOUCH this button to delete the current PLU from the database.
F-35548 Rev. A (June 2013) 4-7 Setting Up the Database
Page 96

HLX Scale System with GCD Supervisor Manual
Product Changes Screen Page 5
The information on page 5 is related to assigning a product to a
category or special.
These fields must be present in the Label type you select in order
for them to print on the label.
In This Field On Page 5 Enter This Information
Product number This is the PLU which is the number used to represent a specific
product.
Category Choose from the pull-down menu the category you wish to relate your
product to. See Categories. (For Flashkey use only.)
Type of special Choose from the pull-down menu which type of special you wish to
relate your product to. See Specials. (For Flashkey use only.)
Flashkey graphic Choose from the pull-down menu which graphic you wish to relate
your product to.
Flashkey caption The words you wish to have shown over the Flashkey graphic to iden-
tify this item.
Renumber TOUCH this button to change the PLU number of the current product.
Delete TOUCH this button to delete the current PLU from the database.
Setting Up the Database 4-8 F-35548 Rev. A (June 2013)
Page 97

Product Changes Screen Page 6
HLX Scale System with GCD Supervisor Manual
The information on page 6 is related to assigning a COOL
(Country of Origin Labeling) tracking number or category to a
specific PLU. See Chapter 9: Setting Up COOL
information.
for more
These fields must be present in the Label type you select in order
for them to print on the label.
In This Field On Page 6 Enter This Information
Product number This is the PLU which is the number used to represent a specific
product.
Tracking number This is a number used to track a product run.
COOL Category This is a COOL category to assign a product to such as beef, pork, fish
or chicken.
Pre-text This is text that will appear before a specific PLU such as farm raised,
wild catch or organic.
Force COOL verification check box This will force the operator to the COOL screen.
COOL is required check box This will force operator to enter COOL information.
Default COOL text This will set default COOL text to assist the operator. If COOL is
required, this text will be used unless the operator changes it.
Renumber TOUCH this button to change the PLU number of the current product.
Delete TOUCH this button to delete the current PLU from the database.
Full view TOUCH this button to show entire COOL text area.
Create new COOL text This will take the operator to a new screen where they can create a new
COOL text.
Delete text TOUCH this button to delete current default COOL text.
F-35548 Rev. A (June 2013) 4-9 Setting Up the Database
Page 98

HLX Scale System with GCD Supervisor Manual
Setting Up Classes
The HLX Scale System enables you to organize your Products
into Classes. Classes are groups of Products. You can create
Classes by Product type (such as ham) or set up a Class to represent a department (such as deli). You should group Classes in the
most appropriate way to suit your needs.
Using Classes with your Hobart scale enables:
• More accurate totals reporting
• Simplified data tracking
The subtopics below explain the Hobart Class Structure.
Adding a Class
Editing a Class
Deleting a Class
Whenever an item is weighed on a Hobart PLU Scale, the totals
information (i.e., the number of packages, pounds and dollars
weighed) is stored in the memory of the scale. These totals are
stored by individual items, but they can also be stored by groups
of items called Classes.
For example, in the deli department, the item file can be easily
grouped into major commodities, such as BEEF, CHICKEN,
TURKEY, SALADS, etc. The major commodities can then be
grouped into their primary groups, such as SMOKED, HONEY,
ROASTED, etc. This allows you to track major groups of items
(Classes), instead of having to track each individual item.
With a Class structure in place, it becomes easy to set up your
Products so you can report totals for each Class and sub Class.
Setting Up the Database 4-10 F-35548 Rev. A (June 2013)
Page 99

Adding a Class
HLX Scale System with GCD Supervisor Manual
Your PLU information can be organized into Classes. To simplify the data tracking process, you can create the Class structure
before you start adding product information into your data file.
The following explanation details how to add a Class.
To add a new Class:
1. From the Supervisor Menu, TOUCH Product.
2. From the Product Menu, TOUCH Class Changes. You
should now be on the Class Changes Screen.
3. On the Class Changes Screen, TOUCH the Class number
field and TYPE the new Class number in the Class number
field. This number must be unique. You cannot have the
same number for a Class and a Product. A message will
display saying the number does not exist. If the number
already exists as a PLU or a Class, the existing information
will display.
4. TOUCH OK to add a new Class.
5. TOUCH the Class description field and TYPE the new Class
description.
6. TOUCH the Reporting class field and TYPE the Reporting
class. This is the Class to which another Class, sub Class or
Product is grouped. The default is Grand Totals, Class
999999.
7. Refer to the Table of Contents to perform your next
procedure, or return the scale to Operate mode.
F-35548 Rev. A (June 2013) 4-11 Setting Up the Database
Page 100

HLX Scale System with GCD Supervisor Manual
Editing a Class
Use this option to change the Class description or Reporting class
within an existing Class.
To edit a Class:
1. From the Supervisor Menu, TOUCH Product.
2. From the Product Menu, TOUCH Class Changes. You
should now be on the Class Changes Screen.
3. TOUCH the Class number field and TYPE the Class number
you wish to edit.
4. Edit the necessary information.
5. Refer to the Table of Contents to perform your next
procedure, or return the scale to Operate mode.
Setting Up the Database 4-12 F-35548 Rev. A (June 2013)
 Loading...