

Hobart Food Machines HEC3018 Installation Manual

I
N
S
T
R
U
C
T
I
O
N
S
HEC SERIES ELECTRIC CONVEYOR OVENS
MODELS
HEC3018
10KW ML-126188
15KW ML-126400
HEC4018 ML-126189
HEC3624 ML-126190
HEC3632 ML-126191
HEC4824 ML-126192
HEC4832 ML-126193
HEC6024 ML-126194
HEC6032 ML-126195
701 S. RIDGE AVENUE
TROY, OHIO 45374-0001
FORM 34075 (10-98)

TABLE OF CONTENTS
GENERAL............................................................................................................................................. 3
INSTALLATION .................................................................................................................................... 3
Unpacking ................................................................................................................................. 3
Location .................................................................................................................................... 3
Installation Codes and Standards ........................................................................................... 4
Assembly .................................................................................................................................. 4
Leveling .................................................................................................................................... 5
Electrical Connections ............................................................................................................. 5
OPERATION ........................................................................................................................................ 6
Controls .................................................................................................................................... 6
Before First Use ....................................................................................................................... 7
Using the Oven......................................................................................................................... 7
Cleaning.................................................................................................................................... 9
Conveyor Belt Assembling and Disassembling .................................................................... 13
Cooking Chart ........................................................................................................................ 14
MAINTENANCE ................................................................................................................................. 15
Inspection ............................................................................................................................... 15
Service .................................................................................................................................... 15
TROUBLESHOOTING GUIDE .......................................................................................................... 16
© HOBART CORPORATION, 1998
— 2 —

Installation, Operation and Care of
MODEL HEC SERIES ELECTRIC
CONVEYOR OVENS
PLEASE KEEP THIS MANUAL FOR FUTURE USE
GENERAL
Hobart ovens are produced with quality workmanship and material. Proper installation, usage, and
maintenance of your oven will result in many years of satisfactory performance.
It is suggested that you thoroughly read this entire manual and carefully follow all of the instructions
provided.
INSTALLATION
Before installing, verify that the electrical service agrees with the specifications on the rating plate
located on the right front side panel. If the supply and equipment requirements do not agree, do not
proceed with the installation. Contact your Hobart service representative immediately.
UNPACKING
This oven was inspected before leaving the factory. The transportation company assumes full
responsibility for safe delivery upon acceptance of the shipment. Immediately after unpacking, check
for possible shipping damage. If the oven is found to be damaged, save the packaging material and
contact the carrier within 15 days of delivery.
1. Tilt the oven on its back side.
2. Place the oven on a four-wheel dolly.
3. Move oven to its installation position.
4. Remove oven from the dolly and place on two pieces of 2 x 4 wood.
5. Carefully unpack oven.
Do not use the door or handle to lift oven.
LOCATION
When the crate is turned on its side, the oven will pass through a 34" (86 cm) door opening (or 30"
[76 cm] opening without the crate). Verify that the doors and access routes into the kitchen area will
permit clearance.
— 3 —

When installed, minimum clearance from combustible and non-combustible construction must be
2.5" (63.5 mm) at the sides and 2.5" (63.5 mm) at the rear.
The installation location must allow adequate clearances for servicing and proper operation.
A minimum front clearance of 36" (914.4 mm) is required.
Information on the construction and installation of ventilating hoods may be obtained from the
standard for "Vapor Removal from Cooking Equipment," NFPA No. 96 (latest edition), available from
the National Fire Protection Association, Batterymarch Park, Quincy, MA 02269.
Exhaust: Approximately 2000 CFM required for double stacked ovens.
Approximately 1500 CFM required for single oven.
Make-up air should be 65% to 80% of the exhaust air rating.
INSTALLATION CODES AND STANDARDS
The oven must be installed in accordance with:
In the United States of America:
1. State and local codes.
2. National Electrical Code, ANSI/NFPA-70 (latest edition). Copies may be obtained from The
National Fire Protection Association, Batterymarch Park, Quincy, MA 02269.
In Canada:
1. Local codes.
2. Canadian Electrical Code, CSA C22.2 No. 3 (latest edition). Copies may be obtained from The
Canadian Standard Association, 178 Rexdale Blvd., Etobicoke, Ontario, Canada M9W 1R3.
ASSEMBLY
Ovens Mounted On Casters
Separate instructions for installing casters to the oven are included with the casters.
Installing Basic Oven
1. Attach front legs by screwing them into the bottom of the oven.
2. Tilt oven forward resting it on the front legs.
3. Lift oven from the rear.
4. Attach back legs once oven is lifted.
5. Place oven in its operating position.
— 4 —
Installing Stacked Ovens
1. Stack ovens after basic oven is installed.
2. Lift top oven and place it on top of bottom oven.
3. No fasteners are required; the weight of the oven will keep it in place.
LEVELING
Casters for this oven are of the non-adjustable type. For best results oven should be installed on a level
floor.
ELECTRICAL CONNECTIONS
WARNING: ELECTRICAL AND GROUNDING CONNECTIONS MUST COMPLY WITH THE
APPLICABLE PORTIONS OF THE NATIONAL ELECTRICAL CODE ANSI/NFPA 70 (LATEST EDITION)
AND/OR OTHER LOCAL ELECTRICAL CODES.
WARNING: DISCONNECT ELECTRICAL POWER SUPPLY AND PLACE A TAG AT THE
DISCONNECT SWITCH TO INDICATE YOU ARE WORKING ON THE CIRCUIT.
1. Remove wiring compartment cover from the right rear of the oven.
2. Run power supply cord through the conduit fitting.
3. Connect wires at the terminal block.
4. Follow the appropriate wiring diagram that is included with this manual when making connections
at the electric supply lines.
5. Replace wiring compartment cover.
6. Turn power supply ON.
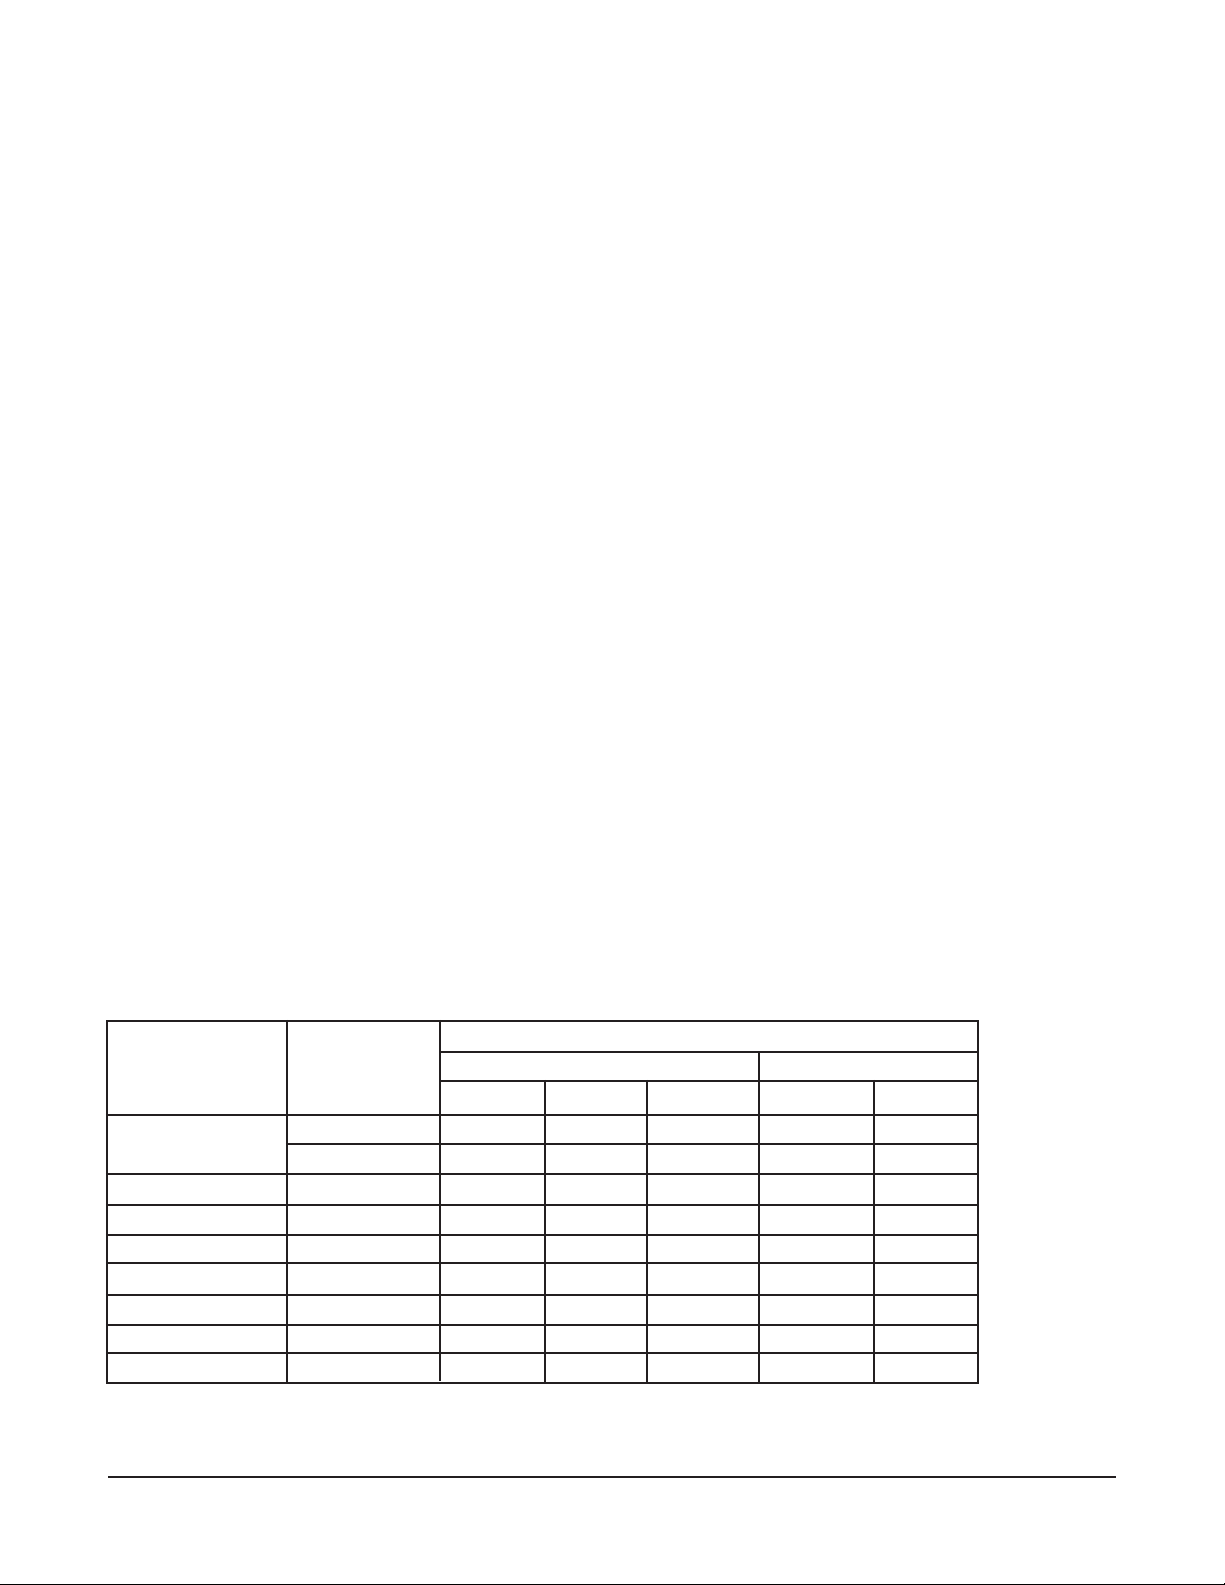
Electrical Data
Nominal Amps Per Line Wire
3 Phase 1 Phase
Oven Model Total Kw 208V 240V 480V 208V 240V
HEC3018
HEC4018 15 42 36 18 72 63
HEC3624 30 83 72 36 144 125
HEC3632 30 83 72 36 144 125
HEC4824 45 125 108 54 216 188
HEC4832 45 125 108 54 216 188
HEC6024 60 166 144 72 288 250
HEC6032 60 166 144 72 288 250
10 28 24 12 48 42
15 42 36 18 72 63
— 5 —
 Loading...