

HNM Diagnostics smartLAB Sprint User Manual
User Manual
D10539-08-01-02_R2_24/02/2011
HMM Diagnostics GmbH
D-69221 Dossenheim, Germany
www.hmm.info
Self-Monitoring Blood Glucose System
Please read this manual thoroughly before first
using this device


Content
I. Introduction
Measuring principle 6
Intended use 6
Important information 7
Note on smartLAB
®
„NO CODE“-test strips 9
II. Your smartLAB®sprint
Display & functions 10
Specifications 10
The smartLAB®pro test strips 12
Explanation of symbols 13
III. Setup & functions
Insert batteries 15
Turning the meter on/off 16
Function check 19
Control solution testing 20
Running a blood glucose test 24
Alternate Site Testing (AST) with the transparent cap 27
Understanding your test results 28
Displaying stored results 32
Displaying average values 33
Additional device settings 34

IV. Miscellaneous
Maintenance 38
Frequently Asked Questions 38
Troubleshooting 42
Limitations of the measurement procedure 45
Warranty 47

5
I. Introduction
Thank you for using the smartLAB®sprint Self-Monitoring Blood
Glucose System. This system was produced in close association
with diabetes health care professionals, hospitals and, most importantly, people with diabetes. The measuring results can help you
determine the effects of food, exercise and diabetes medications.
Your smartLAB®sprint glucose meter was designed to be dependable, easy-to use, compact, lightweight and portable to assist you in
monitoring your blood glucose on a regular basis. Please read this
manual thoroughly before you begin testing. It provides you and
your diabetes care team with important information and step-bystep direction to use meter correctly. Although your smartLAB®sprint
system is easy to use, you should consult your healthcare professional (this may be your doctor, diabetes nurse educator or pharmacist) for instructions on how to use the system. The only way to
obtain accurate results from any system is to make sure you correctly use it. If you have any concerns, please call your authorized
distributor in your country during business hours.

6
Measuring principle
The smartLAB®sprint Self-Monitoring Blood Glucose System is designed to allow rapid measurement of blood glucose by using an
electrochemical biosensor technology. This system employs a disposable dry reagent strip technology, based on the glucose oxidase
method for glucose determination.
Each test strip features an electrode containing the glucose oxidase
from aspergillus niger. A capillary blood sample is applied to the
collecting area of the strip, and is automatically drawn into the
reaction zone, where the glucose oxidase catalyzes the oxidation of
glucose to produce glyconic acid. During the reaction, a mediator
transfers electrons to the electrode surface and generates a current. The amount of the current is proportional to the amount of
glucose present in the blood sample. The glucose concentration
is measured by your smartLAB®sprint meter and displayed on the
screen after 5 seconds.
Intended use
This blood glucose meter is a self-test IVD medical equipment and
intended for both home testing and for professional use to monitor
the blood glucose (B-D-glucose) value from capillary whole blood.
It is used outside the body only (In-vitro diagnostic use). The meter
should be used only smartLAB®pro blood glucose test strips. Testing
is not valid on neonatal blood specimen.

7
Important information
• Severe impact may cause the meter to malfunction. Do not disassemble the meter as it may damage components inside and cause
an incorrect reading. The warranty will be void if the meter has
been disassembled.
• Incorrect results may occur when performing the test. If you
believe you are not feeling well, please contact your healthcare
professional immediately.
• Always keep the meter clean and store it in a safe place. Protect
from direct sunlight to ensure a longer lifespan.
• The strip slot should be kept free from dirt, dust, blood stains,
and water stains.
• Do not store the meter and test strips in a car, a bathroom or a
refrigerator. And the meter, strips and lancing device should be
kept away from children or pets.
• Please refer to the limitations of the procedure before testing.
• Remove batteries if the meter will not be used for one month or
more.
• Store the kits in a dry place with temperature range is 2 to 30°C
(35.6 to 86 °F). Keep away from direct sunlight and heat.
8
• Store your test strips in their original vial only. Do not transfer
them to a new vial or any other container.
• Indicate the date you open the vial.
Discard all unused strips
immediately after 90 days from open date. The strips are for single use only.
• Warning for potential biohazard: Healthcare professionals using
this system on multiple patients should be aware that all products or objects that come in contact with human blood, even
after cleaning, should be handled as if capable of transmitting
viral disease.
• You can download the test results from the meter memory to a
computer for more in-depth analysis. (Requires according software and a Bluetooth interface)
Do not touch the test strip with wet hands
Do not use expired test strips
(see expiration date on the strip vial)
Do not bend, cut or twist the strip

9
Note on smartLAB
®
„NO CODE“-test strips
The smartLAB®pro blood glucose test strips compatible with
smartLAB® glucose meters need not to be coded, any more. Thus,
when inserting a test strip, the display will read „Code 888“. That
is because all test strip charges only use this code. This will make
it easier for you to use your smartLAB® product free from errors.
(Avoidance of coding errors)
If „Code 888“ DOES NOT appear while inserting a test strip, your
meter either needs to be recoded or your glucose meter is not compatible with these smartLAB®pro blood glucose test strips. In either
case, please contact your distributor.
10
II. Your smartLAB®sprint
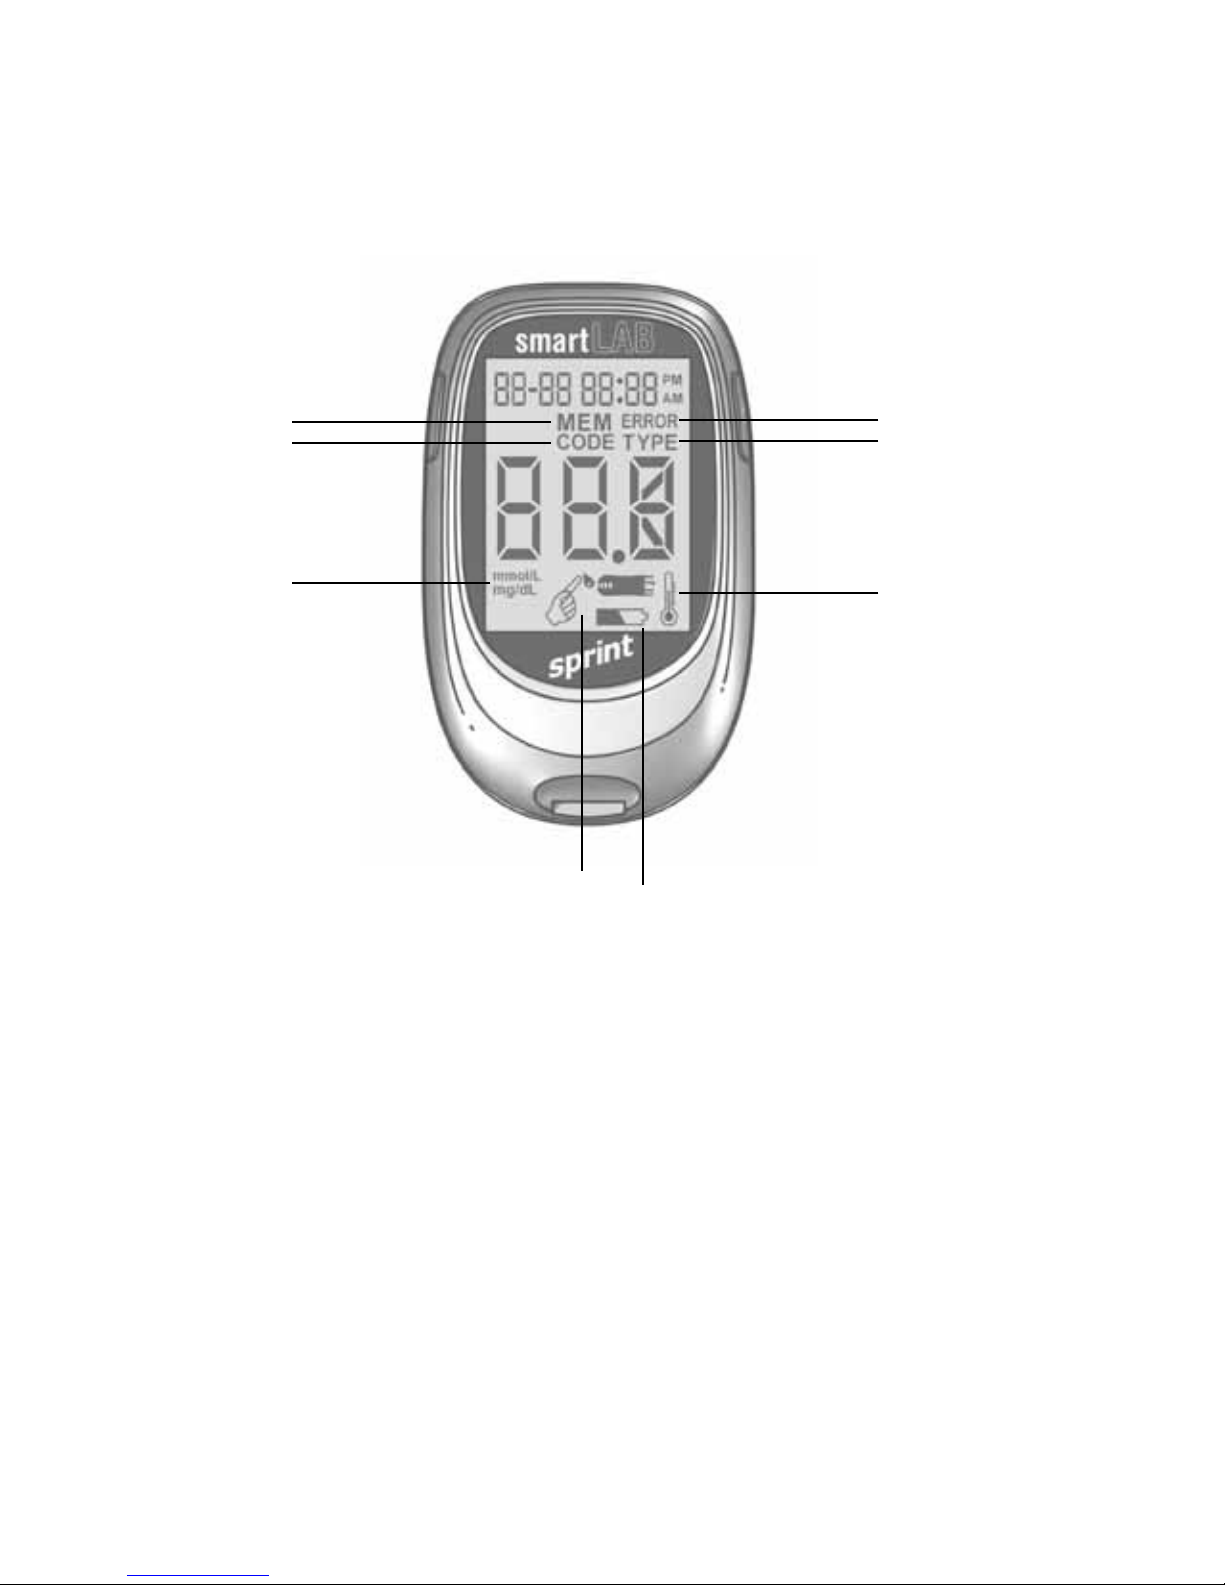
Display & functions
test results
Code number
Measuring unit
Battery power
Thermometer
Test result transfer to
computer
Error Code
Apply blood or control
solution to the test
strip
Specifications
1. Type: smartLAB®sprint
2. Measuring range: 20~630 mg/dL
(1.1~35.0 mmol/L)
3. Measuring duration: 5 seconds
4. Time mode: AM/PM - 24 hours
5. Memory: 450 values
6. Operating temperature: 10°C~40°C
(50°F~104°F)
7. Relative humidity: RH ≤90%
8. Blood sample: ≥ 0,6 µL capillary
whole blood
9. Calibration: Plasma equivalent
10. Hematocrit (Hct): 30-55%
11. Battery type: 2 1,5 V AAA Lithium
batteries
12. Battery life: over 1000 measurements
11. Display-size: 40 x 32 mm
12. Meter dimensions: 82 x 51 x 19 mm
13. Weight: 45,5 g (without batteries)
11
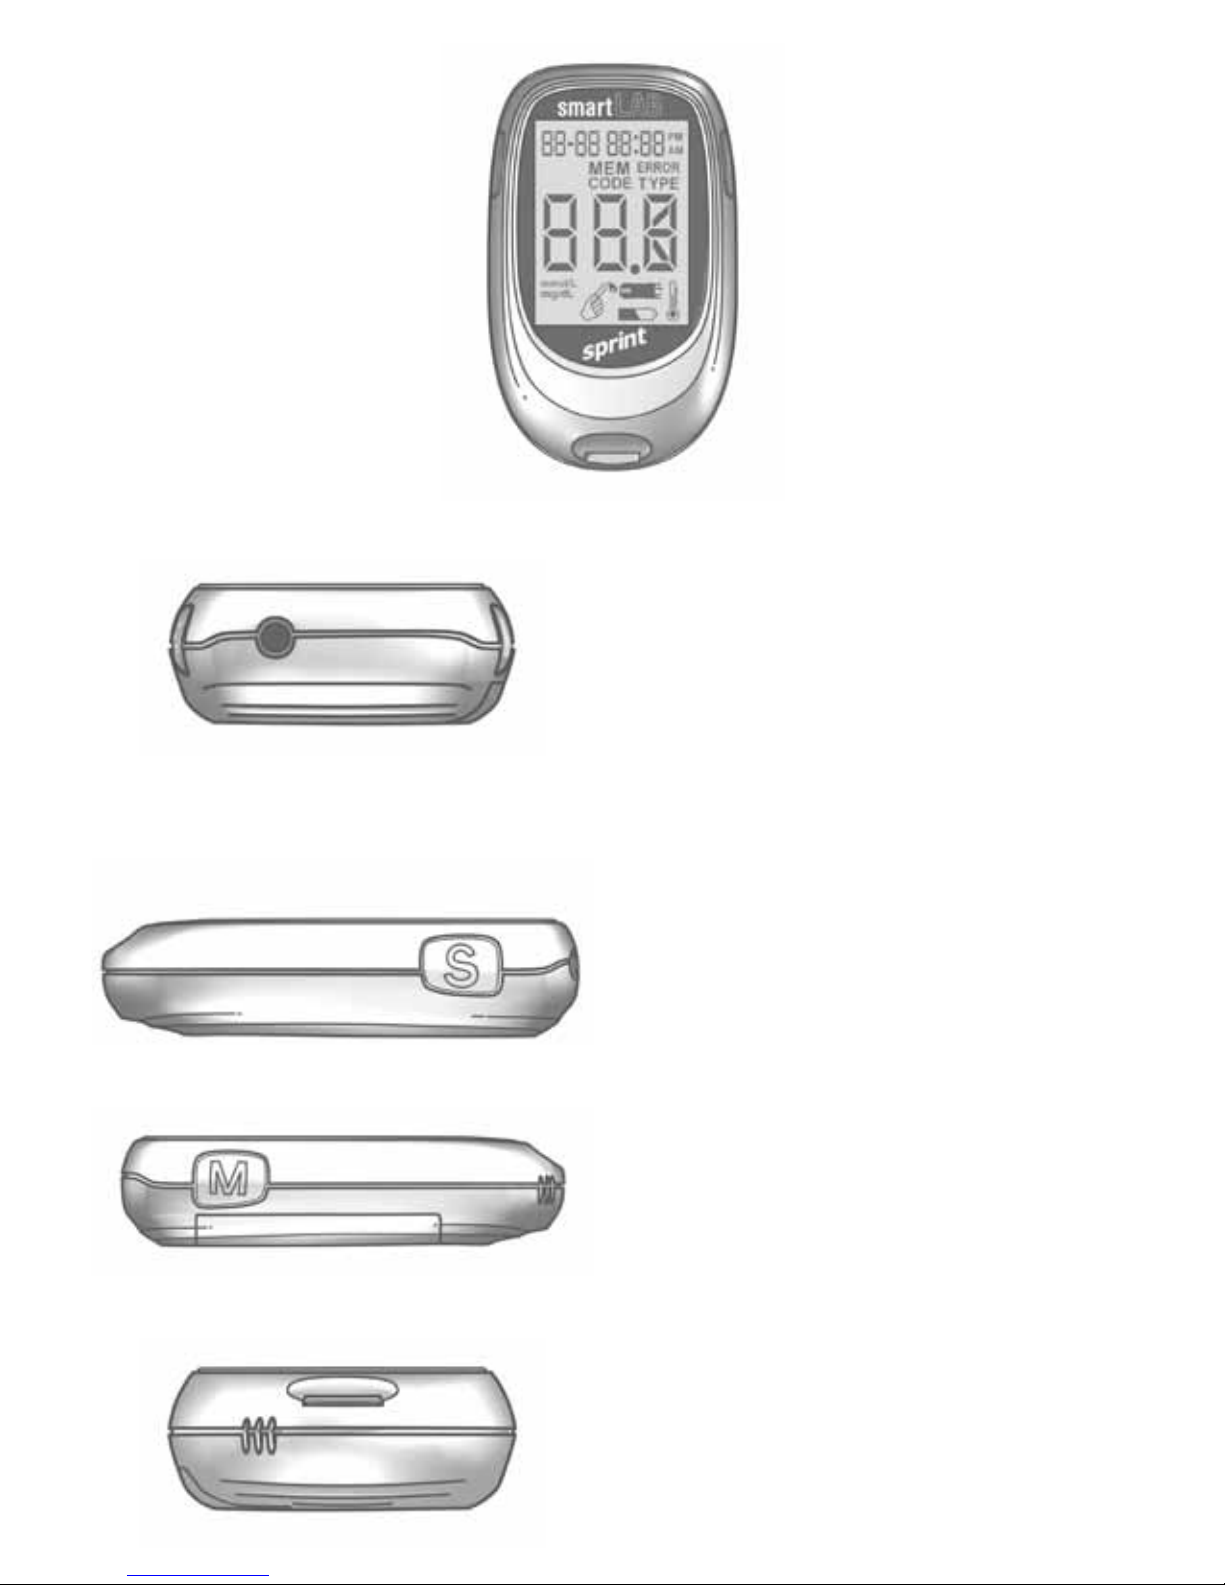
RS-232 DOWNLOAD PORT
In combination with the required USB
cable, you can download values to
your PC with this port
S-Button (right side)
Turn on the meter or enter setting
mode. In setting mode: memory button
M-Button (left side)
Displays stored values. In setting
mode: selection key
TEST STRIP INSERTION SLOT
Insert the test- or check strip here

12
The smartLAB®pro test strips
Note: You can find the test strip expira-
tion date on the vial label next to the
symbol.
Expiration date
Vial opening date (please
note)
Electrode
Insert direction
Grip zone
Reaction zone
Aperture
Application zone
13
Explanation of symbols
+
Please refer to the manual
This product meets the requirements of Directive
98/79/CE for in vitro diagnostic medical devices.
Lot number
Expiration date
For in vitro diagnostic use only
Use Lithium battery CR 2032 3V
Single use only
Storage temperature
Manufacturer
Before use, read manual first
Catalogue number
Serial number
Control solution
Opening date of test strip vial

14
Set contents
1 smartLAB®sprint blood glucose meter
1 User manual
1 carrying bag
2 AAA 1,5V Alkali batteries
1 smartLAB® lancing device
1 smartLAB® Check Strip
1 smartLAB® Quick Start instruction
10 smartLAB® lancets
10 smartLAB®pro blood glucose test strips
1 smartLAB® control solution
1 smartLAB® warranty card
15
III. Setup & functions
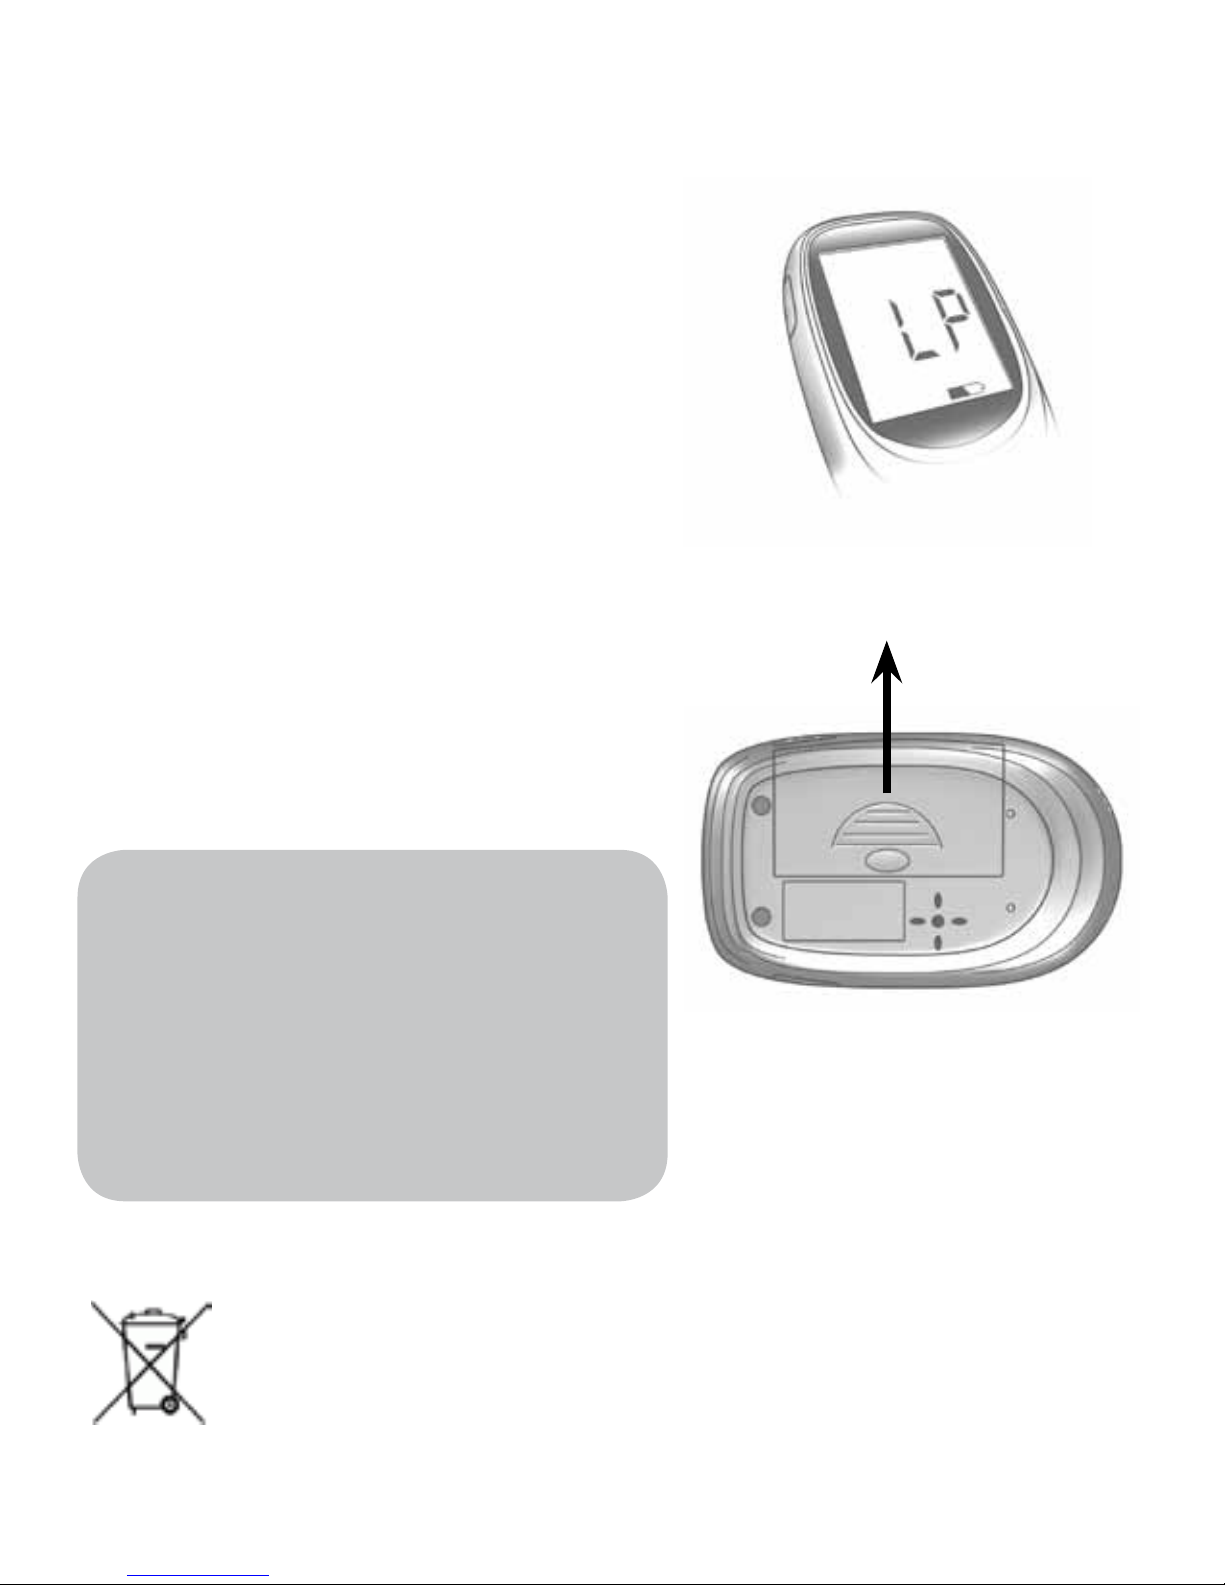
Insert batteries
The meter uses 2 1,5V AAA Alkali
batteries. Batteries will normally
last for aprox. 1000 tests. Install
the batteries when you first use the
meter or replace with new batteries
when the “LP” message and the low
battery symbol appear on the LCD
display. Open the battery lid on the
back side of the smartLAB®sprint
meter and insert the batteries, paying attention to the polarity. Close
the battery lid.
Note:
1. Remove the batteries when you
will not be using the meter for one
month or longer.
2. Values won’t be deleted when the
batteries are replaced.
Meter, batteries, lancets, test strips etc. must be
disposed of according to local regulations at the end of
their usage.
To change batteries, open lid in arrow direction
Low battery display symbols
 Loading...