

Page 1
Flexy Family User Guide
USER MANUAL
UM-0002-00 1.4 en-US ENGLISH
Page 2

Important User Information
Disclaimer
The information in this document is for informational purposes only. Please inform HMS Industrial Networks of any
inaccuracies or omissions found in this document. HMS Industrial Networks disclaims any responsibility or liability
for any errors that may appear in this document.
HMS Industrial Networks reserves the right to modify its products in line with its policy of continuous product
development. The information in this document shall therefore not be construed as a commitment on the part of
HMS Industrial Networks and is subject to change without notice. HMS Industrial Networks makes no commitment
to update or keep current the information in this document.
The data, examples and illustrations found in this document are included for illustrative purposes and are only
intended to help improve understanding of the functionality and handling of the product. In view of the wide range
of possible applications of the product, and because of the many variables and requirements associated with any
particular implementation, HMS Industrial Networks cannot assume responsibility or liability for actual use based on
the data, examples or illustrations included in this document nor for any damages incurred during installation of the
product. Those responsible for the use of the product must acquire sufficient knowledge in order to ensure that the
product is used correctly in their specific application and that the application meets all performance and safety
requirements including any applicable laws, regulations, codes and standards. Further, HMS Industrial Networks will
under no circumstances assume liability or responsibility for any problems that may arise as a result from the use of
undocumented features or functional side effects found outside the documented scope of the product. The effects
caused by any direct or indirect use of such aspects of the product are undefined and may include e.g. compatibility
issues and stability issues.
Flexy Family User Guide User Manual
UM-0002-00 1.4 en-US
Page 3

Table of Contents
Page
1 Preface ................................................................................................................................. 3
1.1 About This Document .......................................................... .. ................... .. ...................... 3
1.2 Document History .. .. ..................... ............................................ ..................... ..................3
1.3 Related Documents ..................... ..................... ............................................ ....................3
1.4 Trademark Information . ..................... ............................................ ..................... ..............3
2 Requirements ...................................................................................................................... 4
2.1 Hardware .... ............................................ ..................... ............................................ ......4
2.2 Software........ .. ..................... ............................................ ..................... .........................4
3 Get in Touch with the Flexy................................................................................................ 5
3.1 Assigning an IP Address....................... ..................... ............................................ ............. 5
3.2 Accessing the Web Configuration Interface.......... ............................................ ..................... 5
4 Quick Launch Wizard........................................................................................................... 6
4.1 System Wizard......................... .. ..................... ............................................ ..................... 6
4.2 Internet Wizard ............................. ................... .. ............................................ ................. 7
4.3 VPN Wizard................. ..................... ............................................ ..................... ..............8
4.4 Gateway Wizard ............... ..................... .. ..................... ............................................ ....... 8
5 Remote Access..................................................................................................................... 9
6 Create Tags and Monitor Values ...................................................................................... 10
6.1 Available IO Servers.............. .. ................... ................................................................. .. .. 10
6.2 Tag Management ............. ................................................................. .. ..................... ...... 10
6.3 Tag Creation.. ..................... ............................................ ..................... .. ........................ 10
6.4 Monitor Tags..... .. ............................................................... .. ..................... .................... 13
7 Alarm Management .......................................................................................................... 14
7.1 Configure Alarm Settings for a Tag .......... ............................................ ................... .. ......... 14
7.2 Alarm Display .... .. ............................................................... .. ................... .. .................... 14
7.3 Alarm Summary ....................................................... .. ..................... ............................... 14
7.4 Alarm History ................... ..................... .. ..................... ............................................ ..... 15
7.5 Alarm Actions................................. .. ..................... ............................................ ............ 15
8 Real-time Logging .............................................................................................................. 17
8.1 Real-time Logging Configuration ............. ............................................ ..................... ......... 17
8.2 Real-time Graph ...................................................... .. ................... .. ............................... 17
Flexy Family User Guide User Manual
UM-0002-00 1.4 en-US
Page 4

9 Historical Logging .............................................................................................................. 18
9.1 Historical Logging Configuration ................................. ..................... .. ............................... 18
9.2 Historical Logging Graph..... .. ................... .. ................................................................. ..... 18
9.3 Historical Logging Table......... .. ................................................................. ..................... .. 18
10 Files Transfer Page ............................................................................................................ 19
11 Task Planner ...................................................................................................................... 20
11.1 Configure FTP Server Settings..................................... ..................... .. ............................... 20
12 Tag Publishing.................................................................................................................... 22
13 Data Management ............................................................................................................ 23
13.1 Talk2M API ................. ..................... ............................................ ..................... ............ 23
13.2 Live data and KPI’s .................................... ..................... ................................................ 23
14 NAT 1:1 .............................................................................................................................. 24
15 Custom Web Pages............................................................................................................ 25
16 Backup and Restore .......................................................................................................... 26
17 Other Configuration Mechanisms .................................................................................... 27
17.1 FTP......................... .. ............................................................... .. ................... .. ............. 27
17.2 SD Card ........................... .. ..................... ............................................ ..................... ..... 27
18 Export Block Descriptors................................................................................................... 28
19 Scripting ............................................................................................................................. 29
20 User Management............................................................................................................. 30
21 Troubleshooting ................................................................................................................ 31
21.1 Summary Page . ............................................ ..................... ............................................ 31
21.2 Event Log......................... ..................... .. ..................... ............................................ ..... 31
21.3 Scheduled Actions ............................................................... .. ......................................... 32
Flexy Family User Guide User Manual
UM-0002-00 1.4 en-US
Page 5

Preface 3 (34)
1 Preface
1.1 About This Document
This guide presents the features of the Ewon Flexy and explains briefly the steps to take to get a
functional Flexy.
For additional related documentation and file downloads, please visit www.ewon.biz/support.
1.2 Document History
Version
1.0 2018-01-12
1.1 2018-04-17
1.2 2018-08-29
1.3 2019-06-12
1.4 2019-10-03
Date
1.3 Related Documents
Document
Ewon Configured by SD Card
eBuddy
OPC UA Server HMS AUG-0064-00
Configure your Ewon using FTP
Email & text message (SMS) relaying using Talk2M
Alarm Email & SMS Templates
Publish Tags in SNMP
Publish Tags in Modbus TCP
IO Servers HMS RG-0007-00
Reference Guide: Flexy Family
Export Block Descriptor
Description
First release
Changing scope of the document: Flexy 205 => Flexy Family
Changed: List of IO servers
Added: NTP Client / Server
Added: Anybus Bolt Configuration
Added: Time Zone
Added: Tag KPI
Added: String Tags
Added: OPCUA
Changed: Disclaimer
Changed: Overall display
Author
HMS AUG-0062-00
HMS AUG-0063-00
HMS KB-0020-00
HMS KB-0046-00
HMS KB-0054-00
HMS KB-0150-00
HMS KB-0184-00
HMS RG-0008-00
HMS RG-0009-00
Document ID
1.4 Trademark Information
Ewon®is a registered trademark of HMS Industrial Networks SA. All other trademarks mentioned
in this document are the property of their respective holders.
Flexy Family User Guide User Manual
UM-0002-00 1.4 en-US
Page 6

Requirements
2 Requirements
2.1 Hardware
This guide presents the features of the Flexy which can be combined with optional extension
cards if needed.
Without extension cards, the Flexy provides Remote Access and Remote Data Services to
Ethernet devices over the local Ethernet network.
Extension cards permit the Flexy to communicate to a wider range of field devices including USB
and serial devices and to use additional Internet connectivity technologies such as Wi-Fi and
cellular modems.
2.2 Software
The Flexy is configured through its web interface which is accessible with any modern web
browser. The recommended platforms are:
• Firefox 15 and higher.
• Chrome 16 and higher.
• Safari 11 and higher.
4 (34)
• Edge 13 and higher.
eBuddy
The companion tool eBuddy assists with initial IP address configuration for the Flexy and with
maintenance tasks such as upgrading firmware, creating/restoring backups...
Download eBuddy.
eCatcher
The companion tool eCatcher is needed if the Flexy will connect to the Talk2M infrastructure to
allow remote access to its plugged in equipment.
Download eCatcher.
Flexy Family User Guide User Manual
UM-0002-00 1.4 en-US
Page 7

Get in Touch with the Flexy 5 (34)
3 Get in Touch with the Flexy
3.1 Assigning an IP Address
The first communication with the Flexy can be established using the companion tool eBuddy
(check Software, p. 4 for more details about eBuddy).
To change the IP address of the Flexy:
1. Connect the port labeled as LAN (port #1) of your Flexy.
This can be done either to the computer point-to-point or through a network if the default
IP of the Flexy, which is 10.0.0.53, will not conflict with another connected device.
2. Start the eBuddy application.
The application scans through the Ethernet adapter network and identifies the connected
Ewon devices displaying the IP address, subnet mask and serial number.
The utility also allows the modification of the default IP address without necessarily being in
the same network range.
3. Optional: Highlight the row representing the device to be modified
4. Click on the button Set IP from the top bar menu or hit the F2 keyboard shortcut.
5. If step 3 was skipped, indicate the serial number of the Flexy to be modified. Click Next.
6. Enter the new IP address and its subnet mask. By clicking Next, eBuddy sends the
commands to the Flexy to change its IP address and to reboot.
7. Once the reboot completes, the Flexy will be accessible at its new IP address.
3.2 Accessing the Web Configuration Interface
The configuration of the Flexy can be done using its internal web pages.
While your computer is connected to a LAN port of the Flexy, open an Internet browser and
enter the LAN IP address of the Flexy into the address field.
If your computer is not in the same network address range as the Flexy, the web interface can be
reached using the EZ DHCP feature of eBuddy. For more information, refer to the eBuddy
reference in Related Documents, p. 3.
Before beginning the configuration of the Flexy, authentication is required. The default login and
password are both adm.
For security reasons, the default password must be changed.
The password can be changed through the System Wizard described below.
At the first boot of the Flexy or after a reset level 2 and after successfully logging in, a prompt
will appear to set the interface language.
After the interface language is selected, a wizard button appears which allows a quick
configuration of the system and communication settings of the Flexy. On later connections, the
configuration wizard is accessible through the Wizards button in the upper right corner.
Flexy Family User Guide User Manual
UM-0002-00 1.4 en-US
Page 8
Quick Launch Wizard 6 (34)
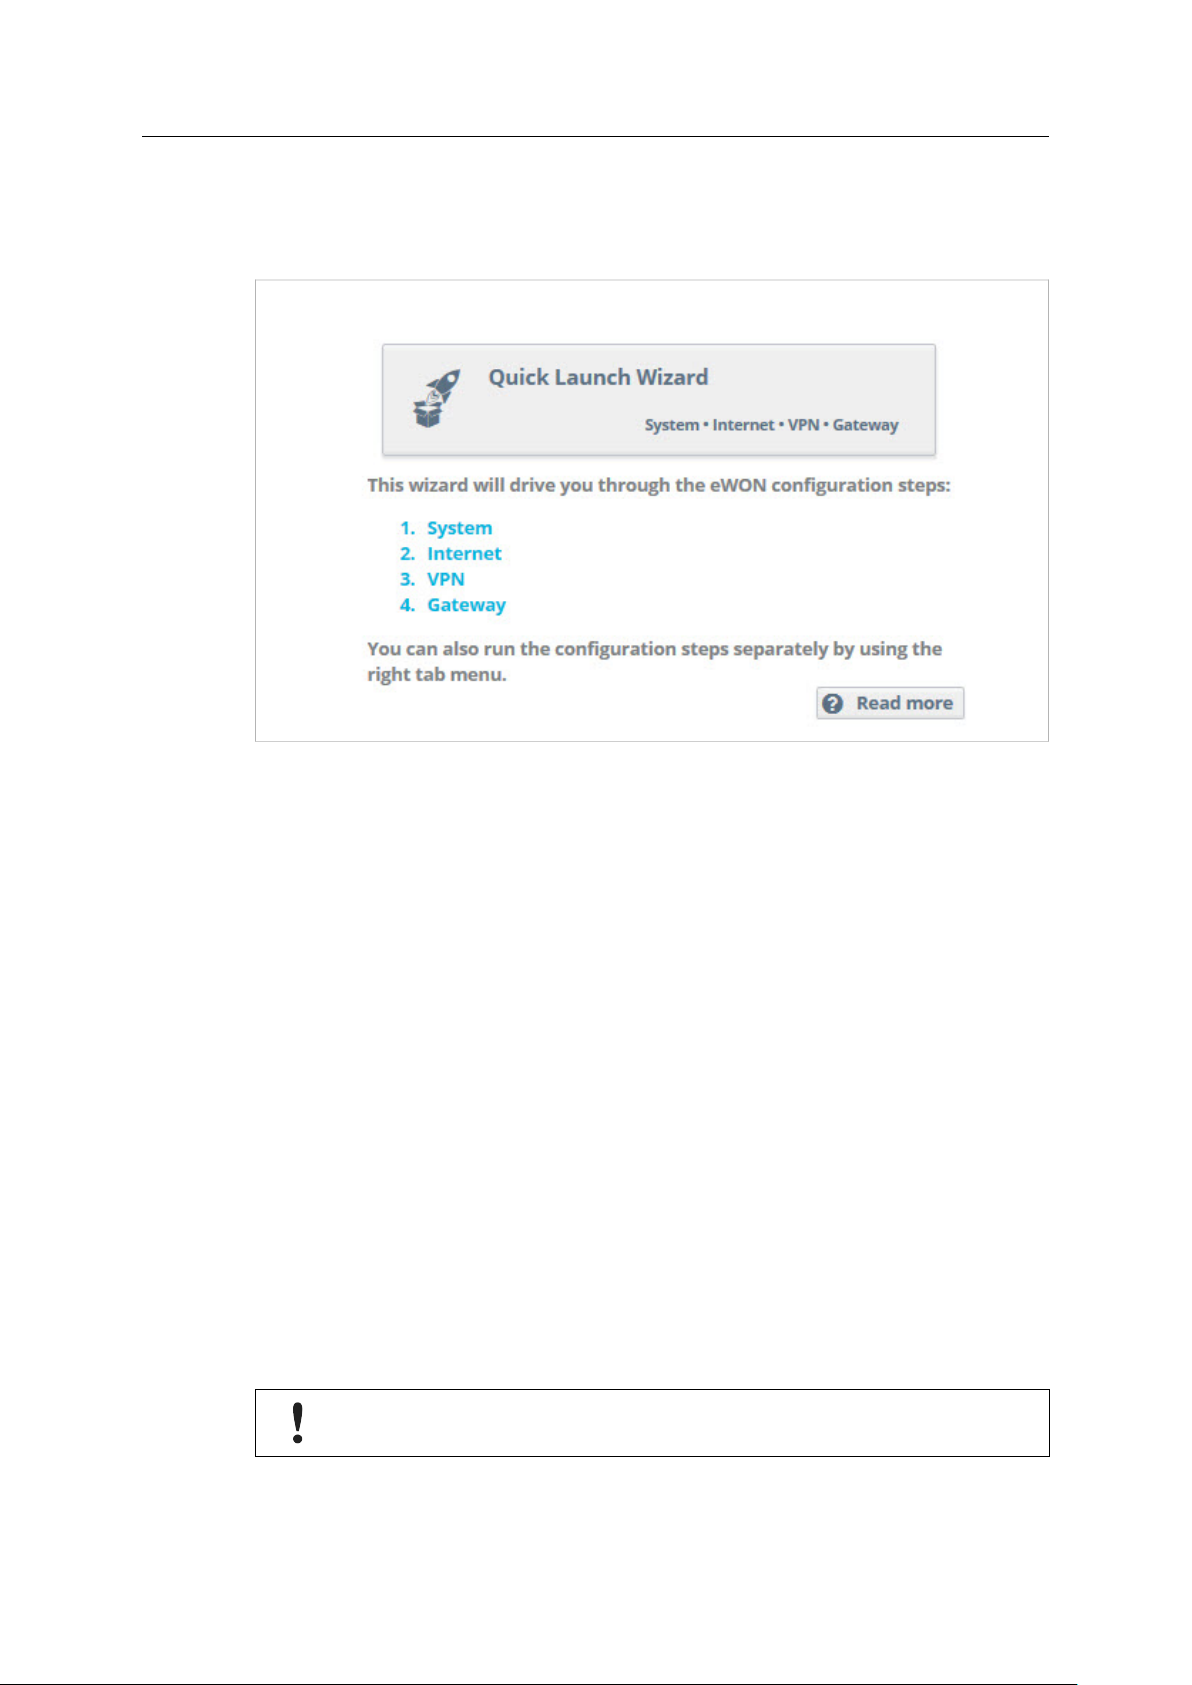
4 Quick Launch Wizard
The Quick Launch Wizard makes it easy to configure the initial system and communication
settings for the Flexy.
Fig. 1 Quick Launch Wizard Button
It passes sequentially through the System Wizard, the Internet Wizard and the VPN wizard:
• The System Wizard configures basic system settings such as the date & time and the default
username & password.
• The Internet Wizard configures the WAN or Internet communication settings for the Flexy.
• Once the Internet Wizard is complete, the VPN wizard connects the Flexy to the Talk2M
VPN infrastructure or to an eFive VPN server.
Based on the hardware configuration of the Flexy, the Quick Launch Wizard can also include the
Gateway Wizard which assists in configuring communication to serial, MPI and USB devices. Each
wizard can also be run independently through the menu options on the right hand of the
Wizards page.
4.1 System Wizard
The System Wizard configures basic system settings.
The first screen of the System Wizard configures the name of the device and the default user
settings. However, checking the Erase all first checkbox will erase all previously configured
settings on the Flexy.
The <Ewon name> helps identify the Flexy for an application. The name appears in the footer of
every web page and can be included in reports and alarm notifications.
The Flexy comes with an initial default user with username adm and password adm.
For security reasons, it is required to change the default password for the adm user. This
username and password can be changed in the System Wizard.
Additional users can be added from Setup ► Users menu. More information about adding
additional users is described later in this document.
Flexy Family User Guide User Manual
UM-0002-00 1.4 en-US
Page 9
Quick Launch Wizard 7 (34)
Click Next to proceed to the second screen.
The second screen of the System Wizard configures the date & time settings. For Talk2M
communication, the date of the Flexy must be correct. Click on the Timezone or Datetime field
icons in the to adjust the date. If typing the date & time directly into the field, be sure to format
the value as shown.
With regard to the timezone option. it allows to configure the timezones including day saving
time [DST] by clicking either on the arrow or the map icon.
Caution
Starting firmwre v13.1s0, the exported Ewon data (through EBD, Talk2M API or any other
methods) with timestamps are by default exported in UTC!
To enable automatic date and time synchronization with an NTP server, check the Enable NTP
checkbox and adjust the NTP synchronization settings as needed.
The default remote NTP server is ntp.talk2m.com but other NTP servers can be used.
Click Next to proceed to the next screen.
The following LAN / WAN ports attribution step of the System wizard applies only for the Flexy 205.
The third screen of the System Wizard configures the attribution of the ports of the four ports
switch. Click on a port to change its attribution.
If no Ethernet extension card is detected then ports #2, #3, and #4 can be configured to be either
a LAN (local access) port or a WAN (Internet access) port. Port #1 will always remain a LAN port.
The attribution of a port can be easily recognized by its LED color:
• Orange for a WAN port.
• Green for a LAN port.
If an Ethernet extension card is detected, all four ports are set to LAN ports and are not
configurable.
Click Next to save the system settings.
If the attribution of the ports changed during the wizard, reboot the Flexy to apply the
changes.
4.2 Internet Wizard
The Internet Wizard configures the WAN or Internet settings for the Flexy. The options available
will depend on the specific hardware configuration of the Flexy.
The first screen selects the WAN interface that will be active.
Checking the <Initialize Configuration> checkbox will delete any existing WAN and VPN settings
already configured.
From the drop down menu, select the WAN interface to configure and activate.
Click Next to begin the WAN interface configuration.
Subsequent screens will differ depending on the WAN interface selected.
Below are the steps for connecting the Flexy to an Ethernet network. Information about
configuring other WAN interfaces is available in the General Reference Guide from the Related
Documents, p. 3.
Flexy Family User Guide User Manual
UM-0002-00 1.4 en-US
Page 10

Quick Launch Wizard 8 (34)
In the <Address Setup> section, select DHCP from the dropdown menu to have the Flexy receive
an address automatically from the network or Static and then enter the network address settings
manually.
If the network uses a proxy server and the Flexy will connect to Talk2M, check the <Connect to
Talk2M through Proxy> checkbox.
Click Next to proceed to the next screen.
Check the Enabled checkbox to make a test connection to the Internet. If this network uses a
proxy server or if port 80 is closed for outbound connections, leave this checkbox unchecked.
Click Next to apply the configuration changes.
If the wizard completes successfully, the Flexy is now connected to the local Ethernet network. If
the wizards fails, check with the local network administrator for any special connection
instructions.
4.3 VPN Wizard
The VPN Wizard configures the settings required to connect the Flexy with the Talk2M
infrastructure or an eFive network.
The first screen of the VPN Wizard selects the VPN network to use. Information for connecting to
an eFive network is available on www.ewon.biz/support.
To connect the Flexy to the Talk2M VPN infrastructure, click the T2M (Configure Talk2M
connectivity) button.
Before proceeding with the Talk2M wizard, the Flexy must first be defined in eCatcher.
Information about eCatcher and defining Ewon devices is available on .
On the next screen select the registration mechanism.
To register with an activation key, select Register with Activation Key and enter the appropriate
activation key.
To register with an Ewon Name, select Register with Ewon Name and enter the Talk2M account
name, the name of the Flexy on the account, and valid user credentials for this account.
Click Next to advance to the next screen.
If the network used for Internet access uses a proxy server, check the Enable checkbox in the
<Connect via HTTP Proxy> section and enter the appropriate connection information for the
proxy server.
Click Next to test and apply the Talk2M connection settings.
If the wizard completes successfully, the Flexy is properly configured for Remote Access through
Talk2M. If the wizard fails, the Diagnosis section will give additional troubleshooting information.
4.4 Gateway Wizard
If the hardware configuration of the Flexy includes certain extension cards that allow
communication with field devices over interfaces other than Ethernet, the Wizards might include
the Gateway Wizard.
The Gateway Wizard configures any necessary communication parameters for these cards. For
specific information about the hardware configuration of the Flexy, check the General Reference
Guide from the Related Documents, p. 3.
Flexy Family User Guide User Manual
UM-0002-00 1.4 en-US
Page 11

Remote Access
5 Remote Access
The Flexy can be used to allow remote access to a wide variety of PLCs.
Under most circumstances, completing the Quick Launch Wizard successfully configures the Flexy
for remote access. In addition, there may be additional configuration steps required in the
programming software of the field device.
Specific documentation for remote access to different manufacturers’ PLCs is available, check
www.ewon.biz/support.
9 (34)
Flexy Family User Guide User Manual
UM-0002-00 1.4 en-US
Page 12

Create Tags and Monitor Values 10 (34)
6 Create Tags and Monitor Values
The tags are variables monitored by the Flexy. The tag values can change over time and can
come from a variety of data sources including external devices such as PLCs. These data sources
are called IO Servers.
6.1 Available IO Servers
The Flexy supports data monitoring for many different data sources. The list of available IO
servers include:
IO Server Data Source
MEM
EWON
MODBUS
OPC UA
SNMP SNMPv1 Devices
DF1
ABLOGIX
FINS Omron PLC
S73&400
S7200
S5-AS511
NETMPI
HITACHI
MELSEC
MITSUFX
BACNET BACnet
UNITE
Internal memory tags
IO and internal system values of the Flexy
Modbus Devices (TCP and RTU)
Devices capable of handling the OPC UA protocol.
Allen-Bradley PLCs
Siemens PLCs
Hitachi PLCs
Mitsubishi PLCs
Schneider PLCs (UNITELWAY)
Some IO servers require specific extension cards and are not available if the current hardware
configuration of the Flexy is not compatible.
The IO server configuration pages are available from Tags ► IO Servers menu. Select the
appropriate IO server from the menu.
Detailed information about configuring the specific IO server for different external devices is
available in the PLC area on www.ewon.biz/support and in the IO Servers reference from the
Related Documents, p. 3.
6.2 Tag Management
Tags on the Flexy can be created and managed from Tags ► Values menu.
The values page has two modes:
• The <SETUP> mode is for creating and deleting tags but also editing existing tag settings.
• The <VIEW> mode is for monitoring and changing tag values.
6.3 Tag Creation
In <SETUP> mode on the Tags ► Values page, tags can be added by clicking on the Add button.
Flexy Family User Guide User Manual
UM-0002-00 1.4 en-US
Page 13

Create Tags and Monitor Values 11 (34)
Fig. 2 Change from VIEW to SETUP Mode to Create a Tag.
On the Tag Setup screen, there are several key fields that identify a tag and its data source.
Every tag must have a <Tag Name> which uniquely identifies the tag on the Flexy. An optional
<Tag Description> can be used to provide additional information about this tag.
The <Server Name>, the <Topic Name> and the <Tag Address> identify the variable and data
source to monitor with a tag.
Below are examples of a tag for monitoring the onboard digital output of the Flexy, a tag for a
Siemens PLC and a memory tag.
Examples of creating tags for the different IO servers are available in the PLC area on
www.ewon.biz/support and in the IO Servers reference from the Related Documents, p. 3.
Fig. 3 Tag Creation — DO.
Flexy Family User Guide User Manual
UM-0002-00 1.4 en-US
Page 14

Create Tags and Monitor Values 12 (34)
Fig. 4 Tag Creation — MEM.
Fig. 5 Tag Creation — Siemens.
The Flexy supports different data types for tags: <Floating Point>, <Boolean>, <Integer>,
<DWord> and <String>. If the <Automatic> data type is selected, the Flexy will store the tag
value in a default data type based on the IO server and tag address as described in the General
Reference Guide from the Related Documents, p. 3.
Strings data type are currently in ASCII format and it is supported by OPCUA, S7 and MEM
I/O servers. UTF-8 is not supported yet.
Once the tag is configured, click Add Tag to create the tag.
Flexy Family User Guide User Manual
UM-0002-00 1.4 en-US
Page 15

Create Tags and Monitor Values 13 (34)
6.4 Monitor Tags
6.4.1 Tag Display
The <VIEW> mode of the Tags ► Values page shows the last read value for the tags.
The contents of the page refreshes at the rate shown in the <Autorefresh> field in the bottom of
the page.
Fig. 6 VIEW mode of the Tags Page.
If the Flexy is unable to read a tag, an red error icon will appear in the tag quality column.
Hovering over the icon will display information about why the tag is not being read properly.
Fig. 7 Error on Tag.
6.4.2 Modify the Tag Value
Most tags can be both read from and written to. If a tag is configured to be read-only, a lock icon
will appear next to the tag value.
Otherwise, a tag value can be edited by double clicking on it or highlighting the tag and selecting
<Edit Value>. The changes to all edited tags will be written to the PLC when the <Apply> button
is pressed.
Flexy Family User Guide User Manual
UM-0002-00 1.4 en-US
Page 16

Alarm Management 14 (34)
7 Alarm Management
The Flexy makes it easy to monitor current alarms, to acknowledge alarms, to notify users
throughout the alarm cycle and record past alarm events.
7.1 Configure Alarm Settings for a Tag
Alarming is configured on a tag by tag basis.
On the tag configuration page of the Tags ► Values web page in <SETUP> mode, check the Alarm
Enabled box to expand the alarm setup area.
Fig. 8
For boolean tags, use the <Boolean Alarm Level> field to specify which tag state triggers an
alarm.
For analog tags, four <Alarm Level> thresholds are available: <Low>, <High>, <LowLow> and
<HighHigh>.
The optional alarm hint gives users additional information about this alarm. This hint can appear
in alarm notifications.
More information about all the alarm configuration fields is available in the General Reference
Guide from the Related Documents, p. 3.
Once an alarm is enabled for a tag, a check will appear in the <Alarm Enabled> column of the
Tags ► Values page in <SETUP> mode.
7.2 Alarm Display
When a tag is in an alarm state, an alarm icon will appear for the tag in the <Alarm Level>
column of the Tags ► Values page in <VIEW> mode.
When the alarm cycle completes, the icon will disappear.
7.3 Alarm Summary
Clicking on the alarm icon will load the <Alarm Summary> page. The <Alarm Summary> is also
accessible from Tags ► Alarms ► Summary.
The <Alarm Summary> page shows all the currently active alarms and their current alarm cycle
states.
Alarms can also be acknowledged from the <Alarm Summary>.
Flexy Family User Guide User Manual
UM-0002-00 1.4 en-US
Page 17

Alarm Management 15 (34)
Fig. 9 Alarm Summary Page
7.4 Alarm History
The <Alarm History> shows the full alarm cycle of both currently active alarms and past alarms.
The <Alarm History> is accessible from Tags ► Alarms ► History.
7.5 Alarm Actions
For every tag with alarms enabled, the Flexy can be configured to perform different actions
when the alarm cycle state changes.
The actions include sending email, putting a file on an FTP Server and sending an SNMP traps. If
the hardware configuration of the Flexy includes a modem extension card, it can send SMS
messages as well.
To configure alarm actions for a tag, on the Tags ►Values page in <SETUP> mode, select the tag
and press the Configure Alarm actions button or click the check in the <Alarm Enabled> column.
Information about configuring SMS, FTP and SNMP actions is available in the General Reference
Guide from the Related Documents, p. 3.
To configure email alarm notifications, begin by selecting those alarm cycle states that should
trigger a notification:
• <ALM>: when an alarm is raised
• <ACK>: when an alarm is acknowledged
• <RTN>: when an alarm has returned to a normal state
• <END>: When the alarm cycle is finished (<ACK> and <RTN>)
Next complete the <Email to>, <Email CC> and<Email Subject> fields.
Free text included in the <Email Attachments> field will appear in the body of the alarm email
message. Files generated by Export Block Descriptors can also be attached to the email message.
Export Block Descriptors are explained later in this document.
7.5.1 Configure SMTP Server Settings
Before any email notifications can be sent, the Flexy must have a working Internet connection
and it must be configured to communicate with an SMTP server.
SMTP server configuration settings are found under Setup ►System ►Main ►Net services ►SMTP
(mails).
If the Flexy is configured for Talk2M connections, using the Talk2M Email and SMS relay as the
SMTP server is recommended.
Flexy Family User Guide User Manual
UM-0002-00 1.4 en-US
Page 18

Alarm Management 16 (34)
Fig. 10 Example of SMTP Server Settings.
More information about using the Talk2M Email and SMS relay is available in the Email & text
message (SMS) relaying using Talk2M reference from the Related Documents, p. 3.
Information about configuring connections to different SMTP servers is available in the General
Reference Guide from the Related Documents, p. 3.
7.5.2 Email Notification Layout
When the Flexy sends out an email notification, it will contain the following information: the
name of the tag created, the level, the status and the alarm action or alarm hint.
Fig. 11 Example of Mail Received on Tag Alarm.
If different information is needed, the email contents can be customized using the Email and
SMS Alarm Templates. Information about alarm notification customizations is available in Alarm
Email & SMS Templates from the Related Documents, p. 3.
Flexy Family User Guide User Manual
UM-0002-00 1.4 en-US
Page 19

Real-time Logging 17 (34)
8 Real-time Logging
Real-time logging records how a tag value changes over time.
Tag values are logged in a circular buffer in volatile memory at regular intervals to show trends
over a user defined period of time. Since the values are only stored in memory, they are lost
after a reboot.
8.1 Real-time Logging Configuration
To enable real-time logging, check the box marked <Real Time Logging Enabled> on the tags
configuration page.
The <Time Span> field contains the size of the logging window in seconds. By default, it is 600
seconds.
The <Logging Interval> field specifies how frequently the values should be recorded. The default
value is every 10 seconds.
Once real-time logging is enabled, a check will appear in the real-time logging column for this tag.
8.2 Real-time Graph
The real-time logging information can be viewed as a graph from the Tags ►Values page in
<VIEW> mode. Select the tag to view and press the RT. Graph button.
Fig. 12 Real-time Graph
Flexy Family User Guide User Manual
UM-0002-00 1.4 en-US
Page 20

Historical Logging 18 (34)
9 Historical Logging
Historical logging stores tag changes for a longer period in a first-in-first-out file in flash file
system. Since the values are stored in non-volatile memory, they are not lost after a reboot.
Logging can be triggered by events such as significant data value changes, on a simple interval
basis or a combination of the two.
9.1 Historical Logging Configuration
To enable historical logging, check the box marked Historical Time Logging Enabled on the tags
configuration page. Then select the criteria to use trigger logging.
The <Logging Deadband> field triggers logging when the tags value changes by a particular
amount. For example, a logging deadband of 2 means that a tag will be logged when the value
changes by 2 or more. A negative value in the logging deadband field disables logging on value
change.
The <Logging Interval> field triggers time based logging. For example, a logging interval of 60
means that the tag will be logged every 60 seconds. A logging interval of 0 disables time based
logging.
Once enabled, a check will appear in the historical logging column for this tag.
9.2 Historical Logging Graph
To see the historical log in a graph from the Tags ► Values page in <VIEW> mode, select the tag
or tags to graph. Multiple tags can be selected using either “Ctrl-click” or “Shift-Click”.
Select the time interval to display and press the Update Graph button.
9.3 Historical Logging Table
To see the historical log in a table from the Tags ► Values page in <VIEW> mode, press the HL
Table button. Select the time interval to display.
Use the <Groups> checkboxes to limit which tags are included in the table then press the Update
button.
Fig. 13 Historical Logging Graph.
Flexy Family User Guide User Manual
UM-0002-00 1.4 en-US
Page 21

Files Transfer Page 19 (34)
10 Files Transfer Page
Many of the files on the Flexy including the current tag values, the Alarm Summary, the Alarm
History, and Historical Logs are available to download from Diagnostic ► Files Transfer. More
information about all the available files is in the General Reference Guide from the Related
Documents, p. 3.
Flexy Family User Guide User Manual
UM-0002-00 1.4 en-US
Page 22

Task Planner 20 (34)
11 Task Planner
With the Task Planner, the Flexy can perform different actions at specified times or at fixed
intervals.
These actions are the same as tag Alarm Actions and include sending an email, sending an SMS,
putting a file on an FTP server and sending an SNMP trap.
To specify a task planner entry, begin by describing the times or frequency when the action
should occur in the timer interval field. The time is entered in “crontab” format as described in
the General Reference Guide from the Related Documents, p. 3.
Example of CRON based format
Example Meaning
* * * * * will do an action every minute
0 * * * * will do an action every hour
0 0 * * * will do an action every day at midnight (00:00)
*/15 * * * *
15 7 1 1 * will do an action at 7:15, the first of January. Equal to ’15 7 1 jan *’
15 8 * * 1 will do an action at 8:15, each Monday. Equal to ’15 8 * * mon’
0 8-18 * * 1-5 will do an action at every hour between 8:00 and 18:00 on every working day (Monday to
0 6,7,8,17,18,19 * * * will do an action at 6, 7, 8, 17, 18 and 19 o’clock every day
* * 13 * fri will do an action at every minutes on each Friday OR the 13th of the month (and not only
will do an action every 15 minutes
Friday)
on the Friday 13th)
Once the timer interval has been specified, select the Edit button to specify the action or actions
that should occur. Check the Enable checkbox for each desired actions and complete the action
configuration in the same fashion as the alarm actions described above.
For example: to configure a file to be put on an FTP server, check the Enable checkbox for the
<Put FTP upon> action. In the <Destination> field, enter the file to create on the destination FTP
server. The file name can include a path specification. In the <File Content> field, enter either
free text or enter one or more Export Block Descriptors. Export Block Descriptors are explained
later in this document.
Fig. 14 Task Planner Settings for FTP.
11.1 Configure FTP Server Settings
Before any files can be put on an FTP server through the Task Planner, the Flexy must have a
working Internet connection and it must be configured to communicate with an FTP server.
Flexy Family User Guide User Manual
UM-0002-00 1.4 en-US
Page 23

Task Planner 21 (34)
FTP server configuration settings are found under Setup ►System ►Main ►Net services ►FTP.
Fig. 15 FTP Server Configuration.
More information about configuring the Task Planner and communicating with an FTP server is
available in the General Reference Guide from the Related Documents, p. 3.
Flexy Family User Guide User Manual
UM-0002-00 1.4 en-US
Page 24

Tag Publishing 22 (34)
12 Tag Publishing
In addition to polling tags from external devices, the Flexy can publish tag values.
With this feature, external software and devices can read tag values from the Flexy. The Flexy
supports tag publishing tag values over Modbus TCP, SNMP, and OPCUA. Check the Related
Documents, p. 3 for more info on publishing those protocols.
Flexy Family User Guide User Manual
UM-0002-00 1.4 en-US
Page 25

Data Management
13 Data Management
The Flexy supports exporting data to a variety of data management platforms. If the Flexy is
configured to connect to Talk2M, the Talk2M API (feature of Talk2M) makes it easy to share data
with many different platforms.
Fig. 16 Data Management for Talk2M API, Live data and KPI’s.
23 (34)
13.1 Talk2M API
To configure the Flexy to send data to the Talk2M API, navigate to Setup ►System ►Main ►Data
Management.
1. Select the Talk2M API option from the dropdown menu
2. Select the Historical data option
3. Use the Select tag group(s) checkboxes to restrict which tags should be included. Leaving
them all unchecked will include all tags.
4. In the <Upload interval> field, enter how frequently data should be sent to the Talk2M API.
5. Press the Update button to save the configuration.
More information about Talk2M API and other data export methods is available on
www.ewon.biz/support.
13.2 Live data and KPI’s
To configure the Flexy to publish the KPI’s in the M2Web portal and the Live data, navigate to
Setup ►System ►Main ►Data Management
1. Select the Talk2M API option from the dropdown menu
2. Select the Live data and KPI’s option
3. Use the Select tag group(s) checkboxes to restrict which tags should be included. Leaving
them all unchecked will include all tags.
4. Press the Update button to save the configuration.
Flexy Family User Guide User Manual
UM-0002-00 1.4 en-US
Page 26

NAT 1:1
14 NAT 1:1
Under some circumstances, devices on the WAN or VPN network of the Flexy could need access
to devices on the LAN network of the Flexy. By enabling the NAT 1:1 feature, addresses on one
network can be mapped to addresses on the other. Once the addresses are mapped, devices on
the LAN network of the Flexy can be accessed without complex networking changes.
The NAT 1:1 feature is enabled from Setup ►System ►Communication ►Networking ►Routing.
Check the Enabled checkbox in the NAT 1:1 section to enable it and expand the mapping table.
From the <Mapping> dropdown menu, select NAT 1:1 on WAN or NAT 1:1 on VPN as appropriate.
LAN device addresses and their corresponding mapped addresses on the other network should
be encoded in the route table.
Before configuring the NAT 1:1 feature, check with the local IT manager about which IP
addresses are available and can be used and reserved for the NAT 1:1 feature of the Flexy. As
these IP addresses are not assigned by the DHCP server, address conflicts can occur.
Instructions for configuring NAT 1:1 for the Flexy are available in the General Reference Guide
from the Related Documents, p. 3.
24 (34)
Flexy Family User Guide User Manual
UM-0002-00 1.4 en-US
Page 27

Custom Web Pages 25 (34)
15 Custom Web Pages
The Flexy has a web server to host its own internal web pages. In addition, the Flexy can support
user created web pages.
The Flexy can host custom HTML pages including special forms and server side includes that
allow users to display and interact with tags and other data of the Flexy. Information about
building custom web pages is available from our developer.ewon.biz.
Alternatively, the viewOn companion tool is a graphical development environment for creating
animated HMI pages for the Flexy. Using the built in graphical objects and animations, users can
easily create dynamic webpages even with no previous web development experience.
ViewON and information about getting started with ViewON is available on
www.ewon.biz/support.
The Flexy can be configured to display a custom web page as its homepage instead of its
standard homepage. The user defined home page is set from Setup ►System ►Main ►General
►Identification.
Flexy Family User Guide User Manual
UM-0002-00 1.4 en-US
Page 28

Backup and Restore 26 (34)
16 Backup and Restore
Backups can be created and restored using the eBuddy companion tool.
To create or restore a backup:
1. Open eBuddy and select Backup/Restore from the menu bar.
2. On the following window, select backup or restore and click Next.
3. On the <Ewon Identification> window, specify the serial number or IP address of the
appropriate Flexy and enter its appropriate administrator credentials.
4. When creating a backup, select a filename and location to save the backup file in the
<Filename> field.
To restore a backup, select the backup to restore.
5. Click Next to complete the process.
The backup is saved as a .tar file. This file contains the /usr directory, a comcfg.txt file, a config.
txt file, and a program.bas file.
Flexy Family User Guide User Manual
UM-0002-00 1.4 en-US
Page 29

Other Configuration Mechanisms 27 (34)
17 Other Configuration Mechanisms
The Flexy can be configured through its web interface or by restoring a backup of a previously
saved configuration with eBuddy. In addition, the Flexy can be configured through other
mechanisms including FTP and using an SD card.
17.1 FTP
Every Flexy can be used as both an FTP server and an FTP client.
This allows data and configuration files to be retrieved and loaded by FTP on to the Flexy. When
a correctly named configuration file is put on the Flexy by FTP, it will analyze the file. If the
syntax of the file is correct, it will perform the corresponding configuration changes.
Configuration files that can be loaded onto the Flexy include the comcfg.txt file, the config.txt
file, the program.bas file and the contents of the /usr directory including custom web pages.
• The config.txt file contains general information about the Flexy including the various IO
server settings and all tags and users.
• The comcfg.txt file contains the communication settings for the Flexy including its LAN IP
address and its Internet connection settings.
• The program.bas file contains any BASIC scripts from the Flexy.
If changes are made to one of these files and then the file is put on the Flexy using FTP, those
changes will be applied to the Flexy.
Additional information about configuring the Flexy with FTP is available in Configure your Ewon
using FTP from the Related Documents, p. 3.
17.2 SD Card
The Flexy includes an integrated SD card reader.
An SD card can be used to upgrade or downgrade the firmware of the Flexy, restore a backup
made through eBuddy, register a Flexy to a Talk2M account using a Talk2M Global Registration
key and to modify communication settings with a comcfg.txt file.
Information about modifying a Flexy using an SD card is available in Ewon Configured by SD Card
from the Related Documents, p. 3.
Flexy Family User Guide User Manual
UM-0002-00 1.4 en-US
Page 30

Export Block Descriptors 28 (34)
18 Export Block Descriptors
Export Block Descriptors can be used to export data from the Flexy.
For example:, they can be used with Alarm Actions or Task Planner entries to include information
such as historical logs and current tag values inside or attached to an email.
An Export Block Descriptor is a string of characters describing the data to export using a
predefined syntax. Typically the Export Block Descriptor includes information about:
• Which data to export (Event log, Historical logging, etc.)
• How to format the exported data (Binary, Text, HTML table, Graph)
• The start time
• The end time
• Which tags are concerned
• ...
For example: the following Export Block Descriptor will extract the historical logging of the last 4
hours of tag <A1> and represent the result in text format: $dtHL $ftT $st_h4 $et_m0
$tnA1.
If this Export Block Descriptor is added to the email for the alarm notification, then the user will
receive an alarm notification containing the historical data of the last 4 hours in a text format.
This will allow the user to make a more precise analysis of the alarm situation.
For a detailed explanation about the use of the Export Block Descriptor please refer to the
Export Block Descriptor reference in the Related Documents, p. 3.
Flexy Family User Guide User Manual
UM-0002-00 1.4 en-US
Page 31

Scripting
19 Scripting
The Flexy supports custom programs using scripting language similar to BASIC with many specific
extensions. With scripting, users can:
• Create customized reports.
• Let users acknowledge alarms by SMS.
• Dynamically adjust communication parameters such as the Internet interface.
• Push data to an external web server on a scheduled basis.
Information about programming on the Flexy as well as a large library of code examples is
available on developer.ewon.biz.
29 (34)
Flexy Family User Guide User Manual
UM-0002-00 1.4 en-US
Page 32

User Management
20 User Management
At initial configuration, a Flexy has a single user with username <adm>. This user has full
administrator rights on the Flexy.
However, the Flexy 205 can support multiple users with their own unique user rights.
Users are added, modified, and deleted from Setup ►Users. To add a user, press the Add button.
Users are required to have a User Login which is unique to this user and a password. Other
<Identification> fields are optional.
In the <Rights> section, select the user rights that are right for this user’s role. For example: if
this user should be able to see tag values and acknowledge alarms but should not be able to
change the configuration of the Flexy, make sure that <View IO> and <Acknowledge Alarms> are
checked and <Change Configuration> is unchecked.
30 (34)
Fig. 17 Creation of a User with Limited Access.
More information about managing users and about specific user rights is available in the General
Reference Guide from the Related Documents, p. 3.
Flexy Family User Guide User Manual
UM-0002-00 1.4 en-US
Page 33

Troubleshooting 31 (34)
21 Troubleshooting
The Flexy provides a number of tools for quickly troubleshooting problems that may occur.
21.1 Summary Page
The Summary page shows at a glance information about the health and status of the Flexy. Its
current Internet connection and VPN connection status, date and time, and firmware versions
are all displayed.
Fig. 18 Troubleshooting Summary Page is the Homepage.
21.2 Event Log
The Event Log records significant system events on the Flexy.
Events are given one of three severity levels: <Error>, <Warning> or <Trace> and color coded
correspondingly.
Fig. 19 Troubleshooting through Event Logs.
Each event also includes an event number or error code. Information about these error codes
and the most common causes is available on www.ewon.biz/support.
Flexy Family User Guide User Manual
UM-0002-00 1.4 en-US
Page 34

Troubleshooting 32 (34)
21.3 Scheduled Actions
The Scheduled Actions log shows the states of the last 20 outgoing actions like SendMail, putFTP,
getFTP, NTPSyncro, SendSMS, and SNMPTrap.
If an error occurs during an action, the Scheduled Actions record will include an error code to
help identify the source of the problem.
Fig. 20 Troubleshooting of Scheduled Actions.
Flexy Family User Guide User Manual
UM-0002-00 1.4 en-US
Page 35

This page intentionally left blank
Page 36

last page
© 2019 HMS Industrial Networks
Box 4126
300 04 Halmstad, Sweden
info@hms.se UM-0002-00 1.4 en-US / 2019-10-03 / 15199
 Loading...