

Page 1

Device Configuration
Issue date: 10/2020
V1.0
Page 2

Device Configuration 1.0
© HMS Industrial Networks S.L.U - All rights reserved
This information is subject to change without notice
URL https://www.intesis.com
2 / 24
Important User Information
Disclaimer
The information in this document is for informational purposes only. Please inform HMS
Industrial Networks of any inaccuracies or omissions found in this document.
HMS Industrial Networks disclaims any responsibility or liability for any errors that may appear
in this document. HMS Industrial Networks reserves the right to modify its products in line
with its policy of continuous product development. The information in this document shall
therefore not be construed as a commitment on the part of HMS Industrial Networks and is
subject to change without notice. HMS Industrial Networks makes no commitment to update
or keep current the information in this document.
The data, examples and illustrations found in this document are included for illustrative
purposes and are only intended to help improve understanding of the functionality and
handling of the product. In view of the wide range of possible applications of the product, and
because of the many variables and requirements associated with any particular
implementation, HMS Industrial Networks cannot assume responsibility or liability for actual
use based on the data, examples or illustrations included in this document nor for any
damages incurred during installation of the product. Those responsible for the use of the
product must acquire sufficient knowledge in order to ensure that the product is used correctly
in their specific application and that the application meets all performance and safety
requirements including any applicable laws, regulations, codes and standards. Further, HMS
Industrial Networks will under no circumstances assume liability or responsibility for any
problems that may arise as a result from the use of undocumented features or functional side
effects found outside the documented scope of the product. The effects caused by any direct
or indirect use of such aspects of the product are undefined and may include e.g. compatibility
issues and stability issues.
Page 3

Device Configuration 1.0
© HMS Industrial Networks S.L.U - All rights reserved
This information is subject to change without notice
URL https://www.intesis.com
3 / 24
INDEX
1. Description ..............................................................................................................................................4
1.1 Introduction .......................................................................................................................................4
1.2 About this document .........................................................................................................................4
1.3 What is needed .................................................................................................................................4
2. AC Cloud Control Button .......................................................................................................................6
2.1 Reset Wi-Fi settings ..........................................................................................................................7
2.2 WPS mode ........................................................................................................................................8
2.3 Change Wi-Fi channel ......................................................................................................................9
2.4 Autolearning ................................................................................................................................... 10
3. Configuration ....................................................................................................................................... 12
3.3 Automatic ....................................................................................................................................... 15
3.4 Manual ........................................................................................................................................... 17
3.5 WPS ............................................................................................................................................... 19
3.6 Settings .......................................................................................................................................... 21
4. LED status information ....................................................................................................................... 23
4.1 LED status during Wi-Fi configuration ........................................................................................... 23
4.2 LED status during IR configuration (Autolearning mode) .............................................................. 23
4.3 LED status during working mode ................................................................................................... 24
Page 4
Device Configuration 1.0
© HMS Industrial Networks S.L.U - All rights reserved
This information is subject to change without notice
URL https://www.intesis.com
4 / 24
1. Description
1.1 Introduction
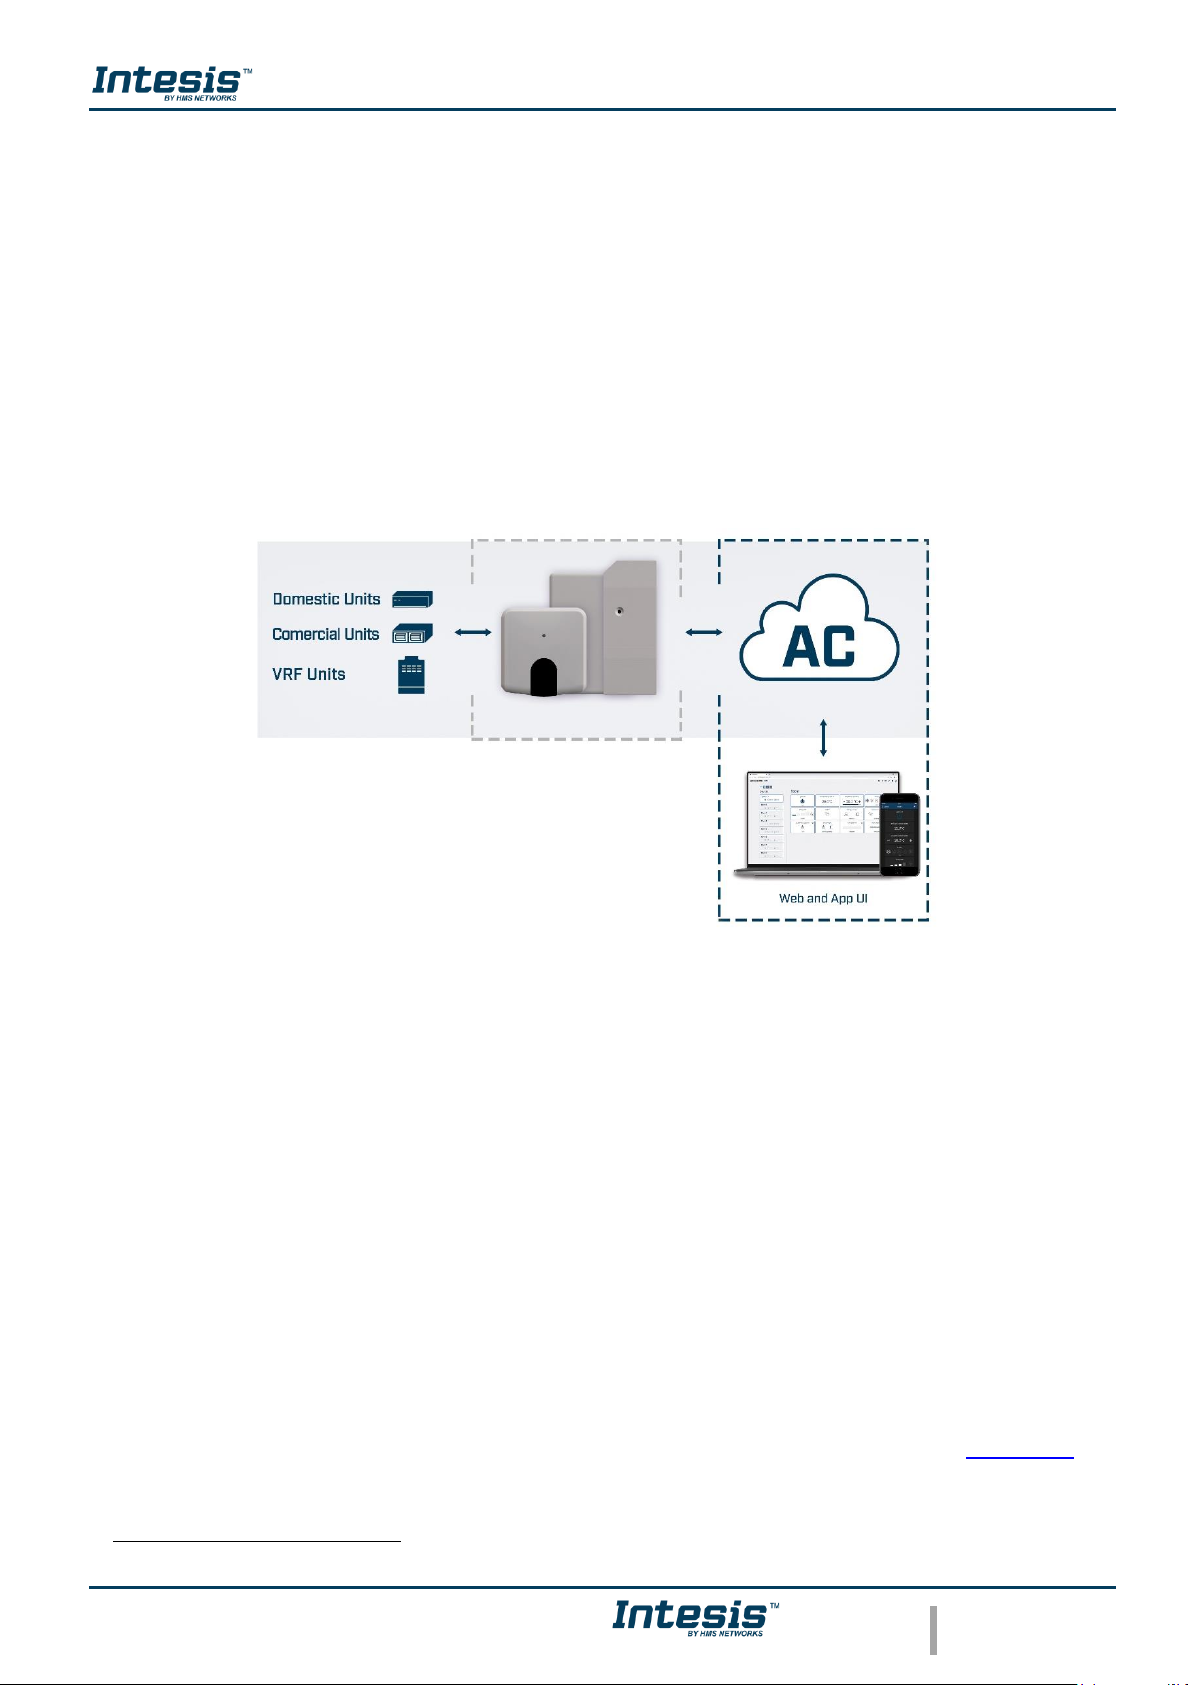
AC Cloud Control is the perfect IoT solution for professional AC management. It has been
developed along with the mayor AC manufacturers and offers the possibility to control almost
any domestic, commercial or VRF AC unit in the market from a generic dashboard available
for Android, iOS or in any web browser.
The AC Cloud Control system offers many functionalities covering different needs like energy
saving and air conditioner maintenance just to name some of them. All these functionalities
make the product the best professional solution for offices, stores, schools or any other
commercial building.
Figure 1.1 AC Cloud integration.
1.2 About this document
This document describes how to configure the AC Cloud Control device It contains the
meaning of the feedback light from AC Cloud Control LED during the configuration process
and working mode
1.3 What is needed
In order to use AC Cloud Control system is needed, at least, the following:
• AC Control device.
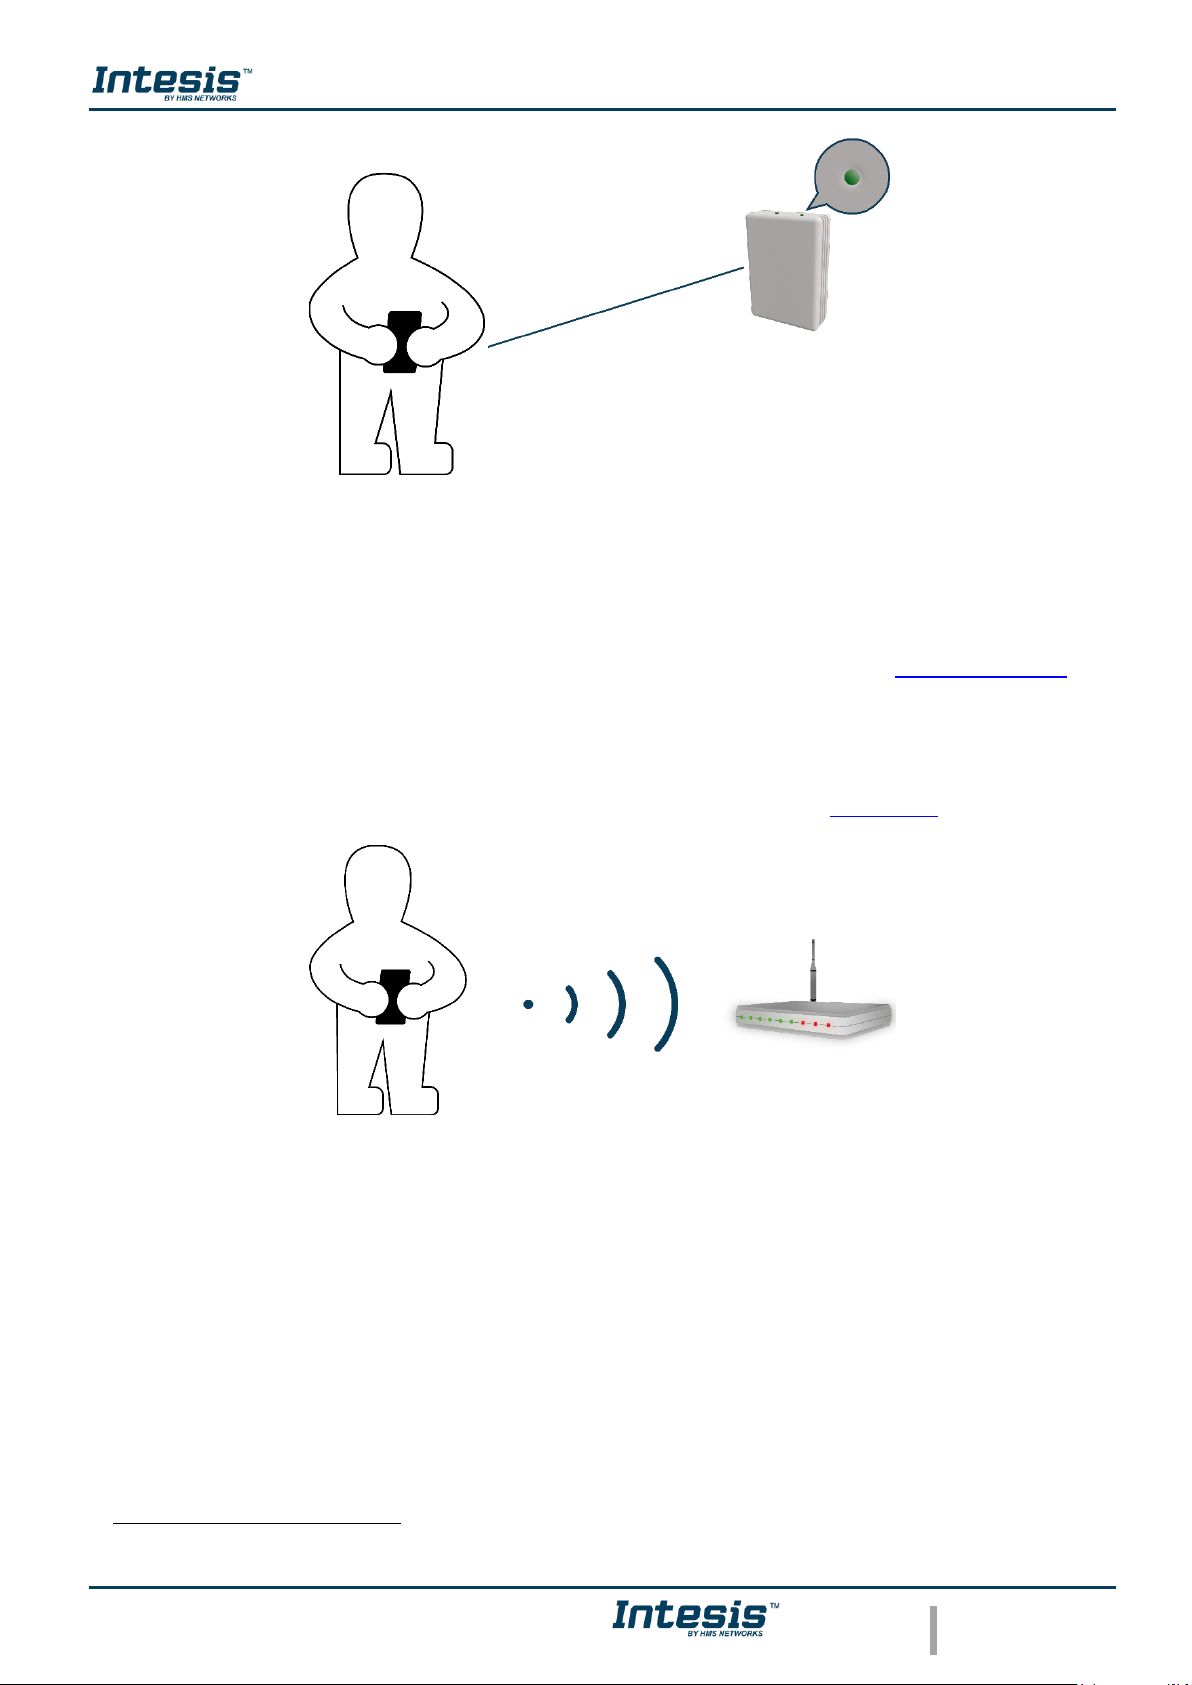
Before start using AC Cloud Control is needed to acquire (if the user hasn’t done yet)
an AC Cloud Control device1. In addition, is necessary be close to it (See Figure 1.2)
1
AC Cloud Control devices can be purchased in your usual air conditioner or heat pump reseller center.
Page 5
Device Configuration 1.0
© HMS Industrial Networks S.L.U - All rights reserved
This information is subject to change without notice
URL https://www.intesis.com
5 / 24
Figure 1.2 Get close to the device.
• Make sure to buy the right device.
Remember that there are the Universal and the Band Specific Wi-Fi Controllers
available for each manufacturer and type of climate system, check the compatibility.
• Internet access2.
The AC Cloud Control devices must be connected to internet using Wi-Fi, therefore
make sure the Wi-Fi signal reaches the device location (See Figure 1.3).
Figure 1.3 Check Wi-Fi Signal.
• Device with Internet access:
A device with internet access is needed (Smartphone or Tablet).
Make sure the smartphone or tablet used is Android or iOS compatible.
In addition, double check that the data is turned off and Wi-Fi is turned on.
2
Costs related with Internet access are not included in the AC Cloud Control price. Ask your Internet Service Provider about the
associated costs of your Internet connection.
<2m
OK
Page 6

Device Configuration 1.0
© HMS Industrial Networks S.L.U - All rights reserved
This information is subject to change without notice
URL https://www.intesis.com
6 / 24
2. AC Cloud Control Button
AC Cloud Control devices have one unique button located in different places depending of
the device Universal (See Figure 2.1), specific brand AC (See Figure 2.2) and specific brand
RC (See Figure 2.3).
Figure 2.1 Universal´s button
Figure 2.2 AC´s button
Figure 2.3 RC´s button
Page 7
Device Configuration 1.0
© HMS Industrial Networks S.L.U - All rights reserved
This information is subject to change without notice
URL https://www.intesis.com
7 / 24
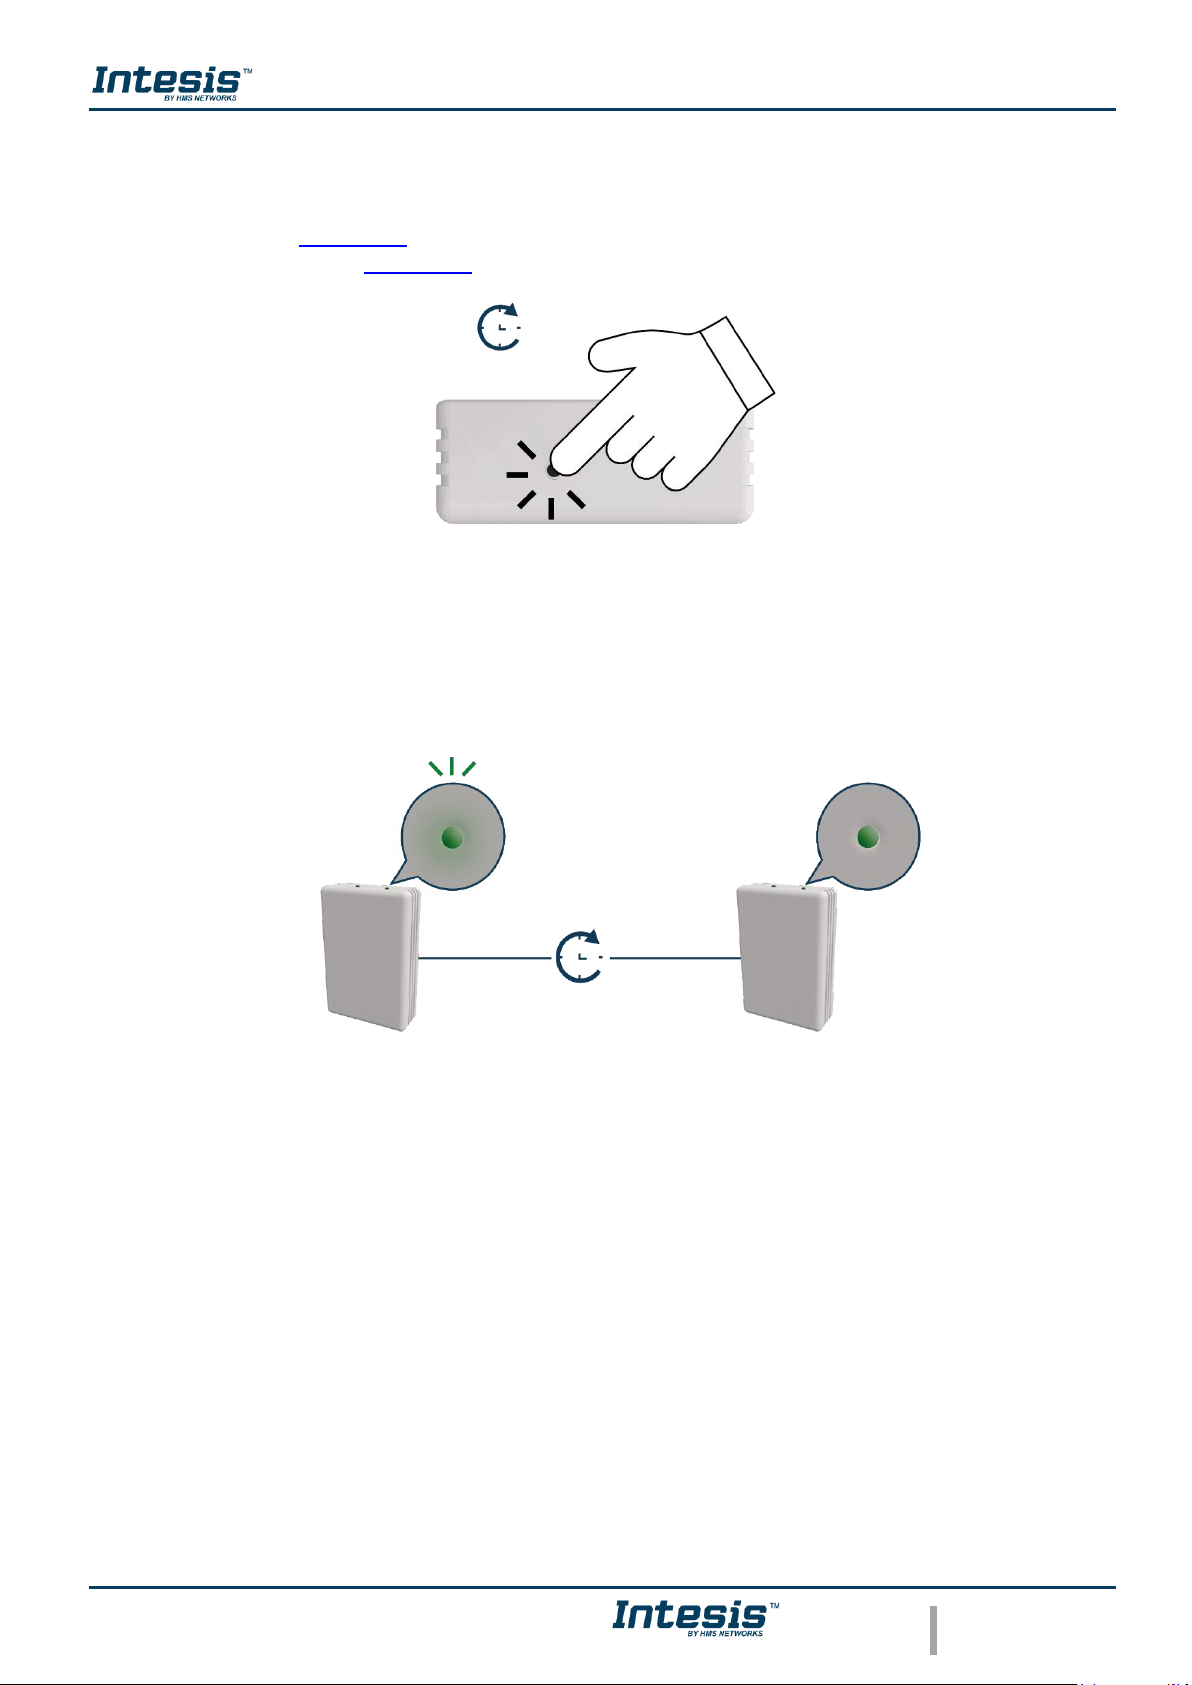
2.1 Reset Wi-Fi settings
To reset the Wi-Fi information in an AC Cloud Control device is needed to hold the button for
10 seconds (See Figure 2.4), the light of the LED will blink in green after some seconds it will
turn steady green (See Figure 2.5).
Figure 2.4 Reset Wi-Fi procedure.
Figure 2.5 Reset LED feedback.
Green
Blinking
Green
Steady
<10 sec
10 sec
Page 8
Device Configuration 1.0
© HMS Industrial Networks S.L.U - All rights reserved
This information is subject to change without notice
URL https://www.intesis.com
8 / 24
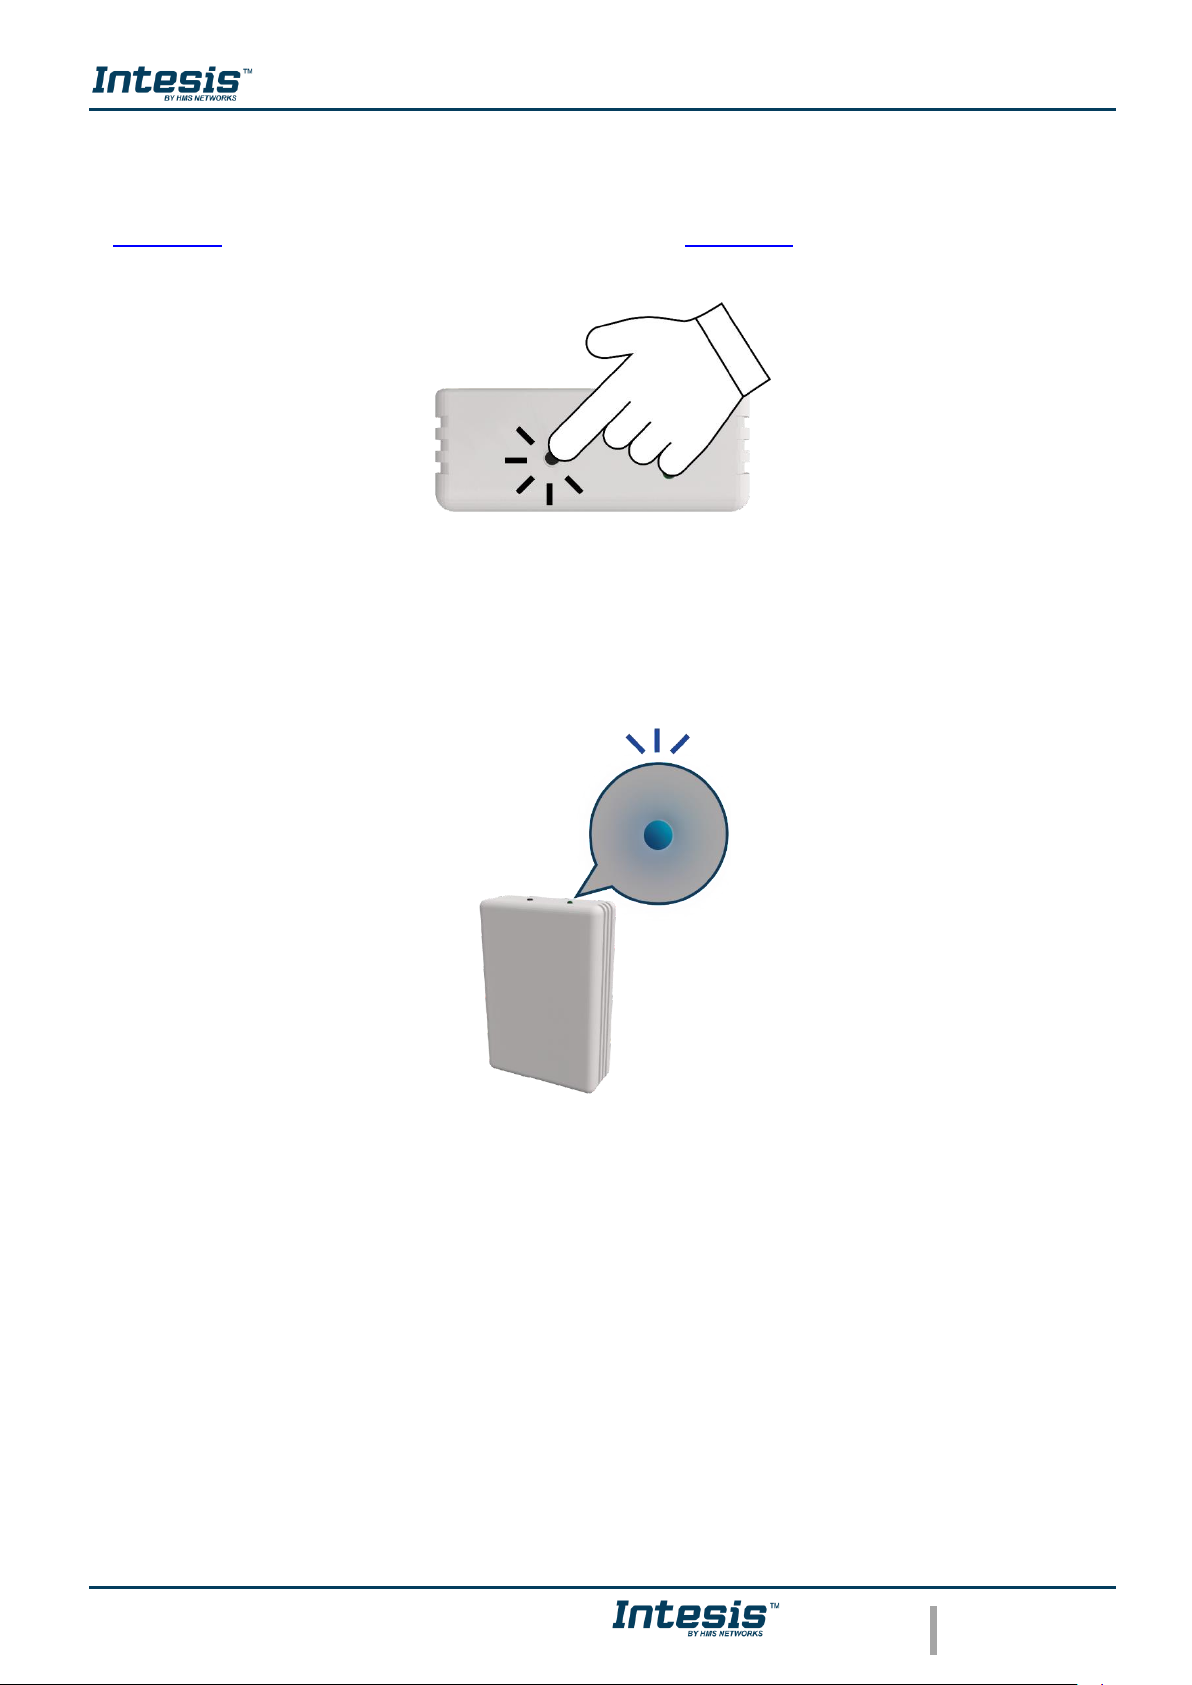
2.2 WPS mode
Press one time the button to activate the WPS mode in the AC Cloud Control device (See
Figure 2.6), the light of the LED will blink in blue (See Figure 2.7).
Figure 2.6 WPS mode.
Figure 2.7 WPS mode LED feedback.
“Click”
Blue
Blinking
Page 9
Device Configuration 1.0
© HMS Industrial Networks S.L.U - All rights reserved
This information is subject to change without notice
URL https://www.intesis.com
9 / 24
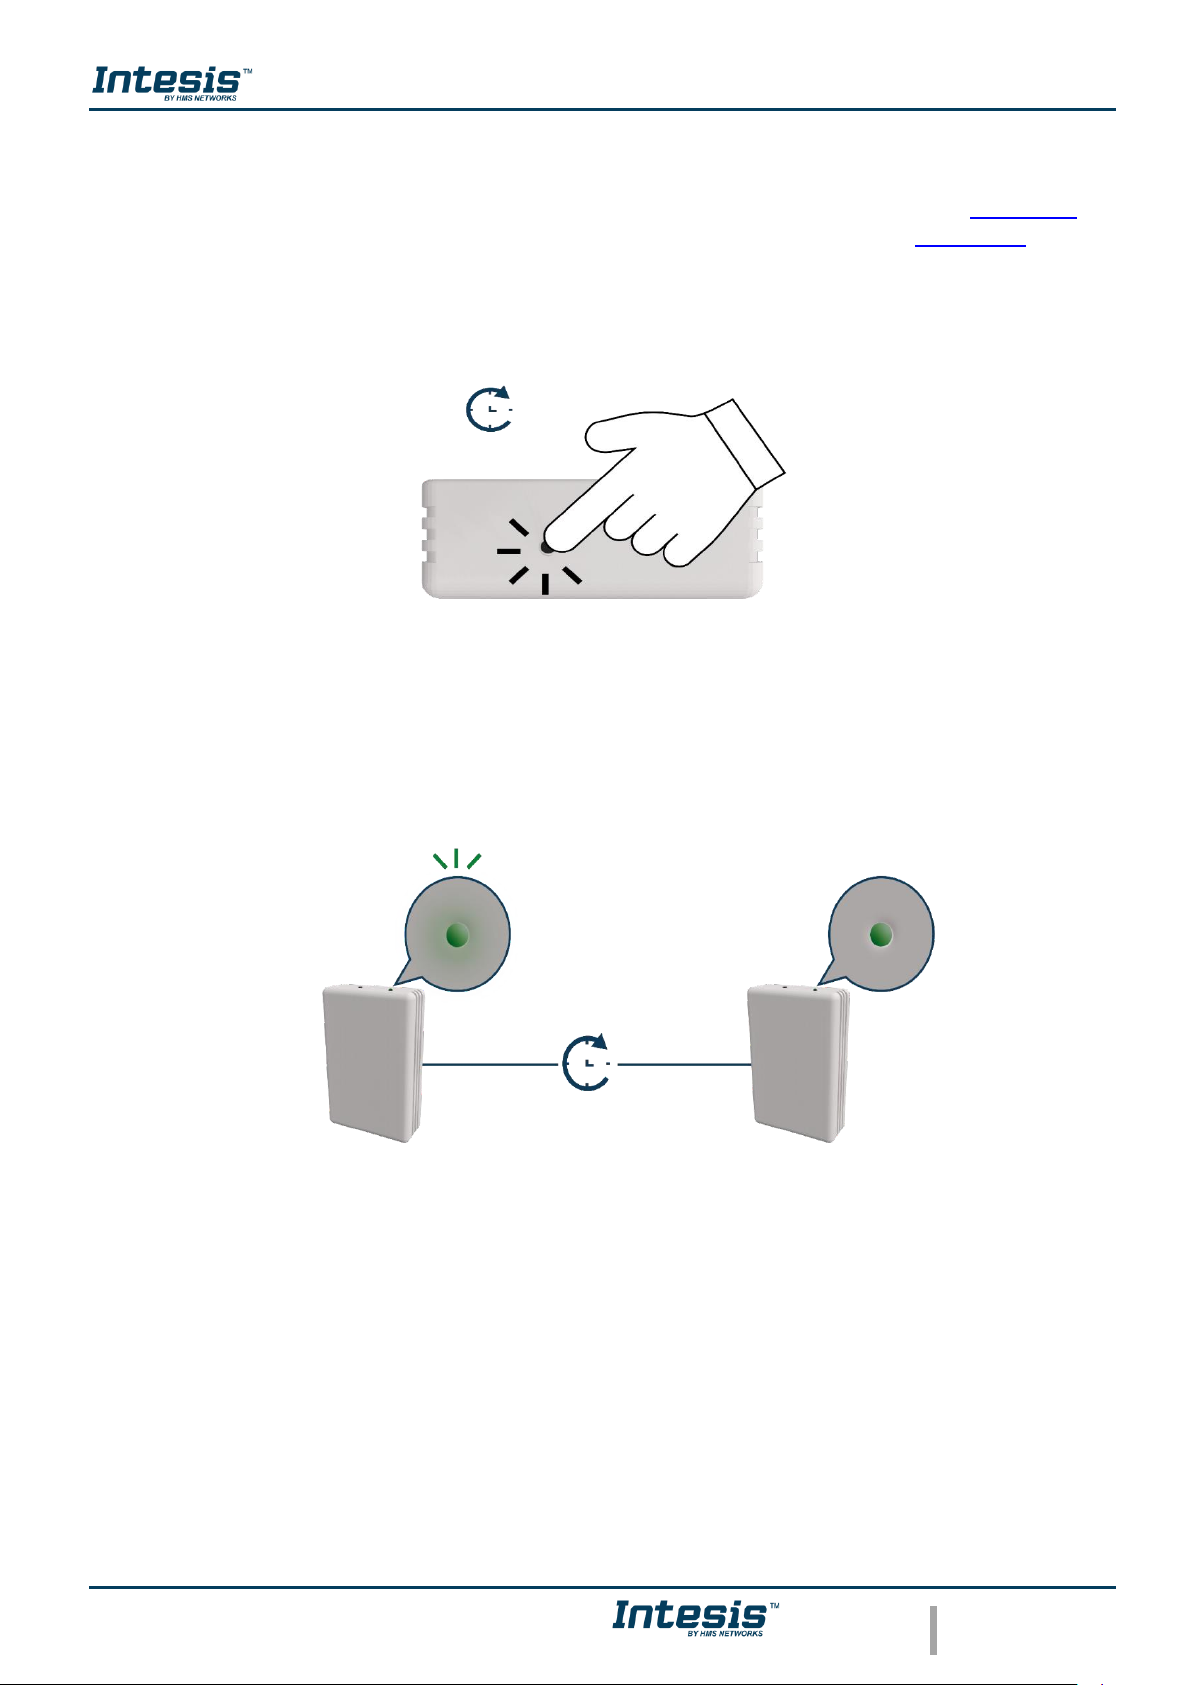
2.3 Change Wi-Fi channel
Holding the button for 2 seconds to change the channel of the Wi-Fi network (See Figure 2.8),
the light of the LED will blink in green and it will turn steady green (See Figure 2.9). The
process can be repeated until reach the channel wanted.
Figure 2.8 Change Wi-Fi channel procedure.
Figure 2.9 Change Wi-Fi channel LED feedback.
2 sec
<2 sec
Green
Blinking
Green
Steady
Page 10

Device Configuration 1.0
© HMS Industrial Networks S.L.U - All rights reserved
This information is subject to change without notice
URL https://www.intesis.com
10 / 24
2.4 Autolearning
Autolearning mode is used to pair the IR control of the Climatize system with the Universal
AC Cloud Control device.
To active the Autolearning mode in the Universal device is needed to hold the button for 4
seconds (See Figure 2.10), the light of the LED will be steady white (See Figure 2.11).
Figure 2.10 Autolearning procedure.
Figure 2.11 Autolearning LED feedback.
Once the light is steady withe, press the on/off button of the IR remote of the air conditioner
machine pointing it to the universal device (See Figure 2.12), the light of it will blink green. If
the Universal device recognized the IR remote successfully the light will turn steady green
(See Figure 2.13). Otherwise, it will turn red (See Figure 2.14).
White
Steady
Note: The autolearning can be performed just with Universal
AC Cloud Control devices.
!
4 sec
Page 11

Device Configuration 1.0
© HMS Industrial Networks S.L.U - All rights reserved
This information is subject to change without notice
URL https://www.intesis.com
11 / 24
Figure 2.12 IR remote pointing to Universal device.
Figure 2.13 Autolearning performed successfully LED feedback.
Figure 2.14 Autolearning performed with not success LED feedback.
Green
Blinking
Green
Steady
4 sec
Green
Blinking
Red
Steady
4 sec
Page 12

Device Configuration 1.0
© HMS Industrial Networks S.L.U - All rights reserved
This information is subject to change without notice
URL https://www.intesis.com
12 / 24
3. Configuration
Configuration of the AC Cloud Control device must be done through the AC Cloud Control
app.
There are 2 ways to realize the procedure
1. Tap on Device configuration in the main page (See Figure 3.1).
2. Login, tapping on settings and in the white square (See Figure 3.2).
Figure 3.1 Access to Configuration network device without login.
Figure 3.2 Access to Configuration network device from settings login.
Note: Make sure to reset the Wi-Fi configuration. Further
information can be found in Section 2.1.
!
Page 13

Device Configuration 1.0
© HMS Industrial Networks S.L.U - All rights reserved
This information is subject to change without notice
URL https://www.intesis.com
13 / 24
Go to Wi-Fi settings of your mobile or Table and select the network generated by AC Cloud
Control device (See Figure 3.3). Tap on Next.
In case the user is not connected to the device network a pop-up window will be shown asking
to connect to it. (See Figure 3.4).
The mode to configure the Wi-Fi network can be selected as preference. Further information
about each mode configurations will be found at Section 3.3, Section 3.4 and Section 3.5.
Figure 3.3 Configuration network procedure.
Figure 3.4 Configuration network warning pop-up window.
Page 14

Device Configuration 1.0
© HMS Industrial Networks S.L.U - All rights reserved
This information is subject to change without notice
URL https://www.intesis.com
14 / 24
If the configuration network has been carried out successfully the light of the LED will follow
a light sequence (See Figure 3.5). Tap on Done.
Figure 3.5 LED configuration network sequence.
Page 15

Device Configuration 1.0
© HMS Industrial Networks S.L.U - All rights reserved
This information is subject to change without notice
URL https://www.intesis.com
15 / 24
3.3 Automatic
1. Tap on Automatic (See Figure 3.6)
Figure 3.6 Automatic configuration procedure.
2. Tap on name of the network wanted (See Figure 3.7)
Figure 3.7 Wi-Fi Network selection.
3. Enter the password of the Wi-Fi network selected, to double check if the password
entered is the correct one and tap on show password (See Figure 3.8). Tap on
Connect.
Page 16

Device Configuration 1.0
© HMS Industrial Networks S.L.U - All rights reserved
This information is subject to change without notice
URL https://www.intesis.com
16 / 24
Figure 3.8 Enter password.
If the configuration network has been carried out successfully the light of the LED will follow
a light sequence (See Figure 3.5). To continue tap on done.
In case the light of the LED does not follow the sequence or start lighting different, start the
process from the beginning.
Page 17

Device Configuration 1.0
© HMS Industrial Networks S.L.U - All rights reserved
This information is subject to change without notice
URL https://www.intesis.com
17 / 24
3.4 Manual
Tap on Manual (See Figure 3.9)
Figure 3.9 Manual configuration procedure.
• In case to select the security open, type the SSID of the Wi-Fi network wanted. (See
Figure 3.10). Tap on Connect.
Figure 3.10 Security Open.
If the configuration network has been carried out successfully the light of the LED will follow
a light sequence (See Figure 3.5). Tap on Done.
In case the light of the LED does not follow the sequence or start lighting different, start the
process from the beginning.
Page 18

Device Configuration 1.0
© HMS Industrial Networks S.L.U - All rights reserved
This information is subject to change without notice
URL https://www.intesis.com
18 / 24
• In case to select the security WEP/WAP2 type the SSID of the Wi-Fi network wanted.
Also, type the password Wi-Fi network and to make sure is well entered slide Show
password selector (See Figure 3.11). Tap on Connect.
Figure 3.11 Security WEP/ WPA2.
If the configuration network has been carried out successfully the light of the LED will follow
a light sequence (See Figure 3.5). Tap on Done.
In case the light of the LED does not follow the sequence or start lighting different, start the
process from the beginning.
In manual mode is an option for advanced configuration. (See Figure 3.10 and Figure 3.11).
By default, it comes in option DHCP (See Figure 3.12). Tap on Save.
Figure 3.12 Advanced options (DHCP).
• In case to select Static IP, type the IP address, Subnet Mask and Getaway. (See Figure
3.13). Tap on Save.
Figure 3.13 Advanced options (Static IP).
Page 19
Device Configuration 1.0
© HMS Industrial Networks S.L.U - All rights reserved
This information is subject to change without notice
URL https://www.intesis.com
19 / 24
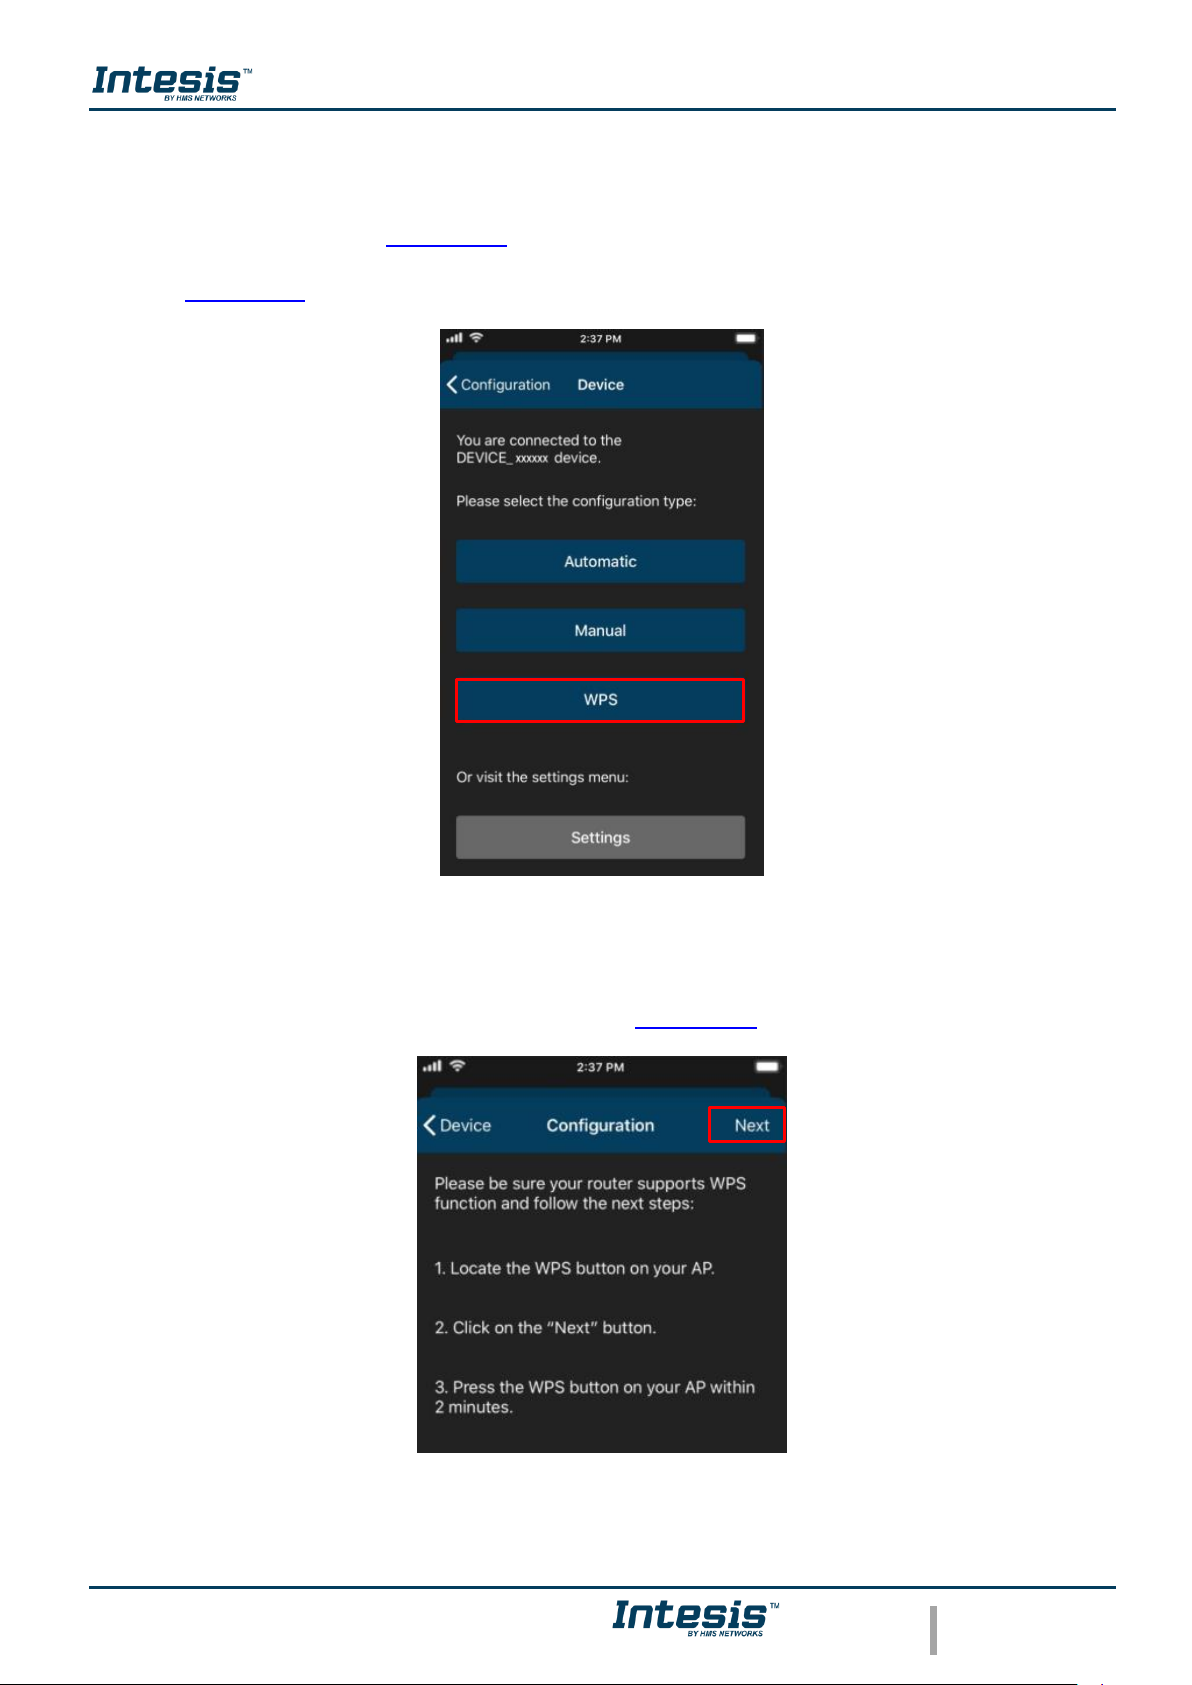
3.5 WPS
There are 2 ways to start the WPS configuration procedure
1. Tap on WPS (See Figure 3.14).
2. Press one time the button to activate the WPS. Further information can be found at
Section 2.2
Figure 3.14 WPS configuration procedure.
Follow the instructions in the screen shown (See Figure 3.15). Tap on Next.
Figure 3.15 Instructions to perform WPS mode configuration.
Page 20
Device Configuration 1.0
© HMS Industrial Networks S.L.U - All rights reserved
This information is subject to change without notice
URL https://www.intesis.com
20 / 24
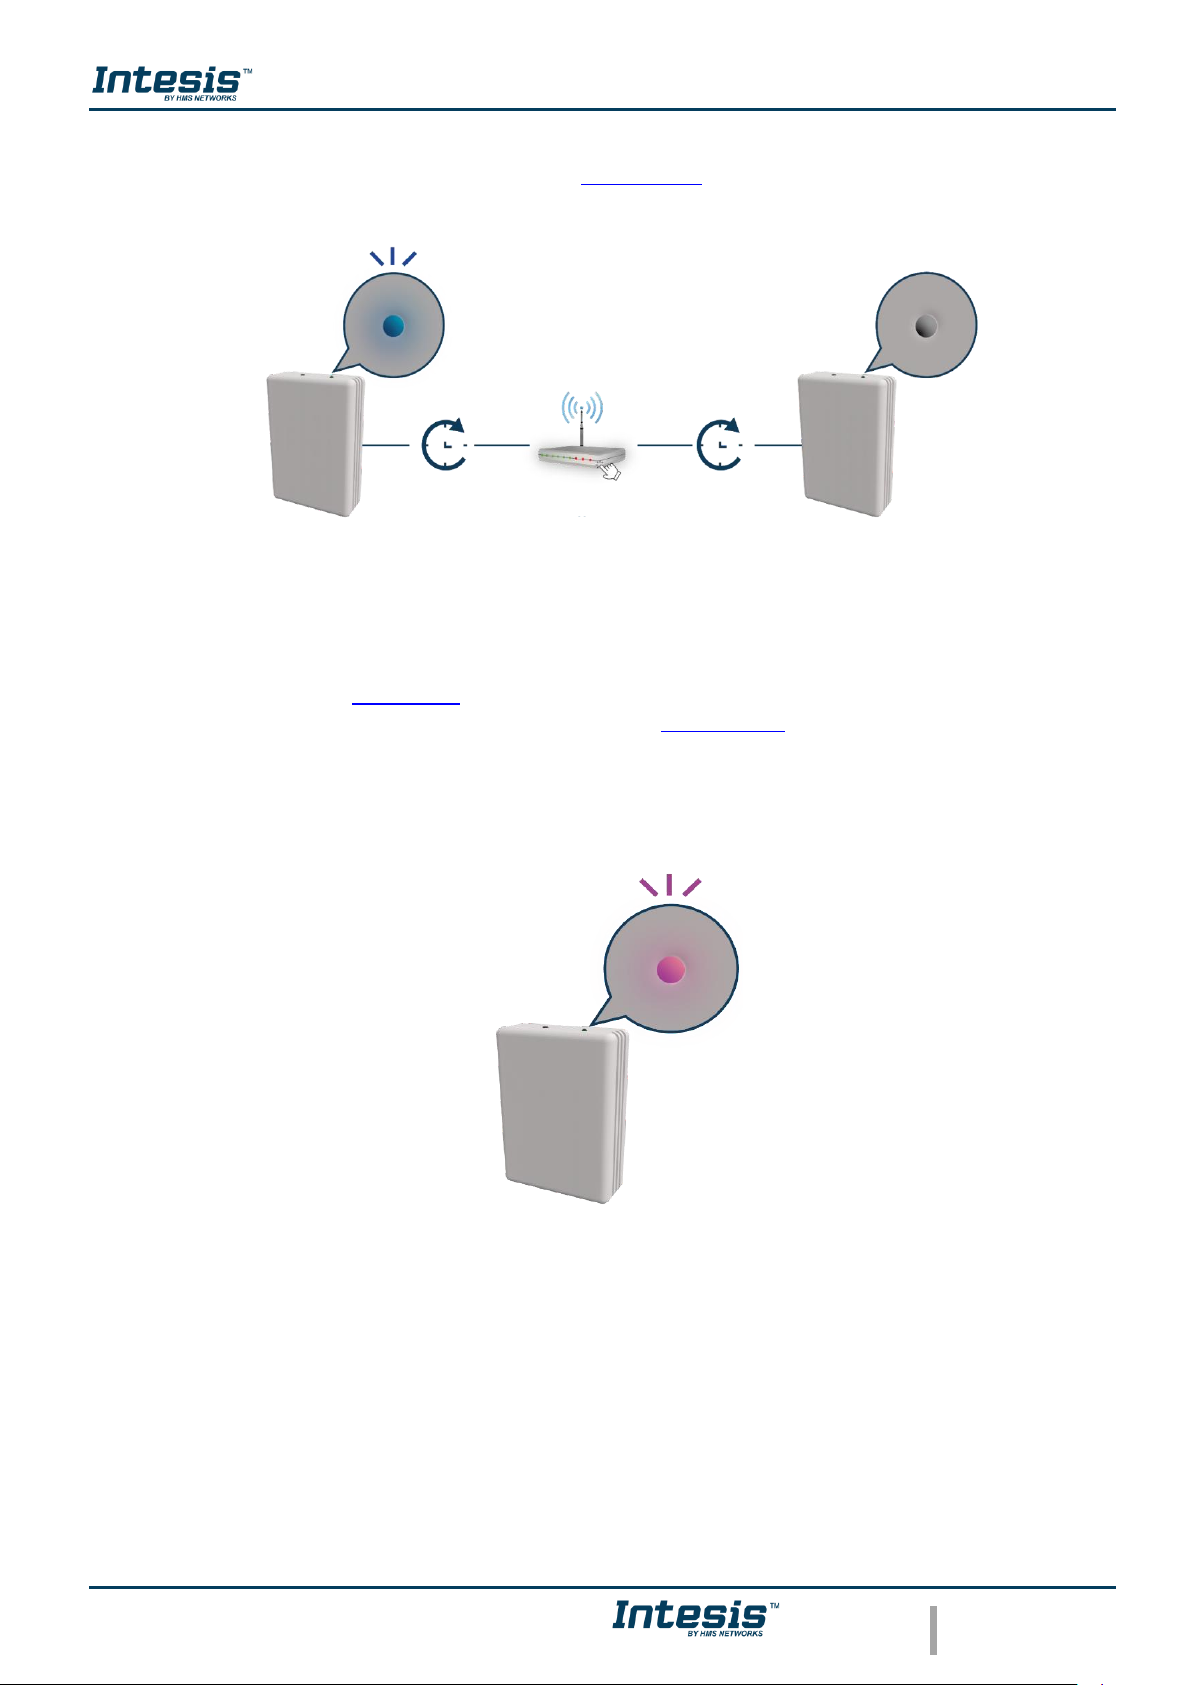
the light of the LED will blink blue, 2 minutes after the WPS button of the router had been
pressed the light of the LED will be off (See Figure 3.16).
Figure 3.16 Performing WPS configuration LED feedback.
If the configuration network has been carried out successfully the light of the LED will follow
a light sequence (See Figure 3.5). To continue tap on done.
In case the light of the LED blinks Magenta (See Figure 3.17), start the process from the
beginning.
Figure 3.17 Unsuccessful connection LED feedback.
Blue
Blinking
OFF
“Click
<2 min
<2 min
Magenta
Blinking
Page 21
Device Configuration 1.0
© HMS Industrial Networks S.L.U - All rights reserved
This information is subject to change without notice
URL https://www.intesis.com
21 / 24
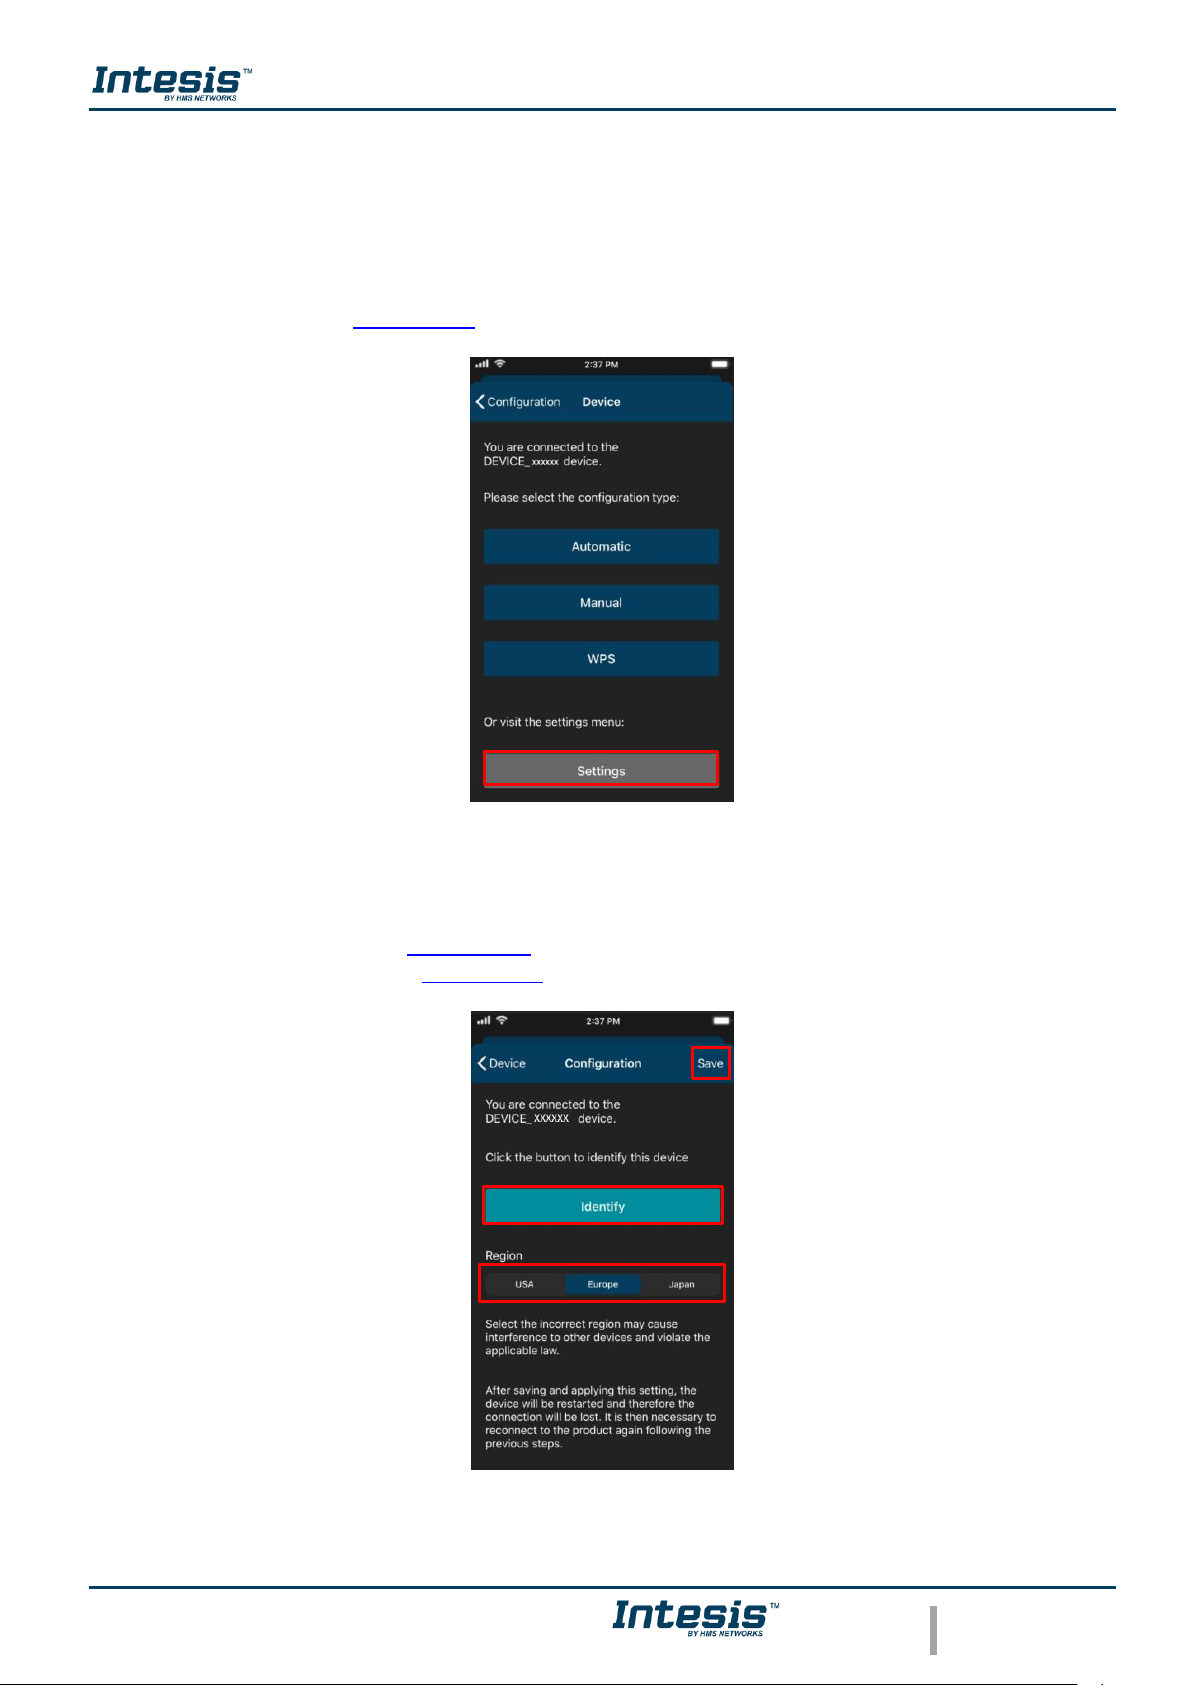
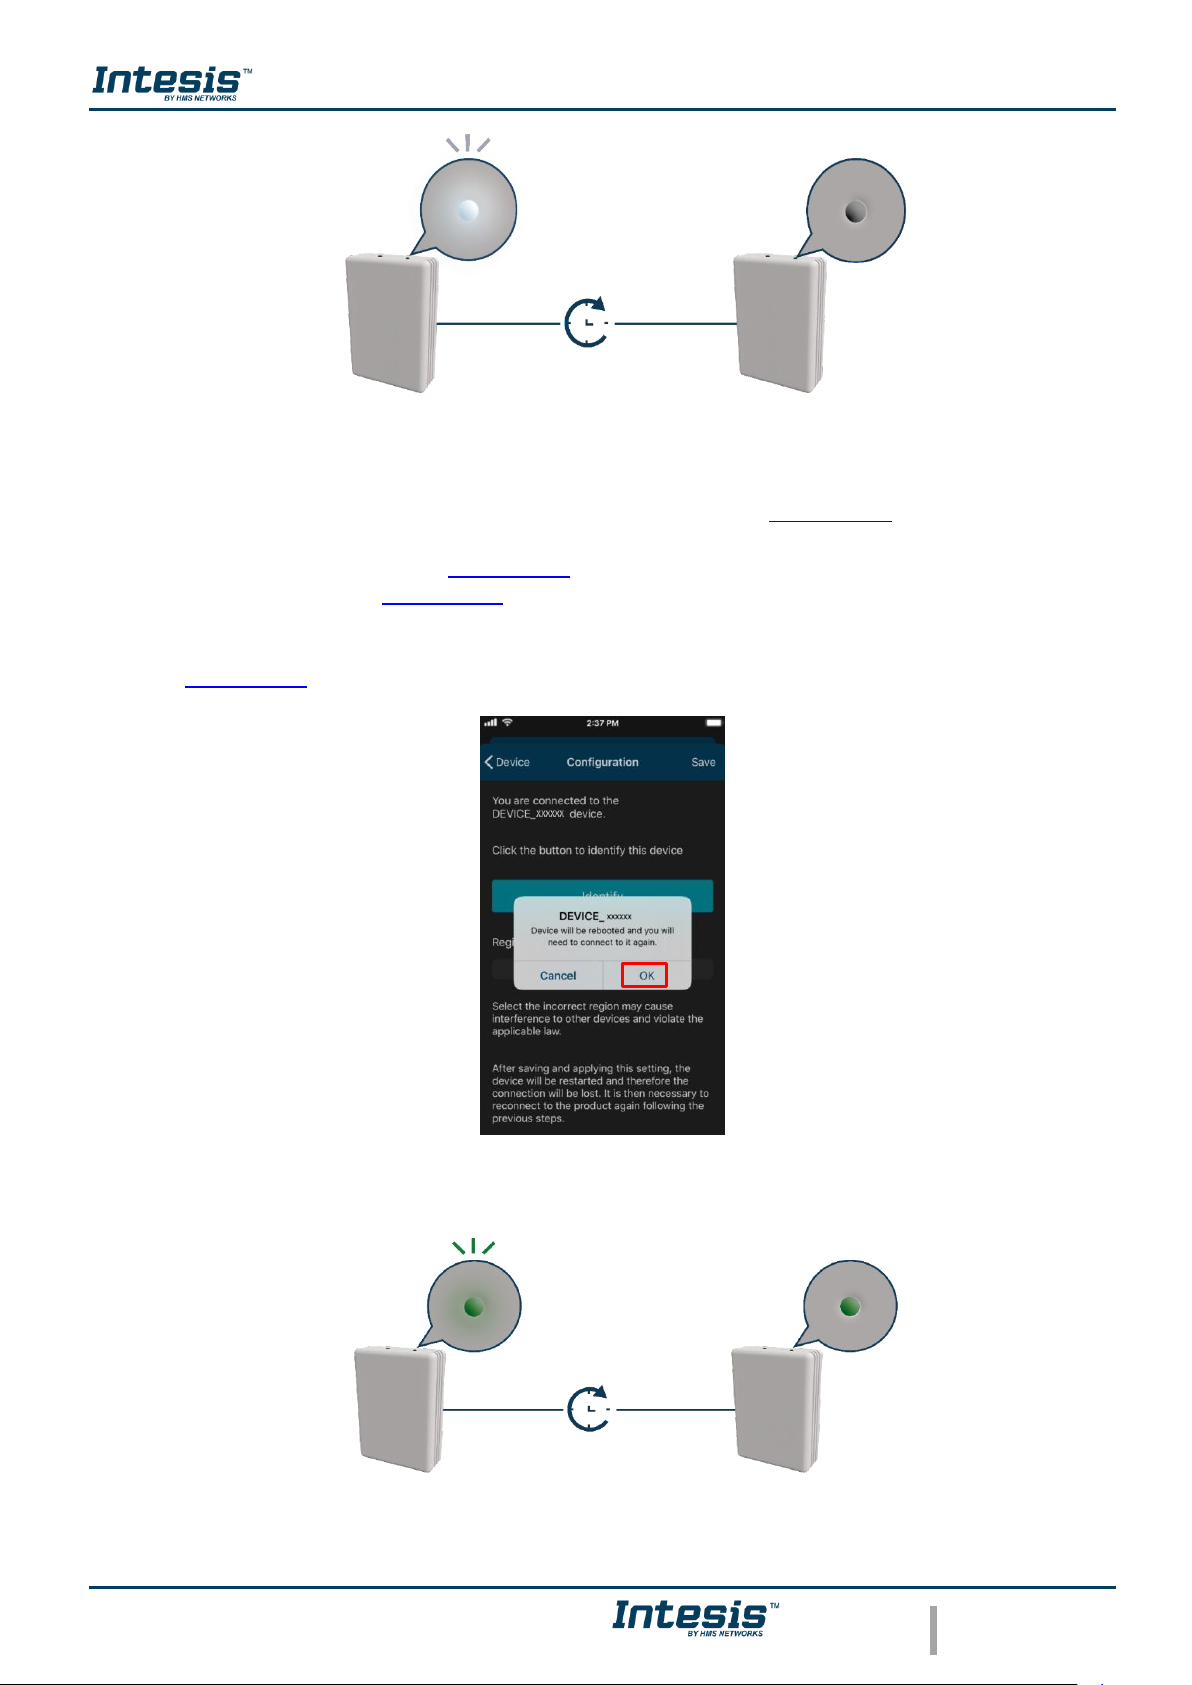
3.6 Settings
In settings the domain region where the AC Cloud Control device will work can be changed,
also, if the installation has more than device and the user needs to identify which device is
going to be configured it can be called.
Tap on Settings (See Figure 3.18)
Figure 3.18 Settings configuration site.
• To identify to which network AC Cloud Control device is connected the mobile or tablet
tap on Identify (See Figure 3.19). the light of the LED will blink white for 6 seconds,
then it will be off (See Figure 3.20).
Figure 3.19 Settings AC Cloud control.
Page 22
Device Configuration 1.0
© HMS Industrial Networks S.L.U - All rights reserved
This information is subject to change without notice
URL https://www.intesis.com
22 / 24
Figure 3.20 Identify LED feedback.
• To change of Region, tap on the region wanted (See Figure 3.19). A pop-up will be
shown telling that if the region is changed the configuration process must be started
from the beginning (See Figure 3.21). Tap on OK.
Tap on save (See Figure 3.19).
The light of the LED will blink green for 6 seconds, then it will turn steady green (See
Figure 3.22)
Figure 3.21 Change region.
Figure 3.22 Selecting region LED feedback.
White
Blinking
OFF
6 sec
Green
Blinking
Green
Steady
<6 sec
Page 23
Device Configuration 1.0
© HMS Industrial Networks S.L.U - All rights reserved
This information is subject to change without notice
URL https://www.intesis.com
23 / 24
4. LED status information
AC Cloud Control device has an external LED which uses to give the user a feedback to
communicate the status of the device.
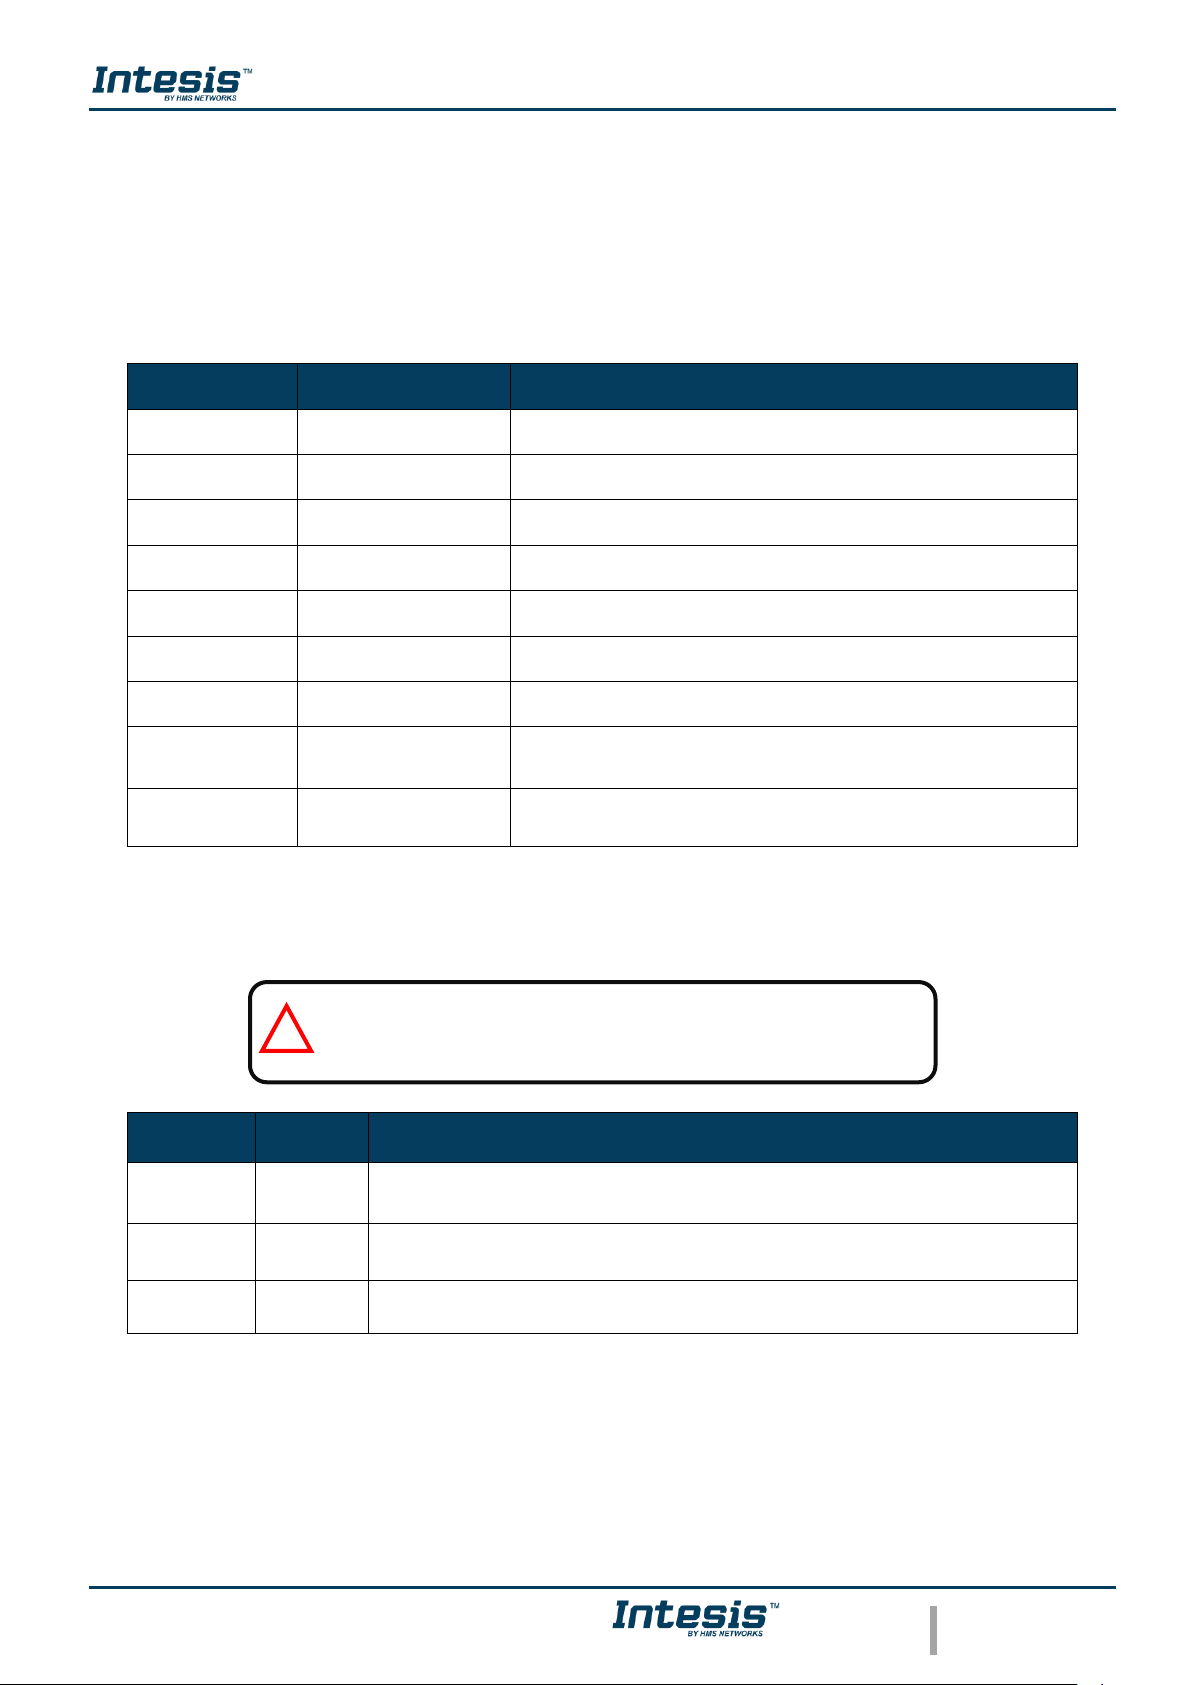
4.1 LED status during Wi-Fi configuration
LED Color (s)
Behavior
Description
Blue
Blinking
Performing WPS connection (up to 2 min)
Magenta
Blink
WPS connection error
White
Blinking
Identifying AC Cloud Control Device
Green
Steady
Not configured
Green
Blinking
Checking device configuration parameter values (up to 2 min)
Red
Blinking
Connecting to access point and server (up to 2 min)
Yellow
Blinking
Downloading configuration. Wait (up to 2 min)
Red - Green
Alternate blinking
Error Connecting to Access point or router. Try to connect
again and make sure you write the correct password.
Yellow - Green
Alternate blinking
Server not reached. Check if there is Internet connectivity on
your Access Point or router.
4.2 LED status during IR configuration (Autolearning mode)
LED Color
Behavior
Description
White
Steady
Waiting customer pressing the On/Off button of the IR remote controller (up
to 20 seconds)
Green
Blinking
The IR remote controller has been linked as expected with the AC Cloud
Control device
Red
Blinking
The IR remote controller has NOT been linked as expected with the AC
Cloud Control device
Note: The autolearning can be performed just with Universal
AC Cloud Control devices.
!
Page 24
Device Configuration 1.0
© HMS Industrial Networks S.L.U - All rights reserved
This information is subject to change without notice
URL https://www.intesis.com
24 / 24
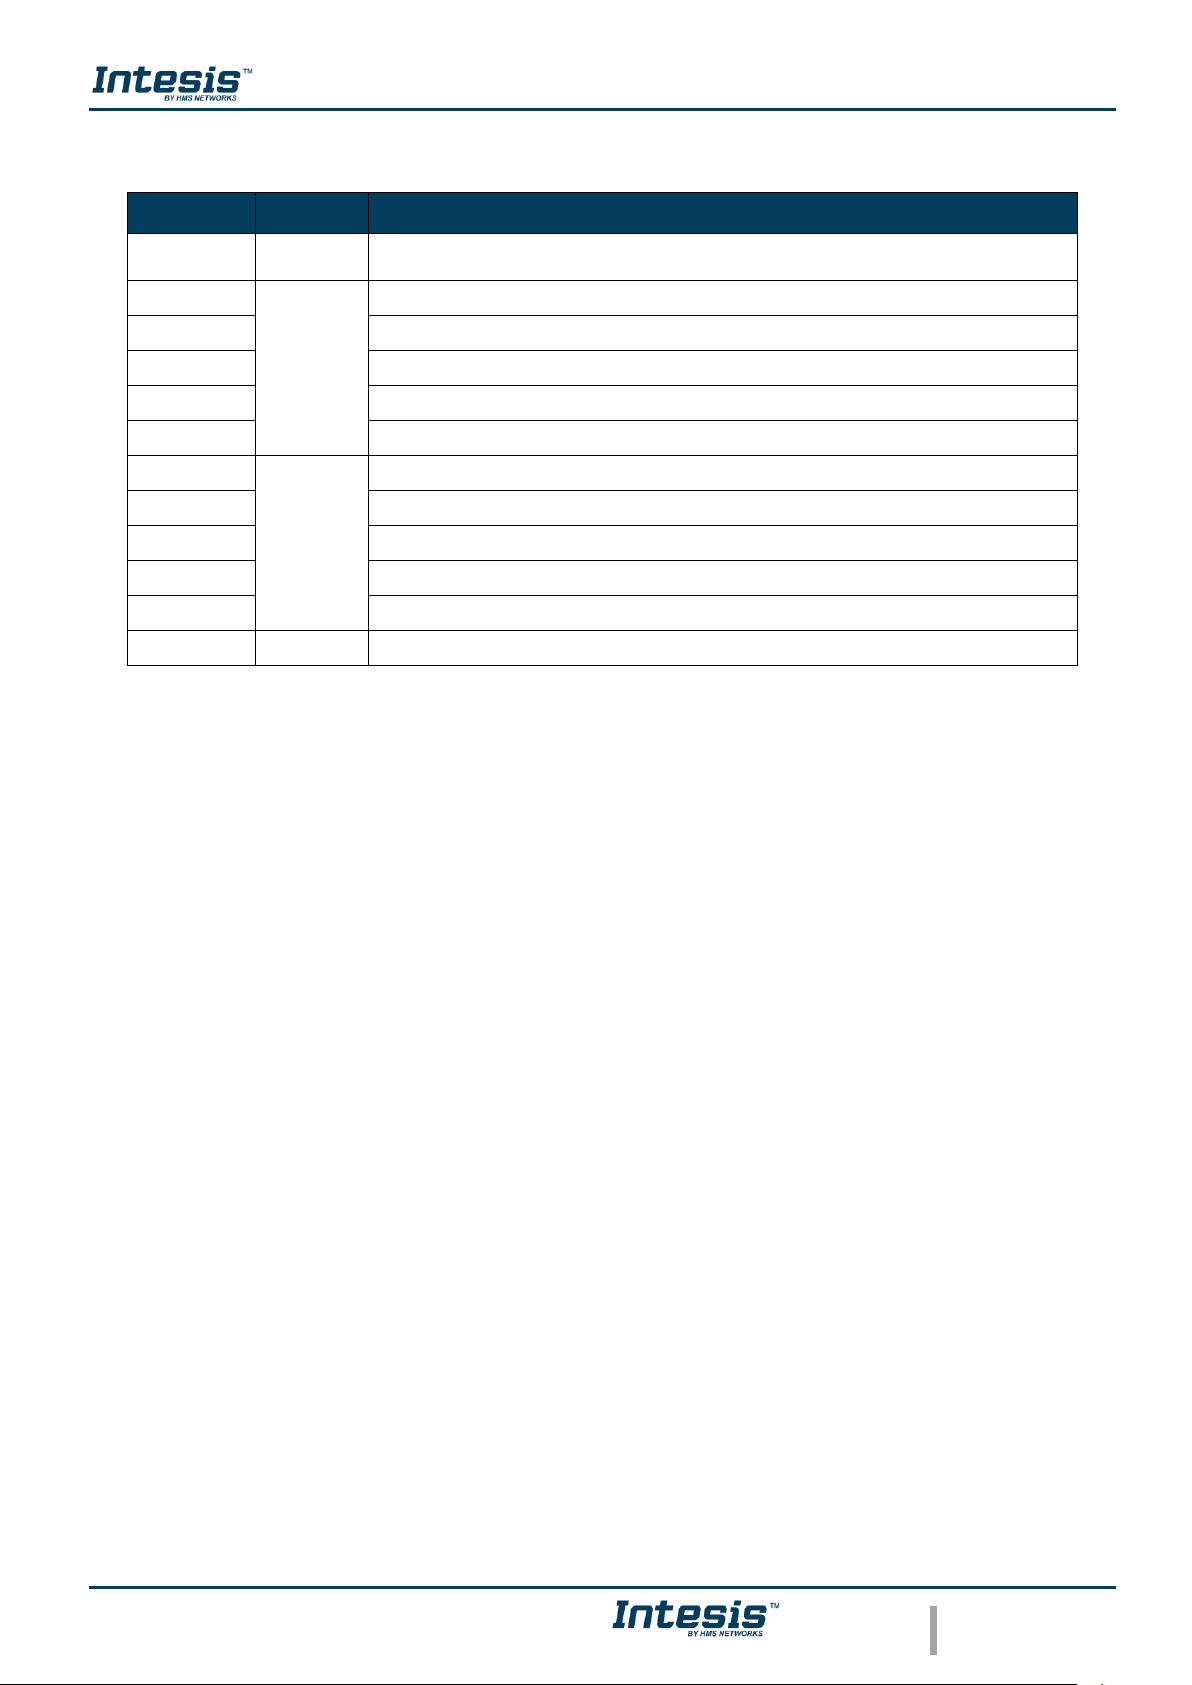
4.3 LED status during working mode
LED Color
Behavior
Description
Off
AC Cloud Control device not powered or AC Cloud Control device working,
and the AC unit is Off.
Blue
Steady
Indoor Unit ON working in Cool or Dry mode
Red
Indoor Unit ON working in Heat mode
Green
Indoor Unit ON working in Fan mode
Yellow
Indoor Unit ON working in Auto mode
Cyan
Indoor Unit working in anti-frost mode
Blue
3 blinks
Command received or sent during Cool or Dry mode
Red
Command received or sent during Heat mode
Green
Command received or sent during Fan mode
Yellow
Command received or sent during Auto mode
Cyan
Command sent during anti-frost mode
Red
Blinking
AC Cloud Control device trying to connect to the Internet
 Loading...