

Page 1
App Interface - User Manual
Issue date: 02/2021
V2.0
Page 2
App User Manual 2.0
© HMS Industrial Networks S.L.U - All rights reserved
This information is subject to change without notice
URL https://www.intesis.com
1 / 46
Important User Information
Disclaimer
The information in this document is for informational purposes only. Please inform HMS Industrial
Networks of any inaccuracies or omissions found in this document.
HMS Industrial Networks disclaims any responsibility or liability for any errors that may appear in
this document. HMS Industrial Networks reserves the right to modify its products in line with its
policy of continuous product development. The information in this document shall therefore not
be construed as a commitment on the part of HMS Industrial Networks and is subject to change
without notice. HMS Industrial Networks makes no commitment to update or keep current the
information in this document.
The data, examples and illustrations found in this document are included for illustrative purposes
and are only intended to help improve understanding of the functionality and handling of the
product. In view of the wide range of possible applications of the product, and because of the
many variables and requirements associated with any particular implementation, HMS Industrial
Networks cannot assume responsibility or liability for actual use based on the data, examples or
illustrations included in this document nor for any damages incurred during installation of the
product. Those responsible for the use of the product must acquire sufficient knowledge in order
to ensure that the product is used correctly in their specific application and that the application
meets all performance and safety requirements including any applicable laws, regulations, codes
and standards. Further, HMS Industrial Networks will under no circumstances assume liability or
responsibility for any problems that may arise as a result from the use of undocumented features
or functional side effects found outside the documented scope of the product. The effects caused
by any direct or indirect use of such aspects of the product are undefined and may include e.g.
compatibility issues and stability issues.
Page 3

App User Manual 2.0
© HMS Industrial Networks S.L.U - All rights reserved
This information is subject to change without notice
URL https://www.intesis.com
2 / 46
INDEX
1. Description ............................................................................................................................................................. 3
1.1 Introduction .................................................................................................................................................... 3
1.2 About this document ...................................................................................................................................... 3
1.3 What is needed ............................................................................................................................................. 4
2. Quick Start Guide .................................................................................................................................................. 5
3. Users ....................................................................................................................................................................... 6
3.1 User Registration ........................................................................................................................................... 6
3.2 App login........................................................................................................................................................ 8
3.3 Password Reset ............................................................................................................................................ 8
4. Settings ................................................................................................................................................................. 10
4.1 Units ............................................................................................................................................................ 10
4.2 Language..................................................................................................................................................... 10
4.3 About ........................................................................................................................................................... 11
4.4 Profile .......................................................................................................................................................... 12
4.5 Facilities ....................................................................................................................................................... 14
4.6 Devices ........................................................................................................................................................ 17
4.7 Log Out ........................................................................................................................................................ 24
5. Control .................................................................................................................................................................. 26
5.1 General ........................................................................................................................................................ 27
5.2 Ambient temperature ................................................................................................................................... 28
5.3 Setpoint temperature ................................................................................................................................... 28
5.4 Mode ............................................................................................................................................................ 28
5.5 Fan speed.................................................................................................................................................... 28
5.6 Airflow .......................................................................................................................................................... 29
5.7 Heat 8/10 ..................................................................................................................................................... 29
5.8 Outdoor temperature ................................................................................................................................... 29
5.9 Up/down vanes ............................................................................................................................................ 30
5.10 Left/right vanes ............................................................................................................................................ 30
5.11 Instant power consumption ......................................................................................................................... 30
5.12 Total energy consumption ........................................................................................................................... 30
5.13 Extremes protections ................................................................................................................................... 31
5.14 Binary input.................................................................................................................................................. 31
6. Scenes .................................................................................................................................................................. 32
6.1 Temporize.................................................................................................................................................... 35
7. Calendar ............................................................................................................................................................... 37
7.1 Pattern ......................................................................................................................................................... 38
7.2 Action ........................................................................................................................................................... 41
7.3 Rule ............................................................................................................................................................. 44
Page 4
App User Manual 2.0
© HMS Industrial Networks S.L.U - All rights reserved
This information is subject to change without notice
URL https://www.intesis.com
3 / 46
1. Description
1.1 Introduction
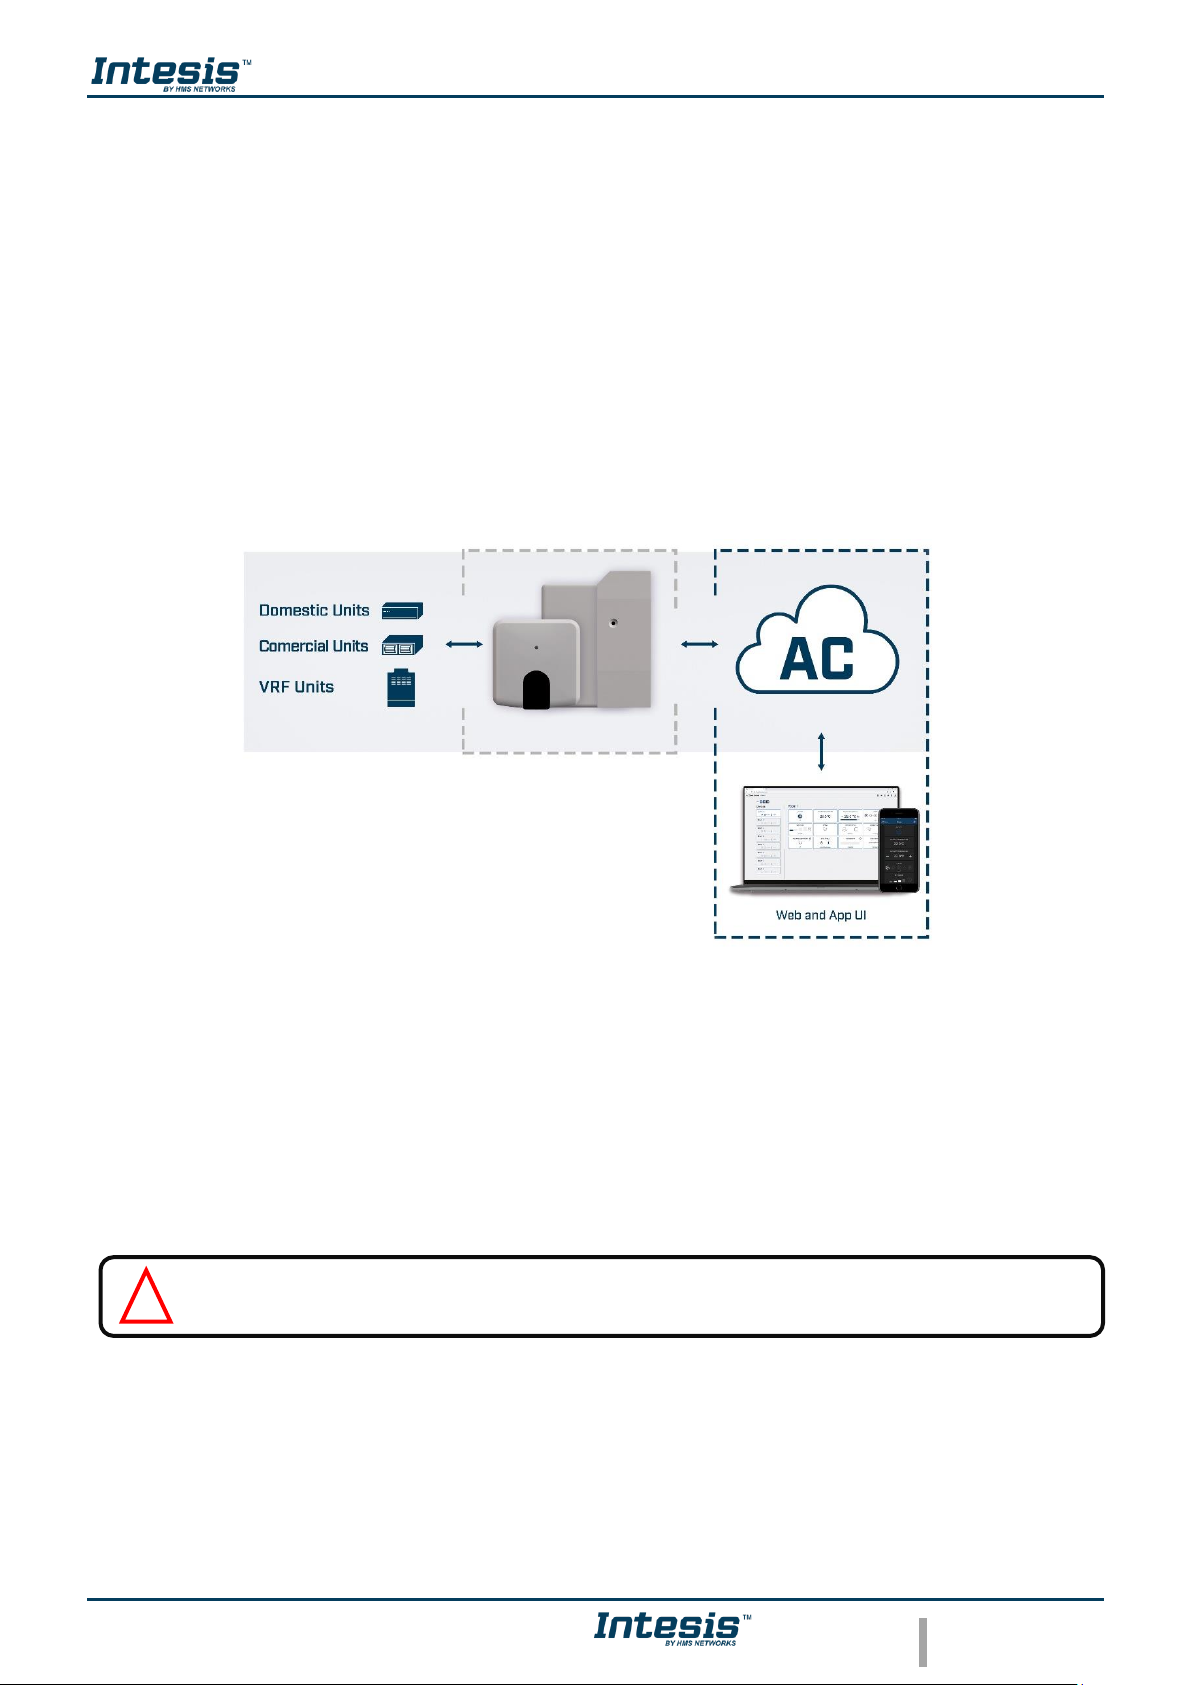
AC Cloud Control is the perfect IoT solution for professional AC management. It has been
developed along with the mayor AC manufacturers and offers the possibility to control almost any
domestic, commercial or VRF AC unit in the market from a generic dashboard available for
Android, iOS or in any web browser.
The AC Cloud Control system offers many functionalities covering different needs like energy
saving and air conditioner maintenance just to name some of them. All these functionalities make
the product the best professional solution for offices, stores, schools or any other commercial
building.
Figure 1.1 AC Cloud Control integration.
1.2 About this document
This document describes how to use the AC Cloud Control web interface. It contains a step by
step guide explaining how to create a user account, how to register an AC Cloud device, how to
configure them using the web interface and how to use the all different functions available.
Note: This document assumes that the user had downloaded the AC Cloud Control
application in the apple store or play store.
!
Page 5
App User Manual 2.0
© HMS Industrial Networks S.L.U - All rights reserved
This information is subject to change without notice
URL https://www.intesis.com
4 / 46
1.3 What is needed
In order to use AC Cloud Control system is needed, at least, the following:
• AC Cloud Control device.
Before starting to use the AC Cloud Control system, it is needed to acquire and install (if
the user hasn’t done yet) an AC Cloud Control device1.
• Make sure to buy the right device.
Remember that there are the Universal and the Band Specific Wi-Fi Controllers available
for each manufacturer and type of climate system, check the compatibility.
• Installation and Quick Start Guide
To connect properly the device to the climate system and the Wi-Fi AP/router can be found
inside of the packaging and in our Manuals section as well.
• Internet access2.
The AC Cloud Control devices must be connected to internet using Wi-Fi, therefore make
sure the Wi-Fi signal reaches the device location.
- During registration process.
- During normal working mode.
- To control the device from the App.
• Device with Internet access.
A device with access to Internet is needed (Smartphone or Tablet).
Make sure that mobile data is turned off and Wi-Fi is turned on.
1
AC Cloud Control devices can be purchased in your usual air conditioner or heat pump reseller center or distributor.
2
Costs related with Internet access are not included in the AC Cloud Control price. Ask your Internet Service Provider about the associated
costs of your Internet connection.
Page 6
App User Manual 2.0
© HMS Industrial Networks S.L.U - All rights reserved
This information is subject to change without notice
URL https://www.intesis.com
5 / 46
2. Quick Start Guide
In order to start using the AC Cloud Control system is needed to install the device, register it and
own a user account. Down below, is a step by step guide to guide the user through the process.
1. Device installation
The device installation varies depending on the model, so a printed installation sketch
guide is included in the device box. The installation sheet can be found in our website, on
the technical documentation tab of each product. In addition, is needed the quick start
guide depending of the device, it can be consulted in our website as well
2. User registration
In order to get access to the AC Cloud Control device and its functionalities, a user account
is needed. For detailed user creation information, go to see Section 3.
3. Device registration
Once the device is installed, it must be registered using a user account. Further information
on device registration can be found in Section 4.6 .
4. System configuration
Set the account with the preferred settings: language interface, personal data, device
organization and more. See Section 4 for more details on system settings.
5. System control
See Section 5 for more detail about how to control the climate system and the different
options available according to the climate system.
Page 7

App User Manual 2.0
© HMS Industrial Networks S.L.U - All rights reserved
This information is subject to change without notice
URL https://www.intesis.com
6 / 46
3. Users
To access the system an AC Cloud Control user account is needed. Each user is identified by
the email address or username.
3.1 User Registration
To create a new account, follow the instructions bellow.
1. Go to AC Cloud Control app
2. Click on Login (See Figure 3.1 ).
Figure 3.1 AC Cloud Control login site.
3. Click on Register (See Figure 3.2)
Figure 3.2 User login site.
User ID (Username
or Registration mail)
Password
Password reset
View a demo example
of AC Cloud Control app
Login button
Register
Page 8
App User Manual 2.0
© HMS Industrial Networks S.L.U - All rights reserved
This information is subject to change without notice
URL https://www.intesis.com
7 / 46
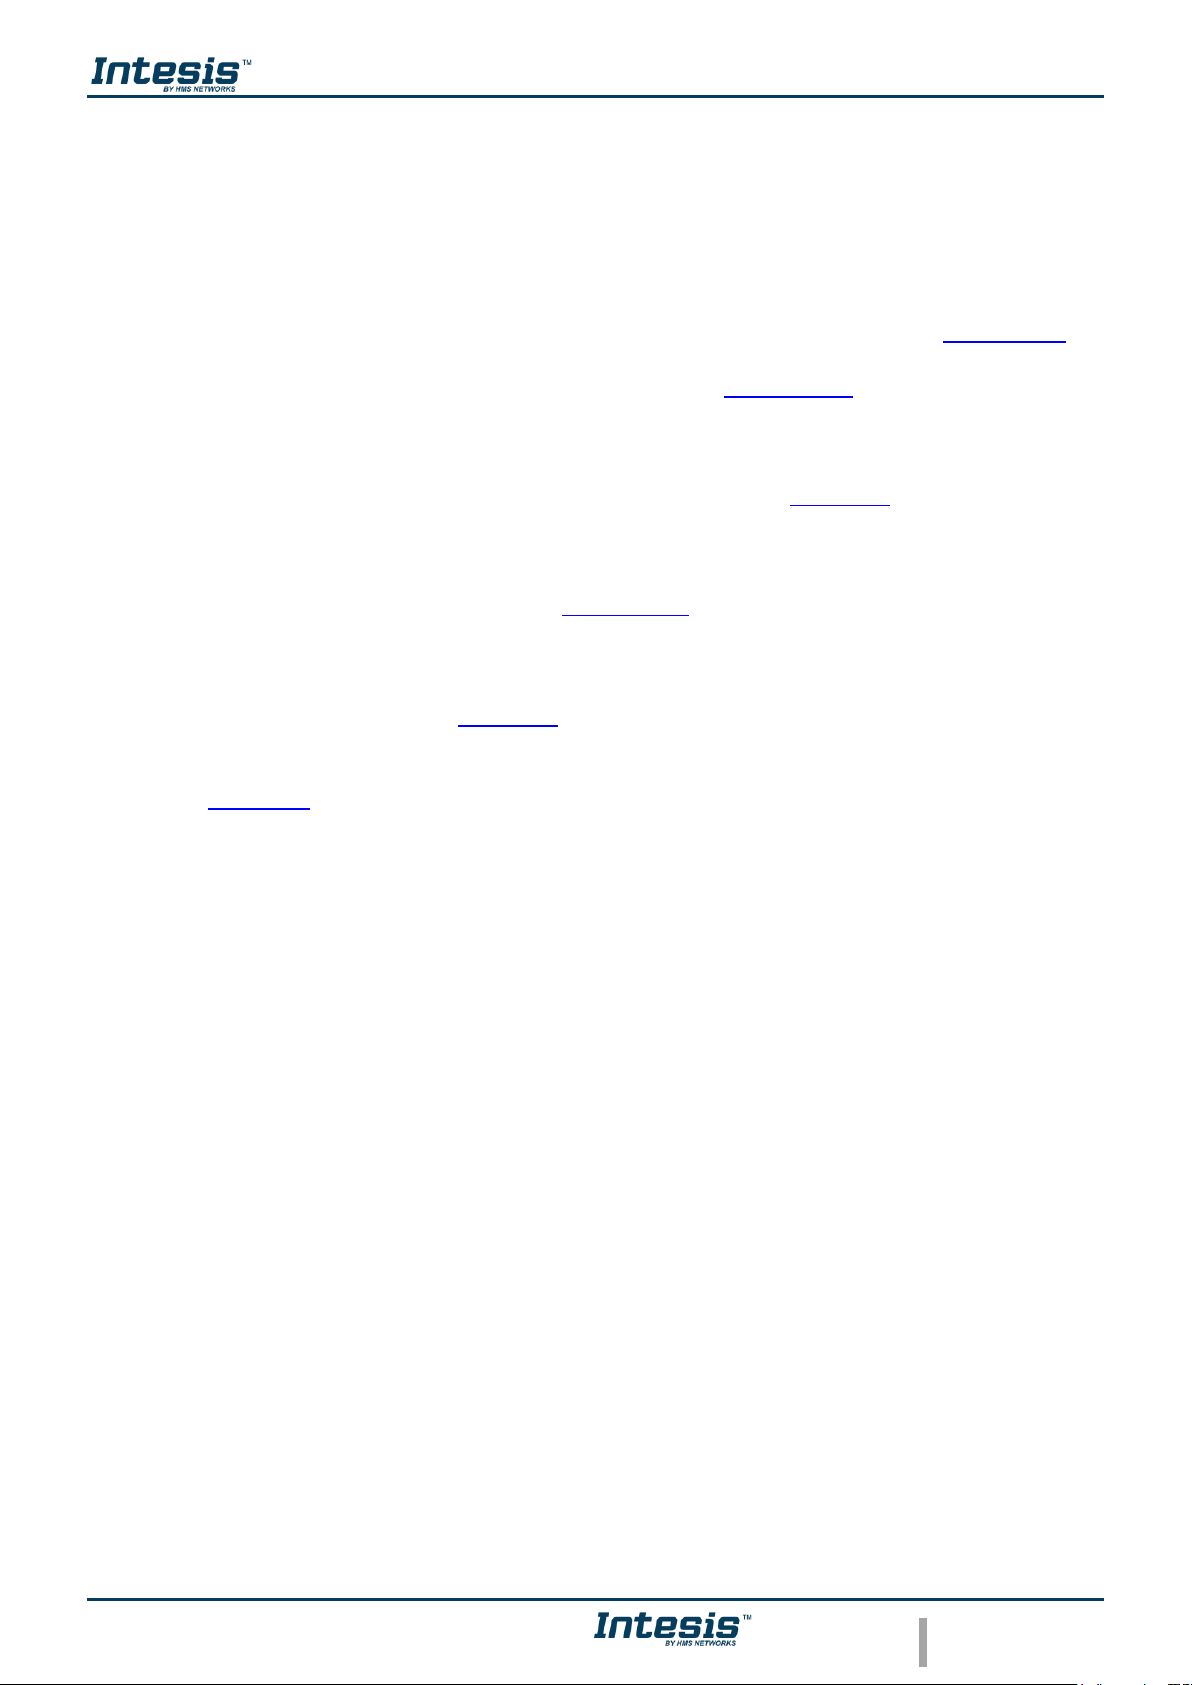
4. Fill the form with proper personal data3 (Fields which have not written (optional) are
mandatory) and accept terms and conditions (See Figure 3.3). Click on Register
Figure 3.3 User registration form.
The personal information entered in this form can be modified afterwards. More information
regarding this matter can be found in Section 4.4
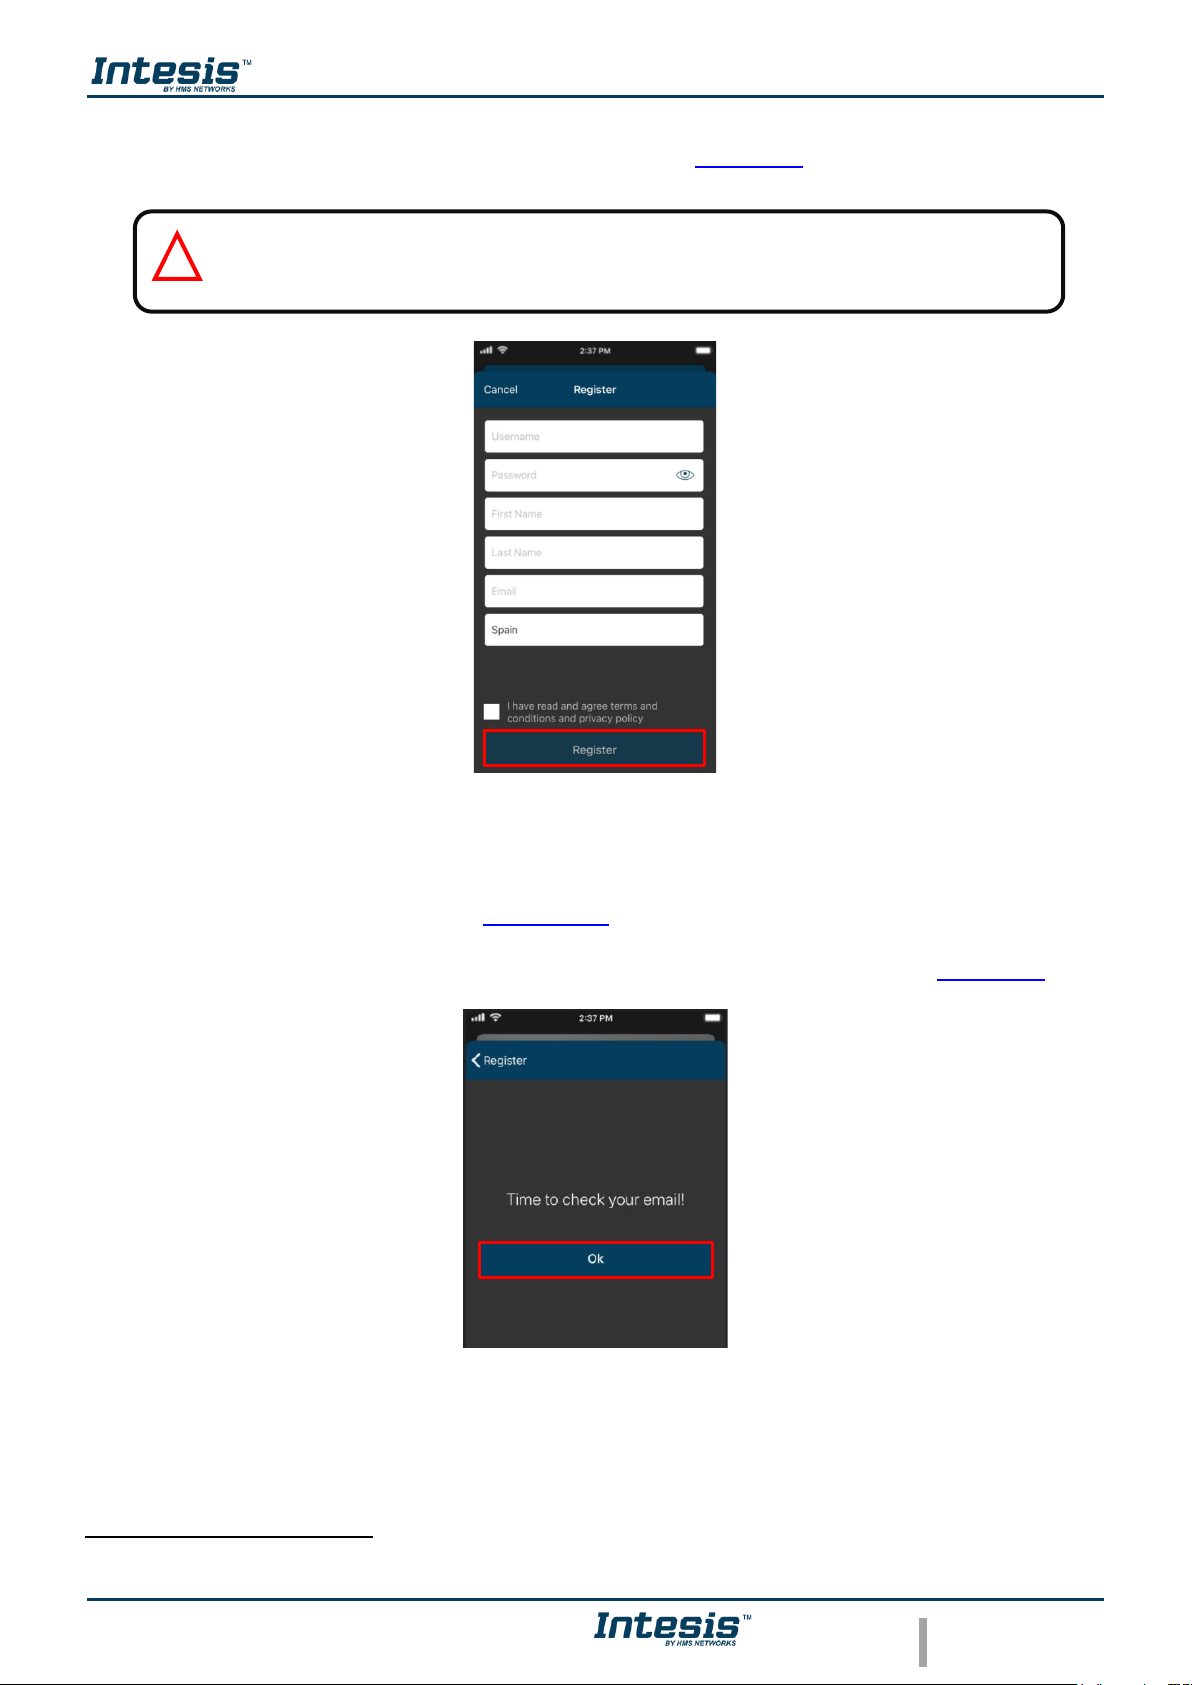
5. A validation e-mail will be sent to the e-mail registered. Click on OK (See Figure 3.4).
Figure 3.4 Register procedure finished.
6. Check the inbox and follow the instructions in the validation e-mail to finish the registering
process.
3
All personal data will be treated as specified in the Terms and Conditions document.
Note: The password must be 6 characters long, must include an uppercase character,
one lowercase character, one number and a symbol.
!
Page 9
App User Manual 2.0
© HMS Industrial Networks S.L.U - All rights reserved
This information is subject to change without notice
URL https://www.intesis.com
8 / 46
The link sent to the e-mail will validate the email account, and therefore activate it
3.2 App login
A valid user account is needed to login to the AC Cloud Control.
1. Go to AC Cloud Control app, tap on Login (See Figure 3.1).
2. Type the user name or the registered e-mail and password on the corresponding fields,
tap on Login button (See Figure 3.2).
3.3 Password Reset
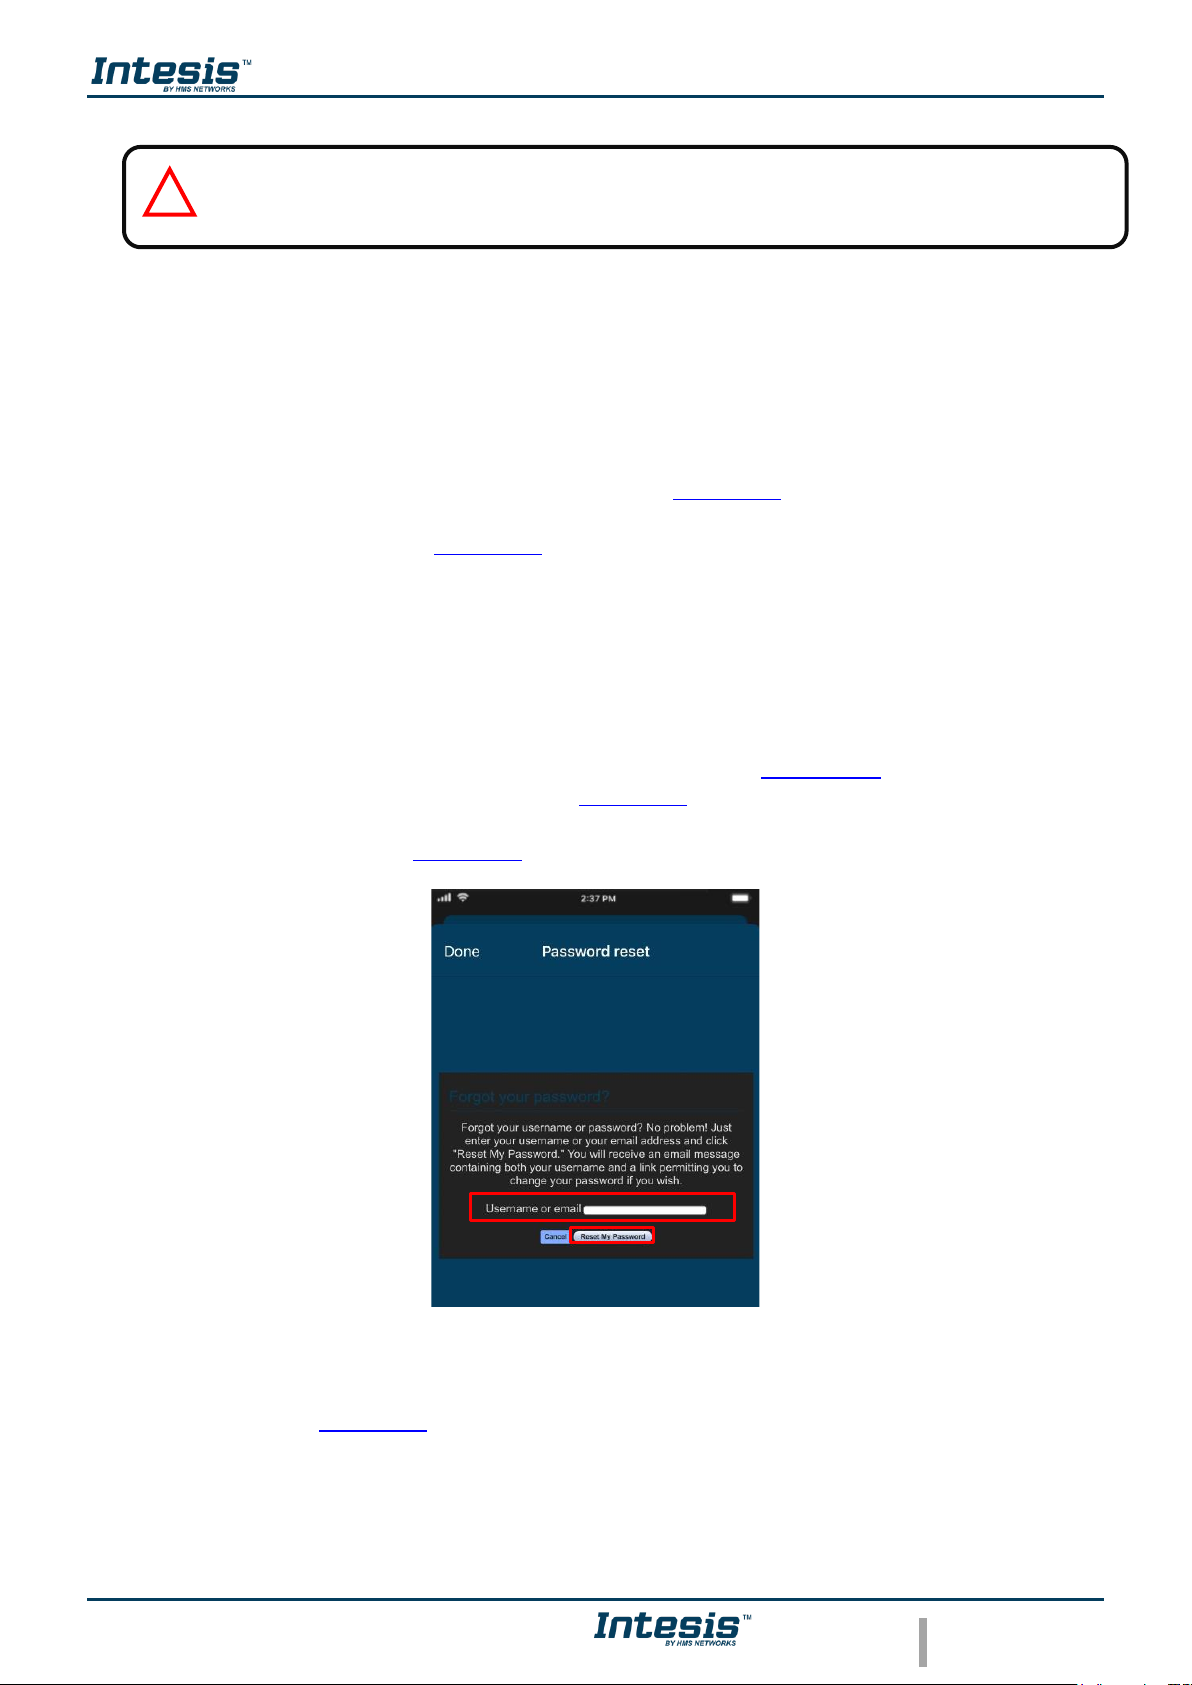
In case the user wants to change the password or do not remember it.
There are 2 ways to reset the password
1. Go to Settings, Password. For more information go to Section 4.4
2. Tap on Forgot your Password? (See Figure 3.4).
Enter the e-mail address (See Figure 3.5) Tap on Reset My Password.
Figure 3.5 Password reset requesting site.
If the entered email corresponds with an existing user, an e-mail will be sent to the user for
password reset. (See Figure 3.6).
Note: If no e-mail notification is received, please make sure that you entered correctly your
e-mail address and/or check that the e-mail notification is not in the Junk or Trash
folder of
the e-mail account.
!
Page 10
App User Manual 2.0
© HMS Industrial Networks S.L.U - All rights reserved
This information is subject to change without notice
URL https://www.intesis.com
9 / 46
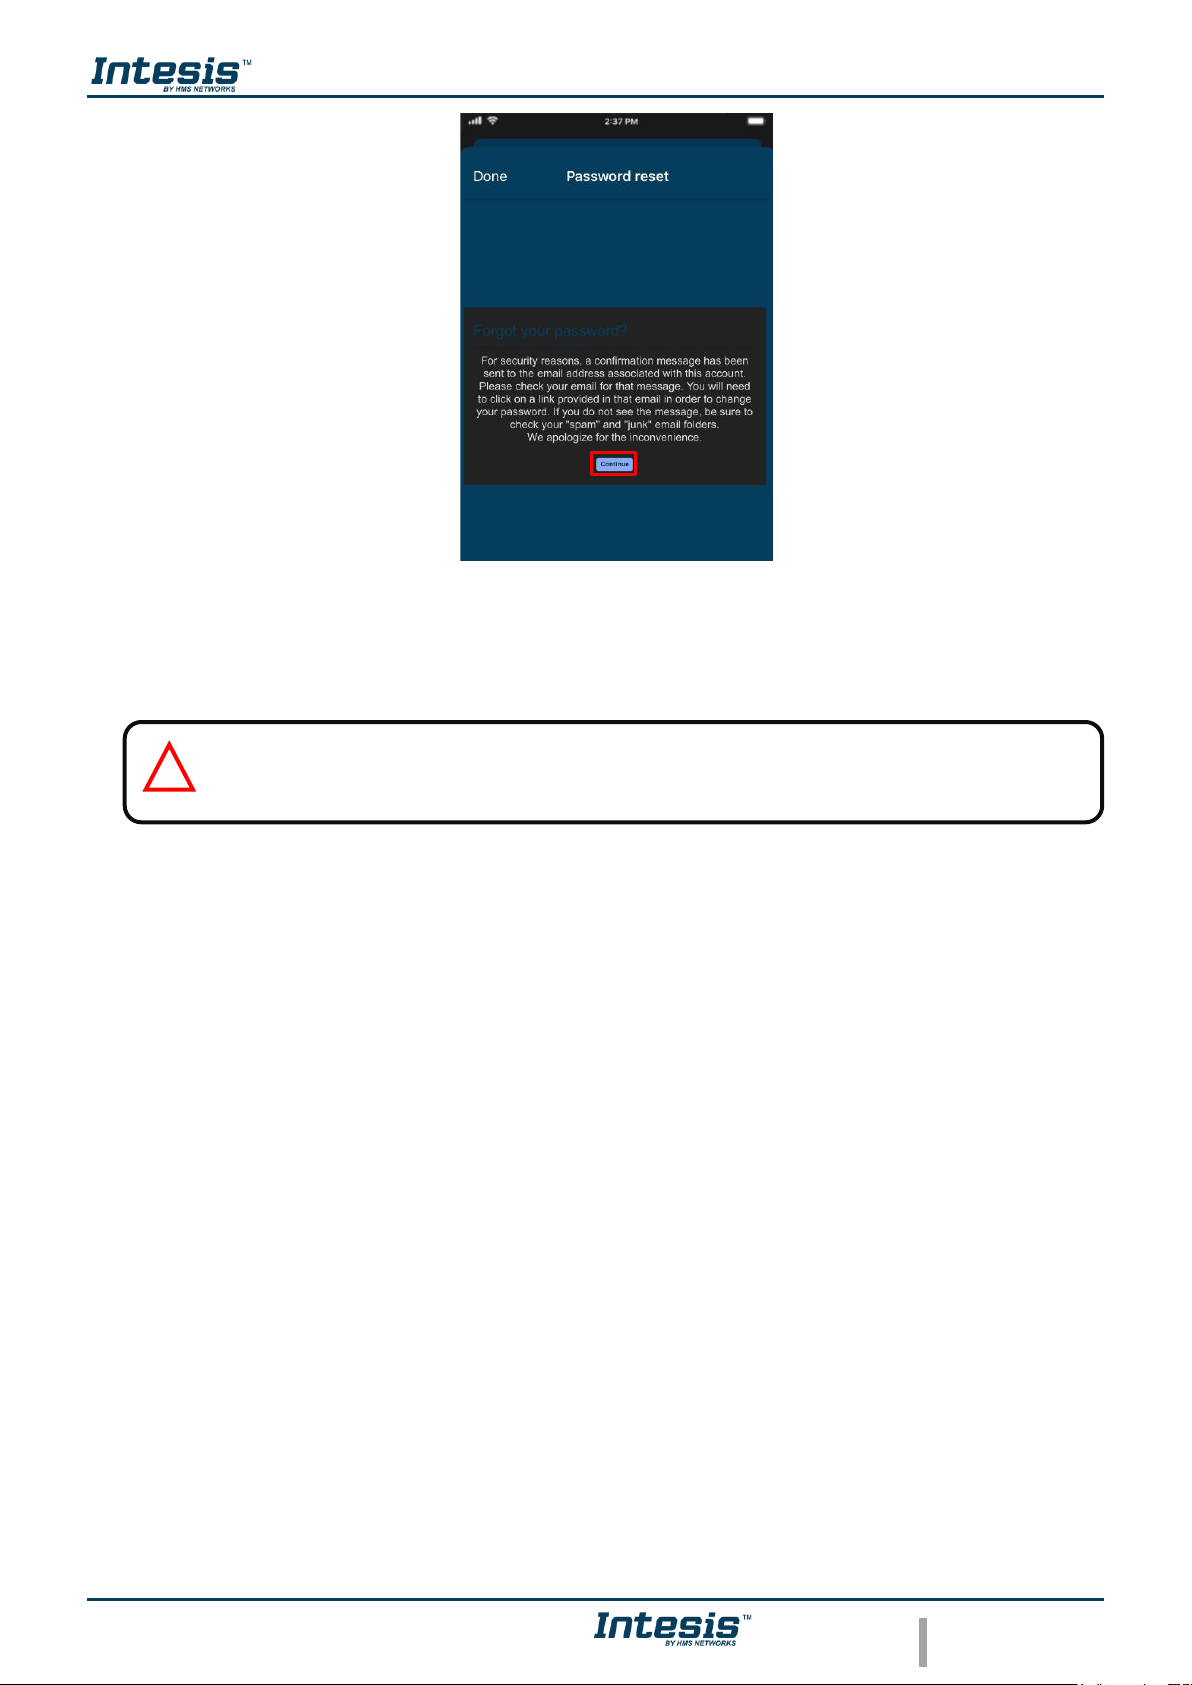
Figure 3.6 AC Cloud Control password reset.
Check the email inbox and follow the instructions for password reset.
The link sent to the e-mail will lead the user to a site where the new password can be changed
Note: If no e-mail notification is received, make sure that the e-mail address entered is
correct and/or check that the e-mail notification is not in the Junk or Trash folder of the e-
mail account.
!
Page 11
App User Manual 2.0
© HMS Industrial Networks S.L.U - All rights reserved
This information is subject to change without notice
URL https://www.intesis.com
10 / 46
4. Settings
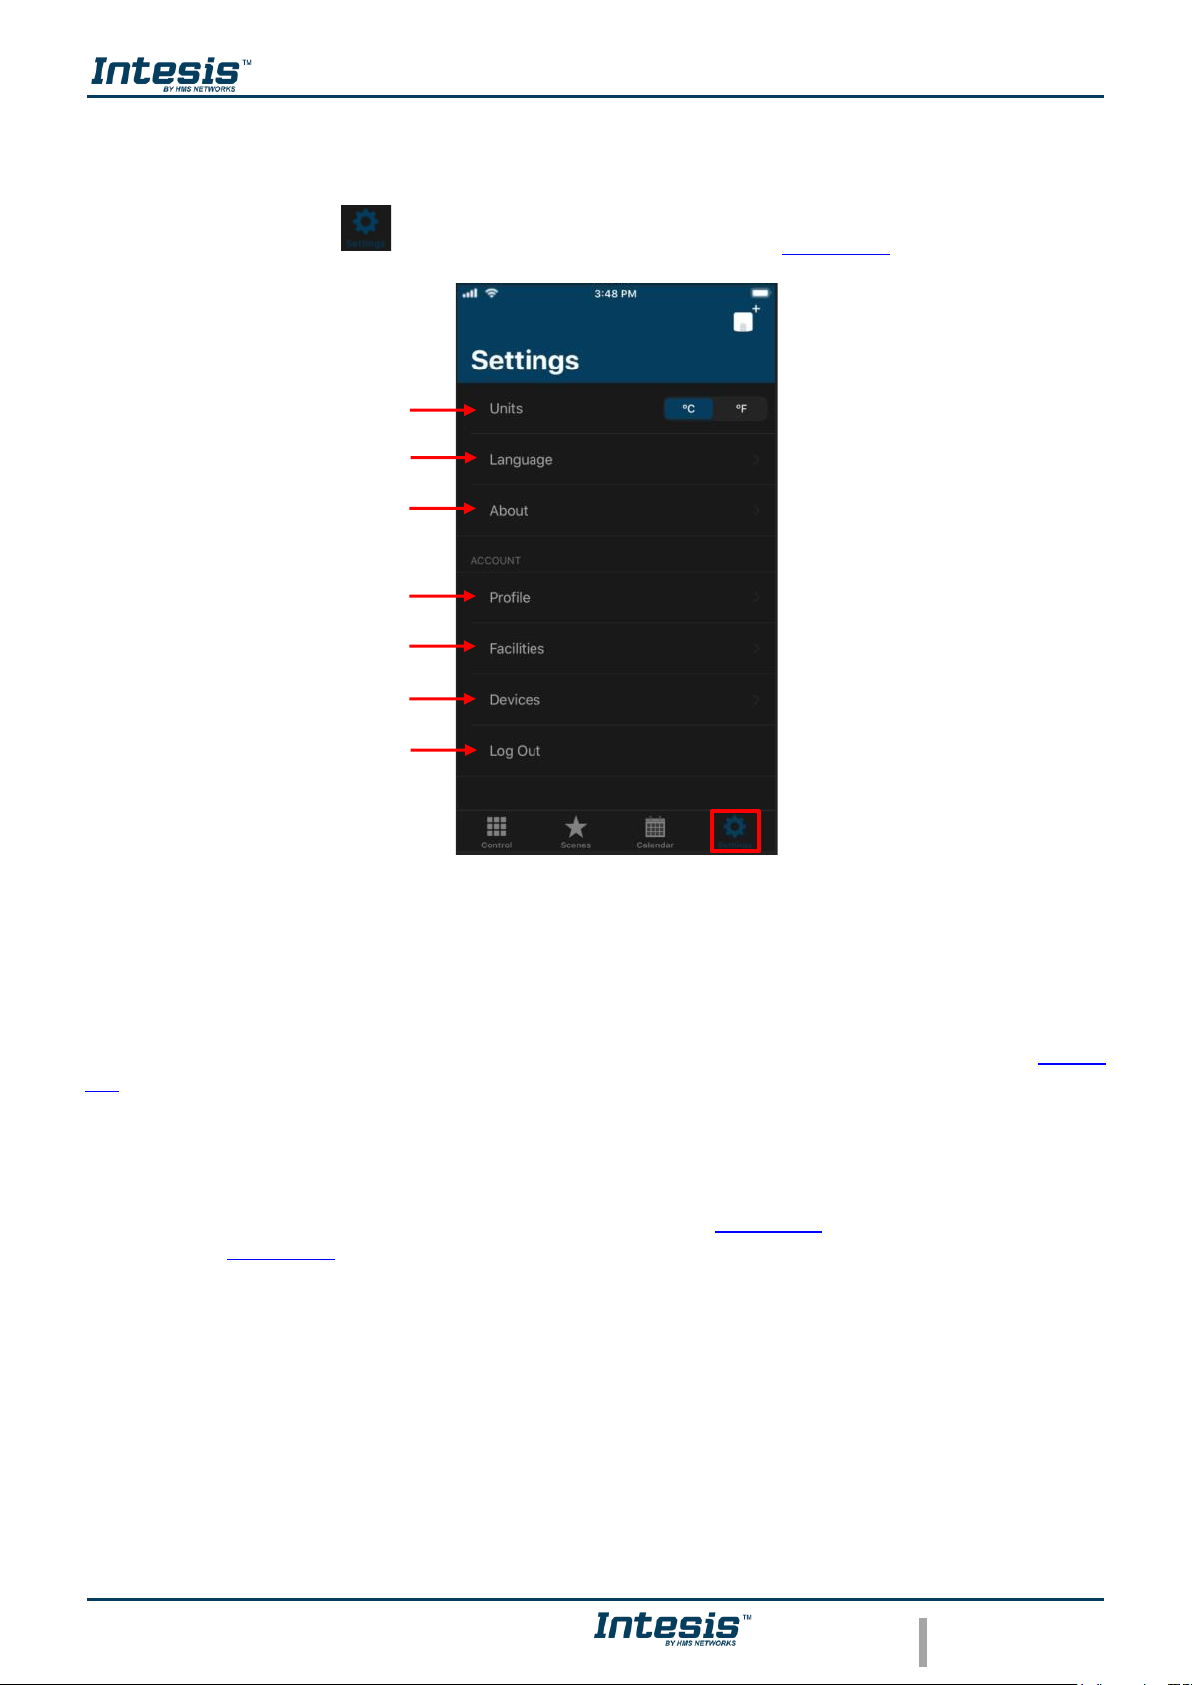
The system general and device configuration options can be found in the Settings menu
Tap on Settings button to access to configuration site (See Figure 4.1).
Figure 4.1 Access to Settings from AC Cloud Control menu.
4.1 Units
To change the units of temperature (Celsius or Fahrenheit) tap on the unit wanted (See Figure
4.1).
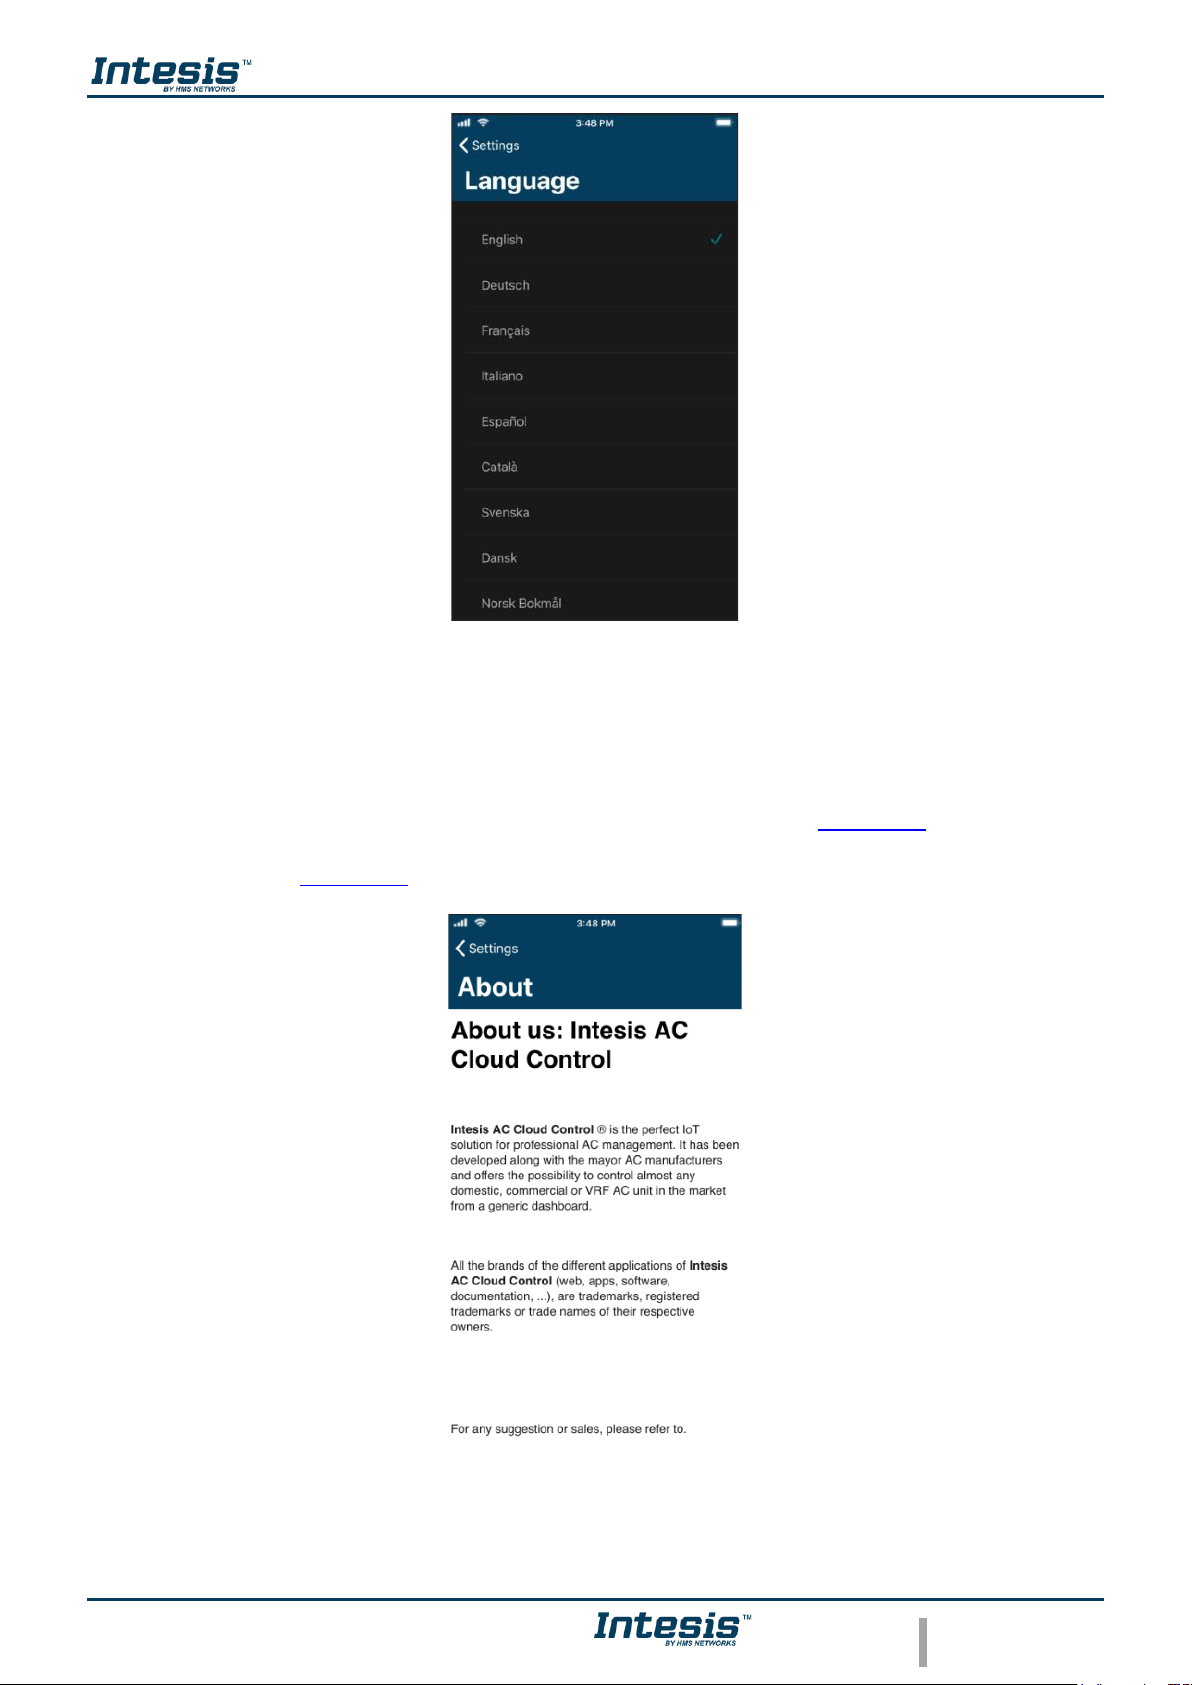
4.2 Language
To change the language of the App, tap on Language (See Figure 4.1).Then, press the language
wanted (See Figure 4.2).
Units
Language
About
Profile
Facilities
Devices
Log Out
Page 12
App User Manual 2.0
© HMS Industrial Networks S.L.U - All rights reserved
This information is subject to change without notice
URL https://www.intesis.com
11 / 46
Figure 4.2 Language site.
4.3 About
Information regarding to AC Cloud Control system can be seen (See Figure 4.3).
Tap on About (See Figure 4.1).
Figure 4.3 About AC Cloud Control site.
Page 13
App User Manual 2.0
© HMS Industrial Networks S.L.U - All rights reserved
This information is subject to change without notice
URL https://www.intesis.com
12 / 46
4.4 Profile
Interface preferences regarding to personal data and account configuration can be seen and
modified.
• To edit the personal data, tap on Profile (See Figure 4.1). Type on the fields wanted (See
Figure 4.4). Tap on Update.
Figure 4.4 Profile AC Cloud Control site.
• There are 2 ways to reset the password
1. Go to the login site, tap on Forgot your Password? For more information go to Section
3.3
2. Tap on Update located beside the password field (See Figure 4.4).
A pop-up window will be shown with instructions to continue with the procedure (See Figure 4.5)
Tap on Reset Password. An e-mail will be sent to the user for password reset.
Figure 4.5 Reset Password site.
Page 14
App User Manual 2.0
© HMS Industrial Networks S.L.U - All rights reserved
This information is subject to change without notice
URL https://www.intesis.com
13 / 46
Check the email inbox and follow the instructions for password reset.
The link sent to the e-mail will lead the user to a site where the new password can be changed
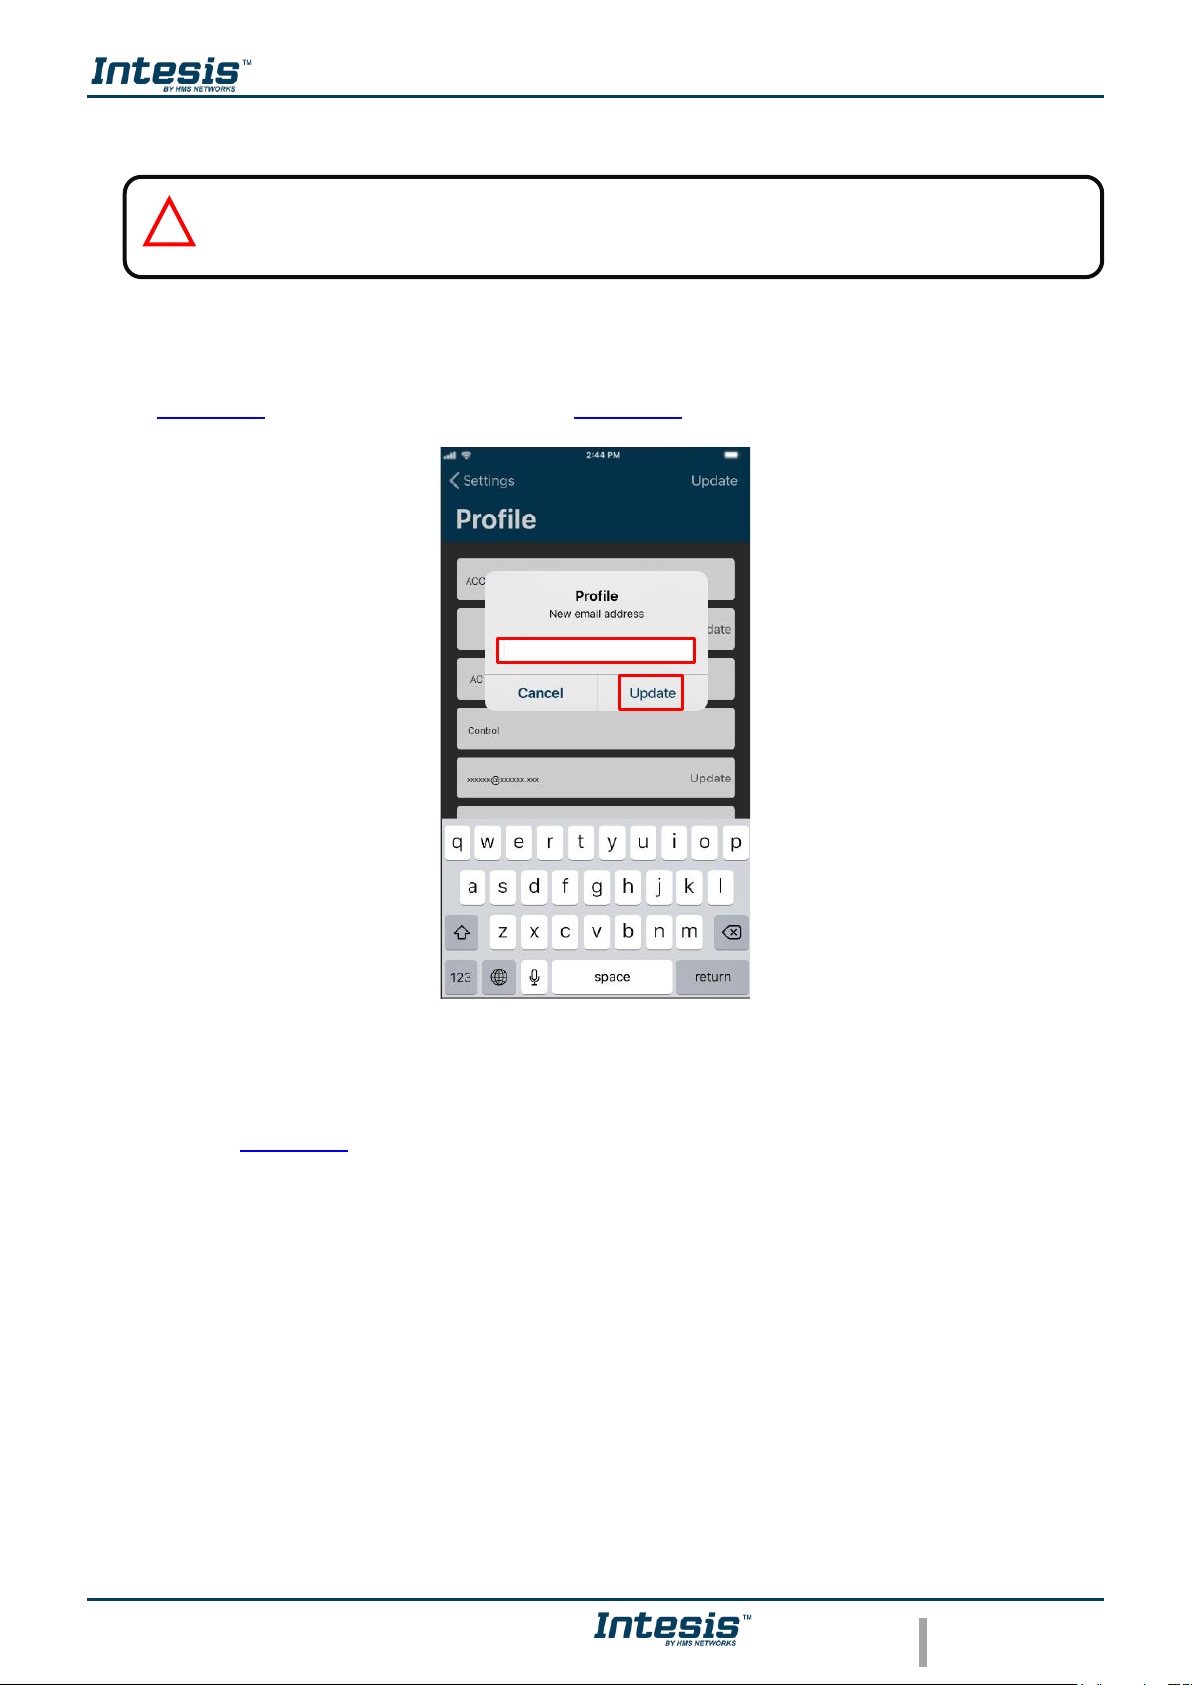
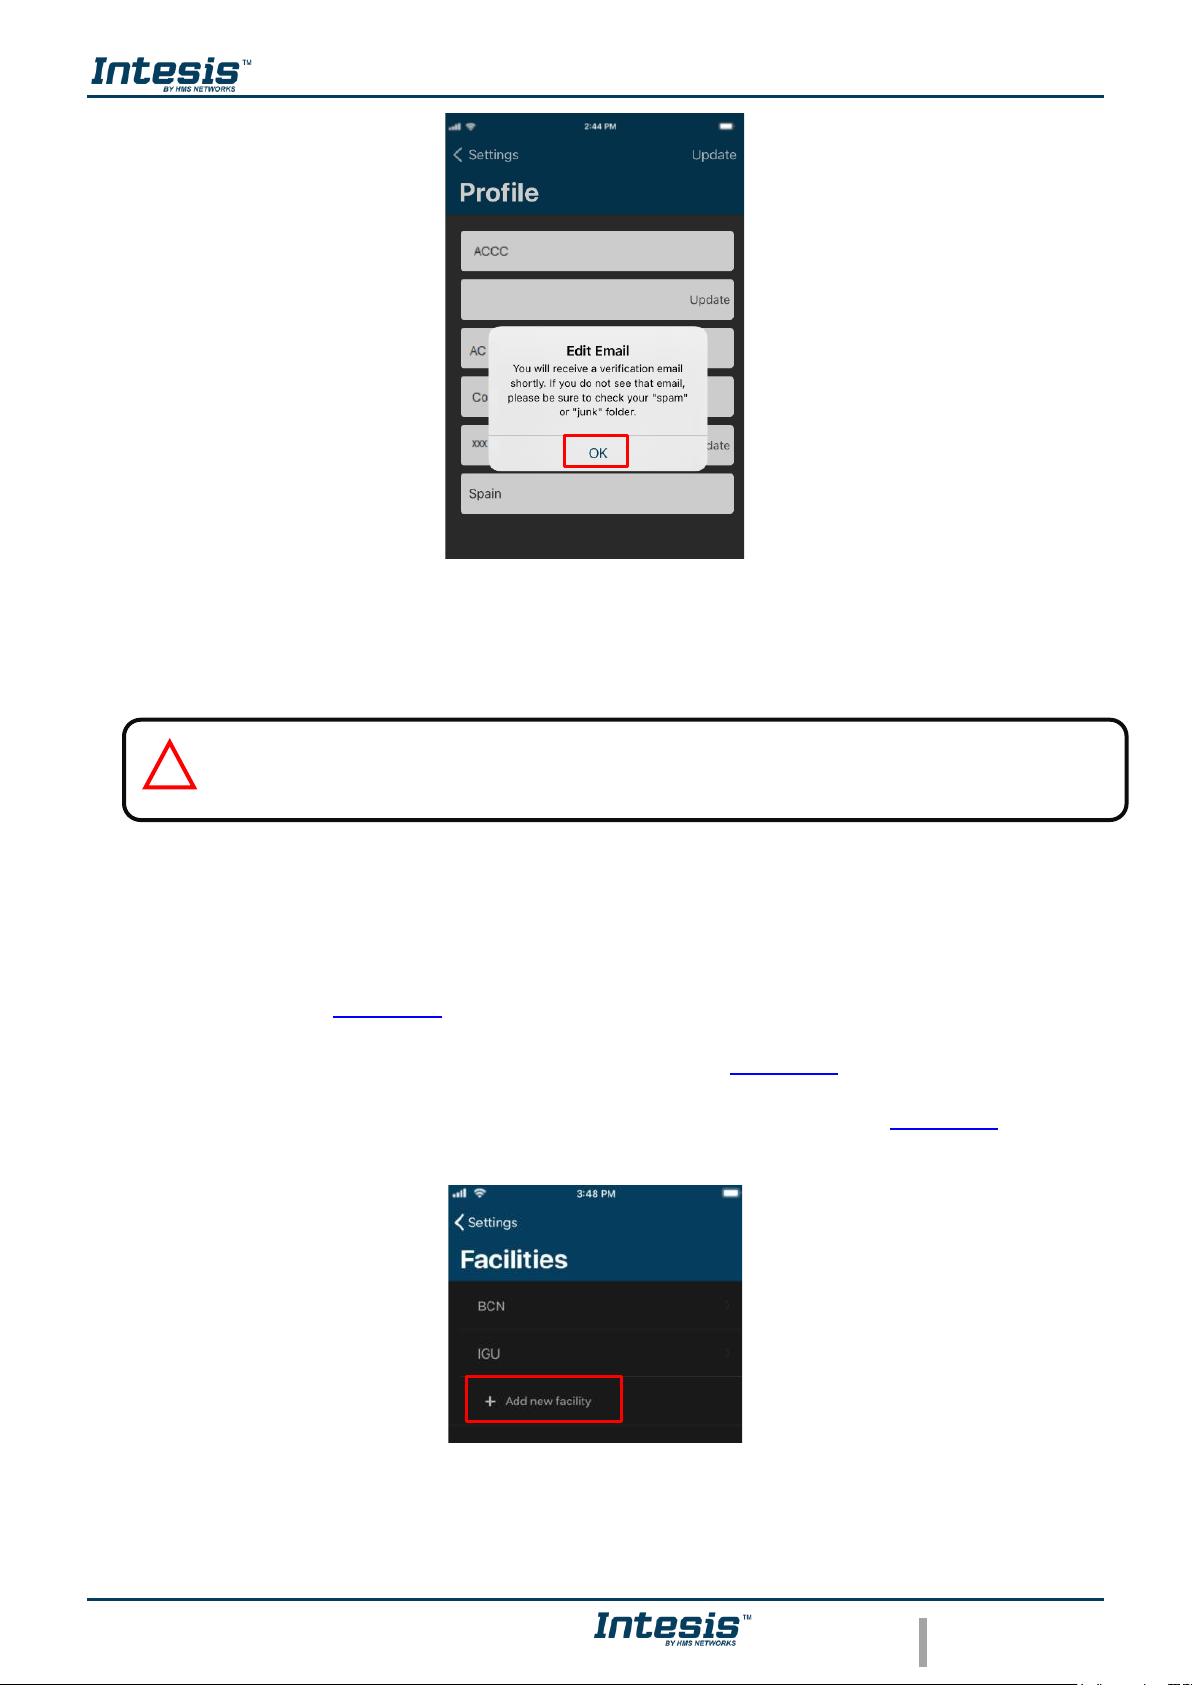
• To change the e-mail address, tap on Update located beside the e-mail field (See
Figure 4.4). Enter the new e-mail (See Figure 4.6). Tap on Update.
Figure 4.6 Change e-mail address.
A pop-up window will be shown informing that a verification e-mail has been sent to the
account (See Figure 4.7) Tap on OK.
Note: If no e-mail notification is received, make sure that the e-mail address entered is
correct and/or check that the e-mail notification is not in the Junk or Trash folder of the e-
mail account.
!
Page 15
App User Manual 2.0
© HMS Industrial Networks S.L.U - All rights reserved
This information is subject to change without notice
URL https://www.intesis.com
14 / 46
Figure 4.7 Verification e-mail sent.
Check the inbox and follow the instructions in the validation e-mail to finish the process.
The link sent to the e-mail will validate the email account, and therefore activate it
4.5 Facilities
Tap on Facilities (See Figure 4.1).
• To add a new facility, tap on “Add new facility” (See Figure 4.8). Type the information of
it and set the accurate Time zone for the location of the AC Cloud Control device. The time
zone of the facility will be used to create Scenes and Calendar (See Figure 4.9). Click on
Add Facility.
Figure 4.8 Facility site.
Note: If no e-mail notification is received, please make sure that you entered correctly your
e-mail address and/or check that the e-mail notification is not in the Junk or Trash
folder of
the e-mail account.
!
Page 16

App User Manual 2.0
© HMS Industrial Networks S.L.U - All rights reserved
This information is subject to change without notice
URL https://www.intesis.com
15 / 46
Figure 4.9 Add facility.
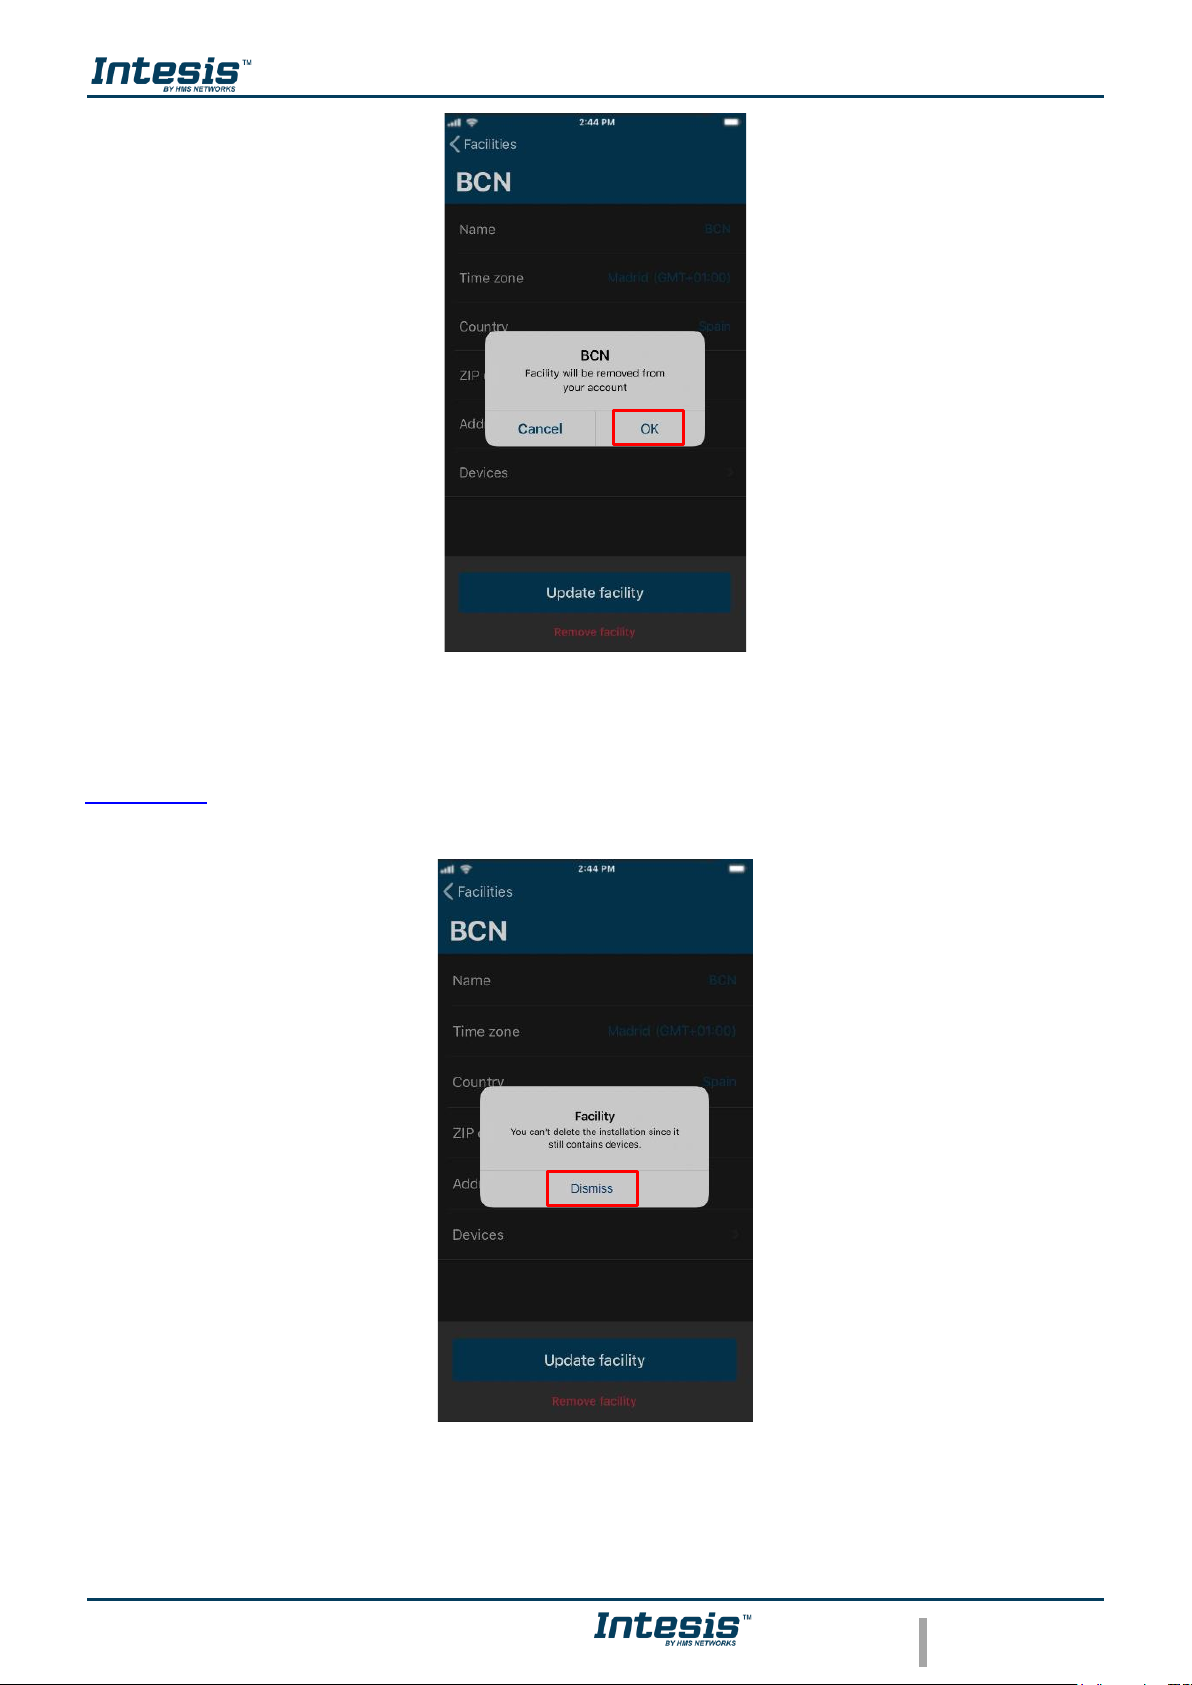
• To edit a facility, tap on the facility wanted. Then, change the information wanted and tap
on Update facility (See Figure 4.10).
• To remove facility, tap on the facility wanted. Then, tap on Remove facility (See Figure
4.10).
Figure 4.10 Facility information.
In case the facility is empty without any zone and/or devices on it a pop-up window will be shown
asking to confirm the procedure (See Figure 4.11). Click on OK.
Page 17
App User Manual 2.0
© HMS Industrial Networks S.L.U - All rights reserved
This information is subject to change without notice
URL https://www.intesis.com
16 / 46
Figure 4.11 Remove Facility.
Otherwise, a pop-up window will be shown telling that is not possible remove the facility (See
Figure 4.12). Make sure to remove devices and zones of it before erase the facility. Click on
Dismiss.
Figure 4.12 Error deleting Facility.
Page 18
App User Manual 2.0
© HMS Industrial Networks S.L.U - All rights reserved
This information is subject to change without notice
URL https://www.intesis.com
17 / 46
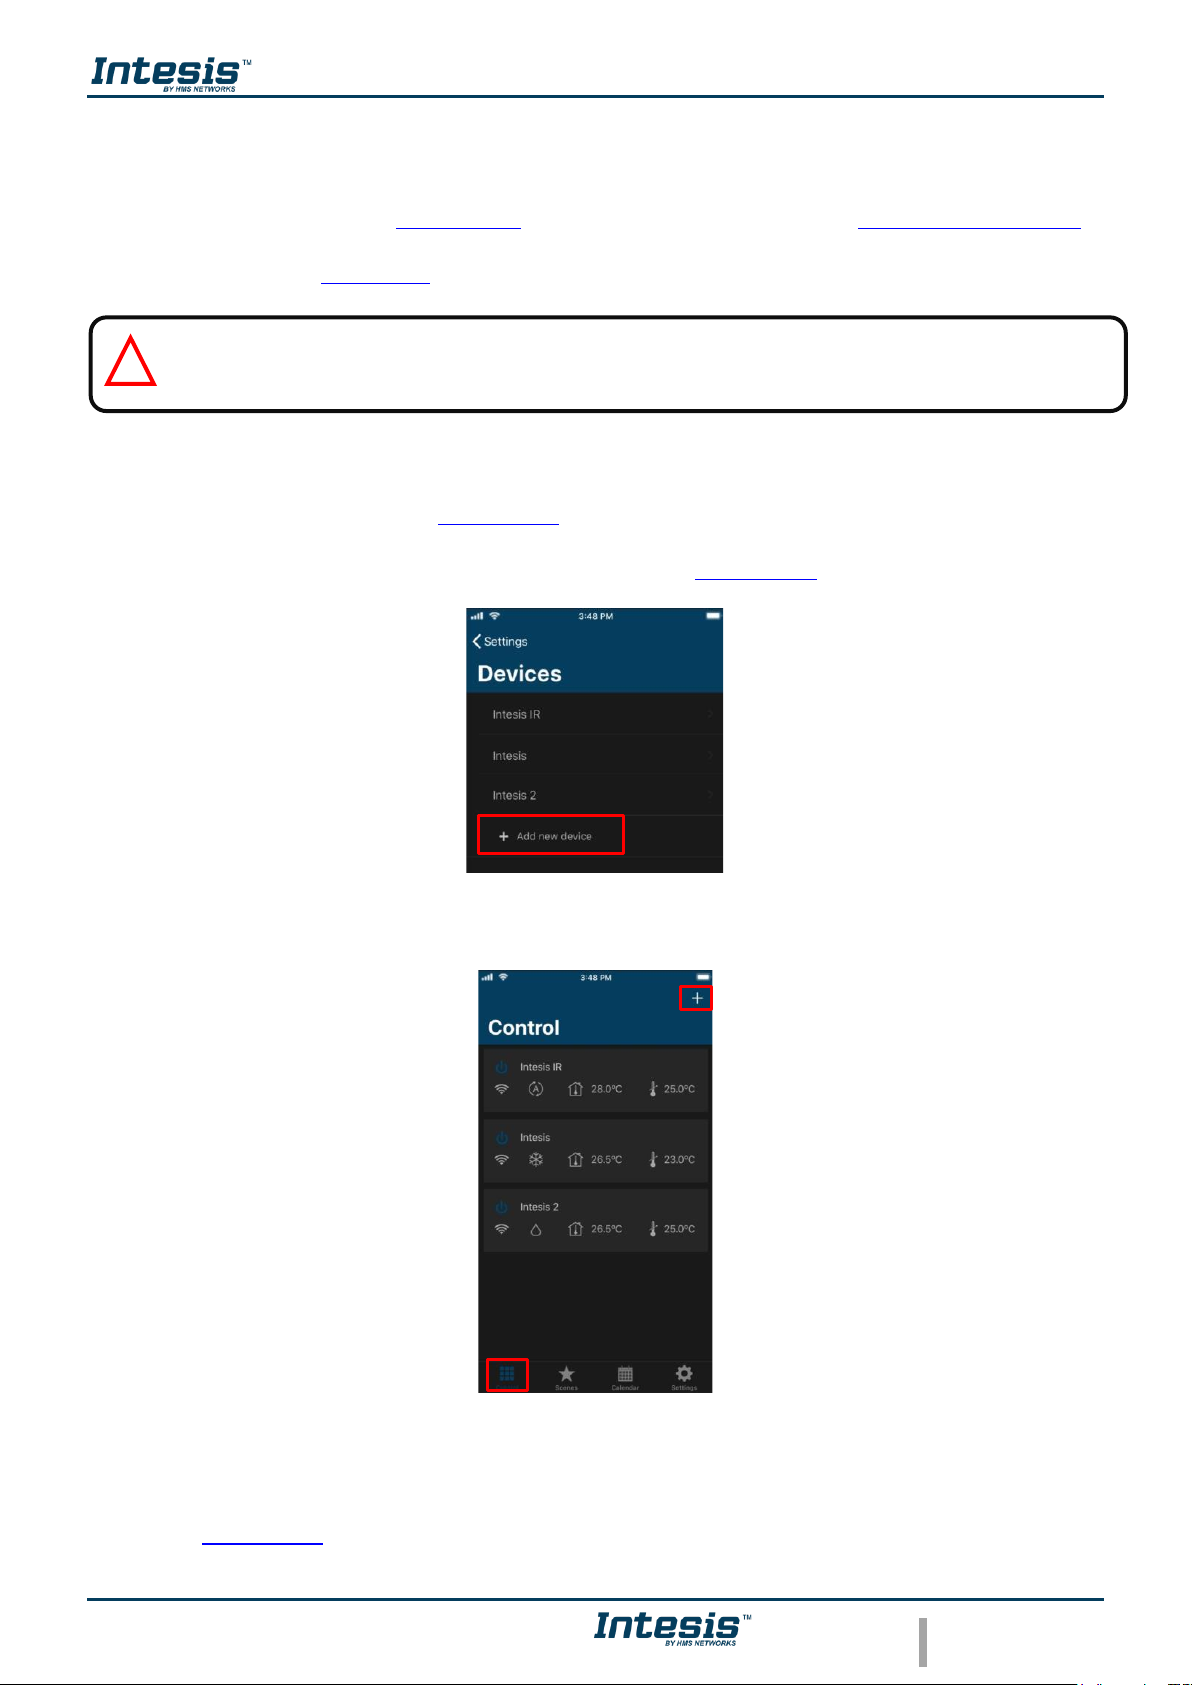
4.6 Devices
AC Cloud Control device registration process must be done after the user registration. Further
information can be found in Section 3.1 and the device configuration (Device Configuration).
Tap on Devices (See Figure 4.1).
• There are 2 ways to add an AC Cloud Control Device:
1. Click on add device (See Figure 4.13).
2. The device register process can be done through the control, tap on Control icon and in
the + button located on top, next to control (See Figure 4.14).
Figure 4.13 Devices site.
Figure 4.14 Add devices from control site.
Scan the bar code in a withe sticker in the packaging or tap on Manually to type the registration
code (See Figure 4.15).
Important: Make sure that to have the AC Cloud Control Quick Start Guide (with the registration
code on it) to proceed correctly with the registration process. Also, it can be found in the front
cover of the manual or on the silver label on the back of AC Cloud Control
Page 19

App User Manual 2.0
© HMS Industrial Networks S.L.U - All rights reserved
This information is subject to change without notice
URL https://www.intesis.com
18 / 46
Figure 4.15 Add device scanning the bar code.
Type the 25 characters code to link the AC Cloud Control device. then, tap on Add device
button (See Figure 4.16).
Figure 4.16 Type 25 characters of AC Cloud Control device.
If the code or procedure has any mistake, one of the following errors will be shown in a popup window.
- “Device not connected.”
AC Cloud Control device needs to be connected to the Internet at least once before
registering it to an account. In case it hadn´t been connected yet, a pop-up window will be
shown (See Figure 4.17).
Page 20

App User Manual 2.0
© HMS Industrial Networks S.L.U - All rights reserved
This information is subject to change without notice
URL https://www.intesis.com
19 / 46
Figure 4.17 Device not connected.
- “Please check all entered information is correct and that all fields are filled in.”
If in the code registration is typed a wrong character, a pop-up window will be shown.
Double check the code and type the correct one (See Figure 4.18).
Figure 4.18 Please check all entered information is correct and that all fields are filled in.
- “Device already assigned.”
If the AC Cloud Control device is already added to an account, a pop-up window will
be shown (See Figure 4.19). Contact the previous user of the device and ask to remove
it from his/her account in order to add it into the account wanted. In case the previous
user can’t be located, contact https://mysupport.hms.se/
Page 21

App User Manual 2.0
© HMS Industrial Networks S.L.U - All rights reserved
This information is subject to change without notice
URL https://www.intesis.com
20 / 46
Figure 4.19 Device already assigned.
- If less than 5 characters are entered in any field the process will not continue.
If the code is correct a screen with the details of the device will be shown (See Figure 4.20).
Figure 4.20 Add new device.
• To configure the new AC Cloud Control device, tap on Edit device (See Figure 4.20).
Page 22

App User Manual 2.0
© HMS Industrial Networks S.L.U - All rights reserved
This information is subject to change without notice
URL https://www.intesis.com
21 / 46
Figure 4.21 New device information.
- To change the name of the device, tap on Name (See Figure 4.21). Type the name (See
Figure 4.22). Tap on OK
Figure 4.22 Type the name of the device.
- Tap Subfamily-Model (See Figure 4.22). Select the brand of the air conditioner (See
Figure 4.23). Then, choose the model (See Figure 4.24). Tap on Update Subfamily-
Model.
Page 23

App User Manual 2.0
© HMS Industrial Networks S.L.U - All rights reserved
This information is subject to change without notice
URL https://www.intesis.com
22 / 46
Figure 4.23 Choose the brand of the Air Conditioner.
Figure 4.24 Select the Model of the Air Conditioner.
Make sure to select the right indoor Air Conditioner model or heat pump4 as it defines the
device functionalities. Not selecting the right model could lead to a misbehavior of the system.
When the configuration is done tap on OK (See Figure 4.20).
4
Device model is typically in the label under de air conditioner or heat pump indoor unit. If you cannot find it, contact your installer/distributor. If
the device model cannot be obtained anyway use the DEFAULT option. Extra functions not available for your indoor unit might appear on the
control screens but will not be executed by your indoor unit.
Page 24

App User Manual 2.0
© HMS Industrial Networks S.L.U - All rights reserved
This information is subject to change without notice
URL https://www.intesis.com
23 / 46
• To edit an AC Cloud Control device, tap on the device wanted (See Figure 4.13). Then,
tap on Edit device (See Figure 4.25).
Figure 4.25 Edit device.
- To change the name and subfamily-model, follow the previous steps. (See Figure 4.21).
(See Figure 4.22). and (See Figure 4.23), (See Figure 4.24).
Figure 4.26 Edit device information.
- To change the facility of the device, tap on Facility (See Figure 4.26). Select the facility
(See Figure 4.27). Tap on Update Facility
Page 25

App User Manual 2.0
© HMS Industrial Networks S.L.U - All rights reserved
This information is subject to change without notice
URL https://www.intesis.com
24 / 46
Figure 4.27 Edit device Facility.
When the configuration is done tap on Devices (See Figure 4.26).
• To remove an AC Cloud Control device, tap on the device wanted (See Figure 4.13). Then,
tap Remove device (See Figure 4.25). A pop-up window will be shown asking to confirm
the procedure (See Figure 4.28). Tap on OK.
Figure 4.28 Remove device.
4.7 Log Out
Click on Log Out (See Figure 4.1). A pop-up window will be shown asking to confirm the
procedure (See Figure 4.29). Tap on Log Out.
Page 26

App User Manual 2.0
© HMS Industrial Networks S.L.U - All rights reserved
This information is subject to change without notice
URL https://www.intesis.com
25 / 46
Figure 4.29 Log Out.
Page 27
App User Manual 2.0
© HMS Industrial Networks S.L.U - All rights reserved
This information is subject to change without notice
URL https://www.intesis.com
26 / 46
5. Control
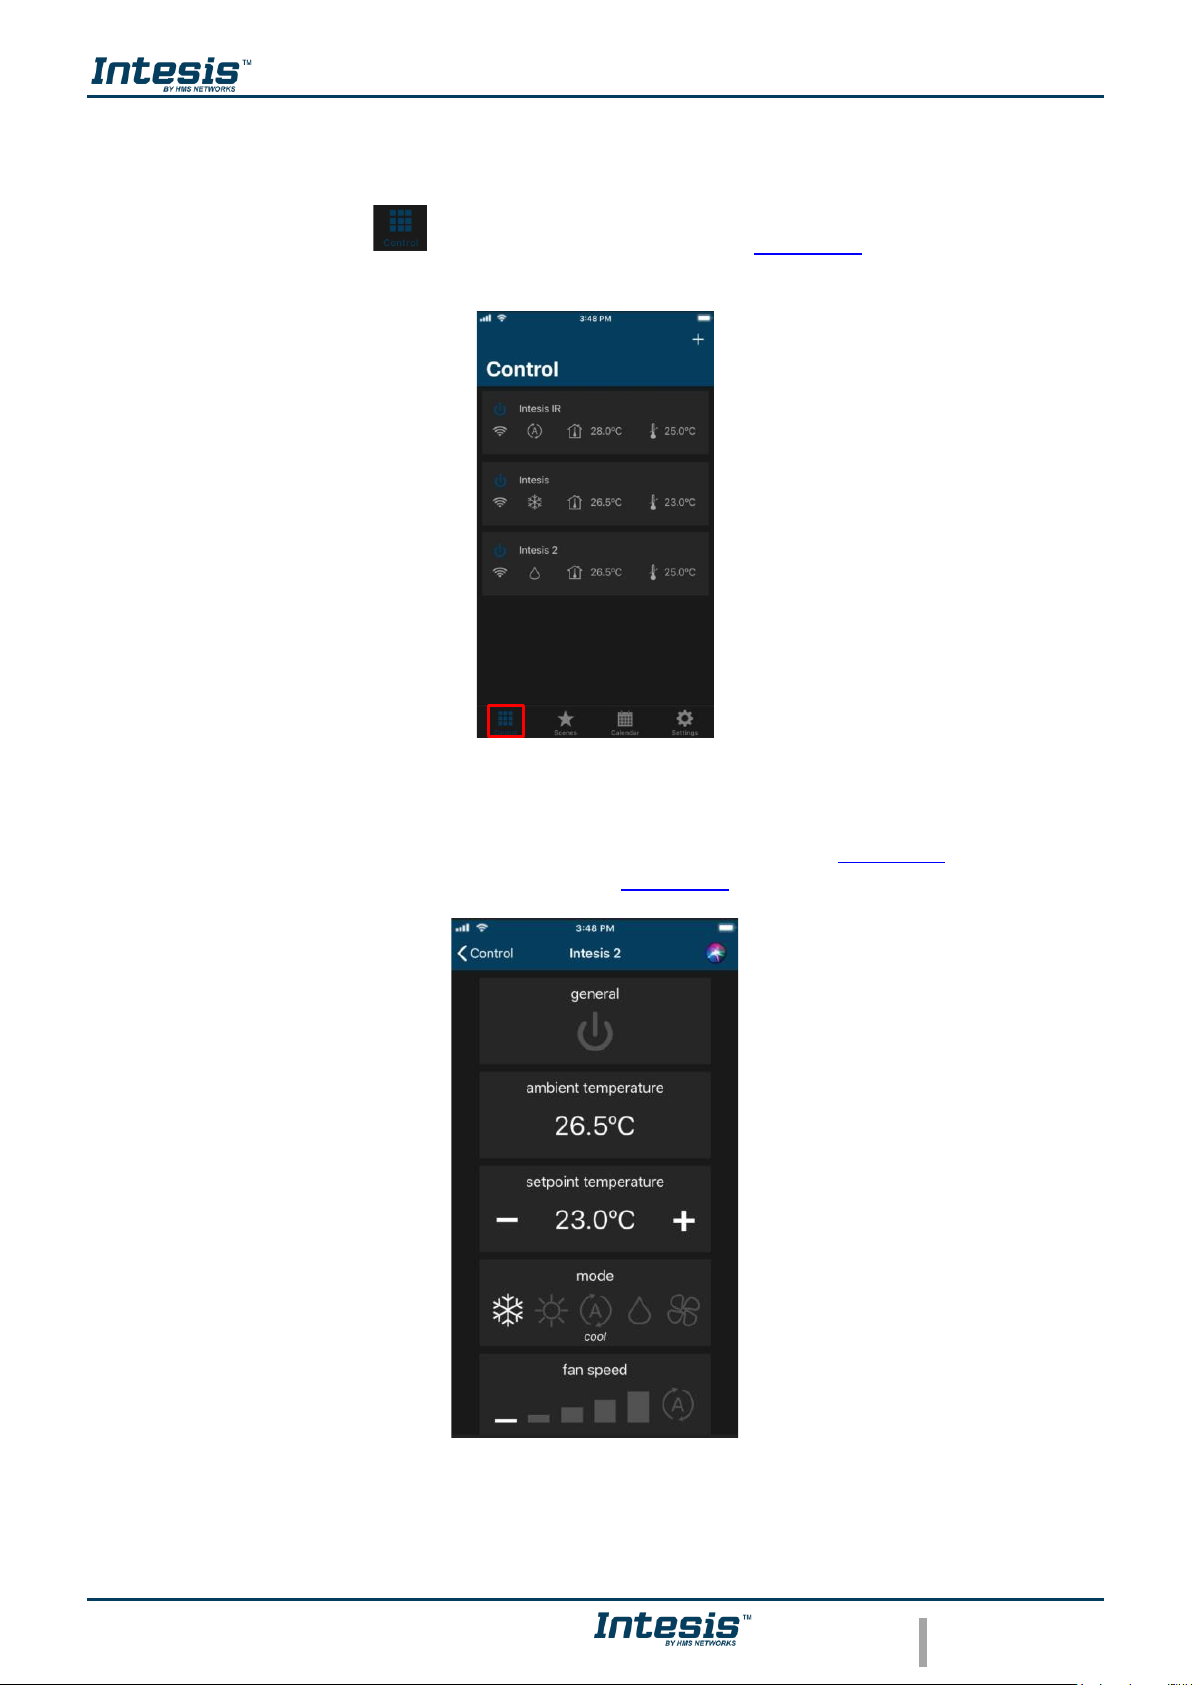
In the control dashboard the user will have access to all devices and the corresponding widgets.
Tap on the Control button to access to control site (See Figure 5.1). Devices linked to the
account will be shown listed
Figure 5.1 Access to Control from AC Cloud Control menu.
To send command to the climatize unite, tap on the device wanted (See Figure 5.1). The available
widgets to control the devices will be shown. (See Figure 5.2).
Figure 5.2 Widgets available in the device.
Page 28

App User Manual 2.0
© HMS Industrial Networks S.L.U - All rights reserved
This information is subject to change without notice
URL https://www.intesis.com
27 / 46
In the square of the device, are shown some icons, which are the summary of its status or possible
status (See Figure 5.3)
Figure 5.3 Status summary of devices.
In case the device is not working properly, a warning signal will appear next to the device
name. Click on the signal to have details of it (See Figure 5.4).
Figure 5.4 Error code and details.
In case the Wi-Fi signal appear in red, it means that the device doesn’t have connectivity with the
system (See Figure 5.5). It can be caused by a Wi-Fi problem or that the device is not powered
up. Check the FAQ section in our website (https://www.intesis.com/support/ac-cloud-control-faq/)
for further information.
Figure 5.5 Device without connectivity.
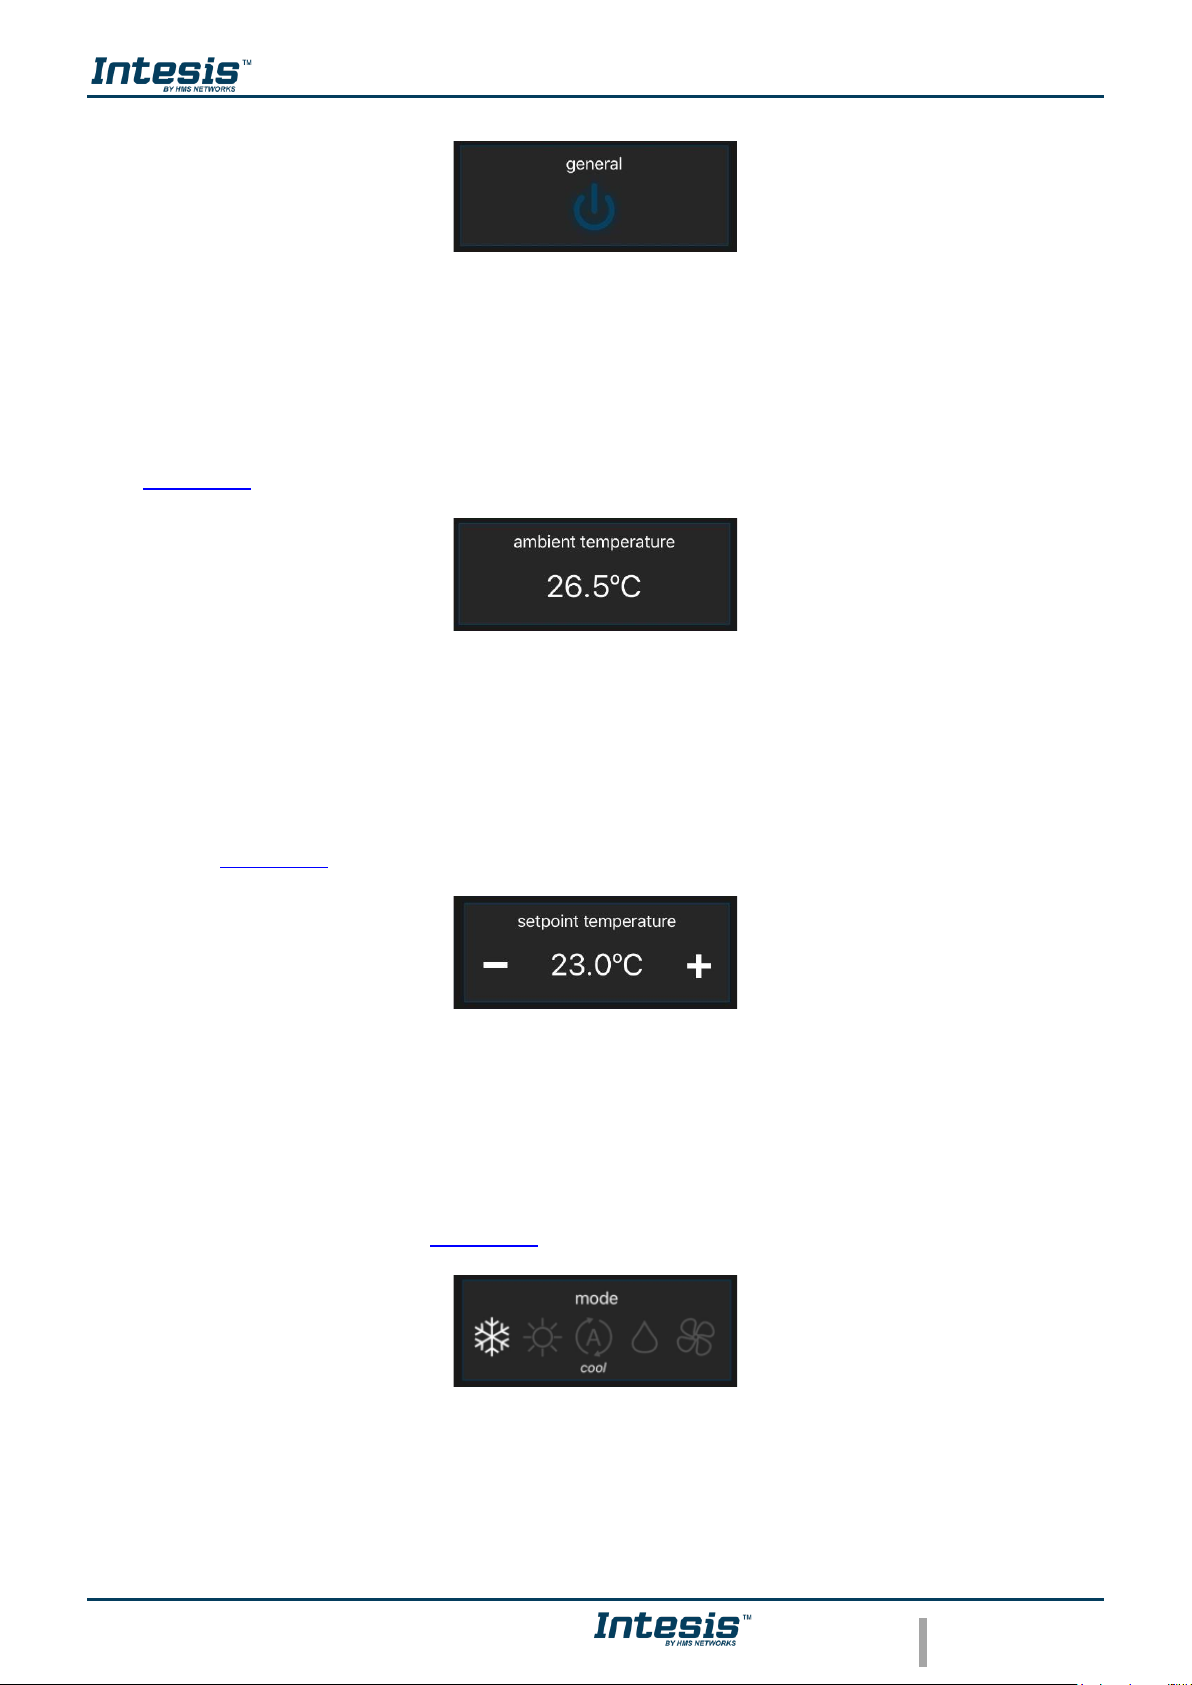
5.1 General
Tapping on general widget, the Air Conditioner will be turned on or turned off (See Figure 5.6).
Wi-Fi signal
Details
Name/ Turning On/Off
Error (if existing)
Not Wi-Fi connection
Page 29
App User Manual 2.0
© HMS Industrial Networks S.L.U - All rights reserved
This information is subject to change without notice
URL https://www.intesis.com
28 / 46
Figure 5.6 General widget.
5.2 Ambient temperature
This widget shows the temperature in the room (that temperature must be taken as an estimate)
(See Figure 5.7)
Figure 5.7 Ambient temperature widget.
5.3 Setpoint temperature
Tapping on Setpoint temperature widget, the temperature wanted in the Air Conditioner can be
settled (See Figure 5.8)
Figure 5.8 Setpoint temperature widget.
5.4 Mode
Tapping on mode widget, the Air Conditioner is going to be working in a mode wanted (cooling,
heating, auto, dry and fan) (See Figure 5.9)
Figure 5.9 Mode widget.
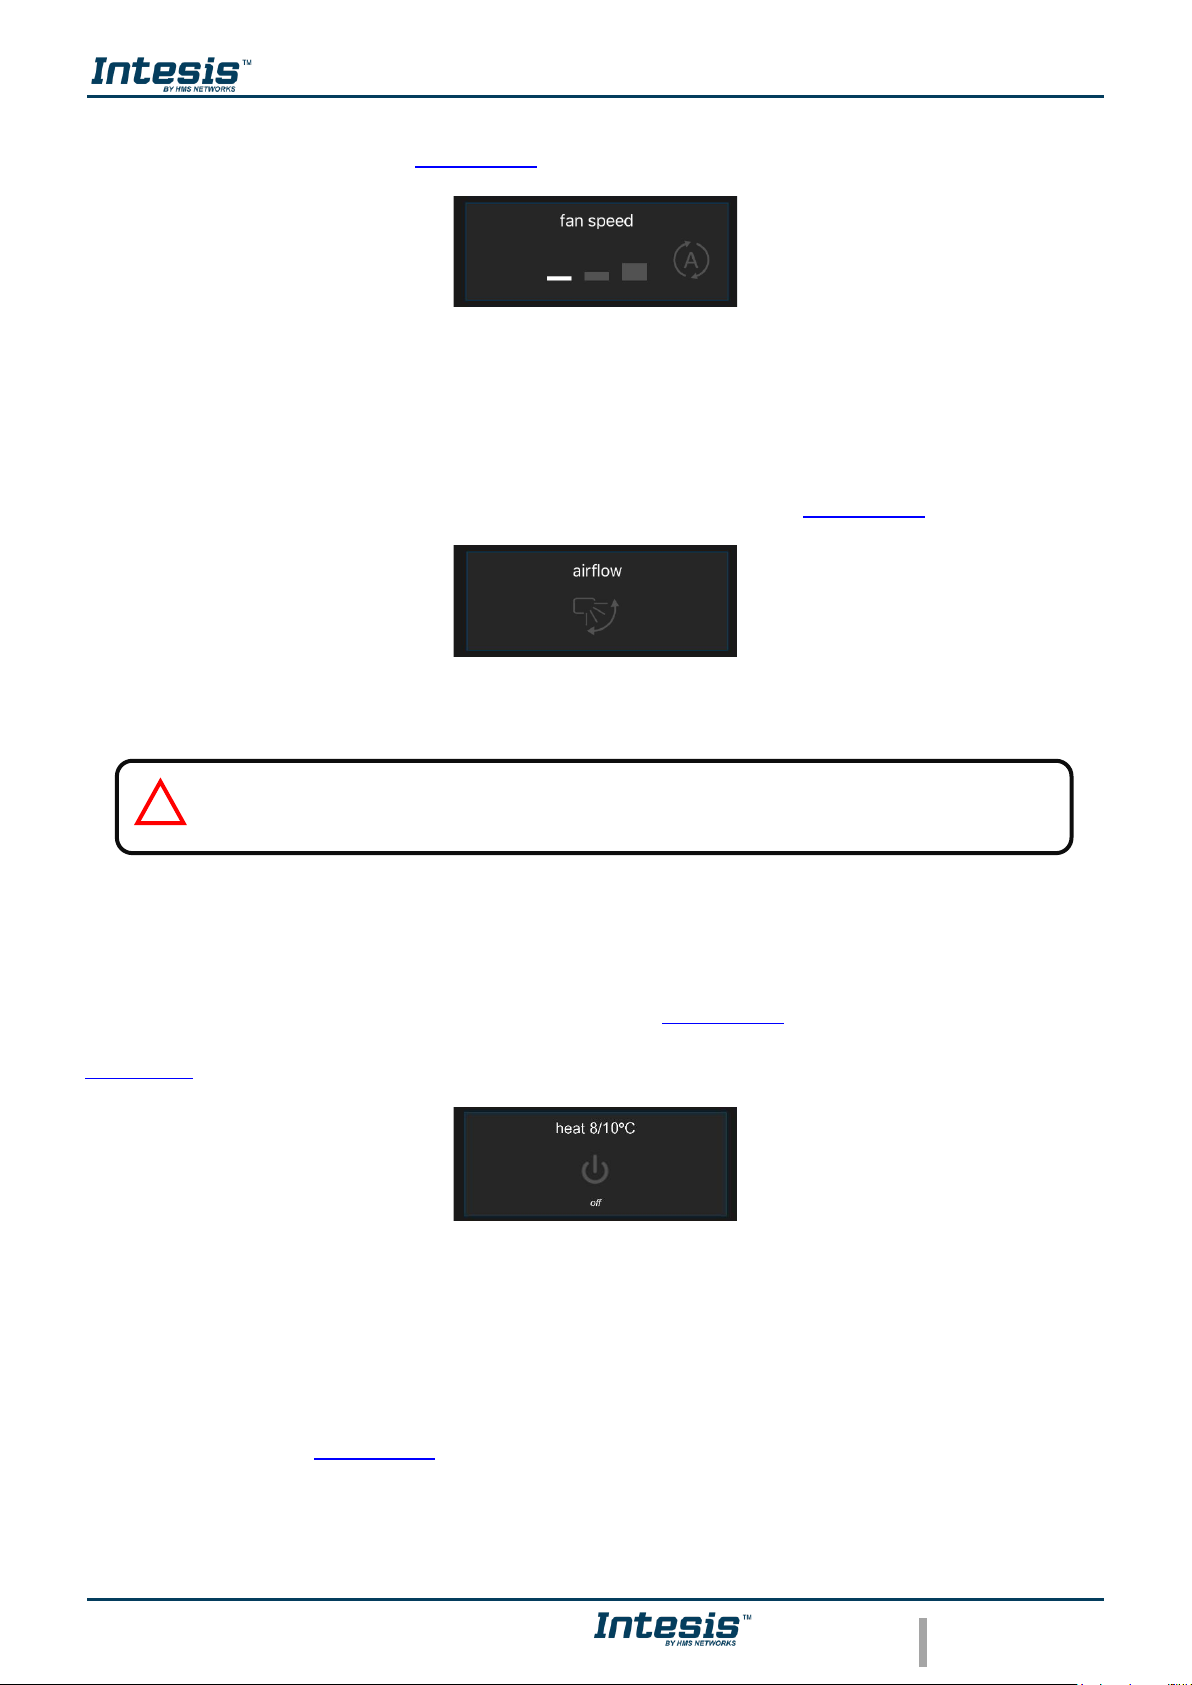
5.5 Fan speed
Page 30
App User Manual 2.0
© HMS Industrial Networks S.L.U - All rights reserved
This information is subject to change without notice
URL https://www.intesis.com
29 / 46
Tapping on Fan speed widget, the speed of the fan of Air Conditioner can be changed as wanted
or can be settled as Auto (See Figure 5.10).
Figure 5.10 Fan speed widget.
5.6 Airflow
This widget sets the vanes, also the positions of those as well (See Figure 5.11).
Figure 5.11 Airflow widget.
5.7 Heat 8/10
This functionality let work the Air Conditioner unit in the range of 8 to 10 degrees. Once is turned
on; the unit is going to be working on that range (See Figure 5.12). If the temperature wanted is
above than the range 8/10 this widget must be off to continue working with General widget (See
Figure 5.6).
Figure 5.12 Heat 8/10 widget.
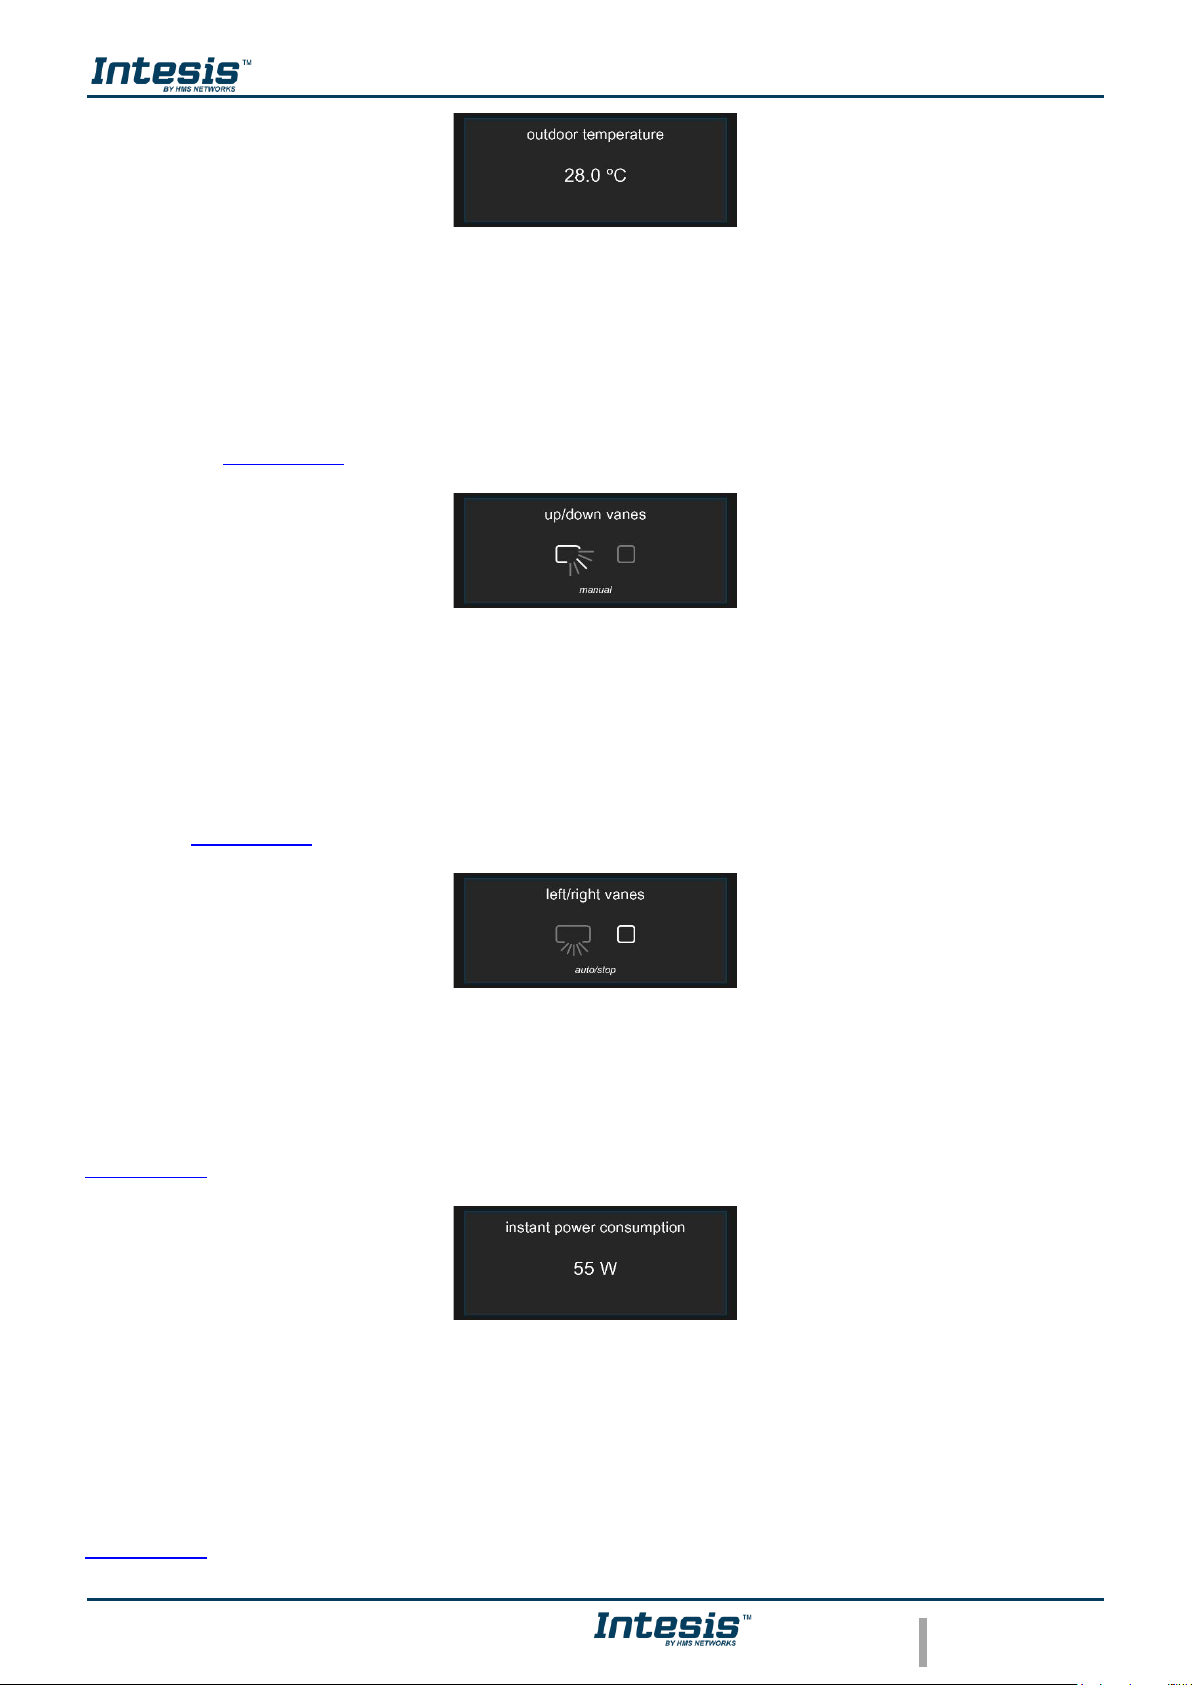
5.8 Outdoor temperature
Outdoor temperature widget will show the outside temperature (that temperature must be taken
as an estimate) (See Figure 5.13)
Note: The following functions are going to be available if the Climate System Unit has
those. Double check if Climate System Unit has those.
!
Page 31
App User Manual 2.0
© HMS Industrial Networks S.L.U - All rights reserved
This information is subject to change without notice
URL https://www.intesis.com
30 / 46
Figure 5.13 Outdoor temperature widget.
5.9 Up/down vanes
Up/down vanes widget can be settled, also the positions of those or can be configurated in Auto
as well (See Figure 5.14).
Figure 5.14 Up/down vanes widget.
5.10 Left/right vanes
Left/right vanes widget can be settled, also the positions of those, can be configurated in Auto as
well (See Figure 5.15).
Figure 5.15 Left/right vanes widget.
5.11 Instant power consumption
Instant power consumption widget shows the instant power consumption of Climate System (See
Figure 5.16).
Figure 5.16 Instant power consumption widget.
5.12 Total energy consumption
Total energy consumption widget shows the total energy consumption of Climate System (See
Figure 5.17).
Page 32

App User Manual 2.0
© HMS Industrial Networks S.L.U - All rights reserved
This information is subject to change without notice
URL https://www.intesis.com
31 / 46
Figure 5.17 Total Energy consumption widget.
5.13 Extremes protections
Tapping on extremes protection widget can be activated. The function should be configurated just
through the Web interface (See Figure 5.18).
Figure 5.18 Extremes protections widget.
5.14 Binary input
Tapping on binary input widget can be activated. The function should be configurated just through
the Web interface (See Figure 5.19).
Figure 5.19 Binary input widget.
Note: The functions of Extremes protections and Binary input will be available just for
the Universal AC Cloud Control device.
!
Page 33

App User Manual 2.0
© HMS Industrial Networks S.L.U - All rights reserved
This information is subject to change without notice
URL https://www.intesis.com
32 / 46
6. Scenes
A scene is a predefined way to interact with more than one device, at the same time from a single
point. Frequently used sets of commands can be saved in a scene to facilitate the control of the
A/C unit. The scenes can be executed on demand by clicking the scene widget.
Tap on the Scenes button to access to scenes site (See Figure 6.1).
Figure 6.1 Access to Control from AC Cloud Scenes menu.
• To add a new Scene, tap on + button located in the right corner on top, next to Scenes
label. (See Figure 6.1). Type the name of the new scene (See Figure 6.2)
Figure 6.2 Scene configuration site.
Page 34

App User Manual 2.0
© HMS Industrial Networks S.L.U - All rights reserved
This information is subject to change without notice
URL https://www.intesis.com
33 / 46
Tap on the device wanted (See Figure 6.1). Then, select in the widgets section the values desired
(See Figure 6.3). Tap on Back
Beside each device is a counter with the number of commands settled (See Figure 6.2).
Figure 6.3 Select commands.
Commands are stored directly in the scene after the arrow Back is pressed (See Figure 6.3).
• To edit a Scene, tap on Edit (See Figure 6.4).
Note: If the Off command is wanted to be sent, make sure that power command is
enable by pressing it twice to toggle from “On” to “Off”.
!
Page 35

App User Manual 2.0
© HMS Industrial Networks S.L.U - All rights reserved
This information is subject to change without notice
URL https://www.intesis.com
34 / 46
Figure 6.4 Scene site.
Tap on the scene wanted (See Figure 6.5).
Figure 6.5 Edit Scene.
It will go to scene configuration the commands can be edited and the name of it (See Figure 6.6).
Tap on Save.
Page 36

App User Manual 2.0
© HMS Industrial Networks S.L.U - All rights reserved
This information is subject to change without notice
URL https://www.intesis.com
35 / 46
Figure 6.6 Edit fields of the Scene.
When the edition process is finished, tap on Done (See Figure 6.5)
• To delete a Scene, tap on Edit (See Figure 6.4). then, tap on the red icon of the scene
wanted (See Figure 6.7). Tap on Delete.
Figure 6.7 Remove Scene.
When the edition process is finished, tap on Done (See Figure 6.5)
6.1 Temporize
A timer is a Scenes functionality to execute a scene automatically at the desired time, by default
it comes "OFF". The temporizer can be created in a new add or an existing scene
Page 37

App User Manual 2.0
© HMS Industrial Networks S.L.U - All rights reserved
This information is subject to change without notice
URL https://www.intesis.com
36 / 46
• To create a temporizer, slide the Temporize selector, select the time wanted (See Figure
6.8). In addition, if this scene wants to be repeated slide the Repeat selector
Figure 6.8 Scene configuration site temporize function.
• Temporize: In case that Temporize, function is enable, Time and Repeat fields are going
to become available to be configured. (See Figure 6.8)
• Time: Select the time (hours, minutes and AM/PM) wanted to execute the scene.
• Repeat: If repeat is settled ON and the timer is settled ON as well, the scene will be
repeated on the preset time. If repeat is settled OFF the scene will be executed just once
in a preset time (See Figure 6.8).
There are 2 ways to activate the scene’s temporize function.
1. Slide the Temporize selector in a scene configuration site (See Figure 6.8).
2. Tap on icon to enable/disable the Temporize function of the scene in the Scenes main
page (See Figure 6.9).
Figure 6.9 Scene temporize site.
Page 38

App User Manual 2.0
© HMS Industrial Networks S.L.U - All rights reserved
This information is subject to change without notice
URL https://www.intesis.com
37 / 46
7. Calendar
Calendar function is made to program commands to be sent to the A/C unit in different moments
during the preset day(s).
Tap on the Calendar button. to access to calendar site (See Figure 7.1)
Figure 7.1 Access to Control from AC Cloud Calendar menu.
Note: The Calendar scheme is stored and executed by the AC Cloud Control
device (not in the Cloud).
The Calendar scheme is sent to the AC Cloud Control device and stored in its memory.
AC Cloud Control device sends the actions on the scheduled time, even when there is a
possible disconnection from the Wi-Fi, Internet or AC Cloud-Cloud.
The AC Cloud Control device can hold the scheduled calendar for weeks and upon
reconnection with the AC Cloud-Cloud. The AC Cloud Control device updates the last
changes made into its memory. This way, it contributes to energy savings.
!
Page 39
App User Manual 2.0
© HMS Industrial Networks S.L.U - All rights reserved
This information is subject to change without notice
URL https://www.intesis.com
38 / 46
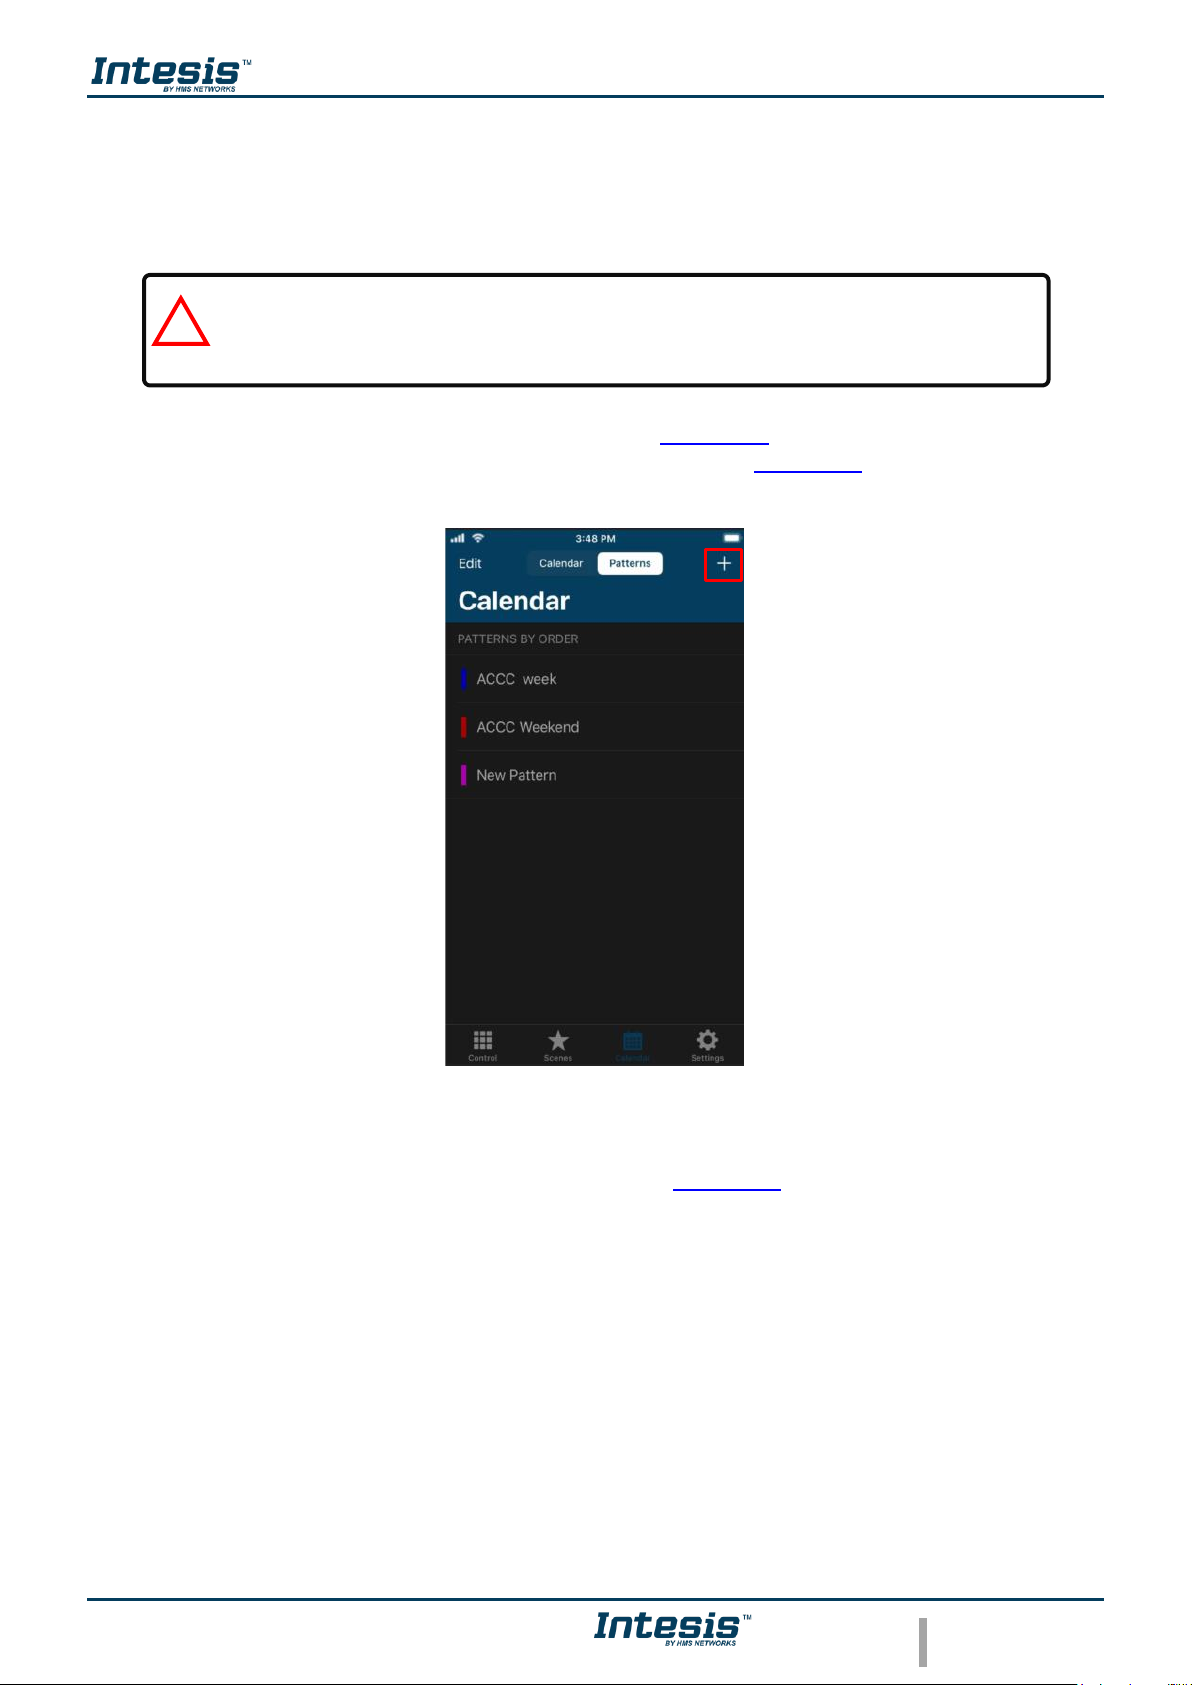
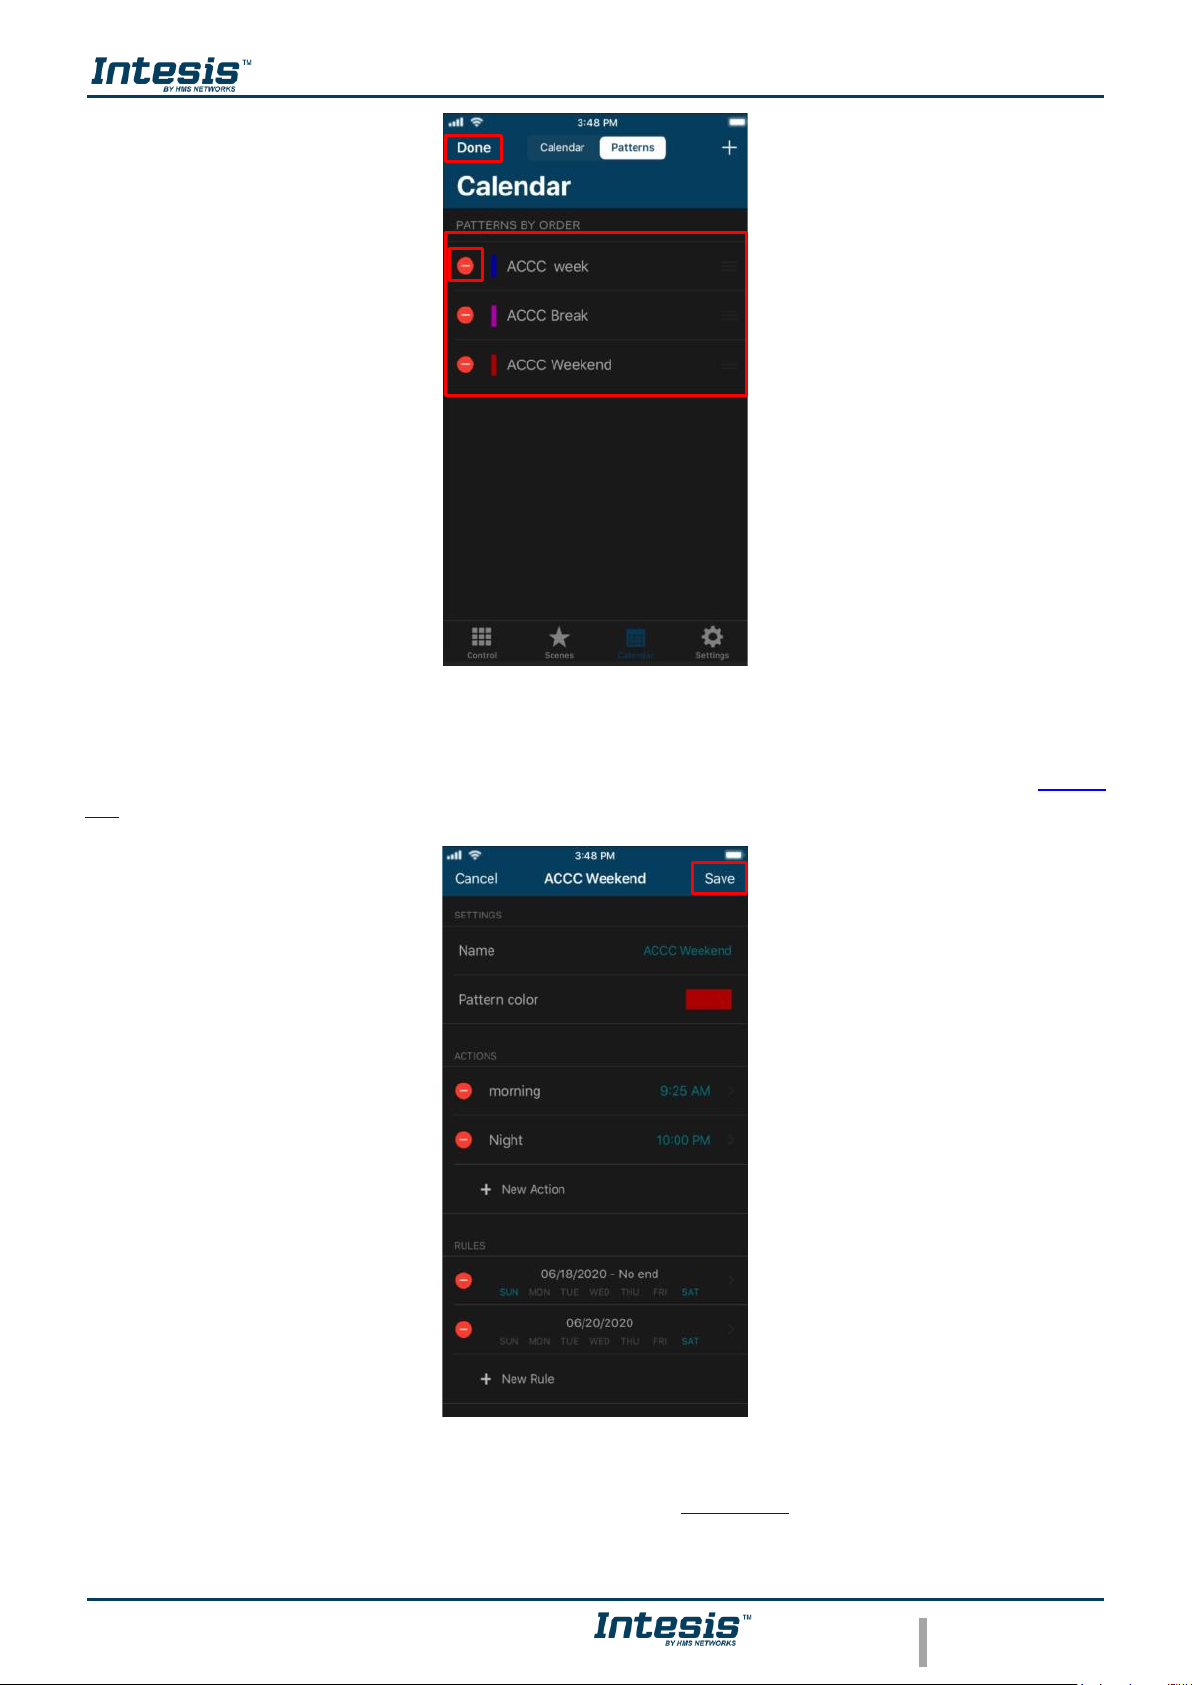
7.1 Pattern
Patterns are used to define several actions during a day and up to 10 different patterns in the
Calendar are allowed.
• To add a new Pattern, tap on Patterns (See Figure 7.1). then, tap in + button located
in the right corner on top, next to Calendar label (See Figure 7.2).
Figure 7.2 Add Pattern.
Type the name of the pattern and select the color (See Figure 7.3). Click on Save
Note: If different paterns are created in the calendar, all of those shall be will
executed. In case that the patterns overlap, the patterns which are located above
will have priority and will be executed over the patterns which are located below.
!
Page 40

App User Manual 2.0
© HMS Industrial Networks S.L.U - All rights reserved
This information is subject to change without notice
URL https://www.intesis.com
39 / 46
Figure 7.3 Pattern configuration site.
• To edit a pattern, Tap on Edit (See Figure 7.4).
Figure 7.4 Pattern site.
Then, tap on the scene wanted (See Figure 7.5).
Page 41
App User Manual 2.0
© HMS Industrial Networks S.L.U - All rights reserved
This information is subject to change without notice
URL https://www.intesis.com
40 / 46
Figure 7.5 Edit Pattern.
It will go to calendar configuration the name, color, actions and rules can be edited (See Figure
7.6). Tap on Save
Figure 7.6 Edit Pattern configuration.
When the edition process is finished, tap on Done (See Figure 7.5)
Page 42
App User Manual 2.0
© HMS Industrial Networks S.L.U - All rights reserved
This information is subject to change without notice
URL https://www.intesis.com
41 / 46
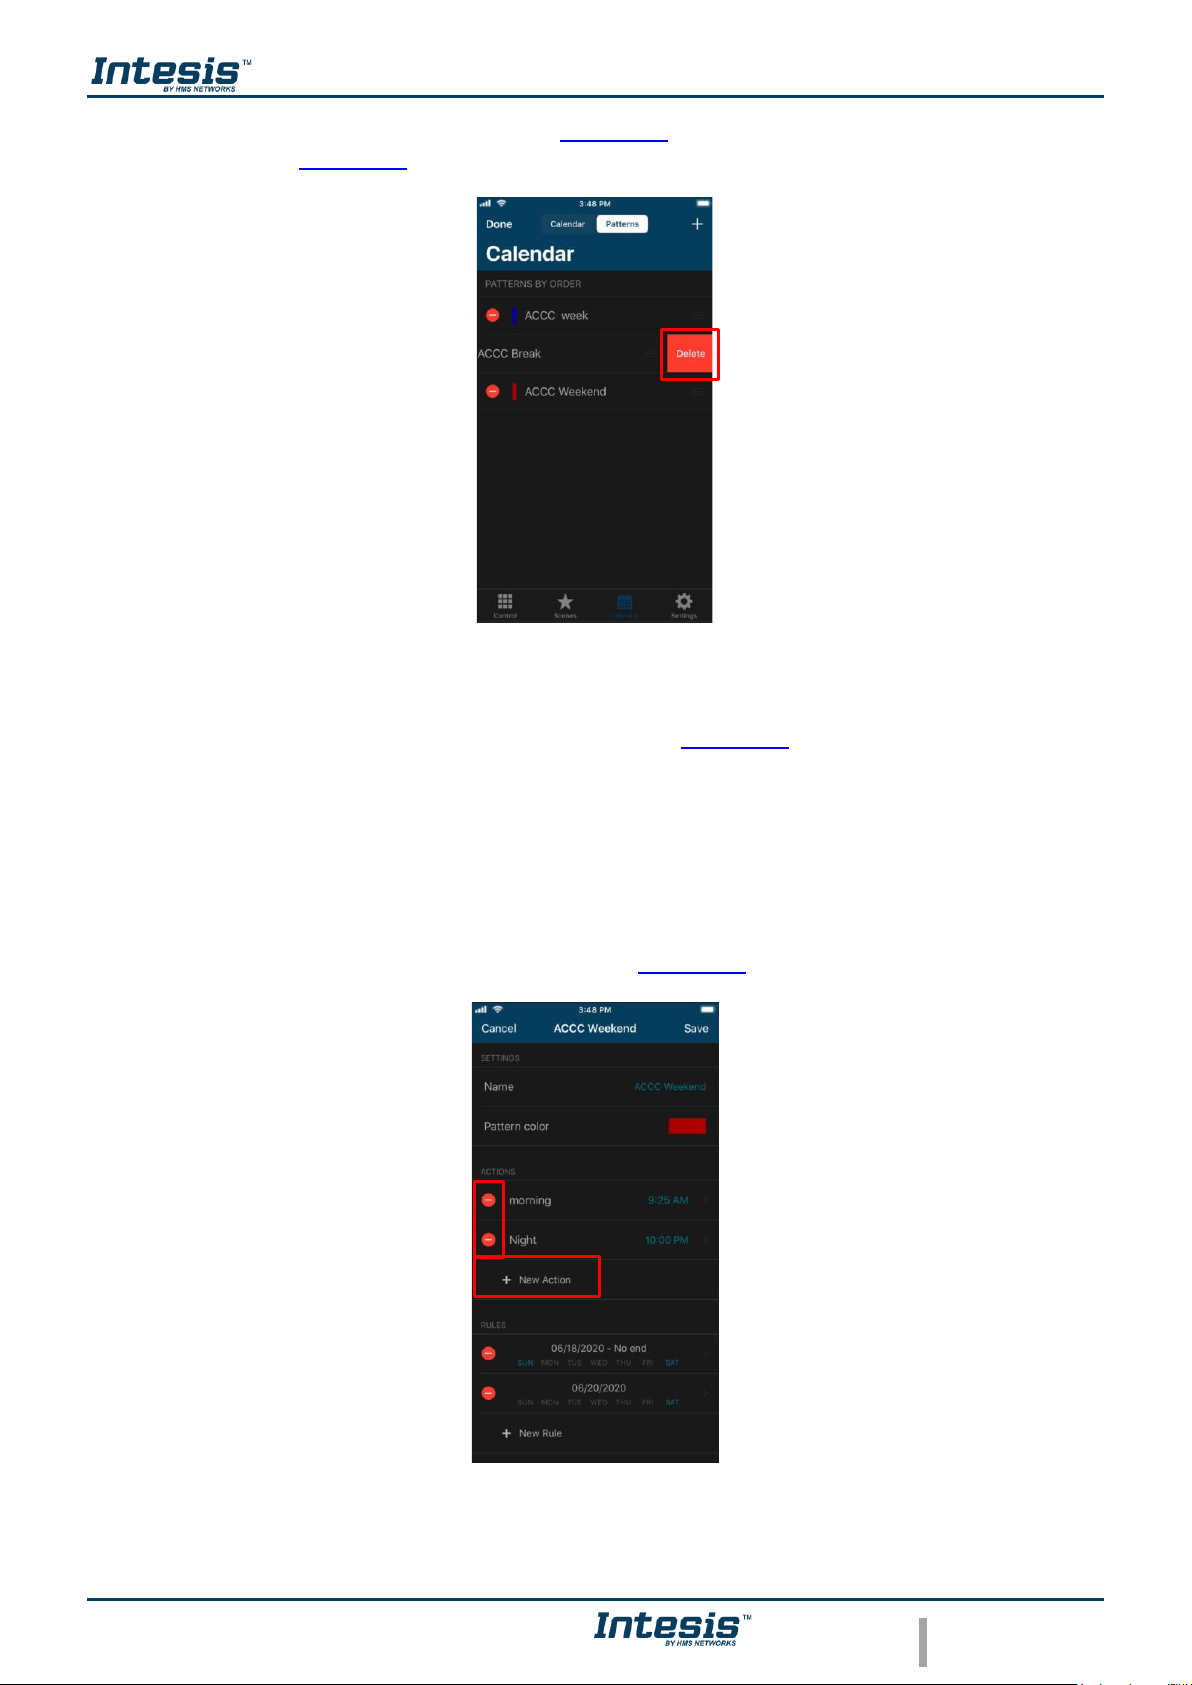
• To delete a Pattern, tap on Edit (See Figure 7.4). Then, tap on the red icon of the pattern
wanted (See Figure 7.7). Tap on Delete
Figure 7.7 Delete Pattern.
When the edition process is finished, tap on Done (See Figure 7.5)
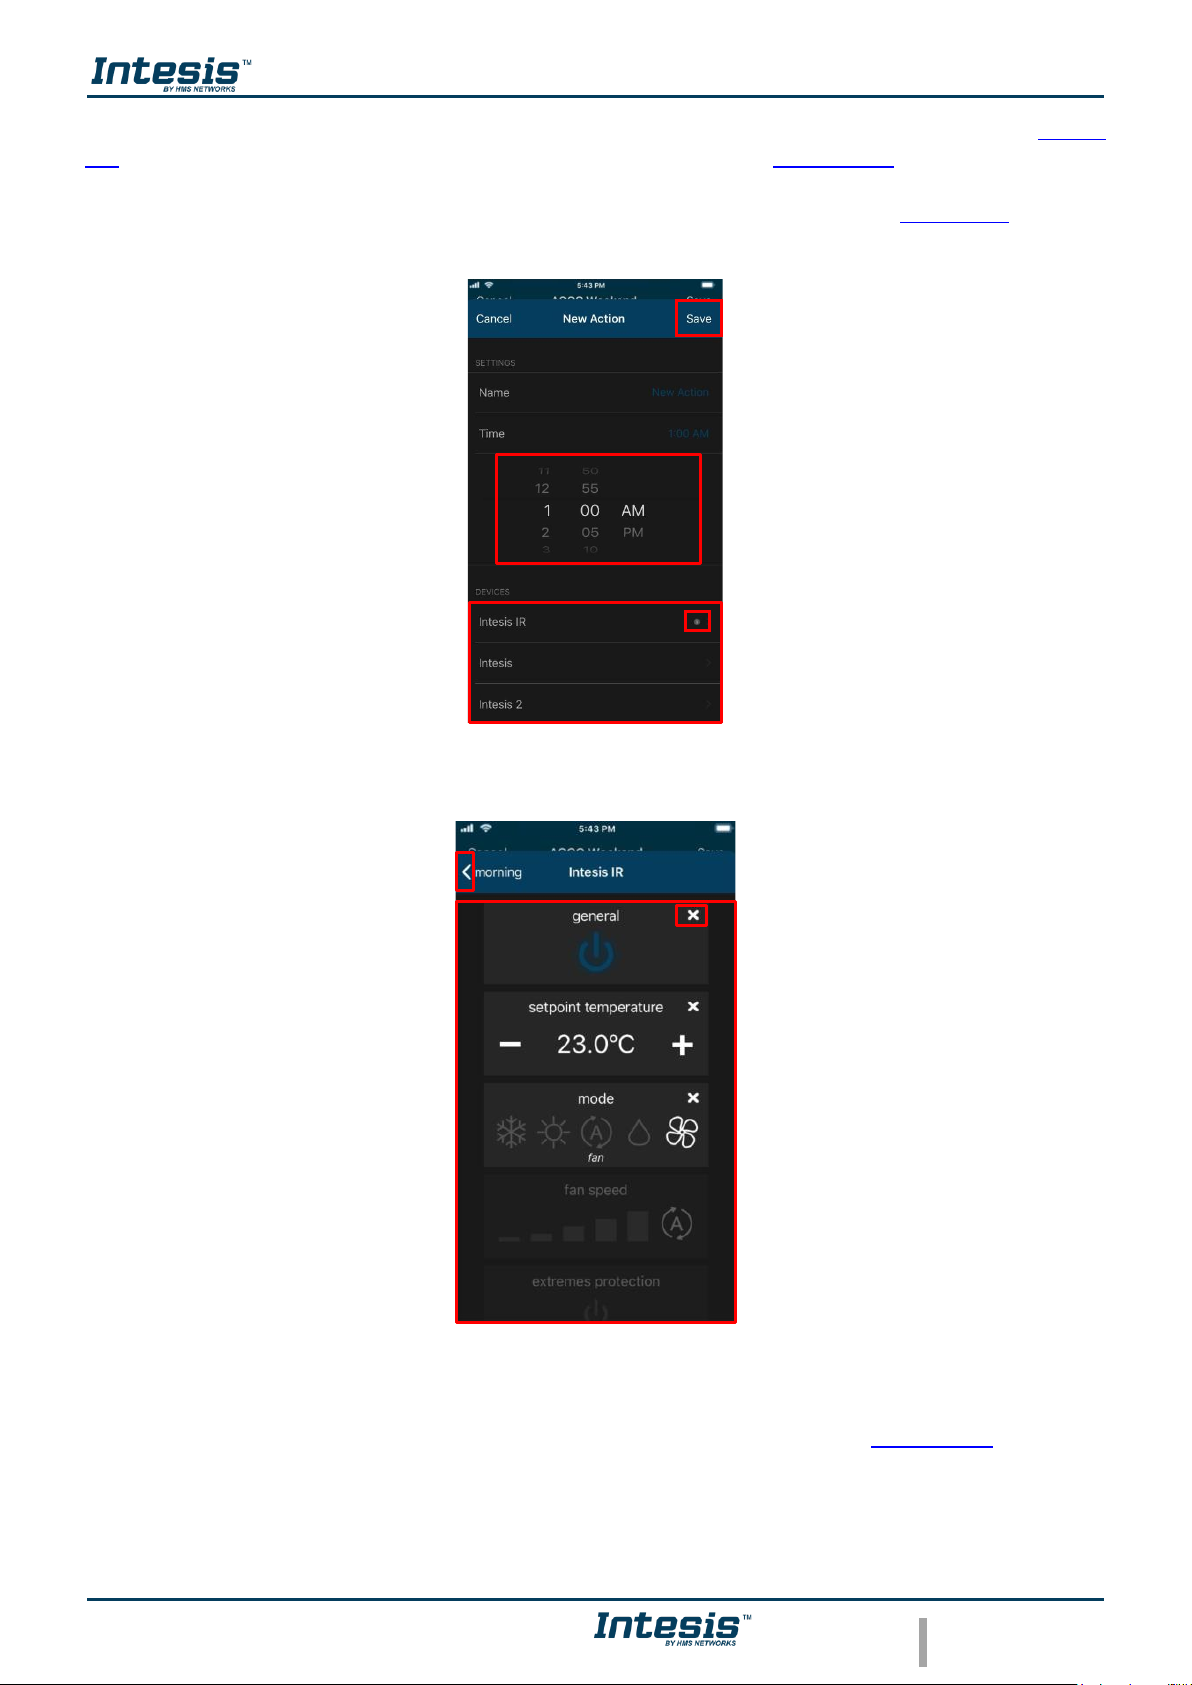
7.2 Action
Actions are a group of commands in one or more devices to be sent to the climate system on a
specific time of the day. In addition, up to 10 different actions in the pattern are allowed
• To create an action, tap on Add action (See Figure 7.8).
Figure 7.8 Add Action.
Page 43
App User Manual 2.0
© HMS Industrial Networks S.L.U - All rights reserved
This information is subject to change without notice
URL https://www.intesis.com
42 / 46
Type the name of the action, set the time to start the action. Tap on the device wanted (See Figure
7.9). Then, select in the widgets section the values desired (See Figure 7.10).
Beside each device is a counter with the number of commands settled (See Figure 7.9). Tap on
Save
Figure 7.9 Action parameters site.
Figure 7.10 Set the Commands.
Commands are stored directly in the action after the arrow is tapped (See Figure 7.10).
Page 44

App User Manual 2.0
© HMS Industrial Networks S.L.U - All rights reserved
This information is subject to change without notice
URL https://www.intesis.com
43 / 46
• To edit an Action, tap on the action wanted (See Figure 7.8). It will go to actions
configuration; the commands, time can be edited and the name of it (See Figure 7.11). Tap
on Save
Figure 7.11 Action configuration site.
• To delete an Action, tap on the red icon of the scene wanted (See Figure 7.8). Tap on
Delete (See Figure 7.12). Tap on Save
Figure 7.12 Delete Action.
Note: If the Off command is
wanted to be sent, make sure that
power command is enable by
pressing it twice
to toggle from
“On” to “Off”.
!
Page 45

App User Manual 2.0
© HMS Industrial Networks S.L.U - All rights reserved
This information is subject to change without notice
URL https://www.intesis.com
44 / 46
7.3 Rule
Rules are a group of days which the pattern is going to be executed.
• To create a rule, tap on Add rule (See Figure 7.13).
Figure 7.13 Add Rule.
There are 3 ways to configurate the days to execute the pattern
1. 1-DAY: Performs the pattern-actions only once on a preset date selected.
To create a 1-DAY rule tap on it, select the day wanted in (See Figure 7.14). Tap on Save
Figure 7.14 1-day rule configuration site
Note: If different rules are created for one pattern, those shall add-up and all be will
executed. In case that the rules overlap, the rules which are located above will have
priority and will be executed over the rules which are located below
!
Page 46

App User Manual 2.0
© HMS Industrial Networks S.L.U - All rights reserved
This information is subject to change without notice
URL https://www.intesis.com
45 / 46
2. INTERVAL: Performs the pattern-actions repeated on the selected days of the week
starting and ending in a preset date
To create an INTERVAL rule tap on it, select the day wanted to start (See Figure 7.15), then
select the day to wanted to end. Also, deactivate the days of the week which are not wanted the
rule to be applied. (See Figure 7.16). Tap on Save.
Figure 7.15 Interval rule (start date) configuration site.
Figure 7.16 Interval rule (end date) configuration site.
Page 47

App User Manual 2.0
© HMS Industrial Networks S.L.U - All rights reserved
This information is subject to change without notice
URL https://www.intesis.com
46 / 46
3. NO-END: Performs the pattern-actions repeated on the selected days of the week starting
in a preset date.
To create a NO END rule tap on It, select the day wanted to start. Also, deactivate the days of the
week which are not wanted the rule to be applied (See Figure 7.17). TP on Save.
Figure 7.17 Add No-end rule configuration site.
• To edit a Rule, tap on the rule wanted (See Figure 7.13). It will go to rules configuration;
the commands can be edited.
• To delete a Rule, tap on the red icon of the rule wanted (See Figure 7.13). Tap on Delete
(See Figure 7.18). Tap on Save
Figure 7.18 Edit or Delete Rule.
 Loading...