

Page 1
User Manual
D30410-08-01-02_R5_16/06/2010
HMM Diagnostics GmbH
D-69221 Dossenheim, Germany
www.hmm.info
Fully automatic wrist-cuff blood pressure monitor
Please read this user manual thoroughly before
first using the blood-pressure monitor.
Page 2

Page 3

3
Content
I. Introduction
Normal blood pressure fluctuation 5
II. Your smartLAB®indi
Display & functions 7
Product description 9
Specifications 9
Note 10
III. Setup & Operating procedures
Battery loading 12
Clock Mode 13
Clock Adjusting 13
Connecting the cuff to the monitor 14
Applying the cuff 15
Body posture during measurement 16
Measuring Process 16
Page 4

4
Displaying stored results 18
Erasing results 19
IV. Miscellaneous
Assessing high blood pressure for adults 20
Knowledge on Blood Pressure 21
Troubleshooting 27
Maintenance 29
Explanation of Symbols 30
Warranty 30
Page 5

5
I. Introduction
Thank you for using the smartLAB®indi wrist-cuff blood pressure monitor.
With this device you can easily control your blood-pressure values and pulse
rate and store the measured data. With its colored Bi-Classification LEDs,
all results on the meter can be classified according to their value. Please
read this manual thoroughly, before first using your smartLAB®indi wrist-
cuff blood pressure monitor.
Normal blood pressure fluctuation
All physical activity, excitement, stress, eating, drinking, smoking and
many other activities or factors (including taking a blood pressure measurement) will influence blood pressure value. Because of this, it is mostly
unusual to obtain identical multiple blood pressure readings.
Blood pressure fluctuates continually — day and night. The highest value
usually appears in the daytime and lowest one usually at midnight. Typically, the value begins to increase at around 3:00AM, and reaches to highest level in the daytime while most people are awake and active.
Page 6

6
Considering the above information, it is recommended that you measure
your blood pressure at approximately the same time and with the same
circumstances each day.
Please always relax a minimum of 3 to 5 minutes between measurements to
allow the blood circulation in your arm to recover. It is rare that you obtain
identical blood pressure readings each time.
Page 7
7
II. Your smartLAB®indi
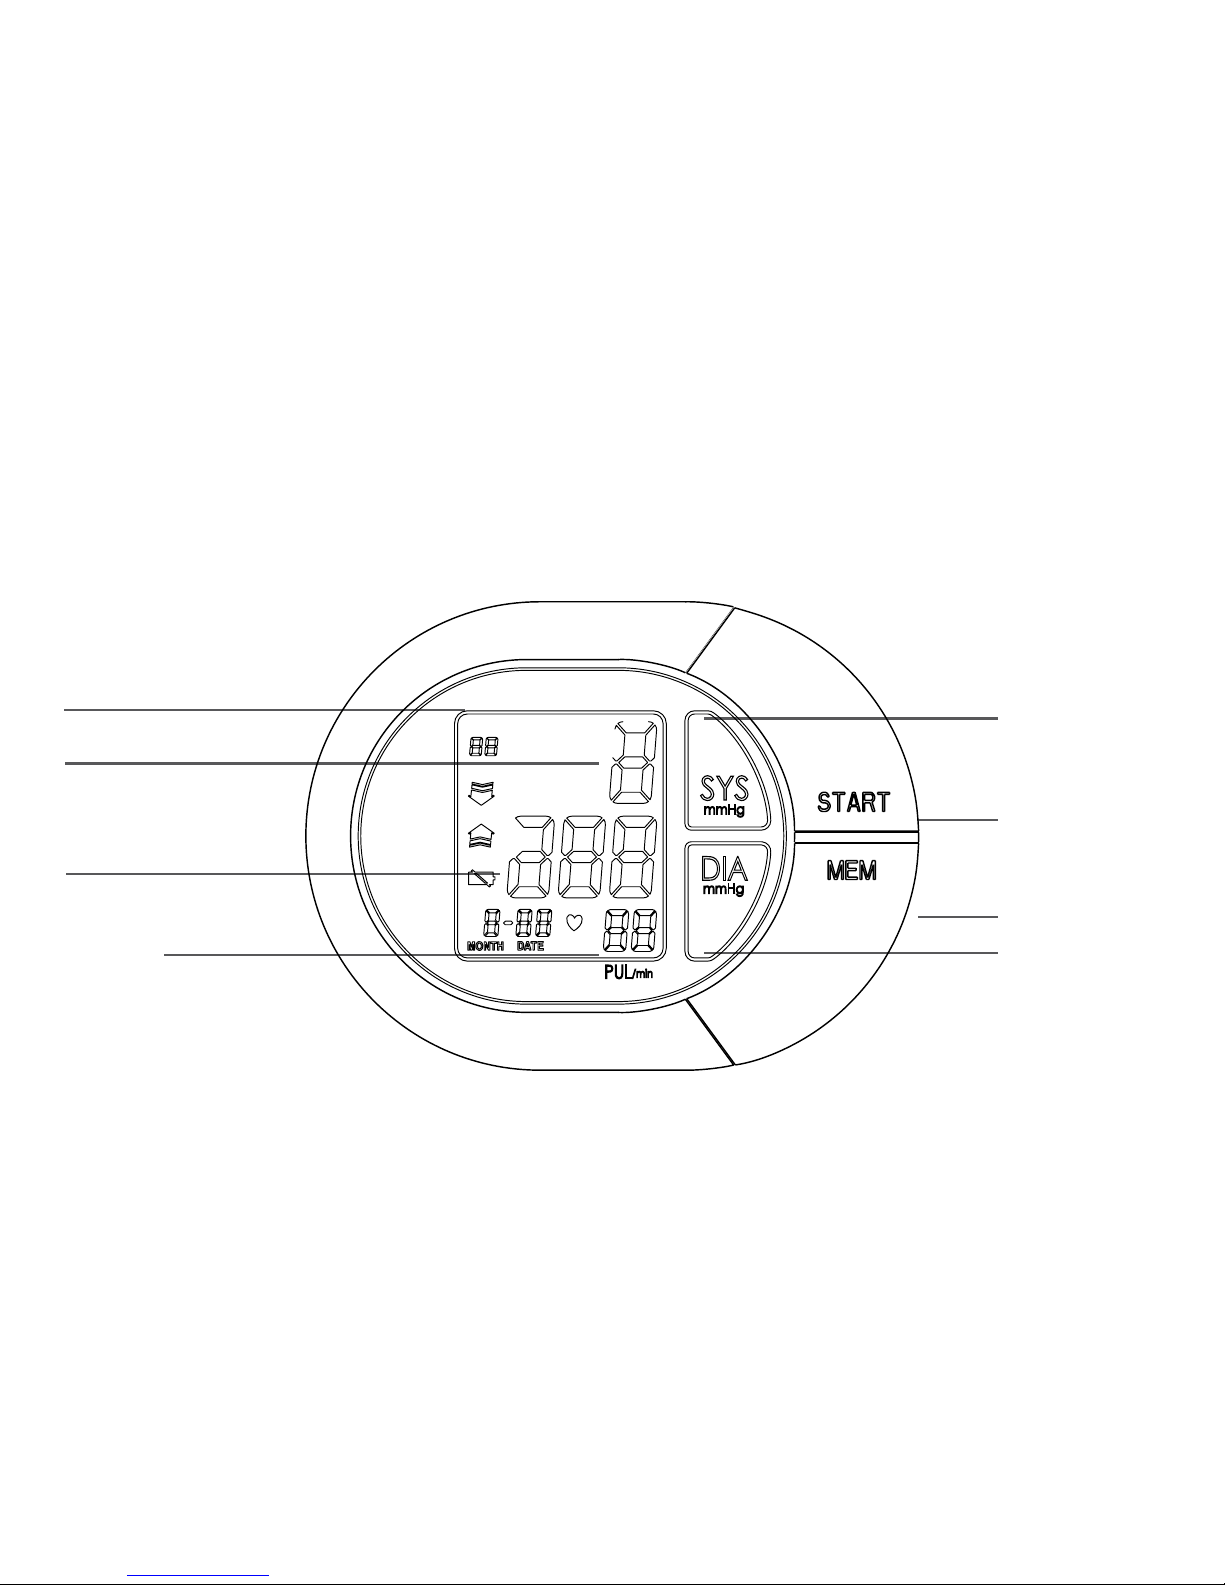
Display & functions
SYS Classification
LED
START button
DIA Classification
LED
MEM button
pulse
systolic
diastolic
LCD
mmHg
SYS
mmHg
DIA
PUL
/min
Page 8

8
Set Contents
1 smartLAB®indi Blood Pressure Monitor
1 User Manual
1 smartLAB® Blood Pressure Passport
1 smartLAB® Plastic Box
1 Warranty card
2 „AAA“ batteries
Page 9

9
Product description
Based on oscillometric methodology and silicon integrated pressure sensor
technology, blood pressure and heart rate can be measured automatically
and non-invasively. The LCD display will show blood pressure, pulse rate
and irregular heart beat (if any). The most recent 60 measurements can be
stored in the memory with date and time stamp. Systolic and Diastolic be
classified for your blood pressure respective.
Specifications
1. Model: smartLAB®indi
2. Classification: Internally powered, type B
3. Device size: 83 mm x 65.6mm x 32.2mm
4. Cuff size: 300 mm x 70mm
5. Weight: 130 g (ohne Batterien)
6. Measuring method: oscillometric, automatic
air inflation and measurement
7. Memory volume: 60 values with date and time
8. Batteries: 2xAAA
9. Blood pressure measuring range: 0-295mmHg
10. Measuring accuracy: ±3mmHg
11. Heart / Pulse rate range: 40-180/min
12. Environmental temperature for using:
5°C-40°C
13. Environmental humidity for using: 90%
14. Environmental temperature for storage:
-20°C~55°C
15. Environmental humidity for storage:
~
95%
16. Environmental pressure: atmosphere
pressure
17. Battery life: Approx.1 months with 3-min.
usage per day
18. Cuff Material: Nylon
Page 10

10
Note:
1. Stay quite, calm and rest for 5 minutes before blood pressure
measurement.
2. The cuff should be placed at the same level as your heart.
3. During measurement, neither speak nor move your body and arm.
4. Measuring on same wrist for each measurement.
5. Please always relax a minimum of 3 to 5 minutes between
measurement to allow the blood circulation in your arm to recover.
6. Remove the batteries if the monitor will not be used for a month or
more to avoid damage of battery leakage.
7. This blood pressure monitor is designed for adults and should never be
used on infants or young children. Consult your physician or other
health care professionals before use on older children.
8. Blood pressure measurements determined by this monitor are
equivalent to those obtained by a trained observer using the cuff/
stethoscope auscultation method, within the limits prescribed by the
American National Standard, Electronic or automated sphygmomano meters.
9. Please avoid strong magnetism interference, such as mobile telephone,
Page 11

11
microwave oven, etc.
10. If Irregular Heartbeat (IHB) brought by common arrhythmias is
detected in the procedure of blood pressure measurement, this signal
will be displayed:
Under this condition, the smartLAB®indi can keep function, but
the results may not be accurate, it’s suggested that you consult with
your physician for accurate assessment.
Page 12
12
III. Setup & Operating procedures
Battery loading
• Open battery cover at the back of the monitor.
• Load two “AAA” size batteries. Please pay attention to polarity.
• Close the battery cover.
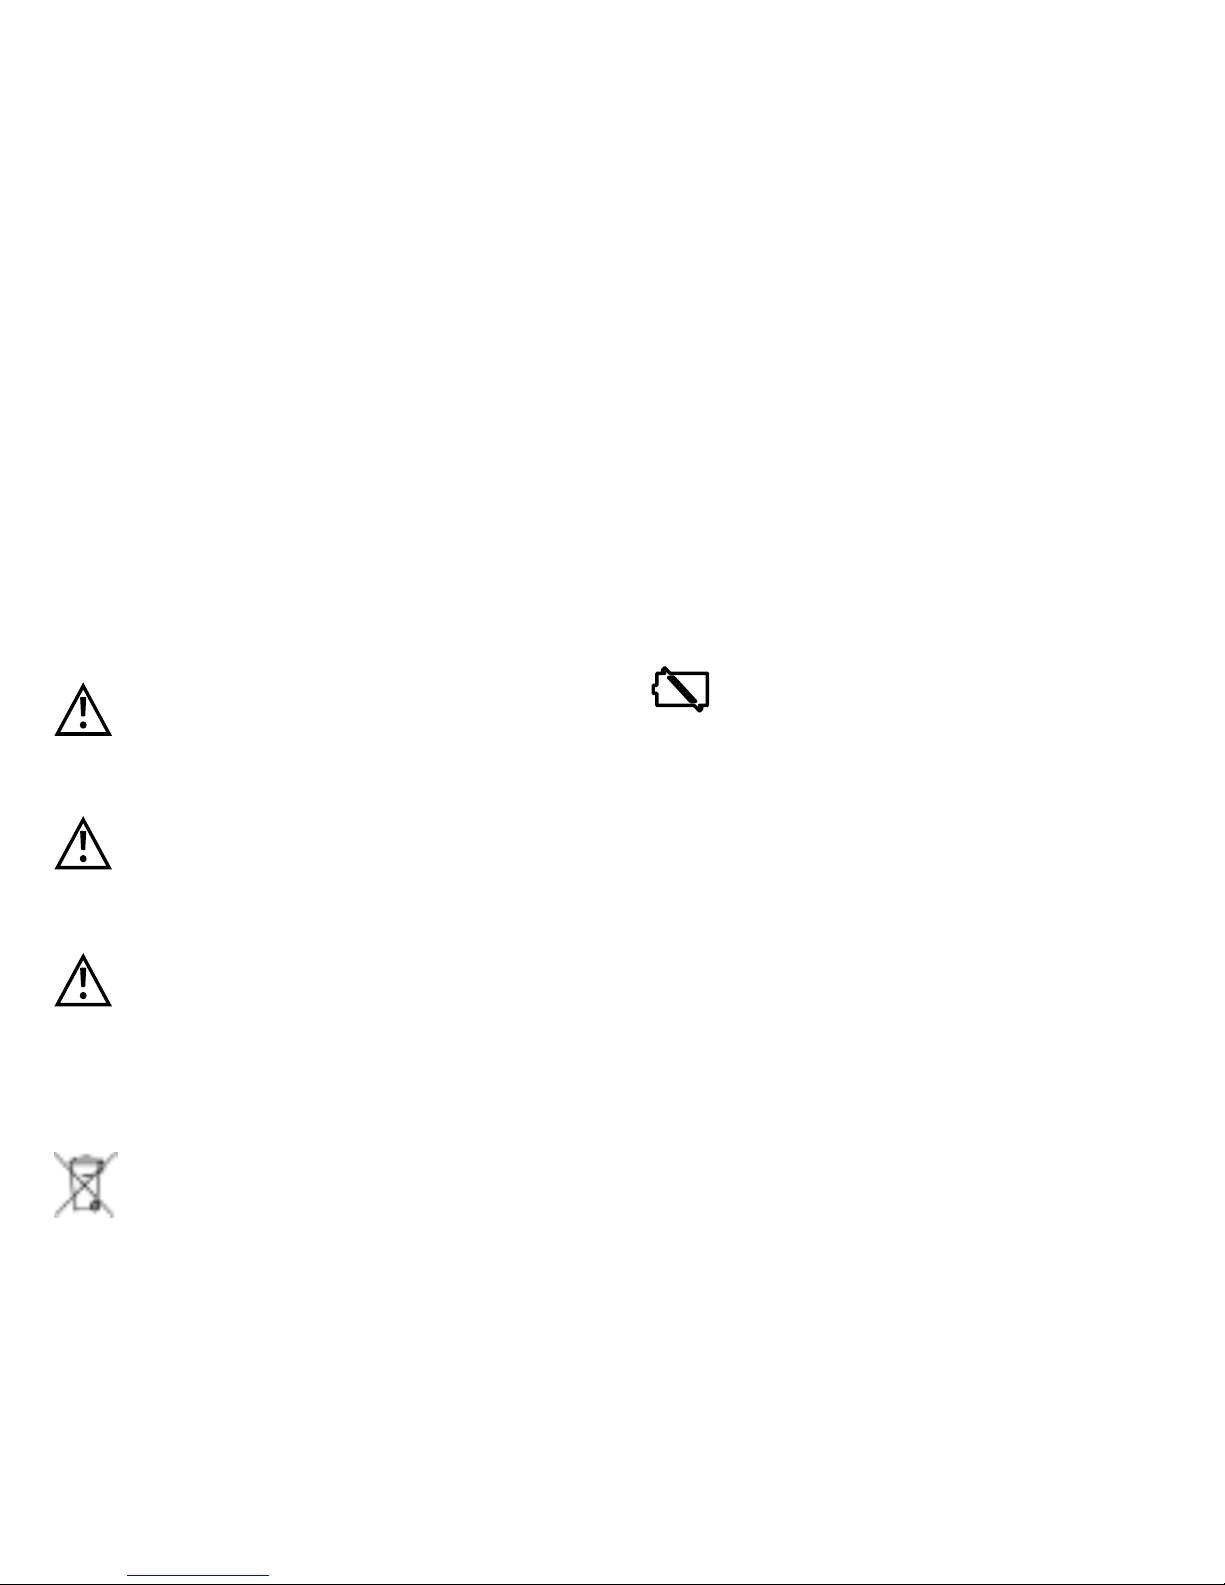
When LCD shows battery symbol replace all batteries with
new ones.
Rechargeable batteries with a voltage of 1.2V are not suitable
for this monitor
Remove the batteries if the monitor will not be used for a month or
more to avoid relevant damage of battery leakage
The monitor, the batteries and the cuff, must be disposed of
according to local regulations at the end of their usage.
Page 13
13
Clock Mode
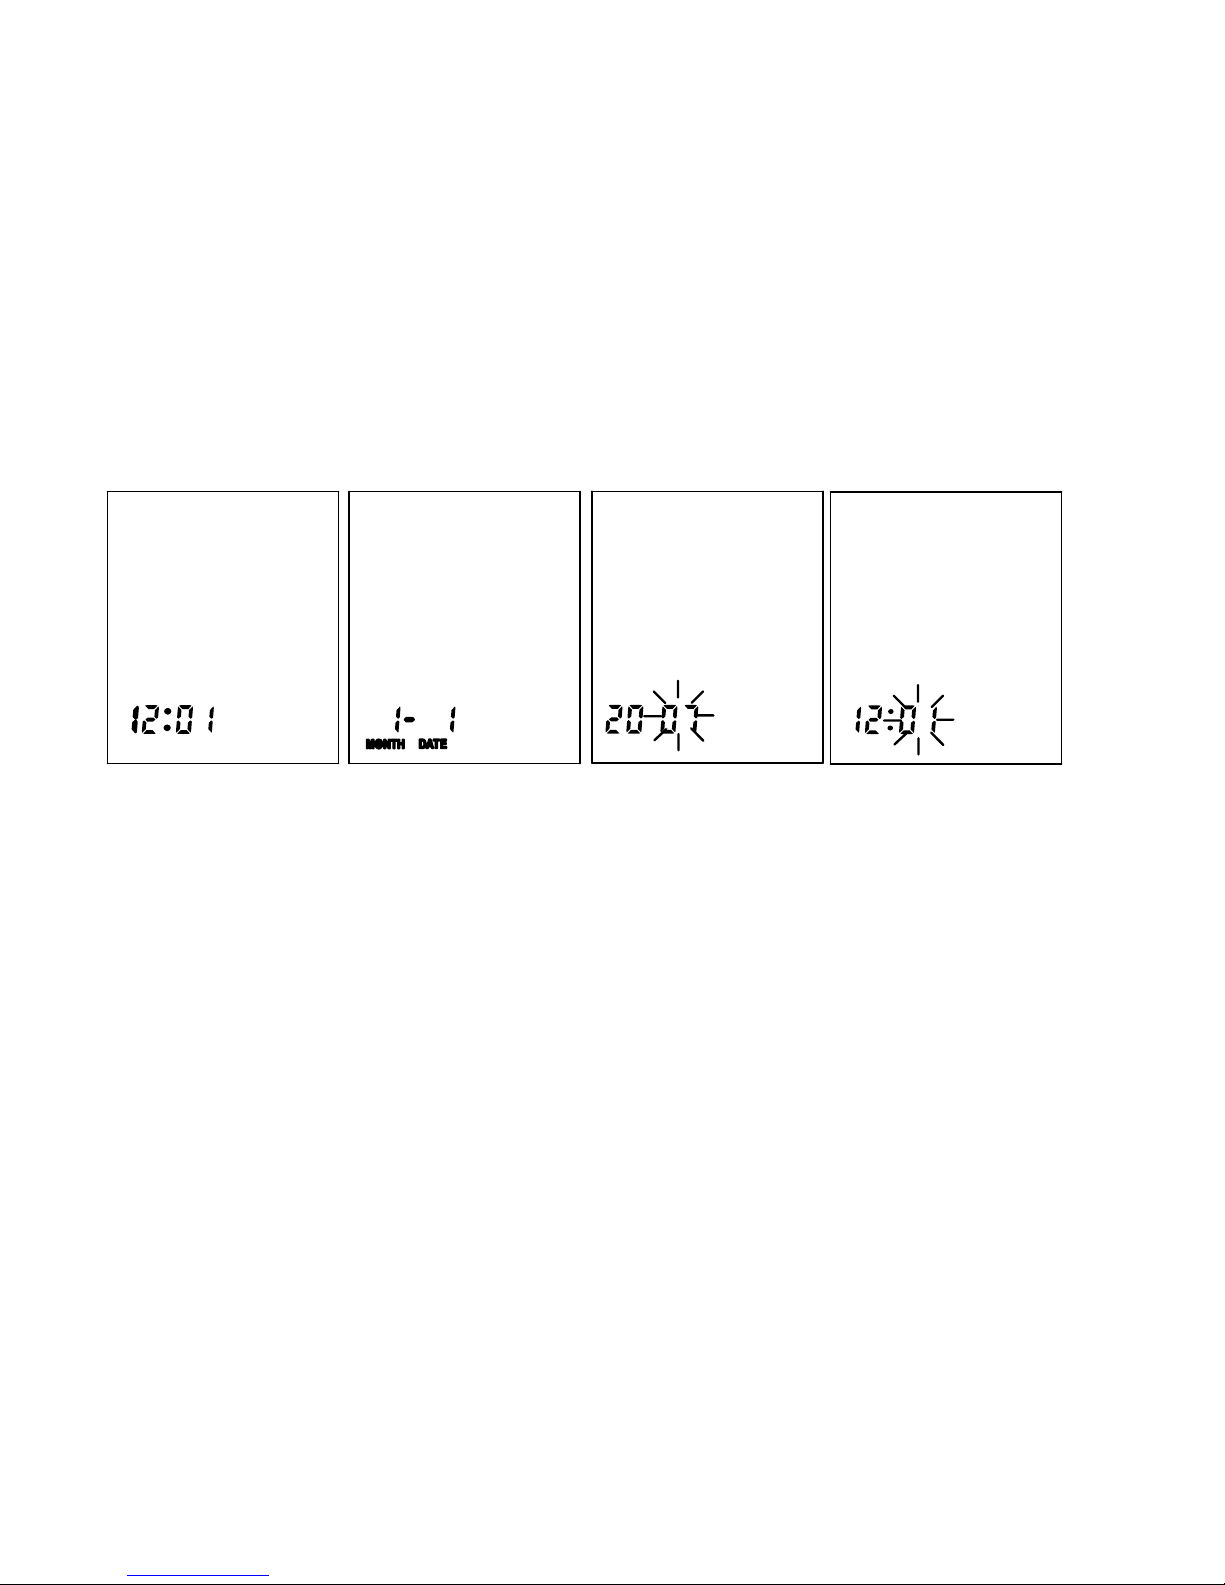
Once you install the battery, two “beep” later, the LCD will display the time
and date by turns.
Clock Adjusting
• When the smartLAB®indi is in Clock Mode, press the START and
MEM button at the same time, the machine enters Manual Clock
Adjusting mode, the number of year will twinkle first. Press START
button continuously, the numbers of month, date, hour and minute
will twinkle in turn. While the number is twinkling, press MEM button to
increase the corresponding number. Keep on pressing the button
“MEM”, the number will increase fast.
• You can turn off your smartLAB®indi by pressing “START” button when
Page 14

14
the minute is twinkling, then the time and date is confirmed.
• Your smartLAB®indi will turn off automatically after 1 minute of
no operation with the time and date unchanged.
• Once you change the batteries, you will have to readjust clock.
Connecting the cuff to the monitor
The cuff is attached to your smartLAB®indi when it is packaged. Should the
cuff become unattached, align the two plugs and four brackets of the cuff
with the plug sockets and bracket sockets of the monitor and press the cuff
to the monitor until the plugs and brackets are securely attached.
Page 15

15
Applying the cuff
Place the cuff around a bare wrist 1-2 cm above the wrist joint on the palm
side of the wrist.
• While seated, place the arm with the cuffed wrist in front of your body
on a desk or table with the palm up. If the cuff is correctly placed, you
can read the LCD display.
• The cuff must be neither too tight nor too loose. You should be able to
insert one finger between the cuff and your wrist.
Note:
• Always measure on the same wrist each time.
• Do not move your arm, body, or the monitor and do not move the
rubber tube during measurement.
• Stay quite, calm for 5 minutes before blood pressure measurement.
• If the cuff becomes dirty, remove it from the monitor and clear it by
hand in a mild detergent, then rinse it thoroughly in cold water. Never
dry the cuff in clothes dryer or iron it.
Page 16
16
Body posture during measurement
Sitting Measurement – Recommended Position
• Sit upright
• Place palm upside in front of you on a at surface such as a desk or
table, with your elbow resting on a chair or table
• The cuff should be at the same level as your heart.
• Place your arm on the monitor’s plastic case to aid maintaining a cor-
rect and still arm position.
Measuring Process
• After applying the cuff and your body is in a comfortable
position, press the “START” button. After a long “beep”,
your smartLAB
®
indi will verify itself, and LCD will
twinkle automatically, and the Bi-classification
LED will lighten.
Page 17
17
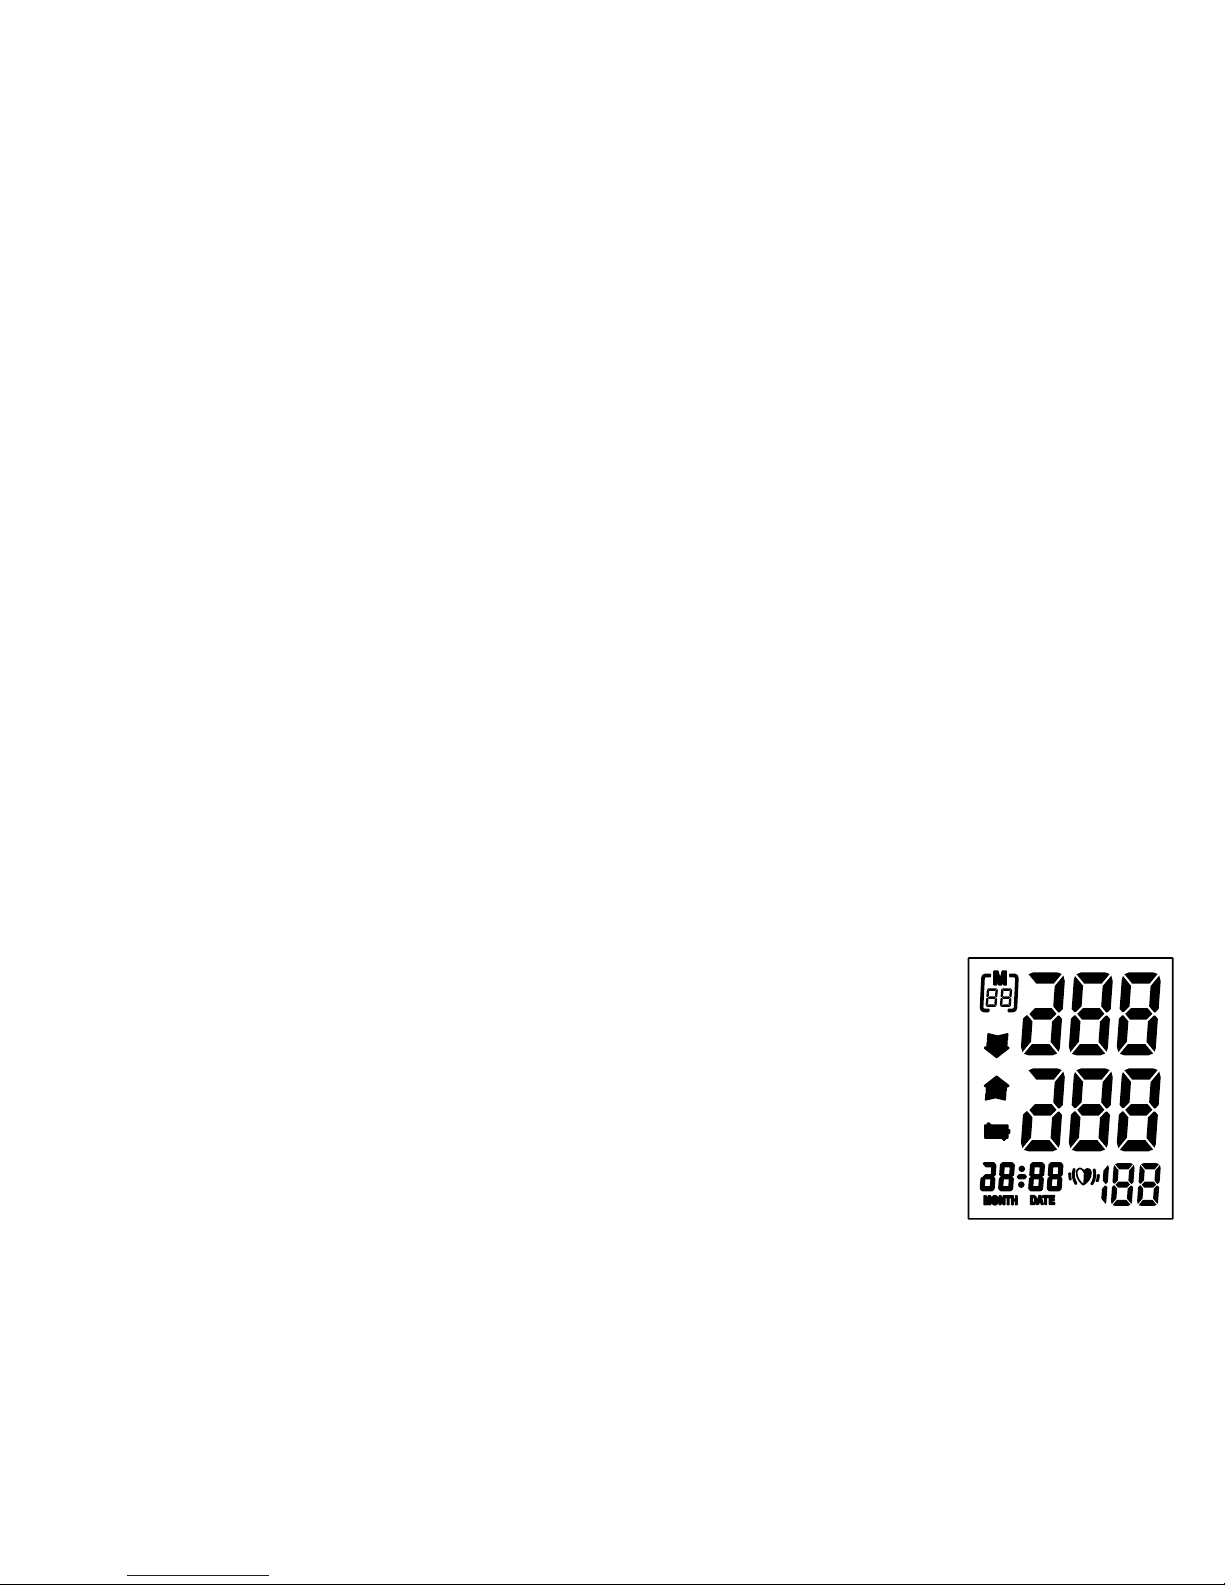
• If it already has memory, LCD will show the latest result. If your
smartLAB®indi has not stored any memory, the LCD will show six “0”.
The Bi-classification LED will lighten with the colour that
indicates the blood pressure classification of the result.
• Then your smartLAB®indi inflates
the cuff until sufficient pressure has
built up for a measurement. Then the
monitor slowly releases air from the
cuff and carries out the measurement.
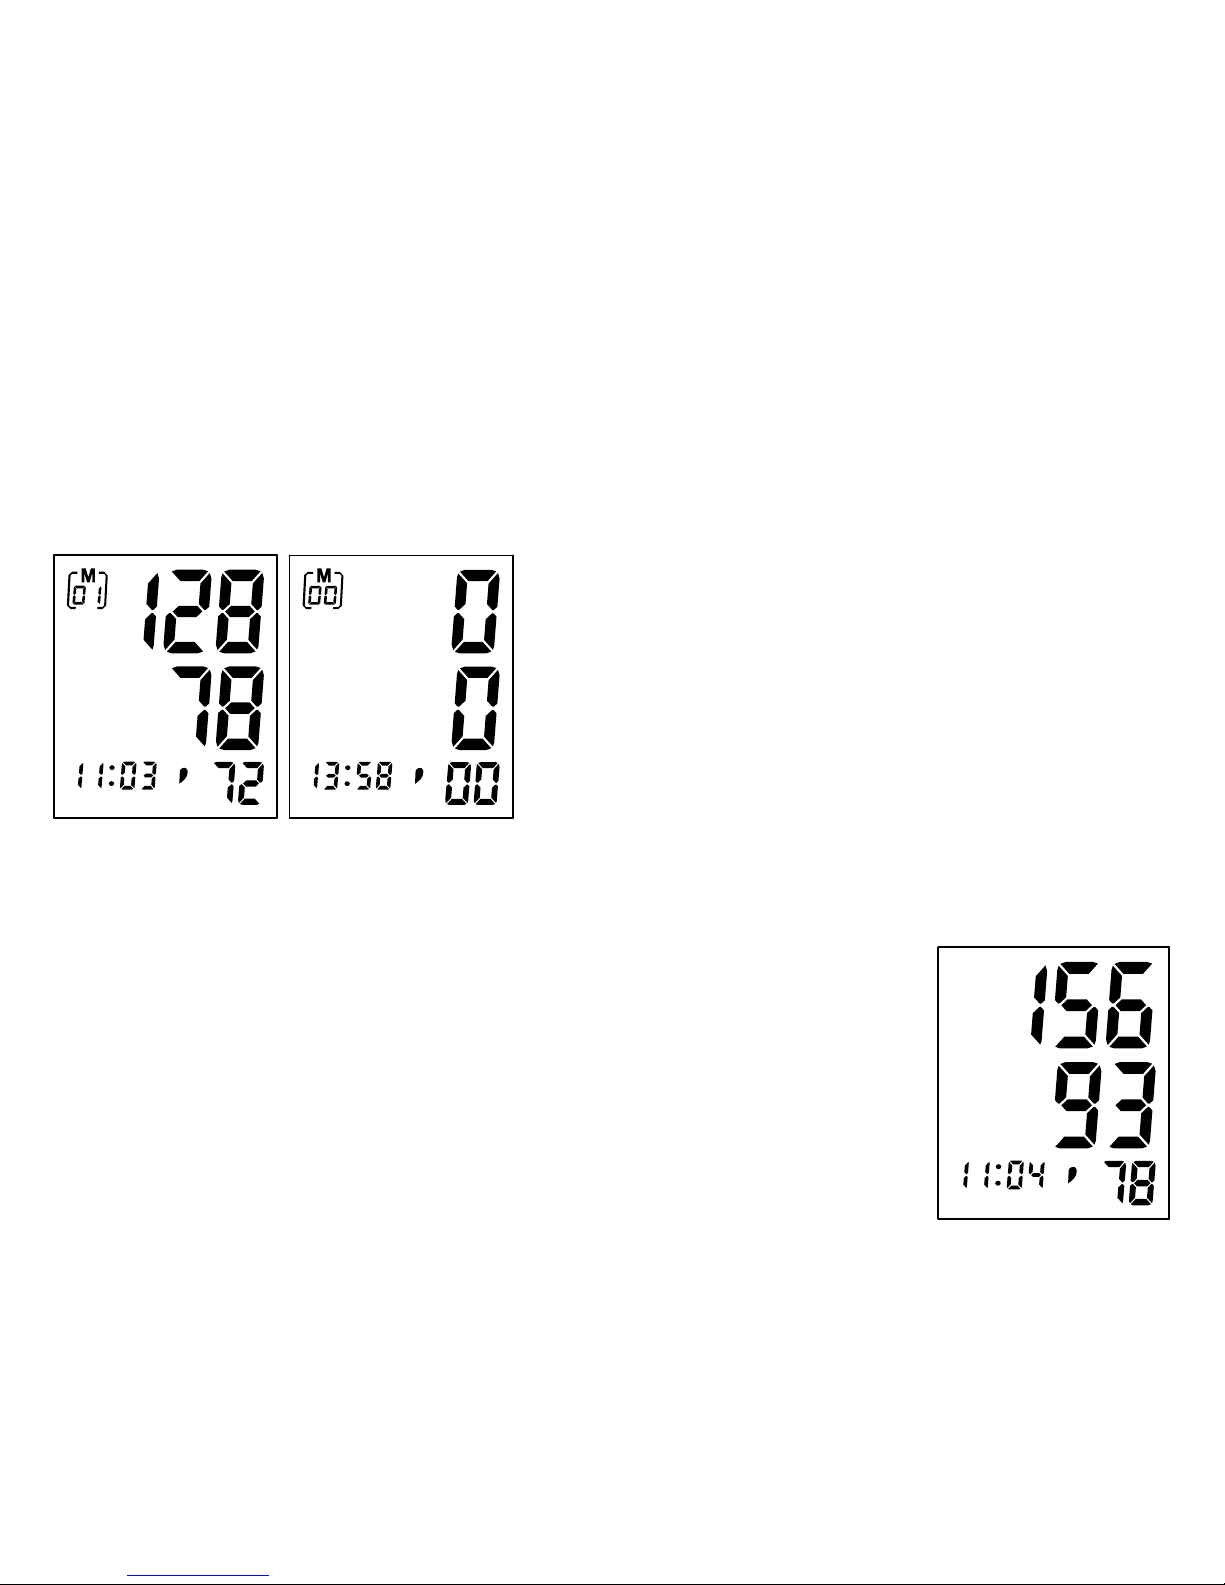
Finally the blood pressure and pulse
rate will be calculated and displayed on
the LCD screen. The irregular heartbeat symbol (if any) and blood pressure
classification indicator will twinkle.
The result will be automatically stored.
Page 18

18
• After measurement, your smartLAB®indi will turn off automatically
after 1 minute of no operation. Alternatively, you can press the “START”
button to turn off the monitor manually.
• During measurement, you can press the “START” button to turn off the
monitor manually.
Displaying stored results
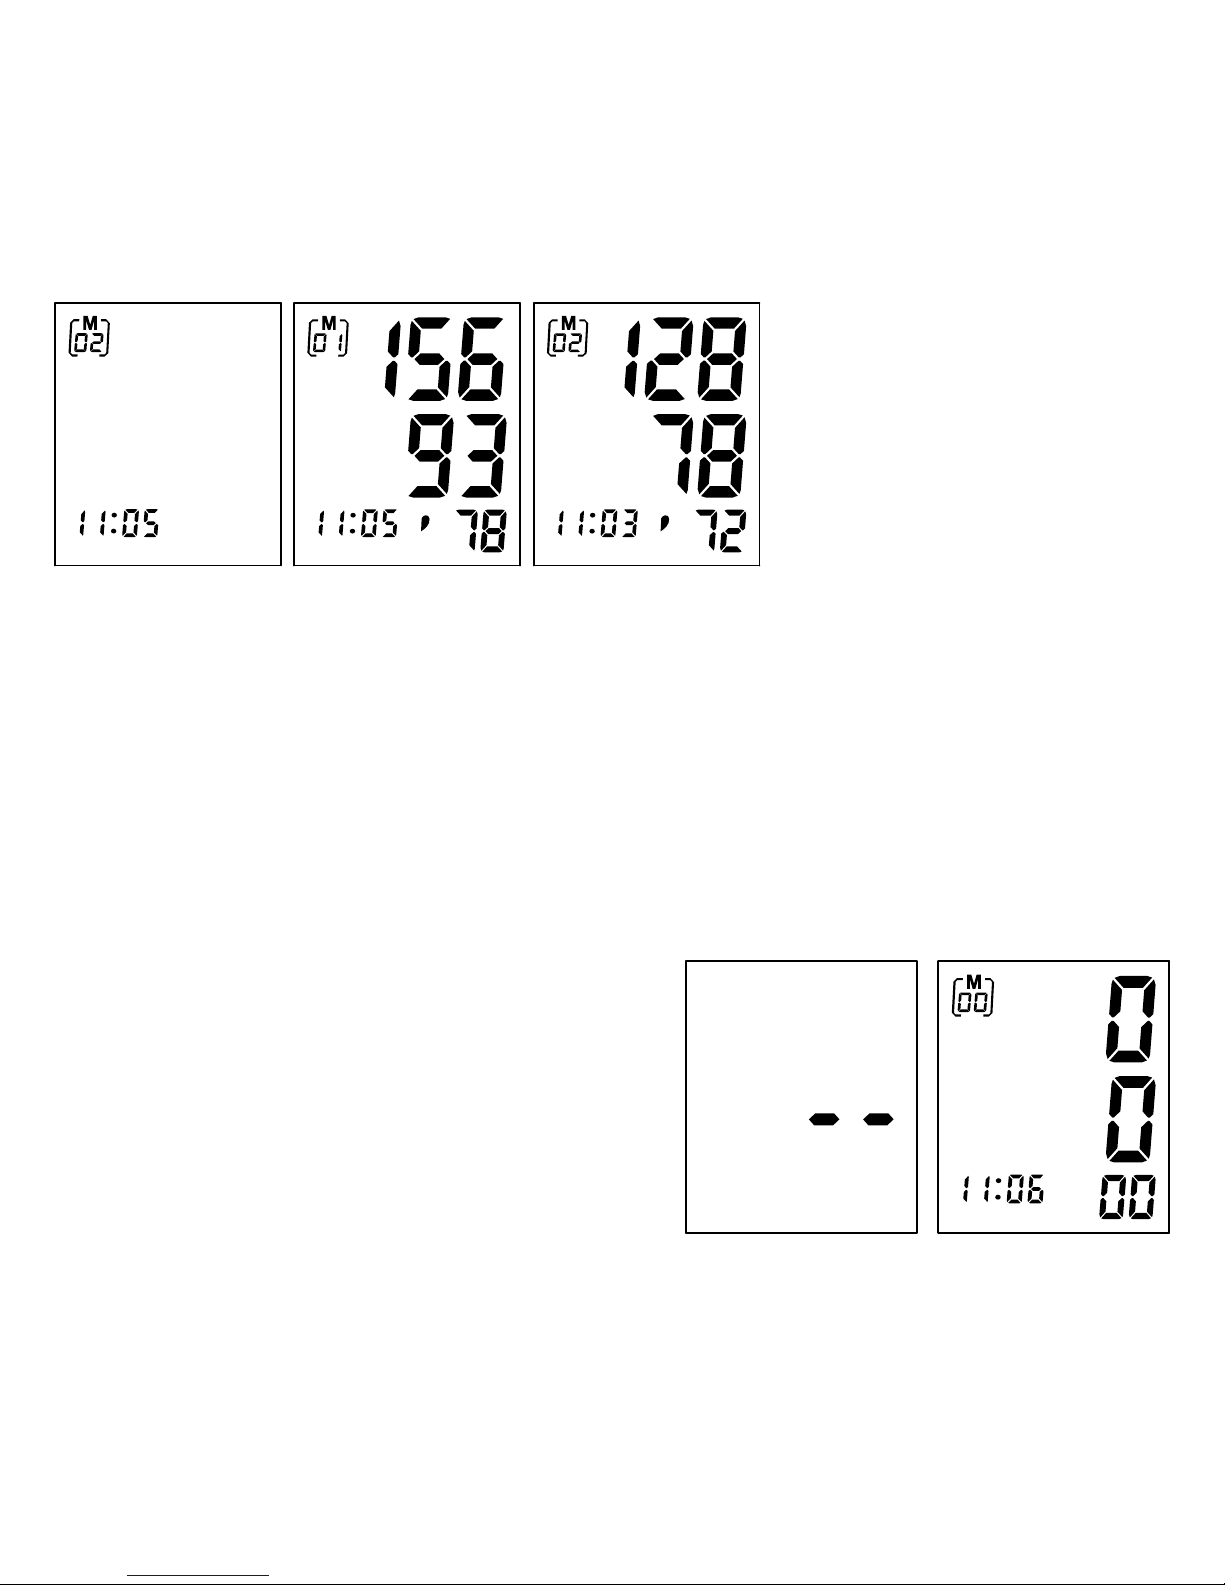
• In clock mode, press “MEM” button to display the stored results.
LCD will show the amount of results.
• A few seconds later the latest result will be displayed, which is 01 for
memory number. It has irregular heartbeat indication (if any) and the
indication of blood pressure classification. The time of the measurement
will also be displayed. Continuously press the “MEM” button, to
scroll through the stored values
Page 19
19
• The Bi-classication LED
will also indicate the
blood pressure
classification.
• Press “MEM” button
again after the last
memory, the monitor
will power off. In the reviewing mode, it will automatically power off after
1 minute of no use. Alternatively, you can press the “START” button to shut
down the smartLAB®indi.
• If no memory is stored (or all memories have been deleted), the LCD will
show “0” for systolic, diastolic and “00”for the numbers of memory,
heart rate. By pressing the “MEM” or “START”, the monitor will power
off.
Erasing results
When any result is displayed, keep on
pressing button “MEM” for three seconds,
and all results in current memory bank
Page 20

20
will be deleted after three “beep”. By pressing the button “MEM” or
“START”, the monitor will turn off.
IV. Miscellaneous
Assessing high blood pressure for adults
The following guidelines for assessing high blood pressure (without regard
to age or gender) have been established by the World Health Organization (WHO). Please note that other factors (e.g. diabetes, obesity, smoking,
etc.) need to be taken into consideration. Consult your physician
for accurate assessment.
systolic
mmHg
180
160
140
130
120
80 85 90 100 110
severe hypertension
moderate hypertension
diastolic
mmHg
mild hypertension
high-normal BP
normal BP
Page 21
21
Knowledge on Blood Pressure:
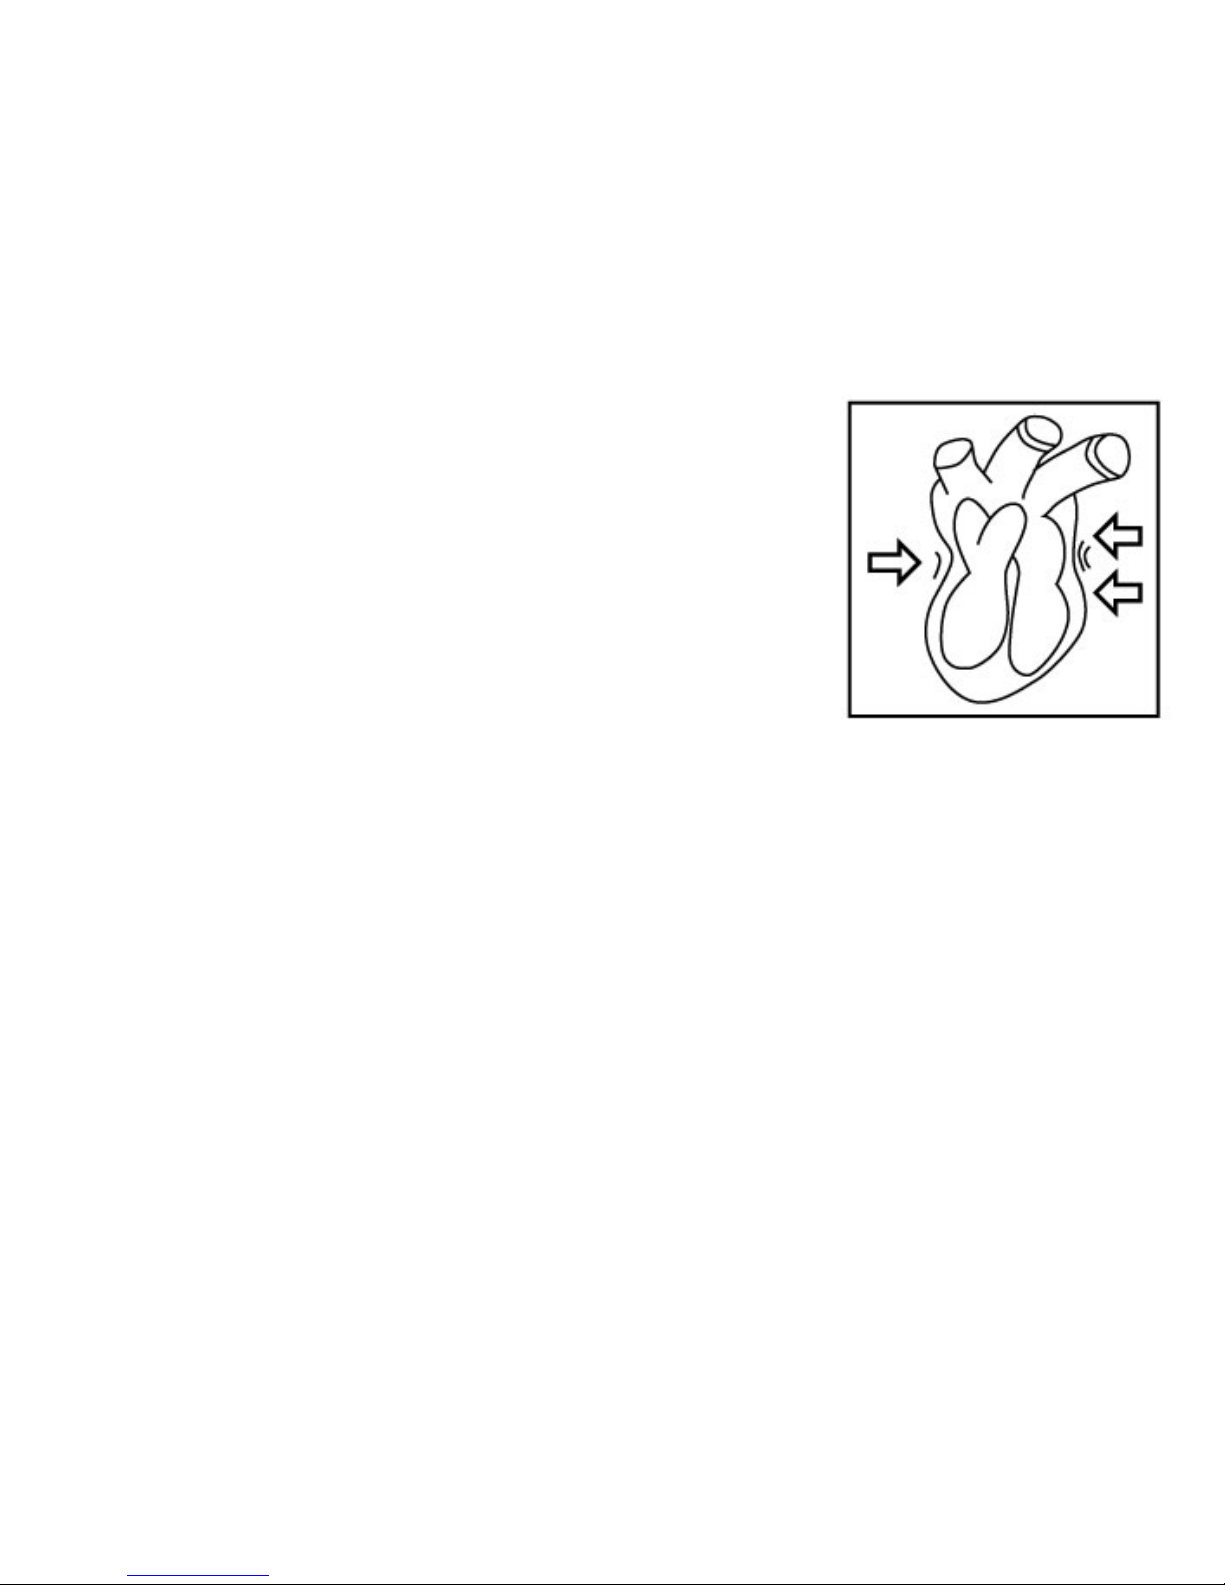
Your heart is just like a pump which causes the
blood to circulate through all vessels. As a result,
the blood pressure is the pressure on the wall of
the blood vessel pressed by blood. The output of
blood from the heart when it is a systole is called
systolic pressure. The blood returning to the heart
when it is a diastole is called diastolic pressure.
Blood pressure fluctuates continually — day and
night. The highest value usually appears in the daytime and lowest one usually at midnight. Typically, the value begins to increase at around 3:00AM,
and reaches to highest level in the daytime while most people are awake
and active.
For this reason it is recommended to measure your blood pressure each day
at the same time.
Page 22
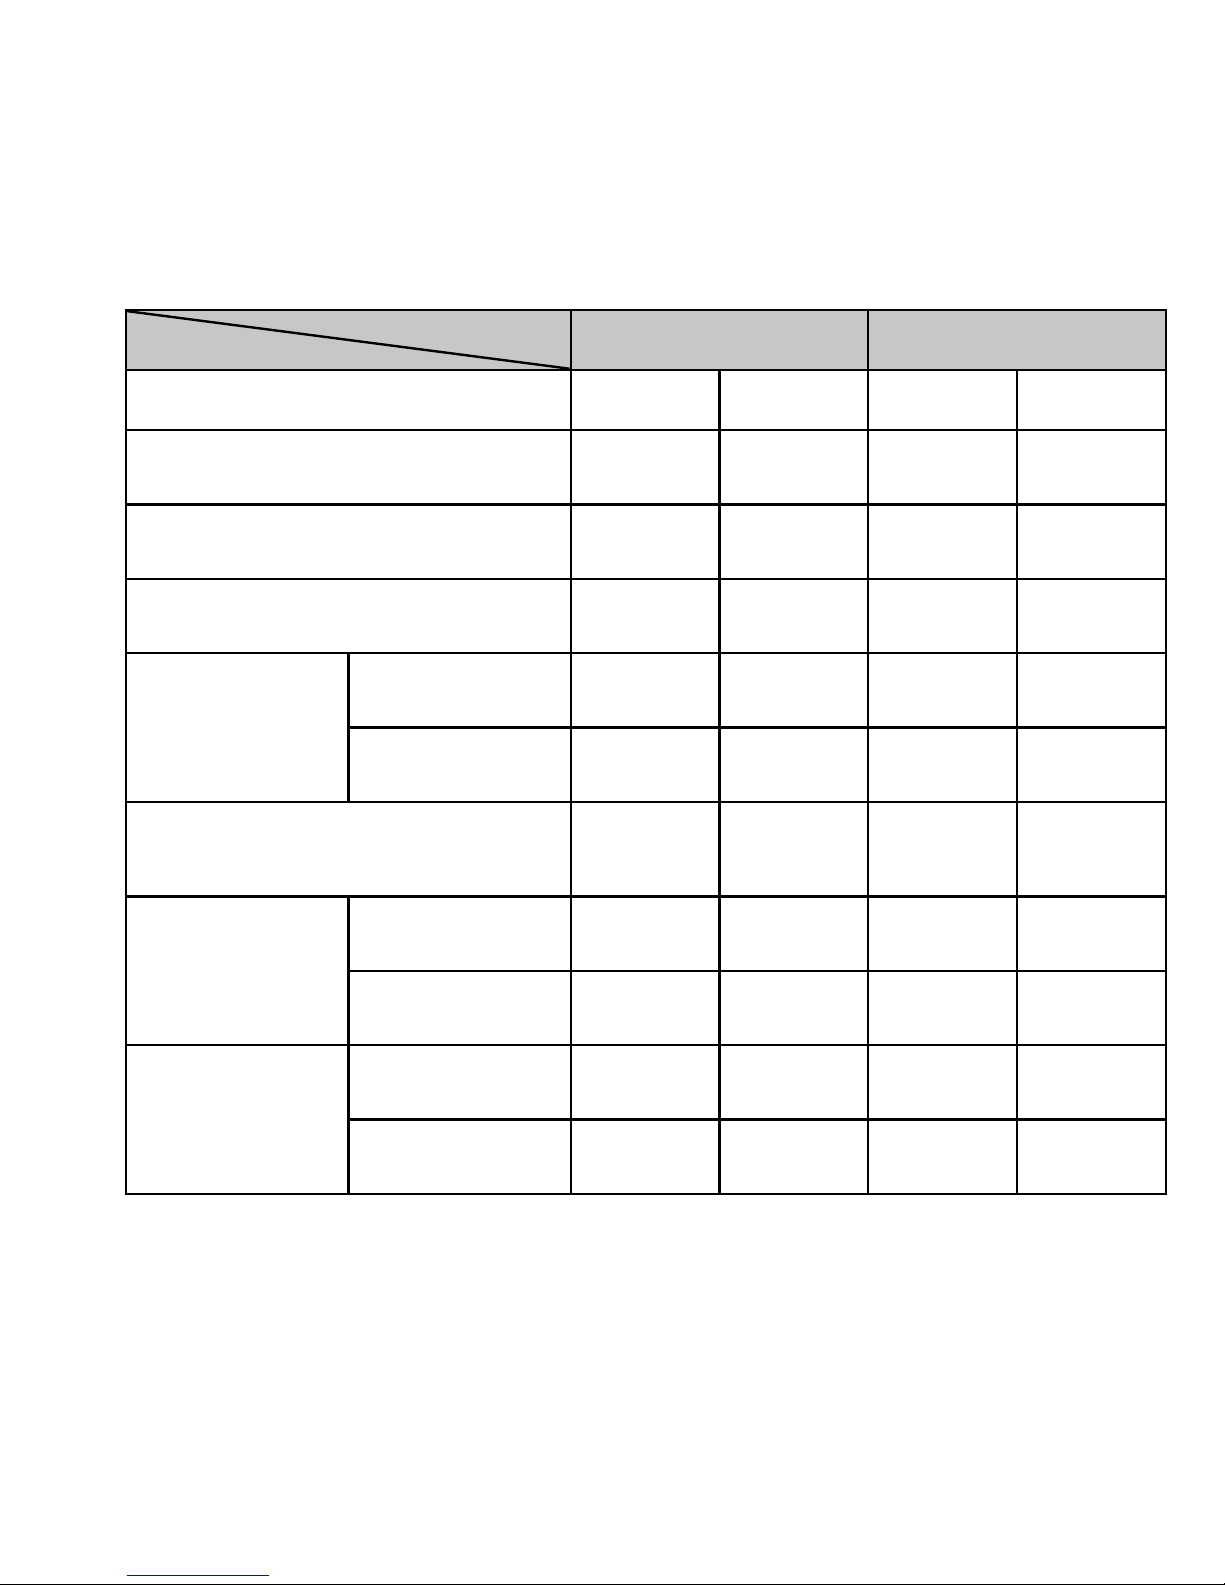
22
Reason sytolic pressure diastolic pressure
high low high low
Drinking, smoking
• •
Excitement or sporting
• •
seeing a doctor, desire to urinate
• •
change of temperature
high
• •
low
• •
After bathing, deep breathing or
yawning
• •
Cuff placing tight
• •
loose
• •
Cuff position above the heart
• •
below the heart
• •
B O D Y & C I R C U M S T A N C E SO P E R A T I O N
Page 23

23
The blood pressure is influenced by a variety of different factors, such as
bodily circumstances or a wrong operation of the monitor. Some people
even get nervous when seeing a doctor and that will make their blood pressure rise.
Single measurements can not indicate the whole blood level, so you need
not to be anxious for isolated higher or lower blood pressure results. The
most important thing is to master one‘s blood pressure trend through longterm measurement. Please talk to your doctor for useful judgement of your
recorded values.
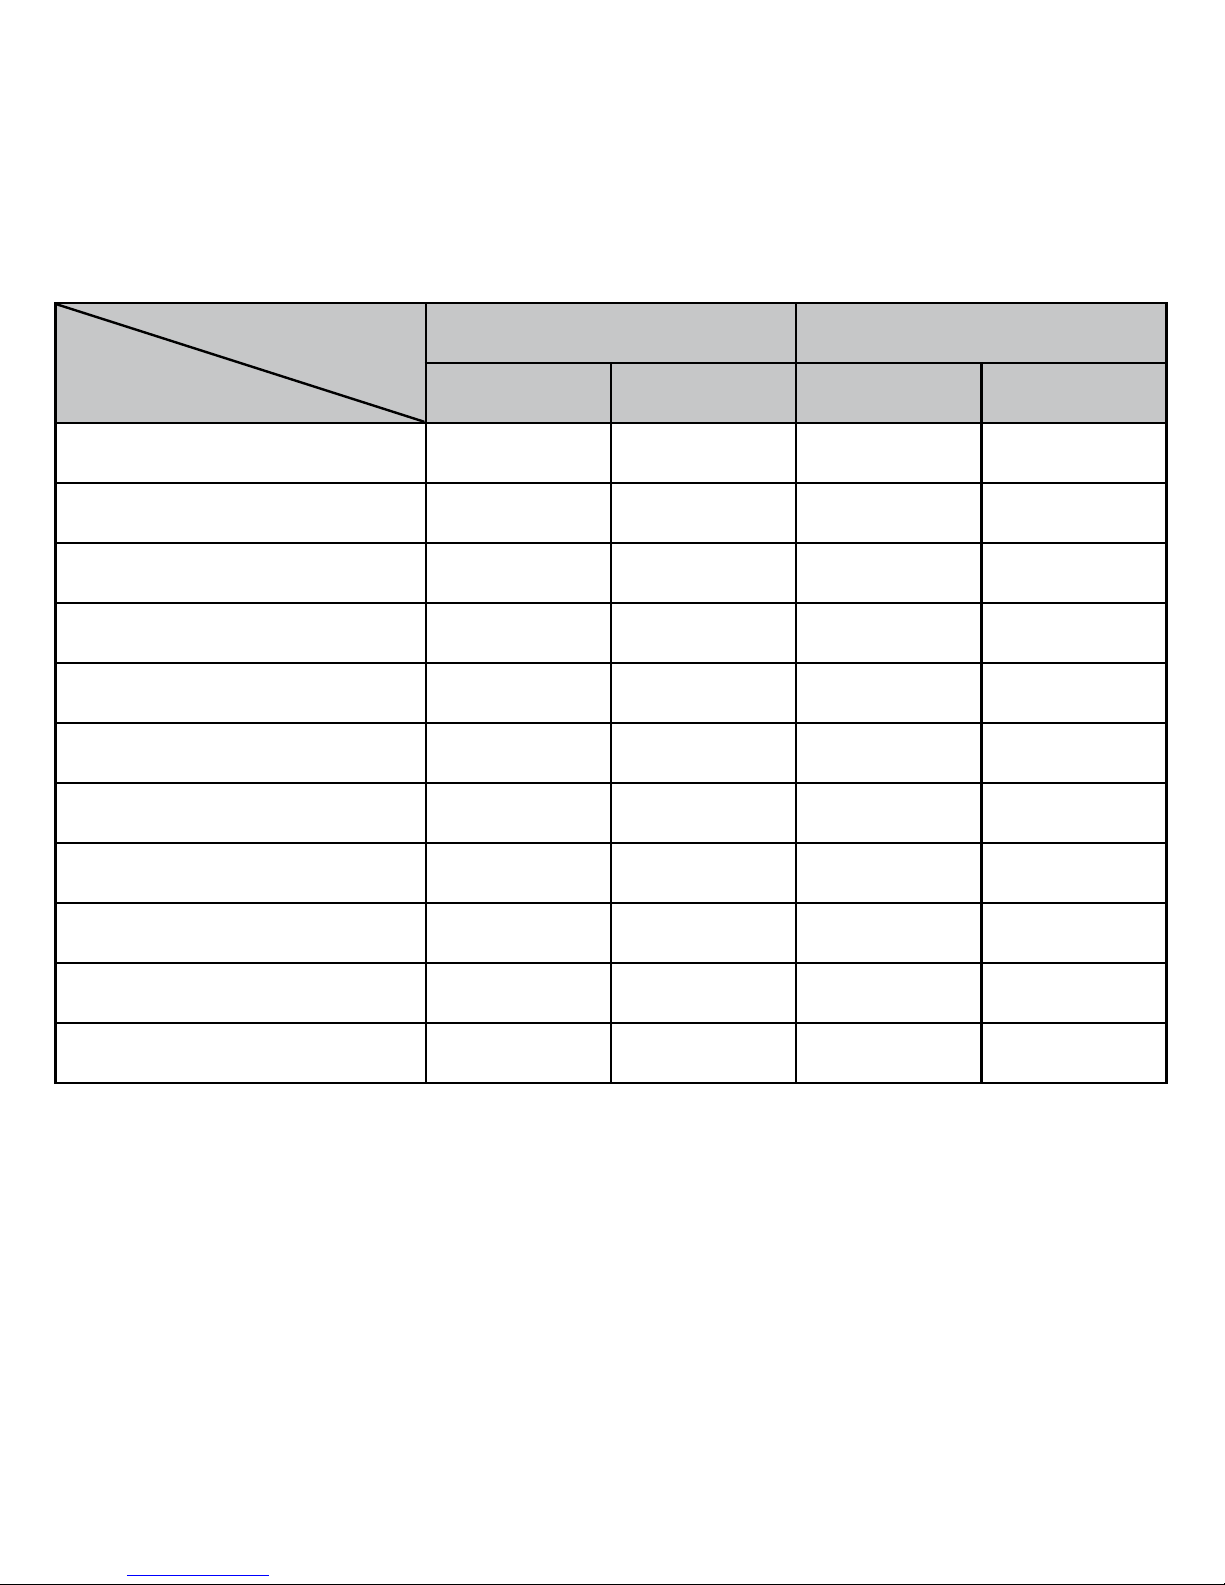
Average values of normal arterial blood pressure (mmHg):
The following chart shows usual average values. You could obtain similar
results by measuring your blood pressure for several days at the same time.
(so called „Basic Blood Pressure“)
Page 24
24
Age
Male Female
systolic diastolic systolic diastolic
11-15 114 72 109 70
16-20 115 73 110 70
21-25 115 73 110 71
26-30 115 75 112 73
31-35 117 76 114 74
36-40 120 80 116 77
41-45 124 81 122 78
46-50 128 82 128 79
51-55 134 84 134 80
56-60 137 84 139 82
61-65 148 86 145 83
Page 25

25
Hypertension:
Various cardiovascular or kidney diseases can cause hypertension. Longterm hypertension can also cause pathological changes in heart, brain and
kidney. These changes can lead to hypertension complications which are
often diagnosed or treated too late.
Low Blood Pressure:
There are two kinds of minimum pressure:
• If you always feel dizzy, unsuitable in the chest and have difculties
in breathing or occurences of temporary myopia when standing up, you
might have a standing minimum pressure disease. You should go to see
a doctor.
• The original minimum pressure disease has no self-symptoms (besides
low blood pressure). To get rid of it, you should pay more attention to
nutrition and do more physical exercise.
Page 26
26
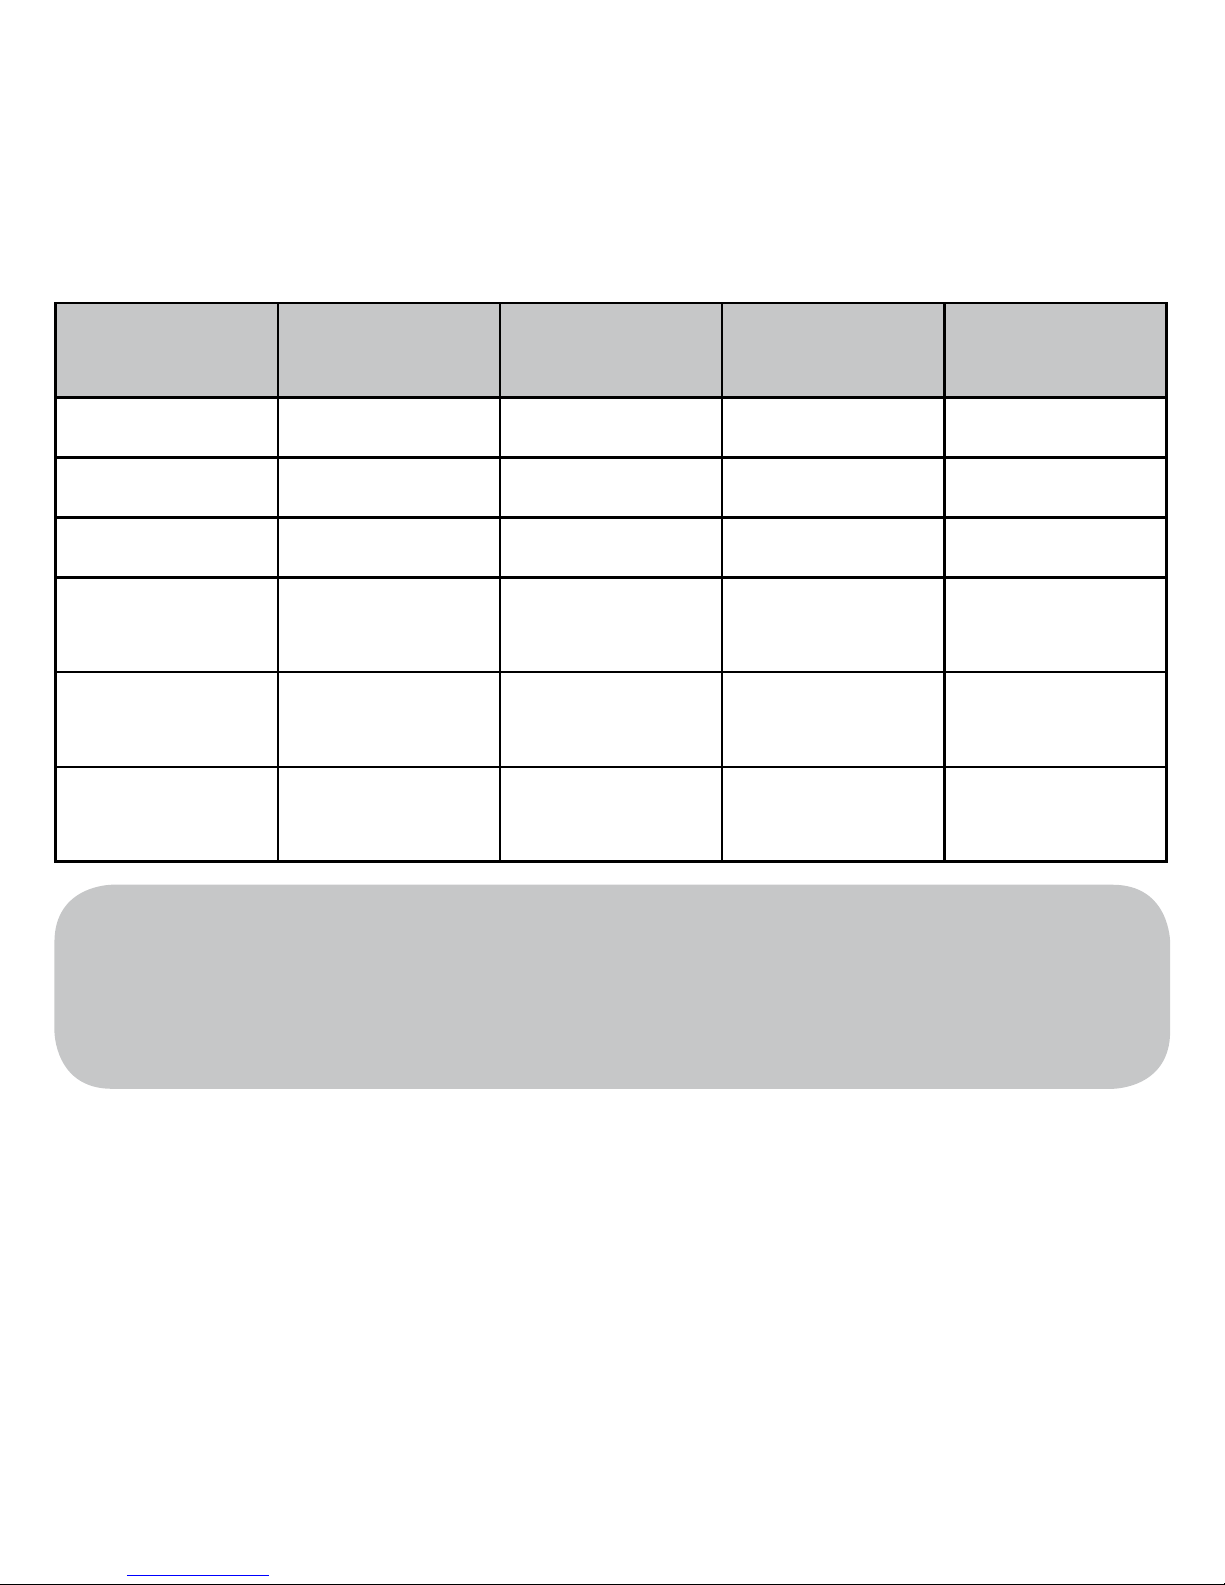
BD Classification
SBP
mmHg
DBP
mmHg
Color indicator Color changing
area
Optimal < 120 < 80 GREEN GREEN
Normal 120-129 80-84 GREEN GREEN
High- 130-139 85-89 GREEN GREEN
Stage 1
Hypertension
140-159 90-99 YELLOW YELLOW
Stage 2
Hypertension
160-179 100-109 ORANGE RED
Stage 3
Hypertension
≥180 ≥110
RED RED
Note: It is not intended to provide a basis of any type of rush toward
emergency conditions/diagnosis based on the color scheme.
This color scheme is only meant to discriminate between the
different levels of blood pressure.
Page 27
27
Additionally, the Bi-classification LED will display the corresponding colour
respective for the Systolic and the Diastolic.
Example: if the systolic value is 161 (which is Stage 2 Hypertension), the
LED for the Systolic (which is upper) should display red. And if the diastolic
value is 89 (which is High-normal), the LED for the Diastolic (which is lower) should display green.
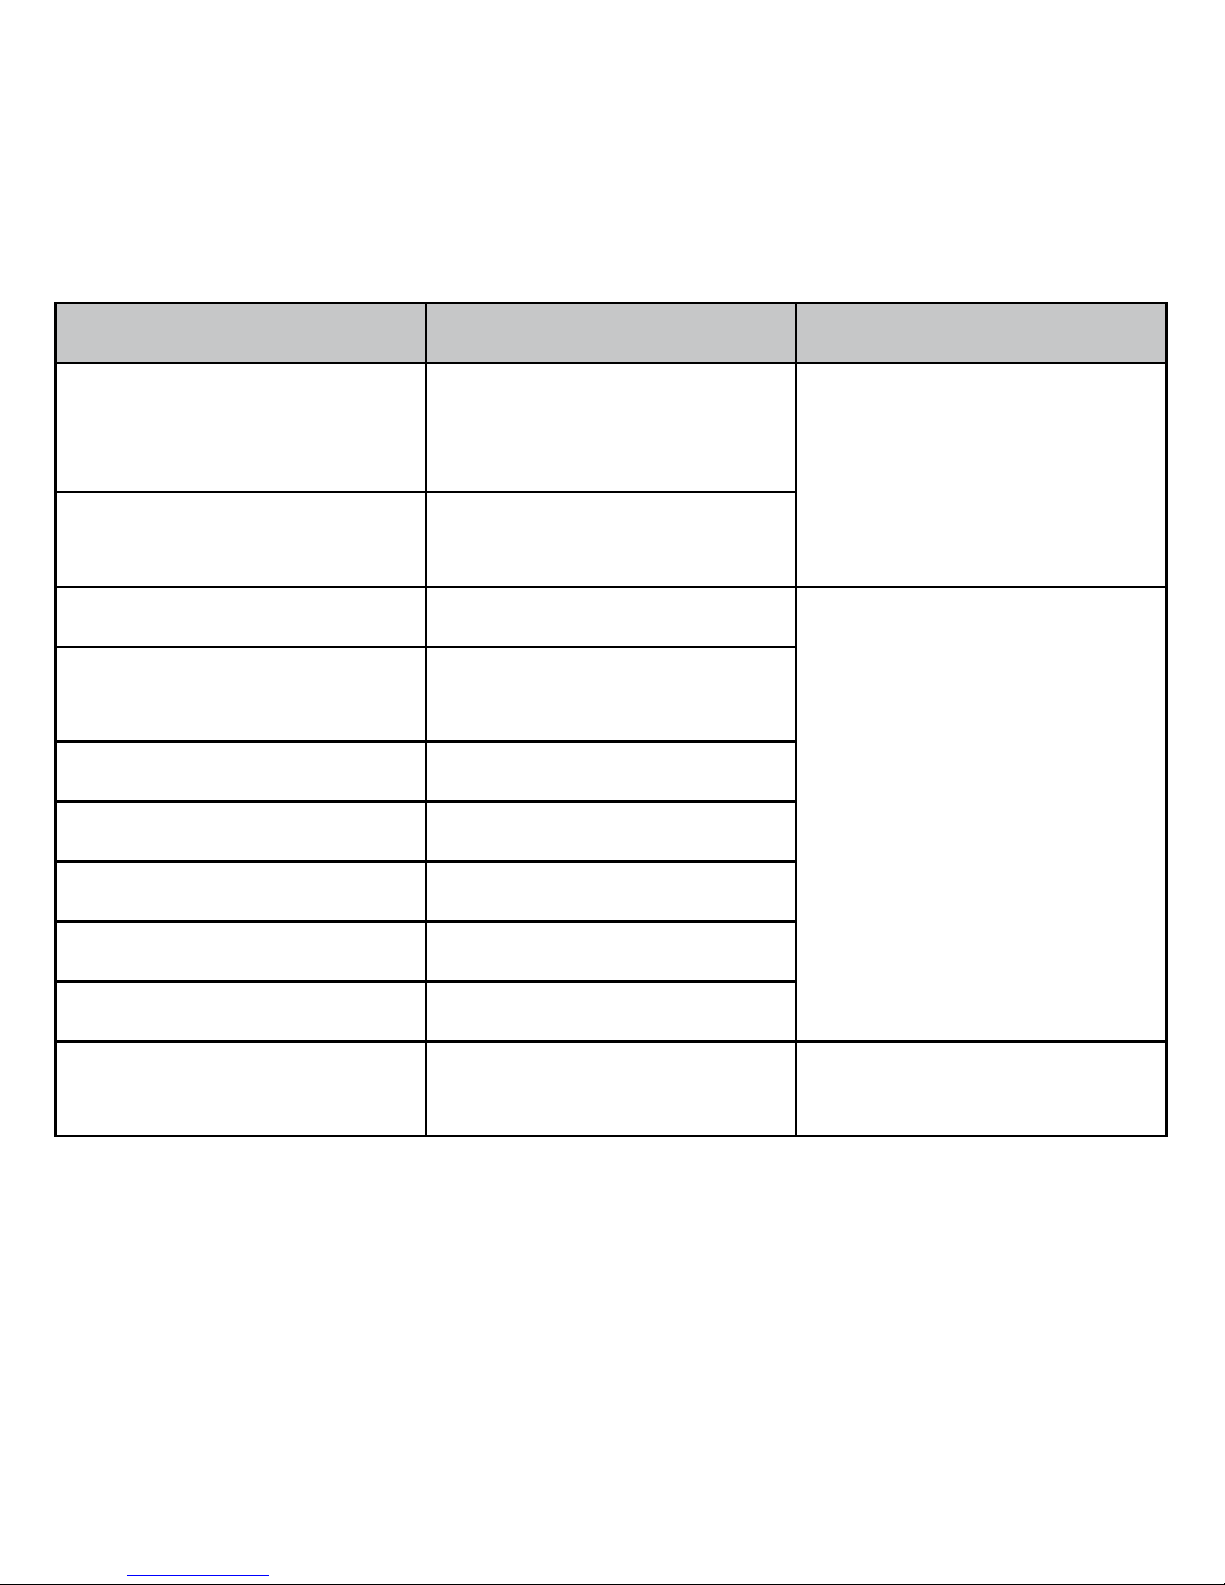
Troubleshooting
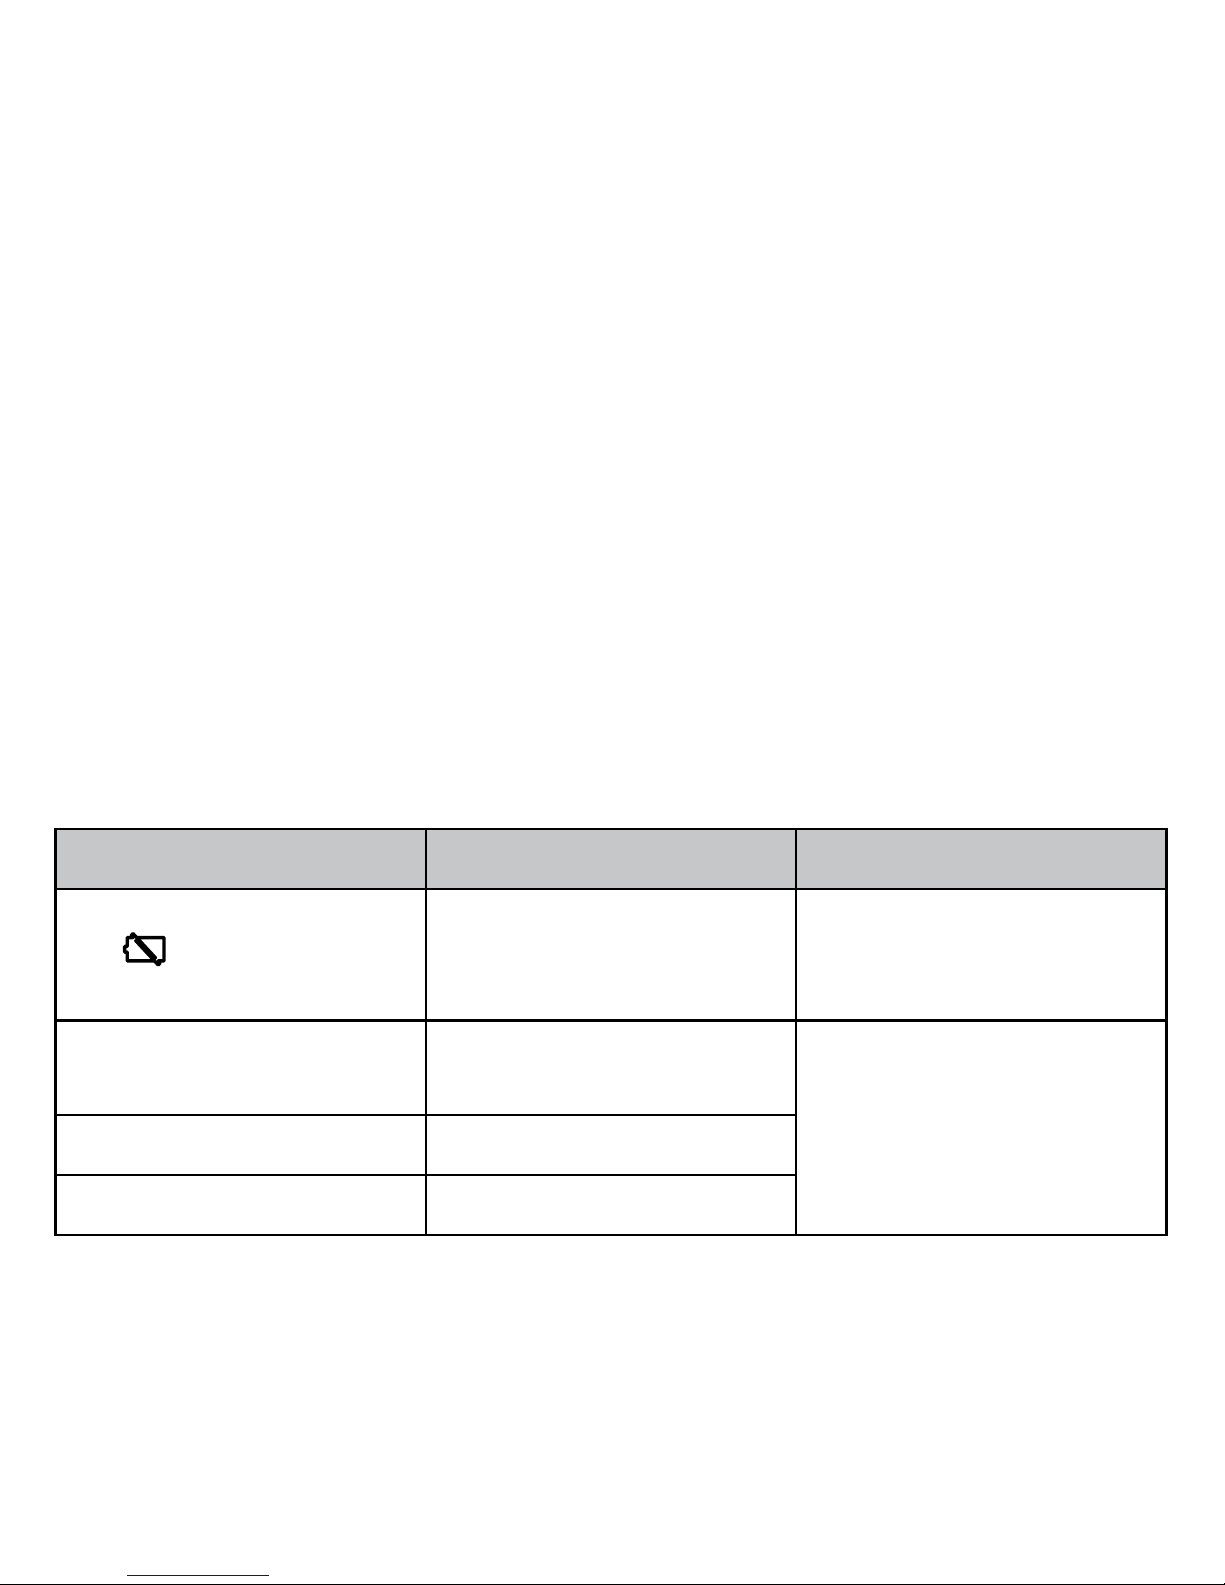
Problem Cause Remedy
LCD shows low battery symbol
Battery power low exchange batteries
LCD shows „Er 0“ Pressure system is instable be-
fore measurement
Don‘t move and measure
againLCD shows „Er 1“ Systolic pressure detect fail
LCD shows „Er 2“ Diastolic pressure detect fail
Page 28
28
Problem Cause Remedy
LCD shows „Er 3“ Pneumatic system is blocked
or cuff is too tight during inflation
Place the cuff correctly and
try again
LCD shows „Er 4“ Pneumatic system leak or cuff
is too loose during inflation
LCD shows „Er 5“ Inflation above 300mmHg
Measure again after 5 minutes. If the monitor is still abnormal, please contact the local distributor / manufacturer.
LCD shows „Er 6“ Over 3 minutes while pressure
above 15 mmHg
LCD shows „Er7“ EEPROM accessing error
LCD twinkling Device parameter check error
LCD shows „Er 9“ MCU self-verity error
LCD shows „Er A“ Span error
LCD shows „Er b“ EEPROM Backup-error
No response when you press
any button. BPM hang
Incorrect operation Take out batteries for a while,
and then reinstall all batteries.
Page 29

29
Maintenance
1. Do not drop this monitor or subject it to strong impact.
2. Avoid high temperature and solarization. Do not immerse the monitor in
water as this will result in damage to the monitor.
3. If this monitor is stored near freezing, allow it to acclimate to room
temperature before use.
4. Do not attempt to disassemble this monitor.
5. If you do not use the monitor for a long time, please remove the
batteries.
6. It is recommended to check the monitor performance every 2 years or
after repair.
7. If the cuff becomes dirty, remove it from the monitor and clear it by
hand in a mild detergent, then rinse it thoroughly in cold water. Never
dry the cuff in clothes dryer or iron it.
Page 30
30
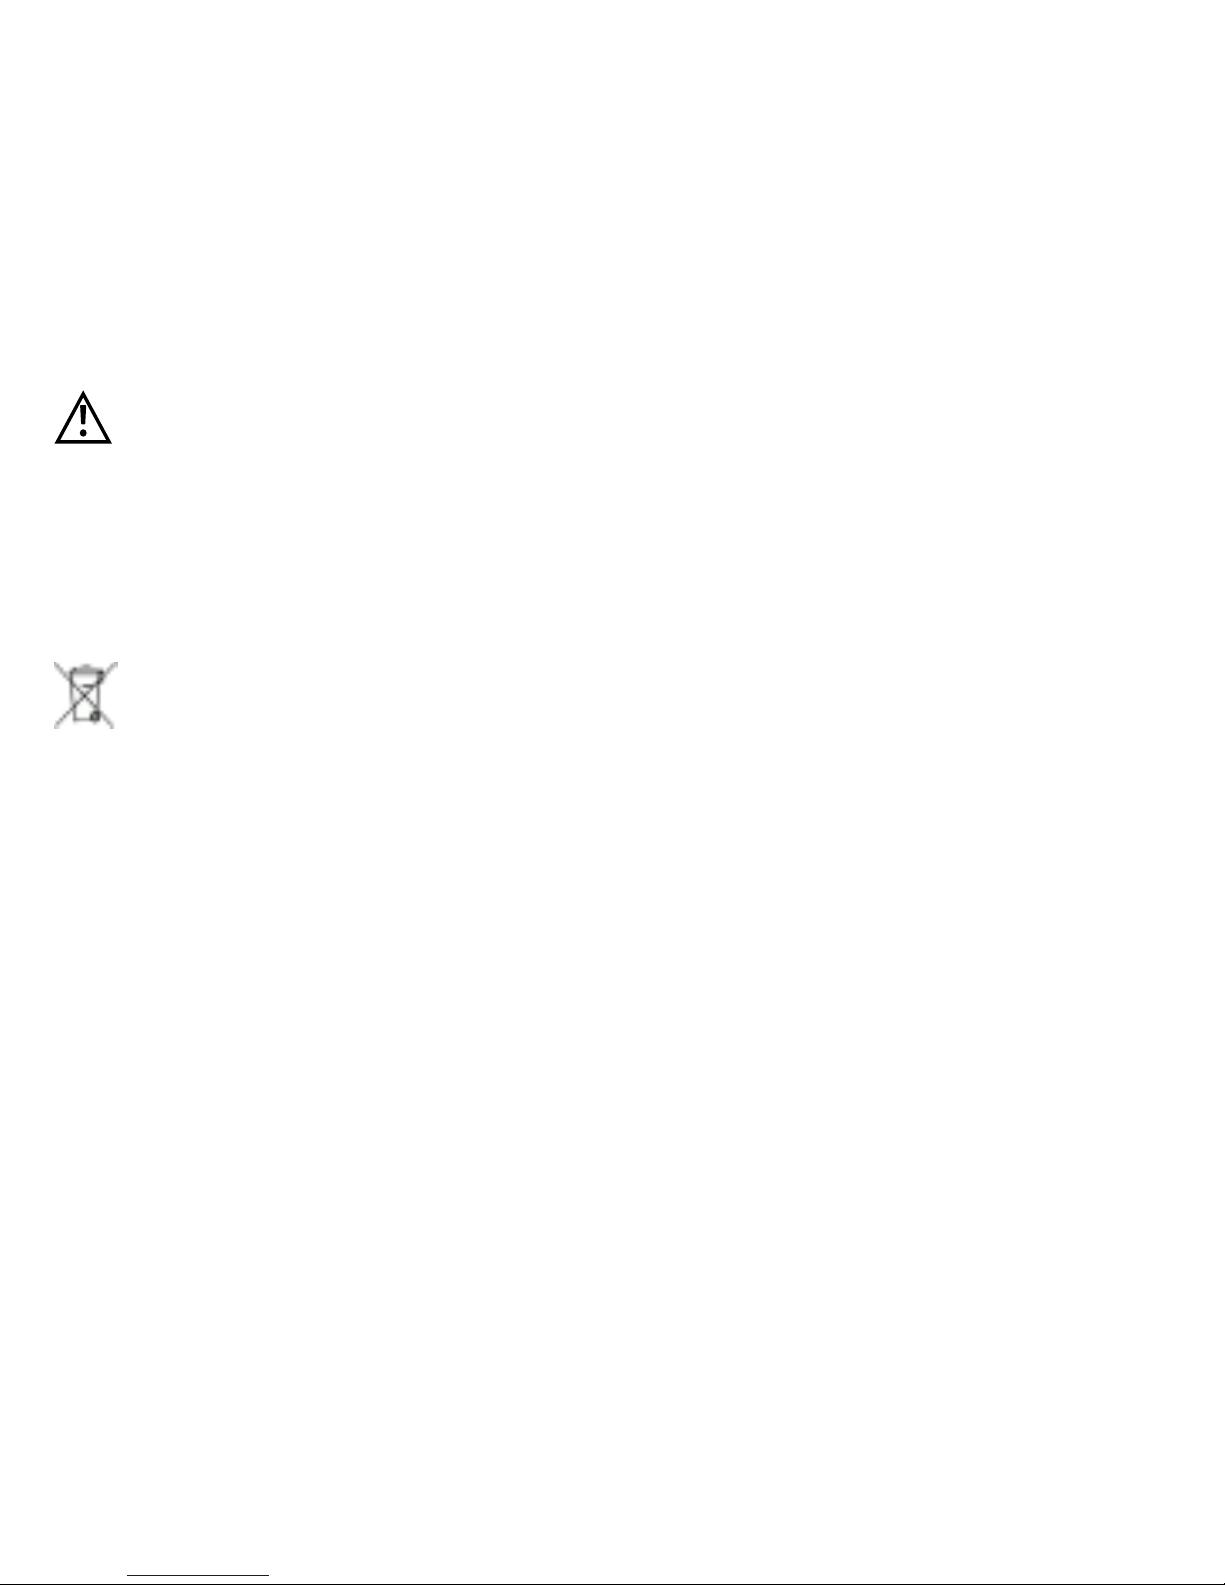
Explanation of Symbols
Caution! Please red user manual thoroughly!
M
Type-B Applied Parts
Disposal Information
Warranty
HMM Diagnostics GmbH products need to fulfill high quality requirements.
Because of this reason, HMM Diagnostics GmbH gives a 2-year warranty by
purchasing this smartLAB® product. You can even extend the warranty from
2 to 5 years without extra pay when you register your product. Please use
the warranty card included in your product set.
Wear parts, cuff, batteries etc. are excluded from warranty.
Page 31

HMM Diagnostics GmbH
Friedrichstr. 89
D-69221 Dossenheim, Germany
mail: [email protected]
www.hmm.info
Manufacturer:
Weitere Informationen zu den smartLAB® Produkten /
More information on our smartLAB® products:
www.smartlab.org
 Loading...