

Page 1
Quick-Start
User Manual
H80400-08-01-01_R0_20/09/2010
HMM Diagnostics GmbH
D-69221 Dossenheim, Germany
www.hmm.info
Telehealth Touchscreen Mobile Phone
Pleas read this user manual thoroughly before the rst use
Page 2

Page 3

Content
Important information 4
I. Introduction 9
II. Your h
Fon
10
Charge the h
Fon
and insert the battery 12
Insert SIM card 13
Insertion of optional available modules* 14
Use navigation pen 14
Open and close applications 15
III. Setup & functions 16
The main options of the HOME screen 17
First steps: How to set up your h
Fon
20
Camera 33
Notes concerning directives 34
Declaration of Conformity 34
WEEE note 34
RoHS compliance 35
Technical specications 35
Page 4

4
Important information
Please read rst!
Safety Advices / General Use
• Ensure that the device and accessories are out of reach of
young children, because small parts could be swallowed.
Ingestion may cause choking or serious injuries!
• Ensure that a minimum distance of 15 cm between the
device and a pacemaker is observed. Failure to comply
can cause serious interference with the pacemaker (or
other medical devices)! It’s better to switch off your device when in doubt, in order to prevent this!
• The use of this device is prohibited in most hospitals, be-
cause electromagnetic interferences have an impact on
medical devices and can disturb. Observe the valid local
regulations and turn your device off if necessary!
• If you use yourself another medical device, check with
the manufacturer if the device has already a protection
against external RF radiation. If necessary, contact your
doctor if you doubt the compatibility of the devices with
each other. Use this device only when you can exclude
all interferences with other medical devices!
• Handle this device with care and rationality.
• Do not disassemble the device independently. Never in-
sert objects into the case slots or other openings of the
device.
Page 5

5
• Fold carefully the protective covers for SIM and T-Flash
card and the protective cover for the optional modules*.
Do not tear off the protective covers.
• Always make sure that the device does not get wet and
there is no moisture in the case openings. Moisture can
cause serious damage to the device! Do not touch the
device with wet hands!
• Avoid bumping or dropping the device. Handle this elec-
tronic product always with the necessary precautions in
order to prevent damages to the device.
• Do not use the device if the display is cracked or broken.
Glass or pieces of broken acrylic glass can cause injury
to hands or face.
• Do not paint your device. The paint could damage the
case, stick together moving parts and therefore damage the device totally or could damage irreparably optionally available modules for the device.*
• If the device has a camera ash or another light source,
avoid it to blind children, other persons or animals with
it.
• Operate the device or headphones that you use in con-
nection with the device, with moderate volume. It can
cause permanent hearing damage, when headphones
are used over a longer period of time at excessive volume.
* For more information about the optional measuring modules see the
relevant chapter of this manual or visit the websitewww.hLine.eu
Page 6

6
Safety advices / Power supply and accessories
• Use for the supplied power pack only such power
sources that are appropriate according to the label.
• Do not remove the battery from the device while this
is being charged.
• Do not attempt to open the battery or to repair it.
The battery should not be bent, punctured, drilled,
shorted, thrown in the water or re, or exposed to
excessive temperatures.
• The device can be used only with the original battery
supplied. When using any other batteries there is the
danger of explosion!
• Do not expose the device to excessive moisture or ex-
treme temperatures. Device or battery should not be
stored for a prolonged period of time in a vehicle or
other location where the temperature can raise above
60°C (140°F). Avoid overheating the battery!
• Prevent accidental contact of the battery with other
metal parts, since in this way can be made currentcarrying connections which can lead to damages of
the battery.
• When you use optional available measuring modules
with this device, use only the modules approved by
the manufacturer therefor. Other modules can damage the device or can lead to wrong measuring results.
Page 7
7
• Dispose of or recycle the battery, the mobile phone,
the charger and / or other accessories, spare parts
and modules in accordance with local regulations.
Safety advices/ special environment
• When driving vehicles (apart from emergency cases), it
is not permitted to use telephone services with devices that must be held in the hand. In some countries
the use of mobile phones with hands-free equipment
is allowed.
• If possible, do not use the device when driving a ve-
hicle. Follow always all regulations concerning limitation of use of mobile phones on the road trafc
and observe the legal requirements referring to this.
• Ensure that all mobile phones or their respective
equipment (e.g. hands-free system), which are implemented in your vehicle, are xed securely.
• Do not place the device and equipment in the vicinity
or in the operating range of airbags implemented in
the car. In case of improperly installed mobile phones
the rapidly inating airbags can cause serious injuries.
Page 8

8
• Do not use the device in a tank fuel pump or in the vi-
cinity of chemicals and fuels. Always pay attention to
warnings and switch off the device. Your device can
cause explosions or res in and around fuel or chemical storages and transport areas or explosive areas.
• If you are in explosive areas or in places where exist
combustible materials, the device should be switched
off. Sparks in such environments can produce res
and explosions which can cause serious injuries or
even death. Do not use the device at petrol stations,
chemical plants and warehouses in the vicinity of explosives or detonators.
Potentially explosive environments are often, but not
always, marked as such. Pay attention to the corresponding advices. Such environments can be: spaces
under deck (for ships), transportation, distribution
or storage facilities for chemicals, vehicles driven
with liquid gas (such as propane or butane), areas
where the air contains chemicals or particles (such as
grain, dust or metal powders) and any other areas in
which you are invited to turn off the engine of your
vehicle.
• Switch off your device in any facility where you are
invited to do so by signs or other indicators.
• In most countries it is forbidden to use this device on
ights, because it can interfere with the navigation
system and the communication network of airplanes.
Please observe the applicable recommendations and
regulations regarding the use of mobile phones and
switch off the device if necessary.
Page 9

9
I. Introduction
Thank you for choosing the h
Fon
. This telehealth touchscreen smartphone enables you to use, in addition to the
usual advantages of a mobile phone, also the comprehensive monitoring of your vital values in combination
with the corresponding smartLAB® measurement systems. You can nd an overview of the products of this
telemonitoring set and additional information about the
HMM h
Line
on www.smartlab.org.
In this Quick Start manual you learn the basic functions
in using your h
Fon
and a detailed description of the applications with which you can display and administer your
vital data.
Page 10
10
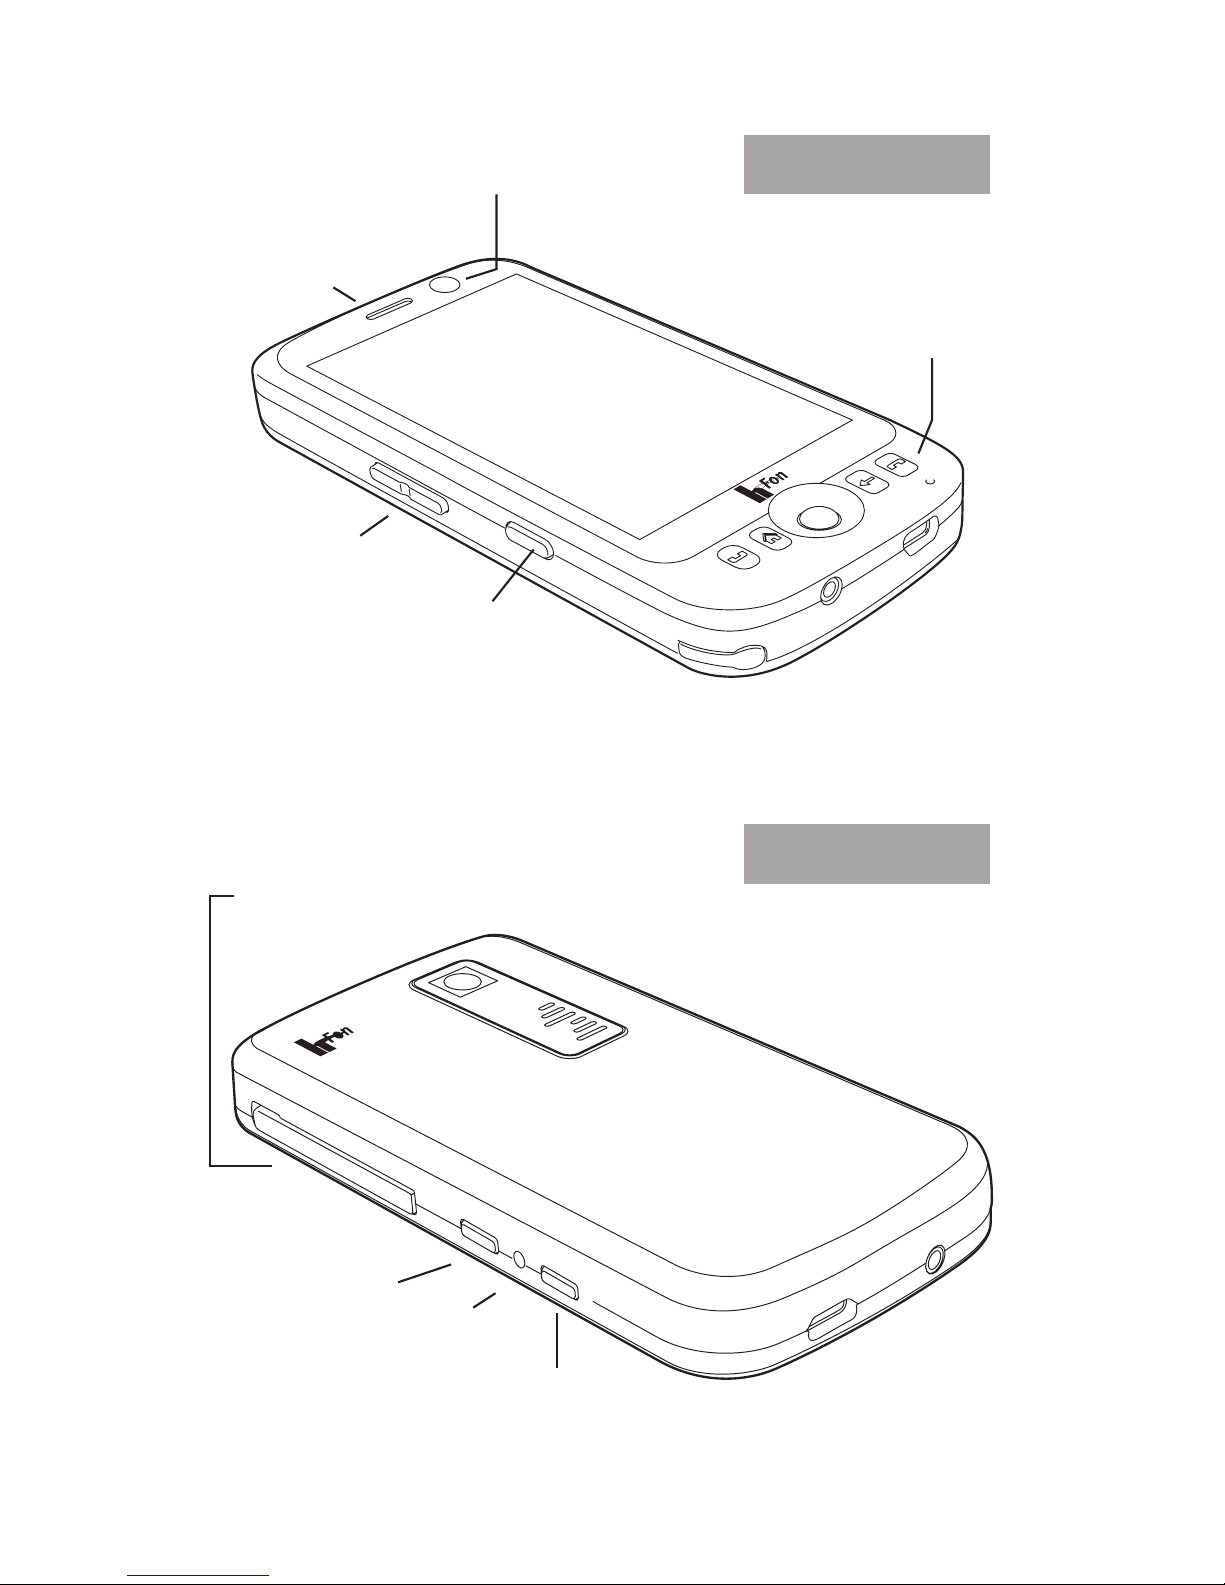
II. Your h
Fon
front
camera
Speaker
volume
keys
quick select
h
Line
application
navigation buttons
frontside
camera
menu
Reset
Power/
Standby
insertion slot for SIM- & SD cards
backside
Page 11
11
navigationbuttons
1
2
3
4
5
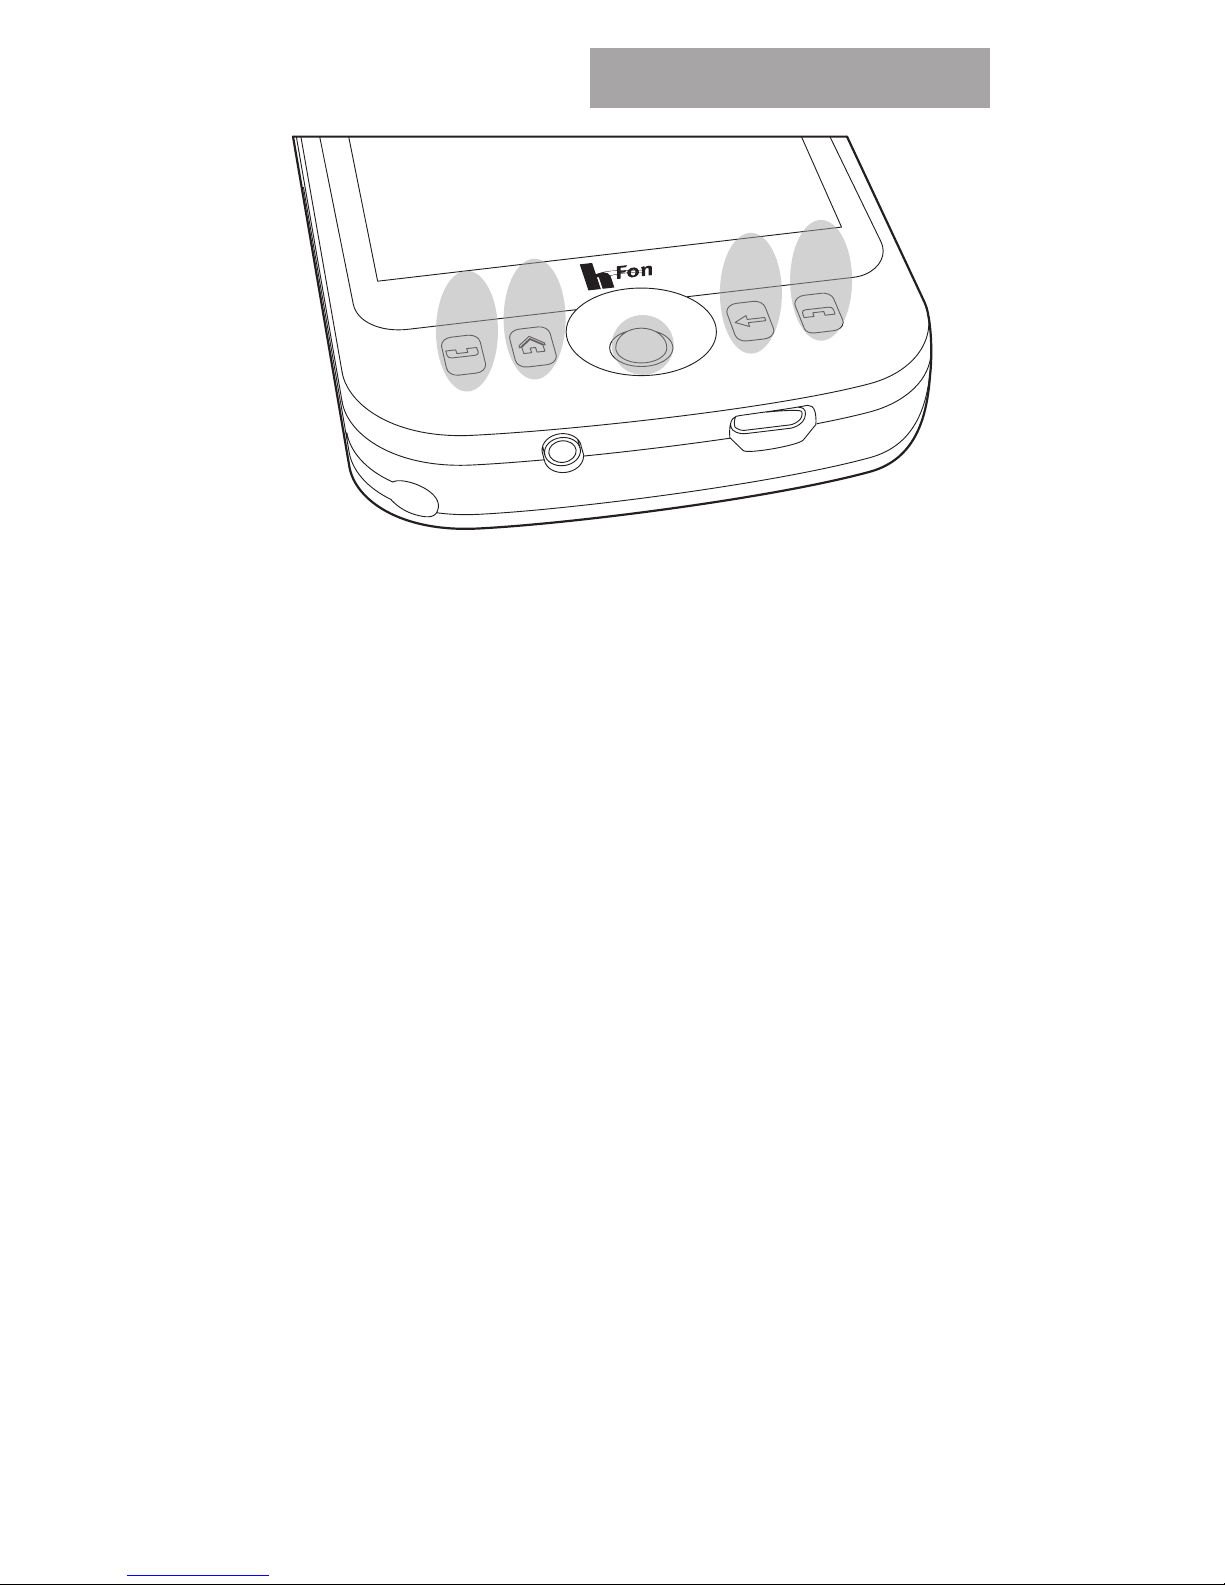
Through the navigation area you can directly select the
basic functions of your h
Fon
:
1 Phone green: speed calling phone menu
2 Home: Quick select HOME screen
3 Navigation Trackball / conrmation (press)
4 Back: goes back to the previous menu
5 Phone red: nish / interrupt call
Single menu points can either be selected using the navigation buttons or by tipping the touch screen. You can do
this directly with the thumb or index nger, or with the
supplied pen. Over time you will develop your preferred
method to scroll and select individual single menu items.
Page 12
12
Charge the h
Fon
and insert the battery
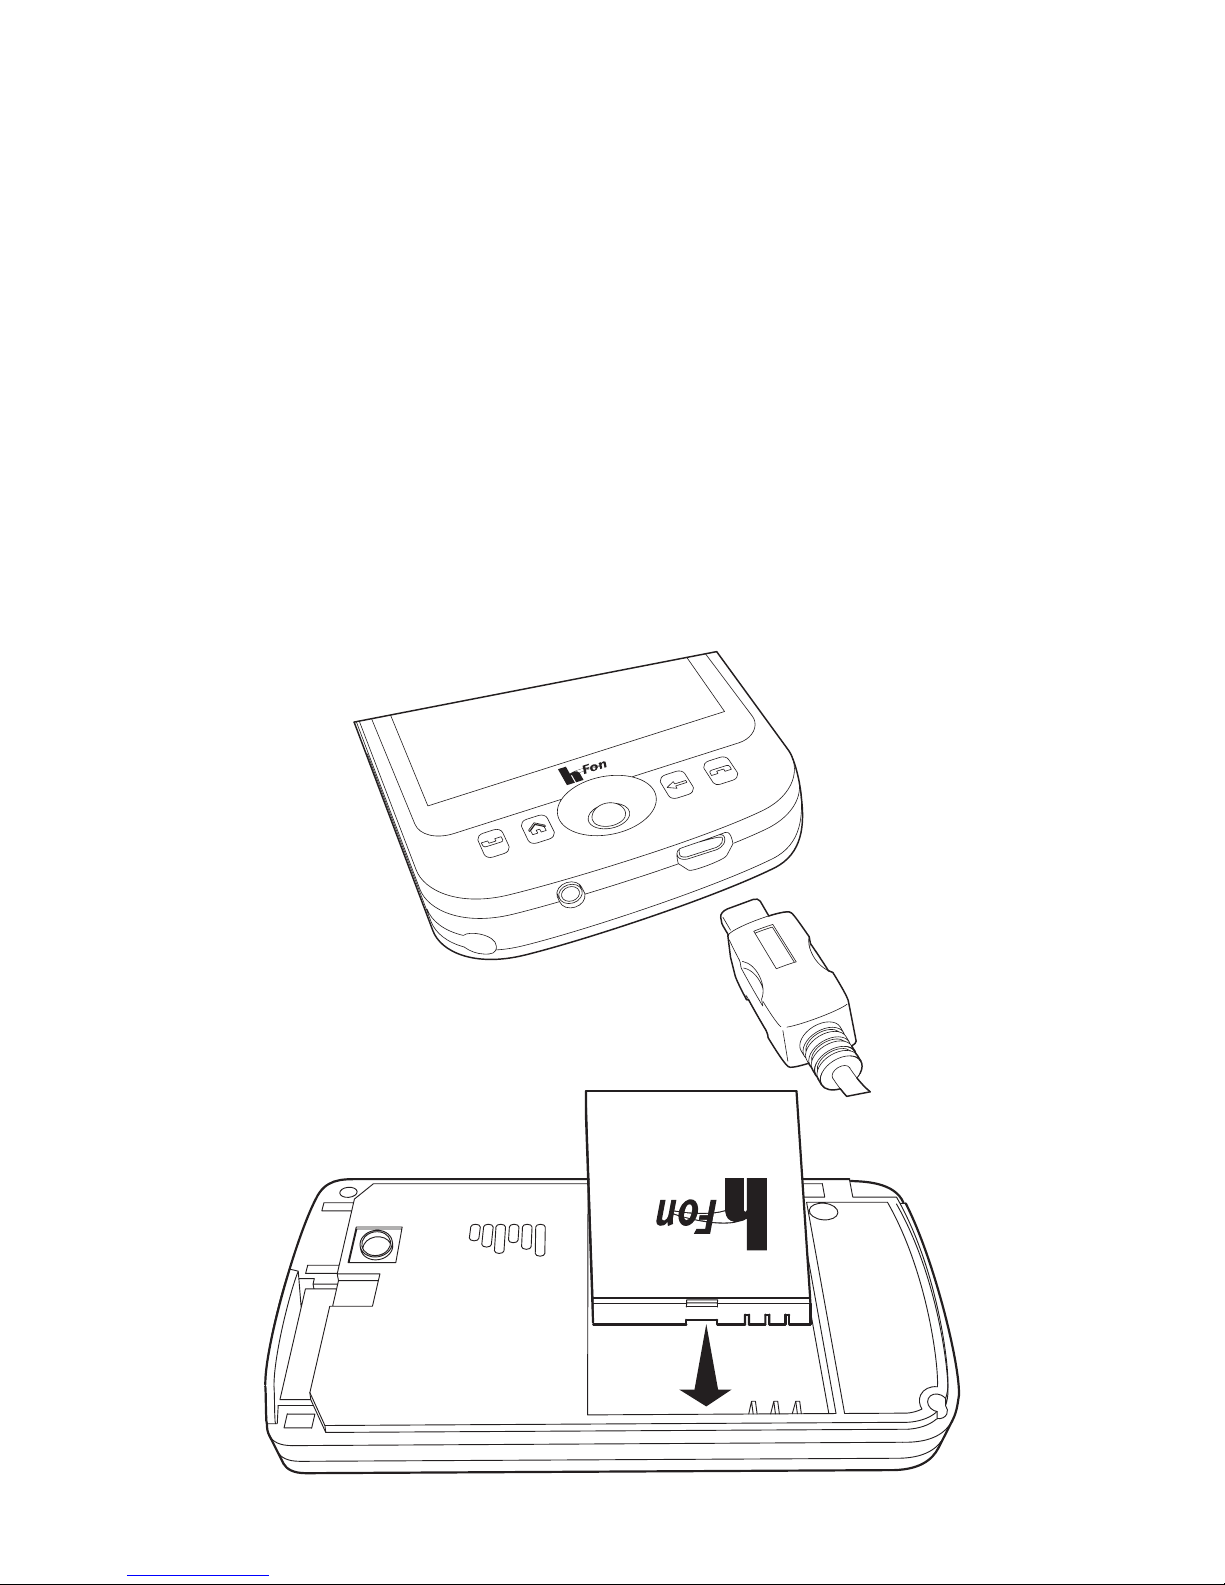
Before the rst use you must charge the battery of your
h
Fon
for at least XX hours. Please use for this purpose the
included USB charging cable and plug this into the appropriate opening at the bottom of the phone (see image
1). To insert the battery, carefully push the back cover of
the h
Fon
down and lift it.
Insert then the battery so that the h
Fon
label points up
and the three pin contacts are in the left corner are (see
image 2).
image 1
image 2
Page 13
13
Insert SIM card
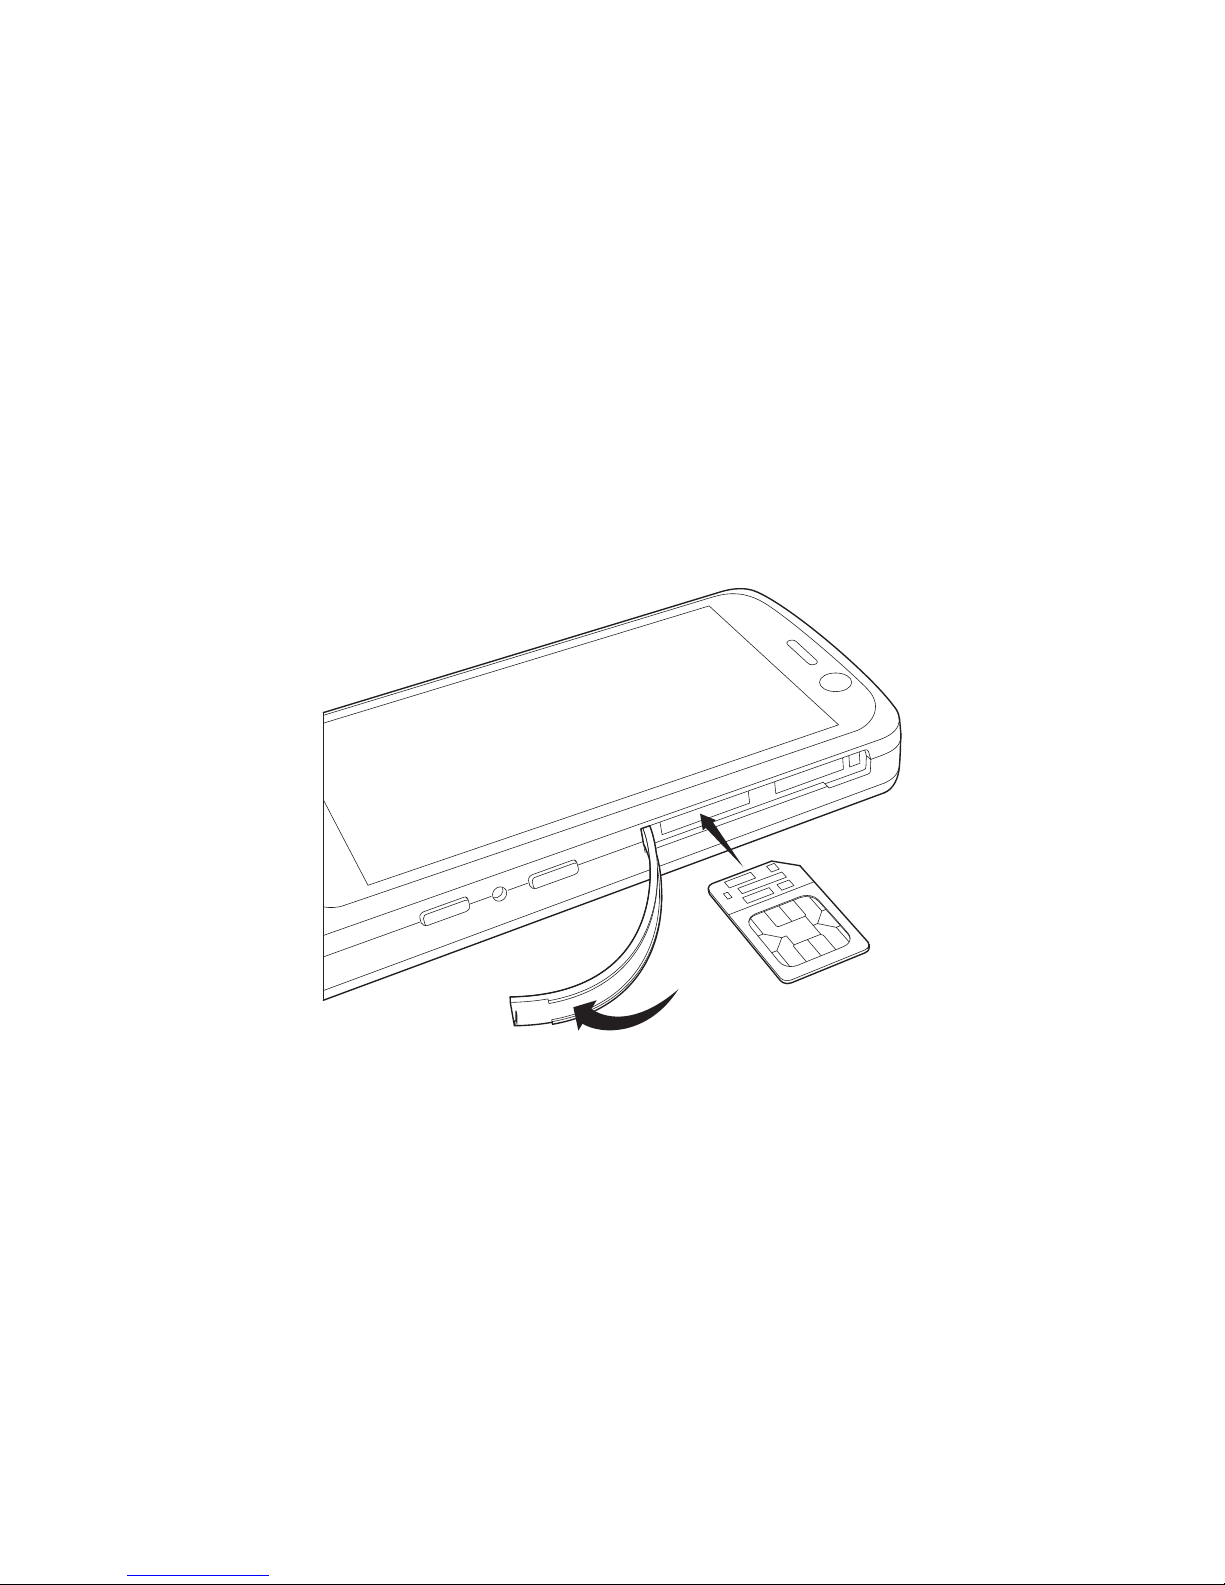
To make calls with the h
Fon
and use mobile internet, you
need to insert the SIM card of your mobile phone provider
in the designated slot on the side of the device.
For this purpose, rst strike down the protective cover. The
SIM card slot is the upper one of the two insertion slots.
Now take your SIM card and insert it carefully into the slot.
The snapped off corner of the SIM card must be on the left
top (see illustration).
Page 14
14
Insertion of optional available modules*
Apart from its function as smart phone, your h
Fon
has an
optionally equippable slot for additional measuring modules (such as for example a blood glucose measuring module). With it, your h
Fon
can be set up to a multifunctional
applicable health care smart phone and can offer you
many additional functions concerning the personal health
administration.
You can read in the separate manual supplied with each
module, how exactly the optional available modules are
inserted in the device.
* For more information about the optional measuring modules see the
relevant chapter of this manual or visit the websitewww.hLine.eu
Use navigation pen
In addition to track ball and touch screen operation, your
h
Fon
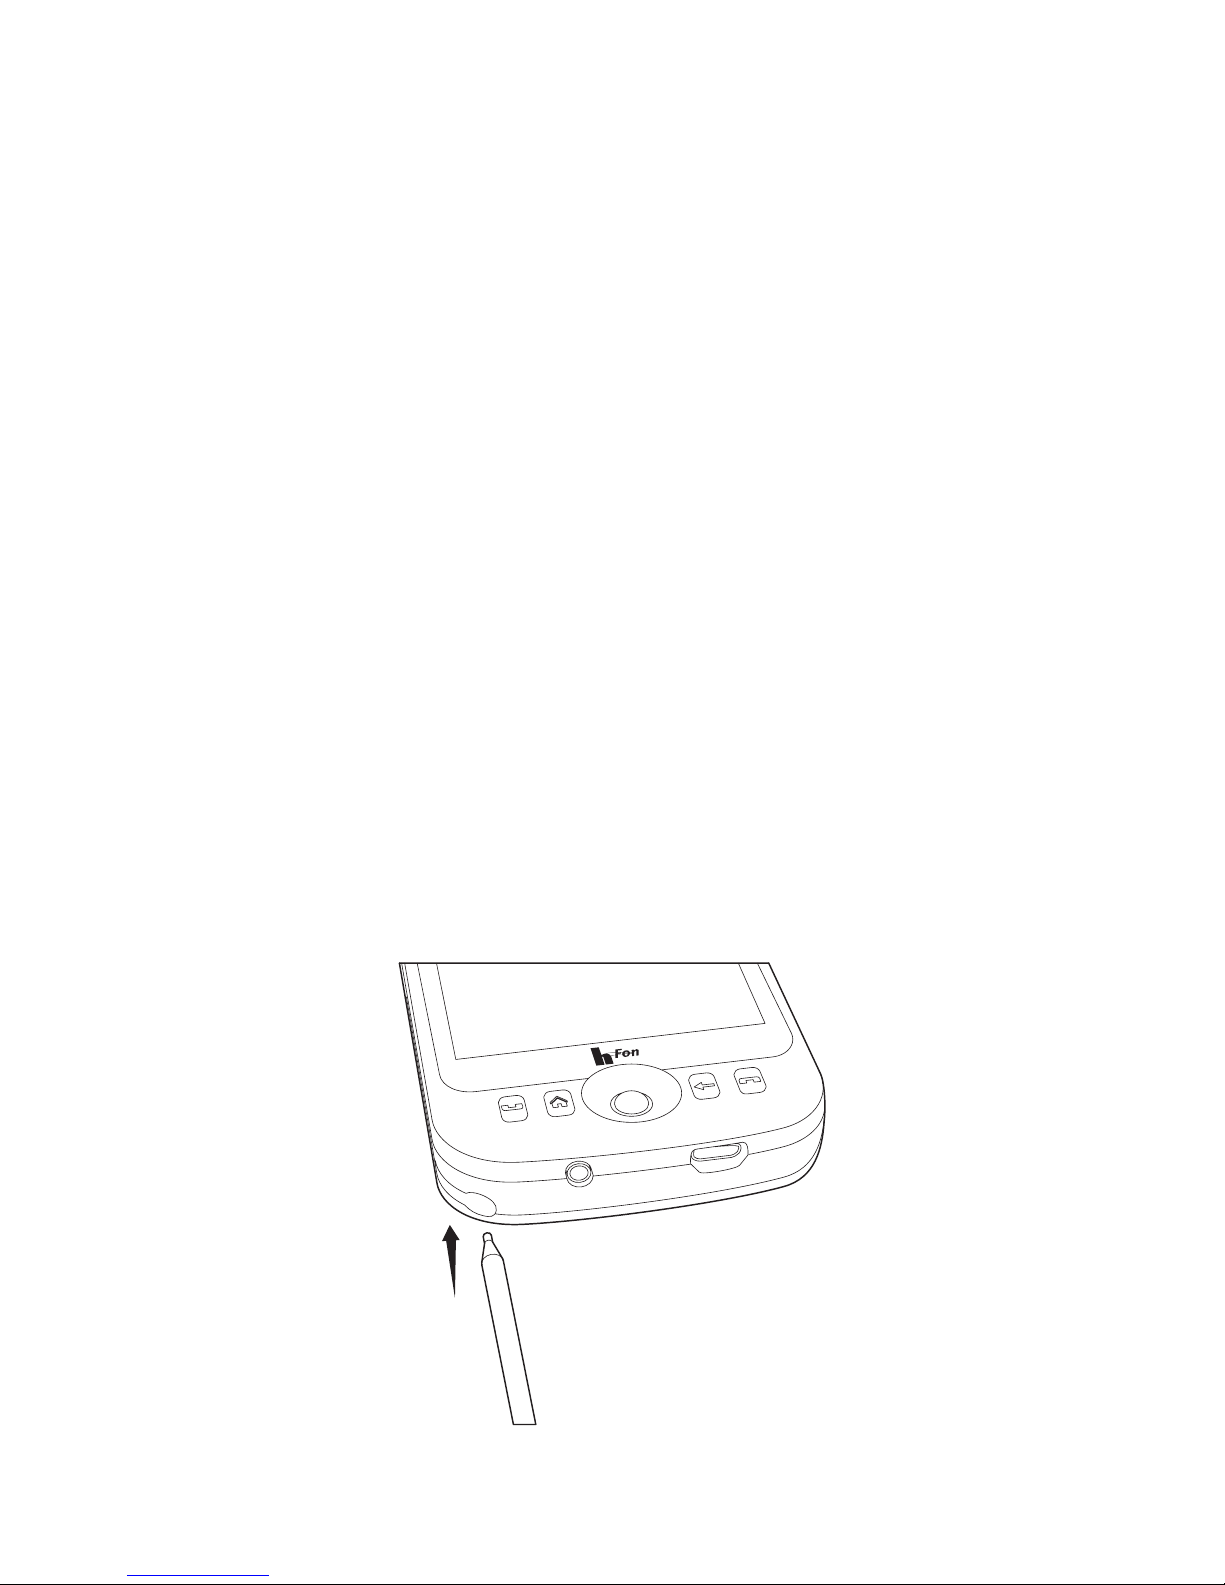
has a pen, with which you can navigate on the screen.
You can pull the pen out of the designated appliance on
the bottom of the device, and put it back there after using it.
Page 15

15
Open and close applications
Scroll with your ngers (or with the supplied pen) on the
touch screen monitor of your h
Fon
, in order to navigate
through the various programs and applications.
Open an application by gently tapping / pressing. Intuitively navigate within menus with the help of arrow icons
and other icons shown on the display.
Alternatively, you can also navigate using the “track ball”
(quick select button “3”). Run your thumb gently over the
trackball to the top or down. Select specic menu items by
briey pressing the trackball out.
Note: Not all applications support the navigation with the
track ball. Use in such cases the navigation by the touch
screen display.
You can always turn back to the respective previous submenu by pressing the quick select button “4” in the lower
navigation area of your hFon.
By pressing the quick select button “5” you break off all
operations, and always go back to the HOME screen.
Page 16
16
III. Setup & functions
After having inserted and fully charged the battery, you
can switch on your h
Fon
. To do so press the power / standby button on the side of the device for at least XX seconds.
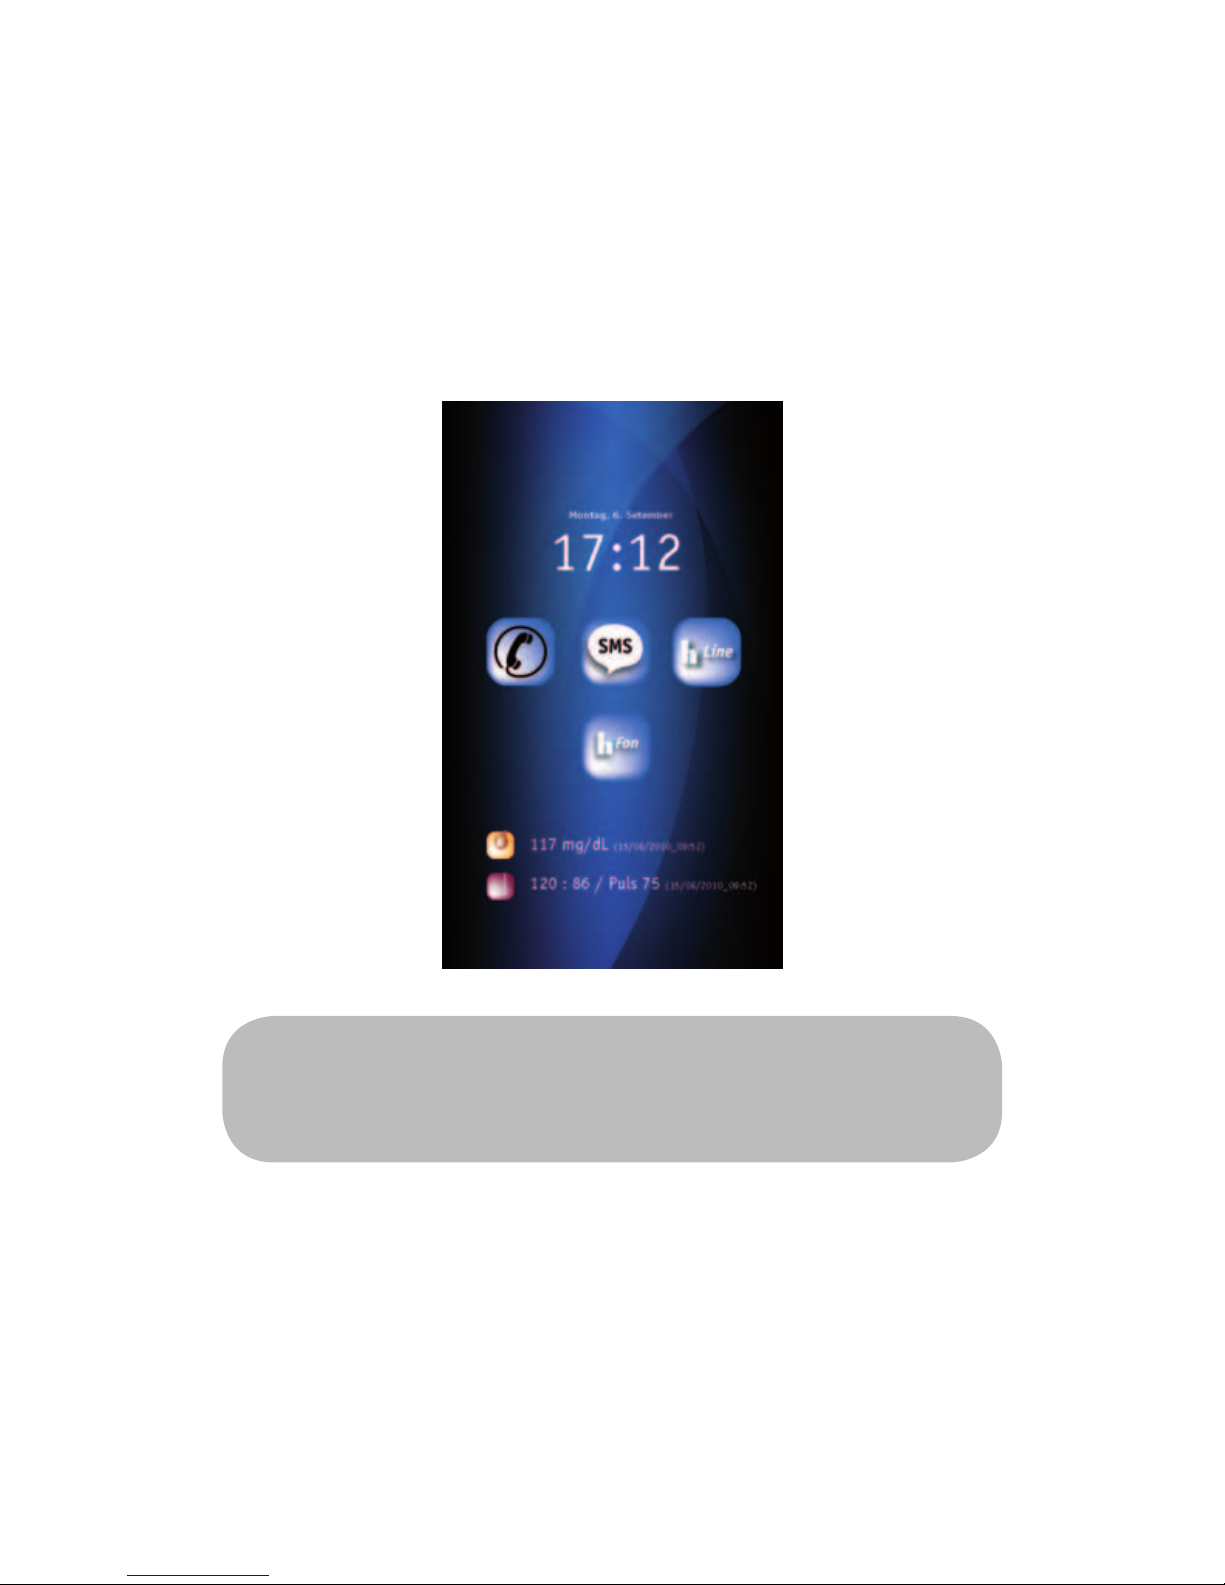
It appears the h
Fon
logo and then the HOME screen.
Note: The HOME screen is the starting point for all functions of your h
Fon
. You can call it up at any time using the
quick select button “2” (HOME screen).
Page 17
17
The main options of the HOME screen
The HOME screen combines the most important features of
the h
Fon
at a glance. From here you can for example make
calls, write SMS, start the hLine application or call up the
other applications of the h
Fon
.
Phone
Opens the touch screen keypad, with whose
help you can type a desired phone number.
You can call up the phone directly also via
the quick select button “1”, if you are not on
the HOME screen.
SMS (text messaging)
Opens the menu in order to write SMS (short
messages). To do so, rst press the menu to
write a new text message. Enter the text using the keyboard on the touch screen. You
can use for this your ngers or the pen.
Page 18

18
hLine
Opens the hLine applications for the admin-
istration of your vital data. This application
includes a health diary in which can be entered various measurement results (blood
sugar, blood pressure, tness values, etc.).
Take advantage of this application for the
administration of the vital values, which you
have measured with other smartLAB® products or with one of the optionally available
measuring modules.
hFon
Opens the program overview of all applications and settings, which are available to
your h
Fon
.
In this menu, you carry out the basic device
settings, administer addresses and contacts
or open the browser for the mobile internet.
Here you can also administer photos, images and other les and can call up other
h
Fon
standard applications (e.g. calendars,
tasks, calculator or games).
The application hFon calls up the operating
system which forms the basis of your h
Fon
.
Page 19

19
Vital data
If you use your h
Fon
with optional available measurement modules, or use
measuring devices from the smartLAB®
/ h
Line
program to administer your vital
data, the results of the last measurements are displayed with date & time
also on the HOME screen. You do not
have to call up always rst the diary of
the hLine application in order to check
your last value*.
The display of the vital values appears,
however, only when you use the h
Fon
in
the above mentioned cases.
* For more information about the optional measuring modules see the
relevant chapter of this manual or visit the websitewww.hLine.eu
Page 20
20
First steps: How to set up your h
Fon
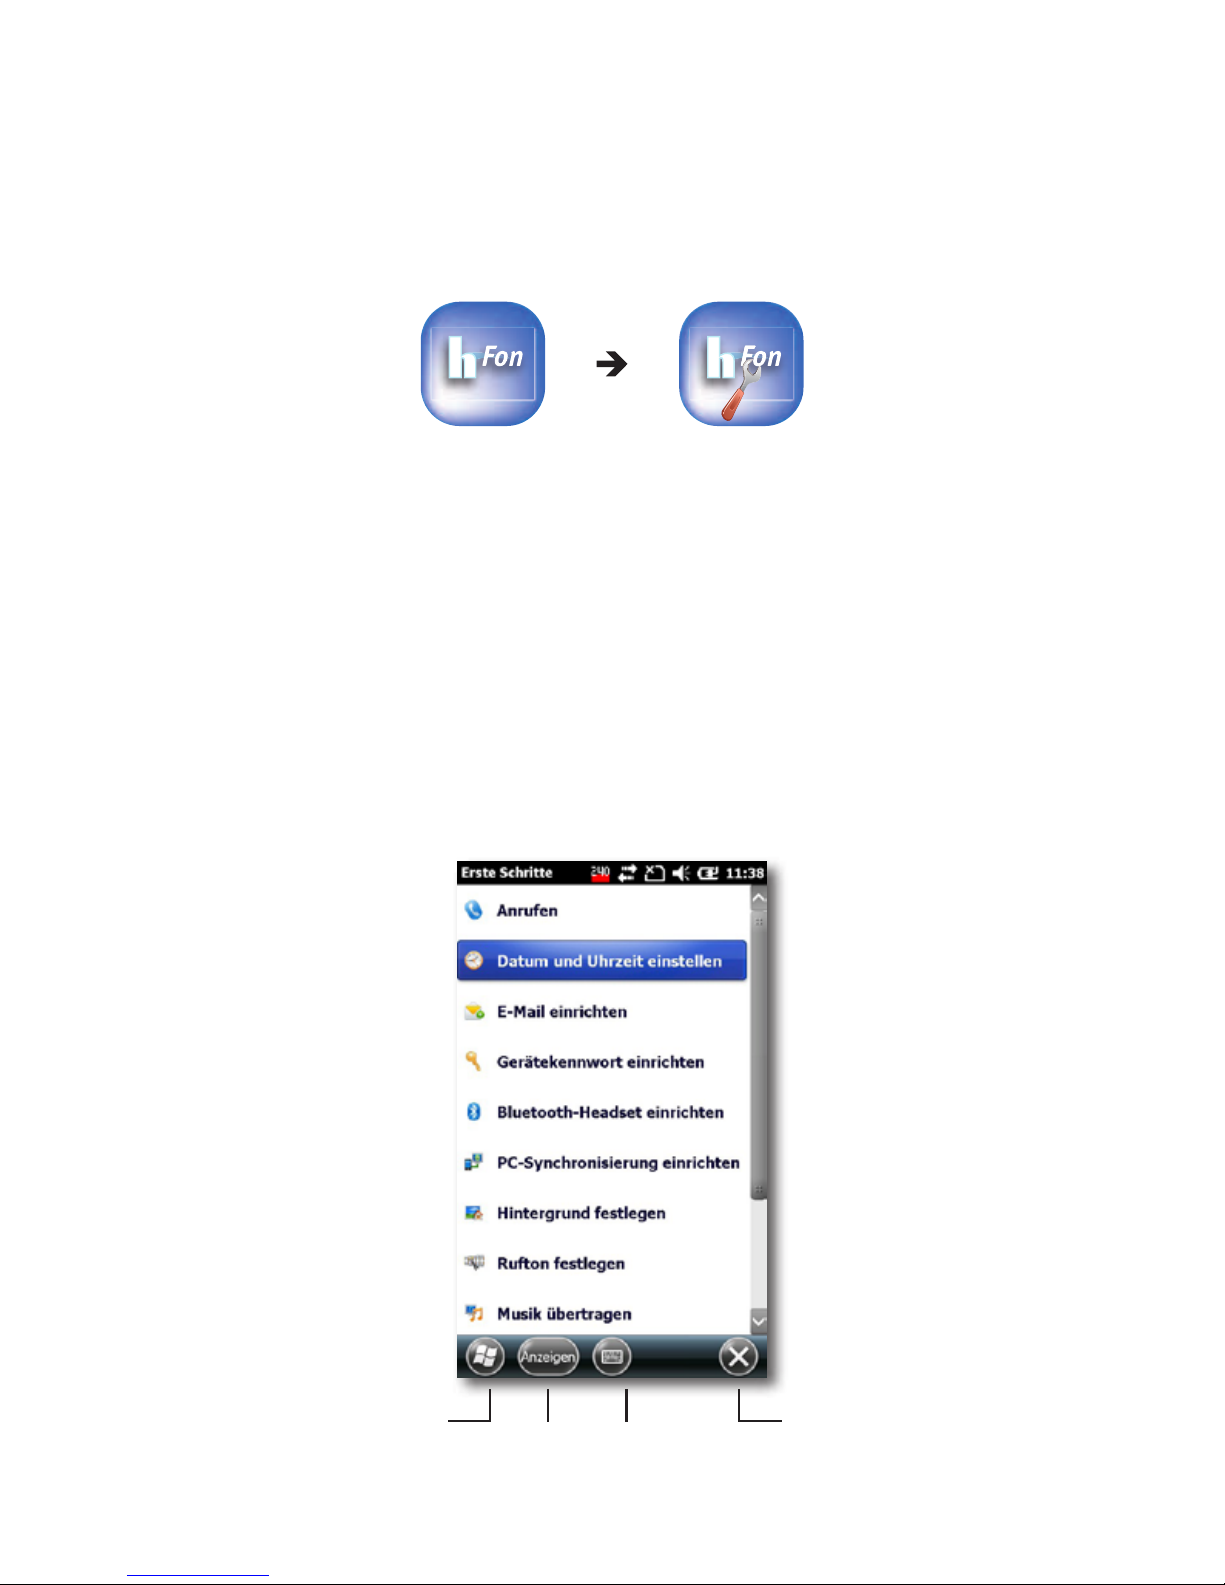
Call up the HOME screen and press the hFon application.
Select the application hFon setup.
The hFon setup application guides you step by step
through the key points in handling your h
Fon
. When you
start the application you see a summary list of the single
points. Scroll down with the nger, pen or track ball the
list and select the single menu items by pressing the
menu item or the “Show” button.
to the hFon application
select keyboard
Abort, back to HOME
menu
Page 21
21
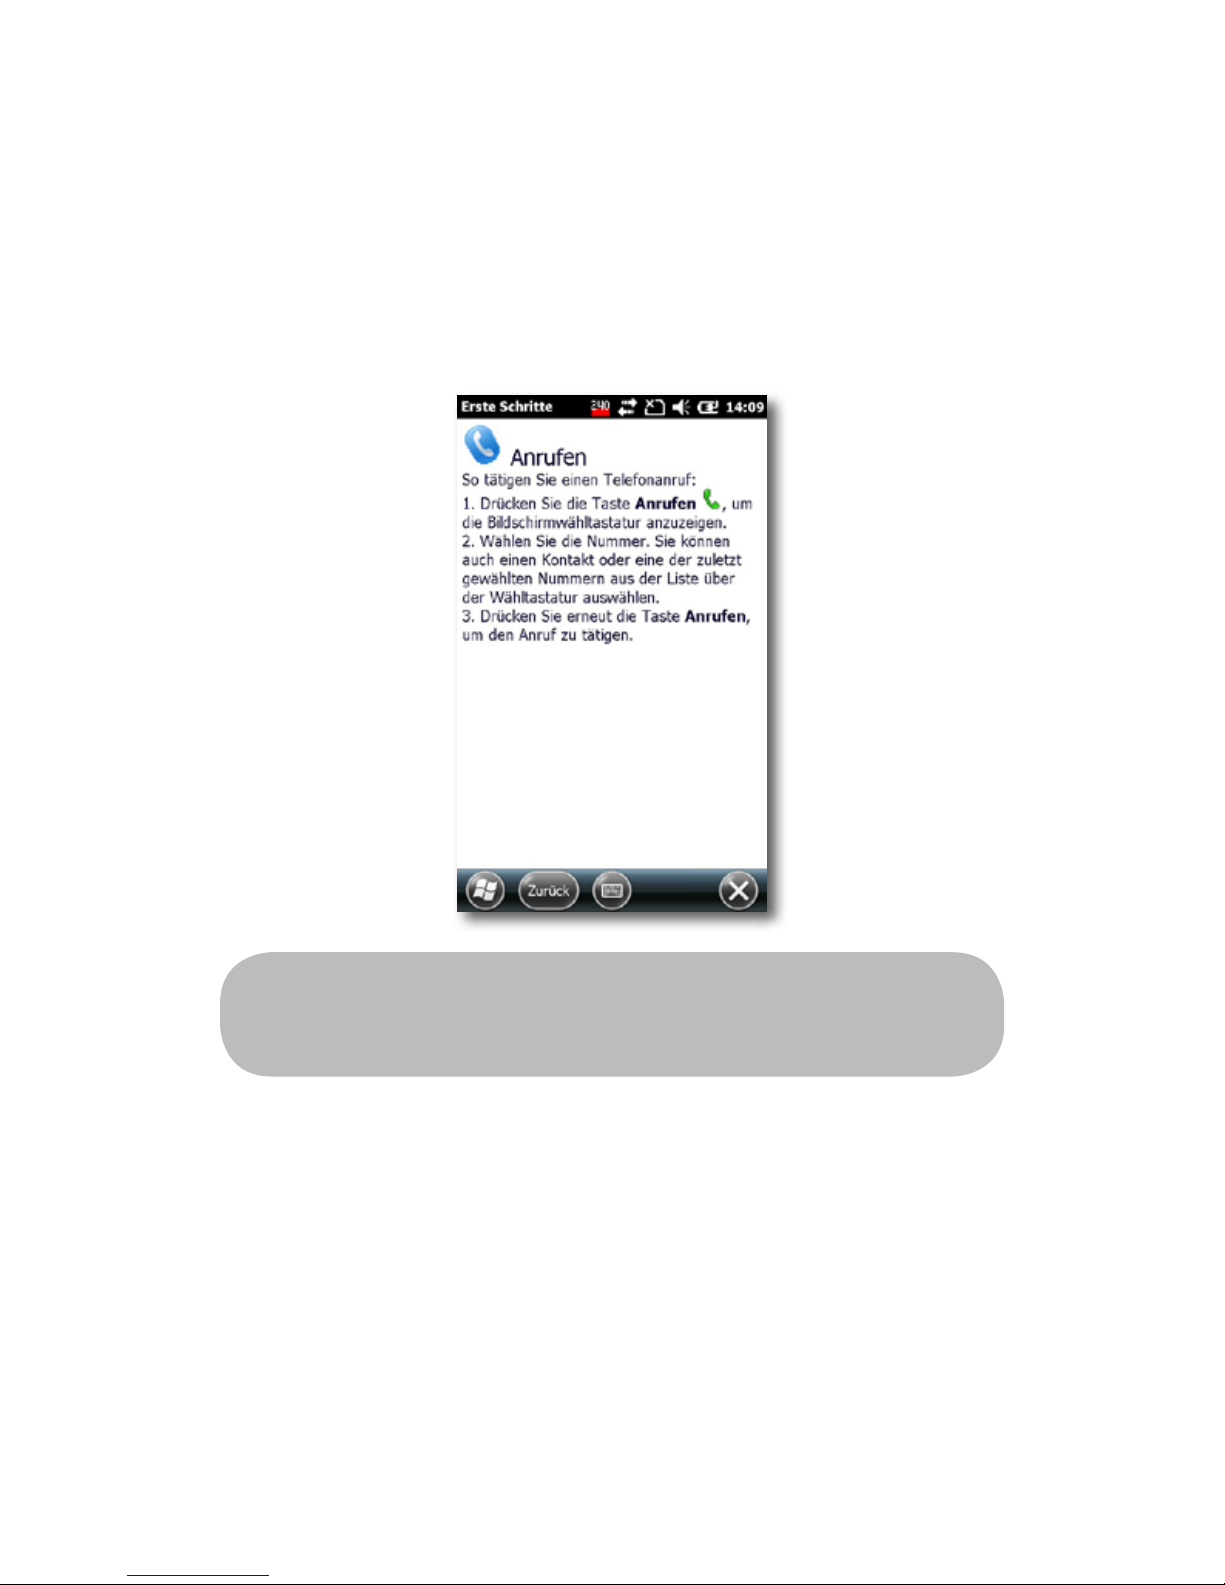
Making a phone call
This menu item explains how to make a call with your
h
Fon
. In addition to the option mentioned here (Pressing
the quick select button “1”), you can also press on the
HOME screen the phone icon in order to make a call.
Note: In order to make calls, a SIM card must be inserted
in your h
Fon
.
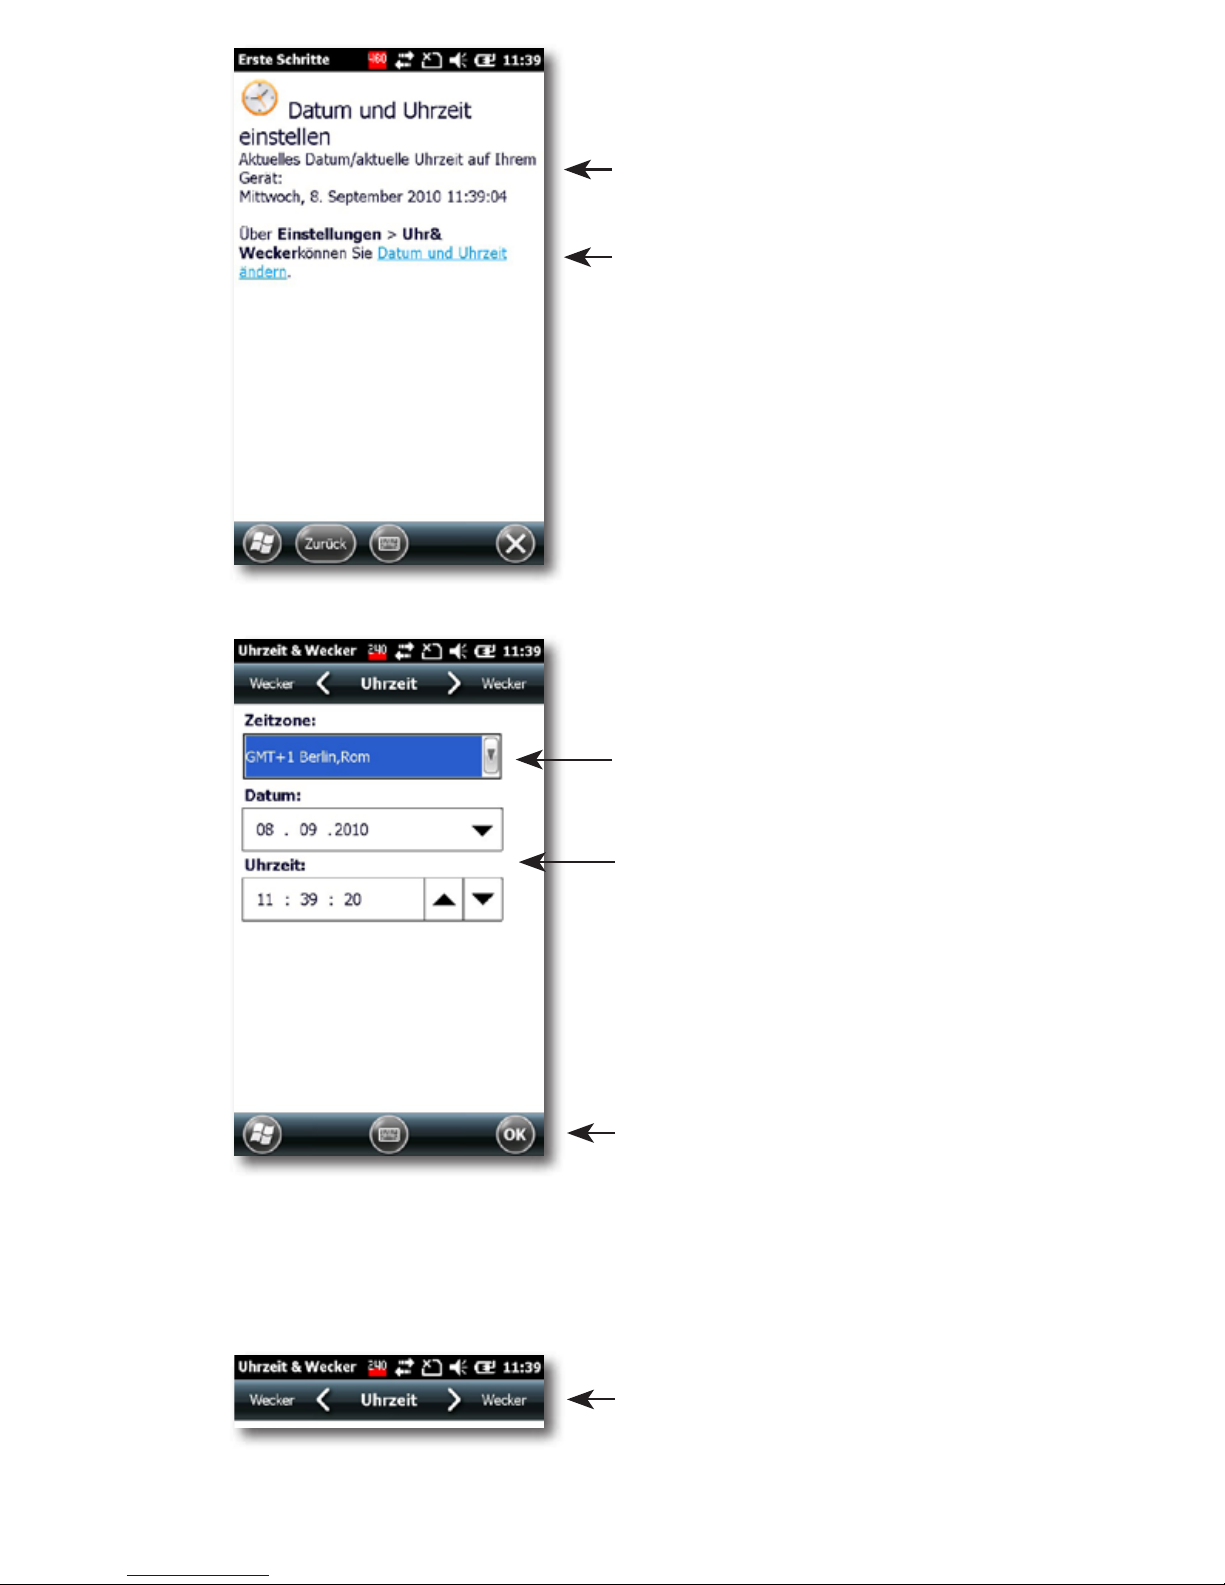
Setting date and time
To use the calendar, alarm clock, the hLine application
and other applications, you should set correctly the date
and time of your h
Fon
. This menu guides you through the
setup process.
Page 22
22
Display the current settings
Press the link to change date and
time
Select your time zone by pressing
the arrow for the drop-down menu
Set the date by selecting on the
calendar, and the time by selecting
the hour / minute / second, and adjust by using the arrow keys.
Conrm with OK
If you want to set, in addition to the time, also one (or
more) alarms, choose the menu for the alarm clock using
the arrow buttons in the upper area.
Press the arrow to set the alarm
Page 23
23
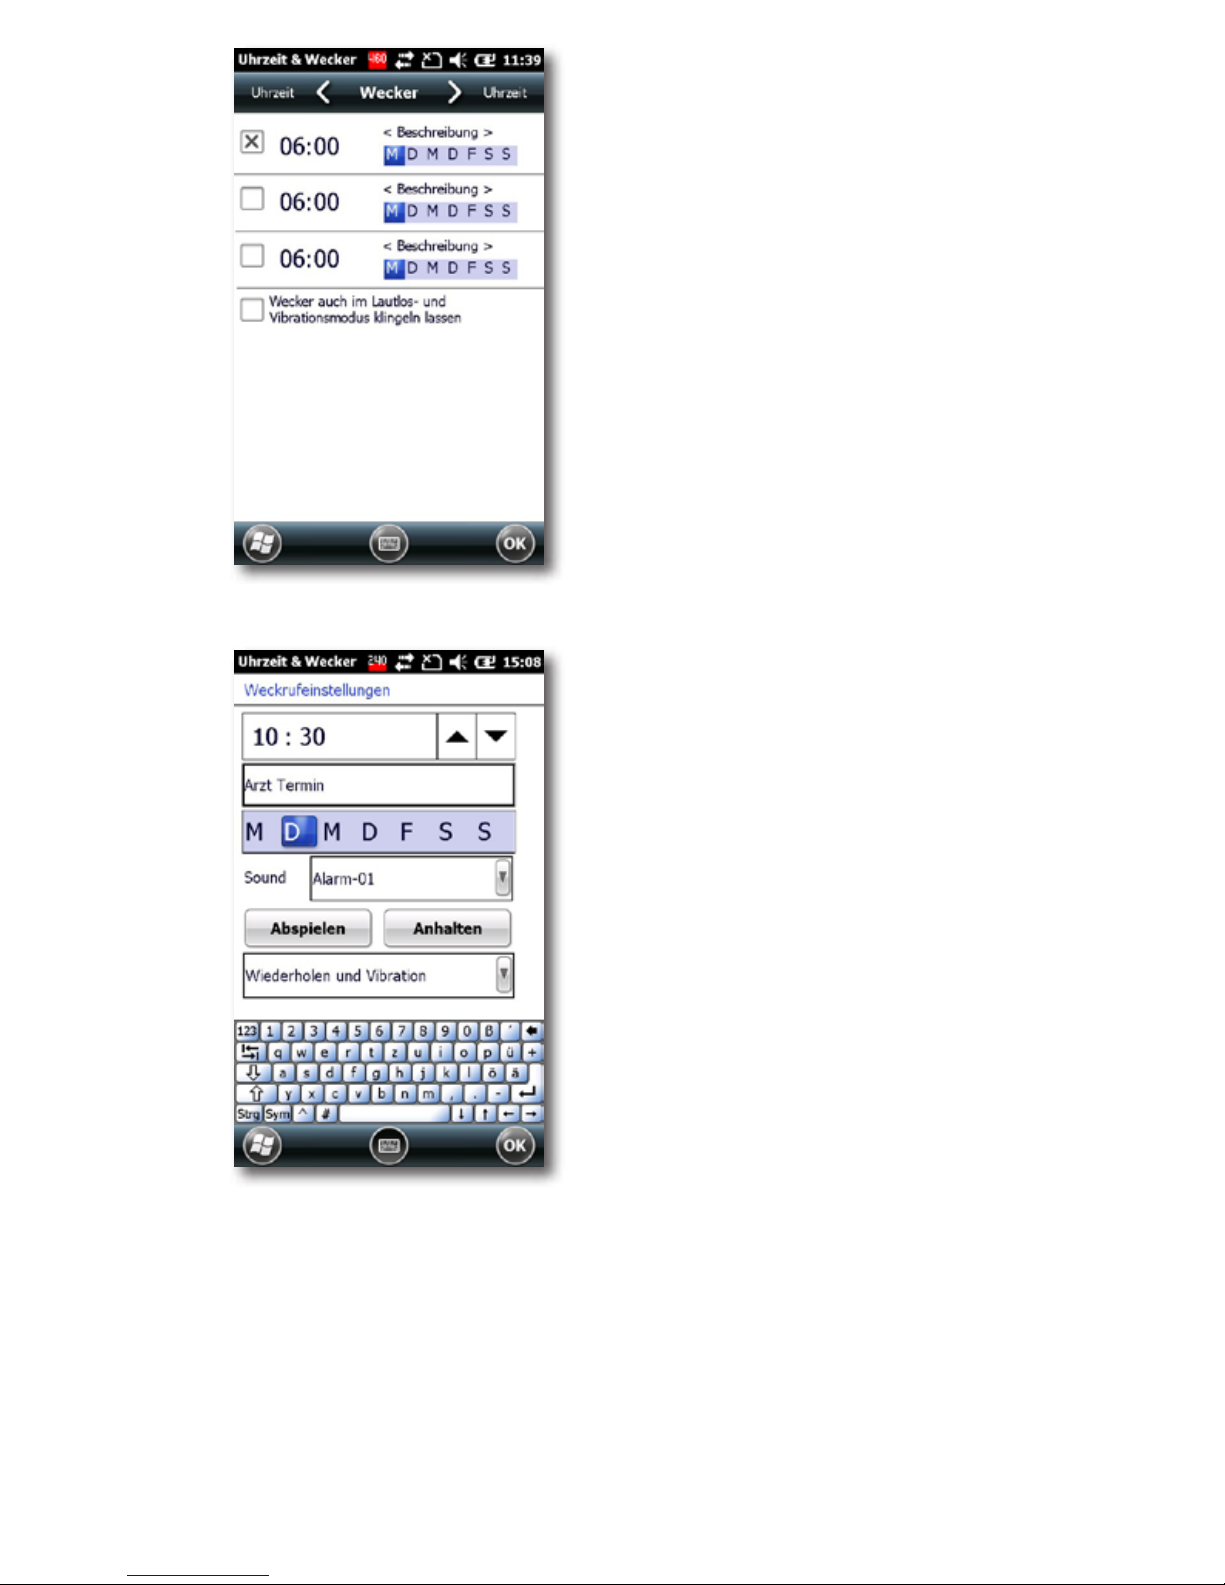
Selection of various alarms: Activate
the alarm by tapping the rst box.
Change the alarm settings (date,
time, alarm, etc.) by pressing the
respective line.
In the “Description” eld, you can
give different names to the alarms.
Select by tapping the corresponding
day of the week, the alarm tone and
the different options such as vibration, repetition etc.
Page 24
24
Setup E-Mail
Before you can send and receive e-mails with your h
Fon
,
you have to setup an e-mail account on your device. This
Setup wizard helps you to easily set up POP, IMAP, or exchange server accounts.
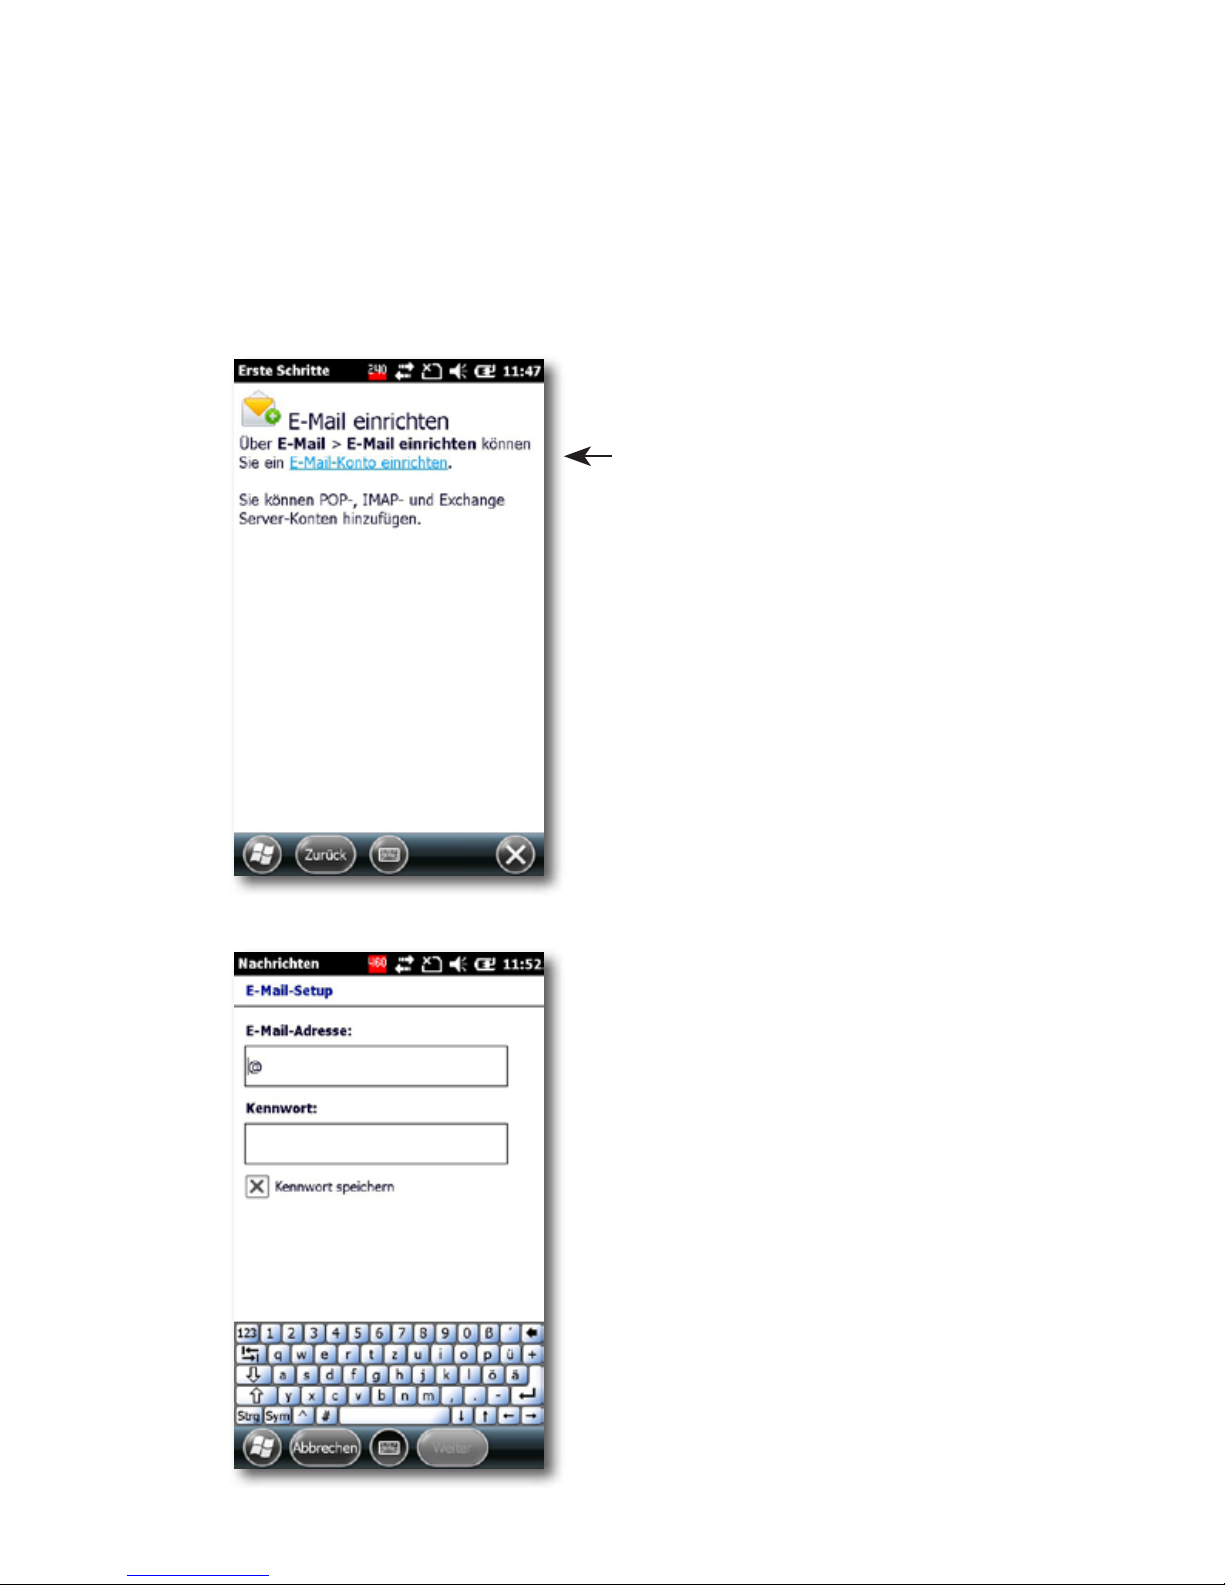
Press the link in order to setup an
e-mail account
Enter e-mail address and password
using the keyboard shown on the
bottom.
Activate „Save Password“, so that
you do not have to re-enter it every
time.
Page 25
25
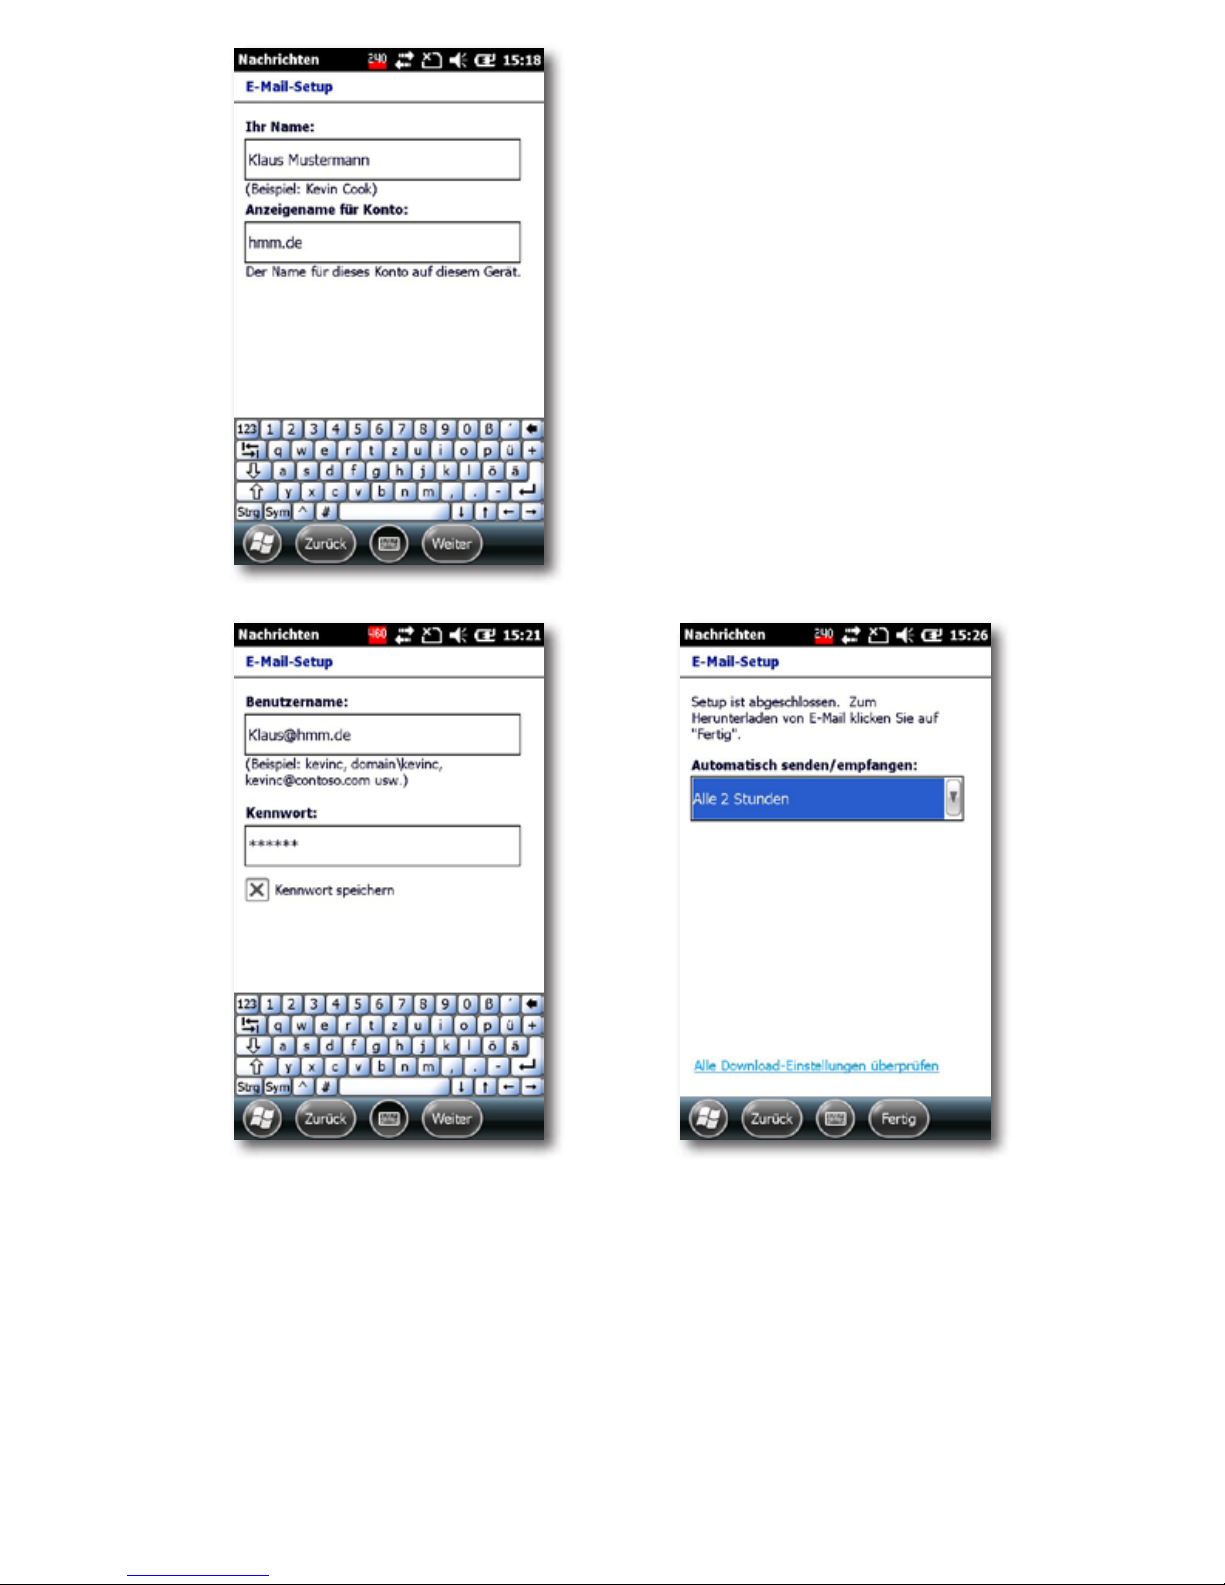
The Setup Wizard will guide you step
by step through the setup process of
your e-mail account.
Dene name, mailbox and password.
Finally, setup with which frequency
your h
Fon
has to pick up e-mails
from the server.
For writing an e-mail, open within the hFon app the corresponding e-mail
application. Select your e-mail account, and then tap on “New”. Write your
e-mail with the screen keyboard.
Page 26
26
Setup device password
To better protect your privacy, you can lock your h
Fon
with
a password. It is then required to enter the password
each time you switch on the device.
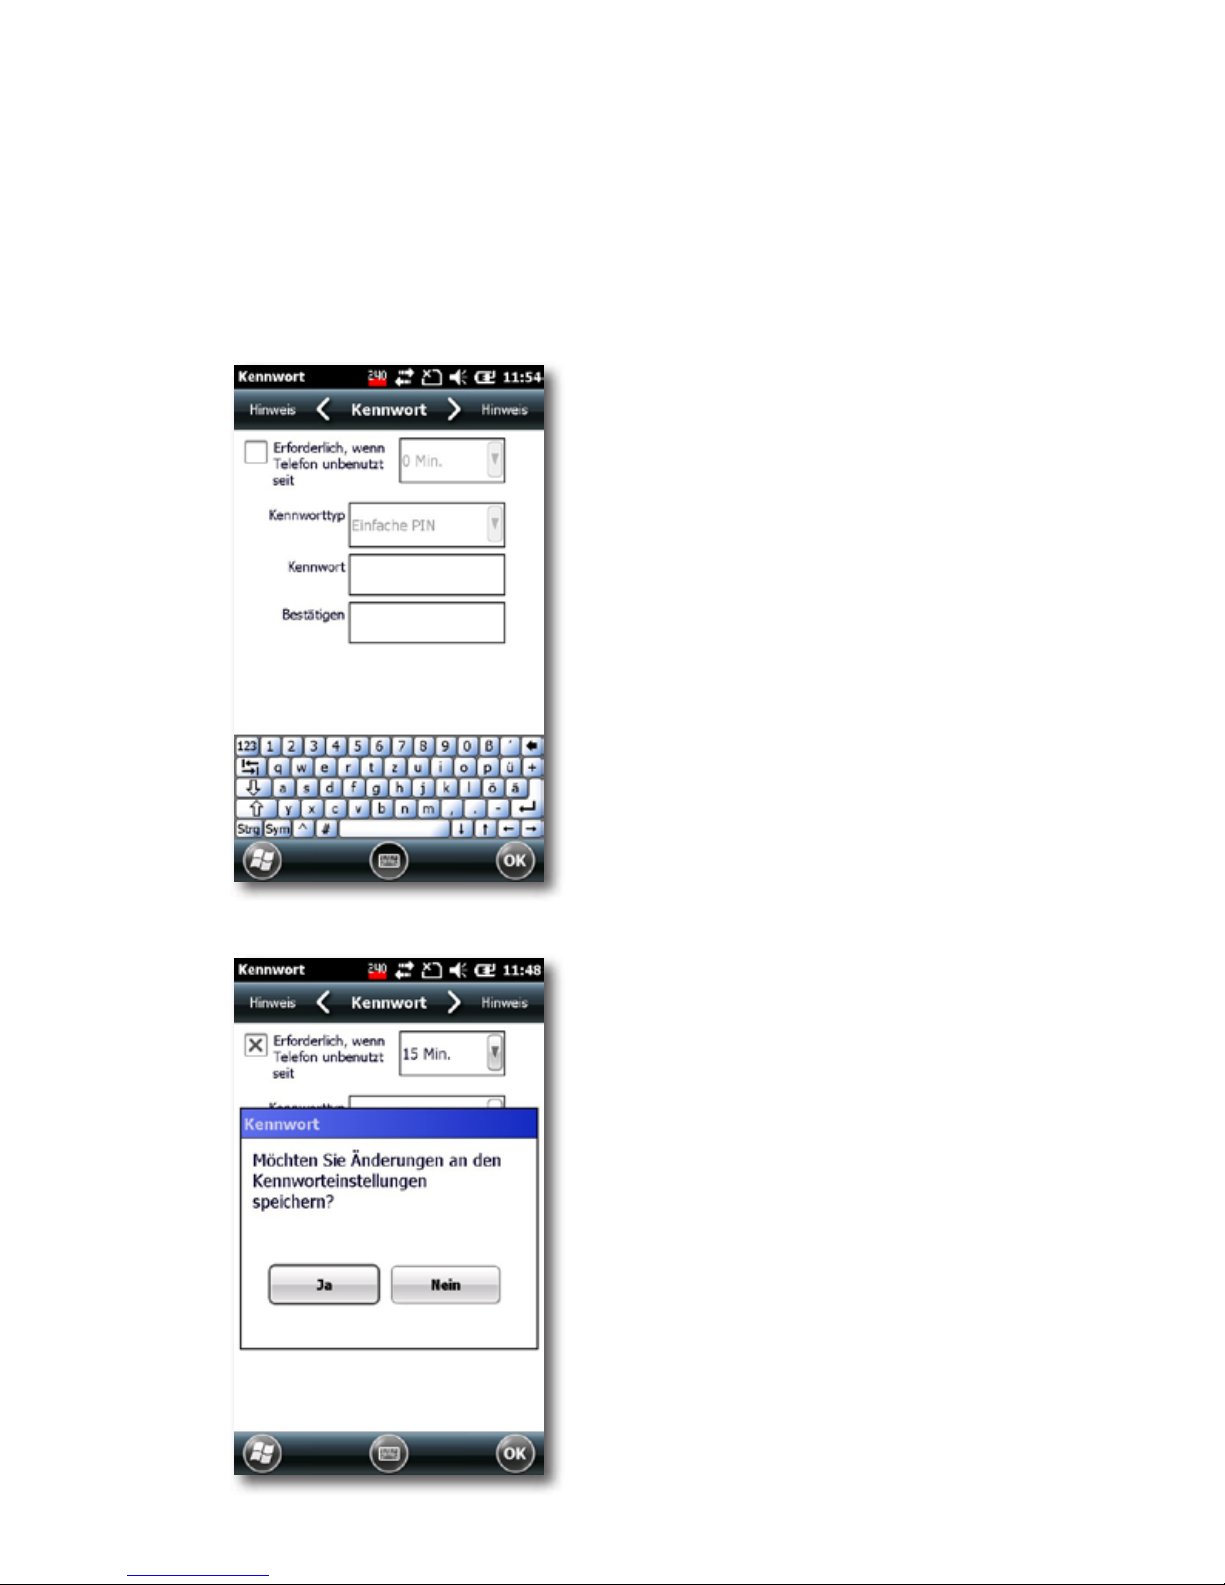
Dene after which period of time
is required the query of the device
password.
Select the password type, enter the
password and conrm it.
Page 27
27
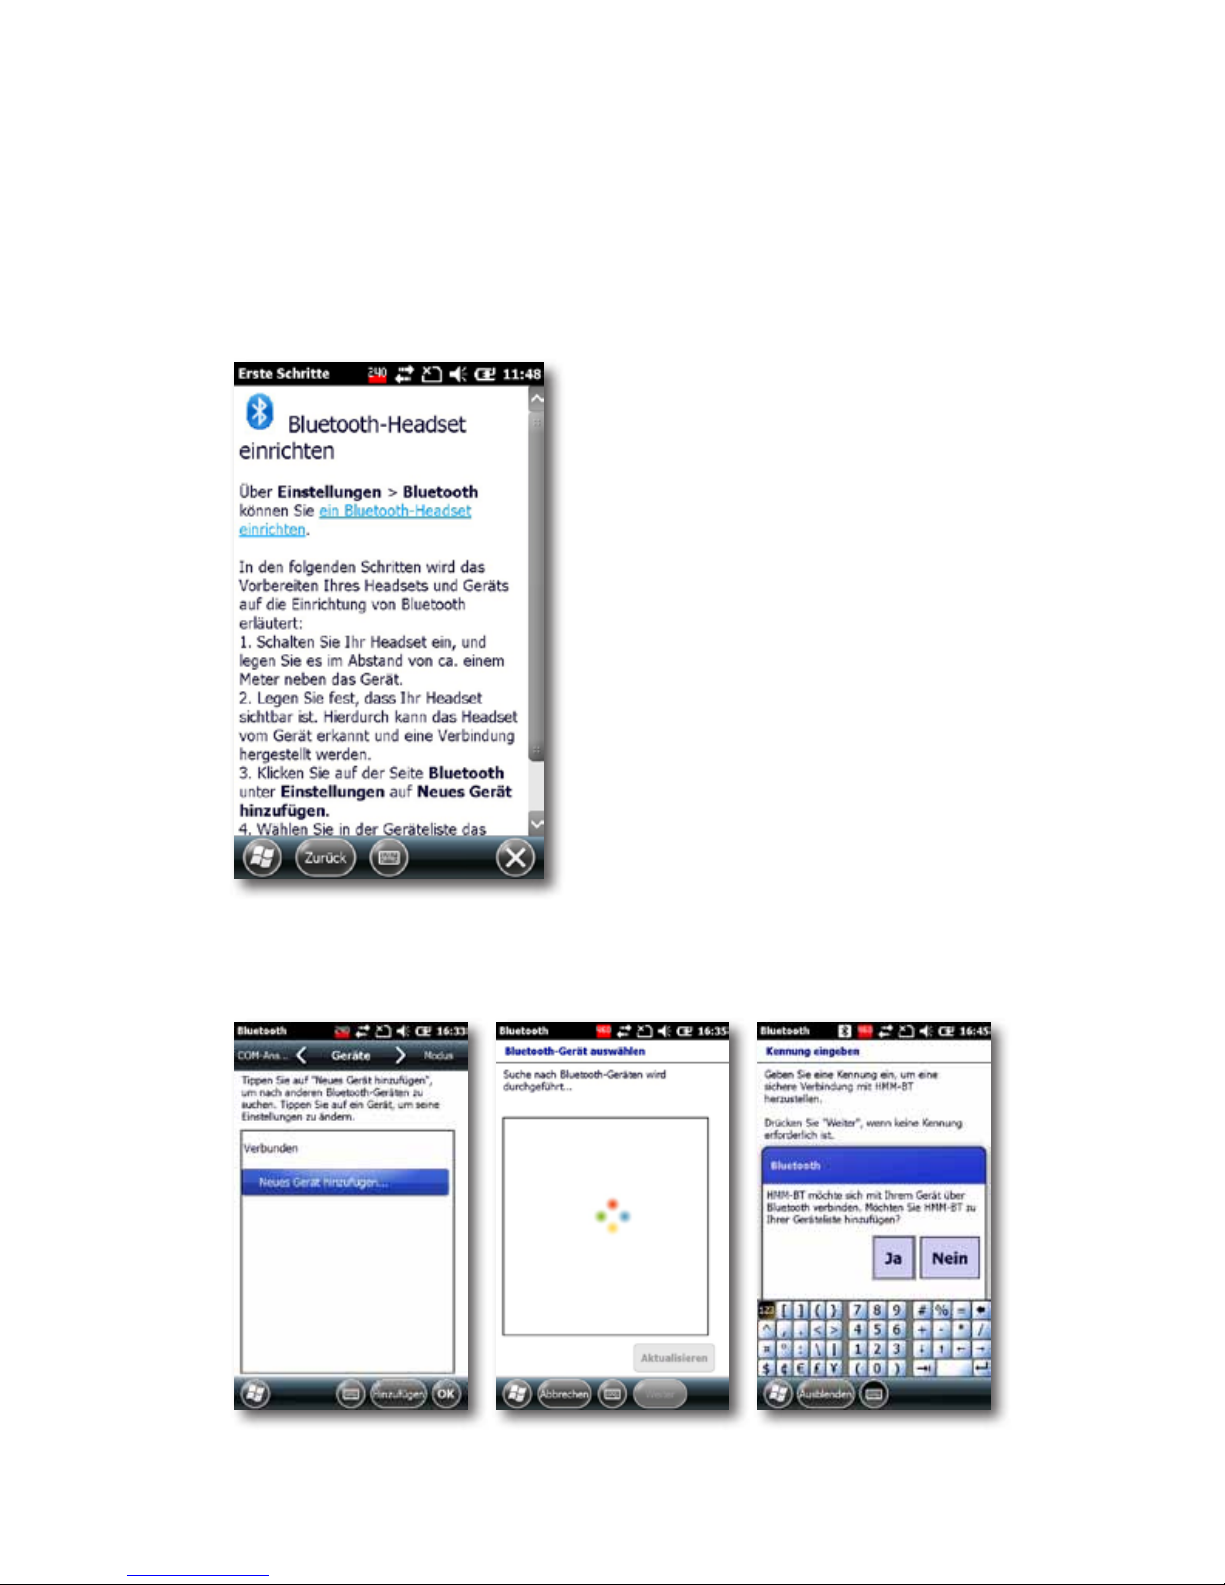
Setup Bluetooth headset
In this menu point you can setup a Bluetooth headset, so
that you can use it when you make calls with your h
Fon
.
This can be very useful for example when you phone in
the car, etc.
Open the menu. The wizard leads
you step by step through the setup
process.
Click on „Add new device“. Subsequently, is searched after Bluetooth-enabled devices in the area.
Select the headset and enter the
required device password therefore.
The password can be found in the
manual of the partner device (e.g.
headset). Conrm adding the device
to the device list.
Page 28
28
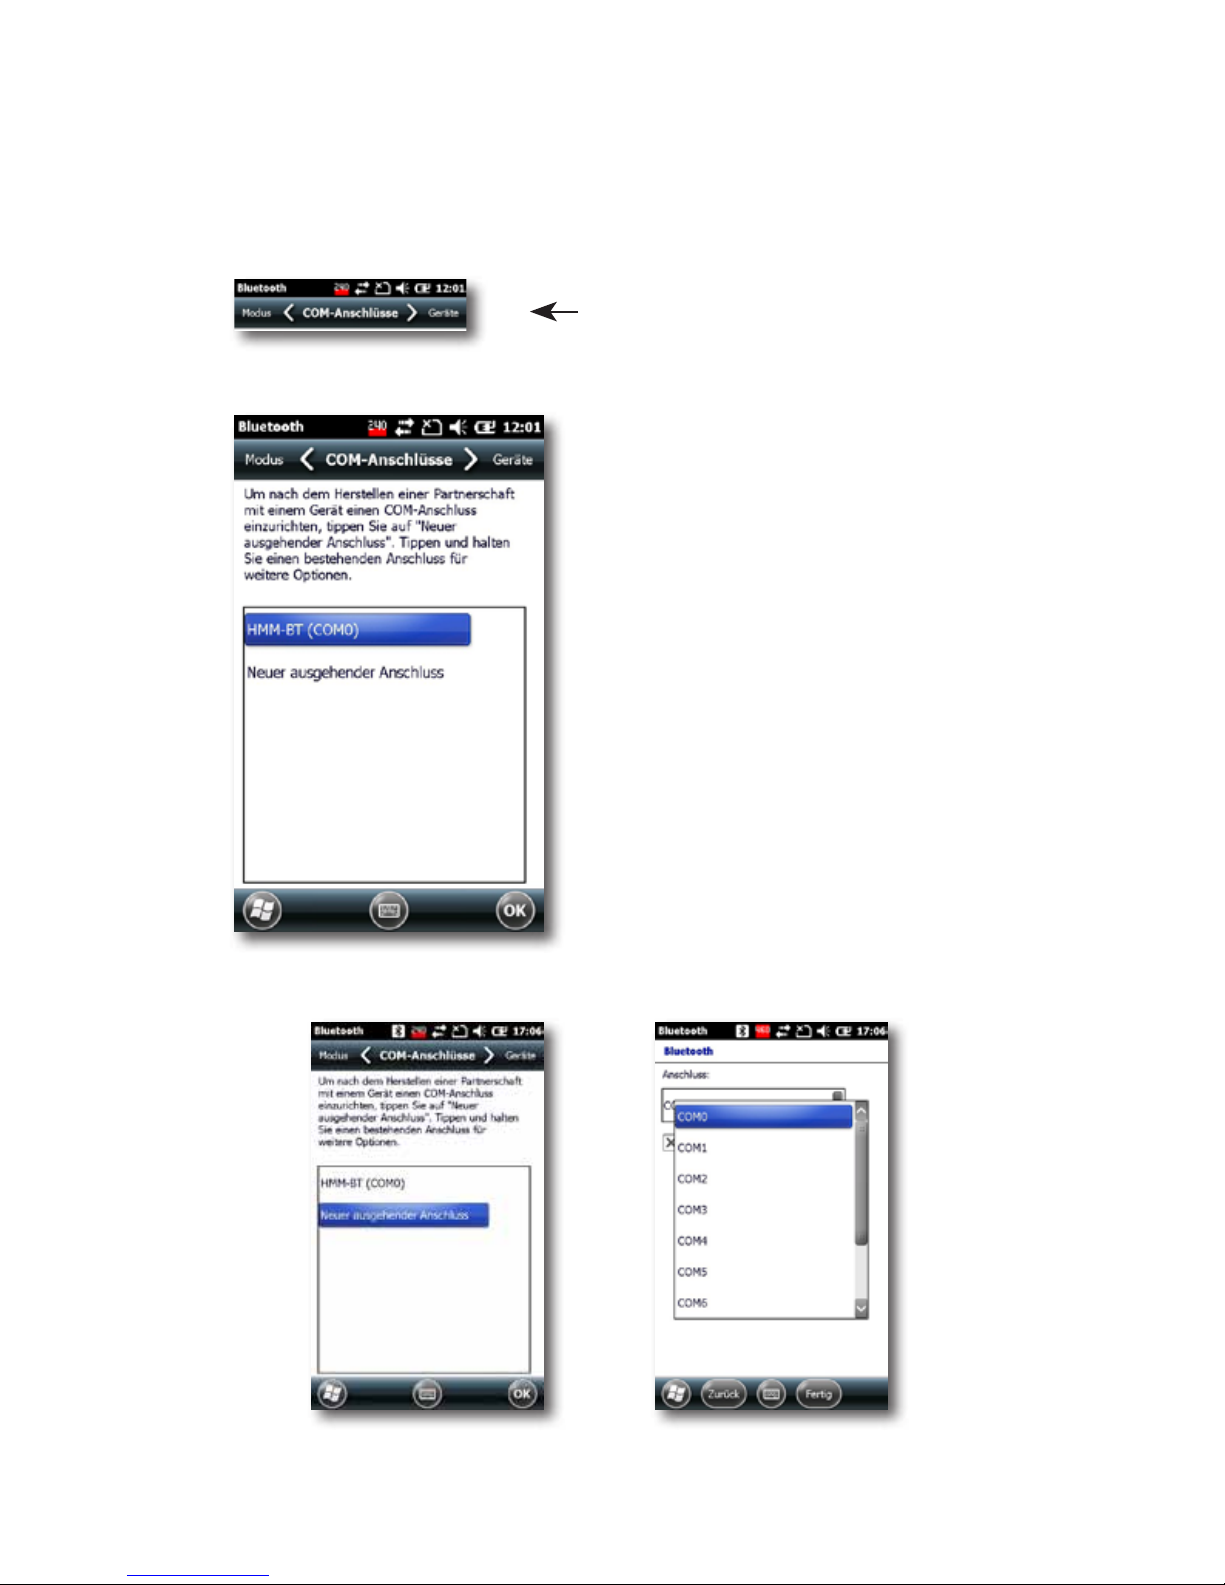
In order to determine a COM-connection after establishing a partnership between the devices, change in the upper navigation area to “COM connections”.
Go to „COM connections“.
Select the device for which a COM
connection shall be dened and
follow the setup assistant.
Page 29
29
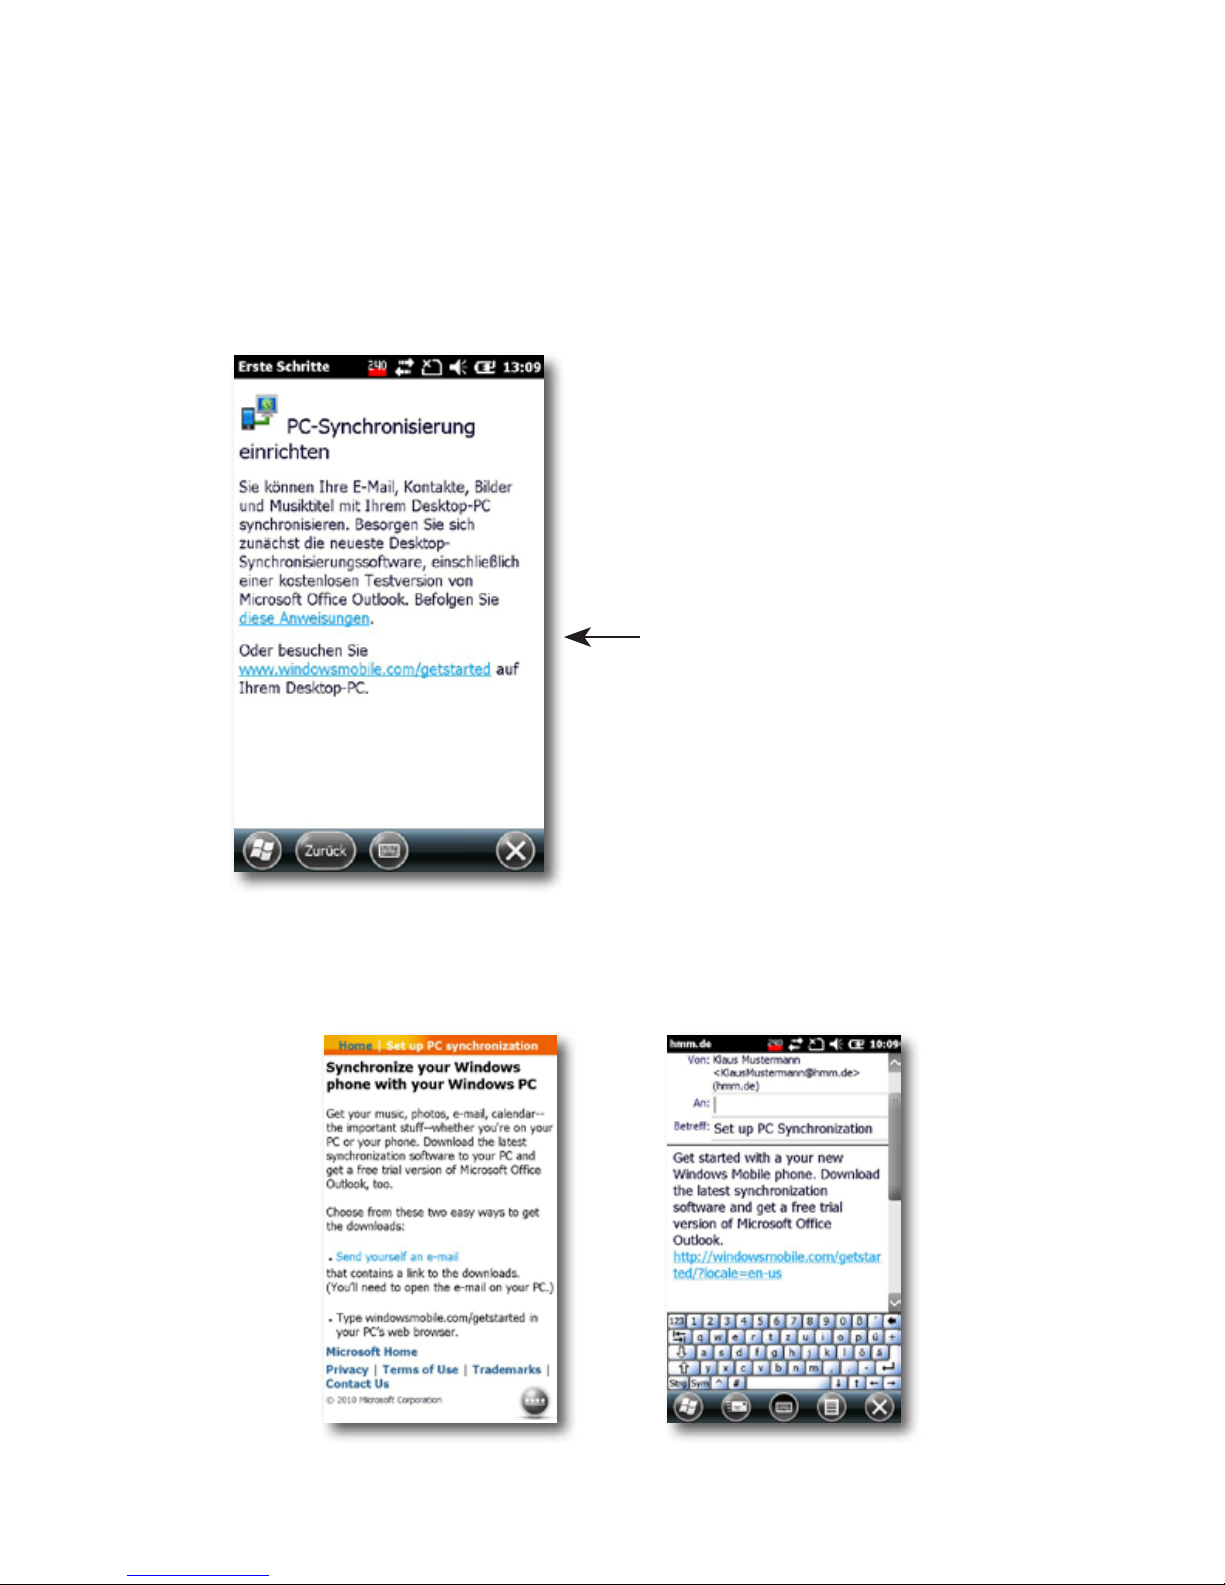
Setup PC synchronization
You can synchronize your e-mails, contacts, pictures
and music titles with your desktop PC. The setup wizard
guides you step by step through the synchronization
process.
Open the menu for synchronization.
Click on the link in order to be guided through the synchronization
process.
Page 30
30
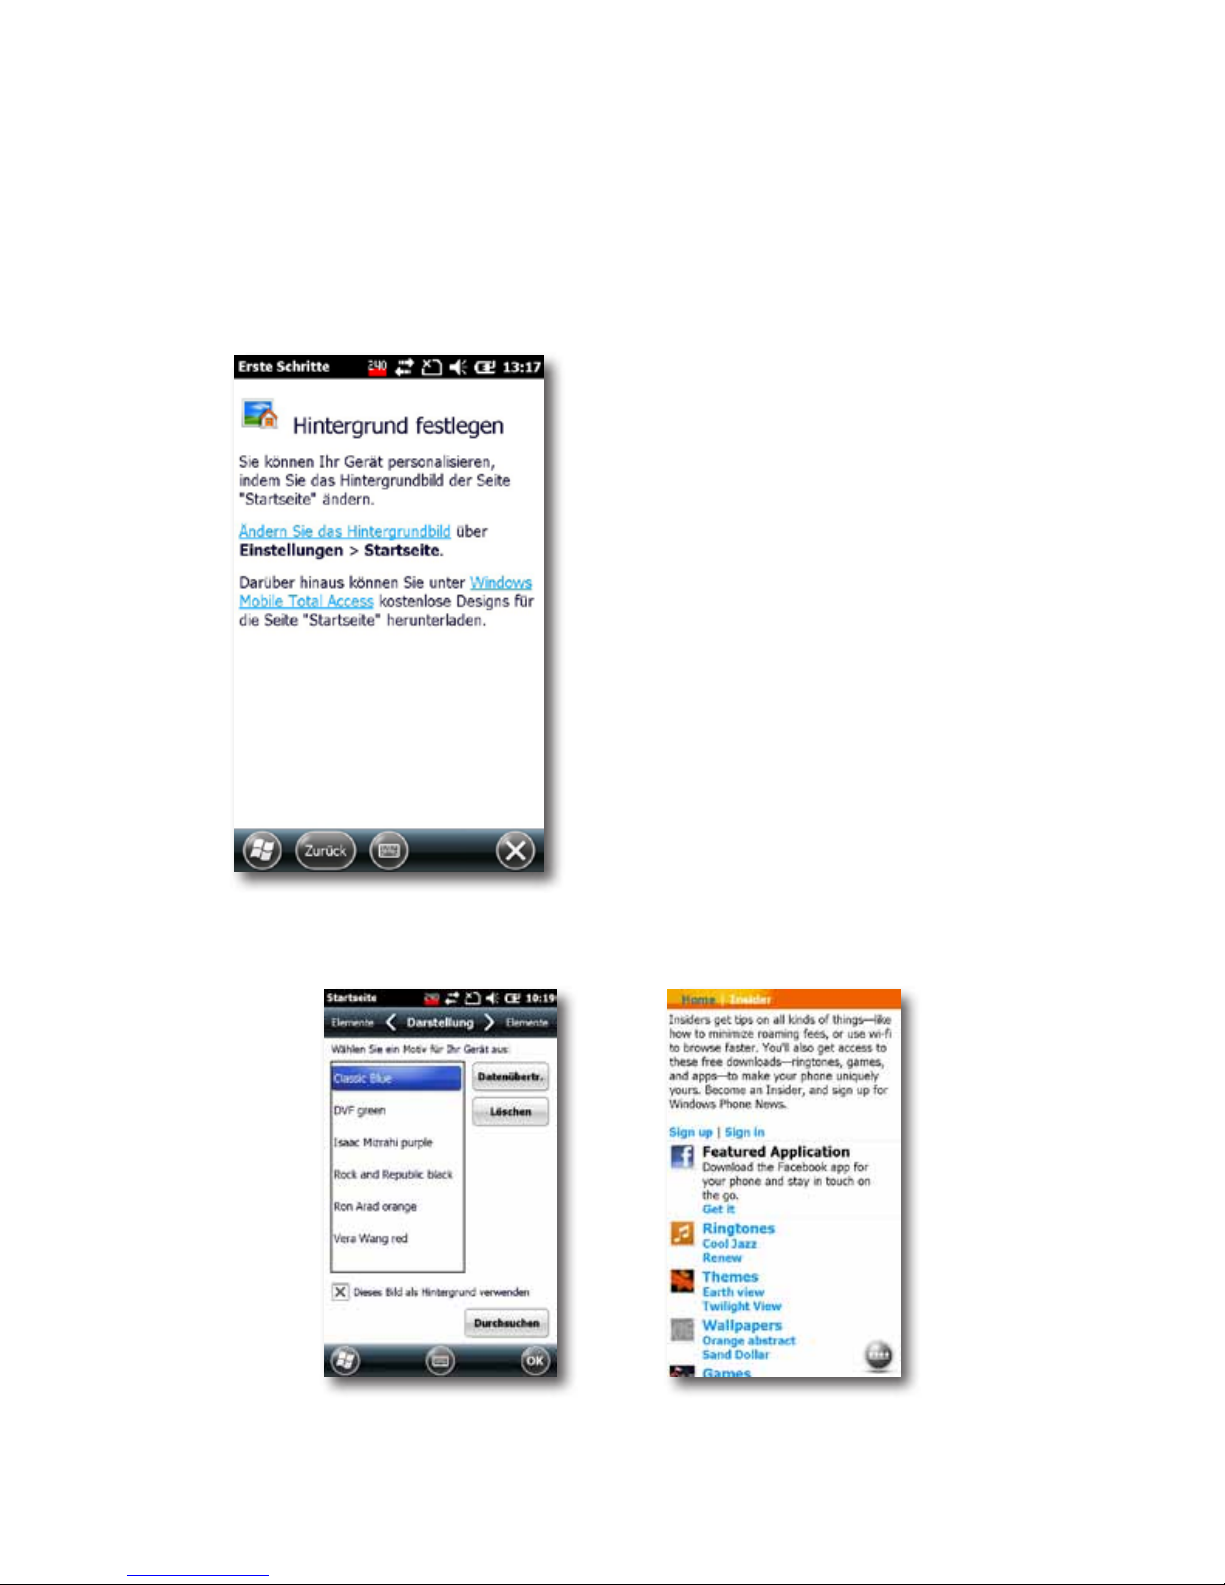
Set background
You can personalize your h
Fon
by changing the background image of the HOME screen. This wizard helps you
setup a new design. In order to restore the original h
Fon
HOME screen, select in this menu “hFon Today Screen”.
Open the menu for changing the
HOME screen.
Follow the wizard and select from
the different design patterns your
favorite design, or download free
additional designs through the
specied link.
Page 31
31
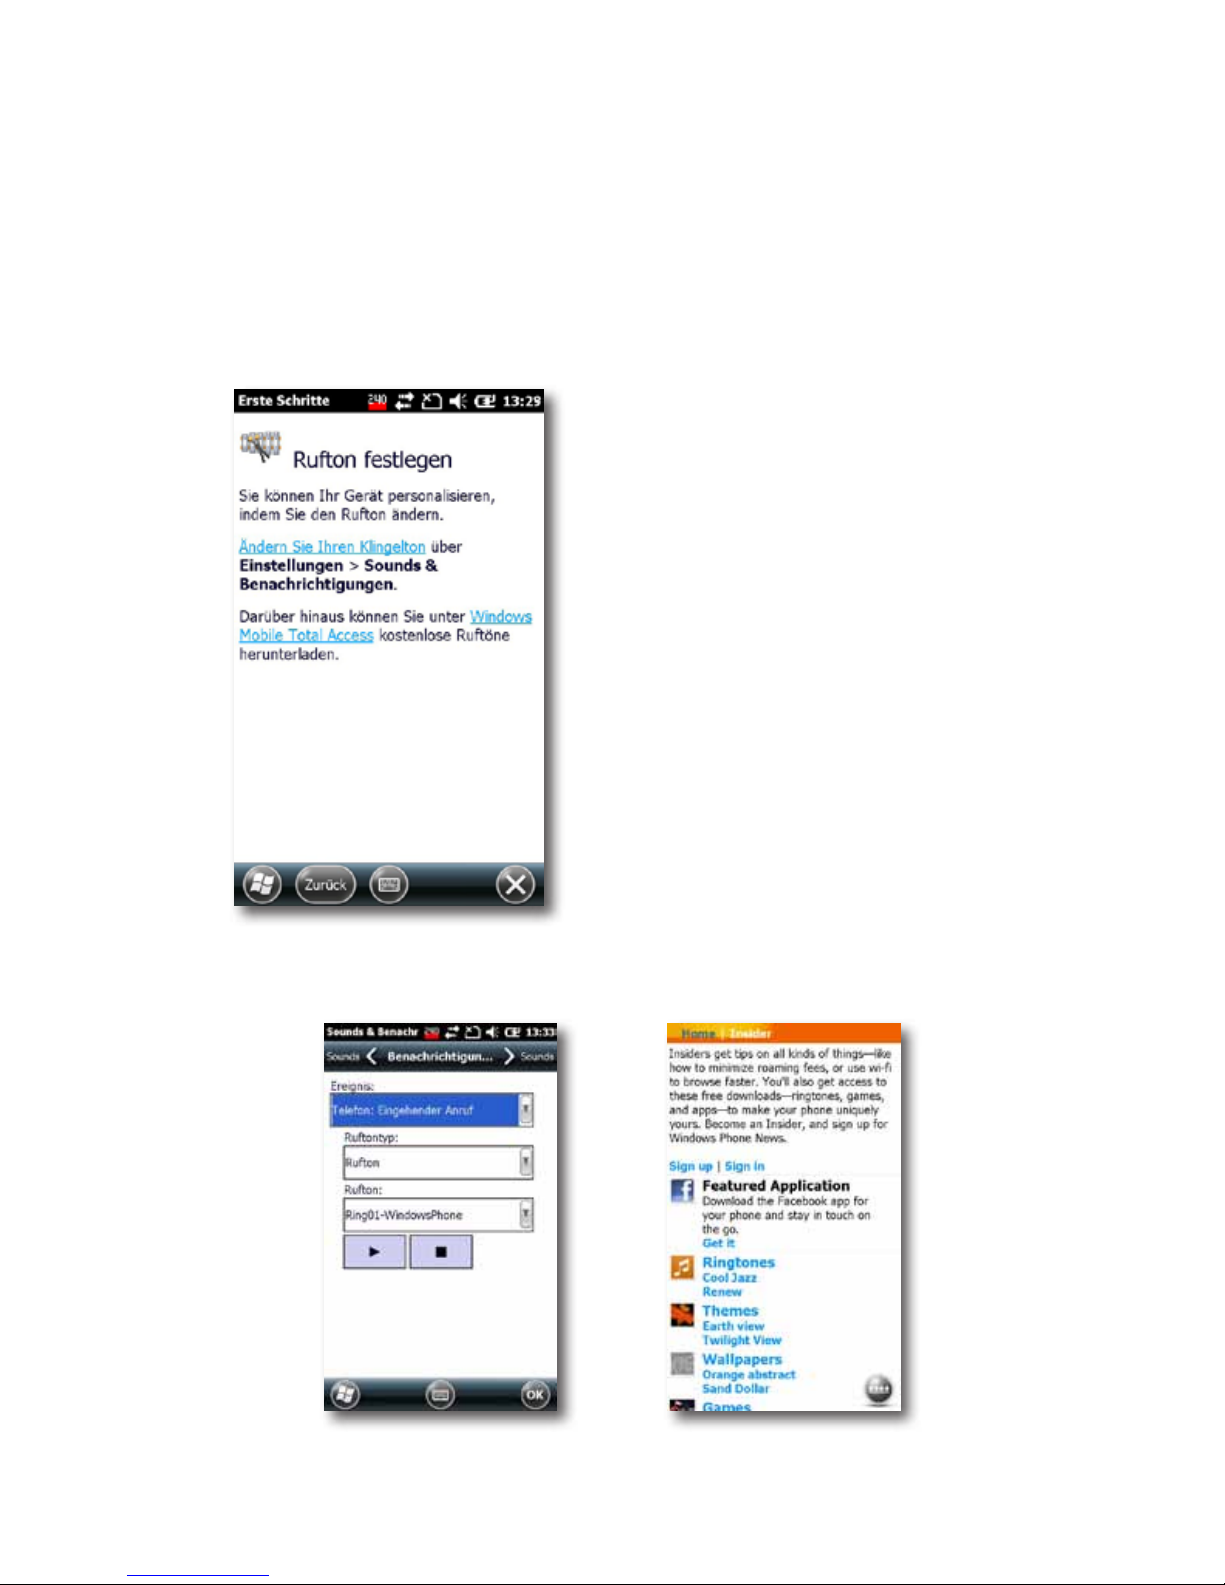
Set ring tone
You can personalize your h
Fon
by changing the ringing
tone. This wizard will help you setup
a new ringing tone.
Open the menu for changing the
HOME screen.
Follow the wizard and select from
the different ring tones to your favorite one, or download free tones
through the specied link.
Determine what ring tone you
want to use for which type of call.
Page 32
32
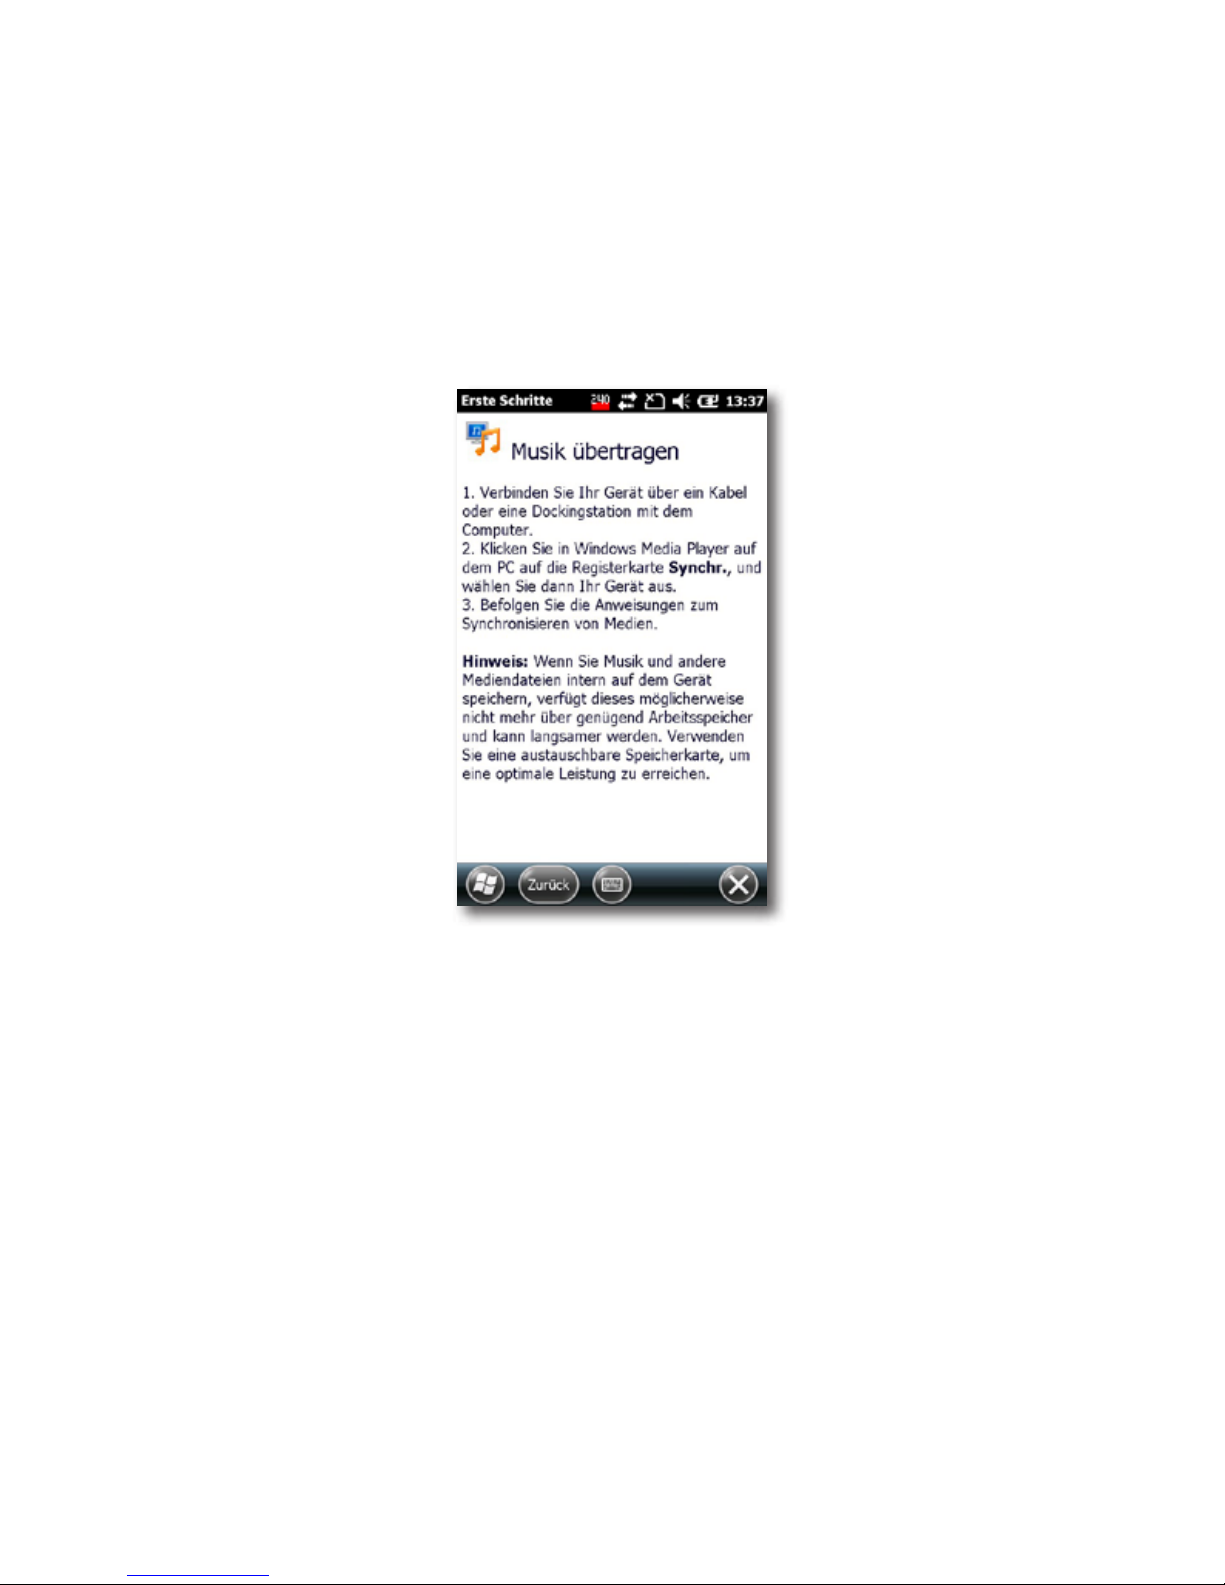
Transfer music
In order to download music les to your h
Fon
, you have to
connect it via cable to your PC. Then both devices must
be synchronized with each other. Here you can read,
which instructions you must follow up to do this.
Online help and instructions
With the aid of the wizard now you carried out the basic
setups on your h
Fon
. In addition, there are more comprehensive online helps and instructions for the advanced
setup of the device, which you can nd in this menu
point.
Page 33

33
Add / remove rst steps
After having made the basic setups, you can remove the
setup hFon application from the overview screen of the
hFon application. The application will not be displayed
anymore.
You can always return from the HOME screen to the set-
up hFon application, changing in the start menu to the
folder “programs” and tapping on rst steps.
Camera
Your h
Fon
has an integrated 2 megapixel digital camera,
with which you can take photos. You can call up the camera using the speed dial button on the side of the device
or on the submenu “HiCamera” of the hFon application.
On the display then appears the chosen section of the
lens. To take a picture, tap briey on the camera lens icon
on the bottom of the screen. The picture is automatically
saved on your h
Fon
.
To view and administer photos and images, open the hFon
application on the HOME screen and select the appropriate
submenu for images and photos.
Page 34
34
Notes concerning directives
Declaration of Conformity
Products with a CE label meet the R&TTE Directive (99/5/
EC), issued by the EU Commission.
WEEE note
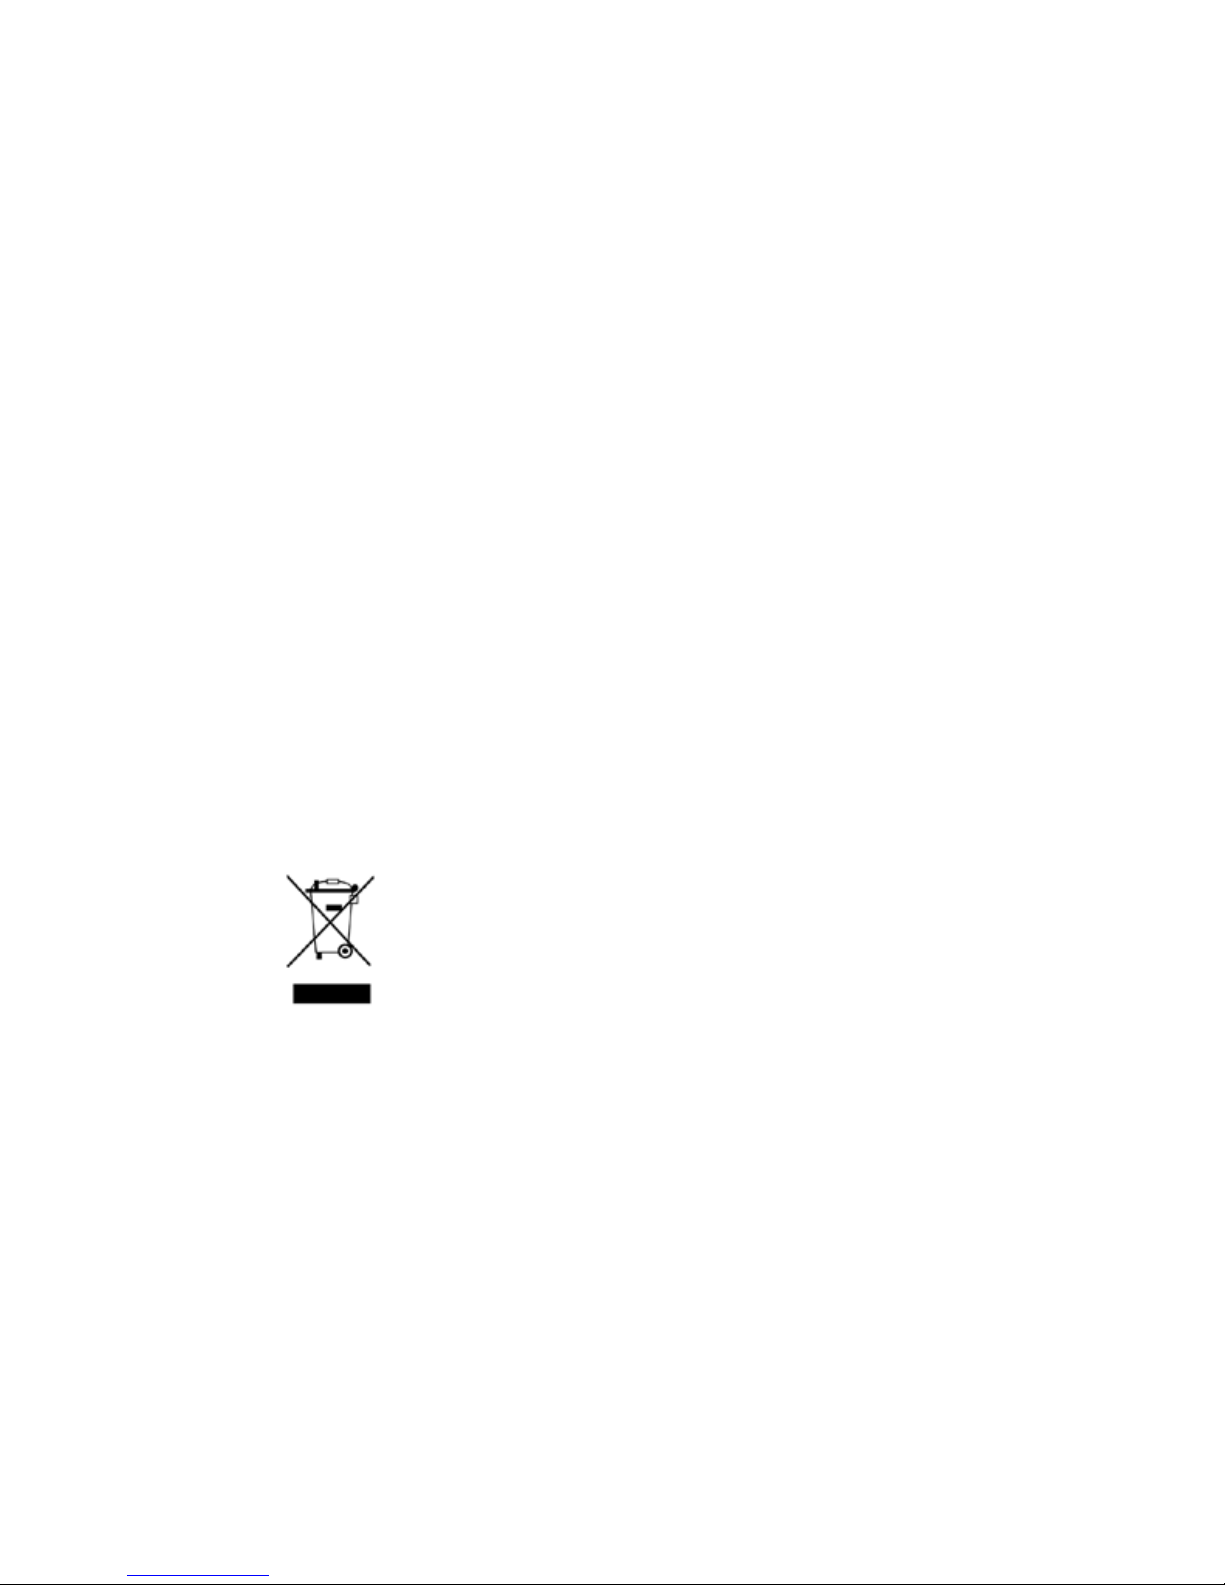
The WEEE (Waste Electrical and Electronic Equipment)
Directive, that came into effect as European law on 13th
February 2003, led to a major change in the disposal of
electrical equipment.
The primarily purpose of this directive is to prevent of
electronic waste (WEEE), while encouraging for reuse, recycling and other forms of reprocessing to reduce waste.
The WEEE logo on the product and the packaging indicates that it is not allowed to dispose of the product in
the ordinary household waste. It is your responsibility to
deliver all the disused electrical and electronic equipment
to the respective collection points. A separate collection
and proper recycling of electronic waste helps dealing
economically with natural resources. Furthermore, the
recycling of electrical waste is a contribution to the
conservation of our environment and thus the health of
all people. More information concerning the disposal of
electrical and electronic devices, reprocessing and the
collection points
you can get from the local authorities, waste disposal
companies, from retailers and manufacturers of the device.
Page 35

35
RoHS compliance
This product complies with Directive 2002/95/EC of the
European Parliament and the Council of 27th January
2003 regarding the limited use of dangerous substances
in electrical and electronic equipment (RoHS) and its
variations.
Technical specications
• Processor: K3 ARM 926.460 MHZ
• Memory: ROM 512 MB, RAM 128 MB
• Quad-band/GSM/GPRS/EDGE
• 3,7’’ OLED-LCD TouchFlo Display mit 480 x 800 WVGA
resolution
• TouchFlo 3D and Touch Sensitive button navigation
• 3D G sensor integrated
• camera: mini 2 MPixel with auto focus
• communikation: WIFI IEEE 802.11 b/g, Bluetooth 2.0
with Enhanced Data Rate and A2DP for wireless stereo Headsets and ANT+
• GPS with integrated antennae
• OS: Windows Phone (6.5)
• Micro-SD Karte with max. 4-16 GB (SD 2.0 compatible)
• 3.5 mm audio jack & microphone speaker
• Supported audio formats: AAC, AAC+, eAAC+, AMRNB,
AMR-WB, QCP, MP3, WMA, WAV, 40 polyphone & stan-
dard MIDI
• Micro USB Slot for data transfer, battery charging and
docking station.
• Dimensions: 115 x 62 x 14 mm (H x B x T)
• Weight: 160 g
• Blood glucose meter: integrated (separate test strip
slot at the upper end of the phone) (optional)
Page 36

HMM Diagnostics GmbH
Friedrichstr. 89
D-69221 Dossenheim, Germany
mail: [email protected]
www.hmm.info
Manufacturer:
Weitere Informationen zu den smartLAB® Produkten /
More information on our smartLAB® products:
www.smartlab.org
 Loading...