

Page 1
User Manual
HMM Diagnostics GmbH
Friedrichstraße 89
D-69221 Dossenheim, Germany
www.hmm.info
Self-Monitoring Blood Glucose System with wireless data transfer
Please read this manual thoroughly before first
using this device
Page 2

Page 3

41
ENGLISH
Contents
I. Introduction 43
Measuring principle 44
Intended use 44
Important information 45
Note on smartLAB®nG „NO CODE“ test strips 47
II. Your smartLAB®global W nG 48
Display & functions 48
Specifications 48
The smartLAB®nG test strips 49
Explanation of symbols 50
Set content 50
III. Setup & Operating procedures 51
Installing batteries 51
Function check 52
Wireless Data transfer 53
Notes on using smartLAB®nG blood glucose test strips 55
Running a blood glucose test 56
Alternate Site Testing (AST) with the transparent cap 59
Understanding your test results 60
Optional: Control Solution Testing 63
Page 4

42
IV. Miscellaneous 67
Maintenance 67
Troubleshooting 68
Limitations of the measurement procedure 72
Regularity and Safety Notice 74
Warranty 75
Page 5

43
ENGLISH
I. Introduction
Thank you for using the smartLAB®global W nG Self-Monitoring
Blood Glucose System. This system was produced in close association with diabetes health care professionals, hospitals and, most
importantly, people with diabetes. The measuring results can help
you determine the effects of food, exercise and diabetes medications.
Your smartLAB®global W nG glucose system was designed to be dependable, easy-to use, compact, lightweight and portable to assist
you in monitoring your blood glucose on a regular basis. Please
read this manual thoroughly before you begin testing. It provides you and your diabetes care team with important information
and step-by-step direction to use meter correctly. Although your
smartLAB®global W nG System is easy to use, you should consult
your healthcare professional (this may be your doctor, diabetes
nurse educator or pharmacist) for instructions on how to use the
system. The only way to obtain accurate results from any system is
to make sure you correctly use it. If you have any concerns, please
call your authorized distributor in your country during business
hours.
The smartLAB®global W nG System is an ANT+ and Bluetooth® Smart
device. It supports the ANT+ device profile (V. 2.1) and is kompatible
with receiving devices (such as PC and Smartphones) that support
the ANT+ weight scale device profile. With the integrated Bluetooth®
Smart the smartLAB®global W nG System can also sent data via BLE
to a corresponding receiver. You can then transmitt your values
wireless to these receiving devices.
Page 6

44
Measuring principle
The smartLAB®global W nG Self-Monitoring Blood Glucose System
is designed to allow rapid measurement of blood glucose by using
an electrochemical biosensor technology. This system employs a
disposable dry reagent strip technology, based on the FAD-binding
glucose dehydrogenase.
Each test strip features an electrode containing FAD-binding glucose dehydrogenase. A capillary blood sample is applied to the collecting area of the strip, and is automatically drawn into the reaction zone, where the FAD-binding glucose dehydrogenase catalyzes
the glucose dehydrogenation. It will produce gluconolactone.
During the reaction, a mediator transfers electrons to the electrode
surface and generates a current. The amount of the current is proportional to the amount of glucose present in the blood sample.
After 5 seconds, the smartLAB® global W nG will show glucose concentration on the screen
Intended use
This blood glucose meter is a self-test IVD medical equipment and
intended for both home testing and for professional use to monitor the blood glucose value from capillary whole blood and venous
whole blood. It is used outside the body only (In-vitro diagnostic
use). The meter should be used only with smartLAB®nG blood glucose test strips.
Page 7

45
ENGLISH
Important information
• The smartLAB® global W nG blood glucose meter is designed and approved for testing venous whole blood or fresh capillary whole blood
samples from your fingertips, palm and forearm. The meter is for in
vitro diagnostic use ONLY (for testing outside the body). It should not
be used to diagnose diabetes.
• The smartLAB® global W nG blood glucose meter can only be used with
smartLAB®nG Blood Glucose Test Strips. Other test strips will give in-
accurate results.
• Severe impact may cause the meter to malfunction. Do not disassemble the meter as it may damage components inside and cause an
incorrect reading. The warranty will be void if the meter has been
disassembled.
• Testing is not valid for neonatal blood specimens.
• Incorrect results may occur when performing the test. If you believe
you are not feeling well, please contact your healthcare professional
immediately.
• Always keep the meter clean and store it in a safe place. Protect from
direct sunlight to ensure a longer lifespan.
• The strip slot should be kept free from dirt, dust, blood stains, and
water stains.
• Do not store the meter and test strips in a car, a bathroom or a refrigerator. And the meter, strips and lancing device should be kept away
from children or pets.
Page 8
46
• Remove batteries if the meter will not be used for one month or more.
• Store the kits in a dry place with temperature range is 2 to 30°C (35.6
to 86 °F). Keep away from direct sunlight and heat.
• Store your test strips in their original vial only. Do not transfer them
to a new vial or any other container.
• Indicate the date you open the vial.
Discard all unused strips immediately after 90 days from open date. The strips are for single use
only.
• You should not test critically ill patients with home-use blood glucose
meters.
• Warning for potential biohazard: Healthcare professionals using this
system on multiple patients should be aware that all products or objects that come in contact with human blood, even after cleaning,
should be handled as if capable of transmitting a viral disease.
• Please dispose device according to the local rule of the disposition of
electronic device/ accessory waste.
• If the equipment is used in a manner not specified by the manufacturer, the protection provided by the equipment may be impaired.
Do not touch the test strip with wet hands
Do not use expired test strips
(see expiration date on the strip vial)
Do not bend, cut or twist the strip
Page 9

47
ENGLISH
Consult with your healthcare professional before testing
on your palm or forearm.
Altitude up to 3,048 meters above sea level has no effect
on readings.
Health-Related Information
• If you are experiencing dehydration, frequent urination, low blood
pressure, shock or hyperosmolar hyperglycemic nonketotic coma
(HHNKC), you may get a test result that is lower than what your blood
glucose really is. If you think you are dehydrated, call your healthcare
professional right away.
• If you have followed the steps in the user’s manual, but still have
symptoms that do not seem to match your test results, or if you have
questions, please contact your healthcare professional.
• Please read your test strip instructions carefully for additional healthrelated information
•
Note on smartLAB® nG „NO CODE“-test strips
The smartLAB®nG blood glucose test strips compatible with
smartLAB®nG glucose systems need not to be coded, any more.
Page 10
48
II. Your smartLAB®global W nG
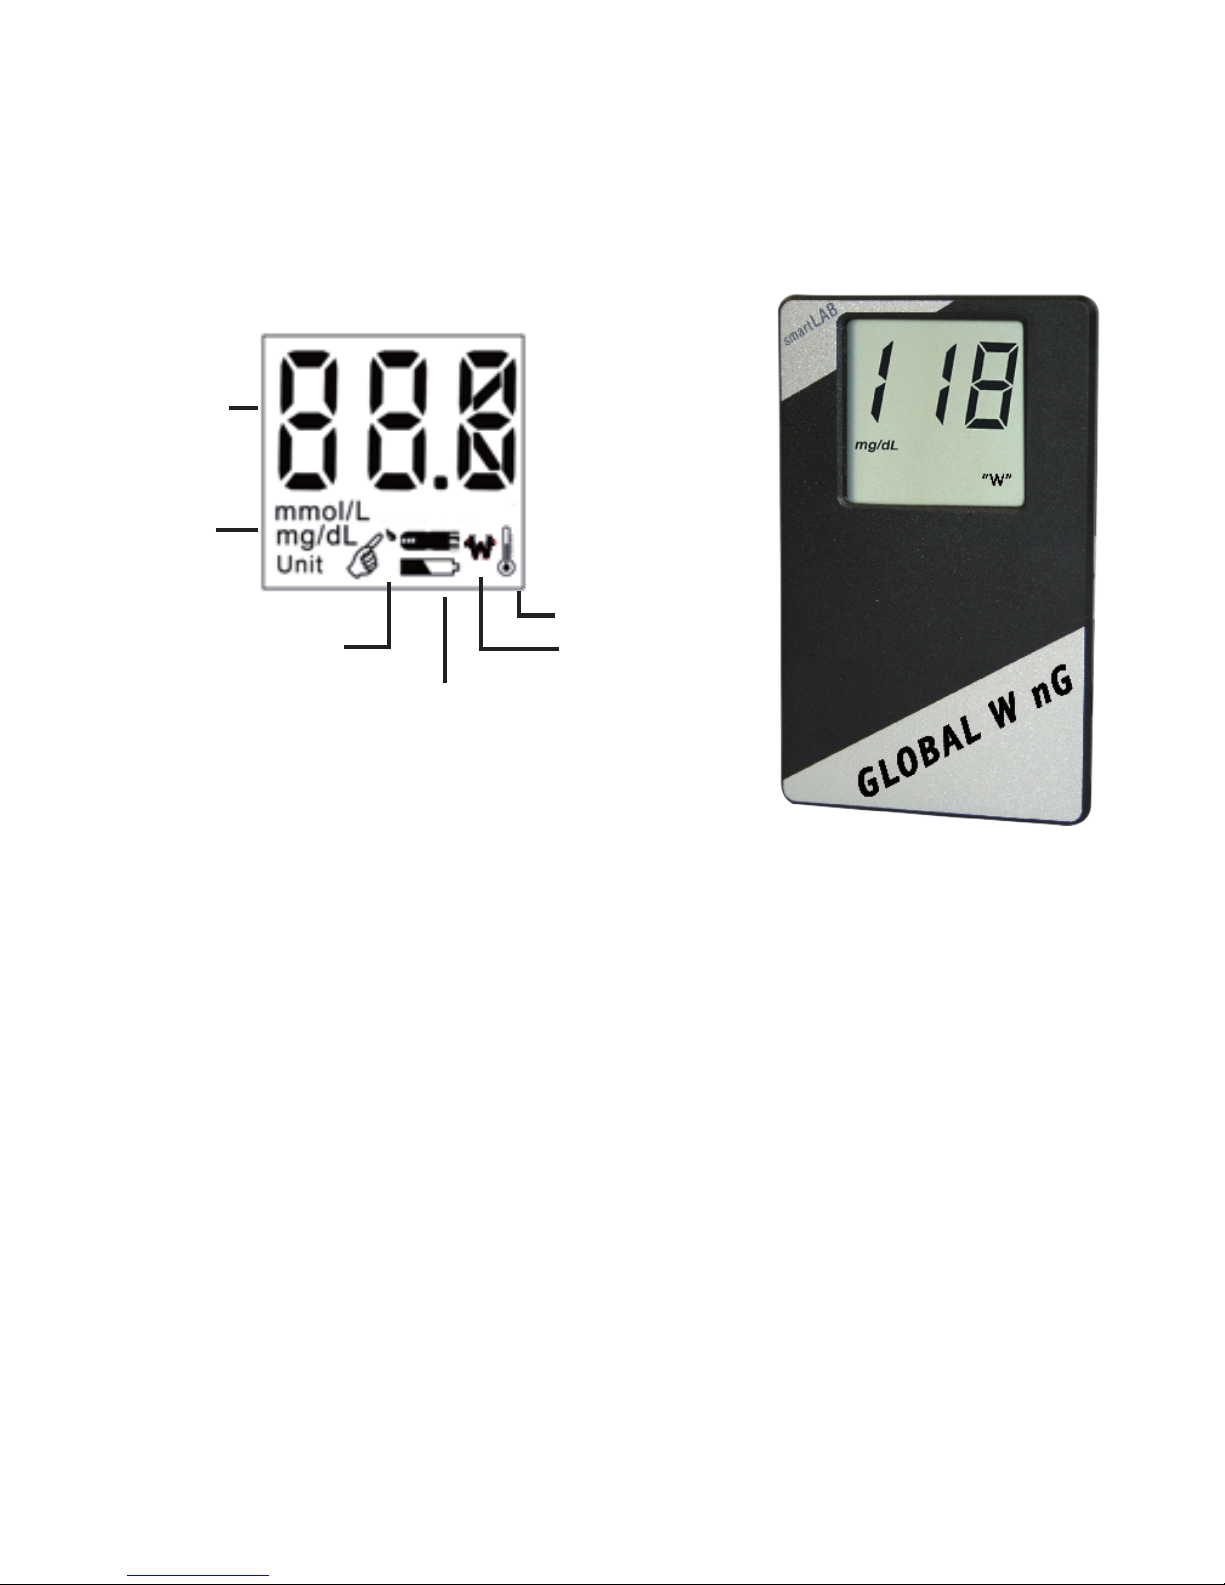
Display & functions
M e as ur in g
result
M e as ur in g
unit
Apply
blood or control solution to
the test strip
Battery power
Thermometer
Wireless
Specifications
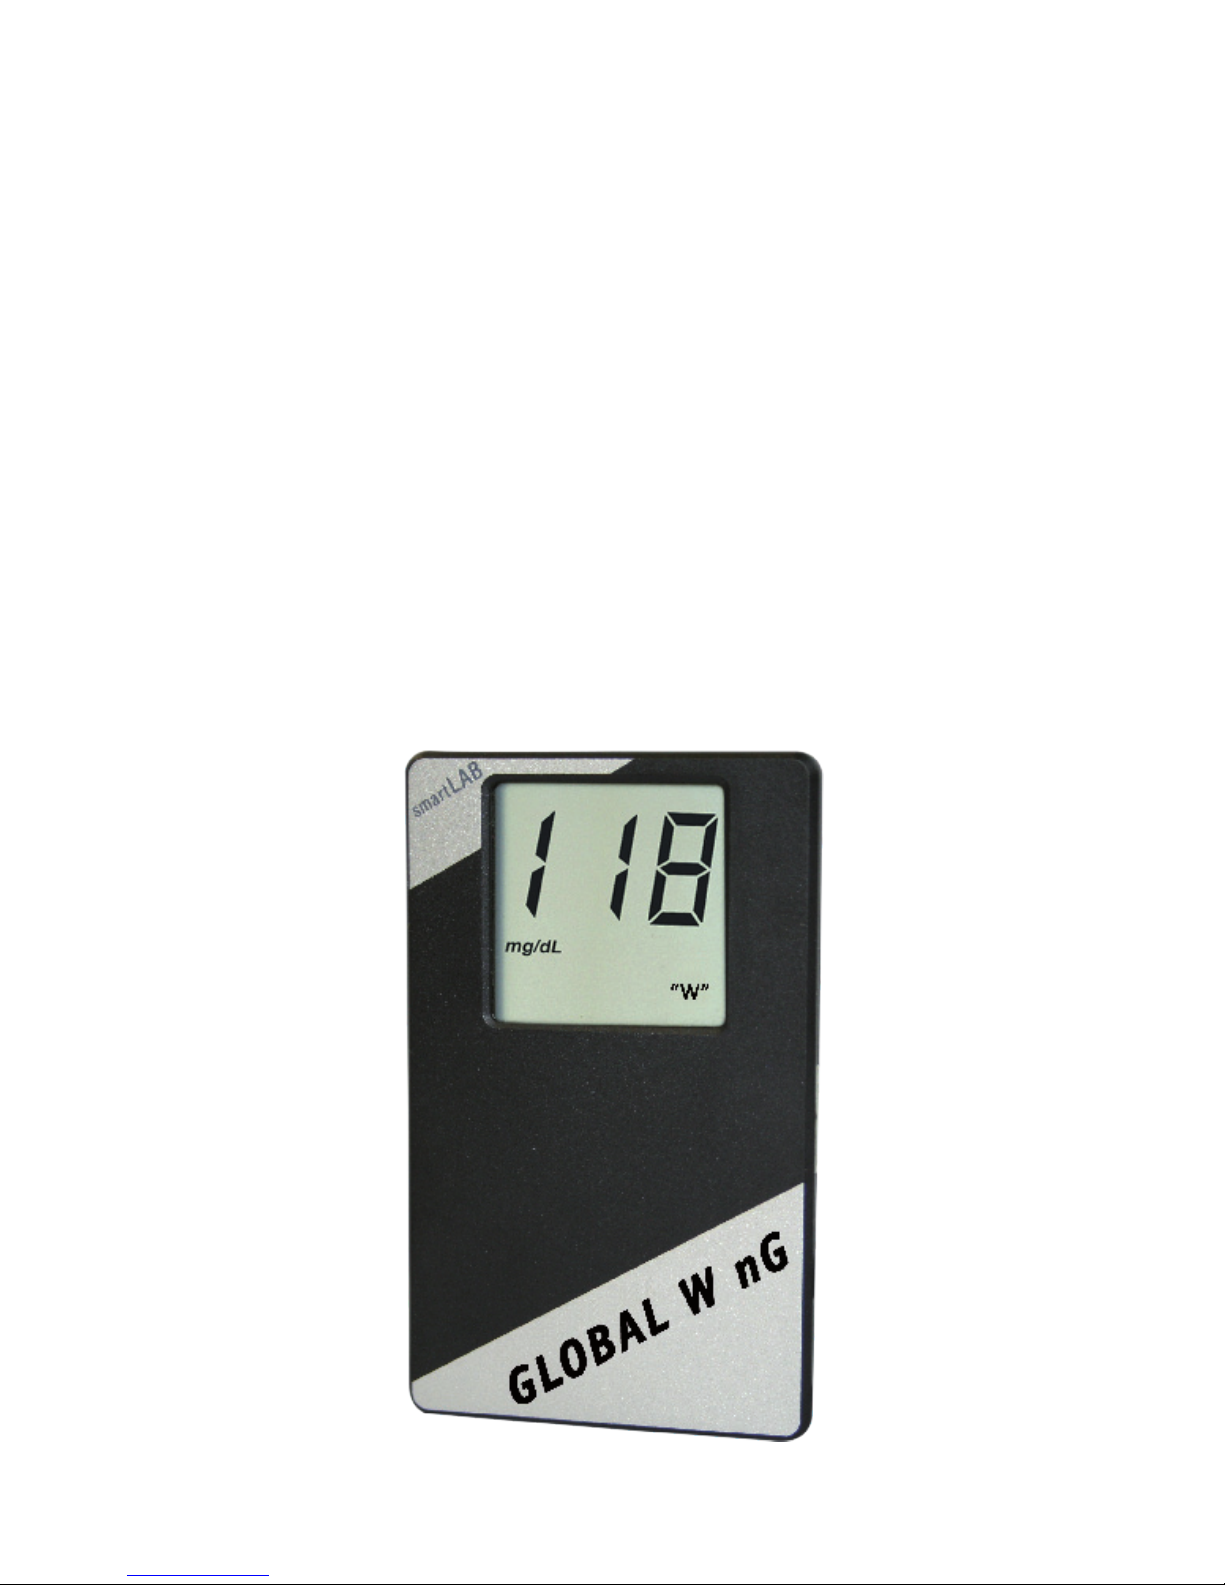
1. Type: smartLAB®global W nG
2. Measuring range: 20~630 mg/dL
(1.1~35.0 mmol/L)
3. Measuring duration: 5 seconds
4. Time mode: AM/PM - 24 hours
5. Memory: 480 values
6. Operating temperature: 10°C~40°C
(50°F~104°F)
7. Storage Temperature: -20°C ~50°C
(-4°F~122°F)
8. Relative humidity: RH ≤90%
9. Blood sample: ≥ 0,6 µL capillary
whole blood
10. Calibration: Plasma equivalent
11. Hematocrit (Hct): 30-55%
12. Battery type: 2 CR 3V Lithium
batteries
13. Battery life: approx. 500 measurements
14. Display-size: 30 x 30 mm
15. Meter dimensions: 80 x 50 x 5 mm
16. Weight: 30g (without batteries)
17. Data transfer: wireless through
integrated ANT and BLE module
18. Transportation temperature: -20°C
~50°C (-4°F~122°F)
19. Transportation humidity: RH ≤90%
Page 11
49
ENGLISH
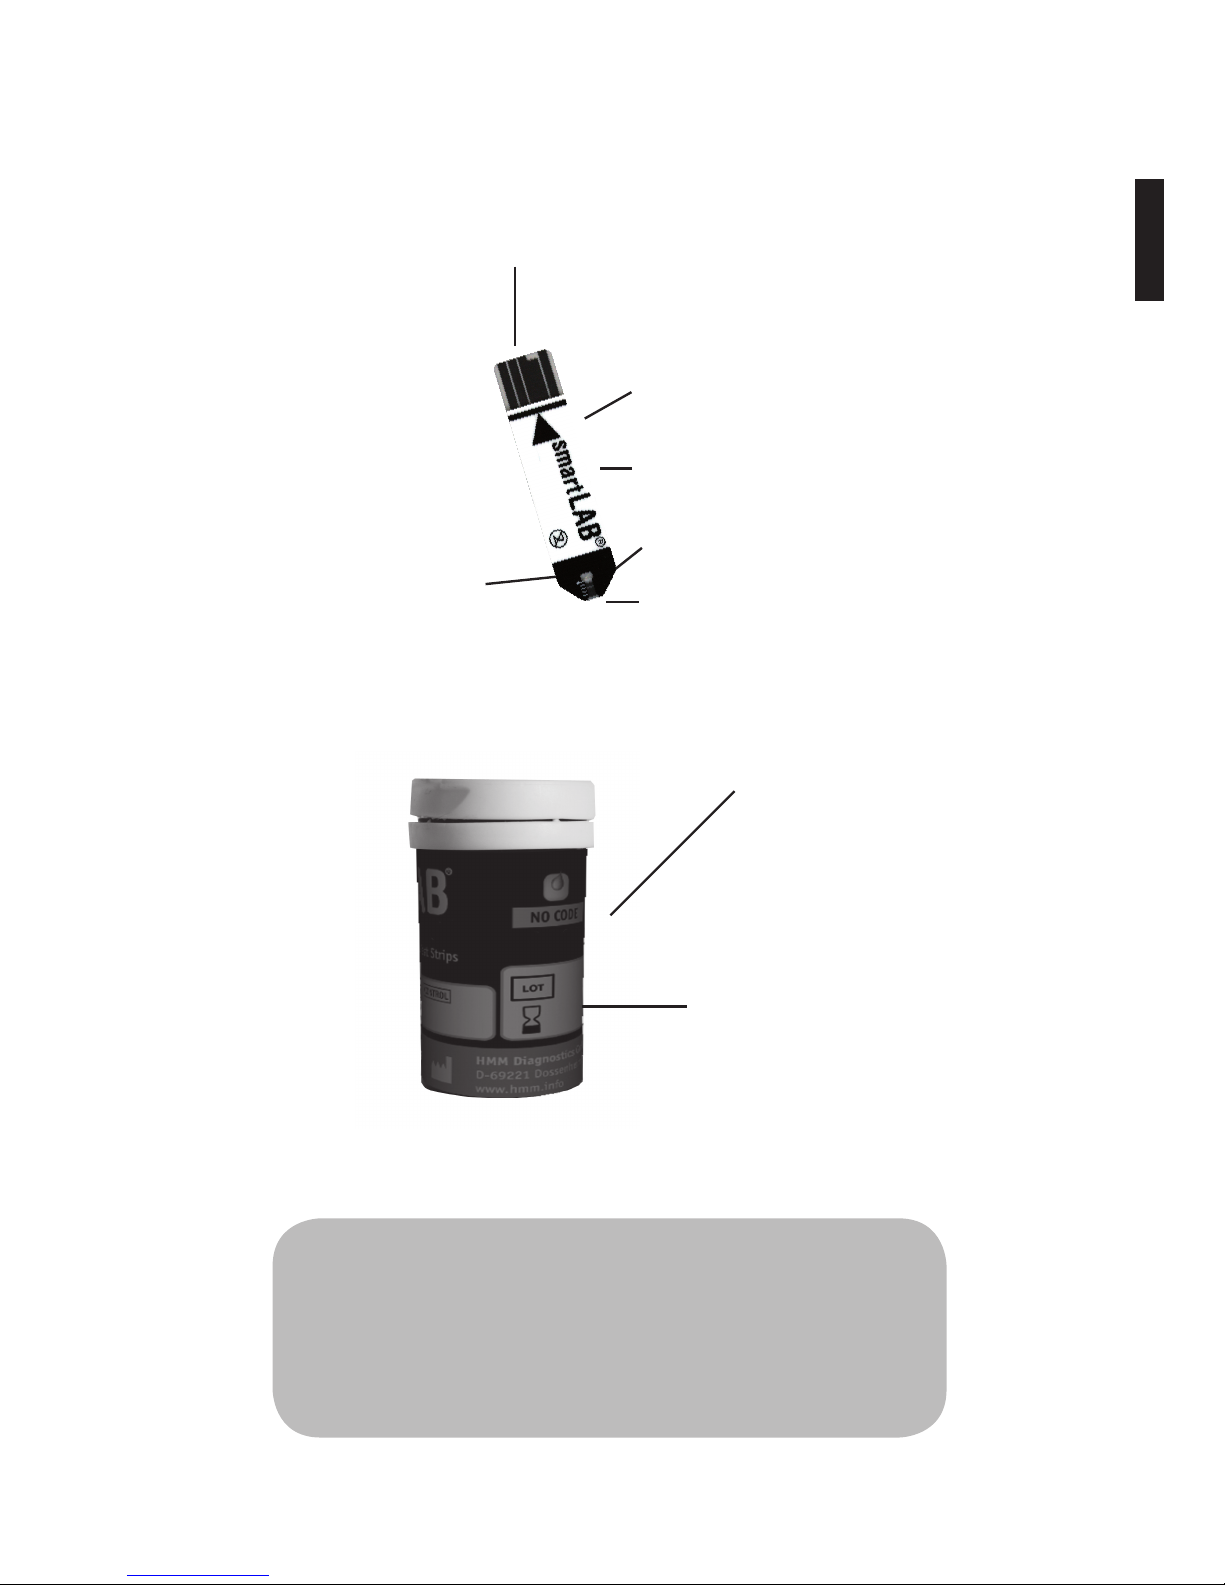
The smartLAB®nG test strips
Note: You can find the test strip expira-
tion date on the vial label next to the
symbol.
Expiration date
Vial opening date (please
note)
Electrode
Insert direction
Grip zone
Reaction zone
Aperture
Application zone
Page 12
50
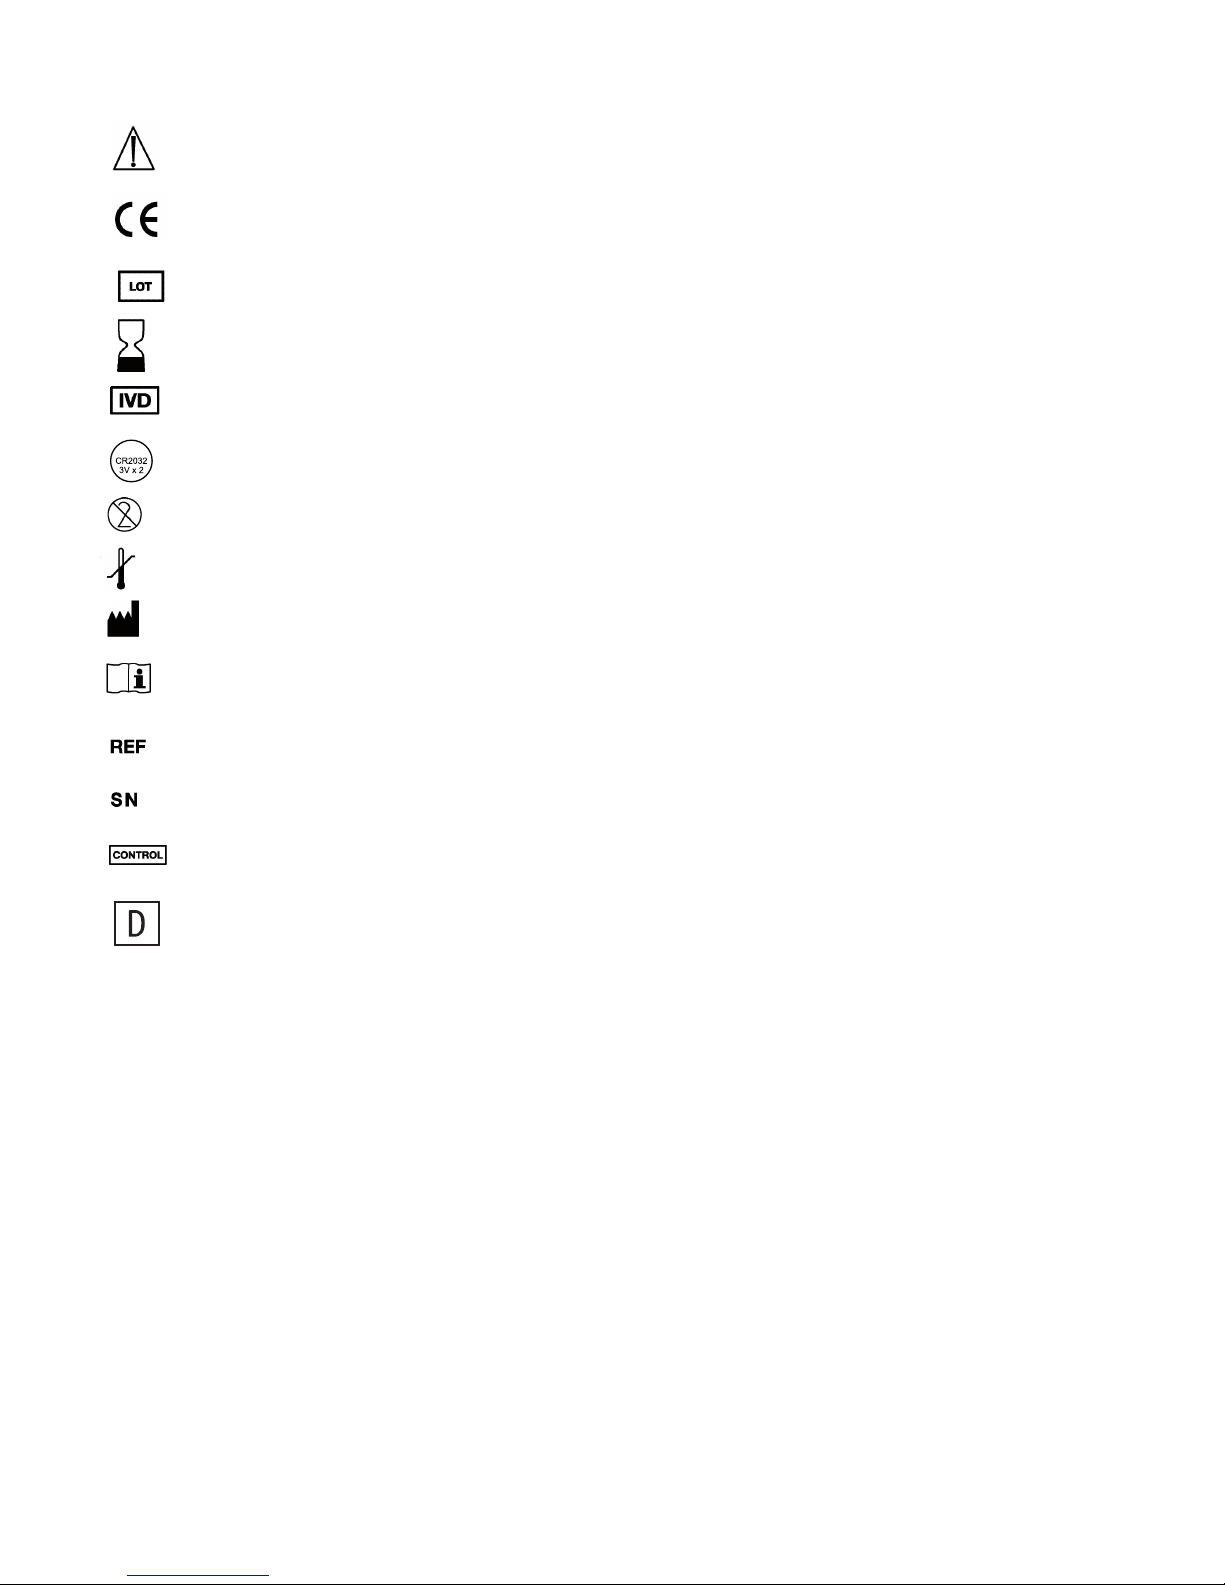
Explanation of symbols
+
Caution
This product meets the requirements of Directive
98/79/CE for in vitro diagnostic medical devices.
Lot number
Expiration date
For in vitro diagnostic use only
Use Lithium battery CR 2032 3V
Single use only
Storage temperature
Manufacturer
Before use, read manual first
Catalogue number
Serial number
Control solution
Opening date of test strip vial
Set contents
1 smartLAB®global W nG blood glucose meter
1 User manual
1 hard box
2 CR 2032 3V batteries
1 smartLAB® lancing device
1 smartLAB® Check Strip
1 smartLAB® Quick Start instruction
10 smartLAB® lancets
10 smartLAB®nG blood glucose test strips
1 smartLAB®nG blood glucose test strip instruction
Page 13
51
ENGLISH
III. Setup & Operating procedures
Installing batteries
The meter uses 2 CR 2032 3V Lithium
batteries. Batteries will normally last
for aprox. 500 tests. Other types of CR
3V lithium batteries are also acceptable,
yet the capacity of test times may differ.
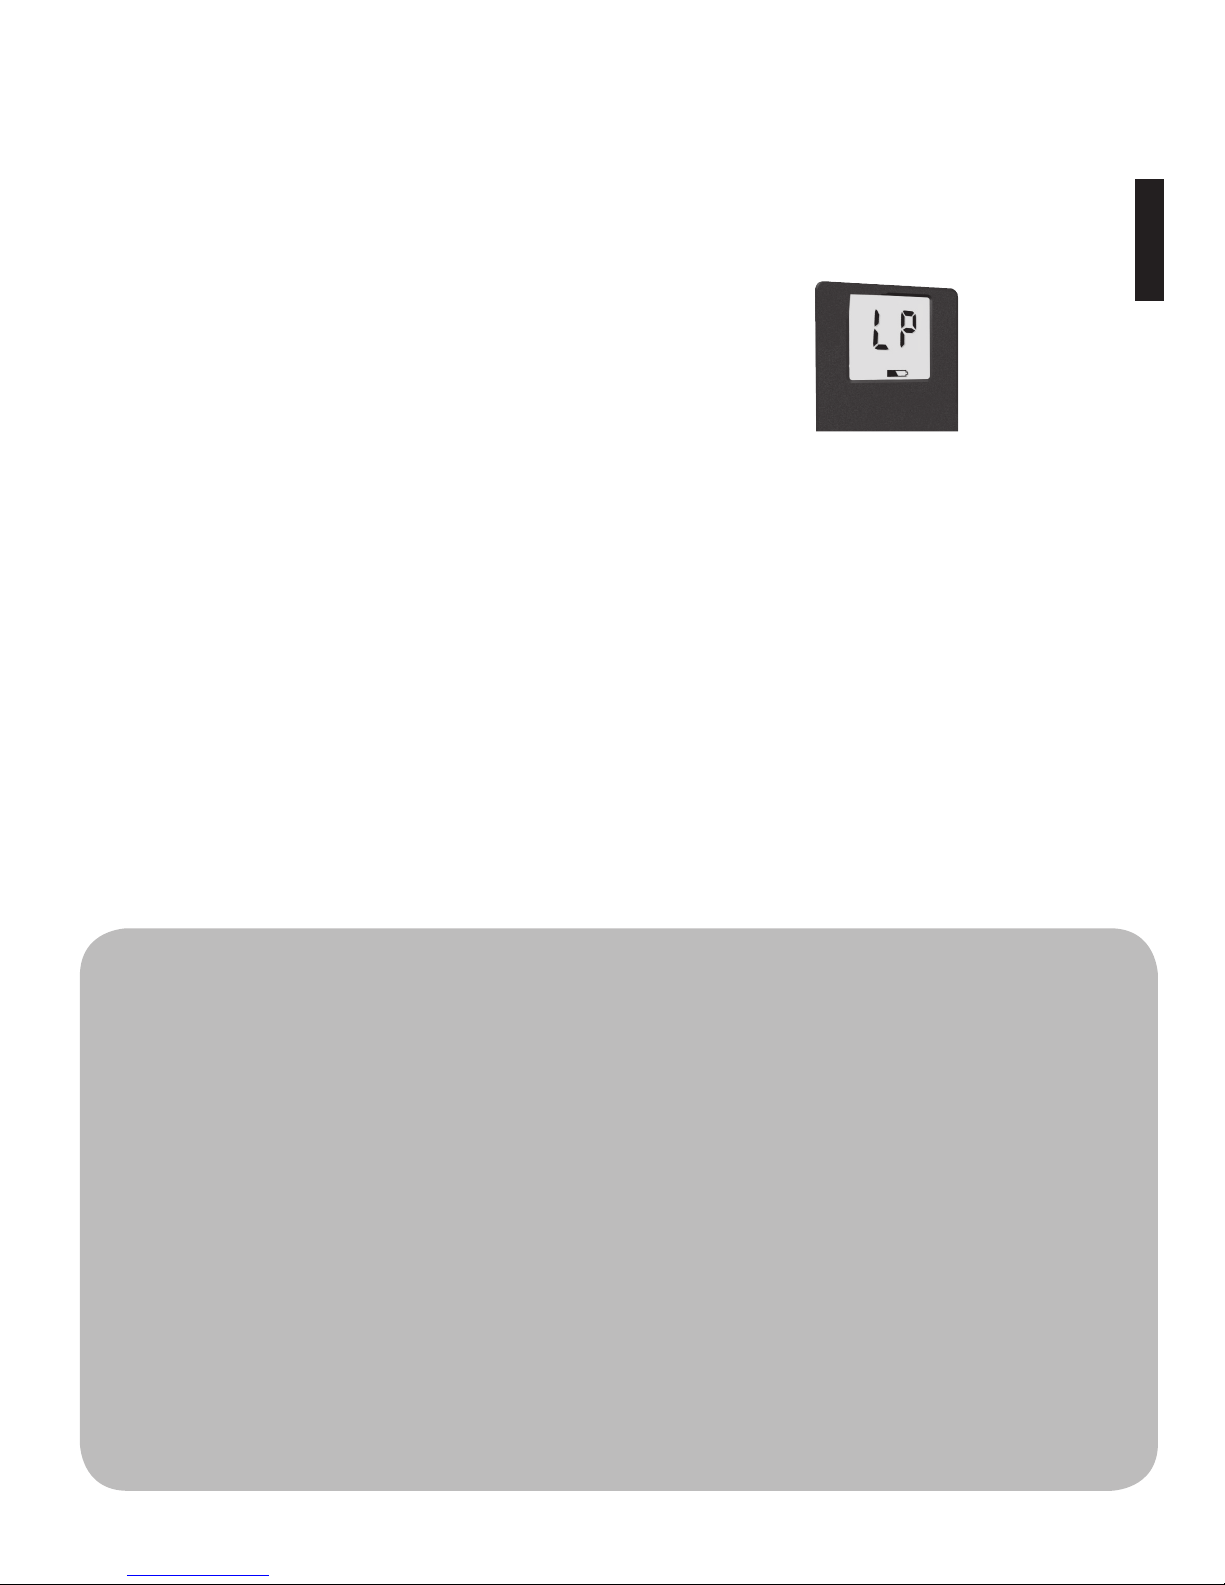
Install the batteries, by removing the plastic protection when you
first use the meter or replace with new batteries when the “LP” message and the low battery symbol appear on the LCD display. Open
the battery lid on the back side of the smartLAB®global W nG meter
and insert batteries with plus sign to top. First insert the battery on
the right side and then press the left side down until it clicks. Close
the battery lid. The display will light up and all symbold will blink
for around 10 seconds. Afterwards you can use the device.
Note:
1. Remove the batteries when not using the meter for one month
or longer.
2. Values won’t be deleted when the batteries are replaced.
3. The device needs to be set again after battery change. Please
make sure that the device is close to a corresponding receiving device for settings.
4. The device will try to contact the gateway within the first 10
minutes after inserting batteries. If no connection is possible, “ERR
002” will show on the display. The device will now try to connect to
gateway in a certain interval in the background.
Low battery symbol
Page 14
52
Meter, batteries, lancets, test strips etc. must be disposed of
according to local regulations at the end of their usage.
Function check
You can carry out a function check with the Check Strip which is
included in your meter set. You do not have to do the function
check before every measurement. It helps you to control if your
smartLAB®nG meter works properly, from time to time, though.
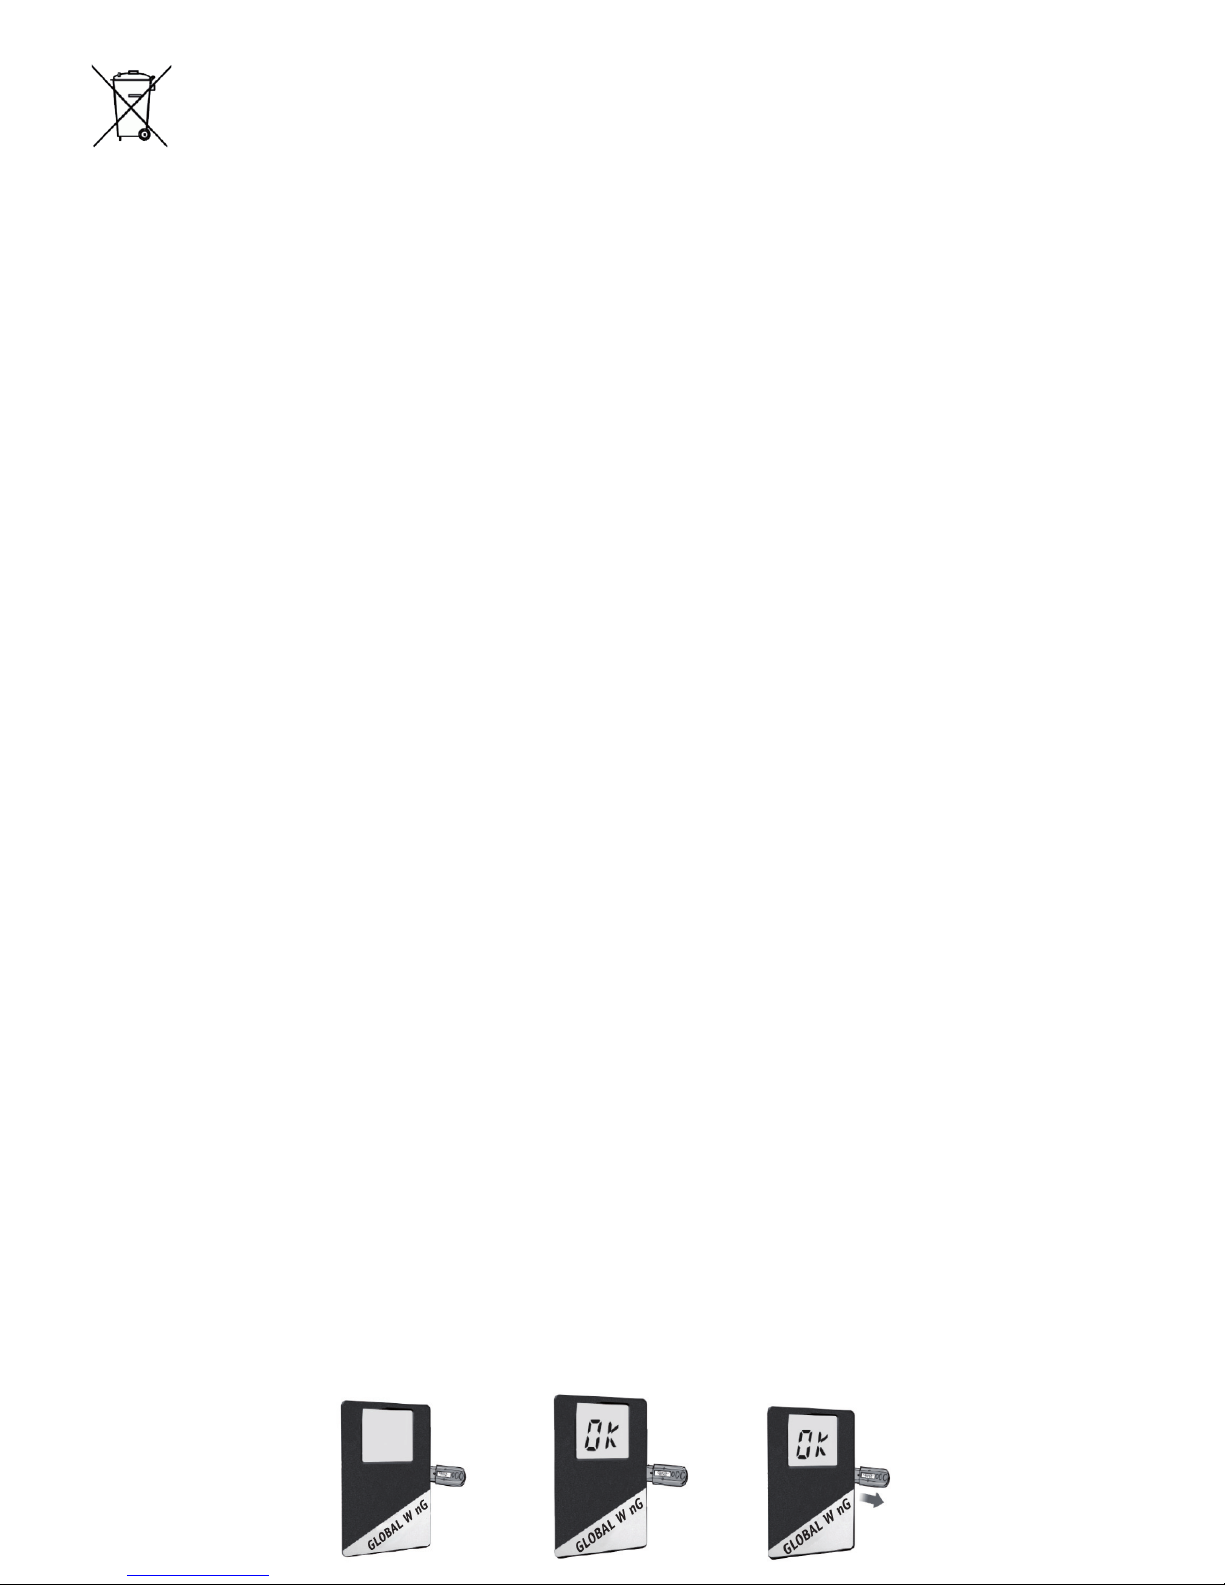
1. Insert check strip into the meter:
Make sure your check strip is inserted with writing to top. The meter
will turn on automatically and the display will show „CHK“.
2. Check message in LCD display:
The function check will take approx. 3 seconds. The check can produce the following messages on the display:
•„OK”-yourmeterworksproperly
•„FAL“-changebatteriesandcheckagain.Ifthemessagestillap-
pears, please refer to your local supplier.
After showing “OK” the device will start to send measured data. If
device has not been set yet by the system it will be set now. Afterwards the data will be shown on the screen.
3. Remove check strip:
The meter will turn off automatically after removing the check strip.
Please keep the check strip in the soft case of the meter.
Page 15

53
ENGLISH
Wireless Data transfer
You can connect your smartLAB®global W nG with a partner device
which fulfills the standard protocol of ANT+ or BLE wireless data
transfer. You can transfer measured blood glucose values automatically and wireless to the device. Partner devices could be laptops,
smartphones, tablets or any other ANT+ or BLE-capable device.
The communication will be enabled by a gateway* which can be
installed on PC, Smartphone or Tablet.
To allow a data transfer to a portal your smartLAB®global W nG
needs to be set by the system. When using the device for the first
time and removing the battery protection the display will blink for
5 seconds which indicates that the device is trying to communicate
with the gateway to set the device.
After each measurement the device will send the data to the gateway. Saved Data will be transfered automatically every 30 minutes
or together with a new Mesaurment. You can also manually transfer
measured data. Please go to Chaper “Manually transfer not sent
data”.
When transfering data, the wireless symbol “W” will flash on the
display.
Note: The BLE or ANT+ installation on the according partner device
varies and can not be explained in every detail, here. Please read
the partner device’s user manual thoroughly on how to activate BLE
or ANT and how to connect the device to your smartLAB®global W
nG.
* For more information on the gateways please visit www.hline-online.com
Page 16
54
Manually transfer not sent data
You can initialize a manual data tranfer by following these steps:
• Insert the Check Strip into the test strip slot. “Chk” and “OK”
should show.
• On the display the wireless symbol will flash afterwards; the
device is now trying to communicate with gateway and send all
data, which have not been send yet.
• The last 20 measured values will show display. The results will
be shown chronologically on the display, the rst for 3 seconds, the values afterwards for 1 second.
• The device will turn off when removing the Check Strip.
Page 17

55
ENGLISH
Notes on using smartLAB® nG blood glucose test strips
• Use only with smartLAB®nG Blood Glucose Meters.
• Run a control solution test every time you open a new box of
test strips
• Keep the test strips in their original bottle.
• After you take a test strip out of the bottle, tightly close the
bottle immediately. This keeps the test strips dry.
• Use the test strip within three minutes after taking it out of
the bottle.
• The strip is for single use only. Do not reuse it.
• Record the date you open the test strip bottle. Be sure to check
the expiration date on the test strip bottle. The test strip is
good for 6 months from the date the bottle is opened or until
the expiration date on the bottle, whichever comes first.
• Store the test strip bottle and your meter in a cool dry place.
• Store the test strips between 2°C ~30°C (36°F - 86°F). Do not
freeze.
• Do not apply blood or control solution to the test strip before
you insert it into the meter.
• Do not touch the test strip with wet hands. Do not bend, cut,
or twist the test strips.
Page 18
56
Running a blood glucose test
1. Preparations
Before running a blood glucose test, make
yourself acquaint with the test strips and the
lancing device. Keep all required materials
ready for use: your smartLAB®global W nG
meter, the smartLAB®nG test strips and the
smartLAB® lancing device including lancets.
Wash your hands thoroughly with warm water
before collecting the blood sample. Rinse your hands thoroughly.
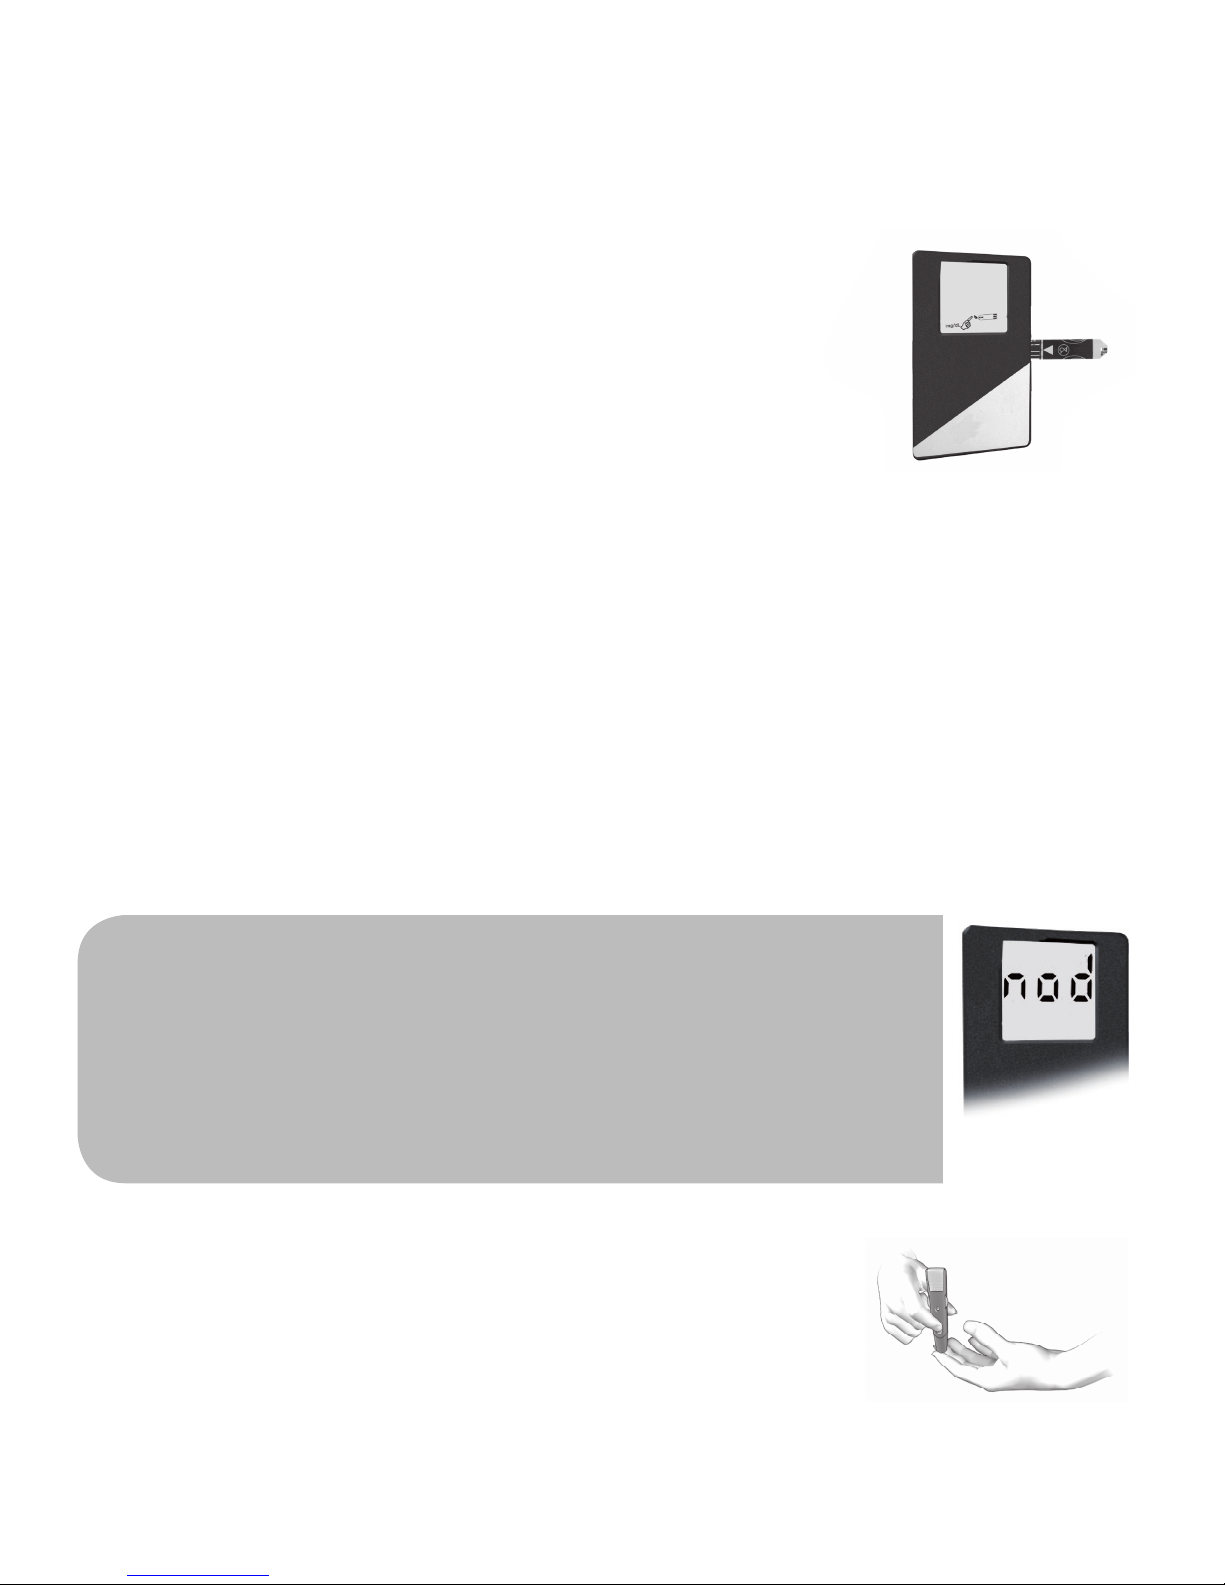
2. Switch on the meter
Take a strip out of the vial and immediately close it. Insert the strip
into the meter in the direction of the arrow on the strip. The meter
turns on automatically. The symbol for applying blood will appear
on the display.
Note: If the device could not be set by the gateway
after changing the batteries you can still run a blood
glucose test. When inserting a test strip the display will
show „nod“. After that the symbol for applying blood
will appear on the display.
3. Collecting a blood sample
When the blood drop flashes on the display, gently massage the part of your finger tip which you
obtain a drop of blood from using the lancing
device. Place the lancing device against the pad
of your finger. Press the trigger button to activate the lancing device.
Page 19

57
ENGLISH
4. Blood glucose measurement
Hold the application zone of the test strip vertically onto the blood
sample. The blood is automatically sucked in the reaction zone of
the test strip. Be sure to get enough blood on the strip’s reaction
zone, otherwise, an inaccurate reading may result. The signal tone
indicates that enough blood entered the reaction zone. The meter
will now start with the measurement which will last 5 seconds. The
LCD display shows the remaining time of measurement in seconds.
Afterwards the note „OK“ indicates a correct measurement. The
measurement is finished with another signal beep and the measured value is shown on the display.
5. Storing memories
The displayed result is automatically stored in the memory of the
meter. If more than 480 results are reached, the oldest one is deleted.
After every measurement the meter tries to connect to another preinstalled ANT or BLE partner (please refer to the chapter “Wireless
data transfer” in this manual to learn how to connect your device
with a ANT or BLE partner). The Wireless-sign will start flashing. If
a connection can be established, the result will be transferred automatically. In case no connection was found, “ERR” and the Wirelesssign appears on the display. Please make sure that you set up your
wireless connection correctly according to the instructions in the
manual of your partner device.
Page 20
58
Note: If the glucose value could not be transmitted via ANT or BLE, it
will still be saved on the internal memory of your smartLAB®global
W nG.
Once the connection can be established the next time, all values
that have been measured in the meantime will be transferred to the
partner device.
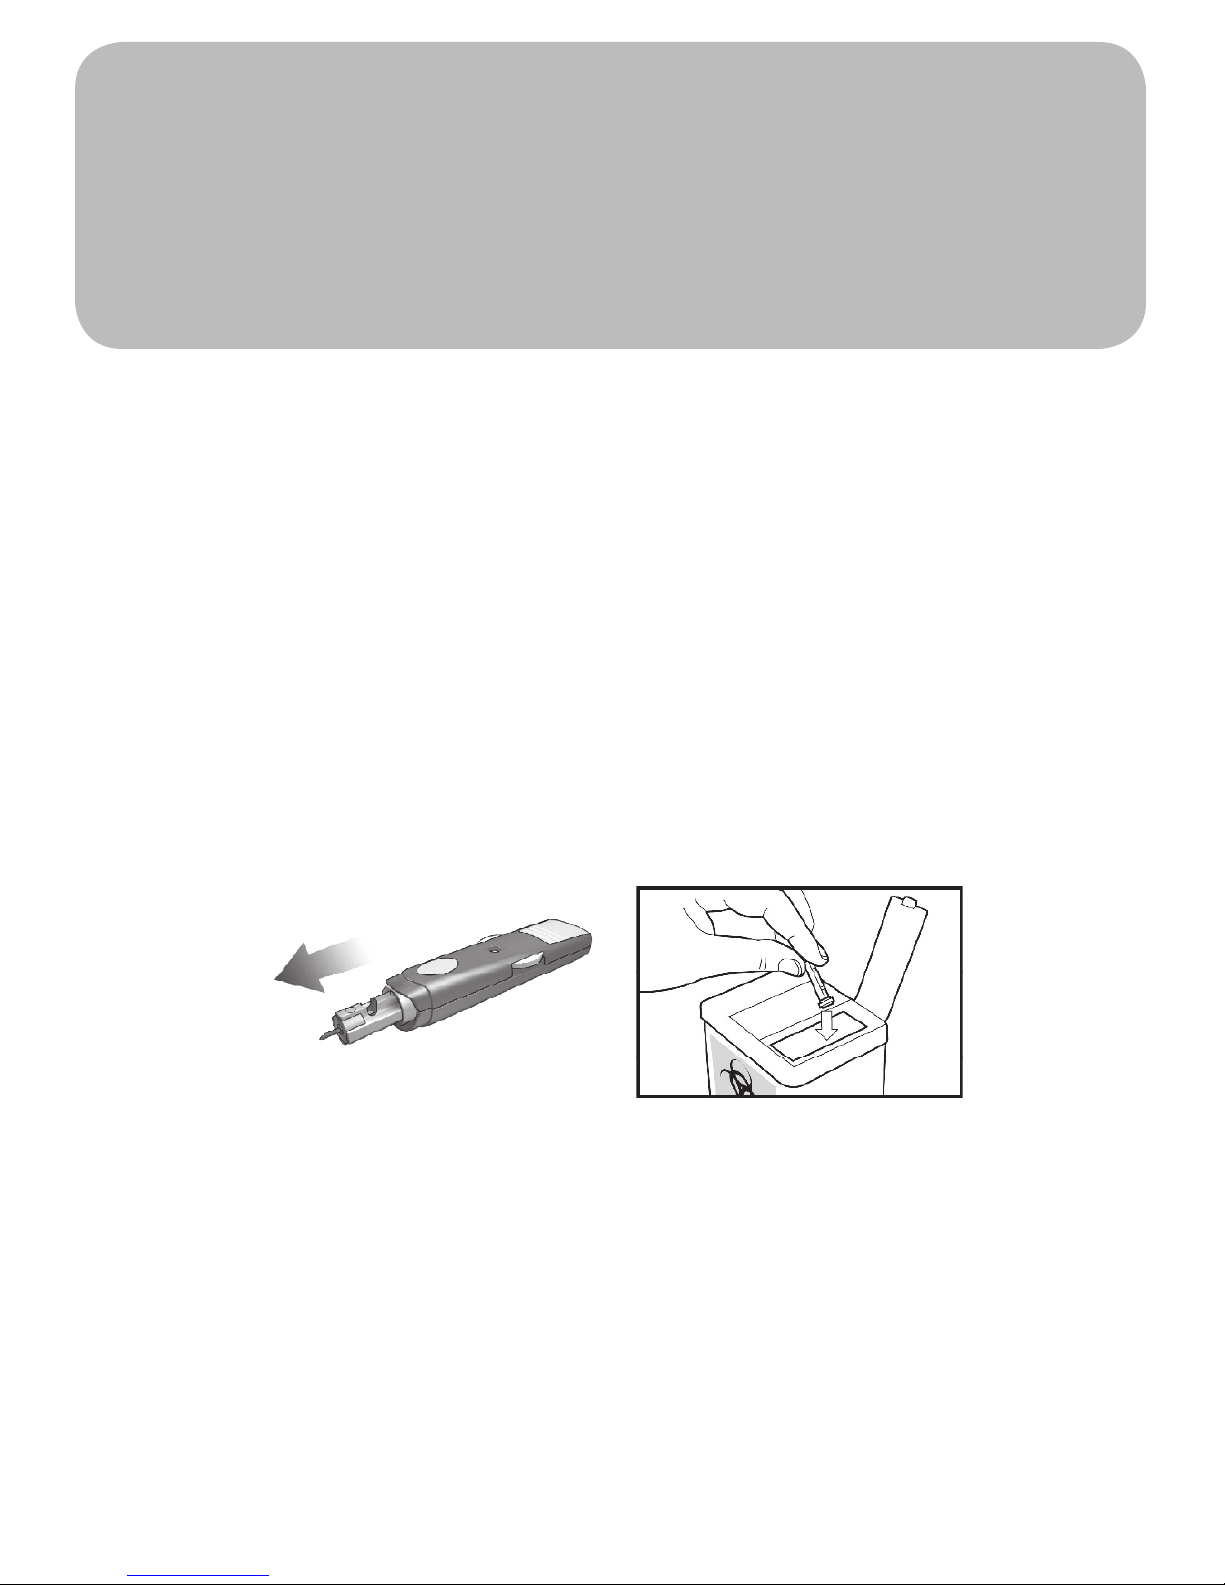
6. Discarding used test strips and lancets
Write down the measured result in your personal diabetic log book
and take the test strip off the strip slot. The meter turns off. If you
don’t take off the test strip, the meter will turn off automatically
after 5 minutes.
In order to discard lancets from the smartLAB
®
lancing device, remove the end cap and carefully pull the used lancet out of the holder. Dispose the lancet according to local regulations, in order to
avoid hurting other people.
Reading stored test results from memory
You can read the last 20 test results on the internal memory of
your smartLAB®global W nG meter by inserting the check strip.
The results will be shown chronologically on the display. Further
results can be seen in the corresponding portal.
Page 21

59
ENGLISH
Alternate Site Testing (AST) with the transparent cap
You can also gain the blood
sample from other parts of the
body than the finger tip. If you
want to use Alternate Site Testing, please use the transparent
cap for your lancing device. Carry out the following steps:
• Gently massage the desired
punctuation site on your arm or
hand for a few seconds. This will
improve the blood circulation.
•Pushthelancingdevicewith
the transparent cap against the desired blood collection site and
push the trigger button to gain a sample.
•Exerciseaconstantpressureuntilyouseethroughthetransparent cap, that enough blood is gained. After that you can carry out
the blood glucose test, as usual.
Alternate Blood Collection Sites
Page 22

60
Understanding your test results
The smartLAB®nG blood glucose test strips are plasma referenced
and calibrated for easier comparison to lab results. The unit of
blood glucose test results displayed on the screen is either mg/
dL or mmol/L, depending on which unit of measurement you have
selected. The mmol/L results will always include a decimal point;
mg/dL results do not include a decimal point.
Expected results for non-diabetic adults:
The normal fasting glucose range is 70 to 100 mg/dL (3.9 to 6.1
mmol/L). Two hours after meals, normal glucose values should be
less than 120 mg/dL (6.7 mmol/L).
Expected results for diabetic adults:
The normal fasting blood glucose range for an adult with diabetes is
70-130 mg/dL (3.9~7.2 mmol/L)*. Two hours after meals, the blood
glucose range for an adult with diabetes is less than 180 mg/dL
(10.0 mmol/L). For further queries about diabetes: please consult
your healthcare professional for the blood glucose range
appropriate for you.
Unusual test results:
If your blood glucose result doesn‘t match the way you feel, follow
these steps, and then repeat the test:
1. Check if the strips are within the expiration date.
2. Be sure that the drop of blood completely filled the reaction zone
of the test strip
Page 23

61
ENGLISH
3. Do a function control test with the smartLAB® check strip
4. Optional: Check meter and test strip performance with the
smartLAB®nG control solution. When test results are still questionable or inconsistent, consult your healthcare professional before making any changes to your diabetes medication program.
5. Repeat the Measurement:
If the values of the repeated measurements are however questionable and do not match the way you feel, please contact your health
care professional before you change your medication.
Note:
1. Extremely high humidity may affect the test results. A relative
humidity greater than 90% may cause inaccurate results.
2. A red blood cell count (Hematocrit) below 30% may cause higher
results. Hematocrit above 55% may cause lower results.
3. Some studies have shown that electromagnetic fields may affect
results. Do not test near an operating microwave oven.
Symptoms of high or low blood glucose:
Being aware of the symptoms of high or low blood glucose can help
you understand your test results and decide what to do if they seem
unusual. A high blood glucose would be greater than 240 mg/dL
(13.33 mmol/L). A low blood glucose would be below 60 mg/dL
(3.33 mmol/L). Here are the most common symptoms:
High blood glucose (hyperglycemia): fatigue, increased appetite or
Page 24

62
thirst, frequent urination, blurred vision, headache, general aching, or vomiting.
Low blood glucose (hypoglycemia): sweating, trembling, blurred vision, rapid heartbeat, tingling, or numbness around mouth or fingertips. If you are experiencing any of these symptoms, test your
blood glucose. If your blood glucose result is displayed greater than
240 mg/dL (13.33 mmol/L) or below 60 mg/dL (3.33 mmol/L) and
you have symptoms of low or high blood glucose, contact your doctor immediately. If your blood glucose result does not match how
you feel, follow the steps under „Unusual Test Results.“
Comparing your meter‘s result to a lab result:
A common question is how the blood glucose results on your meter
compare to the lab results. Your blood glucose can change quickly,
especially after eating, taking medication, or exercising. If you
test yourself in the morning, then go to the doctor’s office for a
blood glucose test. The results will probably not match, even if you
are fasting. This is typically not a problem with your meter, it just
means that time has elapsed and your blood glucose has changed.
If you want to compare your meter result to the lab result, you must
be fasting. Bring your meter to the doctor’s office, and test yourself
by fingertips within five minutes of having blood drawn from your
arm by a healthcare professional. Keep in mind that the lab could
use different technology than smartLAB®global W nG blood glucose
meter, and that blood glucose meters for self testing generally read
somewhat lower or higher than the lab result. For accuracy and precision data and for important information on limitations, see the
instructions that come with your test strips.
Page 25

63
ENGLISH
Optional: Control Solution Testing
Running a control test lets you know that your meter and test strips
are working properly to give reliable results. You should run a control test when:
•YouusethesmartLAB®global W nG blood glucose meter for the
first time.
•Youopenanewvialofteststrips.
•Youthinkthemeterorteststripsmightbeworkingincorrectly.
•Youdropthemeter.
•Youhaverepeatedatestandthetestresultsarestillloweror
higher than expected.
•Youarepracticingthetestprocedure.
Note: Professional users are instructed to follow federal, state, and
local guidelines concerning QC practices.
About the smartLAB
®
nG control solution
• smartLAB®nG control solution is not intended for human
consumption or injection.
• Use only with smartLAB®nG test strips.
• Write the date you first opened the bottle on the bottle label.
• The smartLAB
®nG
control solution is durable for three months
from the date the vial is opened or until the „Expiration Date“
on the bottle, whichever comes first.
• Do not use smartLAB®nG control solution that is past the
„Expiration Date“
• The smartLAB®nG control solution can stain clothing. If you
spill it, wash your clothes with soap and water.
Page 26

64
• Close the bottle tightly after use.
• Left over control solution should not be added back into the
control bottle.
• Store the bottle of smartLAB®nG control solution at room
temperature, below 30°C (86°F). Do not freeze nor refrigerate.
• If you would like to purchase smartLAB®nG control solutions,
please contact your local dealer.
Running a smartLAB® control solution test
Please make sure you have all necessary items at hand when running a control solution test. You need the smartLAB®global W nG
meter, a smartLAB®nG test strip, and smartLAB®nG control solution.
1. Switch on the meter
Take a strip out of the vial and immediately close it. Insert the strip
into the meter in the direction of the arrow on the strip. The meter
turns on automatically and the symbol for applying blood.
2. Running the control solution test
When the symbol for applying blood appears, shortly shake the
bottle with the smartLAB®nG control solution. Open the bottle and
wipe the tip of the bottle with a tissue. Squeeze a little drop of control solution on a clean, not adsorbing surface (plastic, glass, etc.)
andclose the bottle immediately. Hold the application/reaction
zone of the test strip vertically onto the drop of control solution.
The control solution is automatically sucked in the reaction zone of
the test strip. The signal tone indicates that enough blood entered
the reaction zone. The meter will now start with the measurement
Page 27

65
ENGLISH
which will last 5 seconds. The LCD display shows the remaining time
of measurement in seconds. Afterwards the note „OK“ indicates a
correct measurement. The measurement is finished with another
beep signal and the measured value is shown on the display. Leave
the test strip in its slot.
3. Comparing the results / acceptable range
Compare the result with the acceptable range indicated on the test
strip vial. The acceptable range is indicated in both units (mg/
dL and mmol/L). Please pay attention on comparing the results with
corresponding units.
Page 28
66
4. Understanding control test results
The label on your test strip vial shows the acceptable ranges for the
smartLAB®nG control solutions. The result you get should be inside
this range. Make sure you compare the result to the correct level
of control. When the control result is inside the range on the test
strip vial, your test strips and your meter are working properly. If
your control result is not inside the acceptable range (printed on
your test strip vial), here are some things you can do to solve the
problem:
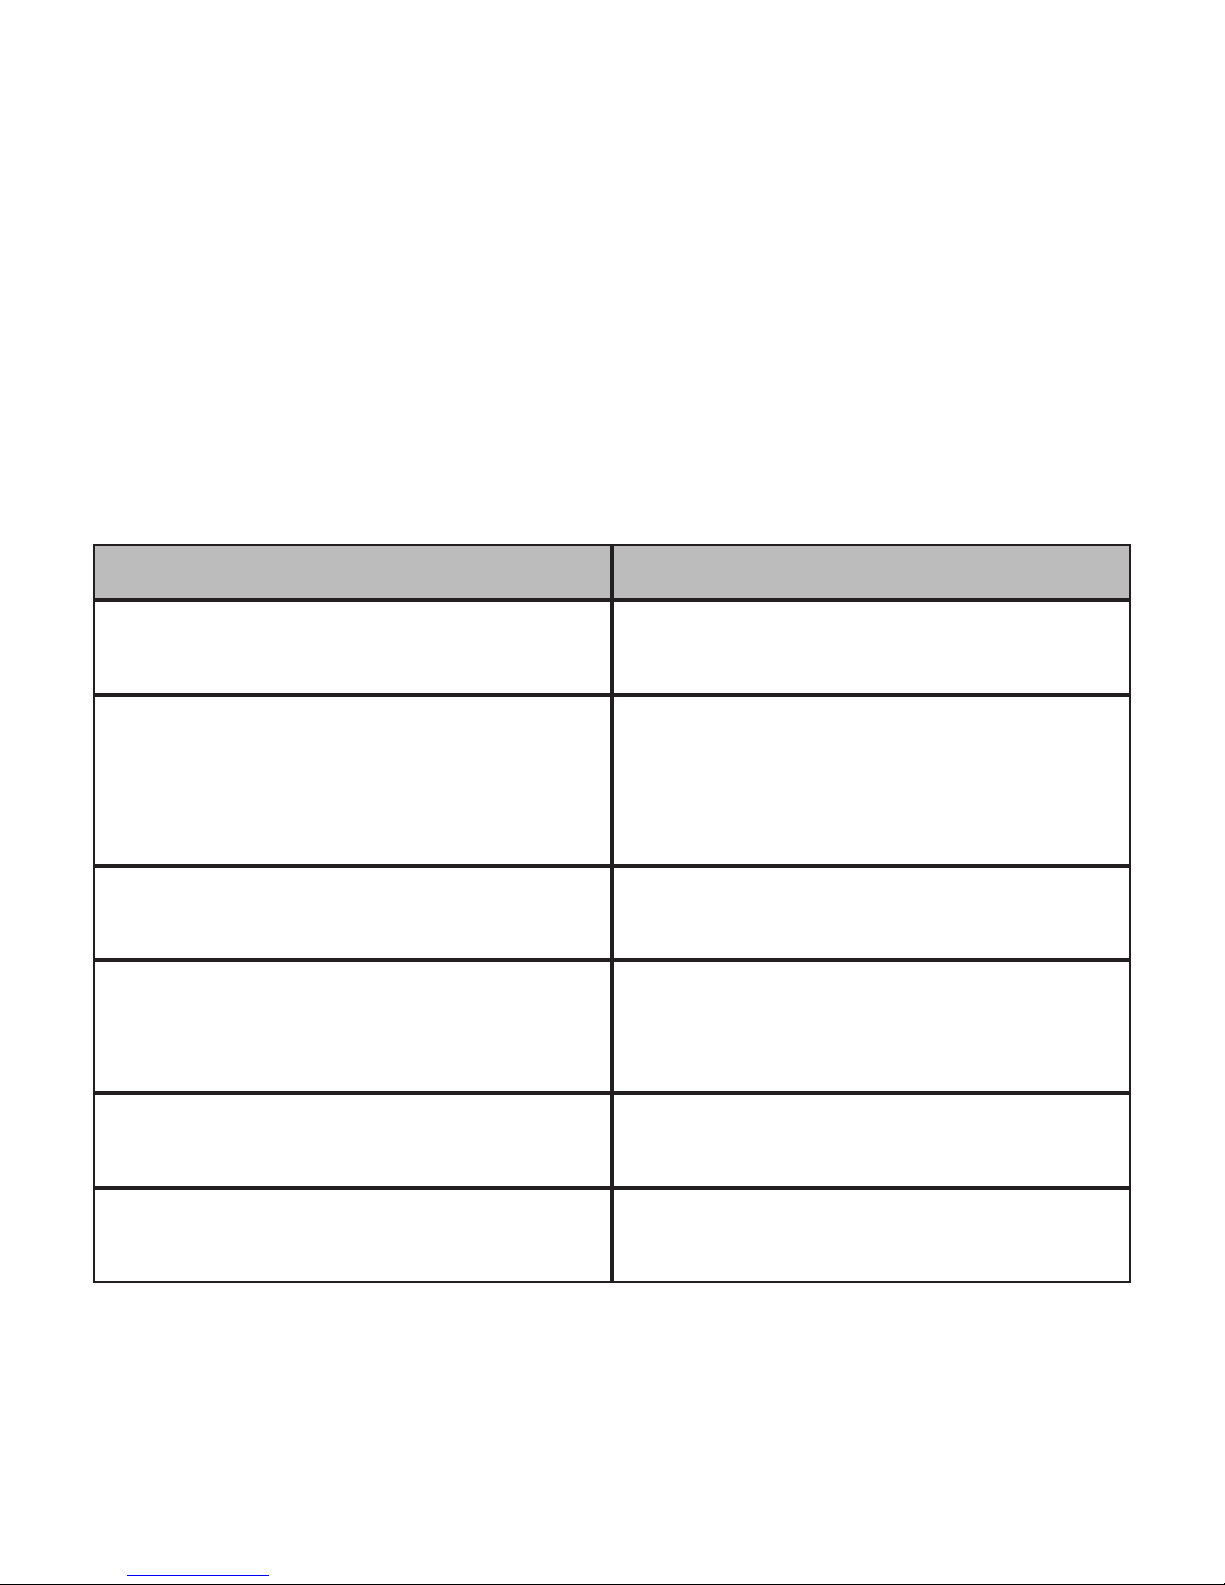
Problem Solution
Was the test strip exposed to open air for
a long period of time?
Repeat the control test with properly
stored strips.
Was the test strip vial capped tightly? Or
was test strip cap left open?
If the cap was not tight, or the bottle
was left uncapped, open a new bottle of
test strips. Do not reuse the strips from
the affected bottle.
Does the meter work properly? You can use the check strip to verify
the meter’s functions.
Is the control solution expired or contaminated?
Replace with new control solution
to check the performance of your glucose meter.
Were test strips and control solution
stored in a cool and dry place?
Repeat the control test with properly
stored strips or control solutions.
Did you follow the testing steps properly?
Read Chapter “Control Solution
Testing” again and retest.
Page 29
67
ENGLISH
IV. Miscellaneous
Maintenance
Your smartLAB®global W nG Blood Glucose System does not require
any special cleaning. Just keep the meter free of dirt, dust, bloodand water stains. Following these guidelines carefully will help you
getting the best performance possible: Gently wipe the meter‘s surface with a soft cloth Do not get any moisture in the test strip slot.
Please do not spray any cleaning solution directly onto
the system.
Do not pour liquid into the system or put the system under
water or liquid
To clean the lancing device, use a mild dishwashing liquid and a soft
cloth. DO NOT place the entire device under water.
Please make sure that no liquids enter the meter‘s
apertures.
Page 30
68
Troubleshooting
Note: If you are not sure how to react on error codes, please con-
tact your local supplier.
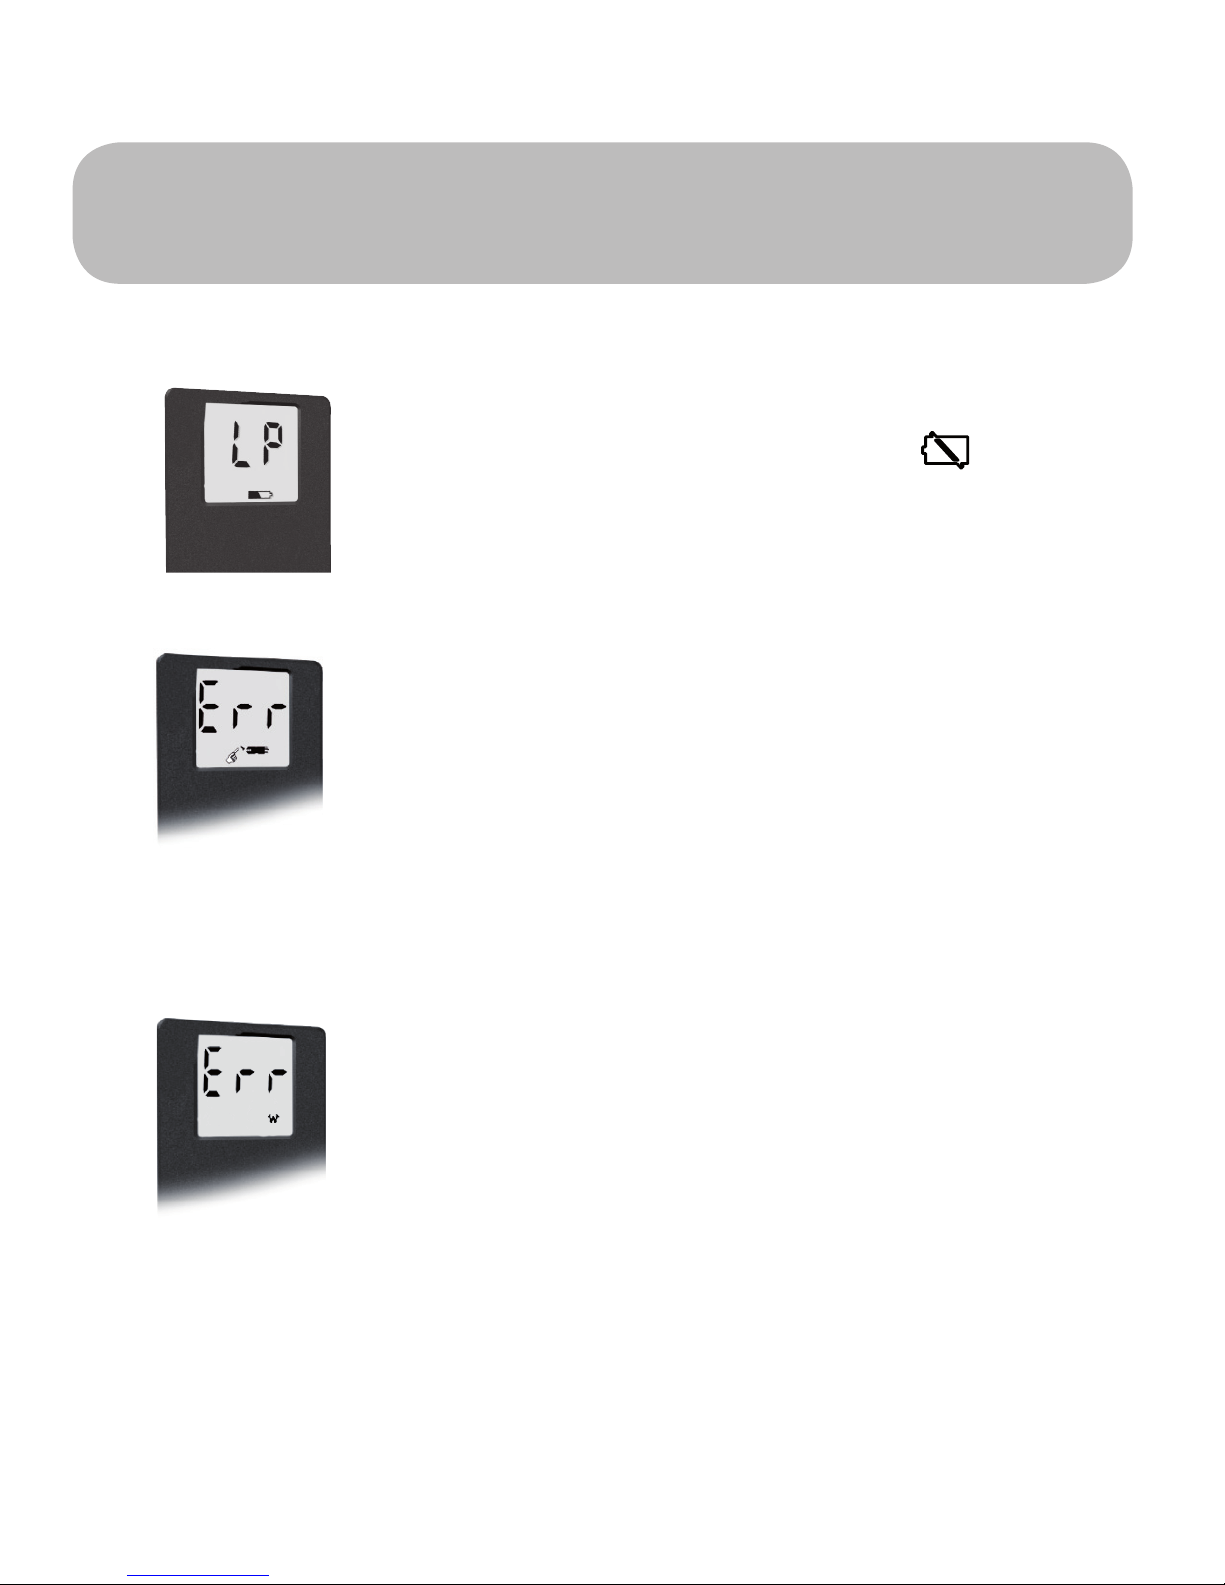
Battery empty
Display: „LP“ & „Battery symbol “
Solution: Replace with new batteries.
No Wireless connection
Display: “Err“ and Wireless-sign
After measurement, the meter tries to transfer
the value to the gateway but a connection cannot be established.
Solution: Make sure meter and partner device
are in close communication proximity. If necessary, set up the Wireless connection again.
Not enough blood in test strip
Display: „Err“ and test strip with hand
If not enough blood is in the test strip, this
error will show.
Solution: Use a new test strip and restart the
measurement procedure.
Page 31
69
ENGLISH
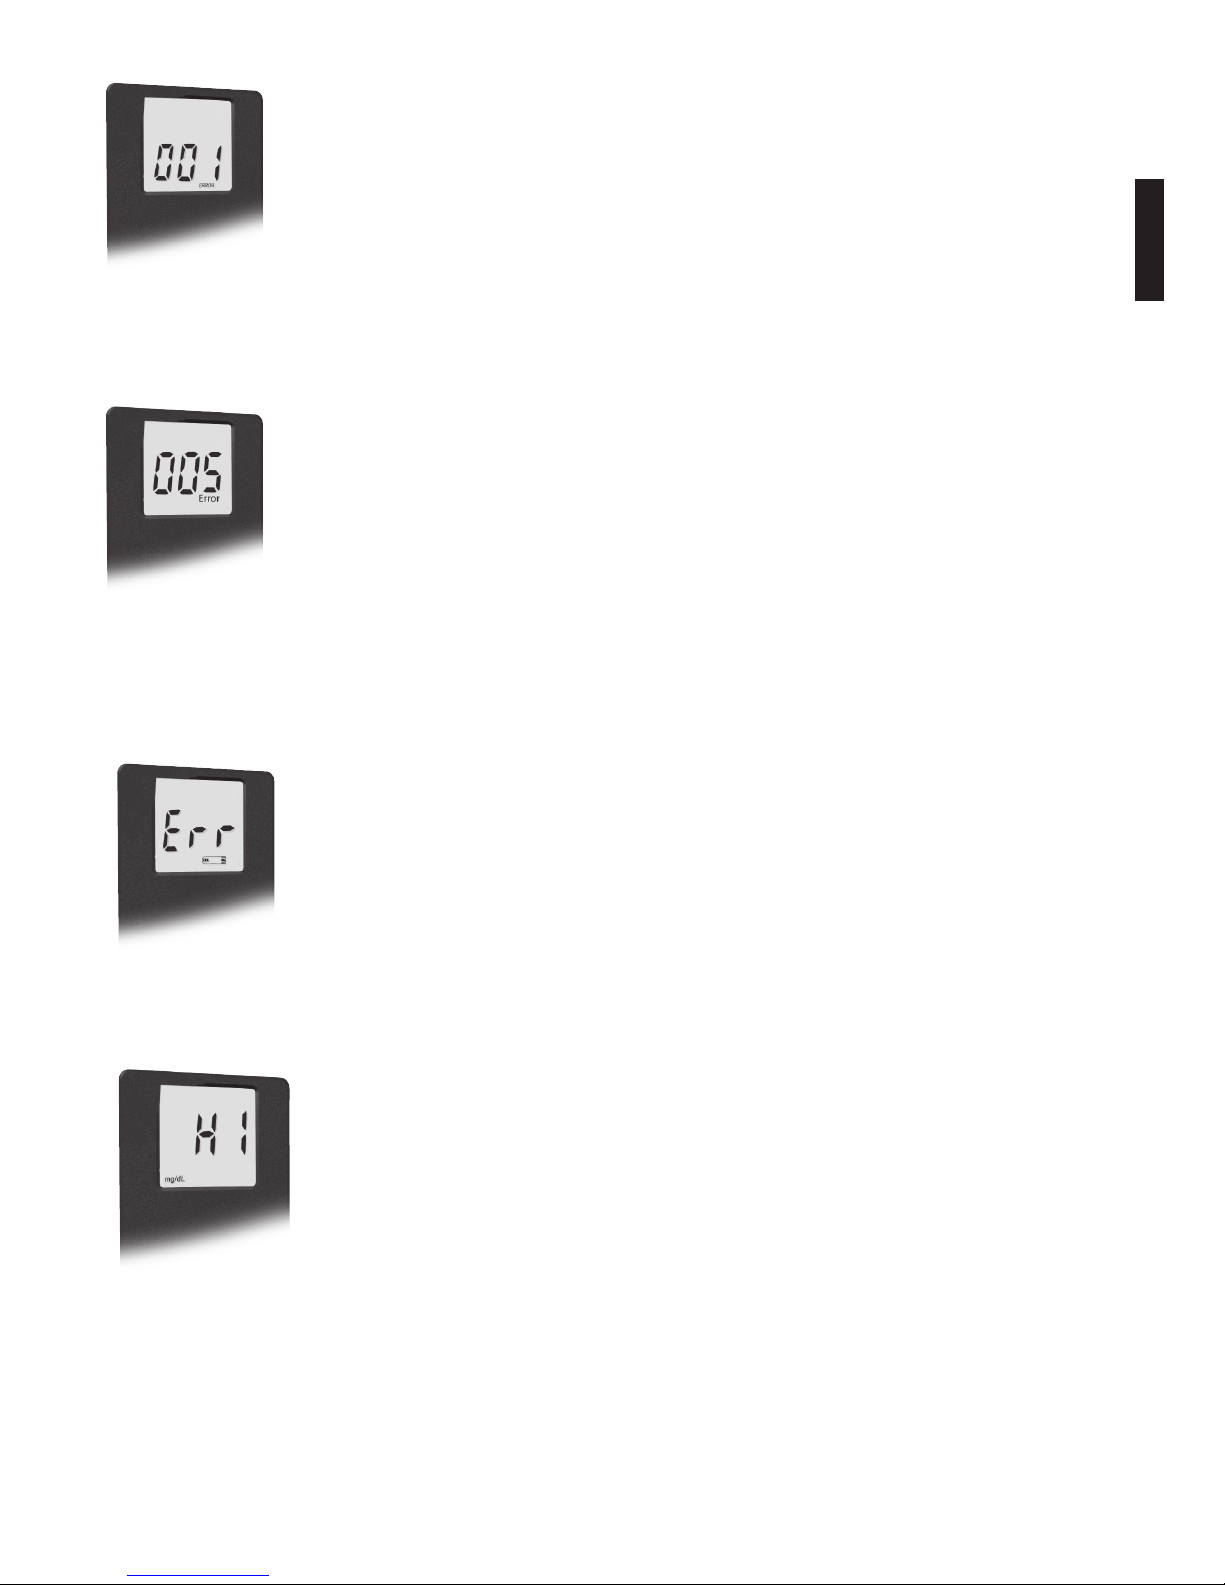
System error
Display: „001 Error “
Solution: Replace batteries first. If the error
still occurs, please contact your local supplier.
Memory error
Display: „005 Error“
Solution: Replace batteries first. If “Err”still oc-
curs, please contact your local supplier.
Test strip already used or wet
Display: „Err“ & „Test strip symbol“
Solution: Use a new test strip.
Test result is higher than 630 mg/dL (35.0
mmol/L)
Display: „HI“
Solution: Test again. If the result is still too
high, please contact your doctor immediately.
Page 32
70
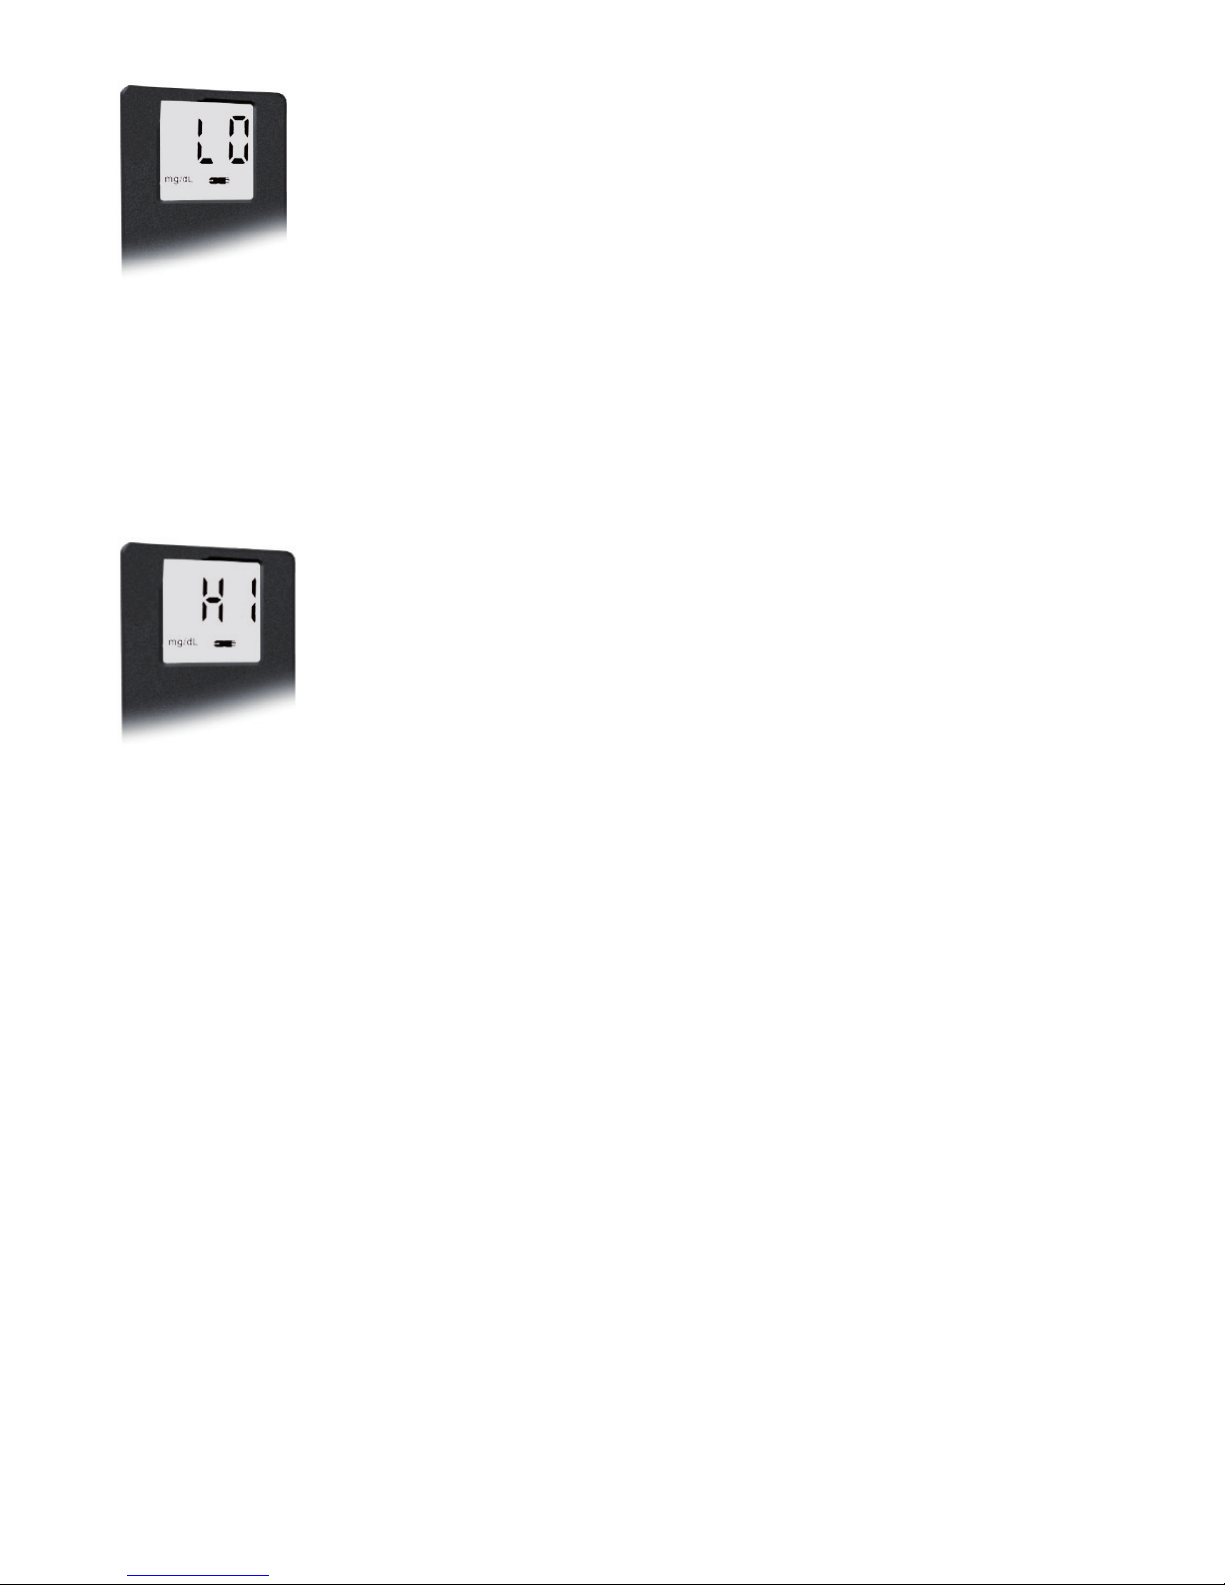
Temperature too high
Display: „Ht“ & „Thermometer symbol“
The operating temperature is too high (above
the required temperature range from 10°C 40°C (50°F - 104°F)). The error is a warning
that a continuation under these conditions
might lead to wrong blood glucose readings.
Solution: Take the meter to a location with
appropriate working temperature and wait for
the next measurement until the error does not
occur again.
Test result is under 20 mg/dL (1.1 mmol/L)
Display: „LO“
Solution: Test again. If the result is still too
low, please contact your doctor immediately.
Page 33
71
ENGLISH
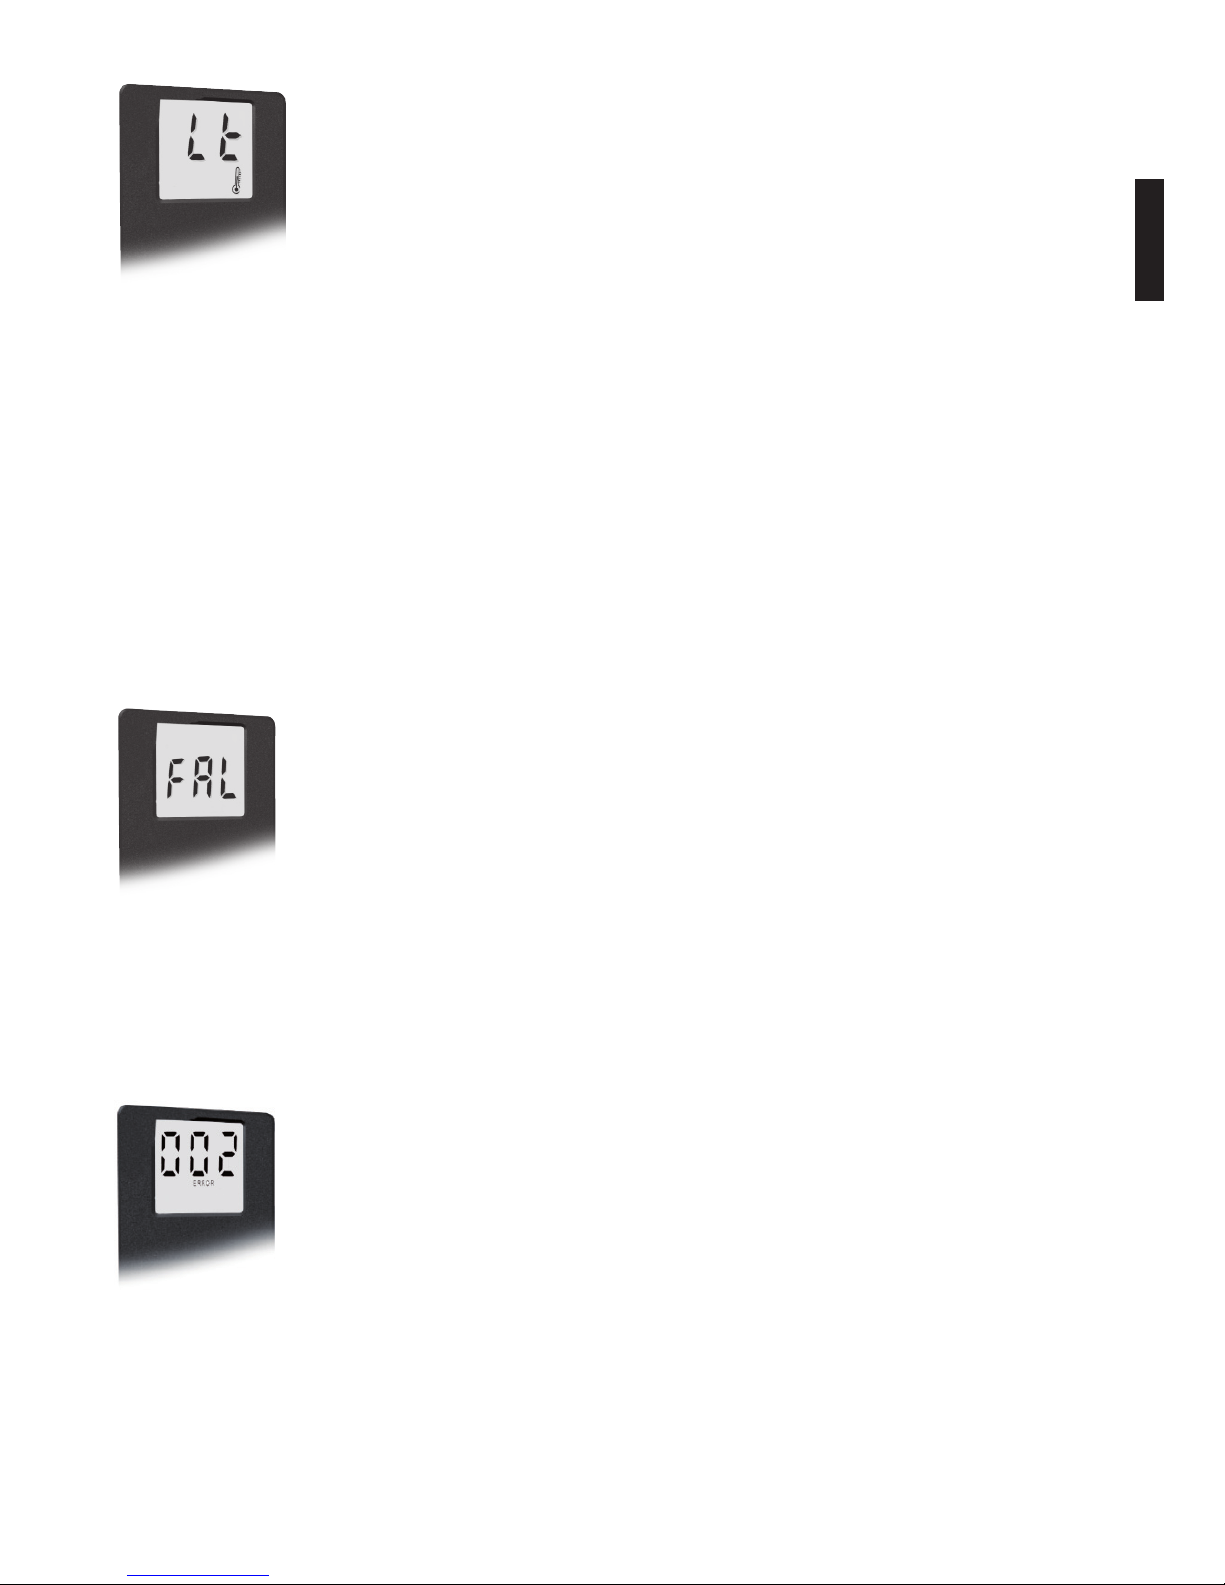
Temperature too low
Display: „Lt“ & „Thermometer symbol“
The operating temperature is too low (below the
required temperature range from 10°C - 40°C
(50°F - 104°F)). The error is a warning that a
continuation under these conditions might lead
to wrong blood glucose readings.
Solution: Take the meter to a location with appropriate working temperature and wait for the
next measurement until the error does not occur again.
System error
Display: „FAL“
Solution: Re-insert the check strip (with writing
to top). If „FAL“ still occurs, please contact your
local supplier.
Error 002
Display: „ERR 002“
Solution: Device was not set by gateway. When
inserting batteries again, please be close to a
gateway. Device will anyhow try to connect with
gateway in certain interval.
Page 34

72
Limitations of the measurement procedure
1. DO NOT use serum or plasma sample.
2. DO NOT use neonate blood sample.
3. DO NOT use anticoagulant NaF or potassium oxalate for venous
sample preparation.
4. Extreme humidity may affect the results. A relative humidity gre-
ater than 90% may cause incorrect results.
5. The system is designed to be used at temperatures between 10°C
and 40°C (50°F and 104°F). Outside this range, the system may
yield erroneous results.
6. DO NOT reuse the test strips. The test strips are intended for
single use only.
7. DO NOT use iodoacetic acid, fluoride or sodium fluoride/oxalate
as a preservative for blood specimens.
8. Hematocrit:
Test strip results are not significantly affected by hematocrits in
range of 30% to 55%. Hematocrit levels less than 30% may cause
incorrect high readings and hematocrit levels greater than 55%
may cause incorrect low readings. If you do not know your hematocrit level, consult your healthcare professional.
9. Critically ill patients should not be tested with smartLAB®nG
blood glucose meters.
10. DO NOT use during xylose absorption testing. Xylose in the blood
will interfere Self-Monitoring Blood Glucose System.
Page 35

73
ENGLISH
11. Patients undergoing oxygen therapy may have inaccurate re-
sults.
12. Altitude up to 3050 meters above sea level has no effect on
readings.
13. Test results may be false if the patient is severely dehydrated or
severely hypertensive, in shock, or in hypoglycemic-hyperosmo-
lar state (with or without ketosis). Critically ill patients should
not be tested with home-use blood glucose meter.
14. Elevated cholesterol and triglyceride levels may interfere with
the way light is reflected producing erroneous meter results.
15. Recent studies have shown that EMI can cause electronic medi-
cal device performance degradation and could lead to inappropriate therapy.
16. Lipemic samples: Cholesterol level up to 500 mg/dL (12.92
mmol/L) and triglycerides up to 3,000 mg/dL (33.6mmol/L)
do not affect the results. Grossly lipemic patient samples have
not been tested and are not recommended for testing with
smartLAB®global W nG Blood Glucose Meter.
Page 36
74
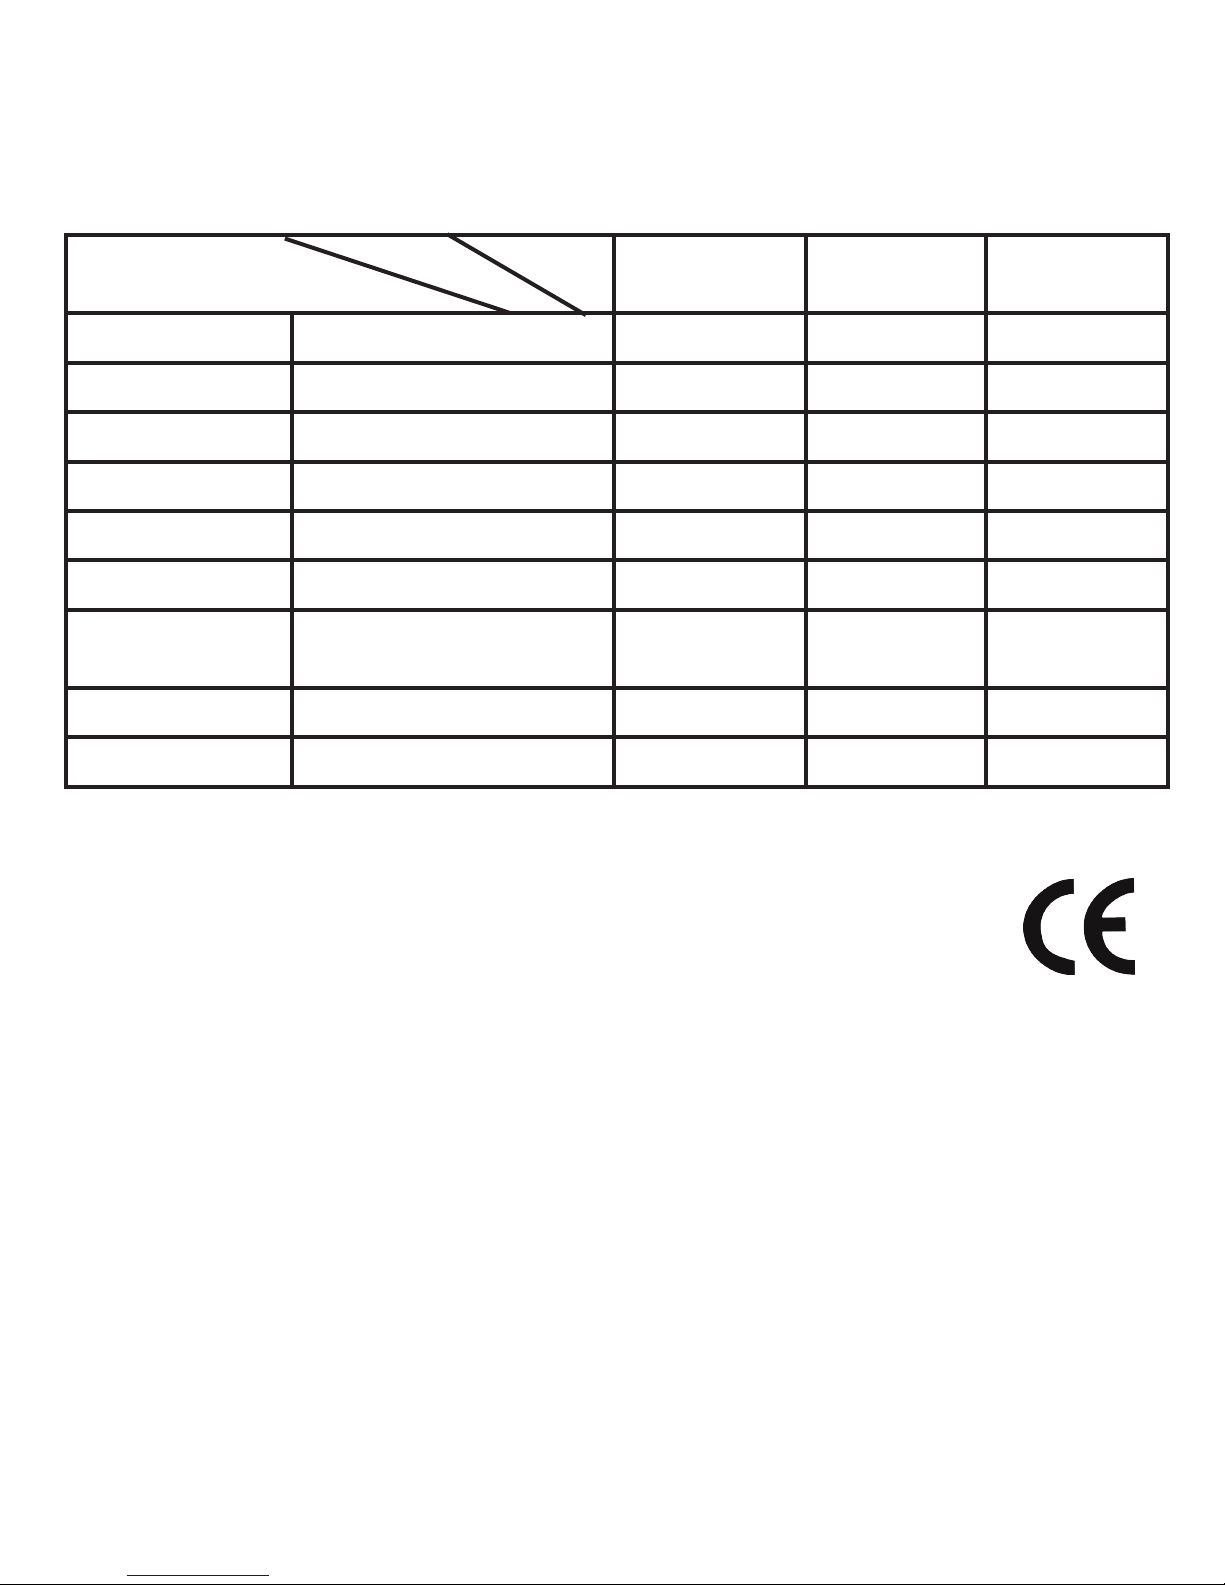
17. Interfering Substances depend on the concentration. The below
substances up to the test concentration will not affect the test
results:
Regularity and Safety Notice
Declaration of Conformity
This product is compliant with the EC Directives: -1999/5/EC
Safety Statement
This product has been veried to conform to the safety certication in accordance with the specication of EN Standards: EN
60950-1:2006 + A11:2009 + A1:2010 + A12:2011
80 mg/dL
(4.4 mmol/L)
250 mg/dL
(13.9 mmol/L)
500 mg/dL
(27.8 mmol/L)
Ascorbic Acid 4 mg/dL (0.26 mmol/L) 10.89% -1.76% 4.55%
Ibuprofen 50 mg/dL (2.43 mmol/L) 3.10% 2.88% 4.62%
L-Dopa 1.8 mg/dL (0.09 mmol/L) 10.59% 7.91% 4.90%
Sodium Salicylate 50 mg/dL (3.12 mmol/L) -2.59% 9.42% -0.84%
Tetracycline 1.5 mg/dL (0.03 mmol/L) -5.32% 3.81% 3.20%
Tolbutamide 100 mg/dL (3.70 mmol/L) -2.60% 12.30% 0.89%
Bilirubinunconjugated
2.4 mg/dL (0.04 mmol/L) -2.52% 4.05% -0.23%
Uric acid 8 mg/dL (0.48 mmol/L) 2.71% 9.55% -1.75%
Xylose 4 mg/dL (0.27 mmol/L) -5.12% -1.64% -4.44%
Concentrations
of the interferance tested
Bias
Glucose
Level
Page 37

75
ENGLISH
WEEE note
The WEEE (Waste Electrical and Electronic Equipment) Directive,
that came into effect as European law on 13th February 2003, led
to a major change in the disposal of electrical equipment.
The primarily purpose of this directive is to prevent electronic waste (WEEE), while encouraging for reuse, recycling and other forms
of reprocessing to reduce waste.
Warranty
HMM Diagnostics GmbH products need to fulfill high quality requirements.
Because of this reason, HMM Diagnostics GmbH gives a 2-year
warranty by purchasing this smartLAB® product. You can even
extend the warranty from 2 to 5 years without extra pay when
you register your product. Please register online under following
website: www.hmm.info/en/registration.
Wear parts, batteries etc. are excluded from warranty.
The WEEE logo on the product and the packaging indicates that it is not
allowed to dispose of the product in the ordinary household waste. It
is your responsibility to deliver all the disused electrical and electronic
equipment to the respective collection points. A separate collection
and proper recycling of electronic waste helps dealing economically
with natural resources. Furthermore, the recycling of electrical waste
is a contribution to the conservation of our environment and thus the
health of all people. More information concerning the disposal of electrical and electronic devices, reprocessing and the collection points
you can get from the local authorities, waste disposal companies, from
retailers and manufacturers of the device.
Page 38

HMM Diagnostics GmbH
Friedrichstr. 89
D-69221 Dossenheim, Germany
mail: [email protected]
www.hmm.info
Hersteller/ Manufacturer:
Weitere Informationen zu den smartLAB® Produkten /
More information on our smartLAB® products:
www.smartlab.org
 Loading...