

Page 1

HM Electronics, Inc.
14110 Stowe Drive
Poway, CA 92064 USA
Phone: 800-848-4468
Fax: 858-552-0172
Website: www.hme.com
Wireless Audio System
Operating Instructions
HME# 400G679 Rev D 4/19/13
Page 2
1
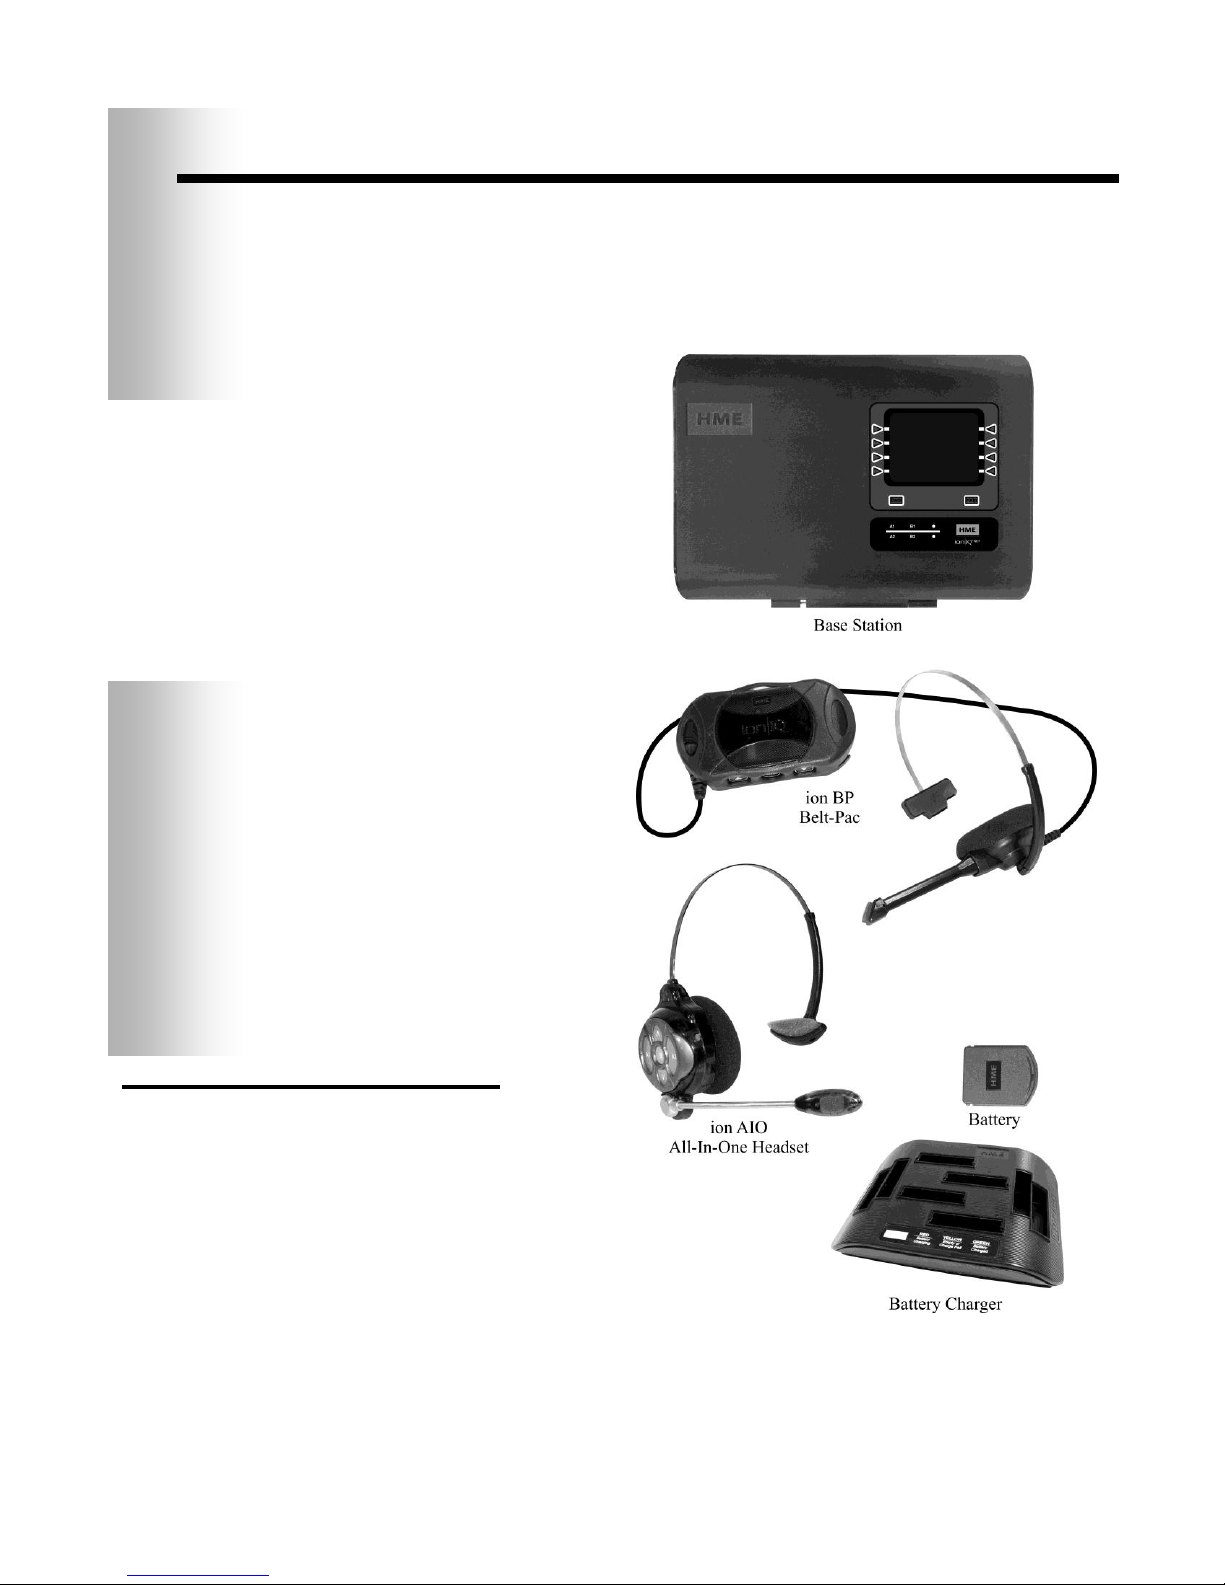
Figure 1. ion|IQ®NDT standard equipment
NOTE:
Equipment
quantities vary,
depending on
individual store
needs at time of
purchase.
Additional
equipment can be
ordered from the
list below.
OPTIONAL EQUIPMENT
Equipment Model Number
ionBP Belt-Pac BP6100
Belt None
Ion AIO All-In-One Headset HS6100
Wireless Headset (listen only) HS6000L
Battery for ionBP or ionAIO BAT51
Headset for ionBP HS12
Headset Earmuff None
Headset Earpiece Cover (disposable) None
Telephone Interface TI6000
Antenna Coverage Extension Kit EC10
Extended Coverage Antenna Kit EC20
Remote Antenna Kit
(with 6 ft / 1.83 meter cable) ANT20-6
Remote Antenna Kit
(with 30 ft / 9.14 meter cable) ANT20-30
ion|IQ® NDT EQUIPMENT
The ion|IQ®NDT is an audio system primarily for use at quickservice restaurants without drive-thru operations. The
equipment shown below is standard with the ion|IQ®NDT.
Optional equipment can be ordered from your local dealer.
Page 3
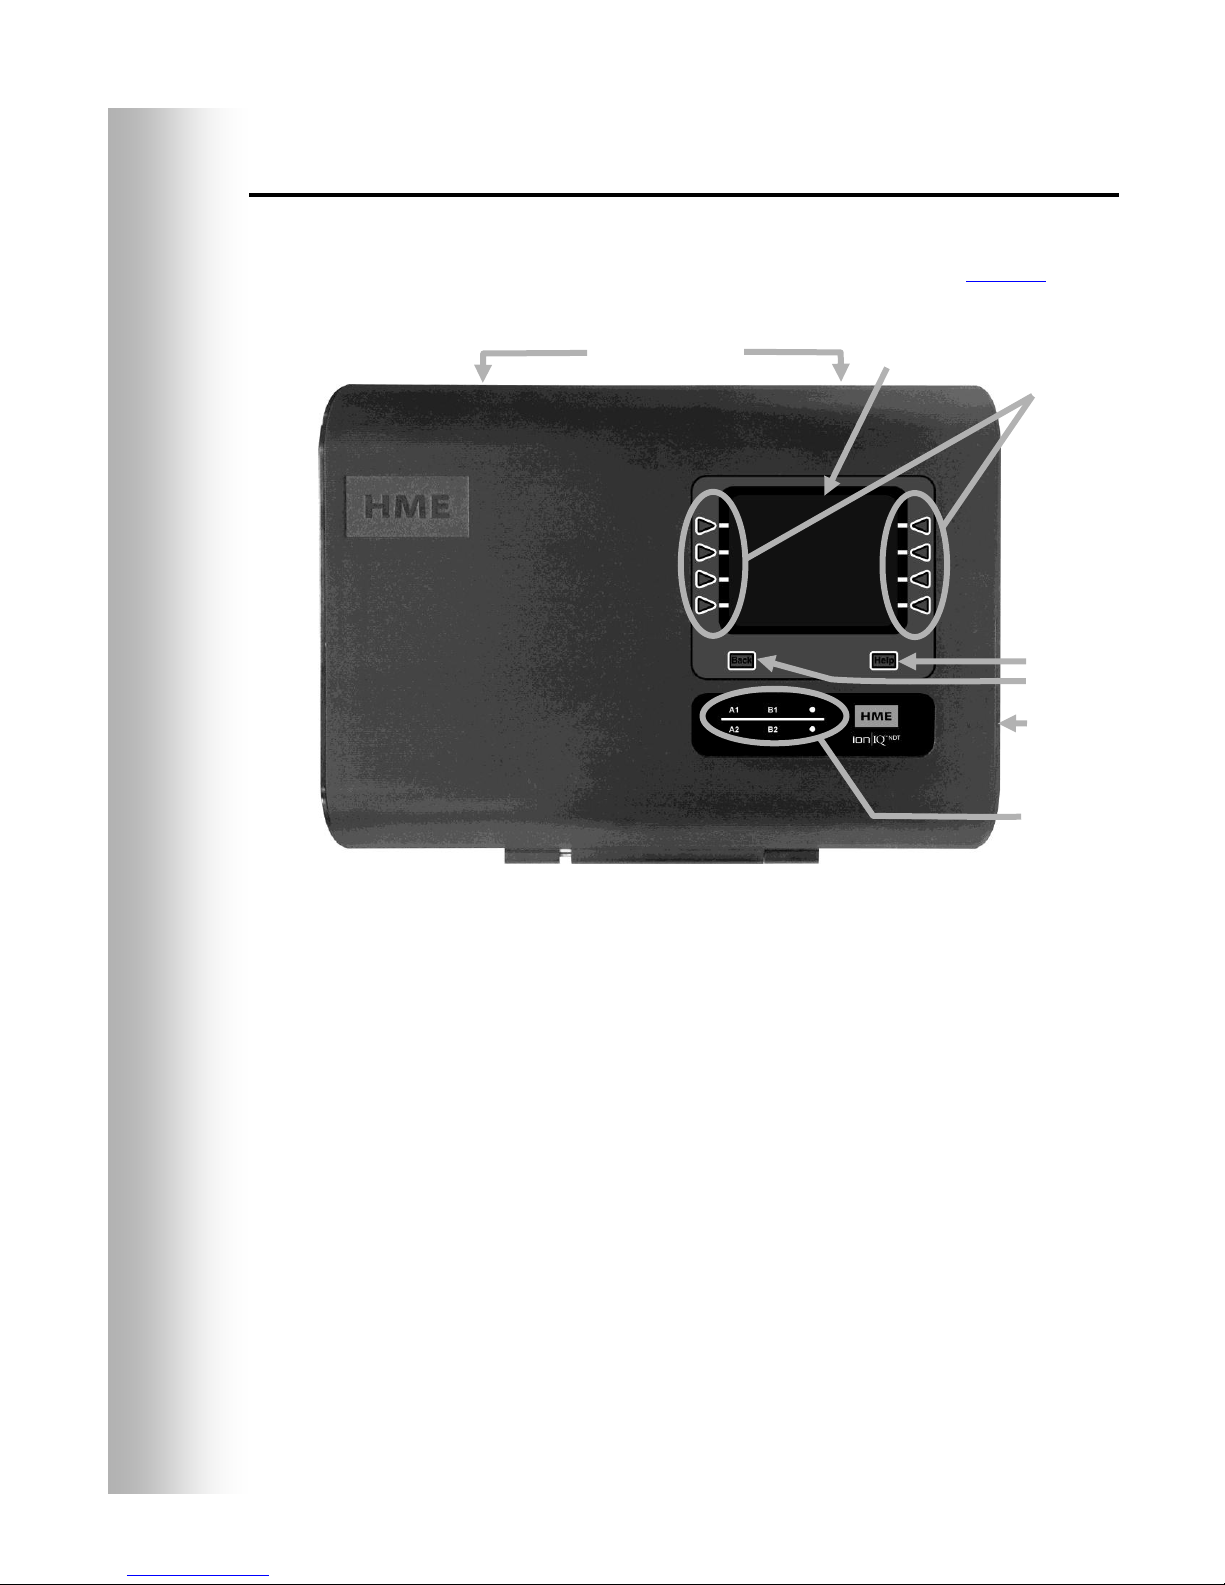
2
Display
screen
Menu-select
buttons
Help button
Back button
Activity
indicators
Reset switch
(recessed)
Cabinet latches
(not shown)
Figure 2. Base station front panel features
Base Station
All functions of the audio system are channeled through the base station. It is
the electronic heart of the ion|IQ®NDT. External base station features are
shown in Figure 2. Internal connectors and controls are shown in Figure 8.
The menu-select buttons are used to make selections from the menu on the
display screen.
The Help button can be pushed to obtain information needed in case of problems
with the ion|IQ®NDT.
The Back button can be pushed to go back to the previous menu display, saving
any setting changes or exiting a display screen when no changes have been made.
The activity indicators light up as follows:
Above the line – Group 1 activity
A1 lights up when the A1 button is pushed on any Group 1 headset/belt-pac.
B1 lights up when the B button is pushed on any Group 1 headset/belt-pac.
Below the line – Group 2 activity
A2 lights up when the A2 button is pushed on any Group 2 headset/belt-pac.
B2 lights up when the B button is pushed on any Group 2 headset/belt-pac.
When both of the cabinet latches, on top of the cabinet are pressed down at the
same time, the cabinet can be opened by pulling forward and down.
The reset switch is used to perform a soft restart of the base station. It is located
in a small hole on the right side of the base station. To press the reset switch,
carefully push a small pointed object, such as an unfolded paper clip, into the hole.
Page 4
3
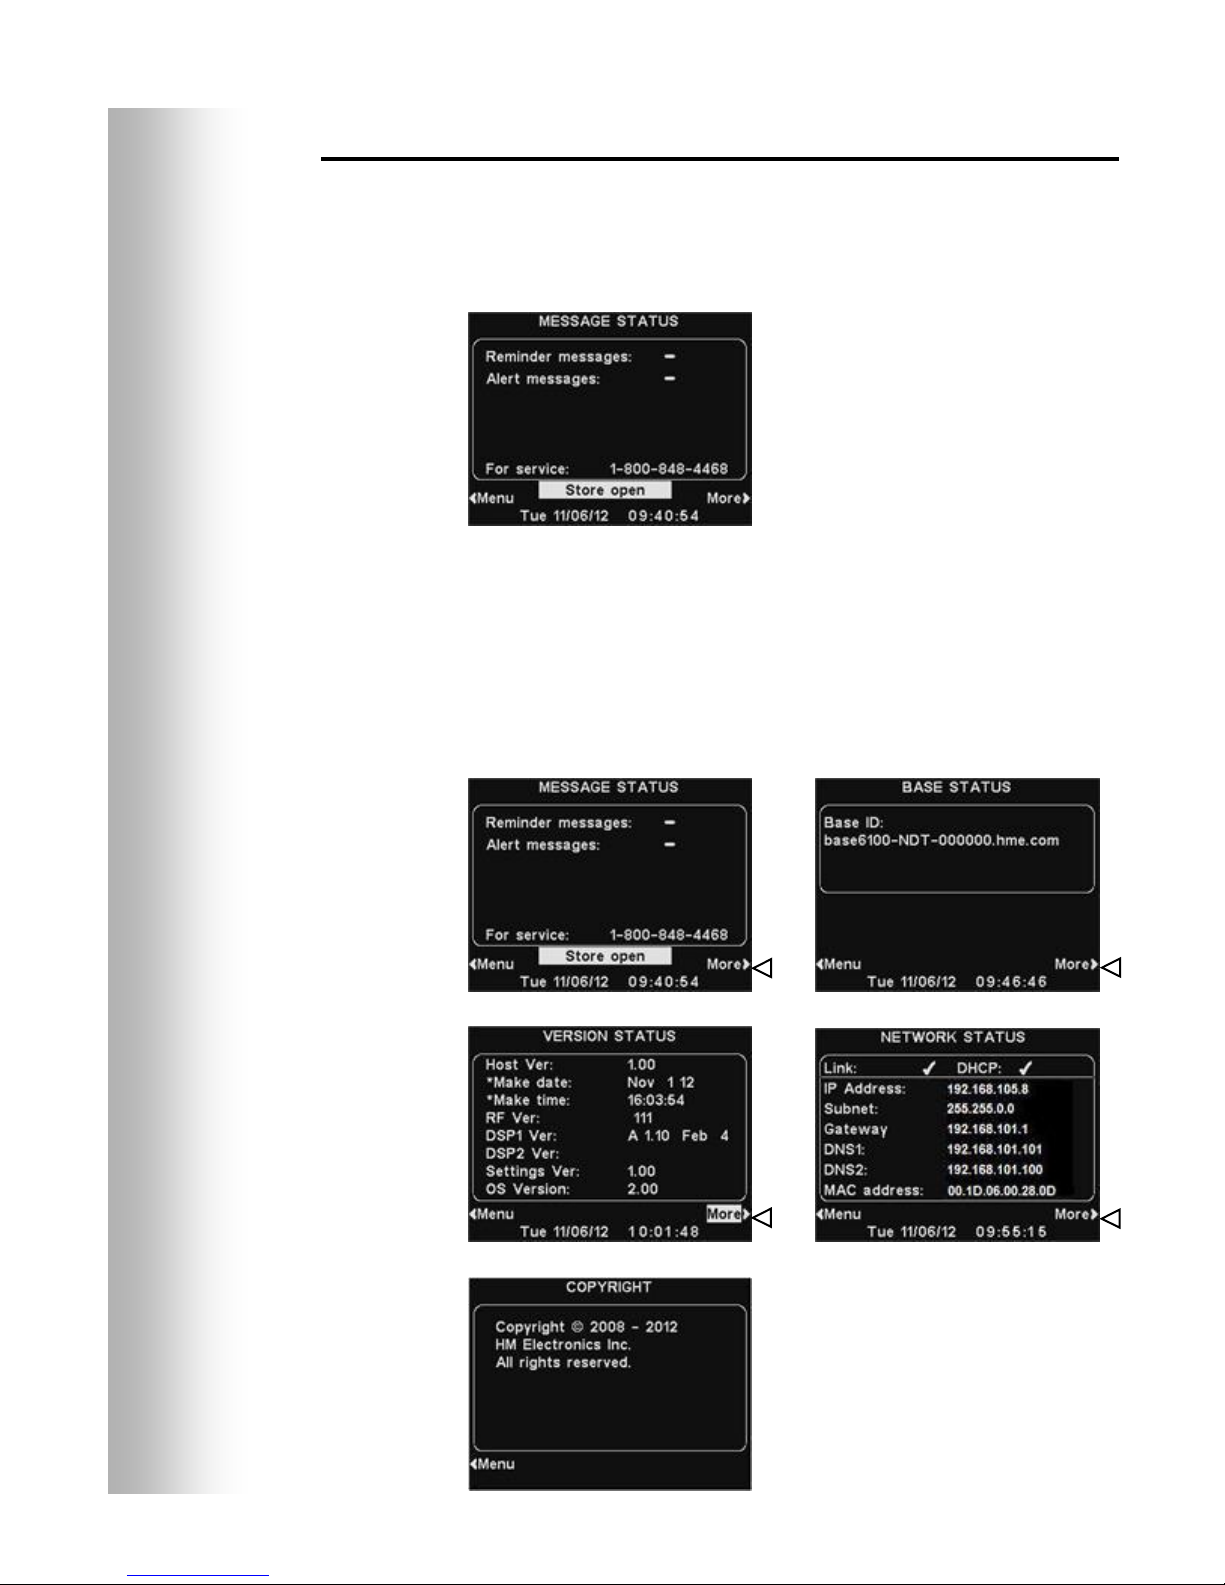
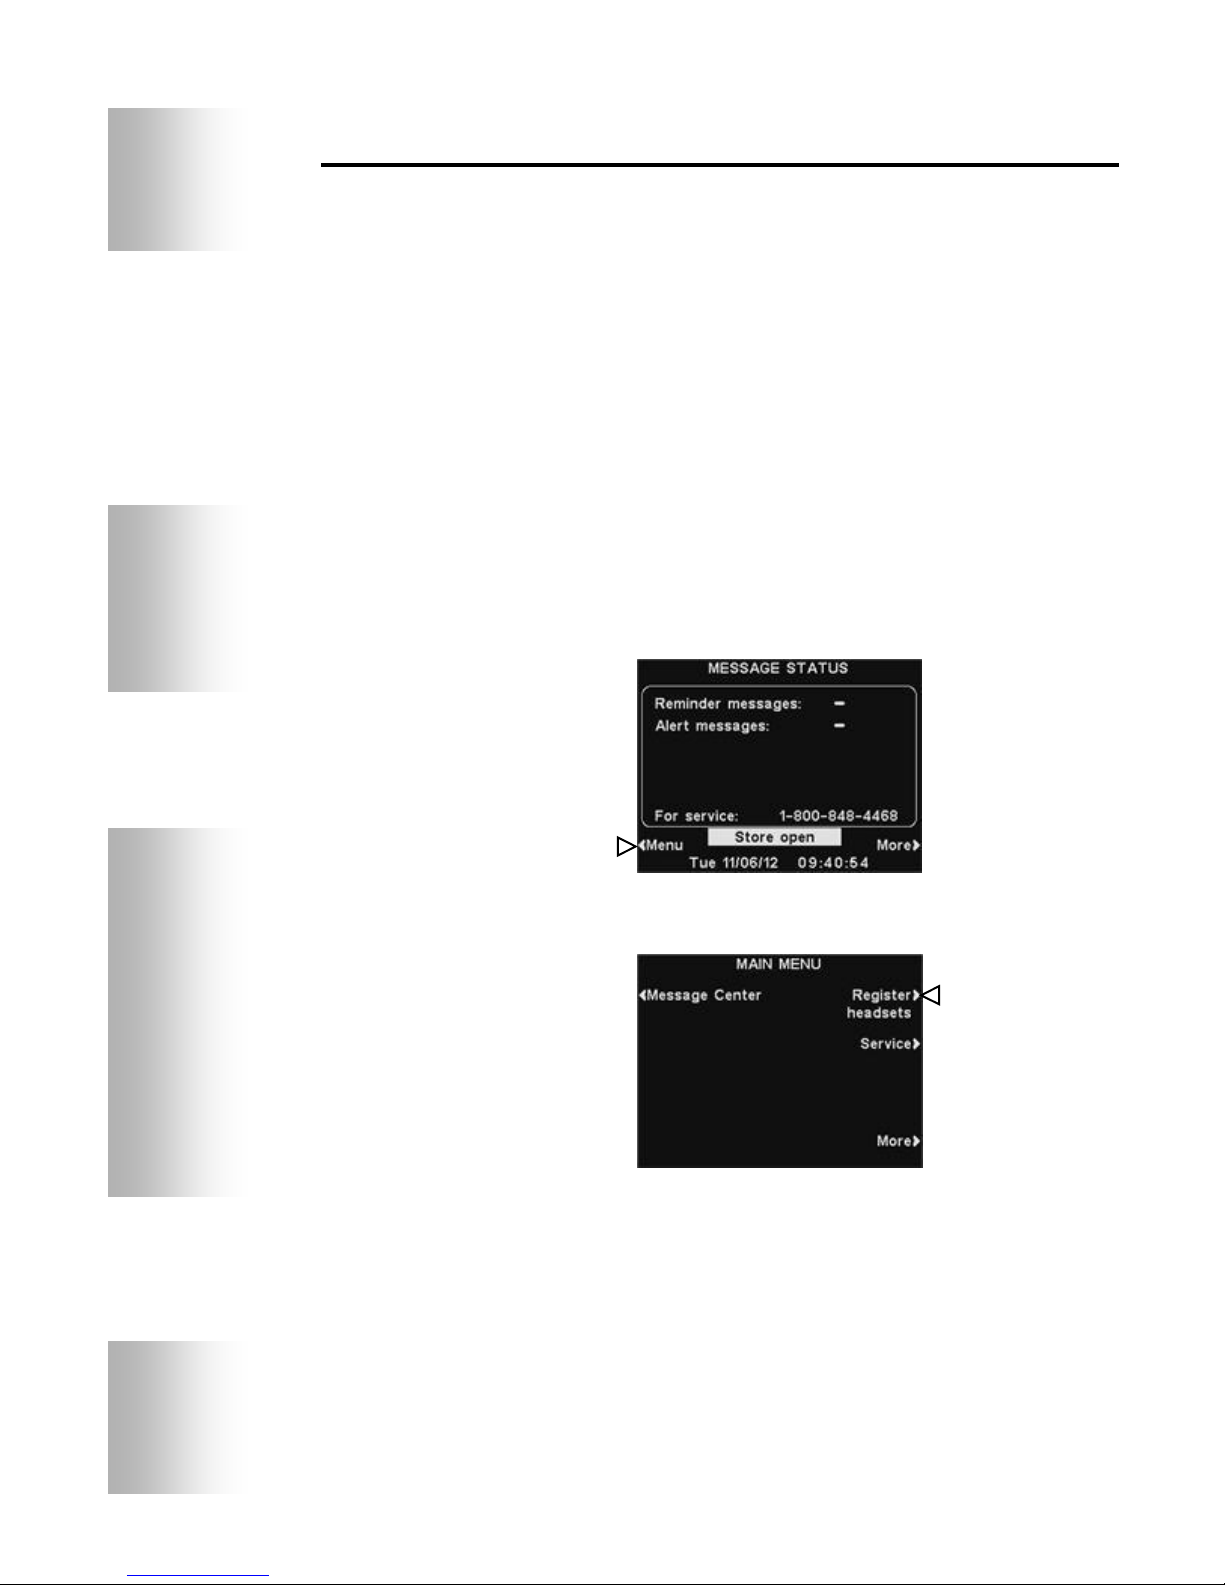
The MESSAGE STATUS display
will be shown on the base station
until either the Menu or More
button is pushed.
Base Station Display Screen
The display screen is where all menu selections will be seen for
installer setups and routine operation options.
The display screen will turn off (sleep) if there is no button
activity. Pressing any button will turn it back on (wake it up).
Press the Menu button at the bottom-left of the MESSAGE
STATUS display to view the MAIN MENU, which provides access
to system settings. Press the More button on the MAIN MENU
for additional settings.
Press the More button at the bottom-right of the MESSAGE
STATUS display to view additional system status, and then press
the More button at the bottom-right of any other STATUS display.
The information on each STATUS display shows other base
station information needed to operate the system on a network and
to identify its version data.
Page 5
4
Figure 3. Belt-pac/Headset controls
Figure 4. Correct wearing of the headset
Power
button
Volume-down
button
Headset cable
connector socket
Volume-up
button
Channel “A2”
button
Channel “B”
button
Channel “A1”
button
Power
lights
Transmit
light
Channel “A1”
button
Channel “A2”
button
Channel “B”
button
Volume-up
button
Volume-down
button
Power
light
Power
button
Belt-pac headset
All-In-One headset
Hold microphone
boom here to adjust
microphone
Clothing
clip
Headsets and Belt-Pacs
Features and Controls
How to Wear the Headset
Wear the headset with the microphone on your right or left side
next to your mouth.
Adjust the headband and microphone boom as needed.
If you are using a belt-pac with headset, clip the belt-pac to your
belt or waistband on either your right or left side. Clip the clothing
clips on the headset cable to the back of your shirt and collar.
Page 6

5
How to Use the Headset/Belt-Pac Controls
The control buttons will activate when pressed firmly. Use your
fingertips, not your fingernails, to press the buttons.
Power On/Off
Power On Press and release the power button.
If using an ionIQ® Belt-pac ─ A voice message in the headset will
say “belt-pac #, battery full/half/low” and the red power lights next
to the A1 and A2 buttons on the belt-pac will blink. After a short
time, the A2 light will go off and the A1 light will change to green. A
voice message will then say “Lane 1” (Group 1). The green light
indicates the unit is ready to use. A green light next to A1 indicates
ready for Group 1 and a green light next to A2 indicates ready for
Group 2.
If using an ionAIO Headset ─ A voice message in the headset will
say “headset #, battery full/half/low” and both the power light and
the transmit light will flash red. After a short time, the power light
will change to steady green for Group 1 and the transmit light will go
off. A voice message in the earpiece will then say “Lane 1 (or 2).”
Power Off — Press and hold the PWR button for about two seconds.
A voice message in the earpiece will say “belt-pac off” or “headset off,”
and the power light will go off.
Volume Up/Down
Volume-Up Adjustment — Press and release the volume-up ▲
button. Each time you press the button you will hear a higher pitch
beep in the earpiece as the volume increases. When you reach
maximum volume, you will hear a high-pitched double beep. If you
press and hold the volume-up ▲ button, you will hear repeating
beeps, increasing in pitch until the volume reaches maximum.
Then you will hear high-pitched double beeps repeating until you
release the volume-up ▲ button.
Volume-Down Adjustment — Press and release the volume-down
▼ button. Each time you press the button you will hear a lower
pitch beep in the earpiece as the volume decreases. When you reach
minimum volume, you will hear a low-pitched double beep. If you
press and hold the volume-down ▼ button, you will hear repeating
beeps, decreasing in pitch until the volume reaches minimum. Then
you will hear low-pitched double beeps repeating until you release the
volume-down ▼ button.
A1, A2 and B Buttons
Press the A1 button to communicate with Group 1 personnel
wearing headsets/belt-pacs.
Press the A2 button to communicate with Group 2 personnel
wearing headsets/belt-pacs.
The B button function depends on how your system was set up.
If your system was set up for “Split-B” operation;
when you are communicating with Group 1, the B button will
function the same as the A1 button. When you are communicating
with Group 2, the B button will function the same as the A2 button.
If your system was set up for “Combined-B” operation;
when you press the B button, you will communicate with all
personnel wearing headsets/belt-pacs.
Page 7
6
NOTE:
Headsets/Belt-pacs must be
within 6 feet (1.83 meters)
of the base station while
being registered.
NOTE:
All registered headsets/
belt-pacs must be turned
on, or they will be
unregistered when you
clear inactive headsets.
If you clear all registrations,
you must re-register all
headsets/belt-pacs.
NOTE:
You will be given a
warning and allowed to
quit or continue before
registrations are cleared.
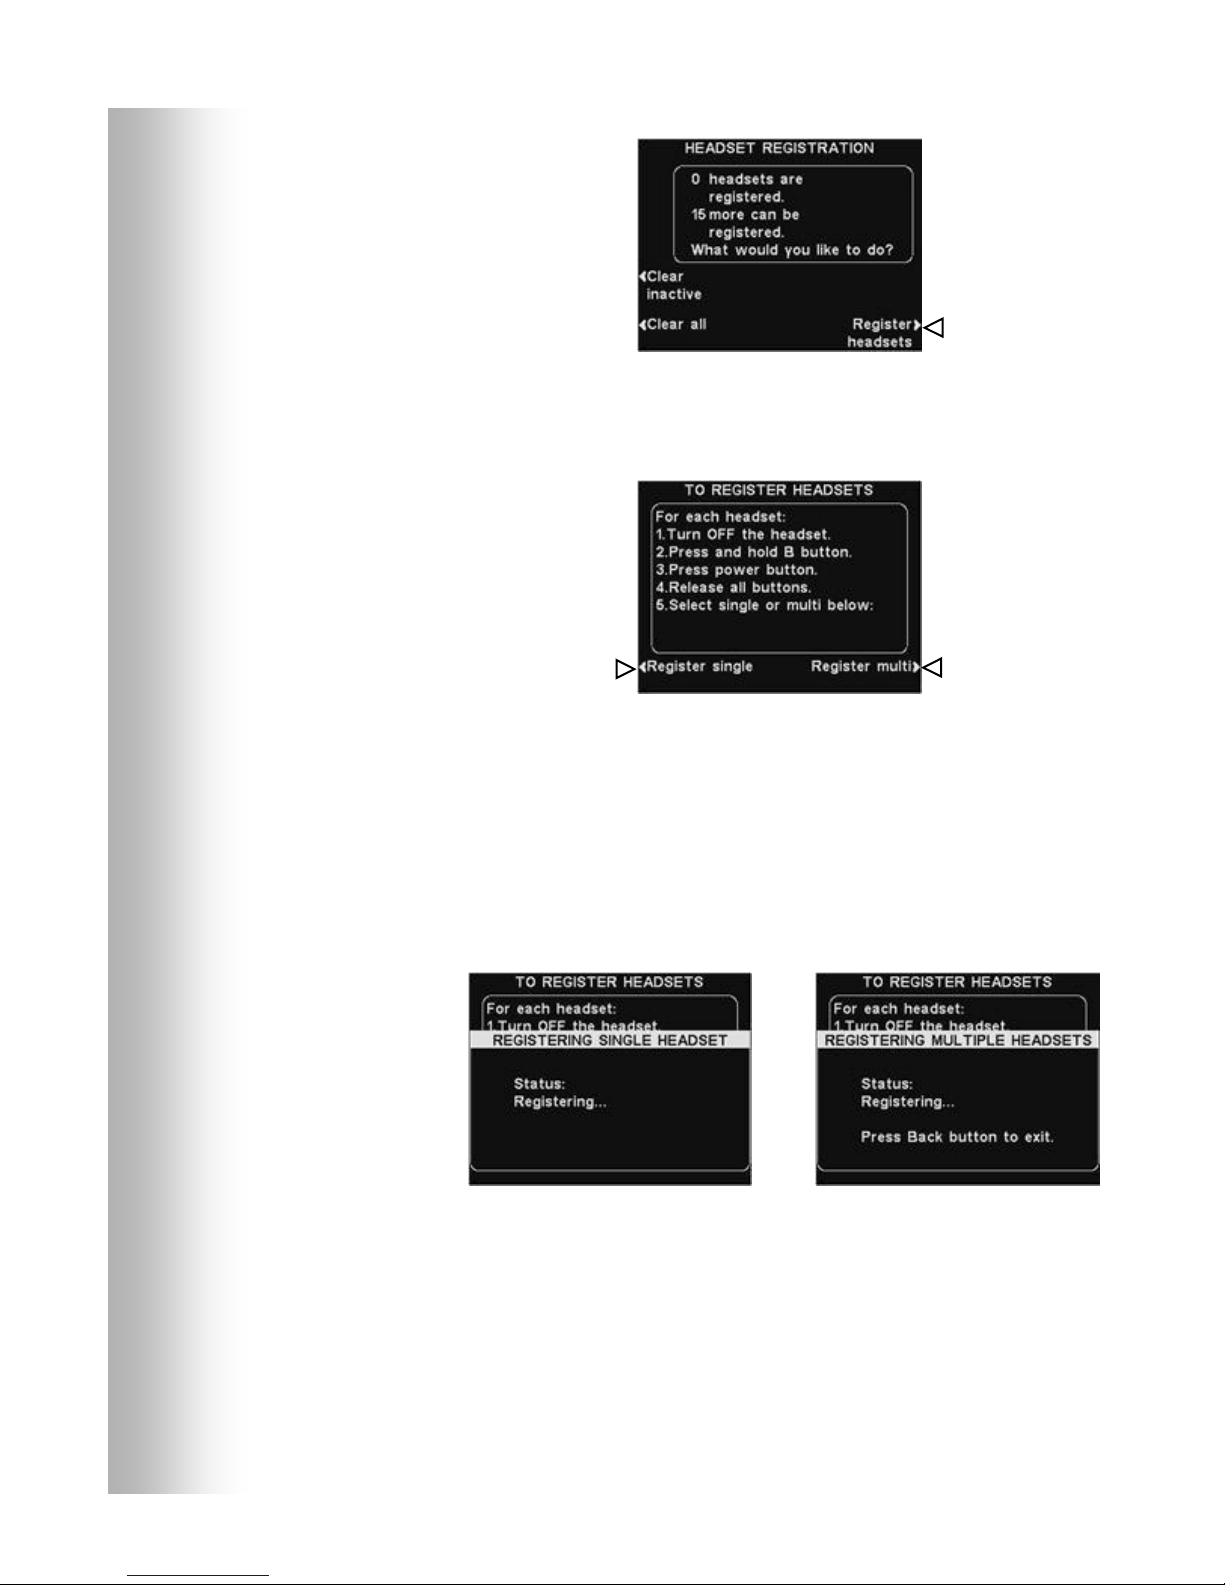
Headset/Belt-Pac Registration
During installation of the ion|IQ®NDT, each headset/belt-pac was
registered for use with the base station. The base station
recognizes all headsets/belt-pacs registered to it when their
power is on, and will be able to tell the difference between them
and other electronic equipment operating on similar frequencies.
A maximum of 15 headsets/belt-pacs can be registered. If one is
replaced, you must register the new one before you use it. When
a headset/belt-pac is replaced, the old one remains in memory.
If the maximum number of 15 (in memory) is exceeded, the base
station HEADSET REGISTRATION display will tell you that 0 more
can be registered. If this happens, you may either clear all inactive
headsets/belt-pacs (not currently turned on) or clear all registered
headsets/belt-pacs. If you clear all inactive headsets/belt-pacs,
you can initiate the new registration. Each headset/belt-pac is
registered the same way, one at a time.
Register each headset/belt-pac as follows:
Be certain all headsets/belt-pacs to be registered are turned off
and the base station power is on. Others can be on or off.
On the base station MESSAGE STATUS display, press the Menu
button.
On the MAIN MENU, press the Register headsets button.
On the HEADSET REGISTRATION display, if you press the Clear
inactive button, you will unregister only those headsets/beltpacs that are turned off.
If you press the Clear all button, you will unregister all
headsets/belt-pacs that are registered to the base station, and
the base station will automatically restart.
Page 8
7
To register headsets/belt-pacs, press the Register headsets
button on the HEADSET REGISTRATION display.
On the TO REGISTER HEADSETS display, follow the
instructions in the box.
If you are registering only one headset/belt-pac, press the Register
single button on the TO REGISTER HEADSETS display.
If you are registering more than one headset/belt-pac, press the
Register multi button on the TO REGISTER HEADSETS display,
and continue registering the remaining ones, one at a time.
When each registration is successfully completed:
The ID number assigned to this headset/belt-pac will be shown.
ID numbers are assigned sequentially as 0 thru 9, A, B, C, D and E.
When you have finished registering headsets/belt-pacs, press the
Back button to exit the registration mode. You can continue
pressing the Back button repeatedly until you return to the MAIN
MENU or MESSAGE STATUS display.
The power light on the headset/belt-pac will remain on steady
green.
If you have any problems registering headsets/belt-pacs:
In the USA, call HME Customer Support at 1-800-848-4468.
Outside the USA, call your local HME representative for assistance.
Page 9
8
Battery
Battery-release
button
Battery-release
button (blue)
Battery
Figure 5.
Belt-pac battery-release button
Figure 6.
Headset battery-release button
Battery Removal and Replacement
Belt-pac Batteries —
To change batteries:
If a battery is weak when beltpac power is turned on, a
voice in the headset will say
“Battery low.” If a battery
becomes weak during
operation, a voice in the
headset will say “Change
battery.” When this happens,
press the battery-release
button and slide the battery out of
the belt-pac as shown in Figure 5.
To replace batteries:
When replacing a battery in the belt-pac, place the end of the
battery with the metal contacts into the belt-pac, in the same
position as the battery you removed. Press the battery carefully in
until it snaps in place.
All-In-One Headset Batteries —
To change batteries:
When a battery becomes weak, a voice in the headset will say
“Change battery.” When this happens, press the battery-release
button and slide the battery out of the headset as shown in
Figure 6.
To replace batteries:
When replacing a battery in the
headset, place the end of the battery
with the metal contacts into the
headset, in the same position
as the battery you removed.
Press the battery carefully in
until it snaps in place.
Recharge batteries according to the instructions on page 9.
Page 10
9
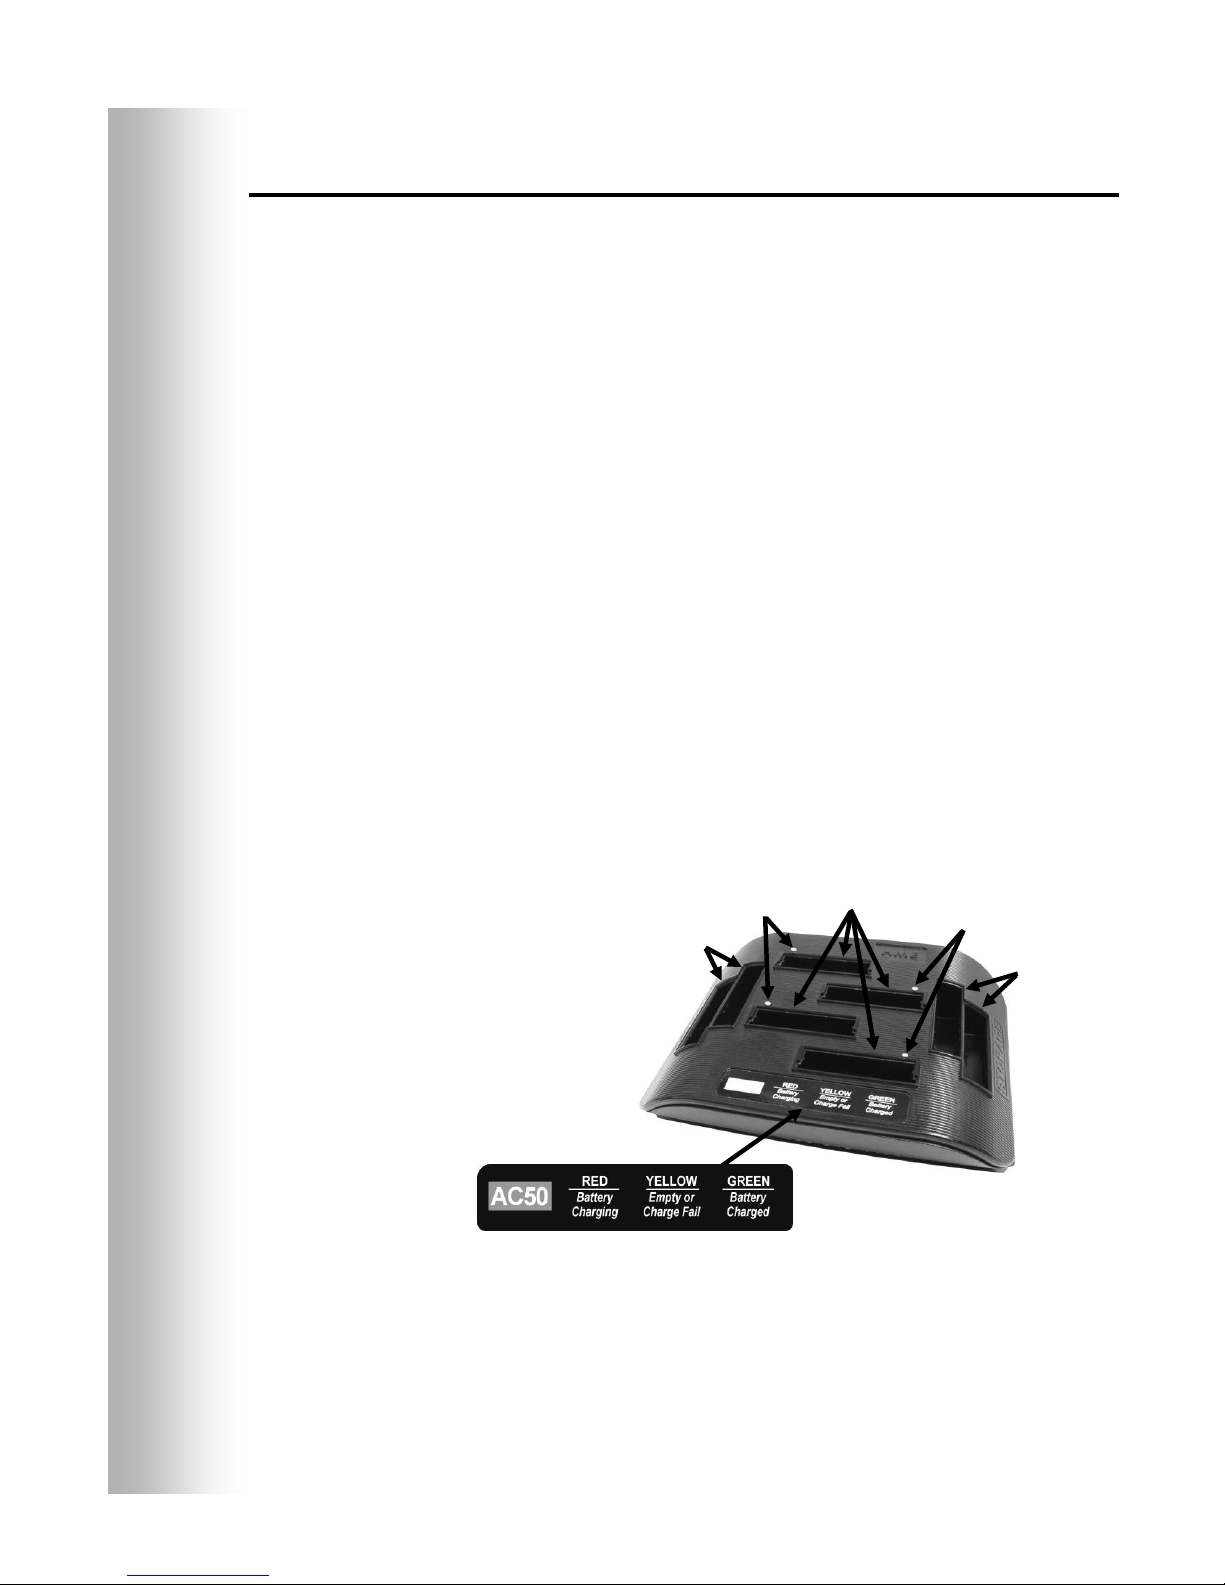
Figure 7. Batteries in charger
Battery status
lights
Battery storage
ports
Battery status
lights
Battery storage
ports
Battery
charging
ports
Battery Charger
Up to four batteries can be charged in the charger at the same time.
Charging time is approximately 2.5 hours. The battery status lights
next to each charging port are explained below. Up to six fully
charged batteries can be stored in the battery storage ports.
Procedure:
Insert batteries in the charging ports for charging. The batteries can
only go into the charging ports one way. If they do not go in easily,
turn them around. DO NOT force them. Push each battery down
into a port until it snaps in place, to be sure it makes full contact.
Battery Status Lights:
A yellow light stays on steady next to each charging port while the
port is empty.
Insert a battery in one of the four charging ports until it clicks
in place.
A red light will stay on next to a battery while it is charging.
A green light will go on next to a battery when it is fully charged.
If a yellow light is on next to a battery in a charging port, it
means the charge failed. If this happens: (1) Be sure the battery is
pushed all the way into the port until it snaps into place to make
contact. (2) Try charging in a different port. If it charges this time,
the first charging port may be defective. If the battery does not
charge in the second port, replace it with another battery.
Store up to four fully charged batteries in the storage ports.
Page 11

10
ion|IQ®NDT OPERATION
The ion|IQ®NDT can be operated in Hands-Free (HF) or Push-ToTalk (PTT) modes.
In HF operation, communication can be transmitted and received
at the same time, as in a normal telephone conversation. In the
HF mode, transmission and reception are activated by touching
and releasing the A1 or A2 button on the headset/belt-pac. In the
PTT mode, the A1 or A2 button must be pressed and held while the
operator is talking to the customer.
Changing Language of Headset/Belt-Pac Cues
To change the language of the cues heard in the headset from
English to Spanish/French and back to English, with the
headset/belt-pac power off, press and hold the volume-down ▼
button and the A1 button while you press the power PWR button.
The language of the cues heard in the headset will change when the
power goes on. The headset/belt-pac will remember this setting.
Obtaining Headset/Belt-Pac Status
To obtain headset/belt-pac status, with its power off, press and
hold the volume-down ▼ button and the A2 button while you
press the power PWR button. You will hear the status message in
the headset when the power goes on.
Page 12

11
Routine Operation
Hands-Free (HF) Mode
With the headset/belt-pac power off, press and hold the volume-up
▲ and B buttons while you press and release the PWR button to
turn it on in the HF mode. The headset/belt-pac will remember
this setting.
Touch and release the A1 or A2 button to speak and listen.
Touch and release the A1, A2 or B button to end communication.
Touch and release the A1 or A2 button if you want to speak again.
Use the volume-up ▲ and down ▼ buttons to adjust the voice
level in your headset if necessary.
Push-To-Talk (PTT) Mode
With the headset/belt-pac power off, press and hold the volume-
down ▼ and B buttons while you press and release the PWR
button to turn it on in the PTT mode. The headset/belt-pac will
remember this setting.
Touch and hold the A1 or A2 button to speak. Release to stop
speaking.
Use the volume-up ▲ and down ▼ buttons to adjust the voice
level in your headset if necessary.
Internal Communication
To communicate internally with other headset/belt-pac operators,
press and hold the B button while talking. Release when finished.
Up to three operators can have conference-call type
communication by all pressing the B button. Everyone pressing
the B button will hear each other without interference.
If your system was set up for “Split-B,” internal communication will
be heard only by headset/belt-pac operators in their group. If your
system was set up for “Combined-B” operation, internal
communication will be heard by all operators.
Page 13

12
HINT!
Before continuing, it is
important to consider
all the possible time periods
during which any of the
Message Center messages
need to be played in your
store. Up to 12 time periods
can be set up. You can use
the Message Center Settings
Worksheet at the back of this
manual. When you have
determined all the time
periods needed, go to the
Schedule Times section of
these instructions to set up
the time periods for your store
before continuing with the
Message Center settings. The
current time and date, and
store open and close times
should also be set before other
Message Center settings.
NOTE:
Message Center settings are
normally made or changed
only by authorized
personnel such as store
managers. Making changes
to Message Center settings
may require a password.
If a password is needed, see
APPENDIX, Access Control.
* If currently playing, messages will be interrupted when either
of these two events occur during play: A press, B press. After
the interruption has ended, the message will attempt to play
again to completion.
Message Center Operation
The Message Center is a central point at which messages can be
set up to be triggered by various events during designated time
periods, to be sent to crew members via headsets or ceiling
speakers.
Some messages are pre-named and pre-recorded. All messages
can be edited and re-recorded to meet your specific requirements.
The three types of messages are described below. The table on
the next page shows the names and contents of factory pre-set
messages. Following the table are detailed instructions of how to
set up your Message Center.
At the back of this manual you will find a Message Center Quick
Start Guide for planning your message settings.
Reminder messages *
Reminder messages are heard by crew members in their headsets
to remind them when routine tasks need to be done. Reminder
messages can also be set to play in the ceiling speaker. There are
12 pre-named and pre-recorded Reminder messages that can be
named and recorded to meet your store needs. There are also 3
“Empty” messages that can be named and recorded as needed.
Reminder messages can be sent to all headsets or targeted only to
designated headsets.
Alert messages *
Alert messages (audio) can be heard by crew members in their
headsets to let them know about something that requires
attention, such as a door being left open or a customer arriving in
the store. Alert messages can be sent to all headsets or only to
designated headsets. Alert messages (audio) can also be set to
play in ceiling speakers. There are 6 Alert messages that can be
triggered by switches in the store that sense conditions such as
open doors, and 14 that can be triggered by PC Network commands.
Alert messages (email/text) can also be sent to designated email
recipients, smart phones and other email/texting devices with text
information to let the manager know about Alert events in the store.
Page 14

13
MESSAGE CENTER MESSAGES
NAME
CONTENT
REMINDER
Hand Washing
Please wash your hands.
Sanitizer
Please change sanitizer solution.
DR Trash
Please check the dining room trash.
HACCP
Please complete the HACCP shift checklist.
Quality Check
Please complete the shift quality check.
Lot Check
Please complete a parking lot check.
Restroom Check
Please check the restrooms.
Pre-Rush
Please complete the pre-rush tasks for your
workstation.
Post-Rush
Please complete the post-rush tasks for your
workstation.
Headset Status
To check headset status, press and hold A2 and volume
down while turning on the power.
Change Language
To change headset prompt language, press and hold A1
and volume down while turning on the power.
Hands Free ON
To turn headset hands free mode on, press and hold B
and volume up while turning on the power.
Empty 1-3
Not pre-recorded.
ALERT
NAME
EVENT
CONTENT
Freezer Door
SW1
The freezer door has been left open.
Cooler Door
SW2
The cooler door has been left open.
Back Door
SW3
The back door has been left open.
Lobby Door
SW4
A guest has entered the lobby.
Empty
SW5
Not pre-recorded.
Empty
SW6
Not pre-recorded.
Empty
N1 – N14
Not pre-recorded.
Reminder messages are
triggered by time and
day only.
Alert messages are
triggered by input
signals, plus time and
day or Network events.
Under EVENT −
SW# refers to a
switch-triggered alert.
N# refers to a
Network-triggered alert.
Page 15

14
Reminder Message Settings
To set up the time periods and locations for Reminder Messages
to be played, or to name and/or record Reminder Messages, press
the Menu button on the base station MESSAGE STATUS display
and then, on the MAIN MENU press the Message Center button.
Press the Reminder messages button on the MESSAGE
CENTER MENU.
To select a message on the REMINDER MESSAGES display, press
the ▲(up) or ▼(down) button to scroll up or down to highlight the
desired message. To edit the highlighted message, press the Edit
button.
Rename Message
To change the name of the selected message, press the Rename
button on the EDIT REMINDER MESSAGE display.
On the Rename display, use the Erase button to clear characters
in the current name to change them. Use the ◄, ►, ▲ and ▼
buttons to move the highlight to a character you would like to use
in the name. Use the Sel (select) button to enter the highlighted
character in the name. When you are finished, press the Back
button to save the new name.
Page 16

15
NOTE:
Reviewed messages
are played to a
specific headset.
To review the existing selected
message, or to record a new
message, press the
Review/Record button on the
EDIT REMINDER MESSAGE
display.
To turn the selected message on
or off, press the Message button
on the EDIT REMINDER
MESSAGE display to highlight
either ✔(on) or −(off). Press the
Back button to save this setting.
Turn Message On/Off
Review or Record Message
To listen to the existing message, press the Review button on the
REVIEW/RECORD MESSAGE display. Follow instructions under
READY TO REVIEW on the display. Press and hold the headset
B button. The message will be played only to the headset where
the B button is pressed.
To record a new message, press the Record button on the
REVIEW/RECORD MESSAGE display.
Follow the instructions under READY TO RECORD on the
display. You will have up to 16 seconds to record a message
while you are pressing the headset B button. The Progress
indicator will show you how long you have been recording.
When you finish recording, release the B button and press the
Review button on the display, and follow the instructions under
READY TO REVIEW to confirm a successful recording.
Page 17

16
NOTE:
Reminder messages are
triggered to play at the
beginning of their selected
schedule time period(s).
NOTE:
To edit the Start and Stop
times for the time periods
listed on the SELECT
SCHEDULE TIMES
display, go to the
MESSAGE CENTER
MENU and select
Edit schedule times.
NOTE:
The message will play to
completion. If a message
is interrupted by an A or
B button being pressed
on any headset/belt-pac,
it will retry until it is able
to play to completion.
Message Schedule
To choose the schedule for the selected message, press the
Schedule button on the EDIT REMINDER MESSAGE display.
On the SCHEDULE REMINDER MESSAGE display, press the
button for the day you want the selected message to be played.
On the SELECT SCHEDULE TIMES display, select the time
period(s) when you want the selected message to play by pressing
the ▲(up) and ▼(down) buttons to scroll through the 12 available
time periods. When the desired time period is highlighted, press
the Edit button.
On the EDIT display, press the Scheduled button to turn the
message ✔(on) or −(off) for the selected time period. If you want
the message to be on or off during this time period every day,
press the Apply to all days? button to select Yes. If No is
selected, only the selected day will be affected by this change.
Press the Back button to save this setting.
Page 18

17
NOTE:
By default, Reminder
messages play to all
headsets.
Message Playback Settings
Routing − To choose where the selected Reminder message will be
heard, press the Settings button on the EDIT REMINDER
MESSAGE display, and then press the Headsets button on the
EDIT REMINDER SETTINGS display.
On the SELECT REMINDER HEADSETS display, use the ▲(up)
and ▼(down) buttons to select a headset number for which you
would like to turn the selected Reminder message on or off, and
then press the Edit button.
To turn the message on or off in the selected headset, press the
Select headset button on the EDIT display to highlight ✔(on) or
−(off). To turn the message on or off in all headsets, press the
Apply to all headsets? button to highlight Yes or No.
To save this setting, press the Back button.
Repeats − To have the Reminder message play repeatedly at
selected intervals, press the Repeat button on the EDIT
REMINDER SETTINGS display. On the REPEAT INTERVAL
display, use the ◄ or ► button to move the highlight left or right
in the Time field for hours, minutes or seconds (HH:MM:SS), and
use the + and − buttons to change the number in the highlighted
box. Setting the repeat interval to all 0’s disables repeats.
To save this setting, press the Back button.
Page 19

18
Alert Message Settings
To set up the time periods and locations for Alert Messages to be
played, or to name and/or record Alert Messages, press the Menu
button on the base station MESSAGE STATUS display and then,
on the MAIN MENU press the Message Center button.
Press the Alert messages button on the MESSAGE CENTER MENU.
To select a message on the ALERT MESSAGES display, press the
▲(up) and ▼(down) button to scroll up or down to highlight the
desired message. To edit a message, select the message and press
the Edit button.
Rename Message
To change the name of the selected message, press the Rename
button on the EDIT ALERT MESSAGE display.
On the Rename display, use the Erase button to clear characters
in the current name to change them. Use the ◄, ►, ▲ and ▼
buttons to move the highlight to a character you would like to use
in the name. Use the Sel (select) button to enter the highlighted
character in the name. When you are finished, press the Back
button to save the new name.
Page 20

19
NOTE:
Reviewed messages
are played to a
specific headset.
To review the existing selected
message, or to record a new
message, press the
Review/Record button on the
EDIT ALERT MESSAGE
display.
To turn the selected message on
or off, press the Message button
on the EDIT ALERT MESSAGE
display to highlight either ✔(on)
or −(off). Press the Back button
to save this setting.
Turn Message On/Off
Review or Record Message
To listen to the existing message, press the Review button on the
REVIEW/RECORD MESSAGE display. Follow instructions under
READY TO REVIEW on the display. Press and hold the headset B
button. The message will be played only to the headset pressing
the B button.
To record a new message, press the Record button on the
REVIEW/RECORD MESSAGE display.
Follow the instructions under READY TO RECORD on the
display. You will have up to 10 seconds to record a message while
you are pressing and holding the headset B button. The Progress
indicator will show you how much time you have left. When you
finish recording, release the headset B button and press the
Review button on the display, and follow the instructions under
READY TO REVIEW to confirm a successful recording.
Page 21

20
NOTE:
To edit the Start and Stop
times for the time periods
listed on the SELECT
SCHEDULE TIMES
display, go to the
MESSAGE CENTER
MENU and select
Edit schedule times.
NOTE:
The message will play to
completion. If a message
is interrupted by an A or B
button being pressed on
any headset/belt-pac, it
will retry until it is able to
play to completion.
Message Schedule
To choose the schedule for the selected message, press the
Schedule button on the EDIT ALERT MESSAGE display.
On the SCHEDULE ALERT MESSAGE display, press the button
for the day you want the selected message to be played.
On the SELECT SCHEDULE TIMES display, select the time period
when you want the selected message to play by pressing the ▲(up)
and ▼(down) buttons to scroll through the 12 available time periods.
When the desired time period is highlighted, press the Edit button.
On the EDIT display, press the Scheduled button to turn the
message ✔(on) or −(off) for the selected time period. If you want
the message on or off during this time period every day, press the
Apply to all days? button to select Yes. If No is selected, only
the selected day will be affected by this change.
To save these settings, press the Back button.
Page 22

21
Message Playback Settings
Routing − To choose where the selected Alert message will be
heard, press the Settings button on the EDIT ALERT MESSAGE
display, and then press the Headsets button on the EDIT ALERT
SETTINGS display.
On the SELECT ALERT HEADSETS display, use the ▲(up) and
▼(down) buttons to select a headset number for which you would
like to turn the selected Alert message on or off, and then press the
Edit button.
To turn the message on or off in the selected headset, press the
Select headset button on the EDIT display to highlight ✔(on) or
−(off). To turn the message on or off in all headsets, press the
Apply to all headsets? button to highlight Yes or No, and then
press the Back button.
Page 23

22
NOTE:
The repeat interval does not
apply to emails, since they
are not repeated for a given
message.
Delay − To set a delay after the Alert message is triggered until it
begins playing, press the Delay button. On the DELAY BEFORE
PLAY display, use the ◄ or ► button to move the highlight left or
right in the Delay field for minutes and seconds (MM:LL), and use
the + and − buttons to change the number in the highlighted box.
To save these settings, press the Back button.
Repeats − To have the Alert message play repeatedly at selected
intervals, press the Repeat button on the EDIT ALERT SETTINGS
display. On the REPEAT INTERVAL display, use the ◄ or ►
button to move the highlight left or right in the Time field for
hours, minutes or seconds (HH:MM:SS), and use the + and −
buttons to change the number in the highlighted box.
Setting the repeat interval to all 0’s disables repeats.
To save these settings, press the Back button.
Page 24

25
NOTE:
Times are in
24 hour format.
example:
0500 = 5 A.M.
1700 = 5 P.M.
0000 = Midnight
NOTE:
You can schedule
a full 24-hour
period by setting
Start and Stop
times the same.
Schedule Times
To set up all the time periods during each day, in which Message
Center messages can be scheduled, press the Menu button on the
base station MESSAGE STATUS display and then, on the MAIN
MENU press the Message Center button.
Press the Edit schedule times button on the MESSAGE
CENTER MENU.
There are 12 possible time periods. To select a time period to be
edited, use the ▲(up) and ▼(down) buttons to scroll through the
12 available time periods on the EDIT SCHEDULE TIMES
display. When the desired time period is highlighted, press the
Edit button.
On the drop-down EDIT SCHEDULE TIMES display, to edit the
Start or Stop time, use the ◄ and ► buttons to move the highlight
in the Start or Stop field, and use the + and − buttons to change
the highlighted numbers. To move from one field to the other,
repeat pressing the ◄ or ► button until the highlight moves from
one field to the other.
To save these settings, press the Back button.
Page 25

30
NOTE:
The LCD contrast is set
at the factory, and will
normally not need to be
adjusted.
Phone Headset
If there is an HME Telephone Interface connected to your base
station, you can assign one headset/belt-pac to receive incoming
telephone calls. To do this, press the Phone headset button on
the ADVANCED STORE SETTINGS display. On the SELECT
PHONE HEADSET display, use the ◄ and ► buttons to move the
highlight in the Select phone headset field, and then use the +
and − buttons to enter number of the headset/belt-pac.
To save these settings, press the Back button.
LCD Contrast
To adjust the light/dark contrast of the base station display, press
the More button on the STORE SETTINGS display. On the
ADVANCED STORE SETTINGS display, press the LCD Contrast
button and then press the + (lighter) and − (darker) buttons to adjust
the contrast. When you are finished, press the Back button as
needed to save the setting and return to the desired display.
Page 26

39
NOTE:
To find the IP Address, go
through the following
display path on your base
station:
MESSAGE STATUS>
More>More>More.
Edit
buttons
Secondary menu
Main menu
Save
button
Edit
bar
PC Navigation
If your ion|IQ®NDT was set up to operate with a PC network, all of
the same settings that can be edited on the base station can also be
edited on your PC. The following examples show you how to navigate
through system settings as they appear on your PC screen.
The ion|IQ®NDT provides the ability to view and edit base station
configuration settings.
To open the ion|IQ®NDT on your PC, enter its IP Address in the
address bar on your internet browser as shown below, and then
press the Enter key on your keyboard.
Select any category from the Main Menu that you would like to
view or edit. Some topics will cause a Secondary Menu bar to
appear, from which you can select a sub-topic.
If you click your cursor on an Edit button, an edit bar will appear
with setup choices. If you make any setup changes, you must
click on the Save button to save your changes. If you do not
want to save your changes, or do not make any changes, you can
click on any other menu topic, or click on the back arrow at the
top-left corner of the browser screen.
Page 27

40
The ion|IQ®NDT interface provides the following web pages:
Status – provides Message, Version, Network and Copyright
information.
Register headset – allows you to register one or multiple
headsets, or to clear headset registrations.
Message Center – allows you to set up messages to be played to
audio destinations as well as in the case of Alert messages, set up
text messages to be sent to email and text recipients.
Store settings – allows you to set up store parameters such as
date, time, store hours, schedule times, passwords, Phone
headset and LCD contrast, as well as Restore installer settings.
Installer settings – allows you to set up basic operational
settings such as Language selection, Phone, Radio options and
Split-B, as well as Save installer settings and Restore factory
settings.
Reports – allows you to view Message Center settings and headset
statistics reports.
Diagnostics – provides information that may be used by HME
Technical Support to diagnose problems.
Service – displays all version information and contact information,
in case you need assistance from HME Technical Support.
Page 28

41
CAUTION:
Always unplug
the battery
charger before
cleaning it.
EQUIPMENT CARE AND CLEANING
Handling the Equipment Properly
When adjusting the position of the headset microphone, hold the
boom at its base, not at the microphone end.
Carry the headset by the headband, not by the earpiece, and
never by the microphone boom.
Use both hands to put the headset on or take it off.
Cleaning the Equipment
Belt-Pacs and Headsets
Remove the battery.
Clean the battery and headset or belt-pac with a damp sponge
sprayed with household cleaner. Squeeze excess liquid out of the
sponge before using it.
Clean the metal battery contacts on the battery and headset or
belt-pac as follows. Wet the tip of a swab with alcohol and
squeeze the excess alcohol from it. Wipe each contact with the
swab and be certain all the contacts are dry before reinstalling
the batteries.
Foam muffs on headset earpieces can easily be replaced for
sanitary purposes. To order extra foam muffs, call your local
HME sales representative.
Battery Charger
Avoid splashing water or grease on the battery charger.
Clean the battery charger monthly as follows.
Remove all batteries from the battery charger.
Clean the battery charger case with a damp sponge. Wet the
sponge and wring it out so it is damp, not dripping wet. Spray
household cleaner on the sponge (NOT DIRECTLY ON THE
EQUIPMENT). Clean the battery charger with the sponge and dry
it thoroughly.
Wet the tip of a cotton swab with rubbing alcohol and squeeze the
excess alcohol from the swab. Wipe the metal contacts inside
each battery port with the damp swab. Allow the contacts to dry
before placing batteries in the ports.
Page 29

42
PROBLEM
PROBABLE CAUSE
SOLUTION
“Battery failed” is heard
in headset when PWR
button is pressed.
Battery may be defective.
Replace battery. Call HME.*
Battery contacts may be dirty.
Clean battery contacts with alcohol.
“Headset (or belt-pac)
failed” is heard in
headset when PWR
button is pressed.
Headset/Belt-pac may be defective.
Use another headset/belt-pac. Call HME.*
Headset/Belt-pac battery contacts may
be dirty.
Clean headset/belt-pac battery contacts with alcohol.
No sound is heard in
headset when you press
button A and speak into
microphone.
Power may be off at base station.
Be sure HME logo and other lights on base station are lit.
Check circuit breaker for building.
Power supply in base station may not be
working.
Be certain power adapter is plugged into AC electrical outlet,
and is connected to J3 on base station audio circuit board.
Headset/Belt-pac power may not be on.
Press PWR button on headset/belt-pac. Be certain power
light goes on and switches from red to green.
Volume may not be set correctly.
Adjust volume with Volume-up and down buttons.
Battery may be low or defective.
Check Power light. If not lit, replace battery.
Headset/Belt-pac may be defective.
Use another headset/belt-pac. Call HME.*
Headset/Belt-pac may not be registered.
Register headset/belt-pac.
Channel A or B is not
working.
Headset/Belt-pac power may not be on.
Press PWR button on headset/belt-pac. Be certain power
light goes on and switches from red to green.
Battery may be low or defective.
Check Power light. If not lit, replace battery.
A1/A2 or B1/B2 light on base station
does not light when headset/belt-pac
button A or B is pressed.
Use another headset/belt-pac. Call HME.*
Headset/Belt-pac may not be registered.
Register headset/belt-pac.
Only intermittent voice
can be heard in
headsets.
Transmitter antenna connectors on base
station transceiver circuit board may be
loose or damaged.
Be certain antennas are screwed securely onto base station.
Check transmitter antenna cable connection at ANT1 and
ANT2 on left side of transceiver circuit board. Call HME.*
Circuit board may be defective.
Call HME.*
VAA level is too sensitive.
Reduce VAA level.
Personnel hear
customers in ceiling
speaker or headsets, but
cannot hear each other.
Circuit board may be defective.
Check to see if A1/A2 and B1/B2 lights on base station are
lit when buttons are pressed. Call HME.*
Headset/Belt-pac may be defective.
Use another headset/belt-pac. Call HME.*
Headset has intermittent
sound.
Battery may be low.
Replace battery.
Headset/Belt-pac may be defective.
Use another headset/belt-pac. Call HME.*
Battery charger is not
working.
Charger may not be plugged in.
Be certain charger is plugged in.
If it still is not working, call HME.*
“Registration failed”
message heard in
headset. Lights stay
red.
Base station power not on.
Be sure HME logo and other lights on base station are lit. If
no light is lit, be sure power adapter is plugged into electrical
outlet, and is connected to J3 on base station audio circuit
board.
Registration button not pushed.
Repeat registration procedure. Call HME.*
IN CASE OF PROBLEMS
Troubleshooting
Page 30

NAME
START TIME
STOP TIME
REPEAT
HEADSETS
CEILING SPKR
1
2
3
4
5
6
7
8
9
10
NAME
START TIME
STOP TIME
REPEAT
DELAY
HEADSETS
CEILING SPKR
1
2
3
4
START TIME
STOP TIME
NOTES
1
2
3
4
5
6
7
8
9
10
11
12
REMINDERS
ALERTS
HME ion|IQ®NDT Message Center Quick Start Guide
Right Message, Right People, Right Time!
SCHEDULE
Page 31

Page 32

NAME
START TIME
STOP TIME
REPEAT
HEADSETS
CEILING SPKR
1
2
3
4
5
6
7
8
9
10
NAME
START TIME
STOP TIME
REPEAT
DELAY
HEADSETS
CEILING SPKR
1
2
3
4
START TIME
STOP TIME
NOTES
1
2
3
4
5
6
7
8
9
10
11
12
REMINDERS
ALERTS
HME ion|IQ®NDT Message Center Quick Start Guide
Right Message, Right People, Right Time!
SCHEDULE
 Loading...