

Page 1
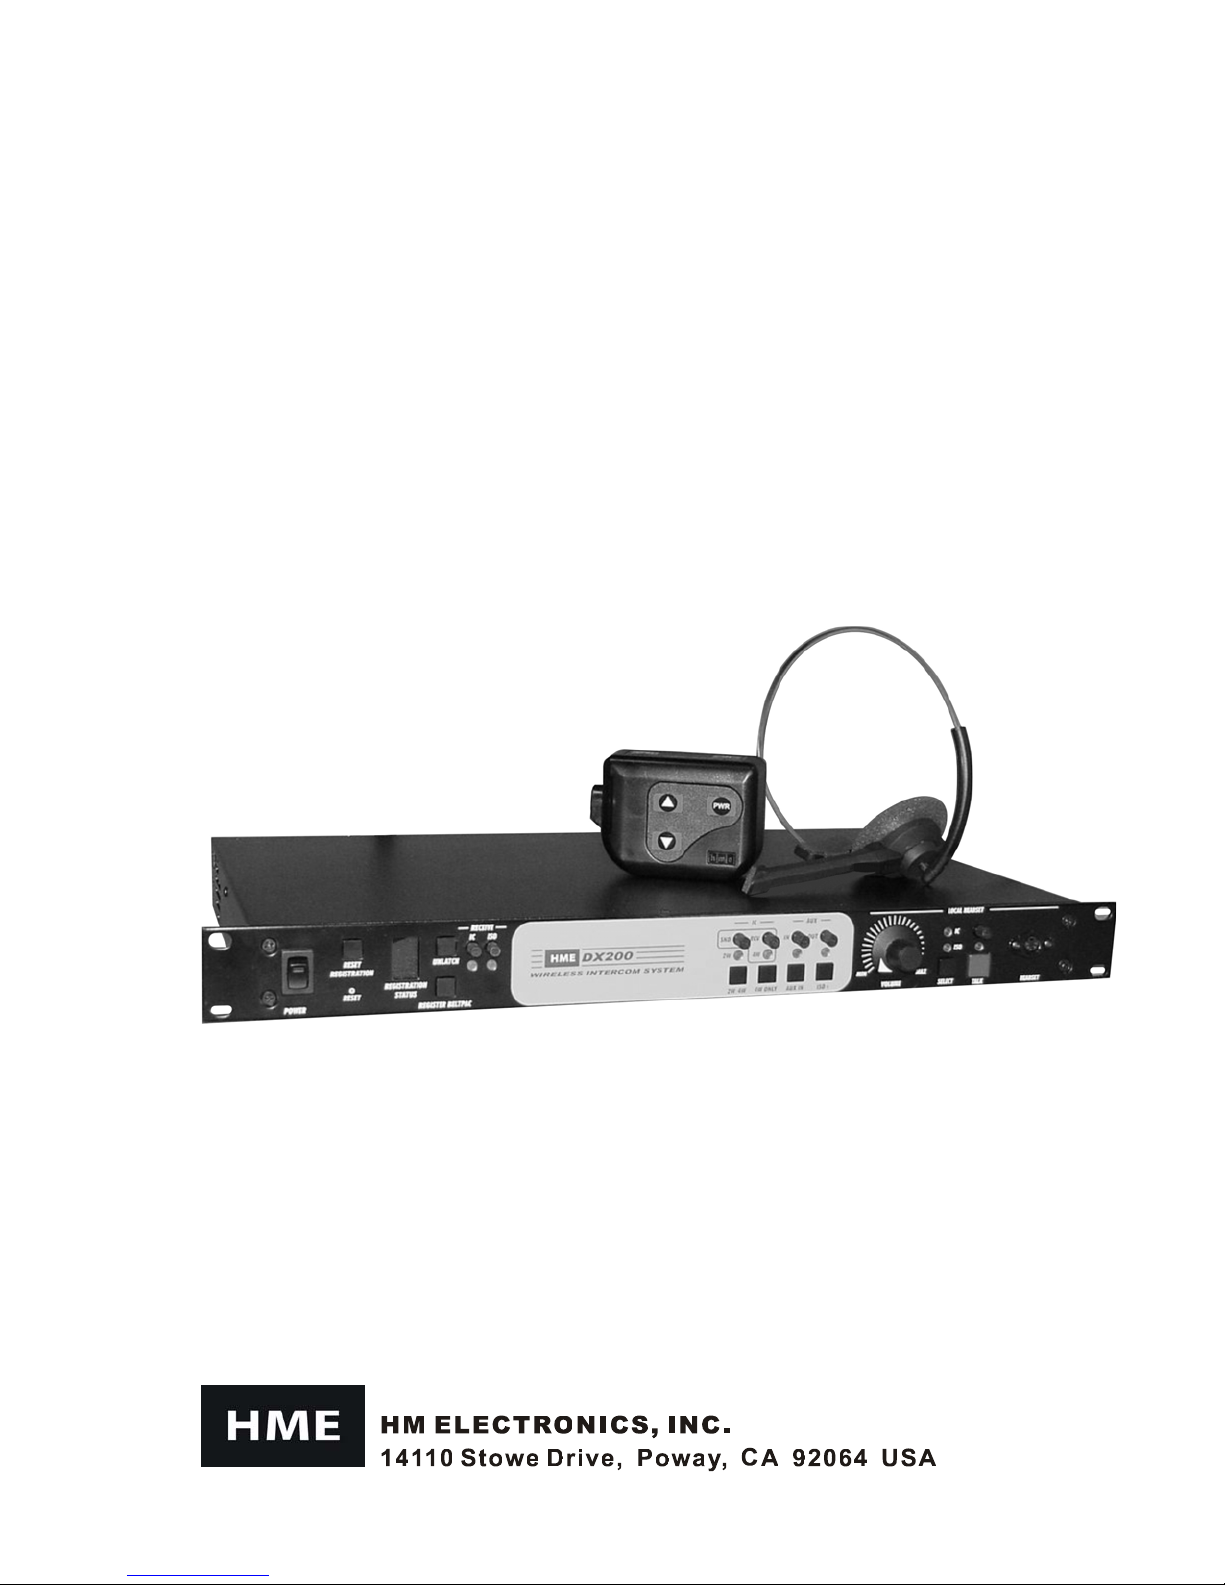
DX200
Wireless Intercom
HME# 400527
Rev B 6/30/04
Operating Instructions
Page 2

Table of Contents
SECTION 1.
EQUIPMENT IDENTIFICATION....................................................................................................................2
SECTION 2. EQUIPMENT SETUP..............................................................................................................3
BATTERY CHARGER SETUP ........................................................................................................................ 3
Connect AC Adapter......................................................................................................................................3
Charge Batteries .............................................................................................................................................3
BASE STATION SETUP...................................................................................................................................4
Equipment Connections..................................................................................................................................4
BELTPAC SETUP AND REGISTRATION......................................................................................................5
Set Up Beltpacs ..............................................................................................................................................5
Register Beltpacs............................................................................................................................................5
INTERCOM AND AUXILIARY EQUIPMENT SETUPS ...............................................................................7
2-Wire Intercom.............................................................................................................................................7
4-Wire Intercom.............................................................................................................................................7
Auxiliary Equipment......................................................................................................................................8
8-Ohm Speaker...............................................................................................................................................8
Multiple DX200 Units....................................................................................................................................8
SECTION 3. EQUIPMENT OPERATION..................................................................................................9
BASE STATION OPERATION ........................................................................................................................9
Front Panel Controls, Indicators and Connector.............................................................................................9
BELTPAC OPERATION................................................................................................................................. 11
Beltpac Controls and Indicator Lights.......................................................................................................... 11
Batteries........................................................................................................................................................12
SECTION 4. TROUBLESHOOTING.........................................................................................................13
SECTION 5. TECHNICAL DATA..............................................................................................................14
EQUIPMENT SPECIFICATIONS ..................................................................................................................14
Base Station..................................................................................................................................................14
Beltpac.......................................................................................................................................................... 15
BLOCK DIAGRAM ........................................................................................................................................16
DX200 Base Station.....................................................................................................................................16
APPENDIX A: BATTERY CHARGER 230 VOLT AC ADAPTER CONNECTIONS................................17
INTRODUCTION....................................................................................................................1
Illustrations in this publication are approximate representations of the actual
equipment, and may not be exactly as the equipment appears.
HM Electronics, Inc. is not responsible for equipment malfunctions due to
erroneous translation of its publications from their original English version.
The HME logo and pr od uc t n am es are registered tr a demarks of HM Electronics, Inc. All ri gh ts r eser ved.
© 2004 HM Electronics, Inc.
Page 3

FCC NOTICE
l
This device complies with Part 15 of the FCC rules. Operation is subject to the following two conditions:
(1) This device may not cause harmful interference, and (2) This device must accept any interference
received, including interference that may cause undesired operation.
NOTE: This equipment has been tested and found to c om ply w ith the lim i ts for a Class A dig it a l dev ice, pur sua nt
Part 15 of the FCC rules. These limits are designed to provide reasonable protection against harmful interference
when the equipment is operated in a commercial environment. This equipment generates, uses and can radiate
radio frequency energy and, if not installed and used in accordance with the instruction manual, may cause harmfu
interference to radio communication. Operation of this equipment in a residential area is likely to cause harmful
interference, in which case the user will be required to correct the interference at his own expense.
Changes or modifications not expressly approved by HM Electronics, Inc. could void the users authority to
operate this equipment.
MANDATORY SAFETY INSTRUCTIONS
FOR INSTALLERS AND USERS
Use only manufacturer or dealer supplied antennas.
The Federal Communications Commission has adopted a safety standard for human exposure to RF (Radio
Frequency) energy, which is below the OSHA (Occupational Safety and Health Act) limits.
The term “IC:” before the certification/registration number only signifies that the Industry Canada technical
specifications were met.
Base Station Antenna minimum safe distance: 7.9 inches (20 cm) at 100% duty cycle.
Base Station Antenna gain: This device has been designed to operate with an antenna having a maximum
gain of 2dBi. To reduce potential radio interference to other users, the antenna type and its gain should be so
chosen that the equivalent isotropically radiated power (EIRP) is not more than that required for successf ul
communication. The required antenna impedance is 50 ohms.
Antenna mounting: The antenna(s) used for the base transmitter must be installed to provide a separation
distance of at least 7.9 inches (20 cm) from all persons and must not be co-located or operating in conjunction
with any other antenna or transmitter.
Antenna substitution: Do not substitute any antenna for the one supplied or recommended by the
manufacturer or radio dealer. You may be exposing person or persons to excess radio frequency radiation.
You may contact your radio dealer or the manufacturer for further instructions.
WARNING: Maintain a separation distance from the base station transmit antenna to a person(s) of at least
7.9 inches (20 cm) at 100% duty cycle.
You, as the qualified end-user of this radio device must control the exposure conditions of bystanders to ensure
the minimum separation distance (above) is maintained between the antenna and nearby persons for satisfying
RF exposure compliance. The operation of this transmitter must satisfy the requirements of
Occupational/Controlled Exposure Environment, for work-related use. Transmit only when person(s) are at
Hereby, HM Electronics, Inc. declares that the DX200 is in compliance with the essential requirements and other
relevant provisions of R&TTE Directive 1999/5/EC.
This product operates in the 2400 to 2483.5 MHz frequency range. The use of this frequency range is not yet
harmonized between all countries. Some countries may restrict the use of a portion of this band or impose other
restriction relating to pow e r level or use . Y ou should c ont ac t your Spectrum authority to dete rm ine possibl e r e stri ct i ons.
Page 4
SECTION 1. INTRODUCTION
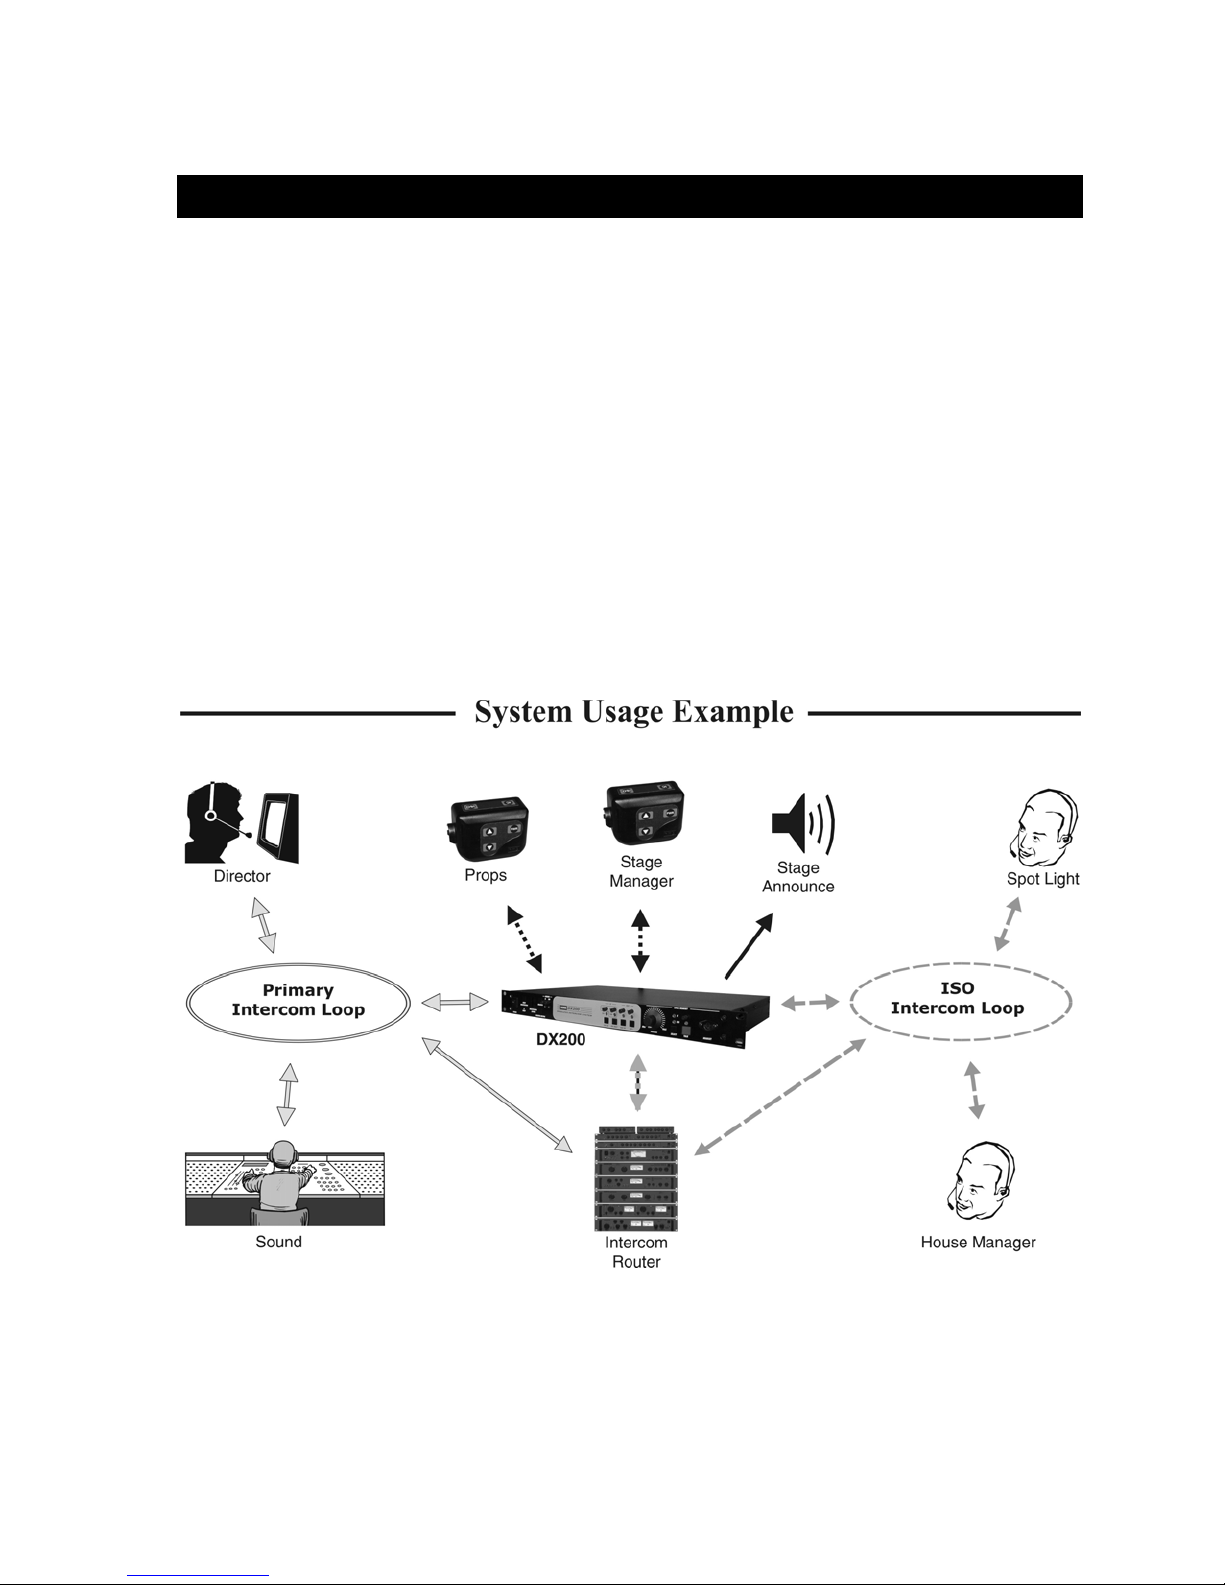
The DX200 provides private, secure communication. Each base station can have up to fifteen Beltpacs
“registered” to it. Four of the fifteen Beltpacs can transmit at the same time. However, by connecting two or
more base stations together, these numbers can be increased. For example, two base stations can support thirty
Beltpacs, of which eight can transmit at the same time. Beltpacs can be used either in the push-to-talk or handsfree mode. The base station operator can stop any Beltpac from transmitting.
The DX200 can be used with RTS
and 4-wire cabled intercoms can be operated at the same time. Also, using the AUX In and AUX Out
connections, a second 4-wire intercom channel can be used.
Either a monitor speaker or a local headset can be used with the DX200. Using a local headset, the base station
operator can talk to crew members on the cabled intercom channel, Beltpacs only or all channels.
The base station can be operated using standard DC electricity or a vehicle electrical system for mobile
operation. A power adapter and cable are included with the base station.
®
and Clear-Com® cabled intercom systems. On the intercom channel, 2-wire
1
Page 5
EQUIPMENT IDENTIFICATION
p
p
p
(1 p
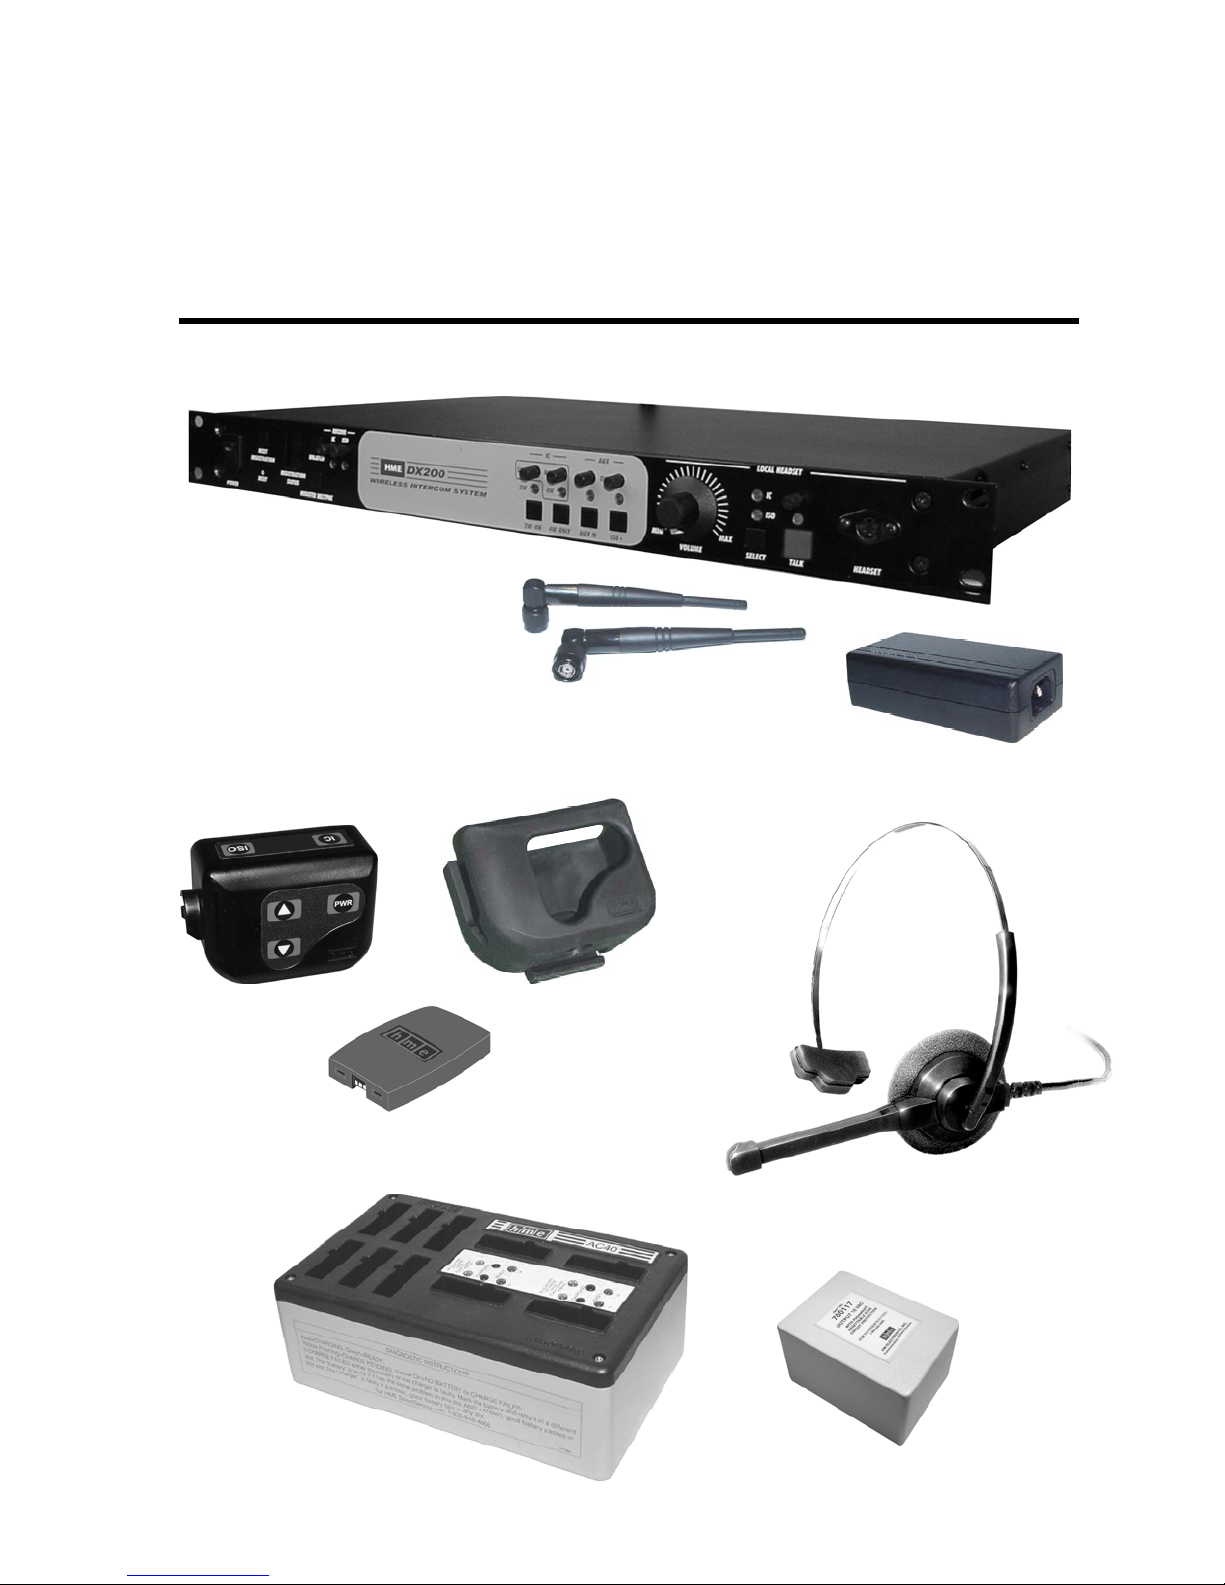
The following equipment is standard with the DX200 Wireless Intercom System.
As you unpack the equipment, check the packing list to be sure you received all items listed.
BS200 Base Station
Base Station Antennas
(2 per Base Station)
115/230 Volt AC Power Supply
(1 per Base Station, with Power Cables)
BP200 Belt
ac
Belt
ac Battery
AC40 Battery Charger
Belt
ac Pouch
HS11 Headset
AC Power Adapter
er Battery Charger)
2
Page 6
SECTION 2. EQUIPMENT SETUP
BATTERY CHARGER SETUP
IMPORTANT! – Before installing the system, connect the AC adapter to the battery charger and plug it into
an electrical outlet. Charge all the Beltpac batteries while the other equipment is being installed. Charging time
is about 2.5 hours.
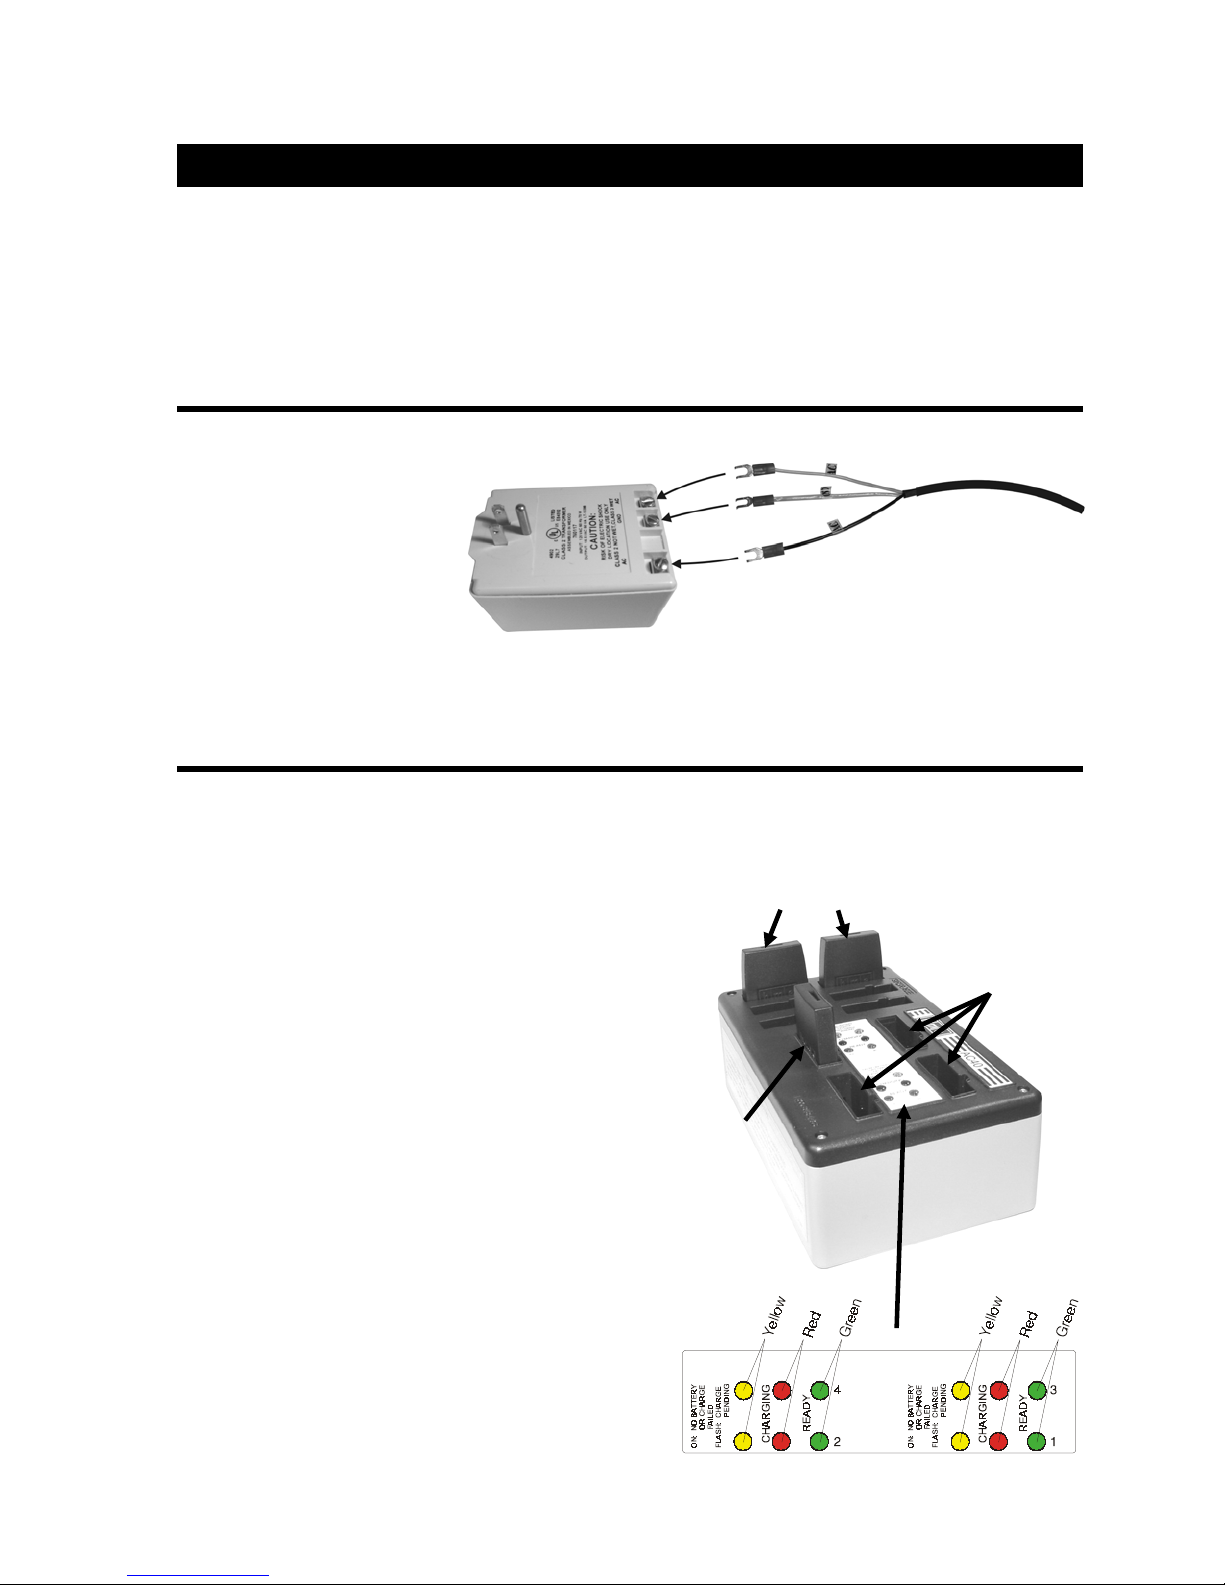
Connect AC Adapter
• Connect the battery charger
cable to the AC adapter as
shown to the right. Match
the wires labeled AC and
GND to the terminals on the
adapter with the same labels.
• Plug the adapter into an
electrical outlet.
The red lights on the charger will come on and go off, and then the yellow lights will come on and stay on.
16.5 Volt AC adapter
NOTE: For 230 Volt AC adapter
connections, typically used outside
the U.S.A., refer to Appendix A.
Battery charger cable
Charge Batteries
Up to four batteries can be charged in the battery
charger at the same time. The battery status lights
next to each charging port are explained below.
Up to six fully charged batteries can be stored in the
battery storage ports.
• Insert a battery in each of four charging ports
until it clicks in place.
• A yellow light next to each charging port stays on
while th e port is empty. Wh en a battery is in a
charging port, a flashing yellow light next to it
indicates CHARGE PENDING, which means the
battery is too hot. Adjust the room temperature or
move the charger to a cooler area. When a battery is
in a charging port, a yellow light on steady next to it
means CHARGE FAILED. If this happens, follow
the instructions on the side of battery charger.
• A red CHARGING light next to a battery port
stays on while a battery in the port is charging.
A green READY light next to a battery port goes
on when a battery in the port is fully charged.
Store fully charged batteries in storage ports.
Batteries should not be left in charge ports after being
fully charged. If a battery is left in a charge port for
more than three weeks, the yellow indicator may light
up. In this case, it does not indicate a faulty battery.
Charged batteries
in storage ports
Empty
charging ports
Battery in
charging port
3
Page 7

BASE STATION SETUP
The following description is for a basic, stand-alone DX200 system setup. Connections with 2-wire and 4-wire
intercoms, and other auxiliary equipment are described in the INTERCOM AND AUXILIARY EQUIPMENT
SETUPS on pages 7 and 8.
Equipment Connections
1 2 3 4
5
The numbers (#
Step 1. Connect the tw o en cl ose d ant en nas to the ant enn a c onn ect ors ( #1 and #2) on the rear panel of the base
station. Position the antenna at the 0° ANTENNA connector (#1) vertical ly . Positi on the an tenn a at th e 90°
ANTENNA connector (#2) horizontally , p ointin g to the lef t as in dic ate d on the pane l. Tu rn the s leev e on
each of the antenna connectors clockwise to tighten them securely in place.
Step 2. Plug the connector at the end of the AC power supply cord into the 12-14VDC power connector (#3) on the
rear panel of the base station. Turn the nut on the cable connector clockwise to secure it to the base station.
Plug the large female connector at one end of the AC power cord into the power supply. Plug the other end
of the AC power cord into an electrical outlet.
Step 3. Connect a grounding wire from #4 to an earth ground.
Step 4. Plug a headset into the HEADSET connector (#8) on the fron t pa n el of th e b as e s ta ti on .
6 7
) below refer to items on the illustrations above.
Rear Panel
8
Front Panel
Step 5. Press the POWER switch (#5) to tu rn on the b ase st ati on . The red lig ht on the swit ch shoul d g o on.
4
Page 8

BELTPAC SETUP AND REGISTRATION
The first time you operate the DX200 system, you must register each Beltpac for use with a specific base
station. The base station will then recognize all registered Beltpacs when their power is on, and will know the
difference between them and other electronic equipment operating on the same frequencies. If a Beltpac is added
or replaced later, the new one must be registered and the old one remains in memory. A maximum of 15
Beltpacs can be registered to a single base station at one time.
Set Up Beltpacs
Before registering them, set up all Beltpacs as follows.
Step 1. Insert a fully charged battery in the
Beltpac, with the metal contacts on
the end of the battery inserted first.
Press it in until it snaps.
Step 2. Place the Beltpac in the pouch.
Step 3. Plug the headset cable connector into the Beltpac.
Step 1
Step 2
Step 3
Register Beltpacs
Beltpacs must be within 6 feet (1.83 meters) of the base station while you are registering them. Be certain the
base station power is on, and each Beltpac you are going to register is turned off before you begin. Beltpacs that
are already registered can be on or off.
Step 1. Put the headset, of the Beltpac being registered, on your head.
Step 2. Press the REGISTER BELTPAC button on th e f ron t pan e l of th e bas e st at i on (# 7 on base s t at ion f r ont
panel illustration).
• The REGISTRATION STATUS display (#6 on base station front panel illu stratio n) will show a
small “o” for open.
NOTE: If you wait too long before going on to Step 3, the base station will go out of the registratio n
mode and you will have to repeat Step 2.
Step 3. Press and hold the ISO button on the Beltpac while you press and
release the PWR (power) but t on to turn th e un it on , th en rel ease the
ISO button. This will cause the Beltpac to enter the registration mode.
• The two power lights at the corners of the Beltpac near the IC
and ISO buttons will begin blinking red, then will blink green
two or three times and go off.
Wait! There may be a short delay.
•
If registration is successfully completed:
• A voice message in the headset will say “Power on, Beltpac #, Version #, Begin registration, Registration
complete, …”
• After a delay of up to 15 seconds, the REGISTRATION STATUS display will show the ID number assigned
to this Beltpac for about 10 seconds.
NOTE: ID numbers are assigned sequentially as 0 thru 9, A, b, C, d and E.
• The power light on the Beltpac, next to the IC button, will remain on steady green.
• Repeat Steps 1 to 3 above for each Beltpac to be registered.
5
Page 9

If registration failed:
• A voice message in the headset will say “Power on, Beltpac #, Version #, Begin registration, …” Both
power lights on the Beltpac will be blinking red, and there may be a delay of up to 90 seconds before you
hear “Registration failed.”
• Press the RESET b utton on the base station. To press the RESET button, insert a small paper clip or
similar object into the RESET hole at the lower-left corner of the base station front panel. When the
REGISTRATION STATUS display becomes blank, press the REGISTER BELTPAC button and register
the Beltpac again. If registration fails again, call your dealer for assistance.
If you try to register more than 15 Beltpacs
• An F will appear on the REGISTRATION STATUS display on the
base station and you will hear “Registration failed” in the headset.
• Clear all current registrations by pressing the RESET
REGISTRATION button and the RESET button at the same time.
To press the RESET button, insert a small paper clip or similar
object into the RESET hole at the lower-left corner of the base
station fro nt panel. Continue holding the RESET REGISTRATION button after you release the RESET
button, until the clear code “c” (lower case) appears on the REGISTRATION STATUS display.
• Register all active Beltpacs, one at a time. Previously registered Beltpacs must be re-registered.
:
NOTICE
You have completed the stand-alone system setup.
The instructions under INTERCOM AND AUXILIARY EQUIPMENT SETUPS on the following pages
are for setting up additional equipment which you may want to use with your DX200, such as a 2-wire
intercom, 4-wire intercom, an external speaker or other auxiliary audio equipment. Instructions are also
provided for daisy-chaining two or more base stations together.
6
Page 10

INTERCOM AND AUXILIARY EQUIPMENT SETUPS
1 2 3 4 5 6 7 8 9
Rear Panel
10 11 12 13 14 15 16 17 18 19 20 21 22
Front Panel
The numbers (#
23 24 25 26 27 28 29 30
) below refer to items on the illustrations above.
2-Wire Intercom
Step 1. If using a 2-wire intercom, plug it into the base station at #3 or #5, depending on whether a male or female
connection is required.
Step 2. Depending on whether you are us in g a Clear-C om ® or RTS® compatible 2-wire intercom system, p osition
the CLEAR-COM / RTS TW button (# 1) as foll ow s:
In position = RTS® Mode Out position = Clear-Com® Mode
Step 3. If you selected RTS TW, position the RTS CHANNEL select button (#2) to the desired channel as follows:
Out position = Channel 1 In position = Channel 2
Step 4. Press the 2W/4W button (#25) on the front panel of the base station. The 2W and 4W lights (#15) above the
button sh ou l d g o on . Turn t he Be lt pa c pow e r on . Pres s th e IC button on the Beltpac pressed and speak into
the headset microphone. You will hear a delayed echo of your voice. Adjust the NULL control (#4) with a
small scr ewdriver w hile you ar e speaking, until the echo is eliminate d .
4-Wire Intercom
Step 1. If using only a 4-w ir e inte rc om, plug it int o the 4-WIRE connector (#6).
Step 2. Press the 4W ONLY button (# 26 ). The 4W light (#15) abov e th e but t on s h oul d go on .
Step 3. Adjust th e 4-wire in tercom send and rece iv e leve ls with the SND an d RCV controls (#16).
Pin designations for the RJ45
4-WIRE connector are as follows: Pins 1, 2, 7 & 8 = N/C
Pin 3 = In t er c om Out +
Pin 4 = In t er c om In +
Pin 5 = In t er c om In –
Pin 6 = In t er c om Out –
NOTE: If no 2-wire intercom will be used, you must
heard in the h ea dsets .
press the 4W ONLY button (#26), or a squeal will be
7
Page 11

The numbers (#
) below refer to items on the illustrations on page 7.
Auxiliary Equipment
Step 1. If using auxiliary equipment, such as another intercom, a CD player or other audio source, connect its
output cable connector (male) to the AUX IN connector (#7), and its input cable connector (female) to
the AUX OUT connector (#8) (if applicable).
The cable connectors must be 3-pin
XLR type for balanced +20dBV Pin 1 = Ground
maximum audio input/output, with Pin 2 = Audio +
the following pin connections: Pin 3 = Audio –
Step 2. If the auxiliary e quipment pr ov id e s audio in put only, press the AUX IN bu t t on ( #27). The light above the
button (#17) should g o on. Listen to the audio input in your head s et as you adjust the IN control (#17)
above the light to the desired level.
Step 3. If the auxiliary equipment requires two-way communication, have someone listening at the auxiliary unit.
Press the ISO+ button (#28) on t h e fr ont p ane l of th e ba s e s ta tio n . The lig ht a bov e the bu t ton shoul d go on .
While speaking into your headset microphone, adjust the OUT control (#17) above the light to the desired
listening lev el at th e aux ili a ry un it . Lis ten t o the au di o in put in y our hea dse t as y ou a djus t the IN control
(#17) above the light to the desired level.
8-Ohm Speaker
Step 1. If an external 8 ohm speaker will be used, connect its cable wires to the 8 OHM SPKR 2-pin Phoeni x
connector (#9).
Step 2. Adjust th e speaker volume with th e LOCAL HEADSET VOLUME control knob (#18).
NOTE: Either a local headset or an external speaker can be used, but not both. The LOCAL HEADSET
VOLUME control knob is the adjustment for both.
Multiple DX200 Units
Two or more DX200 units can be “daisy-chained” together with cables connected to the 2-wire connectors
(#3 and #5) on the rear panels of each base station, following Clear-Com
NOTE: DX200 does not provide or require 2-wire line power.
The cable connectors must be
3-pin XLR type for balanced RTS
+20dBV maximum audio Pin 1 = Common Pin 1 = Common
input/output, with the Pin 2 = Channel 1 Pin 2 = N/C
following pin connections: Pin 3 = Channel 2 Pin 3 = Audio
If “daisy-chaining” multiple base stations, you must do the following:
Step 1. Remove the cover from one
locate the JP1 jumper on the main circuit board. Slide
the jumper to the upward position
and replace the cover on the base station.
Be sure you d o this in only one
of the bas e s ta ti on s an d
®
Mode Clear-Com® Mode
base station.
®
/RTS
®
standards.
+
JP1
Jumper
Step 2. For each base stat ion , fo llow all th e ste ps f or
the base station setup on page 4.
8
Page 12

SECTION 3. EQUIPMENT OPERATION
BASE STATION OPERATION
Front Panel Controls, Indicators and Connector
1. POWER Switch
2. Beltpac Registration Cont rols and Status Indicator
3. UNLATCH Button
4. IC (Intercom) and ISO (Isolate) Receiver Indicators and Controls
5. Local Headset Connector, Indicators and Controls
1 3 4
2 6 7 5
Press the upper part of the switch to turn the power on. A red light on the switch will be lit when the base
station power is on. Press the lower part of the switch to turn the power off. The red light will go off. All
settings are preserved when the power is turned off, and will be restored when the power is turned on again.
Use these controls to register each Beltpac used with a specific base station, as described on pages 7 and 8.
Use this button to unlatch all Beltpac transmitters. (Beltpac users can “latch” their Beltpacs on, in order to talk
and listen to each other. Base station operators can use the UNLATCH button to stop Beltpac conversations, in
order to have uninterrupted communication with the Beltpac users.)
Lights indicate whether Beltpac reception is IC or ISO. Use IC and ISO controls to independently adjust
IC and ISO receive levels. NOTE: This adjustment does not affect Beltpac-to-Beltpac communication.
• Adjust the microphone level control, above the TALK button on the front panel, to mid-point. The
level can be readjusted during use, as needed.
• Adjust the receive level by turning on a Beltpac, speaking into the Beltpac headset microphone and
listening through the local headset earpiece while adjusting the VOLUME control on the base station to
the desired level.
• Use the SELECT button to select communication via IC or ISO. Above the SELECT button, the
indicator light will be lit for the selection you made. IC will allow you to communicate via the intercom
channel. ISO will send your audio to Beltpacs and auxiliary output if ISO+ is enabled (See #7 above).
NOTE: If neither 2W nor 4W is on, this will have no effect. It will stay on ISO.
• For open communication, press and release the TALK button quickly to “latch on.” To “latch off,”
press and release the button again quickly.
• For momentary communication, press and hold the TALK button for more than one second. In this
mode, the selected channel will remain open only as long as you are pressing the TALK button.
The TALK light indicates the TALK mode is active via the local headset.
• Use the TALK control knob to adjust the outbound audio level from the local headset microphone.
• Use the VOLUME
control knob to adjust the input to the local headset earpiece.
The following base station indicators and controls are used only if 2-wire or 4-wire
intercoms, or other auxiliary equipment is being used with the DX200, as described under
INTERCOM AND AUXILIARY EQUIPMENT SETUPS on pages 7 and 8.
9
Page 13

6. 2Wire/4Wire IC Indicators and Controls
The 2W/4W button turns on/off both 2-wire and 4-wire intercoms simultaneously. The 2W light above the
button indicates intercom on/off status. The 4W ONLY button turns on/off the 4-wire intercom alone. The
4W light above the button indicates intercom on/off status. Use the SND and RCV controls in the outlined
area to adjust the 4-wire intercom send and receive levels.
7. AUX IN and ISO+ Indicators and Controls
The AUX IN button enables/disables the auxiliary input. The light above the button indicates auxiliary
equipment’s on/off status. IN and OUT controls adjust auxiliary inbound and outbound audio levels.
ISO+ button enables/disables the AUX IN / OUT audio input and output. The light above the button
indicates ISO+ on/off status. Either AUX IN or ISO+ can be on, but not both at the same time. If ISO+
is on and you push the AUX IN button, ISO+ will automatically go off when AUX IN goes on, and vice versa.
Enabling ISO+ will open an audio path from the Beltpacs and local headset to AUX OUT.
10
Page 14

BELTPAC OPERATION
Beltpac Controls and Indicator Lights
The Beltpac control buttons have a snap action. They will activate when
pressed firmly. Use your fingertips, not your fingernails, to press the buttons.
Power On/Off
• Power On – Press and release the PWR (power) button.
A voice message in the earpiece will say “power on,” and the red
power lights at the corners of the IC and ISO buttons will go on. After a
short time, one light will go off and the other will change to green, indicating the Beltpac is ready for use.
The REGISTRATION STATUS indicator on the base stat ion will momentarily indicate the ID of th e Beltpac.
• Power Off – Press and hold the PWR button for approximately two seconds.
A voice message in the earpiece will say “power off,” and the green power light will go off.
NOTE: While the Beltpac is transmitting, the green power light will be flashing.
The green power light will be on steady whenever the Beltpac is ready, but not transmitting.
ISO (Isolate)
Use the ISO button to communicate with other Beltpac users and the DX200 base station operator.
Pressing ISO on the Beltpac will send audio to AUX OUT if ISO+ button on the base station is on.
• Press and hold the ISO button while talking.
IC (Intercom)
Use the IC button to communicate via the intercom channel and with the DX200 base station operator, or
anyone listening to a local speaker connected to the DX200 base station. Pressing IC on the Beltpac will
send audio to the intercom if intercom is on.
• Push-To-Talk Mode – To set the Beltpac for push-to-talk (PTT) communication, with the power off,
press and hold the volume-down T and ISO buttons while you press and release the PWR (power) button.
You will hear “Hands-free off” in the headset earpiece. Press and hold the IC button while talking.
• Hands-free Mode – To set the Beltpac for hands-free communication, with the power off, press and
hold the volume-up S and ISO buttons while you press and release the PWR (power) button. You will hear
“Hands-free on” in your headset earpiece. When set up for hands-free communication, the Beltpac can be
operated in either hands-free or PTT.
To operate in the hands-free mode, quickly press and release the IC button to “latch” the transmitter on. Talk
and listen, as in a normal telephone conversation. Press and release the IC button again to “unlatch,” to end the
conversation. All Beltpacs can be unlatched by the base station operator, by pressing the UNLATCH but t on on
the base station.
For PTT operation, press and hold the IC button for more than one second. In PTT operation, audio will be
transmitted only while you are pressing the IC button.
NOTE: The above settings only need to be repeated when you want to change between hands-free and PTT
operation. When changing modes, if both power lights begin blinking, turn the Beltpac off and begin again.
Volume Up/Down
• Volume Up Adjustment – Each time you press and release the volume-up S button, a beep will be
heard in the earpiece as the volume increases one step. If you press and hold the volume-up button, repeating
beeps will be heard as the volume steps up to maximum. When maximum volume is reached, “maximum”
will be heard in the earpiece, and will be repeated until you release the volume-up button.
• Volume Down Adjustment – Each time you press and release the volume-down T button, a beep will
be heard in the earpiece as the volume decreases one step. If you press and hold the volume-down button,
repeating beeps will be heard as the volume steps down to minimum. When minimum volume is reached,
rapidly repeating beeps will be heard.
11
Page 15

Batteries
Battery
Battery
release latch
Change Batteries
When a battery becomes weak, a voice in the
earpiece will say “Change battery.” When this
happens, take the Beltpac out of its pouch and
remove its battery. Slide the arrow-shaped batteryrelease latch in the direction of the arrow. Pull up
on the end of the battery near the battery-release
latch and lift the battery out of the Beltpac, or turn
the Beltpac over and catch the battery in your hand.
When replacing a battery in the Beltpac, place the end
of the battery with the metal contacts into the battery
holder on the Beltpac, in the same position as the
battery you removed. Press the top of the battery
carefully into the battery holder until it snaps in place
under the battery-release latch.
12
Page 16

SECTION 4. TROUBLESHOOTING
If you are unable to correct any of the problems described below, contact your dealer for assistance.
• Red light on base station power switch does not come on.
Be certain power cords are properly connected to base station, power supply and electrical outlet.
• Beltpac power lights do not turn green and “out of range” is heard in the headset.
Be certain your base station power is on. Turn the Beltpac and base station power on and off.
• When trying to register, it keeps saying registration failed.
Clear registration as described on page 7, and repeat the registration procedure.
• Others cannot hear me when I talk.
Be certain the headset is securely connected to the Beltpac or base station, and that you are pressing the IC
or ISO button on the Beltpac, or the TALK button on the base station. Be certain the appropriate IC or ISO
setting is selected under LOCAL HEADSET on the base station.
• People on the 4-wire intercom cannot hear me or I cannot hear them.
Be certain the cables are securely connected and the 4-wire intercom is on. If using a local headset, be
certain the IC setting is selected under LOCAL HEADSET on the base station.
• People on the RTS/ClearCom systems cannot hear me or I cannot hear them.
Be certain the cables are securely connected and the 2-wire intercom is on. If using a local headset, be
certain the IC setting is selected under LOCAL HEADSET on the base station.
• The 2-wire intercom is on and there is a loud squeal whenever I try to talk.
This can occur if two or more base stations are daisy-chained and the JP1 jumper on the circuit board in
one of the base stations has not been adjusted as described in Step 12 on page 6.
• Settings are not retained when the base station power is turned off and on again.
The internal battery may be low. Contact your dealer.
2400MHz cordless telephone interference —
If there is a 2400MHz cordless telephone nearby, interference may occur. However, because the DX200
is a frequency-hopping system, this problem is unlikely. If it does occur, changing frequencies on the
telephone may alleviate the problem. If not, move the phone as far as practical from the base station, or use
another type phone.
In the event of an electrical power outage —
such as from a lightning storm or power generator failur e, if you experience problems with your H ME
equipment after the electricity comes on again, unplug the AC power adapters from their electrical outlets
and wait 15 seconds, then plug them back in.
13
Page 17

SECTION 5. TECHNICAL DATA
EQUIPMENT SPECIFICATIONS
Base Station
GENERAL ⎯
Frequency Range: 2400 – 2483.5 MHz
Frequency Response: 200 Hz to 3.5 kHz
Power Requirements: 100-240VAC, 50-60Hz or 12-14VDC
Temperature Range: 32-122°F (0-50°C)
Size: 19” x 1.72” x 17.13” (1-RU) (48.26 x 4.37 x 43.51 cm)
Weight: 9.2 lbs. (4.18 kg) maximum
# of Beltpacs per Base: 15 can be registered
Any 4 can have simultaneous full-duplex communication at one time
4-Wire I/O: RJ45, 600Ω balanced, level adjustable, simultaneous operation with 2-wire
2-Wire I/O: XLR-3M, XLR-3F, externally-switchable RTS
200Ω, level adjustable, null adjustable
Auxiliary Input: XLR-3F/¼” (6.35 mm) combo jack, 600Ω balanced, level adjustable
Auxiliary Output: XLR-3M, 600Ω balanced, level adjustable
8Ω Speaker Output: 1W into 8Ω
Headset Connector: 4-pin mini-DIN
Electret microphone
Headset Output: 250mW into 32Ω
Front Panel Controls: Power switch
Reset Registration, Reset, Unlatch and Register Beltpac buttons,
IC and ISO Receive level adjustments, IC 2W/4W and 4W-Only buttons,
IC4W-Only Send and Receive level adjustments,
Auxiliary In and ISO+ buttons, Auxiliary In and Out level adjustments,
Rotary knob for volume adjustment,
Headset IC/ISO Select button and Headset Talk button
Front Panel Indicators: Registration Status indicator, IC and ISO Receive LEDs,
IC 2W and 4W-Only LEDs, Auxiliary In/Out LEDs,
Headset IC/ISO select LEDs, Headset PTT LED
Rear Panel Controls: Clear-Com
2-wire cha nnel line null adjustment
Antenna Type: External ½ -wave dipole (R-TNC connector)
RX/TX horizontal/vertical diversity
System Distortion: <2%
Communication Security: 64-bit encryption dual-slot diversity
®
/RTS® mode switch, RTS® Channel 1/2 switch,
®
or Clear-Com
®
mode,
TRANSMITTER ⎯
Type: Frequency hopping, spread spectrum
Transmit Power: 100mW burst
Modulation Type: Gaussian filtered FSK, TDM
Frequency Stability: 13 ppm
Harmonics/Spurious: Exceeds FCC and ETSI specifications over temperature
RECEIVER ⎯
Type: Frequency hopping, spread spectrum
RF Sensitivity: <−90dBm w 10
Frequency Stability: 13 ppm
Distortion: <2%
14
-3
BER
Page 18

Beltpac
GENERAL ⎯
Frequency Range: 2400 MHz – 2483.5 MHz
Antenna Type: Internal, horizontal/vertical diversity
Frequency Response: 200 Hz to 3.5 kHz
Battery Requirements: 3.6V lithium ion
Battery Life: Up to 20 hours
Temperature Range: 32-122°F (0-50°C)
Weight: 7.4 oz (.21 kg) with battery and pouch
Headset Connector: 4-pin, mini-DIN
Mic Input: Electret microphone
Headset Output: 160mW into 32Ω
Controls: Power, Volume-up S, Volume-down T, IC, ISO
Indicators: Dual-color LED (red/green)
Communication Security: 64-bit encryption
System Distortion: <2%
TRANSMITTER ⎯
Type: Frequency hopping, spread spectrum
Transmit Power: 100mW burst
Transmission Modes: Momentary or latch
Modulation Type: Gaussian filtered FSK, TDM
Frequency Stability: 13 ppm
Harmonics/Spurious: Exceeds FCC and ETSI specifications
RECEIVER ⎯
Type: Frequency hopping, spread spectrum
RF Sensitivity: <−90dBm w 10
Frequency Stability: 13 ppm
Distortion: <2%
-3
BER
15
Page 19

DRAFT
16
BLOCK DIAGRAM
DX200 Base Station
Page 20

APPENDIX A:
BATTERY CHARGER 230 VOLT AC ADAPTER
DRAFT
CONNECTIONS
If your DX200 will be used outside the U.S.A., where a 230 Volt AC adapter is required for your battery
charger, connect the AC adapter to the battery charger as follows.
Step 1. Connect an electrical plug to the wires on the power cable according to color codes.
(Brown = live, Blue = neutral, Green with yellow stripes = ground)
Step 2. Plug the other end of the power cable into the receptacle on the AC adapter.
Step 3. Remove the spade lugs from the brown and blue wires of the battery charger cable and cut the green/yellow
wire as short as possible. No ground wire will be used. Cut the connector off the AC adapter output cable.
Strip enough of the insulation from the wires of both cables so they can be spliced. Splice the wires from
the AC adapter cable to the “AC” wires of the battery charger cable. Cover the splice with electrical tape or
shrink tubing.
Step 4. Plug the electrical plug into an AC electrical outlet.
17
 Loading...