

Page 1
HMDX Audio
Service Center
1.800.466.3342
8:30 am – 7:00 pm (EST)
M – F
Mail To: HMDX Audio
Service Center
43155 W. Nine Mile Road
Suite 3
Novi, MI 48375
e-mail:
cservice@hmdxaudio.com
ONE YEAR LIMITED WARRANTY
HMDX Audio sells its products with the intent that they are free of defects in manufacture and
workmanship for a period of one year from the date of original purchase, except as noted below.
HMDX Audio warrants that its products will be free of defects in material and workmanship under normal
use and service. This warranty extends only to consumers and does not extend to Retailers.
To obtain warranty service on your HMDX Audio product, mail the product and your dated sales receipt
(as proof of purchase), postpaid, to the following address:
HMDX Audio
Service Center
43155 W. Nine Mile Road, Suite 3
Novi, MI 48375
No COD's will be accepted.
HMDX Audio does not authorize anyone, including, but not limited to, Retailers, the subsequent consumer
purchaser of the product from a Retailer or remote purchasers, to obligate HMDX Audio in any way
beyond the terms set forth herein. This warranty does not cover damage caused by misuse or abuse;
accident; the attachment of any unauthorized accessory; alteration to the product; improper installation;
unauthorized repairs or modifications; improper use of electrical/power supply; loss of power; dropped
product; malfunction or damage of an operating part from failure to provide manufacturer’s recommended
maintenance; transportation damage; theft; neglect; vandalism; or environmental conditions; loss of use
during the period the product is at a repair facility or otherwise awaiting parts or repair; or any other
conditions whatsoever that are beyond the control of HMDX Audio.
This warranty is effective only if the product is purchased and operated in the country in which the
product is purchased. A product that requires modifications or adoption to enable it to operate in any
other country than the country for which it was designed, manufactured, approved and/or authorized, or
repair of products damaged by these modifications is not covered under this warranty.
THE WARRANTY PROVIDED HEREIN SHALL BE THE SOLE AND EXCLUSIVE WARRANTY. THERE
SHALL BE NO OTHER WARRANTIES EXPRESS OR IMPLIED INCLUDING ANY IMPLIED WARRANTY OF
MERCHANTABILITY OR FITNESS OR ANY OTHER OBLIGATION ON THE PART OF THE COMPANY WITH
RESPECT TO PRODUCTS COVERED BY THIS WARRANTY. SI PRODUCTS SHALL HAVE NO LIABILITY FOR
ANY INCIDENTAL, CONSEQUENTIAL OR SPECIAL DAMAGES. IN NO EVENT SHALL THIS WARRANTY
REQUIRE MORE THAN THE REPAIR OR REPLACEMENT OF ANY PART OR PARTS WHICH ARE FOUND TO BE
DEFECTIVE WITHIN THE EFFECTIVE PERIOD OF THE WARRANTY.
NO REFUNDS WILL BE GIVEN. IF REPLACEMENT PARTS FOR DEFECTIVE MATERIALS ARE NOT AVAILABLE,
SI PRODUCTS RESERVES THE RIGHT TO MAKE PRODUCT SUBSTITUTIONS IN LIEU OF REPAIR OR
REPLACEMENT.
This warranty does not extend to the purchase of opened, used, repaired, repackaged and/or resealed
products, including but not limited to sale of such products on Internet auction sites and/or sales of such
products by surplus or bulk resellers. Any and all warranties or guarantees shall immediately cease and
terminate as to any products or parts thereof which are repaired, replaced, altered, or modified, without
the prior express and written consent of HMDX Audio.
This warranty provides you with specific legal rights. You may have additional rights which may vary from
state to state. Because of individual regulations, some of the above limitations and exclusions may not
apply to you. For more information regarding our product line in the USA,
please visit: www.hmdxaudio.com
M
A
o
e
m
k
e
a
T
e
s
a
e
l
P
Register
Your Product At:
www.hmdxaudio.com
Your valuable input regarding this
product will help us create
the products you will
want in the future.
n
t
N
GEO
Sound System
o
w
©2011 HMDX Audio, all rights reserved. HMDX Audio® is a registered trademark of
HMDX Audio and its affiliated companies.
IB-HXS112
El manual en español empieza
a la página 13
Instruction Manual and
Warranty Information
HX-S112
Page 2
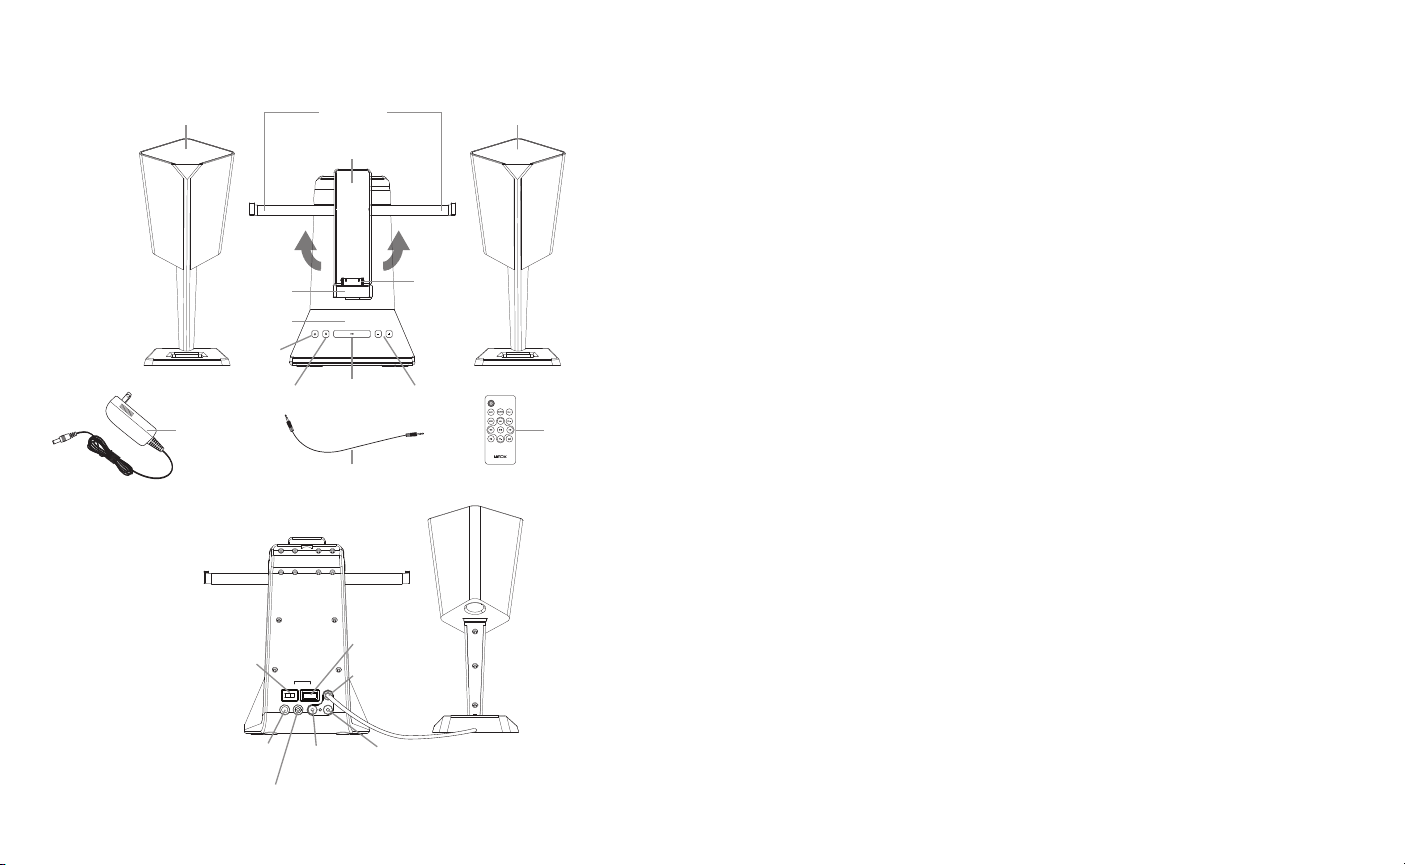
Docking Speaker Buttons and Parts:
USB to SyncPCUNIT
VIDEO OUTAUX IN5V DC IN L-OUT
R-OUT
iPad Support
Brackets
Swivel
Play/PauseSource Volume +/–
3.5mm Cord
USB Port to Sync
Right Speaker
USB to SyncPCUNIT
R-OUT
VIDEO OUTAUX IN5V DC IN L-OUT
Video Out
Left Speaker
Jack
(Fig. 1)
Left Speaker Right Speaker
Front Edge
Base
Power
AC Adaptor Remote Control
(Fig. 2)
Unit/PC
Switch
DC 5V In
Jack
Aux In
Jack
Output
Output
Dock
GEO: The ultimate shelf system that transform your iPad into a personal home theater experience
Thank you for purchasing the HMDX Geo Sound System for iPad, iPhone and iPod. This product, along with
the entire HMDX Electronics lineup, connects high-tech innovation with design to provide you with years of
dependability and enjoyment.
Geo Dock Main Features
• Charges, syncs and plays the iPad, iPhone and iPod
• Swivel design for viewing in portrait or landscape mode
• Superior speaker quality with integrated bass ports for enhanced bass
• Video-out capability for sending your movies and videos form the Apple device to your TV
• Remote Control
Remote Control Battery
The battery is already installed. Simply pull tab out to activate battery power. To replace remote battery, open the
battery door by pressing the two tabs together. Remove the old battery and replace with a CR2025 size battery.
Battery Precautions
• Use only the size and type of batteries specified.
• When installing batteries, observe proper +/- polarities. Incorrect installation of battery may cause damage to
the unit.
• Do not mix different types of batteries together (e.g., alkaline with carbon-zinc or old batteries with new ones).
• If the unit is not going to be used for a long period of time, remove batteries to prevent damage due to
possible battery leakage.
• Do not dispose of batteries in fire. Batteries may explode or leak.
This product contains small parts that may present a choking hazard for young children.
Getting Started
Unpack the unit carefully. Remove all the accessories from the carton. Do not remove any labels or stickers on
the bottom of the unit or adaptor. Before setting up the unit, verify that the following accessories
are present:
• Instruction manual x 1
• AC power adaptor x 1
• Base unit x1
• Speakers x 2 (1 left, 1 right)
• Remote control x 1
• 3.5mm audio cable x 1
• Locking cover
Power source / Connecting the Speakers to the Base (Fig. 2)
This unit is supplied with an AC adaptor; take the following steps to connect the adaptor.
1. Unwind the power cord of the AC adaptor to its full length.
2. Connect the AC adaptor to the DC jack on the back of the unit.
3. Plug the AC adaptor to an outlet (110v – 240v AC. 60 Hz). Connecting this system to any other power source
may cause damage to the system.
4. To switch the unit off completely, withdraw the AC adaptor from the wall outlet.
This unit is equipped with two speakers that connect to the base unit. The plug on the left speaker wire is colorcoded WHITE and the plug for the right speaker wire is color-coded RED; take the following steps to properly
connect the speakers.
32
Page 3

1. Connect the left speaker wire to the jack the back of the base labeled L-OUT. The L-OUT jack is also color
(Figure 4) (Figure 4A)
(Figure 3)
1. Before you begin, remove your iPad from
its case or ‘skin’.
2. Swing SUPPORT BRACKETS upward.
3. Gently dock your iPad into the DOCK,
gripping the FRONT EDGE, so that the pin
connector in the dock is fully connected to
the pin socket on the bottom of your iPad.
4. Depending on iPad model, you may need to lift support brackets
upward until they secure against iPad.
Support Brackets
Front Edge
Dock
(Figure 5)
(Figure 5A)
1. Before you begin, remove your iPad from
its case or ‘skin’.
2. Swing SUPPORT BRACKETS upward.
3. Gently dock your iPad into the DOCK,
gripping the FRONT EDGE, so that the pin
connector in the dock is fully connected to
the pin socket on the bottom of your iPad.
4. Depending on iPad model, you may need to lift support brackets
upward until they secure against iPad.
Support Brackets
Front Edge
Dock
Front Edge
Base
1. Grip FRONT EDGE of dock & BASE, carefully rotate iPad 90° until
you reach either landscape or portrait position.
NOTE: After rotation, be sure pin connector is firmly connected
to the pin socket on the bottom of your iPad.
2. Tilt to adjust for desired viewing angle.
coded WHITE to match the left speaker wire plug.
2. Connect the right speaker wire to the jack the back of the base labeled R-OUT. The R-OUT jack is also color
coded RED to match the right speaker wire plug.
3. Use the locking cover to secure wires
Volume Control
To adjust the volume, press the “+” and “-” buttons on the front of the base or the VOL+ and VOL- on the remote
control.
iPad/iPhone/iPod Operation
iPad Support Brackets
PLEASE NOTE: The Geo is equipped with a swivel dock, which allows you to dock your iPad in
either portrait or landscape. In order to properly support the iPad (in either orientation) swing the
support brackets out from behind the swivel dock so they are perpendicular with the swivel dock.
Once your iPad is docked, the support brackets will help to keep the iPad
in place. See below instructions on docking, rotating, and undocking your iPad.
Please Note:
To avoid damage, do not force the device onto the docking pin
WARNING: The dock connector is designed for Apple iPad, iPhone, and iPod devices. Attempting
to attach a non-iPad/iPhone/iPod music player will damage or destroy your device and/or the
product.
Docking your iPad
(Figure 3)
(Figure 4) (Figure 4A)
Rotating iPad to Landscape or Portrait
(Figure 5)
Front Edge
Base
1. Grip FRONT EDGE of dock & BASE, carefully rotate iPad 90° until
you reach either landscape or portrait position.
NOTE: After rotation, be sure pin connector is firmly connected
to the pin socket on the bottom of your iPad.
Undocking your iPad
(Figure 6)
Remote Control
(Figure 5A)
2. Tilt to adjust for desired viewing angle.
(Fig. 7)
Power
Mute Volume Up
Menu Volume Down
Play/Pause
Previous Track Next Track
Shuffle Album/Playlist Repeat Song/Album/Playlist
Source
Menu +
Menu –
Dock
1. Before you begin, remove your iPad from
its case or ‘skin’.
2. Swing SUPPORT BRACKETS upward.
3. Gently dock your iPad into the DOCK,
gripping the FRONT EDGE, so that the pin
connector in the dock is fully connected to
the pin socket on the bottom of your iPad.
Support Brackets
Front Edge
Front Edge
1. If needed, carefully rotate iPad to Portrait position.
4. Depending on iPad model, you may need to lift support brackets
upward until they secure against iPad.
2. Grip FRONT EDGE of dock & top of iPad, pull upward gently to
undock your iPad from pin connector.
4 5
Page 4

Listening to Music from your iPad/iPhone/iPod
1. Make sure the adaptor is plugged in and press the POWER button, located on front of the base unit or on the
remote control to turn the unit and speakers ON.
2. Be sure the UNIT/PC switch is turned to UNIT. the apple device will not charge if the UNIT/PC switch is on PC
and syncing cord (not included) is connected to the Unit and to the PC.
3. Fit the iPad carefully on to the docking pin
4. Press the SOURCE button on the base unit or on the remote control to select Dock Mode. The indicator light
above the SOURCE button(s) will be OFF when Dock Mode is selected.
5. Press the PLAY button on the base unit, the device or the remote control to play and again to PAUSE.
6. To skip forward and backward through tracks, press the FORWARD and REVERSE buttons on the device or
the remote control.
7. Press the REPEAT button on the remote control to repeat songs, albums and playlists.
8. Press the SHUFFLE button on the remote control to shuffle songs with in albums or playlists.
9. To turn the unit OFF, press the POWER button on the base or on the remote control. Note: For your
convenience, your device will continue charging on the dock while the unit is plugged in, even if the power is
turned off.
Watching movies & videos from your iPad/iPhone/iPod touch
1. Press the POWER button, located on front of the base unit or on the remote control to turn the unit and
speakers ON.
2. Be sure the UNIT/PC switch is turned to UNIT. the apple device will not charge if the UNIT/PC switch is on PC
and syncing cord (not included) is connected to the Unit and to the PC.
3. Fit the iPad carefully on to the docking pin
4. Press the SOURCE button on the base unit or on the remote control to select Dock Mode. the indicator light
above the SOURCE button(s) will be OFF when Dock Mode is selected.
5. Select the desired video or movie on the device and press play.
6. Connect a standard AV cable (not included) to the back of the unit and connect the other end to the external
video source (TV, projector, etc.)
7. Hold the PLAY button on the unit or on the remote control down for five seconds.
• If playing from the iPad, the video will stop playing on your device and will return to the opening screen of
the video. Press play on the iPad screen and the video will be sent to the external video source.
• If playing from the iPhone or iPod touch, the video will stop playing on your device and will return to the
main movie/video list on your device. Press the desired video again from the list on your iPhone/iPod touch
and the video will be sent to the external video source.
8. To return your movie or video back to your iPad/iPhone/iPod, just press and hold the PLAY/PAUSE button for
five seconds. The screen of your device will then show the movie/video homescreen.
9. Press PLAY on the iPad, or for iPhone/iPod, select the video from the video list and the video will stop playing
on the external video source and will resume play on your device.
Syncing your Apple device while docked
PLEASE NOTE: The USB port on the back of the base is ONLY intended for syncing an Apple
device while it’s docked on this product and is NOT intended to play or charge external or nondocking devices.
Syncing your Apple device while docked:
1. Make sure the adaptor is plugged in and press the POWER button, located on front of the base unit or on the
remote control to turn the unit ON.
2. Flip the UNIT/PC switch to PC. your device will not sync if the switch is on UNIT. If you are in UNIT mode
and need to sync, you must undock your device, flip the switch to PC and then re-dock the device to begin
syncing.
3. Fit iPad/iPod/iPhone carefully onto the docking pin.
4. Connect the base unit to your computer via the USB port on the back of the base using a USB to USB cord
(not included).
5. Depending on how the device is setup, iTunes will either launch automatically or you will have to manually
launch iTunes in order to “back up” and sync your device.
PLEASE NOTE: When the switch on the back of the base is in “PC” mode for syncing, the iPhone
or iPod will charge, but the iPad will NOT.
Charging your Apple device
This product will charge the iPad, iPhone or iPod whether the product is turned ON or OFF as long as the
product is plugged in and the UNIT/PC switch on the back of the base is in the UNIT position prior to docking the
device.
To charge the Apple device while the product is turned OFF:
1. Be sure the UNIT/PC switch on the back of the base is in the “UNIT” position.
2. Simply fit the Apple device carefully onto the docking pin. Once properly connected, the Apple device will
begin charging.
3. To confirm charging, check the charging indicator located in the upper right-hand corner of your device. The
symbol means your device is charging. The symbol means your device is properly docked, but is
fully charged.
To charge your Apple device while the product is ON:
1. Press the Power button to turn the product ON.
2. Use the SOURCE button on the base to select dock mode (check the mode indicator light located on the
front of the base).
3. Be sure the UNIT/PC switch on the back of the base is in the “UNIT” position.
4. Fit the Apple device carefully onto the docking pin. Once properly connected, the Apple device will begin
charging.
5. To confirm charging, check the charging indicator located in the upper right-hand corner of your device. The
symbol means your device is charging. The symbol means your device is properly docked, but is
fully charged.
This equipment has been tested and found to comply with the limits for a Class B digital device, pursuant to Part
15 of the FCC Rules. These limits are designed to provide reasonable protection against harmful interference
in a residential installation. This equipment generates, uses and can radiate radio frequency energy and, if not
installed and used in accordance with the instructions, may cause harmful interference to radio communications.
However, there is no guarantee that interference will not occur in a particular installation. If this equipment does
cause harmful interference to radio or television reception, which can be determined by turning the equipment off
and on, the user is encouraged to try to correct the interference by one or more of the following measures:
• Reorient or relocate the receiving antenna.
• Increase the separation between the equipment and receiver.
• Connect the equipment into an outlet on a circuit different from that to which the receiver is connected.
• Consult the dealer or an experienced radio/TV technician for help.
76
 Loading...