

Page 1
OPERATOR'S MANUAL
MANUEL de L'UTILISATEUR
MANUAL del OPERADOR
TO REDUCE THE RISK OF INJUR Y, USER MUST READ AND UNDERSTAND OPERATOR'S
MANUAL.
AFIN DE RÉDUIRE LE RISQUE DE BLESSURES, L'UTILISA TEUR DOIT LIRE ET BIEN
COMPRENDRE LE MANUEL DE L'UTILISATEUR.
PARA REDUCIR EL RIESGO DE LESIONES, EL USUARIO DEBE LEER Y ENTENDER EL
MANUAL DEL OPERADOR.
Cat. No.
No de Cat.
2101-20
M4™ CORDLESS SCREWDRIVER
TOURNEVIS DE M4™
ATORNILLADORES DE M4™
Documentation Provided By HMC Electronics
33 Springdale Ave. Canton, MA 02021
http://www.hmcelectronics.com
(800) 482-4440
Page 2
2
3
PERSONAL SAFETY
GENERAL POWER TOOL SAFETY WARNINGS
WORK AREA SAFETY
ELECTRICAL SAFETY
• Keep work area clean and well lit. Cluttered or
dark areas invite accidents.
• Do not operate power tools in explosive atmospheres, such as in the presence of f ammable liquids, gases or dust. Power tools create
sparks which may ignite the dust or fumes.
• Keep children and bystanders away while
operating a power tool. Distractions can cause
you to lose control.
• Power tool plugs must match the outlet. Never
modify the plug in any way . Do not use any
adapter plugs with earthed (grounded) power
tools. Unmodifi ed plugs and matching outlets will
reduce risk of electric shock.
• Avoid body contact with earthed or grounded
surfaces such as pipes, radiators, ranges and
refrigerators. There is an increased risk of electric
shock if your body is earthed or grounded.
• Do not expose power tools to rain or wet conditions. Water entering a power tool will increase
the risk of electric shock.
• Do not abuse the cord. Never use the cord for
carrying, pulling or unplugging the power tool.
Keep cord away from heat, oil, sharp edges
or moving parts. Damaged or entangled cords
increase the risk of electric shock.
• When operating a power tool outdoors, use an
extension cord suitable for outdoor use. Use
of a cord suitable for outdoor use reduces the risk
of electric shock.
• If operating a power tool in a damp location
is unavoidable, use a residual current device
(RCD) protected supply. Use of an RCD reduces
the risk of electric shock.
attached to a rotating part of the power tool may
result in personal injury.
• Do not overreach. Keep proper footing and
balance at all times. This enables better control
of the power tool in unexpected situations.
• Dress properly. Do not wear loose clothing or
jewellery. Keep your hair, clothing and gloves
away from moving parts. Loose clothes, jewel-
lery or long hair can be caught in moving parts.
• If devices are provided for the connection of
dust extraction and collection facilities, ensure
these are connected and properly used. Use of
dust collection can reduce dust-related hazards.
WARNING READ ALL SAFETY WARNINGS AND ALL INSTRUCTIONS.
Failure to follow the warnings and instructions may result in electric shock, f re and/or
serious injury. Save all warnings and instructions for future reference.
The term "power tool" in the warnings refers to your mains-operated (corded) power tool or
battery-operated (cordless) power tool.
POWER TOOL USE AND CARE
• Do not force the power tool. Use the correct
power tool for your application. The correct
power tool will do the job better and safer at the
rate for which it was designed.
• Do not use the power tool if the switch does not
turn it on and off. Any power tool that cannot be
controlled with the switch is dangerous and must
be repaired.
• Disconnect the plug from the power source
and/or the battery pack from the power tool
before making any adjustments, changing
accessories, or storing power tools. Such
preventive safety measures reduce the risk of
starting the power tool accidentally.
• Store idle power tools out of the reach of children and do not allow persons unfamiliar with
the power tool or these instructions to operate
the power tool. Power tools are dangerous in the
hands of untrained users.
• Maintain power tools. Check for misalignment
or binding of moving parts, breakage of parts
and any other condition that may affect the
power tool’s operation. If damaged, have the
power tool repaired before use. Many accidents
are caused by poorly maintained power tools.
• Keep cutting tools sharp and clean. Properly
maintained cutting tools with sharp cutting edges
are less likely to bind and are easier to control.
• Use the power tool, accessories and tool bits
etc., in accordance with these instructions,
taking into account the working conditions and
the work to be performed. Use of the power tool
for operations different from those intended could
result in a hazardous situation.
• Stay alert, watch what you are doing and use
common sense when operating a power tool. Do
not use a power tool while you are tired or under
the inf uence of drugs, alcohol or medication. A
moment of inattention while operating power tools
may result in serious personal injury.
• Use personal protective equipment. Always
wear eye protection. Protective equipment such
as dust mask, non-skid safety shoes, hard hat, or
hearing protection used for appropriate conditions
will reduce personal injuries.
• Prevent unintentional starting. Ensure the
switch is in the off-position before connecting
to power source and/or battery pack, picking
up or carrying the tool. Carrying power tools with
your fi nger on the switch or energising power tools
that have the switch on invites accidents.
• Remove any adjusting key or wrench before
turning the power tool on. A wrench or a key left
• Recharge only with the charger speci f ed by
the manufacturer. A charger that is suitable for
one type of battery pack may create a risk of fi re
when used with another battery pack.
• Use power tools only with speci f cally designated battery packs. Use of any other battery
packs may create a risk of injury and fi re.
BATTERY TOOL USE AND CARE
Documentation Provided By HMC Electronics
33 Springdale Ave. Canton, MA 02021
http://www.hmcelectronics.com
(800) 482-4440
Page 3
4
5
Direct Current
Volts
No Load Revolutions per Minute
(RPM)
Underwriters Laboratories, Inc.
United States and Canada
• Hold power tool by insulated gripping surfaces, when performing an operation where the
fastener may contact hidden wiring. Fasteners
contacting a “live” wire may make exposed metal
parts of the power tool “live” and could give the
operator an electric shock.
• Keep hands away from all cutting edges and
moving parts.
• Maintain labels and nameplates. These carry
important information. If unreadable or missing,
contact a MILWAUKEE service facility for a free
replacement.
• WARNING: Some dust created by power sanding,
sawing, grinding, drilling, and other construction
activities contains chemicals known to cause
cancer, birth defects or other reproductive harm.
Some examples of these chemicals are:
• lead from lead-based paint
• crystalline silica from bricks and cement and other
masonry products, and
• arsenic and chromium from chemically-treated
lumber.
Your risk from these exposures varies, depending
on how often you do this type of work. To reduce
your exposure to these chemicals: work in a well
ventilated area, and work with approved safety
equipment, such as those dust masks that are specially designed to fi lter out microscopic particles.
3
1
2
4
6
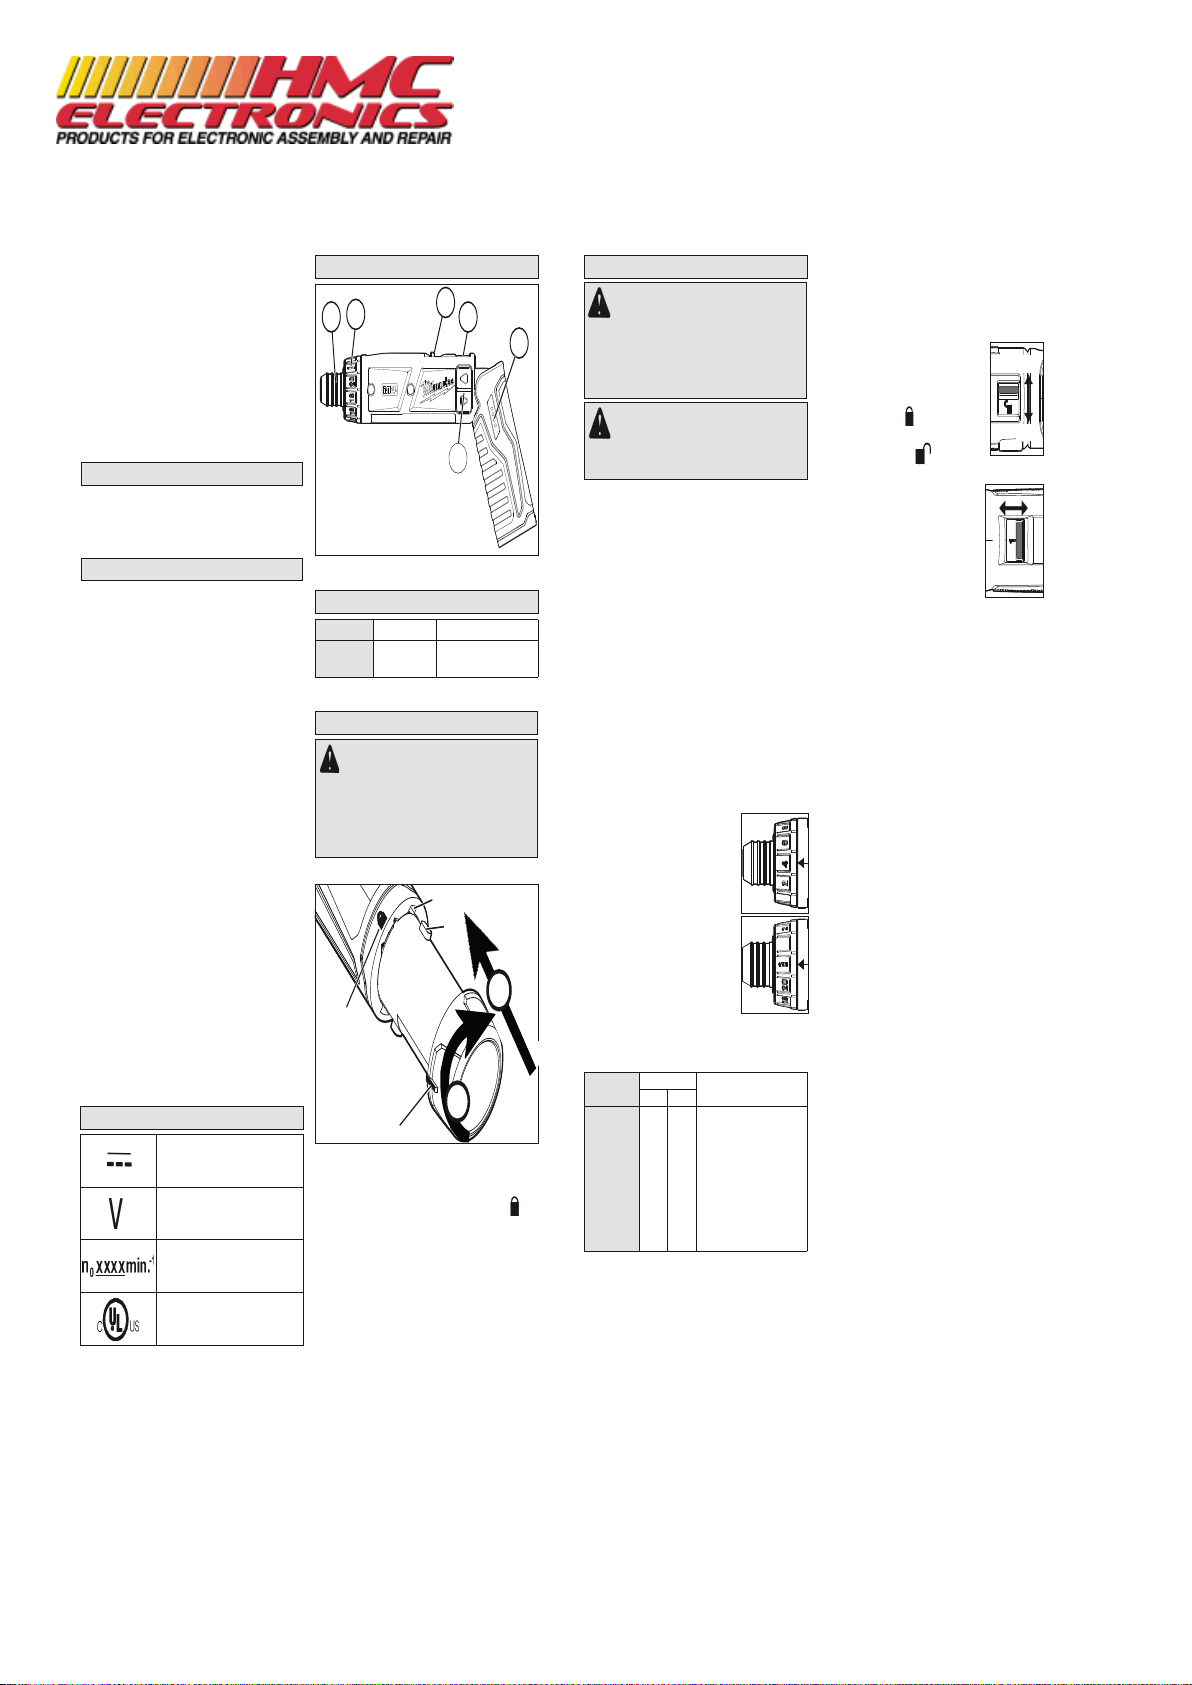
1. Bit holder collar
2. Clutch adjusting ring
3. Speed selector
4. Lock switch
5. Fuel Gauge
6. Forward/reverse switch
5
FUNCTIONAL DESCRIPTION
SYMBOLOGY
SPECIFICATIONS
Cat. No. Volts DC No Load RPM
2101-20 4 Low 200
High 600
SPECIFIC SAFETY RULES
• When battery pack is not in use, keep it away
from other metal objects like paper clips,
coins, keys, nails, screws, or other small metal
objects that can make a connection from one
terminal to another. Shorting the battery termi-
nals together may cause burns or a fi re.
• Under abusive conditions, liquid may be ejected from the battery; avoid contact. If contact
accidentally occurs, f ush with water. If liquid
contacts eyes, additionally seek medical help.
Liquid ejected from the battery may cause irritation
or burns.
SERVICE
• Have your power tool serviced by a quali f ed
repair person using only identical replacement
parts. This will ensure that the safety of the power
tool is maintained.
WARNING Recharge only with
the charger specified for the battery . For
specific charging instructions, read the
operator’s manual supplied with your charger
and battery.
Inserting the Battery into the Tool
1
Slot
Tab
Line
Lock
Line up the tabs on the battery with the slots in the
tool opening. Slide the battery all the way into the
tool. Turn the battery clockwise to lock it in place.
The line on the battery will line up with the
on
the tool. The tool will not run if the battery is not
properly locked into the tool.
Removing the Battery from the Tool
Turn the battery cap counterclockwise to unlock.
Pull the battery out of the tool.
Checking the Fuel Gauge
To determine the amount of charge left in the battery, press the forward/reverse switch. The Fuel
Gauge will light up for 2-3 seconds.
ASSEMBLY
2
WARNING To reduce the risk of injury,
wear safety goggles or glasses with sideshields.
WARNING Always remove battery
pack before changing or removing accessories. Only use accessories specif cally
recommended for this tool. Others may be
hazardous.
Installing Bits
Always remove the battery before inserting or
removing bits. Select the proper style and size bit
for the type of screw you are using.
1. To install the bit, pull out the collar. Press the bit
into the socket until the collar snaps back and
the bit is locked into place.
2. To remove the bit, pull out the collar, then pull
out the bit.
NOTE: It is not necessary to hold the collar out
when installing and removing bits.
Adjusting the Handle
The handle is designed for convenience and control. The durable, center pivot allows the handle to
be used in the conventional shape or folded into a
pistol grip. Access to the forward/reverse switch and
lock switch is comfortable in either handle position.
Using the Adjustable Clutch
This tool has an adjustable clutch
for driving different types of screws
into different materials. When properly adjusted, the clutch will slip at
a preset torque to prevent driving
the screw too deep and to prevent
damage to the screw or tool.
To adjust the clutch, turn the clutch
adjusting ring so that the desired
setting (1-21) lines up with the arrow
on the motor housing, as shown.
The torque specifications shown here are approximate values obtained with a fully charged
battery pack.
Using the Lock Switch
When the battery is installed, the tool is in operating condition. The lock switch prevents accidental
starting by locking the forward/reverse switch. Always set the lock switch to “lock” before performing
maintenance, changing accessories,
storing the tool and any time the tool
is not in use.
1. To lock , push the lock switch to
display the lock
symbol.
2. To unlock, push the lock switch to
display the unlock symbol.
Selecting High or Low Speed
1. For low speed and more torque,
push the speed selector back ("1"
is displayed).
2. For high speed and less torque,
push the speed selector forward
("2" is displayed).
Selecting Forward or Reverse
Press and hold the top of the switch ◄ for forward
rotation, and the bottom of the switch ► for reverse
rotation. The switch will automatically return to the
center OFF position when it is released.
Automatic Shut-Off
To prevent extra driving force after the selected
torque has been reached, the tool will automatically
shut off if the clutch slips. At higher clutch settings,
this feature may not immediately engage. Release
the switch to reset the automatic shut-off.
Cold Weather Operation
MILWAUKEE Lithium-Ion battery packs are designed to operate in temperatures below freezing.
When the battery pack is too cold, it may need to
warm up before normal use. Put the battery on a
tool and use the tool in a light application. It may
“buzz” for a short time until it warms up. When the
buzzing stops, use the tool normally.
Unlock
Lock
OPERATION
Clutch
Setting
(in lbs)
Applications
Lo Hi
1
4
7
10
13
16
19
3.7
6.5
9.3
12.8
16.4
20.0
23.4
3.7
6.5
9.3
11.2
N/A
N/A
N/A
Small screws in softwood.
Medium screws in soft-
wood or small screws in
hardwood.
Large screws in softwoods. Medium screws in
hardwood or large screws
in hardwood with pilot
hole.
Drilling
Driving
HI LO
* When set to high speed, set the clutch at 10 or below.
The Automatic Shut-Off may not work at higher clutch
settings (see "Automatic Shut-Off").
NOTE: Because the settings shown in the table are
only a guide, use a piece of scrap material to test
the different clutch settings before driving screws
into the workpiece.
Documentation Provided By HMC Electronics
33 Springdale Ave. Canton, MA 02021
http://www.hmcelectronics.com
(800) 482-4440
Page 4
6
7
APPLICATIONS
WARNING To reduce the risk of elec-
tric shock, check work area for hidden pipes
and wires before drilling or driving screws.
This tool provides a quick, convenient means of
drilling small holes and installing and removing
screws. Because of the many screw sizes, types,
thread engagements and materials available, it is
diffi cult to limit the application of this tool by screw
size. However, for applications in wood, a #6 wood
screw with a full pilot hole is recommended as a
practical limit.
Drilling in Wood, Composition Materials and
Plastic
Always use sharp bits. When using twist drill bits,
pull the bit out of the hole frequently to clear chips
from the bit fl utes. To reduce the chance of splinter-
ing, back work with a piece of scrap wood. Select
low speeds for plastics with a low melting point.
Driving Screws
Drill a pilot hole when driving screws into thick or
hard materials. Set the clutch adjusting ring to the
proper position and set the speed to low. Use the
proper style and size screwdriver bit for the type
of screw you are using.
With the screwdriver bit in the screw, place the tip
of the screw on the workpiece and apply fi rm pres-
sure before pressing the foward/reverse switch up.
Screws can be removed by pressing the foward/
reverse switch down.
Locking the Screwdriver Bit
When the forward/reverse switch is off, the screwdriver bit automatically locks in place allowing you
to use the screwdriver manually. Do this to tighten
screws that require more torque than the driver is
capable of delivering, when confi rming the tight-
ness of a screw or when loosening an extremely
tight screw.
ACCESSORIES
For a complete listing of accessories refer to your
MILWAUKEE Electric Tool catalog or go online
to www.milwaukeetool.com. To obtain a catalog,
contact your local distributor or service center.
WARNING Always remove battery pack
before changing or removing accessories.
Only use accessories specif cally recommended for this tool. Others may be hazardous.
Maintaining Tool
Keep your tool, battery pack and charger in good
repair by adopting a regular maintenance program.
After six months to one year, depending on use,
return the tool, battery pack and charger to A
MILWAUKEE service facility for:
• Lubrication
• Mechanical inspection and cleaning (gears, spindles, bearings, housing, etc.)
• Electrical inspection (battery pack, charger,
motor)
• Testing to assure proper mechanical and electrical
operation
If the tool does not start or operate at full power
with a fully charged battery pack, clean the contacts
on the battery pack. If the tool still does not work
properly, return the tool, charger and battery pack,
to a MILWAUKEE service facility for repairs.
MAINTENANCE
Cleaning
Clean dust and debris from charger and tool vents.
Keep tool handles clean, dry and free of oil or
grease. Use only mild soap and a damp cloth to
clean the tool, battery pack and charger since certain
cleaning agents and solvents are harmful to plastics
and other insulated parts. Some of these include
gasoline, turpentine, lacquer thinner, paint thinner,
chlorinated cleaning solvents, ammonia and household detergents containing ammonia. Never use
fl ammable or combustible solvents around tools.
Repairs
For repairs, return the tool, battery pack and
charger to the nearest service center.
WARNING To reduce the risk of per-
sonal injury and damage, never immerse your
tool, battery pack or charger in liquid or allow
a liquid to f ow inside them.
WARNING To reduce the risk of injury,
always unplug the charger and remove the
battery pack from the charger or tool before
performing any maintenance. Never disassemble the tool, battery pack or charger .
Contact a MILWAUKEE service facility for
ALL repairs.
TECHTRONIC INDUSTRIES' warranty is for 5 year since the original purchase date.
This warranty card covers any defect in material and workmanship on this Power Tool.
To make this warranty valid, present this warranty card, sealed/stamped by the distributor or store where you purchased the product, to the Authorized Service Center (ASC). Or, if this card has not been sealed/stamped, present the
original proof of purchase to the ASC.
Call toll-free 1 800 832 1949 to fi nd the nearest ASC, for service, parts, accessories or components.
Procedure to make this warranty valid
Take the product to the ASC, along with the warranty card sealed/stamped by the distributor or store where you purchased the product, and there any faulty piece or component will be replaced without cost for you. We will cover all
freight costs relative with this warranty process.
Exceptions
This warranty is not valid in the following situations:
a) When the product is used in a different manners from the end-user guide or instruction manual.
b) When the conditions of use are not normal.
c) When the product was modifi ed or repaired by people not authorized by TECHTRONIC INDUSTRIES.
Note: If cord set is damaged, it should be replaced by an Authorized Service Center to avoid electric risks.
SERVICE AND ATTENTION CENTER
Av Presidente Mazarik 29 Piso 7, 11570 Chapultepec Morales
Miguel Hidalgo, Distrito Federal, Mexico
Ph. 52 55 4160-3547
IMPORTED AND COMMERCIALIZED BY:
TECHTRONIC INDUSTRIES MEXICO, .S.A. DE C.V.
Av Presidente Mazarik 29 Piso 7, 11570 Chapultepec Morales
Miguel Hidalgo, Distrito Federal, Mexico
LIMITED WARRANTY - USA AND CANADA
LIMITED WARRANTY - MEXICO, CENTRAL AMERICA AND CARIBBEAN
Model:
Date of Purchase:
Distributor or Store Stamp:
Every MILWAUKEE power tool (including cordless product – tool, battery pack(s) - see separate & distinct
CORDLESS BATTERY PACK LIMITED WARRANTY statements & battery charger and Work Lights*) is warranted to the original purchaser only to be free from defects in material and workmanship. Subject to certain
exceptions, MILWAUKEE will repair or replace any part on an electric power tool which, after examination, is
determined by MILWAUKEE to be defective in material or workmanship for a period of fi ve (5) years* after the
date of purchase unless otherwise noted. Return of the power tool to a MILWAUKEE factory Service Center
location or MILWAUKEE Authorized Service Station, freight prepaid and insured, is required. A copy of the
proof of purchase should be included with the return product. This warranty does not apply to damage that
MILWAUKEE determines to be from repairs made or attempted by anyone other than MILWAUKEE authorized
personnel, misuse, alterations, abuse, normal wear and tear, lack of maintenance, or accidents.
*The warranty period for, Job Site Radios, M12™ Power Port, M18™ Power Source, and Trade Titan™ Industrial Work Carts is one (1) year from the date of purchase. The warranty period for a LED Work Light and LED
Upgrade Bulb is a limited LIFETIME warranty to the original purchaser only, if during normal use the LED bulb
fails the Work Light or Upgrade Bulb will be replaced free of charge.
*This warranty does not cover Air Nailers & Stapler, Airless Paint Sprayer, Cordless Battery Packs, Gasoline
Driven Portable Power Generators, Hand Tools, Hoist – Electric, Lever & Hand Chain, M12™ Heated Jackets,
Reconditioned product and Test & Measurement products. There are separate and distinct warranties available for these products.
Warranty Registration is not necessary to obtain the applicable warranty on a MILWAUKEE power tool product.
The manufacturing date of the product will be used to determine the warranty period if no proof of purchase is
provided at the time warranty service is requested.
ACCEPTANCE OF THE EXCLUSIVE REPAIR AND REPLACEMENT REMEDIES DESCRIBED HEREIN IS A
CONDITION OF THE CONTRACT FOR THE PURCHASE OF EVERY MILWAUKEE PRODUCT. IF YOU DO NOT
AGREE TO THIS CONDITION, YOU SHOULD NOT PURCHASE THE PRODUCT. IN NO EVENT SHALL MIL-
WAUKEE BE LIABLE FOR ANY INCIDENTAL, SPECIAL, CONSEQUENTIAL OR PUNITIVE DAMAGES, OR FOR
ANY COSTS, ATTORNEY FEES, EXPENSES, LOSSES OR DELAYS ALLEGED TO BE AS A CONSEQUENCE
OF ANY DAMAGE TO, FAILURE OF, OR DEFECT IN ANY PRODUCT INCLUDING, BUT NOT LIMITED TO, ANY
CLAIMS FOR LOSS OF PROFITS. SOME STATES DO NOT ALLOW THE EXCLUSION OR LIMITATION OF INCIDENTAL OR CONSEQUENTIAL DAMAGES, SO THE ABOVE LIMITATION OR EXCLUSION MAY NOT APPLY
TO YOU. THIS WARRANTY IS EXCLUSIVE AND IN LIEU OF ALL OTHER EXPRESS WARRANTIES, WRITTEN
OR ORAL. TO THE EXTENT PERMITTED BY LAW, MILWAUKEE DISCLAIMS ANY IMPLIED WARRANTIES,
INCLUDING WITHOUT LIMITATION ANY IMPLIED WARRANTY OF MERCHANTABILITY OR FITNESS FOR A
PARTICULAR USE OR PURPOSE; TO THE EXTENT SUCH DISCLAIMER IS NOT PERMITTED BY LAW, SUCH
IMPLIED WARRANTIES ARE LIMITED TO THE DURATION OF THE APPLICABLE EXPRESS WARRANTY AS
DESCRIBED ABOVE. SOME STATES DO NOT ALLOW LIMITATIONS ON HOW LONG AN IMPLIED WARRANTY
LASTS, SO THE ABOVE LIMITATION MAY NOT APPLY TO YOU, THIS WARRANTY GIVES YOU SPECIFIC
LEGAL RIGHTS, AND YOU MAY ALSO HAVE OTHER RIGHTS WHICH VARY FROM STATE TO STATE.
This warranty applies to product sold in the U.S.A. and Canada only.
Please consult the ‘Service Center Search’ in the Parts & Service section of MILWAUKEE’s website www.mil-
waukeetool.com or call 1.800.SAWDUST (1.800.729.3878) to locate your nearest service facility for warranty
and non-warranty service on a Milwaukee electric power tool.
Documentation Provided By HMC Electronics
33 Springdale Ave. Canton, MA 02021
http://www.hmcelectronics.com
(800) 482-4440
Page 5

8
9
RÈGLES DE SÉCURITÉ GÉNÉRALES RELATIVES AUX
OUTILS ÉLECTRIQUES
AVERTISSEMENT LIRE TOUTES LES RÈGLES ET INSTRUCTIONS DE SÉCURITÉ.
Ne pas suivre l’ensemble des règles et instructions peut entraîner une électrocution, un
incendie ou des blessures graves. Conserver les règles et les instructions à des f ns
de référence ultérieure. Le terme «outil électrique» f gurant dans les avertissements ci-
dessous renvoie à l’outil électrique à alimentation par le réseau (à cordon) ou par batterie (sans f l).
• Maintenir la zone de travail propre et bien
éclairée. Les zones encombrées ou mal éclairées
sont favorables aux accidents.
• Ne pas utiliser d’outil électrique dans une atmosphère explosive, telle qu’en en présence
de liquides, de gaz ou de poussières in f ammables. Les outils électriques génèrent des
étincelles qui peuvent enfl ammer les poussières
ou les fumées.
• Tenir les enfants et les personnes non autorisées à l’écart pendant le fonctionnement
d’un outil électrique. Un manque d’attention de
l’opérateur risque de lui faire perdre le contrôle de
l’outil.
• La f che de l’outil électrique doit correspondre
à la prise d’alimentation. Ne jamais modif er la
f che d’une manière quelconque. Ne pas utiliser d’adaptateur avec les outils électriques mis
à la terre (à la masse). Des fi ches non modifi ées
et des prises d’alimentation assorties réduisent le
risque de choc électrique.
• Éviter tout contact corporel avec des surfaces
reliées à la masse ou à la terre telles que
tuyaux, radiateurs, cuisinières et réfrigérateurs. Un risque de choc électrique plus élevé
existe si le corps est relié à la masse ou à la terre.
• Ne pas exposer les outils électriques à la pluie ou
à l’humidité. Le risque de choc électrique augmente
si de l’eau s’infi ltre dans un outil électrique.
• Prendre soin du cordon. Ne jamais utiliser le
cordon pour transporter, tirer ou débrancher
l’outil électrique. Tenir le cordon à l’écart de la
chaleur, des huiles, des arêtes coupantes ou
des pièces en mouvement. Un cordon endom-
magé ou emmêlé présente un risque accru de
choc électrique.
• Se procurer un cordon d’alimentation approprié en cas d’utilisation d’un outil électrique à
l’extérieur. L’utilisation d’un cordon d’alimentation
pour usage extérieur réduit le risque de choc
électrique.
• S’il est nécessaire d’utiliser l’outil électrique
dans un endroit humide, installer un appareil
à courant résiduel (RCD). L’utilisation d’un RCD
réduit le risque de décharge électrique.
• Porter l’équipement de protection requis.
Toujours porter une protection oculaire. Selon
les conditions, porter aussi un masque antipoussières, des bottes de sécurité antidérapantes,
un casque protecteur ou une protection auditive
afi n de réduire les blessures.
• Empêcher les démarrages accidentels.
S’assurer que la gâchette est en position
d’arrêt avant de brancher l’outil à une source
de courant, d’insérer la batterie, de le ramasser
ou de le transporter . Le fait de transporter
l’outil en gardant le doigt sur la gâchette ou de le
brancher lorsque la gâchette est en position de
marche favorise les accidents.
• Retirer toute clé de réglage avant de mettre
l’outil sous tension. Une clé laissée attachée sur
une pièce mobile de l’outil électrique peut entraîner
des blessures.
• Ne pas travailler à bout de bras. Bien garder
un bon équilibre à tout instant. Ceci permet de
mieux préserver la maîtrise de l’outil électrique
dans des situations imprévues.
• Porter des vêtements adéquats. Ne pas porter
de vêtements amples ni de bijoux. Ne pas approcher les cheveux, vêtements et gants des
pièces en mouvement. Les vêtements amples,
les bijoux ou les cheveux longs risquent d’être
happés par les pièces en mouvement.
• Si des dispositifs sont prévus pour l’extraction
et la récupération des poussières, vérifier
qu’ils sont connectés et utilisés correctement.
L’utilisation de ces dispositifs peut réduire les
risques liés aux poussières.
SÉCURITÉ INDIVIDUELLE
SÉCURITÉ ÉLECTRIQUE
SÉCURITÉ DU LIEU DE TRAVAIL
UTILISATION ET ENTRETIEN
DE L’OUTIL ÉLECTRIQUE
• Ne pas forcer l’outil électrique. Utiliser l’outil
électrique approprié à l’application considérée.
L’outil électrique adapté au projet considéré produira de meilleurs résultats, dans des conditions
de sécurité meilleures, à la vitesse pour laquelle
il a été conçu.
• Ne pas utiliser l’outil électrique si le commutateur ne le met pas sous ou hors tension. Tout
outil électrique dont le commutateur de marchearrêt est inopérant est dangereux et doit être
réparé.
• Débrancher la f che de la prise d’alimentation
et/ou la batterie de l’outil électrique avant
d’effectuer des réglages, de changer
d’accessoires ou de ranger l’outil. De telles
mesures de sécurité préventive réduisent le risque
de mettre l’outil en marche accidentellement.
• Ranger les outils électriques inutilisés hors
de la portée des enfants et ne pas laisser des
personnes qui connaissent mal les outils électriques ou ces instructions utiliser ces outils. Les
• Être sur ses gardes, être attentif et faire preuve
de bon sens en utilisant un outil électrique. Ne
pas utiliser un outil électrique en cas de fatigue
ou sous l’in f uence de drogues, d’alcool ou
de médicaments. Un instant d’inattention lors
de l’utilisation d’un outil électrique peut entraîner
des blessures graves.
• Entretenez les étiquettes et marques du fabricant. Les indications qu'elles contiennent sont
précieuses. Si elles deviennent illisibles ou se
détachent, faites-les remplacer gratuitement à un
centre de service MILWAUKEE accrédité.
• AVERTISSEMENT La poussière dégagée par
perçage, sciage et autres travaux de construction
contient des substances chimiques reconnues
comme pouvant causer le cancer, des malformations congénitales ou d’autres troubles de
reproduction. Voici quelques exemples de telles
substances :
• Le plomb contenu dans la peinture au plomb.
• Le silice cristallin contenu dans la brique, le béton
et divers produits de maçonnerie.
• L’arsenic et le chrome servant au traitement
chimique du bois.
Les risques associés à l’exposition à ces substanc-
es varient, dépendant de la fréquence des travaux.
Afi n de minimiser l’exposition à ces substances
chimiques, assurez-vous de travailler dans un
endroit bien aéré et d’utiliser de l’equipement
de sécurité tel un masque antipoussière spécifi quement conçu pour la fi ltration de particules
microscopiques.
• Lorsque l’outil électrique est utilisé pour
un travail risquant de mettre le dispositif de
f xation en contact avec des f ls électriques
cachés, tenez l’outil par les surfaces de
prise isolées. Le contact d’un dispositif de
fi xation avec un fi l sous tension « électrifi e » les
pièces métalliques exposées de l’outil et peut
électrocuter l’utilisateur.
• Tenez les mains à l’écart des arêtes tranchantes et des pièces en mouvement.
PICTOGRAPHIE
1. Mandrin porte-forets
2. Anneau de rélage de
l'accouplement
3. Sélecteur de régime
4. Verrou de rotation
5. Indicateur de niveau d’énergie
6. Inverseur de rotation
DESCRIPTION FONCTIONNELLE
SPÉCIFICATIONS
RÈGLES DE SÉCURITÉ
SPÉCIFIQUES
outils électriques sont dangereux dans les mains
d’utilisateurs non formés à leur usage.
• Entretien des outils électriques. S’assurer de
l’absence de tout désalignement ou de grippage des pièces mobiles, de toute rupture de
pièce ou de toute autre condition qui pourrait affecter le bon fonctionnement de l’outil
électrique. En cas de dommages, faire réparer
l’outil avant de l’utiliser de nouveau. Les outils
électriques mal entretenus sont à la source de
nombreux accidents.
• Garder les outils de coupe affûtés et propres.
Les outils de coupe correctement entretenus et
bien affûtés risquent moins de se gripper et sont
plus faciles à manier.
• Utiliser l’outil électrique, les accessoires, les
grains etc. conformément à ces instructions
en tenant compte des conditions de travail
et de la tâche à effectuer . L’utilisation de cet
outil électrique pour effectuer une opération pour
laquelle il n’est pas conçu peut occasionner une
situation dangereuse.
• Ne recharger la batterie qu’avec le chargeur
spécif é par le fabricant. Un chargeur qui convient
à un type de batterie peut créer un risque d’incendie
s’il est utilisé avec un autre type de batterie.
• N’utiliser les outils électriques qu’avec les
batteries spécialement conçues pour eux.
L’utilisation de batteries d’autres marques peut
créer un risque de blessure et d’incendie.
• Lorsque la batterie est hors service, la ranger
à l’écart d’autres objets métalliques tels que
trombones, pièces de monnaie, clés, clous, vis
et autres petits objets métalliques qui peuvent
établir une connexion d’une borne à l’autre.
Un court-circuit aux bornes de la batterie peut
provoquer des brûlures ou un incendie.
• Du liquide peut être éjecté de la batterie en cas
de manutention abusive ; éviter tout contact.
En cas de contact accidentel avec les projections, rincer à l’eau. En cas de contact avec
les yeux, consulter un médecin. Le liquide
s’échappant de la batterie peut provoquer des
irritations ou des brûlures.
ENTRETIEN
• Faire effectuer l’entretien de l’outil électrique
par un technicien quali f é qui n’utilisera que
des pièces de rechange identiques. La sécurité
d’utilisation de l’outil en sera préservée.
UTILISATION ET ENTRETIEN
DE LA BATTERIE
Tension CD seul
Volts
No Load Revolutions per Minute
(RPM)
Underwriters Laboratories, Inc.
United States and Canada
No. de Cat. Volts CD Tr/min. à vide
2101-20 4 Bas 200
Haut 600
3
1
2
4
6
5
Documentation Provided By HMC Electronics
33 Springdale Ave. Canton, MA 02021
http://www.hmcelectronics.com
(800) 482-4440
Page 6

10
11
AVERTISSEMENT Ne recharger la
batterie qu’avec le chargeur spéci f é. Pour
les instructions de charge spécif ques, lire le
manuel d’utilisation fourni avec le char-geur
et les batteries.
AVERTISSEMENT Il faut tou-
joursretirer la batterie et verrouiller la détente
de l’outil avant de changer ou d’enlever les accessoires. L’emploi d’accessoires autres que
ceux qui sont expressément recommandés
pour cet outil peut comporter des risques.
AVERTISSEMENT Pour minimiser
les risques de blessures, portez des lunettes
à coques latérales.
Insertion de la batterie dans l’outil
Fente
Verrouillage
Alignez les onglets de la batterie avec les fentes
de l’ouverture de l’outil. Glisser la batterie jusqu’au
fond de l’outil. Tourner la batterie dans le sens des
aiguilles d’une montre pour la verrouiller en place.
La ligne sur la batterie s’alignera avec le
de
l’outil. L’outil ne fonctionnera pas si la batterie n’est
pas correctement verrouillée dans l’outil.
Retrait de la batterie de l’outil
Tourner l’extrémité de la batterie dans le sens
inverse des aiguilles d’une montre pour la déverrouiller. Retirer la batterie de l’outil.
Vérif cation de l’indicateur de niveau
d’énergie
Pour déterminer le niveau d’énergie charge restant
de la batterie, appuyer sur l’inverseur du sens de
rotation. L’indicateur de niveau d’énergie s’allumera
de 2 à 3 secondes.
l’accouplement se déclenchera à
un couple préréglé pour empêcher
l’enfoncement trop profond de
la vis dans le matériau et éviter
d’endommager la vis ou l’outil.
Pour régler l’accouplement,
tournez l’anneau de réglage
d’accouplement pour aligner la
position de réglage choisie (1-21)
sur la marque imprimée sur le boîtier du moteur, tel qu’indiqué.
Les spécifi cations de couple sus-
mentionnées sont approximatives
et basées sur une batterie à pleine charge.
MONTAGE DE L’OUTIL
MANIEMENT
1
Alignement
2
Languette
Enfonçage
Perçage
Installation des pièces
Retirez toujours la batterie de l’outil avant d’insérer
ou de retirer les pièces ou les forets. Choisissez le
calibre de pièce tournevis qui convient au calibre
de vis que vous employez
1. Pour installer la mèche, retirer le mandrin. En-
foncer la mèche ou le foret dans la douille jusqu’à
ce que le collier et la mèche soient verrouillés en
place.
2. Pour retirer la mèche ou le foret, retirer le collier,
puis la mèche ou le foret.
NOTE : Il n’est pas nécessaire de maintenir le
collier hors de l’outil pour installer ou retirer des
mèches/forets.
Réglage de la poignée
Le design de la poignée en assure la commodité
et la maîtrise. Son axe durable permet d’employer
l’outil dans sa forme originale ou en pliant la poignée en forme de pistolet. L’accès à l’inverseur et
au verrou de rotation est facile aux deux positions.
Utilisation de l’accouplement réglable
Cet outil est pourvu d’un accouplement ré
glable
pour enfoncer différents calibres de vis dans différents matériaux. Lorsqu’il est correctement réglé,
* Quand l’ensemble à la grande vitesse, a placé
l’embrayage à 10 ou ci-dessous. L’interruption
automatique peut ne pas fonctionner à des arrangements plus élevés d’embrayage (voir “Mise
à l’arrêt automatique”).
N.B. Les réglages indiqués au tableau étant approximatifs, il est conseillé de tester différents
réglages sur un morceau de matériau de rebut
avant de commencer à enfoncer les vis dans le
matériau à ouvrer.
Réglage de
l’accoupement
(N•m)
Applications
Basse Haute
1
4
7
10
13
16
19
0.4
0.7
1.0
1.4
1.9
2.3
2.6
0.4
0.7
1.0
1.3
- -*
- -*
- -*
Petites vis dans le
bois mou.
Vis moyennes dans
le bois mou ou petites
vis dans le bois dur.
Grosses vis dans le
bois mou. Vis moyennes dans le bois
durou grosses vis
dans le bois dur avec
trou-guide.
Usage du verrou de rotation
Lorsque la batterie est dans l’outil, celui-ci est prêt
à fonctionner. Le verrou de rotation prévient les
démarrages accidentels en bloquant l’inverseur de
rotation. Placez toujours le verrou de rotation à la
position marquée «LOCK» avant de faire l’entretien
de l’outil, d’en changer les accessoires ou de le
ranger lorsqu’il ne sert pas.
1. Pour verrouiller, appuyez sur
l’interrupteur de verrouillage pour
affi cher le symbole de verrouillage
.
2. Pour déverrouiller, appuyez sur
l’interrupteur de verrouillage pour
affi cher le symbole de déverrouil-
lage .
Choix du régime de vitesse
1. Pour choisir un régime bas et un
couple élevé, pousser le sélecteur
de vitesse vers l’arrière pour affi cher « 1 ».
2. Pour choisir un régime bas et un
couple bas, pousser le sélecteur de vitesse vers
l’arrière pour affi cher « 2 ».
Inversion de la rotation
Appuyez et maintenir enfoncé le haut de
l’interrupteur ◄ pour une rotation normale, et le
bas de l’interrupteur ► pour une rotation inverse.
L’interrupteur retournera automatiquement à la
position centrale éteinte lorsque relâché.
Mise à l’arrêt automatique
Une fois que l’outil a été selectionné, pour éviter
l’entraînement d’une force supplémentaire, l’outil
s’arrêtera automatiquement en cas de glissement de l’accouplement. Cette fonction ne
s’enclenche pas immédiatement sur des réglages
d’accouplement plus élevés. Relâcher la commande pour rétablir la mise à l’arrêt automatique.
Fonctionnement par temps froid
Le bloc de batteries au lithium-ion de MILWAUKEE
sont conçus pour fonctionner à des températures
infé-rieures au point de congélation. Lorsque le
bloc des batteries est très froid, mettre le bloc
des batteries sur l’outil et utiliser celui-ci pour une
utilisation légère. Une alarme sonore peut se faire
entendre pendant un court instant jusqu’à ce qu’il
se réchauffe. Lorsque l’alarme s’arrête, utiliser
l’outil normalement.
AVERTISSEMENT Pour minimiser
les risques d’explosion, choc électrique
et dommages à la propriété, inspectez toujours l’aire de travail pour y déceler les f ls
électriques ou les tuyaux avant d’entreprendre
le forage.
APPLICATIONS
Cet outil fournit un moyen rapide et pratique pour
le perçage de petits trous ainsi que pour le vissage
et le dévissage des vis. Étant donné la grande
variété de calibres, de fi le tages et de formes des
vis et de la nature des matériauz disponibles, il est
diffi cile de déterminer les limites d'application de
cet outil selon le seul calibre des vis. Cependant,
pour les applications dans le bois, une vis à bois
numéro 6 amorcée dans un trou-guide parait une
limite raisonnable.
Perçage du bois, des matériaux synthétiques
et du plastique
Utilisez toujours des forets ou des mèches bien affûtés. Lorsque vous utilisez des forets hélicoïdaux,
retirez-les fréquemment du trou pour enlever les
copeaux des goujures. Afi n de réduire les risques
d’éclatement, appuyez la pièce sur un morceau
de bois de rebut. Sélectionnez des vitesses lentes
pour le perçage de matières plastiques qui ont un
point de fusion assez bas.
Enfonçage de vis
Percez un trou pilote lorsque vous enfoncez des
vis dans des matériaux épais ou durs. Réglez le
anneau de rélage de l'accouplement à la position
correcte et à une vitesse lente. Utilisez le bon type
et la bonne taille d’embout de tournevis pour le
type de vis utilisé.
Avec la mèche de tournevis dans la vis, placer
l’extrémité de la vis sur la pièce de travail et appuyer fermement avant de presser l’inverseur du
sens de rotation vers le haut. Les vis peuvent être
retirées en appuyant l’inverseur du sens de rotation vers le bas.
Verrouillage de la rotation
Lorsque l'inverseur de rotation est à la position
marqée « OFF » la rotation est à du moteur est
effective ment bloquée et le tournevis peut être
utilisé manuellement. Cette caractéristique est
commode pour serrer les vis dont le serrage exige
un couple supérier à celui que l'outil peut fournir,
pour raffermir le serrage des vis et pour dévisser
les vis extrêmement serrées.
Déverrouiller
Verrouiller
Basse Haute
Documentation Provided By HMC Electronics
33 Springdale Ave. Canton, MA 02021
http://www.hmcelectronics.com
(800) 482-4440
Page 7

12
13
Entretien de l’outil
Gardez l’outil, la batterie et le chargeur en bon
état en adoptant un programme d’entretien
ponctuel. Après une période de six mois à un an,
selon l’utilisation, renvoyez l’outil, la batterie et le
chargeur à un centre de service MILWAUKEE ac-
crédité pour les services suivants:
• Lubrifi cation
• Inspection et nettoyage de la mécanique (engrenages, pivots, coussinets, boîtier etc.)
• Inspection électrique (batterie, chargeur, moteur)
• Vérifi cation du fonctionnement électromécanique
Si l’outil ne démarre pas ou ne fonctionne pas à
pleine puissance alors qu’il est branché sur une
batterie complètement chargée, nettoyez les points
de contact entre la batterie et l’outil. Si l’outil ne
fonctionne toujours pas correctement, renvoyez
l’outil, le chargeur et la batterie à un centre de service MILWAUKEE accrédité, afi nqu’on en effectue
la réparation (voir “Réparations”).
Nettoyage
Débarrassez les évents du chargeur et de l’outil
des débris et de la poussière. Gardez les poignées
de l’outil propres, à sec et exemptes d’huile ou de
graisse. Le nettoyage de l’outil, du chargeur et de
la batterie doit se faire avec un linge humide et un
savon doux. Certains nettoyants tels l’essence, la
térébenthine, lesdiluants à laque ou à peinture, les
solvants chlorés, l’ammoniaque et les détergents
d’usage domestique qui en contiennent pourraient
détériorer le plastique et l’isolation des pièces. Ne
laissez jamais de solvants infl ammables ou com-
bustibles auprès de l’outil.
Réparations
Pour les réparations, retournez outil, batterie et
chargeur en entier au centre-service le plus près.
ENTRETIEN
AVERTISSEMENT Pour minimiser
les risques de blessures corporelles, débranchez le chargeur et retirez la batterie
du chargeur ou de l’outil avant d’y effectuer
des travaux d’entretien. Ne démontez jamais
l’outil, la batterie ou le chargeur . Pour toute
réparation, consultez un centre de service
MILWAUKEE accrédité.
AVERTISSEMENT Pour minimiser
les risques de blessures ou de dommages à
l'outil, n'immergez jamais l'outil, la batterie
ou le chargeur et ne laissez pas de liquide
s'y inf ltrer.
ACCESOIRES
AVERTISSEMENT Retirez toujours
la batterie avant de changer ou d’enlever les
accessoires. L’utilisation d’autres accessoires que ceux qui sont spécifiquement
recommandés pour cet outil peut comporter
des risques.
Pour une liste complète des accessoires, prière de
se reporter au catalogue MILWAUKEE Electric Tool
ou visiter le site internet www.milwaukeetool.com.
Pour obtenir un catalogue, il suffi t de contacter votre
distributeur local ou l'un des centres-service.
GARANTIE LIMITÉE - AUX ÉTATS-UNIS ET AU CANADA
TECHTRONIC INDUSTRIES' garantit le produit pendant cinq ans à partir de la date d’achat d’origine. Le présent bon
de garantie couvre tous les vices de matériau et de fabrication que peut affi cher cet outil électrique. Pour assurer la
validité de la présente garantie, veuillez présenter le bon de commande, estampillé du sceau du distributeur ou du
magasin où le produit a été acheté, au centre de réparations agréé. Si le bon de commande n’a pas été estampillé,
veuillez fournir la preuve d’achat d’origine au centre de réparations agréé. Pour un entretien, des pièces, des accessoires ou d’autres composants, composer sans frais le 1-800-832-1949 afi n d’obtenir les coordonnées du centre de
réparations agréé le plus près.
Procédure pour assurer la validité de la garantie
Présenter le produit au centre de réparations agréé, accompagné du bon de commande estampillé du sceau du
distributeur ou du magasin où le produit a été acheté. Toute pièce défectueuse ou tout composant défectueux sera
remplacé sans frais. Milwaukee assume tous les frais de transport liés à ce processus de garantie.
Exceptions
La garantie ne s’applique pas dans les situations suivantes :
a) Si le produit a été utilisé pour une fi n autre que celle indiquée dans le guide de l’utilisateur fi nal ou le manuel d’instructions.
b) Si les conditions d’utilisations ne sont pas habituelles.
c) Si le produit a été modifi é ou réparé par une personne non autorisée par TECHTRONIC INDUSTRIES.
Note : Si le cordon électrique est endommagé, il doit être remplacé par un centre de réparations agréé pour éviter les
risques d’électrocution.
CENTRE DE RÉPARATIONS ET DE SERVICE
Av Presidente Mazarik 29 Piso 7, 11570 Chapultepec Morales
Miguel Hidalgo, Distrito Federal, Mexico
Ph. 52 55 4160-3547
IMPORTÉ ET COMMERCIALISÉ PAR :
TECHTRONIC INDUSTRIES MEXICO, .S.A. DE C.V.
Av Presidente Mazarik 29 Piso 7, 11570 Chapultepec Morales
Miguel Hidalgo, Distrito Federal, Mexico
GARANTIE LIMITÉE – MEXIQUE, AMÉRIQUE CENTRALE ET CARAÏBES
Modèle :
Date d’achat :
Sceau du distributeur ou du magasin :
Chaque outil électrique MILWAUKEE (y compris les produits sans fi l [outils, piles, chargeur de piles, lampe de travail];
consulter les énoncés de la GARANTIE LIMITÉE DES BLOCS-PILES SANS FIL) est garanti à l’acheteur d’origine
être exempt de vice de matériau et de fabrication. Sous réserve de certaines exceptions, MILWAUKEE réparera ou
remplacera toute pièce d’un outil électrique qui, après examen par MILWAUKEE, s’est avérée être affectée d’un vice de
matériau ou de fabrication pendant une période de cinq (5) ans* après la date d’achat, sauf indication contraire. Retourner
l’outil électrique, à un centre de réparations en usine MILWAUKEE ou à un poste d’entretien agréé MILWAUKEE, en
port prépayé et assuré. Une copie de la preuve d’achat doit être présentée au moment de retourner le produit. Cette
garantie ne couvre pas les dommages que MILWAUKEE détermine être causés par des réparations ou des tentatives
de réparation par quiconque autre que le personnel agréé par MILWAUKEE, des utilisations incorrectes, des altérations, des utilisations abusives, une usure normale, une carence d’entretien ou des accidents.
*La période de garantie applicable pour les radios de chantier, le port d’alimentation M12™, Source d'énergie M18™,
et les chariots de travail industriels Trade Titan™ est d’une durée d’un (1) an à partir de la date d’achat. La période de
la garantie couvrant la lampe de travail à DÉL et l’ampoule améliorée à DÉL est une garantie À VIE limitée à l’acheteur
d’origine seulement; si, lors d’une utilisation normale, l’ampoule à DÉL présente une défectuosité, la lampe de travail
et l’ampoule seront remplacées sans frais.
*Cette garantie ne s’applique pas aux cloueuses-agrafeuses pneumatiques, aux pulvérisateurs à peinture sans air,
aux blocs piles pour outils sans fi l, aux génératrices d’alimentation portatives à essence, aux outils à main, aux monte-
charge – électrique, à levier et à chaîne (manuel), aux vestes chauffantes M12™, aux produits réusinés, ni aux produits
d’essai et de mesure. Il existe des garanties distinctes pour ces produits.
L’enregistrement de la garantie n’est pas nécessaire pour bénéfi cier de la garantie en vigueur sur un outil électrique
MILWAUKEE. La date de fabrication du produit servira à établir la période de garantie si aucune preuve d’achat n’est
fournie lorsqu’une demande de service sous garantie est présentée.
L’ACCEPTATION DES RECOURS EXCLUSIFS DE RÉPARATION ET DE REMPLACEMENT DÉCRITS AUX
PRÉSENTES EST UNE CONDITION DU CONTRAT D’ACHAT DE TOUT PRODUIT MILWAUKEE. SI VOUS
N’ACCEPTEZ PAS CETTE CONDITION, VOUS NE DEVEZ PAS ACHETER LE PRODUIT. EN AUCUN CAS
MILWAUKEE NE SAURAIT ÊTRE RESPONSABLE DE TOUT DOMMAGE ACCESSOIRE, SPÉCIAL OU INDIRECT,
DE DOMMAGES-INTÉRÊTS PUNITIFS OU DE TOUTE DÉPENSE, D’HONORAIRES D’AVOCATS, DE FRAIS, DE
PERTE OU DE DÉLAIS ACCESSOIRES À TOUT DOMMAGE, DÉFAILLANCE OU DÉFAUT DE TOUT PRODUIT,
Y COMPRIS NOTAMMENT LES PERTES DE PROFIT. CERTAINS ÉTATS ET PROVINCES NE PERMETTANT
PAS L’EXCLUSION OU LA LIMITATION DES DOMMAGES DIRECTS OU INDIRECTS, LES RESTRICTIONS CIDESSUS PEUVENT NE PAS ÊTRE APPLICABLES. CETTE GARANTIE EST EXCLUSIVE ET REMPLACE TOUTE
AUTRE GARANTIE EXPRESSE, QU’ELLE SOIT ORALE OU ÉCRITE. DANS LA MESURE PERMISE PAR LA LOI.
MILWAUKEE RENONCE À TOUTE GARANTIE IMPLICITE, Y COMPRIS, SANS S’Y LIMITER, TOUTE GARANTIE
IMPLICITE DE QUALITÉ MARCHANDE OU D’ADAPTATION À UNE UTILISATION OU À UNE FIN PARTICULIÈRE.
DANS LA MESURE OÙ UNE TELLE STIPULATION D’EXONÉRATION N’EST PAS PERMISE PAR LA LOI, LA DURÉE
DE CES GARANTIES IMPLICITES EST LIMITÉE À LA PÉRIODE APPLICABLE DE LA GARANTIE EXPRESSE, TEL
QUE DÉCRIT PRÉCÉDEMMENT. CERTAINS ÉTATS ET PROVINCES NE PERMETTANT PAS DE LIMITATION DE
DURÉE DES GARANTIES IMPLICITES, LES RESTRICTIONS CI DESSUS PEUVENT NE PAS ÊTRE APPLICABLES.
LA PRÉSENTE CONFÈRE À L’UTILISATEUR DES DROITS LÉGAUX PARTICULIERS; IL BÉNÉFICIE ÉGALEMENT
D’AUTRES DROITS QUI VARIENT D’UN ÉTAT À L’AUTRE.
Cette garantie s’applique aux produits vendus aux États-Unis et au Canada uniquement.
Veuillez consulter la rubrique Centre SAV MILWAUKEE, dans la section Pièces & Service du site Web de MILWAUKEE,
à l’adresse www.milwaukeetool.com, ou composer le 1-800-SAWDUST (1-800-729-3878) afi n de trouver le centre de
réparations en usine MILWAUKEE le plus près.
Documentation Provided By HMC Electronics
33 Springdale Ave. Canton, MA 02021
http://www.hmcelectronics.com
(800) 482-4440
Page 8

14
15
SEGURIDAD EN EL ÁREA
DE TRABAJO
SEGURIDAD ELÉCTRICA
ADVERTENCIAS DE SEGURIDAD GENERALES PARA LA
HERRAMIENTA ELÉCTRICA
• Mantenga limpia y bien iluminada el área de
trabajo. Las áreas desordenadas u oscuras con-
tribuyen a que se produzcan accidentes.
• No utilice herramientas eléctricas en atmósferas explosivas, como en la presencia de
líquidos, gases o polvo in f amables. Las her-
ramientas eléctricas crean chispas que pueden
incendiar el polvo o las emanaciones.
• Mantenga a los niños y otras personas alejadas
mientras utiliza una herramienta eléctrica. Las
distracciones pueden hacerle perder el control.
• Los enchufes de las herramientas eléctricas
deben ser del mismo tipo que el tomacorrientes. Nunca realice ningún tipo de
modif cación en el enchufe. No use enchufes
adaptadores con herramientas eléctricas
con conexión a tierra. Se reducirá el riesgo de
descarga eléctrica si no se modifi can los enchufes
y los tomacorrientes son del mismo tipo.
• Evite el contacto corporal con superf cies con
conexión a tierra, como tuberías, radiadores,
estufas y refrigeradores. El riesgo de descarga
eléctrica aumenta si su cuerpo está conectado a
tierra.
• No exponga la herramientas eléctricas a la
lluvia o a condiciones de humedad. El agua
que entra en una herramienta eléctrica aumenta
el riesgo de descarga eléctrica.
• No abuse del cable. Nunca use el cable para
transportar la herramienta eléctrica, tirar de
ella o desenchufarla. Mantenga el cable alejado
del calor, los bordes a f lados o las piezas en
movimiento. Los cables dañados o enmarañados
aumentan el riesgo de descarga eléctrica.
• Cuando se utiliza una herramienta eléctrica
en el exterior , use una extensión que sea
apropiada para uso en el exterior. El uso de un
cable apropiado para el exterior reduce el riesgo
de descarga eléctrica.
• Si debe operar una herramienta eléctrica en
un lugar húmedo, utilice un suministro protegido por un dispositivo de corriente residual
(RCD). Usar un RCD reduce el riesgo de que se
produzcan descargas eléctricas.
nas. Despistarse un minuto cuando se utiliza una
herramienta eléctrica puede tener como resultado
lesiones personales graves.
• Use un equipo de protección personal. Lleve
siempre protección ocular . Llevar un equipo
de protección apropiado para la situación, como
una máscara antipolvo, zapatos de seguridad
antideslizantes, un casco o protección auditiva,
reducirá las lesiones personales.
• Evite el encendido accidental. Asegúrese
de que el interruptor esté en la posición de
apagado antes de conectarlo a la toma de
alimentación o a la batería, al levantar o mover
la herramienta. Mover herramientas con el dedo
en el interruptor o enchufarlas con el interruptor
en la posición de encendido contribuye a que se
produzcan accidentes.
• Quite todas las llaves de ajuste antes de
encender la herramienta. Una llave que esté
acoplada a una pieza giratoria de la herramienta
puede provocar lesiones personales.
• No se estire demasiado. Mantenga los pies
bien asentados y el equilibrio en todo momento. Esto permite tener mejor control de la
herramienta eléctrica en situaciones inesperadas.
• Vístase de manera apropiada. No lleve ropa
suelta ni joyas. Mantenga el cabello, la ropa y
los guantes lejos de la piezas en movimiento.
La ropa fl oja, las joyas o el cabello largo pueden
quedar atrapados en las piezas en movimiento.
• Si se proporcionan dispositivos para la conexión de sistemas de recolección y extracción de
polvo, asegúrese de que estén conectados y
se usen apropiadamente. El uso de estos dis-
positivos puede reducir los peligros relacionados
con el polvo.
SEGURIDAD PERSONAL
ADVERTENCIA LEA TODAS LAS ADVERTENCIAS E INSTRUCCIONES DE
SEGURIDAD. Si no sigue todas las advertencias e instrucciones, se pueden provocar
una descarga eléctrica, un incendio o lesiones graves.
Guarde todas las advertencias e instrucciones para consultarlas en el futuro.
El término “herramienta eléctrica” en todas las advertencias incluidas más abajo se re f ere a su
herramienta operada por conexión (cable) a la red eléctrica o por medio de una batería (inalámbrica).
USO Y CUIDADO DE LAS
HERRAMIENTAS ELÉCTRICAS
• No fuerce la herramienta eléctrica. Use la herramienta eléctrica correcta para la aplicación.
La herramienta eléctrica correcta funcionará mejor
y de manera más segura a la velocidad para la
que se diseñó.
• No use la herramienta eléctrica si el interruptor
no la enciende ni la apaga. Cualquier herrami-
enta eléctrica que no se pueda controlar con el
interruptor es peligrosa y se debe reparar.
• Desconecte el enchufe de la toma de alimentación y/o la batería de la herramienta eléctrica
antes de realizar cualquier ajuste, cambiar
accesorios o almacenar las herramientas eléctricas. Dichas medidas preventivas de seguridad
reducen el riesgo de que la herramienta se prenda
accidentalmente.
• Manténgase alerta, ponga cuidado a lo que
está haciendo y use el sentido común cuando
utilice una herramienta eléctrica. No use una
herramienta eléctrica cuando está cansado o
bajo la inf uencia de drogas, alcohol o medici-
• Sostenga la herramienta eléctrica de las su-
perf cies de sujeción aisladas al llevar a cabo
una operación en la que el tornillo pueda hacer
contacto con cableado oculto. El contacto de los
tornillos con un cable que conduzca electricidad
puede hacer que las partes metálicas de la herramienta se electrifi quen y podría ocasionar una
descarga eléctrica al operador.
• Mantenga las manos alejadas de todos los
bordes cortadores y partes en movimiento.
• Guarde las etiquetas y placas de especi f caciones. Estas tienen información importante.
Si son ilegibles o si no se pueden encontrar,
póngase en contacto con un centro de servicio
de MILWAUKEE para una refacción gratis.
• ADVERTENCIA Algunas partículas de polvo
resultantes del lijado mecánico, aserrado, esmerilado, taladrado y otras actividades relacionadas
a la construcción, contienen sustancias químicas
que se saben ocasionan cáncer, defectos congénitos u otros daños al aparato reproductivo. A
continuación se citan algunos ejemplos de tales
sustancias químicas:
• plomo proveniente de pinturas con base de plomo
• sílice cristalino proveniente de ladrillos, cemento
y otros productos de albañilería y
• arsénico y cromo provenientes de madera
químicamente tratada.
El riesgo que usted sufre debido a la exposición
varía dependiendo de la frecuencia con la que
usted realiza estas tareas. Para reducir la exposición a estas sustancias químicas: trabaje
en un área bien ventilada, y utilice equipo de
seguridad aprobado como, por ejemplo, máscaras
contra el polvo que hayan sido específi camente
diseñadas para fi ltrar partículas microscópicas.
1. Collar de soporte
para punta
2. Anillo ajustador del embrague
3. Selector de velocidad
4. Interruptor de seguridad
5. Indicador de carga
6. Interruptor de acción y reversa
DESCRIPCION FUNCIONAL
USO Y CUIDADO DE LAS
HERRAMIENTAS CON BATERÍA
MANTENIMIENTO
REGLAS ESPECIFICAS
DE SEGURIDAD
• Almacene las herramientas eléctricas fuera
del alcance de los niños y no permita que
personas no familiarizadas con ellas o estas
instrucciones las utilicen. Las herramientas
eléctricas son peligrosas en las manos de usuarios
no capacitados.
• Mantenimiento de las herramientas eléctricas. Revise que no haya piezas móviles
que estén desalineadas o que se atasquen,
piezas rotas ni ninguna otra condición
que pueda afectar el funcionamiento de
la herramienta eléctrica. Si se encuentran
daños, haga que le reparen la herramienta
antes de usarla. Las herramientas mal man-
tenidas son la causa de muchos accidentes.
• Mantenga las herramientas de corte limpias
y af ladas. Es menos probable que se atasquen
las herramientas de corte con fi los afi lados que
se mantienen de manera apropiada y también son
más fáciles de controlar.
• Use la herramienta eléctrica, los accesorios,
las brocas, etc. siguiendo estas instrucciones,
teniendo en cuenta las condiciones de trabajo
y la tarea que se va a realizar. El uso de la her-
ramienta eléctrica para operaciones diferentes de
aquellas para las que se diseñó podría originar
una situación peligrosa.
• Recárguela solamente con el cargador especif cado por el fabricante. Un cargador que
sea apropiado para un tipo de batería puede crear
riesgo de incendio cuando se use con otra batería.
• Use las herramientas eléctricas solamente con
baterías específ camente diseñadas. El uso de
cualquier otro tipo de batería puede crear riesgo
de lesiones o incendio.
• Cuando no se use la batería manténgala
alejada de otros objetos de metal como clips
para papel, monedas, llaves, clavos, tornillos
u otros objetos de metal pequeños que puedan
realizar una conexión entre los bornes. Realizar
un cortacircuito en los terminales de la batería
puede provocar quemaduras o un incendio.
• Bajo condiciones abusivas, puede salir líquido
expulsado de la batería; evitar el contacto. Si
se produce un contacto accidental, lavar con
agua. Si el líquido entra en contacto con los
ojos buscar ayuda médica adicional. El líquido
que sale despedido de la batería puede causar
irritaciones o quemaduras.
• Haga que un técnico calificado realice el
mantenimiento de la herramienta eléctrica utilizando solamente piezas de repuesto idénticas.
Esto asegurará que se mantiene la seguridad de
la herramienta eléctrica.
ESPECIFICACIONES
Cat. No. Volts cd rpm
2101-20 4 Baja 200
Alta 600
3
1
2
4
6
5
Documentation Provided By HMC Electronics
33 Springdale Ave. Canton, MA 02021
http://www.hmcelectronics.com
(800) 482-4440
Page 9

16
17
ADVERTENCIA Recargue la batería
sólo con el cargador especificado para
ella. Para instrucciones especí f cas sobre
cómo cargar, lea el manual del operador
suministrado con su cargador y la batería.
ADVERTENCIA Para reducir el riesgo
de lesiones, trabe siempre el gatillo o
quite la batería antes de cambiar o quitar accesorios. Use solamente acceso rios específ camente recomenda dos para esta herra mienta.
El uso de otros puede resultar peligroso.
ADVERTENCIA Para reducir el riesgo
de lesiones, use siempre lentes de seguridad o anteojos con protectores laterales.
Instalación de las puntas
Quite siempre la batería antes de insertar o retirar
las puntas. Seleccione el tipo y tamaño adecuado
de punta para atornillador, de acuerdo al tipo de
tornillo que usted va a usar.
1. Para instalar la punta, saque el collar. Oprima
la punta en la boquilla hasta que el collar se
contraiga y la punta quede bloqueada en su
lugar.
2. Para quitar la punta, saque el collar y a continu-
ación la punta.
NOTA: No es necesario mantener el collar fuera
al instalar o quitar las puntas.
Ajustando la empuñadura
La empuñadura está diseñada para operar a
convenience y con control. El ddurable pivote
central permite que la empuñadura sea usada en
su forma convencional o doblada para formar una
empuñadura tipo pistola. El acceso al interruptor
de seguridad es muy fácil y cómodo en cualquiera
de las posiciones de la empuñadura.
Uso del embrague ajustable
Esta herramienta tiene un embrague ajustable para
poder atornillar diferentes tipos de tornillos dentro
de diferentes materiales. Cuando
está adecuadamente ajustado, el
embrague se colocará en un torque
predeterminado con el objeto
de prevenir que se atronille muy
profundamente el tornillo asi como
para evitar dañar tanto al tornillo o
a la herramienta.
Para seleccionar la adecuada
posición del embrague (1-21) para
el tipo de material y tornillo que
usted va a usar, refi érase a la tabla
mostrada a la derecha.
Como se inserta la batería en la herramienta
Ranura
Lengüeta
Bloqueo
Alinee las lengüetas de la batería con las ranuras
en la abertura de la herramienta. Deslice la batería
por toda la longitud de la herramienta. Gire la batería en el sentido de las manecillas del reloj para
trabarla en su lugar. La línea de la batería coincidirá
con las
de la herramienta. La herramienta no
funcionará hasta que la batería no esté correctamente trabada en la herramienta.
Como se quita la batería de la herramienta
Gire la tapa de la batería en el sentido contrario a
las manecillas del reloj para destrabar. Extraiga la
batería de la herramienta.
Revisión del indicador de carga
Para determinar la carga restante en la batería,
oprima el interruptor de acción/reversa. El indicador
de carga se encenderá de 2 a 3 segundos.
ENSAMBLAJE
OPERACION
SIMBOLOGÍA
Corriente directa
Voltas
No Load Revolutions per Minute
(RPM)
Underwriters Laboratories, Inc.
United States and Canada
1
Alinear
2
Poder
atornillar
Taladrado
* Cuando el sistema a la velocidad, fi jó el embrague
en 10 o abajo. El cierre automático puede no trabajar en ajustes más altos del embrague (véase
el “Apagado automático”).
NOTA: Dado que los niveles de ajuste mostrados
en el cuadro son solo una referencia, se sugiere
usar un pedazo de material de desperdicio y probar
en él los diferentes ajustes del embrague antes
de proceder a colocar tornillos en el material de
trabajo.
Uso del interruptor de seguridad
Una vez que se ha instalado la batería, la herramienta está en condiciones de operación. El
interruptor de seguridad previene encendidos accidentales ya que bloquea al interruptor de acción
y reversa. Siempre coloque el interruptor de seguridad en posición de “asegurado” (“lock”) antes de
realizar operaciones como: darle mantenimiento,
cambiar accesorios, almacenar la herramienta o en
cualquier otra ocasión en que no se vaya a usar la
herramienta.
1. Para trabar, pulse el interruptor de
la traba para mostrar el símbolo de
trabado
.
2. Para destrabar, pulse el interruptor
de la traba para mostrar el símbolo
de destrabado .
Seleccionando la velocidad alta o baja
1. Para la velocidad baja y mayor
torque, empuje hacia atrás el
selector de velocidad (se muestra
“1”).
2. Para la velocidad alta y menor
torque, empuje hacia adelante el
selector de velocidad (se muestra
“2”).
Selección de acción o reversa
Pulse y sostenga la parte superior del interruptor
◄ para rotación directa, y la parte inferior del
interruptor ► para rotación inversa. Al soltar el
interruptor, este regresará automáticamente a la
posición central de apagado.
Apagado automático
Para evitar una fuerza motora excesiva después
de alcanzar el torque seleccionado, la herramienta
se apagará automáticamente si el embrague
patina. Es posible que esta función no se active
inmediatamente a mayores ajustes del embrague.
Libere el interruptor para restablecer la función de
apagado automático.
Funcionamiento en clima frío
El paquete de batería de iones de litio de
MILWAUKEE están diseñados para funcionar
en temperaturas bajo cero. Cuando el paquete
de batería se encuentre muy fría, colóquela en
una herramienta y utilice ésta en una tarea ligera.
Es posible que “zumbe” por un breve período de
tiempo hasta que se caliente. Una vez que el zumbido cese, utilice la herramienta de manera normal.
Las especifi caciones de torque mostradas en este
cuadro son valores aproximados obtenidos con una
batería con plena carga.
Ajuste del
embrague
(N•m)
Applicaciones
Baja Alta
1
4
7
10
13
16
19
0.4
0.7
1.0
1.4
1.9
2.3
2.6
0.4
0.7
1.0
1.3
- -*
- -*
- -*
Tornillos pequeños en
madera suave.
Tornillos medianos
en madera suave o
tornillos pequeños en
madera dura.
Tornillo largos en
madera suave. Tornillos
medianos en madera
dura o tornillos largos
en madera dura con
perforación piloto.
Sin asegurer
Asegurado
Alta Baja
Documentation Provided By HMC Electronics
33 Springdale Ave. Canton, MA 02021
http://www.hmcelectronics.com
(800) 482-4440
Page 10

18
19
APPLICACIONES
ADVERTENCIA Para reducir el riesgo
de electrocución, antes de taladrar o
colocar tornillos verif que que en el área de
trabajo no hayan tuberías o cables ocultos.
Esta herramienta ofrece un medio rápido y conveniente para perforar agujeros pequeños e instalar
y quitar tornillos. Debido a la gran cantidad de
tipos de tornillos, tamaños, cuerdas y materiales
disponibles, es muy difícil limitar las aplicaciones
de esta herramienta al solamente el tamaño del tornillo. Sin embargo, para aplicaciones en madera, el
límite práctico sería un tornillo para madera #6, con
una perforación piloto o guia previamente realizada.
Taladrado en madera, materiales compuestos
y plásticos
Siempre use brocas afi ladas. Cuando use brocas
helicoidales, tire de la broca hacia fuera del orifi cio
para eliminar las rebabas de las estrías de la broca.
Para reducir la producción de astillas, apoye el
trabajo con una pieza de material de desecho. Se
recomienda seleccionar velocidades lentas para
plásticos con un punto de derretimiento bajo.
Cómo colocar tornillos
Perfore un orifi cio piloto cuando coloque tornillos
en materiales gruesos o duros. Coloque el anillo
ajustador del embrague en la posición correcta y
ajuste la velocidad a “baja”. Use el estilo y tamaño
de destornillador de berbiquí correcto para el tipo
de tornillo que está utilizando.
Con la punta del destornillador colocada en el
tornillo, coloque la punta del tornillo sobre la pieza
de trabajo y aplique presión fi rmemente antes de
mover el interruptor de acción/reversa hacia arriba.
Se puede quitar los tornillos al oprimir el interruptor
de acción/reversa hacia abajo.
Trabando la punta
Cuando el interruptor de acción y reversa está en
posición “OFF”, la punta queda automáticamente
trabada en su lugar, permitiendo usar la herramienta como si fuera un atornillador de mano. Esta
característica es muy práctica para poder apretar
tornillos que requieren mas torque del que la herramienta es capaz de entregar, o para verifi car el
apriete de un tornillo, o para sacar un tornillo que
esté muy apretado.
Mantenimiento de la herramienta
Adopte un programa regular de mantenimiento
y mantenga sus baterías y cargador en buenas
condiciones. Despues de 6 meses a un año,
dependiendo del uso dado, envíe su herramienta, batería y cargador, al Centro de Servicio
MILWAUKEE mas cercano para que le hagan:
• Lubricación
• Inspección mecánica y limpieza (engranes,
fl echas, baleros, carcaza, etc.)
• Inspección eléctrica (batería, cargador, motor)
• Probarla para asegurar una adecuada operación
mecánicay eléctrica
Si la herramienta no arranca u opera a toda su
potencia con una batería completamente cargada,
limpie, con una goma o borrador, los contactos de
la batería y de la herramienta. Si aun asi la herramienta no trabaja correctamente, regrésela, con
el cargador y la batería, a un centro de servicio
MILWAUKEE para que sea reparada.
MANTENIMIENTO
ADVERTENCIA Para reducir el
riesgo de una lesión, desconecte siempre la
herramienta antes de darle cualquier mantenimiento. Nunca desarme la herramienta ni
trate de hacer modi f caciones en el sistema
eléctrico de la misma. Acuda siempre a un
Centro de Servicio MILWAUKEE para TODAS
las reparaciones.
ADVERTENCIA Para reducir el
riesgo de una explosión, no queme nunca
una batería, aun si está dañada, “muerta” o
completamente descargada.
Para una lista completa de accessorios, refi érase
a su catálogo MILWAUKEE Electric Tool o visite
nuestro sitio en Internet: www.milwaukeetool.com.
Para obtener un catálogo, contacte su distribuidor
local o uno de los centros de servicio.
ACCESORIOS
ADVERTENCIA Para reducir el riesgo
de lesiones, siempre extraiga la batería antes de cambiar o retirar accesorios. Utilice
únicamente accesorios específicamente
recomendados para esta herramienta. El
uso de accesorios no recomendados podría
resultar peligroso.
Limpieza
Limpie el polvo y suciedad de las ventilas del cargador y la herramienta. Mantenga los mangos y empuñaduras limpios, secos y libres de aceite o grasa.
Use solo jabón neutro y un trapo húmedo para
limpiar la herramienta, batería y el cargador, ya
que algunos substancias y solventes limpiadores
son dañinos a los plásticos y partes aislantes. Algunos de estos incluyen: gasolina, turpentina,thíner,
lacas, thíner para pinturas, solventes para limpieza
con cloro, amoníaco y detergentes caseros que
tengan amonia. Nunca usa solventes infl amables
o combustibles cerca de una herramienta.
Reparaciones
Si su herramienta, batería o cargador están dañados, envíela al centro de servicio más cercano.
GARANTÍA LIMITADA - E.U.A. Y CANADÁ
TECHTRONIC INDUSTRIES., garantiza por 5 años este producto a partir de la fecha original de compra.
Esta garantía cubre cualquier defecto que presenten las piezas, componentes y la mano de obra contenidas en este
producto Para América Central y el Caribe se debe confi rmar en el Centro de Servicio Autorizado el plazo de la garantía.
Para hacer efectiva la Garantía deberá presentar al Centro de Servicio Autorizado la Póliza de Garantía sellada por
el establecimiento en donde adquirió el producto. Si no la tienen, podrá presentar el comprobante de compra original.
Usted puede llamar sin costo al teléfono 01 800 832 1949 o por correo electrónico a la dirección "servicio@ttigroupna.
com", para ubicar el Centro de Servicio Autorizado más cercano a su domicilio, en el cual además podrá adquirir partes,
componentes, consumibles y accesorios, que usted necesite.
Procedimiento para hacer válida la garantía
Acuda al Centro de Servicio con el producto y la póliza de garantía sellada por el establecimiento donde realizó la compra.
Ahí se reemplazará cualquier pieza o componente defectuoso sin cargo alguno para el usuario fi nal. La empresa se hace re-
sponsable de los gastos de transportación razonablemente erogados que se deriven del cumplimiento de la presente garantía.
Excepciones
La garantía perderá validez en los siguientes casos:
a) Cuando el producto se hubiese utilizado en condiciones distintas a las normales.
b) Cuando el producto no hubiese sido operado de acuerdo con el instructivo de uso que le acompaña.
c) Cuando el producto hubiese sido alterado o reparado por personas no autorizadas por TECHTRONIC INDUSTRIES.
Nota: Si el cordón de alimentación es dañado, este debe ser remplazado por el fabricante o por un Centro de Servicio
Autorizado para evitar riesgo.
CENTRO DE SERVICIO Y ATENCIÓN A CLIENTES
Av Presidente Mazarik 29 Piso 7, 11570 Chapultepec Morales
Miguel Hidalgo, Distrito Federal, Mexico
Tel. 52 55 4160-3547
IMPORTADO Y COMERCIALIZADO POR:
TECHTRONIC INDUSTRIES MEXICO, .S.A. DE C.V
Av Presidente Mazarik 29 Piso 7, 11570 Chapultepec Morales
Miguel Hidalgo, Distrito Federal, Mexico
PÓLIZA DE GARANTÍA - VALIDA SOLO PARA MÉXICO,
AMÉRICA CENTRAL Y EL CARIBE
Modelo:
Fecha de Compra:
Sello del Distribuidor:
Se garantiza al comprador original que ninguna de las herramientas eléctricas MILWAUKEE (incluido el producto inalámbrico,
la herramienta y las baterías; consulte las declaraciones distintas y por separado en GARANTÍA LIMITADA DEL PAQUETE
DE BATERÍAS INALÁMBRICAS y de las luces de trabajo y del cargador de baterías*) presentan defectos en material ni en
mano de obra. En un plazo de cinco (5) años* a partir de la fecha de compra y sujeto a ciertas excepciones, MILWAUKEE
reparará o reemplazará cualquier parte de una herramienta eléctrica que, luego de ser examinada, MILWAUKEE compruebe
que presenta defectos en material o mano de obra, a menos que se indique lo contrario. Se requiere la devolución de la
herramienta eléctrica a un centro de mantenimiento de la fábrica MILWAUKEE o a un centro de reparaciones autorizado por
MILWAUKEE, con gastos de envío prepagados y asegurados. La devolución del producto debe estar acompañada por un
comprobante de compra. Esta garantía no se aplica a los daños que MILWAUKEE establece que fueron ocasionados por
reparaciones o intentos de reparación por parte de personal no autorizado por MILWAUKEE, uso indebido, alteraciones,
abuso, desgaste y deterioro normal, falta de mantenimiento o accidentes.
*El período de garantía de las radios para obras, del puerto de alimentación M12™, Fuente de poder M18™, y de las
carretillas de trabajo industrial Trade Titan™ es de un (1) año a partir de la fecha de compra. El período de garantía de la
lámpara de trabajo con diodo luminiscente y del foco mejorado con diodo luminiscente es una garantía VITALICIA limitada
para el comprador original únicamente. Si durante el uso normal el foco de diodo luminiscente no funciona, la lámpara de
trabajo o el foco mejorado se reemplazará sin carga.
*Esta garantía no cubre las clavadoras aéreas, las engrapadoras, el rociador de pintura inalámbrico, el paquete de baterías
inalámbrico, los generadores eléctricos portátiles que funcionan con gasolina, herramientas manuales, elevadores (eléctricos,
con palanca y con cadenas manuales), camisas de calefacción M12™, productos reacondicionados y productos de prueba
y medición. Se encuentran disponibles garantías distintas para estos productos.
No se necesita registro de garantía para obtener la garantía correspondiente de un producto eléctrico MILWAUKEE. La
fecha de fabricación del producto se utilizará para determinar el período de garantía si no se presenta un comprobante de
compra en el momento en que se solicita el servicio de garantía.
LA ACEPTACIÓN DE LOS DERECHOS A REPARACIÓN Y REEMPLAZO EXCLUSIVAMENTE DESCRITOS EN EL PRESENTE DOCUMENTO CONSTITUYE UNA CONDICIÓN DEL CONTRATO POR LA COMPRA DE CADA PRODUCTO
MILWAUKEE. SI NO ACEPTA ESTA CONDICIÓN, NO DEBE COMPRAR EL PRODUCTO. MILWAUKEE NO SERÁ EN
NINGÚN CASO RESPONSABLE DE DAÑOS INCIDENTALES, ESPECIALES, CONSECUENTES O PUNITIVOS, NI DE
COSTOS, HONORARIOS DE ABOGADOS, GASTOS, PÉRDIDAS O DEMORAS SUPUESTAMENTE CAUSADOS COMO
CONSECUENCIA DE CUALQUIER DAÑO, FALLA O DEFECTO EN CUALQUIER PRODUCTO, INCLUIDOS, A MODO DE
EJEMPLO, RECLAMOS POR PÉRDIDA DE GANANCIAS. ALGUNOS ESTADOS NO PERMITEN LA EXCLUSIÓN O LA
LIMITACIÓN DE DAÑOS INCIDENTALES O CONSECUENTES. POR LO TANTO, LAS LIMITACIONES Y EXCLUSIONES
ANTERIORES PUEDEN NO APLICARSE PARA USTED. ESTA GARANTÍA ES EXCLUSIVA Y SUSTITUYE A TODAS LAS
OTRAS GARANTÍAS EXPRESAS, ESCRITAS U ORALES. SEGÚN LO PERMITA LA LEY, MILWAUKEE SE EXIME DE
TODA GARANTÍA IMPLÍCITA, INCLUIDOS, A MODO DE EJEMPLO, TODA GARANTÍA IMPLÍCITA DE COMERCIABILIDAD
O IDONEIDAD PARA UN USO O PROPÓSITO EN PARTICULAR; EN LA MEDIDA EN QUE DICHA RENUNCIA NO ESTÉ
PERMITIDA POR LA LEY, DICHAS GARANTÍAS IMPLÍCITAS ESTÁN LIMITADAS A LA DURACIÓN DE LA GARANTÍA
EXPRESA APLICABLE SEGÚN SE DESCRIBE ANTERIORMENTE. ALGUNOS ESTADOS NO PERMITEN LIMITACIONES
EN LA DURACIÓN DE UNA GARANTÍA IMPLÍCITA. POR LO TANTO, LA LIMITACIÓN ANTERIOR PUEDE NO APLICARSE
PARA USTED. ESTA GARANTÍA LE OTORGA DERECHOS LEGALES ESPECÍFICOS Y TAMBIÉN PUEDE TENER OTROS
DERECHOS QUE VARÍAN DE ESTADO EN ESTADO.
Esta garantía se aplica a los productos vendidos en los EE. UU. y Canadá.
Consulte ‘Service Center Search’ (Búsqueda de centro de servicio’ en la sección Parts & Services (Piezas y servicios) del
sitio web MILWAUKEE, www.milwaukeetool.com o llame al 1.800.SAWDUST (1.800.729.3878) para encontrar su Centro
de Servicio de la fábrica de MILWAUKEE más cercano.
Documentation Provided By HMC Electronics
33 Springdale Ave. Canton, MA 02021
http://www.hmcelectronics.com
(800) 482-4440
Page 11

UNITED STATES
MILWAUKEE Service
CANADA - Service MILWAUKEE
MILWAUKEE prides itself in producing a premium
quality product that is NOTHING BUT HEAVY DUTY®.
Your satisfaction with our products is very important to us!
If you encounter any problems with the operation
of this tool, or you would like to locate the factory
Service/Sales Support Branch or authorized ser-
vice station nearest you, please call...
1.800.268.4015
Monday – Friday 7:00 – 4:30 CST
fax: 866.285.9049
Milwaukee Electric Tool (Canada) Ltd
140 Fernstaff Court, Unit 4 18129 111 Avenue NW
Vaughan, ON L4K 3L8 Edmonton, AB T5S 2P2
Additionally, we have a nationwide network of
authorized Distributors ready to assist you with your
tool and accessory needs. Call 1.800.268.4015 to
fi nd the names and addresses of the closest retailers or consult “Where to buy” on our Web site
www.milwaukeetool.com
MILWAUKEE est fi er de proposer un produit de
première qualité NOTHING BUT HEAVY DUTY®. Votre
satisfaction est ce qui compte le plus!
En cas de problèmes d’utilisation de l’outil ou pour
localiser le centre de service/ventes ou le centre
d’entretien le plus proche, appelez le...
1.800.268.4015
Lundi – Vendredi 7:00 – 4:30 CST
fax: 866.285.9049
Milwaukee Electric Tool (Canada) Ltd
140 Fernstaff Court, Unit 4 18129 111 Avenue NW
Vaughan, ON L4K 3L8 Edmonton, AB T5S 2P2
Notre réseau national de distributeurs agréés se
tient à votre disposition pour fournir l’aide technique, l’outillage et les accessoires nécessaires.
Composez le 1.800.268.4015 pour obtenir les
noms et adresses des revendeurs les plus proches
ou bien consultez la section «Où acheter» sur notre
site web à l’adresse www.milwaukeetool.com
CENTRO DE ATENCIÓN A CLIENTES
Av Presidente Mazarik 29 Piso 7
11570 Chapultepec Morales
Miguel Hidalgo, Distrito Federal, Mexico
Telefono 52 55 4160-3547
e-mail: servicio@ttigroupna.com
Adicionalmente, tenemos una red nacional de
distribuidores autorizados listos para ayudarle con
su herramienta y sus accesorios. Por favor, llame
al 01 800 832 1949 para obtener los nombres y
direcciones de los más cercanos a usted, o consulte la sección ‘Where to buy’ (Dónde comprar)
de nuestro sitio web en
www.ttigroupmexico.com
MILWAUKEE prides itself in producing a premium
quality product that is NOTHING BUT HEAVY DUTY®.
Your satisfaction with our products is very important to us! If you encounter any problems with the
operation of this tool, or you would like to locate the
factory Service/Sales Support Branch or authorized
service station nearest you, please call...
Additionally, we have a nationwide network of
authorized Distributors ready to assist you with
your tool and accessory needs. Check your “Yellow
Pages” phone directory under “Tools-Electric” for
the names & addresses of those nearest you or see
the 'Where To Buy' section of our website.
1-800-SAWDUST
(1.800.729.3878)
Monday-Friday
7:00 AM - 6:30 PM
Central Time
or visit our website at
www.milwaukeetool.com
For service information, use the 'Service Center
Search' icon found in the 'Parts & Service' section.
Contact our Corporate After Sales Service
Technical Support about ...
•Technical Questions
•Service/Repair Questions
•Warranty
call: 1-800-SAWDUST
fax: 1.800.638.9582
email: metproductsupport@milwaukeetool.com
Register your tool online at
www.milwaukeetool.com and...
• receive important notifi cations regarding
your purchase
• ensure that your tool is protected under the
warranty
• become a HEAVY DUTY club member
MEXICO - Soporte de Servicio MILWAUKEE
Registre su herramienta en línea, en
www.ttigroupmexico.com y...
• reciba importantes avisos sobre su compra
• asegúrese de que su herramienta esté protegida por la garantía
• conviértase en integrante de Heavy Duty
Documentation Provided By HMC Electronics
33 Springdale Ave. Canton, MA 02021
http://www.hmcelectronics.com
(800) 482-4440
 Loading...