

Page 1
Instruction manual
Manuel d'utilisation
Bedienungsanleitug
Handboek
Manual de utilizacion
Manuale d'uso
V26
Steam ironing system
Centrale vapeur
Dampfbügelstation
Stoominstallatie
Central vapor
Centrale Vapore
Page 2
ENGLISH
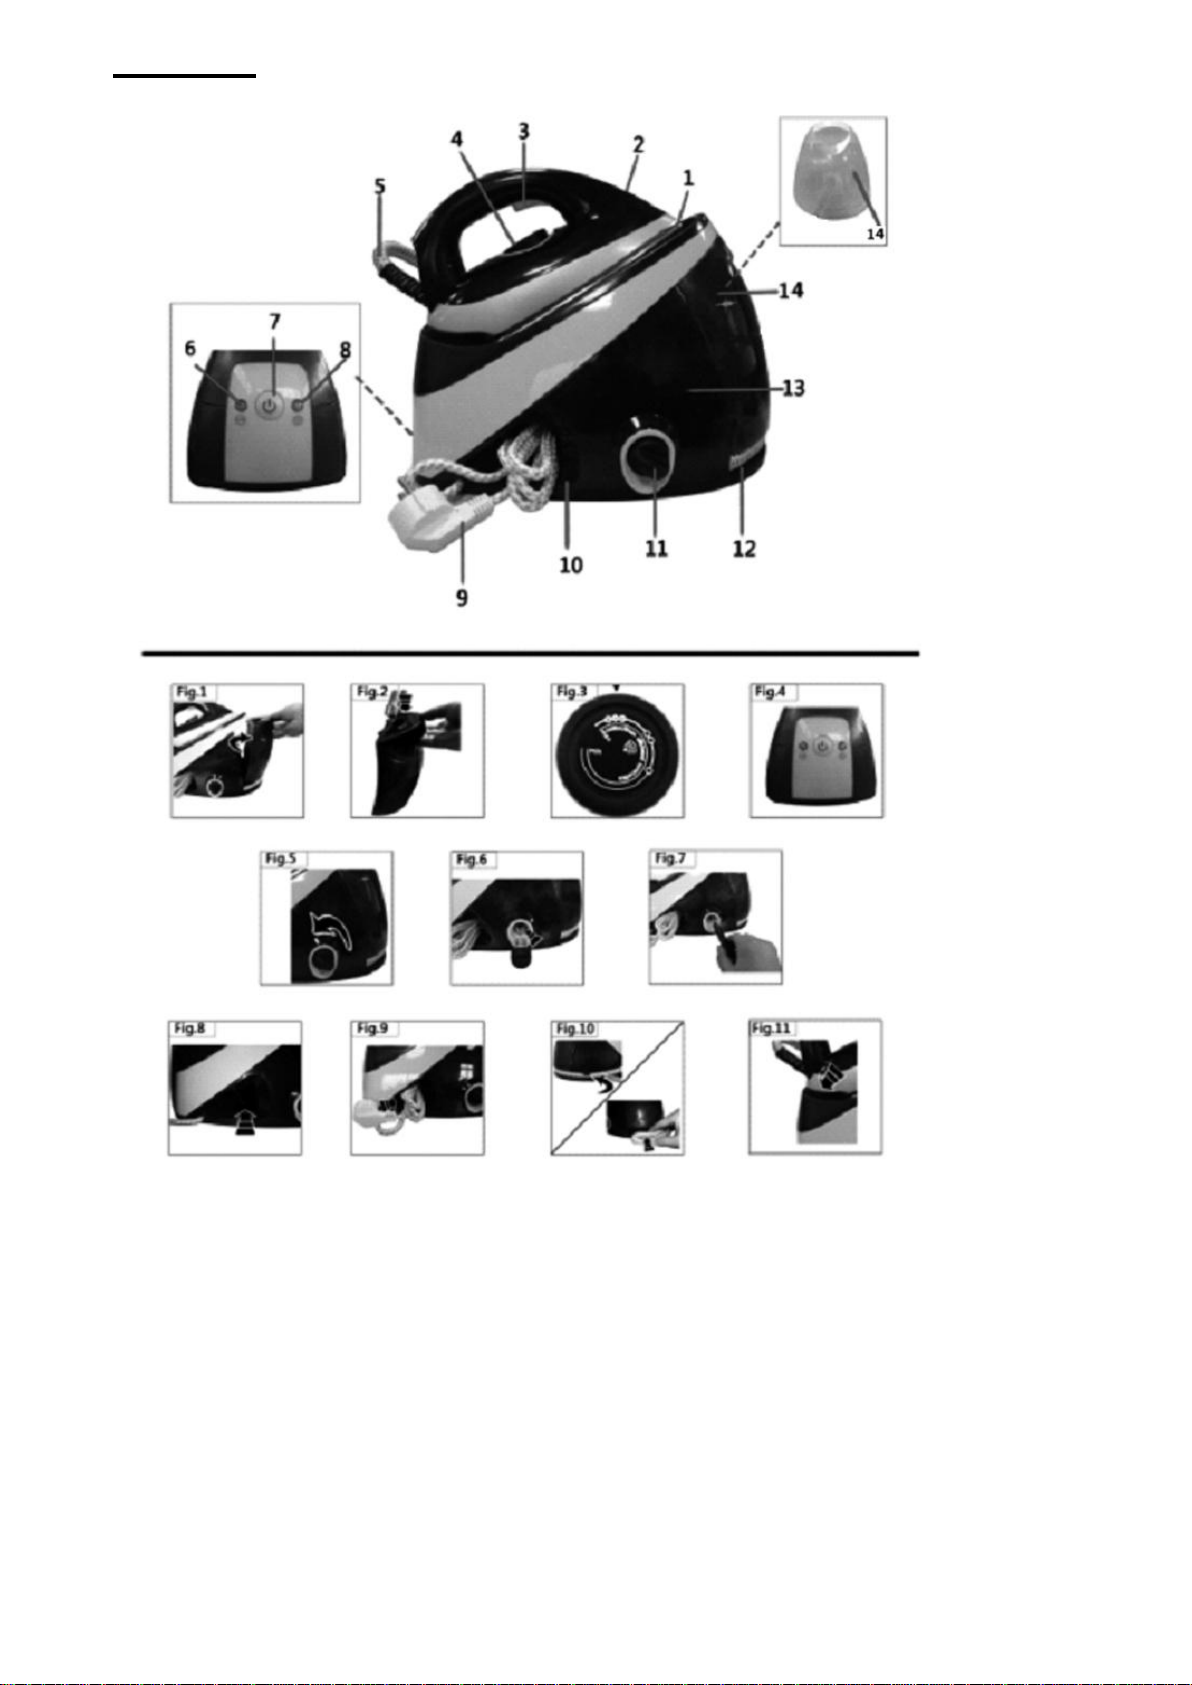
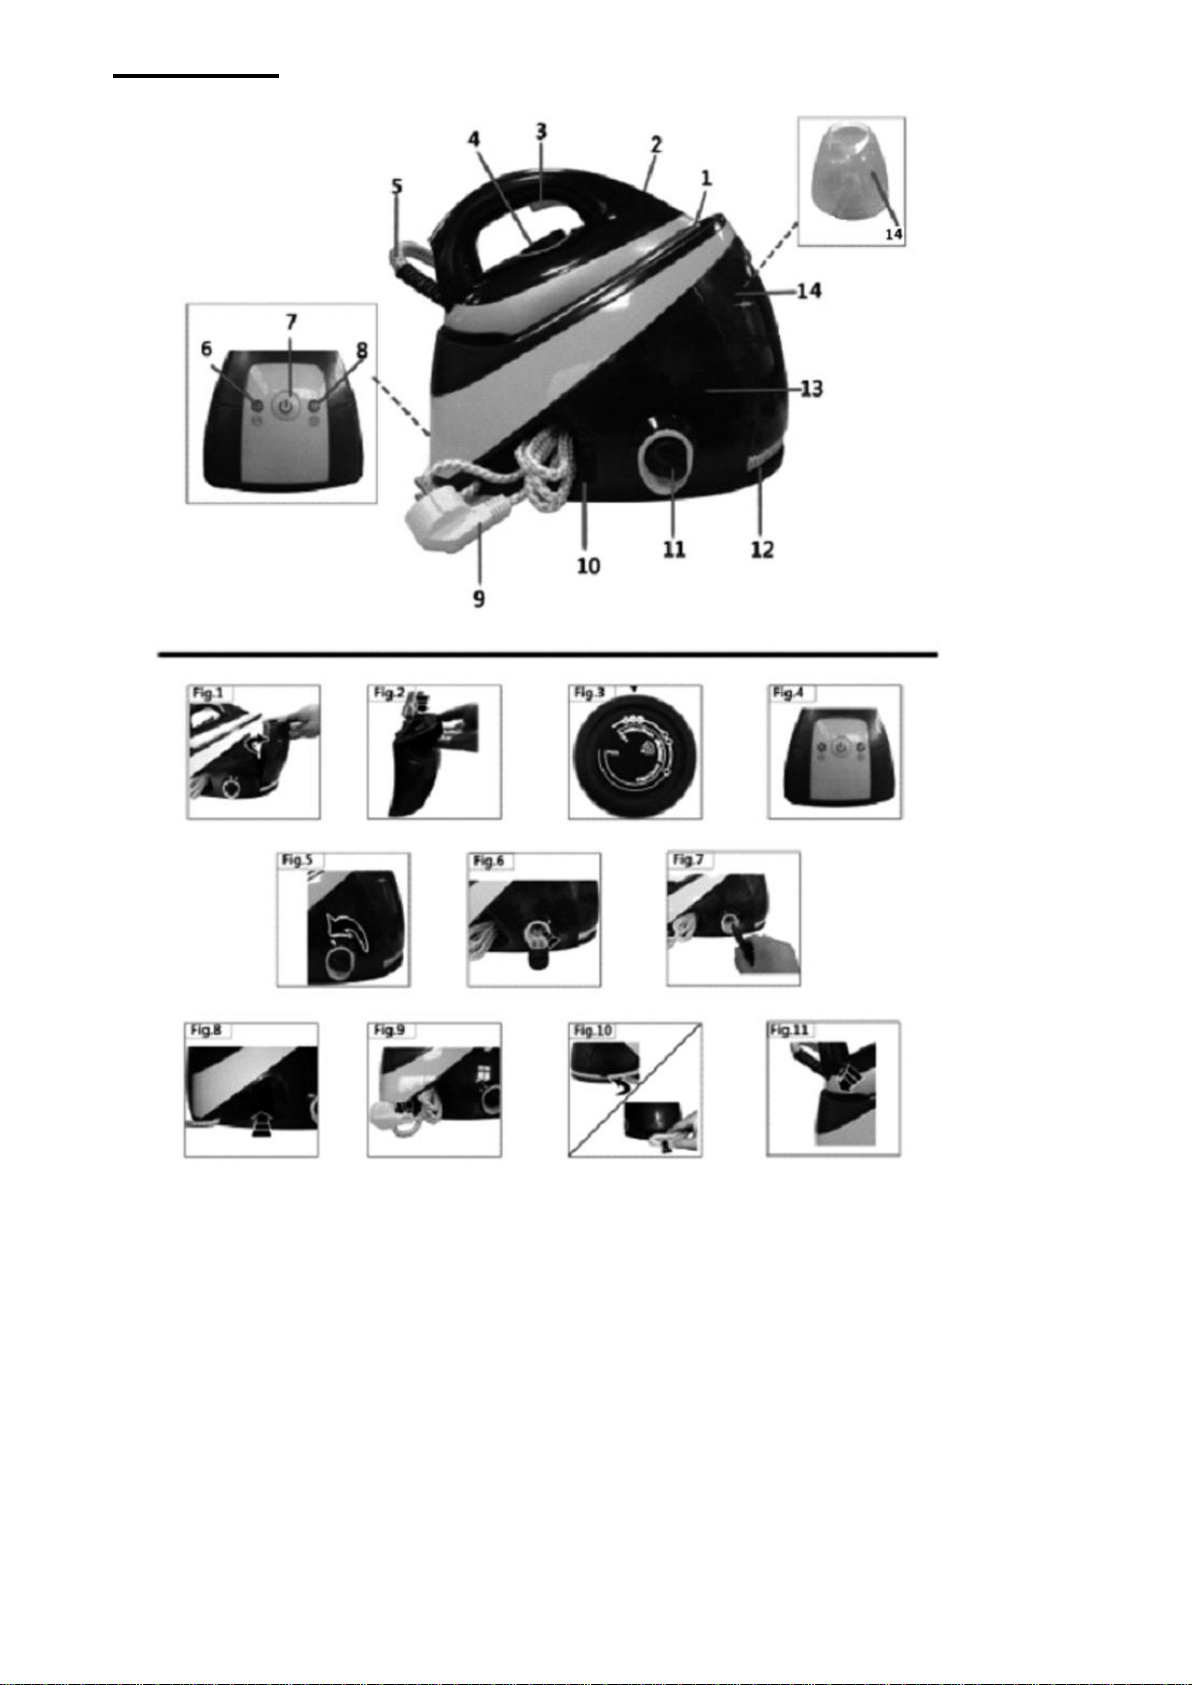
Description
1) Heating plate
2) “Iron heating” indicator light
3) Steam request button
4) Thermostat knob
5) Single hose (supply cable + steam hose)
6) On/off indicator light for switch
7) Switch button
8) Steam indicator light
9) Supply cable with plug
10) Storage box for supply cable
11) The cleaning valve of the boiler
12) Storage slot for single hose
13) Boiler
14) Water tank
Page 3

Read this instruction booklet carefully
before installing and using the machine.
In this way you will obtain the best possible results and maximum
operating safety.
Safety warnings
Read the following instructions carefully:
Before use, check that the power supply corresponds to the voltage shown on the serial number
plate. Connect the appliance only to a properly earthed power outlet (minimum 10A).
In the event of incompatibility between the plug and you socket, have the socket replaced by a
qualified electrician.
The electrical safety of this appliance is only guaranteed when it is properly earthed according to
current electrical safety regulations. The manufacturer declines all responsibility for any damage
resulting from inadequate earthing of the appliance. If in doubt, consult a qualified electrician.
Do not leave water in the machine when the room temperature is 0℃ or below.
After unpacking, check the appliance for damage if in doubt, do not use the appliance; contact a
qualified technician.
Packaging materials (plastic bags, polystyrene foam, etc.) are a potential source of danger and
must be kept out of reach of children.
It is inadvisable to use adapters, multiple sockets and/or extensions. In cases in which this is
unavoidable, always use adapters, multiple sockets and extensions which comply with current
safety regulations. Do not exceed the maximum power rating shown on the adapter.
This appliance is designed for domestic use only. Any other use of the appliance is considered
improper and therefore dangerous.
The manufacturer declines all responsibility for any damage resulting from improper, incorrect or
careless use of the appliance.
This appliance should not be used by children below 8 years of age, physically or mentally disabled
people nor inexperienced individuals; unless they use it under the strict surveillance and tutoring of
an experienced user and have been provided with detailed usage instructions to ensure a safe
usage of the appliance as well as a realistic risk awareness. Children should never play with the
appliance. Cleaning and maintenance should not be performed by unwatched children.
When using any electrical appliance, a few basic rules should be observed:
If the supply cord is damaged, it must be replaced by the manufacturer or its service agent or a
similarly qualified person in order to avoid a hazard.
The filling aperture must not be opened during use.
Don’t allow children in the front of the iron when press “Jet button”,its ‘s shot range is far.
Fasten lace is for lashing the steam tube and power cable .
It is easy for you to put the long steam tube and cable on the tube clip, it is easy for operating.
In particular:
Do not touch the appliance with wet or damp hands or feet.
Do not use the appliance in bathrooms.
Do not pull the supply cable or the appliance to remove the plug form the socket.
Do not leave the appliance exposed to atmospheric agents (rain, sun, frost, etc.).
Do not allow the appliance to be used by children or irresponsible persons unless under
supervision.
Do not immerse the appliance in water.
Do not leave the iron unattended when it is switched on, as this may be a source of danger.
Before carrying out any cleaning or maintenance operations or filling water into container, always
disconnect the appliance from the mains power supply by removing the plug .
In the event of failure or malfunction, switch off the appliance and do not attempt to carry out repairs.
Contact an authorized Service Centre and insist on original spare parts. Failure to observe the
Page 4
above points may affect the safety of the appliance.
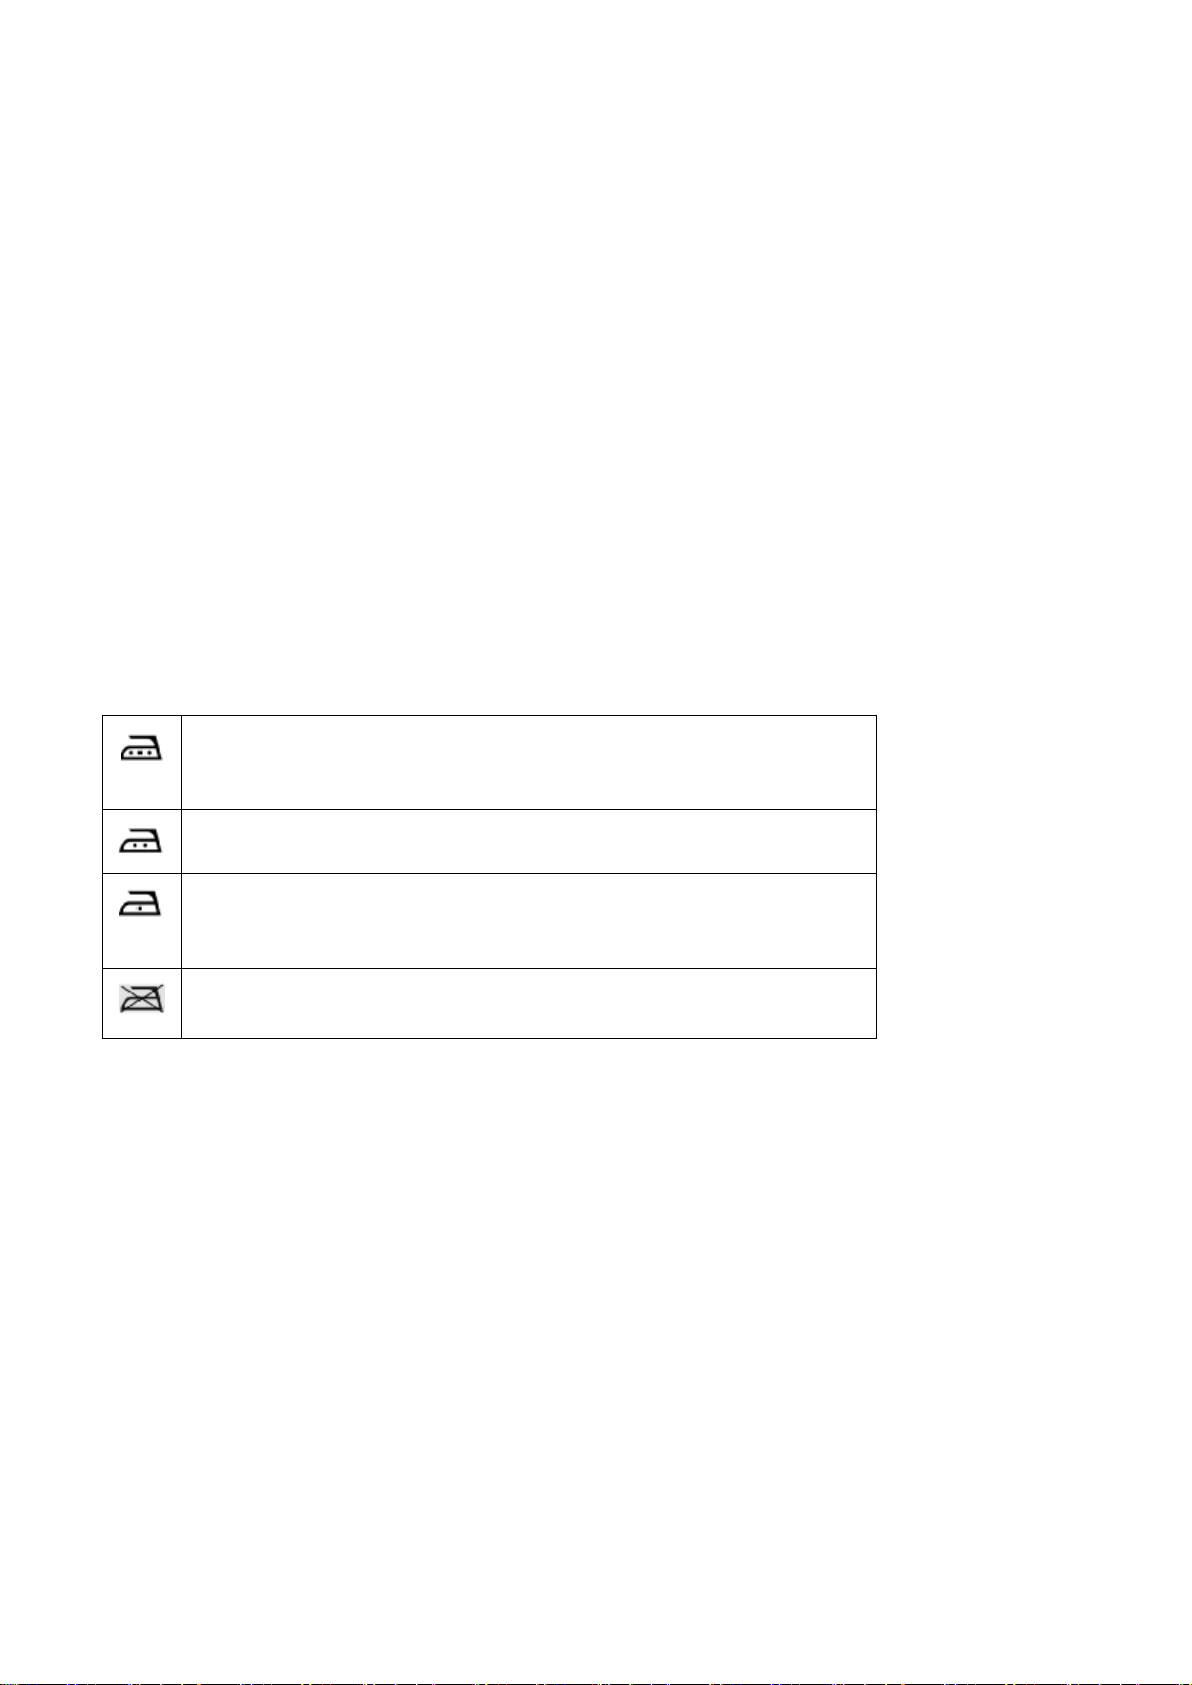
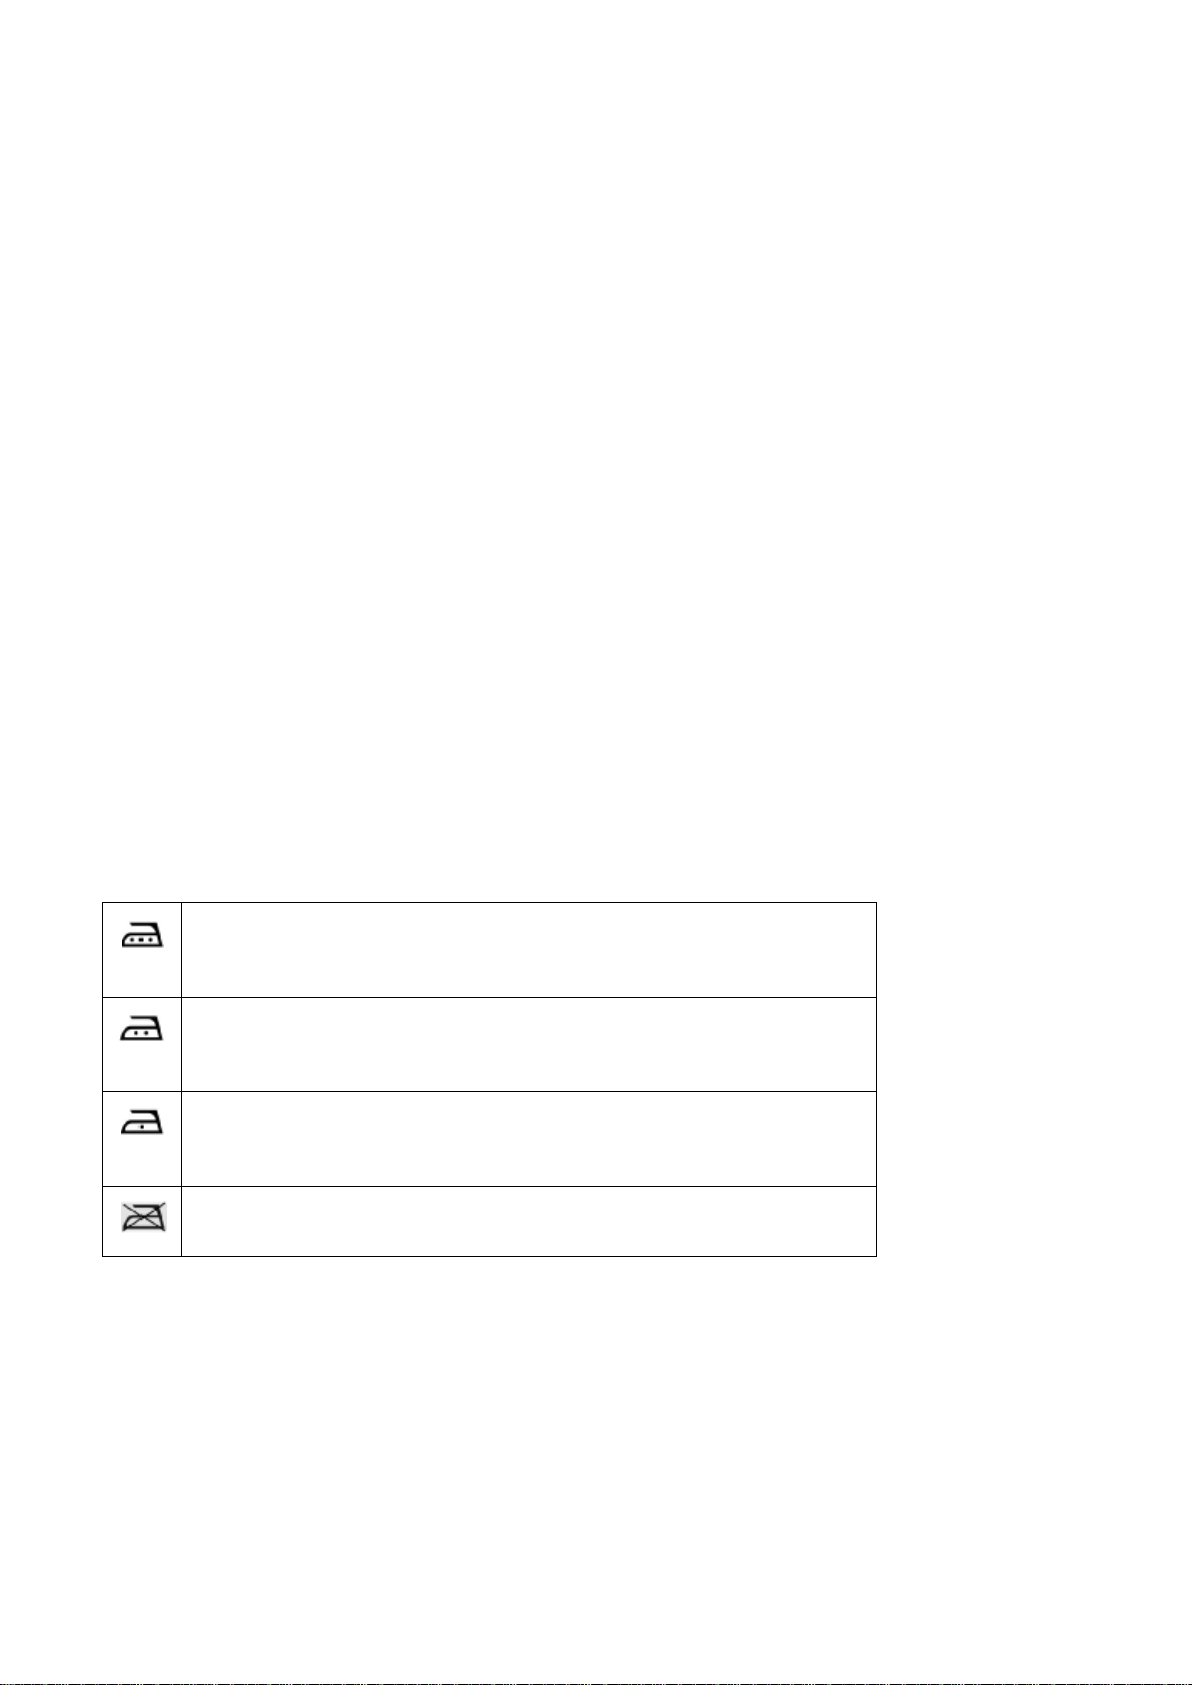
Steam ironing allowed
For dry ironing, set temperature adjustment knob(4)on …
Steam ironing allowed
For dry ironing, set temperature adjustment knob (4) on …
Dry ironing
Check the fabric’s resistance to steam ironing or dry iron with
temperature adjustment knob (4) set on…
Do not iron
Steam ironing or treatment not allowed
Should you decide not to use the appliance again, remove the plug from the socket and cut the
supply cable to render the appliance completely inaperative.
Installation must be carried out according to the manufacture’s instructions.
The supply cable must not be replaced by the user, as this requires the use of special tools, if the
supply cable is damaged, contact an authorized Service Centre.
Do not fill the appliance under a running tap.
Do not allow the supply cable to come into contact with the ironing plate.
If the safety cut-out intervenes, the iron will no longer function. To restore normal operation. Contac
a qualified electrician.
Never direct the steam jet in the direction of persons, as this may be extremely dangerous.
Do not use the iron on very wet fabrics.
Do not place the iron on the stand when the plate is hot.
Do not overfill the boiler and do not add stain-removers of simllar products to water.
Remove the plug from the mains socket when the appliance is not in use. Do not leave the
appliance switched on unnecessarily.
Never unscrew the safety valve when the appliance is connected to the power supply network.
Use a funnel to fill the boiler without causing the water to overflow.
The boiler must be placed on a flat surface that is particularly resistant to high temperatures.
INSTRUCTIONS FOR USE
Check the manufacturer’s label on the garment, and interpret the symbol on label as follows:
STEAM IRONING
The appliance uses ordinary tap water.
If the water is very hard (hardness higher than27 degrees French).we suggest using distilled or
demineralized water.
When using the iron for the first time, iron a plain cloth first.
Before using the appliance, taken down the water tank (14) and fill it, not exceeding MAX
waterline.
When you want to take back the water tank(14),firstly put the water tank base and then push the
water tank softly, after hear “click”, it means the water tank in the place.
Connecting the appliance and power cord.
Press the switch button (7), power indicator light (6) and steam available indicator light (8) bright,
it means the boiler and iron start running.
Feed-water from electromagnetism water pump coming down the boiler when the boiler (13)
heating enough.
Choosing the temperature by temperature knob (4), the steam device indicate ironing area
which can be chose (Fig.3).
Around 2 minutes, heating indicator (2) will die out, it means the appliance can be using the
steam.
Page 5

Around 3 minutes, steam available light (8) will die out, it means the appliance can be using the
steam.
Obtain steam after pressing the steam button (3).
Release the button(3)and the steam flow stops.
This appliance is also able to generate steam in a vertical position and can therefore be used to
refresh fabrics easily with a jet of steam.
When you ending the ironing, press the switch button (7), cut down the power, press the steam
button (3) to release the residual steam in the boiler (13).
NOTE: Continue to release steam for long time, when pump adds water into boiler,
soleplate will stop to release steam for short time, almost 10secs.
DRY IRONING
Connect the appliance to the mains supply, press the switch button(7), then select the desired
temperature by turning the thermostat knob(4).Wait until the iron heating indicator light (2) goes off,
indicating that the desired temperature has been reached.
For dry ironing it is not necessary to press the steam button (3).
FILLING THE TANK
Thanks to the self-filling function, there is no longer any need to stop and wait while the boiler
fills up again.
When the water in the boiler is at minimum level, the pump is automatically activated which fills
the boiler once again.
If you hear the loud feed-water sound when you ironing, it means there is no water in the water
tank (14).Press the switch button (7) and cut down the power. After fill the water tank (14), then
press the switch button (7) again, go on ironing.
To keep on working, simply restore the water level in the self-refilling tank as described in the
“Preparation for use” paragraph.
PUTTNG THE APPLIANCE AWAY
First ensure that the appliance has cooled down completely.
Empty the water tank(14).
It is not necessary to drain the boiler after ironing.
Steam line (5) and power cord (9) could be receipt into the wire groove (12) and line box (10).
LOCKING IRON
To lock the iron it must be set on the rear part of the rest mat (Fig11).
NOTE: make sure to firmly hook the iron to prevent it falling accidentally.
CARE OF YOUR VAPORELLA
Before attempting any maintenance operation, always disconnect the appliance from the mains.
To clean the body of the appliance, simply use a moist cloth. Do not use solvents or detergents
which may harm the body material.
Always keep the surface the ironing plate perfectly clean. To clean it, just wipe the cold surface
with a damp cloth. The appliance must not be cleaned with descaling agents.
Do not iron over zippers, hooks, rings, etc; as these may scratch the plate.
When you have finished ironing. Place the iron correctly on its stand. Ensure that there are no
traces of water under the plate, as these may cause stains.
Store the appliance in a dry place
Page 6
PROBLEM
CAUSE
SOLUTION
Water comes out of the iron
instead of steam
The appliance has not reached
the right temperature yet.
The temperature control dial
has set at the minimum.
Wait for the “Steam Ready”
indicator light and the iron
indicator light to turn off.
Increase the regulation of the
temperature control dial.
The appliance is on but it is not
producing steam
Water tank is empty or not
inserted correctly.
Fill the water tank.
PERIODIC CLEANING OF THE BOILER
· To maintain optimum performance, clean the boiler every 10/20 uses depending on the amount
of limestone in the water.
· Disconnect the appliance and let it cool down for at least 2 hours.
· After the appliance refrigeration enough put up one side of the cleaning valve (11), forced to
rotate counterclockwise the cleaning valve (Fig.5) (do not lie flat the appliance when you open
the cleaning valve, otherwise the water will leakage).
CAUTION! Never attempt to open the cleaning valve (11)while the boiler is under pressure.
CAUTION: do not pour more than 200ml water into the boiler. Pour water slowly, being careful
not to let it overflow, as this could damage the appliance.
· Rinse out the boiler and pour the water away into the sink or into a container for collecting dirty
water.
· If the water is very dirty, repeat the operation until it is clean.
· Checking that the seal is present and that the cap is screwed on properly.
· Fill the water tank again.
· Turn the appliance on again.
· Before ironing, release steam into the sink or another container and check that the steam is
clean. This should take a few seconds.
· Resume ironing normally.
TROUBLESHOOTING
Page 7
How to get a professional ironing finish
A normal iron generates only a small quantity of steam. In this case it is necessary to products
steam constantly in order to eliminate crease in the fabric being ironed.
A professional ironing system works rather differently. The fabric is first made damp by the
steam and then, in a second phase, dry-ironed in the normal way. This means that every.
Tiniest crease is removed and your garments are ironed to perfection.
In the first phase (steam-damping of the fabric),hold the iron about 20 cm above the fabric and
press the steam(3). Pass the iron over the garment in a circular movement so that the powerful
jet of steam damps the fabric. Lightly creased garments require only a few moments of
steaming. While very heavy fabrics or garments with particularly difficult creases must be
damper, so steam must be applied for a few seconds more.
During the second phase (dry ironing), check that the thermostat knob is in the correct position
for the type of fabrics; release the steam button(3) and dry-iron the garment. The special
ironing plate will prevent the fabrics from becoming shiny. Using this ironing technique, and
following the suggestions in the chart below, you will find it easy to give your garments a really
professional ironing finish.
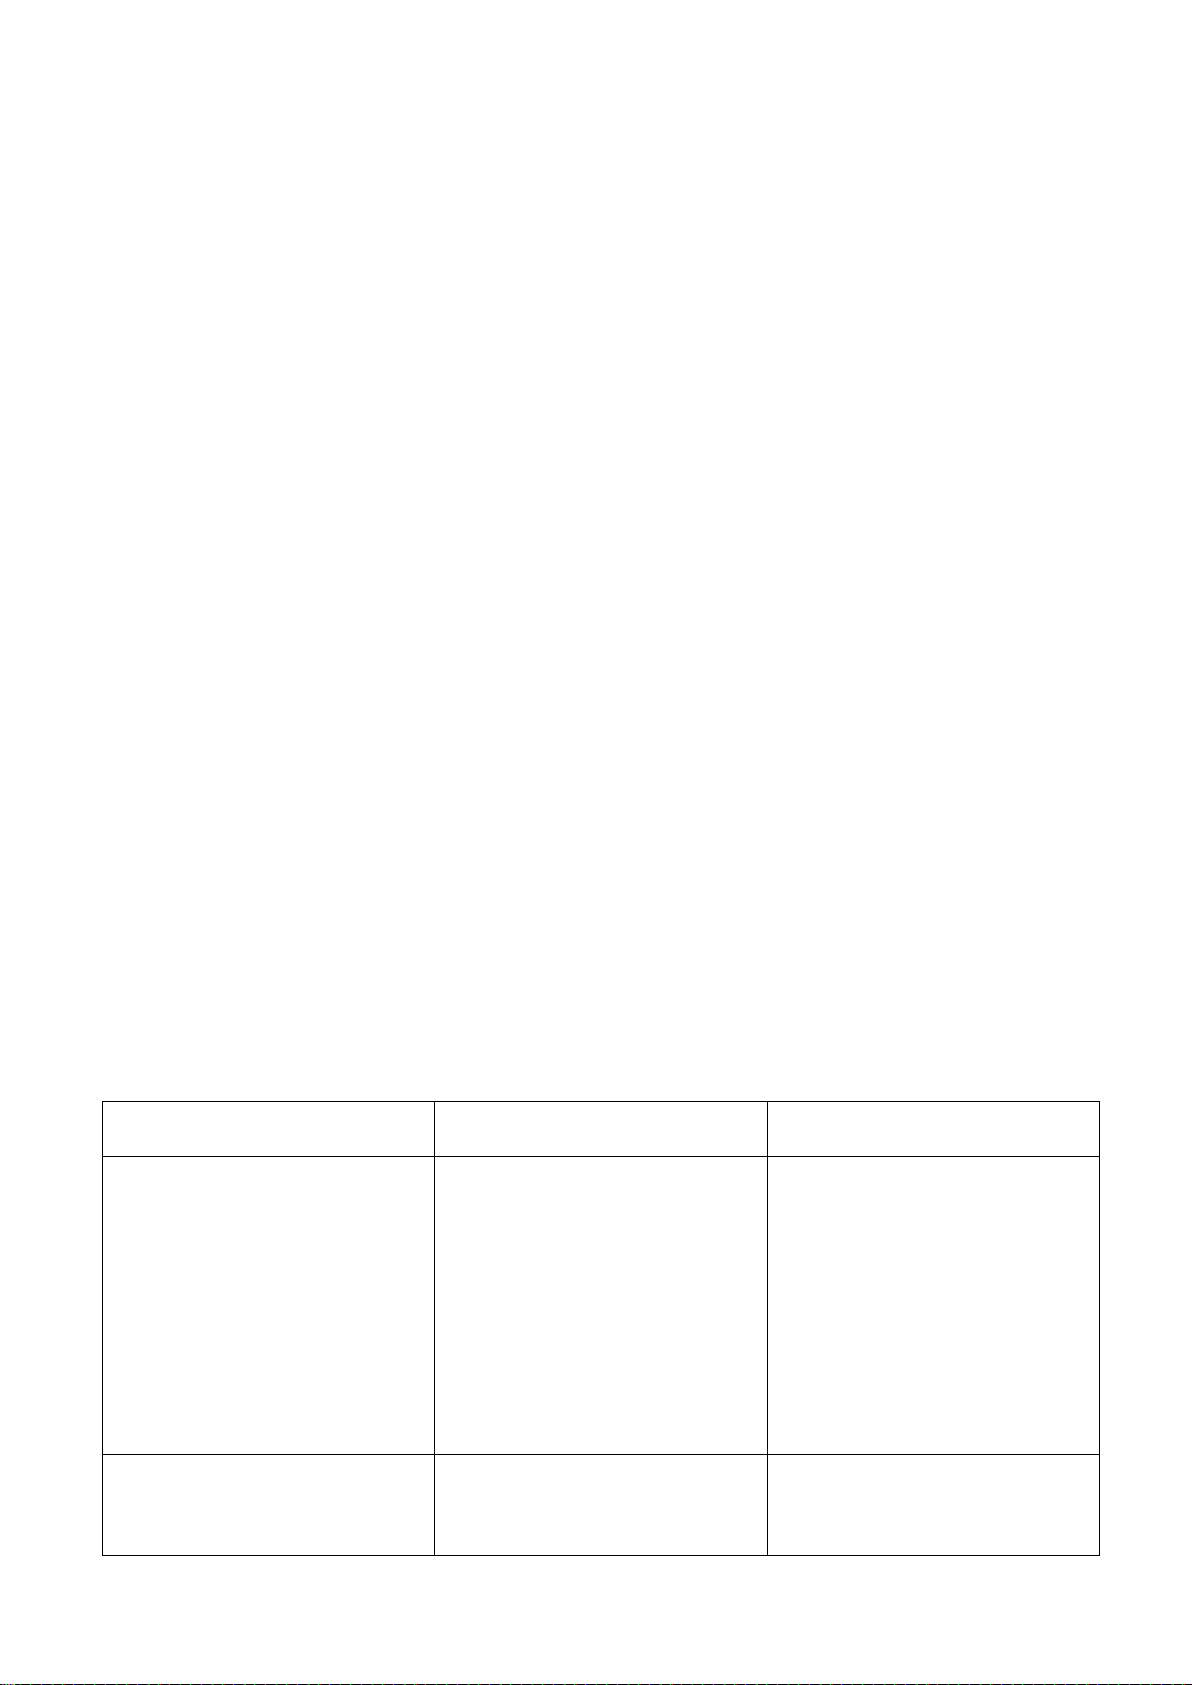
Guide to perfect ironing
Check the manufacturer’s label on the garment, and interpret the symbol on the label as follows.
Type of
fabric
Position of
thermostat
knob
Ironing instructions
Acetate
Acrylic
Nylon
Dry ironing
Follow the instructions on the label of the garment.
This type of fabric generally requires very light ironing.
Pollester
Rayon
Dry ironing
Iron inside out. When ironing mixed fabrics. Select the
Lowest recommended temperature.
Silk
Dry ironing
Iron inside out.
Wool
Light cotton
Light linen
Steam ironing
Iron inside out. Place a thin cloth over the fabric in order to
avoid a shiny finish
Cotton
Fine linen
Starched
fabrics
Steam ironing
Dampen the fabric before ironing. Heavier fabrics and
tarched fabrics can be ironed on the front; darker colours
and embroidered garments should be ironed inside out.
Suggestions
Divide the washing according to the correct ironing temperatures. Start by ironing those garments
that require a lower temperature. For fuller details, refer to the chart at end of this booklet.
Fabrics such as velvet and wool, and accessories such as gloves, handbags, etc. will regain their
brand-new look and texture by simply passing the iron near the surface of the fabric and pressing
the steam button.
Imprints left in carpets by furniture can be removed by applying steam on the parts where the pile is
crushed and the brushing lightly.
If the carpet is made of synthetic material, do not select a high temperature.
Page 8

Linen
Steam ironing
Use plenty of steam and iron dark fabrics inside out in
order to avoid a shiny finish, Iron lapels and cuffs on the
right side for better finish.
ENVIRONMENT
CAUTION :
Do not dispose of this product as it has with other household products. There is a separation of this
waste product into communities, you will need to inform your local authorities about the places where
you can return this product. In fact, electrical and electronic products contain hazardous substances
that have harmful effects on the environment or human health and should be recycled. The symbol
here indicates that electrical and electronic equipment should be chosen carefully, a wheeled waste
container is marked with a cross.
Manufactured and imported : Adeva SAS 8 rue Marc Seguin 77290 Mitry-Mory FRANCE
www.hkoenig.com - contact@hkoenig.com - Tel 01 64 67 00 01
Page 9
FRANCAIS
Description
1) Semelle du fer
2) Voyant de chauffe
3) Bouton de vapeur
4) Bouton du thermostat
5) Tuyau flexible (câble d'alimentation + tuyau de vapeur)
6) Voyant marche / arrêt
7) Bouton interrupteur
8) Voyant de vapeur
9) Câble d'alimentation
10) Boîte de rangement pour le câble d'alimentation
11) Vanne de nettoyage
12) Emplacement de stockage pour un seul flexible
13) Centrale
14) Réservoir
Page 10

Lire ce livret d'instructions attentivement avant d'installer et d'utiliser la machine de façon, à
obtenir les meilleurs résultats possibles en toute sécurité.
Consignes de sécurité
Lire attentivement les instructions suivantes:
Avant utilisation, vérifier que la tension de votre installation électrique correspond à celle indiquée
sur la plaque de numéro de série. Branchez l'appareil uniquement à une prise d'alimentation
correctement mise à la terre (minimum 10A).
En cas d'incompatibilité entre la prise et votre prise murale, faites remplacer la prise par un
électricien qualifié.
La sécurité électrique de cet appareil n´est garantie que s'il est correctement mis à la terre
conformément aux règlements de sécurité électrique en vigueur. Le fabricant décline toute
responsabilité pour tout dommage résultant d'une mise à la terre inadéquate de l'appareil. En cas
de doute, consultez un électricien qualifié.
Cet appareil peut être utilisé par des enfants âgés d'au moins 8 ans et par des personnes ayant des
capacités physiques, sensorielles ou mentales réduites ou dénuées d'expérience ou de
connaissance, s'ils (si elles) sont correctement surveillé(e)s ou si des instructions relatives à
l'utilisation de l'appareil en toute sécurité leur ont été données et si les risques encourus ont été
appréhendés. Les enfants ne doivent pas jouer avec l'appareil. Le nettoyage et l'entretien par
l'usager ne doivent pas être effectués par des enfants sans surveillance.
Ne pas laisser d'eau dans la machine lorsque la température ambiante est de 0 ou en dessous.
Après le déballage, vérifiez que l´appareil n´est pas endommagé, en cas de doute, ne pas utiliser
l'appareil et contacter un technicien qualifié.
Les matériaux d'emballage (sacs en plastique, polystyrène expansé, etc.) peuvent être dangereux
et doivent être tenus hors de portée des enfants.
Il est déconseillé d'utiliser des adaptateurs, prises multiples et/ou extensions. Dans les cas où cela
est inévitable, veillez à utiliser des adaptateurs, prises multiples et extensions qui sont conformes
aux normes de sécurité en vigueur. Ne pas dépasser la puissance maximale indiquée sur
l'adaptateur.
Cet appareil est conçu pour un usage domestique. Toute autre utilisation de l'appareil est
considérée comme impropre et donc dangereuse.
Le fabricant décline toute responsabilité pour tout dommage résultant d'une utilisation inappropriée,
incorrecte ou négligée de l'appareil.
Lorsque vous utilisez un appareil électrique, quelques les règles de sécurité de base doivent être
respectées:
Si le cordon d'alimentation est endommagé, il doit être remplacé par le fabricant, son agent de
service ou une personne qualifiée afin d'éviter tout danger.
L'orifice de remplissage ne doit pas être ouvert pendant l'utilisation.
Ne laissez pas les enfants à l'avant du fer lorsque le " bouton Jet" est appuyé, car la puissance du
jet est importante et pourrait causer des brulures.
Le lacet permet d'arrimer le tube de vapeur et câble d'alimentation. Il est recommandé de fixer le
long tube de vapeur et le câble sur le clip, pour faciliter l´utilisation.
En particulier:
Ne pas toucher l'appareil avec les mains mouillées ou les pieds humides.
Ne pas utiliser l'appareil dans une salle de bains.
Ne tirez pas sur le câble d'alimentation ou l'appareil pour enlever la fiche de la prise.
Ne laissez pas l'appareil exposé aux conditions atmosphériques (pluie, soleil, gel, etc.).
Ne laissez pas l'appareil être utilisé par des enfants ou des personnes non responsables, à moins
de le faire sous surveillance.
Ne pas plonger l'appareil dans l'eau.
Il est dangereux de laisser le fer sans surveillance lorsqu'il est allumé.
Page 11
Avant d'effectuer toute opération de nettoyage, d'entretien ou de remplissage de l'eau dans un
Repassage à vapeur possible
Pour repasser à sec, réglez la température à l´aide du bouton
identifié ci-dessus par le numéro (4) …
Repassage à vapeur possible
Pour repasser à sec, réglez la température à l´aide du bouton
identifié ci-dessus par le numéro (4) …
Repassage à sec
Vérifiez la résistance du tissu à la vapeur et réglez la température à
l´aide du bouton identifié ci-dessus par le numéro (4) …
Ne pas repasser
Repassage ou traitement vapeur interdits
récipient, débranchez toujours l'appareil du circuit électrique en retirant la prise.
En cas de panne ou de dysfonctionnement, éteignez l'appareil et ne tentez pas d'effectuer des
réparations. Contactez un service après vente agréé et insistez sur les pièces de rechange d'origine.
Le non respect des points ci-dessus peut affecter la sécurité de l'appareil.
Si l´appareil n´était pas réparable, il est conseillé de couper le câble d'alimentation afin de rendre
l'appareil complètement inutilisable avant d´en disposer dans le respect des règles de recyclage et
de récupération d´appareils électriques en vigueur dans votre région.
Le câble d'alimentation ne doit pas être remplacé par l'utilisateur car cette manipulation nécessite
l'utilisation d'outils spéciaux. Si le câble d'alimentation est endommagé, contactez un service après
vente autorisé.
Ne pas remplir l'appareil sous le robinet.
Ne laissez pas le câble d'alimentation entrer en contact avec la plaque de repassage.
Si la coupure de sécurité intervient, le fer ne fonctionnera plus. Pour rétablir le fonctionnement
normal de l´appareil vous devez contacter un électricien qualifié.
Ne jamais diriger le jet vers des êtres vivants, car cela peut être extrêmement dangereux.
Ne pas utiliser le fer sur des tissus très humides.
Ne pas placer le fer sur le support lorsque la plaque est chaude.
Ne pas trop remplir la centrale et ne pas ajouter de produits dans l'eau.
Retirez la fiche de la prise de courant lorsque l'appareil n'est pas utilisé. Ne laissez pas l'appareil en
marche inutilement.
Ne jamais dévisser la soupape de sécurité lorsque l'appareil est connecté au réseau électrique.
Utilisez un entonnoir pour remplir la centrale sans provoquer de débordement d'eau.
La centrale doit être placée sur une surface plate et résistant à des températures élevées.
MODE D'EMPLOI
Vérifiez l'étiquette du fabricant sur le vêtement, et interprétez le symbole sur l'étiquette comme suit:
REPASSAGE A LA VAPEUR
L'appareil utilise de l'eau ordinaire/du robinet.
Si l'eau est très dure (au delà des normes de dureté de l´eau en France), nous vous suggérons
d'utiliser de l'eau distillée ou déminéralisée.
Lorsque vous utilisez le fer pour la première fois, commencez par repasser un tissue uni.
Avant d'utiliser l'appareil, prendre le réservoir d'eau (14) et le remplir, ne dépassant pas ligne de
flottaison MAX.
Lorsque vous voulez remettre le réservoir d'eau (14), placez d'abord la base du réservoir d'eau
puis appuyez sur le réservoir d'eau jusqu´à entendre un "clic", (cela signifie que le réservoir
d'eau est en place).
Branchez l'appareil.
Page 12

Appuyez sur le bouton de l'interrupteur (7): le témoin d'alimentation (6) et le voyant lumineux de
la vapeur disponible (8), s´allument (cela signifie que la centrale et le fer commencent à
fonctionner).
L'eau d'alimentation de la pompe électromagnétique d'eau descend dans la centrale lorsque la
centrale est assez chaude (13).
Choisir la température à l´aide du bouton de température (4), le dispositif de vapeur indique la
zone de repassage qui peut être choisie (Fig.3).
Au bout d´à peu près deux minutes, l'indicateur de chauffage (2) s'éteindra, cela signifie que
l'appareil peut être utilisé pour repasser à sec.
Au bout d´à peu trois minutes, le voyant de la vapeur disponible (8) s'éteindra, cela signifie que
l'appareil peut utiliser repasser à la vapeur.
On obtient de la vapeur après avoir appuyé sur le bouton de vapeur (3).
Relâchez le bouton (3) et le flux de vapeur s'arrête.
Cet appareil est également capable de produire de la vapeur dans une position verticale et peut
donc être utilisé pour rafraîchir facilement les tissus avec un jet de vapeur.
Lorsque vous terminez le repassage, appuyez sur le bouton de l'interrupteur (7), pour réduire la
puissance, puis appuyez sur le bouton de vapeur (3) pour libérer la vapeur résiduelle dans la
centrale (13).
NOTE: la semelle arrêtera de libérer la vapeur pendant à peu près 10secs, lorsque la
pompe ajoute de l'eau dans la centrale.
Repassage à sec
Branchez l'appareil.
Appuyez sur le bouton de l'interrupteur (7): le témoin d'alimentation (6) et le voyant lumineux de
la vapeur disponible (8), s´allument (cela signifie que la centrale et le fer commencent à
fonctionner).
Au bout d´à peu près deux minutes, l'indicateur de chauffage (2) s'éteindra, cela signifie que
l'appareil peut être utilisé pour repasser à sec.
Pour repasser à sec il suffit de ne pas appuyer sur le bouton de vapeur (3).
REMPLISSAGE DU RESERVOIR
Grâce à la fonction de remplissage automatique, il n´est pas nécessaire d´arrêter le repassage
pendant que le réservoir vapeur se remplit à nouveau. Lorsque l´eau du réservoir vapeur atteint
le niveau minimum, le réservoir se remplira automatiquement grâce à la pompe.
Si vous entendez l´alarme de niveau d´eau insuffisant pendant le repassage, cela signifie que le
réservoir d´eau doit être rempli (14). Éteignez l´appareil à l´aide de l´interrupteur (7) et
débranchez la prise.
Avant de continuer à utiliser l'appareil, prendre le réservoir d'eau (14) et le remplir, ne dépassant
pas ligne de flottaison MAX.
Lorsque vous voulez remettre le réservoir d'eau (14), placez d'abord la base du réservoir d'eau
puis appuyez sur le réservoir d'eau jusqu´à entendre un "clic", (cela signifie que le réservoir
d'eau est en place). Vous pouvez alors brancher le fer à nouveau, appuyer sur l´interrupteur (7)
et reprendre votre repassage.
RANGEMENT
Tout d´abord, assurez vous que l´appareil a complètement refroidi avant de le déplacer ou de le
préparer au rangement.
Videz le réservoir d´eau (14).
Il n´est pas nécessaire d´assécher le réservoir vapeur après le repassage.
Vous pouvez ranger le flexible (5) et le câble d´alimentation (9) dans l´emplacement de stockage
Page 13

pour flexible (12) et la boîte de rangement pour le câble d'alimentation (10).
BLOCKAGE DU FER
Pour bloquer le fer vous devez le placer sur la partie inférieure du support (Fig11).
NOTE: assurez vous que le fer est bien fixé pour éviter qu´il ne chute.
ENTRETIEN DE VOTRE VAPORELLA
Toujours débrancher l´appareil avant de manipuler le fer pour son entretien.
Nettoyer la surface externe de l´appareil avec un chiffon doux et légèrement humide. Ne pas
utiliser de solvants ou détergents pouvant endommager la surface de l´appareil.
Toujours maintenir la semelle du fer parfaitement propre. Pour la nettoyer, utilisez un chiffon
propre et humide. Ne pas utiliser de détergents anticalcaire.
Une fois le repassage terminé, replacez le fer sur son support. Assurez vous d´éliminer toute
trace d´eau sur la semelle car cela pourrait tacher vos vêtements.
Rangez l´appareil dans un endroit sec.
ENTRETIEN DU RESERVOIR VAPEUR
· Le réservoir vapeur doit être nettoyé toutes les 10 à 20 utilisations pour maintenir des
performances optimales et limiter la formation de calcaire.
· Débranchez l´appareil et laissez refroidir pendant un minimum de deux heures.
· Ouvre la vanne de nettoyage de la centrale (11), (Fig.5)
ATTENTION! Ne jamis essayer d´ouvrir la valve de nettoyage (11) pendant que la centrale est
sous pression.
ATTENTION: ne pas verser plus de 200ml d´eau dans la chaudiere.et faire attention à ne pas la
déverser sur l´extérieur de l´appareil.
· Rincez la centrale et disposez de l´eau sale dans l´évier.
· Si l´eau est très sale, répétez l´opération ci-dessus jusqu'à élimination de la saleté.
· Vérifiez que le joint est bien placé et que la valve est bien refermée.
· Remplissez le réservoir à eau.
· Allumez l´appareil.
· Relâchez un peu de vapeur au-dessus d´un évier avant de commencer à repasser pour vous
assurer de la propreté de celle ci. Quelques secondes devraient suffire.
· Reprenez le repassage.
Page 14

IDENTIFICATION DE PANNES
PROBLEME
CAUSE
SOLUTION
De l´eau coule au lieu de la
vapeur
L´appareil n´a pas encore
chauffé suffisamment
Le bouton de température est
au minimum.
Attendez que le voyant vapeur
s´éteigne.
Augmentez la température de
repassage.
L´appareil est chaud mais ne
produit pas de vapeur
Le réservoir à eau est vide ou
mal placé
Vérifiez que le réservoir est
bien fixe ou remplissez le s´il
est vide.
Comment obtenir un résultat professionnel
Un fer traditionnel relâche une petite quantité de vapeur ce qui rend difficile l´élimination des
plis.
Un fer professionnel humidifie les vêtements avec la vapeur et les sèche avec la chaleur de la
semelle obtenant un résultat parfait.
Pour l´humidification, tenez le fer à 20cm environ, actionnez le bouton vapeur (3) et humidifiez
le vêtement avec un geste circulaire. Lorsque les vêtements sont peu froisses, il se peut que
quelques secondes de vapeur suffisent à les défroisser, pour les vêtements plus lourds ou très
froissés, appliquez de la vapeur plus longuement.
Pendant le repassage, veilliez à bien sélectionner la température (3) adaptée au vêtement te
repassez à sec. La semelle prévient les traces lustrées.
Vos vêtements seront impeccablement repasses si vous suivez ses conseils.
Guide de repassage
Vérifier les conseils d´entretien sur les étiquettes des vêtements.
Type de tissu
Position du
thermostat
Instructions de repassage
Acétate
Acrylique
Nylon
Repassage à sec
Suivez les instructions sur l'étiquette du vêtement.
Ce type de tissu requiert un repassage très délicat.
Suggestions
Divisez vos vêtements par température de repassage. Commencez pas les vêtements ayant besoin
d´être repassés à basse température Référez-vous au tableau ci-dessus.
Les tissus tels que la laine et le velours et des accessoires tels que des gants, sacs, etc
regagneront leur fraicheur avec un sinople jet de vapeur.
Pour éliminer les marques laissées sur les tapis et moquettes par le mobilier, appliquez de la vapeur
pour que les fibre regonflent et veillant à utiliser une température relativement basse si la moquette
ou le tapis sont synthétiques.
Page 15

Polyester
Rayon
Repassage à sec
Repassez à l´envers. Lorsque les tissus sont différents,
choisissez les conseils d´entretien du plus délicat.
Soie
Repassage à sec
Repassez à l´envers.
Laine
Cotton léger
Lin léger
Repassage vapeur
Repassez à l´envers.
Placez un tissu fin par dessus le vêtement pour éviter les
traces lustrées
Cotton
Lin léger
Tissus amidonnés
Repassage vapeur
Humidifiez avant de repasser.
Les tissus plus épais ou amidonnés peuvent être repassés
à l´endroit, les tissus brodés ou de couleur foncée doivent
être repassés à l ´envers.
Lin
Repassage vapeur
Les tissus plus épais ou amidonnés peuvent être repassés
à l´endroit, les tissus brodés ou de couleur foncée doivent
être repassés à l ´envers.
Repassez les revers et les poignets à l´endroit pour un
meilleur résultat.
ENVIRONNEMENT
ATTENTION :
Vous ne devez pas vous débarrasser de cet appareil avec vos déchets ménagers. Un système de
collecte sélective pour ce type de produit est mis en place par les communes, vous devez vous
renseigner auprès de votre mairie afin d'en connaître les emplacements. En effet, les produits
électriques et électroniques peuvent contenir des substances dangereuses qui ont des effets
néfastes sur l'environnement ou la santé humaine et doivent être recyclés. Le symbole ci-contre
indique que les équipements électriques et électroniques font l'objet d'une collecte sélective, il
représente une poubelle sur roues barrée d'une croix.
Fabriqué pour et importé par : Adeva SAS 8 rue Marc Seguin 77290 Mitry-Mory FRANCE
www.hkoenig.com - contact@hkoenig.com - Tél. 01 64 67 00 01
Page 16

DEUTSCH
Beschreibung
1) Heizteller
2) “Bügeleisen” Kontrollleuchte
3) Dampfwunschtaste
4) Thermostatgriff
5) Einzelschlauch (Zufuhrkabel + Dampfschlauch)
6) An/Aus Kontrollleuchte zum umschalten
7) Schalter
8) Dampfanzeigelicht
9) Netzanschlusskabel
10) Aufbewahrungsbox für das Netzanschlusskabel
11) Reinigungsventil des Dampfkessels
12) Steckplatz für den einzelnen Schlauch
13) Dampfkessel
14) Wassertank
Page 17

Lesen Sie die Gebrauchsanweisung gut durch bevor sie
die Maschine benutzen.
Auf diese Weise werden die bestmöglichen Ergebnisse und maximale
Betriebssicherheit gewährt.
Sicherheitshinweise
Lesen Sie die folgenden Anweisungen sorgfältig durch:
Stellen Sie vor der Verwendung sicher, dass die Netzspannung mit der auf dem Typenschild
angegebenen Spannung übereinstimmt. Schließen Sie das Gerät nur an eine ordnungsgemäß
geerdete Steckdose (mindestens 10 A) an.
Im Falle einer Inkompatibilität zwischen Stecker und Buchse, lassen Sie die Steckdose von einem
Elektriker ersetzen. Die elektrische Sicherheit dieses Gerätes ist nur dann gewährleistet, wenn es
korrekt nach den geltenden elektrischen Sicherheitsvorschriften geerdet ist. Der Hersteller haftet
nicht für Schäden, die aus einer infolge der unangemessenen Erdung des Gerätes resultieren.
Wenn Sie Zweifel haben, wenden Sie sich an einen qualifizierten Elektriker.
Kein Wasser in der Maschine lassen, wenn die Raumtemperatur 0°C oder darunter ist.
Nach dem Auspacken ist das Gerät auf Beschädigungen zu prüfen. Wenn Sie Zweifel haben, dass
das Gerät nicht benutzbar ist, kontaktieren Sie einen qualifizierten Techniker.
Verpackungsmaterial (Plastikbeutel, Styropor usw.) stellen eine potentielle Gefahrenquelle dar und
müssen außerhalb der Reichweite von Kindern gehalten werden. Es ist nicht ratsam, Adapter,
Mehrfachsteckdosen und / oder Erweiterungen zu verwenden. In Fällen in denen dies
unvermeidbar ist, verwenden Sie immer Adapter, Mehrfachsteckdosen und Erweiterungen die den
aktuellen Sicherheitsbestimmungen entsprechen. Die auf dem Adapter angegebene maximale
Nennleistung nicht überschreiten.
Dieses Gerät ist nur für den Hausgebrauch bestimmt. Jede andere Verwendung des Gerätes ist
unsachgemäß und daher gefährlich.
Dieses Gerät kann von Kindern ab 8 Jahren und Personen mit eingeschränkten physischen,
sensorischen oder geistigen Fähigkeiten oder Personen, die keine Erfahrung in der Anwendung des
Produketes haben, verwendete werden, wenn sie ordnungsgemäß beaufsichtigt werden oder sie
die erforderlichen Anweisungen mit den notwendigen Sicherheitsmaßnahmen zur Bedienung des
Gerätes erhalten haben. Lassen Sie Kinder nicht mit dem Gerät spielen. Die Reinigung und
Wartung sollte nicht ohne entsprechende Aufsicht von Kindern durchgeführt werden.
Der Hersteller haftet nicht für Schäden die durch unsachgemäße, fehlerhafte oder nachlässige
Benutzung des Gerätes entstehen.
Bei der Verwendung von Elektrogeräten sollten einige Grundregeln beachtet werden:
Falls das Netzkabel beschädigt ist, muss es durch den Hersteller, den Kundendienst oder durch
eine ähnlich qualifizierte Person ersetzt werden um eine Gefahr zu vermeiden.
Die Einfüllöffnung darf während der Verwendung nicht geöffnet werden.
Bitte lassen Sie keine Kinder, während die "Jet" Taste aktiviert ist, an die Vorderseite des
Bügeleisens. Die Reichweite ist sehr hoch.
Der Schnellbinder ist zum verzurren des Dampfrohres und des Netzkabels.
Für den einfachen Betrieb, können sie das Dampfrohr und das Kabel an die Schlauchklemme
stecken.
Insbesondere:
Das Gerät nicht mit nassen oder feuchten Händen oder Füßen berühren.
Verwenden Sie das Gerät nicht im Badezimmer.
Ziehen Sie nicht am Netzkabel oder am Gerät um den Stecker von der Steckdose zu trennen.
Das Gerät nicht der Witterung (Regen, Sonne, Frost, etc.) aussetzen.
Lassen Sie das Gerät nicht unbewacht bei Kindern oder unverantwortlichen Personen. Nutzen Sie
es nur unter Aufsicht.
Stellen Sie das Gerät nicht ins Wasser.
Page 18

Lassen Sie das Bügeleisen nicht unbeaufsichtigt solange es eingeschaltet ist, da dieses eine
Dampfbügeln erlaubt
Beim Trockenbügeln eingestellte Temperatur Einstellknopf(4)an …
Dampfbügeln erlaubt
Beim Trockenbügeln eingestellte Temperatur Einstellknopf(4)an …
Trockenbügeln
Überprüfen Sie die Materialdampfbeständigkeit Bügeln oder
Trockenbügeleisen mit Temperaturregler (4) auf ein stellen ...
Kein Bügeln
Dampfbügeln oder Behandlung nicht erlaubt
Gefahrenquelle darstellen könnte.
Vor der Durchführung von Reinigungs- oder Wartungsarbeiten oder dem auffüllen von Wasser in
den Behälter muss das Gerät vom Netz getrennt werden indem Sie den Netzstecker herausziehen.
Im Falle einer Störung oder Fehlfunktion, schalten Sie das Gerät aus und versuchen Sie nicht
Reparaturen selbst durchzuführen. Wenden Sie sich an einen autorisiertes Service-Center und
bestehen Sie auf Original-Ersatzteile. Die Nichtbeachtung der oben genannten Punkte kann die
Sicherheit des Gerätes beeinflussen.
Sollten Sie sich dazu entscheiden das Gerät nicht weiter zu benutzen, trennen Sie den Stecker
vollständig von der Steckdose. Die Installation muss gemäß den Anweisungen des Herstellers
durchgeführt werden.
Das Netzkabel darf nicht vom Benutzer ausgetauscht werden, da dies den Einsatz von
Spezialwerkzeugen erfordert. Falls das Netzkabel beschädigt ist, wenden Sie sich an ein
autorisiertes Service-Center. Stellen Sie das Gerät nicht unter fließendes Wasser
Lassen Sie das Netzkabel nicht in Kontakt mit dem Heizteller kommen.
Das Bügeleisen stellt die Funktion ein wenn sich die Sicherheitsabschaltung aktiviert. Um den
normalen Betrieb wieder herzustellen, kontaktieren Sie einen qualifizierten Elektriker. Richten Sie
den Dampfstrahl niemals in Richtung einer Personen, da dies sehr gefährlich ist.
Verwenden Sie das Bügeleisen nicht auf sehr nassen Stoffen.
Stellen Sie das Bügeleisen nicht auf die Platte wenn diese noch heiß ist. Überfüllen Sie den Kessel
nicht und geben Sie keine Fleckenentferner oder ähnliche Produkte dem Wasser hinzu.
Ziehen Sie den Stecker aus der Steckdose, wenn das Gerät nicht benutzt wird. Lassen Sie das
Gerät nicht unnötig eingeschaltet.
Schrauben Sie niemals das Sicherheitsventil ab wenn das Gerät noch an das Stromnetz
angeschlossen ist. Mit Hilfe eines Trichters den Kessel, ohne dass Wasser überläuft, füllen.
Den Kessel nur auf eine ebenen Oberfläche, welche besonders widerstandsfähig gegen hohe
Temperaturen ist, stellen.
BEDIENUNGSANLEITUNG
Überprüfen Sie dem Typenschild auf dem Kleidungsstück, und interpretieren Sie das Symbol auf
dem Etikett wie folgt:
DAMPFBÜGELN
Das Gerät mit normalem Leitungswasser verwenden.
Wenn das Wasser sehr hart ist (Härtegrad höher als 27) schlagen wir vor, das Gerät mit
destilliertem oder demineralisiertem Wasser zu verwenden. Bügeln Sie bei der ersten
Verwendung erst ein einfaches Tuch.
Bevor Sie das Gerät benutzen, entnehmen Sie den Wassertank (14) und füllen ihn bis MAX.
Dabei die Wasserlinie nicht überschreiten.
Wenn Sie den Wasserbehälter (14) aufsetzen wollen, setzen Sie zunächst den Wassertank auf
die Basis und drücken Sie dann auf den Wasserbehälter bis Sie ein "Klick" hören.
Page 19

Schließen Sie das Netzkabel und das Gerät an.
Betätigen Sie den Schalter (7), die Betriebsanzeige (6) und die Dampf Kontrollleuchte (8). Dies
bedeutet , dass der Kessel und das Bügeleisen anlaufen. Wenn der Boiler heiß genug ist läuft
an ihm durch Elektromagnetismus auftretendes Speisewasser herunter.
Die Wahl der Temperatur durch Temperaturknopf (4), das Dampfgerät zeigt den Bügelbereich,
welcher gewählt werden kann (Bild 3).
Nach etwa 2 Minuten geht die “Bügeleisen” Kontrollleuchte (2) aus. Dies bedeutet, dass das
Gerät mit Dampf benutzt werden kann.
Nach etwa 3 Minuten geht das Dampfanzeigelicht (8) aus. Dies bedeutet, das Gerät kann mit
Dampf benutzt werden.
Erhalt des Dampfes nach dem Drücken der Dampftaste (3).
Lassen Sie die Taste (3) und der Dampfstrom stoppt.
Dieses Gerät ist auch in der Lage, Wasserdampf in einer vertikalen Position zu erzeugen und
kann daher verwendet werden, um leichtes Gewebe leicht mit einem Dampfstrahl aufzufrischen.
Wenn Sie bei Beendigung des Bügelns den Schalter (7) drücken, verringern Sie die Kraft.
Drücken Sie die Dampftaste (3), um den Restdampf im Kessel (13) freizugeben.
Hinweis: Fahren Sie mit freilassen des Dampfes für einige Zeit fort, da die Pumpe dem
Kessel Wasser hinzufügt, der Teller unterbricht jedes Mal mit dem freilassen des
Dampfes für 10 Sekunden.
TROCKENBÜGELN
Schließen Sie das Gerät an das Netz an, drücken Sie den Schalter (7) und wählen Sie die
gewünschte Temperatur durch Drehen des Thermostat-Knopfes (4). Warten Sie, bis die
Bügeleisen -Kontrollleuchte (2) erlischt. Diese zeigt an, dass die gewünschte Temperatur erreicht
ist.
Für Trockenbügeln es nicht notwendig ist, um die Dampftaste drücken (3).
BEFÜLLEN DES TANKES
Dank der selbst Füllfunktion, besteht keine Notwendigkeit mehr, zu stoppen und zu warten, dass
der Kessel sich wieder füllt.
Wenn das Wasser im Kessel auf Minimum ist, wird die Pumpe automatisch eingeschaltet, um
den Kessel wieder zu füllen.
Wenn Sie die laute Speisewassergeräusche beim Bügeln hören, bedeutet dies, dass sich kein
Wasser in den Wassertank (14) befindet. Betätigen Sie den Schalter (7) und reduzieren die
Energie. Nachdem Sie den Wassertank (14) gefüllt haben, drücken Sie den Schalter (7) wieder,
und fahren mit dem Bügeln fort.
Zum weiterarbeiten, einfach, wie in der "Inbetriebnahme" Abschnitt beschrieben, den
Wasserstand in dem Selbstfüller-Tank wiederherstellen.
AUßERBETRIEBNAHME DES GERÄTES:
Stellen Sie zunächst sicher, dass das Gerät vollständig abgekühlt ist.
Leeren Sie den Wassertank (14).
Es ist nicht notwendig, den Kessel nach dem Bügeln zu entleeren.
Einzelschlauch (5) und Netzanschlusskabel (9) können in den Steckplatz für den einzelnen
Schlauch (12) und in die Aufbewahrungsbox für das Netzanschlusskabel (10) gelegt werden.
SPERREN DES BÜGELEISENS
Das Bügeleisen muss zum sperren mit dem hinteren Teil auf die Ruhematte gestellt werden (Fig11).
HINWEIS: Stellen Sie sicher, dass Sie das Bügeleisen dabei nicht versehentlich fallen lassen.
Page 20

PFLEGE IHRES VAPORELLA
Vor allen Wartungsarbeiten das Gerät vom Netz trennen. Für die Außenreinigung des Geräts
einfach ein feuchtes Tuch verwenden. Verwenden Sie keine Lösungs- oder Reinigungsmittel,
die dem Material schädigen können.
Immer die Oberfläche der Bügelplatte sauber halten. Um es zu reinigen, wischen Sie die kalte
Oberfläche mit einem feuchten Tuch ab. Das Gerät darf nicht mit Entkalkungsmittel gereinigt
werden.
Nicht über Reißverschlüsse, Haken, Ringe, etc. bügeln; da diese die Platte zerkratzen.
Wenn Sie fertig mit dem Bügeln sind, stellen Sie das Bügeleisen korrekt auf seinem Stand.
Stellen Sie sicher, dass keine Spuren von Wasser unter der Platte sind, da diese Flecken
verursachen. Bewahren Sie das Gerät an einem trockenen Ort auf.
REGELMÄSSIGE REINIGUNG DES KESSELS
· Um eine optimale Leistung zu erhalten, sollte der Kessel alle 10/20 Anwendungen in
Abhängigkeit von der Menge an Kalk im Wasser gereinigt werden.
· Trennen Sie das Gerät vom Strom und lassen Sie es für mindestens 2 Stunden abkühlen
· Nachdem das Gerät ausreichend abgekühlt ist ,öffnen Sie eine Seite des Reinigungsventils (11)
indem Sie gegen den das Reinigungsventil (Bild 5) drehen (Legen sie das Gerät nicht flach auf
den Boden, wenn Sie das Reinigungsventil öffnen, da sonst Wasser ausläuft).
VORSICHT! Versuchen Sie niemals, das Reinigungsventil (11) zu öffnen, während der Kessel
unter Druck steht.
· ACHTUNG: nicht mehr als 200 ml Wasser in den Kessel gießen. Das Wasser langsam hinein
gießen. Passen Sie auf das es nicht überläuft, da dieses das Gerät beschädigen könnte
· Spülen Sie den Boiler aus und gießen Sie das Wasser in das Waschbecken oder in einen
Behälter zum sammeln des Schmutzwassers.
· Wenn das Wasser sehr schmutzig ist, wiederholen Sie den Vorgang bis er sauber ist.
· Überprüfen Sie, dass die Dichtung sitzt und dass die Kappe richtig verschraubt ist.
· Füllen Sie den Wassertank wieder auf.
· Schalten Sie das Gerät wieder ein.
· Vor dem Bügeln, lassen Sie Dampf in das Waschbecken oder einen anderen Behälter und
überprüfen Sie, dass der Dampf sauber ist. Dies sollte einige Sekunden dauern.
· Setzen Sie das Bügeln normal fort.
Page 21

FEHLERBEHEBUNG
PROBLEM
URSACHE
LÖSUNG
Wasser kommt statt Dampf aus
dem Bügeleisen.
Die richtige Temperatur wurde
noch nicht erreicht.
Der Temperaturregler ist auf
den Minimalwert eingestellt.
Warten Sie auf die "Dampf
bereit" Kontrollleuchte und auf
das ausschalten der Bügeleisen
Kontrollleuchte.
Erhöhen Sie die Regelung der
Temperatur.
Das Gerät ist eingeschaltet,
aber es erzeugt keine Dampf
Wassertank ist leer oder nicht
richtig eingesetzt.
Füllen Sie den Wassertank.
Wie man ein professionelles Bügelergebnis erreicht
Eine normale Bügeleisen erzeugt nur eine geringe Menge an Wasserdampf. In diesem Fall ist
es notwendig, Dampf ständig zu entwickeln um falten im Stoff gut heraus zu bügeln.
Eine professionelles Bügelsystem funktioniert etwas anders. Das Gewebe wird zuerst vom
Dampf feucht um dann in einer zweiten Phase auf normale Weise gebügelt werden zu können.
In der ersten Phase (Dämpfung des Gewebes) halten Sie das Bügeleisen etwa 20 cm über
dem Stoff und drücken Sie Dampf (3). Halten Sie das Bügeleisen über ein Kleidungsstück in
einer kreisförmigen Bewegung so dass der enorme Dampfstoß den Stoff dämpft. Leicht
knittrige Kleidungsstücke erfordern nur wenige Augenblicke Dampf. Bei sehr schweren Stoffen
oder Kleidungsstücken mit besonders schwierigen Falten muss der Dämpfer einige Sekunden
länger angewendet werden. In der zweiten Phase (Trockenbügeln) prüfen Sie, ob der
Thermostat-Knopf in der richtigen Position für die Art des Gewebes ist. Lassen Sie die
Dampftaste los (3) und bügeln Sie das Kleidungsstück trocken. Die spezielle Bügelplatte wird
verhindern, dass die Wäschestücke glänzen. Mit dieser Bügeltechnik und den Hinweises in
der unten stehenden Tabelle ist es für Sie einfach, ein wirklich professionelles Bügelergebnis
zu bekommen.
Vorschläge
Teilen Sie die Wäsche nach den richtigen Bügeltemperaturen. Beginnen Sie mit dem Bügeln der
Kleidungsstücke welche eine niedrigere Temperatur erfordern. Nähere Angaben finden Sie in der
Tabelle am Ende dieser Broschüre. Materialien wie Samt und Wolle, sowie Accessoires wie z.B.
Handschuhe, Handtaschen usw. erlangen ein frisches Aussehen indem Sie einfach die Dampftaste
drücken und das Bügeleisen dabei in der Nähe der Oberfläche des Gewebes halten.
Möbelabdrücke welche sich noch im Teppich befinden, können an den aufgehäuften flächen mittels
Dampf und leichtem bürsten entfernt werden.
Besteh der Teppich aus Synthetik Material, keine hohen Temperaturen verwenden.
Page 22

Leitfaden für das perfekte Bügeln
Überprüfen Sie dem Typenschild auf dem Kleidungsstück, und interpretieren Sie das Symbol auf
dem Etikett wie folgt.
Typ
Stoff
Position des
Thermostat
Knopfes
Bügelanweisungen
Acetat
Acryl
Nylon
Trockenbügeln
Folgen Sie den Anweisungen auf dem Etikett des
Kleidungsstücks.
Diese Art von Gewebe erfordert in der Regel sehr leichtes
Bügeln.
Polyester
Kunstseide
Trockenbügeln
Auf links bügeln. Beim Bügeln von Mischgewebe: Wählen
Sie die niedrigste empfohlene Temperatur.
Seide
Trockenbügeln
Auf links bügeln.
Wolle
Leichte Baumwolle
Leichte Leinen
Dampfbügel
Auf links bügeln. Legen Sie ein dünnes Tuch über den Stoff
um eine glänzende Oberfläche zu vermeiden
Baumwolle
Feine Laken
Gestärkt
Stoffe
Dampfbügel
Befeuchten Sie das Tuch vor dem Bügeln. Schwerere
Stoffe und gestärkte Stoffe können auf der Vorderseite
gebügelt werden; dunklere Farben und gestickte Kleider
sollten auf links gebügelt werden.
Leinenstoffen
Dampfbügel
Verwenden Sie viel Dampf und bügeln Sie dunkle Stoffe
von innen nach außen um eine glänzende Oberfläche zu
vermeiden. Aufschläge und Ärmelbündchen, für ein
besseres Ergebnis, auf der rechten Seite bügeln.
UMWELT
ACHTUNG :
Werfen Sie nicht dieses Produkt, wie es mit anderen Haushaltsprodukten hat. Es gibt eine
Mülltrennungs von diesem Produkt in Gemeinden, Sie müssen Ihre lokalen Behörden über die
Orte, wo man dieses Produkt zurückgeben können zu informieren. In der Tat enthalten
elektrische und elektronische Produkte gefährliche Stoffe, die schädliche Auswirkungen auf die
Umwelt oder die menschliche Gesundheit haben und sollte recycelt werden. Das Symbol hier
darauf hinweisen, dass elektrische oder elektronische Geräte sollten sorgfältig ausgewählt
werden, ist ein fahrbarer Abfallbehälter mit einem Kreuz markiert.
Hergestellt und importiert : Adeva SAS 8 rue Marc Seguin 77290 Mitry-Mory FRANCE
www.hkoenig.com - contact@hkoenig.com - Tel. 01 64 67 00 01
Page 23

NEDERLANDS
Beschrijving
1) Verwarmingsplaat
2) "Strijkbout verwarming" lampje
3) Stoomknop
4) Thermostaatknop
5) Enkele slang (voedingskabel + stoomslang)
6) Aan / uit-indicator licht voor schakelaar
7) Inschakel-knop
8) Stoom indicatielampje
9) Stroomkabel met stekker
10) Opbergdoos voor voedingskabel
11) De reinigingsklep van de ketel
12) Opslag slot voor enkele slang
13) Boiler
14) Water tank
Page 24

Lees deze gebruikershandleiding zorgvuldig
voor installatie en gebruik van de machine.
Op deze manier bereikt u de best mogelijke resultaten en wordt een
maximale veiligheid gegarandeerd.
Veiligheidswaarschuwingen
Lees de volgende instructies zorgvuldig:
Controleer voor gebruik dat de stroomvoorziening overeenkomt met de gegevens op het typeplaatje
in de spanning. Sluit het apparaat alleen aan op een goed geaard stopcontact (minimaal 10A).
In het geval van onverenigbaarheid tussen de stekker en je stopcontact, laat u het stopcontact
vervangen door een elektricien.
De elektrische veiligheid van dit apparaat is alleen gegarandeerd als het goed is geaard
volgens de geldende voorschriften voor elektrische veiligheid. De fabrikant is niet aansprakelijk voor
eventuele schade als gevolg van onvoldoende aarding van het apparaat. Als u twijfelt, raadpleeg
dan een elektricien.
Laat geen water in de machine wanneer de kamer temperatuur 0 ℃ of lager.
Controleer na het uitpakken van het apparaat voor schade in geval van twijfel, het apparaat niet
gebruiken; contact op met een gekwalificeerde technicus.
Verpakkingsmateriaal (plastic zakken, piepschuim, enz.) Zijn een potentiële bron van gevaar en
moet buiten het bereik van kinderen worden gehouden. Het is af te raden adapters, verloopstekkers
en / of verlengsnoeren te gebruiken. In gevallen waarin dit onvermijdelijk is, altijd gebruik maken
van adapters, meervoudige contactdozen en uitbreidingen die voldoen aan de geldende
veiligheidsvoorschriften. Overschrijd niet het maximale vermogen aangegeven op de adapter.
Dit apparaat is uitsluitend bedoeld voor huishoudelijk gebruik. Elk ander gebruik van het
apparaat wordt beschouwd als oneigenlijk en dus gevaarlijk.
De fabrikant is niet aansprakelijk voor eventuele schade als gevolg van onjuist, onjuist of
onzorgvuldig gebruik van het apparaat.
Dit apparaat is geschikt voor gebruik door kinderen van 8 jaar of ouder. Personen met een
lichamelijke, zintuiglijke of verstandelijke handicap of zonder ervaring of kennis van het apparaat,
kunnen deze alleen gebruiken mits onder toezicht of wanneer duidelijke instructies zijn gegeven
waarmee de risico's van het gebruik van het apparaat worden geminimaliseerd. Kinderen mogen
niet met het apparaat spelen. Reiniging en onderhoud kunnen bovendien niet uitgevoerd worden
door kinderen zonder toezicht.
Bij het gebruik van een elektrisch apparaat, moet een paar basisregels in acht worden
genomen:
Indien het netsnoer beschadigd is, moet het worden vervangen door de fabrikant, zijn servicedienst
of een gelijkwaardig gekwalificeerd persoon om gevaar te voorkomen.
De vulopening mag tijdens gebruik geopend.
Laat de kinderen in de voorkant van het ijzer niet toestaan wanneer druk op de "Jet knop", zijn 's
shot serie is ver.
Bevestig kant is het voor het vastmaken van de stoompijp en stroomkabel.
Het is gemakkelijk voor u om de lange stoompijp en kabel op de buis klem te zetten, is het
gemakkelijk voor operationele.
In het bijzonder:
Gebruik het apparaat niet met natte of vochtige handen.
Gebruik het apparaat niet in de badkamer.
Trek niet aan de voedingskabel of aan het apparaat om de stekker uit het stopcontact te
verwijderen.
Stel het apparaat niet bloot aan weersinvloeden (regen, zon, vorst, etc.).
Page 25

Sta niet toe dat het apparaat wordt gebruikt door kinderen of onverantwoordelijke personen, tenzij
Stoomstrijken toegestaan
Voor droog strijken, ingestelde temperatuur regelknop (4) op ...
Stoomstrijken toegestaan
Voor droog strijken, ingestelde temperatuur regelknop (4) op ...
Droog strijken
Controleer de weerstand van de stof aan stoom strijken of droog ijzer
met temperatuursinstelknop (4) geplaatst die op ...
Niet strijken
Stoomstrijken of behandeling niet toegestaan
onder toezicht.
Dompel het apparaat niet onder in water.
Houd toezicht op het strijkijzer wanneer deze is ingeschakeld, omdat dit een bron van gevaar kan
zijn.
Alvorens het reinigen of onderhoud of het vullen van water in de container, haalt u het apparaat van
het elektriciteitsnet af door de stekker te verwijderen.
In geval van een storing of defect, schakelt u het apparaat uit en probeert u niet om reparaties uit te
voeren. Neem contact op met een geautoriseerd Service Center en vervang enkel met originele
onderdelen. Als u de bovenstaande punten niet in acht neemt, kan de veiligheid van het apparaat
afnemen.
Mocht u besluiten om het apparaat niet opnieuw kunnen gebruiken, halt u de stekker uit het
stopcontact en snijdt u de voedingskabel van het apparaat door om deze volledig onbruikbaar te
maken.
De installatie moet worden uitgevoerd volgens de instructies van de fabrikant.
De voedingskabel mag niet vervangen worden door de gebruiker, als dit vereist het gebruik van
speciale gereedschappen, als de voedingskabel beschadigd is, contact opnemen met een erkend
servicecentrum.
Vul het apparaat niet diect onder een kraan
Sta niet toe dat de voedingskabel in contact komen met het strijken plaat te komen.
Als de veiligheid cut-out ingrijpt,zal de strijkijzer niet meer functioneren. Om de normale werking te
herstellen. Contac een gekwalificeerde elektricien.
Richt de stoom nooit jet in de richting van personen, omdat dit zeer gevaarlijk kan zijn.
Laat het strijkijzer niet op een zeer natte stoffen.
Plaats het strijkijzer op de stand wanneer de plaat heet is.
Doe niet te veel van de ketel en geen vlekverwijderaars van simllar producten niet toe te voegen
aan het water.
Haal de stekker uit het stopcontact als het apparaat niet in gebruik is. Het apparaat niet onnodig
ingeschakeld laten.
Maak nooit de veiligheidsklep als het apparaat is aangesloten op het elektriciteitsnet.
Gebruik een trechter om de ketel vullen zonder dat het water overloopt.
De ketel moet op een vlakke ondergrond staan, dat bijzonder goed bestand tegen hoge
temperaturen kan.
GEBRUIKSAANWIJZINGEN
Controleer het etiket van de fabrikant op het kledingstuk, en interpreteren van het symbool op het
etiket als volgt:
STOOMSTRIJKEN
Het apparaat maakt gebruik van gewoon kraanwater.
Als het water erg hard is (hardheid hoger than27 graden Frans) .Raden wij aan om met gedistilleerd
Page 26

of gedemineraliseerd water te werken.
Bij gebruik van het strijkijzer voor de eerste keer, strijkt dan eerst een doek.
Voordat u het apparaat, genomen langs de watertank (14) en vul het, niet meer dan MAX waterlijn.
Als u wilt terug te nemen de watertank (14), in de eerste plaats zet de watertank basis en duw het
waterreservoir zachtjes, na "klik" hoort, betekent dit dat het waterreservoir in de plaats.
Aansluiten van het apparaat en het netsnoer.
Druk op de schakelaar knop (7), lampje (6) en de stoom beschikbaar indicatielampje (8) helder,
betekent dit dat de ketel en ijzer begint te lopen.
Feed-water uit het elektromagnetisme waterpomp naar beneden de ketel bij de ketel (13)
verwarming genoeg.
Het kiezen van de temperatuur door de temperatuur knop (4), de stoom apparaat geven strijken
gebied dat kan worden gekozen (figuur 3).
Ongeveer 2 minuten, zal verwarming indicator (2) sterven, betekent dit dat het apparaat kan worden
met behulp van de stoom.
Ongeveer 3 minuten, zal stoom beschikbare licht (8) sterven, betekent dit dat het apparaat kan
worden met behulp van de stoom.
Verkrijgen van stoom na het indrukken van de stoom knop (3).
Laat de knop (3) en de stoom stopt.
Dit apparaat kan ook stoom in een verticale positie en kan daarom worden gebruikt om weefsels
eenvoudig verfrissen met een stoomstoot.
Wanneer u het beëindigen van het strijken, drukt u op de switch knop (7), het kappen van de macht,
drukt de stoom knop (3) om de resterende stoom vrij te geven in de ketel (13).
OPMERKING: Om stoom vrij te maken voor lange tijd, voegt de pomp water in de ketel. De
zoolplaat zal dan ongeveer 10 seconden stoppen met stoom vrijmaken.
DROOG STRIJKEN
Sluit het apparaat op het stroomnet, drukt u op de switch knop (7), selecteer dan de gewenste
temperatuur met behulp van de thermostaatknop (4) .Wait totdat het ijzer verwarming lampje (2)
gaat uit, wat aangeeft dat de gewenste temperatuur is geweest bereikt.
Voor droge strijken is het niet nodig om op de stoomknop te drukken (3).
VULLEN VAN DE TANK
Dankzij de zelfvullende functie, is er geen noodzaak meer om te stoppen en wachten terwijl de ketel
weer opvult.
Wanneer het water in de boiler op minimumniveau, wordt de pomp automatisch geactiveerd die de
ketel opnieuw vult.
Als u het luide watervul geluid hoort tijdens het strijken, betekent dit dat er geen water in de
watertank (14) zit. Druk de switch knop (7) en haal het apparaat van de elektriciteit af. Na het vullen
van de watertank (14), drukt u de schakelaar knop (7) weer, gaan strijken.
OPBERGEN VAN HET APPARAAT
Zorg er eerst voor dat het apparaat volledig is afgekoeld.
Leeg het waterreservoir (14).
Het is niet nodig de ketel afvoer na het strijken.
Stoomleiding (5) en het netsnoer (9) kon de ontvangst in de draad groef (12) en lijn doos (10) zijn.
VASTZETTEN VAN DE STRIJKIJZER
Om de strijkijzer vast te zetten, moet deze worden ingesteld op het achterste deel van de rest mat
(Fig11).
Page 27

LET OP: zorg ervoor dat u stevig haak de ijzer om te voorkomen dat per ongeluk vallen.
PROBLEEM
OORZAAK
OPLOSSING
ZORG VOOR UW STRIJKIJZER
Alvorens het uitvoeren van onderhoudswerkzaamheden, haal de stekker uit het stopcontact.
Om het lichaam van het apparaat te reinigen, gewoon gebruik maken van een vochtige doek.
Gebruik geen oplosmiddelen of reinigingsmiddelen die het oppervlak kunnen beschadigen.
Houd het oppervlak van de strijken plaat perfect schoon. Om het schoon te maken, veeg het koude
oppervlak met een vochtige doek. Het apparaat mag niet worden schoongemaakt met
ontkalkingsmiddelen.
Niet strijken dan ritsen, haken, ringen, enz; Deze kunnen krassen op de plaat.
Wanneer u klaar bent met strijken. Plaats het strijkijzer correct op de standaard. Zorg ervoor dat er
geen sporen van water onder de plaat, want deze kunnen vlekken veroorzaken.
Bewaar het apparaat op een droge plaats
PERIODIEKE REINIGING VAN DE KETEL
· Om een optimale prestatie te behouden, het reinigen van de ketel iedere 10/20 toepassingen,
afhankelijk van de hoeveelheid kalk in het water.
· Koppel het apparaat en laat het afkoelen gedurende minstens 2 uur.
· Na het apparaat koel genoeg opgemaakt ene kant van de schoonmaak klep (11), gedwongen
om te draaien tegen de klok in de schoonmaak klep (figuur 5) (niet plat van het apparaat liggen
wanneer u de schoonmaak klep te openen, anders zal het water lekkage) .
LET OP! Probeer nooit de schoonmaak klep (11) openen terwijl de ketel onder druk staat.
LET OP: niet meer dan 200 ml water gieten in de ketel. Giet het water langzaam, dat evenwel
niet tot het overflow te laten, aangezien dit het apparaat kan beschadigen.
· Spoel de ketel en giet het water weg in de gootsteen of in een container voor het verzamelen
van vuil water.
· Als het water erg vuil is, herhaal de handeling tot het schoon is.
· Controleren of de afdichting aanwezig is en dat de dop goed vastgeschroefd.
· Vul het waterreservoir opnieuw.
· Zet het apparaat weer aan.
· Alvorens het strijken, laat stoom in de gootsteen of een andere container en controleer of de
stoom schoon is. Dit moet een paar seconden duren.
· Resume strijken normaal.
PROBLEEMOPLOSSINGEN
Page 28

Water komt uit het strijkijzer in
plaats van stoom
Het apparaat heft nog niet de
juiste temperatuur bereikt.
Het temperatuur controle panel
staat op het minimum afgesteld.
Wacht tot het ‘Steam Ready’
lampje brandt en tot de
strijkindicator uit is geschakeld.
Verhoog de temperatuur op het
controle paneel.
Het apparaat staat aan, maar
produceert geen stoom
Watertank is leeg of niet correct
geinstalleerd
Vul de watertank.
Het krijgen van een professioneel strijkresultaat
Een normaal ijzer genereert slechts een kleine hoeveelheid stoom. In dit geval moeten
producten stoom voortdurend om elimineren vouw in het weefsel te strijken.
Een professioneel strijksysteem werkt nogal verschillend. Het weefsel wordt eerst vocht door
de stoom en vervolgens in een tweede fase, droog gestreken op de normale manier. Dit
betekent dat elke. Kleinste vouw wordt verwijderd en uw kleding wordt gestreken tot in de
perfectie.
In de eerste fase (stoom demping van het weefsel), Het strijkijzer ongeveer 20 cm boven de
stof en druk stoom (3). Passeert het strijkijzer boven het kledingstuk in een cirkelvormige
beweging, zodat de krachtige stoomstoot dempt de stof. Licht gekreukte kledingstukken
vereisen slechts een paar momenten van stomen. Terwijl zeer zware stoffen of kleding met
bijzonder moeilijke plooien demper moet zijn, zodat stoom moet worden toegepast voor een
paar seconden meer.
Tijdens de tweede fase (droog strijken), controleer dan of de thermostaatknop op de juiste
positie voor het type weefsel; de stoom knop (3) en droog-ijzer het kledingstuk los. De speciale
strijken plaat wordt voorkomen dat het wasgoed steeds glanzend. Met behulp van deze
strijken techniek, en naar aanleiding van de suggesties in de onderstaande tabel vindt u het
gemakkelijk om uw kleding een echt professionele strijkafwerking te geven.
Gids voor het perfecte strijken
Controleer het etiket van de fabrikant op het kledingstuk, en interpreteren van het symbool op
het etiket als volgt.
Type stof
Afstelling
van de
termostaat
Srijkinstructies
Suggesties
Verdeel het wasgoed volgens de juiste strijk temperaturen. Begin met het strijken van de kleding die
een lagere temperatuur nodig. Voor nadere bijzonderheden, zie de tabel aan het einde van dit
boekje.
Stoffen zoals fluweel en wol, en accessoires zoals handschoenen, tassen, enz. Zullen hun
gloednieuwe look en textuur te herwinnen door simpelweg het passeren van het ijzer in de buurt
van het oppervlak van het weefsel en op de stoomknop.
Sporen achtergelaten in tapijten van meubilair kan worden verwijderd door toepassing van stoom
op de delen waar de paal wordt gemalen en het borstelen licht.
Als het tapijt is gemaakt van synthetisch materiaal, kan een hoge temperatuur selecteren.
Page 29

Acetaat
Acryl
Nylon
Droog strijken
Volg de instructies op het etiket van het kledingstuk.
Dit soort stof vereist in het algemeen zeer licht strijken.
Pollester
Rayon
Droog strijken
Binnenstebuiten strijken. Bij het strijken gemengde stoffen.
Selecteer de laagst aanbevolen temperatuur.
Zijde
Droog strijken
Binnenstebuiten strijken.
Wol
Licht katoen
Licht linnen
Stoomstrijken
Binnenstebuiten strijken. Plaats een dunne doek over het
weefsel om een glanzend oppervlak te voorkomen
Katoen
Fijn linnen
Gesteven stoffen
Stoomstrijken
Bevochtig de stof voordat strijken. Zwaardere stoffen en
gesteven stoffen kan worden gestreken op de voorkant;
donkere kleuren en geborduurde kledingstukken moeten
worden gestreken binnen naar buiten.
Linnen
Stoomstrijken
Gebruik veel stoom en ijzer donkere stoffen binnen naar
buiten om een glanzende afwerking, Iron revers en
manchetten aan de rechterkant voor een betere afwerking
te voorkomen.
MILIEU
ATTENTIE :
Dit apparaat mag niet met uw ander huishoudelijke toestellen worden verwijdert. Dit product moet op een
geselecteerde stortplaats verwijdert worden. U kunt bij de gemeente een indiceerde plaats aanvragen.
Elektrisch en elektronische producten kunnen gevaarlijke stoffen inhouden die schadelijk zijn voor
mensen en het milieu en moet recycled worden. Het symbool aan de kant geeft aan dat het een
elektrisch en elektronisch toestel is en zijn dus artikelen van een selectieve collectie. Het beeld geeft een
afvalbak met een X teken aan.
Geproduceerd en geïmporteerd door : Adeva SAS 8, Rue Marc Seguin 77290, Mitry-Mory FRANKRIJK
www.hkoenig.com - contact@hkoenig.com – Telefoon: 01 64 67 00 01
Page 30

ESPANOL
Descripción
1) Placa de calentamiento
2) Luz que indica el calentamiento de la plancha
3) Pulsador de vapor
4) Mando del termostato
5) Manguera individual (cable de alimentación + manguera de vapor)
6) Luz de encendido / apagado para el interruptor
7) Interruptor
8) Luz indicadora de vapor
9) Cable de alimentación con enchufe
10) Caja de almacenamiento para el cable de alimentación
11) Válvula de limpieza de la caldera
12) Ranura de almacenamiento de la manguera
13) Caldera
14) Depósito de agua
Page 31

Lea con atención este manual de instrucciones
antes de instalar y utilizar este aparato para
obtener los mejores resultados posibles y la máxima seguridad de
funcionamiento.
Instrucciones de seguridad
Lea atentamente las siguientes instrucciones:
Antes del uso, compruebe que la fuente de alimentación se corresponde con el voltaje indicado en
la placa de número de serie. Conecte el aparato sólo a un enchufe con toma de tierra (mínimo 10A).
En caso de incompatibilidad entre el enchufe y el zócalo, haga sustituir la toma por un electricista
calificado.
La seguridad eléctrica del aparato sólo está garantizada cuando está conectado a tierra
correctamente de acuerdo a la normativa vigente de seguridad eléctrica. El fabricante no se hace
responsable por los daños derivados de la puesta a tierra inadecuada del aparato. En caso de duda,
consulte a un electricista calificado.
No deje agua en la máquina cuando la temperatura ambiente es de 0 ℃ o menor.
Después de desembalar, compruebe si el aparato está dañado, en caso de duda, no utilice el
aparato y póngase en contacto con un técnico cualificado.
Los materiales de embalaje (bolsas de plástico, espuma de poliestireno, etc.) son una fuente
potencial de peligro y deben mantenerse fuera del alcance de los niños.
No es aconsejable el uso de adaptadores, tomas múltiples y / o extensiones. En los casos en los
que esto es inevitable, siempre use adaptadores, tomas múltiples y extensiones que se ajusten a
las normas de seguridad actuales. No sobrepasar la capacidad máxima indicada en el adaptador.
Este aparato está diseñado sólo para uso doméstico. Cualquier otro uso del aparato se considera
inadecuado y por tanto peligroso.
Este aparato puede ser utilizado por niños mayores de 8 años y personas con capacidades físicas,
sensoriales o mentales reducidas o personas con falta de experiencia en el uso de este tipo de
aparato si son adecuadamente supervisados o si se les ha dado instrucciones para el uso del
aparato con las medidas de seguridad necesarias. No deje que los niños jueguen con el aparato.
La limpieza y el mantenimiento no deben de ser realizados por niños sin la supervisión
correspondiente.
El fabricante no se hace responsable por los daños derivados de un uso indebido, incorrecto o
negligente del aparato.
Al usar cualquier aparato eléctrico, se deben observar algunas reglas básicas:
Si el cable de alimentación está dañado, debe ser reemplazado por el fabricante o su agente de
servicio o por personal cualificado con el fin de evitar todo tipo de peligro.
La abertura de llenado no debe abrirse durante el uso.
No permita que los niños estén ubicados en frente de la plancha cuando pulse el botón "Jet", su
alcance es bastante extenso.
El lazo de encaje es para asegurar la manguera de vapor y el cable de alimentación.
Está diseñado para manejar fácilmente la manguera y el cable de alimentación.
Cuidado:
No toque el aparato con las manos o los pies mojados o húmedos.
No utilice el aparato en cuartos de baño.
No tire del cable de alimentación o del aparato para quitar el enchufe del zócalo.
No deje el aparato expuesto a agentes atmosféricos (lluvia, sol, heladas, etc.).
No permita que el aparato sea utilizado por niños o personas irresponsables a menos que bajo
supervisión.
No sumerja el aparato en agua.
No dejar la plancha sin vigilancia cuando está encendida, ya que esto puede ser una fuente de
peligro.
Page 32

Antes de efectuar cualquier operación de limpieza o de mantenimiento o llenar con agua el
Planchar con vapor
Para planchar en seco, ajuste la perilla de ajuste de temperatura
(4)…
Planchar con vapor
Para planchar en seco, ajuste la perilla de ajuste de temperatura
(4)…
Planchar en seco
Compruebe la resistencia del tejido al vapor o planche en seco con
mando de ajuste de temperatura fijada en (4)...
No planchar
Planchado no permitido.
recipiente, siempre desconecte el aparato de la red eléctrica quitando el enchufe.
En caso de avería o mal funcionamiento, apague el aparato y no intente llevar a cabo las
reparaciones usted mismo. Póngase en contacto con un centro de servicio autorizado y sólo
permita el uso de repuestos originales. El incumplimiento de los puntos anteriores puede afectar a
la seguridad del aparato.
Si usted decide no utilizar el aparato de nuevo, retire el enchufe de la toma de corriente y corte el
cable de alimentación para hacer que el aparato quede completamente inoperativo.
La instalación debe ser llevada a cabo de acuerdo con las instrucciones del fabricante.
El cable de alimentación no debe ser sustituido por el usuario, ya que esto requiere el uso de
herramientas especiales, si el cable de alimentación está dañado, póngase en contacto con un
centro de servicio autorizado.
No llene el aparato colocándolo directamente debajo del grifo.
No permita que el cable de alimentación entre en contacto con la placa de planchado.
Si la desconexión de seguridad interviene, la plancha ya no funcionará. Para restablecer el
funcionamiento normal. Contacte con un electricista calificado.
No dirigir el chorro de vapor en la dirección de personas, ya que esto puede ser extremadamente
peligroso.
No utilice la plancha sobre tejidos muy húmedos.
No coloque la plancha sobre el soporte cuando la placa está caliente.
No llene demasiado la caldera y no agregue quitamanchas o productos similares al agua.
Retire el enchufe de la toma de corriente cuando el aparato no está en uso. No deje el aparato
encendido innecesariamente.
Nunca desenroscar la válvula de seguridad cuando el aparato está conectado a la red de
alimentación.
Use un embudo para llenar la caldera sin que el agua se desborde.
La caldera debe ser colocada sobre una superficie plana que sea particularmente resistente a las
altas temperaturas.
INSTRUCCIONES DE USO
Revise la etiqueta del fabricante de la prenda, los símbolo en la etiqueta tienen estos significados:
PLANCHADO A VAPOR
El aparato utiliza agua de grifo.
Si el agua es muy dura (dureza mayor a 27 grados), sugerimos usar agua destilada o
desmineralizada.
Cuando se utiliza la plancha por primera vez, planchar una tela simple primero.
Antes de utilizar el aparato, llene el depósito de agua (14), no supere la línea MAX.
Cuando desee volver a colocar el depósito de agua (14), en primer lugar, ponga la base del
depósito de agua y luego empuje el depósito de agua suavemente, después de oír un "clic", el
tanque de agua está bien ubicado en su lugar.
Page 33

Conexión del aparato y del cable de alimentación.
Presione el interruptor (7), la luz indicadora de encendido (6) y el indicador luminoso de vapor
de agua disponible (8) se encenderán, significa que la caldera y la plancha empiezan a
funcionar.
Puede usar el vapor cuando la caldera (13) se ha calentado lo suficiente.
Elija la temperatura con el mando de temperatura (4), en la (Fig.3) se indica las opciones.
Después de alrededor de 2 minutos, el indicador de calentamiento (2) se apagará, esto significa
que el aparato puede utilizar el vapor.
Después de alrededor de 3 minutos, la luz de vapor disponible (8) se apagará, esto significa
que el aparato puede utilizar el vapor.
Obtener vapor después de pulsar el botón de vapor (3).
Suelte el botón (3) para detener el flujo de vapor.
Este aparato también es capaz de generar vapor en una posición vertical y por lo tanto se
puede utilizar para refrescar telas fácilmente con un chorro de vapor.
Al poner fin a la plancha, presione el botón del interruptor (7), reducir la potencia, pulse el botón
de vapor (3) para liberar el vapor residual en la caldera (13).
NOTA: Si desea continuar usando vapor durante mucho tiempo, cuando la bomba añade
agua a la caldera, la plancha dejará de liberar vapor durante un corto tiempo, casi 10
segundos.
PLANCHADO EN SECO
Conecte el aparato a la red eléctrica, presione el interruptor (7), a continuación, seleccionar la
temperatura deseada girando el mando del termostato (4) . Espere hasta que la luz de
calentamiento de la plancha (2) se apague, lo que indica que la temperatura deseada ha sido
alcanzada.
Para el planchado en seco no es necesario pulsar el botón de vapor (3).
LLENADO DEL DEPÓSITO
Gracias a la función de auto-llenado, ya no hay ninguna necesidad de parar y esperar a que la
caldera se llene de nuevo.
Cuando el agua en la caldera está en el nivel mínimo, la bomba se activa automáticamente y
llena la caldera una vez más.
Si escucha el sonido de alimentación del agua cuando está planchando, esto significa que no
hay agua en el depósito de agua (14) . Presione el interruptor (7) y reduzca la potencia.
Después, llene el depósito (14) de agua, a continuación, pulse el interruptor (7) de nuevo y siga
planchando.
Para seguir planchando, simplemente restaure el nivel de agua en el depósito de auto-llenado
como se describe en el párrafo de "Preparación"..
APAGANDO EL APARATO
En primer lugar asegúrese de que el aparato se haya enfriado por completo.
Vacíe el depósito de agua (14).
No es necesario drenar la caldera después de planchar.
La manguera de vapor (5) el cable de alimentación (9) pueden guardarse en el lazo (12) y en la
caja para el cable (10).
ASEGURANDO LA PLACHA
Para bloquear la plancha se debe ponerse en la parte posterior de la placa de reposo (Fig. 11).
NOTA: asegúrese de conectar firmemente la plancha para evitar que se caiga accidentalmente.
Page 34

CUIDADO DE SU PLANCHA
Antes de efectuar cualquier operación de mantenimiento, siempre desconecte el aparato de la
red de alimentación.
Para la limpieza externa del aparato utilizar simplemente un paño húmedo. No utilice
disolventes o detergentes que podrían dañar la superficie plástica.
Siempre mantenga la superficie de la placa de planchar perfectamente limpia. Para limpiarla,
simplemente frote la superficie fría con un paño húmedo. El aparato no se debe limpiar con
químicos.
No planche sobre cierres, ganchos, anillos, etc. ya que pueden rayar la placa.
Cuando haya acabado de planchar. Coloque la plancha correctamente en su soporte.
Asegúrese de que no hay trazas de agua debajo de la placa, ya que estos pueden causar
manchas.
Guarde el aparato en un lugar seco
LIMPIEZA PERIÓDICA DE LA CALDERA
· Para mantener un rendimiento óptimo, limpie el depósito cada 10/20 usos en función de la
dureza del agua.
· Desconecte el aparato y deje que se enfríe durante al menos 2 horas.
· Después de que el aparato se haya enfriado lo suficiente ponga la válvula de limpieza (11), gire
la válvula de limpieza en el sentido opuesto a las agujas del reloj (fig. 5) (no acueste el aparato
cuando se abre la válvula de limpieza, de lo contrario el agua se fugará).
¡CUIDADO! Nunca intente abrir la válvula de limpieza (11), mientras que la caldera se
encuentra bajo presión.
PRECAUCIÓN: No vierta más de 200 ml de agua en la caldera. Vierta el agua lentamente, con
cuidado de no dejar que se derrame ya que podría dañar el aparato.
· Aclarar la caldera y luego echar el agua en el fregadero o en un recipiente para recoger el agua
sucia.
· Si el agua está muy sucia, repetir la operación hasta que esté limpia.
· Compruebe que el sello esté bien puesto y que la tapa está bien enroscada.
· Llene el tanque de agua de nuevo.
· Vuelva encender el aparato.
· Antes de planchar, suelte vapor en el lavabo o en otro contenedor y compruebe que el vapor
está limpio. Esto debe tomar unos segundos.
· Reanudar el planchado normalmente.
Page 35

SOLUCIÓN DE PROBLEMAS
PROBLEMA
CAUSA
SOLUCIÓN
Sale agua en lugar de vapor
El aparato todavía no ha
alcanzado la temperatura
adecuada.
El control de la temperatura se
ha fijado en el mínimo.
Espere a que la luz indicadora
"STEAM READY" se apague.
Aumentar la regulación del
control de temperatura.
El aparato está encendido, pero
no está produciendo vapor
El depósito de agua está vacío
o no ha sido insertado
correctamente.
Llene el depósito de agua.
Cómo conseguir un acabado de planchado profesional
Una plancha normal genera sólo una pequeña cantidad de vapor. En este caso es necesario
vapor constante para eliminar arrugas en el tejido a planchar.
Un sistema de planchado profesional trabaja de forma diferente. La tela primero se humedece
por el vapor y, a continuación, en una segunda fase, en seco planchada en la forma normal.
Esto significa que cada pequeño pliegue desaparece y su ropa se planchan a la perfección.
En la primera fase (vaporización de la tela), mantenga la plancha unos 20 cm por encima de la
tela y pulse el vapor (3). Pasaela plancha sobre la prenda en un movimiento circular para que
el potente chorro de vapor humedezca la tela. Las prendas ligeramente arrugadas requieren
sólo unos momentos de vapor. Mientras telas muy pesadas o prendas con pliegues
especialmente difíciles deben ser más humedecidas, así que el vapor se debe aplicar durante
unos segundos más.
Durante la segunda fase (el planchado en seco), compruebe que el mando del termostato
está en la posición correcta para el tipo de tejidos; suelte el botón de vapor (3) y planche en
seco la prenda. La placa de planchado especial impedirá que los tejidos queden brillantes.
Usando esta técnica de planchado, y siguiendo las sugerencias en el cuadro a continuación,
usted verá que es fácil dar a sus prendas un planchado con un acabado realmente
profesional.
Sugerencias
Divida el lavado de acuerdo con las temperaturas de planchado correctas. Iniciar planchando las
prendas que requieren una temperatura más baja. Para más detalles, consulte la tabla al final de
este manual.
Las telas como el terciopelo y lana, y los accesorios tales como guantes, bolsos, etc. recuperarán
su aspecto nuevo y textura simplemente pasando la plancha cerca de la superficie de la tela y
pulsando el botón de vapor.
Las huellas dejadas en las alfombras por los muebles se pueden eliminar mediante la aplicación de
vapor de agua en las partes que han sido aplastadas.
Si la alfombra está hecha de material sintético, no seleccione una temperatura alta.
Page 36

Guía para un planchado perfecto
Revise la etiqueta del fabricante de la prenda, los símbolo en la etiqueta tienen estos
significados.
Tipo de tela
Posición del
termostato
Instrucciones de planchado
Acetato
Acrílico
Nylon
Planchado en seco
Siga las instrucciones en la etiqueta.
Este tipo de tela generalmente requiere un planchado muy
ligero.
Poliester
Seda artificial
Planchado en seco
Planche de adentro hacia afuera. Cuando planche telas
mixtas siempre seleccione la temperatura más baja
requerida por las telas.
Seda
Planchado en seco
Planche de adentro hacia afuera.
Lana
Algodón fino
Lino fino
Planchado al vapor
Planche de adentro hacia afuera. Coloque una tela
delgada sobre la tela que va a planchar para evitar un
acabado en la tela plancha que brile.
Algodón
Lino
Telas almidonadas
Planchado al vapor
Humedezca la tela antes de plancharla. Las telas más
gruesas pueden ser planchadas por la parte frontal. Las
telas bordadas y de colores más oscuros deben de ser
planchadas de adentro hacia afuera.
Lino
Planchado al vapor
Use bastante vapor y planche las telas de adentro hacia
afuera para evitar un acabado de planchado con brillo,
planche las solapas y puños por abajo para tener un mejor
acabado.
MEDIO AMBIANTE
ATENCIÓN :
No se deshaga de este producto como lo hace con otros productos del hogar. Existe un sistema
selectivo de colecta de este producto puesto en marcha por las comunidades, debe de informarse en su
ayuntamiento acerca de los lugares en los que puede depositar este producto. De hecho, los productos
eléctricos y electrónicos pueden contener substancias peligrosas que tienen efectos nefastos para el
medio ambiente o para la salud humana y deben ser reciclados. El símbolo aquí presente indica que los
equipos eléctricos o electrónicos deben de ser cuidadosamente seleccionados, representa un recipiente
de basura con ruedas marcado con una X.
Fabricado e importado por : Adeva SAS 8 rue Marc Seguin 77290 Mitry-Mory FRANCE
www.hkoenig.com - contact@hkoenig.com - Tel. 01 64 67 00 01
Page 37

ITALIANO
Descrizione
1) Piastra riscaldante
2) Spia "riscaldamento ferro"
3) Pulsante richiesta vapore
4) Manopola termostato
5) Tubo singolo (cavo di alimentazione + tubo vapore)
6) Spia interruttore On/Off
7) Interruttore
8) Spia del vapore
9) Cavo di alimentazione con spina
10) Vano di stoccaggio per il cavo di alimentazione
11) Valvola di pulizia della caldaia
12) Vano di stoccaggio per tubo singolo
13) Caldaia
14) Serbatoio dell’acqua
Page 38

Leggere attentamente questo manuale prima di
utilizzare l’apparecchio; solo in questo modo sarà
possibile sfruttare al meglio tutte le sue potenzialità in sicurezza.
Avvertenze di sicurezza
Leggere attentamente le seguenti istruzioni:
Prima dell'uso, verificare che la tensione del vostro impianto elettrico corrisponda alla tensione
indicata sulla targhetta dell’apparecchio. Collegare l'apparecchio solo a una presa di corrente dotata
di messa a terra (minimo 10A).
In caso di incompatibilità tra la spina e la presa, far sostituire la presa da un tecnico qualificato.
La sicurezza elettrica di questo apparecchio è garantita solo quando esso è collegato a una presa
con messa a terra secondo le vigenti norme di sicurezza. Il costruttore declina ogni responsabilità
per eventuali danni derivanti dall’uso di questo apparecchio se collegato a una presa inadeguata
senza messa a terra. In caso di dubbio, consultare un elettricista qualificato.
Non lasciare acqua all’interno dell’apparecchio quando la temperatura ambiente è di 0°C o inferiore.
Dopo il disimballaggio, controllare l'apparecchio per eventuali danni. In caso di dubbio, non
utilizzare l'apparecchio e contattare un tecnico qualificato.
I materiali di imballaggio (sacchetti di plastica, polistirolo espanso, ecc.) sono una potenziale fonte
di pericolo e devono essere tenuti fuori dalla portata dei bambini.
È sconsigliato l'uso di adattatori, prese multiple e/o prolunghe. Nei casi in cui questo è inevitabile,
usare sempre adattatori, prese multiple e prolunghe conformi alle vigenti norme di sicurezza. Non
superare la potenza massimale indicata sull’etichetta.
Questo apparecchio è stato progettato solo per uso domestico. Ogni altro uso dell'apparecchio è da
considerarsi improprio e quindi pericoloso.
Si declina ogni responsabilità per eventuali danni derivanti da un uso improprio, scorretto o
negligente dell'apparecchio.
Questo apparecchio può essere utilizzato da utenti minori di 8 anni e da persone con capacità
fisiche, sensoriali o mentali ridotte o con mancanza di esperienza o di conoscenza
dell'apparecchio, purché siano adeguatamente monitorati e abbiano ricevuto le istruzioni per l'uso
del dispositivo in modo sicuro onde evitare i rischi annessi all'uso dell'apparecchio. I bambini non
dovrebbero giocare con l'apparecchio. La pulizia e la manutenzione dell'apparecchio non devono
essere eseguite da bambini senza sorveglianza.
Quando si utilizza qualsiasi apparecchio elettrico, si devono osservare alcune regole di base:
Se il cavo di alimentazione è danneggiato, deve essere sostituito dal costruttore o dal suo agente di
servizio o una persona qualificata al fine di evitare situazioni pericolose.
La bocca del serbatoio non deve essere aperta durante l'uso.
Assicurarsi che non vi siano bambini di fronte all’apparecchio quando si preme il tasto vapore,
poiché il getto è molto potente.
È opportuno conservare il tubo e il cavo negli appositi vani.
Mettere il tubo lungo del vapore e il cavo nell’apposito vano è facile e pratico al funzionamento
dell’apparecchio.
In dettaglio:
Non toccare l'apparecchio con mani o piedi bagnati o umidi.
Non usare l'apparecchio in bagno.
Non tirare il cavo di alimentazione o l'apparecchio per staccare la spina dalla presa a muro.
Non lasciare l'apparecchio esposto ad agenti atmosferici (pioggia, sole, gelo, ecc.)
Non permettere che l'apparecchio sia usato da bambini o persone irresponsabili se non sotto
supervisione.
Non immergere l'apparecchio in acqua.
Non lasciare il ferro incustodito quando è acceso, in quanto può essere fonte di pericolo.
Page 39

Prima di effettuare qualsiasi operazione di pulizia, manutenzione o riempimento del serbatoio,
Stiratura a vapore consentita
Per la stiratura a secco, regolare la manopola della temperatura (4) su ...
Stiratura a vapore consentita
Per la stiratura a secco, regolare la manopola della temperatura (4) su ...
Stiratura a secco
Controllare la resistenza del tessuto da stirare a vapore o a secco e impostare la
manopola della temperatura (4) su ...
Non stirare
Non è consentita nessuna stiratura o altro trattamento.
staccare sempre la spina dalla presa elettrica tirando la spina e non il cavo.
In caso di guasto o malfunzionamento, spegnere l'apparecchio e non tentare di effettuare
riparazioni autonomamente. Contattare un centro di assistenza autorizzato ed esigere parti di
ricambio originali. La mancata osservanza dei punti sopra citati può compromettere la sicurezza
dell'apparecchio.
Se si decide di non utilizzare più l'apparecchio, staccare la spina dalla presa e tagliare il cavo di
alimentazione in modo da rendere la macchina completamente non operativa.
L'installazione deve essere effettuata secondo le istruzioni fornite dal produttore.
Il cavo di alimentazione non deve essere sostituito dall'utente, in quanto richiede l'utilizzo di attrezzi
speciali, se il cavo di alimentazione è danneggiato, contattare un centro di assistenza autorizzato.
Non riempire l'apparecchio sotto l'acqua corrente.
Non permettere che il cavo di alimentazione venga a contatto con la piastra di stiratura.
Se il dispositivo di sicurezza “cut-out” interviene, il ferro terminerà di funzionare. Per ripristinare il
normale funzionamento, contattare un elettricista qualificato.
Non dirigere mai il getto del vapore in direzione di persone, in quanto questo può essere
estremamente pericoloso.
Non utilizzare il ferro su tessuti molto bagnati.
Non posizionare il ferro sul supporto quando il piatto è caldo.
Non riempire troppo la caldaia e non aggiungere smacchiatori o altri prodotti simili nell'acqua.
Togliere la spina dalla presa di corrente quando l'apparecchio non è in uso. Non lasciare
l'apparecchio acceso inutilmente.
Non svitare mai la valvola di sicurezza quando l'apparecchio è collegato alla presa di alimentazione.
Usare un imbuto per riempire la caldaia senza traboccare l'acqua.
La caldaia deve essere posta su una superficie piana e particolarmente resistente alle alte
temperature.
ISTRUZIONI PER L’USO
Controllare l'etichetta del produttore sul capo d’abbigliamento e interpretare il simbolo sull'etichetta
come segue:
STIRATURA A VAPORE
L'apparecchio utilizza normale acqua di rubinetto.
Se il valore della durezza dell’acqua del vostro rubinetto è molto alta (maggiore di 27), si
consiglia di usare acqua distillata o demineralizzata.
Quando si usa l’apparecchio per la prima volta, testare prima il ferro su un panno.
Prima di utilizzare l'apparecchio, togliere il serbatoio dell'acqua (14) e riempirlo, non
superandoil livello MAX indicato dalla linea.
Quando si intende riprendere il serbatoio dell'acqua (14), per prima cosa, mettere la base
del serbatoio dell'acqua e poi spingere il serbatoio dolcemente fino a quando non si sente
un "click", che indica che il serbatoio dell'acqua è stato inserito correttamente.
Collegare il cavo di alimentazione dell'apparecchio a una presa elettrica.
Premere l’interruttore (7). La spia di alimentazione (6) e la spia del vapore (8) si
Page 40

accenderanno per indicare che la caldaia e il ferro entrano infunzionare.
La pompa comincerà a prendere elettromagneticamente l’acqua dalla caldaia(13) quando
raggiungerà una temperatura adatta.
Scegliere la temperatura tramite l’apposita manopola (4), il dispositivo del vapore indica
l'area che può essere selezionata (Fig.3).
Dopo circa 2 minuti, l’indicatore di riscaldamento (2) si spegnerà a indicare che
l'apparecchio può utilizzare il vapore.
Dopo circa 3 minuti, la spia del vapore (8) si spegnerà a indicare che l'apparecchio può
utilizzare il vapore.
Per usare il vapore, premere il tasto del vapore (3).
Quando si rilascia il tasto del vapore (3) il flusso si interrompe.
Questo apparecchio è in grado di generare vapore in posizione verticale e può quindi
essere utilizzato per stirarefacilmente tessuti con un getto di vapore.
Quando si finiscedi stirare, premere l’interruttore (7), spegnere l’apparecchio e premere il
tasto del vapore (3) per rilasciare il vapore residuo nella caldaia (13).
NOTE:Se si rilascia vapore per lungo tempo, la pompa aggiungerà acqua nella caldaia e
la piastra non rilascerà vapore per un breve tempo, quasi 10 sec.
STIRATURA A SECCO
Collegare l'apparecchio alla rete elettrica, premere l’interruttore (7), quindi selezionare la
temperatura desiderata ruotando la manopola del termostato (4). Aspettare fino a quando la spia di
riscaldamento del ferro (2) si spegne, indicando che la temperatura desiderata è stata raggiunta.
Per la stiratura a secco non è necessario premere il tasto vapore (3).
RIEMPIMENTO DEL SERBATOIO
Grazie alla funzione di auto-riempimento, non è più necessario fermarsi e attendere che la caldaia
si riempia di nuovo.
Quando l'acqua nella caldaia è al minimo, la pompa viene attivata automaticamente e riempie
nuovamente la caldaia.
Se, durante la stiratura, il rumore dell'acqua è molto alto, significa che non c'è acqua nel serbatoio
dell'acqua (14). Premere l’interruttore (7) e spegnere l’apparecchio. Dopo aver riempito il serbatoio
dell'acqua (14), premere nuovamentel’interruttore (7) e stirare.
Per continuare a lavorare, è sufficiente ripristinare il livello dell'acqua nel serbatoio di
auto-riempimento come descritto nel paragrafo sulla preparazione all'uso.
COME CONSERVARE L’APPARECCHIO
Per prima cosa, verificare che l'apparecchio si sia raffreddato completamente.
Svuotare il serbatoio dell'acqua (14).
Non è necessario svuotare la caldaia dopo la stiratura.
Il tubo singolo del vapore (5) e il cavo di alimentazione (9) possono essere conservati negli
appositi vani, per il tubo (12) e per il cavo (10).
COME BLOCCARE IL FERRO DA STIRO
Per bloccare il ferro, esso deve essere posto sulla parte posteriore dell’appoggia ferro (Fig11).
NOTA: assicurarsi di agganciare saldamente il ferro per evitare cadute accidentali.
COME PRENDERSI CURA DELL’APPARECCHIO
Prima di effettuare qualunque operazione di manutenzione, staccare sempre la spina dalla presa
elettrica.
Per pulire il corpo dell'apparecchio, utilizzare semplicemente un panno umido. Non utilizzare
solventi o detergenti che potrebbero arrecare danni alla superficie del corpo macchina.
Tenere sempre la superficie della piastra di stiratura perfettamentepulita. Per pulirla, basta passare
Page 41

la sua superficie, quando è fredda, con un panno umido. L'apparecchio non deve essere pulito con
PROBLEMA
CAUSA
SOLUZIONE
Dal ferro esce acqua invece di
vapore
L'apparecchio non ha ancora
raggiunto la giusta temperatura.
La manopola di controllo della
temperatura è impostata al
minimo.
Attendere che la spia del
vapore e la spia di accensione
si spengano.
Aumentare la temperatura
attraverso l’apposita manopola
di regolazione della
temperatura.
L'apparecchio è acceso ma non
produce vapore
Il serbatoio dell'acqua è vuoto o
non inserito correttamente.
Riempire il serbatoio dell’acqua
o posizionarlo in modo corretto.
prodotti anticalcare.
Non stirare sopra cerniere, ganci, anelli, ecc., poiché potrebbero graffiare la piastra.
Una volta finito di stirare, posizionare il ferro correttamente sul suo supporto. Garantire che non vi
siano tracce di acqua sotto la piastra, in quanto potrebbero causare macchie.
Conservare l'apparecchio in un luogo asciutto.
PULIZIA PERIODICA DELLA CALDAIA
· Per mantenere prestazioni ottimali, pulire la caldaia ogni 10/20 usi a seconda della quantità di
calcare nell'acqua.
· Scollegare l'apparecchio e lasciarlo raffreddare per almeno 2 ore.
· Dopo che l’apparecchio si è raffreddato completamente,azionare un lato della valvola di pulizia
(11), e ruotarla in senso antiorario (Fig.5) (non mettere il ferro in posizione orizzontale mentre si
apre la valvola di pulizia, altrimenti potrebbe sgocciolare dell'acqua).
ATTENZIONE! Non tentare di aprire la valvola di pulizia (11), mentre la caldaia è sotto
pressione.
ATTENZIONE: non versare più di 200 ml di acqua nella caldaia. Versare l'acqua lentamente,
facendo attenzione a non farla traboccare, in quanto ciò potrebbe danneggiare l'apparecchio.
• Risciacquare la caldaia e versare l'acqua nel lavandino o in un contenitore per la raccolta di
acqua sporca.
• Se l'acqua è molto sporca, ripetere l'operazione fino a quando non è pulita.
• Verificare che il sigillo sia presente e che il tappo sia avvitato.
• Riempire nuovamente il serbatoio dell'acqua.
• Riaccendere l'apparecchio.
• Prima di stirare, rilasciare il vapore nel lavandino o altro contenitore e controllare che il vapore
sia pulito. Questo dovrebbe richiedere alcuni secondi.
• Riprendere a stirare normalmente.
RISOLUZIONE DEI PROBLEMI
Page 42

Consigli
Come ottenere un effetto di stiratura professionale
Un ferro normale genera solo una piccola quantità di vapore richiedendo inoltre un uso
costante di prodotti per eliminare le pieghe dai tessuti.
Un sistema di stiratura professionale funziona in maniera piuttosto diversa. Il tessuto viene
prima reso umido dal vapore e poi, in una seconda fase, il tessuto viene stirato in modo
normale. Ciò significa che ogni piccola piega viene rimossa e i vostri vestiti sono stirato alla
perfezione.
Nella prima fase (quando il vapore smorza il tessuto), tenere il ferro a circa 20 cm sopra il
tessuto e premere il tasto vapore (3). Poi passare il ferro sul capo con un movimento circolare
in modo che il getto di vapore smorzi il tessuto. I capi leggermente piegati richiedono solo
pochissimo vapore; mentre i tessuti molto pesanti o i capi con pieghe particolarmente difficili
devono essere smorzati maggiormente, e quindi richiedono una quantità di vapore applicata
per alcuni secondi in più.
Durante la seconda fase (stiratura a secco), verificare che il termostato sia in posizione
corretta a seconda del tipo di tessuto; rilasciare il tasto vapore (3) e stirare a secco. La
speciale piastra di stiratura impedisce ai tessuti di diventare lucidi. Utilizzando questa tecnica
di stiratura, e seguendo i suggerimenti della tabella qui sotto, vedrete come sarà facile dare a
ogni indumento una stiratura e una finitura veramente professionali.
Guida alla perfetta stiratura
Controllare l'etichetta del produttore sul capo e interpretare il simbolo sull'etichetta come segue:
Tipo di tessuto
Posizione
della
manopola
del
termostato
Istruzioni sulla stiratura
Acetato
Acrilico
Nylon
Stiratura a secco
Seguire le istruzioni riportate sull'etichetta del capo.
Questo tipo di tessuto generalmente richiede una stiratura
molto leggera.
Poliestere
Raion
Stiratura a secco
Stirare il capo al rovescio. Quando si stirano tessuti misti,
selezionare la più bassa temperatura consigliata.
Seta
Stiratura a secco
Stirare il capo al rovescio.
Lana
Cotone leggero
Lino leggero
Stiratura a vapore
Stirare il capo al rovescio.Disporre un panno sottile sopra il
tessuto in modo da evitare una finitura lucida.
Dividere il lavaggio dei capi a secondadelle temperature di stiratura. Iniziare a stirare i capi che
richiedono una temperatura più bassa. Per maggiori dettagli, consultare la tabella alla fine di questo
manuale.
I tessuti come il velluto e la lana, e gli accessori come guanti, borse, ecc., riacquisteranno un
aspetto e una consistenza pari al nuovo, semplicemente passando il ferro vicino alla superficie del
tessuto e premendo il tasto vapore.
Le impronte lasciate dai mobili sui tappeti possono essere rimosse spazzolando leggermente e
applicando del vapore sulle parti dove il pelo è schiacciato.
Se il tappeto è realizzato in materiale sintetico, non selezionare una temperatura elevata.
Page 43

Cotone
Lino sottile
Inamidato
Tessuti
Stiratura a vapore
Inamidare il tessuto prima di stirarlo. I tessuti pesanti e i
tessuti inamidati possono essere stirati direttamente sulla
parte esterna, mentre i colori più scuri e gli indumenti
ricamati devono essere stirati al rovescio.
Lino
Stiratura a vapore
Utilizzare una grande quantità di vapore e stirare i tessuti
scuri al rovescio al fine di evitare una finitura lucida. Per
una migliore finitura, stirare risvoltie polsini sul lato esterno.
AMBIANTE
ATTENZIONE :
Non gettare quest’ apparecchio tra i rifiuti domestici. Per questo tipo di prodotti è fornito dai
comuni un sistema di raccolta e ritiro in zona ed è quindi un dovere informarsi per conoscere il
giusto smistamento del rifiuto. Infatti, i prodotti elettrici ed elettronici possono contenere
sostanze pericolose che hanno effetti dannosi sull’ambiente o sulla nostra salute e quindi
devono essere riciclati. Il simbolo al lato indica che le apparecchiature elettriche ed elettroniche
fanno parte di una raccolta selettiva e differenziata (rappresentata da un bidone su due ruote
sbarrato da una croce.
Prodotto e importato da : Adeva SAS 8 rue Marc Seguin 77290 Mitry-Mory FRANCE
www.hkoenig.com - contact@hkoenig.com - Tel. 01 64 67 00 01
 Loading...