

Hkoenig SWRC90 Operation Manual
Operation manual
Manuel d´instructions
Bedienungsanleitung
Gebruiksaanwijzing
Manual de Instrucciones
Manuale d’uso
SWRC90
Robot vacuum cleaner
Aspirateur robot
Roboter- Staubsauger
Robot stofzuiger
Robot aspiradora
Aspirapolvere robot

Safety instruction
Before using this product, please read the safety instructions and follow all
regular safety precautions.
1. Only authorized technicians can disassemble the product. Users are not allowed to disassemble or
repair the product.
2. Only use the original battery and power adapter of the product for charging. Using an unmatched adapter
may cause electric shock, fire or product damage.
3. Do not touch the power cord, plug or adapter with wet hands.
4. Do not operate any appliance with a damaged cord or plug, or after the appliance malfunctions or
has been damaged in any manner. Return appliance to Service Center for examination, repair or
adjustment.
5. Do not use this product in wet or moist environment (any environment with liquid), e.g.
Bathroom or laundry.
6. Do not have curtain, or all kinds of wrapping material or part of user’s body wound in the drive wheels.
7. Before use, clear the object on the floor (remove all the fragile objects and cords, clothing, papers, loose
cables, as well as make sure to lift curtains and drapes off the floor to avoid any possible accidents.)
8. Make sure this product is not close to cigarette ends, lighters, matches or any flammables.
9. Never use the product to clean combustible or highly volatile liquids, such as gasoline.
10. Only use the product indoors; Do not use it outdoors.
11. If the product needs cleaning, clean it after it is fully charged.
12. Do not over-bend or press the flexible cord with heavy or sharp objects.
13. Do not sit on top of this product or attach an object on the top of it. Beware of children or pets while the
product is in operation mode.
14. Do not place this product where it is easy to drop off (tables, chairs, etc).
15. Turn off the power switch during product transportation or when you don’t need to use this product for a long
time.
16. Before charging, check the adapter and outlet whether these are properly connected.
17. To avoid tripping, all people in the house should be noticed when this product is on.
18. When dust bin is full, empty it before use.
19. Use this product in temperature from 0℃ to 40℃.
20. Do not use this product in high-temperature environment or under baking sunlight for a long time.
21. The battery must be removed from the product before it is scrapped.
22. The battery should be disposed of properly for safety sake.
23. The adapter must be removed from the socket-outlet before cleaning, maintaining the appliance or removing
the battery.
Warning:
When the appliance is to be used by a child, the child must be of 8 years old and above. For persons with
reduced physical, sensory or mental capabilities or lack of experience and knowledge, proper supervision
or instruction should be given concerning use of the appliance in a safe way to help them understand the
hazards involved. Children should not play with the appliance. Cleaning and user maintenance should not
be made by children without supervision.
ENGLISH(
2
Product Features
Powerful Suction
Suction power of this product is strong enough to ensure that even tiny dust on the floor will be cleaned
thoroughly!
Replaceable Roller Brush Component / Vacuum Suction Component
Main Brush Component / Vacuum Suction Component of this product is replaceable to meet the needs
of different users per various cleaning environments.
Intelligent Suction Adjustment
This product is able to automatically adjust its suction power when different floor environments are
detected. This ability not only makes cleaning more efficient, but also helps to save more power (up to
30%).
User Friendly Design
Operation is greatly simplified.
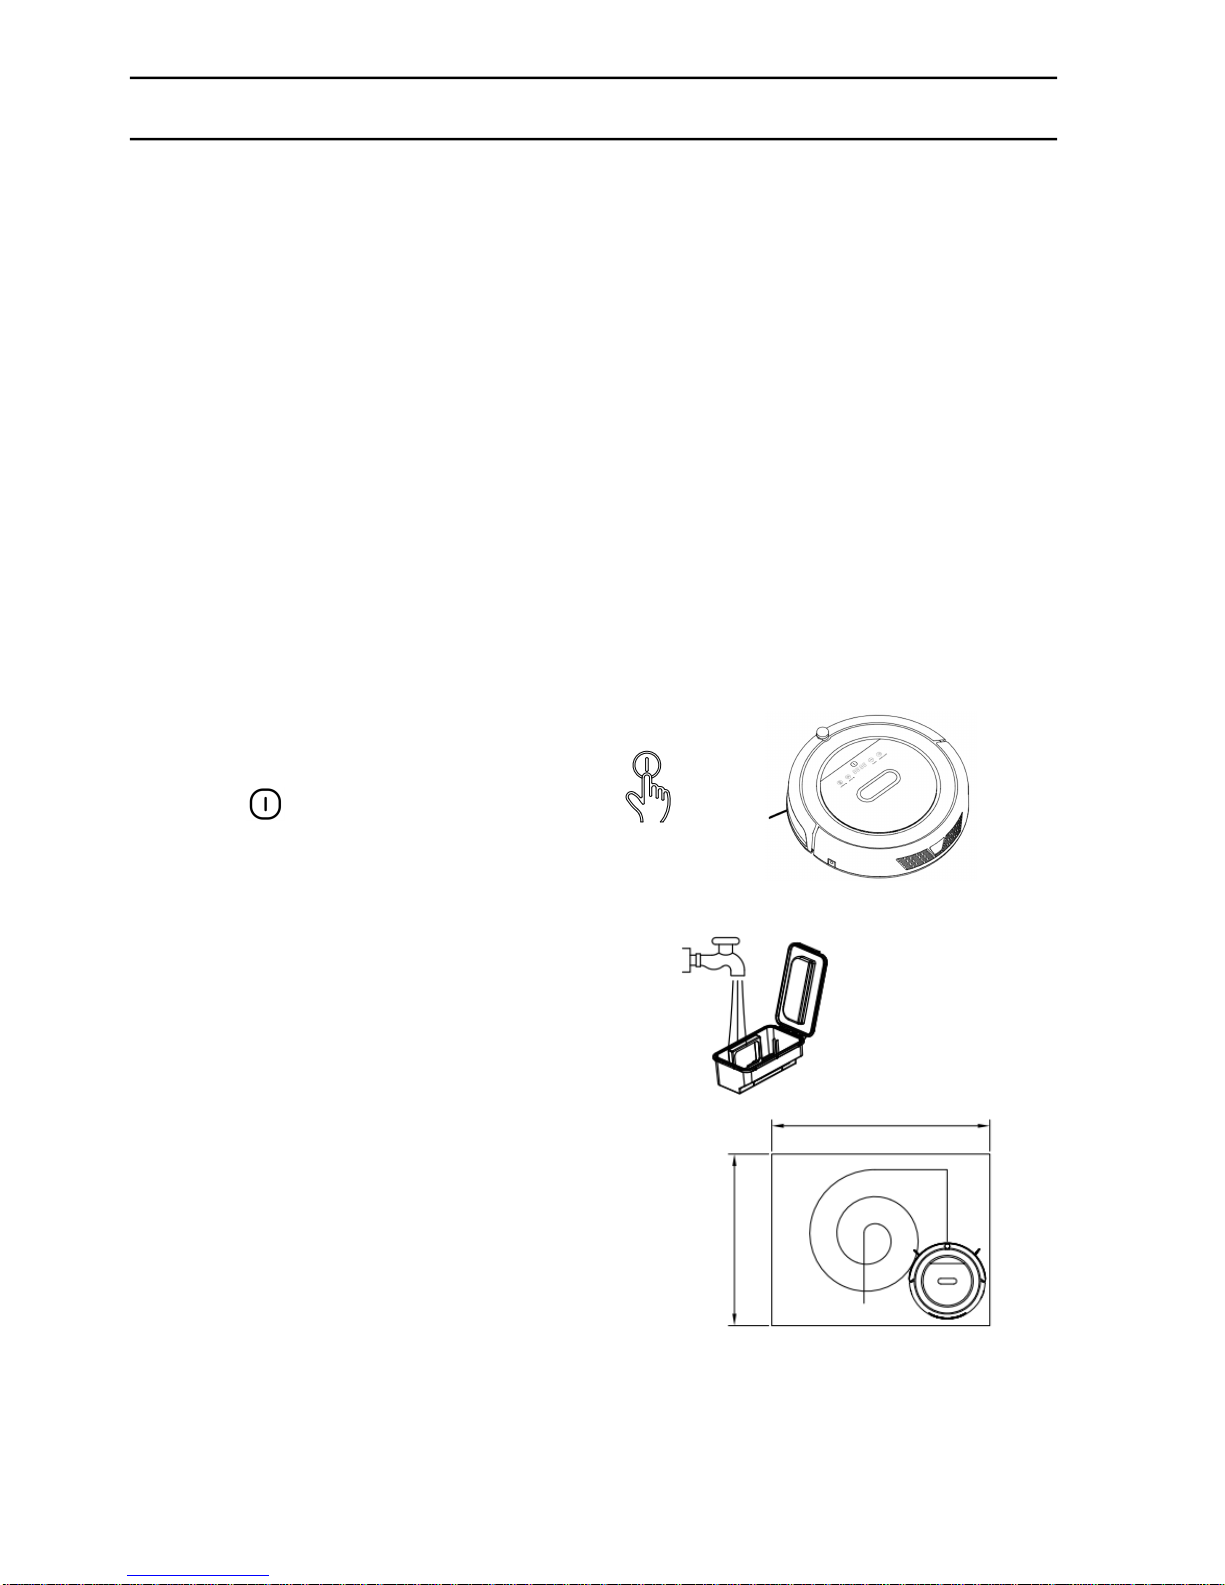
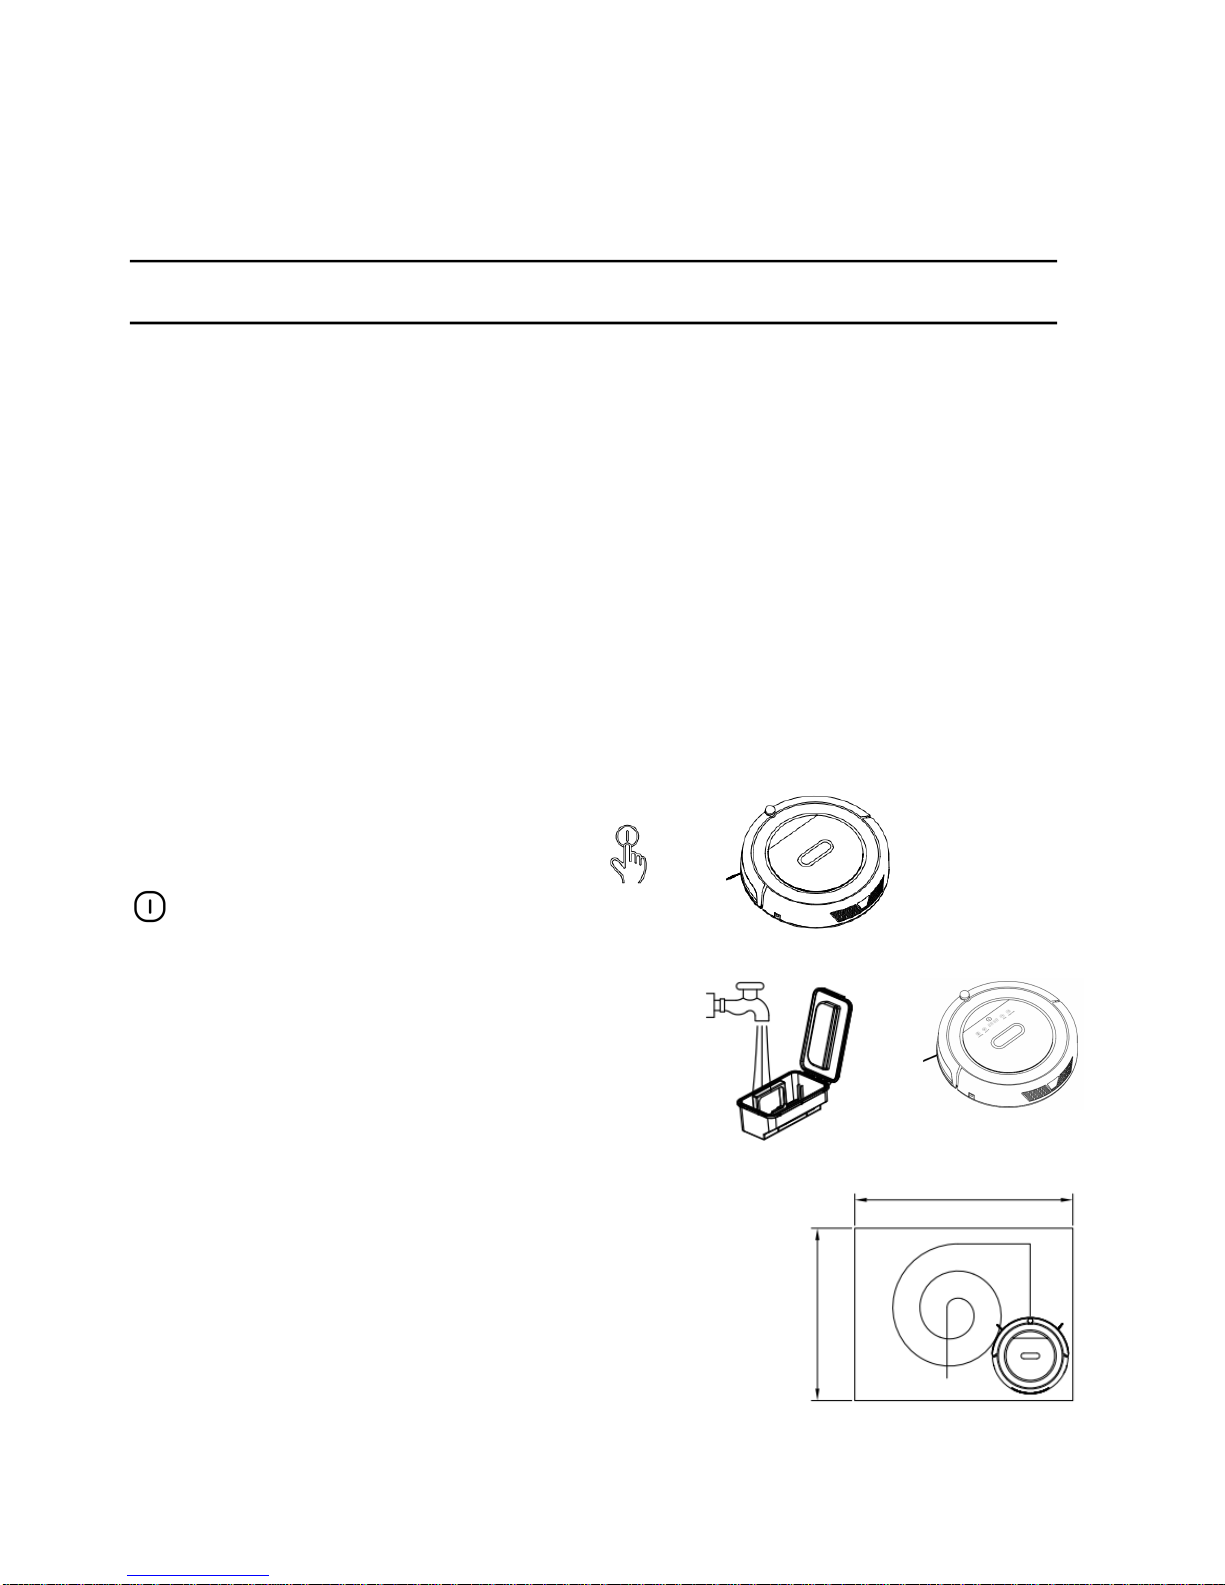
To uc h th e “ ” button, and you could start
the robot.
Washable Dust bin
Dust bin and filters can be washed by water.
Simply wash dust bin under water after use to
avoid dust blowing in the air to cause a second pollution !
Various Cleaning Modes
Four cleaning modes are provided to meet your needs.
1. Auto cleaning mode
The robot will clean your room automatically
and adjust its cleaning behavior based on specific situations.
3
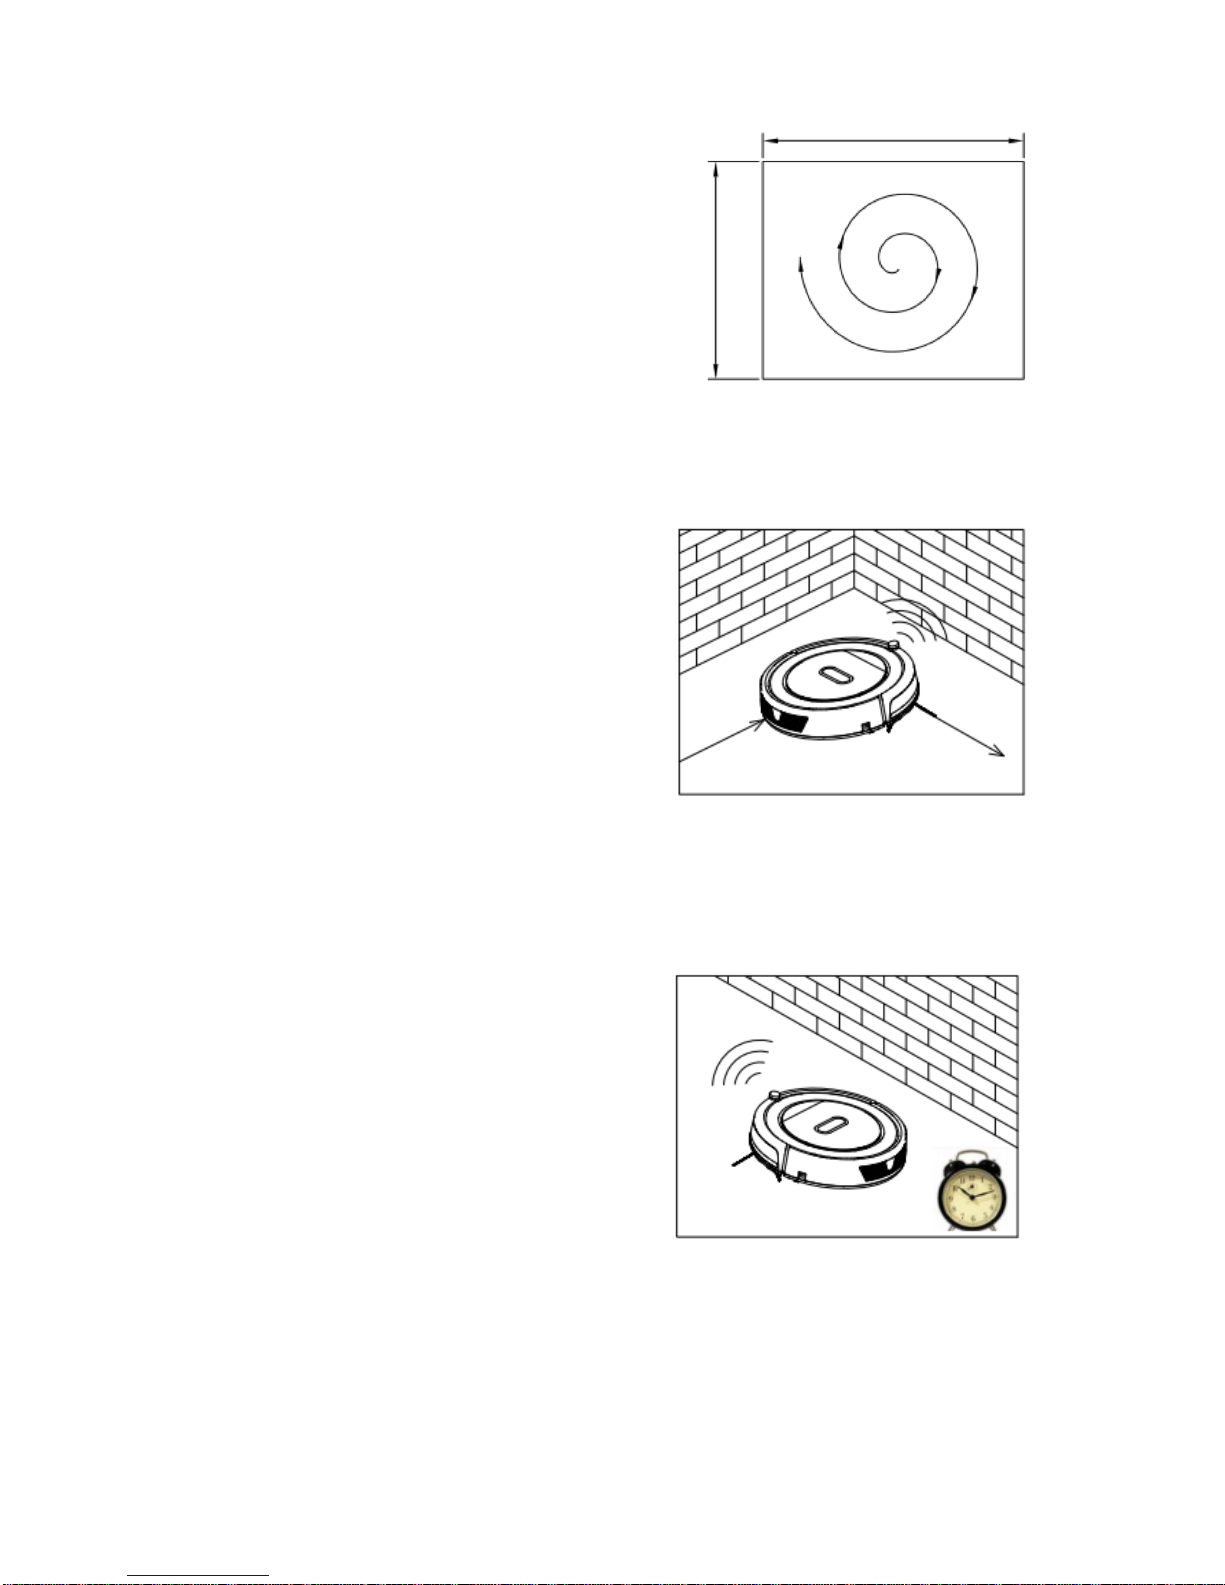
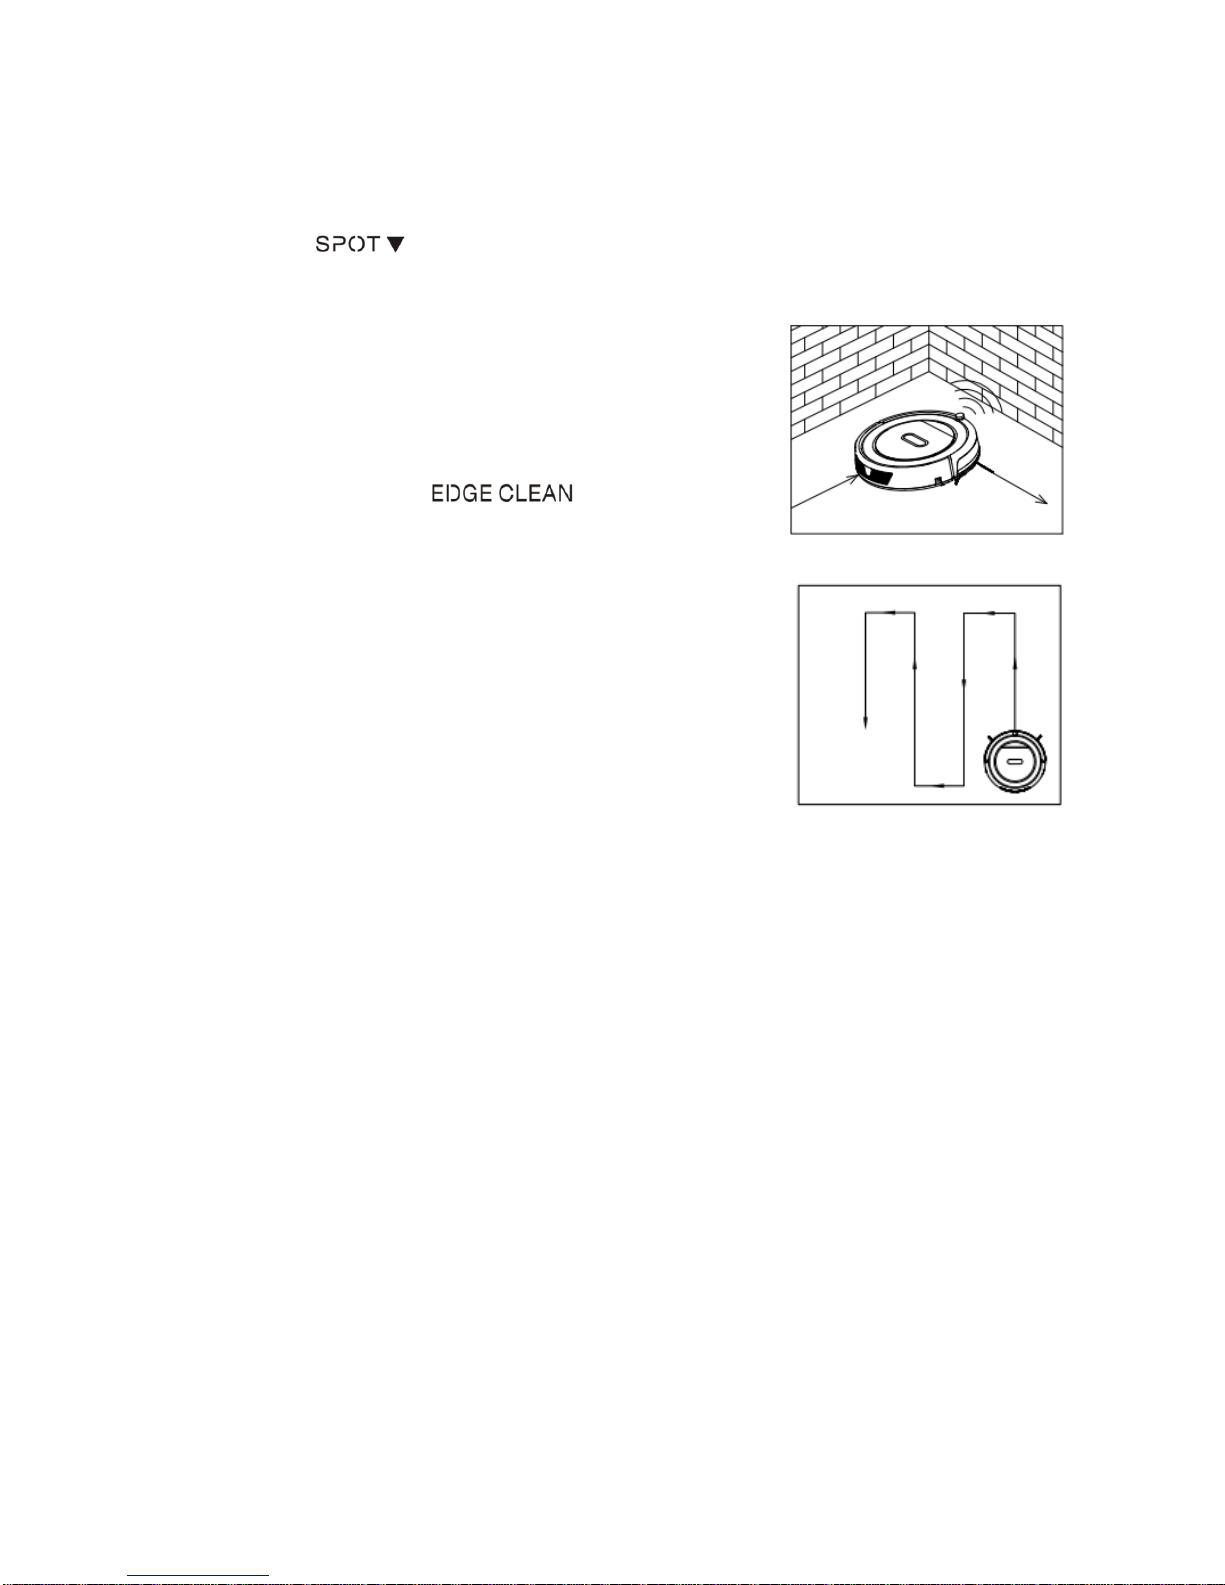
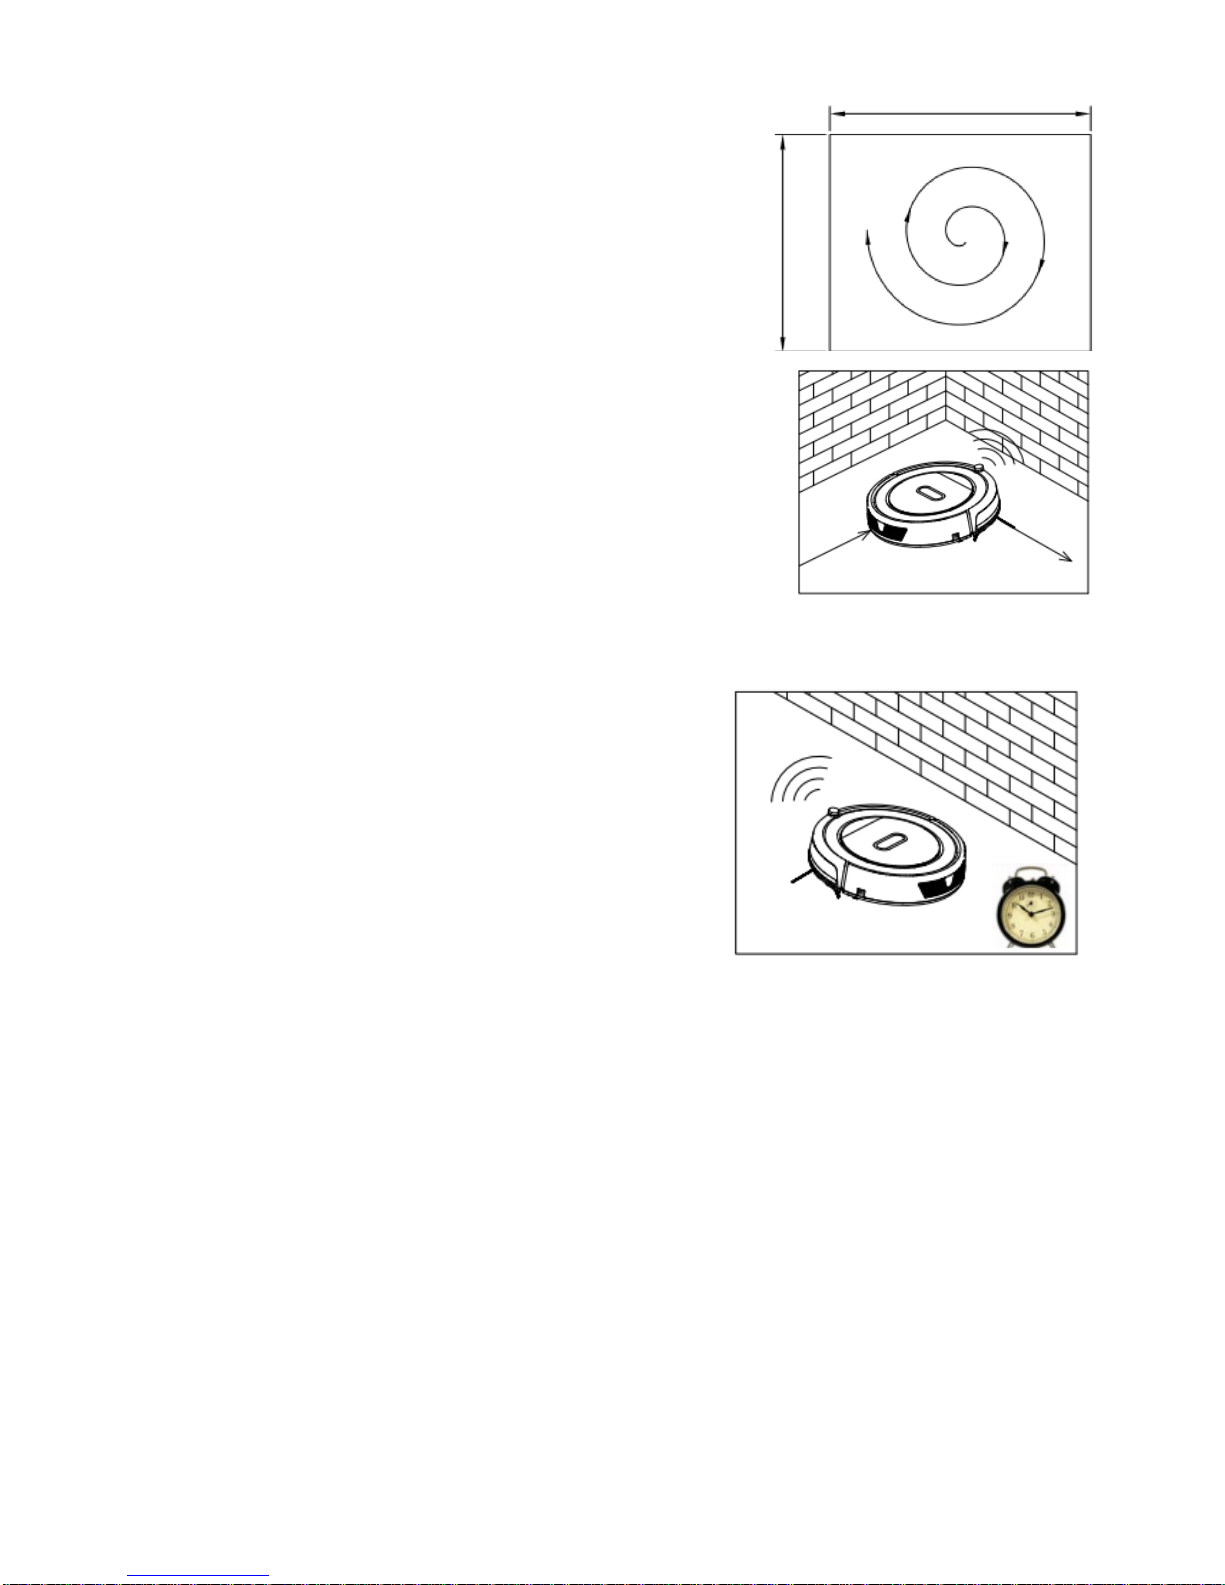
2. Spot cleaning mode
When using suction components, the robot willclean
intensively in a spiral way while it detects a very
dirty area.
3. Edge cleaning mode
In this mode, the robot will clean along the wall or obstacles.
4. Scheduling mode
After scheduled, the robot will leave charging
Station and start working at scheduled time.
4
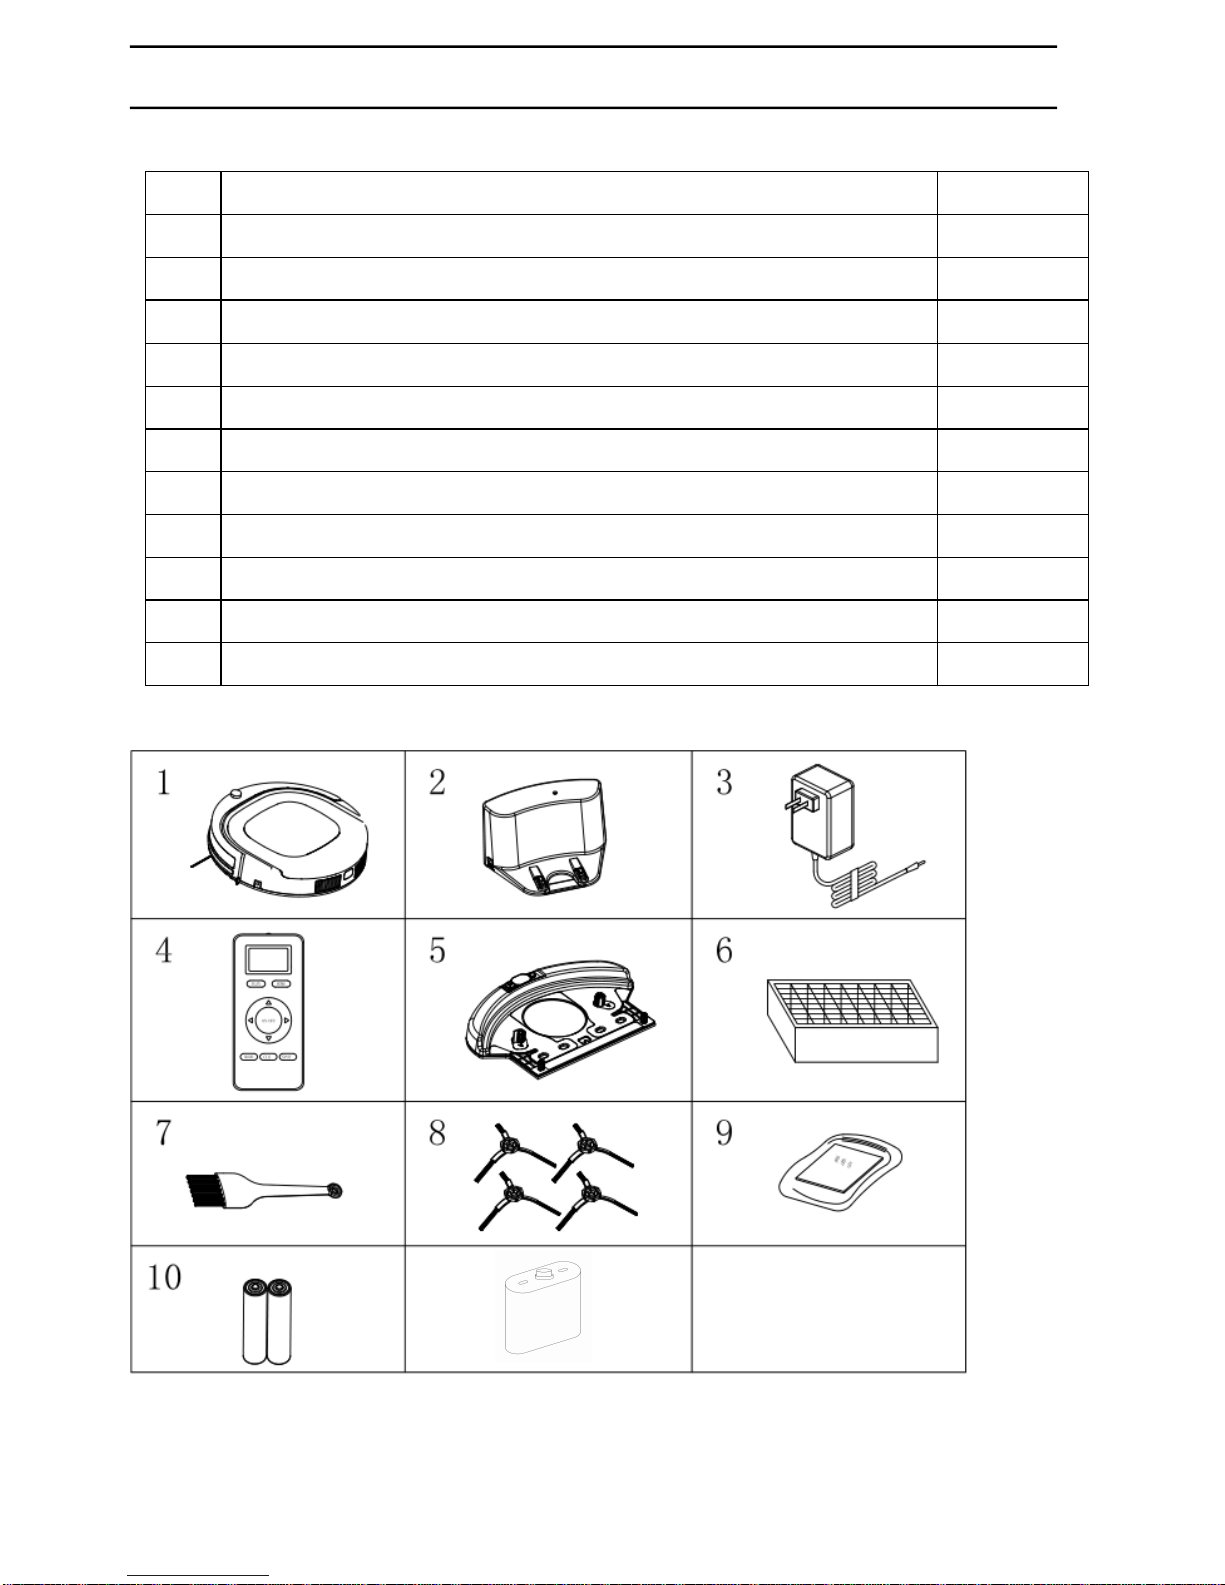
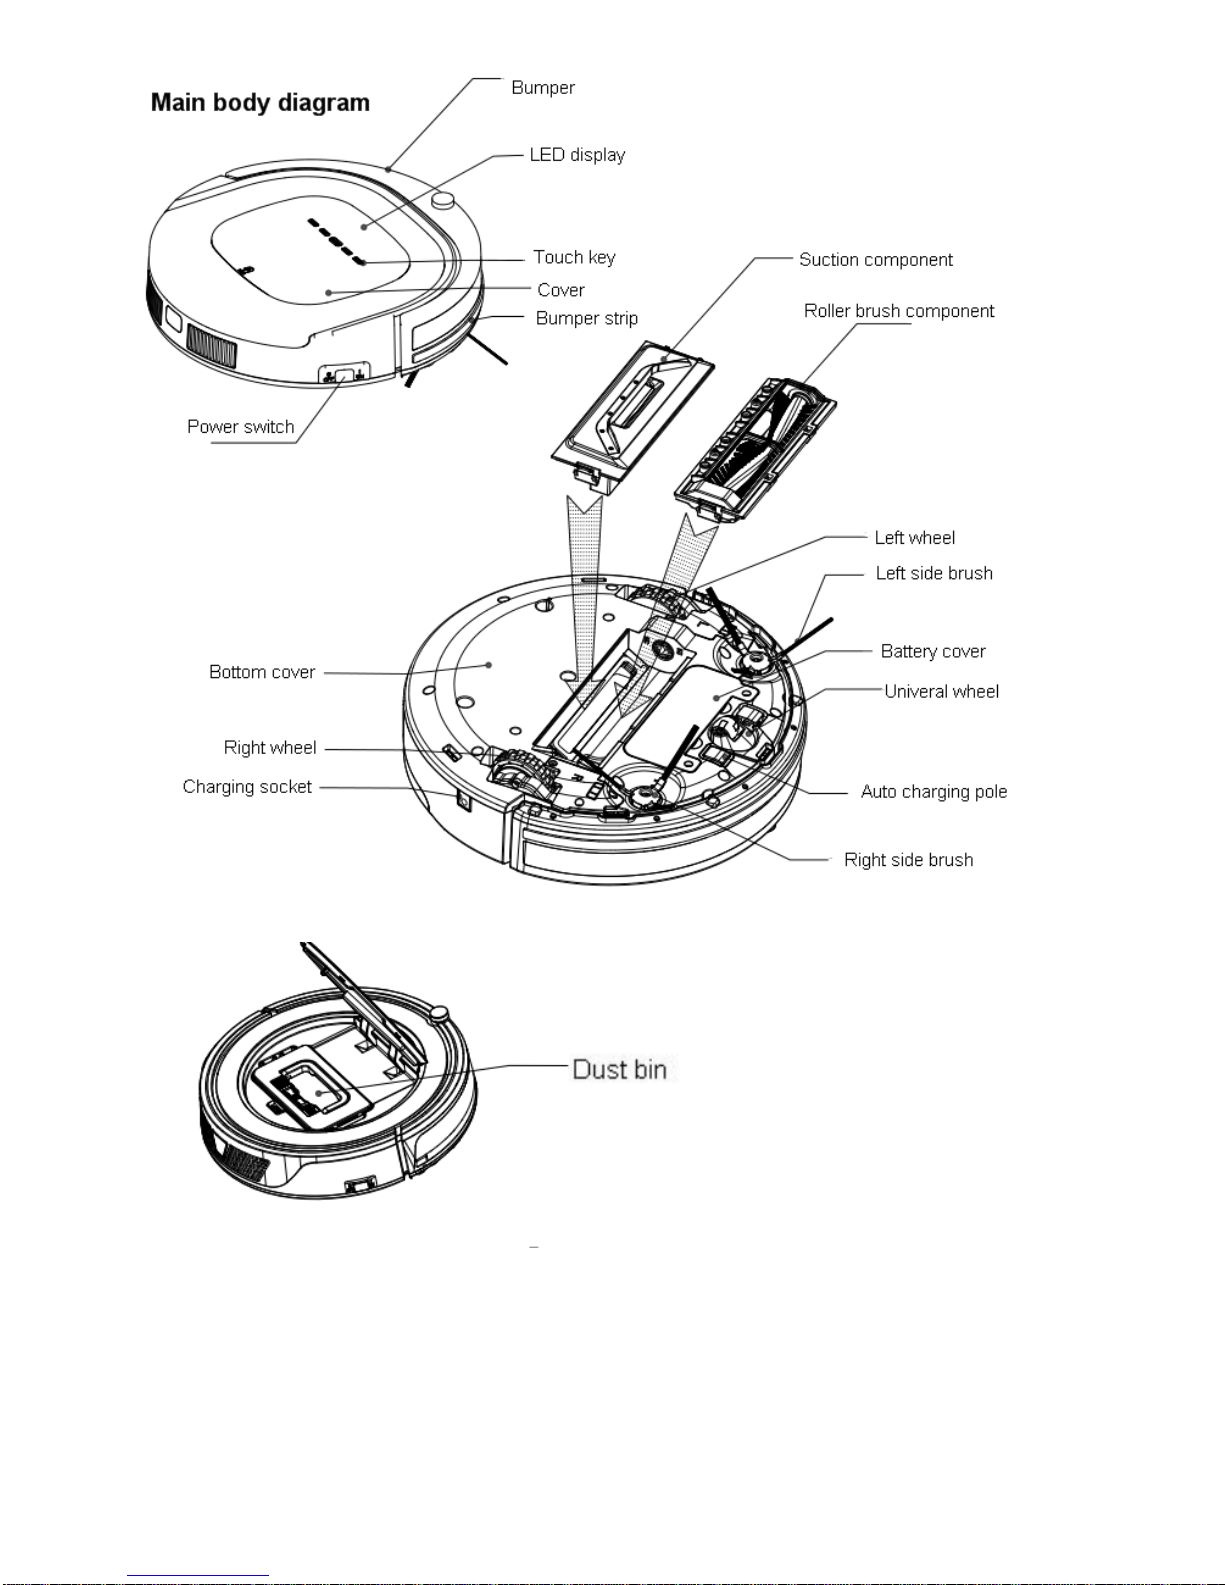
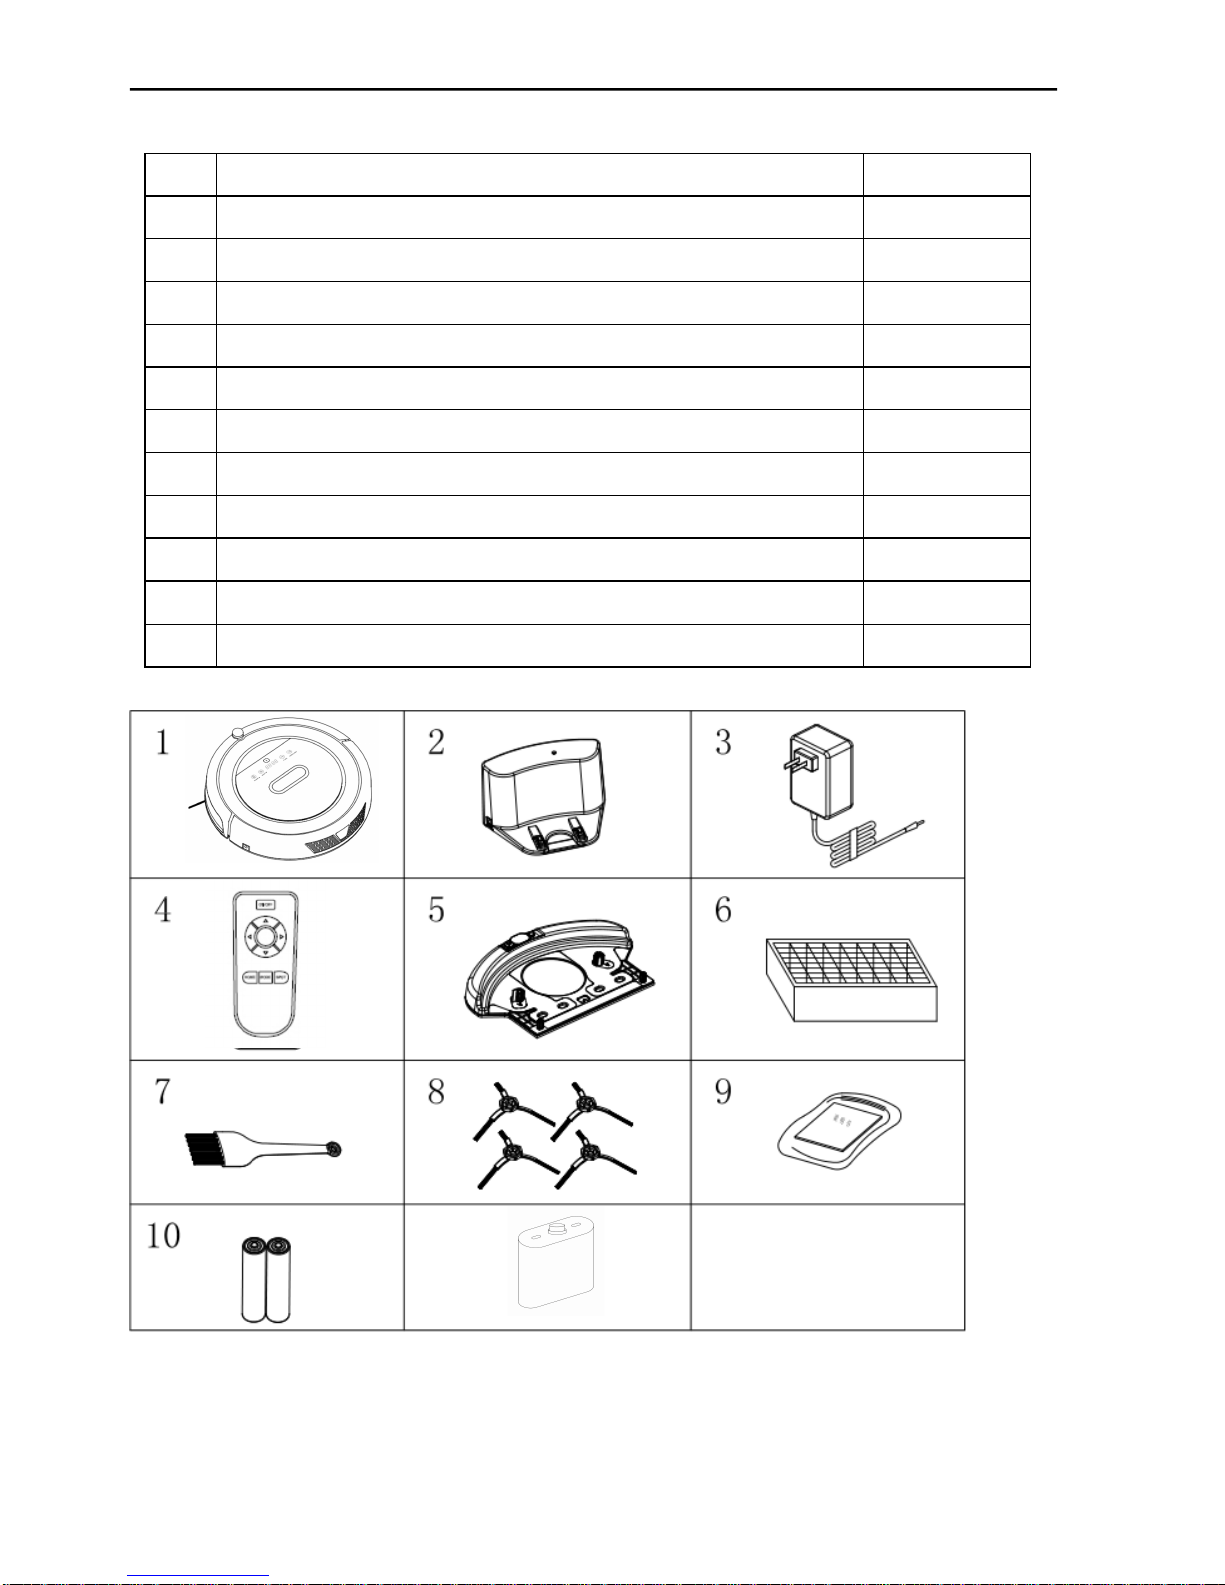
Product Components
Main body and accessories
NO.
Description
Quantity
1
Main Body
1
2
Charging Station
1
3
Adapter
1
4
Remote Control (battery not included)
1
5
Water Tank and Mopping Cloth each one piece
1
6
HEPA Filter
1
7
Cleaning Brush
1
8
Side Brushes *2 and Spare Brushes *2
4
9
User Manual
1
10
Battery
2
11
Virtuel Wall
1
11
5
6
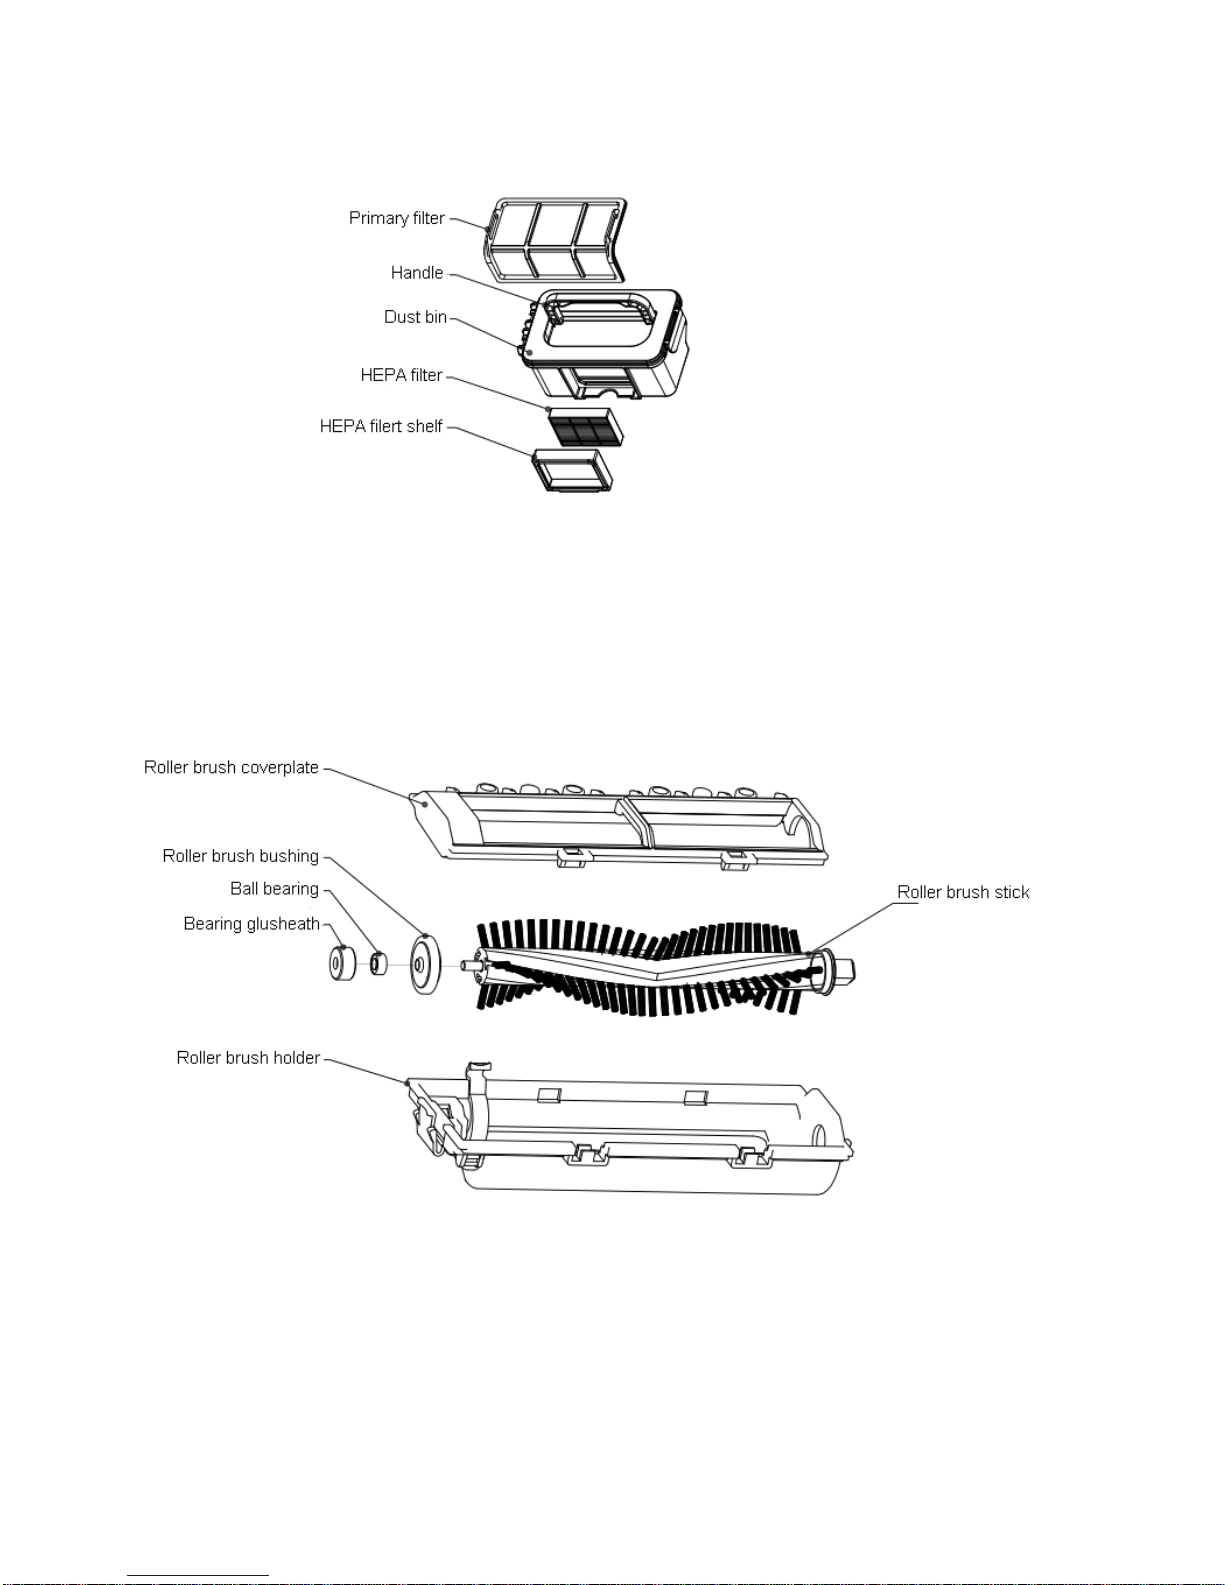
Dust bin
Roller Brush Component
7
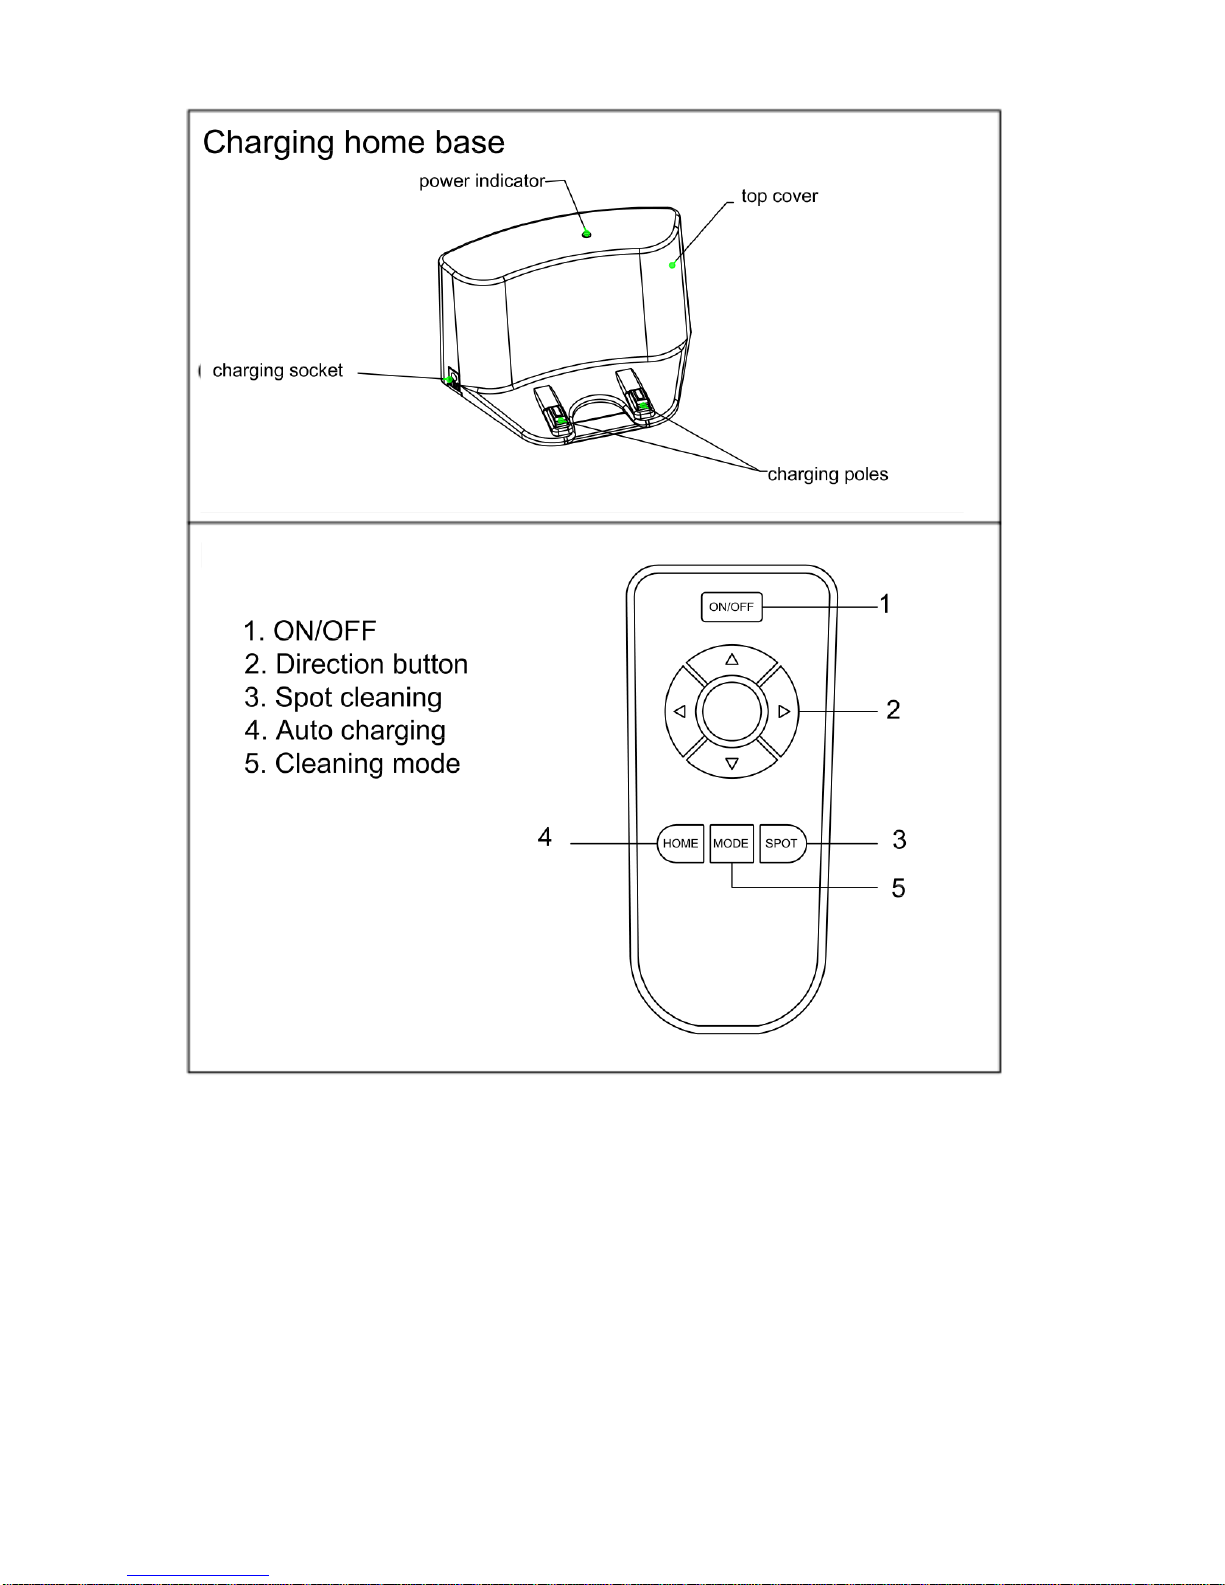
Note:
A. Install two AAA type batteries into the remote control before use,
B. The big round button in the middle of the 4 direction buttons, is a blank button without any function.
C. Remove the batteries if the remote control will be left unused for a long period.
D. If you use the remote control near the charging station, the robot may not recognize the command and
may not work.
8
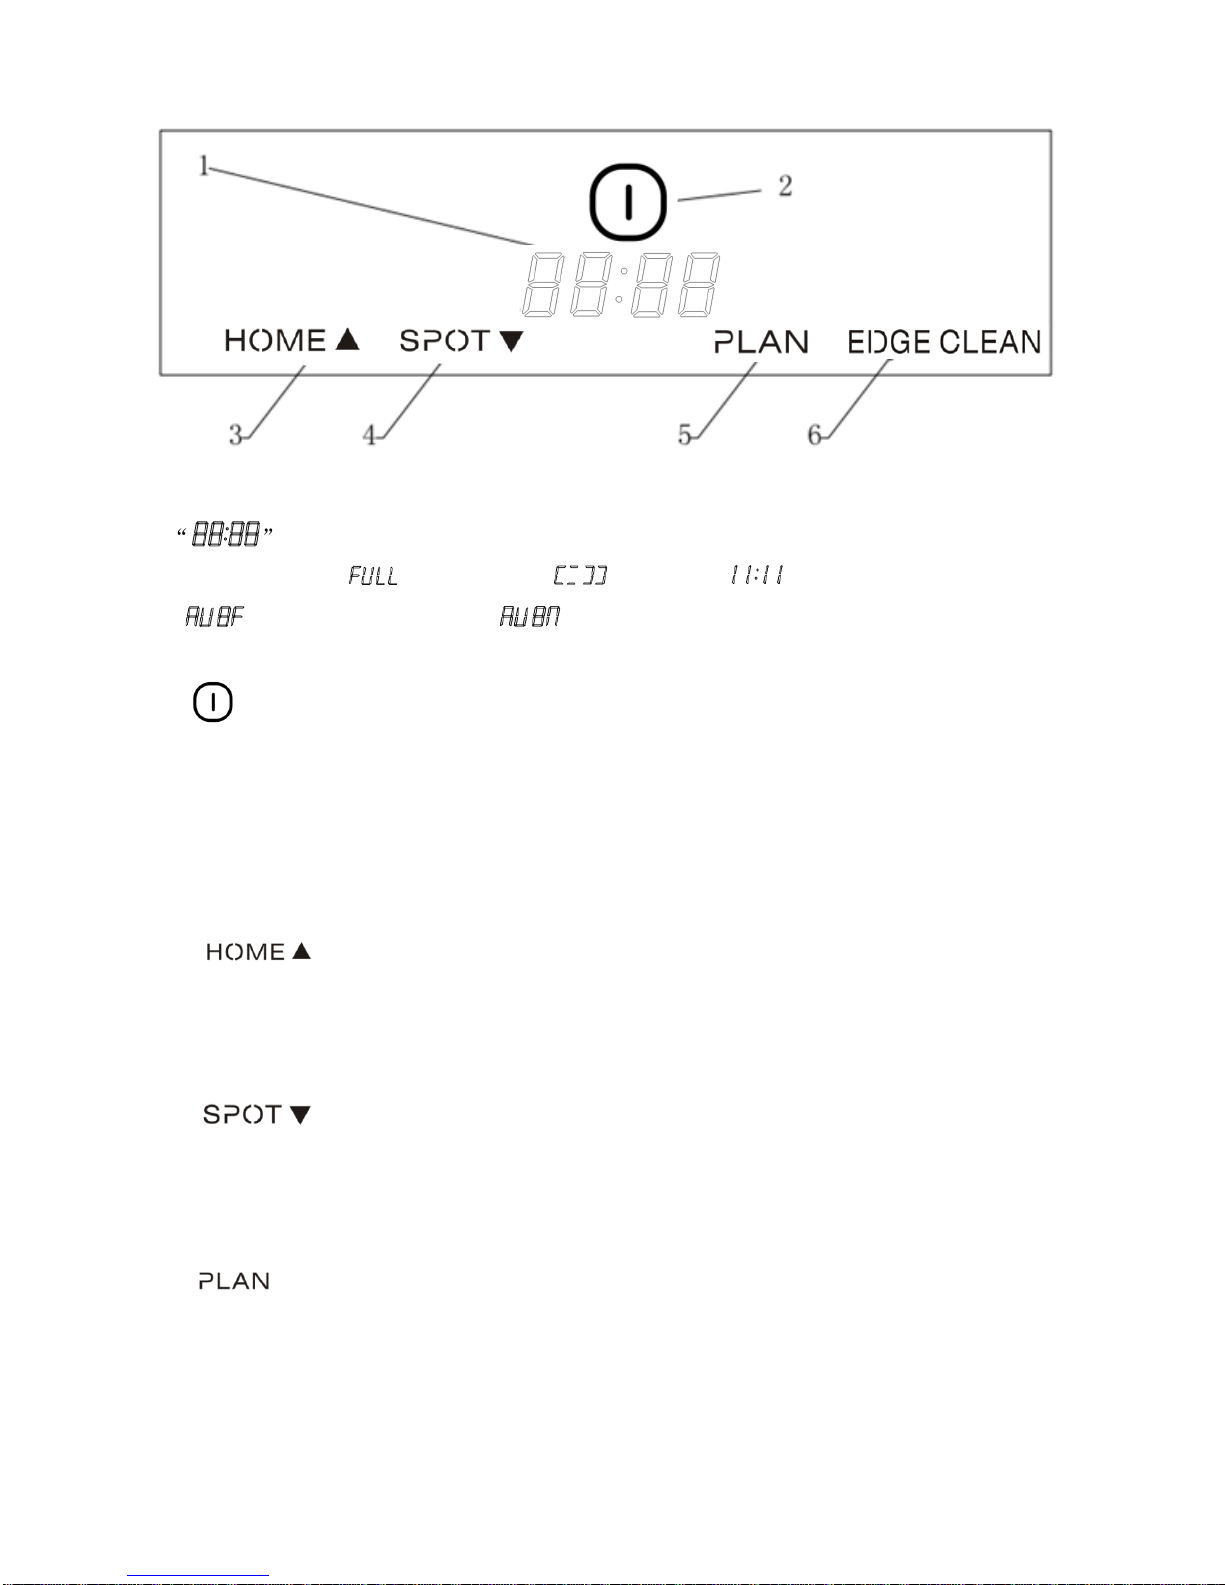
Display Panel
LED Panel
1. LED panel, it shows the time setting, charging status, and error codes by using numbers,
letters or graphs. : Fully charged, : low power, : charging,
: Suction passage blocked, : no dust bin.
2. “ ” Clean Button
A: Press this button to change from sleep mode to standby mode.
B. In standby mode, press this button and hold it for more than 3 seconds to go into sleep mode.
B: Confirm schedule setting in scheduling mode.
C: Start cleaning in standby mode.
3. “ ”Auto homing / number increment button
A: Press this button to increase number in scheduling mode.
B: In other mode, press this button to start auto-homing and charging mode.
4. “ ” Spot cleaning / number decrement button
A: Press this button to decrease number in scheduling mode.
B: In other mode, press this button to start spot cleaning.
5. “ ” Schedule button
Press this button to enter/quit scheduling mode.
9
6. “ ” Edge Cleaning Mode
Press this button to start edge cleaning in “Stand by” mode.
7. “ ”Press button for taking out the dust bin
Press this button to open the top cover and take out the dust bin.
Product Operation
1. Battery charging
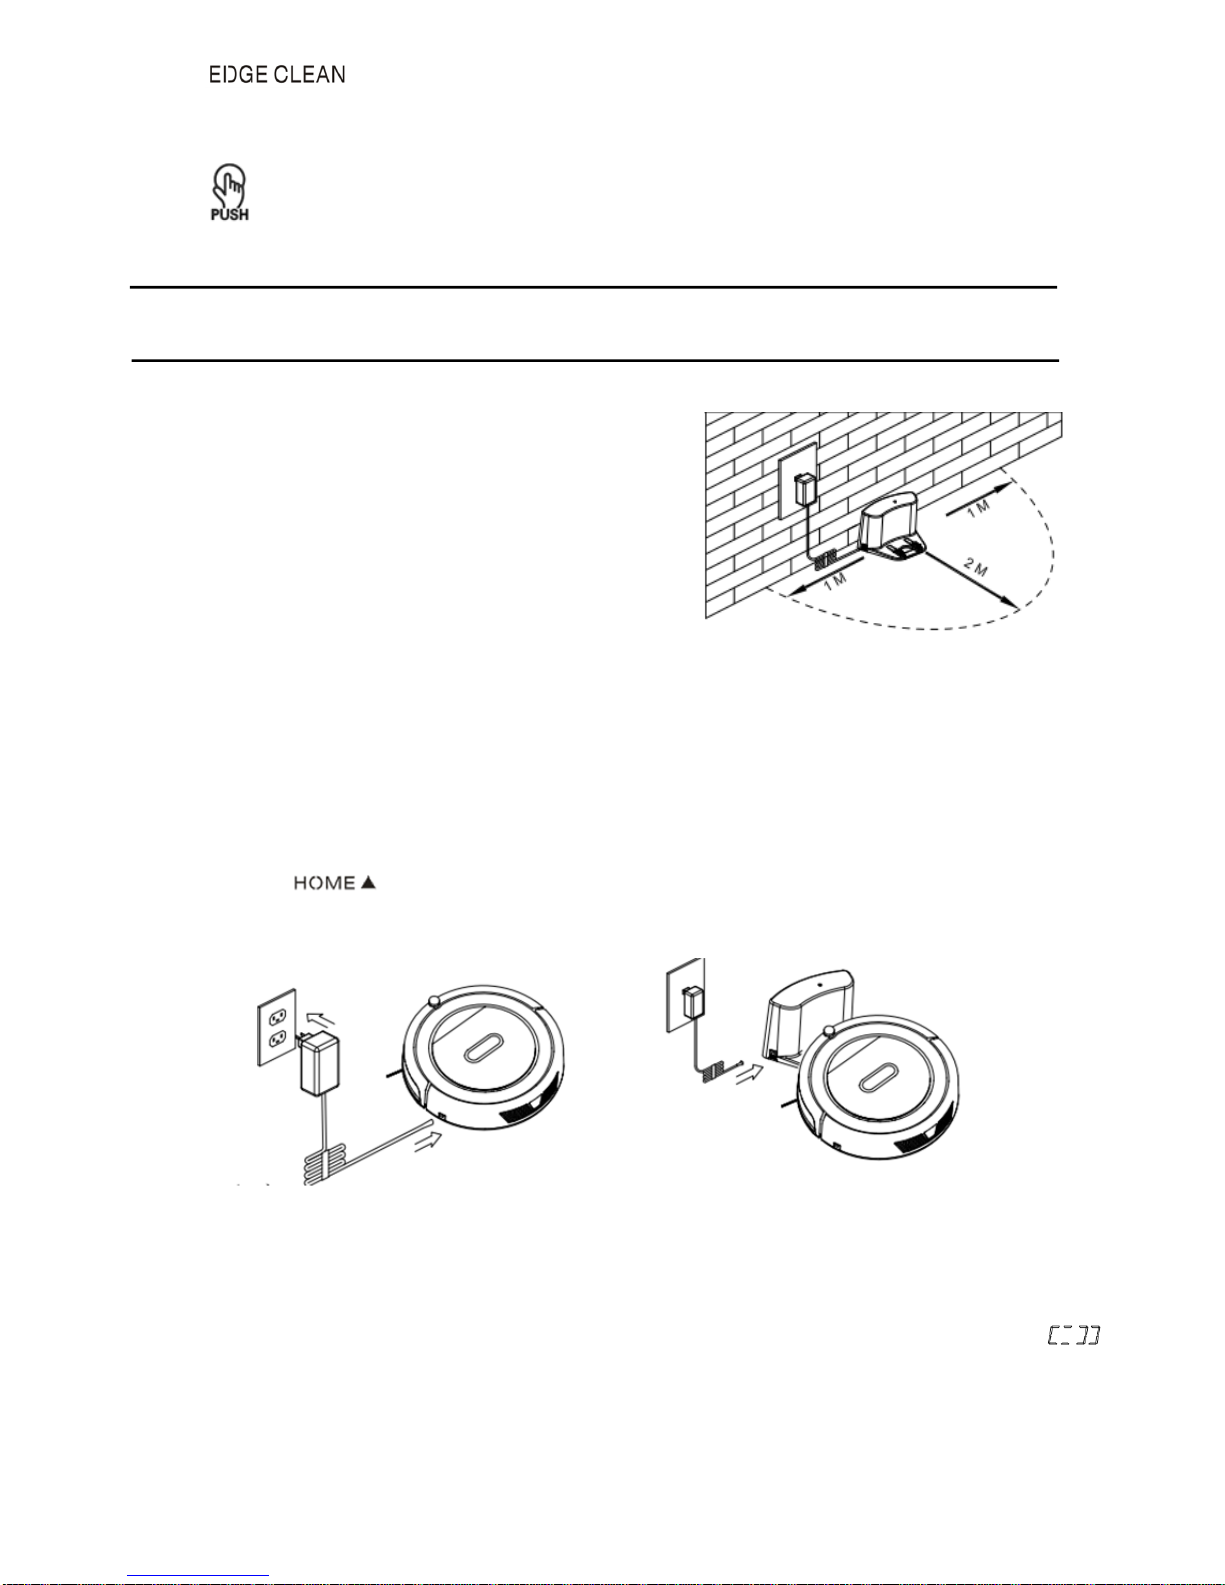
A. Charging station placement
Place charging station against the wall and
remove obstacles from within 1 meter at both
sides and about 2 meters in front of the station,
As shown in the right figure.
B. If the robot has been shut down, power on the robot by pressing the power switch at the right
side of the robot for more than 3 seconds.
C. Charge the robot in either way as shown below:
a. Insert the adapter into the robot and the plug at the other end to the power socket as
shown in Fig.a.
b. Press “ ” on robot or “HOME” on remote control to operate the robot to go back
to the charging station for recharging as shown in Fig.b.
Note:
a. When robot is being charged, LED panel will gradually show “1111” from left to right.
b. Once charging is complete, LED panel will show “FULL”.
c. In the standby status, the robot will broadcast voice “Please charge” and LED panel will show “ ”
when battery power is low.
10
d. In the working status, the robot will return to charging station automatically and LED panel will show
“ ” when battery power is low .
For extending battery life:
a. Before first use, charge the robot for 12 hours.
b. Charge the robot as soon as battery power is low.
c. The robot will return to charging station automatically when it accomplishes cleaning or battery
power is low.
d. If the robot is not to be used for a long time, fully charge the battery before use, turn the power off,
remove and store it in a cool, dry place.
e. If the robot is not to be used for more than 3 months, charge the robot for 12 hours, turn the power
off, remove and store it in a cool, dry place.
2. Starting up / Standby / Sleeping / Power off
A. Starting up
a. Make sure the power switch is on.
b. In standby mode, press “ ” on main body or ON/OFF on remote control to start cleaning.
Note: If robot is in sleep mode, press “ ” on main body or ON/OFF on remote control to wake
up the robot from sleep mode, then press “ ” again, the robot will start cleaning automatically.
B. Standby
Standby means robot has its power switched on, waiting for the user’s operation. It can be changed
to standby mode by one of the following methods:
a. During robot cleaning, press “ ” on main body to enter standby mode.
b. During robot cleaning, press ON/OFF button on remote control to power off the robot.
C. Sleep
In sleep mode, the robot can only be waken up from “ ” button on main body or ON/OFF on
remote control. In order to save power, you can turn the robot into sleep mode from standby mode
via either of the following methods:
a. Press “ ” on main body and hold it for 3 seconds.
b. Robot will automatically enter sleep mode if no command is received for more than 60 seconds.
11
3. Scheduling
You can s che du le th e rob ot to se t it to st art c lea ni ng au tom at ica ll y a t a c er tai n t im e e ve ry da y.
Note: The robot can only be set when it is in standby or charging mode. If the robot is in sleep mode,
press “ ” on main body or ON/OFF button on remote control to wake up the robot. If the robot is in
cleaning mode, stop it before scheduling.
How to schedule the robot
A. Setting robot clock
a. In standby or charging status, press “ ” to start clock-setting. the LED panel will show the
current system time. Then the left two numbers on LED panel will flash.Press “ ” to
increase hour or “ ” to decrease it.
b. Press “ ” to enter minute-setting mode, the right two numbers on LED panel will flash.
Press “ ” to increase it or “ ” to decrease it.
c. Press “ ” gain to save the setting, then press “ ” to exit (Before the setting is saved, if
press “ ” to exit, the current setting will be invalid).
B. Setting the scheduling time
a. In standby or charging status, press “ ” and hold it for 3 seconds to start scheduling,
then the left two numbers on LED panel will flash, press “ ” to increase hour or
“ ” to decrease it.
b. Press “ ” to enter minute-setting mode, the right two numbers on LED panel will flash, press
“ ” to increase it or “ ” to decrease it.
c. Press “ ” gain to save the setting, then press “ ” to exit (Before the setting is saved, if
press “ ” to exit, the current setting will be invalid).
C. Cancel the scheduling
Set the scheduling time to 00:00.
Note:
a. Before scheduling, please set the robot time to be the same with real time.
b. The robot will start cleaning at the schedule time of Robot Clock every day.
12
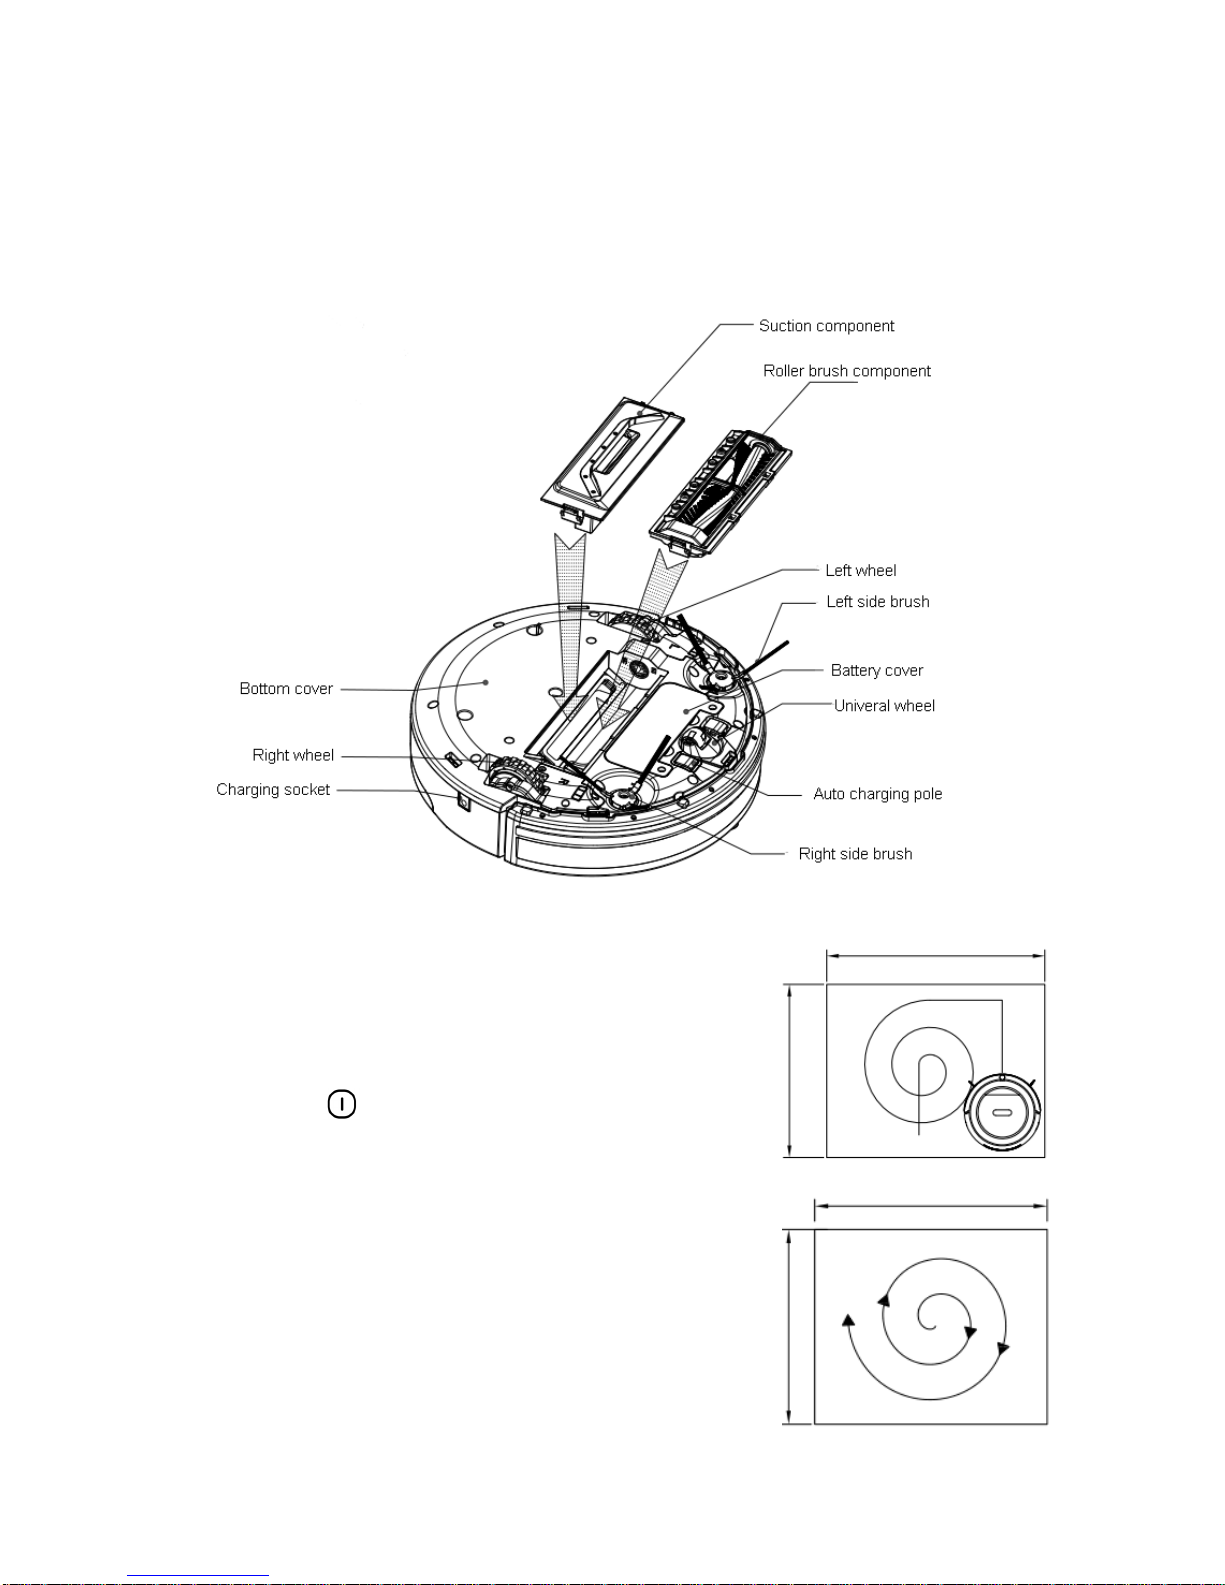
4. Suction component and Roller brush component can be exchangeable
Either suction component or roller brush component is replaceable. Just install either of them in
appropriate place at the bottom of the robot (as shown in the figure below), the robot will bring up
brilliant cleaning performance!
Cleaning mode
1. Auto cleaning
In this mode, the robot will clean a room automatically and
adjust its cleaning mode according to environment.
Note: Press “ ”on robot or “ON/OFF” on remote control
to start auto cleaning.
13
2. Spot cleaning
Under the following situations, the robot will activate spot
cleaning:
1). When it detects a very dirty area.
2). Press “ ” on robot or on remote control.
Note: It’s suggested that user select spot cleaning in a
a very dirty area.
3. Edge cleaning
In cleaning mode, press “ ” to enter edge
cleaning mode. The robot will clean along the obstacles.
4. Zig-Zag cleaning
Robot will automatically goes into Zig-Zag cleaning when it
Detected it is in an open area or the environment with less
obstacles.
Note: Press “ MODE ” button on remote control to select cleaning mode:
A. Mode No.1111 shows on robot LED display: spiral cleaning mode;
B. Mode No.2222 shows on robot LED display: auto cleaning mode;
C. Mode No.3333 shows on robot LED display: edge cleaning mode;
D. Mode No.4444 shows on robot LED display: Zig-zag cleaning mode;
Water tank and its mopping cloth usage
1. Sticking mopping cloth
To stick mopping cloth on the bottom of water tank as shown in fig 1, make sure the sticking side and
mopping cloth are facing the appropriate sides, and then to stick the mopping cloth on its sticking side.

14
2. Fill water tank with water
Ta ke o ut r ub be r pl ug o f wa te r t an k, f il l i t wit h wa t er, a nd th en p ut b ac k t he r ub be r plu g tig ht ly on
Its position in case of water leakage.
3. Fit water tank on the robot
Turnover the robot, fix the water tank on the robot bottom, make sure its bolts are firmly
Pressed into the fixing slots.
15
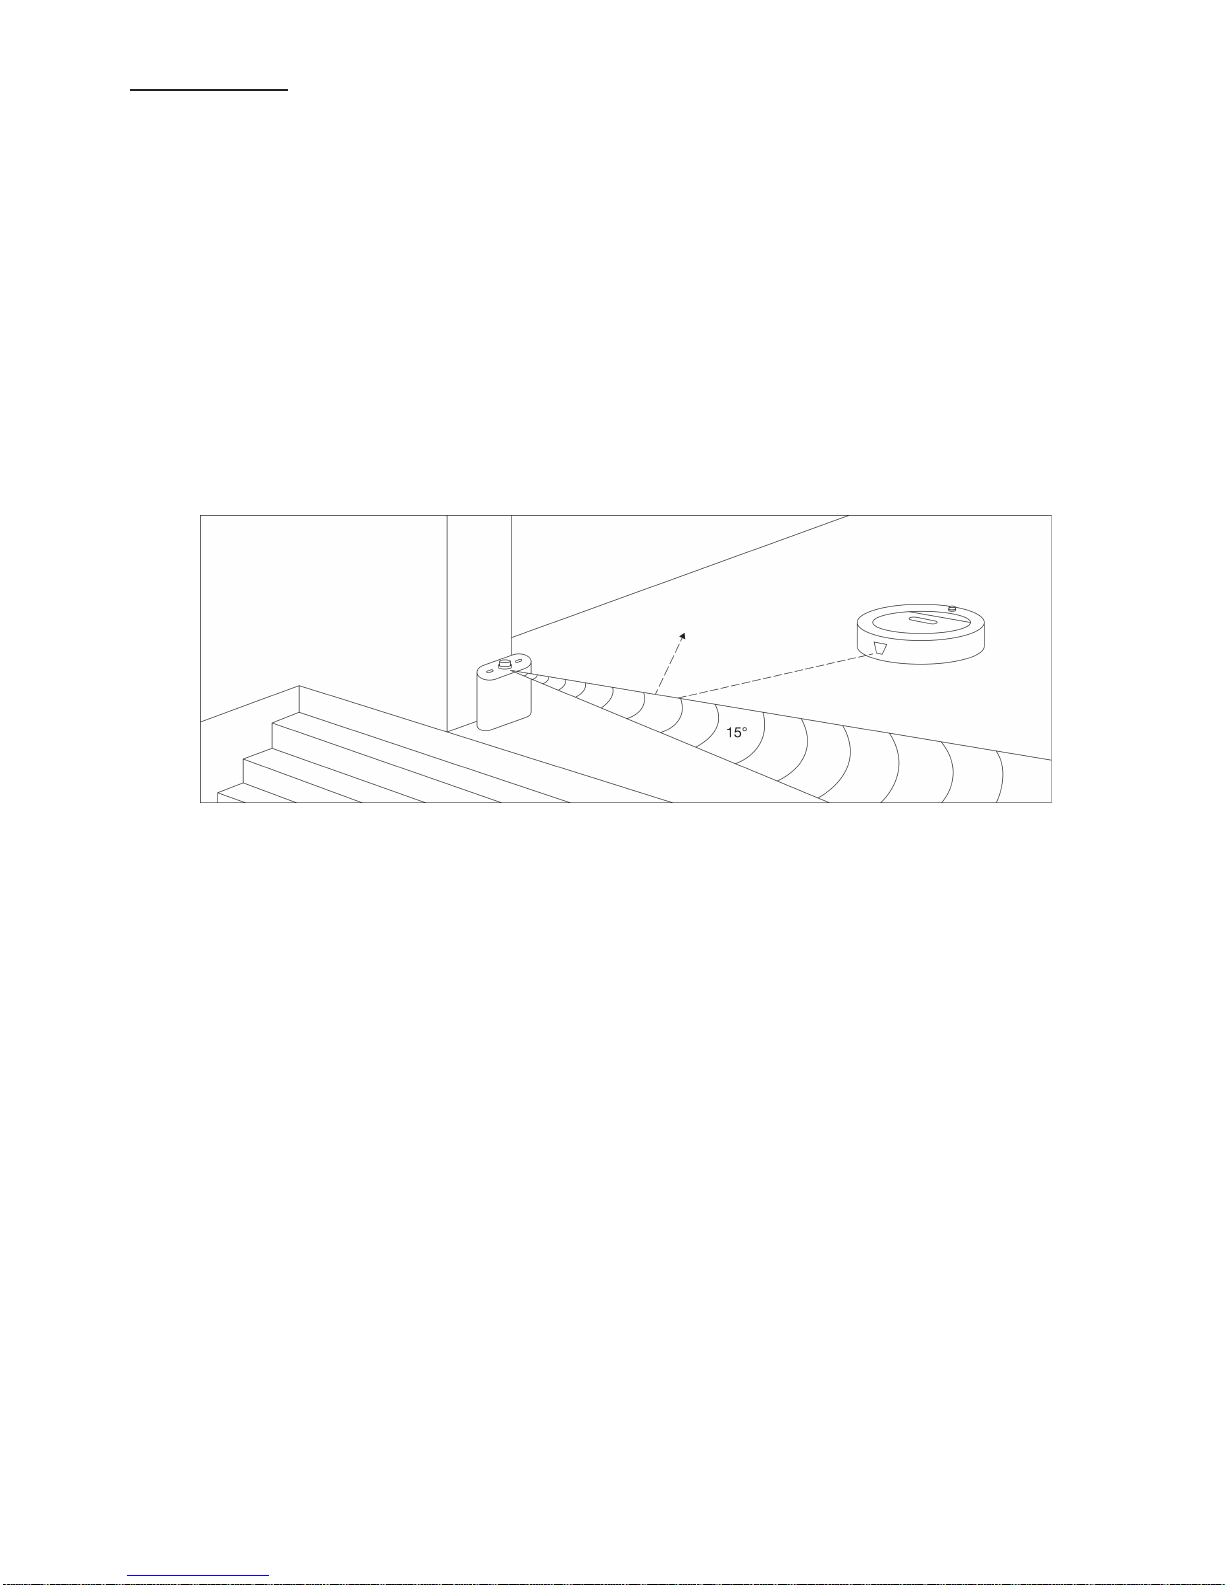
VIRTUAL WALL
The virtual wall is an accessory which allowing you to define the cleaning area. It is sending a horizontal
linear infrared signal to prevent the vacuum from entering certain unwanted areas/rooms.
Positioning the virtual wall
• Place the virtual wall on the floor where you want to send the blocking signal, press the ON button. Then,
the light should switch on.
• The virtual wall should be placed more than 3 meters from the charging base, to avoid any interference.
• The charging base must not be installed in the radius or in front of the virtual wall.
• The virtual wall must also be keep out of direct sunlight so as not to disturb the communication with the
robot.
16
Product Maintaining
1. Cleaning side brushes
Clean the side brush when it gets dirty and replace it if it’s damaged. Max life span for side brush
is 12 months.
Note: before replacing side brushes, check and make L/R mark on side brush match with the L/R
mark on the bottom base of the robot.
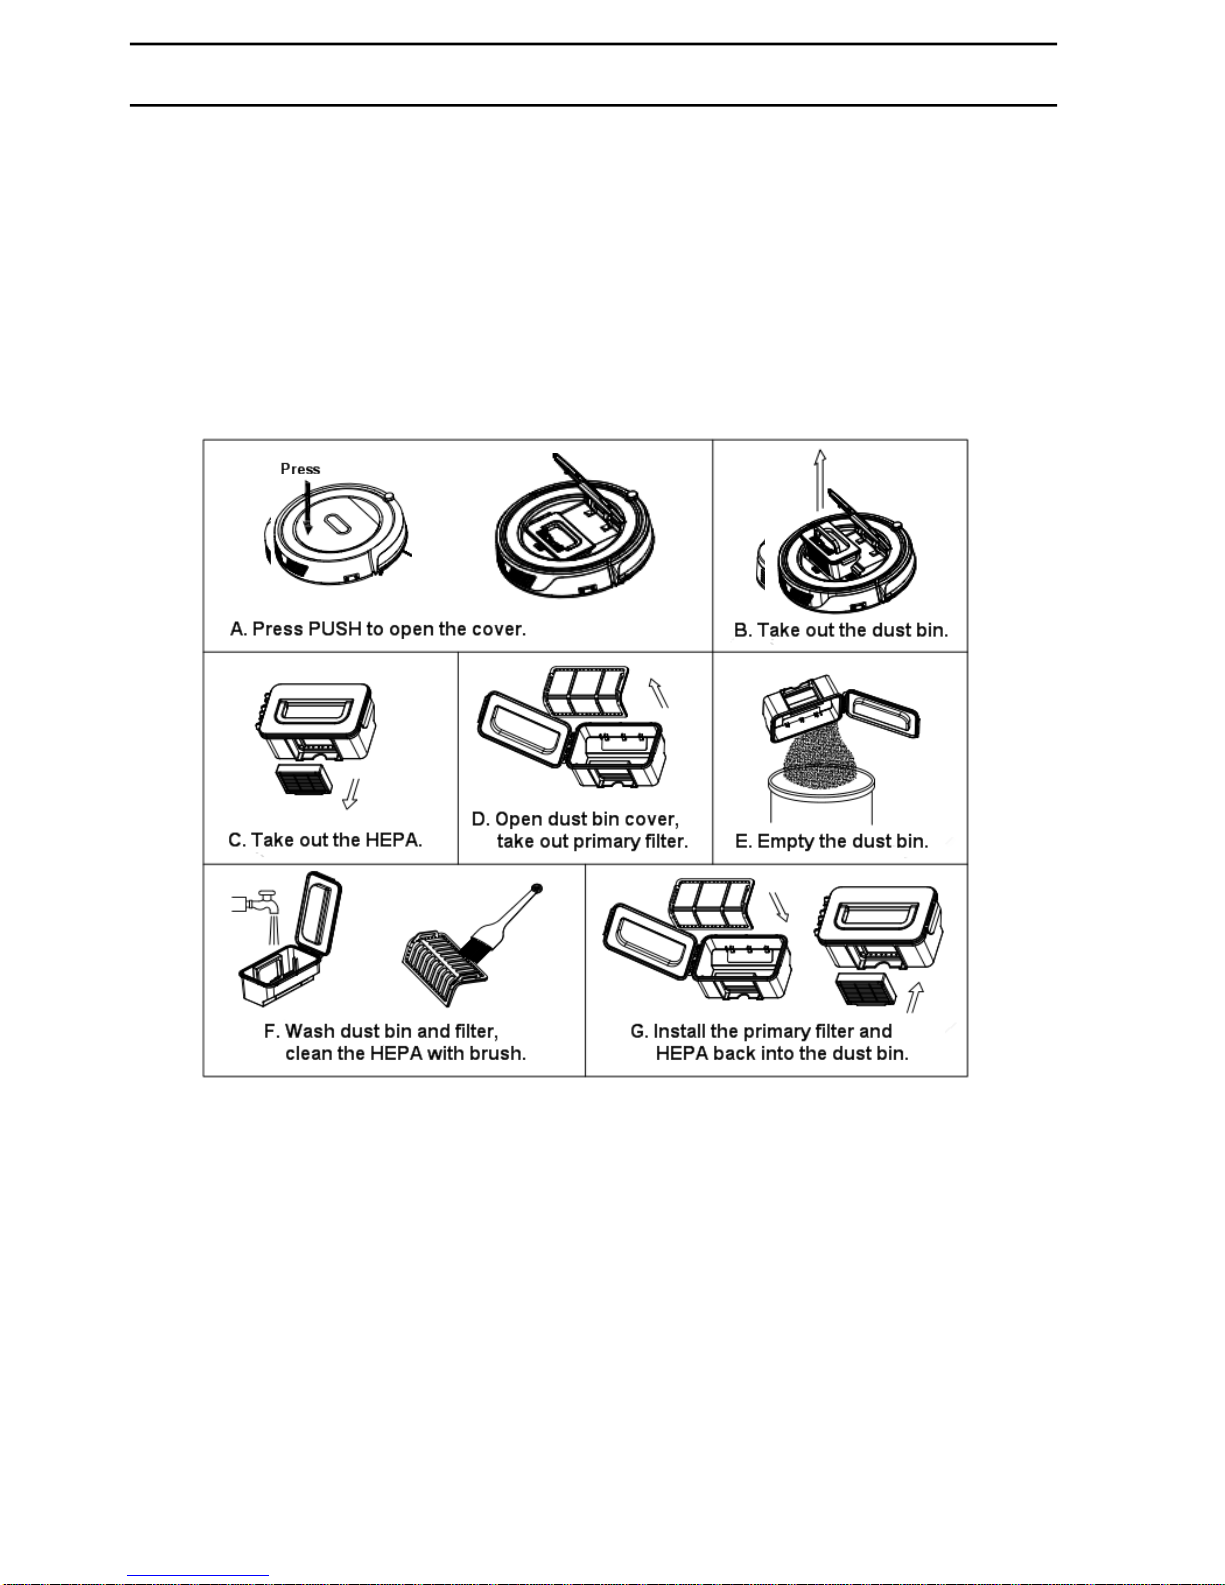
2. Cleaning dust bin and filters
Empty and clean the dust bin after each use following the steps as shown in the figures below.
Note:
a. Wash the HEPA and primary filter after used for 15~30 days. Max life span for HEPA and primary
filter is 24 months.
b. Reinstall the HEPA and primary filter after they are fully dry.
c. HEPA and primary filter could be replaced if needed.
d. Do not dry the filters under baking sunshine.
17
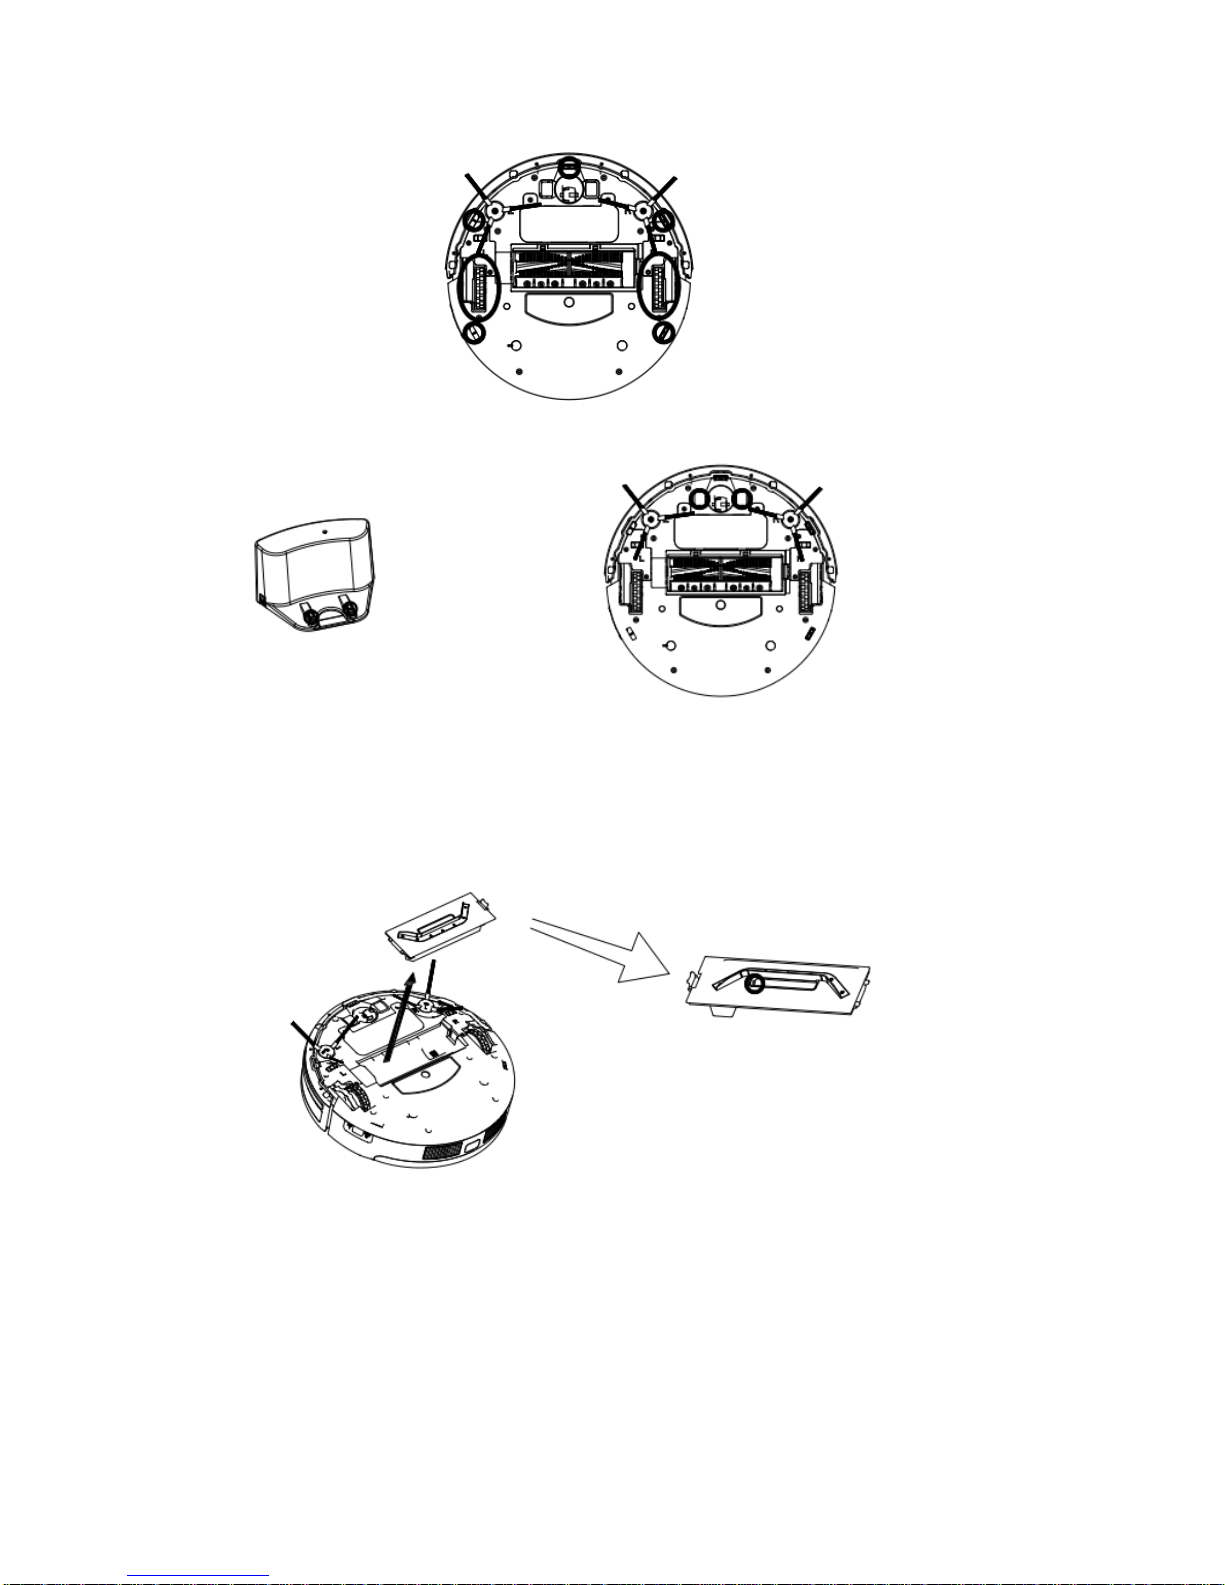
3. Cleaning sensors and wheels
Slightly wipe all the sensors and wheels, as marked in figure below, with soft cleaning cloth or tool.
4. Cleaning charging poles
Clean the charging poles, as marked in figure below, with soft cleaning cloth or tool.
4. Cleaning suction passage and dust sensor
Clean the suction passage and dust sensor, as marked in figure below, with soft cleaning cloth or tool.
Note: Avoid allowing the sensors to get wet by water, thinner, etc.
18
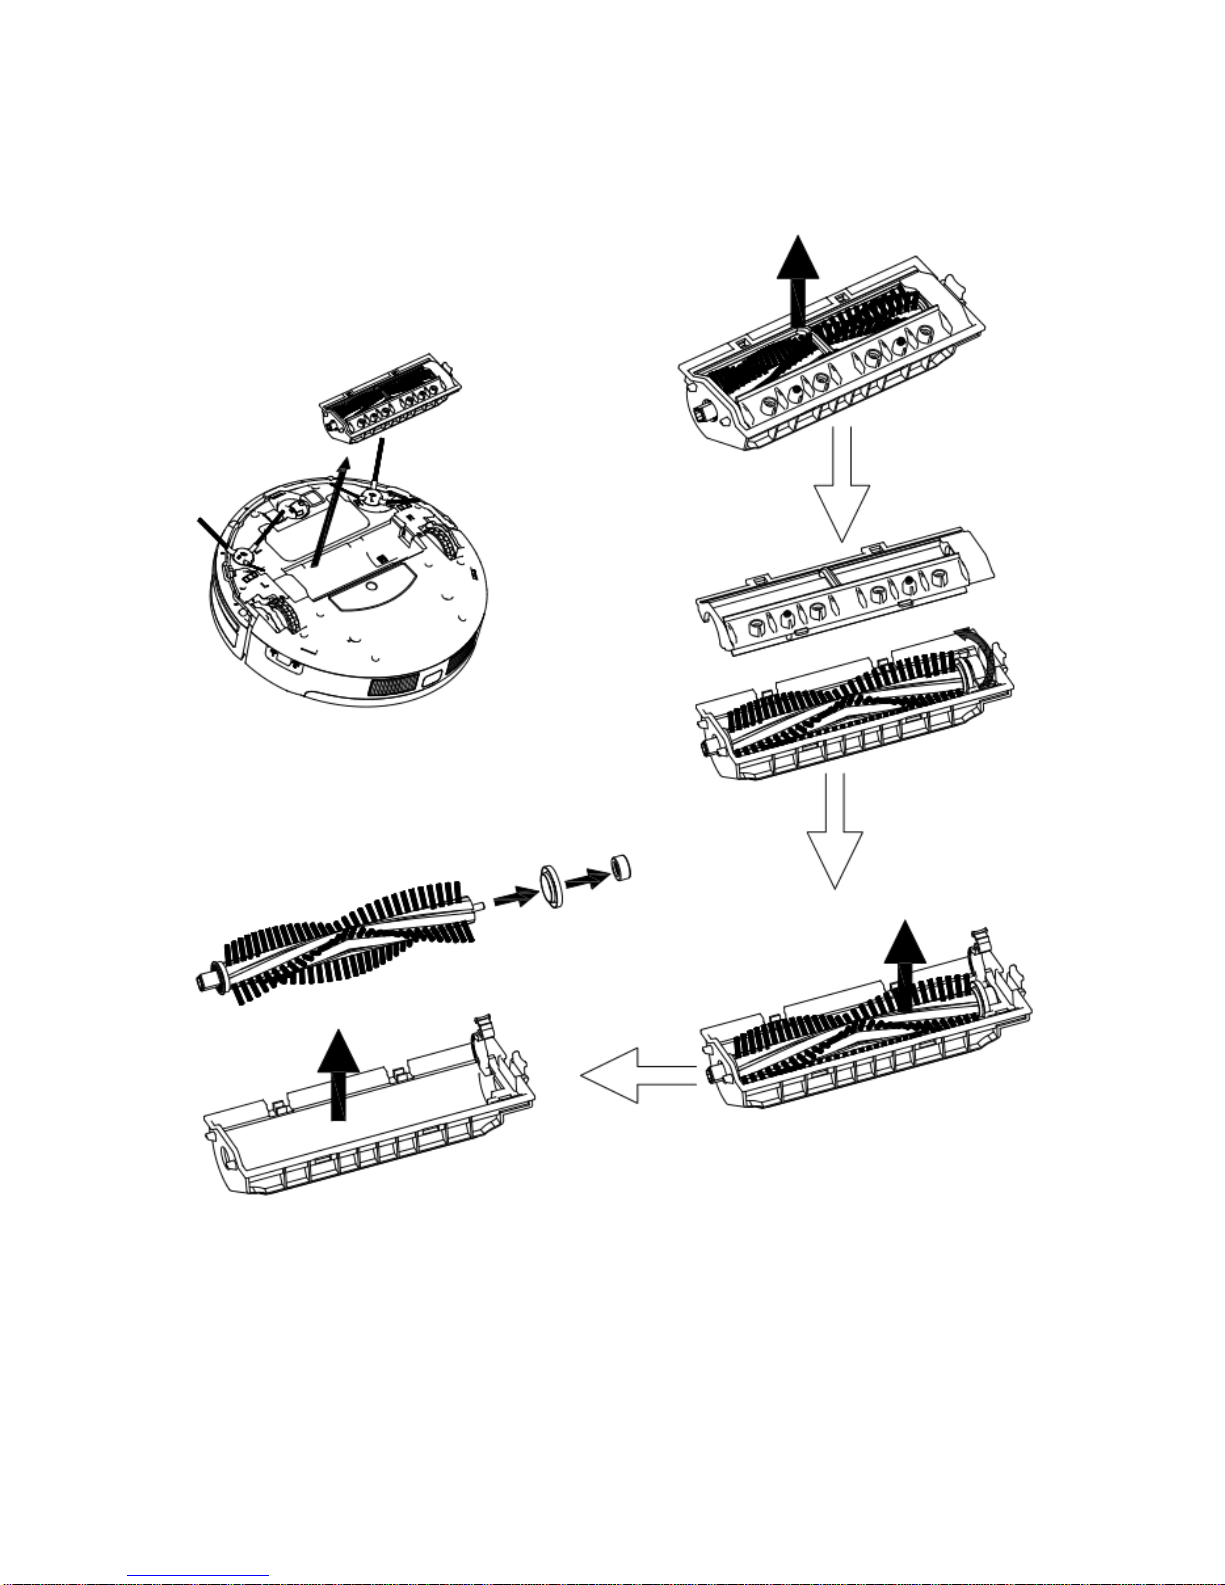
Cleaning roller brush component
Ta ke out and disassemble the roller brush component as shown in figure below, and clean it with
soft cleaning cloth or tool. (the roller brush axle can be washed by water)
Note: Please re-install the roller brush axle after it is fully dry.
19
Product Specifications
Classification
Item
Detail
Mechanical
Specifications
Diameter
340mm
Height
88mm
Weight
3.5Kg
Electrical
Specifications
Power Rating
14.4V
Battery specifications
Ni-MH 2000mAH
Cleaning
Specifications
Dust bin Capacity
0.5L
Charging Type
Auto Charging/ Manual Charging
Cleaning Mode
Auto, Spot, Edge, “弓”, Schedule
Charging Time
240~300 mins
Cleaning Time
80 ~ 90mins
Main Body Button Type
Tou ch p ad (L ED d isp la y)
Battery Removal
1. Remove the screws on battery cover with a screw driver.
2. Remove the battery cover.
3. Grasp the insulating tape at two sides of the battery and lift the battery.
4. Unplug the wire connector that links the battery and robot.
Note: Only use the original battery of the product, otherwise it may cause product damage.
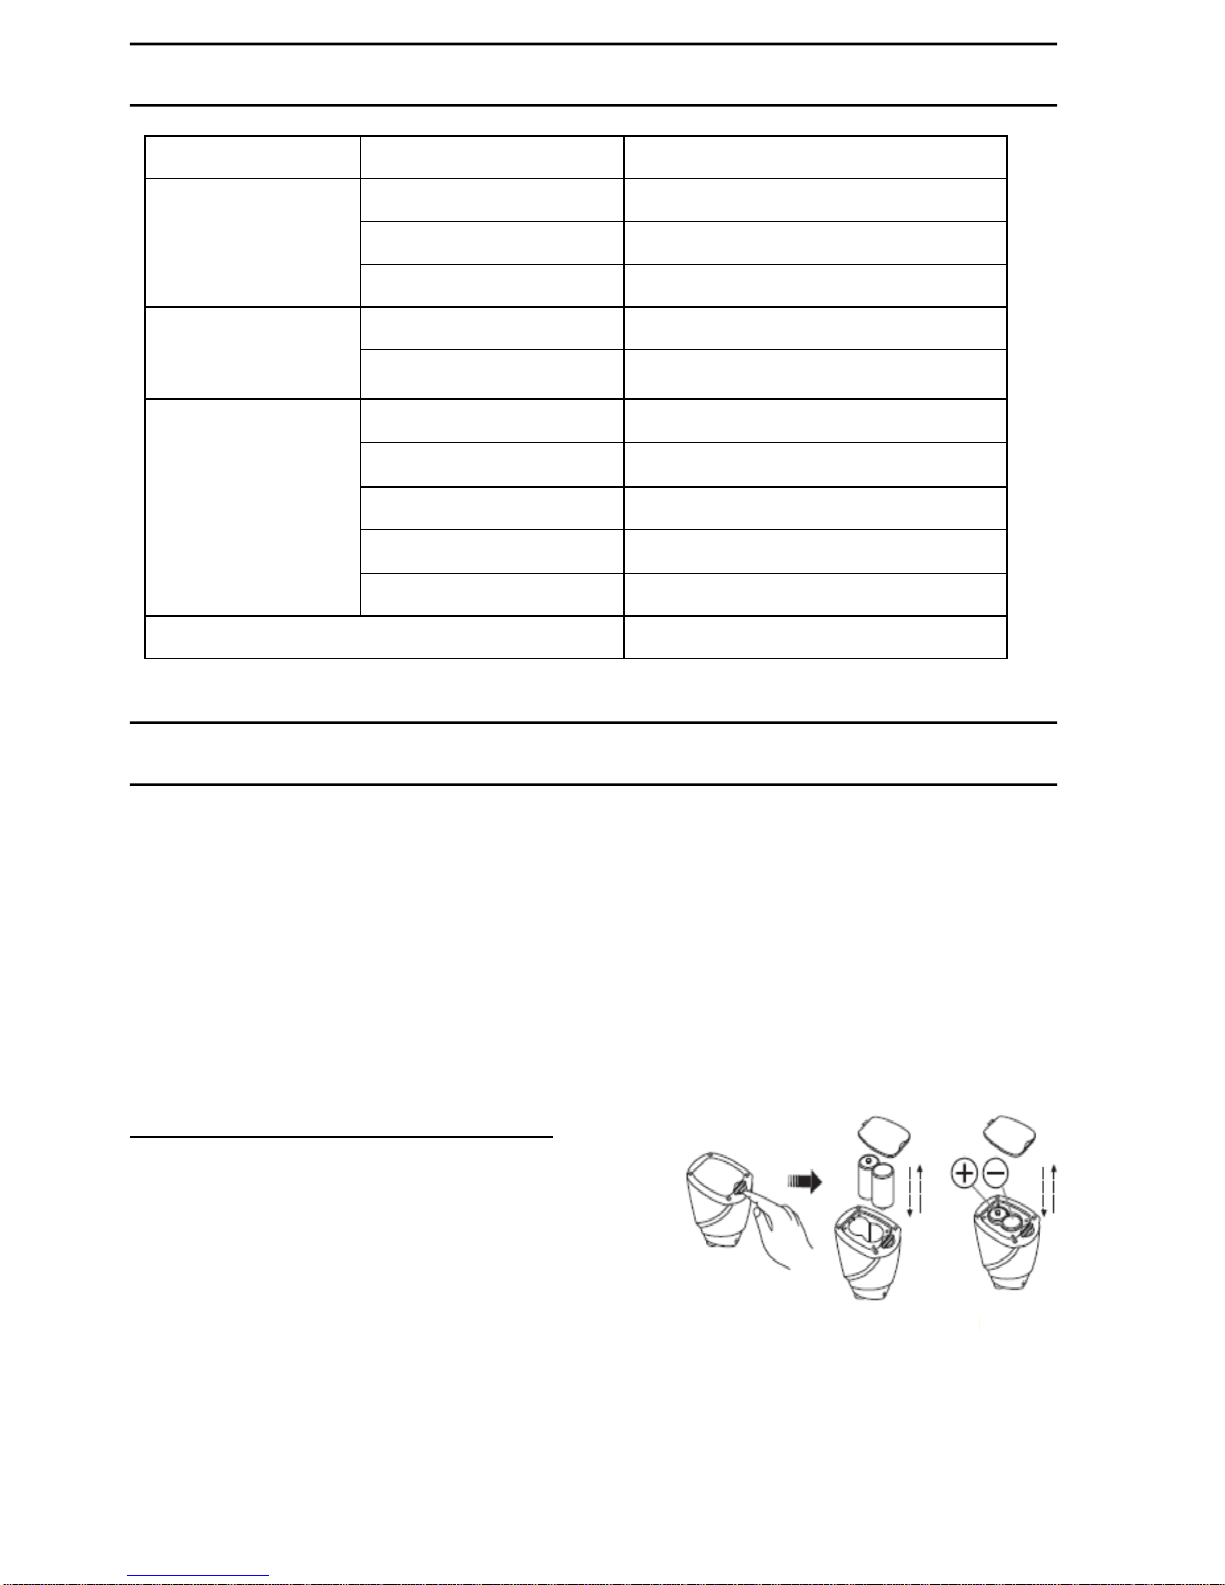
Battery replacement of the space isolator :
1. Spin the pivot as per figure 1 and the cover will open.
2. Please place the batteries with correct polarity (=/-)
3. Please take out the battery if it was unused for long.
20
Troubleshooting
Error Code for Sensors
Error code
Cause
Solution
AUBF
Suction passage blocked
Clean suction passage
AUBN
Dust bin not well located or robot without dust bin
Put back dust bin and place it in position
E1xx
Left collision switch fault
Check sensitivity of the front bumper
E2xx
Right collision switch fault
E3xx
Left and right collision switch fault
E4xx
Left wheel off the ground
Put robot on solid ground
E5xx
Left wheel off the ground, left collision switch fault
Put robot on solid ground and check front
bumper
E6xx
Left wheel off the ground, right collision switch fault
E7xx
Left wheel off the ground, left and right collision
switch fault
E8xx
Right wheel off the ground
Put robot on solid ground
E9xx
Right wheel off the ground, left collision switch fault
Put robot on solid ground and check
sensitivity of the front bumper
Eaxx
Right wheel off the ground, right collision switch fault
Ebxx
Right wheel off the ground, left and right collision
switch fault
Ecxx
Left and right wheel off the ground
Put robot on solid ground
Edxx
Left and right wheel off the ground, left collision
switch fault
Put robot on solid ground and check
sensitivity of the front bumper
Eexx
Left and right wheel off the ground, right collision
switch fault
Efxx
Left and right wheel off the ground, left and right
collision switch fault
Exx1
Left anti-drop sensor detect cliff
Clean bottom anti-drop sensor
Exx2
Front anti-drop sensor detect cliff
Exx3
Left and front anti-drop sensor detect cliff
Clean front sensor lens and bottom antidrop sensor lens
Exx4
Right anti-drop sensor detect cliff
Clean bottom anti-drop sensor
Exx5
Left and right anti-drop sensor detect cliff
Exx6
Front and right anti-drop sensor detect cliff
Clean front sensor lens and bottom antidrop sensor lens
Exx7
Front, left and right anti-drop sensor detect cliff
Exx8
Front bumper right infrared sensors detect obstacle
Clean front bumper sensor lens
21
Error Code for Sensors
Error code
Cause
Solution
Exx9
Left anti-drop sensor detect cliff, front bumper right
infrared sensors detect obstacle
Clean front sensor lens and bottom
anti-drop sensor lens
ExxA
Front anti-drop sensor detect cliff, front bumper right
infrared sensors detect obstacle
ExxB
Left and front anti-drop sensor detect cliff, front
bumper right infrared sensors detect obstacle
ExxC
Right anti-drop sensor detect cliff, front bumper right
infrared sensors detect obstacle
ExxD
Right anti-drop sensor detect cliff, front bumper right
infrared sensors detect obstacle
ExxE
Right and front anti-drop sensor detect cliff, front
bumper right infrared sensors detect obstacle
ExxF
Front, left and right anti-drop sensor detect cliff, front
bumper right infrared sensors detect obstacle
Ex1x
Front bumper left infrared sensors detect obstacle
Clean front bumper sensor lens
Ex2x
Front bumper middle infrared sensors detect
obstacle
Ex3x
Front bumper left and middle infrared sensors detect
obstacle
Ex4x
Front bumper right infrared sensors detect obstacle
Ex5x
Front bumper left and right infrared sensors detect
obstacle
Ex6x
Front bumper middle and right infrared sensors
detect obstacle
Ex7x
Front bumper left, middle and right infrared sensors
detect obstacle
Ex8x
Front bumper wall detection infrared sensors detect
obstacle
Ex9x
Front bumper wall detection sensors and left infrared
sensors detect obstacle
ExAx
Front bumper wall detection sensors and middle
infrared sensors detect obstacle
ExBx
Front bumper wall detection sensors, left and middle
infrared sensors detect obstacle
ExCx
Front bumper wall detection sensors, right infrared
sensors detect obstacle
ExDx
Front bumper wall detection sensors, left and right
infrared sensors detect obstacle
ExEx
Front bumper wall detection sensors, right and
middle infrared sensors detect obstacle
ExFx
Front bumper wall detection sensors, left, right and
middle infrared sensors detect obstacle
22
Troubleshooting for Motors
Error code
Cause
Solution
L01x
Fan overloaded
Check if fan is pressed, and clean dust bin
L0x1
Left wheel overloaded
Check if it’s stuck or wired by obstacles
L0x2
Right wheel overloaded
L0x3
Left and right wheel overloaded
L0x4
Left side brush overloaded
L0x5
Left wheel and left side brush overloaded
L0x6
Right wheel and left side brush overloaded
L0x7
Left and right wheel, left side brush overloaded
L0x8
Right side brush overloaded
L0x9
Left wheel and right side brush overloaded
L0xA
Right wheel and right side brush overloaded
L0xB
Left and right wheel, right side brush overloaded
L0xC
Left and right side brush overloaded
L0xD
Left wheel, left and right side brush overloaded
L0xE
Right wheel, left and right side brush overloaded
L0xF
Left and right wheel, left and right side brush
overloaded
L02X
Roller brush overloaded
Note:
1. There is no problem for the robot when it displays L000.
2. X is the number or letter might appear on display for different fault.
3. If robot displays E001 or E004, please find EXX1 or EXX4 for relative solution referred in troubleshooting.
4. If robot displays EC07, please find ECXX and EXX7 for relative solution referred in troubleshooting.
5. Like wise, if robot displays EE91, please find EXX1 and EX9X relative solution referred in
troubleshooting.
6. If above solution does not work, please try below:
a. Reset the robot by switching off the unit and then turn it on, and check again.
b. If it still does not work after reset, contact after sales.
7. UV light might hurt your eyes, so please do not stare directly at the light when turned on.
23
ENVIRONMENT FRIENDLY DISPOSAL
This marking indicates that this product should not be disposed of with other household waste.
To p re ve nt p os si bl e h ar m t o t he e nv ir on m en t o r h um an h ea lt h f ro m u nc o nt ro lled waste
disposal, recycle it responsibly to promote the sustainable re-use of material resources. To
dispose of your appliance correctly, please contact or take it to your local refuse/ recycling
centre. Alternatively, contact your local council or information on your local re-use centre.
Please make this product environmentally sale for recycling.
(
(
(
(
(
Adeva SAS / H.Koenig Europe - 8 rue Marc Seguin, 77290 Mitry-Mory, France
www.hkoenig.com - sav@hkoenig.com - contact@hkoenig.com - Tél: +33 1 64 67 00 01

24
Instructions de sécurité
Avant d´utiliser cet appareil, lisez ce manuel et les conseils de sécurité et
respectez-les pour votre propre sécurité.
Seul un réparateur professionnel peut démonter et intervenir sur l´appareil. N´essayez jamais de réparer
l´appareil vous-mêmes.
1. Utilisez exclusivement la batterie fournie avec l´appareil pour le charger. Utiliser une batterie non
compatible, pourrait provoquer des électrochocs, peut augmenter les risques d´incendie et
endommager l´appareil.
2. Ne pas toucher le câble d´alimentation, la prise ou l´appareil avec vos mains humides.
3. Ne jamais utiliser l´appareil si celui ou son câble d´alimentation présente des dommages
visibles. Confiez-le à un réparateur professionnel ou bien au département après-vente fourni
par votre revendeur.
4. Ne pas utiliser l´appareil sur les surfaces humides ou mouillées telles que les salles de bain ou la
buanderie.
5. Attention : ne pas laisser vos rideaux, petits objets (jouets) ou autres se coincer dans les roues de
l´appareil.
6. Avant d´utiliser l´appareil, ramasser les objets trainant au sol pour éviter d´endommager l´appareil.
Soulevez les rideaux pour éviter qu´accidentellement, l´appareil reste bloqué.
7. Ne jamais laisser l´appareil à proximité de produit inflammables ou mégots de cigarette.
8. Ne jamais laisser l´appareil aspirer des substances inflammables telles que de l´essence.
9. Utilisez exclusivement en intérieur, jamais en extérieur.
10. Chargez l´appareil avant de le nettoyer.
11. Ne pas plier ou enrouler le câble avec des objets lourds ou tranchants.
12. Ne pas s´asseoir sur l´appareil ou poser des objets lourds dessus. Surveillez les enfants et les animaux
lorsque l´appareil est en cours d´utilisation.
13. Ne pas poser l´appareil sur des surfaces d´où il pourrait tomber (tables, plans de travail, etc.).
14. Éteignez l´appareil lorsque vous le transportez ou lorsque vous ne pensez pas l´utiliser pendant une
longue période de temps.
15. Avant de charger l´appareil, vérifiez que l´adaptateur et la prise sont fermement connectés.
16. Pour éviter de vous entraver, prévenez les habitants de la maison lorsque l´appareil est en marche.
17. Videz le réservoir lorsqu´il est plein avant d´utiliser l´appareil à nouveau.
18. Il est préférable d´utiliser l´appareil entre 0℃ et 40℃.
19. Ne pas utiliser l´appareil sous des températures extrêmes ou au soleil.
20. Disposez de la batterie séparément avant de le recycler.
21. La batterie doit être recyclée séparément pour éviter tout danger de fuite dans l´environnement
22. Débrancher l´adaptateur de la prise avant de nettoyer l´appareil ou le chargeur ou de retirer la batterie.
FRANCAIS(
25
Avertissement:
Ne pas laisser les enfants de moins de 8 ans utiliser l´appareil. Toute personne souffrant d´un
handicap physique ou moral, doit utiliser l´appareil sous la surveillance constante d´un adulte
responsable de leur sécurité, capable de leur enseigner les dangers liés à son utilisation. Ne laissez
pas les enfants jouer avec l´appareil. Le nettoyage et l´entretien de l´appareil ne doit pas être fait
par des enfants ou sans surveillance.
Caractéristiques produit
Puissance de succion
La puissance de succion est assez puissante pour assurer l´aspiration des résidus efficacement.
Brosse rotative et accessoire de succion interchangeable
Vous pouvez alterner entre la brosse rotative et l´accessoire de succion pour adapter le nettoyage à
la surface à nettoyer.
Système de succion intelligent
La puissance de succion s´adapte automatiquement aux surfaces à aspirer. Cette capacité améliore
l´efficacité du nettoyage et améliore la consommation de l´appareil la diminuant de 30%.
Design facilitant l´utilisation
L´utilisation est simplifiée par le bouton unique.
Réservoir lavable
Vous pouvez laver le réservoir et les filtres à l´eau.
Rincez le réservoir sous l´eau et évitez de répandre
la poussière polluant l´air.
Multiples programmes de nettoyage
L´appareil a 4 programmes de nettoyage.
1. Mode de nettoyage automatique
Le robot nettoie automatiquement la pièce et adapte
son comportement à l´environnement.
26
2. Nettoyage statique
Lorsque vous utilisez les accessoires de succion,
le robot nettoiera en spirale en détectant les zones à
nettoyer.
3. Nettoyage de précision
Sur ce mode, le robot nettoie au ras des murs et au tour des
obstacles.
4. Mode programmable
Une fois programmé, le robot laissé à charger
démarre à l´heure choisie.
27
Composants
Le robot et ses accessoires
Nº
Description
Quantité
1
Robot
1
2
Chargeur
1
3
Adaptateur
1
4
Télécommande (piles non fournies)
1
5
Réservoir et coussin nettoyant
1
6
Filtre HEPA
1
7
Brosse de nettoyage
1
8
Brosses latérales *2 et brosses de rechange *2
4
9
Mode d´emploi
1
10
Piles
2
11
Mur virtuel
1
11
28
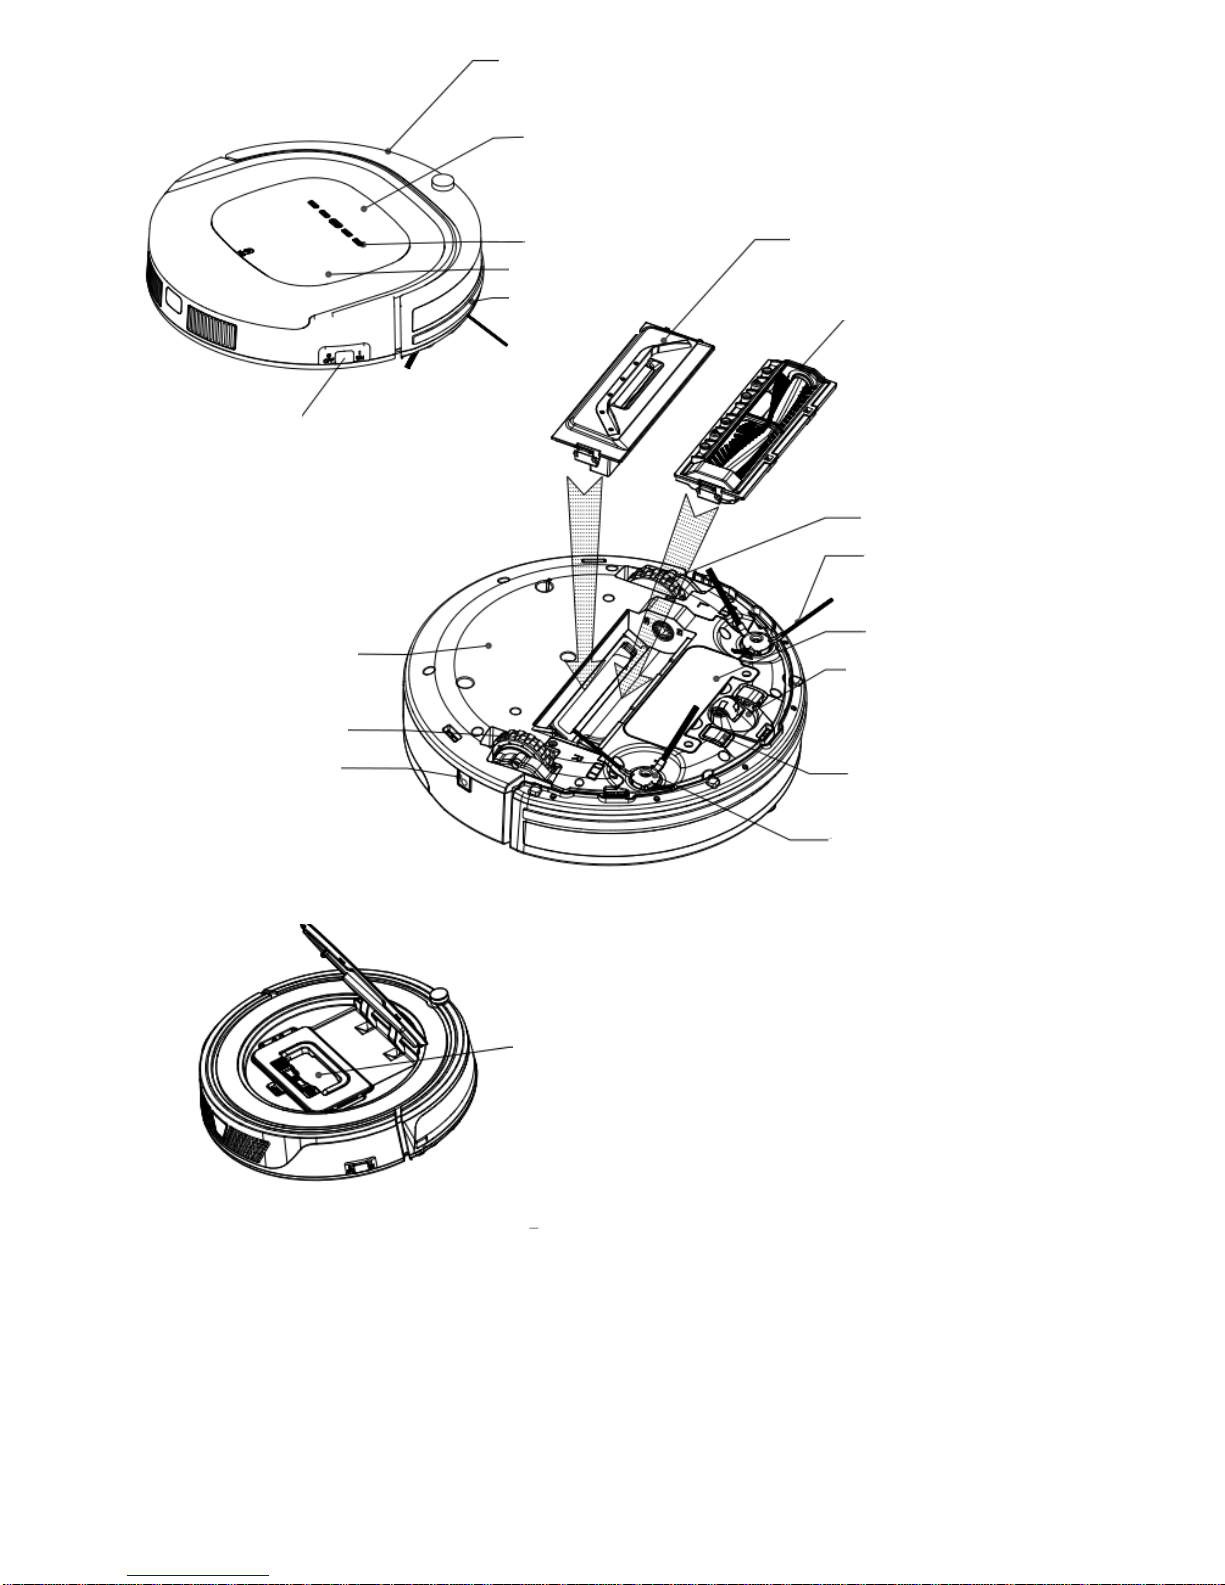
Diagramme
Protection antichocs
LED anti-
Bouton tactile
Couvercle)
Parechocs)
Bouton)ON/OFF)
Entrée)aspiration) )
Brosse)rotative)
Roue)Gauche)
Brosse)Gauche)
Couvercle)batterie)
Roue)centrale)
Contact)chargeur)
Brosse)droite)
Réservoir)))))))))))))))
Roue)droite)
Prise)de)charge)
Couvercle)inférieure)
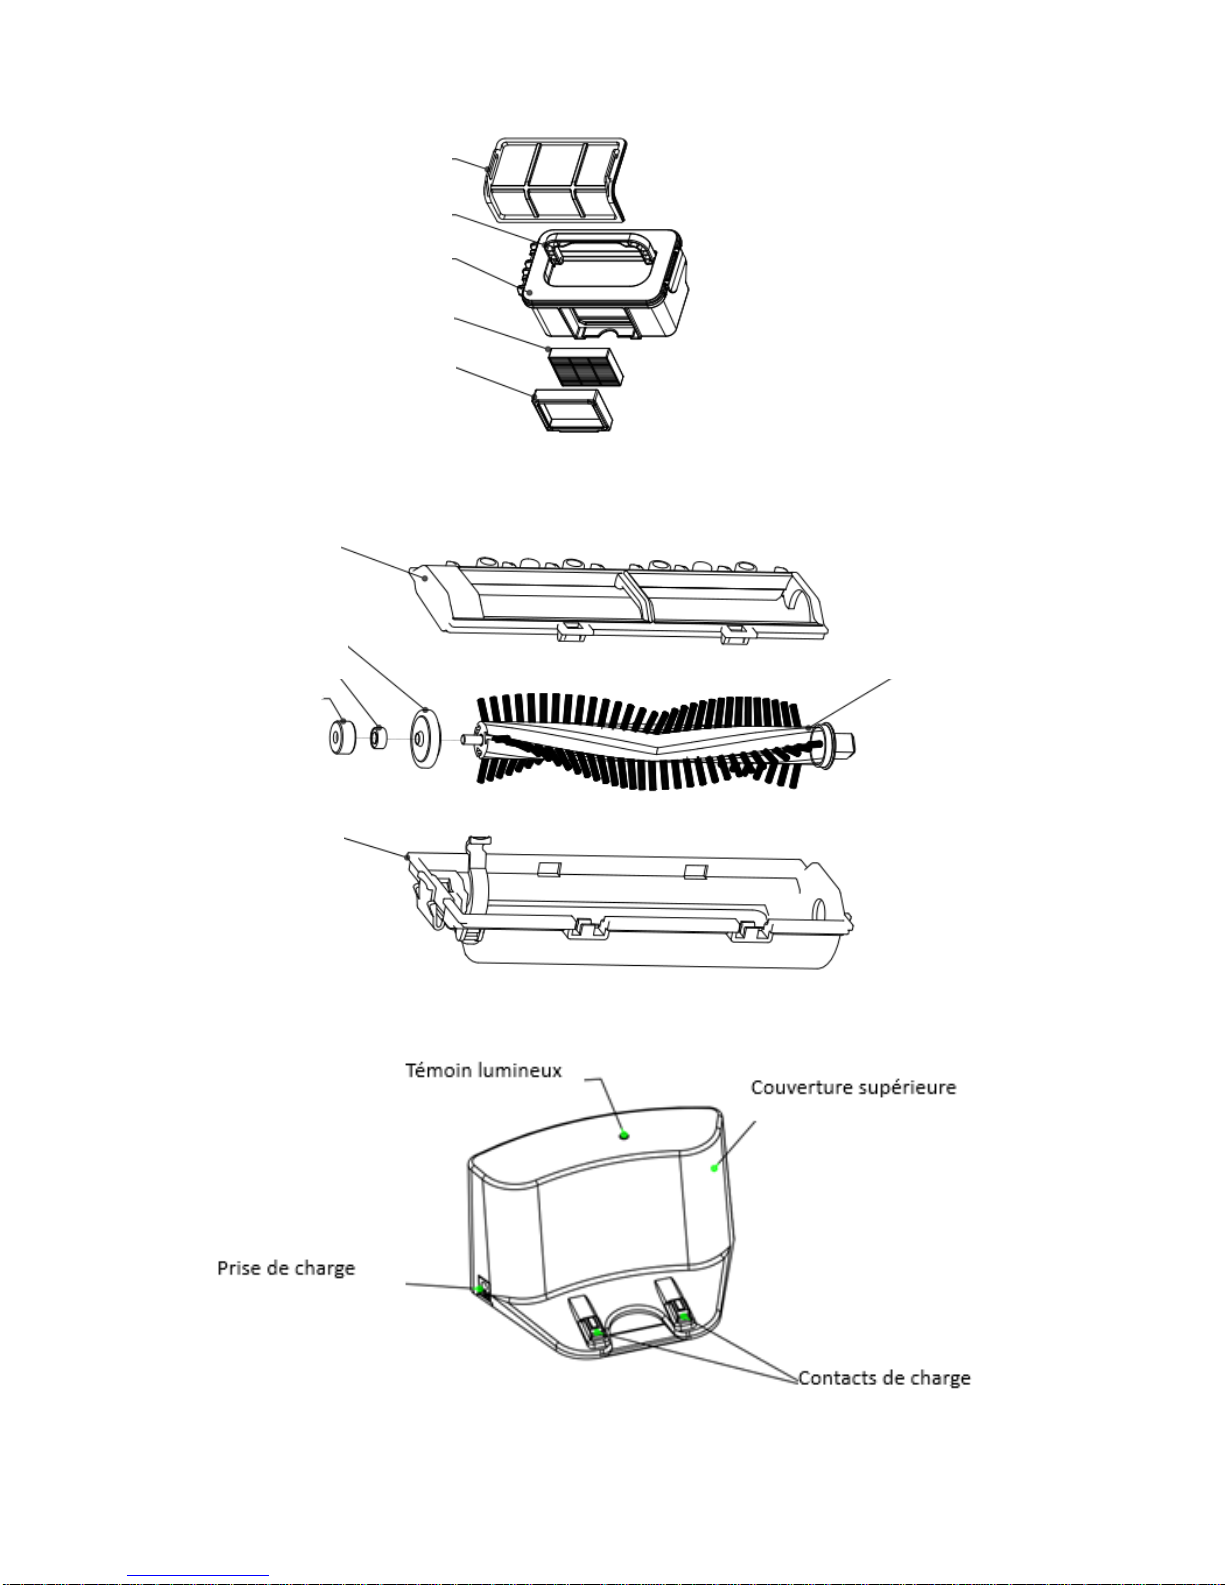
29
Réservoir
Brosse rotative
Chargeur
(
Filtre)Principal) ))))))))))))))
Poignée))))))))))))))
Réservoir))))))))))))))
Filtre)HEPA))))))))))))
Support)Filtre)HEPA))))))))))))
Support)inférieur)de)la)brosse)
Roue)de)la)brosse)rotative))))))))))))
Stoppeur))))))))))))
Stoppeur)intermédiaire))))))))))))
Stoppeur)externe))))
Axe)de)la)brosse)rotative) ) ) ) ) ) ) ) ) ) ) )
 Loading...