

Instruction manual
Manuel d'utilisation
Bedienungsanleitung
Handboek
Manual de utilización
Manuale d'uso
SWR32
Robot Vacuum cleaner
Aspirateur robot
Staubsauger-roboter
Stofzuiger robot
Robot aspirador
Aspirapolvere robot
ENGLISH
Thank you for purchasing our new robotic vacuum cleaner SWR22. Please read carefully this manual before using !
Safety Precautions :
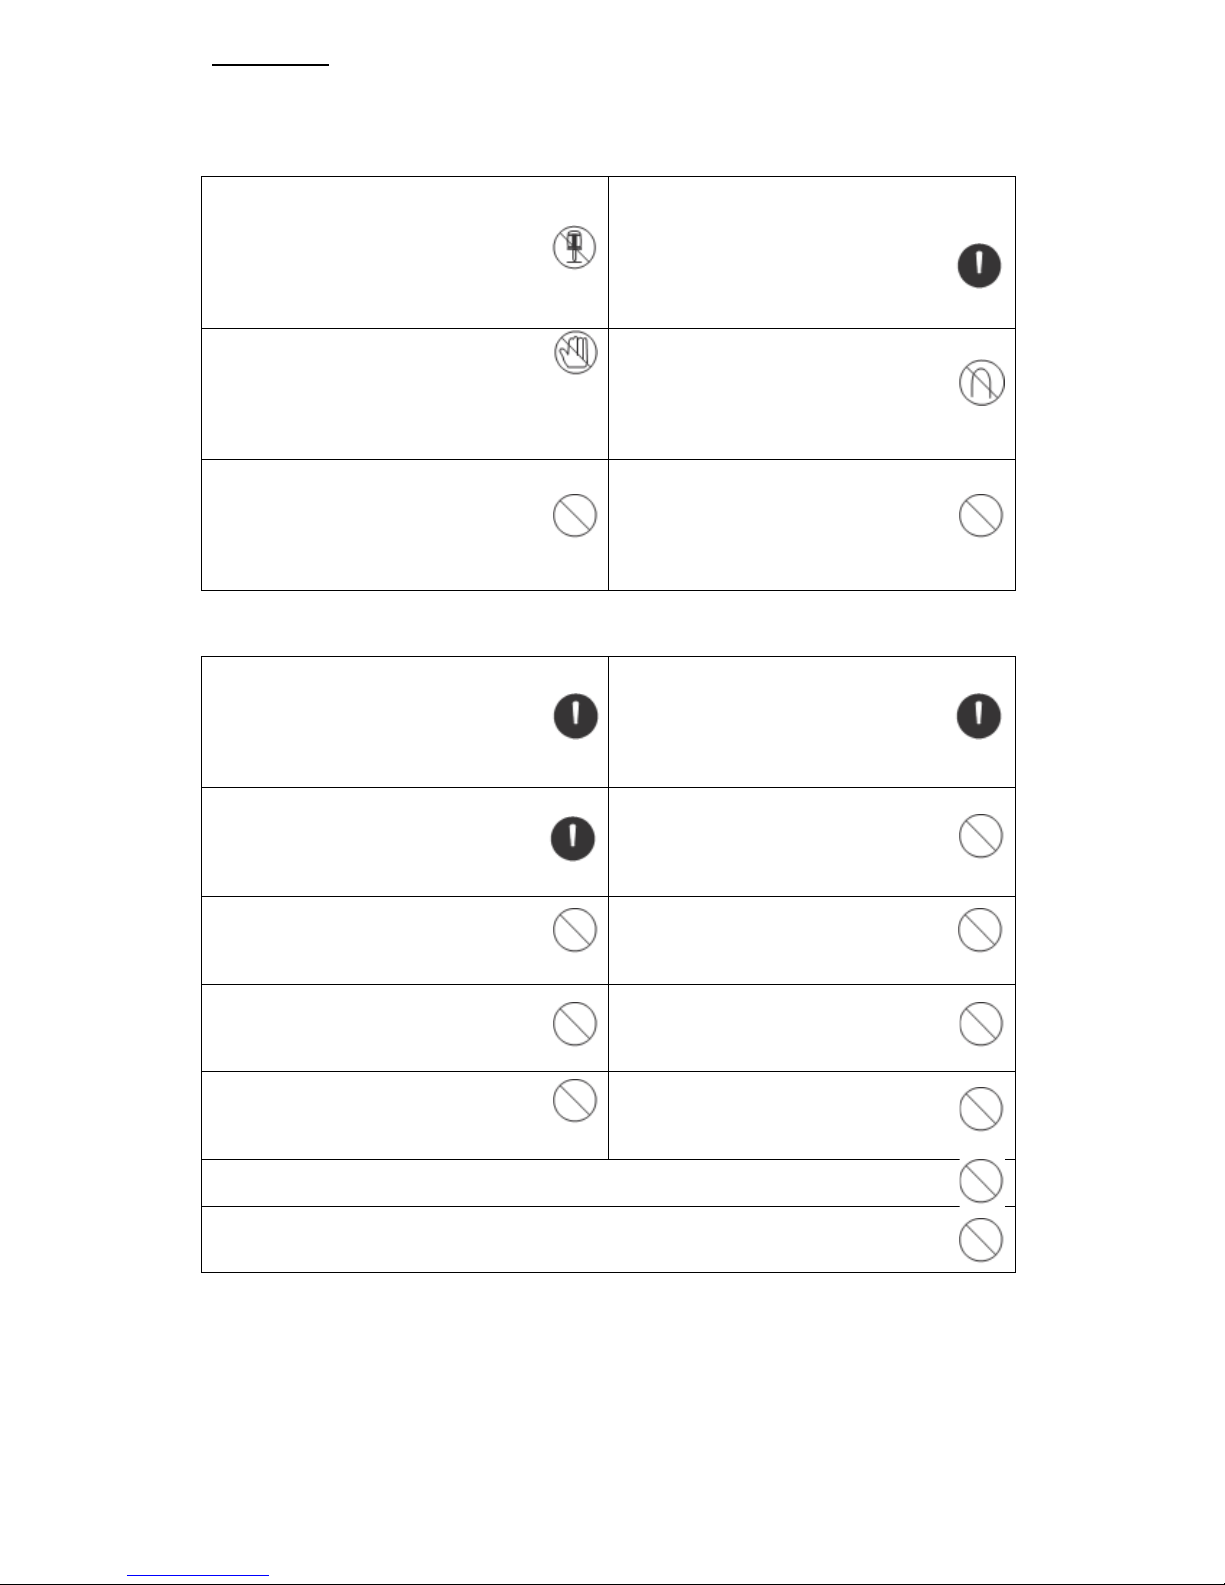
Caution
No one else can disassemble, maintain or
transform the product except the
maintenance technicians designated by our
company, or it may cause fire, electric shock
or personal injury.
Dont' use the other charger but the
equipped one of the robot, or it may cause
product damage, electric shock or fire due
to high voltage.
Don't touch high-voltage power cord of the
electric appliance with your wet hand, or it
may cause electric shock.
Don't bend the power cord overly or place
weight on it, or it may cause power cord
damage, fire or electric shock.
Dont' twist your clothes or any part of
your body (head, finger, etc.) into the
brush or wheel of the robot, or it may
cause personal injury.
Don't approach cigarette, lighter, match
and other heat objects or combustible
materials such as the gasoline cleaner.
Caution
Don't forget to turn off the power w hi le
transporting or storing the cleaner for long,
or the battery may be damaged.
Insert the power cord of the charger w ell or
it may cause electric shock, sh or t circ uit,
smocking or fire.
Check whether the charger and socket is
connected well, or it may cause charging
failure or even fire.
Remove all easily damaged ob ject s
(including luminous objects, fabrics, glass
bottles, etc.) before using, or it may cause
damage to these objects or af fect t he using
of the cleaner.
Please use the cleaner caut ious ly in the
presence of the children to av oid fr ight ening
or harming them.
Don't stand or sit on the cleaner, or it m ay
cause damage to the cleaner or per sonal
injury.
Don't make the cleaner take in water and
other liquors for fear of the product damage.
Don't use the cleaner on small tables and
chairs or other small space, otherwise the
cleaner may be damage.
Don't use the cleaner outdoors , or it may
cause the product damage.
Don't use the cleaner in commercial places,
or the cleaner may be damage by excessive
use.
Don't leave movable thread, wire and other objects with the leg end of more than 150mm on the
ground or the brush may be entan gl ed.
The cleaner is not for use of the disa bled (people with physical or mental handicap), children and
those who use the cleaner befor e r eading the user manual carefully.
Applicability :
The product, mainly applicable to home, hotel rooms and small office, is good for cleaning to various shorthaired carpet, wood floor, ceramic tile, etc.
Function introduction:
It is the new generation Robotic vacuum cleaner with rech argeable battery, controlled b y avanced intelligent
program, with the following function : automatic vacuum cleaning, mopping, sterili zing, timing cleaning, "full
go" cleaning, wireless remote control, speed selection ; easy to use and clean.
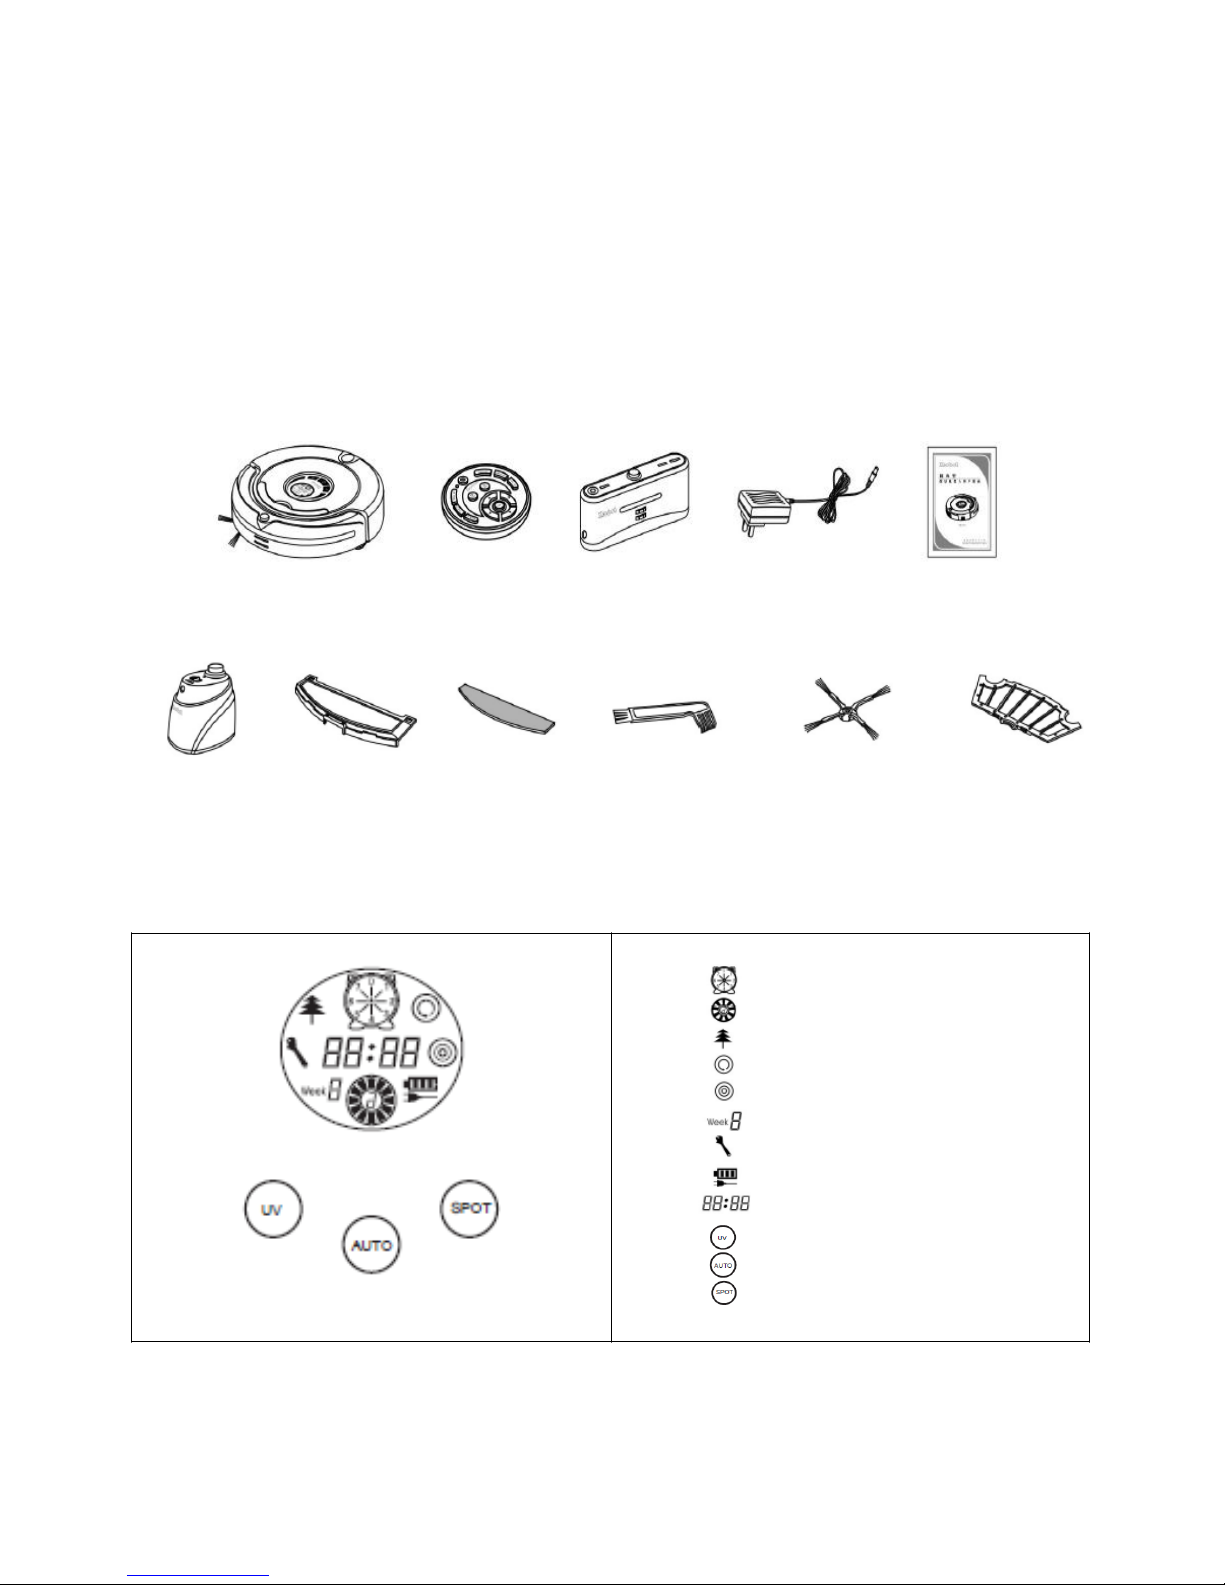
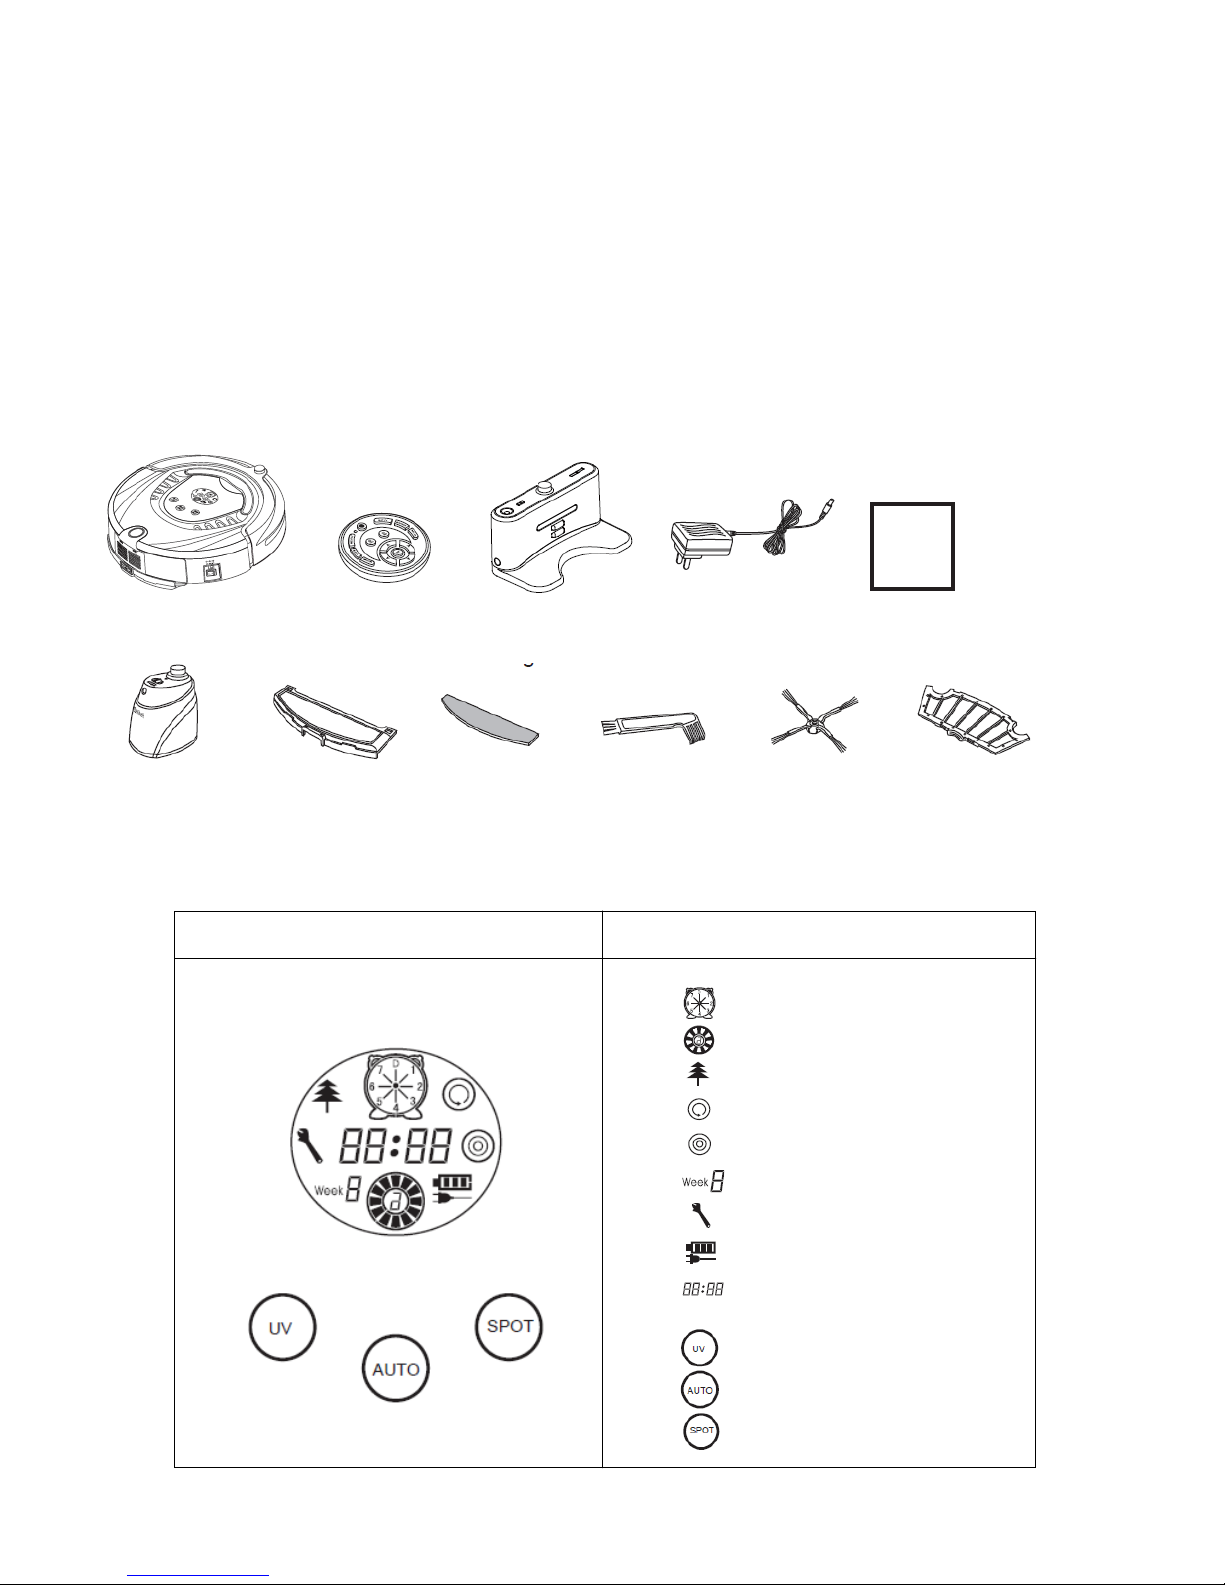
Components of the cleaner :
Cleaner Remote control Auto charging AC/DC adaptor Manual
docking station
Space isolator Trailing Bar Mop pad (two) Dust Brush Side brush (two) Filters (two)
Introduction:
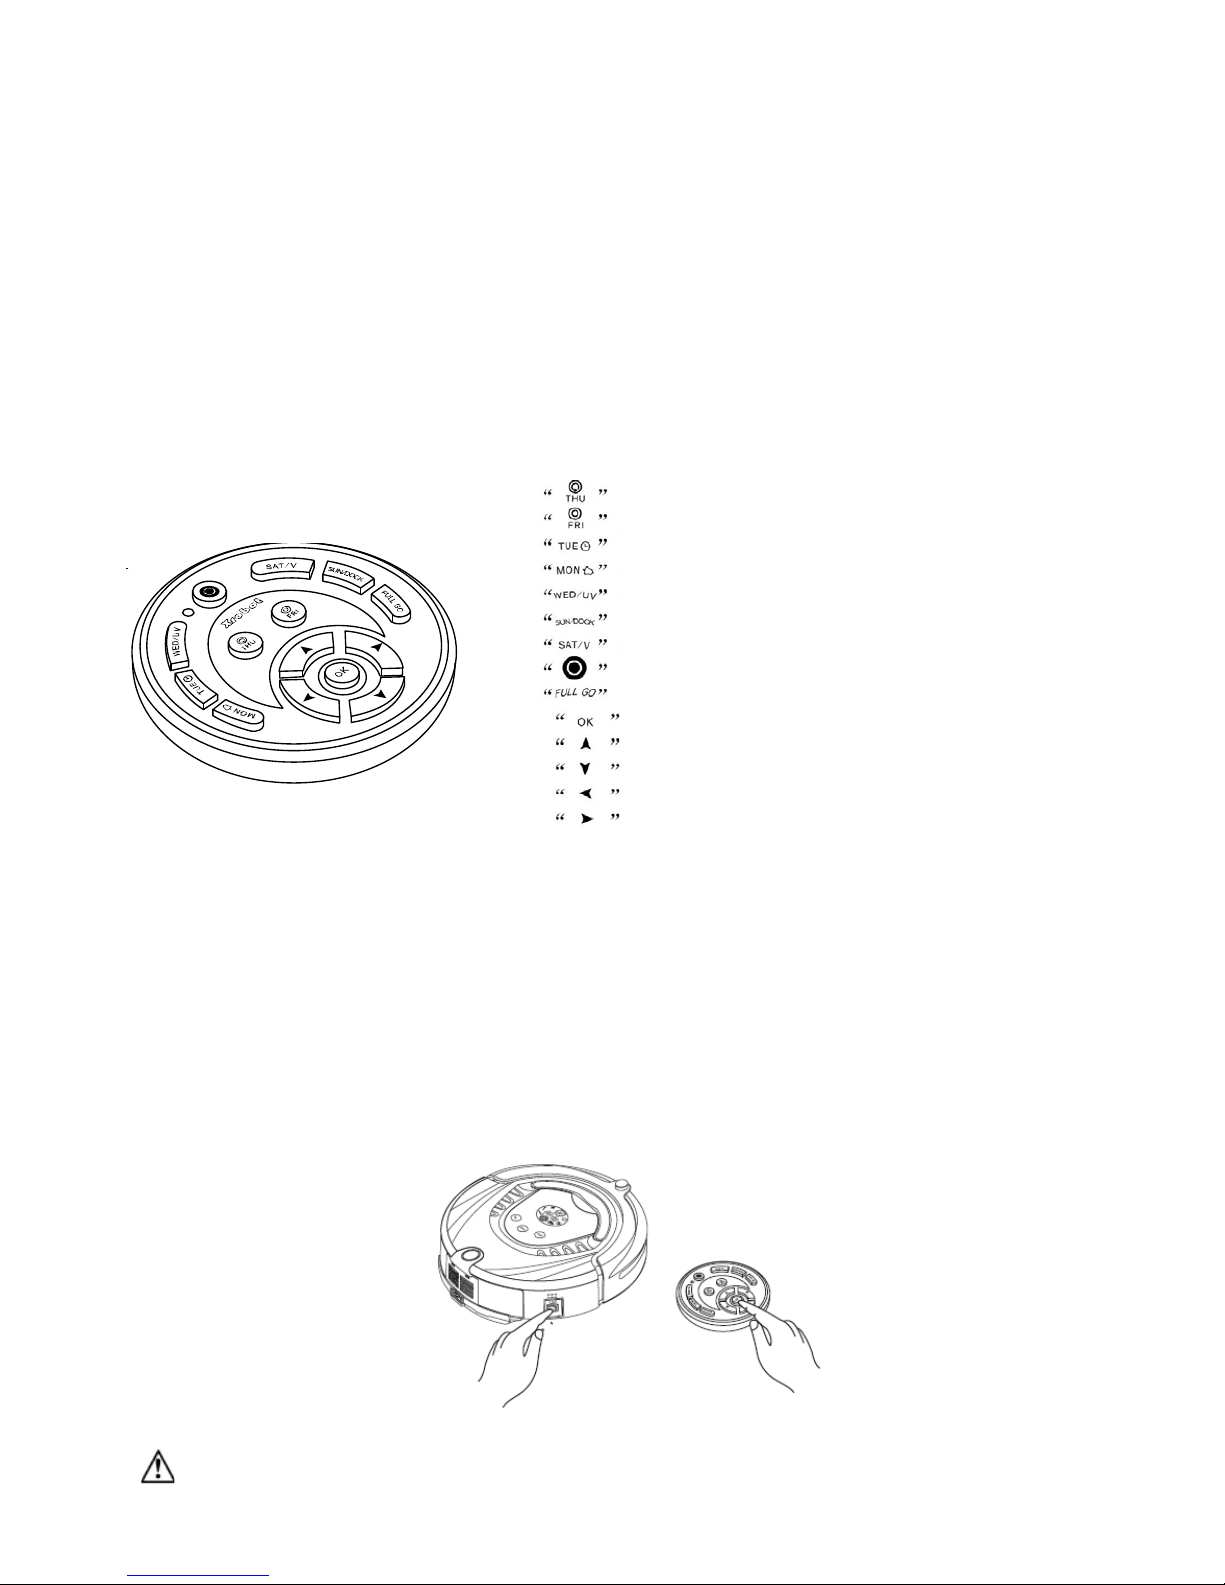
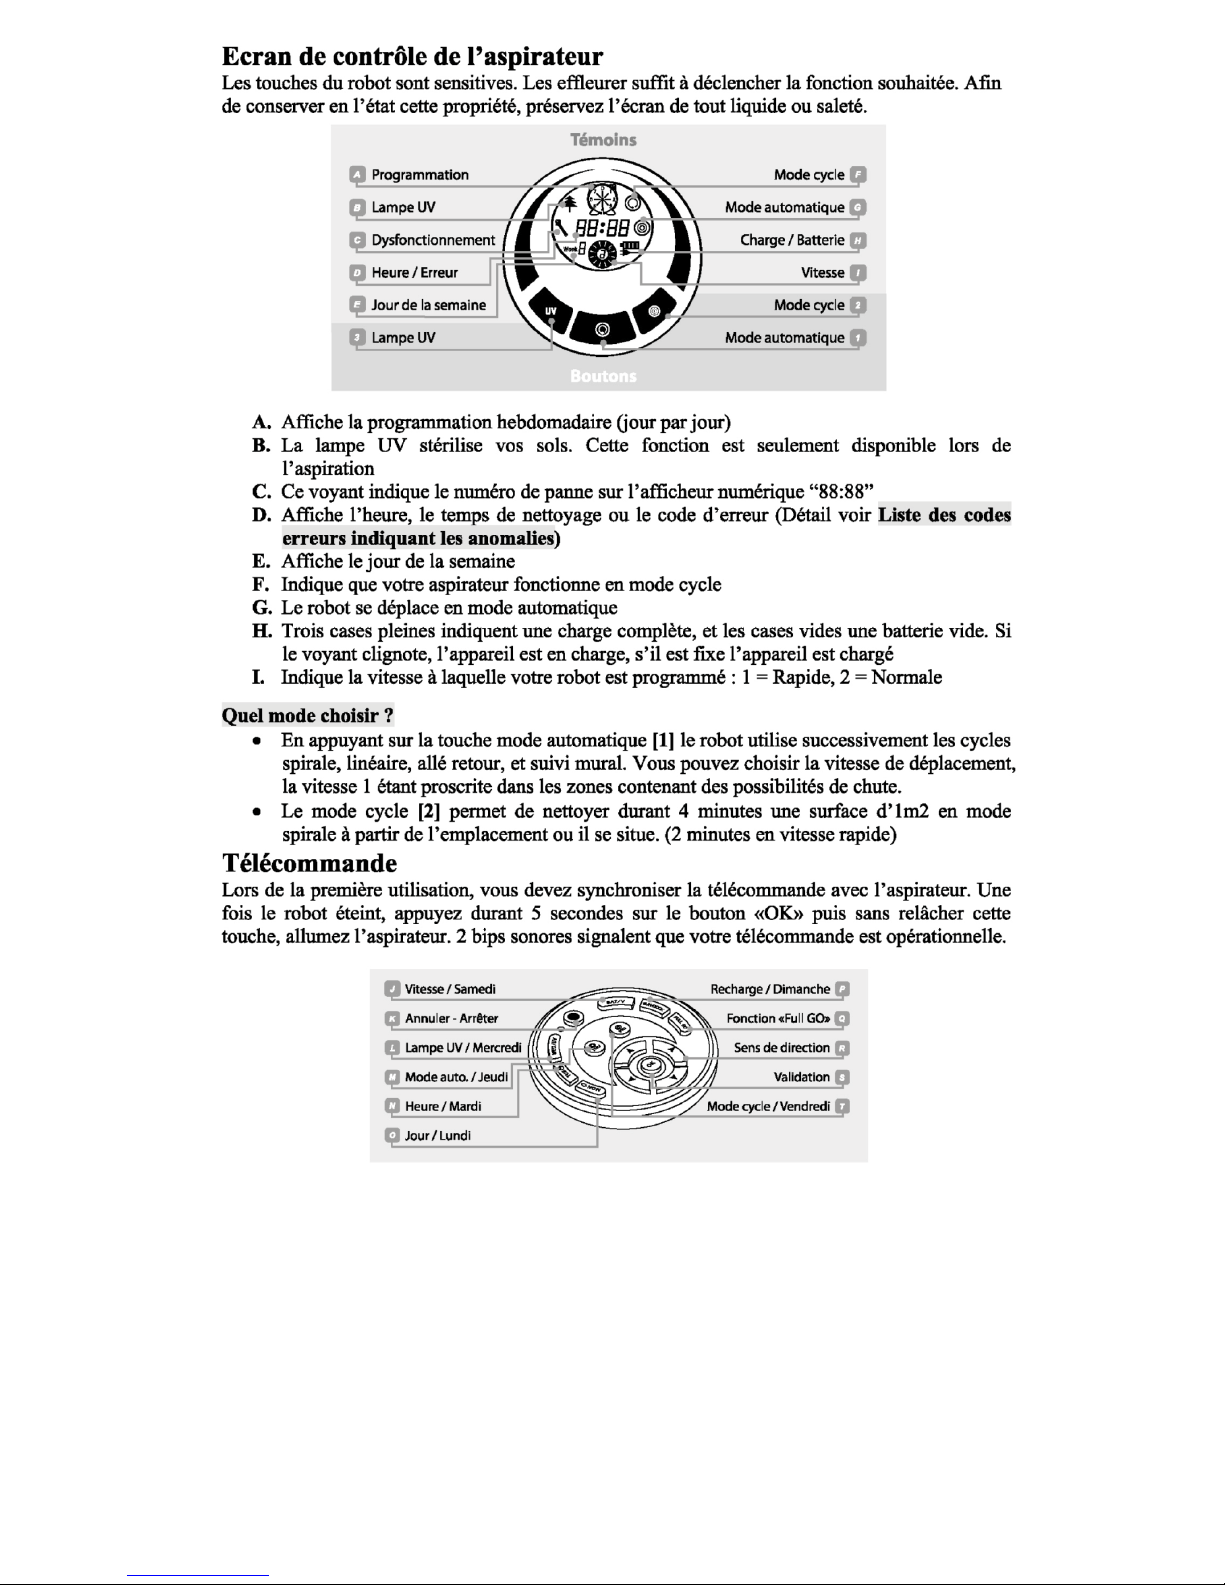
Control panel of main body :
Menu display :
1. Date/week set display
2. Wheel rotation/speed display
3. UV lamp display
4. Auto cleaning display
5. Spot cleaning display
6. Current week display
7. Malfunction display
8. Charging/power display
9. Time/error code display
10. UV lamp key
11. Auto cleaning key
12. Spot cleaning key
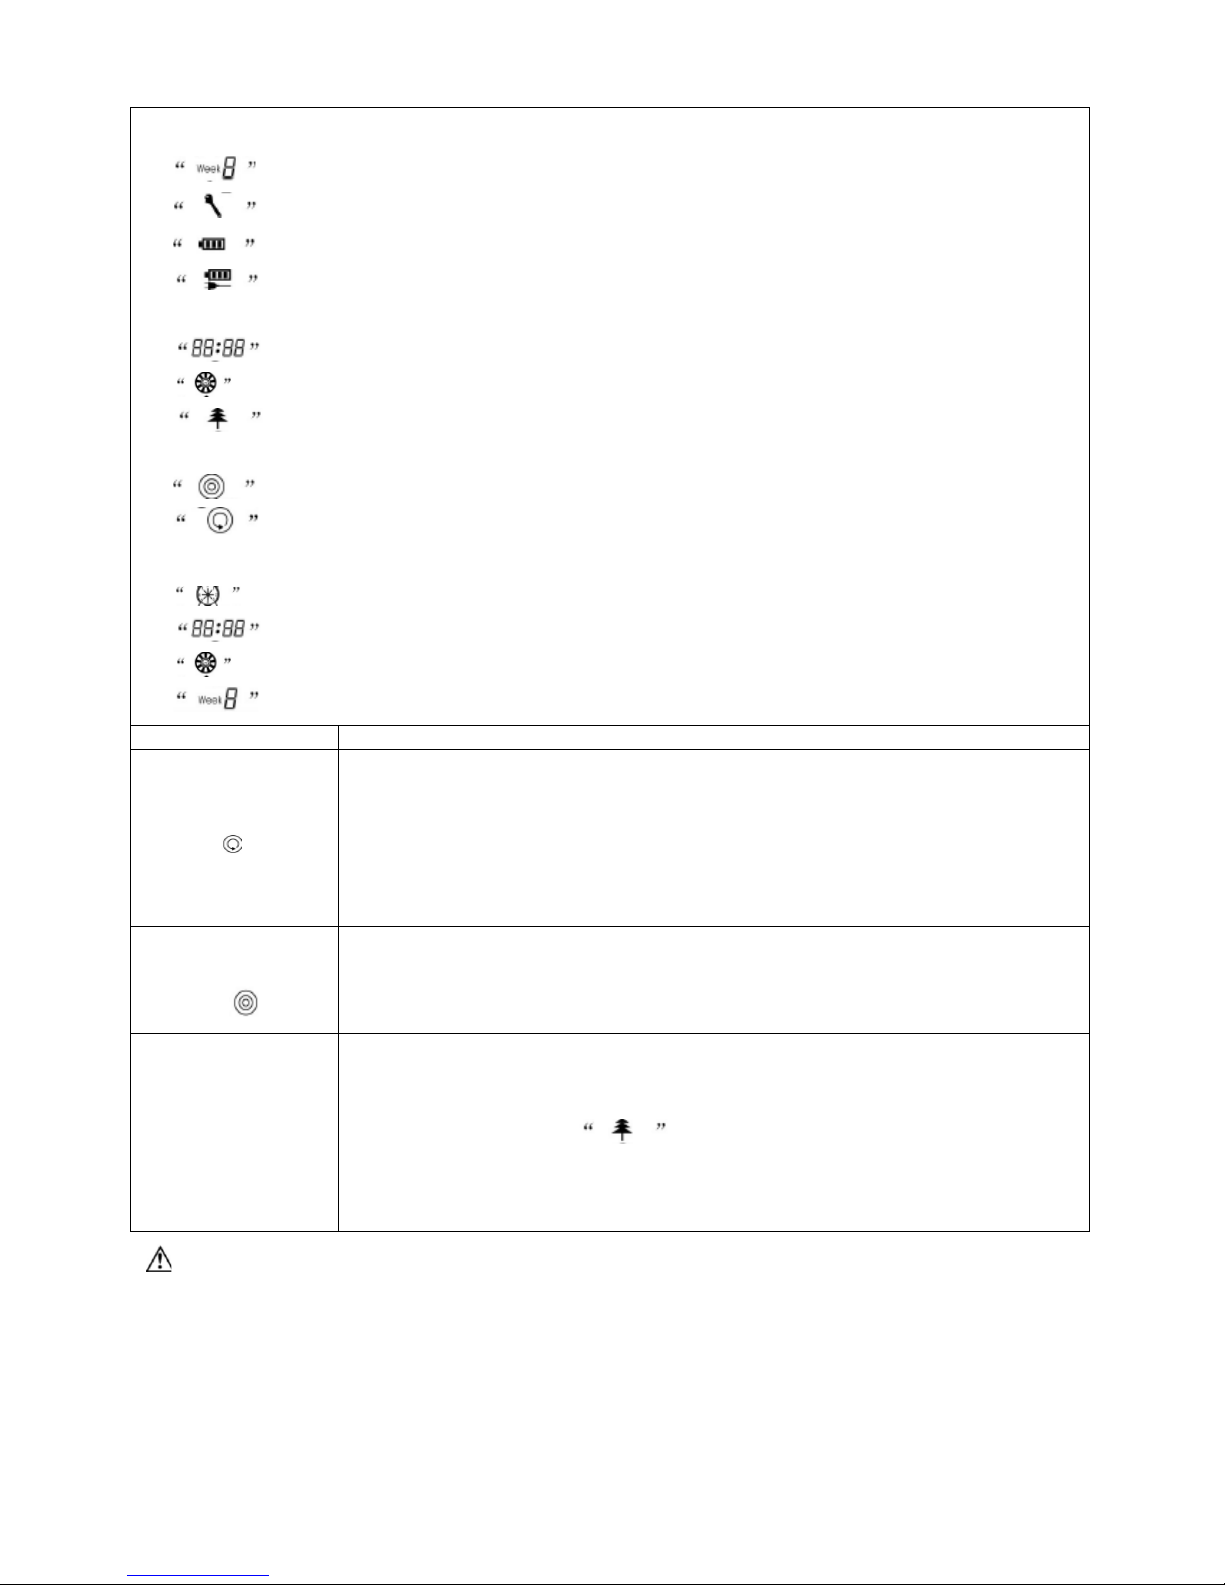
Function information of display interface
Make sure full charged 5/6 hours (the battery should be charged and discharged for about 2 or 3 times before reaching
the best performance). Turn on the power switch, the buzzer will ring once and the display will show as follows :
1. displays the current date per week automatically based on the date.
2. displays in case of malfunction, "88:88
” displays the failure code from E001 to 034
.
3. displays the battery, three grids mean full power, or decreased power with less grids.
4. means the cleaner is in charging, the battery is not enough if the icon is flickering, or full if stops
flickering..
5. displays the timing cleaning time, surrent time per day and malfunction code..
6. means running speed ; faste speed on speed 1, or slow on speed 2.
7. displays the UV lamp is on when the cleaner is working, when open the UV lamp, it can sterilize, or off
when not working.
8. displays the cleaner is cleaning in the spot cleaning mode.
9. displays the cleaner is cleaning in the auto cleaning mode.
The following displays functions will only be selected and set in the remote control :
1. means selecting cleaning day or some days or everyday of one week.
2. displays the time and timing cleaning setting.
3. means adjusting the speed of the wheel.
4. displays the current date per week.
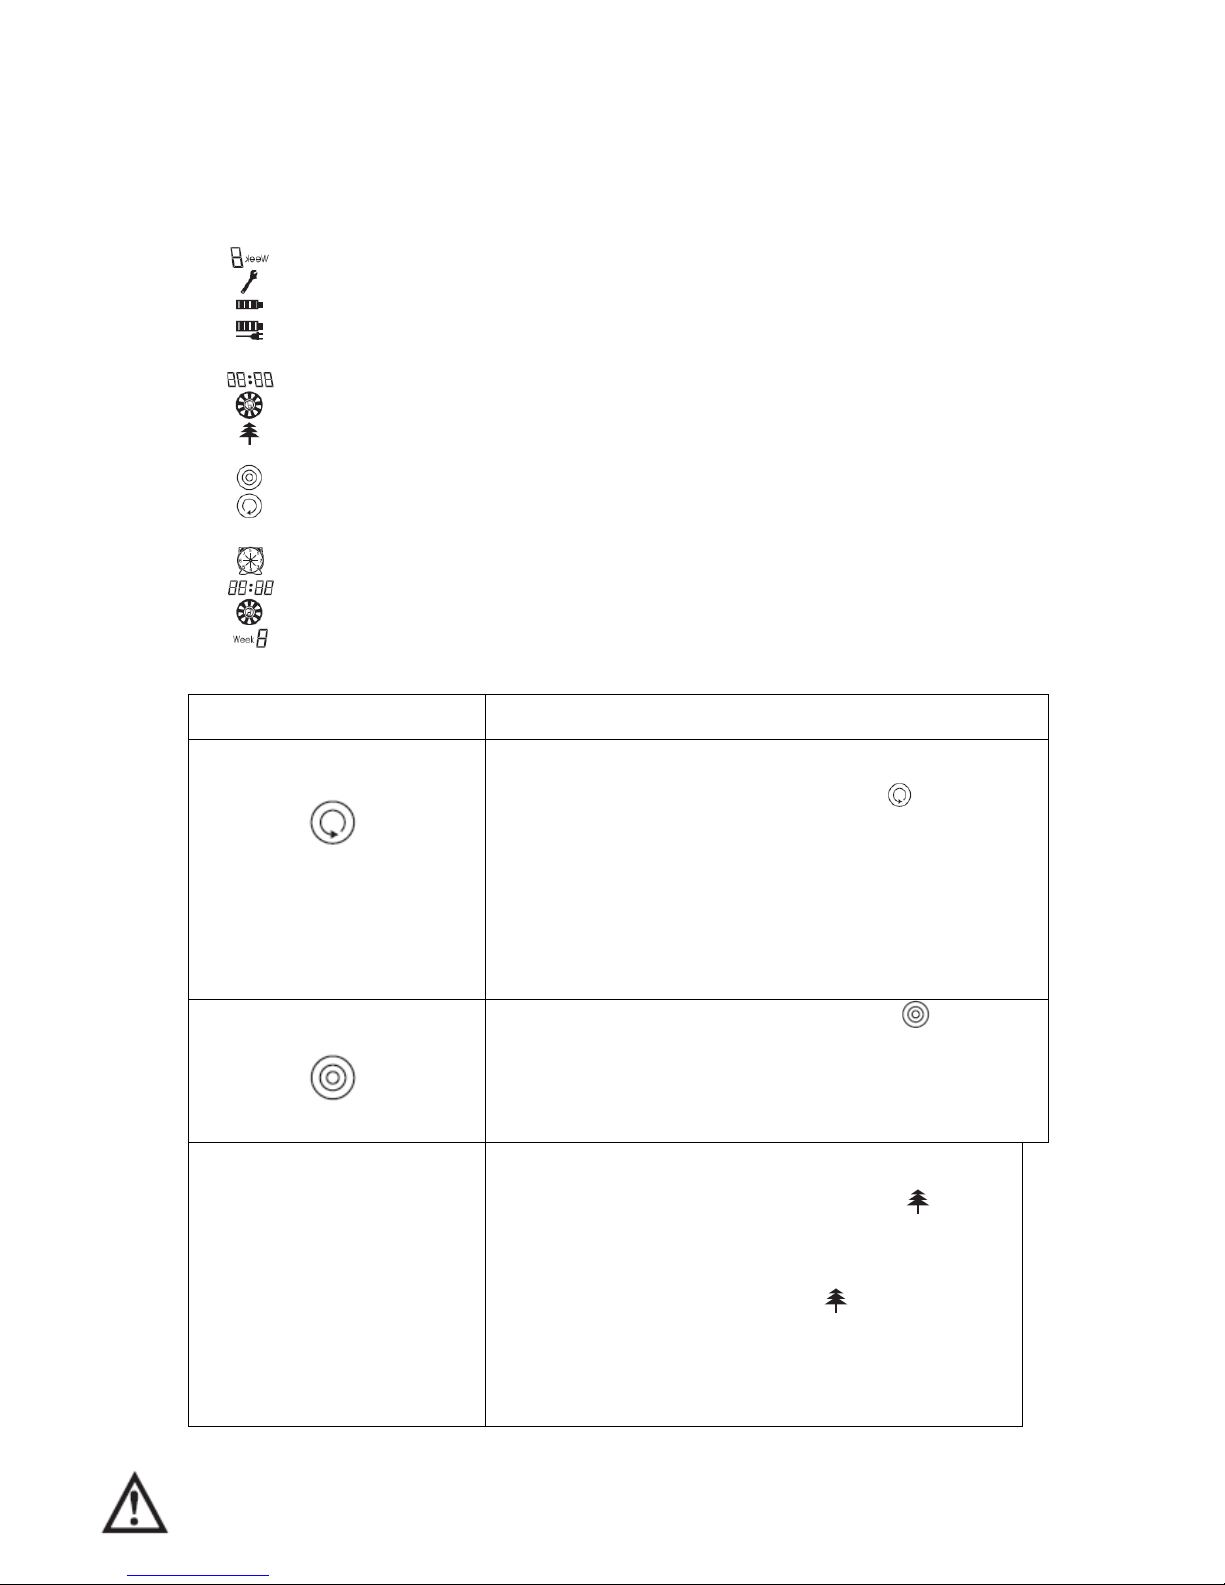
Touch keys
Function description
1. Auto cleaning key
a
Clear up gadgets or obst acl es in the room be for e cleaning , and then pres s Automa tic cle aning
key, it will clean by spiral, linear, zigzag, follow the wall modes automatically.
b You can choose fast or slow running when cleaning.
c
The cleaner will s top running in cas e of low battery, th en it will ring t en times and search the
docking station for charging automatically.
d The cleaner will stop cleaning if you press any keys during cleaning.
2. Spot cleaning key
a
Press spot cleaning key, it will enter the area about 1m² and clean by the spiral mode.
b Choose the fast cleaning time of about 2 minutes and low cleaning time of about 4 minutes,
and it will stop automatically after the cleaning.
C The cleaner will stop cleaning if you press any keys during cleaning.
3. UV lamp key
This cleaner is supplied of a UV lamp which can disinfect the floor and it is especially suitable
for people suffering allergy or for home with pets .
a Turn on the power of the main body, the display will light .
b Press the UV key, the icon will be display, UV lamp will be on if the cleaner is
working, or off if the cleaner stops working.
c If the UV lamp is unused, press the key to turn off, the icon will be off.
d The on/off mode of UV lamp will be memorized automatic ally.
: The keys of ma in body are of electronic touch type, you onl y need to touch them lightly with your finger while us ing it.
Besides, you should clean the keys and the space between them to remove water or oil stains, or may cause the touch failure.
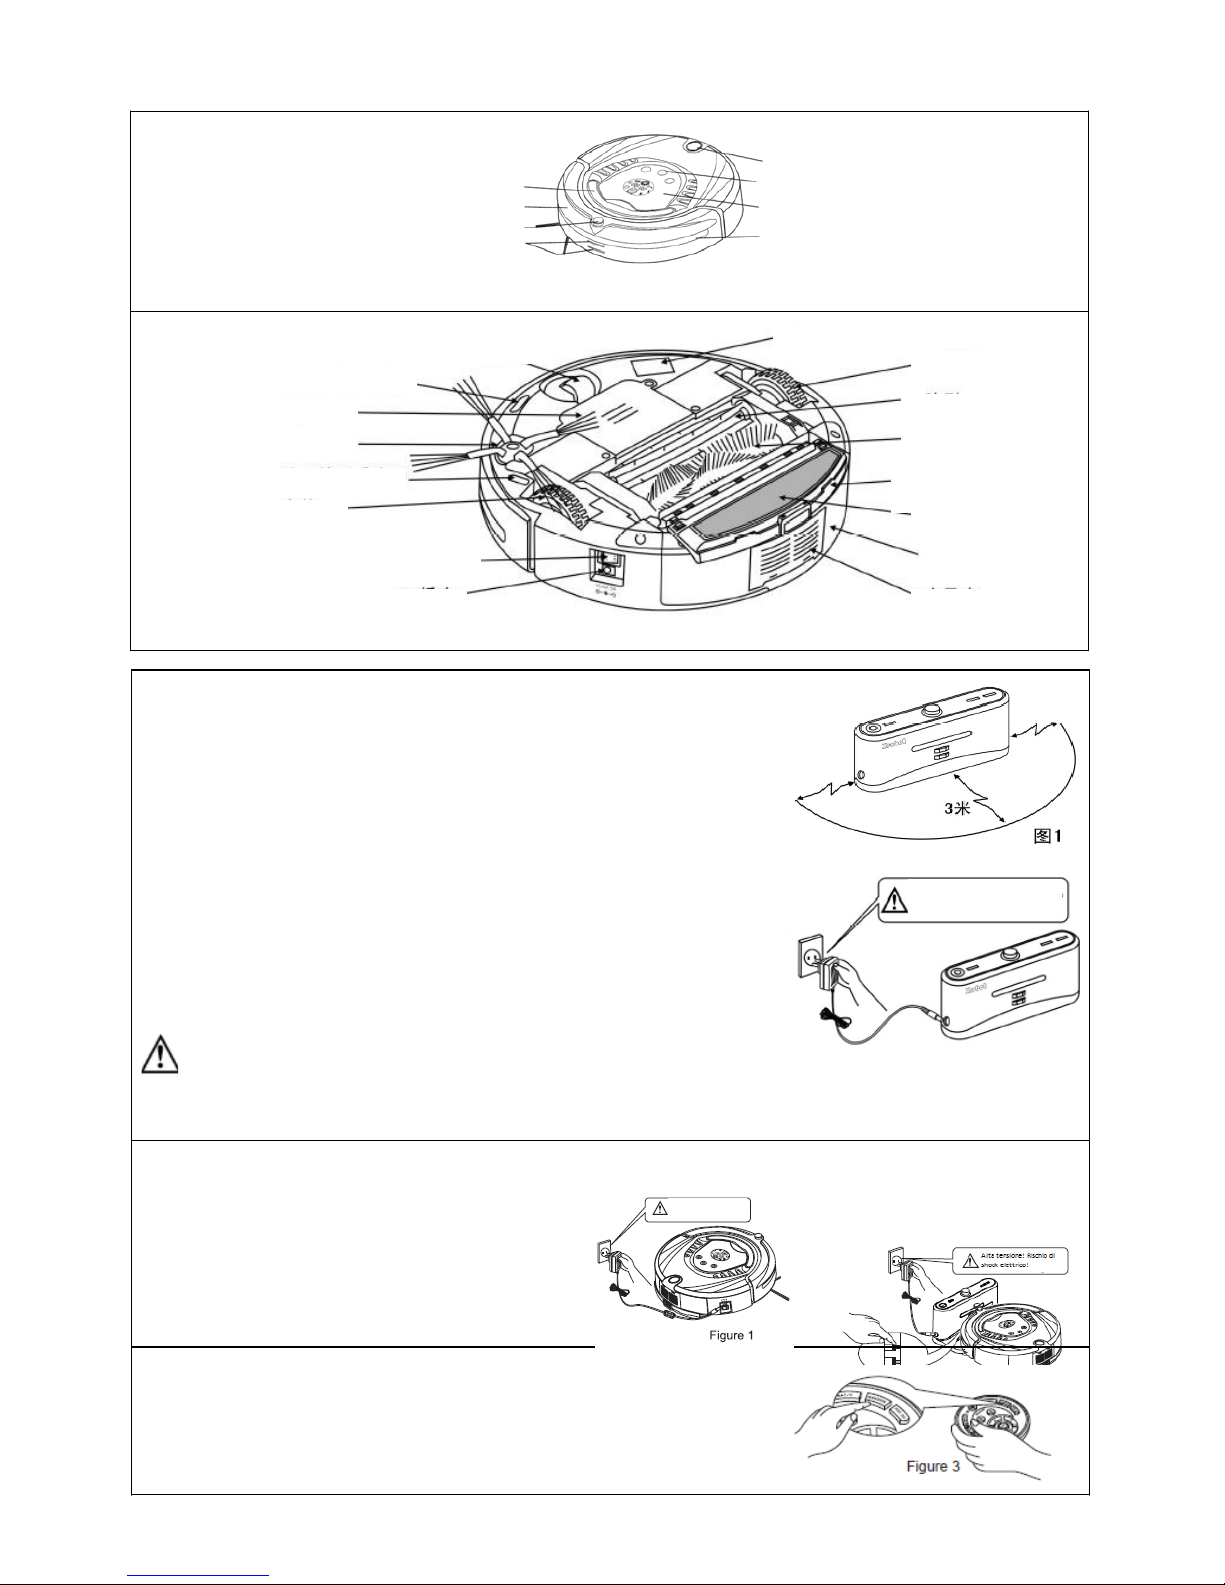
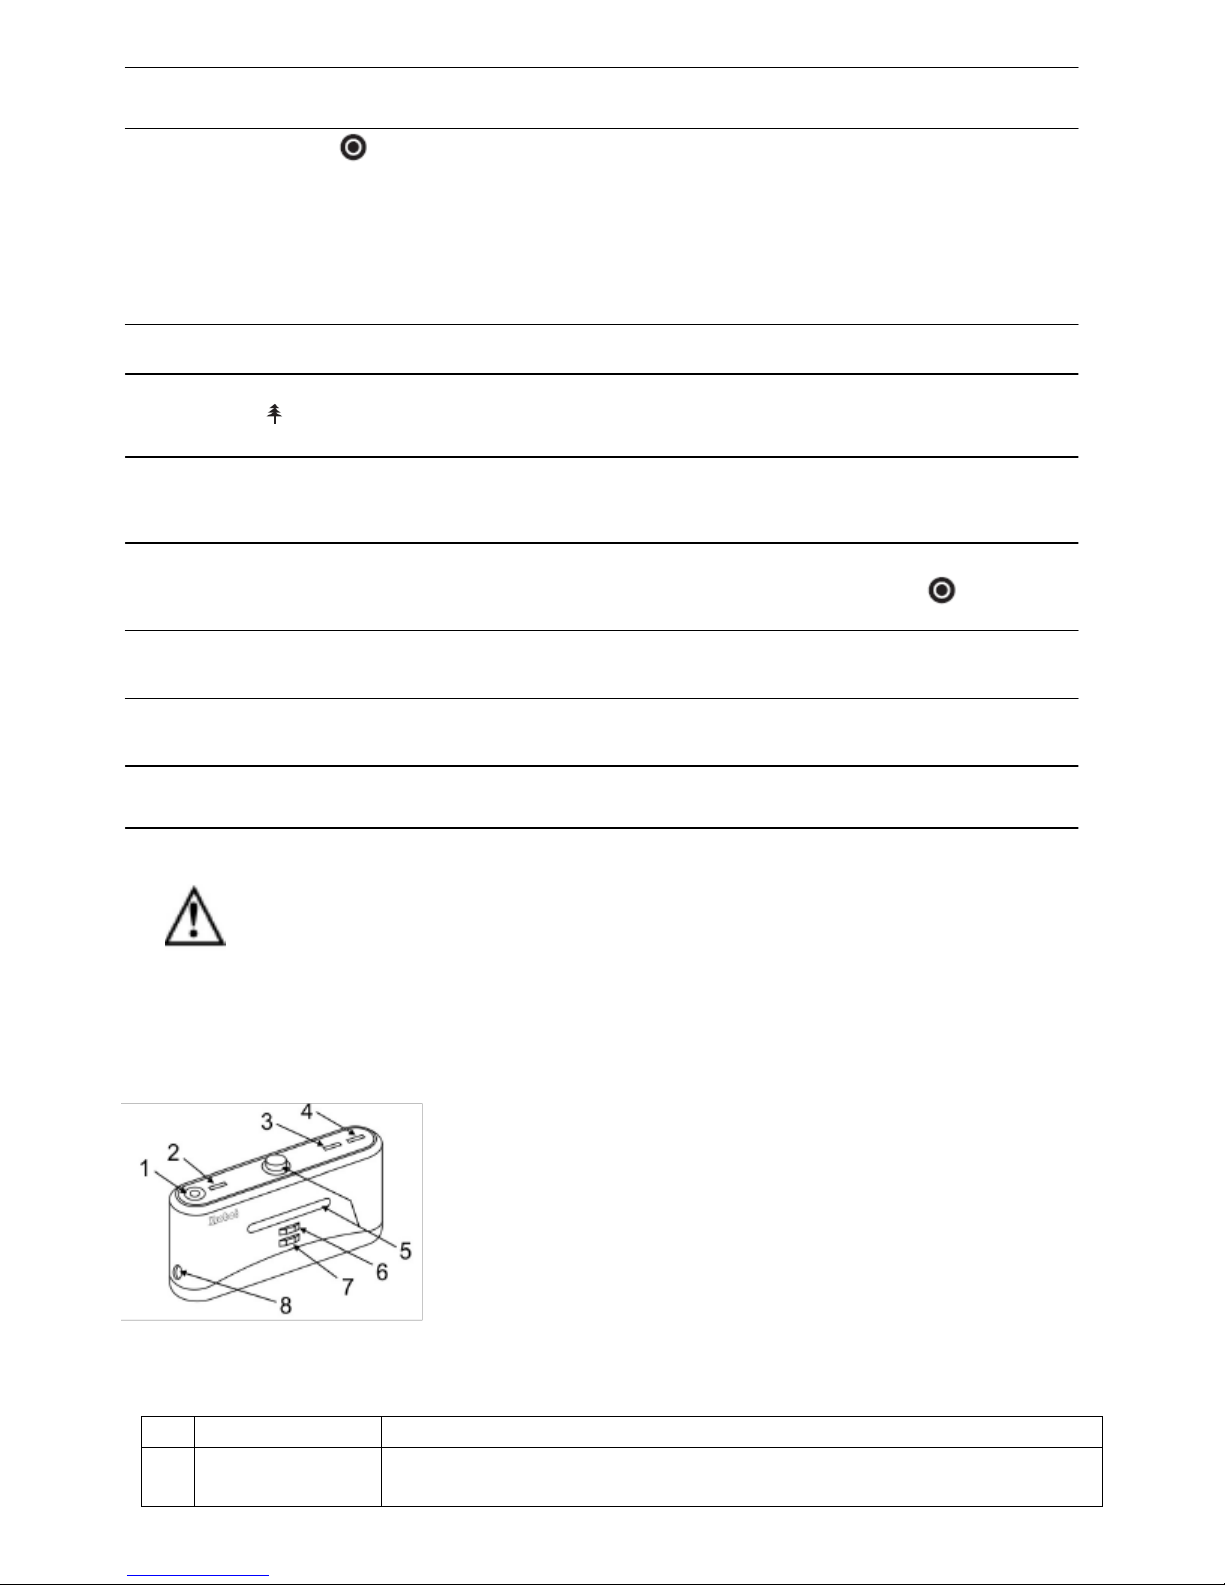
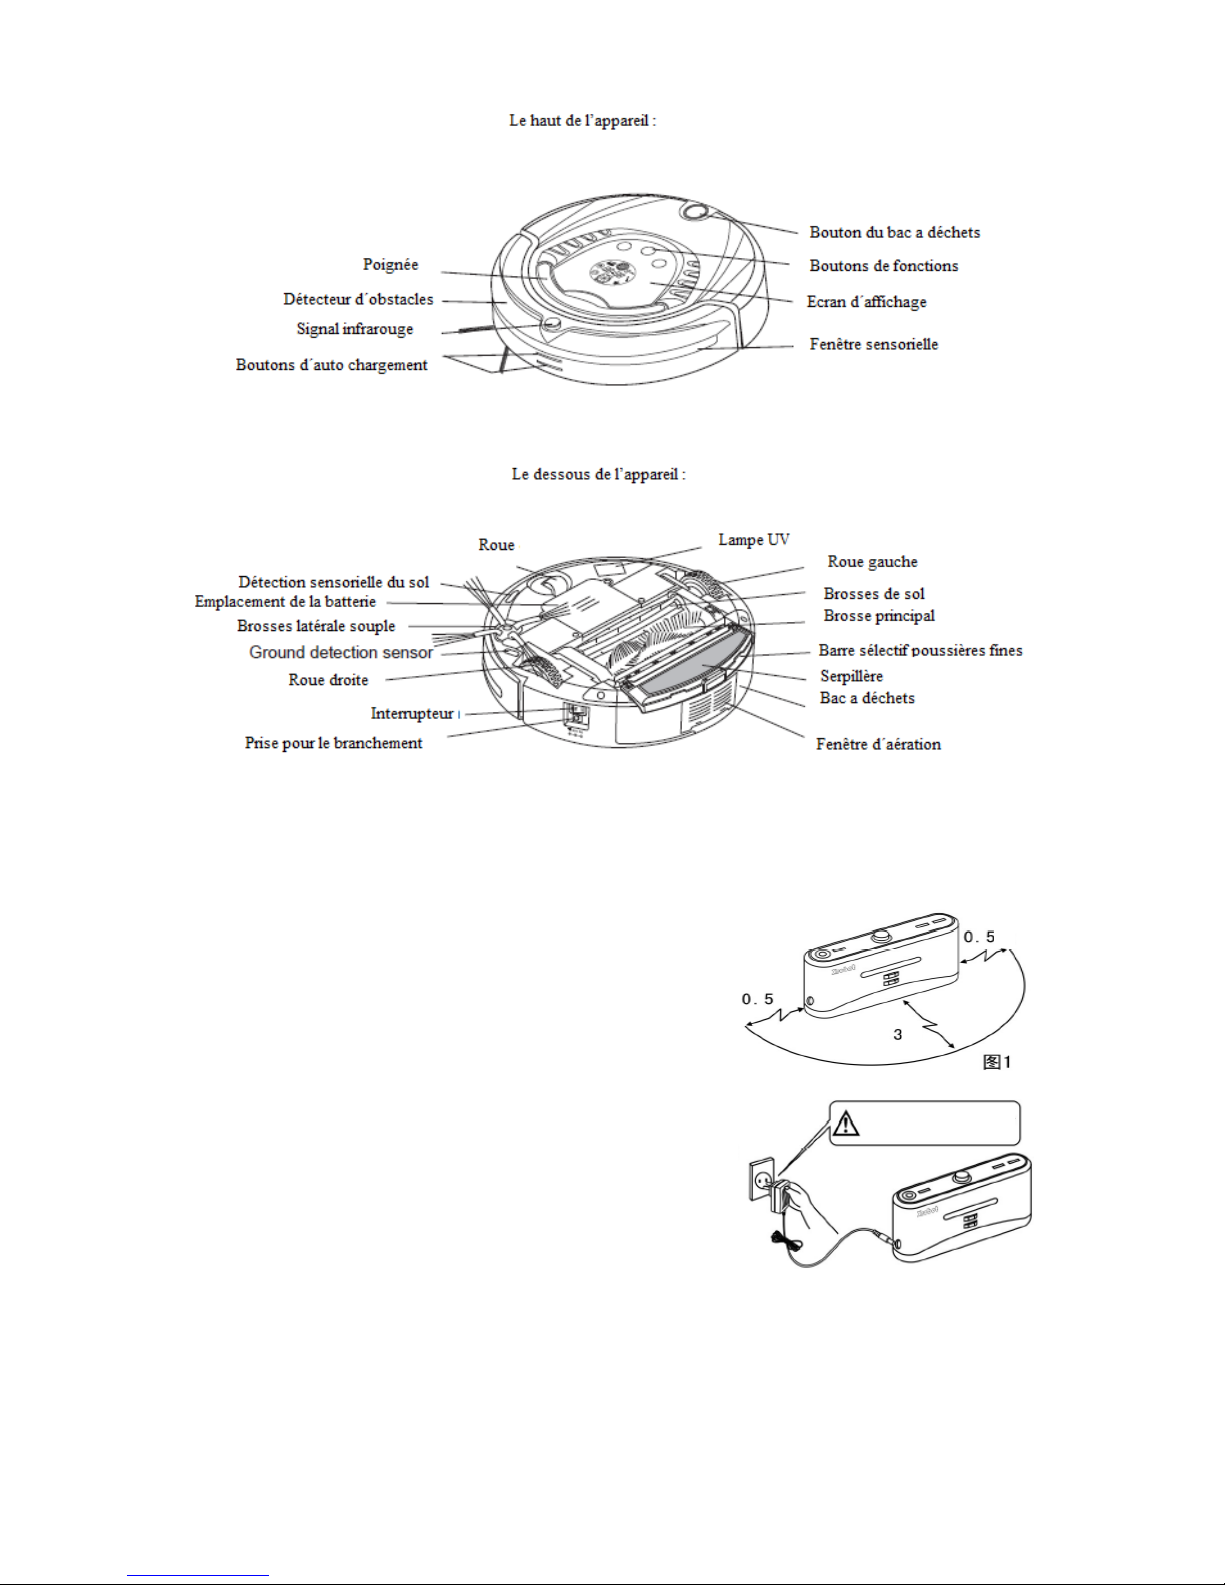
Parts :
Dustbin key
Handle Function key
Front bumper Display screen
Infrared signal receiver
Auto-c harg ing el ect ro de Sensor window
Front wheel
Ground detection sensor
Battery cover
Side cleaning brush
Ground detection sensor
Right wheel
Power switch
UV sterilizing la mp
Left wheel
Floor brush
Main brush
Trainling bar
Mop pad
Dusbin
DC socket
Air outlet window
Install ati o n of do c ki n g st at i o n a nd cha r ging for the cle a n er :
Automatic recharging :
1. Install the docking station on the flat ground firmly and
against the vertical wall.
2.
No obstacle or hollow areas 3m away from the docking station in
the front and 0.5m on the right and left
.
3. The cleaner cannot search the docking station for charging if
the infrared signal transmitting window of the recharger is
covered.
4. Connect the output terminal of the adaptor with DC socket of
the docking station.
0.5m
0.5m
3m
Caution !
: Please place the power cord of the adaptor along the wall,
or it may interfere with the brush or wheels.
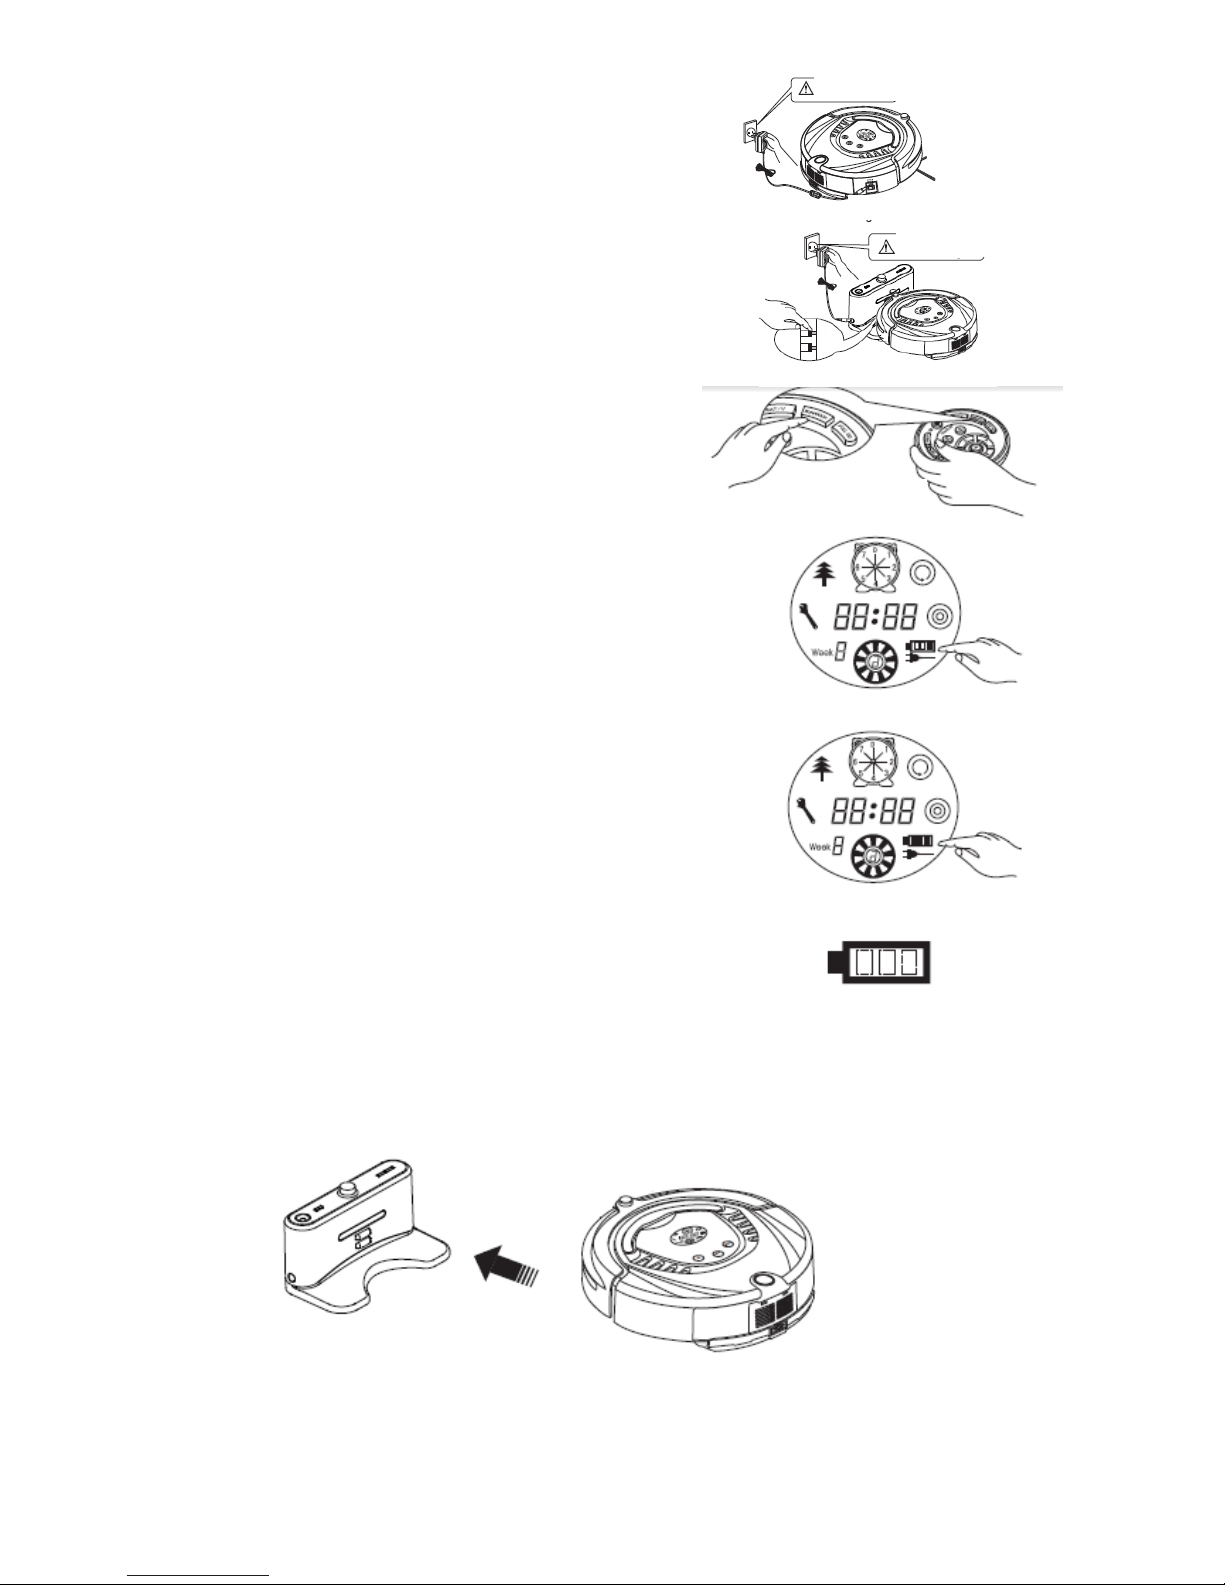
Manual charging :
1. You can use the adaptor or docking station of the
cleaner to charge for the main body directly.
2. Connect the output terminal of the adaptor
with DC socket of the main body while
using the adapter for charging..
3. Press Docking in the remote control if you want to charge for the main
body, the cleaner will search the docking station for charging within
available scope automatically.
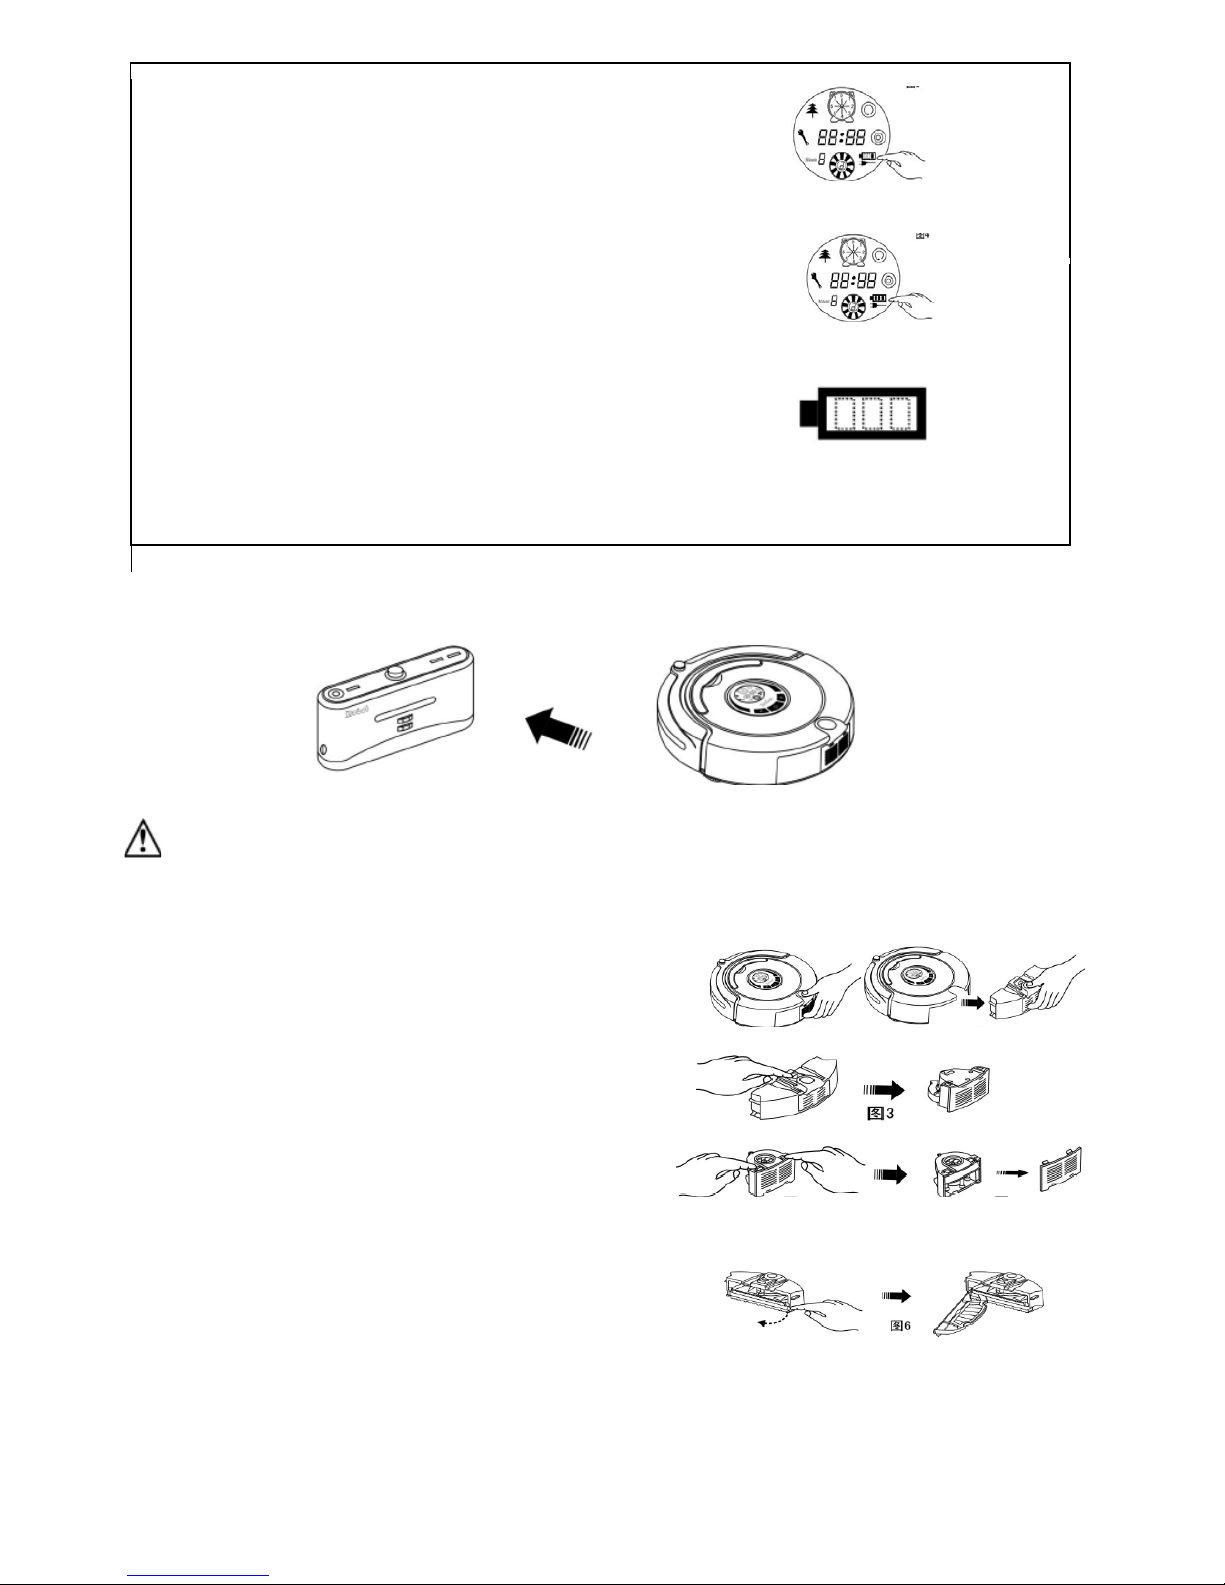
:
4. Press any key in host panel or Power off and
Docking keys in the remote control while the
cleaner is searching for the docking station, the
cleaner will then stop searching.
5. After the battery is used up, the first grid of the
charging icon will flicker, when the second and
then the third grid will flicker showing it is charging,
stop flickering after completing the charging.
.
6. Turn on the cleaner, full three grids show enough
power, one grid missing means the decreased
power, and it should be charged after three grids
missing.
Automatic charging :
The cleaner will search the docking station for charging automatically in case of low battery during cleaning.
1. The cleaner may fail to find the docking statio n due to the obstacle, d ecreased battery and complex c ondition, so the
docking station should be put in wide space.
2. When the cleaner finish cleaning, the temperature of the battery is very high ; so charging time will be longer.
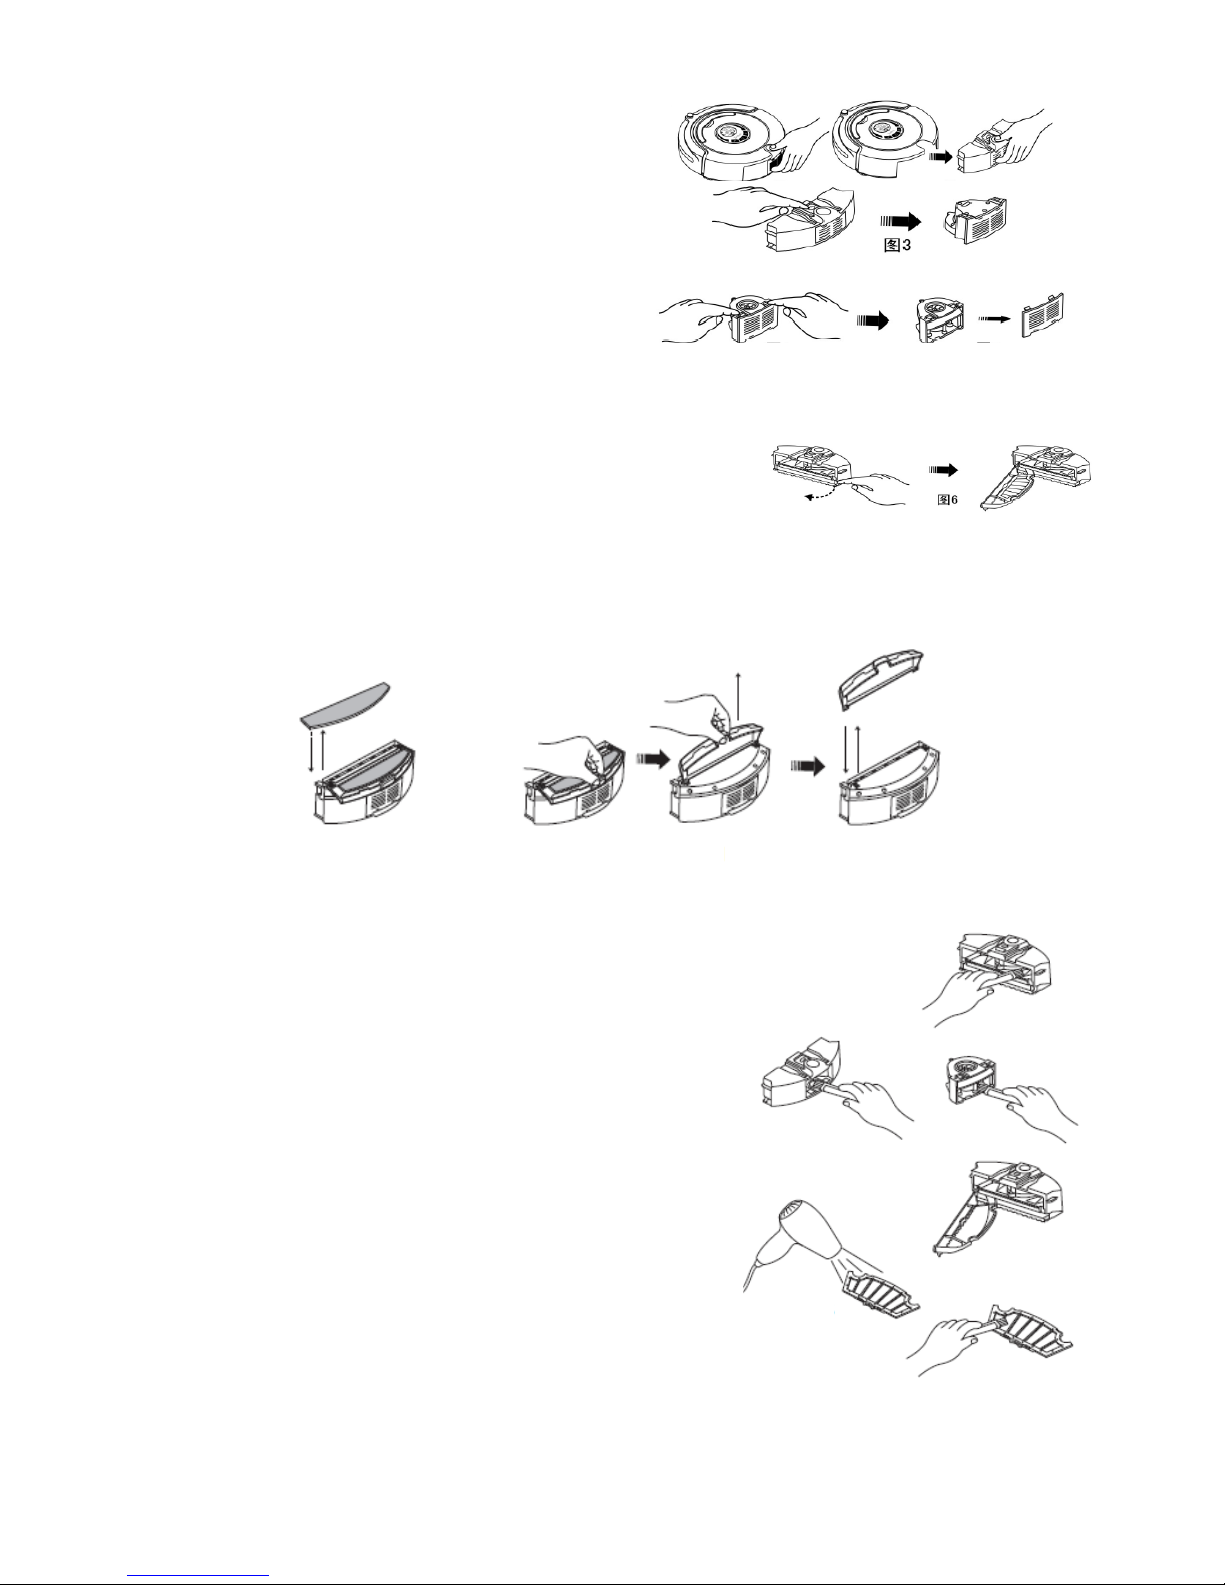
Assembly & disassembly and cleaning of dustbin :
Assembly & disassembly of dustbin :
1. Extract the dustbin by pressing the red key on top.
2. Press the orange button on it, and then the blower
will pop up automatically.
3. Reverse the blower, release 2 fasteners and open
the cover.
4. Open the bracket and the filter wi ll appear.
5. Change a new filter, press the semicircle bracket by
one hand to release the fastener from the filter
screen, and remove the filter grid by the other hand
and then change a new one.
6. Reverse the dustbin, tear out t he mo p, r elease the trailing bar and then unplug the right and left fasteners
on the bottom of the dustbin. All part s should be assembled as bef or e disassembly.
: Don't use the mop and trailing bar on the carpet or uneven ground.
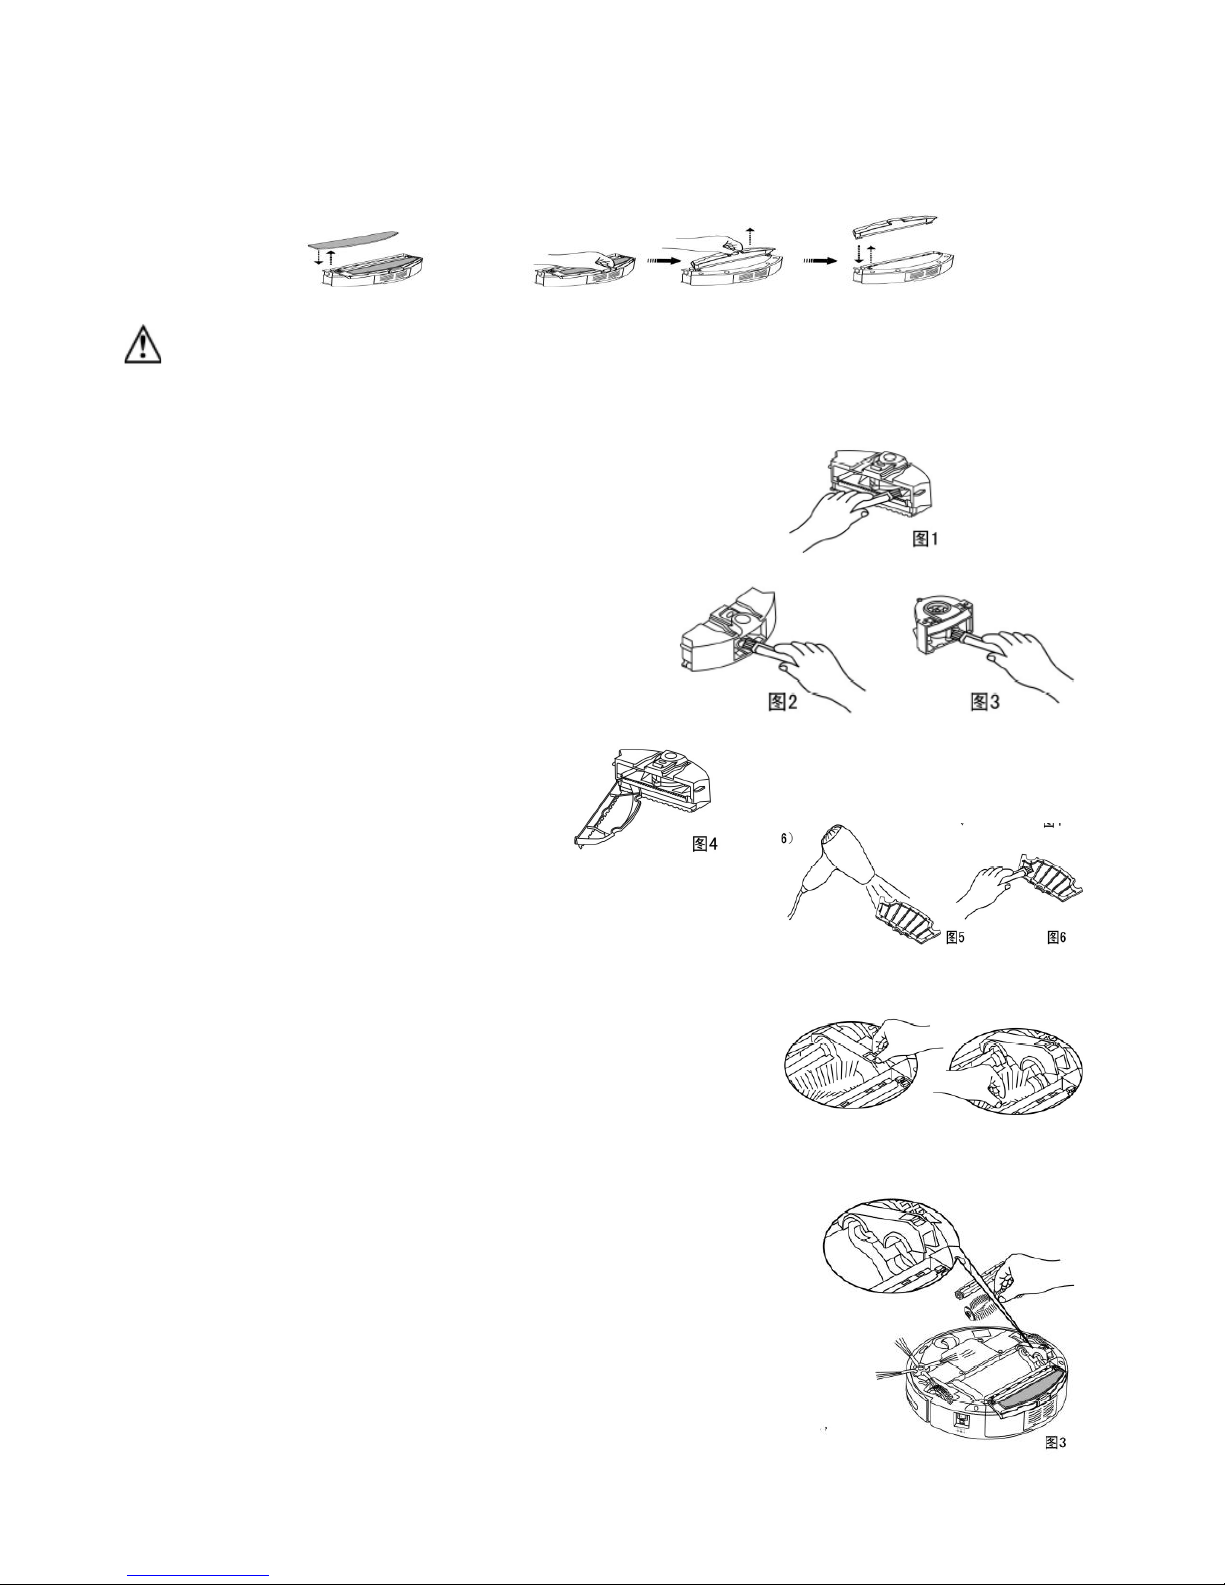
Cleaning of dustbin and blower :
1. First dump the dust, and the, and then
clean it with dust brush.
2. Pop up the blower, and then clean the
air inlet/outlet with dust brush.
3. Don't clean the blower in water !
4. Pop up the blower, take out the filter,
and then clean the dustbin in water.
5. Clean the filter by hairdryer or
dust brush.
6. After cleaning, you can assemble i t
firmly as before the disassembly.
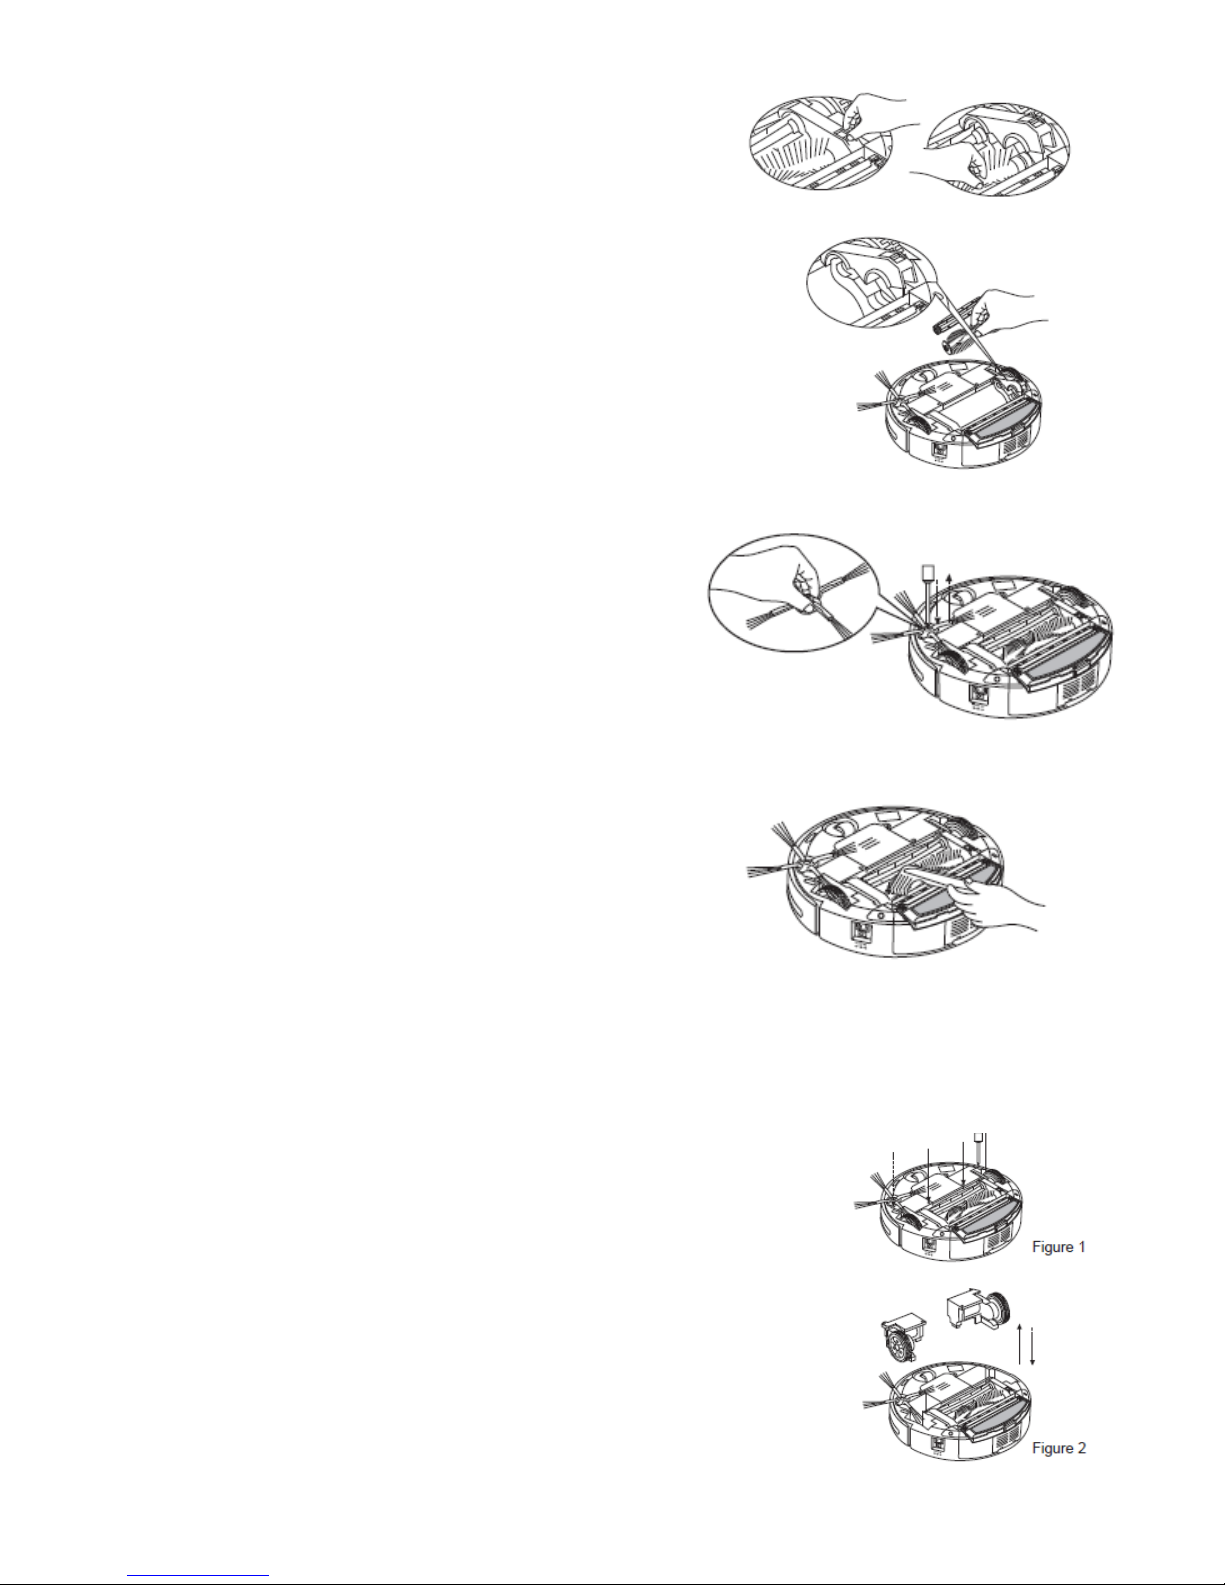
Assembly & disassembly and cleaning of main brush, floor brush, side brush :
Assembly & disassembly of mid cleaning brush and floor brush :
1. Force the locking bar forward and raise the cover by right
thumb, and then raise rod of the mid cleaning brush by
your left hand.
2. Take out the main brush and floor brush.
3. Insert the main brush and floor br ush into the holes before
closing the cover in assembly.

8
Assembly & disassembly of side brush :
1. Release the screw in the main shaft of the
side brush before changing the side brush.
2. Press the side brush against the main shaft
and then fasten the screw.
Cleaning of main brush and floor brush :
1. Clear the hair or big dust particles on the brush
and floor brush regulary to improve the
cleaning performance. Clean the dust at the air
intake. Clean the wastepaper or small particles
by dust brush direcltly. Rotate the brush
carefully and cut by scissors or pull by hand the
hair, yarn and other twisted objects.
2. The cleaning of the main brush and floor brush can be done by reference to the assembly & disassembly.
Assembly & disas sem bly an d clean ing o f L ef t/R ight whee l and fro n t wheel :
Assembly & disassembly and cleaning of Left/Right wheel :
1. Release the screw of the left/right wheel by the screwdriver.
2. Take out the left/right wheel and clean them with the brush.
Don't wash them in water !
3. Place the left/right wheel in th e original position, and tighten
the screw while assembling.
Assembly & disassembly and cleaning of front wheel :
1. Pull out the front wheel with your finger and tools and then clean it.
2. Insert and press the front wheel into the right position while assembling.
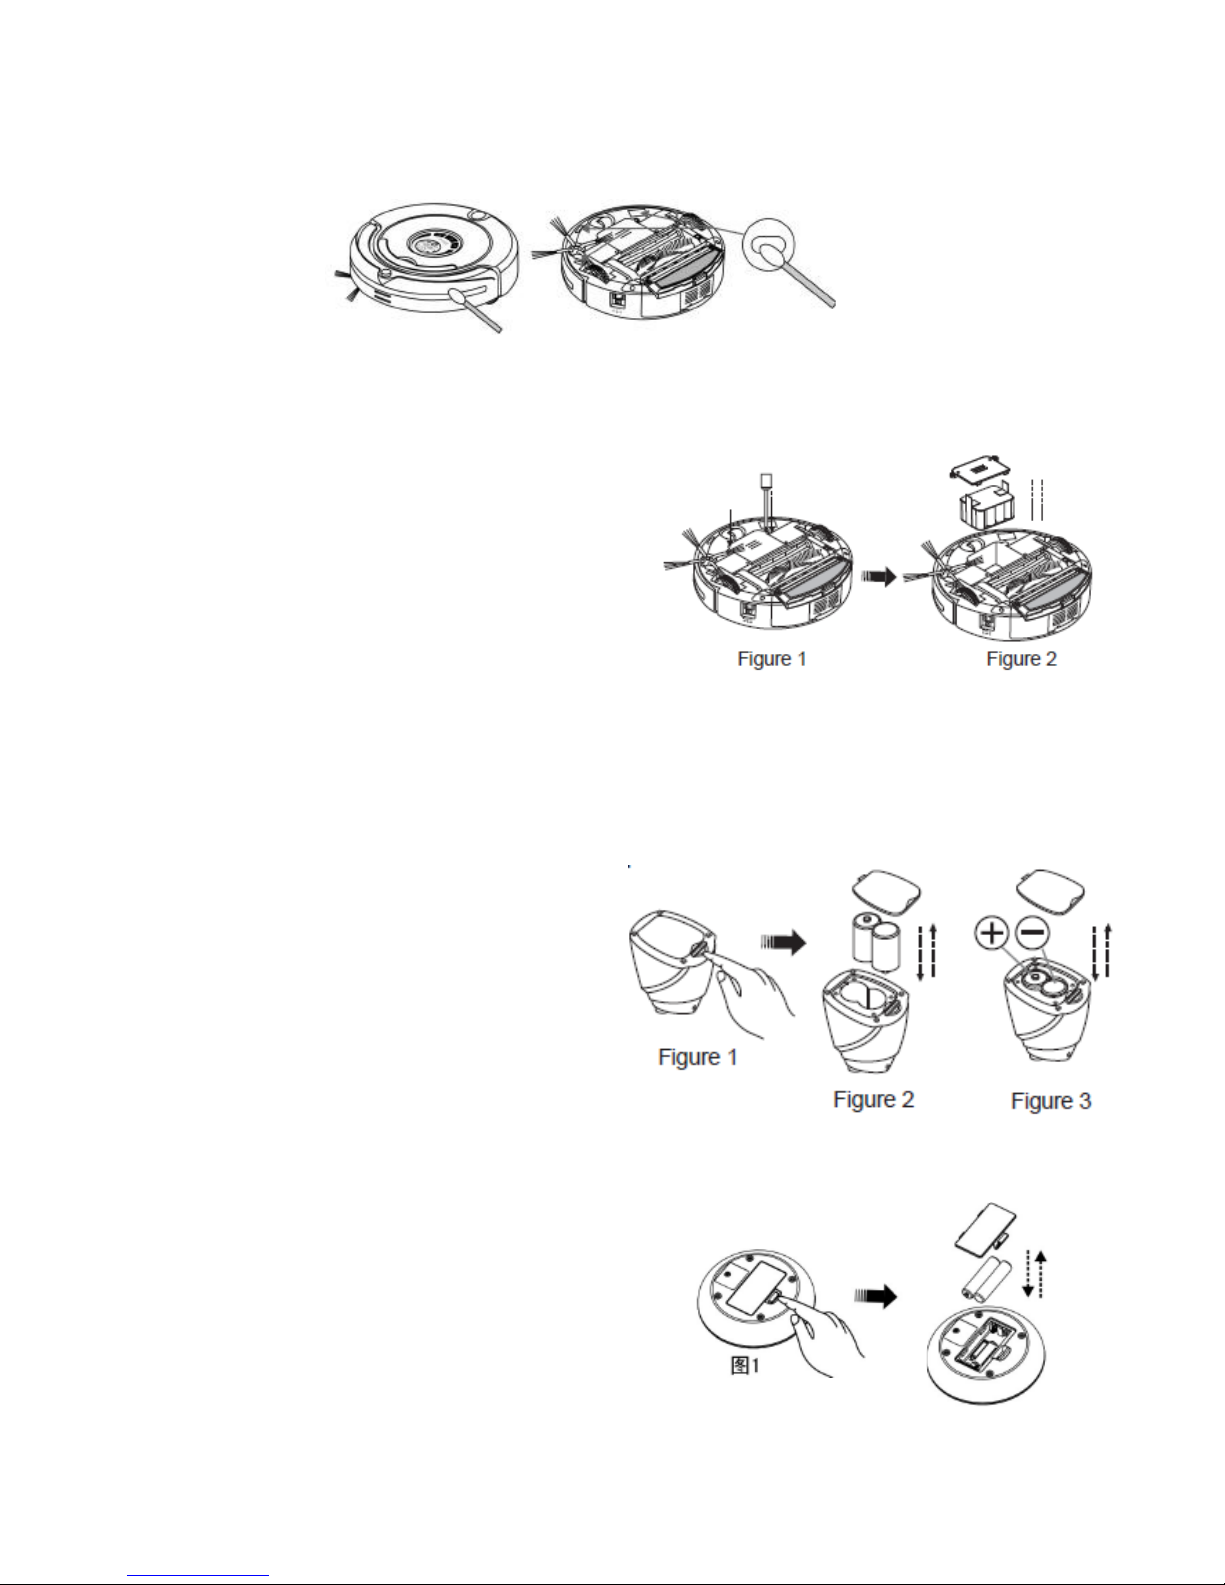
Cleaning of sensor and infrared transparent window :
1. Clean the sensor and infrared transparent window with the cotton swab or soft cloth.
2. The wall detection sensor is in front of the cleaner, while the ground detection sensor and infrared
transparent window are at the bottom of the cleaner.
3. Please keep the transparent window clean so as to make the robot work better.
Replacement of battery :
Battery replacement of the cleaner :
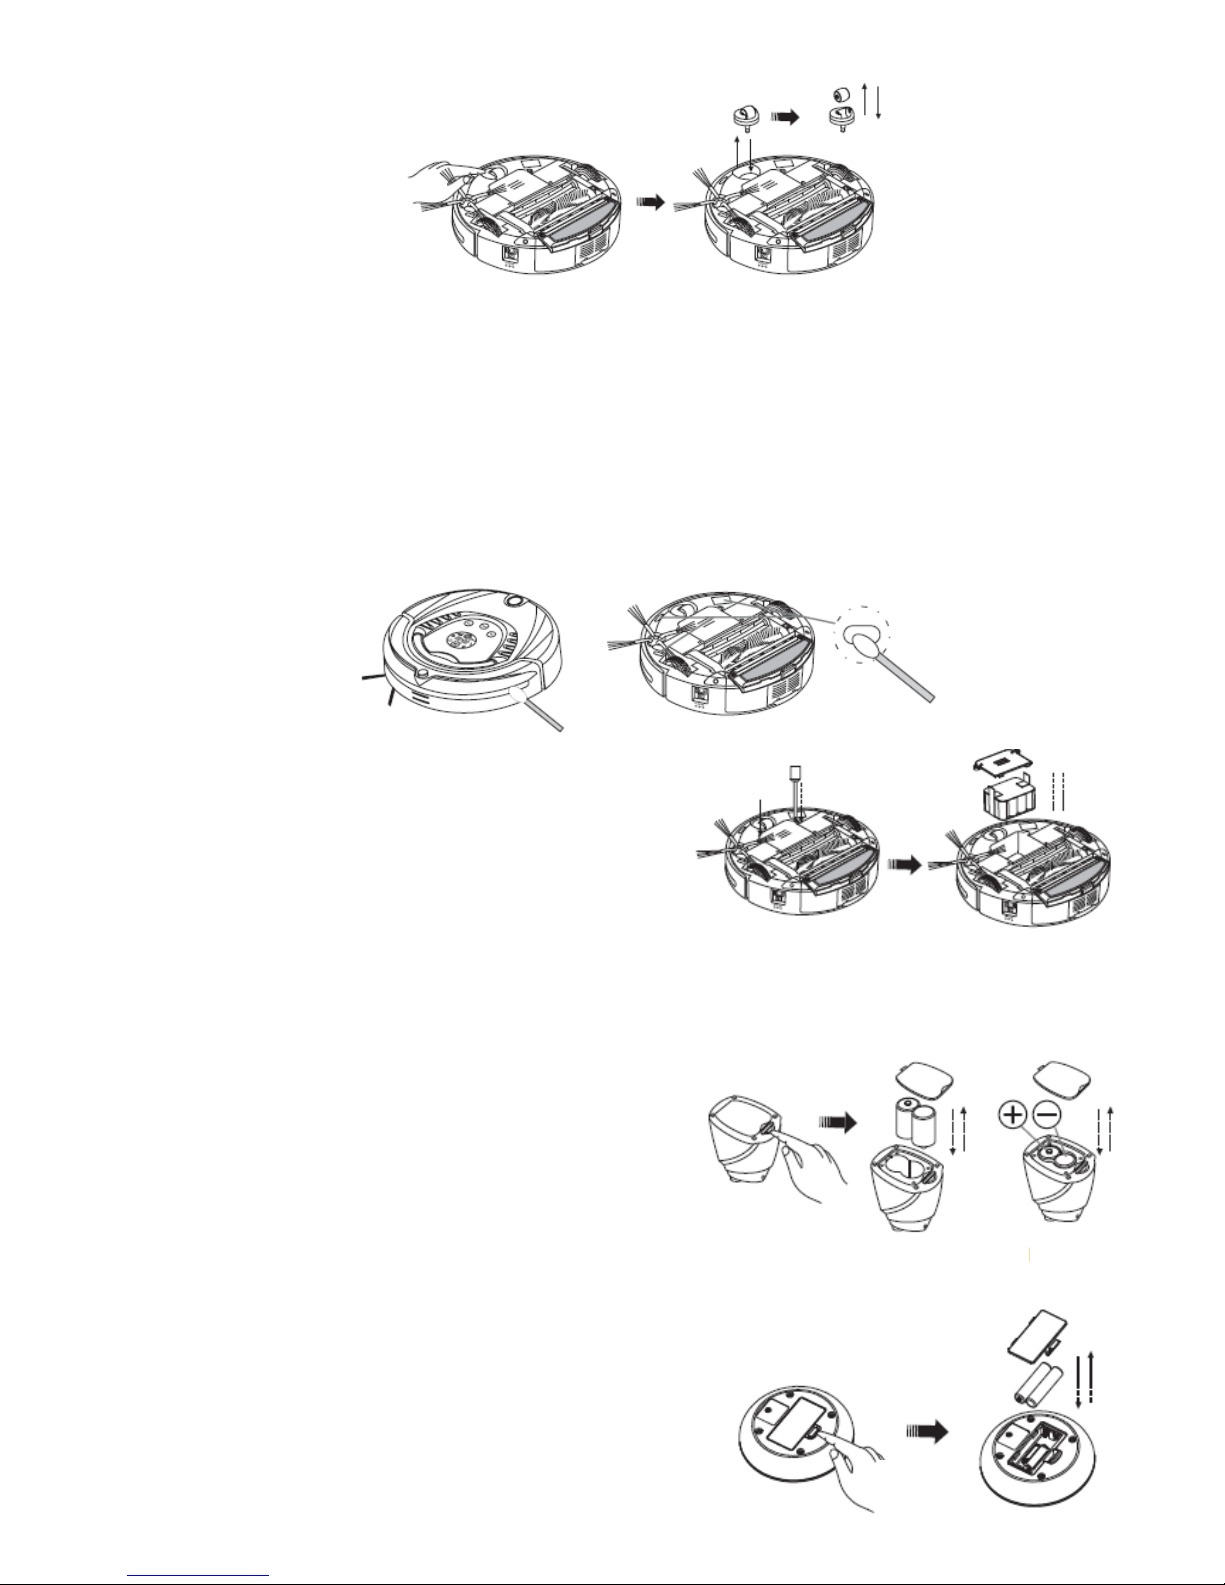
1. Release the screw with a screwdriver,
open its base plate.
2. Connect two terminals during battery
installation.
3. Place the positive and negative poles
correctly for fear of the damage due to
wrong poles.
4. Set the cleaner in charging status to keep
the best performance of the battery while
the cleaner is not in use.
5. Ensure using the original battery of the
manufacturer for installation, otherwise
there may be damage or accident.
Battery replacement of the space isolator :
1. Spin the pivot as per figure 1 and the cover will
open.
2. Please place the batteries ( not inc luded) with
correct polarity (=/-)
3. The right place of battery (Figure 3)
4. Please take out the battery if it was unused for
long.
Battery replacement of the remote control :
1. Open the battery cover and then replace the battery.
2. Please place the batteries ( not included) with correct
polarity.
3. Please take out the battery if it was unused for long.
1. Please don’t forget to take out the battery before discarding the Cleaner.
2. Please remember to turn off the switch before taking out the battery from
the Cleaner and Space Isolator.
3. Please don’t place the battery in the high-temperature environment above
45℃ or in the water.
4. Please don’t exert external force to the battery or drop them from high
place.
5. The battery should be recycled with safe disposal. Please don’t discard it
freely or throw it into fire for fear of explosion!
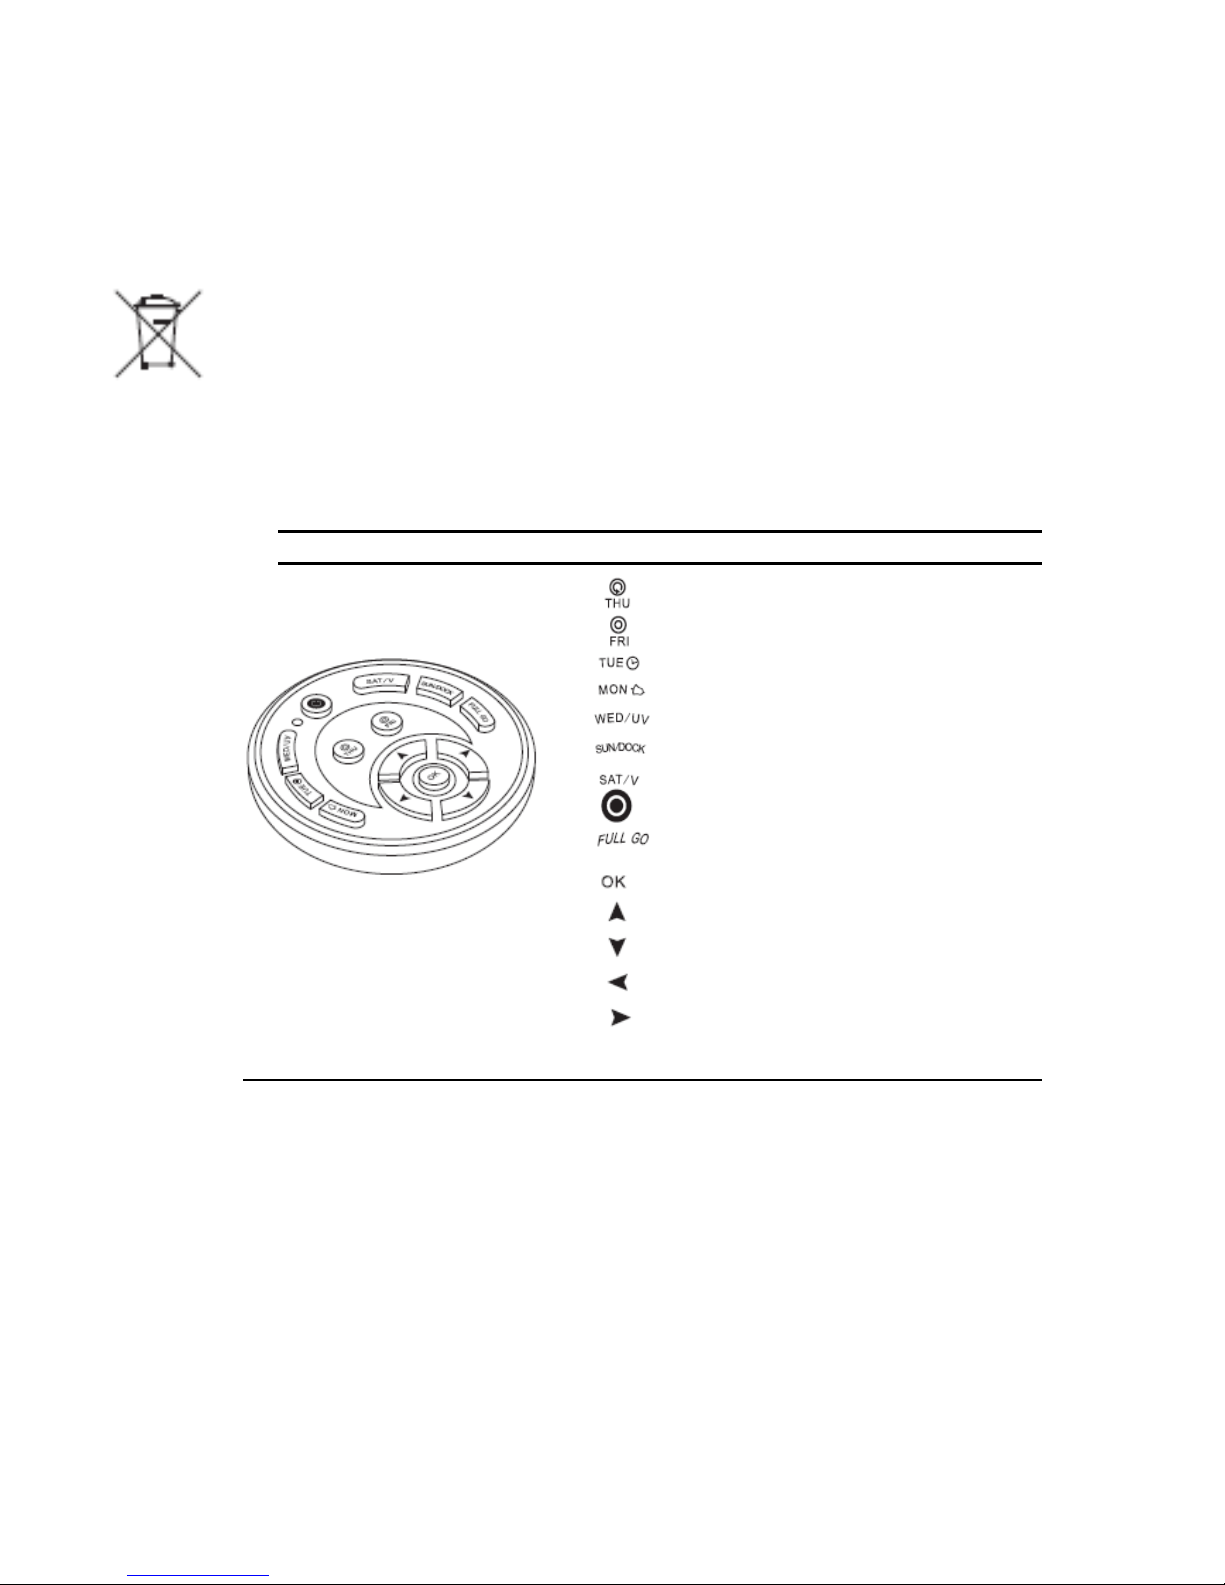
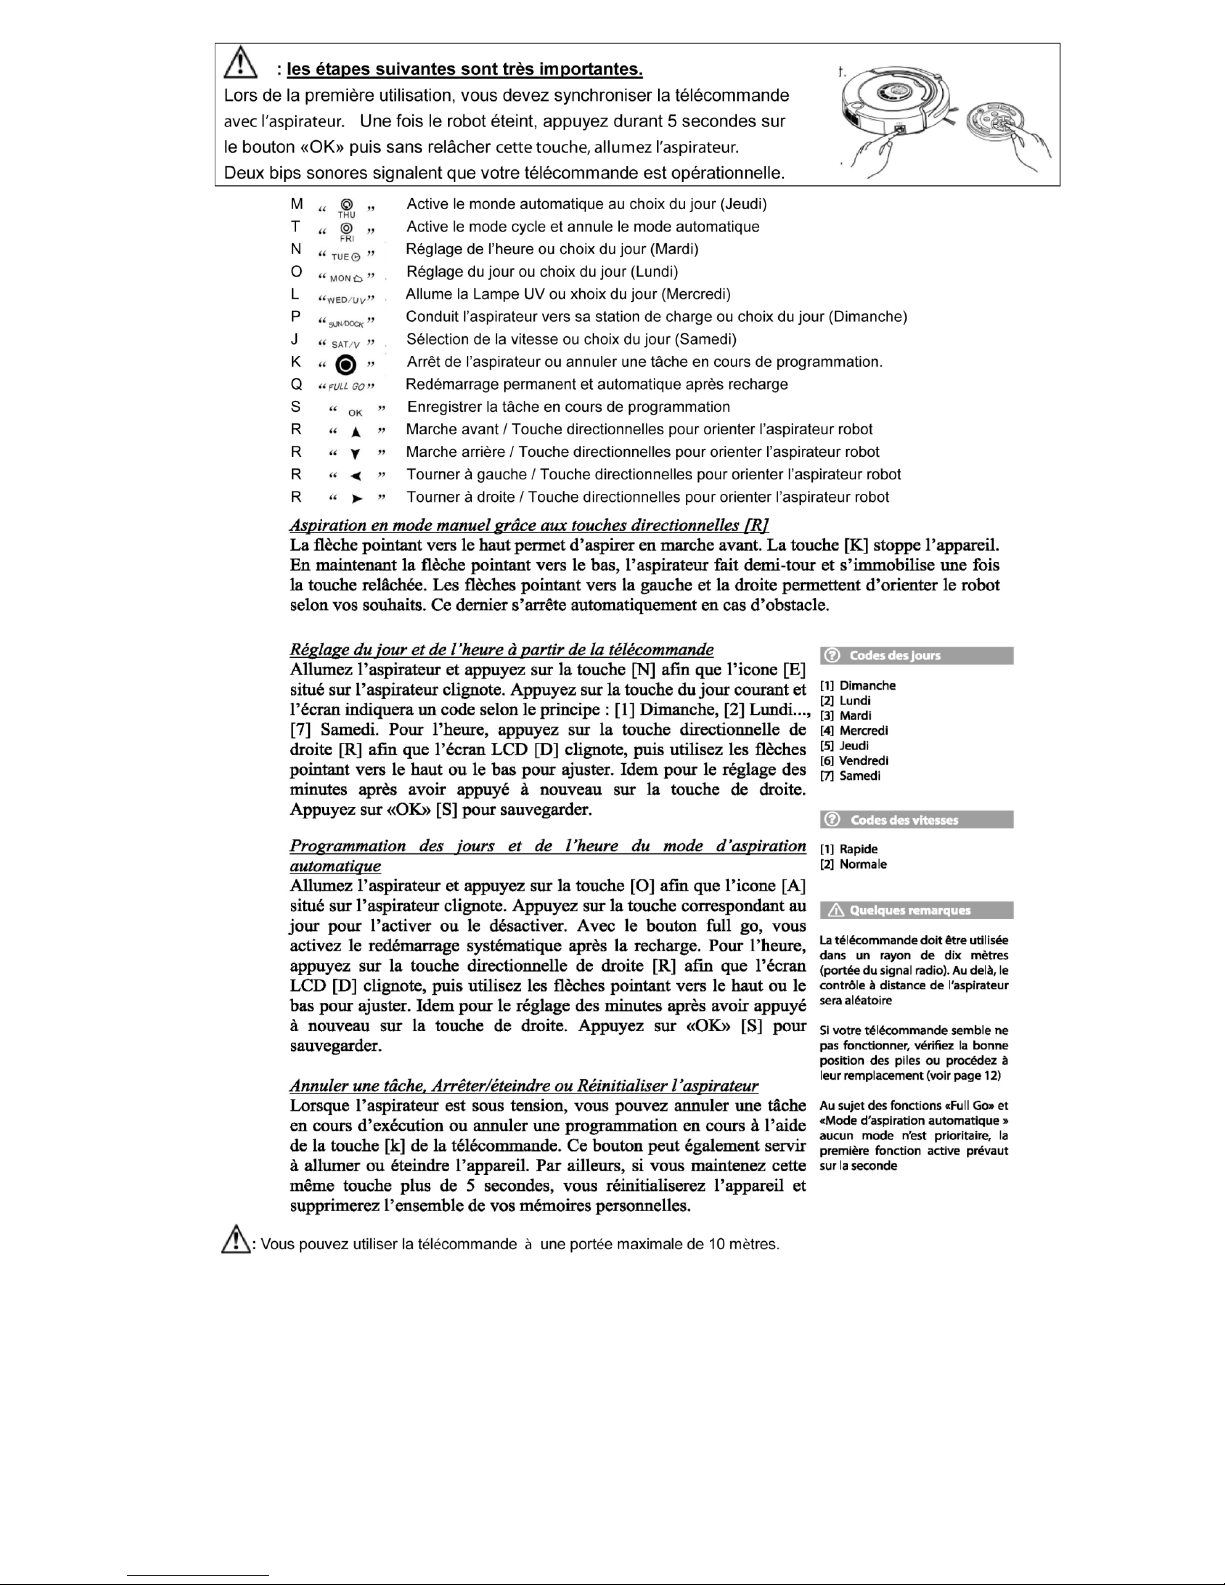
Remote control :
Automatic cleaning key/Thursday
Spot cleaning key/Friday
Time set key/Tuesday
Timing key/Monday
UV sterilizing key/Wednesday
Automatic recharching key/Sunday
Speed selection key/Saturday
Turn off/cancel
It will work automatically after the battery id full
Confirmation key
Forward key
Back key
Turn left key
Turn right key
Keys in total
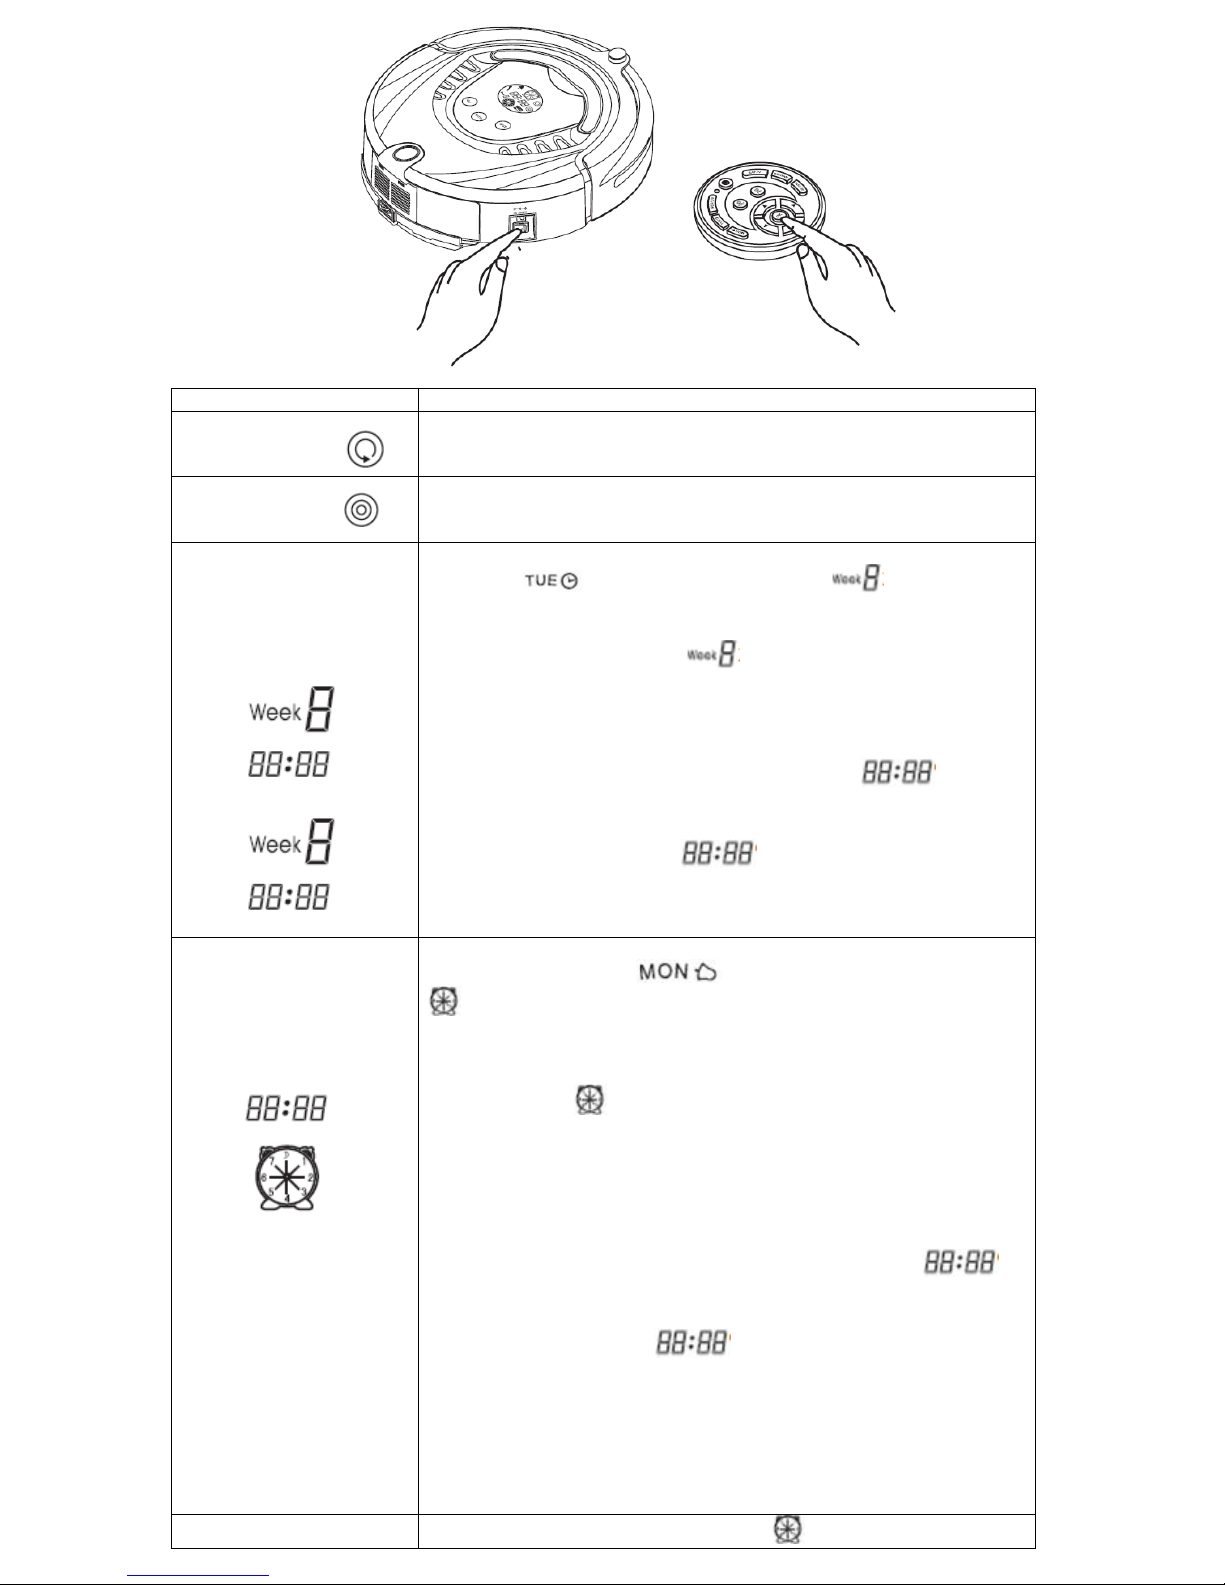
Using method & functional status of control panel :
The following steps are very important, or the remote control may fail.
1. You should check code of the r emote control or cleaner.
2. Check the remote control an d cle aner have enough power, turn off the cl eaner, press OK on the remote
control for more than 4s, and t hen t ur n on the cleaner without releasi ng O K.
After the cleaner toots twi ce, r elea s e O K, t hen t he code check set is finished.
3. If you fail to hear toot during the c ode check, just repeat the abov e pr ocess.
: You can use the remote to a max imum range of 10 met ers.

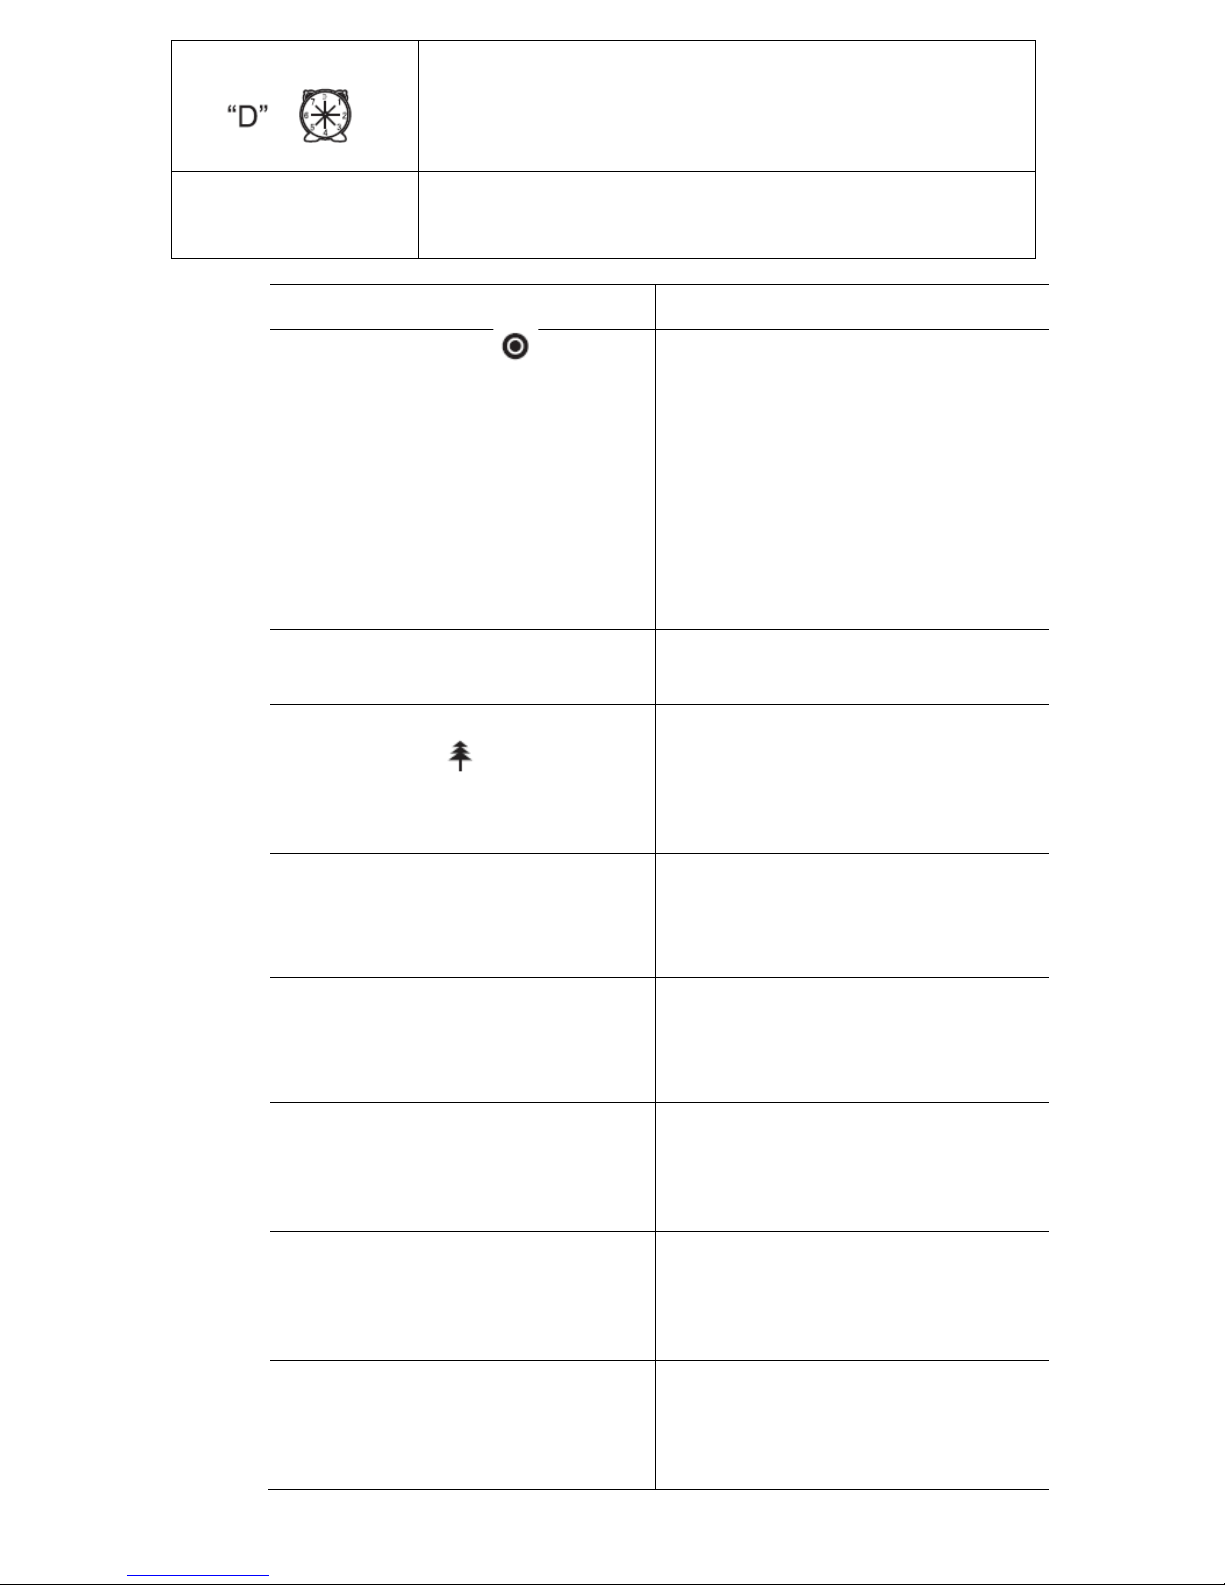
Function guide
Auto cleaning
Spot cleaning
Week & time setting
Timing cleaning setting
Full go function setting
Speed selection
Function informa t ion
Press the key, the Cleaner will clean in the auto cleaning mode ;Pres s
the key again, the Cleaner will stop running.
Press the key, the Cleaner will clean in the spot mode ;Press the key
again, the Cleaner will stop r unni ng.
1. Turn on the Cleaner.
2. Press
on the remote controller, the icon in the LCD screen
of cleaner will flicker.
3. Press correct week button on the r emote controller; there is display
in icon
, 1 means Sunday, 2 means Monday, …accordingly, 7
means Saturday.
4. After setting correct week , then you can set time
5. Press
► to enter time setting, the I con in the LCD screen of
the cleaner will flicker.
6. Press
▲ or ▼ to set the correct hour.
7. Press
► again will flicker
8. Press
▲ or ▼ to set the correct minute
9. After finishing Week & Ti m e Setting, press “OK” to save it
Cleaning week setting :
1. Turn on the Cleaner.
2. Press Timing Cleaning set t ing b utton
, then the icon in
the LCD screen of the cleaner w il l flicker.
3. Press any week button /some week buttons or all week buttons y ou
want to set timing cleaning on any day or days or everyday of a w e-
ek, then the selected date or dat es will flicker. In
, 1 means Su-
nday, 2 means Monday, accordingly, 7 means Saturday.
4. If you want to cancel any set t ing day or days, just press the week
button again.
5. after set the clean day of each week, it is possible to set the start ing
time of cleaning.
Cleaning time setting:
1.Press
► to enter cleaning time sett ing, t he I con in the LCD
screen of the cleaner will flicker.
2.Press
▲ or ▼ to select the timing cleaning hour.
3.Press again
will flicker.
4.After finishing Week & Time Setting, press “OK” to save it.
Cleaning Week setting :
When the cleaner is connect ed to the Docking Station, at t he
setting time it will start cleani ng aut omatically (when the batter y is
fully charged); when the clean ing i s f inished or the battery is low,
the cleaner will go back to the Doc king Station automatically.
Press FULL GO, “D” in the icon “
” will flicker, the cleaner will
start cleaning automatica ll y when the battery is charged (5/6 ho ur s
charging); this function is suitable for large house which one full
charging can not clean all the rooms.
Remark: Can not set timing cleaning and full go function at the
same time !
Press the “SAT/V” key rep eat edly, you can choose fast or slow speed.
It will have automatic memory after the speed selection (fast 1, slow 2)
You should use the r emo t e contr ol wit hi n 10 m (ra di o si gnal sc o pe), or y ou
may fail to control the ma i n body.
The Cleaner may fa il to fi n d the D oc ki ng S ta tio n due to t he obstacle,
complex condition or because the battery ’ po wer us e d up .
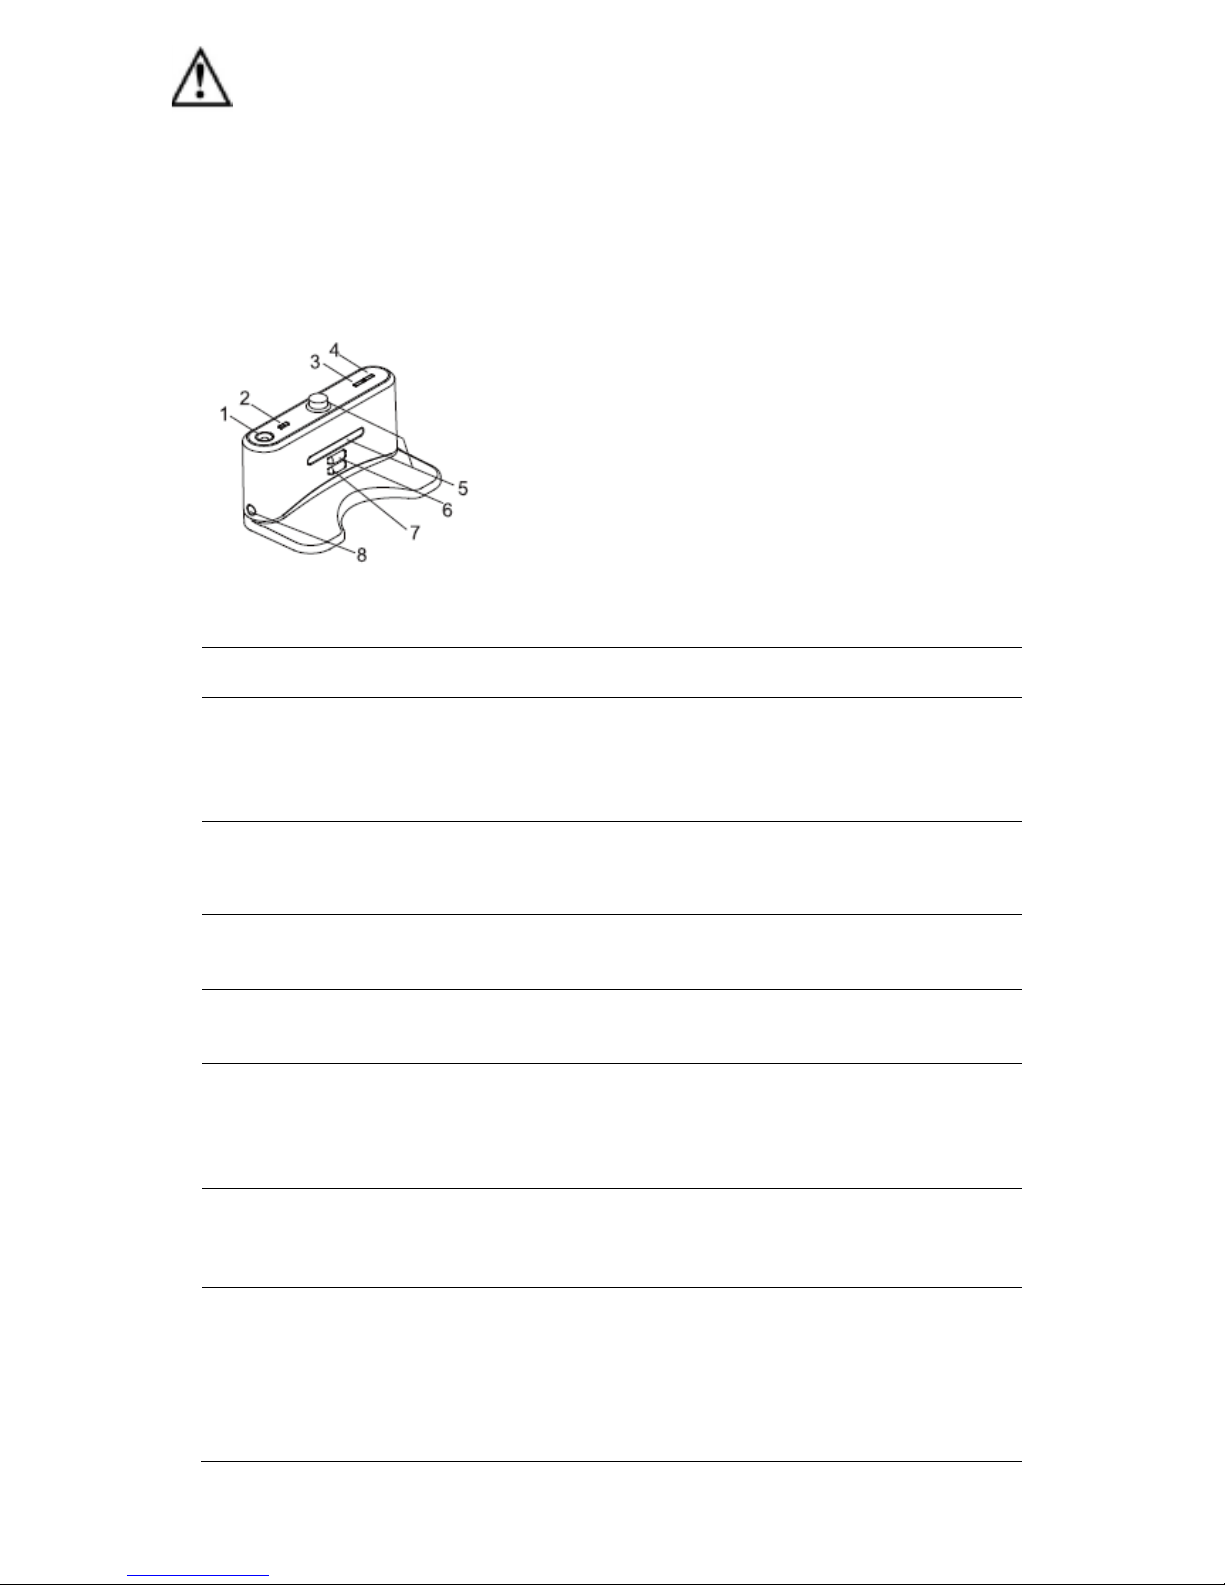
Auto charging docking station
Docking Stati on Di spl ay and Contr ol Panel :
1. LED decorative light (a little e ssence can be placed above)
2.Decorative light switch
3.Power LED
4.Charging indicator
5. Signal transmitting
6. Charging positive electrode
7. Charging negative electr ode
8. Charging power DC socket
Using method & functional status of the docking station :
No. Function guide
Function Information
1
LED decorative
light
Turn on the decorative light to activate the atmosphere, and place in the glowing
center of the light a little essence, wich will give off charming aroma after heating.
Function guide
Turn off/cancel/stop
OK key
UV lamp key
Auto Docking Key
▲ Forward key
▼ Backward key
◄ Turn left key
►
Turn right key
Function informa t ion
1.Turn on the power switch of the cleaner, and press the key can
turn on/off the Cleaner .
2.You can stop the running mode by pressing the key .
3.You can delete and return to the original setting if you get wr ong
sets or want to stop setting.
4.Press the key for more t han 5s , you can delete all set and memory
and return to the initial status
You must press “OK” to sav e any setting you did
You can turn on/off UV lamp by pressing the “UV” key while the
cleaner is in the Standby mode or running. The on/off set will be
memorized automatically.
While the Cleaner is in the Standby mode or running, the Cleaner will
search the Docking Statio n for charging after you press “SU N/ DOCK”
key.
Press “Forward”, the Cleaner w il l run f or ward cleaning press
can stop. It will stop automat ically in case of the obstacle.
Press ▼ for long, the Robot will run backward cleaning, and it will
stop after you release the key .
Press
◄ and release till the Clean er t ur n le ft to the direction you
want. It will stop automatically in case of the obstacle.
Press
► and release till the Clean er t ur n r ight t o the direction you
want. It will stop automatic ally in case of the obstacle.
2
Decorative light
switch
Press the switch to turn on/off while the decorative light is on.
3
Power LED The power LED will light when the docking station is connected with the power, or
turn off if not connected.
4
Charging indicator The indicator will flicker while the recharger is connected with the cleaner.
5
Signal transmitting
Transmitting signal is the only way to lead the cleaner to return the docking
station for charging, so the signal transmitting position should be clean for long
without any obstacle on it.
6、7
Recharging
positive & negative
electrode
The electrode and that of the cleaner are connected to charge under contact
mode, so the position should be clean without any obstacle on it while using, or
there will be impact to the charging.
8
Charging power DC
socket
The power DC socket, called recharger for short, used to connect output terminal
DC24V of the adaptor, is the charging transit station between the cleaner and
adaptor, so the recharger should be placed against the wall firmly and the adaptor
cable should be away from the recharger, or the robot may have impact and
winding during cleaning.
Some essence may damage the plastic surface, so please m ake purchase
and use after consideration.
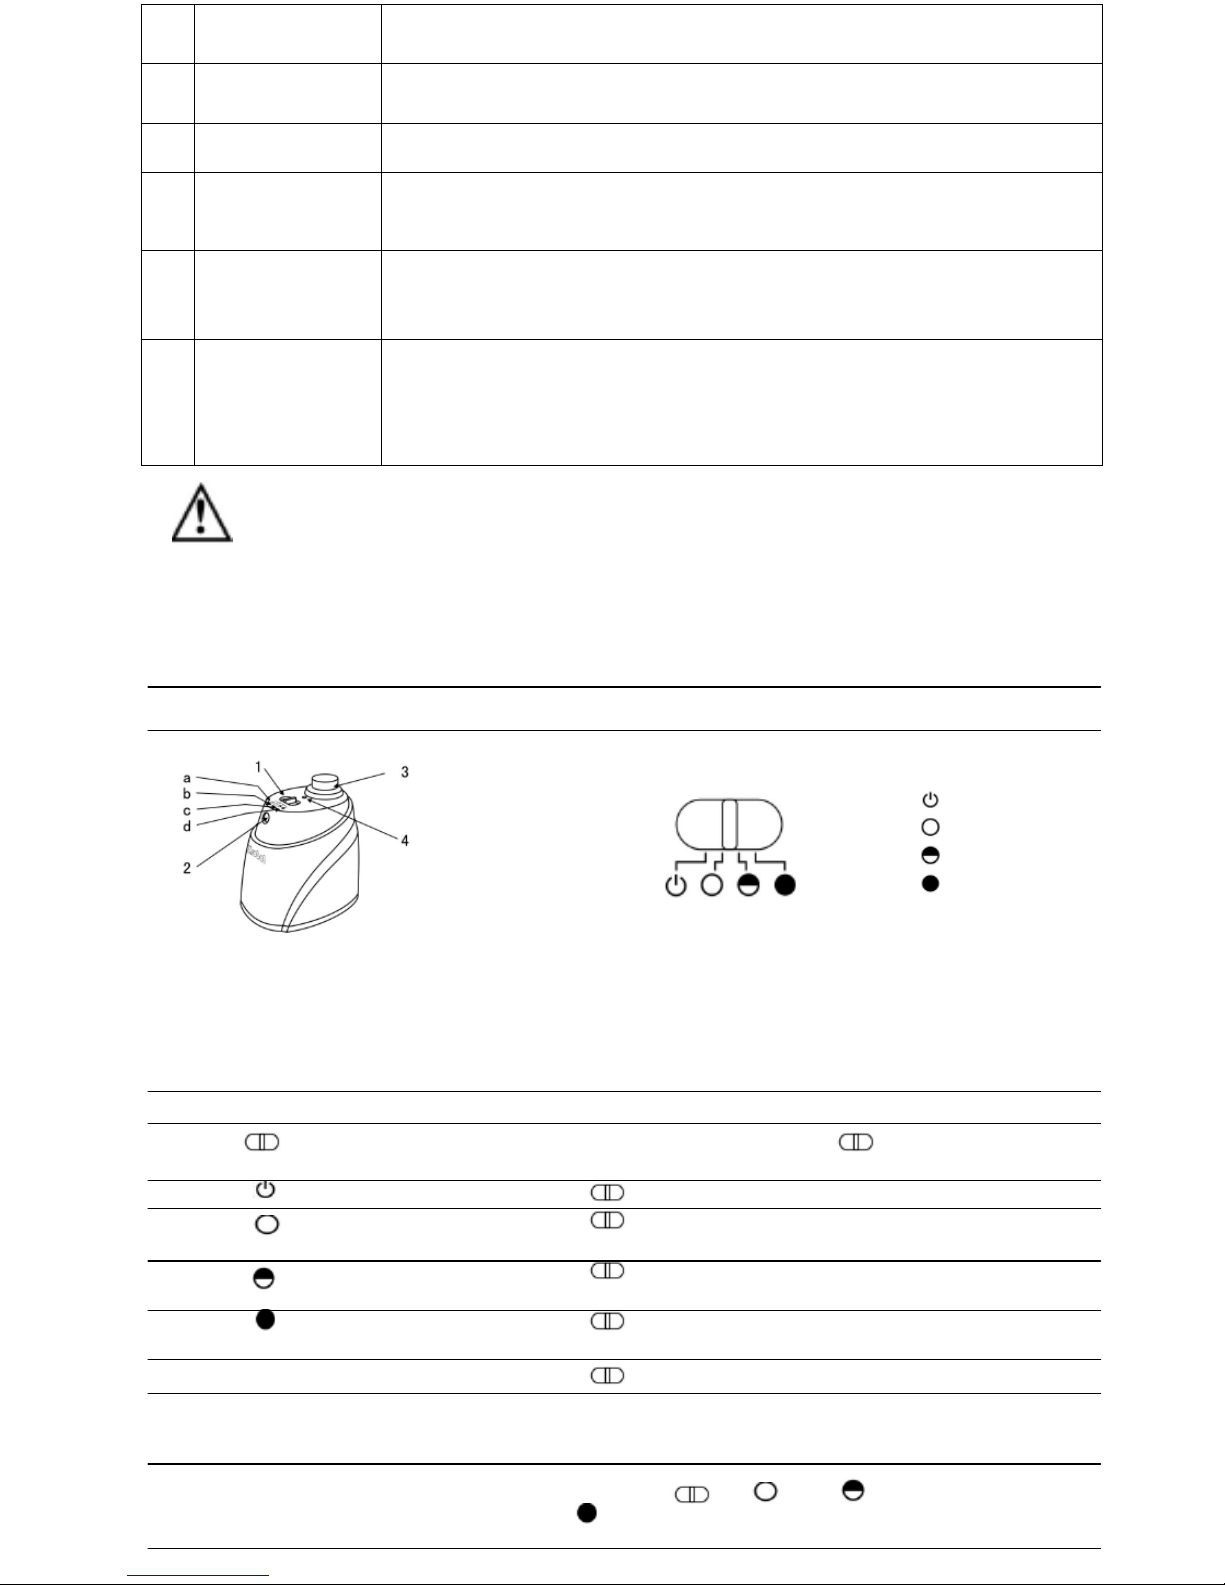
Space isolat or
Space isolat or di splay and co ntr ol pan el :
Overall display Function instructions
1. Toggle switch
Function Int rod ucti on of S pace Is olat or :
Space Isolator, an ac ce sso ry of t he cl e aner, c an b loc k are a by s end ing s p ec ial i nfr are d
signal so as to pr ev ent the Cleaner fr om ent er ing s o me unn ec es sar y ar eas.
Using Metho d & Func tional Stat us of S pac e Isola tor :
No. Name Function information
Turn off
Low
Middle
High
a
b
c
d
1
2
3
4
Toggle switch
a Turn off
b Low
c Middle
d High
Infrared wall transmitting signal head
Near-infrared transmitting
head
Power LED
You can switch the function by sliding repeatedly : Turn off, Low,
Middle and High.
Slide to the position, then the power is off.
Slide to Low and turn on the power, you can select the distance
within 4m as required by infrared wall.
Slide to Middle and turn on the power, you can select the
distance within 6m as required by infrared wall.
Slide to High and turn on the power, you can select the distance
within 8m as required by infrared wall.
Slide , then you can adjust the distance of the Space Isolator.
The near-infrared transmitti ng sign al mak es the Clean er
run outside the Space Isolator scope of 50-100cm without
any impact to it.
The Power LED will flicker once every 8s until the low
battery after you slide to Low, Middle
and High, and the Cleaner works normally.
1. Open the battery cover before using, place 2x ”D” ba tteri es (not incl uded) into
the box correctly. Pay attenti on to the polarity or the S pa c e I solator will not
work.
2. The battery consumption duration is related to t h e se le ct ed tr a ns mit ting
distance and working duration, please select proper t rans mittin g di stanc e
and low transmitting power to s av e th e b at t ery, so don’t f orge t to turn off the
toggle switch while unused.
3. There will be some differ ence in the dir ectio n, tr ansm itting infr ar ed sign al of
the Space Isolator and receiv ing di stanc e of th e Clean er due to env iro nmen tal
impact and movement of the Cleaner during the actual using. The difference
above may vary based on the actu al e nv ir on me nt a nd different battery power
of the Cleaner a nd S p ac e Is olator.
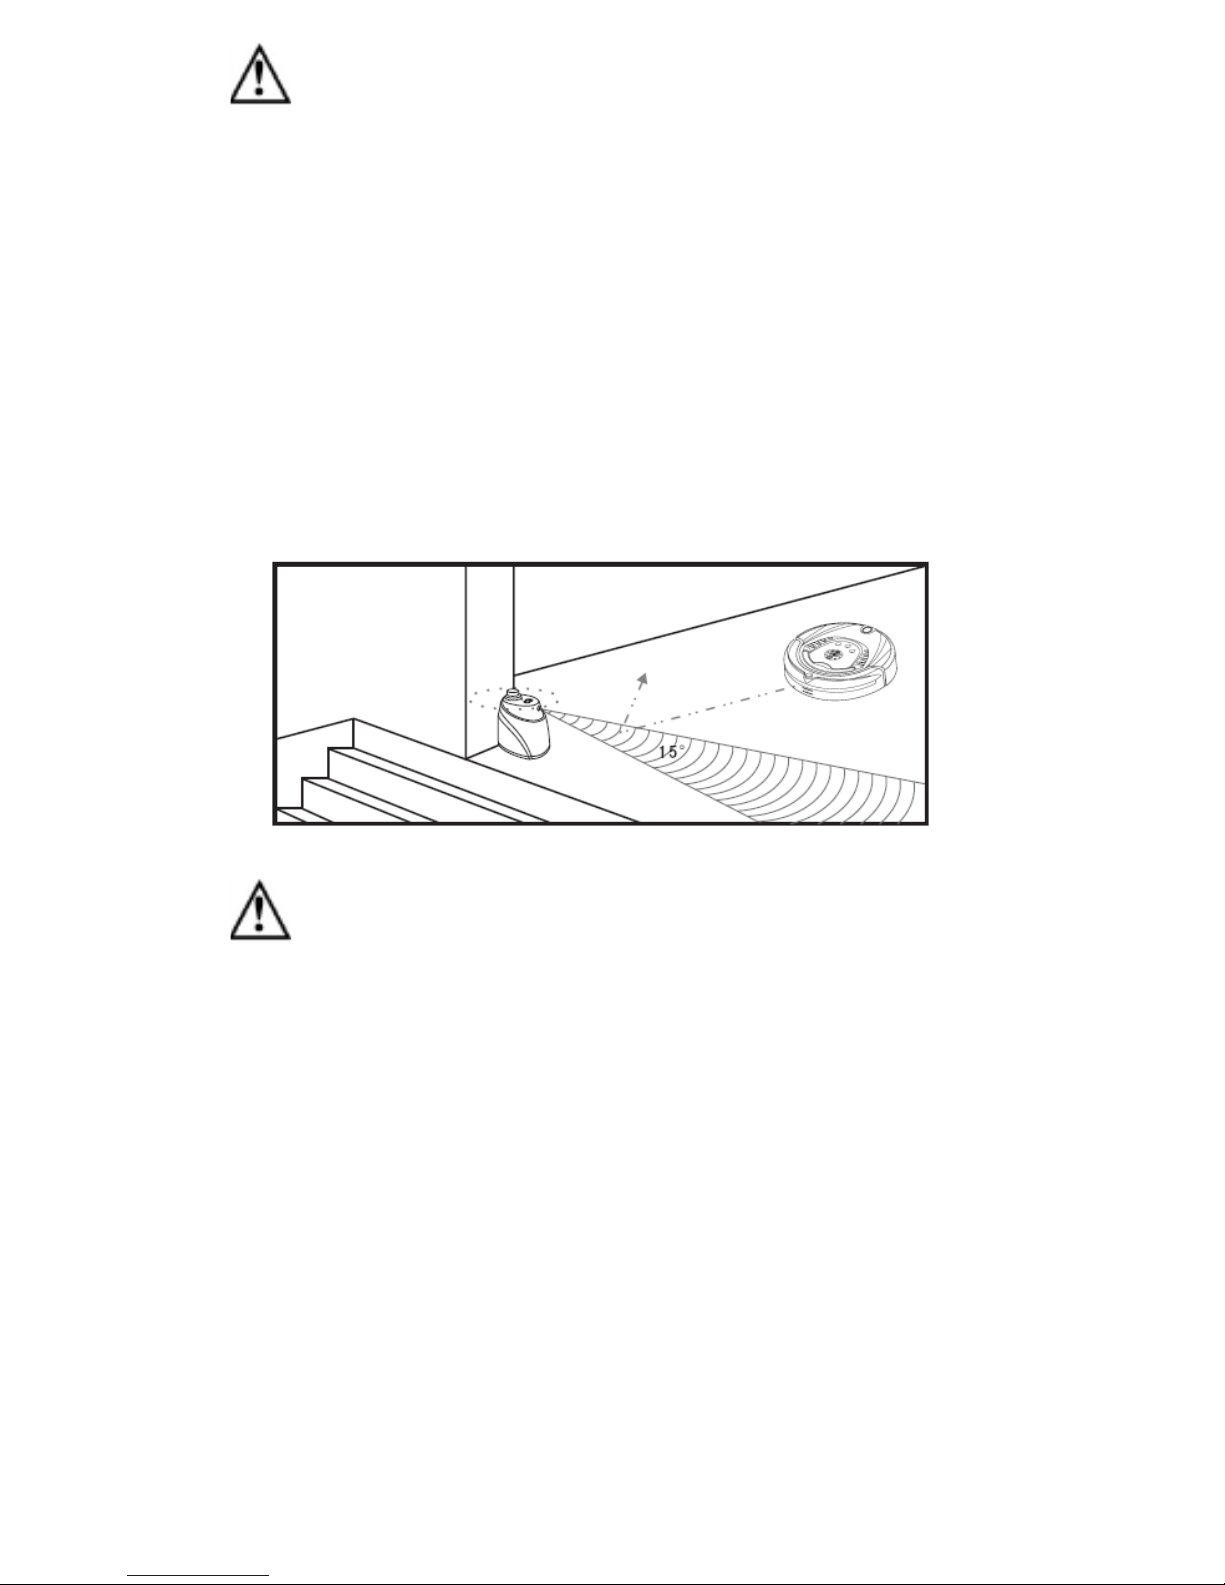
Installation m et ho d of Sp ace I sol at or :
1. The Space Isolator i s p lac ed at th e e ntra n ce t o th e st a ir or r oo m ge ner a lly .
2. You can place the S pac e Is ol ato r at pro per p osit ion t o st o p th e Cl ean er p as si ng t hro ugh
some places.
3. Remove obstacles fro m the area you wa nt to block in fr ont of the Spac e Isolat or as muc h
as possible for fear of poor effect.
1. The Space Iso lat or sh ou ld be placed at t he s am e lev e l o f t h e g round where the
Cleaner is runni ng.
2. You should check wheth er the Clea n er can pass the Space Isolat or wh ile
using it first.
The distance bet we e n t he S p ac e I so la tor and recharger s hould be more th an
3m, or there will be int er f er e n ce.
4. The Docking Station sh oul d not be i nstal led with in th e sign al sco pe of the
Space Isolator.

Trouble shooting :
The cleaner doesn't work or clean poorly :
1. Check whether turning on the switch.
2. Check whether the dustbin, filter and intake are clean, and whether the side brush works.
3. Check whether the battery voltage declines greatly.
The remote control doesn't work :
1. Check the battery status of the remote control.
2. Check the battery status of the robot.
3. Whether check code between the remote control and main body.
4. Check whether the remote control is within the available scope of the signal transmitting.
The cleaner can not charge automatically :
1. Check whether the adaptor is connected well with the charger and whether power LED of the charger lighting.
2. Check whether the battery power is too low ; if so, charge the cleaner with the adaptor directly.
3. Make sure there is no barrier in front of the docking station.
4. Use the remote controller to let the cleaner go back to the docking station.
Increased noise in cleaning :
1. Clean the dustbin and filter.
2. Check whether the brush or side brush is too dirty.
3. If the noise still too big, you may send back the cleaner to the after sale service maintenance to add lubricants.
The cleaner stops working suddenly and ri ngs intermittently :
1. Check whether the set cleaning time is over.
2. Check whether there are failure codes on the display by reference of the followings.
The cleaner back off continuously :
1. Avoid use in sunlight or dark color carpet.
2. Pat the front bumper.
The cleaner dropped from the stair :
Clean the ground detection sensors at the front bottom of the cleaner.
The cleaner can not auto-charging after didn' t use in a long time :
Use adaptor to full charged first.
The cleaner stop to work, but not error code display :
Don't disassemble and maintain it by yourself, contact the after sale service maintenance.
Failure information which may appear during using :
Code
Failure Cause
How to solve
E001 Ground detection sensors Clean the sensors at the front bottom of the cleaner
E002 Middle brush
Clean the rubbish such as hair, thread wrapped on the brush
E003
Power off
Use the adaptor to charge, after full charged, then use again
E004
Left & right wheel
Check the left and right wheels, clean the rubbish on it
E005
Dustin poor contact
Check the dustbin and re-fix the dustbin after cleaning
If the failure still exist after the above check, please contact the after-sale servi ce
maintenance, professional maintenance staff or the technical center of the
company, don't disassem ble and m aint ain i t by your self.
CAUTION:
Do not dispose of this product as it has with other household products. There is a
separation of this waste product into communities, you will need to inform your local
authorities about the places where you can return this product. In fact, electrical and
electronic products contain hazardous substances that have harmful effects on the
environment or human health and should be recycled. The symbol here indicates that
electrical and electronic equipment should be chosen carefully, a wheeled waste
container is marked with a cross.
Manufactured and imported: Adeva SAS 8 rue Marc Seguin 77290 Mitry-Mory FRANCE
www.hkoenig.com - contact@hkoenig.com - Tel 01 64 67 00 01
FRANCAIS
Précautions de sécurité:
Avertissement
Personne ne peut démonter, entretenir ou
transformer le produit à l'exception de
l'entretien fait par des techniciens
désignés par notre entreprise, car cela
pourrait causer des problèmes de feu,
d'électrocutions ou des blessures.
Ne pas utiliser de chargeur autre que celui
distribué avec le robot car cela pourrais
causer des dommages, chocs électriques ou
incendies dû à une grande tension.
Ne pas toucher le cordon
d'alimentation à haute tension de
l’appareil électrique avec les mains
mouillées car cela peut causer un choc
électrique.
Ne pas trop plier le cordon d'alimentation ou
mettre du poids dessus car cela
pourrais endommager le cordon,
causer un incendie ou provoquer un
choc électrique.
Ne laissez pas entrer vos vêtements ou une
partie de votre corps (tête, doigt, etc.)
dans la brosse ou roue du robot car
cela pourrait causer un risque de
blessure.
Ne vous approchez pas d'une source de feu
telle que cigarette, briquet, allumette
et autres sources de chaleur ou autres
matériaux à combustibles tels que le
filtre à essence.
Attention
Ne pas oublier de couper l' alimentation lors
du transport ou quand l'aspirateur est
rangé pour une longue période car la
batterie risque de s’endommager.
Insérez de la bonne façon le cordon
d'alimentation du chargeur car cela
peut provoquer un choc électrique, un
court-circuit, de la fumée ou un
incendie.
Vérifiez si le chargeur et la prise sont bien
reliés, car cela peut provoquer une
panne voir un incendi e.
Enlevez tous les objets facilement
endommageables (y compris les
objets lumineux, tissus, verre,
bouteilles, etc.) avant d'utiliser car cela
peut affecter l'utilisation de l'aspirateur.
Faites attention en utilisant l’aspirateur
en présence d'enfants car l'aspirateur
peut les effrayer ou leur faire du mal.
Ne pas se tenir debout ou s'asseoir
sur l'aspirateur car cela peut causer
des dommages à l'aspirateur ou des
blessures.
Faites attention a ne pas mouiller
l'aspirateur avec de l'eau ou n importe
quel liquide, de peur que le produit s
endommage.
Ne pas utiliser l'aspirateur sur de
petites tables et chaises ou tout autre
petit espace car l'aspirateur risque de
s endommager.
Ne pas utiliser l'aspirateur en usage
extérieur car cela peut provoquer sa
détérioration.
Ne pas utiliser l'asp irateur dans d es
endroits de grand passage ou
l'aspirateur risque d'être endommagé
par un usage excessif.
Ne laissez pas d'objets du type fil, câble et autre d'une longueur de plus de 150 mm sur
le sol car ils peuvent rester coincé dans la brosse.
L'utilisation de l'aspirateur n'est pas adaptée pour les personnes handicapées
(personnes atteintes d'un h and ic ap physique ou mental), les enfants et tous ceux qui
utilisent l'aspirateur avant de lire attentivement le manuel d'utilisation.
Zones d´utilisation possible:
Le produit s utilis e principalement pour la maison, les chambres d’hôtels et les petits bureaux .
C'est un bon appareil pour le nett oyage de diverses moquettes et t api s à
poil court, plancher de boi s, sol dur, céramique, etc.
Introduction aux fonctions de l'aspirateur:
C est un aspirateur robot nouvelle génération avec une batterie rechargeable, contrôlée par
un programme avancé intelligent, avec les fonctions suivantes: aspirateur automatique,
nettoyage, stérilisation, programmation du temps de nettoyage, nettoyage enti er des s urfaces,
télécommande sans fil, sélect i on de la vitesse. Il est facile à utiliser et à net t oyer.
Composants de l’aspirateur
Aspirateur Télécommande Station de charge Adaptateur secteur Manuel d’utilisation
Mur virtuel Support serpillère Balais a franges(2) Brosse Brosse à côtés (2) Filtres (2)
Présentation:
Vous trouverez ici les éléments principaux qui constituent l'aspirateur robot:
Interface d'affichage Les signes LCD
Menu d’affichage:
Menu :
1.
Voyant de la date et l'heure
2.
Molette de rotation / aff ic hag e rapide
3.
Voyant lampe UV
4.
Voyant de nettoyage automatique
5.
Point d'affichage de nettoyage
6.
Affichage de la se m aine en cour s
7.
Voyant de disfonctionnement
8.
Voyant de charge
9.
Heure / Code d'affichage d'une erreur
1.
Clé lampe UV
2.
Clé de l'auto nettoyage
3.
Point d'auto nettoyage
Fonctions d'inf orm ati on de l'interface d'affichage :
Assurez-vous que l'aspirateur soit complètement chargée pendant 5 ou 6 heures (la batterie
doit être chargée et déchar gée entièrement environ 2 ou 3 fois avant d'atteindr e la meilleure
performance).
Appuyer sur le bouton de mise e n m ar che, la son nerie retentira une fois et l'écran affichera ce
qui suit:
1. Affichage automatique de la date actuelle par semaine.
2. Voyant en cas de dysfonctionnement "," affichage du code d'erreur allant d’E001 à 034.
3. Trois barres signifient que la batterie est pleine. Moins il y a de barres, moins il y a de batterie.
4. Signifie que l'aspirateur est en charge. La batterie n'est pas suffisamment chargée si l'icône
clignote, ou complet si celui-ci s arrête de clignoter.
5. Voyant du temps de nettoyage en temps réel, l'heure actuelle par jour et le code de disfonctionnement.
6. Réglage de la vitesse. 1 : vitesse rapide 2 : vitesse.
7. Voyant de la lampe UV sur « allumée » lorsque l'aspirateur est en marche, lors de l'ouverture de
la lampe UV, ou sur « éteint » lorsqu’il ne fonctionne pas.
8. Voyant de l’aspirateur en mode nettoyage.
9. Voyant de l’aspirateur en mode nettoyage autom atique .
1. Sélection du jour de nettoyage ou de quelques jours ou d'une semaine entière.
2. Affichage de l’heure et du temps de nettoyage.
3. Moyens de réglage de la vitesse de l’appareil.
4. Affichage de la date en cours et de la semaine.
Fonctions d’opération des
touches clefs :
Description de la fonction :
1. La touche d’auto nettoyage
a. Enlever les objets et obstacles présents dans la pièce à
nettoyer avant de mettre en marche l’aspirateur. Appuyez
ensuite sur le bouton nettoyage automatique.
L’aspirateur fonctionnera e n fais ant des spira les, en li gne, en
zig-zag, suivant les différents modes automatiques.
b. Vous pouvez choisir la vitesse rapide ou lente pour le mode
de nettoyage.
c. L’appareil s’arrêtera de fonctionner si la batterie est faible. Il
sonnera 10 fois avant de chercher le support de la recharge
automatique.
d. L’aspirateur s’arrêtera de fonctionner si vous appuyer sur
n’importe quel bouton de l’appareil durant son fonctionnement.
2. Bouton de nettoyage
a. Appuyer sur le bouton de la clef de nettoyage , de cette
manière l’aspirateur nettoiera en spirale une surface de 1m2
b. Le mode rapide de nettoyage dure 2 minutes et le lent 4
minutes. Il s’arrêtera automatiquement après avoir finit
c. L’aspirateur s’arrêtera de fonctionner si vous appuyer sur
n’importe quel bouton de l’appareil durant son fonctionnement
3. Bouton de lampe UV
a. Appuyer sur le bouton ON du corps principal de l’appareil.
L’affichage s’allumera.
b. Appuyez sur le bouton de la lampe UV, l’icône
apparaitra et la lampe UV se mettra sur ON si l’aspirateur est
allumé ou sur OFF s’il est éteint
c. Si vous n’avez pas besoin d’utiliser la lampe UV, appuyez
sur le bouton pour l’éteindre, et l’icône
s’éteindra
d. Le mode ON/OFF de la lampe peut être mémorisé
automatiquement.
Ce nettoyage est spécialement conçu pour les personnes
souffrant d'allergies et les maisons avec animaux
domestiques
Les touches du corps principa l de l’appareil sont de type électronique, vous avez juste besoin
de les toucher doucement avec vos doigts pour l’allumer. A côté de ca, v ous devez nettoyer
les touches et l’appareil a vec un tissu humide d’eau, autreme nt c el a peut causer l’usure des
touches si celles-ci ne sont jamai s net toyées.
Les parties :
Installation de la station d’accueil et de la recharge automatique :
La recharge automatiq ue :
1. Installer la station d’accueil fermement
et verticalement sur le sol.
2. Pas d’obstacles ou de surfaces
creuses à 3 mètres devant l’appar eil et
0.5 mètres sur les côtés de l’appareil.
3. L’aspirateur ne peut pas chercher la
station d’accueil si le sign al infrarouge
transmit par le cadran est couv ert.
4. Connecter l’adaptateur à la prise afin
de brancher la station de recharg e.
Placer la corde de la prise au sol lors du
chargement afin d’éviter q ue le fil ne se coince
dans les roues ou les brosses .
Chargement manuel :
1. Vous pouvez directement brancher la prise de
la station de recharge a l’aspirateur.
2. Connecter la prise avec le socle de
branchement de l’aspirateur prévu à cet effet.
3. Avant de charger l’appareil, connecter la prise
avec la station de recharge, en s’assurant que
l’aspirateur soit bien contr e la st at ion.
4. Appuyer sur le bouton « DOCKING » dans
le panneau de configuration des boutons
si vous voulez recharger l’aspirateur,
l’appareil recherchera la station de
recharge pour le recharge r sans avoir
besoin d’être à une certaine dist anc e de la
station.
5. Appuyer sur un bouton dans le panneau
d’accueil ou appuyer sur « POWER OFF »
et « DOCKING » dans le panneau de
configuration quand l’asp irateur recherche
la station de recharge. Cel ui-ci arrêtera
alors sa recherche.
6. Lorsque la batterie est en charge, la
première barre de charge me nt de l’icône
se mettra a clignoter, et lor sque l a
deuxième et la troisième fer ont la mê m e
chose, cela veut dire que la batter ie se
charge normalement. Elle sera
entièrement chargée lorsq ue t outes les
barres de la batterie seron t fixes.
Chargement automatique :
L’aspirateur va rechercher la st at ion de recharge automatique en c as de batterie faible
pendant le nettoyage.
1. L’aspirateur peut ne pas trouver la station de rechar ge à cause des obstacles, de la
batterie qui s’est arrêté et de conditions diverses. La station de recharge doit donc être
placée dans un endroit ac cessible sans obstacles.
2. Lorsque l’aspirateur a finit de nettoyer, la température de la batterie est très élevée. Le
chargement risque de pre ndr e pl us de temps.
Attention !
Montage et Démontage et nettoyage du bac à déchets de l’aspirateur :
1. Enlever le bac déchets en appuyant sur
le bouton rouge en haut.
2. Appuyer sur le bouton orange du bac, le
ventilateur va alors surgir
automatiquement.
3.
3. Inverser le ventilateur, relâchez les 2
attaches et ouvrez la grille.
4. Ouvrez le support et le filtre se trouve
dedans.
5. Changez le filtre par un nouveau, pressez d’une
main le support en forme de de m i cercle pour que
les attaches du filtre se décollent, et enlever le pour
ensuite insérer le nouveau filtr e.
6. Inverser le bac à déchets, retirer la brosse, relâchez la barre arrière, puis débranchez
les attaches droite et gauche sur le fond de la poubelle. Toutes les pièces doivent être
assemblées de la même manièr e qu´ avant le démontage. Ne pas poser la brosse et la
barre arrière sur le sol ou sur n´i mpor te quelle partie.
Nettoyage du bac à déchets et du ventilateur :
1. D'abord vider la poussière, puis nettoyer avec la
petite brosse spéciale.
2. Pousser le ventilateur et nettoyer l´entrée/sortie
d´air avec la petite brosse .
3. Ne pas nettoyer le ventilateur dans l'eau ! Sortez
le ventilateur, retirez le filtre, puis nettoyer le bac a
déchets dans de l'eau.
4. Nettoyer le filtre au sèche-cheveux ou avec la
petite brosse.
5. Après le nettoyage, vous pouv ez assembler de
nouveau les pièces de la même man ière qu´avant
le démontage.
Montage, démontage et nettoyage de la brosse principale, Brosse de plancher,
brosse latérale:
Montage et démo nt age de la petite bross e de
nettoyage et de la brosse pour le sol
1. Forcer la barre de verrouillage vers l'avant et
soulever le couvercle par le pouce droit, et
puis soulevez la tige de la petite brosse de
nettoyage avec la main gauche.
2. Retirez la brosse principale et la bro sse pour le
sol.
3. Insérez la brosse principale et celle pour le sol
aux emplacements appropr iés avant la fermeture
du couvercle.
Montage & Démontage de brosse latérale:
1. Libérer la vis à l'arbre principal de la brosse
latérale avant de la changer .
2. Appuyez sur la brosse latérale contre l´arbre
principal, puis fixez-le. (Se référer à la figure)
Nettoyage de brosse princi pal e et l a brosse pour
le sol:
1. Nettoyer les cheveux ou les particules de
poussière de grands formats sur la brosse
latérale et celle pour le sol de manière
régulière pour améliorer la qualité du
nettoyage. Nettoyez la po us si èr e à
l'admission d'air. Nettoyer les vieux papiers
ou les petites particules de poussière à la
brosse directement. Tour nez la brosse
soigneusement et coupé aux ciseaux ou tirer
à la main les cheveux, les fils coincé s et
autres objets.
2. Le nettoyage de la brosse principale et de la brosse pour le sol peuvent être fa it avec
la référence de l´assembl age et du démontage.
Montage, démontage et nettoyage des roues gauche/droite et avant
Montage, démo nt age et nettoyage des roues droite / gauch e
1) Desserrer la vis de la gauche / droite roue par le tournevis.
2) Sortez la roue gauche / droite et nettoyez les avec la bros se. Ne
pas les laver à l'eau!
3) Placez la roue gauche / droite dans sa position initiale et ser r ez
bien la vis lors de l'assemblage.
Montage, démo nt age et nettoyage de la roue avant:
1. Tirez sur la roue avant avec votre doigt et les out ils , et le nettoyer.
2. Insérer et appuyez sur la roue avant dans la bonne posit ion lors de l'assemblage.
Nettoyage du capteur et de la fenêtre transparente infrarouge
1. Nettoyez le capteur infrarouge et la fenêtre transp arente avec un coton-tige ou un
chiffon doux.
2. Le capteur de détection de paroi se trouve en face de l'aspirateur, tandis que le
capteur de détection de te r r ain et la fenêtre transparente infrarouge se trouvent en bas
de l'aspirateur.
3. Il faut que la fenêtre infrarouge soit souvent nettoyée afin que le travail du robot soit
plus efficace.
Remplacement de la b at ter ie:
Le remplacement des pil es de l'aspirateur:
1. Desserrer la vis avec le tournevis, ouvrir son
couvercle et retirer la batterie.
2. Placez les électrodes positives et négatives
correctement pour ne pas endommager le
reste.
3. Mettez l´aspirateur en charge afin de garder
la batterie plus longtemps lor squ´il n´est pas
utilisé.
Le remplacement des piles et de
l'isolateur d´espace:
1. tourner le pivot pour que le couvercle
s'ouvre.
2. Placez les piles (non fournies) en respect ant
la polarité.
3. Placez les piles au bon endroit.
4. Retirez la batterie si elle ne va pas être
utilisée pour un moment.
Le remplacement des piles de la télécommande:
1. Ouvrez le couvercle de la batterie et remplacez la.
2. Placez les piles (non fournies) en respectant la polarité.
3. Retirez la batterie si elle ne va pas être utilisée pour un moment..
1. Ne pas oublier de retirer les piles avant de jeter l’aspirateur
2. Ne pas oublier d’éteindre l’appareil avant de retirer les piles de l’aspirateur et de
l’isolateur d’espace
3. Ne pas laisser les piles dans un environnement à une température élevée à plus de 45
degrés ou dans l’eau
4. Ne pas exercer de forces sur les piles comme par exemple les faire tomber
5. Les piles seront recyclées avec un dispositif spécial. Ne pas les jeter n’ importe où
dans le feu ce qui peut créer une explosion.
Contrôle à distance
Panneau de configuration:
Vue d’ensemble Description des boutons
Méthodes d’utilisation et l'état fonctionnel de la télécommande :
Les instructions suivantes sont très importantes, autrem ent le système de contrôle peut ne
pas fonctionner.
1. Vérifier le code de la télécommande ou de l´aspirateur.
2. Vérifier que la télécommande et l´aspirateur aient assez de batterie, éteignez le et
appuyez sur OK sur la télécommande pendant plus de 4 s econdes. Allumez ensuite
l´aspirateur sans relâcher le bouton OK.
Après que l´aspirateur ait sifflé deux fois, relâchez le bouton OK, l'ensemble de
vérification de code est a l or s t er m iné.
3. Si vous ne parvenez pas à entendre le bruit lors de la vérification de code, il suffit de
répéter le processus ci-dessus.
Bouton de nettoyage automatique / Jeudi
Bouton de nettoyage/ Vendred i
Bouton de temps de marche / Mardi
Bouton temps / Lundi
Bouton de la lampe UV / Mercredi
Bouton de la charge automatique / Dimanche
Bouton de vitesse rapide / Samedi
Eteindre / Annuler
Continuera de fonctionner une fois la batterie
déchargée
Bouton de confirmation
Bouton d´avance
Bouton de retour
Bouton gauche
Bouton droit
Guide des fonctions
Informations fonctions
Auto-nettoyage
Appuyez sur le bouton, l´aspirateur sera en mode nettoyage
automatique; appuyez de nouveau sur la touche et il s'arrêtera.
Nettoyage
Appuyez sur le bouton, l´aspirateur sera en mode nettoyage, appuyez
de nouveau sur la touche et il s'arrêtera.
Fonction affichage de
et de la semaine
1. Allumez l´aspirateur.
2. Appuyez sur la télécommande, l'icône sur l'écran LCD
de l´aspirateur se met à clignoter.
3. Appuyez sur le bouton de la semaine sur la télécommande et
s´affichera comme suit : l'icône
signifie Dimanche, 2 Lundi..
Jusqu´au 7
désignant le Samedi.
4. Après avoir réglé la semaine correctement, vous pouvez régler
l'heure.
5. Appuyez sur
►dans le réglage du temps, l'icône sur l'écran
LCD de l´aspirateur se met à clignoter.
6. Appuyez
▲ou▼ pour régler l'heure correctement.
7. Appuyez de nouveau
► et va se mettre à clignoter.
8. Appuyez pour régler les minutes correctement.
9. Après avoir terminé le réglage de la semaine et de l'heure, appuyez
sur "OK" pour sauvegarder.
Affichage du temps de
nettoyage
1. Allumez l´aspirateur.
2. Appuyez sur le bouton du nettoyage automatique, l'icône
de l'écran LCD de l'aspirateur se met à clignoter.
3. Appuyez sur n'importe quel bouton semaine / ou sur tous les
boutons de la semaine que vous souhaitez définir comme jour de
nettoyage, puis sélectionnez la ou les dates et l´écran se mettra à
clignoter. L'icône
signifie Dimanche, 2 Lundi…Jusqu´au 7
désignant le Samedi.
4. Si vous voulez annuler tous les jours ou le jour de réglage
enregistré, appuyez simplement sur la le bouton de la semaine.
5. Après avoir programm é le jour fixé de chaque semaine, il est
possible de régler l´heure de nettoyage.
Nettoyage de réglage Semaine:
1. Appuyez
► pour entrer sur le réglage de l'heure, l'icône sur
l'écran LCD de l'aspirateur se met à clignoter.
2. Appuyez
▲ ou ▼ pour sélectionner l´heure de nettoyage.
3. Appuyez à nouveau
►, se met à clignoter.
4. Après avoir finit le réglage de la semaine et de l´heure, appuyez sur
"OK" pour sauvegarder.
Lorsque l'appareil est connecté à la station d'accueil, il va commencer
le nettoyage automatiquement à l´heure et au jour enregistré (lorsque
la batterie est complètement chargée), lorsque le nettoyage est terminé
ou que la batterie est faible, l´aspirateur va r ev enir à la station d'accueil
automatiquement.
Appuyez sur FULL GO, « D » sur l´îcone il se met à clignoter.
Affichage de la
fonction « Full Go »
L´aspirateur commence alors à netto yer automatiquement lorsque la
batterie est entièrement chargée (5 / 6 heures de charge) ; cette
fonction permet de nettoyer une grande maison mais une fois chargé
entièrement il ne peut pas nettoyer toutes les pièces de la maison.
Remarque : Vous ne pouvez pas mettre les fonctions du programme de
l´heure de nettoyage et Full Go en même temps!
Sélection rapide
Appuyez sur le bouton «SAT / V" de façon répétée, vous pouvez
choisir la vitesse rapide ou lente.
La mémoire se souviendra automatiquement après la sélection de la
vitesse (rapide 1, lent 2)
Guide des fonctions
Informations fonctions
Eteindre / Annuler / Stop
1.
Branchez l´aspirateur et allumez le.
2. Vous pouvez arrêter le mode de
fonctionnement en appuyant sur le
bouton.
3. Vous pouvez supprimer et revenir à
la configuration d'origine si vous
vous trompez ou voulez arrêter
l´affichage.
4. Appuyez sur la touche pendant pl us
de 5 secondes, vous pouvez
supprimer tous les programmes
enregistrés et de la mémoire et
revenir à l'état ini t ia l.
OK
Vous pouvez appuyer sur « OK » pour
chaque programme que vous enregistré.
Bouton Lampe UV
Vous pouvez activer / désactiver la lampe
UV en appuyant sur le bouton “UV" pendant
que l'aspirateur est en mode veille ou en
marche. La fonction marche / arrêt sera
automatiquement mémorisé
.
Bouton charge automatique
Alors que l´aspirateur est en mode de veille
ou en marche, il recherchera la station
d'accueil pour se charger lorsque vous
aurez appuyé sur le bouton “SUN / DOCK»
.
▲
Bouton Avant
Appuyez sur le bouton « FORWARD » et
l´aspirateur continueras de nettoyer. Il
s´arrêtera automatiquement s´il croise un
obstacle
.
▼
Bouton Arrière
Appuyer sur ▼ longtemps. Le robot
reviendra nettoyer à l´endroit ou il était et
s´arrêtera lorsque vous relâcherez le
bouton
.
◄
Bouton Gauche
Appuyez sur ◄ et relâchez jusqu´à ce que
le robot tourne à gauche dans la direction
que vous souhaitez. Il s´arrêtera
automatiquement s´il croise un obstacle
.
►
Bouton Droit
Appuyez sur ►et relâchez jusqu´à ce que le
robot tourne à droite dans la direction que
vous souhaitez. Il s´arrêtera
automatiquement s´il croise un obstacle
.
1. Vous pouvez utiliser la téléco m ma nde à 10m (portée du signal radio), ou vous
risquer de perdre le contrôle avec le corps principal.
2. L´aspirateur peut ne pas réussir à t r ouver la station d'accueil en raison d´obstacles, de
conditions difficiles ou parce que la batterie est déchargée.
Station d´accueil pour le chargement automatique
Affichage et panneau de configuration de l a station d'accueil
Vue d´ensemble Introductions aux fonctions
1. Lumière LED décorative (un peu d´arôme peut être placé
au-dessus)
2. Lumière de décoration
3.Signal LED
4.Indicateur de chargement
5.Transmission de signal
6. Electrode positive de char gement
7.Electrode négative de chargement
8.Prise de chargement
Méthodes d’utilisation et de l’état fonctionnel de la station d'accueil
N°
Guide de fonction
Informations fonctions
1
Lumière LED
décorative
Allumez la lumière décorative pour rendre meilleur
l'atmosphère, et le placer dans le centre lumineux de la lumière
avec un peu d´essence dessus, qui dégagera une senteur
après utilisation
.
2
ON/OFF
Lumière de décoration
Allumez avec le bouton on /off pendant que la lumière
décorative est sur on.
3
Signal LED
Le signal LED s´allumera lorsque la station d´accueil sera
allumé ou éteignez-le s´il n´est pas branché.
4
Indicateur de
chargement
L´indicateur va clignoter pendant que le chargeur est connecté
avec l´aspirateur.
5
Transmission de
signal
La transmission du signal est la seule façon de faire venir
l´aspirateur sur la station d'accueil pour charger, donc le signal
de transmission doit être propre et aucun obstacle ne doit se
trouver sur son chemin
.
6-7
Recharge des
électrodes positives et
négatives
L'électrode et celle de l´aspirateur sont connectés à
la charge donc aucun obstacle ne doit se trouver sur son
chemin, sinon il risque de se cogner dessus
.
8
Prise de chargement
La puissance de la prise est utilisée pour connecter la borne
de sortie de l’adaptateur DCDC24V, c´est le transit entre
l´aspirateur et l´adaptateur,
donc le chargeur doit être p lac é fermement contre le mur
et le câble de l'adaptateur doit être loin du chargeur,
ou le robot peut se cogner durant le nettoyage
.
 Loading...