

Page 1

Instructions manual
Manuel d'utilisation
Bedienungsanleitung
Handboek
Manual de Utilización
Manuale d’uso
STC90
Vacuum Cleaner
Aspirateur
Staubsauger
Stofzuiger
Aspiradora
Aspiratore
Page 2

ENGLISH
Please keep the User Manual in good custody for reference.
Please read the User Manual carefully before using the product.
CAUTION
1. This device is not intended for use by persons with reduced capacity on the physical, mental or sensory
or lack of experience and knowledge (including children), unless he has them was asked to monitor or if
they have had instructions on the use of the appliance by a person responsible for their safety. Children
should be supervised to ensure they do not play with the device.
2. If the power cord is damaged, it must be replaced with an after-sales service to avoid any danger.
___________________________________________________________________________________
Safety Precautions
This is an electric appliance. It shall be used under normal operating conditions. Never leave it
running without human attendance.
Do not use the vacuum cleaner to pick up the following objects, otherwise it may damage the vacuum
cleaner or cause a fire and bodily injuries, etc.
A. Hot objects, e.g., charcoal fire, cigarette butt.
B. Large sharp debris, e.g., glass.
C. Hazardous objects (solvents, corrosives), aggressive agents (acids, detergents) and liquids such
as water.
D. Explosives and flammables such as gasoline or alcoholic products.
To clean or repair the vacuum cleaner or put it idle, disconnect it from the power supply. When
disconnecting, never pull the cord but hold the plastic part of the plug and take it out with care.
Do not pull or fold the hose forcibly to prevent deformation or damage.
Check and make sure that the rated voltage of the vacuum cleaner is consistent with the supply
voltage.
Do not insert the power cord of the vacuum cleaner through any sharp objects to avoid damages.
Do not immerse the machine into water, approach it to heaters or expose it to sunshine,
otherwise it may catch a fire.
Do not attempt to move the machine by dragging the power cord.
Do not allow children to tamper with or operate the machine, otherwise it may cause an accident.
Do not press the dust bag release button when moving the machine; otherwise, it may detach
from the machine and cause damage.
It is not recommended to use this machine to pick up lime, ash concrete or any other construction
waste because it may damage the motor or the machine.
Do not operate the machine in any of the following cases:
A. The machine is apparently damaged or doesn’t work properly after falling off.
B. The power cord is damaged.
In case of the above situations, do not turn on the machine. Send it to the designated service
facility for repair immediately.
Do not have the machine operate for prolonged period of time when the inlet is clogged,
otherwise it may cause damage to the motor or deformation of the machine due to
overheating.
The machine uses Y connection, therefore, in case the power cord is damaged, for safety,
please ask a specialist from the manufacturer, its service department or other similar
functions for replacement.
Page 3
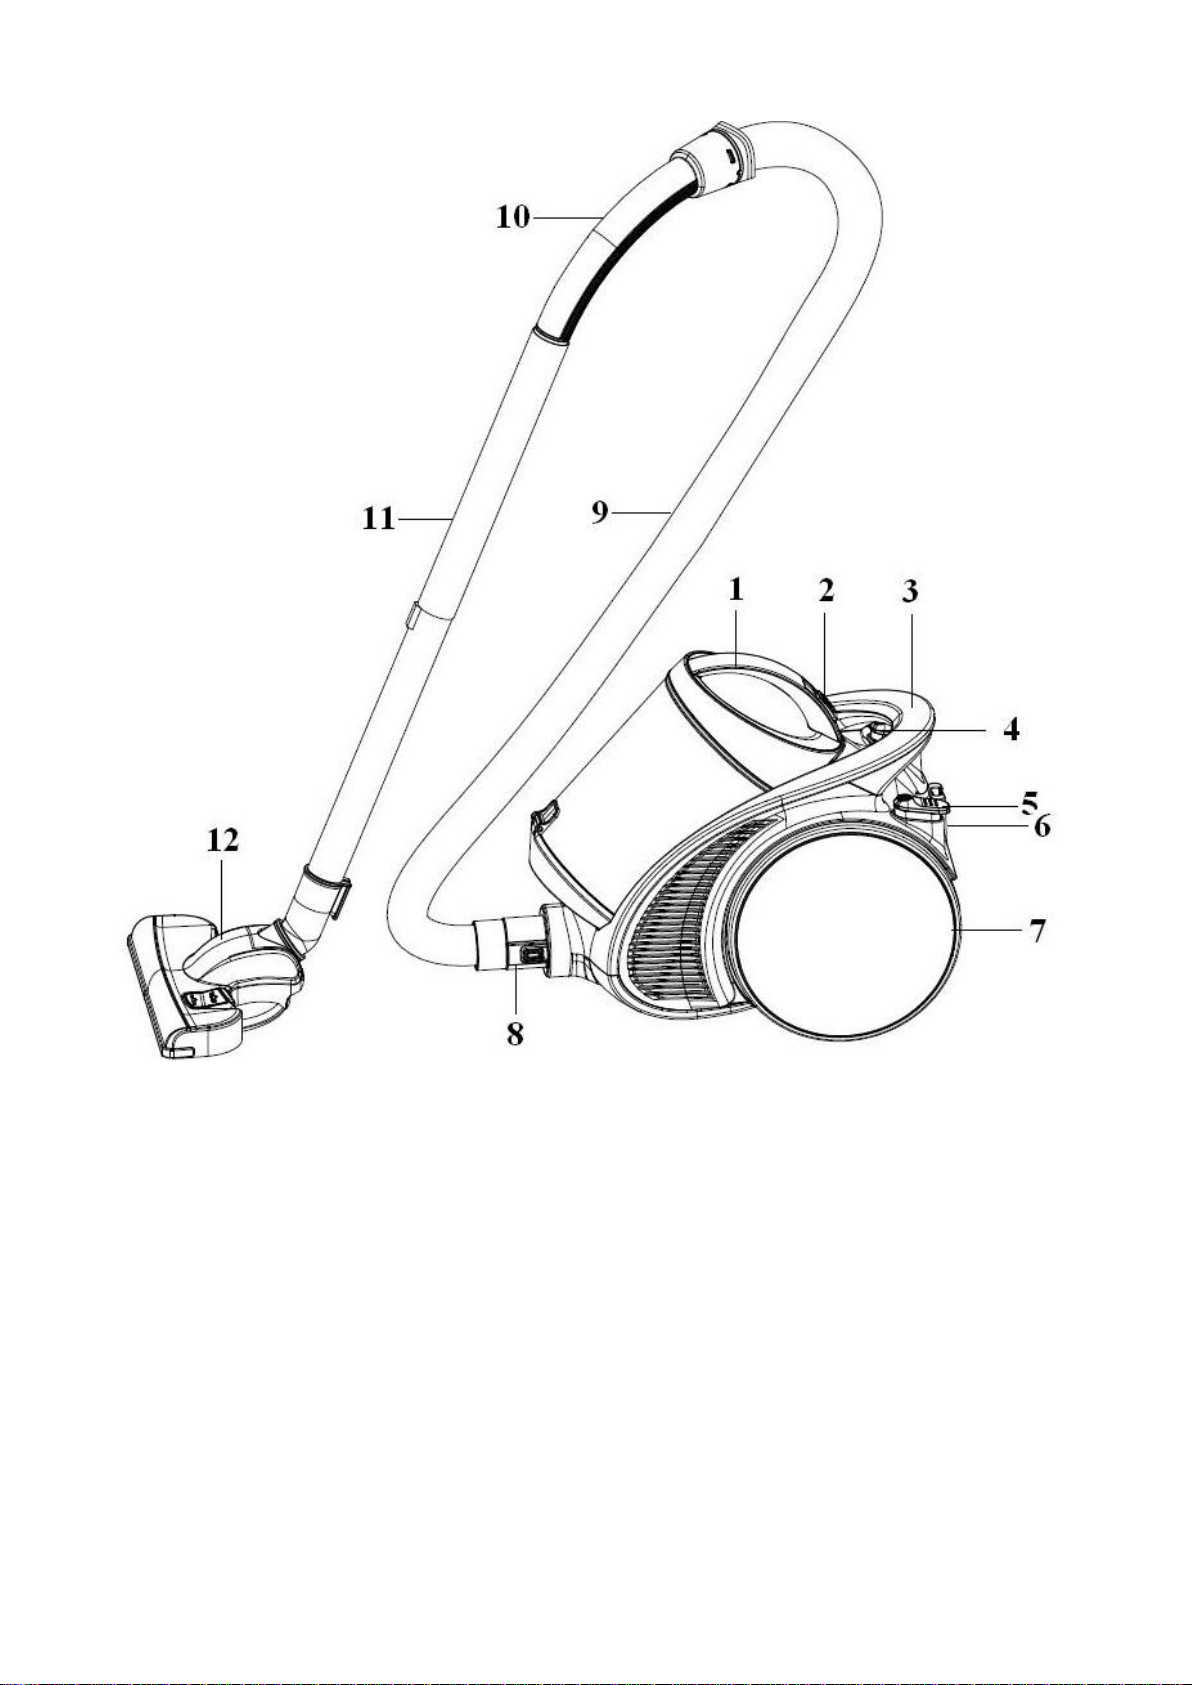
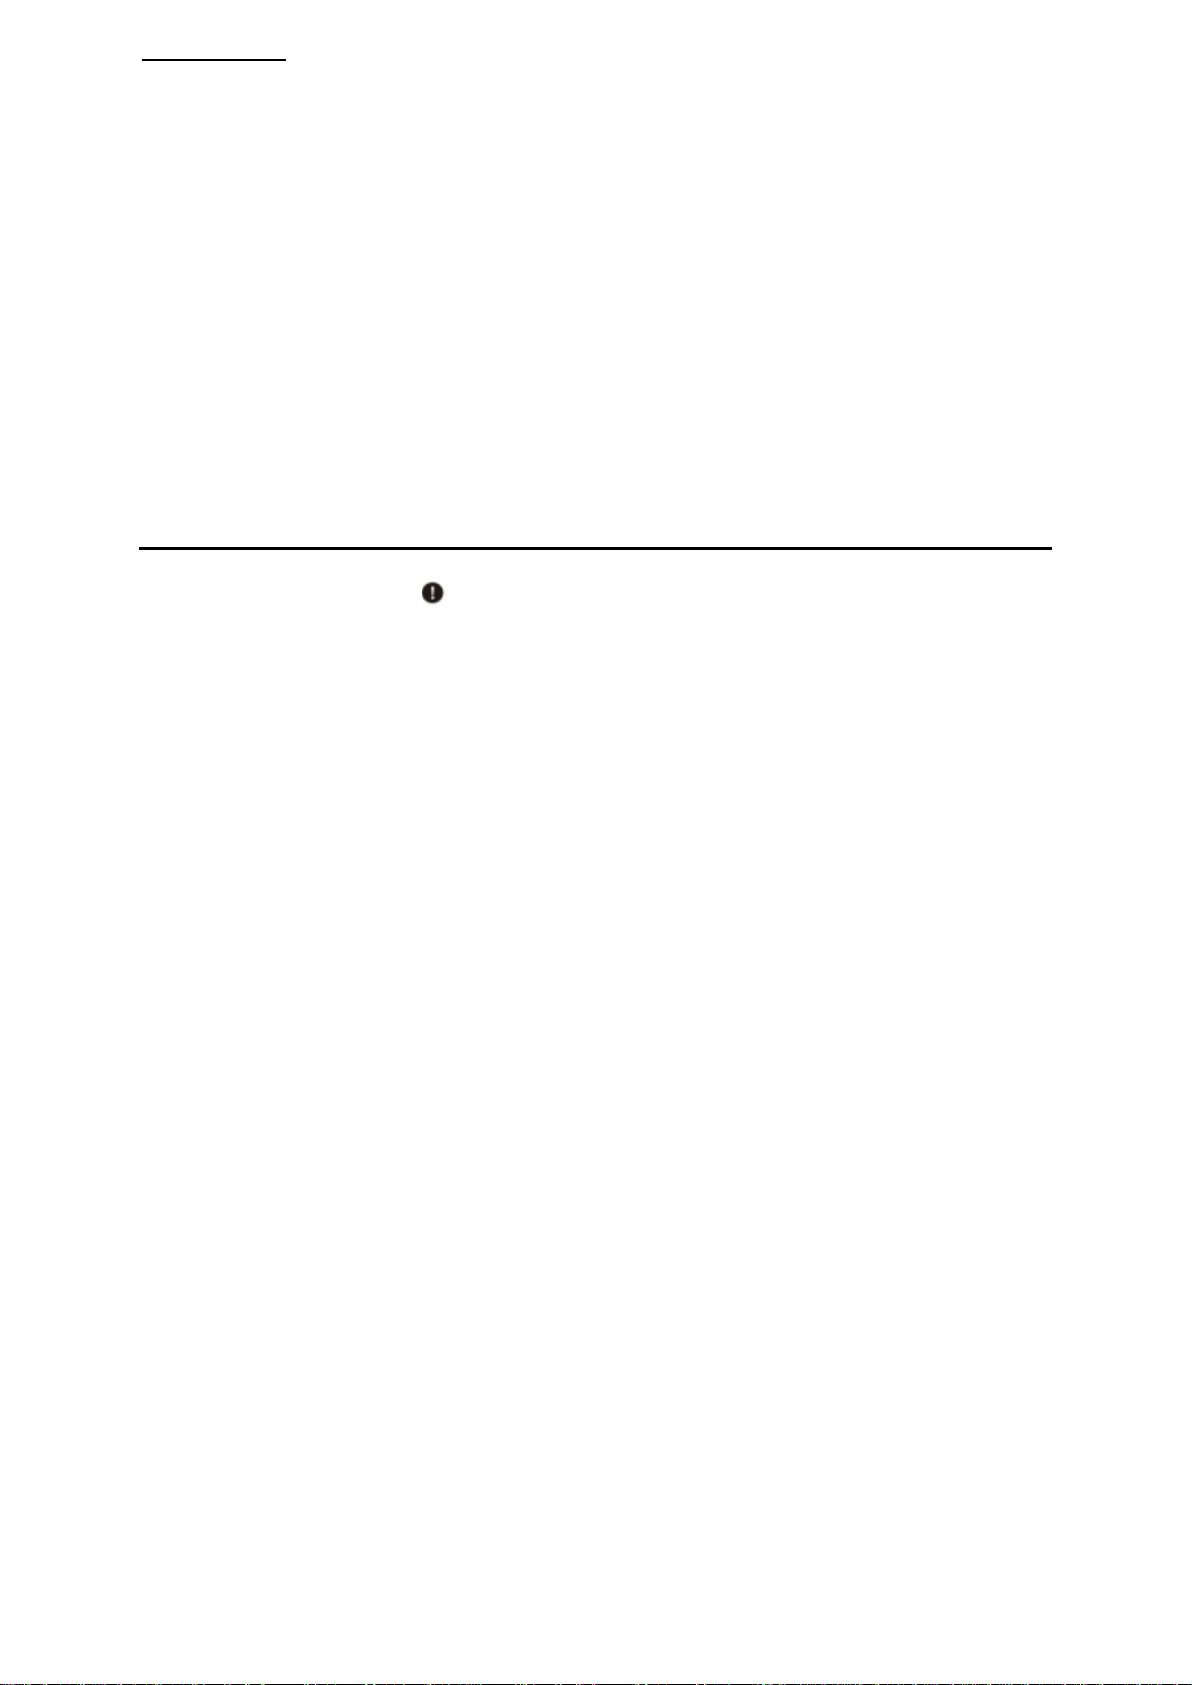
Main Body
1 Dust cup
2 Dust cup buckle
3 Machine lifting handle
4 Cord rewind button
5 Switch button
6 Air-out panel
7 Big roller
8 Main suction tube
9 Hose
10 Flexible hose handle
11 Metal extension tube
12 Floor brush
Page 4
How to Use
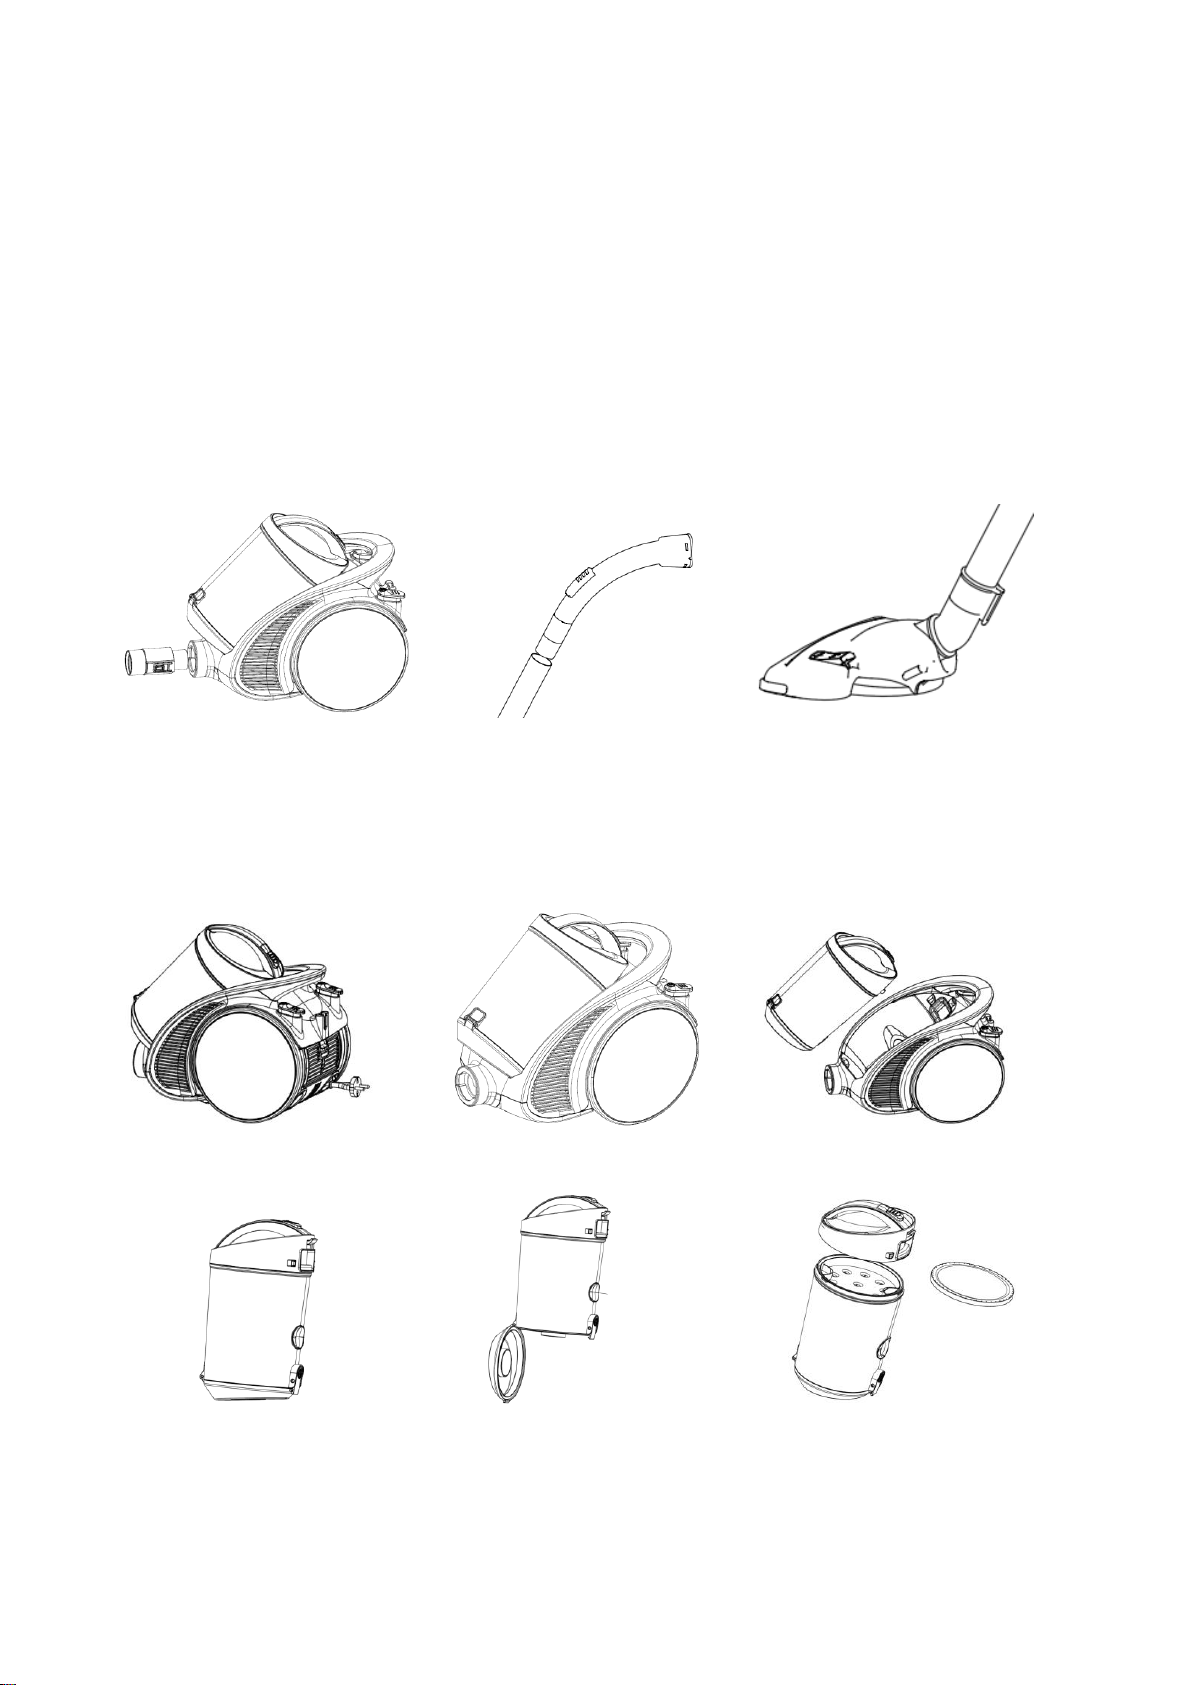
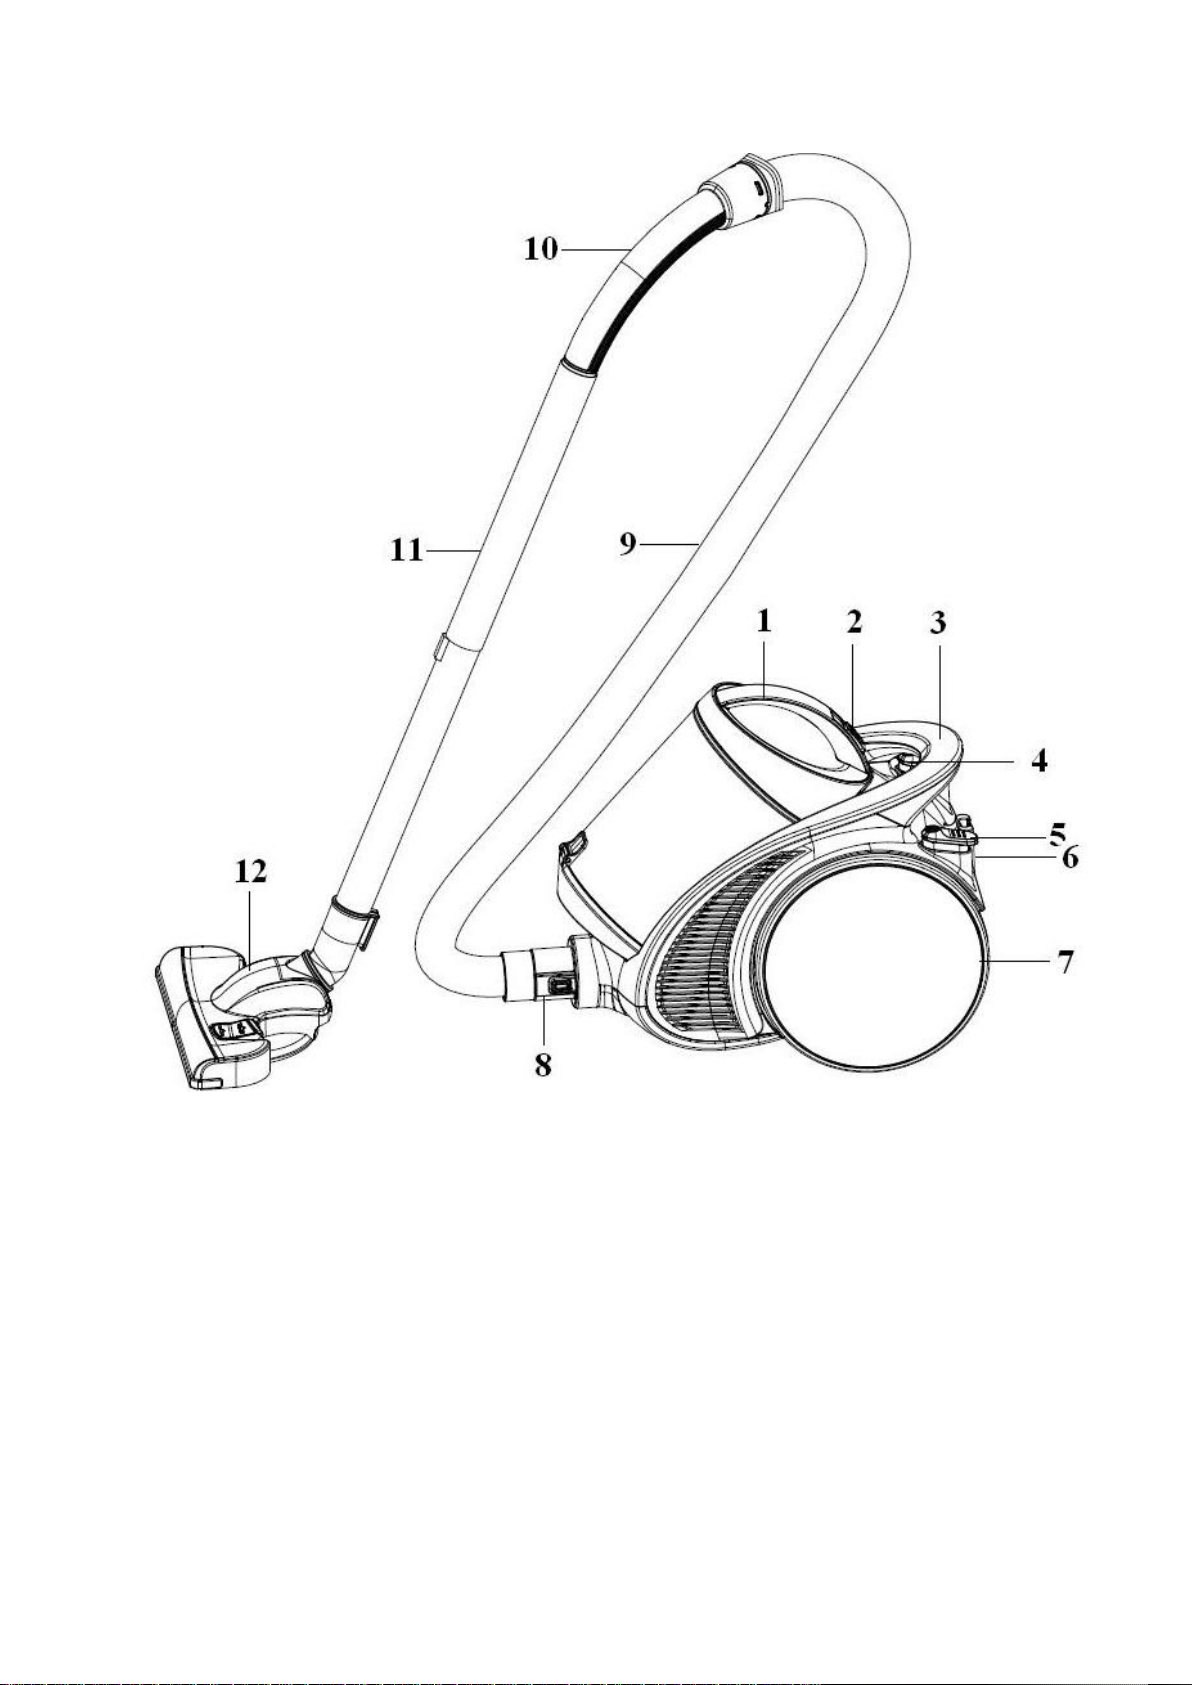
How to assemble before use?
1. (Fig. 1) Attach hose to cleaner
Align the hose joint with the inlet of cleaner and insert it as shown.
To detach the hose, press the buckles of the joint and pull the hose out.
2. (Fig. 2) Attach elbow to metal extension tube
When connecting them, align and insert as shown.
3. (Fig. 3) Attach metal extension tube to floor brush
When connecting them, rotate the parts in opposite directions until secure.
4. (Fig. 4) Pull out power cord
The power cord can be pulled out to the red marking, but can never be pulled beyond it.
5. After use, unplug the machine first, and then press the rewind button for power cord behind the cleaner.
6. (Fig. 5) Switch button
Plug the machine to power supply and push the switch button to control the start and stop of the
machine.
Fig 1 Fig 2 Fig 3
Fig 4 Fig 5 Fig 6
Fig 7 Fig 8 Fig9
Page 5
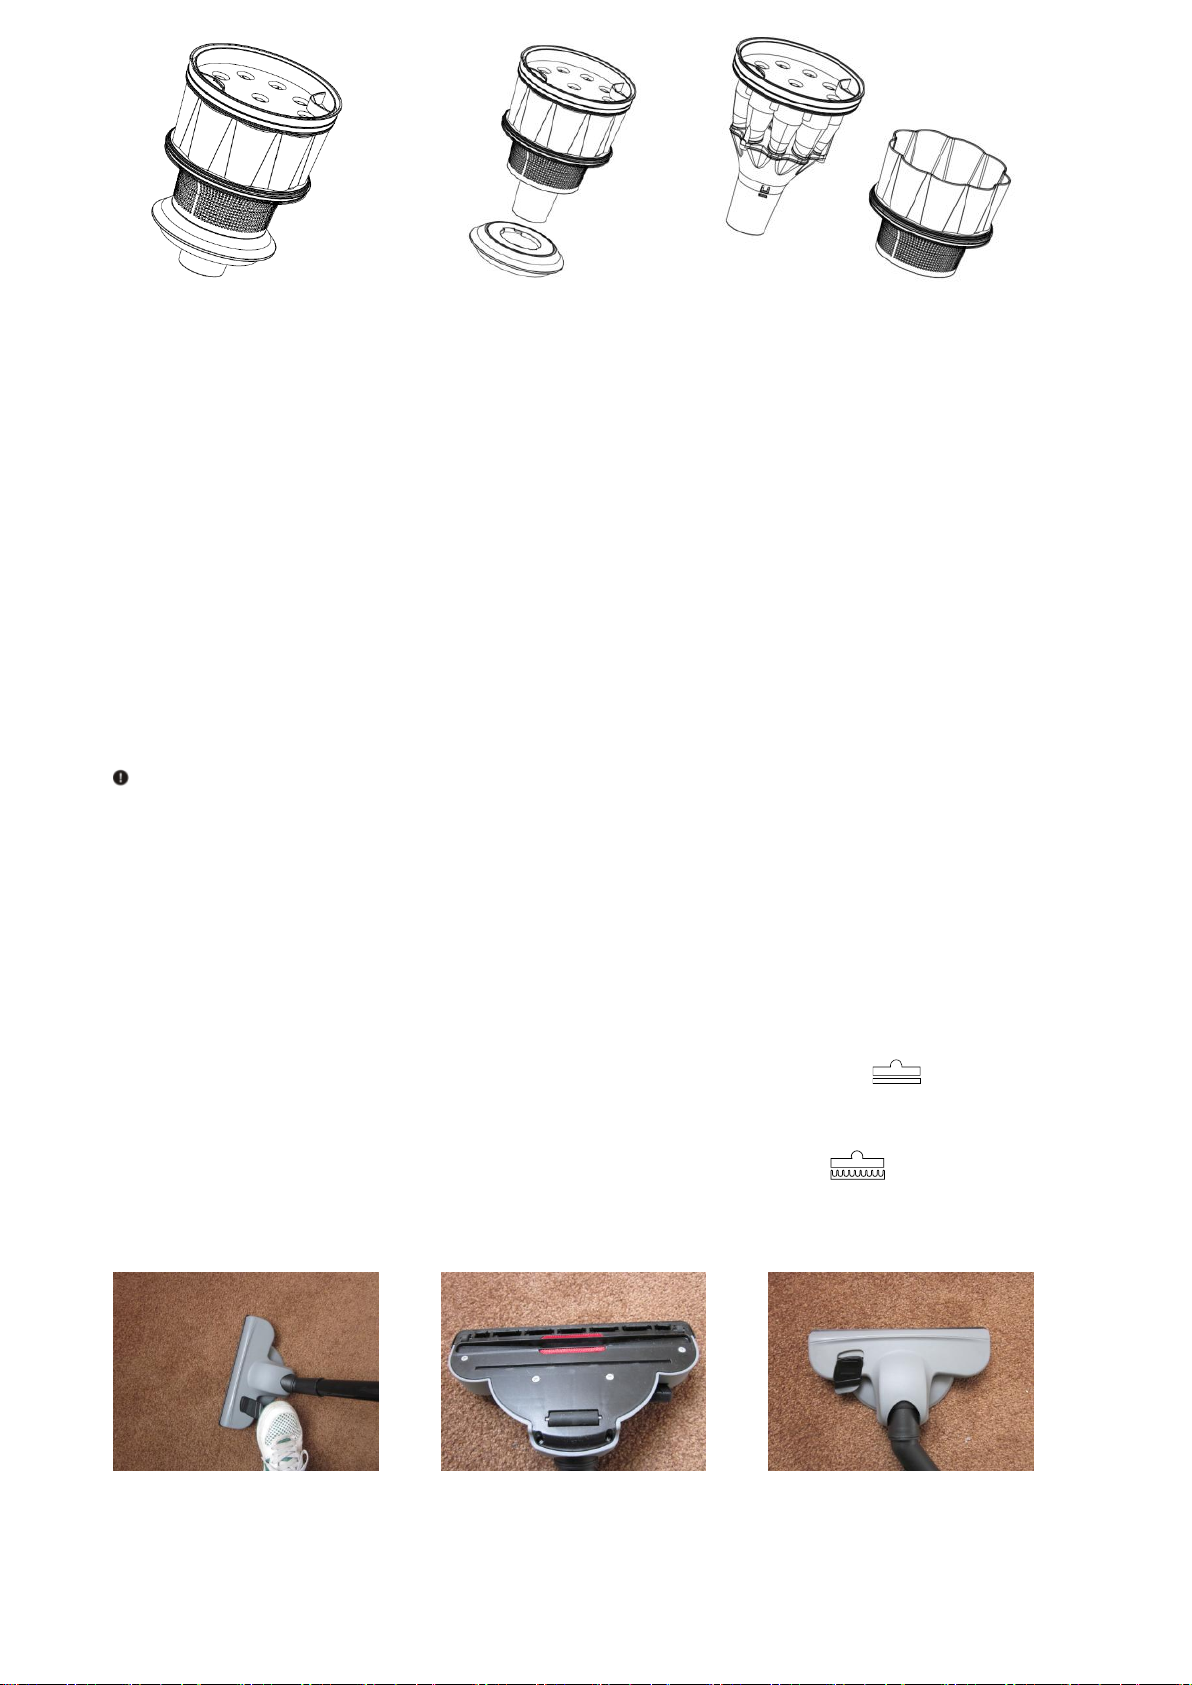
Fig 10 Fig 11 Fig12
How to clean dust cup
Steps to clean dust cup
1. Take out the dust cup as shown in Fig. 6.
2. Gently push the dust dump button to dump dust as shown in Fig. 7, 8.
3. In case the suction power is insufficient when the waste has not reached MAX, turn off the machine,
repeat the above steps 1-2, detach dust cup cover and take out the filter sponge for cleaning as shown in
Fig. 8, 9.
4. In case of cleaning the inside of the dust cup, please operate according to the following steps:
1) Rotate the dust cup cover to detach it and take out the filter sponge (Fig. 9);
2) Take out secondary filter system (Fig. 10);
3) Remove dust press panel and filter net (Fig. 11);
4) Wash the separator under water tap and then dry it out;
5) Reassemble the dust cup and install it.
Note: After cleaning the filter components, dry them first before putting back into the machine for use.
It is suggested to expose to sunshine for 24 hours until they are completely dry. Make sure each
component is back in place otherwise it may cause malfunction; do not allow water to get into the
electrical components otherwise it may cause malfunction.
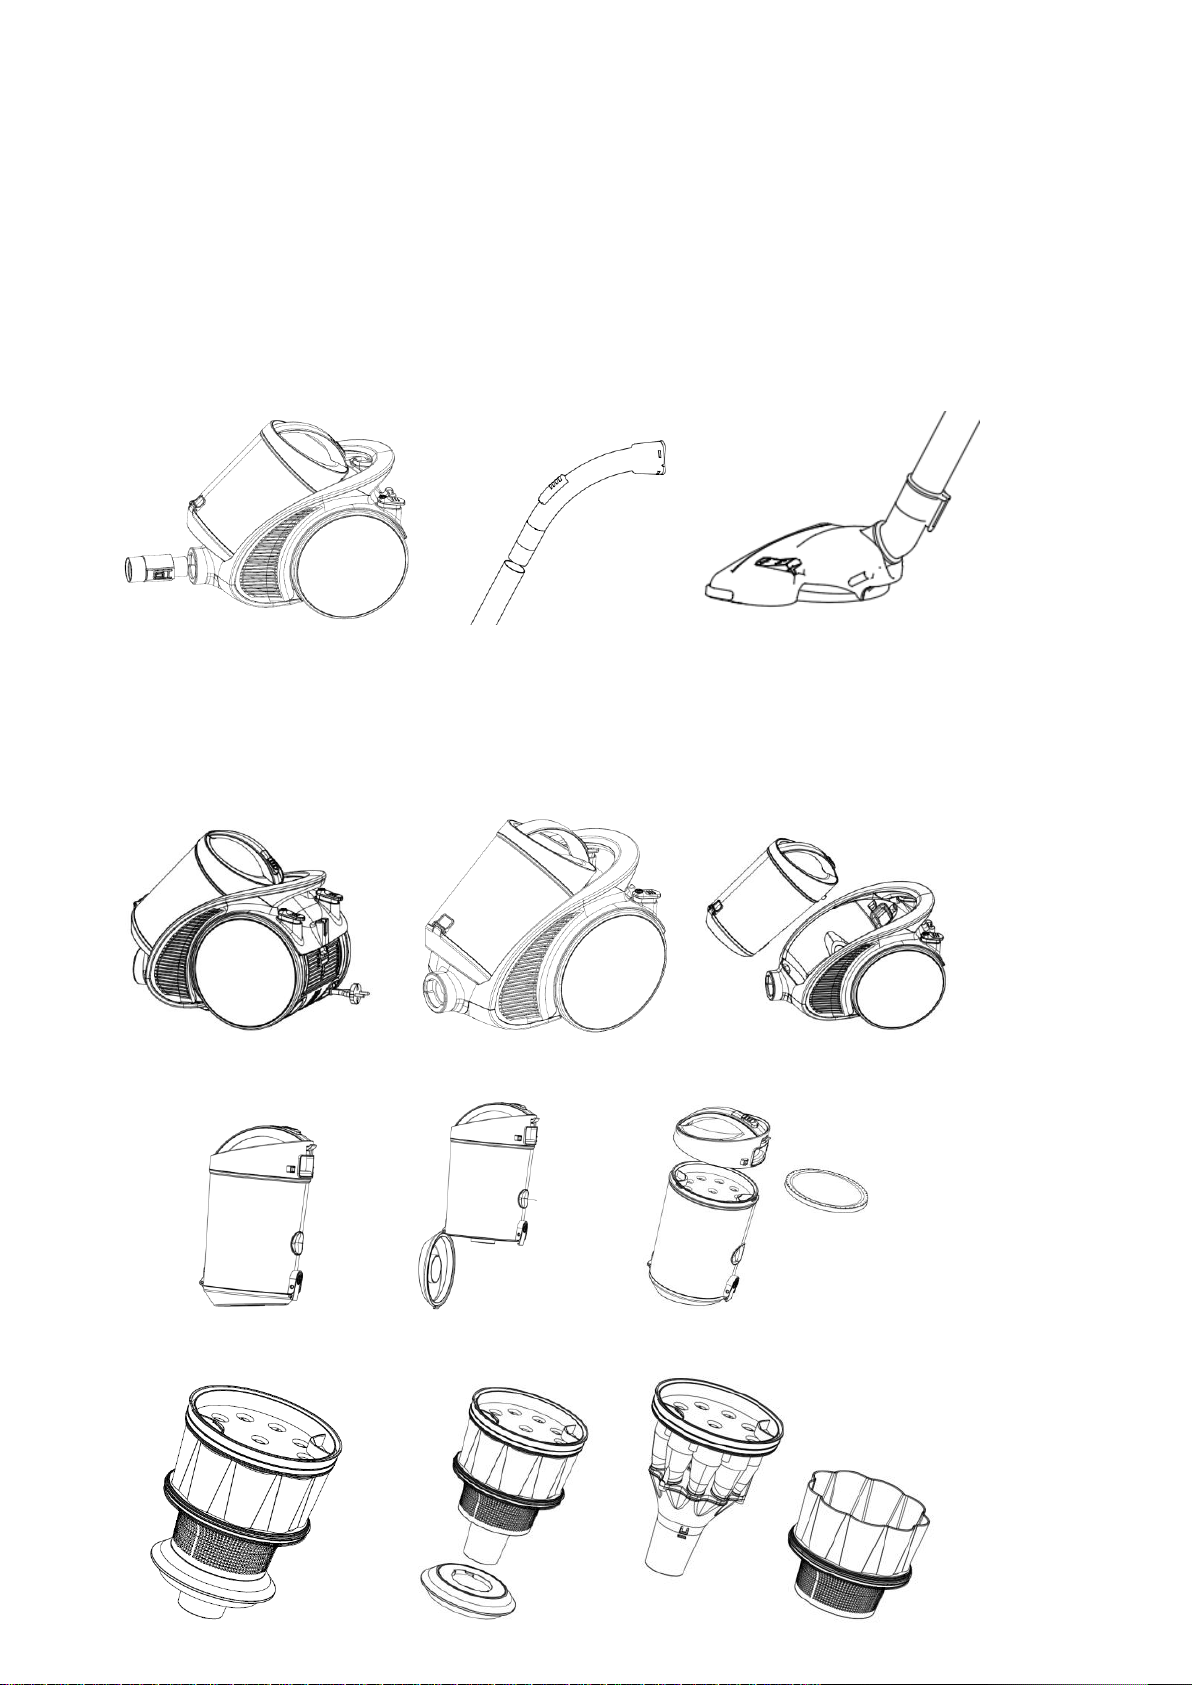
How to use the accessories
1. Combined brush is suitable for picking up dust in small seams in window, furniture, corners, and dust
on short hair fabric furniture and inaccessible places. You may rotate the brush head as necessary.
2. Use the dusting brush to clean curtains draperies cushions and fabrics.
3. To vacuum carpets and rugs, push the brush switch to the carpet position .This will pull the
brushes up into the floor nozzle(Fig. 13)
4. to vacuum bare floors, push the brush switch to the bare floor position . This will extend the
brushes down from the floor nozzle(Fig. 14,15)
Fig.13 Fig.14 Fig.15
Page 6
Troubleshooting
Problem
description
Possible cause
Solution
The machine
does not work
completely
1. The machine is not plugged well
to the socket.
2. The socket has no power.
3. The switch of the machine is not
turned on.
4. Thermal protector of motor is in
operation.
1. Re-plug the plug.
2.Check the circuit breaker.
3. Press the switch button to turn
on the machine.
4. Pull the plug, and wait until
thermal protector recovers.
The suction
power is weak
1. The main floor brush or auxiliary
nozzle is clogged.
2. The dust bag is full.
3. The filter sponge is heavily
contaminated by dust.
1. Remove the clogging.
2. Empty the dust bag timely.
3. Clean the filter sponge.
Refer to the following table first in case of any abnormities during use.
ENVIRONMENT
CAUTION :
Do not dispose of this product as it has with other household products. There is a separation of this
waste product into communities, you will need to inform your local authorities about the places where
you can return this product. In fact, electrical and electronic products contain hazardous substances
that have harmful effects on the environment or human health and should be recycled. The symbol
here indicates that electrical and electronic equipment should be chosen carefully, a wheeled waste
container is marked with a cross.
Manufactured and imported : Adeva SAS 8 rue Marc Seguin 77290 Mitry-Mory FRANCE
www.hkoenig.com - contact@hkoenig.com - Tel 01 64 67 00 01
Page 7
FRANCAIS
Veuillez conserver de manuel pour toute future référence.
Lisez ce manuel attentivement avant d´utiliser l´appareil.
ATTENTION
1. Cet appareil n'est pas destiné à être utilisé par des personnes présentant des
capacités réduites sur le plan physique, mental ou sensoriel ou bien manquant
d'expérience ou de connaissance, (y compris les enfants), sauf s'il leur a été
demandé de surveiller ou si elles ont eu des instructions concernant l'utilisation de
l'appareil par une personne responsable de leur sécurité. Les enfants doivent être
surveillés pour s'assurer qu'ils ne jouent pas avec l'appareil.
2. Si le cordon d'alimentation est endommagé, il doit être remplacé auprès d'un Service
après-vente afin d'éviter tout danger.
Précautions de sécurité
Ceci est un appareil électrique qui doit être utilisé attention. Ne pas laisser l´appareil allumé
sans surveillance.
Ne pas aspirer les objets suivants car cela pourrait détériorer l´appareil ou bien être la cause
de blessures, incendies, etc.
A. Objets chauds comme le charbon, les cigarettes, etc.
B. Morceaux de matériaux coupants, tels que le verre.
C. Substances dangereuses (solvants, corrosifs), agents actifs (acides, détergents) et
liquides tels que l´eau.
D. Matériaux explosifs et inflammables comme l´essence et l´alcool.
Toujours débrancher l´appareil, en tirant sur la prise et pas sur le câble, avant de le
nettoyer ou le réparer.
Ne pas plier le tuyau pour éviter de le détériorer.
Vérifiez que l´appareil est compatible avec votre installation électrique.
Ne pas mettre le câble d´alimentation en contact avec des objets rigides pour éviter de le
détériorer.
Ne pas plonger l´appareil dans l´eau, ne pas le laisser près d´une source de chaleur ou
au soleil.
Ne pas trainer l´appareil par son câble.
Ne pas laisser les enfants jouer ou utiliser l´appareil.
Ne pas presser le bouton d´ouverture du réservoir avec l´appareil en marche, celui-ci
peut se détacher de l´appareil et se briser.
Il n´est pas conseiller d´aspirer de la suie du béton ou tout autre résidu industriel avec
l´appareil car ceci pourrait l´endommager.
Ne pas brancher l´appareil sous les circonstances suivantes:
A. L´appareil apparente des dommages ou ne fonctionne pas correctement après une
chute.
B. Le câble d´alimentation est endommagé.
Dans les situations ci-dessus, ne branchez pas l´appareil et portez le à être révisé par
un professionnel.
Ne pas utiliser l´appareil de façon prolongée lorsque le tube est bouché car ceci peut
surchauffer et abîmer le moteur.
L´appareil est équipé de câble triphasé et doit être réparé par un professionnel.
Page 8
Composants
1 Réservoir
2 Bouton d´ouverture du réservoir
3 Poignée de déplacement
4 Bouton rembobineur
5 Bouton on/off
6 Grille d´évacuation d´air
7 Roues
8 Connecteur
9 Tuyau flexible
10 Poignée du tuyau flexible
11 Extension en métal
12 Brosse
Page 9
Instructions d´utilisation
Comment assembler avant l´utilisation?
1. (Fig. 1) Connectez le tuyau flexible à l´appareil
Aligner le tuyau avec la connexion comme sur le dessin.
Pour détacher le tuyau, pressez le bouton pour le débloquer.
2. (Fig. 2) Fixez le coude en métal au tube.
3. (Fig. 3) Fixez le tube en métal sur la brosse tournez les deux partiez à contre sens pour les sécuriser.
4. (Fig. 4) Sortez le câble
Ne pas tirer sur le câble une fois la marque visible.
5. Après l´utilisation, débranchez l´appareil, rembobinez le câble et rangez.
6. (Fig. 5) Bouton on/off
Branchez l´appareil avant d´appuyer sur le bouton on/off
Image 1 Image 2 Image 3
Image 4 Image 5 Image 6
Image 7 Image 8 Image 9
Image 10 Image 11 Image 12
Page 10
Comment nettoyer le réservoir
Pour nettoyer le réservoir
1. Démontez le réservoir comme sur l´ Image 6.
2. Pressez le bouton comme indiqué sur les images 7 et 8.
3. Si la succion est insuffisante lorsque le réservoir n´est pas plein, débranchez l´appareil et répétez les
opérations 1 et 2 avant de sortir le filtre éponge comme sur les images 8 et 9.
4. Pour nettoyer l´intérieur de l’appareil, suivez les instructions suivantes :
1) Dévissez le couvercle du réservoir pour le sortir et récupérer le filtre éponge (Image 9);
2) Sortez le système de filtrage secondaire (Image 10);
3) Démontez le couvercle du filtre (Image 11);
4) Nettoyez le séparateur sous le robinet et laissez sécher ;
5) Réassemblez le filtre et replacez le.
Note: Après avoir nettoyé le filtre, séchez le bien avant d´utiliser l´appareil. Il est conseillé de le
laisser sécher à l´air libre pendant 24h. Assurez vous que tous les composants sont bien montés, pour
éviter tout disfonctionnement.
Comment utiliser les accessoires
1. Brosse combinée est idéale pour récupérer la poussière, saleté et poils courts sur les fenêtres, les
meubles, les coins etc. La brosse est rotative et vous permet de l´orienter facilement.
2. Utilisez la brosse anti poussière pour nettoyer les rideaux, coussins et tissus.
3. Pour aspirer la moquette, utilisez la brosse en position moquette. Ceci rétracte la brosse et
permet un meilleur contact avec la moquette.(Image 13)
4. Pour aspirer les sols durs, utilisez la brosse en position sols durs. Ceci sort les poils de la
brosse pour protéger les sols.(Images 14 et15)
Image.13 Image.14 Image.15
Page 11

Détection de pannes
Description du
problème
Origine possible
Solution
L´appareil ne
fonctionne pas
correctement
1. L´appareil n´est pas branché
correctement.
2. La prise n´a pas de courant.
3. Le bouton on/off n´est pas sur
on.
4. La protection anti surchauffe est
activé.
1. Débranchez et rebranchez.
2. Vérifiez le disjoncteur.
3. Pressez le bouton on/off
4. Débranchez la prise et
attendez que l´appareil
refroidisse.
Faible puissance
de succion
1. La brosse ou le tuyau sont
bouchés.
2. Le réservoir est plein.
3. Le filtre éponge a besoin d´être
nettoyé.
1. Débouchez-le(s).
2. Videz le réservoir.
3. Nettoyez le filtre éponge.
En cas de panne référez vous au tableau ci-dessous
ENVIRONNEMENT
ATTENTION :
Vous ne devez pas vous débarrasser de cet appareil avec vos déchets ménagers. Un système de
collecte sélective pour ce type de produit est mis en place par les communes, vous devez vous
renseigner auprès de votre mairie afin d'en connaître les emplacements. En effet, les produits
électriques et électroniques peuvent contenir des substances dangereuses qui ont des effets
néfastes sur l'environnement ou la santé humaine et doivent être recyclés. Le symbole ci-contre
indique que les équipements électriques et électroniques font l'objet d'une collecte sélective, il
représente une poubelle sur roues barrée d'une croix.
Fabriqué pour et importé par : Adeva SAS 8 rue Marc Seguin 77290 Mitry-Mory FRANCE
www.hkoenig.com - contact@hkoenig.com - Tél. 01 64 67 00 01
Page 12

DEUTSCH
Bitte bewahren Sie die Bedienungsanleitung gut auf.
Bitte lesen Sie die Bedienungsanleitung sorgfältig durch, bevor Sie das Produkt verwenden.
VORSICHT
1. Dieses Gerät ist nicht für die Nutzung durch Personen mit eingeschränkter Kapazität auf der
körperlichen, geistigen oder sensorischen oder mangelnder Erfahrung und Wissen (einschließlich Kinder),
es sei denn, er hat sie wurde gebeten, zu überwachen oder, wenn sie Anweisungen auf dem Einsatz des
Gerätes durch eine für ihre Sicherheit zuständige Person hatte. Kinder sollten beaufsichtigt werden, um
sicherzustellen, dass sie nicht mit dem Gerät spielen.
2. Wenn das Netzkabel beschädigt ist, muss es mit einem Kundendienst ersetzt werden, um Gefahren zu
vermeiden.
______________________________________________________________
Sicherheitshinweise
Dies ist ein elektrisches Gerät. Es sollte unter normalen Betriebsbedingungen verwendet werden.
Lassen Sie es nie ohne menschliche Anwesenheit laufen.
Verwenden Sie den Staubsauger nicht um die folgenden Objekte auf zu heben, sonst kann es den
Staubsauger beschädigen oder zu einem Brand und Personenschäden usw. führen.
A. Heiße Gegenstände, beispielsweise heiße Holzkohle, Zigarettenstummel.
B. Große scharfe Teile, beispielsweise Glas.
C. Gefährliche Gegenstände (Lösungsmittel, Ätzmittel), aggressive Mittel (Säuren,
Reinigungsmittel) und Flüssigkeiten wie Wasser.
D. Sprengstoffe und brennbare Stoffe wie Benzin oder alkoholische Erzeugnisse.
Um das Gerät zu reinigen oder zu reparieren, oder ihn im Leerlauf laufen zu lassen, trennen Sie
ihn von der Stromversorgung. Beim Trennen, ziehen Sie niemals am Kabel, sondern halten Sie
den Kunststoffteil des Steckers und ziehen Sie es vorsichtig raus.
Ziehen oder falten Sie den Schlauch nicht, um Verformung oder Beschädigung zu verhindern.
Überprüfen und stellen Sie sicher, dass die Nennspannung des Staubsaugers gleich ist mit der
Versorgungsspannung.
Stecken Sie das Netzkabel des Staubsaugers nie durch scharfe Gegenständen, um
Beschädigungen zu vermeiden.
Die Maschine nicht in Wasser eintauchen, in die Nähe von Heizungen stellen und vermeiden Sie
Sonneneinstrahlung, sonst kann es Feuer fangen.
Versuchen Sie nicht, das Gerät durch Ziehen des Netzkabels zu bewegen.
Erlauben Sie Kindern nicht mit dem Gerät zu spielen oder es zu bedienen, da es sonst zu einem
Unfall kommen kann.
Drücken Sie nicht die Staubbeutel Freigabetaste beim Bewegen der Maschine; andernfalls kann
sie sich von der Maschine lösen und Schäden verursachen.
Es wird nicht empfohlen, das Gerät zu benutzen um Kalk, Asche Beton oder andere Bauabfälle
auf zu saugen, weil es den Motor oder die Maschine beschädigen kann.
Benutzen Sie das Gerät nicht in einem der folgenden Fälle:
A. Die Maschine ist offenbar beschädigt oder arbeitet nicht ordnungsgemäß nach einem
Herunterfallen.
B. Das Netzkabel ist beschädigt.
Im Fall der oben genannten Situationen nicht auf der Maschine drehen. Schicken Sie es
sofort an die angegebene Service-Einrichtung für die Reparatur.
Die Maschine sollte, für eine längere Zeitdauer, nicht in Betrieb genommen werden, wenn der
Page 13

Zulauf verstopft ist, da es sonst eine Beschädigung des Motors oder Verformung der
Maschine durch Überhitzung verursachen kann.
Die Maschine verfügt über eine Y-Verbindung, also für den Fall, das das Netzkabel
beschädigt ist, , fragen Sie zur Sicherheit bitte einen Spezialisten des Herstellers, seinen
Kundendienst oder andere ähnliche Spezialisten für den Austausch.
Hauptteil
1 Staubschale
2 Staubschalenschnalle
3 Maschinen Hebegriff
4 Kabelaufwicklungstaste
5 Schaltknopf
6 Air-out Fach
7 Große Rolle
8 Haupt Saugrohr
9 Schlauch
10 Flexibler Schlauchgriff
11 Metall Verlängerungsrohr
12 Bodenbürste
Page 14

Verwendung
Wie muss man es vor dem Gebrauch zusammenbauen?
1. (Fig. 1) Befestigen Sie den Schlauch am Reiniger
Richten Sie die Schlauchverbindung mit dem Einlass auf den Reiniger und setzen Sie es wie gezeigt
zusammen.
Um den Schlauch zu lösen, drücken Sie die Schnallen der Verbindung und ziehen Sie den Schlauch
heraus.
2. (Fig. 2) Bringen Sie den Ellbogen auf das Metall Verlängerungsrohr.
Beim Anschluss ausrichten und einfügen, wie dargestellt.
3. (Fig. 3) Bringen Sie das Metallverlängerungsrohr zur Bodenbürste
Beim zusammenschließen, drehen Sie die Teile in entgegengesetzte Richtungen bis es sicher
verankert ist.
4. (Fig. 4) Stromkabel rausziehen
Das Stromkabel kann bis zur roten Markierung, aber niemals darüber hinaus herausgezogen werden.
5. Nach der Benutzung trennen Sie das Gerät zuerst von der Steckdose und dann drücken Sie die
Rücklauftaste für das Netzkabel hinter dem Reiniger..
6. (Fig. 5) Schaltknopf
Schließen Sie das Gerät an die Stromversorgung an und drücken Sie die Schalter-Taste, um die
Maschine zu starten und zu stoppen.
Fig 1 Fig 2 Fig 3
Fig 4 Fig 5 Fig 6
Fig 7 Fig 8 Fig9
Page 15

Fig 10 Fig 11 Fig12
Reinigung der Staubschale
Schritte zur Reinigung der Staubschale
1. Nehmen Sie die Staubschale, wie in Fig. 6 gezeigt, raus.
2. Drücken Sie behutsam die Staubtaste um den Staub rauszunehmen, wie in Fig. 7, 8.
3. Falls die Saugkraft nicht ausreichend ist, wenn die Abfälle nicht das MAX erreicht haben, schalten Sie
das Gerät aus, wiederholen Sie die Schritte 1-2, nehmen Sie die Staubschalenabdeckung und nehmen
Sie den Filterschwamm für die Reinigung, wie in Fig. 8, 9.
4. Im Falle der Reinigung des Inneren der Staubkappe, bitte arbeiten Sie entsprechend den folgenden
Schritten:
1) Drehen Sie den Staubbehälter Abdeckung, um sie zu lösen und entnehmen Sie den Filterschwamm
(Fig. 9);
2) Entnehmen Sie das zweite Filtersystem (Fig. 10);
3) Entfernen Sie die Staubpresswand und das Filternetz (Fig. 11);
4) Waschen Sie den Separator unter einem Wasserhahn und trocknen Sie es;
5) Montieren Sie die Staubschale und installieren Sie es neu.
Hinweis: Nach der Reinigung der Filterkomponenten, trocknen Sie sie zuerst, bevor sie wieder in das
Gerät für den Einsatz eingesetzt werden. Es wird vorgeschlagen, die Teile für 24 Stunden der Sonne
auszusetzen, bis sie vollständig getrocknet sind. Stellen Sie sicher, das jede Komponente wieder an
seinem Ort ist, sonst kann es zu Fehlfunktionen kommen; Lassen Sie kein Wasser in die elektrischen
Teile kommen, sonst kann es zu Fehlfunktionen kommen.
Verwendung des Zubehörs
1. Die kombinierte Bürste eignet sich zum Aufnehmen von Staub in kleinen Nähten, in Fenstern, Möbeln,
Ecken, und Staub auf Stoffmöbeln mit kurzen Haaren und schwer zugänglichen Stellen. Sie können
den Bürstenkopf nach Bedarf drehen.
2. Verwenden Sie die Staubbürste um Vorhänge, Kissen und Stoffe zu reinigen.
3. Um den Teppich zu Bürsten, drücken Sie den Bürstenschalter auf die Position Teppich . Dadurch
werden die Bürsten nach oben in die Bodendüse gezogen(Fig. 13)
4. Um blanken Boden zu saugen drücken Sie den Bürstenschalter auf die blanke Böden Position .
Dadurch werden die Bürsten nach unten aus der Bodendüse verlängert.(Fig. 14,15)
Fig.13 Fig.14 Fig.15
Page 16

Problembeschreibung
Mögliche Ursache
Lösung
Die Maschine
funktioniert nicht
vollständig
1. Die Maschine ist nicht gut in die
Steckdose eingesteckt.
2. Die Steckdose hat keinen Strom.
3. Der Schalter der Maschine ist
nicht eingeschaltet.
4. Der Thermoschutz des Motors ist
in Betrieb.
1. Stecken Sie de Stecker
nochmals ein.
2.Überprüfen Sie den
Schutzschalter.
3. Drücken Sie den Schalter um
die Maschine einzuschalten.
4. Ziehen Sie den Stecker und
warten Sie bis sich der
Wärmeschutz erholt hat.
Die Saugleistung ist
schwach
1. Die Hauptbodenbürste oder
Hilfsdüse ist verstopft.
2. . Die Staubbeutel voll ist.
3. Die Filterschwamm ist stark
durch Staub verunreinigt.
1. Entfernen Sie die
Verstopfung.
2. Entleeren Sie den
Staubbeutel rechtzeitig.
3. Reinigen Sie den
Filterschwamm.
Fehlerbehebung
Schauen Sie zuerst in die folgende Tabelle im Falle von verändertem Gebrauch..
UMWELT
ACHTUNG :
Werfen Sie nicht dieses Produkt, wie es mit anderen Haushaltsprodukten hat. Es gibt eine
Mülltrennungs von diesem Produkt in Gemeinden, Sie müssen Ihre lokalen Behörden über die
Orte, wo man dieses Produkt zurückgeben können zu informieren. In der Tat enthalten
elektrische und elektronische Produkte gefährliche Stoffe, die schädliche Auswirkungen auf die
Umwelt oder die menschliche Gesundheit haben und sollte recycelt werden. Das Symbol hier
darauf hinweisen, dass elektrische oder elektronische Geräte sollten sorgfältig ausgewählt
werden, ist ein fahrbarer Abfallbehälter mit einem Kreuz markiert.
Hergestellt und importiert : Adeva SAS 8 rue Marc Seguin 77290 Mitry-Mory FRANCE
www.hkoenig.com - contact@hkoenig.com - Tel. 01 64 67 00 01
Page 17

NEDERLANDS
Bewaar deze gebruiksaanwijzing met zorg voor toekomstig gebruik.
Lees deze gebruiksaanwijzing zorgvuldig door alvorens gebruik.
VOORZICHTIG
1. Dit apparaat is niet bedoeld voor gebruik door personen met beperkte capaciteit op de fysieke, mentale
of zintuiglijke of gebrek aan ervaring en kennis (inclusief kinderen), tenzij hij hen heeft werd gevraagd om
te controleren of als zij instructies over het gebruik van het apparaat door een persoon die
verantwoordelijk is voor hun veiligheid hebben gehad. Kinderen moeten onder toezicht te zorgen dat ze
niet spelen met het apparaat.
2. Als het netsnoer beschadigd is, moet het worden vervangen door een after-sales service om elk gevaar
te voorkomen.
Veiligheidsvoorschriften
Dit is een elektrisch apparaat. Het wordt gebruikt onder normale omstandigheden. Laat het apparaat niet
ingeschakeld zonder de aanwezigheid van een mens.
Zorg er voor dat de volgende objecten niet worden opgezogen, anders kan de stofzuiger beschadigen of
een brand/lichamelijk letsel veroorzaken.
A. Hete voorwerpen, bijvoorbeeld, houtskool vuur, sigarettenpeuk.
B. Groot scherp puin, bijvoorbeeld glas.
C. gevaarlijke objecten (oplosmiddelen, bijtende stoffen), agressieve stoffen (zuren, detergenten) en
vloeistoffen zoals water.
D. Explosieven en ontvlambare stoffen zoals benzine of alcoholische producten.
Schoon te maken of te repareren de stofzuiger of zet het stationair draaien, de stekker uit het stopcontact.
Trek bij het loskoppelen, niet aan het snoer, maar houd het plastic gedeelte van de plug vast en verwijder
de stekker met zorg.
Trek niet of vouw de slang niet met geweld om vervorming of schade te voorkomen.
Controleer en zorg ervoor dat de nominale spanning van de stofzuiger in overeenstemming is met de
voedingsspanning.
Houdt het snoer van de stofzuiger uit de buurt van scherpe voorwerpen om beschadigingen te
voorkomen.
Dompel de machine niet onder in het water, en houdt het apparaat uit de buurt van kachels en buiten de
zon, anders kan het apparaat vlam vatten.
Probeer niet om de machine te verplaatsen door te trekken aan het netsnoer.
Laat kinderen niet knoeien met of het bedienen van de machine, anders kan het een ongeluk
veroorzaken.
Druk niet op de stofzak knop wanneer u het apparaat verplaatst; Anders kan het losmaken van de
machine schade veroorzaken.
Het wordt niet aanbevolen om deze machine te gebruiken om kalk, as beton of andere bouwafval op te
ruimen, omdat het de motor of de machine kan beschadigen.
Gebruik de machine niet op een van de volgende gevallen:
A. De machine is blijkbaar beschadigd of werkt niet goed.
B. Het netsnoer is beschadigd.
In het geval van de bovenstaande situaties, schakelen de machine niet meer aan. Stuur het naar de
aangewezen servicecentrum voor onmiddellijke reparatie.
Bij vestopping dient u het apparaat langere tijd niet te gebruiken, anders kan schade aan de motor of
vervorming van het apparaat veroorzaken door oververhitting.
De machine maakt gebruik van Y-aansluiting, dus in het geval dat de stroomkabel beschadigd is, voor de
veiligheid, vraag dan een specialist van de fabrikant, de service-afdeling of andere soortgelijke functies
voor vervanging.
Page 18

Onderdelen en modeltekening
1 Stof container
2 Stof container gesp
3 Machine handvat
4 Kabelopwind knop
5 Aan/uit knop
6 Ventilatie-panel
7 Grote roller
8 Hoofdzuigtube
9 Slang
10 Flexibele slanghendel
11 Metalen verleng tube
12 Vloer borstel
Page 19

Hoe te gebruiken
Hoe te monteren voor gebruik?
1. (afb. 1) Bevestig de slang aan de stofzuiger
Lijn de slang gewricht met de inlaat van schonere en steek deze zoals afgebeeld.
Om de slang los te maken, drukt u op de gespen van de gezamenlijke en trek de slang uit.
2. (afb. 2) Bevestig de elleboog op metaal verlengbuis
Bij het aansluiten van hen, uitlijnen en plaats zoals aangegeven.
3. (Fig. 3) Bevestig de metalen verleng tube aan de vloerborstel
Bij het aansluiten van hen, draaien de delen in tegengestelde richtingen tot veilig.
4. (afb. 4) Trek stekker eruit
Het netsnoer kan worden uitgetrokken om de rode markering, maar kan nooit buiten
worden getrokken.
5. Na gebruik, trek dan eerst, en vervolgens op de terugspoelen knop voor het netsnoer
achter de stofzuiger.
6. (Fig. 5) Aan/uit knop
Sluit de machine aan stroomvoorziening en druk op de schakelaar om de start- en stop
van de machine.
Fig 1 Fig 2 Fig 3
Fig 4 Fig 5 Fig 6
Fig 7 Fig 8 Fig9
Page 20

Fig 10 Fig 11 Fig12
Hoe de stof container schoon te maken
Stappen om stof container schoon te maken
1. Neem de stof container uit het apparaat als in Fig. 6.
2. Duw voorzichtig het stof dump knop om stof te dumpen, zoals getoond in Fig. 7, 8.
3. In het geval dat de zuigkracht niet voldoende is wanneer het afval niet heeft bereikt MAX,
zet de machine, herhaalt u de bovenstaande stappen 1-2, los stof beker deksel en neem
het filter spons voor het schoonmaken zoals weergegeven in figuur. 8, 9.
4. Voor het reinigen van de binnenkant van de stofvanger kunt u werken volgens de
volgende stappen:
1) Draai het stof beker deksel om het los en neem het filter spons (afb 9).;
2) Neem secundaire filter systeem (afb 10).;
3) Verwijder stof pers paneel en filter net (afb 11).;
4) Was de afscheider onder water kraan en droog het vervolgens uit;
5) Monteer het stof beker en installeren.
Let op: Na het reinigen van de filter componenten, droog ze eerst voor het opnieuw in de
machine voor gebruik. Het apparaat mag niet worden blootgesteld aan de zon voordat alle
onderdelen droog zijn. Zorg ervoor dat elke component weer op zijn plaats is anders kan
een storing optreden; vermijd dat de elektrische componenten in contact komen met water,
dit kan leiden tot storingen.
Hoe de accessoires te gebruiken
1. Gecombineerde borstel is geschikt voor het oppakken van stof in kleine naden in het
venster, meubilair, hoeken, en stof op kort haar stof meubels en moeilijk bereikbare
plaatsen. U kunt de borstelkop zo nodig draaien.
2. Gebruik de stofborstel gordijnen draperieën kussens en stoffen reinigen.
3. Om vacuüm tapijten, duw de borstel schakelaar om het tapijt positie .Dit zal de borstels
omhoog te trekken in de vloer mondstuk (afb. 13)
4. stofzuigen kale vloeren, duw de borstel schakelaar in de kale vloer positie. Hierdoor wordt
de borstels reiken van het vloermondstuk (Fig. 14,15)
Fig.13 Fig.14 Fig.15
Page 21

Probleemoplossing
Probleem
omschrijving
Mogelijke oorzaak
Oplossing
De machine
werkt niet
optimaal
1. De machine is niet goed
aangesloten op het stopcontact.
2. Het stopcontact heeft geen
macht.
3. De schakelaar van de machine is
niet ingeschakeld.
4. thermische beveiliging van de
motor is in werking.
1. Doe de stekker opnieuw in het
contact.
2.Controleer de cirtcuit-breker.
3. Druk op de aan/uit knop.
4. Trek de stekker uit het
stopcontactwacht tot de thermo
protector hersteld is.
De zuigkracht is
zwak
1. De begane grond borstel of extra
nozzle verstopt is.
2. De stofzak is vol.
3. Het filter spons is zwaar vervuild
door stof.
1. Verwijder de verstopping.
2. Leeg de stofzak.
3. Reinig het filter spons.
Zie de onderstaande tabel eerste in geval van abnormaliteiten tijdens gebruik.
MILIEU
ATTENTIE :
Dit apparaat mag niet met uw ander huishoudelijke toestellen worden verwijdert. Dit product moet op een
geselecteerde stortplaats verwijdert worden. U kunt bij de gemeente een indiceerde plaats aanvragen.
Elektrisch en elektronische producten kunnen gevaarlijke stoffen inhouden die schadelijk zijn voor
mensen en het milieu en moet recycled worden. Het symbool aan de kant geeft aan dat het een elektrisch
en elektronisch toestel is en zijn dus artikelen van een selectieve collectie. Het beeld geeft een afvalbak
met een X teken aan.
Geproduceerd en geïmporteerd door : Adeva SAS 8, Rue Marc Seguin 77290, Mitry-Mory FRANKRIJK
www.hkoenig.com - contact@hkoenig.com – Telefoon: 01 64 67 00 01
Page 22

ESPANOL
Por favor, mantenga el manual del usuario bien guardado para usarlo en caso de dudas.
Por favor, lea el manual del usuario antes de utilizar el producto.
PRECAUCIÓN
1. Este dispositivo no está destinado a ser utilizado por personas con capacidad reducida en lo físico,
mental o sensorial, o falta de experiencia y conocimiento (incluidos los niños), a menos que los tiene fue
el encargado de supervisar o si han tenido instrucciones sobre el uso del aparato por una persona
responsable de su seguridad. Los niños deben ser supervisados para asegurarse de que no jueguen con
el aparato.
2. Si el cable de alimentación está dañado, debe ser sustituido por un servicio post-venta para evitar
cualquier peligro.
Precauciones de Seguridad
Este es un aparato eléctrico. Se utilizará en condiciones normales de funcionamiento. Nunca lo deje
funcionando sin prestarle atención.
No utilice la aspiradora para recoger los objetos siguientes, de lo contrario, puede dañar la
aspiradora o causar un incendio y lesiones corporales, etc.
A. Objetos calientes, por ejemplo, carbón, colillas de cigarrillo.
B. Residuos cortantes grandes, por ejemplo, pedazos de vidrio.
C. Objetos peligrosos (disolventes, corrosivos), agentes agresivos (ácidos, detergentes) y líquidos
incluyendo agua.
D. Explosivos y sustancias inflamables como gasolina o productos alcohólicos.
Para limpiar o reparar la aspiradora o dejarla sin uso, desconéctela de la fuente de alimentación.
Al hacer esto, no tire del cable, mantenga sujetada la parte de plástico de la clavija y sáquela con
cuidado.
No tire ni doble la manguera con fuerza para evitar la deformación o daños en la misma.
Compruebe y asegúrese de que la tensión nominal de la aspiradora coincide con la tensión de
alimentación de su hogar.
No deslice el cable de alimentación de la aspiradora por objetos afilados para evitar daños
potencialmente peligroso.
No sumerja la máquina en agua, no la acerque a fuentes de calor ni la exponga a la luz directa
del sol, de lo contrario puede encenderse y provocar un incendio.
No trate de mover la máquina arrastrando el cable de alimentación.
No permita que los niños manipulen o utilicen la máquina, de lo contrario puede provocar un
accidente.
No presione el botón de liberación de la bolsa de polvo cuando se la máquina está en uso; de lo
contrario, puede desprenderse de la máquina y causar daños a objetos y personas a su
alrededor.
No se recomienda el uso de esta máquina para recoger cal, cenizas, hormigón o cualquier otro
residuo de construcción, ya que puede dañar el motor o la máquina.
No haga funcionar la máquina en cualquiera de los siguientes casos:
A. La máquina está aparentemente dañada o no funciona correctamente después de haberse
caído.
B. El cable de alimentación está dañado.
En el caso de las situaciones anteriores, no encienda la máquina. Es recomendable que la
envíe a su centro de servicio designado para la reparación correspondiente.
No haga funcionar la máquina durante largos períodos si la entrada de aire que permite la
ventilación está tapada, de lo contrario puede causar daños en el motor o deformación de la
Page 23

máquina debido a un sobrecalentamiento.
La máquina utiliza conexión Y, por lo tanto, en caso de que el cable de alimentación esté
dañado, por seguridad, por favor pregunte a un especialista, al fabricante, un departamento
de servicio o similares para llevar acabo el recambio del cable.
Partes
1 Recipiente para polvo
2 Hebilla del recipiente para polvo
3 Mango
4 Botón para el rebobinado del cable
5 Botón de encendido
6 Panel de salida de aire
7 Rueda
8 Tubo de succión principal
9 Manguera
10 Mango flexible para la manguera
11 Tubo telescópico de metal
12 Cepillo para suelo
Page 24

Uso
Montaje antes del primer uso
1. (Fig. 1) Conecte la manguera a la aspiradora
Alinear la junta de la manguera con la entrada de la aspiradora e insértela como se muestra en la
imagen.
Para retirar la manguera, presione las hebillas de la articulación y tire de la manguera.
2. (Fig. 2) Coloque el codo en el tubo telescópico de metal
Al conectarlos, alinee e inserte como se muestra en la imagen.
3. (Fig. 3) Conecte el tubo de extensión de metal en el cepillo para suelos
Al conectarlos, rotar las piezas en direcciones opuestas hasta que queden firmemente instaladas.
4. (Fig. 4) Saque el cable de alimentación
El cable de alimentación se puede sacar hasta donde aparece la marca roja, nunca jale más allá de
ella.
5. Después del uso, primero desenchufe la máquina, y luego presione el botón de rebobinado de cable
de alimentación ubicado en la parte posterior de la aspiradora.
6. (Fig. 5) Botón de encendido
Conecte la máquina a la fuente de alimentación y presione el botón de encendido para controlar el
arranque y detención de la máquina.
Fig 1 Fig 2 Fig 3
Fig 4 Fig 5 Fig 6
Fig 7 Fig 8 Fig 9
Page 25

Fig 10 Fig 11 Fig 12
Cómo limpiar el recipiente para polvo
Pasos para limpiar el recipiente para polvo
1. Saque el recipiente para polvo, como se muestra en la Fig. 6.
2. Presione suavemente el botón de eliminación de polvo para eliminar el polvo como se muestra en la
Fig. 7, 8.
3. En caso de que la potencia de succión sea insuficiente y cuando los residuos no han alcanzado el nivel
MAX en el recipiente para polvo, apague la máquina, repita los pasos anteriores 1-2, separar la cubierta
del recipiente para polvo y retire el filtro de esponja para su limpieza como se muestra en la Fig. 8, 9.
4. En caso de limpiar el interior del recipiente para polvo, por favor operar de acuerdo a los siguientes
pasos:
1) Gire la cubierta del recipiente para polvo para separar y sacar el filtro esponja (Fig. 9);
2) Saque el sistema de filtro secundario (Fig. 10);
3) Saque el panel de salida de aire (Fig. 11);
4) Lave el separador debajo del grifo de agua y luego séquelo cuidadosamente;
5) Vuelva a montar el recipiente para polvo y vuelva a colocarlo en su posición.
Nota: Después de limpiar los componentes del filtro, secarlos primero antes de poner de nuevo en la
máquina para su uso. Se sugiere exponerlos a la luz solar durante 24 horas hasta que estén
completamente secos. Asegúrese de que cada componente está de vuelta en su lugar de lo contrario
puede provocar un mal funcionamiento; no permita que entre agua en los componentes eléctricos de lo
contrario puede causar un mal funcionamiento y problemas en la aspiradora.
Cómo utilizar los accesorios
1. El cepillo combinado es adecuado para recoger el polvo en pequeñas hendiduras en las ventana,
muebles, esquinas, y el polvo de los muebles de tela de pelo corto y lugares de difícil acceso. Usted
puede girar la cabeza del cepillo como sea necesario.
2. Utilice el cepillo para polvo para limpiar cortinas, cojines y telas.
3. Para aspirar alfombras y otros tipos de telas, empuje el interruptor del cepillo hacia la posición
alfombra .Esto empujará los cepillos hacia arriba en el cepillo para suelos(Fig. 13)
4. Para aspirar pisos descubiertos, empuje el interruptor del cepillo hacia la posición suelo descubierto
. Esto guardará los cepillos y permitirá la limpieza de los suelos con mayor facilidad(Fig. 14,15)
Fig.13 Fig.14 Fig.15
Page 26

Descripción del
problema
Causa posible
Solución
La máquina no
funciona por
completo
1. La máquina no está bien
conectada a la toma de corriente.
2. La toma de corriente no provee
energía.
3. El interruptor de la máquina no
está en la posición de encendido.
4. El protector térmico del motor
está en funcionamiento.
1. Vuelva a conectar el enchufe.
2. Compruebe el interruptor de
circuito.
3. Pulse el botón de encendido
para encender la máquina.
4. Desenchufe la aspiradora y
espere hasta que el protector
térmico se recupere.
La potencia de
aspiración es
débil
1. El cepillo principal o la boquilla
auxiliar están obstruidos.
2. La bolsa para polvo está llena.
3. El filtro de esponja está muy
sucio por el polvo.
1. Retire la obstrucción.
2. Vacíe la bolsa de polvo con
frecuencia.
3. Limpie el filtro.
Solución de Problemas
Consulte la siguiente tabla en caso de cualquier anormalidad durante el uso de la aspiradora
.
MEDIO AMBIANTE
ATENCIÓN :
No se deshaga de este producto como lo hace con otros productos del hogar. Existe un sistema selectivo
de colecta de este producto puesto en marcha por las comunidades, debe de informarse en su
ayuntamiento acerca de los lugares en los que puede depositar este producto. De hecho, los productos
eléctricos y electrónicos pueden contener substancias peligrosas que tienen efectos nefastos para el
medio ambiente o para la salud humana y deben ser reciclados. El símbolo aquí presente indica que los
equipos eléctricos o electrónicos deben de ser cuidadosamente seleccionados, representa un recipiente
de basura con ruedas marcado con una X.
Fabricado e importado por : Adeva SAS 8 rue Marc Seguin 77290 Mitry-Mory FRANCE
www.hkoenig.com - contact@hkoenig.com - Tel. 01 64 67 00 01
Page 27

ITALIANO
Si prega di tenere il manuale d'uso in in luogo sicuro per futuri riferimenti.
Si prega di leggere il manuale d'uso prima di utilizzare il prodotto.
ATTENZIONE
1. Questo dispositivo non è destinato all'uso da parte di persone con ridotta capacità sul piano fisico,
mentale o sensoriale o mancanza di esperienza e di conoscenza (compresi i bambini), a meno che non li
ha è stato chiesto di monitorare o se hanno avuto istruzioni per l'uso dell'apparecchio da una persona
responsabile della loro sicurezza. I bambini devono essere sorvegliati per assicurarsi che non giochino
con l'apparecchio.
2. Se il cavo di alimentazione è danneggiato, deve essere sostituito con un servizio post-vendita per
evitare ogni pericolo.
Precauzioni di sicurezza
Questo è un apparecchio elettrico e come tale deve essere utilizzato in condizioni operative normali.
Non lasciarlo mai in esecuzione senza supervisione.
Non utilizzare l'aspirapolvere per raccogliere i seguenti oggetti, altrimenti potrebbe danneggiare
l'aspirapolvere o causare un incendio e lesioni personali, etc.:
A. Oggetti caldi, per esempio, carbone e mozziconi di sigaretta.
B. Detriti taglienti grande, ad esempio, il vetro.
C. Oggetti pericolosi (solventi, corrosivi), agenti aggressivi (acidi, detergenti) e liquidi come l'acqua.
D. Esplosivi e infiammabili come benzina o prodotti alcolici.
Per conservare, pulire o riparare l'aspirapolvere, scollegarlo dalla rete elettrica. Quando si scollega,
non tirare mai il cavo, ma tenere sempre la spina ed estrarla con cura.
Non tirare o piegare il tubo con forza per evitare deformazioni o danni.
Controllare e verificare che la tensione nominale dell’aspirapolvere sia compatibile con la tensione
della vostra casa.
Non inserire il cavo di alimentazione dell’aspirapolvere attraverso oggetti appuntiti per evitare danni.
Non immergere l’apparecchio in acqua, o avvicinarlo a stufe, o esporlo alla luce solare, altrimenti
potrebbe prendere fuoco.
Non tentare di spostare la macchina, trascinando il cavo di alimentazione.
Non permettere ai bambini di manomettere o utilizzare la macchina, altrimenti potrebbe causare un
incidente.
Non premere il pulsante di rilascio del sacchetto della polvere quando si sposta la macchina; in caso
contrario, potrebbe staccarsi dalla macchina e provocare danni.
Non è raccomandato l'uso di questa macchina per raccogliere tiglio, frassino, calcestruzzo o
qualsiasi altro rifiuto di costruzione poiché potrebbe danneggiare il motore o la macchina.
Non utilizzare la macchina in uno qualsiasi dei seguenti casi:
A. Quando l’apparecchio è apparentemente danneggiato o non funziona correttamente in seguito a
una caduta.
B. Il cavo di alimentazione è danneggiato.
Nei casi sopracitati, non accendere la macchina. Inviare l’apparecchio al centro di assistenza
indicato per la riparazione immediata.
Non lasciare la macchina inutilizzata per un lungo periodo di tempo quando l'entrata è intasata,
altrimenti potrebbe causare danni al motore o una deformazione della macchina a causa del
surriscaldamento.
La macchina utilizza la connessione Y, di conseguenza, nel caso in cui il cavo di alimentazione fosse
danneggiato, per motivi di sicurezza, si prega di rivolgersi al centro di assistenza del produttore o a
un tecnico specializzato per la sostituzione.
Page 28

Corpo macchina
1 Contenitore della polvere
2 Chiusura del Contenitore della polvere
3 Maniglia di sollevamento
4 Tasto avvolgicavo
5 Interruttore
6 Pannello di uscita dell’aria
7 Ruota grande
8 Connettore principale del tubo
9 Tubo snodabile
10 Maniglia del tubo snodabile
11 Tubo di estensione di metallo
12 Spazzola per pavimenti
Come usare l’apparecchio
Come assemblare l’apparecchio prima dell'uso?
1. (Fig. 1) Collegare il tubo flessibile al corpo macchina.
Allineare il raccordo del tubo flessibile con il connettore del corpo macchina e inserire
come mostrato in figura.
Per staccare il tubo, premere l’apposita fibbia del raccordo ed estrarre il tubo.
2. (Fig. 2) Collegare la maniglia del tubo snodabile al tubo di estensione di metallo.
Allinearli ed inserirli come illustrato.
3. (Fig. 3) Collegare il tubo di estensione di metallo alla spazzola per pavimenti.
Quando li si collega, ruotare le parti in direzioni opposte fino al blocco.
Page 29

4. (Fig. 4) Estrarre il cavo di alimentazione
Il cavo di alimentazione potrà essere tirato fuori fino al segno rosso ma mai al di là di
esso.
5. Dopo l'uso, scollegare la macchina prima, e poi premere il pulsante di riavvolgimento del
cavo di alimentazione situato nella parte posteriore.
6. (Fig. 5) Interruttore
Collegare la macchina alla rete elettrica e premere l’interruttore per controllare l'avvio e
l’arresto della macchina.
Fig 1 Fig 2 Fig 3
Fig 4 Fig 5 Fig 6
Fig 7 Fig 8 Fig9
Page 30

Fig 10 Fig 11 Fig12
Come pulire il contenitore della polvere
Seguire tutti i passaggi per pulire il contenitore della polvere:
1. Estrarre il contenitore della polvere come mostrato in Fig. 6.
2. Spingere delicatamente il pulsante di scarico della polvere per fare uscire la polvere, come mostrato in
figura. 7 e 8.
3. Nel caso la potenza di aspirazione sia insufficiente (ovvero quando i rifiuti hanno raggiunto il livello
MAX), spegnere la macchina e ripetere i passaggi precedenti 1-2, rimuovere il coperchio del contenitore
della polvere ed estrarre il filtro spugna per la pulizia, come mostrato in Fig. 8 e 9.
4. Nel caso si voglia pulire l'interno del contenitore della polvere, si prega di eseguire i seguenti passi:
1) Ruotare il coperchio del contenitore della polvere, staccarlo e togliere il filtro spugna (Figura 9);
2) Togliere il sistema filtro secondario (Figura 10);
3) Rimuovere il pannello pressa polvere e la rete del filtro (Fig 11);
4) Lavare il separatore sotto il rubinetto dell'acqua e poi asciugare accuratamente;
5) Rimontare il contenitore della polvere e installarlo correttamente.
Nota: Dopo aver pulito i componenti del filtro, asciugarli prima di metterli nuovamente nella macchina.
Si suggerisce di esporre alla luce solare per 24 ore fino a quando sono completamente asciutti.
Assicurarsi che ogni componente sia stato reinstallato correttamente al suo posto, altrimenti si potrebbero
causare malfunzionamenti. Non permettere all'acqua di entrare a contatto con i componenti elettrici
dell’apparecchio altrimenti si potrebbero causare malfunzionamenti.
Come usare gli accessori
1. Una spazzola combinata è adatta per raccogliere la polvere nelle piccole fessure di una finestra, dei
mobili, degli angoli, agendo su tessuti a pelo corto e su luoghi inaccessibili. Si può ruotare la testina, se
necessario.
2. Usare questa spazzola per spolverare tendaggi, cuscini e tessuti.
3. Per aspirare tappeti e moquette, spingere l'interruttore della spazzola in posizione tappeto .
Questo tirerà le spazzole all’interno nella bocchetta della spazzola (Fig. 13).
4. Per spolverare pavimenti nudi, spingere l'interruttore della spazzola in posizione del pavimento nudo
. Questo estenderà le spazzole giù dall'ugello piano (Fig. 14,15)
Page 31

Descrizione del
problema
Possibile causa
Soluzione
L’apparecchio
non funziona
completamente
1. La macchina non è collegata
bene alla presa.
2. La presa non ha elettricità.
3. L'interruttore della macchina non
è accesa.
4. Il protettore termico del motore è
in funzione.
1. Re-inserire la spina.
2. Controllare l'interruttore.
3. Premere l’interruttore per
accendere la macchina.
4. Staccare la spina e attendere
che il protettore termico
recuperi.
La potenza di
aspirazione è
debole
1. La spazzola principale o l’ugello
ausiliario sono intasati.
2. Il sacchetto della polvere è pieno.
3. La spugna del filtro è fortemente
intasato dalla polvere.
1. Rimuovere l'intasamento.
2. Svuotare il sacchetto
regolarmente.
3. Pulire il filtro spugna.
Fig.13 Fig.14 Fig.15
Risoluzione dei problemi
Fare riferimento alla seguente tabella in caso di anormalità durante l'uso dell’apparecchio.
AMBIANTE
ATTENZIONE :
Non gettare quest’ apparecchio tra i rifiuti domestici. Per questo tipo di prodotti è fornito dai
comuni un sistema di raccolta e ritiro in zona ed è quindi un dovere informarsi per conoscere il
giusto smistamento del rifiuto. Infatti, i prodotti elettrici ed elettronici possono contenere
sostanze pericolose che hanno effetti dannosi sull’ambiente o sulla nostra salute e quindi
devono essere riciclati. Il simbolo al lato indica che le apparecchiature elettriche ed elettroniche
fanno parte di una raccolta selettiva e differenziata (rappresentata da un bidone su due ruote
sbarrato da una croce.
Prodotto e importato da : Adeva SAS 8 rue Marc Seguin 77290 Mitry-Mory FRANCE
www.hkoenig.com - contact@hkoenig.com - Tel. 01 64 67 00 01
 Loading...