

Hkoenig SLCOOK30 Operation Manual
Operation manual
Manuel d´instructions
Bedienungsanleitung
Gebruiksaanwijzing
Manual de Instrucciones
Manuale d’uso
SLCOOK30
SLOW FUNCTION COOKER
MIJOTEUSE
SLOW FUNCTION KOCHGERÄT
FUNCTIE SLOW COOKER
OLLA DE COCCIÓN LENTA
PENTOLA A COTTURA LENTA

ENGLISH
IMPORTANT SAFETY INSTRUCTIONS
For Household Use Only
WHEN USING ELECTRICAL APPLIANCES, BASIC SAFETY PRECAUTIONS SHOULD ALWAYS BE
FOLLOWED, INCLUDING THE FOLLOWING:
READ ALL INSTRUCTIONS BEFORE USING YOUR ROBOT COOKING SYSTEM
PLUG
WARNING: To reduce the risk of electric shock, PLEASE USE THE CORRECT PLUG ONLY. If it does not fit,
contact a qualified electrician to install the proper outlet.
DO NOT modify the plug in any way.
WARNING:
TO REDUCE THE RISK OF FIRE, ELECTRIC SHOCK OR INJURY:
1. To protect against electrical shock, do not submerge the unit or allow the power cord to come into contact with
water or any other liquid. If the unit falls into liquid, unplug the power cord from the electrical outlet
immediately. DO NOT reach into the liquid.
2. Please note that the appliance may become hot during use. DO NOT touch hot surfaces; always use the
handles. Always use oven mitts or pot holders when removing the pot.
3. DO NOT allow young children to operate the appliance or use as a toy. Close supervision is necessary when
any appliance is used by or near children.
4. This appliance can be used by children aged from 8 years and above and persons with reduced physical,
sensory or mental capabilities or lack of experience and knowledge if they have been given supervision or
instruction concerning use of the appliance in a safe way and understand the hazards involved. Children shall
not play with the appliance. Cleaning and user maintenance shall not be made by children without
supervision.
5. Remove the power cord from the electrical outlet when not in use, before assembling or disassembling parts
and before cleaning. To unplug, grasp the plug and pull from the electrical outlet. Never pull from the power
cord. Allow the appliance to cool before adding or removing parts.
6. DO NOT abuse the power cord. Never carry the appliance by the power cord or yank it to disconnect from
electrical outlet; instead grasp the plug and pull to disconnect.
7. DO NOT operate any appliance with a damaged cord or plug, or after the appliance malfunctions, has been
dropped or damaged in any manner. Return the appliance to distributor. If the supply cord is damaged, it must
be replaced by the manufacturer or its service agent or a similarly qualified person in order to avoid a hazard.
8. Please refer to the Cleaning & Maintenance section for regular maintenance of the appliance. Return the
appliance to to distributor..
9. DO NOT let the power cord touch hot surfaces such as the stove. Always use the appliance on a dry, level
surface.
10. Extreme caution must be used when moving an appliance containing hot oil or other hot liquids. Always use
oven mitts or pot holders when moving the cooking system. Allow hot oil to cool prior to removal or cleaning
the appliance.
11. To avoid possible steam damage, place the cooking system away from walls and cabinets during use.
12. When using this appliance, provide adequate air space above and on all sides for air circulation. On surfaces
where heat may cause a problem, use of an insulated heat pad or trivet is recommended.
13. Use extreme caution when removing the lid after cooking. Serious burns can result from the steam inside.
Always lift and tilt the lid away from you when removing, using care to ensure that water does not drip back
into the appliance.
14. DO NOT use outdoors or anywhere the cord or unit housing might come into contact with water while in use.
15. DO NOT use the appliance for anything other than its intended use. 16.DO NOT obstruct the steam release
vent during use.
16. Always position the steam vent hole in the back of the unit away from you.
17. DO NOT place or operate this appliance on or near any hot surfaces (such as gas or electric burner, stove or
in a heated oven).
18. The use of attachments or accessories not recommended by the manufacturer may result in fire, electric
shock or personal injury.
19. DO NOT use this appliance for deep frying.
20. CAUTION: TO REDUCE THE RISK OF ELECTRIC SHOCK, COOK ONLY IN THE POT PROVIDED OR IN
CONTAINERS RECOMMENDED BY DISTRIBUTORS PLACED ON THE COOKING RACK IN THE
PROVIDED POT. DO NOT USE THE APPLIANCE WITHOUT THE REMOVABLE COOKING POT INSIDE.
21. To disconnect, turn the Function Dial to “Off”, then remove the plug from the wall outlet.
22. THIS PRODUCT IS INTENDED FOR HOUSEHOLD USE ONLY. Do not use this
appliance for anything other than its intended use. Do not use outdoors.
23. To avoid the possibility of the cooking system accidentally being pulled off the counter top or tabletop, which
could result in damage to the cooking system or personal injury, do not let the power cord hang over the edge
of the counter or table.
24. Leaving food out too long at room temperature can cause bacteria to grow to dangerous levels that can cause
illnesses.
25. In the event of a loss of power, an error message will display on the unit. It is recommended to dispose of any
food that has been at room temperature for more than an hour.
NOTE: This unit has a short power supply cord to reduce the risk resulting in becoming entangled in or tripping
over a long cord. A longer extension cord may be used if you are careful in its use.
For more technical support, please contact your distributors.
SAVE THESE INSTRUCTIONS
TECHNICAL SPECIFICATIONS
Voltage: 220V. 50Hz. Power: 1350 Watts
Contents
Getting to Know Your Slow Function Cooking System
Getting to Know Your Slow Function Cooking System Control Panel
Preparing to Use the Slow Function Cooking System
Using the Different Functions
Hints & Tips
Troubleshooting Guide
Cleaning & Maintenance
Replacement Parts
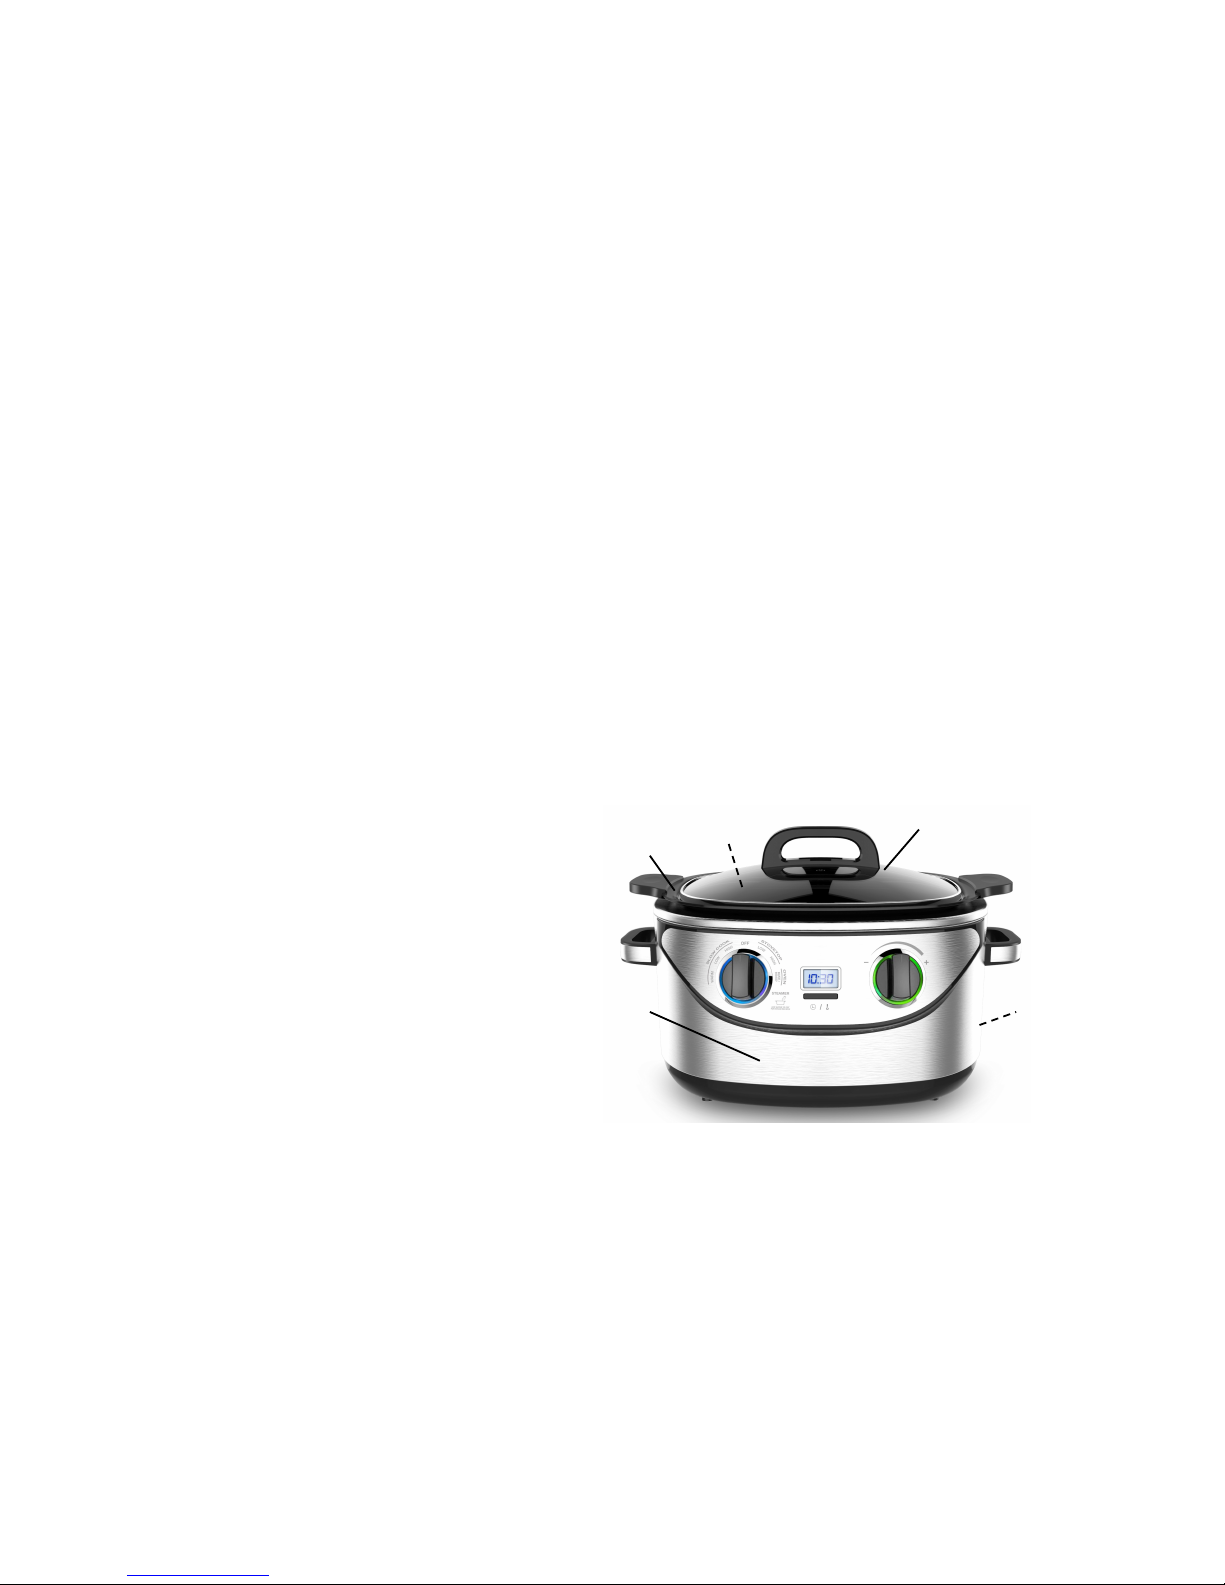
Getting To Know Your Robot Cooking System
1. Roasting Lid with Handle
2. Roasting Rack (not shown)
3. Cooking Pot
4. Main Housing
5. Control Panel
6. Power Cord (not shown) OVEN
The Slow Function Cooking System Steam Oven offers a revolutionary new way to cook your foods faster,
healthier and easier. The easy 1-2-3 electronic controls allow you the flexibility for true one pot cooking.
FEATURES:
-
Stovetop Settings: Low (simmer), High (sear)
-
Slow Cooker Settings: High, Low
-
Warm Settings
-
Oven Function
-
Steam Function
-
Digital Oven Controls with Timer
-
Auto Warm for Slow Cook and steamer function
-
Auto Shut Off
1"2"3"4"6"
5"

Getting to Know the Robot Cooking System Control Panel
Function Dial
Turn the dial to select Stovetop, Warm, Slow Cook, Oven and Steam mode.
Stovetop - Use the Robot Cooking System as you want a stovetop. You can simmer, or sear.
Slow Cook - Use the Robot Cooking System as a slow cooker. Select the low or high and let the cooking
system do all the work. When it has finished cooking, it will automatically switch to Auto Warm.
Warm - Use the warm mode after cooking is completed to keep food warm from 30 minutes up to 12 hours.
Oven - Use the Robot Cooking System instead of the regular oven. You can roast, bake or even cook with
steam.
Steam - Use the Robot Cooking System as you would steam food.
LED Display Screen
The LED screen displays the timer settings for the Slow Cook, Warm, Oven and steam modes. It also
displays the oven temperature settings for the Oven mode.
Time/Oven Temp. Button
Use the Time/Oven Temp. button to toggle between the Time and Temperature when using the Oven mode.
Adjustment Dial
Use the Adjustment dial to set the count down timer in Slow Cook mode or to change the time and temperature
when using the Oven mode.
Auto Warm
The Robot Cooking System will go into auto warm when the set cooking time in Slow Cook mode is over.
Preparing to Use the Slow Function Cooking System
Before using the cooking system for the first time:
1. Carefully remove all the parts from the box. Wash the cooking pot, roasting rack and the roasting lid with
warm, soapy water. The cooking pot may also be washed in the dishwasher. The roasting lid and roasting rack
are not dishwasher safe. Do not place the main housing in water or in the dishwasher. Wipe it clean with a
damp cloth.
2. When ready to use, place the cooking pot inside the main housing. Never use the cooking system
without the cooking pot inserted into the housing.
3. Plug the unit into the wall outlet.
4. The cooking system will not turn “On” as long as the function Dial is in the “Off” position.
5. When ready to start the appliance, turn the Function Dial to the function that you want. The red Power light
will light up indicating that the appliance is on.
6. Follow instructions on the following pages on how to use the different functions.
Using the Different Functions

Stovetop:
1. Place the cooking pot inside the housing.
2. Place the food that you wish to cook inside the pot in an even layer for best results.
3. Set the Function Dial to the desired Stovetop mode to get the appliance heated. The LED Display will
show “On” and the Power light will turn on.
4. When you have finished using the unit, turn the Function Dial to “Off” and then unplug the uni and allow it
to cool completely before handling.
NOTE: The appliance will not function if the cooking pot is not inside the main housing.
TIP: When you want to sear meats, set the Stovetop to “High”. To sauté vegetables, set the Stovetop to
“low” or “High”.
Auto Shut Off for Stovetop:
As a safety feature we have designed the unit to turn off automatically based on the setting that has been
selected.
Stovetop High: Auto shut-off after 1 hour of use.
Stovetop Low: Auto shut off after 4 hours of use.
Slow Cook:
The 5.5L capacity makes this an ideal slow cooker for the entire family. The Low and High settings
automatically switch to Auto Warm after the cooking is complete to keep the food warm. Use the Stovetop
function on “High” to sear meats and vegetables before slow cooking to enhance flavors and create gourmet
meals.
Do not exceed the top of the cooking pot when filling with food. This could result in the food boiling over.
1.Place the ingredients into the cooking pot and place the lid on top.
2.Plug the unit into the electrical outlet.
3. Turn the Function Dial to either Low or High under Slow Cook depending on the recipe instructions. The
LED Display will show “8:00” or “4:00” depending on the slow cook setting that is selected and the Power
Light will turn on.
4. The Display Screen will show “8:00” hours for Low setting and “4:00” hours for High setting. Turn the
Adjustment Dial to set the desired time. The time will increase or decrease in 30 minute increments for up to 12
hours. The timer will begin counting down after 3 seconds. Do not lift the lid continuously while cooking.
5. After the cooking process is done, the unit will switch to Auto Warm for up to 12 hours.
6. When you have finished using the unit, turn the Function Dial to “Off” and then unplug the unit and allow it
to cool completely before handling.
Auto Shut Off for Slow Cook:
As a safety feature we have designed the unit to turn off automatically based on the setting that has been
selected.
When in the Slow Cook “Low or High” modes, at the end of the cooking cycle the unit will automatically
switch to Auto Warm for 12 hours. At the end of the 12 hours the unit will automatically shut off.
Warm Settings:
Use the Robot Cooking System Warm mode to keep food warm from 30 minutes up to 12 hours. This can be
used for food already cooked in the Slow Cooker or for food already prepared that you want kept warm.
1. Place the cooked food inside the cooking pot and cover with the lid.
2. Plug the unit into the electrical outlet.
3. Turn the Function Dial to warm.
4. Time is pre-set to “6:00” hours. Turn the Adjustment Dial to set the desired time that you want the food kept
warm.
5. When you have finished using the unit, turn the Function Dial to “Off” and unplug the unit. Allow it to cool
completely before handling.

Auto Shut Off for Warm:
As a safety feature, we have designed the unit to turn off automatically based on the setting that has been
selected. At the end of the pre-set time, the unit will automatically shut off.
Using the Different Functions - cont.
Oven:
Variable temperatures from 120° to 220° make this an ideal oven for roasting meats and vegetables and for
baking. The programmable timer can be set in 5 minute intervals for up to 6 hours.
Using the Oven mode for Roasting:
1.Place the food on the Roasting rack and lower into the cooking pot. Cover with the lid.
2.Plug the unit into the electrical outlet.
3. Turn the Function Dial to Oven. The Power light will illuminate.
4. The Display Screen will show “175°C”. Turn the Adjustment Dial to set the temperature. The
temperature will adjust in 15°C increments up to 220°C. Press the Time/Oven Temp button once and then
turn the Adjustment Dial to set the cooking time. The time will increase in 5 minute increments up to a
total of 6 hours.
5. The timer will begin counting down after 3 seconds. The time and temperature can be adjusted during the
cooking cycle. Press the Time/Oven Temp button and then turn the Adjustment Dial to change the time or the
temperature.
6. Once cooking is complete the timer will blink for 2 minutes. At the end of the 2 minutes, the power will
shut off.
IMPORTANT: Use caution when handling hot foods.
7. When you have finished using the unit, turn the Function Dial to “Off”, unplug the unit and allow it to cool
completely before handling.
Steam Cooking:
Steam Infused Cooking cooks foods fast and healthy all by the introduction of steam during the cooking
process. The Steam Roasting technique can be applied to a variety of meats you would traditionally roast in
your oven. Some cuts of meat benefit from searing BEFORE roasting while other cuts benefit from searing
AFTER roasting.
No preheating is required when searing before roasting.
Most meats can be seared for less than 10 minutes. You do not want to cook the meat, simply brown the meat to
add color.
Add water to the bottom of the cooking pot. In general, 1 cup of water equals 10 minutes of steam time.
If additional water is required during the cooking process, cautiously lift the lid away from you and add room
temperature water. Water should NOT exceed the roasting rack or touch the food as that will result in poaching.
Use caution when placing hot meats on roasting rack.
CAUTION: DO NOT add any liquids to the base of the main housing of the appliance.
Hints & Tips:
1 Cooking times may vary based on the selected temperature, the current temperature of the cooking
pot and the temperature of the ingredients.
2 Always use nonstick utensils in the cooking pot. Metal utensils may damage the non-stick coating.
3 For even browning, make sure that the food is in an even layer on the bottom of the cooking pot or roasting
rack.
4 Cooking time and temperature can be adjusted at any time during the cooking cycle in Oven.
Press the Time/Oven Temp button and turn the Adjustment Dial to adjust.
5 Cooked foods may not brown or crisp on top as much as in a conventional oven. Instead foods will brown
on the bottom and crisp on the bottom and sides.
6 If you do not manually set a temperature and time, the unit will automatically start at the preset
temperature and time.

7 Multiple modes may be required to cook recipes. To change modes during cooking cycles, simply turn the
Function Dial to select the new desired mode. Once the new mode is selected, begin the programming
process.
8 If the cooking pot is removed during the cooking cycle and then placed back into the unit, the cooking
process will continue as though it was not interrupted.
Troubleshooting Guide
POSSIBLE SOLUTION
“Err” Appears on the Display Screen
This occurs when power to the unit is interrupted or if the unit is plugged in and the function dial is not in the
“OFF” position.
Turn the function dial to “OFF” and then turn dial to desired cooking mode.
If the unit displays “Err” for a prolonged period of time due to power failure, dispose of the food for health and
safety reasons.
Call Customer Service.
“E02” Appears On The LED Display
Slow Function Cooking System is not functioning. Please contact customer service.
Cleaning & Maintenance
The Slow Function Cooking System should be cleaned thoroughly after every use.
1. Unplug the unit from the wall outlet.
2. Never immerse the main housing in water or any other liquid.
3. To clean the main housing and the control panel, wipe it clean with a damp cloth.
4. The roasting lid and roasting rack are not dishwasher safe. Wash the cooking pot, roasting rack and roasting
lid with warm, soapy water. The cooking pot can be washed in the dishwasher.
5. Dry all parts after each use.
6. If food residue is stuck onto the cooking pot, fill the pot with water and allow to soak before cleaning. DO
NOT use scouring pads. If scouring is necessary, use a non-abrasive cleanser or liquid detergent with a
nylon pad or brush.
7. Please return the unit to your distributor for any other servicing.
NOTE: After usage, the exterior of the cooking pot may produce a black film when cleaned. This is due to
oxidation and occurs from normal usage.
Replacement Parts
To order additional parts and accessories, feel free to contact customer service.
ENVIRONMENT
CAUTION:
Do not dispose of this product as it has with other household products. There is a separation of this waste
product into communities, you will need to inform your local authorities about the places where you can return
this product. In fact, electrical and electronic products contain hazardous substances that have harmful effects
on the environment or human health and should be recycled. The symbol here indicates that electrical and
electronic equipment should be chosen carefully, a wheeled waste container is marked with a cross.
Adeva SAS / H.Koenig Europe - 8 rue Marc Seguin - 77290 Mitry Mory - France
www.hkoenig.com - sav@hkoenig.com - contact@hkoenig.com - Tél: +33 1 64 67 00 01

FRANÇAIS
MESURES DE SÉCURITÉ IMPORTANTES
Vous devez seulement utiliser cet appareil à domicile
LORSQUE VOUS UTILISEZ DES APPAREILS ELECTRO-MENAGERS, VOUS DEVEZ TOUJOURS
PRENDRE DES PRECAUTIONS ELEMENTAIRES. CI-DESSOUS, VOUS EN TROUVEREZ QUELQUESUNES:
LISEZ ATTENTIVEMENT TOUTES LES INSTRUCTIONS AVANT D’UTILISER LA PRISE DE VOTRE
MIJOTEUSE.
AVERTISSEMENT: Afin d’éviter de recevoir un choc électrique, VOUS DEVEZ UNIQUEMENT UTILISER LA
BONNE PRISE. Si cette dernière ne correspond pas à votre appareil, veuillez contacter un électricien, afin qu’il
puisse vous venir en aide.
Ne modifiez JAMAIS la prise électrique.
AVERTISSEMENTS:
AFIN DE RÉDUIRE LES RISQUES D’ACCIDENTS, DE BLESSURES OU D’INCENDIES, VOUS DEVEZ PRENDRE
LES PRÉCAUTIONS SUIVANTES :
1. Afin de ne pas recevoir un choc électrique, vous ne devez pas plonger cet appareil ou sa prise dans l'eau ou
dans tout autre liquide. Cependant, s'il tombe dans un liquide quelconque, veuillez débrancher
immédiatement le cordon d'alimentation de la prise murale, et ne mettez PAS les mains dans le liquide.
2. Attention, l'appareil peut s'échauffer durant l'utilisation. Il ne faut PAS toucher les surfaces chaudes, mais
plutôt tenir l'appareil par les anses. Utilisez toujours des gants à four lorsque vous attrapez la marmite.
3. Ne permettez PAS aux jeunes enfants de manipuler cet appareil ou de jouer avec lui. Il faut toujours
surveiller les enfants lorsqu'un appareil électroménager est utilisé par eux ou près d’eux.
4. Cet appareil peut être utilisé par des enfants âgés de 8 ans (ou plus), ou par des personnes qui ont un
handicap physique, mental ou sensoriel, ou qui n'ont pas d'expérience et de connaissances en la matière, à
condition qu’ils soient instruits sur son utilisation par une personne qui est responsable de leur sécurité. Les
enfants ne doivent pas nettoyer ou entretenir l’appareil, et ils ne doivent pas jouer avec celui-ci.
5. Vous devez toujours débrancher l’appareil avant de l’assembler, de le désassembler ou de le nettoyer. Afin
de le debrancher, vous devez tenir le cordon d’alimentation et le deconnecter de la prise murale, au lieu de
tirer dessus. N’oubliez pas de laisser l’appareil refroidir avant d’ajouter ou d’enlever des pièces.
6. NE MALMENEZ PAS le cordon d’alimentation, ne le tenez pas pour transporter l’appareil et ne tirez pas
dessus pour le débrancher.
7. IL NE FAUT PAS utiliser l’appareil si sa prise ou son cordon d’alimentation sont endommagés, ou encore s’il
fonctionne ou que vous l’avez fait tomber. Si vous rencontrez un de ces problèmes, veuillez ramener
l’appareil au distributeur. Si le cordon d’alimentation est endommagé, il doit être remplacé par le fabricant,
l’agent de service ou une personne qualifiée, afin d’éviter un accident.
8. Afin de savoir comment nettoyer régulièrement l'appareil, veuillez consulter la section intitulée ‘Nettoyage et
Entretien’. Si votre appareil a besoin d'un entretien spécial, veuillez le ramener au distributeur.
9. Ne laissez PAS le cordon d'alimentation toucher les surfaces chaudes, telles que la cuisinière. Il faut
toujours utiliser cet appareil sur une surface nivelée et sèche.
10. Faites très attention lorsque vous déplacez un appareil qui contient de l’huile chaude ou d’autres liquides
chauds. Il faut toujours utiliser des gants à four ou des supports à pots/ Laissez l’huile froide refroidir avant de
déplacer l’appareil ou de le nettoyer.
11. Afin d’éviter d’éventuels dégâts causés la vapeur, ne placez pas l’appareil à proximité des murs ou des
placards.
12. Lorsque vous utilisez l’appareil, prévoyez suffisamment de place au-dessus de celui-ci et sur ses côtés, afin
de permettre à l’air de circuler librement. Si L’appareil est placé sur une surface où la chaleur peut causer des
problèmes, veuillez utiliser un coussinet chauffant isolé ou un trépied.
13. Faites très attention en enlevant le couvercle après la cuisson, car la vapeur peut vous bruler
dangereusement. Soulevez toujours le couvercle loin de vous, et prenez garde à ne pas faire de l’eau tomber
sur l’appareil.
14. L’appareil NE DOIT PAS être utilisé dehors, ou dans un endroit où le cordon d’alimentation et le logement
peuvent entrer en contact avec l’eau.
15. N’UTILISEZ PAS cet appareil pour faire autre chose.
16. N’OBSTRUEZ PAS le purgeur de vapeur durant la cuisson.
17. Eloignez-vous toujours du purgeur de vapeur qui se trouve à l’arriere de l’appareil.
18. IL NE FAUT PAS placer ou utiliser l’appareil sur une surface chaude, ou à côté (comme un bruleur à gaz ou
électrique, une cuisinière ou un four chaud).
19. Il ne faut jamais utiliser des accessoires qui ne sont pas conseillés par le fabricant, car ceci peut causer un
incendie, un choc électrique ou une blessure personnelle.
20. IL NE FAUT PAS utiliser cet appareil pour faire de la friture.
21. ATTENTION: AFIN DE REDUIRE LES RISQUES DE CHOCS ELECTRIQUES, VOUS DEVEZ FAIRE
CUIRE LES ALIMENTS DANS LES RECIPIENTS QUI SONT RECOMMANDES PAR LES
DISTRIBUTEURS ET PLACES DANS LA MARMITE. N’UTILISEZ PAS L’APPAREIL SANS Y METTRE LA
MARMITE AMOVIBLE.
22. Afin de déconnecter l’appareil, éteignez-le et débranchez-le de la prise murale.
23. CET APPAREIL DOIT UNIQUEMENT ETRE UTILISE A DOMICILE. Il ne faut pas ;’utiliser pour autre chose,
et il ne faut pas le mettre dehors.
24. Afin d’éviter que l’appareil ne tombe de la table ou du plan de travail, ce qui pourrait l’endommager ou
vous blesser, ne laissez pas le cordon d’alimentation dépasser de la surface.
25. Si vous conservez la nourriture trop longtemps a température ambiante, cela peut causer des bactéries et
vous rendre malade.
26. S’il y a une coupure d’électricité, un message d’erreur s’affichera sur l’appareil. Il est conseillé de vous
débarrasser de toute nourriture qui a été exposée à une température ambiante pendant plus d’une heure.
NOTE: Le cordon d’alimentation de cet appareil est court, afin que vous ne trébuchiez pas dessus et qu’il ne s’emmêle
pas. Une plus longue rallonge électrique peut être utilisée si vous êtes assez prudent.
Si vous désirez recevoir d’autres conseils d’ordre technique, veuillez contacter le fabricant.
RANGEZ CES INSTRUCTIONS SOIGNEUSEMENT
SPÉCIFICATIONS TECHNIQUES
Tension: 220V. 50Hz. puissance: 1350 Watts
Table des Matières
Se familiariser avec la mijoteuse …………………………………………………..
Se familiariser avec le Panneau de Contrôle de la mijoteuse.............................
Apprendre à utiliser la mijoteuse …………………………………………………...
L’utilisation des différentes fonctions……………………………………………….
Conseils ………………………………………………………………………………..
Le guide sur la résolution des problèmes ...........................................................
Le nettoyage & l’entretien...................................................................................
Les pièces de rechange......................................................................................
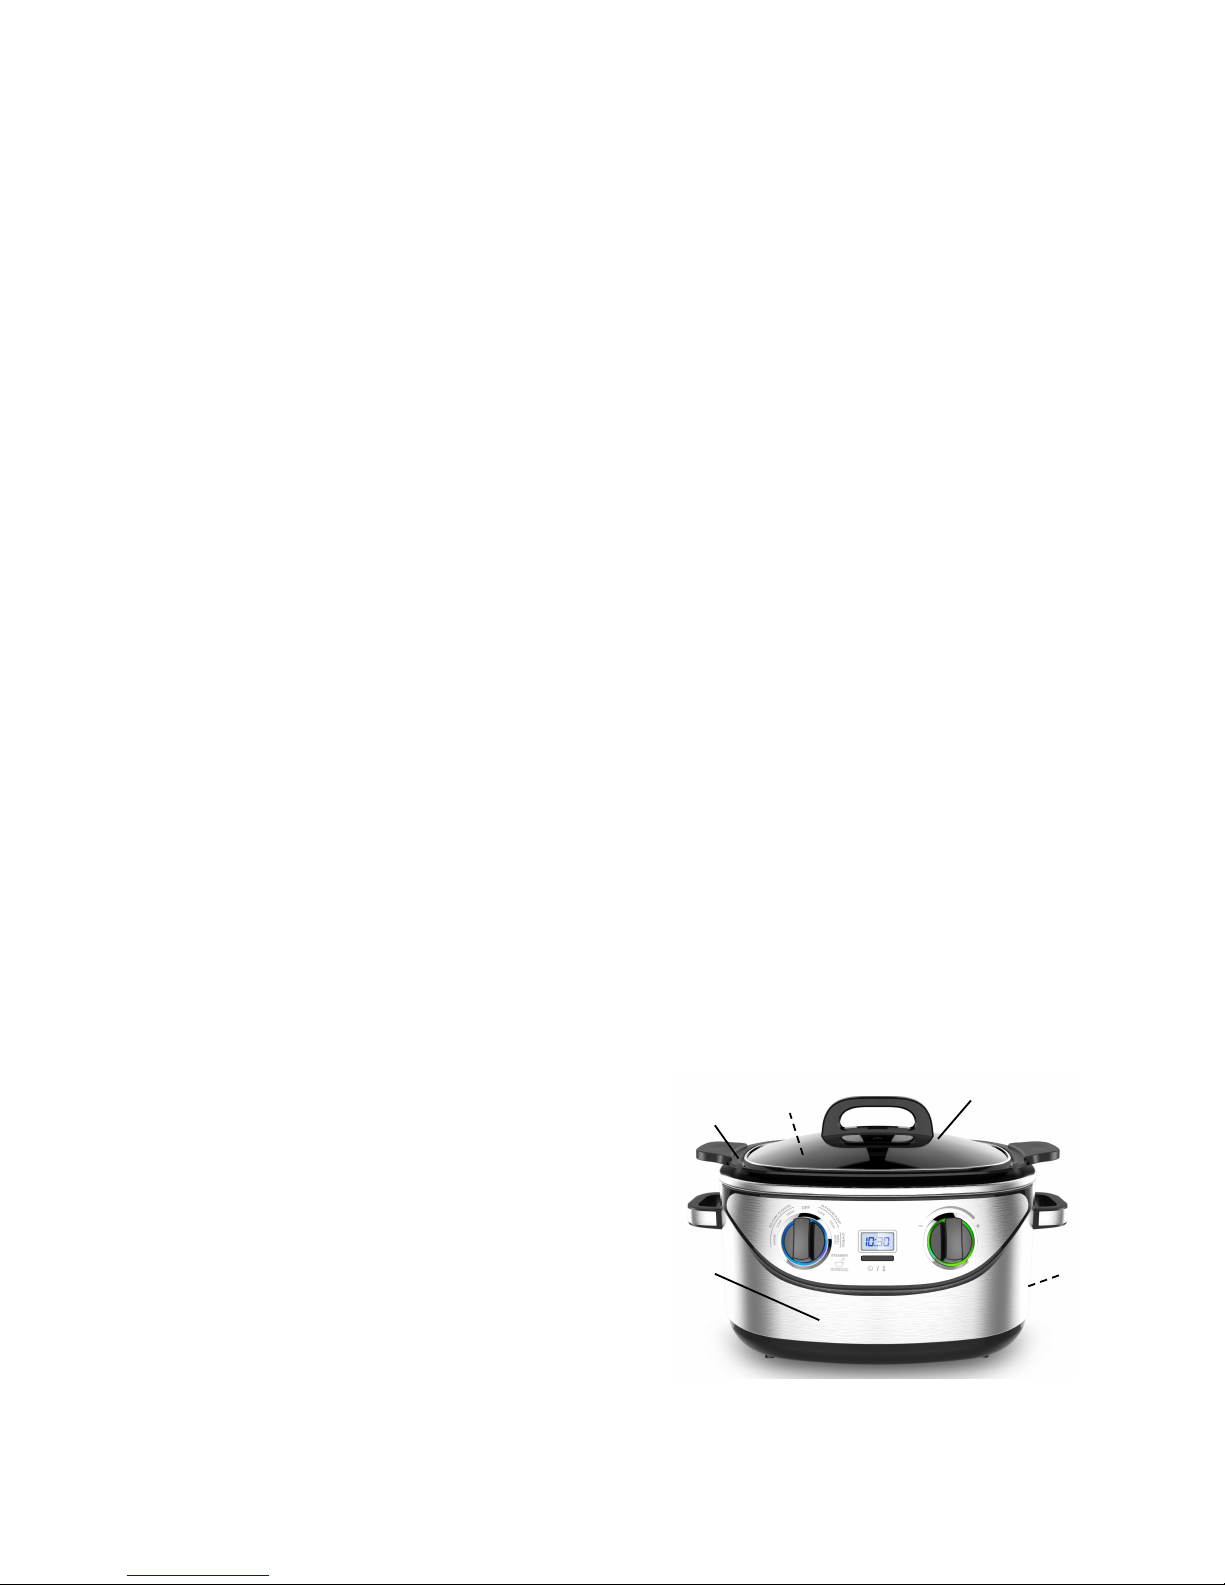
Voici les détails à propos de votre système de cuisson robotisée :
1. Couvercle à rôtir avec manche
2. Grille à rôtir (pas affiché)
3. Marmite
4. Logement principal
5. Panneau de Contrôle
6. Cordon d'alimentation (pas affiché)
Le four à la vapeur de la mijoteuse propose une méthode révolutionnaire pour préparer votre nourriture de
manière plus rapide, plus facile et plus saine. Les contrôles électroniques sont faciles à utiliser et vous offrent la
flexibilité de tout cuire dans une seule et unique marmite, si vous le désirez.
1"
2"
3"
4"
6"
5"

CARACTÉRISTIQUES:
-
Paramètres de la cuisinière: Bas (mijoter), Elevé (dessécher)
-
Paramètres de la mijoteuse (bas, élevé).
-
Paramètres de réchauffement.
-
Cuisson au four
-
Cuisson à la vapeur
-
Contrôle numérique avec minuterie pour le four
-
Réchauffement automatique pour la cuisson lente et la cuisson à la vapeur.
-
Arrêt automatique
Se familiariser avec le Panneau de Contrôle du Système de Cuisson Robotisé.
Sélecteur de mode
Tournez le sélecteur de mode pour choisir La Cuisinière, Le Réchauffement, La Cuisson Lente, La Cuisson au Four et La
Cuisson à la Vapeur.
Cuisiniere – Vous pouvez utiliser la mijoteuse comme cuisinière, pour faire mijoter ou dessécher vos aliments.
Cuisson lente – Vous pouvez utiliser le Système de Cuisson Robotisé comme mijoteuse. Sélectionnez la
puissance (haute ou basse) et laissez l’appareil faire le reste. Apres la cuisson, il passera en mode de
Réchauffement Automatique.
Réchauffement – Utilisez le réchauffement après la caisson, afin de garder les aliments au chaud pendant une
période de 30 minutes à 12 heures.
Four – Utilisez le Système de Cuisson Robotisé au lieu du four ; vous pouvez rôtir les aliments, les faire cuire
au four ou même les laisser cuire à la vapeur.
Cuisson à la vapeur- Vous pouvez utiliser cet appareil pour cuire les aliments à la vapeur.
L’écran d’affichage LED
L’écran LED affiche le réglage de la minuterie pour les modes suivants : cuisson lente,
réchauffement et cuisson au four, et il indique également la température du four.
Bouton qui règle la température et la durée de la cuisson au four:
Utilisez ce bouton pour naviguer entre la Durée et la Température lorsque vous désirez faire cuire quelque
chose au four.
Sélecteur de Réglage
Utilisez le Sélecteur de Réglage pour régler la minuterie, afin qu’elle affiche un compte à rebours pour le mode de
Cuisson Lente, ou pour changer la durée et la température lorsque vous désirez faire cuire quelque chose au four.
Réchauffement Automatique
Le Système de Cuisson Robotisé passera en mode de réchauffement automatique lorsque la durée de la
cuisson sera terminée.
La préparation pour l'utilisation du système de cuisson lente :
Avant d’utiliser la mijoteuse pour la première fois.
1. Enlevez soigneusement toutes les pièces de la boite. Lavez la mijoteuse, la grille et le couvercle à rôtir avec de
l’eau chaude et savonneuse. Vous pouvez également laver la mijoteuse dans le lave-vaisselle. Par contre, il n’est
pas conseillé d’y mettre la grille et le couvercle à rôtir. Ne placez pas le logement principal dans l’eau ou dans le
lave-vaisselle, mais essuyez-le plutôt à l’aide d’un chiffon humide.
2. Lorsque vous êtes prêt à utiliser votre mijoteuse, veuillez placer la marmite dont le logement principal. Vous ne
devez jamais utiliser cet appareil si la marmite ne se trouve pas dans le logement qui lui est destiné.
3. Branchez l’appareil dans la prise électrique
4. L’appareil ne s’allumera pas, tant que le réglage de mode indique ‘Eteindre’.
5. Lorsque vous êtes prêt à utiliser l’appareil, sélectionnez la fonction que vous désirez. La lumière rouge
s’allumera pour indiquer que l’appareil est bien allumé.
6. Suivez les instructions qui se trouvent sur les pages suivantes, afin d’apprendre à utiliser les différentes fonctions.

L’Utilisation Des Différentes Fonctions
Cuisinière:
1. Placez la marmite à l’intérieur du logement.
2. Placez les aliments que vous désirez faire cuire dans la marmite, et disposez-les de manière égale, afin d’obtenir de
meilleurs résultats.
3. Choisissez le mode qui vous convient pour la cuisinière, afin de faire chauffer l’appareil. Puis l’affichage LED
indiquera le bouton ‘ALLUMER’ et la lumière s’allumera.
4. Apres avoir utilisé l’appareil, éteignez-le et débranchez-le, puis laissez-le refroidir avant de le manipuler.
NOTE: L'appareil ne fonctionnera pas si la marmite ne se trouve pas dans le logement principal.
CONSEIL: Lorsque vous désirez dessécher de la viande, réglez la cuisinière sur
“Elevé”, et si vous voulez faire des légumes sautés, réglez la cuisinière sur “Bas” or “Elevé”.
Arrêt Automatique de la Cuisiniere:
Par mesure de précaution, nous avons programmé cet appareil pour qu’il s’éteigne automatiquement après un
certain temps.
Fonction ‘BAS’ de la cuisinière: l’appareil s’éteint automatiquement après 1 heure.
Fonction ‘ELEVE’ de la cuisinière: l’appareil s’éteint automatiquement après 4 heures.
Cuisson lente:
Cette mijoteuse a une capacité de 5.5L, ce qui la rend idéale pour toute la famille. Les sélections BAS et
ELEVE indiquent le Réchauffement Automatique après la cuisson, afin de garder la nourriture au chaud.
Utilisez la fonction ELEVE de la Cuisinière pour faire dessécher les viandes et les légumes avant de les
cuire lentement, car ceci en améliorera la saveur.
Ne laissez pas la nourriture dépasser le haut de la marmite, car ceci risque de la faire déborder.
1. Placez les ingrédients dans la marmite et recouvrez celle-ci.
2. Branchez l’appareil dans la prise électrique.
3. Suivez attentivement les recettes pour savoir s’il faut programmer le sélecteur de mode sur Bas ou Elevé.
L’affichage LED indiquera “8:00” ou “4:00”, dépendant des sélections que vous avez faite pour la cuisson
lente, puis la lumière s’allumera.
4. L’écran d’affichage indique “8:00” pour l’option ‘Bas” et “4:00” pour l’option ‘Elevé’. Tournez le
sélecteur de mode pour choisir le temps que vous désirez. Celui-ci augmente ou diminue
par 30 minutes, pendant près de 12 heures. La minuterie se mettra à faire un compte à
rebours pendant 3 secondes. Vous ne devriez pas soulever continuellement le couvercle
durant la cuisson.
5. Après la cuisson, l’appareil passera en mode de Réchauffement Automatique pendant presque 12
heures.
6. Apres l’utilisation de l’appareil, veuillez l’éteindre et le débrancher ; n’oubliez pas de le laisser refroidir
complètement avant de le tenir.
Arrêt automatique de la mijoteuse:
Pour votre sécurité, cet appareil s'éteint automatiquement, et en se basant sur la fonction qui a été
sélectionnée,
Lorsque l’appareil est en mode “Bas ou Elevé”, il passera automatiquement en mode Réchauffement
Automatique pendant 12 heures ; après cette période, l’appareil s’éteindra automatiquement.
Les paramètres de chaleur :
Vous pouvez utiliser cette fonction pour réchauffer la nourriture pour une durée de 30 minutes à 12 heures. Ceci
peut être utilisé pour la nourriture qui a déjà été préparée dans la mijoteuse, ou pour celle que vous avez
préparée ailleurs, mais que vous désirez réchauffer.
1. Placez la nourriture cuite à l’intérieur de la marmite.
2. Branchez l’appareil dans la prise électrique.
3. Utilisez le sélecteur de mode pour réchauffer la nourriture.
4. Le temps a été présélectionné et indique “6:00” heures. Vous pouvez utiliser le sélecteur de mode pour
choisir le temps qu’il faut pour garder la nourriture au chaud
5. Après avoir utilisé l'appareil, appuyez sur le bouton ‘éteint’ sur le sélecteur de mode, et débranchez l'appareil.
Veuillez laisser ce dernier refroidir avant de l'attraper.

Arrêt automatique pour le réchauffement:
Pour votre sécurité, cet appareil s'éteint automatiquement, et en se basant sur la fonction qui a été
sélectionnée.
L’Utilisation Des Différentes Fonctions – (suite)
Le four:
Étant donné que la température du four varie entre 120° et 220°, il est idéal pour faire rôtir les
légumes et la viande, et pour également faire des gâteaux. La minuterie peut être programmée avec
des intervalles de 5 minutes, et ceci peut durer jusqu'à 6 heures.
L’utilisation du four pour rôtir les aliments :
1. Placez la nourriture sur la grille à rôtir, posez celle-ci dans la marmite, puis mettez le couvercle
sur le tout.
2. Branchez l’appareil dans la prise électrique.
3. Choisissez l'option ‘ Four’ sur le sélecteur de mode, et la lumière s'allumera.
4. Lorsque l’affichage indique “175°C”. tournez le sélecteur de mode pour choisir la
température. Celle-ci augmentera par 15°C jusqu’à ce qu’elle atteigne 220°C. Puis, appuyez sur
le bouton pour régler la minuterie et la température du four, afin de choisir la durée de la cuisson.
Le temps augmente par 5 minutes, jusqu’à ce qu’il atteigne 6 heures.
5. La minuterie commencera son compte à rebours après 3 secondes. Le temps et la température
peuvent être réglés durant le cycle de cuisson. Appuyez sur le bouton qui indique le Temps et la
Température du Four, puis réglez le temps et la température à l’aide du sélecteur de mode.
6. Lorsque la cuisson sera terminée, la minuterie clignotera durant 2 minutes, puis l'appareil
s'éteindra.
IMPORTANT: Soyez prudent lorsque vous attrapez des aliments chauds.
7. Après avoir terminé votre utilisation, veuillez éteindre l'appareil. Ensuite, débranchez-le et
laissez-le refroidir avant de l'attraper.
Cuisson à la vapeur :
La cuisson à la vapeur est efficace car les aliments sont sains et prépares rapidement, grâce à l’incorporation de
la vapeur durant la cuisson. La technique du Rôtissage à la Vapeur peut être utilisée pour plusieurs viandes que
vous aviez l’habitude de rôtir au four. Il est conseillé de faire dessécher certains morceaux de viande AVANT de
les rôtir, alors que d’autres devraient être desséchés APRES le rôtissage.
Si vous désirez dessécher des aliments avant de les rôtir, ce n’est pas la peine de préchauffer l’appareil.
La plupart des viandes peuvent être desséchées durant moins de 10 minutes. Il s’agit simplement de la faire
dorer, afin de lui donner un peu de couleur.
Ajoutez de l’eau au fond de la marmite; en général, 1 tasse d’eau est suffisante pour 10 minutes de caisson à la
vapeur.
Si vous avez besoin d’ajouter de l’eau durant la cuisson, soulevez soigneusement le couvercle (tenez-le loin de
vous) et versez un peu d’eau à température ambiante dans la marmite. L’eau ne doit PAS dépasser la grille à rôtir
ou toucher les aliments, car ceci risqué d’en faire des aliments pochés.
Faites attention lorsque vous placez des aliments chauds sur la grille à rôtir.
ATTENTION: N’AJOUTEZ AUCUN liquide à la base du logement principal de l’appareil.
Conseils:
1 Le temps de caisson peut varier selon plusieurs facteurs: la température sélectionnée, celle de la marmite
et celle des ingrédients.
2 Il faut toujours utiliser des ustensiles non-adhésifs dans la marmite, car les ustensiles en métal peuvent
endommager cette dernière.
3 Afin que la nourriture soit dorée de manière égale, elle doit justement être disposée de manière égale au fond
de la marmite ou sur la grille à rôtir.
4 La durée et la température de la cuisson peuvent être changées à n’importe quel moment durant la
cuisson au Four. Appuyez sur le bouton qui indique le Temps et la Température du Four, afin
d’effectuer les changements nécessaires.
 Loading...