

Hkoenig NV700 Instruction Manual
Instruction manual
Manuel d’utilisation
Bedienungsanleitung
Handboek
Manual de
Utilización
Manuale d’uso
NV700
STEAM CLEANER
NETTOYEUR VAPEUR
DAMPFREINIGER
STOOMREINIGER
LIMPIADOR A VAPOR
PULITORE A VAPORE

ENGLISH
STEAM CLEANER
Explanation of symbols :
Safety instructions :
Please read these carefully and comply with them in order to prevent
personal injury and damage to property.
Supplementary information
This device works with hot steam!
Intended Use
• The device is intended to be used exclusively for steam-cleaning water-
resistant and heat-resistant surfaces, for example bathroom fittings,
mirrors, tiles, shower cubicles, and certain floor coverings. Ask a specialist
whether your flooring is suitable for cleaning with the steam cleaner. Always
test the cleaning at a small spot first.
• The device is not suitable for surfaces which are sensitive to heat or
moisture, for example wallpaper, velvet, silk, glued objects, unsealed
and/or waxed wooden surfaces, soft plastic, leather and cold glass (with
outside temperatures of below 10°C).
• The device is not suitable for cleaning electronic equipment and fragile
objects.
• The device is for personal use only and is not intended for commercial
applications.
• Use the device only as described in the instructions. Any other use is
deemed to be improper.
• The warranty does not cover faults caused by incorrect handling, damage,
calcification or repair attempts.
This also applies to normal wear and tear

Safety Instructions
Dangers of Injury
• This device is not intended for use by persons
with reduced capacity on the physical, mental
or sensory or lack of experience and
knowledge (including children), unless they
have had instructions to use the appliance by
a person responsible for their safety use of the
appliance and understand the hazards
involved. Children should be supervised to
ensure they do not play with the device.
• The device should only be used and stored out
of the reach of children and animals. Improper
use can lead to scalding and electric shock.
• Keep children and animals away from the
packaging film. There is a danger of
suffocation!
• Never aim steam directly at people, animals or
plants. This can cause severe scalding.
• Only hold the device by the handle when you
are operating it. There is a danger of scalding!
• Never leave the device unattended when it is
connected to the mains.
• Shortly after use, the attachment used may still
be very hot. You should therefore wait for a few

minutes until it has completely cooled down
before you detach it.
• Danger of scalding! Always allow the device to
cool down completely before you pour water in
or out, clean the device and/or store it away.
Never attempt to open the water reservoir
during use. Always make sure that the water
reservoir is firmly shut before you use the
device.
• Make sure that the connected mains cable
does not present a trip hazard.
Danger of Fire
• Do not use the device in rooms containing
easily ignitable dust or poisonous and
explosive fumes.
• Do not insert anything into the openings of the
device and make sure that these do not
become clogged.
Danger of Electric Shock
• The device should only be connected to a
properly installed plug socket with safety
contacts. The plug socket must also be readily
accessible after connection. The mains
voltage must match the technical data of the

device. Only use suitable extension cables
whose technical data is the same as that of the
device.
• Do not operate this appliance if it has a
damaged cord or plug, if it is not working
properly or if it has been damaged or dropped.
If the supply cord is damaged, it must be
replaced by the manufacturer or its service
agent or a similarly qualified person in order to
avoid a hazard.
• This device must be earthed when connected.
Use only the appropriate plug. Do not try to
circumvent the earthing.
• Never immerse the device in water or other
liquids! Ensure that the device, the cable or the
plug do not fall into water or become wet.
Should the device fall into water, switch off the
power supply immediately. Only then should
you remove it from the water.
• Never touch the device, the cable or the plug
with wet hands to prevent electric shocks.
• The steam must not be aimed directly at
electrical equipment, mains cables or parts
containing electrical components (for example
inside ovens, fridges, switches and lights,
microwave ovens, screens).

• Pull out the mains plug after each use before
you remove/ change an attachment, top
up/empty the water reservoir or clean the
device. Always pull the plug and never the
cable.
• Use the device only in closed rooms.
• Always check the device for damage before
putting it into operation. Use the device only
when it is completely assembled and
operational. The device must not be used if it
has been dropped, if obvious signs of damage
are visible or if it has leaks.
• In the event of damage/faults, switch the
device off immediately.
• Never try to repair the device, the mains cable
or the mains plug yourself or replace parts. If
defects occur, the device may no longer be
used. Get in touch with the nearest customer
service centre/specialist dealer or, in the event
of damage, please contact our customer
service department. Incorrect repairs may
cause considerable risks to the user.
Avoiding Damage to Material, Property and the
Device
• Position the cable in such a way that it does not

become squashed or bent and does not come
into contact with hot surfaces.
• Only switch on the device when the water
reservoir is filled with water as otherwise the
water pump may be damaged and the useful
service life of the device may be shortened.
• Do not place any heavy objects on the device,
the cable or the plug.
• Do not pull or carry the device by the cable.
• Do not use any other accessories. Use only
original manufacturer's accessories.
• Never pour any cleaning agent or other
chemical additives into the device. This could
destroy the device and safe working is no
longer guaranteed.
• Never cover up the steam outlet openings and
do not stick any objects into them.
• Maintain a sufficient distance from heat
sources such as hobs or ovens in order not to
damage the device.
• Do not drop the device or allow it to be
knocked violently.
• Do not expose the device or accessories to
extreme temperatures, wide temperature
fluctuations, open fire, direct sunlight, and do
not expose the device housing to any moisture

or wet conditions.
• Always try cleaning first at a small,
inconspicuous spot.
• Never direct the steam at one spot for too long.
• Never use the device on cold glass surfaces (at
temperatures of below 10°C). The hot steam
could cause the glass to shatter.
• In the case of surfaces treated with wax, the
heat and steam may remove the wax!
• Do not use any caustic or abrasive cleaning
agents (e.g. vinegar) or cleaning pads to clean
the device.
• Put the device back into its storage position
only once it has completely cooled down and
there is no more water in the water reservoir.
• Store the device in a dry, clean place that is not
accessible to children and animals.
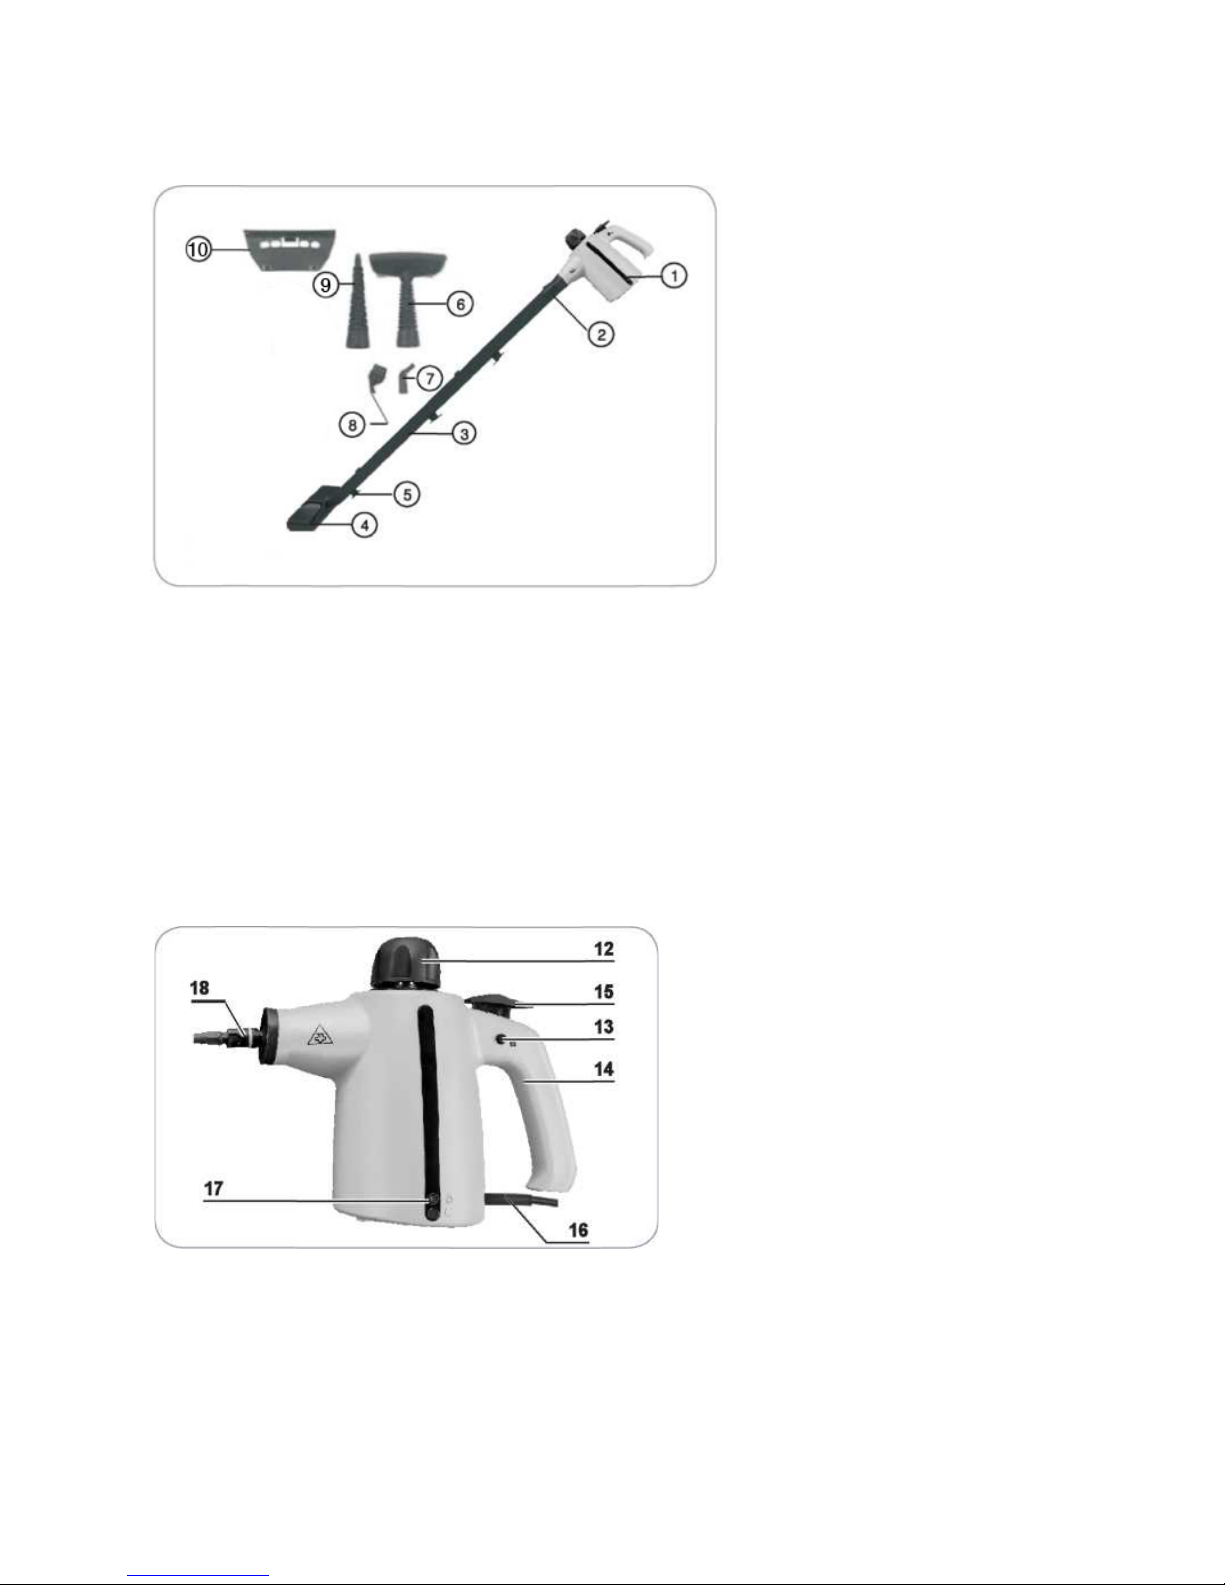
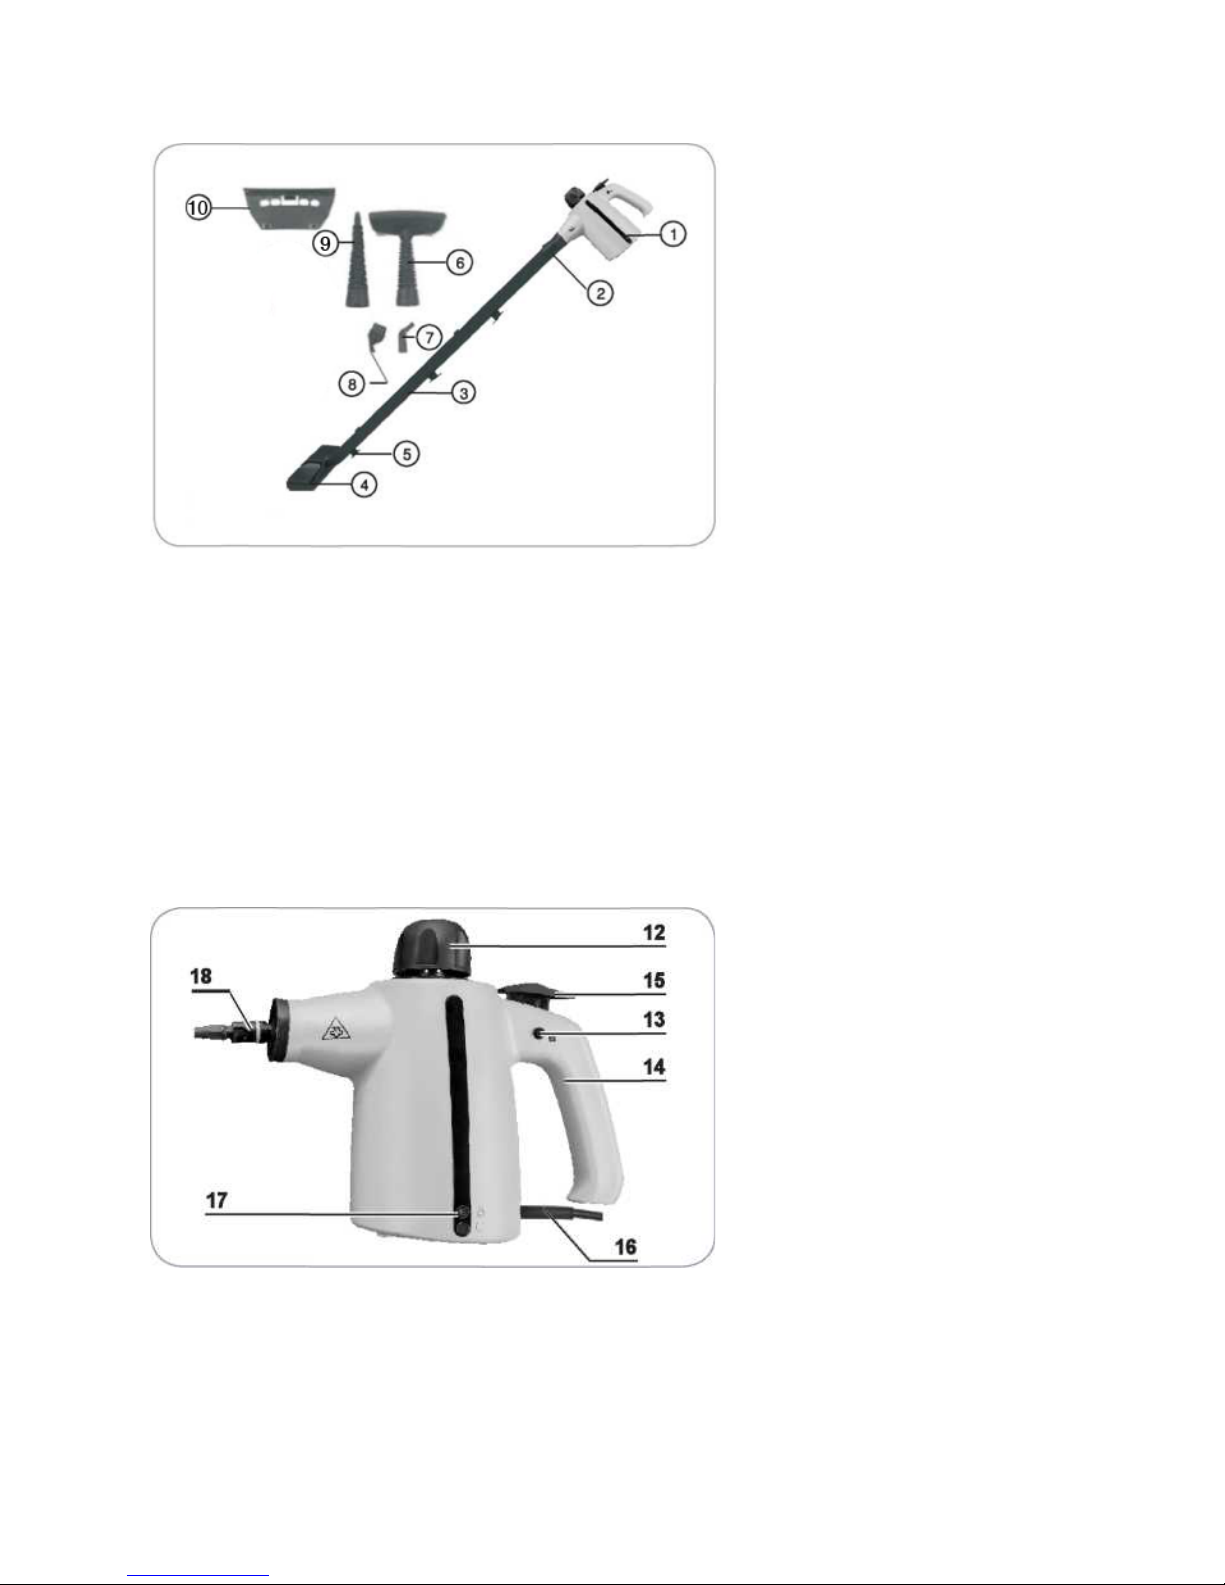
Items Supplied
Device Overview
1 Main unit (1x)
2 Adapter (1 x)
3 Extension tube (2x)
4 Floor attachment (1 x)
5 Connecting piece (1 x)
6 Combination attachment (1 x)
7 Curved attachment (1x)
8 Brush attachment (1 x}
9 Long nozzle attachment (1x)
10 Scraper lip (1 x)
Not shown:
• Cleaning cloth, small, for the combination attachment (1x)
• Floor cloth, large, for the floor attachment (1 x)
• Measuring cup (1x)
• Funnel for filling up the water reservoir (1 x)
12 Safety reservoir cap
13 Safeguard (blocks the steam
trigger)
14 Handle
15 Steam trigger
16 Mains cable
17 Control lamp
18 Steam nozzle
Before Initial Use
Caution
•
Danger of suffocation from plastic films and bags! Keep children and animals away
from the packaging material.
•
Water residues in the water reservoir are attributable to the fact that this device has
been tested and do not constitute a defect.
•
Unpack the items supplied and check them for completeness (see the "Items Supplied"
chapter) and transport damage. If the device, plug, mains cable or accessories do have
damage, do not use the device(!), but contact our customer service department.
•
Before using the device, remove all packaging materials and any labels that may be on
the device and are used for protection during transportation or for advertising.
Mounting the Accessories
Caution
• plug and never the cable.
• Shortly after use, the attachment used may still be very hot. You should therefore wait
for a few minutes until it has completely cooled down before you detach it.
Long Nozzle Attachment
The long nozzle attachment (10) can be used anywhere. It is ideally suited to cleaning
heat-resistant surfaces in the kitchen and bathroom, corners and places that are hard
to reach.
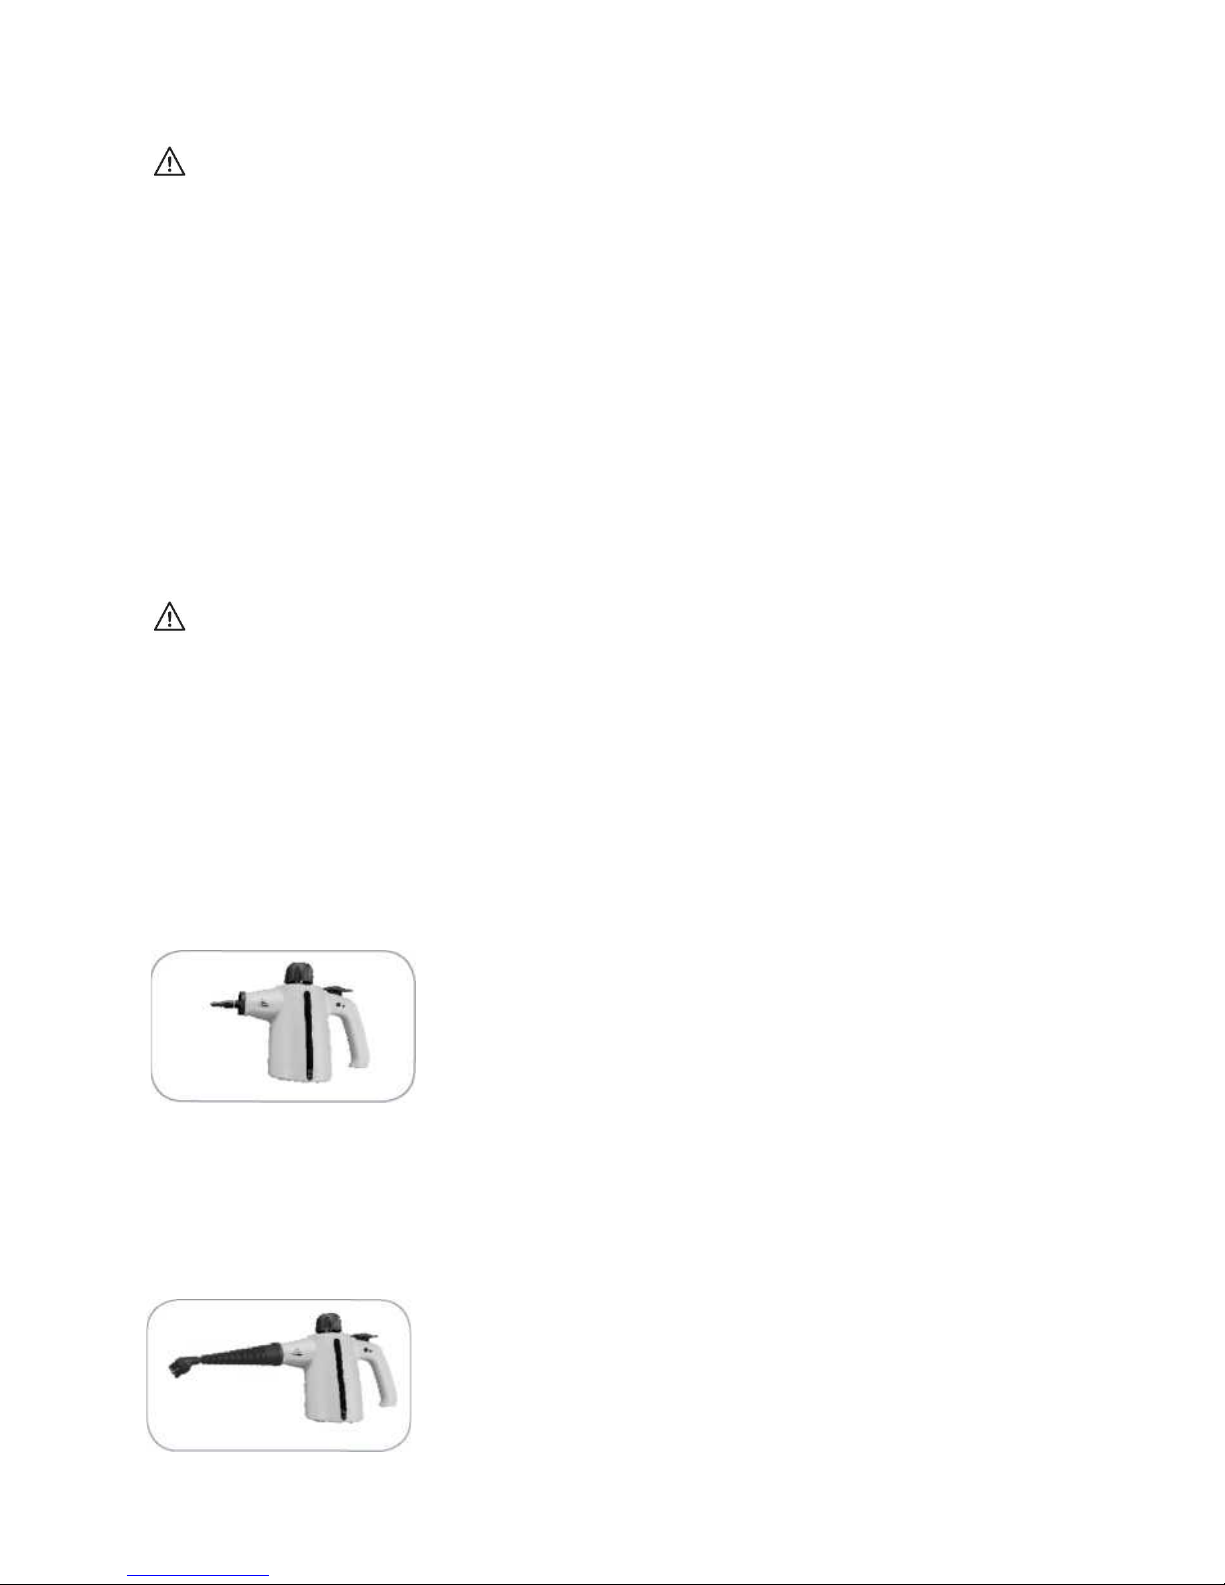
The long nozzle attachment can have the brush attachment (8)
or the curved attachment (7} plugged onto it.
• Plug the long nozzle attachment as fer as it will go onto the
steam nozzle (18) of the device.
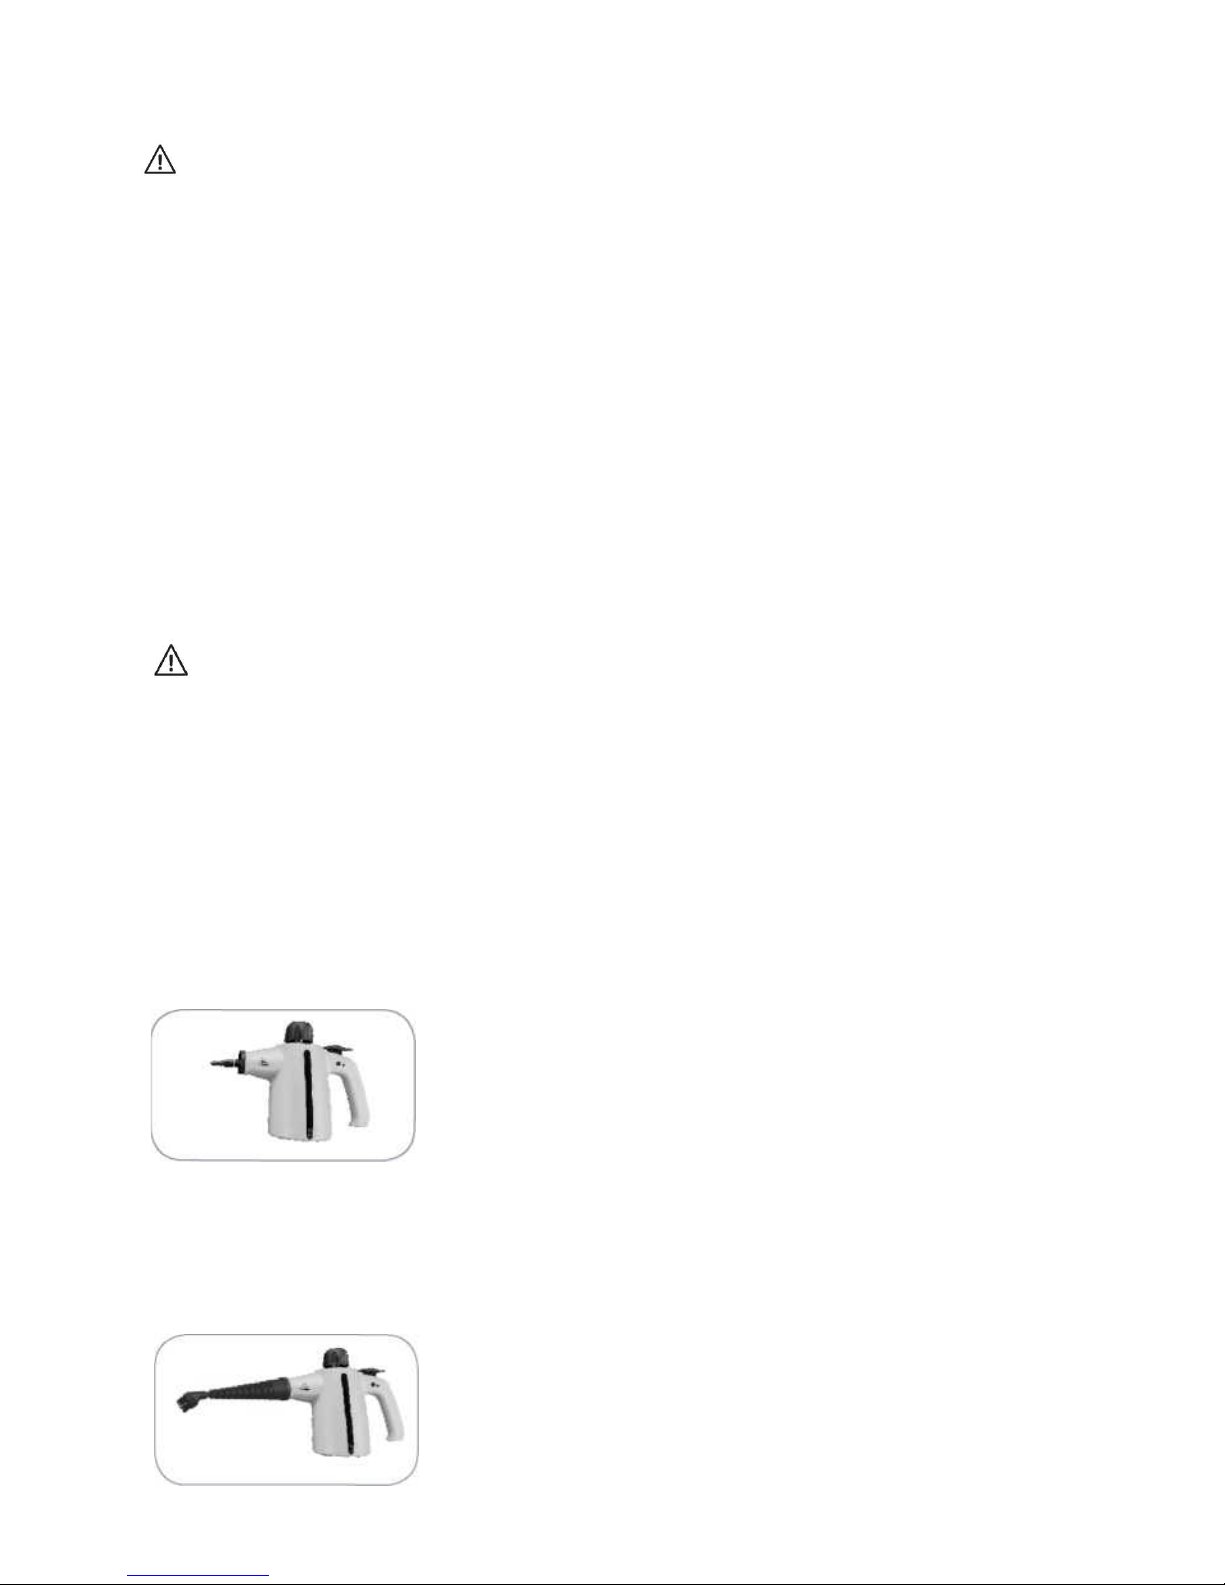
Brush Attachments
The brush attachment (8) is used for cleaning all sorts of possible objects, e.g. ovens,
bathroomfittings, bathtubs, sinks,toys.
• Plug the brush attachment directly onto the steam nozzle (18)
of the device or the long nozzle attachment (10).
Curved Attachment
Use the curved attachment (7) for cleaning places or crevices which are hard to reach.
• Plug it directly onto the steam nozzle (18) of the device or
the long nozzle attachment (10).
Combination attachment
The combination attachment (6) is used in conjunction with the cleaning cloth or the scraper
lip (11).
• Plug the combination attachment as far as it will go onto the steam nozzle (18) of the
device and screw it on tight.
Cleaning Cloth
The cleaning cloth is suitable for cleaning and refreshing upholstery and textiles and also for
scratch-sensitive and fairly large surfaces, e.g. shower cubicles.
• Pull the cleaning cloth over the combination attachment (6). Allow the cleaning cloth
to cool down after use before you detach it!
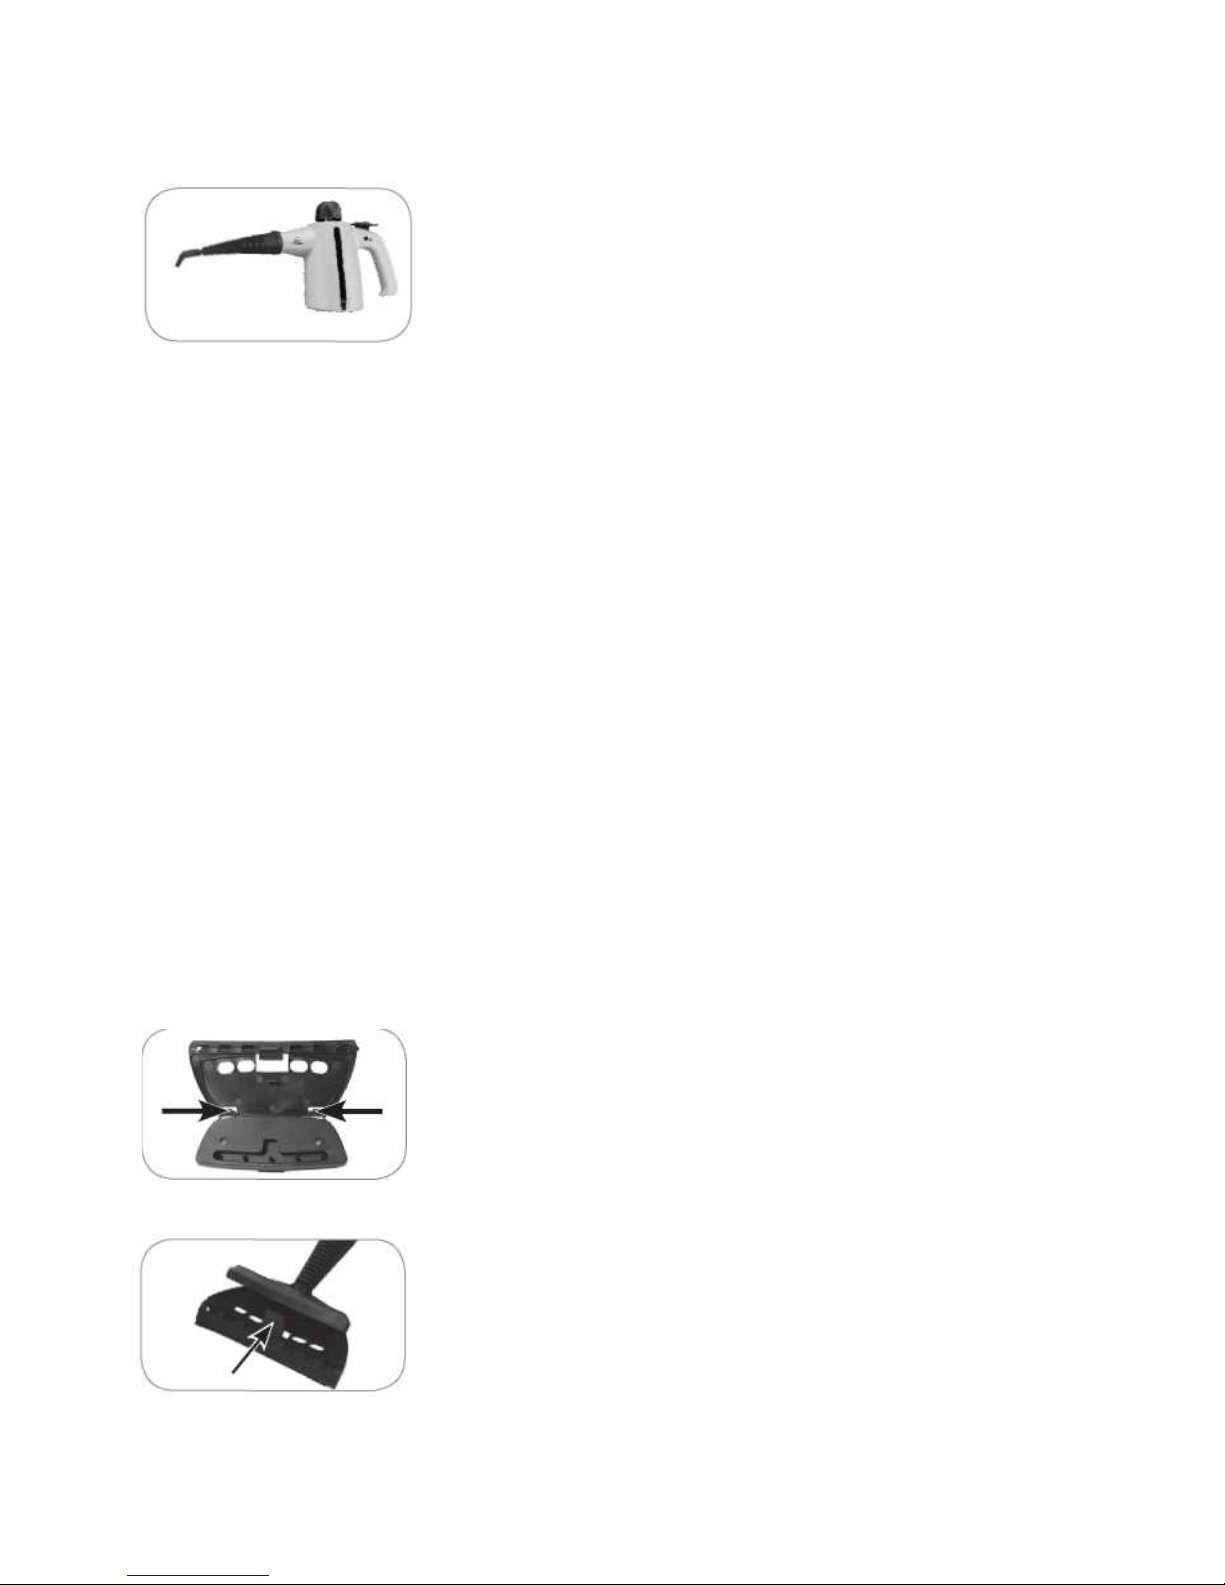
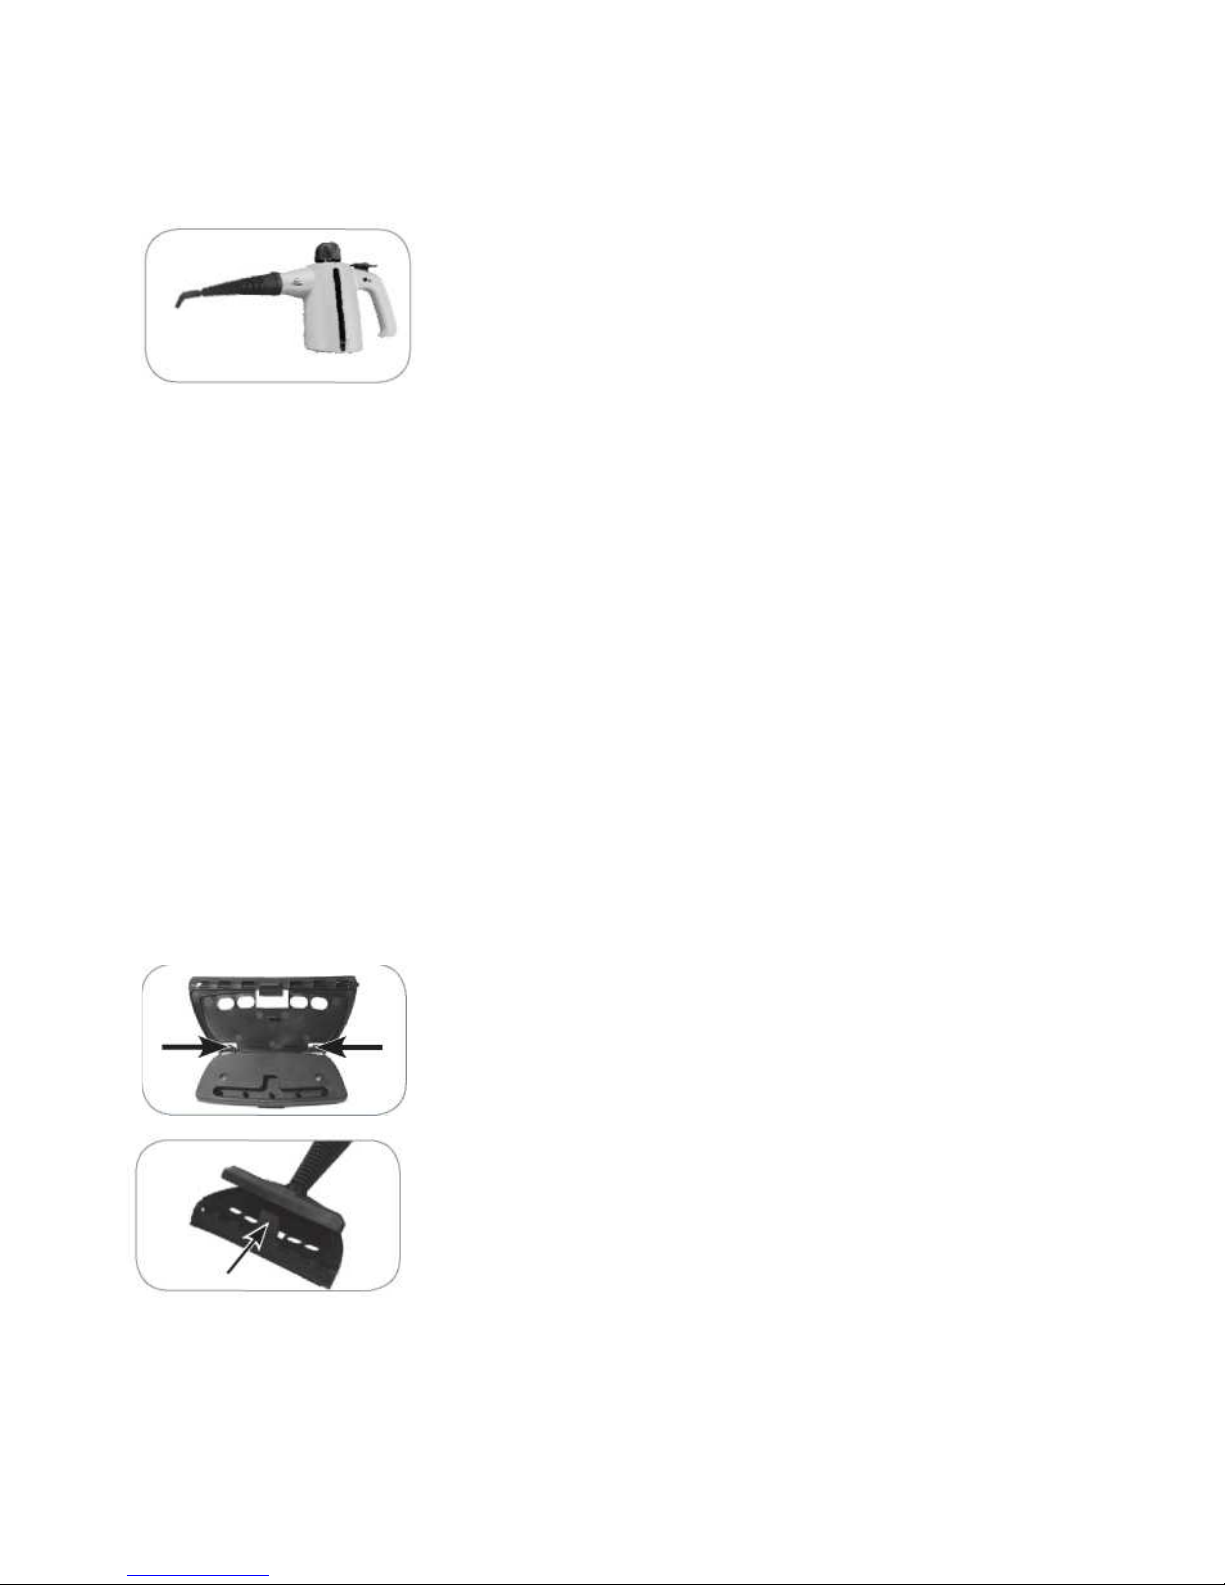
Scraper Lip
Use the scraper lip (11) to clean smooth surfaces such as window panes, glass doors,
mirrors or ceramic tiles.
Attach the scraper lip to the bottom of the combination
attachment (6):
-Insert the two hooks on the bottom end of the scraper lip into
the two eyelets of the combination attachment.
-Press the combination attachment and the scraper lip together
until they are heard to lock together.
To release the scraper lip, pull the catch of the scraper lip away
from the combination attachment.
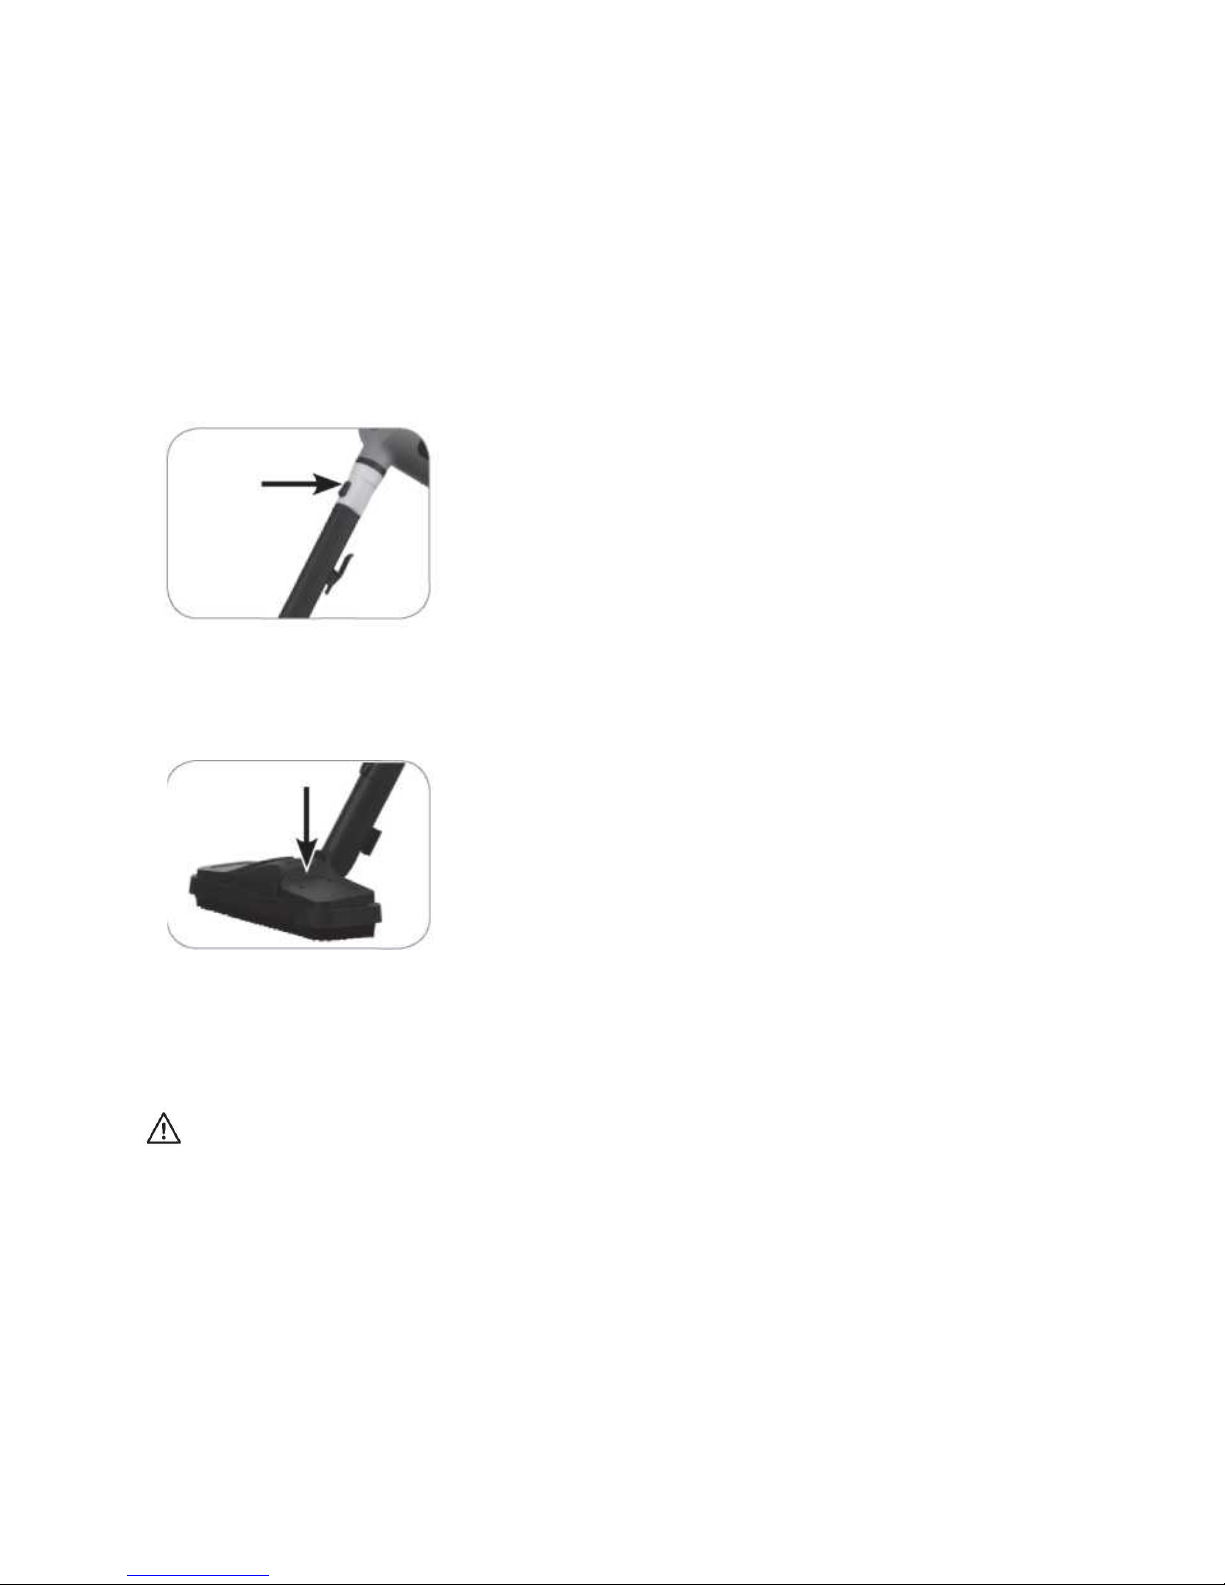
Floor Attachment, Extension tube, Adapter
The floor attachment (4) is used for cleaning floors. It is attached to the device with the aid
of the connecting piece (5), extension tube (3) and adapter (2). You can use the floor
attachment with or without a floor cloth. Without the floorcloth the bristles of the floor
attachment will remove stubborn dirt. The floor cloth is suitable for gentle cleaning.
1. Plug the adapter (2) as far as it will go onto the steam nozzle (19) of the device and
screw it on tight.
2. Screw the connecting piece into the floor attachment.
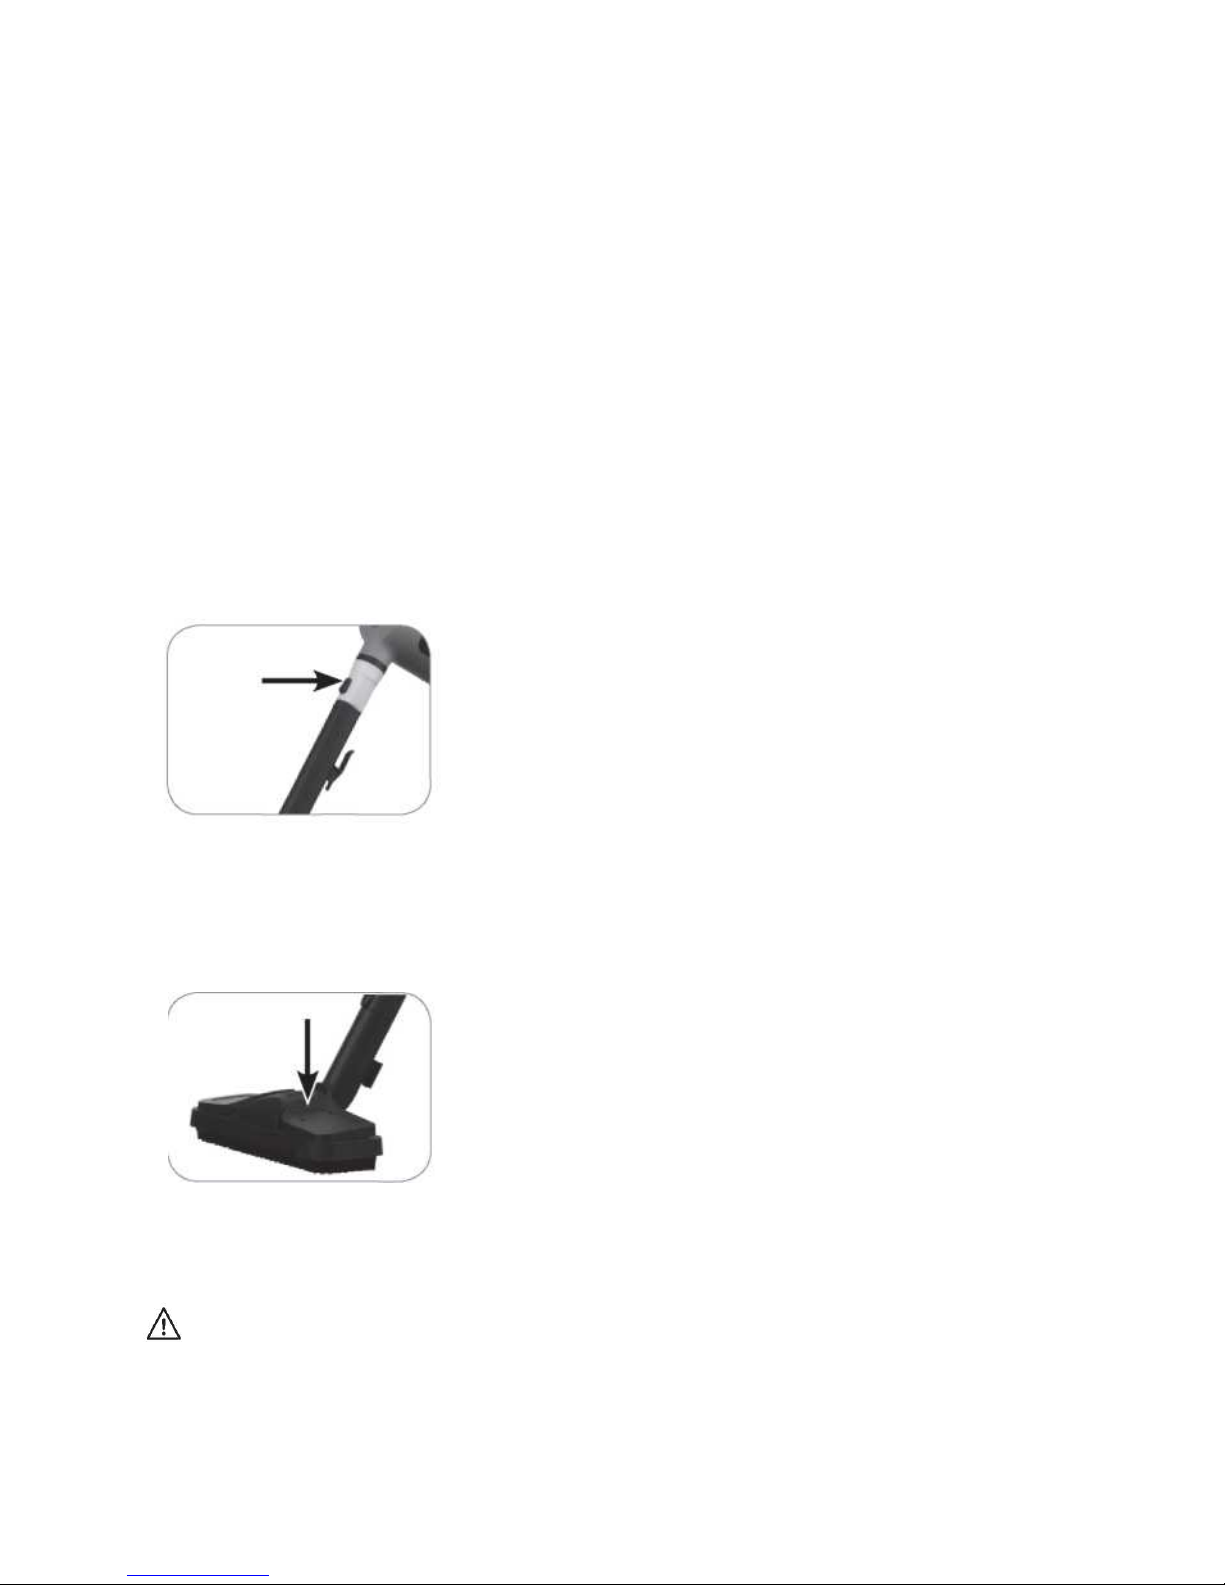
3. Push the narrow end of the extension tube into the connecting piece. The locking
lug of the extension tube must lock in the matching opening in the connecting piece.
4. In the same way, plug the adapter into the open end of the extension tube or, for a
longer tube, the second extension tube and then the
adapter into this.
To disassemble the extension tube, press the release
buttons on the extension tube and adapter and pull it out
To remove the adapter from the device, turn it in the
opposite direction and pull it off.
Floor Cloth
Use the floor cloth to gently wipe down the floor.
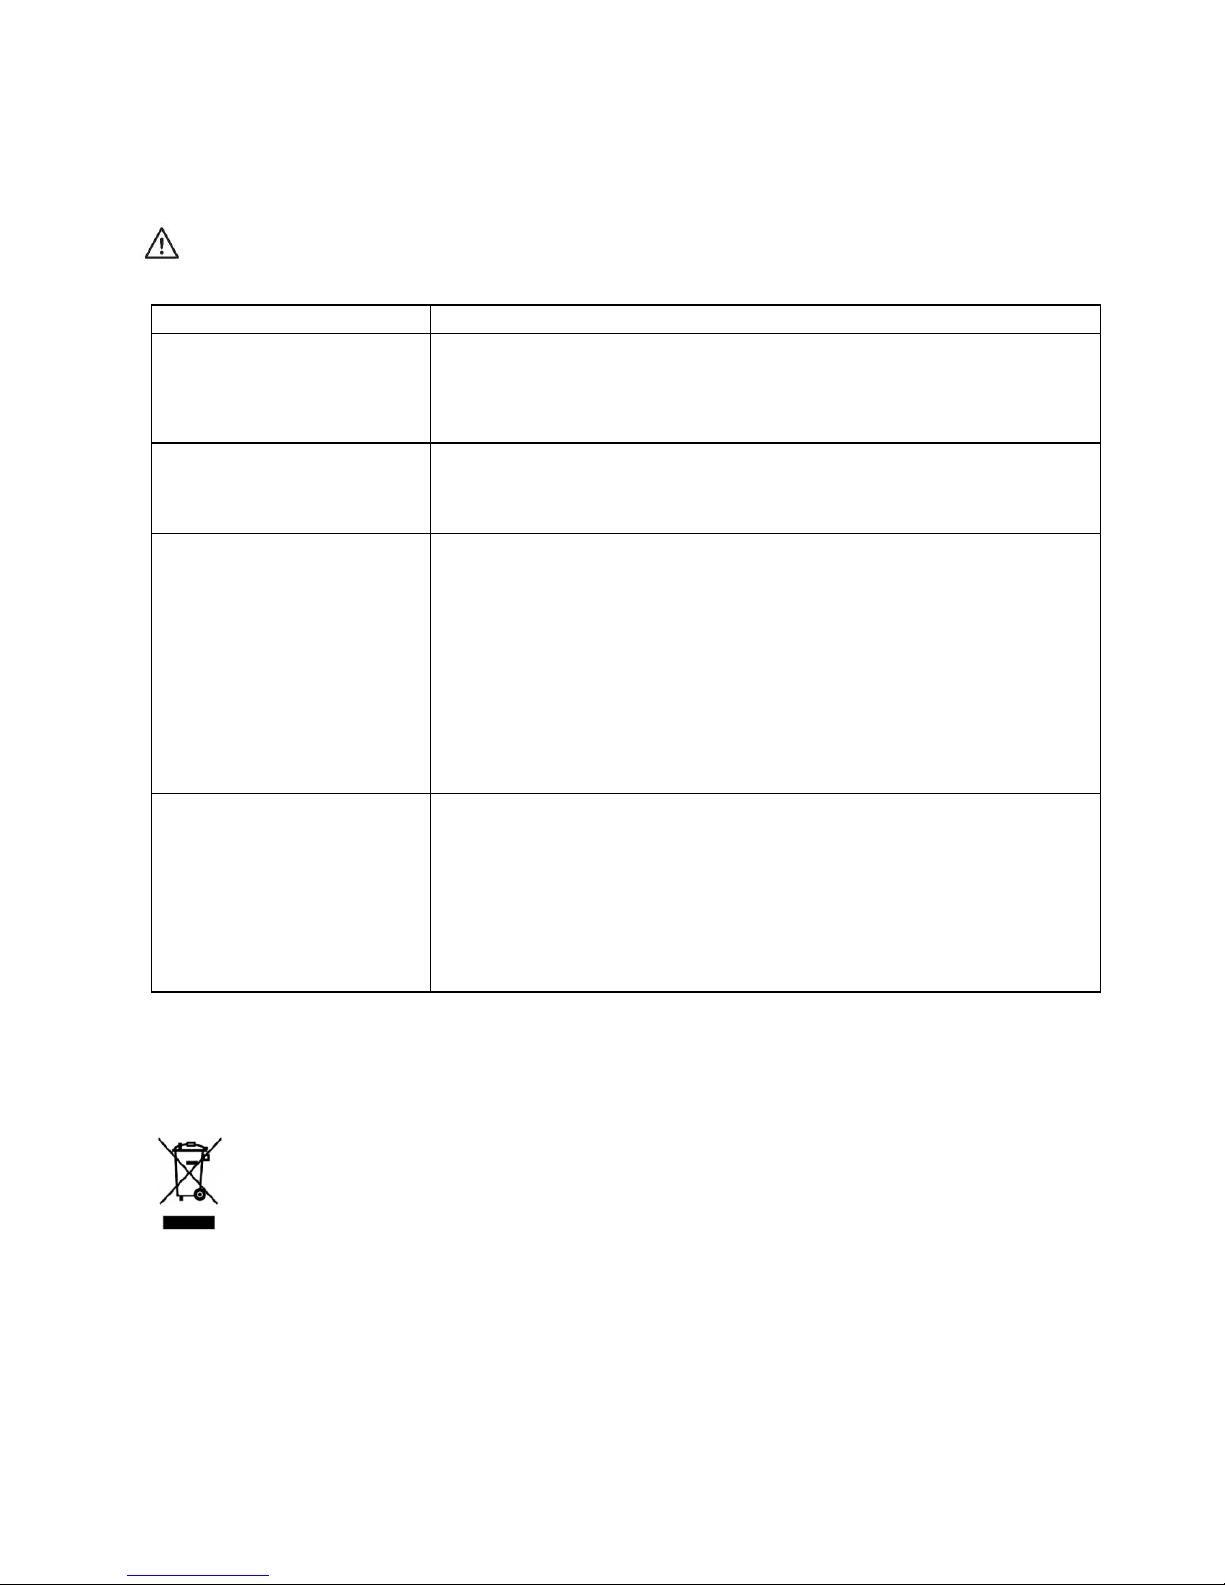
1. The floor attachment (4) has two clips on the top of it.
Press down the end of the clip in the middle of the floor
attachment to open the clip.
2. Insert one end of the floor cloth and release the clip.
3. Stretch the floor cloth over the bottom of the floor
attachment and secure it in the second clip.
Filling the Water Reservoir
Caution
• Always pull out the mains plug and allow the device to cool down completely before you
open the water reservoir. Otherwise there could be an uncontrolled emission of steam.
• Do not overfill the water reservoir. Pour a maximum of 260 ml of water into the device.

• Never hold the device under the tap and never immerse it in water to pour water into the
reservoir.
• Never pour any cleaning agent or other additives into the device. This could destroy the
device and safe working is no longer guaranteed.
1. The device has a safety reservoir cap (12). It cannot be removed if the water reservoir is
pressurised. Press the reservoir cap down and unscrew it in the anticlockwise direction.
To release pressure from the water reservoir, keep pressing the steam trigger (15)
until steam stops emerging from the device. The water reservoir can then be opened.
2. Pour water into the water reservoir using the measuring cup and the funnel supplied.
3. Screw the reservoir cap back into the device.
Use
• Never aim steam directly at people, animals or plants. This can cause severe scalding.
• Only ever hold the device by the handle and not by the attachment while operating the
device as it can become very hot. There is a danger of scalding!
• Always work with sufficient lighting.
• Make sure that you do not trip over the mains cable while using the device.
• Never use the device without water!
• Never use the device on cold glass surfaces or at outside temperatures of below 10 °C.
The hot steam could cause the glass to shatter.
• Always try cleaning first at a small, inconspicuous spot.
• Never direct the steam at one spot for too long.
• The water reservoir must not be opened during use!
• The device has a safeguard (13) which blocks the steam trigger (15) so that it cannot
be pressed accidentally. To (de)activate the safeguard, push in the securing pin.
• Water may emerge from the attachment when you first start using it. This is normal and
does not constitute a defect with the device.
• As the pipe in the device has to fill with steam, you may need to press the steam trigger
(16) several times when you start using it before steam starts emerging.
• How much steam is emitted depends mainly on the speed and frequency with which the

steam trigger (15) is pressed. The faster you press it, the more steam is emitted.
However, this is at the expense of the temperature.
1. Attach the attachment you want to the device (see the "Mounting the Accessories"
chapter).
2. Insert the mains plug into a properly installed mains socket that is easily accessible.
Steam starts to be generated and the control lamp (17) lights up.
3. Wait until the control lamp goes out. Operating temperature has then been reached and
you can start steam-cleaning: Press the steam trigger (15) and move the attachment
over the surface to be cleaned as you do so.
If the steam trigger cannot be pressed, the safeguard (13) has probably been
activated. Push in the securing pin to release the safeguard.
4. If the control lamp lights up, the temperature has dropped. Let go of the steam trigger
and only press it again once the control lamp has gone out.
5. If the water reservoir is empty, steam will no longer be produced. If you want to top up
the water in the reservoir (see the "Filling the Water Reservoir" chapter) or want to stop
working, pull the mains plug out of the plug socket and allow the device to cool down
completely. Keep pressing the steam trigger if necessary until no more steam emerges
from the device. The water reservoir can then be opened.
6. Empty and clean the water reservoir each time after you use the device (see below)
to prevent deposits in the reservoir and thus damage to the device!

After Use / Cleaning the Device
• Empty and clean the water reservoir each time
after you use the device to prevent deposits in
the reservoir and thus damage to the device!
• The water reservoir cannot be opened while
it is pressurised. Pull out the mains plug and
keep pressing the steam trigger until no
more steam emerges from the device. The
reservoir cap can then be screwed off.
• Always pull the mains plug out of the plug
socket when you are not using the device,
before you open the water reservoir or remove
an attachment.
• The attachment and the water in the reservoir
may still be hot shortly after use. You should
therefore wait until they have completely
cooled down before you remove the
attachment or empty the water reservoir.
• Never immerse the device in water or other
liquids!
• Never touch the device, the cable or the plug
with wet hands.
• To extend the useful service life of the steam
cleaner, it should be regularly descaled with a
standard commercial descaling agent. Note
the manufacturer's instructions on the

packaging of the descaling agent.
• Empty the water reservoir: Unscrew the
reservoir cap and remove it Hold the device
over a sink or similar outlet and allow all of the
water to run out of the reservoir.
• Wash the cleaning cloth and floor cloth after
every use in accordance with the washing
instructions.
• Clean the attachments if necessary with clear,
warm water.
• If necessary, wipe down the outside of the
device with a soft, slightly damp cloth and dry
it with a soft cloth.
• Allow all device and accessory parts to dry
completely before you store them in a clean
and dry place that is inaccessible to children.
Troubleshooting
If the device should stop working properly, first check whether you are able to correct the
problem yourself.
Do not attempt to repair a defective electrical device yourself!
Problem
Water emerges from the
attachment.
the control lamp has gone out.
it. This is normal and does not constitute a defect with the device.
The device does not work.
The control lamp does not
light up.
• Is the mains plug correctly inserted into the socket ?
• Is the socket defective? Try a different socket and check
the fuse of your mains connection.
No steam is produced.
• Is the water reservoir filled with water ?
• The device has not yet reached operating temperature.
Wait until the control lamp has gone out.
• The pipe of the device is not yet completely filled with
steam. Press the steam trigger several times until steam
emerges.
• Is the attachment clogged?
• Has the safeguard (13) been activated? Push in the
securing pin to release the safeguard.
Streaks when cleaning
windows or other smooth
surfaces.
• Is the scraper lip dirty? Wipe it clean.
• Is the scraper lip worn? Turn it over: Pull the rubber piece
sideways out of its holder, moisten with water or cleaning
agent in the rounded area and slide back into the holder
the other way round.
piece is required.
ENVIRONMENT
CAUTION:
Do not dispose of this product as it has with other household products. There is a separation
of this waste product into communities, you will need to inform your local authorities about
the places where you can return this product. In fact, electrical and electronic products contain
hazardous substances that have harmful effects on the environment or human health and should be
recycled. The symbol here indicates that electrical and electronic equipment should be chosen carefully,
a wheeled waste container is marked with a cross.
Adeva SAS / H.Koenig Europe - 8 rue Marc Seguin - 77290 Mitry Mory - France
www.hkoenig.com - sav@hkoenig.com - contact@hkoenig.com - Tél: +33 1 64 67 00 01

FRANÇAIS
NETTOYEUR VAPEUR
Explication des symboles :
Usage prévu
• L’appareil est conçu pour fonctionner exclusivement sur des surfaces
résistantes à l’eau et à la vapeur comme les éléments d’une salle de bain,
les glaces, les carreaux, les cabines de douche et les revêtements de sol.
Demandez à un spécialiste si votre revêtement est résistant à l’eau et à la
vapeur. Pensez d’abord à faire un test sur une petite portion.
• L’appareil n’est pas adapté aux surfaces qui sont sensibles à la chaleur ou
à l’humidité comme par exemple le papier peint, le velours, la soie, les
objets collés, les surfaces non-étanches et/ou celles en bois vernissées,
les plastiques fragiles, le cuir et le verre exposé à des températures froides
(en-dessous de 10°C).
• L’appareil n’est pas adapté pour nettoyer des équipements électroniques
et des objets fragiles.
• L’appareil est conçu pour un usage domestique et non pour des emplois
commerciaux.
• Veuillez utiliser l’appareil comme indiqué dans les instructions. Tout autre
emploi est considéré impropre.
• La garantie ne couvre pas les dommages causés par un emploi incorrect,
l’accumulation de tartre, les tentatives de réparation et aussi l’usure
normale.
Instructions de sécurité :
Veuillez les lire attentivement et les respecter afin d’éviter tout risque
de blessure ou de dégât.
Information supplémentaire : Cet appareil fonctionne avec de la
vapeur !

Instructions de sécurité
Risques de blessure
• Cet appareil n'est pas destiné à être utilisé par
des personnes présentant des capacités
réduites sur le plan physique, mental ou
sensoriel ou bien manquant d'expérience ou
de connaissance, (y compris les enfants), sauf
si elles ont eu des instructions concernant
l'utilisation de l'appareil par une personne
responsable de leur sécurité et qu’elle en
comprennent les risques. Les enfants doivent
être surveillés pour s'assurer qu'ils ne jouent
pas avec l'appareil.
• L’appareil doit être utilisé et rangé hors de
portée des enfants.
• Gardez les enfants et les animaux à l’écart des
emballages, car ils pourraient s’étouffer avec.
• Ne dirigez pas le jet de vapeur vers les
personnes, les animaux et les plantes, car cela
peut produire une brûlure sévère.
• Maniez toujours l’appareil par la poignée car il
y a un risque de brûlure.
• Ne laissez pas l’appareil sans surveillance
quand il est branché.
• Juste après l‘emploi de l’appareil, les

accessoires peuvent être très chauds, aussi
est-il recommandé d’attendre quelques
minutes avant de les démonter.
• Danger de brûlure ! Attendez toujours que
l’appareil ait refroidi avant de le remplir à
nouveau, de le nettoyer et/ou de le ranger. Ne
tentez jamais d’ouvrir le réservoir d’eau quand
vous utilisez l’appareil. Assurez-vous que le
réservoir soit bien fermé avant d’utiliser
l’appareil.
• Faites attention de ne pas trébucher contre le
câble d’alimentation.
Risque d’incendie
• N’employez pas l’appareil dans des pièces
contenant des produits inflammables ou
nocifs, ainsi que des gaz explosifs.
• Ne bloquez pas les ouvertures de l’appareil et
assurez-vous qu’elles soient toujours
dégagées.
Risque d’électrocution
• L’appareil doit être branché uniquement à une
prise correctement installée et possédant des
contacts de sécurité. La prise murale doit être
facilement accessible. Le voltage de la prise

doit correspondre à celui de l’appareil, de
même pour les rallonges éventuelles.
• Cet appareil doit être relié à une prise de terre.
Ne tentez pas de l’employer avec une prise
simple.
• Ne mettez pas l’appareil dans l’eau ou tout
autre liquide. Assurez-vous que l’appareil, le
câble d’alimentation ou la prise ne tombe dans
l’eau ou ne soit mouillé. S’il venait à tomber
dans l’eau, débranchez-le immédiatement,
puis enlevez-le.
• Ne touchez jamais l’appareil, le câble ou la
prise si vos mains sont mouillées afin d’éviter
une secousse électrique.
• Le jet de vapeur ne doit pas être orienté vers
un dispositif électrique, le câble
d’alimentation, des équipements contenant
des composants électriques (l’intérieur d’un
four, d’un réfrigérateur, les interrupteurs et les
lampes, les fours à micro-onde et les écrans).
• Débranchez le câble après chaque emploi,
avant de changer/enlever les accessoires, de
remplir/vider le réservoir ou de nettoyer
l’appareil. Tirez sur la prise et non pas sur le
câble.
• Utilisez l’appareil uniquement dans des pièces

fermées.
• Vérifiez toujours l’appareil avant de le mettre en
marche. Allumez-le seulement quand il est
entièrement monté et en état de marche.
L’appareil ne doit pas être utilisé s’il est
tombé, s’il a des traces de dommages ou s’il
fuit.
• En cas de dégât ou de panne, débranchez-le
immédiatement.
• N’essayez jamais de réparer l’appareil, le
câble, la prise ou de remplacer des éléments
par vous-même. S’il présente un défaut, ne
l’employez plus. Contactez le technicien le
plus proche de chez vous ou en cas de
panne/dommage notre service technique. Une
réparation incorrecte peut provoquer de
grands risques pour l’utilisateur.
• N’utilisez pas l’appareil si son câble
d’alimentation ou sa prise est endommagée,
s’il ne fonctionne pas correctement, s’il a été
abimé ou s’il est tombé. Si le câble
d’alimentation est endommagé, il doit être
remplacé par le fabricant ou son agent ou
encore par une personne qualifiée afin d’éviter
tout risque.

Comment éviter un accident
• Positionner le câble de telle sorte qu’il ne soit
pas écrasé ou plié et qu’il ne soit pas en
contact avec des surfaces chaudes.
• N’allumez l’appareil que lorsque le réservoir
d’eau est rempli, car sinon la pompe peut être
endommagée et la durée de vie de l’appareil
écourtée.
• Ne mettez pas d’objets lourds sur l’appareil, le
câble ou la prise.
• Ne tirez/ transportez pas l’appareil par le câble.
• N’employez pas d’autres accessoires que ceux
qui ont été prévus.
• Ne versez pas de produit de nettoyage ou
d’additif chimique dans l’appareil. Cela peut
l’endommager et son fonctionnement correct
n’est plus garanti.
• Ne bouchez pas les sorties du jet de vapeur.
• Gardez une certaine distance avec les sources
de chaleur comme les plaques de cuisson ou
les fours afin de ne pas abimer l’appareil.
• Évitez de donner un choc violent à l’appareil.
• N’exposez pas l’appareil et ses accessoires à
des températures élevées ou à des écarts de
température importants, au feu et au soleil
direct ; ne laissez pas l’appareil sous la pluie

ou dans des conditions humides.
• Faites toujours un essai d’abord dans un
endroit discret.
• Ne vaporisez pas au même endroit trop
longtemps.
• Ne vaporisez jamais des vitres froides (à une
température inférieure à 10°C), car le jet de
vapeur pourrait les faire éclater.
• Dans le cas de surfaces recouvertes de cire, la
vapeur peut l’enlever.
• N’employez pas de produit de nettoyage
caustique ou abrasif (ex. vinaigre), ni des
lingettes.
• Replacez l’appareil dans sa position de repos
une fois qu’il ait refroidi complètement et qu’il
n’y ait plus d’eau dans le réservoir.
• Rangez l’appareil dans un endroit sec et propre
qui soit hors de portée des enfants et des
Animaux.
Accessoires
Accessoires non indiqués
• Petit adaptateur pour tissu (1x)
• Grand adaptateur pour sol (1 x)
• Verre gradué (1x)
• Entonnoir pour réservoir (1 x)
Vue générale
1 Corps principal (1x)
2 Adaptateur (1 x)
3 Rallonge (2x)
4 Brosse principale (1 x)
5 Raccord (1 x)
6 Brosse rectangulaire (1 x)
7 Pulvérisateur coudé (1x)
8 Brosse ronde nylon (1 x}
9 Buse vapeur (1x)
10 Raclette à vitre (1 x)
11 Bouchon de sécurité du
réservoir
12 Ergot de sécurité (bloque la
gâchette)
13 Poignée
14 Gâchette
15 Câble
16 Témoin lumineux
17 Buse
Avant la première utilisation
Attention !
•
Danger d’étouffement avec les emballages : gardez les enfants et les animaux à l’écart.
•
Les dépôts dans le fond du réservoir d’eau sont un phénomène naturel et ne
constituent pas un défaut de l’appareil.
•
Quittez les accessoires de leur emballage et vérifiez leur état et qu’il n’en manque pas
(voir le schéma descriptif). Si l’un d’eux est abimé, n’utilisez pas l’appareil et appelez
notre service technique.
•
Avant d’utiliser l’appareil, enlevez tous les emballages et les étiquettes qui servent de
protection ou de publicité lors du transport.
Montage des accessoires
Attention !
• Ne branchez pas le câble avant d’avoir monté les accessoires.
• Juste après l’emploi de l’appareil, les accessoires peuvent être très chauds. Attendez
donc quelques minutes qu’ils aient refroidi avant de les démonter.
Brosse étroite
La brosse étroite (10) peut être utilisée n’importe où. Elle est idéale pour nettoyer les surfaces
résistantes à la chaleur et les recoins comme dans une cuisine ou une salle de bain.
On peut lui attacher la brosse (8) ou l’accessoire courbe (7}.
• Fixez la brosse étroite aussi profondément que vous
pourrez dans la buse de sortie de la vapeur (18.
Brosses
La brosse (8) est employée pour nettoyer toute sorte d’objet, à savoir les fours, la robinetterie
sanitaire, les baignoires et cabines de douche, les éviers, les jouets, etc.
• Fixez directement la brosse dans la buse (18) ou la brosse
étroite (10).
Accessoire courbe
Employer l’accessoire courbe (7) pour nettoyer les endroits et les anfractuosités difficiles
d’accès.
• Fixez directement la brosse dans la buse (18) ou la brosse
étroite (10).
Brosse large
La brosse large (6) est employée (11) avec l’adaptateur pour tissu ou la raclette à vitre.
• Fixez directement la brosse profondément dans la buse (18).
Adaptateur pour tissu
Il est utile pour nettoyer et raviver les tissus d’ameublement et les textiles, les surfaces
importantes ou qui se rayent facilement comme les cabines de douche.
• Fixer l’adaptateur pour tissu à la brosse large (6). Laissez-le refroidir après son
emploi !
Raclette pour vitre
Employer la raclette pour vitre (11) pour nettoyer les surfaces lisses comme les vitres, les
miroirs ou les carreaux de céramique.
Attacher la raclette dans le fond de la brosse large (6) :
-Insérer les 2 crochets situés à la base de la raclette dans les
œillets de la brosse.
-Presser la raclette et la brosse l’une contre l’autre pour
finaliser l’accroche.
Pour détacher la raclette, tirer sur le loquet.
Patin pour sol, raccord, adaptateur
Le patin pour sol (4) est utilisé pour nettoyer les sols. On l’attache à l’appareil à l’aide du
raccord (5), de la rallonge (3) ou de l’adaptateur (2). Vous pouvez employer le patin avec ou
sans la brosse pour tissu. Sans celle-ci, les crins du patin enlèveront la poussière incrustée.
La brosse pour tissu convient aux nettoyages délicats.
1. Fixer l’adaptateur (2) profondément dans la buse (18) et vissez fermement.
3. Enfoncer la partie étroite du raccord dans la rallonge. L’ergot du raccord doit
s’enclencher dans l’ouverture de la rallonge.
4. De la même façon, fixer l’adaptateur dans l’extrémité de la rallonge ou dans le cas d’un
tube plus long, dans la seconde partie puis l’adaptateur à
son tour.
Pour démonter la rallonge, appuyer sur les ergots et
séparer les éléments.
Pour enlever l’adaptateur de l’appareil, tournez-le dans la
direction inverse puis retirez-le.
Patin pour sol
Employez-le pour essuyer le sol.
1. Le patin pour sol (4) possède 2 clips sur le dessus.
Presser l’extrémité du clip situé au milieu du patin pour
l’ouvrir.
2. Insérez une extrémité de la brosse et relâchez le clip.
3. Étirez la brosse vers la base du patin et fixez-la à l’aide du
second clip.
Remplissage du réservoir d’eau
Attention
• Débranchez l’appareil et laissez-le refroidir complètement avant d’ouvrir le réservoir.
• Respectez le niveau maximum de 260 ml d’eau.
• Ne placez pas l’appareil sous le robinet et ne l’immergez pas dans l’eau pour remplir le
réservoir.
• Ne versez pas de produit nettoyant ou d’additif dans l’appareil. Cela pourrait l’abimer et
perturber son fonctionnement.
1. Cet appareil possède un bouchon de sécurité (12). On ne peut pas l’enlever si le
réservoir est sous pression. Sinon, appuyez dessus et tournez-le vers la gauche pour le

dévisser.
Pour enlever la pression dans le réservoir, maintenez appuyée la gâchette (15) jusqu’à
ce qu’il ne sorte plus de vapeur. Vous pouvez ouvrir alors le réservoir.
2. Verser de l’eau dans le réservoir en utilisant le verre gradué et l’entonnoir.
3. Revisser le bouchon de sécurité.
Emploi
• Ne projetez pas de vapeur directement sur les personnes, les animaux et les plantes.
Cela peut entrainer de graves brûlures
• Maniez toujours l’appareil par la poignée et non par un accessoire car celui-ci peut
devenir brûlant et vous blesser !
• Travailler toujours avec suffisamment de lumière.
• Assurez-vous de ne pas trébucher contre le câble durant l’utilisation de l’appareil.
• N’utilisez pas l’appareil sans eau !
• Ne vaporisez jamais des vitres froides (à une température inférieure à 10°C), car le jet de
vapeur pourrait les faire éclater.
• Faites toujours un essai d’abord dans un endroit discret.
• Ne vaporisez pas au même endroit trop longtemps.
• Il ne faut pas ouvrir le réservoir durant l’utilisation de l’appareil !
• L’appareil possède une sécurité (13) qui bloque la gâchette (15) pour qu’elle ne soit pas
enclenchée par erreur. Pour activer/désactiver la gâchette, appuyer sur l’ergot de
sécurité.
• De l’eau peut s’écouler de l’accessoire quand vous commencez à l’utiliser. Cela est
normal et ne constitue pas un défaut de l’appareil.
• Comme le tuyau d’eau a besoin d’un certain temps pour se remplir, il vous faut appuyer
plusieurs fois sur la gâchette (15) au début pour que de la vapeur sorte.
• La quantité de vapeur émise dépend de la manière avec laquelle vous appuyez sur la
gâchette. Plus vous appuyez et plus il sort de vapeur, mais celle-ci est alors moins
chaude.
1. Attacher l’accessoire que vous désirez employer (voir le chapitre « Montage des
accessoires »).
2. Brancher le câble dans une prise murale correctement installée et facilement accessible
La formation de vapeur débute et le témoin (17) s’allume.

commencer à utiliser l’appareil. Appuyez sur la gâchette (15) et déplacez l’accessoire sur la
surface que vous désirez nettoyer.
Si la gâchette est bloquée, la sécurité (13) est probablement activée. Appuyez sur
l’ergot de sécurité pour la désactiver.
4. Si le témoin s’allume, cela signifie que la température a baissé. Relâchez la gâchette puis
reprenez quand le témoin s’éteint.
5. Si le réservoir est vide, il n’y aura plus de vapeur. Si vous désirez remplir le réservoir (voir
le chapitre « Remplissage du réservoir d’eau ») ou arrêter votre travail, débranchez le
câble et laissez l’appareil refroidir complètement. Pressez la gâchette pour enlever la
vapeur résiduelle. Vous pouvez alors ouvrir le réservoir.
6. Videz et nettoyez le réservoir chaque fois que vous utilisez l’appareil (voir ci-
dessous) pour éviter la formation de dépôts qui nuiraient au fonctionnement de
l’appareil.
Après utilisation / Nettoyage de l’appareil
• Videz et nettoyez le réservoir chaque fois que
vous utilisez l’appareil pour éviter la formation
de dépôts qui nuiraient au fonctionnement de
l’appareil !
• Le réservoir ne peut pas être ouvert quand il
est sous pression. Débranchez le câble et
appuyez sur la gâchette jusqu’à ce qu’il n’y
ait plus de vapeur. Vous pouvez alors retirer
le bouchon.
• Débranchez toujours l’appareil quand vous ne
l’utilisez pas, avant d’ouvrir le réservoir ou
d’enlever un accessoire.
• L’accessoire et l’eau du réservoir peuvent être
 Loading...