

Page 1
Instruction manual
Manuel d'utilisation
Bedienungsanleitung
Handboek
Manual de Utilización
Manuale d’uso
MX16
Multifunctions food processor
Robot Multifonctions
Multifunktions-Roboter
Multifunctionele Robot
Robot multifunción
Robot multifunzione
Page 2

ENGLISH
⑴ Blender Jug Cup Measuring
Cup
⑵ Blender Jug cover
⑶ Blender Jug
⑷ Switch Connecter
⑸ Knob
⑹ Power Unit
⑺ Button Switch
⑻ Axis Tube
⑼ Mixing Bowl
⑽ Bowl Cover(Plastic)
⑾ Measuring Cup
⑿ Shredding Knife
⒀ Slicing Knife
⒁ Knife Support
⒂ Whisking Blade
⒃ Chopping Blade
⒄ Blade Support
⒅ Scoop
⒆ Protect cover
TECHNICAL SPEC:
Voltage:220-240V 50Hz
Power: 500W
Structure:
GENERAL INSTRUCTIONS
·Please read this handbook as it gives important instructions about safety, use and
maintenance of your appliances and keep it carefully for future reference.
· Do not leave parts of packaging (plastic bags, foam polystyrene, nails, etc.)within reach of
children or incapable persons as they are potential sources of danger.
·Make sure the data on the appliance rating plate corresponds to that of the main power supply
and of your electrical system before plugging into the outlet. In case of doubt, contact
professionally qualified personnel.
·It is advisable not to use adapters, multiple plugs and extensions. Use devices certified and
confirming to existing safety standards only should it be absolutely necessary, making sure
they are compatible with your electrical system and with the appliance technical data.
·Any installation not conforming to instructions may endanger your safety and forfeit the
guarantee.
·The appliance must be used for the purpose for which it was designed only, i.e. Prepare food for
domestic use.
·For safety’s sake be careful:
-not to use the appliance with bare feet or wet hands or feet
-not to use the appliance anywhere other than domestic environment
-not to leave the appliance exposed to atmospheric agents (sun / rain…)
-not to allow children or incapable persons to use the appliance
-never tug on the lead or appliance itself to unplug from the outlet
-not to leave the appliance plugged into the main power supply unattended
-never submerge the appliance into the water or in other liquids.
·The user must not replace the appliance lead. Contact a professionally qualified person in
Page 3

case of need.
· Switch off and do not mishandle the appliance if it should breakdown and/or work badly. Contact
a authorized Service Centre for eventual repairs, asking for original spares.
· Put the appliance out of service at the end or its service life by cutting off the lead after
unplugging from the outlet. Abide by local existing rules and regulations for its disposal.
·Our company may not be held liable for eventual damages to persons, animals or objects
caused by incorrect installation or deriving from improper, erroneous or unreasonable use.
·Observe maximum of 1 min for continues operation of the appliance, then rest 8 min before
restart. Thus after five period, the appliance should be keep rest for30 min.
USING IT THE FIRST TIME
-Read this handbook to familiarize yourself with all the parts of your new food processor.
-Clean all the parts and accessories in contact with food before using the appliance for the first
time (see paragraph “Cleaning”).
Warning!
1.Always take care when you are handling the blades to fit them on, taking them out of the bowl
(B1) after preparing the food and when cleaning them, as they are very sharp.
2. This appliance is not intended for use by persons (including children) with reduced physical,
sensory or mental capabilities, or lack of experience and knowledge, unless they have been
given supervision or instruction concerning use of the appliance by a person responsible for
their safety.
Children should be supervised to ensure that they do not play with the appliance.
3. We suggest wearing ear protection while operating the appliance.
HOW TO USE IT
Your new food processor will help you to prepare a lot of basic mixtures that you can use for
your recipes.
Please abide by the following instructions to achieve the best results and to keep your
appliance in good working condition.
Attention!
Never exceed the maximum quantities below and never pour liquids hotter than 75℃ into the bowl
and/or blender
Follow the instructions given below every time you use it:
-Never leave the appliance unattended while it is on.
-Never make the appliance work while it is empty.
-Never touch the moving parts.
-Never put your fingers or utensils inside the lid opening.
-Never press down the ingredients into the lid opening with your hands.
-Do not use the appliance to work hard ingredients (e.g. frozen meat, crusts of cheese…),
rubbery (e.g. candied peel…), and uneatable parts of ingredients (e.g. bones, fishbone…) or
crush ice.
-Do not remove the lid and never replace accessories without switching off the appliance and if
the accessory being used has not stopped working.
-Do not remove the ingredients from the bowl before removing the blade
A: Mixing Bowl
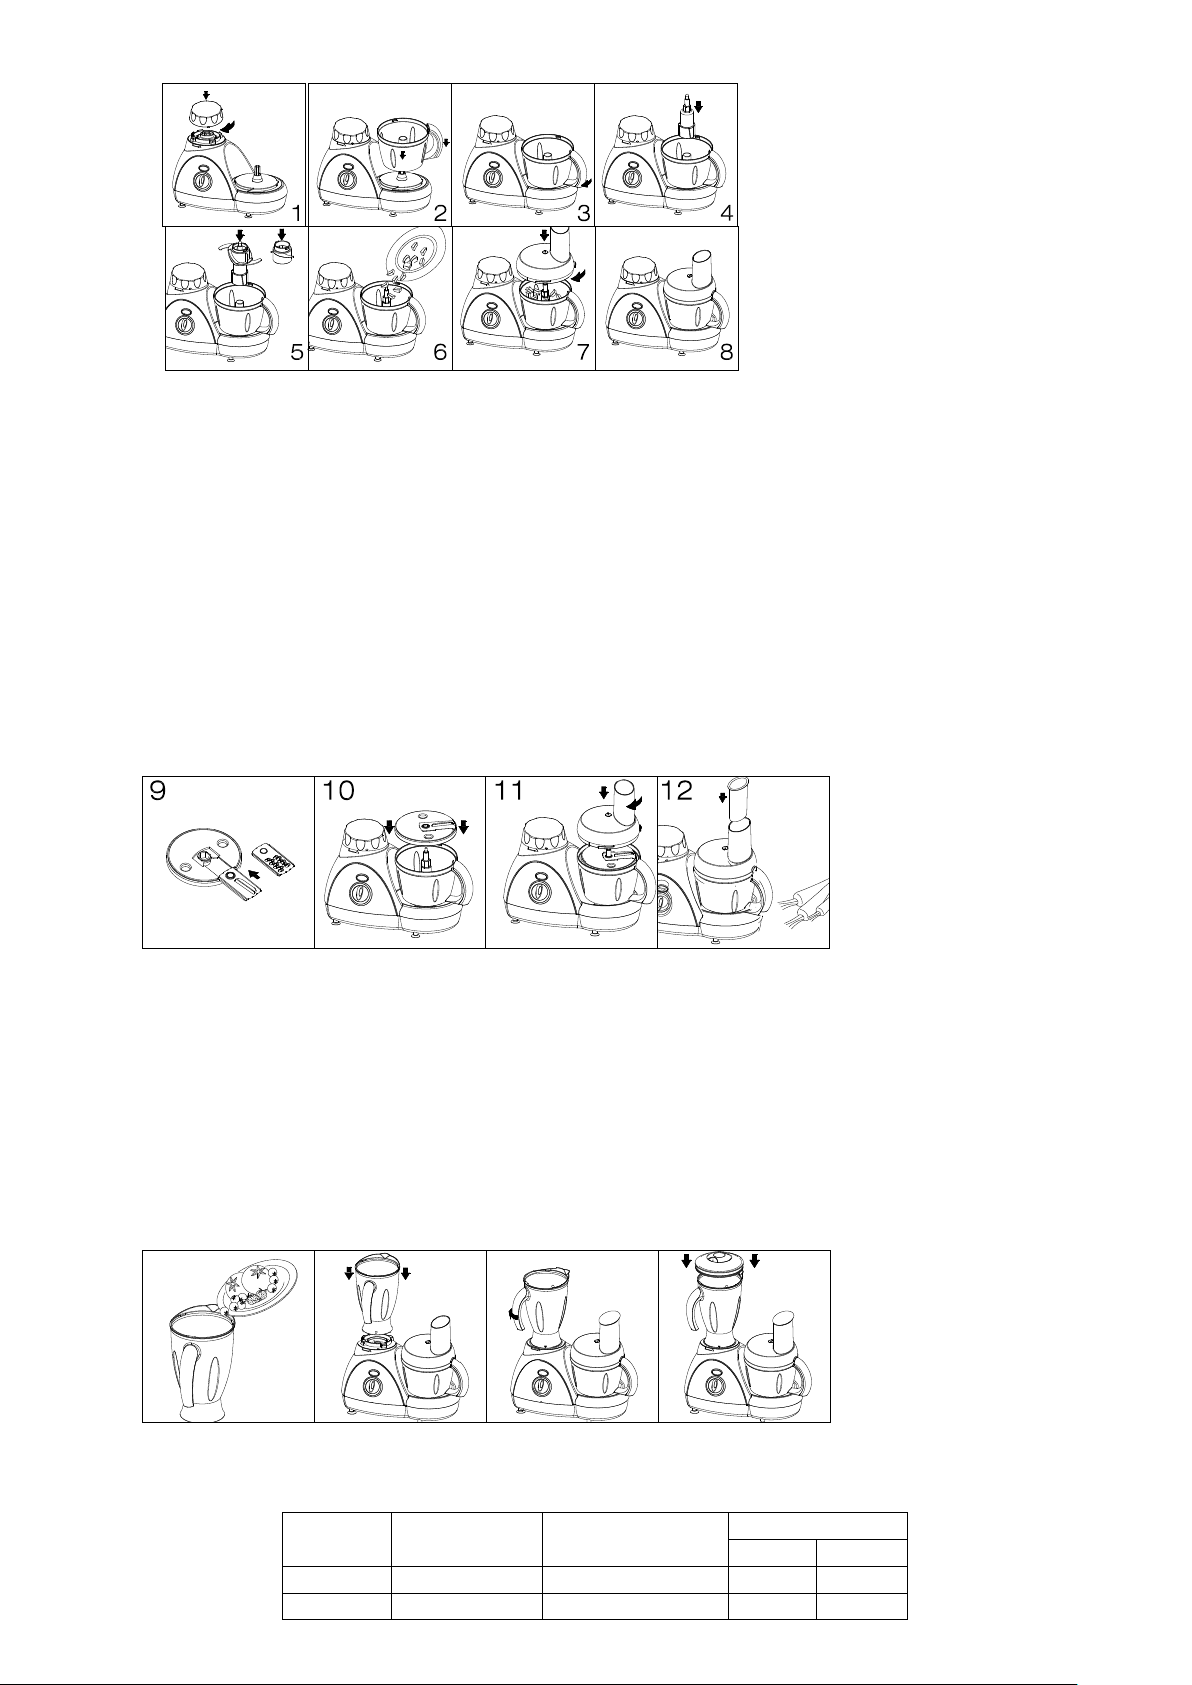
I. Chopping Function
-put the plastic bowl on power unit and turn the handle in clock-wise direction, as
shown in Diagram 1.2.
- Put the blade support on the axis in the middle of the bowl, and press it to the bottom. Then fix
the chopping blade to the blade support, as shown in Diagram 3&4.
Warning: The blade in sharp. Please only hold the plastic part while using.
- Put the food (e.g. Meet) into the bowl, as shown in Diagram 5. Big piece food needs to be cut
into small pieces. (Approx 2 cm × 2 cm × 2 cm).
- Put the cover on the bowl, and turn it until hearing the chattering sound, as shown in Diagram 6
&7.
- Fix the plug to the electric socket, press the button switch to choose the speed, as shown in
Diagram 8. (1-3The power increases by degree; PULSE is touch switch, used for intermittent
operation)
- When the chopping is finished, press the button switch to “0”. After the blade stops, pour out the
food.
Page 4
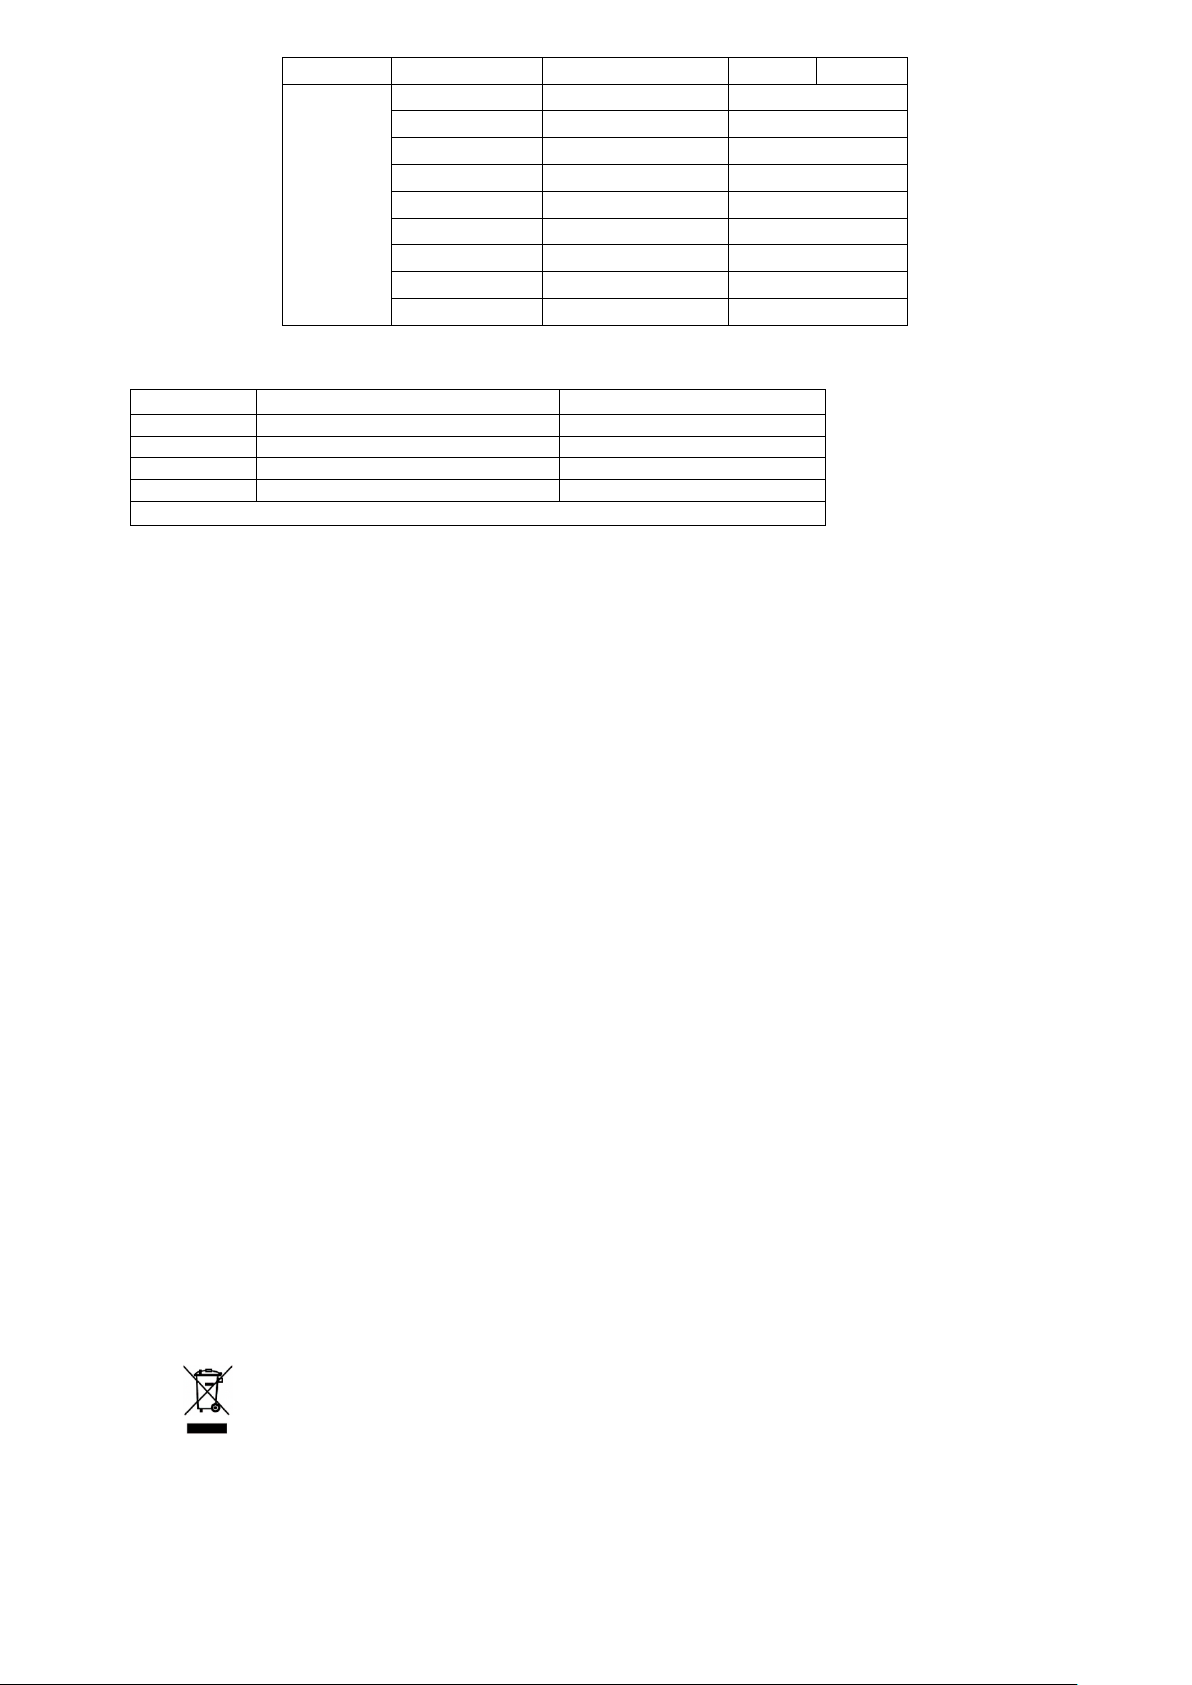
FUNCTION
INGREDIENT
MAX QUANTITIES
MAXIMUM TIMES (s)
SLICING
SHREDDIN
SLICING
MURPHY
400g
50s
30s
MELON
400g
50s
30s CARROT
II. Whisking Function
Mixing function has almost the same operating steps as chopping function. Only change the
chopping blade to shredding blade. It is used for mixing and whisking of food, e.g. egg.
III. Slicing & Shredding Function
- Fix the slicing/shredding knife to the knife support, as shown in Diagram 9. Slicing knife makes
the food into slices. Shredding knife make the food into shreds.
- Put the bowl on the power unit first, and then turn the bowl in clock-wise direction, until hearing
the chattering sound. Then put the knife support on the axis in the middle of the bowl, as shown
in Diagram 10.
- Put the cover on the bowl, and turn it until hearing the chattering sound. Then fix the plug to the
electric socket, turn the switch to choose the level. Put into the clean food in strip from the
entrance of the cover, and push the food down slowly. When the food strip is short, push them
down with the measuring cup, as shown in Diagram 12.
- When the operation is finished, press the switch to “0”. After the blade stops completely, pour
out the food.
B: Blender jug
-Put stuff into the Blender jug and fix the Blender jug cover onto the body tightly
-Put Blender jug on the power unit till cup support connects with power unit properly.
-Connect the power plug of the machine and switch on the food processor. Turn the knob to the
required level (The speed is increased by levels. PULSE is the highest level. Turn the knob to
the PULSE for any intervallic operation. )
-You can add some liquid material (such as oil, cream if any) to the food when mixing from
material entrance if necessary;
-Turn the knob to “0” level and shut off the machine after working. Pour the mixed food out of the
Blender jug.
INGREDIENTS LIST:
-Bowl:
Page 5
400g
50s
30s
CHOPPING
&
WHISKING
MEAT
300g(about 10g/piece)
30s
HAM
300g(about 15g/piece)
30s
ONIONS
400g(about 20g/piece)
30s
EGG
six yolks
25s
STRAWBERRY
200g
25s
CHEESE
100g
20s
ALMONDS
100g
20s
HAZELNUTS
100g
20s
WALNUTS
100g
20s
material
MAX QUANTITIES
MAXIMUM TIMES (s)
apple
250g
30s
orange
300g
30s
grape
250g
30s
strawberry
250g
30s
material volume:20X20X20mm3 /pc,water:400ml.
-Blender jug:
CLEANING
Always unplug from power outlet before any cleaning jobs.
Clean the Power Unit (6) with a soft slightly damp cloth. Do not wash it under running water
and do not submerge it in water or other liquids.
All accessories can be washed by hand or in the dishwasher:
-for hand washing use tepid water and normal washing up detergent, being careful of the steel
blade as it is very sharp;
-washing in the dishwasher-place accessories in the upper part and make sure the water
never exceeds maximum temperature of 50℃
Do not use chemical or abrasive substances.
Note!
When you have finished cleaning make sure the parts controlled by the bowl safety system
(motor unit at the point where the lip of the lid fits into place) and for models with blender jugs (jug
housing on the
motor unit, blender jug and
lids), are not obstructed by solid waste. If necessary use a soft brush to clean eventual residuals
with the
appliance unplugged from the mains.
The blades cannot be sharpened. Replace them if they are not cutting properly or are worn.
Contact an authorized Service Centre to purchase accessories, parts liable to wear and for
maintenance work on your appliance.
STORAGE
Make sure your appliance and all its accessories are completely dry before putting them away.
Your food processor has a space-saving storage system where all accessories can be put away
tidily in the bowl.
Attention!
To avoid damages never use the appliance with accessories still inside.
ENVIRONMENT
CAUTION:
Do not dispose of this product as it has with other household products. There is a
separation of this waste product into communities, you will need to inform your local
authorities about the places where you can return this product. In fact, electrical and
electronic products contain hazardous substances that have harmful effects on the environment
or human health and should be recycled. The symbol here indicates that electrical and electronic
equipment should be chosen carefully, a wheeled waste container is marked with a cross.
Manufactured and imported: Adeva SAS 8 rue Marc Seguin 77290 Mitry-Mory FRANCE
www.hkoenig.com - contact@hkoenig.com - Tel 01 64 67 00 01
Page 6

FRANCAIS
ASPECTS TECHNIQUES :
Voltage:220-240V 50Hz
Puissance: 500W
Structure:
1-Coupole du mixeur 11- Verre doseur du mixeur
2- Couvercle du mixeur 12 – Lames à broyer
3- Cruche du mixeur 13- Lames à trancher
4 – Bague de blocage 14 – Support des lames
5 - Bouton de mise en marche 15 – Lames de fouets
6 - Unité de puissance 16 – Lames à découper
7 – Socle 17 – Support de lames
8 – Axe de rotation 18- Spatule
9 – Bol du mixeur 19 – Couvercle protecteur
10 – Couvercle du bol (plastique)
Page 7

INSTRUCTIONS GENERALES
Lisez le manuel d’utilisation pour obtenir des informations importantes concernant la sécurité,
l’utilisation et l’entretien de votre appareil et conservez le précieusement pour vous y référer
ultérieurement.
Ne pas laisser les composantes de l’emballage (sac plastique, polystyrène, vis, etc.) à la portée des
enfants ou personnes handicapés puisqu’ils présentent des risques de danger.
Vérifier que les informations techniques présentes sur l’étiquette de l’appareil correspondent à la
tension d’alimentation et à votre système électrique avant de le brancher sur votre prise. En cas de
doute, faites appel à des personnes compétentes et qualifiées.
Il n’est pas recommandé d’utiliser des adaptateurs, des multiprises et extensions. Utilisez des
appareils certifiés et conformes aux standards de sécurité et seulement si cela est absolument
nécessaire, en vérifiant que ces derniers soient compatibles avec votre système électrique et avec les
données techniques de l’appareil.
Toute installation non-conforme aux instructions peut mettre en danger votre sécurité et
annuler la garantie.
L’appareil doit être utilisé dans l’objectif pour lequel il a été conçu, c'est-à-dire : préparer des
aliments à usage domestique.
Pour votre sécurité, soyez vigilent :
- Ne pas utilisé l’appareil pieds nus ou avec les mains/pieds mouillés
- Ne pas utilisé l’appareil dans un environnement autre que domestique
- Ne pas laisser l’appareil exposé aux agents atmosphériques (soleils, pluies, etc.)
- Ne pas laisser les enfants ou les personnes handicapées utiliser l’appareil
- Ne pas tirer sur le câble ni sur l’appareil lui-même pour le débrancher.
- Ne pas laisser l’appareil branché sur la prise d’alimentation sans surveillance.
- Ne jamais submerger l’appareil dans l’eau ou dans d’autres liquides.
- L’utilisateur ne doit pas remplacer le câble d’alimentation de l’appareil. Contactez un
professionnel qualifié en cas de besoin.
- Eteindre l’appareil et ne pas le manipuler s’il ne fonctionne plus ou pas bien. Contactez le
Centre de Service autorisé en cas d’éventuelles réparations, en demandant les pièces originales.
Mettre l’appareil hors service en fin de vie en coupant le câble d’alimentation après l’avoir
débrancher de la prise électrique. Pour la mise au rebut, respectez les normes relatives à
l’élimination des déchets en vigueur de votre pays, commune.
- Notre société ne se fera pas responsable d’éventuels dommages à personnes, animaux ou objets
causés par une installation incorrecte ou provenant d’une utilisation impropre, erronée ou
irraisonné.
- Ne pas laisser l’appareil fonctionné en continu plus d’une minute. Attendre ensuite 8 minutes
avant de l’allumer à nouveau. Après 5 périodes d’utilisation, l’appareil doit rester éteint pendant
30 min.
LA PREMIERE UTILISATION
- Lire ce manuel pour vous familiariser avec toutes les composantes de votre nouvel appareil pour
aliments.
- Nettoyez toutes les composantes et accessoires en contact avec les aliments avant d’utiliser
l’appareil pour la première fois (voir paragraphe « nettoyage »)
Attention !
1. Toujours faire attention lorsque vous manipulez les lames pour les installer, les retirer du bol
(B1) après avoir préparé des aliments et lorsque vous les nettoyez, puisqu’elles sont très
coupantes.
2. Cet appareil ne devrait pas être utilisé par des personnes (incluant les enfants) avec des
déficiences physiques, sensorielles ou mentales, ni par celles qui présentent un manque
d’expérience et connaissance, à moins qu’une personne responsable de leur sécurité les
supervise et leur donne des instructions concernant l’utilisation de l’appareil. Les enfants
doivent être sous surveillance pour s’assurer qu’ils ne jouent pas avec l’appareil.
3. Nous vous recommandons de porter des protections pour les oreilles pendant l’utilisation de
l’appareil.
Page 8

COMMENT UTILISER L’APPAREIL
Votre nouveau processeur d’aliments vous aidera à préparer beaucoup de mixtures basiques que vous
pourrez utiliser pour vos recettes.
Reportez vous aux instructions suivantes pour obtenir les meilleurs résultats et maintenir votre
appareil dans de bonnes conditions de fonctionnement.
Attention!
Ne jamais dépasser les quantités maximums indiquées plus bas et ne pas verser de liquides qui
auraient une température supérieure à 75°C dans le bol et/ou le mixeur.
Suivez les instructions données ci-dessous à chaque utilisation :
- Ne jamais laisser l’appareil sans surveillance lorsqu’il est en fonctionnement.
- Ne jamais faire fonctionner l’appareil lorsqu’il est vide.
- Ne jamais toucher les composantes détachables.
- Ne jamais mettre vos doigts ou ustensiles à l’intérieur du couvercle ouvert
- Ne jamais insérer les ingrédients au fond du couvercle ouvert avec vos mains.
- Ne pas utiliser l’appareil pour mixer des aliments durs (ex : viande congelée, peau de
fromage…) caoutchouc, (ex : écorce d’orange, de citron…) et les parties non comestibles des
ingrédients (ex : os, arrêtes, etc.) ou glace pilée.
- Ne pas enlever le couvercle et jamais remettre les accessoires sans éteindre l’appareil et si les
accessoires sont encore en marche.
- Ne pas enlever les ingrédients du bol avant d’avoir enlevé les lames.
A. Le Bol Mixeur
I- La fonction de découpage
- Mettre le bol en plastique sur l’unité de puissance et tournez le bouton dans le sens des aiguilles
d’une montre, comme montré sur le Diagramme 1.2.
- Mettre le support de lames sur l’axe au milieu du bol, et appuyez sur le bouton. Fixez ensuite les
lames coupantes sur le support de lames, comme montré sur le Diagramme 3&4.
Attention : La lame est coupante. Tenir seulement la partie en plastique pendant l’utilisation.
- Mettre les aliments (ex : viande), dans le bol, comme montré sur le Diagramme 5. Les gros
morceaux d’aliments doivent être coupés en petits morceaux (Approx. 2 cm x 2 cm x 2 cm).
- Mettre le couvercle sur le bol, et tournez le jusqu’à entendre le bruit du blocage, comme montré
sur le Diagramme 6&7.
- Branchez le câble dans la prise électrique, appuyez sur le bouton de mise en marche et
choisissez la vitesse, comme montré sur le Diagramme 8. (1-3 La puissance augmente par
degré ; PULSE est le bouton de d’impulsion, utilisé pour des utilisations intermittentes)
- Quand le découpage est terminé, mettre le bouton de mise en marché à 0. Lorsque les lames
s’arrêtent, extraire les aliments.
Page 9

FONCTION
INGREDIENT
QUANTITE MAX
TEMPS MAXIMUM (s)
TRANCHER
BROYER
Trancher
MELON
400g
50s
30s
CARROTTE
400g
50s
30s
Découper et battre
VIANDE
300g(environ 10g/morceau)
30s
JAMBON
300g(environ 15g/morceau)
30s
OIGNONS
400g(environ 20g/morceau)
30s
II. La fonction Batteur
La fonction de batteur a presque la même façon de fonctionner que la fonction de découpage. Le seul
changement réside dans le fait que l’on remplace les lames de découpage par des lames de fouet.
Cette fonction est utilisée pour mixer et battre les aliments, par exemple des œufs.
III. La function de trancher et broyer
Fixer les lames à trancher /à broyer sur le support de lames, comme montré sur le Diagramme 9. La
lame à trancher fait des aliments en tranches. La lame à broyer rend les aliments en purée.
- Mettre le bol sur l’unité de puissance, puis tournez le bol dans le sens des aiguilles d’une
montre, jusqu’à entendre le son de blocage. Ensuite, placez le support de lames sur l’axe au
milieu du bol, comme montré sur le Diagramme 10.
- Mettre le couvercle sur le bol et tournez le jusqu’à entendre le son de blocage. Branchez le câble
dans la prise électrique, appuyez sur le bouton de mise en marche et choisissez la puissance.
Mettre les aliments prélavés en bande dans l’entrée du couvercle et les y insérer doucement.
Lorsque la bande l’aliment est courte, insérer la à l’aide du verre doseur, comme montré sur le
Diagramme 12.
- Lorsque vous avez fini, appuyez sur le bouton en position 0. Lorsque les lames se sont arrêtées
complètement, extraire les aliments.
B: La cruche du mixeur
- Mettre les aliments dans la cruche du mixeur et fixer le couvercle bien fort.
- Mettre la cruche du mixeur sur l’unité de puissance pour que la bague de blocage soit connectée à
l’unité de puissance.
- Branchez l’appareil sur la prise électrique et allumer le processeur d’aliment. Tournez le bouton
jusqu’au niveau de puissance souhaité (La puissance augmente par degré ; PULSE est le bouton de
d’impulsion, utilisé pour des utilisations intermittentes)
Vous pouvez ajouter des aliments liquides (tels que l’huile, toute sorte de crème) aux autres aliments
si nécessaire ;
- Tournez le bouton sur la position 0 et éteignez l’appareil après son utilisation. Extraire les
aliments mixés de la cruche du mixeur.
LA LISTE DES INGREDIENTS:
Page 10

OEUFS
Six jaunes
25s
FRAISE
200g
25s
FROMAGE
100g
20s
AMANDES
100g
20s
NOISETTE
100g
20s
NOIX
100g
20s
Ingredients
QUANTITE MAX
TEMPS MAX (s)
pomme
250g
30s
orange
300g
30s
raison
250g
30s
fraise
250g
30s
Volume d’ingrédients :20X20X20mm3 /pc,eau : 400ml.
NETTOYAGE
Toujours débrancher l’appareil de la prise d’alimentation avant les travaux de nettoyage.
Nettoyez l’unité de puissance (6) avec un chiffon un peu humide. Ne pas le laver sous l’eau et ne
pas le submerger dans l’eau ou d’autres liquides.
Tous les accessoires peuvent être lavés à la main ou dans le lave vaisselle :
- Pour un lavage à la main, utilisez de l’eau tiède et du produit détergent normal, soyez prudent
avec les lames de métal car elles sont très coupantes.
- Pour un lavage en lave vaisselle, mettez les accessoires dans la partie haute et s’assurer que
l’eau n’excède pas une température maximum de 50°C.
Ne pas utilisez de produits chimiques ou corrosifs.
Note!
Lorsque vous avez fini de nettoyer, assurez vous que les composantes du bol (socle du moteur où le
bord du couvercle est mis en place – et pour les modèles avec la cruche du mixeur – la bague de
blocage sur le socle du moteur) ne soient pas obstruées par des résidus solides. Si besoin, utilisez une
brosse douce pour nettoyer les éventuels résidus, lorsque l’appareil est débranché.
Les lames ne peuvent pas être aiguisées. Remplacez-les si elles ne coupent pas bien ou sont usées.
Contactez un Centre de Service autorisé pour l’achat des accessoires et des composantes pour le
fonctionnement et l’entretien de votre appareil.
Environnement
Fabriqué pour et importé par : Adeva SAS 8 rue Marc Seguin 77290 Mitry-Mory FRANCE
www.adeva-import.com - contact@adeva-import.com - Tél. 01 64 67 00 01
Page 11

DEUTSCH
1.Mixer Krug Deckel Tasse
2.Mixer Krug Deckel
3.Mixer Krug
4.Mixer Verbindung
5.Hebel
6.Gehaeuse
7.Knopf
8.Achse
9.Mixer Schuessel
10.Schuessel Deckel
11.MessTasse
12.Hack Klinge
13.Scheiben Klinge
14.KlingenSupport
15.Schlag Klinge
16.Hack Klinge
17.Klingen Support
18.Spachtel
19.Deckel
TECHNISCHE DATEN:
Spannung:220-240V 50Hz
Lesitung: 500W
Struktur:
GENERELLE ANWEISUNGEN
- Bitte lesen Sie die folgende Gebrauchsanwesiung sorgfaelltig durch, Sie enthaelt
wichtige Sicherheits- und Wartungshinweise. Bewahren Sie die
Gebrauchsanweisung fuer spaetere Zwecke gut auf.
- Lassen Sie die Verpackungsteile nicht herumliegen (Plastiktaschen, Styropor,
Naegel, etc) Kinder koennten die in die Hanede kriegen und einen Unfall
verursachen.
- Versichern Sie sich das die elektrischen Daten des Geraetes die Ihres Haushaltes
entsprechen. Falls Sie Fragen haben wenden Sie sich an qualifiziertes
Fachpersonal.
- Es wird empfohlen keine Elektrischen Adapter fuer den Betrieb des Geraetes zu
benutzen. Benutzen Sie nur sicherheits zertifizierte Zubehoer das den Technischen
Daten des Geraetes entspricht.
- Jegliches Zubehoer oder Installation die nicht den Sicherheitsanweisungen
entpricht kann Ihre Sicherheit in Gefahr bringen und die Garantie verfallen
Lassen.
- Das Geraet darf nuer fuer Zwecke benutzt werden fuer die es hergestellt wurde.
(Haushalt, Zubereitung von Speisen)
- Fuer Ihre Sicherheit:
o benutzen Sie das Geraet nicht mit nassen Haenden oder oder Fuessen
o benutzen Sie das Geraet nur im Haushalt.
o lassen sie das Geraet nicht im Regen oder direkten Sonnenlicht stehen.
o lassen Sie Kinder nicht mit dem Geraet spielen.
Page 12

o ziehen Sie niemals am Kabel oder Geraet um das Gerat aus dem Stromnetz
zu entfernen.
o lassen Sie das Geraet nicht am stromnetz wenn Sie es nicht beaufsichtigen.
o tauchen Sie das Geraet niemals in Wasser.
o
- Versuchen sie nicht das Kabel selber zu reparieren. Bringen Sie das Geraet zu
qualifiziertem Fachpersonal.
- Schalten Sie das Geraet aus und veruchen Sie nicht das Geraet selber zu
reparieren falls es beschaedigt sein sollte. Bringen Sie es zu qualifiziertem
Fachpersonal um es zu reparieren.
- Wenn Sie das Geraet nicht mehr benutzen werden (am Ende des Lebenszyklus)
schneiden Sie das Kabel ab um es unverwendbar zu machen. Entsorgen Sie es je
nach den Lokalen Ensorgungs Regeln.
- Unsere Gesellschaft kann nich haftbar gemacht werden fuer falsches Handhaben
und nicht folgen der Sicherheitshinweise.
- Benutzen Sie das Geraet nur durchgehend waehrend 1 Minute, lassen Sie es
danach fuer 8 Minuten abkuehlen und maximal 5 mal. Danach sollte es waehrend
30 Minuten ruhen Lassen.
ERSTER GEBRAUCH
-Lesen Sie die Anweisungen um alle Teile Ihrer Kuechenmaschine zu kennen.
-Waschen Sie alle Teile die in Kontakt mit den Speisen kommen. (siehe Reinigung)
ACHTUNG!
1.Seien Sie immer sorgfaellting wenn sie die klingen des Geraetes handhaben, wenn Sie
die Klingen aus der Schuessel nehmen (B1), nach dem vorbereiten der Speisen, die
Klingen sind sehr scharf.
2.Das Geraet sollte nicht von Kinder oder Personen benutz werden die Psychische oder
Physiche Probleme haben. Sie sollten immer von einer Erwachsenen Person
beaufsichtigt werden. Kinder sollten auch immer ueberwacht werden um zu vermeiden
das Sie mit dem Geraet spielen.
3.Wir empfehlen Gehörschutz zu benutzen wenn Sei das Geraet benutzen.
WIE BENUTZ MANN DAS GERAET
Ihre neue Kuechenmaschine wird Ihnene helfen neue mischungen fuer Ihren Speisen
herzustellen
Bitte folgen sie Hinweise um die besten Resultate von Geraet zu bekommen und das
Geraet in einem guten zustand zu behalten.
Achtung!
Geben Sie niemals mehr Fluessikeit als der gegebene MAX. Pegel in das Geraet und
geben Sie keine Fluessigkeiten oder Speisen heisser als 75℃ in die Schuessel oder Mixer.
Folgen Sie die Hinweise jedes mal wenn Sie das Geraet benutzen:
-Lassen Sie das Geraet niemals ohne Beaufsichtigung laufen.
-Lassen Sie das Geraet niemals laufen wenn es leer ist.
-Behruehren Sie niemals dieTeile in Bewegung.
-Tun Sie niemals Ihre Finger oder Haende in die Oeffnungen des Geraetes.
-Geben Sie niemals Zutaten in die Oeffnung mit Ihren Haenden.
-Benutzen Sei das Geraet nicht fuer harte Speisen (gefrorenes Fleisch, etc), Knochen, Eis,
etc.
-Entfernen Sie niemals den Deckel wenn das Geraet in gebracuh ist oder wenn das Teil
noch in Bewegung ist.
-Entfernen Sie niemals die Speisen ohne bevor die Klingen entfernt zu haben.
A: Misch Schuessel
I. Hacken Funktion
-setzen Sie die Schuessel auf das Gehause un drehen Sie es um Uhrzeigersinn, wie in 1.2
gezeigt wird.
-Setzen Sie den klingen support auf die Achse un druecken Sie nach unten. Danach
befestigen Sie die Hack Klinge wie in 3 & 4 gezeigt wird.
Page 13

Achtung: Die Klinge ist scharf fassen Sie sie nur am Plastik teil an.
-Geben Sie die Speisen in die Schuessel (5) Grosse Speisen sollten in kleinere geschnitten
werden (ungefaehlr 2 cm × 2 cm × 2 cm)
- Setzen Sie den Deckel auf die Schuessel und drehen Sie bis sie ein klick gerausch
hoeren (6 & 7)
-Stecken Sie den Stecker ins Stromnetz, wahelen sie die gewuenschte intensitaet (8) (1-3
je nach staerkte, PULSE ist nur fuer Impuls benutzt.)
-Wenn das hacekn zuende ist, druecken Sie auf den “0” Knopf. Die klinge hoert auf zu
drehen, erst danahc koenne Sie die Speisen aus der Schuessel nehmen.
II. Schlag Funktion
Die Schlag Funktion hat die selben Schritte wie Hack Funtkion, das einzige das wechselt
ist die Klinge.
III. Scheiben und Zerkleinern Funktion
-Setzen Sie die Scheiben und Zerkleinern Funktion wie in (9) gezeigt wird.
-Setzen Sie die Schuessel auf das Gehause und drehen Sie es im Uhrzeigersinn bis Sie ein
Klick Geraeusch hoeren. Danach Setzen Sie die Klinge ein (10).
- Setzen Sie den Deckel auf die Schuessel und drehen Sie bis sie ein klick gerausch
hoeren
-Stecken Sie den Stecker ins Stromnetz, wahelen sie die gewuenschte intensitaet. Stecken
Sie dan die sauberen Speisen sorgfaellting mit der Messtasse hinein, diese werden dan
in Scheiben geschnitten oder zerkleinert. (12)
-Wenn das hacekn zuende ist, druecken Sie auf den “0” Knopf. Die klinge hoert auf zu
drehen, erst danahc koenne Sie die Speisen aus der Schuessel nehmen.
B: Mixer Krug
-Geben Sie die Zutaten in den Krug und schliessen Sie Ihn gut.
-Setzen Sie den Krug auf das Gehause und stecken sie den Stecker ins Stromnetz.
-Drehen sie en Knopf in die Gewuenscht eintensitaet.
-Sie koennen Fluessigkeiten ins den Krug geben waehrned er in Gebrauch ist.
-Wenn das mixen zuende ist, druecken Sie auf den “0” Knopf. Die klinge hoert auf zu
drehen, erst danach koenne Sie die Speisen aus dem Krug nehmen.
Page 14

INGREDIENTEN:
FUNKTION
ZUTATEN
MAX KANTITAET
MAXIMUM ZEITEN (s)
SCHNEIDEN
ZERKLEINERN
SCHNEIDEN –
ZERKLEINERN
MURPHY
400g
50s
30s
MELON
400g
50s
30s
KARROTEN
400g
50s
30s
HACKEN &
SCHALGEN
FLEISCH
300g(ungefaehr
10g/stueck)
30s
SCHINKEN
300g(ungefaehr
15g/stueck)
30s
ZWIEBELN
400g(ungefaehr
20g/stueck)
30s
EIER
6 Eigelb
25s
ERDBEEREN
200g
25s
KAESE
100g
20s
MANDELN
100g
20s
WALNUESSE
100g
20s
HAZELNUESSE
100g
20s
Zutaten
MAXIMALE MENGE
MAXIMALE ZEIT (s)
Apfel
250g
30s
Apfelsine
300g
30s
Trauben
250g
30s
Erdebeeren
250g
30s
Zutat Volumen: 20X20X20mm3 /pc,Wasser:400ml.
-Schuessel:
-Krug:
REINIGEN
Ziehen Sie immer den Stecker aus dem Stromnetz bevor Sie es reinigen.
Reinigen Sie das Gehaeuse (6) mit einem feuchten Tuch. Waschen Sie das Geraet nicht
unter dem Wasserhahnen und tauchen Sie es auch nicht ins Wasser oder jegliche
Fluessigkeit.
Jegliches Zubehoer kann mit Wasser und Seife und in der Geschirrspuelmaschine
gewaschen werden.
-Seien Sie vorsichtig wenn Sie die Klingen waschen, die koenne sehr scharf sein!
-Wenn Sie im der Geschirrspuelmaschine waschen setzen Sie das Zubehoer auf den
oberen Teil und vergewissern Sie sich dass die Wasser Temperatur nicht ueber 50⁰C
ist.
Benutzen Sie keine Scheuermittel
Hinweis!
Wenn Sie fertig mit dem reinigen des Geraetes sind vergewissern Sie sich das die
mechanischen Teile (Motor, Teil wo die Schuessel in das Gehause einrastet) und bei
Modellen mit Misch Krug) nicht von Speise resten obstruirt werden. Wenn noetig
benutzen Sie eine Buerste um die Speise reste zu entfernen.
Die Klingen koenne nicht geschaerft werden, wenn noetig kaufen sie neuen Klingen,
kontaktieren sie den Kundenservice.
UMWELT
ACHTUNG:
Werfen Sie nicht dieses Produkt, wie es mit anderen Haushaltsprodukten hat. Es gibt eine
Mülltrennungs von diesem Produkt in Gemeinden, Sie müssen Ihre lokalen Behörden über
die Orte, wo man dieses Produkt zurückgeben können zu informieren. In der Tat enthalten
elektrische und elektronische Produkte gefährliche Stoffe, die schädliche Auswirkungen auf
die Umwelt oder die menschliche Gesundheit haben und sollte recycelt werden. Das
Symbol hier darauf hinweisen, dass elektrische oder elektronische Geräte sollten sorgfältig
ausgewählt werden, ist ein fahrbarer Abfallbehälter mit einem Kreuz markiert.
Hergestellt und importiert: Adeva SAS 8 rue Marc Seguin 77290 Mitry-Mory FRANCE
www.hkoenig.com - contact@hkoenig.com - Tel. 01 64 67 00 01
Page 15

NEDERLANDS
⑴ Blender Jug Cup Measuring
Cup
⑵ Blender Jug cover
⑶ Blender Jug
⑷ Switch Connecter
⑸ Knob
⑹ Power Unit
⑺ Button Switch
⑻ Axis Tube
⑼ Mixing Bowl
⑽ Bowl Cover(Plastic)
⑾ Measuring Cup
⑿ Shredding Knife
⒀ Slicing Knife
⒁ Knife Support
⒂ Whisking Blade
⒃ Chopping Blade
⒄ Blade Support
⒅ Scoop
⒆ Protect cover
Voltage : 220-240V 50Hz
Power : 500W
Structuur:
TECHNISCHE SPECIFICATIES:
Voltage:220-240V 50Hz
Power: 500W
Structure:
ALGEMEENE INSTRUCTIES
- Lees dit handboek met belangrijke instructies over veiligheid, het gebruik en
onderhoud van uw apparaat en bewaar het op voor toekomstig gebruik.
- Houd onderdelen van de verpakking (plastic zakken, polystreen, spijkers, enz) buiten
het bereik van kinderen omdat deze bronnen van potentiӫ le gevaar zijn.
- Zorg ervoor dat de gegevens op het typeplaatje overeenkomstig zijn met die van de
hoofdvoeding en van uw elektrische installatie voordat u het apparaat op het
stopcontact aansluit. In het geval van twijfel, neem contact op met een gekwalificeerd
persoon.
- Het is aan te raden geen adapters, meervoudige contactdozen en verlengingskabels
te gebruiken. Gebruik alleen apparaaten die gecertificeerd zijn met bestaande
veiligheidsnormen, alleen als het absoluut noodzakelijk is. Zorg ervoor dat ze
compatibel zijn met uw elektrische installatie en de technische gegevens van het
apparaat.
- Elke installatie die niet aan de instructies voldoen kunnen uw veiligheid in gevaar
brengen en uw verliest de garantie.
- Het apparaat mag alleen worden gebruikt voor het doel waarvoor het ontworpen is,
het bereiden van voedsel voor huishoudelijk gebruik.
- Voor uw veiligheid wees voorzichtig:
-gebruik het apparaat nooit met blote voeten of natte handen of voeten
- gebruik het apparaat alleen binnenshuis
Page 16

- stel het apparaat niet bloot aan atmosferische invloeden (zon/regen)
- Zorg ervoor dat kinderen of onervaren personen het apparaat niet gebruiken
- Trek nooit aan het kabel zelf om het apparaat los te koppelen.
- Laat het apparaat nooit zonder toezicht achter als het op de netspanning aangesloten is.
- Dompel het apparaat nooit onder water of andere vloeistoffen
- De gebruiker mag het kabel nooit zelf vervangen. Neem contact op mete en vakman.
- Schakel het apparaat uit en gebruik het niet als het niet goed functioneert. Neem contact
op mete en geautoriseerde Service Center voor eventuele reparaties of vragen voor
origínele onderdelen.
- Plaats het apparaat buiten dienst als het aan het einde van de levensduur is, door het
kabel door te snijden zodra de stekker uit het stopcontact werd verwijdert.Volg de lokale
bestaande regels en voorschriften voor de verwijdering.
- Ons bedrijf kan niet aansprakelijk worden gesteld voor eventuele schade aan personen,
dieren of voorwerpen veroorzaakt door verkeerde installatie of als gevolg van onjuist,
verkeerd of onredelijk gebruik.
- Le top: Laat het apparaat maximaal 1 minute continu draaien, en laat het dan 8 minuten
rusten voor dat u het herstart. Dus na vijf keer gebruik, moet het apparaat 30 minuten
rusten.
Het eerste gebruik
- Lees deze handleiding om u zelf met de keukenmachine en alle onderdelen vertrouwd te
maken.
- Reinig alle onderdelen en accessoires die met voedsel in contact komen voordat u het
apparaat voor het eerste keer gebruikt (zie paragraaf “Reiniging”)
Waarschuwing!
1.Wees altijd voorzichtig wanneer u de messen behandeld om ze te plaatsen of uit de kom
te nemen (B1) na het bereiden van het eten en bij het reinigen want ze zijn zeer scherp.
2. Dit apparaat is niet bedoeld voor gebruik door personen (inclusief kinderen) met
beperkte lichamelijke of geestelijke vermogens, of gebrek aan ervaring tenzij ze onder
toezicht worden houden en geïnstrueerd werden over het gebruik van het apparaat door
een verantwoordelijk person. Kinderen moeten onder toezicht worden gehouden om
ervoor te zorgen dat ze niet met het apparaat spelen.
3. We raden het dragen van gehoorbescherming aan tijdens het gebruik van het apparaat.
Het Gebruik
Uw nieuwe food processor zal u helpen om standaard mengsels die u voor uw
recepten kunt gebruiken te bereiden. Houd u eigen aan de volgende instructies om de
beste resultaten te bereiken en uw apparaat in goede staat te houden.
Attentie!
Ga nooit over de maximale hoeveelheiden en giet nooit vloeistoffen warmer dan 75℃ in de
kom/blender.
Volg de instructies hieronder bij ieder gebruik:
-Laat het apparaat nooit onbeheerd achter als het in werking is.
-Schakel het apparaat nooit aan als het leeg is.
-Raak nooit roterende onderdelen aan.
-Steek nooit uw vingers of voorwerpen in het deksel opening.
-Druk nooit ingrediӫ nten met uw vingers in de deksel opening.
-Gebruik het apparaat niet om harde ingrediӫ nten te mengen (bijv. Bevroren vlees, korsten
van kaas, rubberachtig voedsel zoals sukade, botjes, visgraat of ijsblokjes.
-Verwijder nooit het deksel en vervang nooit accessoires zonder het uitschakelen van het
apparaat of als de accessoires nog in werking staan.
-Verwijder ingrediӫ nten niet uit de kom voordat u het mes heeft verwijdert.
A: Meng Kom
I. Hak functie
-Zet de plastic kom op het power unit en draai het handvat in de richting van de klok mee,
zoals aangegeven in Figuur 1.2
- Leg het mes steum op de as in het midden van de schaal en druk de onderkant aan.
Bevestig vervolgens de hakmes om het mes te ondersteunen, zoals aangegeven in
grafiek 3 & 4.
Waarschuwing: Het mes is scherp. Gebruik alleen het plastic onderdeel.
- Plaats het voedsel in de kom zoals aangegeven in Figuur 5. Snijd groot voedsel in kleine
stukjes (ongeveer 2cm x 2cm)
- Leg het deksel op de kom en draai het tot u een kletserend geluid te horen krijgt, zoals
aangegeven in grafiek 6 &7.
- Bevestig de stekker in het stopcontact, druk op de knop schakelaar om de snelheid te
kiezen, zoals aangegeven in Figuur 8. (1-3 Vermogens stijgen met mate; PULSE is een
touch schakelaar voor het gebruik van intermitterende werking).
Page 17

- Wanneer het hakken voltoid is, druk op stand “0”. Als het mes stopt, giet het voedsel eruit.
FUNCTIE
INGREDIËNTEN
MAX HOEVEELHEDEN
MAXIMUM TIMES (s)
SNIJDEN
SHREDDEN
SNIJDEN
MURPHY
400g
50s
30s
MELOEN
400g
50s
30s WORTEL
400g
50s
30s
HAKEN
&
KLOPPEN
VLEES
300g(rond 10g/stuk)
30s
HAM
300g(rond15g/stuk)
30s
UIEN
400g(rond 20g/stuk)
30s
EI
Zes eierdooieren
25s
AARDBEEIEN
200g
25s
KAAS
100g
20s
AMANDELEN
100g
20s
HAZELNOTEN
100g
20s
WALNOTEN
100g
20s
II. Kloppen Functie
De meng functie heeft bijna dezelfde bedieningsstappen als de hakken functie. Vervang
alleen de hakmes voor het shredder mes. Het wordt gebruikt voor het mengen en
kloppen van voedsel, bijvoorbeeld ei.
III. Snijd & Shredding Functie
- Bevestig het snijd/shredder mes op de messteun, zoals aangegeven in Afbeelding 9.
Vleesmes bereid het voedsel in plakjes. Shredder mes bereid het voedsel in flarden.
- Zet de kom op de motor, en draai de kom met de klok mee, totdat het een hoorbaar
klapperend geluid weergeeft. Vervolgens de messteun op de as in het midden van de
schaal plaatsen, zoals aangegeven in Afbeelding 10.
- Plaats het deksel op de kom en draai deze tot u een klapperend geluid hoort. Bevestig
vervolgens de stekker in het stopcontact, en draai de schakelaar om het niveau te
kiezen. Plaats voedsel in het strip van de ingang van het deksel en duw het voedsel
langzaam naar beneden.Als het voedsel strip kort is, druk deze naar beneden met de
maatbeker zoals aangegeven in Afbeelding 12.
- Als de handeling voltooid is, druk de schakelaar op “0”. Als het blad volledig is gestopt,
giet het voedsel eruit.
B: Blender kan
- Plaats voedsel in de kan en bevestig het deksel stevig op de behuizing.
-Zet de blender kan op het aggregaat tot de kan steun en het power unit goed verbonden
zijn.
-Sluit de stekker van de machine op de keukenmachine aan. Draai de knop op het
gewenste niveau (de snelheid wordt verhoogd met niveaus. PULSE is het hoogste niveau.
Draai de knop naar PULSE voor interval werking)
-U kunt een aantal vloeibaar material (zoals olie, crème) toevoegen bij het mengen indien
nodig.
-Draai de knop op “0” niveau en het apparaat wordt uitgeschakeld na het werken. Giet het
mengsel uit de kom.
INGREDIËNTEN LIJST:
-Kom:
Page 18

-Blender:
materiaal
MAX HOEVEELHEDEN
MAXIMUM TIJDEN (s)
appel
250g
30s
sinaasappel
300g
30s
druif
250g
30s
aardbei
250g
30s
materiaal volume:20X20X20mm3 /pc,water:400ml.
REINIGING
Koppel het apparaat altijd los voordat u het gaat reinigen.
Reinig de Power Unit (6) met een zachte, vochtige doek. Niet onder stromend water
wassen en dompel het apparaat nooit onder water of andere vloeistoffen.
Alle accessoires kunnen per hand of in de vaatwasser gereinigd worden:
- voor het wassen per hand gebruik lauw water en normal afwasmiddel, wees voorzichtig
met de messen, ze zijn erg scherp.
-reiniging in de vaatwasser-plaats accessoires in het bovenste deel en zorg ervoor dat het
water nooit heter is dan maximal 50℃.
Gebruik geen chemische of scheurende middelen.
Note!
Als u klaar bent met reinigen zorg ervoor dat de onderdelen gecontroleerd door het
veiligheidssysteem van de kom (aandrijving op het punt waar de rand van het deksel past)
en voor modelen met blender kan (kan behuizing op de motor aandriving, blender kan en
deksel), niet door vuil geblokkeerd zijn. Indien nodig, gebruik een zachte borstel om
eventuele resten schoon te maken, zodra het apparaat ontkoppeld werd.
De messen kunnen niet worden geslepen. Vervang ze als ze niet snijden of goed versleten
zijn. Neem contact op met een erkend servicecentrum om accessoires en onderdelen van
het apparaat te vervangen.
MILIEU
ATTENTIE:
Dit apparaat mag niet met uw ander huishoudelijke toestellen worden verwijdert. Dit
product moet op een geselecteerde stortplaats verwijdert worden. U kunt bij de gemeente
een indiceerde plaats aanvragen. Elektrisch en elektronische producten kunnen
gevaarlijke stoffen inhouden die schadelijk zijn voor mensen en het milieu en moet
recycled worden. Het symbool aan de kant geeft aan dat het een elektrisch en elektronisch
toestel is en zijn dus artikelen van een selectieve collectie. Het beeld geeft een afvalbak
met een X teken aan.
Geproduceerd en geïmporteerd door : Adeva SAS 8, Rue Marc Seguin 77290, Mitry-Mory FRANKRIJK
www.hkoenig.com - contact@hkoenig.com – Telefoon: 01 64 67 00 01
Page 19

ESPANOL
ESPECIFICACIONES TÉCNICAS
Voltaje :220-240V 50Hz
Potencia: 500W
Estructura:
⑴ Taza de medición de la licuadora
⑵ Tapa
⑶ Vaso
⑷ Interruptor conector
⑸ Perilla
⑹ Motor
⑺ Botón
⑻ Eje
⑼ Recipiente de mezcla
⑽ Tapa del recipiente (Plástico)
⑾ Taza de medición
⑿ Cuchilla de trituración
⒀ Cuchilla para rodajas
⒁ Soporte de cuchillas
⒂ Hoja batidora
⒃ Hoja de corte
⒄ Soporte de hojas
⒅ Cuchara
⒆ Cubierta de protección
INSTRUCCIONES GENERALES
• Por favor, lea este manual, ya que da instrucciones importantes sobre la seguridad,
el uso y
mantenimiento del dispositivo y guárdelo para futuras consultas.
• No dejar las piezas de embalaje (bolsas de plástico, espuma de poliestireno, clavos,
etc.) al alcance de los niños o personas incapaces, ya que son fuentes potenciales de
peligro.
Page 20

• Asegúrese de que los datos de la placa de características del aparato correspondan
con el de la fuente de alimentación principal y de su sistema eléctrico antes de
enchufar el dispositivo a la toma de corriente. En caso de duda, póngase en contacto
con personal cualificado.
• Es recomendable no utilizar adaptadores, tomas múltiples y extensiones. Utilice los
dispositivos certificados respetando las normas de seguridad existentes sólo en caso
de que sea absolutamente necesario, asegurándose de que sean compatibles con su
sistema eléctrico y con los datos técnicos del dispositivo.
• Cualquier instalación no conforme a las instrucciones puede poner en peligro
su seguridad y hará que la garantía sea nula.
• El dispositivo debe ser utilizado solamente para el propósito para el que fue
diseñado, es decir, preparación de comidas en ámbito doméstico.
• Por motivos de seguridad asegúrese de:
-No utilizar el dispositivo con los pies descalzos o con las manos o los pies mojados.
-No utilizar el dispositivo en cualquier lugar que no sea un entorno doméstico.
-No dejar el dispositivo expuesto a agentes atmosféricos (sol / lluvia ...).
-No permitir que los niños o personas discapacitadas usen el dispositivo.
-Nunca tire del cable o el dispositivo mismo para desenchufarlo.
-No deje el dispositivo enchufado sin supervisión.
-Nunca sumerja el dispositivo en agua u otros líquidos.
• El usuario no debe sustituir el cable del dispositivo. Póngase en contacto con
una persona profesionalmente cualificada en caso de necesidad.
• Apague y no maltrate el dispositivo si hay avería y/o funciona mal. Póngase en
contacto con un centro de servicio autorizado para las reparaciones eventuales, pida
siempre piezas de repuesto originales.
• Cuando el dispositivo llegue al final de su vida útil dispóngalo para su reciclaje
cortando el cable después de desconectarlo de la toma de corriente. Cumpla con las
normas locales para su eliminación.
• Nuestra empresa no se hace responsable por eventuales daños a personas,
animales u objetos causados por una instalación incorrecta o derivados de un uso
incorrecto, erróneo o irracional del dispositivo.
• El uso máximo del dispositivo es de 1 min de funcionamiento continuo, deje que el
dispositivo repose por 8 min antes de reiniciar su uso. Así, después de cinco usos, el
dispositivo debe guardar reposo por 30 min.
USAR EL DISPOSITIVO POR PRIMERA VEZ
-Lea este manual para familiarizarse con todas las partes de su nuevo dispositivo.
-Limpie todas las piezas y accesorios que entrarán en contacto con los alimentos
antes de utilizar el dispositivo por primera vez (consulte el apartado "Limpieza").
¡Advertencia!
1. Siempre tenga cuidado cuando usted está manejando las hojas para montarlas,
desmontarlas del recipiente(B1) después de preparar la comida y al limpiarlas, ya que
están muy afiladas.
Page 21

2. Este dispositivo no está diseñado para ser utilizado por personas (incluidos niños)
con discapacidades físicas, sensoriales o mentales, o con falta de experiencia y
conocimiento, a menos que hayan recibido supervisión o instrucciones relativas al uso
del dispositivo por una persona responsable de su seguridad.
Los niños deben ser supervisados para asegurarse de que no jueguen con el
dispositivo.
3. Le sugerimos usar protección para los oídos mientras opere el dispositivo.
CÓMO USAR EL DISPOSITIVO
Su nuevo procesador de cocina le ayudará a preparar una gran cantidad de mezclas
básicas que usted puede utilizar para sus recetas.
Por favor, observe las siguientes instrucciones para obtener los mejores resultados y
para mantener el dispositivo en buenas condiciones de trabajo.
¡Atención!
Nunca exceda las cantidades máximas y nunca vierta líquidos calientes de más de 75
℃ en el recipiente y/o en la licuadora
Siga las instrucciones que se indican a continuación cada vez que utilice el dispositivo:
-Nunca deje el dispositivo desatendido mientras esté encendido.
-Nunca haga funcionar el dispositivo cuando está vacío.
-Nunca toque las piezas en movimiento.
-Nunca ponga los dedos ni utensilios en el interior.
-No presione hacia abajo los alimentos por la apertura de la tapa con las manos.
-No utilice el dispositivo para procesar alimentos duros (carne congelada, cortezas de
queso...), caucho (cáscara confitada...), y las partes no comestibles de los alimentos
(huesos, espina de pescado...) o hielo.
-No quite la tapa y nunca sustituya los accesorios sin apagar el dispositivo y si el
accesorio que está usando no ha dejado de funcionar.
-No retire los ingredientes del vaso antes de retirar la hoja
A: Recipiente de mezcla
I. Función de picado
-Ponga el recipiente de plástico en el motor y gire la manija hacia la derecha, como se
muestra en el diagrama 1.2.
- Coloque el soporte de la cuchilla en el eje en el centro del recipiente y presione hasta
el fondo. A continuación, fije la cuchilla de picar al soporte de la hoja, como se muestra
en el Diagrama 3 y 4.
Advertencia: La cuchilla está muy afilada. Sólo toque la pieza de plástico durante el
uso.
- Coloque los alimentos (como la carne) en el recipiente, como se muestra en el
Diagrama 5. Los alimentos grandes deben de ser cortado en trozos pequeños.
(Aproximadamente 2 cm x 2 cm x 2 cm).
- Coloque la tapa sobre el recipiente y gírela hasta que se cierre, como se muestra en
el Diagrama 6 y 7.
- Enchufe el dispositivo, pulse el botón interruptor para elegir la velocidad, como se
muestra en el Diagrama 8. (1-3 la potencia aumenta por grados; PULSE para
mantener presionado, que se utiliza para el funcionamiento intermitente)
- Cuando el picado se termine, ponga el interruptor en la posición "0". Después de que
el disco se detenga, puede sacar los alimentos.
Page 22

II. Función de batido
Esta función tiene casi las mismas etapas de trabajo que la función anterior. Sólo
cambie la cuchilla de picar por la cuchilla de trituración. Se usa para mezclar y batir
alimentos, por ejemplo, los huevos.
III. Función de corte y trituración
- Fije el cuchillo de corte / trituración en el soporte de la cuchilla, como se muestra en
el Diagrama 9. La cuchilla de corte hace que la comida se corte en rodajas. El cuchillo
de trituración hacer que la comida se corte en pedazos.
- Coloque el recipiente en motor, y luego gire el recipiente hacia la derecha. A
continuación, ponga el soporte de la cuchilla en el eje en el centro del recipiente, como
se muestra en el diagrama 10.
- Coloque la tapa sobre el recipiente y gírela hasta que se cierre. A continuación,
enchufe el dispositivo, encienda el interruptor para seleccionar el nivel. Ponga los
alimentos en la abertura de la tapa y empújelos hacia abajo lentamente. Cuando la tira
de alimentos es corta, empújelos hacia abajo con la taza de medición, como se
muestra en el diagrama 12.
- Cuando la operación haya terminado, coloque el interruptor a la posición "0".
Después de que la hoja se detenga por completo, puede retirar los alimentos.
B: Vaso
- Llene el vaso y tápelo
- Coloque el vaso en el motor.
- Enchufe el dispositivo y encienda el procesador de alimentos. Gire la perilla hasta el
nivel requerido (La velocidad se incrementa en los niveles 1-3. PULSE es el más alto
nivel. Gire el mando hacia la función PULSE para procesar a intervalos).
-Se puede añadir líquidos (tal como aceite, crema, etc.) a la comida cuando se está
procesando.
-Gire la perilla a "0", y apague el dispositivo después de trabajar.
Page 23

FUNCIÓN
INGREDIENTES
MAX CANTIDADES
TIEMPO MAX.
CORTAR
TRITURAR
CORTAR
MURPHY
400g
50s
30s
MELÓN
400g
50s
30s
ZANAHORIA
400g
50s
30s
PICADO
&
BATIDO
CARNE
300g(APROX.
30s
JAMÓN
300g(APROX.
30s
CEBOLLA
400g(APROX.
30s
HUEVO
six yolks
25s
FRESA
200g
25s
QUESO
100g
20s
ALMENDRA
100g
20s
AVELLANAS
100g
20s
NUECES
100g
20s
Material
MAX CANTIDADES
TIEMPO MAX
Manzana
250g
30s
Naranja
300g
30s
Uva
250g
30s
Fresa
250g
30s
volumen:20X20X20mm / pieza,agua: 400ml.
LISTA DE INGREDIENTES:
- Recipiente:
- Vaso:
LIMPIEZA
Siempre desenchufe el dispositivo antes de limpiarlo.
Limpie el motor (6) con un paño suave ligeramente húmedo. No lo lave bajo el agua y
no lo sumerja en agua u otros líquidos.
Todos los accesorios se pueden lavar a mano o en el lavavajillas:
- Para el lavado manual, use agua tibia con detergente de lavado normal, teniendo
cuidado con las hojas de acero, están muy afiladas.
-Lavado en lavavajillas de los accesorios, ubíquelos en la parte superior y asegúrese
de que el agua no supere la temperatura máxima de 50 ℃.
No utilice productos químicos o sustancias abrasivas.
Page 24

¡Nota!
Cuando haya terminado de limpiar asegúrese de que las partes del recipiente (base
del motor en el punto en el que el borde de la tapa encaje en su lugar) y para los
modelos con vaso de licuadora (que la base del vaso encaje en el motor), además
asegúrese de que no no están obstruidos por desechos sólidos. Si es necesario utilice
un cepillo suave para limpiar los residuos eventuales cuando el dispositivo esté
desenchufado.
Las cuchillas no pueden ser afiladas. Reemplácelas cuando ya no corten
correctamente o estén desgastadas.
Póngase en contacto con un centro de servicio autorizado para comprar los
accesorios, piezas sujetas a desgaste y los trabajos de mantenimiento del dispositivo.
MEDIO AMBIENTE
ATENCIÓN:
No se deshaga de este producto como lo hace con otros productos del hogar. Existe
un sistema selectivo de colecta de este producto puesto en marcha por las
comunidades, debe de informarse en su ayuntamiento acerca de los lugares en los
que puede depositar este producto. De hecho, los productos eléctricos y electrónicos
pueden contener substancias peligrosas que tienen efectos nefastos para el medio
ambiente o para la salud humana y deben ser reciclados. El símbolo aquí presente
indica que los equipos eléctricos o electrónicos deben de ser cuidadosamente
seleccionados, representa un recipiente de basura con ruedas marcado con una X.
Fabricado e importado por: Adeva SAS 8 rue Marc Seguin 77290 Mitry-Mory FRANCE
www.hkoenig.com - contact@hkoenig.com - Tel. 01 64 67 00 01
Page 25

ITALIANO
1) Tappo con misurino
2) Coperchio frullatore
3) Caraffa frullatore
4) Connettore frullatore
5) Manopola velocità
6) Base
7) Base ciotola
8) Asse ciotola
9) Ciotola
10) Coperchio ciotola
(in plastica)
11) Pestello con misurino
12) Lama per sminuzzare
13) Lama per affettare
14) Supporto lame
15) Lama per miscelare
16) Lama tritatutto
17) Supporto lame
18) Mestolo
19) Coperchio di protezione
SPECIFICHE TECNICHE:
Voltaggio: 220-240V 50Hz
Potenza: 500W
Struttura:
ISTRUZIONI GENERALI
• Si prega di leggere attentamente questo manuale, in quanto fornisce importanti
indicazioni riguardanti la sicurezza, l'utilizzo e la manutenzione dell’apparecchio.
Conservare con cura per ogni riferimento futuro.
• Non lasciare parti dell'imballaggio (sacchetti di plastica, polistirolo, viti, ecc.) alla portata
dei bambini o di persone disabili in quanto potrebbero rappresentare potenziali fonti di
pericolo.
• Prima di collegare la spina, assicurarsi che la tensione del vostro impianto elettrico
corrisponda a quella riportata sull’apparecchio. Nel dubbio, rivolgersi a un tecnico
qualificato.
• Si consiglia di non utilizzare adattatori, prese multiple e prolunghe. È assolutamente
necessario utilizzare dispositivi certificati e conformi agli standard di sicurezza vigenti.
Inoltre, assicurarsi che siano compatibili con il sistema elettrico e con i dati tecnici
dell'apparecchio.
• Qualsiasi installazione non conforme alle istruzioni può compromettere la vostra
sicurezza e la perdita della garanzia.
• L'apparecchio deve essere utilizzato unicamente per lo scopo per il quale è stato
progettato, ossia per la preparazione di cibo per uso domestico.
• Per motivi di sicurezza prestare particolare attenzione a:
- non usare l'apparecchio a piedi nudi o con le mani e/o piedi bagnati;
- non utilizzare l'apparecchio al di fuori delle mura domestiche;
- non lasciare l'apparecchio esposto ad agenti atmosferici (sole, pioggia, ecc.);
- non permettere a bambini o persone disabili di utilizzare l'apparecchio;
- non tirare il cavo o l’apparecchio stesso per staccare la spina dalla presa di corrente;
Page 26

- non lasciare incustodito l'apparecchio quando collegato alla presa elettrica;
- non immergere mai l'apparecchio in acqua o altri liquidi.
• Non sostituire mai il cavo di alimentazione autonomamente. In questi casi, rivolgersi
sempre a personale qualificato.
• Quando l’apparecchio presenta danni o malfunzionamenti, spegnerlo e non cercare di
ripararlo autonomamente. Contattare un centro di assistenza autorizzato per eventuali
riparazioni, richiedendo esclusivamente ricambi originali.
• Quando l’apparecchio non può più essere riparato, metterlo definitivamente fuori
servizio, staccando la spina dalla presa e tagliando il cavo di alimentazione. Per il suo
smaltimento, rispettare le disposizioni prescritte dal regolamento del vostro comune.
• Il produttore non può essere ritenuto responsabile per eventuali danni a persone,
animali o cose causati da un’errata installazione o derivanti da usi impropri, erronei ed
irragionevoli dell’apparecchio.
• Utilizzare l’apparecchio per un massimo di 1 minuto continuato; se si desidera
continuare a utilizzarlo, lasciarlo riposare per 8 minuti prima del riavvio. Dopo cinque
cicli, l'apparecchio deve essere lasciato al riposo per 30 minuti.
UTILIZZARE L’APPARECCHIO PER LA PRIMA VOLTA
- Leggere questo manuale per familiarizzare con tutte le parti del vostro nuovo robot da
cucina.
- Prima di utilizzare l'apparecchio per la prima volta, lavare tutte le parti e gli accessori
destinati al contatto diretto con gli alimenti (vedi paragrafo "Pulizia").
Avviso!
1.Prestare sempre attenzione quando si maneggiano le lame poiché molto taglienti,
specialmente quando: si inseriscono, si estraggono fuori della ciotola (B1), dopo aver
preparato il cibo e durante la pulizia.
2.Questo dispositivo non è destinato all'uso da parte di persone con capacità fisiche,
mentali o sensoriali ridotte, o da persone con scarsa conoscenza (inclusi i bambini),
salvo che una persona responsabile della loro sicurezza non abbia fornito loro le dovute
indicazioni. Accertarsi sempre che i bambini non giochino in prossimità
dell’apparecchio..
3.Si consiglia di indossare protezioni per le orecchie durante il funzionamento
dell'apparecchio.
COME UTILIZZARE L’APPARECCHIO
Il vostro nuovo robot da cucina vi aiuterà a preparare una moltitudine di miscele di base
che potrete utilizzare per le vostre ricette.
Si prega di attenersi alle seguenti istruzioni per ottenere i migliori risultati e per mantenere il
vostro apparecchio in buone condizioni.
Attenzione!
Non superare mai i quantitativi massimi riportati e non versare mai liquidi che raggiungono
più di 75°C nella ciotola o nel frullatore.
Seguire le istruzioni qui riportate ogni volta che si utilizza l’apparecchio:
- Non lasciare mai l'apparecchio incustodito quando è in funzione.
- Non mettere in funzione l’apparecchio quando il frullatore e la ciotola sono entrambi vuoti.
- Non toccare mai le parti in movimento.
- Non mettere mai le dita o utensili all'interno dell’apertura del coperchio.
- Non premere verso il basso gli ingredienti nell’apertura del coperchio con le mani.
- Non utilizzare l'apparecchio per tritare ingredienti
-duri (ad esempio carni congelate, croste di formaggio, ecc.),
-gommosi (ad esempio canditi, ecc.),
-parti di cibo non commestibili (ad esempio ossa, lische di pesce, ecc.),
-ghiaccio.
- Non rimuovere il coperchio e non sostituire gli accessori senza aver precedentemente
spento l'apparecchio e/o se l'accessorio da sostituire è ancora in movimento.
- Non rimuovere gli ingredienti della ciotola prima di aver rimosso la lama.
A: Ciotola
I. Funzione tritatutto
- mettere la ciotola di plastica sulla base e ruotare la sua maniglia in senso orario, come
mostrato in figura 1.2.
- Inserire la lama tritatutto sull'asse situato al centro della ciotola e spingerlo verso il basso.
Quindi fissare tutto appropriatamente come mostrato in figura 3 e 4.
Avviso: Le lame sono molto taglienti, perciò è opportuno maneggiarle con cura
afferrandole dalle parti di plastica.
- Mettere il cibo (ad esempio carne, ecc.) nella ciotola, come mostrato in figura 5. Il cibo in
pezzi grossi deve essere tagliato in pezzi più piccoli (circa 2 cm di diametro).
- Fissare il coperchio sulla ciotola e ruotarlo fino a sentire lo scatto, come mostrato nelle
figure 6 e 7.
Page 27

- Inserire la spina nella presa elettrica e utilizzare la manopola per scegliere la velocità,
come mostrato in figura 8. (da 1 a 3 la potenza aumenta a seconda del numero, mentre
PULSE indica la funzione a intermittenza).
- Quando il cibo è stato tritato ruotare la manopola su "0". Versare il cibo solo dopo l'arresto
completo delle lame.
II. Funzione frusta
La funzione frusta di miscelazione ha le stesse fasi operative della funzione tritatutto;
quindi sarà necessario solo cambiare il tipo di lama. Questa funzione viene utilizzata
soprattutto per mescolare o montare ingredienti come ad esempio le uova.
III. Funzione affetta e sminuzza
- Fissare la lama per affettare/sminuzzare al supporto lama, come mostrato in figura 9. La
lama per affettare affetta il cibo mentre quella per sminuzzare lo riduce a brandelli.
- Mettete la ciotola sulla base e ruotarla in senso orario, fino a sentire lo scatto.
Successivamente, inserire la lama sull'asse situato nel centro della ciotola, come
mostrato in Figura 10.
- Mettere il coperchio sulla ciotola e ruotarlo fino a sentire lo scatto. Quindi inserire la spina
nella presa elettrica e scegliere la velocità regolandola dall’apposita manopola. Ora
inserire il cibo precedentemente lavato e tagliato a strisce (se necessario) nell’apertura
del coperchio e spingere lentamente. Quando la striscia di cibo si è ridotta molto,
spingere verso il basso utilizzando il pestello, come mostrato in figura 12.
- Quando l'operazione è terminata, ruotare la manopola su "0". Dopo che la lama si è
fermata completamente, versare il cibo.
B: Frullatore
- Mettere gli ingredienti da frullare nella caraffa e fissare saldamente il coperchio
- Inserire la caraffa del frullatore sulla base facendo attenzione a inserirla correttamente.
- Collegare la spina alla presa di corrente e accendere il robot da cucina. Ruotare la
manopola al livello di velocità desiderato (da 1 a 3 la potenza aumenta a seconda del
numero, mentre PULSE indica la funzione a intermittenza).
- Se necessario, durante la miscelazione è possibile aggiungere alcuni ingredienti liquidi
(come olio, crema, ecc.) inserendoli dall’apposita fessura.
- Dopo aver frullato il cibo, ruotare la manopola su "0" e scollegare la spina. Versare il cibo
frullato direttamente dalla caraffa.
Page 28

LISTA DEGLI INGREDIENTI:
FUNZIONE
INGREDIENTE
QUANTITÀ MASSIMA
TEMPO MASSIMO
AFFETTA
SMINUZZA
AFFETTA
E
SMINUZZA
MURPHY
400g
50s
30s
MELONE
400g
50s
30s
CAROTE
400g
50s
30s
MISCELA
E
FRUSTA
CARNE
300g (ca. 10g/pezzo)
30s
PROCIUTTO
300g (ca. 15g/pezzo)
30s
CIPOLLE
400g (ca. 20g/pezzo)
30s
UOVA
6 tuorli
25s
FRAGOLE
200g
25s
FORMAGGIO
100g
20s
MANDORLE
100g
20s
NOCCIOLE
100g
20s
NOCI
100g
20s
INGREDIENTE
QUANTITÀ MASSIMA
TEMPO MASSIMO
MELE
250g
30s
ARANCE
300g
30s
UVA
250g
30s
FRAGOLE
250g
30s
Volume massimo di ogni pezzo: diametro 2 cm circa. Acqua: 400 ml.
-Ciotola:
-Frullatore:
PULIZIA
Staccare sempre la spina dalla presa di corrente prima di qualsiasi lavoro di pulizia.
Pulire la base (6) con un panno morbido leggermente umido. Non lavarlo sotto l'acqua
corrente e non immergerlo in acqua o altri liquidi.
Tutti gli accessori possono essere lavati a mano o in lavastoviglie:
-per il lavaggio a mano utilizzare acqua tiepida e un comune detersivo per stoviglie,
prestando la massima attenzione alle lame, poiché molto affilate;
-per il lavaggio in lavastoviglie disporre gli accessori nella parte superiore della
lavastoviglie e assicurarsi che l'acqua non superi la temperatura massima di 50°C.
Non usare prodotti chimici o sostanze abrasive.
Nota!
Una volta terminata la pulizia assicurarsi che non vi siano residui solidi che
ostruiscano i punti della base motore (connettore) sui quali si agganciano la ciotola
e la caraffa (per i modelli con frullatore). Se necessario, utilizzare una spazzola morbida
per pulire eventuali residui, sempre con l'apparecchio scollegato dalla rete elettrica.
Le lame non possono essere ri-affilate. Sostituirle qualora non tagliassero
adeguatamente o se presentano segni di usura.
Per l'acquisto di accessori, parti soggette a usura e per lavori di manutenzione sul vostro
apparecchio, contattare sempre un centro assistenza autorizzato.
AMBIENTE
ATTENZIONE:
Non gettare quest’ apparecchio tra i rifiuti domestici. Per questo tipo di prodotti è fornito dai
comuni un sistema di raccolta e ritiro in zona ed è quindi un dovere informarsi per
conoscere il giusto smistamento del rifiuto. Infatti, i prodotti elettrici ed elettronici possono
contenere sostanze pericolose che hanno effetti dannosi sull’ambiente o sulla nostra salute
e quindi devono essere riciclati. Il simbolo al lato indica che le apparecchiature elettriche ed
elettroniche fanno parte di una raccolta selettiva e differenziata (rappresentata da un
bidone su due ruote sbarrato da una croce.
Prodotto e importato da : Adeva SAS 8 rue Marc Seguin 77290 Mitry-Mory FRANCE
www.hkoenig.com - contact@hkoenig.com - Tel. 01 64 67 00 01
 Loading...