

Page 1

Instructions manual
Manuel d'utilisation
Bedienungsanleitung
Handboek
Manual de Utilización
Manuale d’uso
MIX330
FOOD PROCESSOR
ROBOT CULINAIRE
KÜCHENMASCHINE
VOEDSEL VERWERKER
PROCESADOR DE ALIMENTOS
ROBOT DA CUCINA
Page 2

ENGLISH
GENERAL SAFETY INSTRUCTIONS
Read the operating instructions carefully before putting the
appliance into operation and keep the instructions for future
reference.
l This appliance is for household use only.
l Never dip machine into any liquid and sharp edges. Do not use
the appliance with wet hands. If the appliance is humid or wet,
unplug it immediately.
l This appliance can be used by children aged from 8 years and
above and persons with reduced physical, sensory or mental
capabilities or lack of experience and knowledge if they have
been given supervision or instruction concerning use of the
appliance in a safe way and understand the hazards involved
l Children shall not play with the appliance. This appliance shall
not be used by children. Keep the appliance and its cord out of
reach of children.
l Always disconnect the blender from the supply if it is left
unattended and before assembling, disassembling or cleaning.
l If the supply cord is damaged, it must be replaced by the
manufacture of its service agent or a similar qualified person in
order to avoid a hazard.
l Keep your finger away from moving parts and fitted tools. Never
put your fingers etc in hinge mechanism.
l Use only original spare parts.
l In order to ensure your children’s safety, please keep all
packaging (plastic bags, boxes, polystyrene etc.) out of their
reach.
l Do not interfere with any safety switches.
l Place the machine on a smooth, flat and stable working surface.
l Never use your fingers or an object (e.g. a spatula) to push
ingredients down the feed tube while the appliance is running.
l Be very careful when you handle the blades or inserts. Be
especially careful when you remove them from the bowl or jar,
when you empty the bowl or jar and when you clean them. Their
Page 3
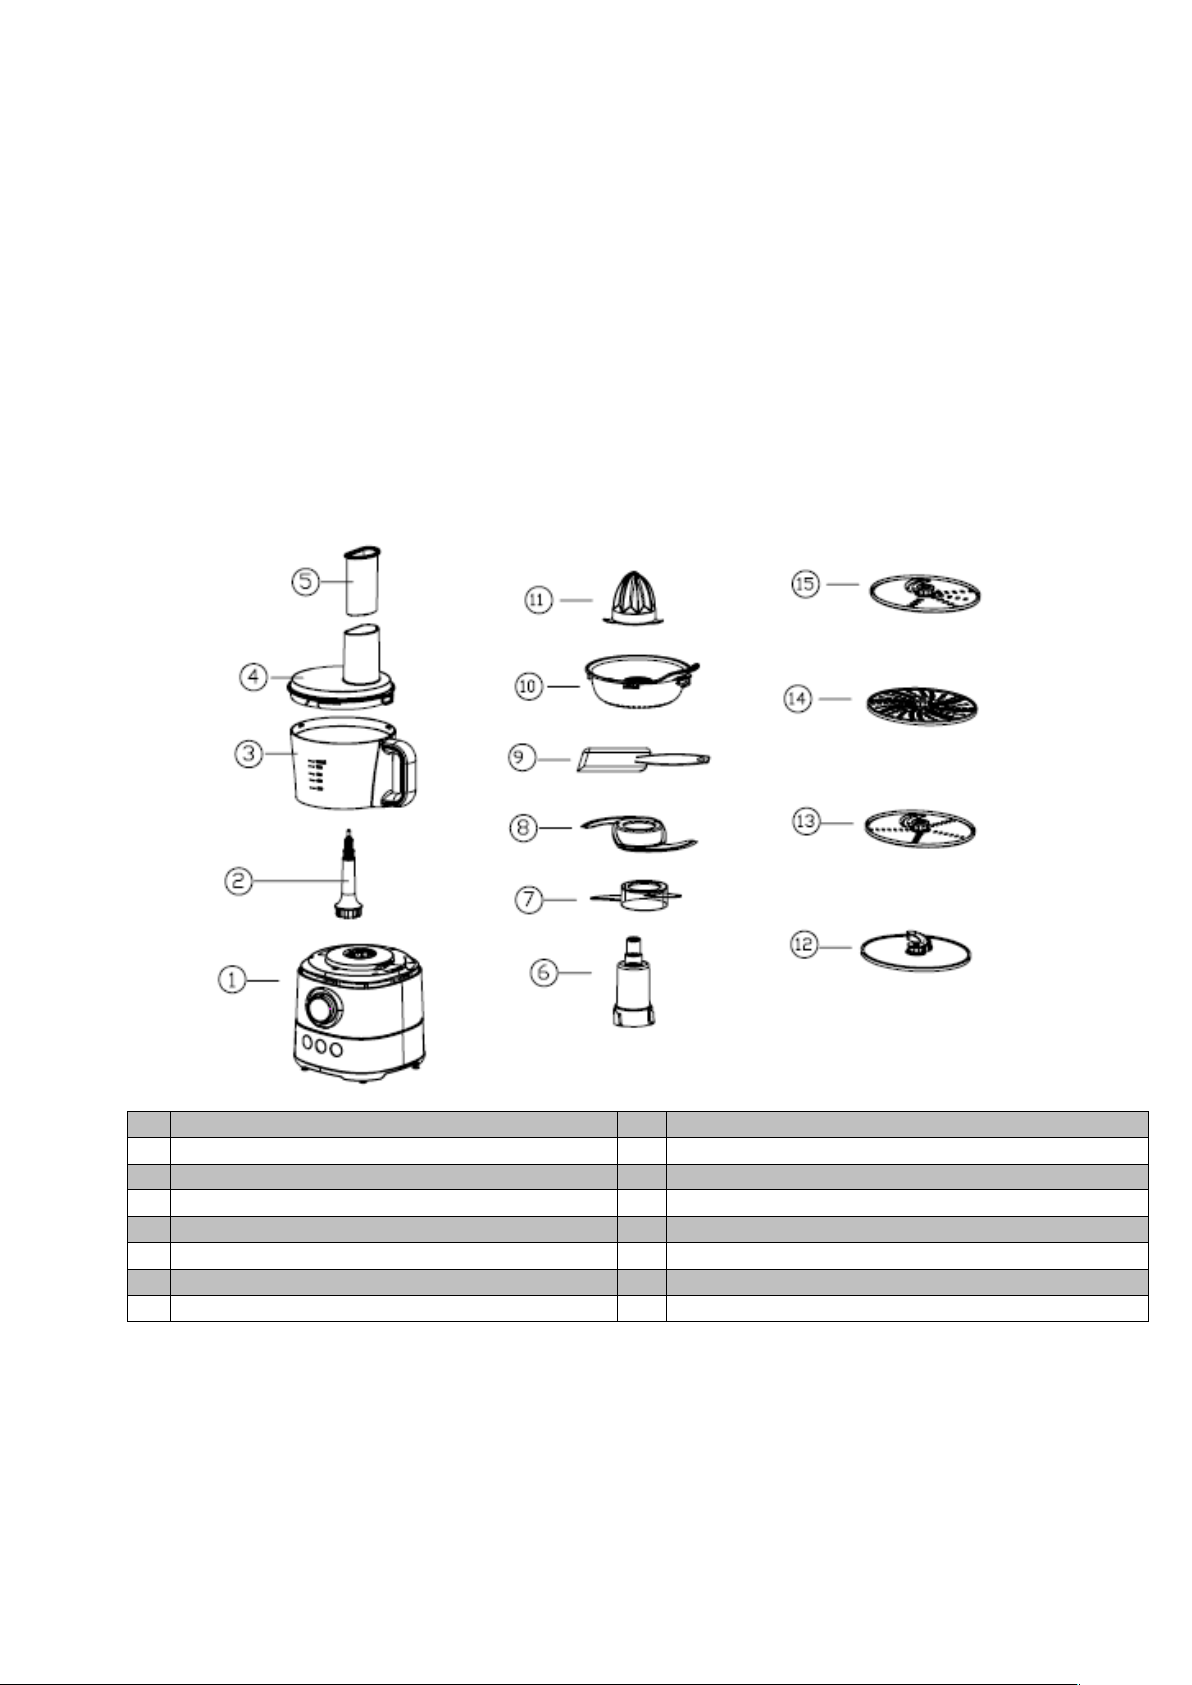
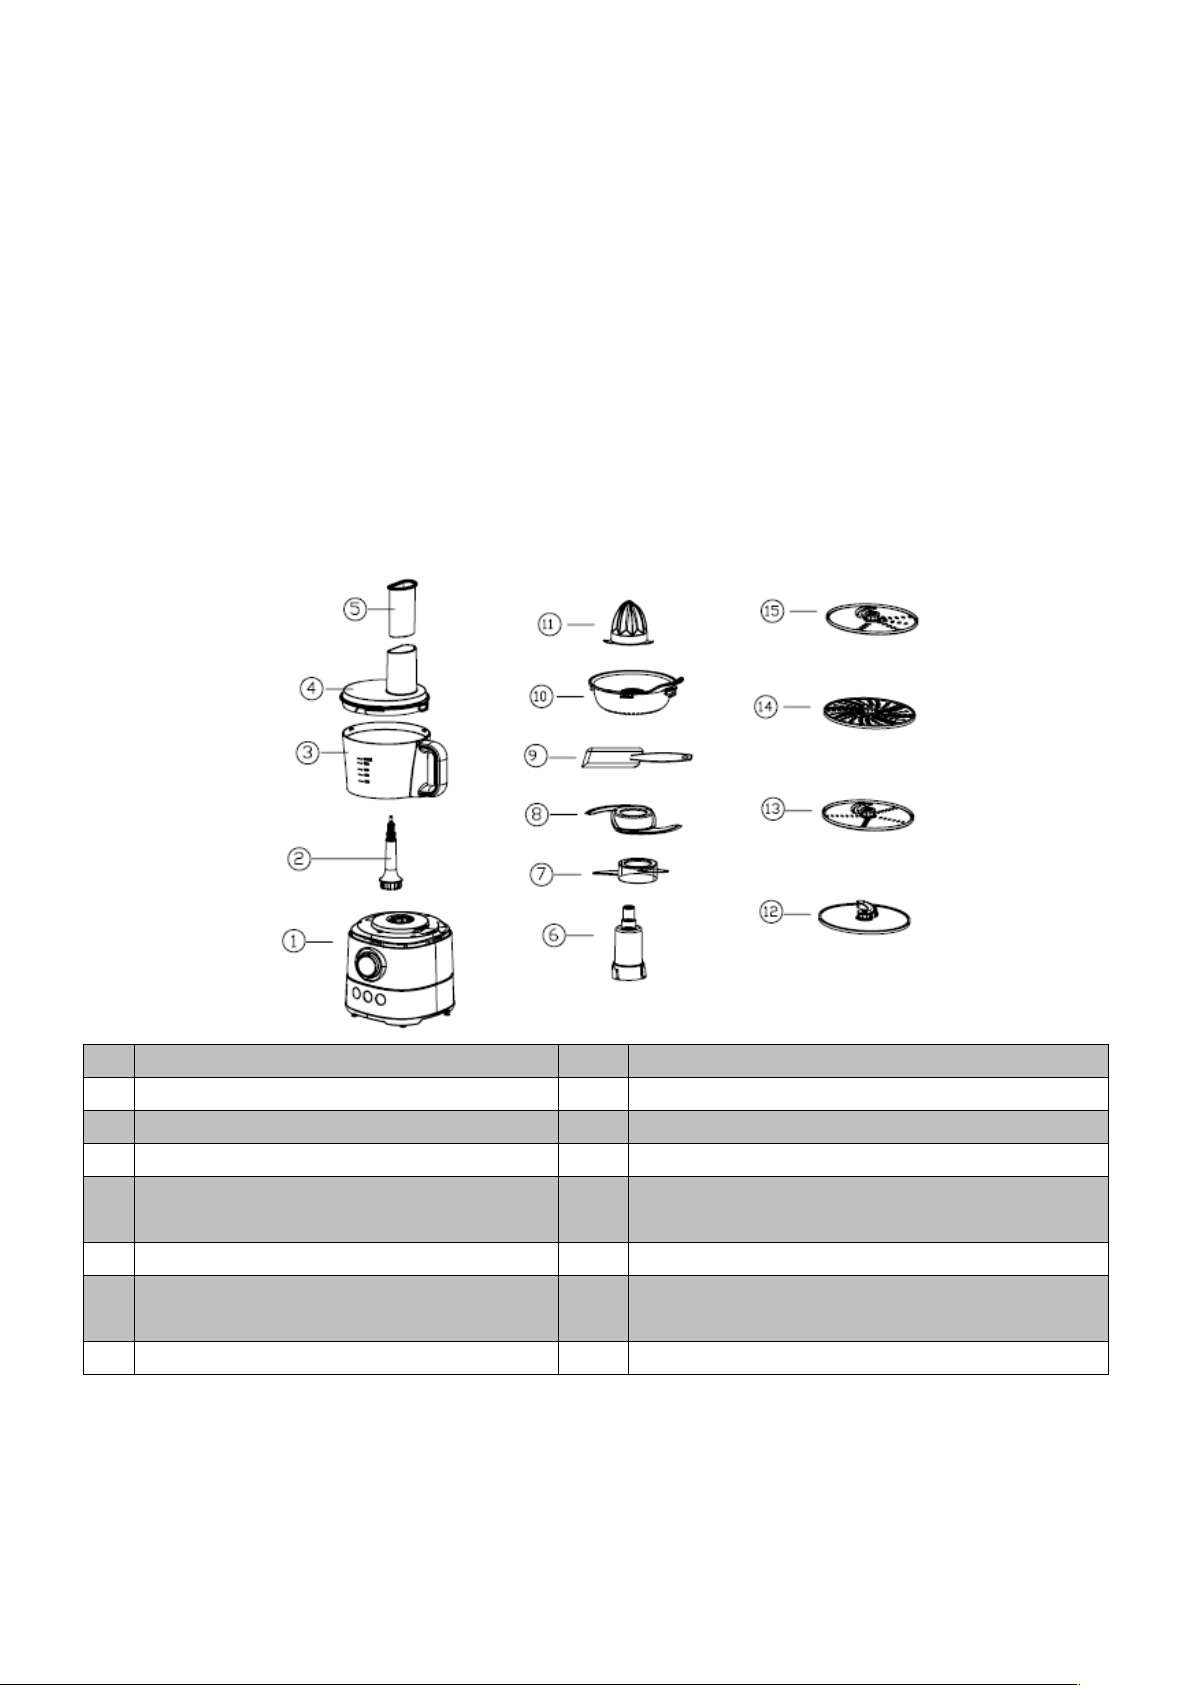
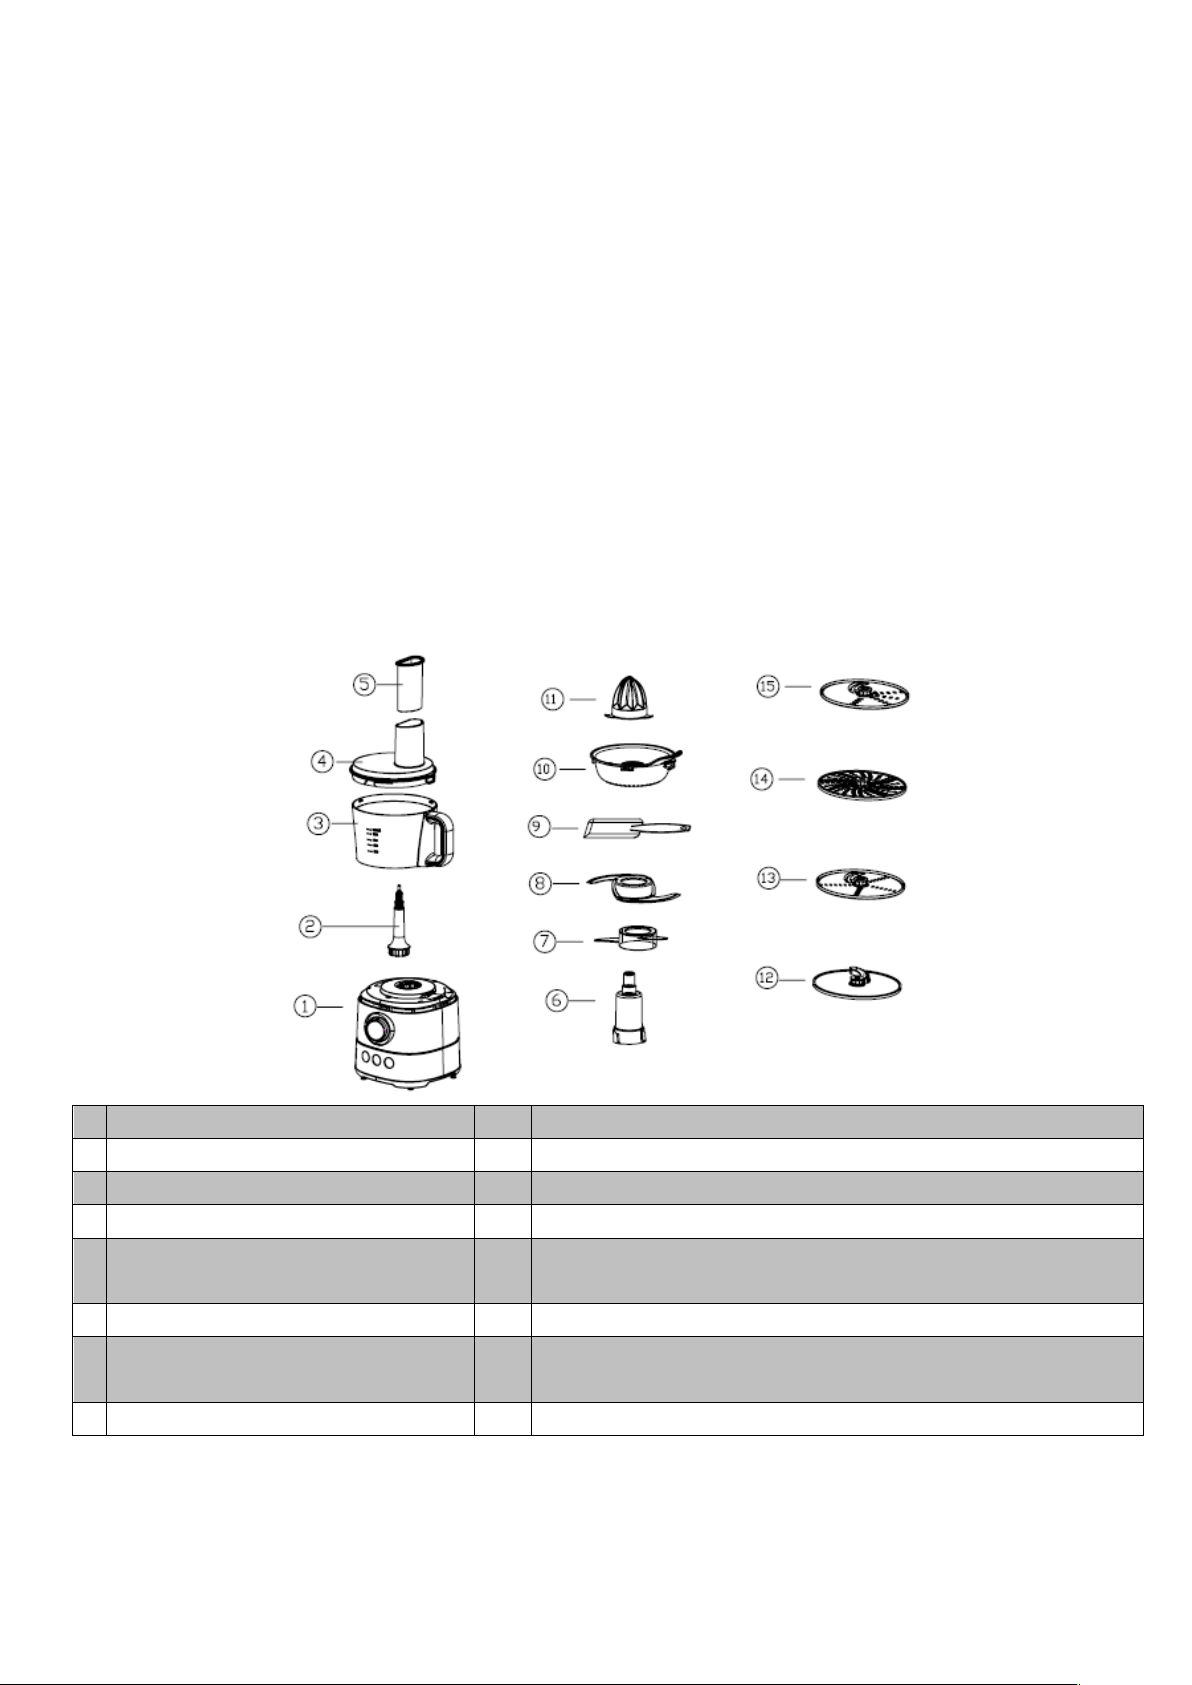
1
Motor Body Unit
9
Spatula
2
Drive Shaft
10
Citrus Juicer Body Unit
3
Bowl
11
Citrus Juicer Runner
4
Bowl Cover
12
Full Stainless Steel French Fries potato cutter
5
Feed Tube Pusher
13
Full Stainless Steel Fine Slicer and Julienne
6
Detachable Drive Shaft B
14
Full Stainless Steel Shredding Disc
7
Plastic dough mixer
15
Full Stainless Steel Rough Slicer and Julienne
8
S/S chopper blade
cutting edges are very sharp.
l Wait until moving parts stop running before you remove the lid of
the bowl or jar.
l Do not exceed the maximum content indicated on the bowl or the
blender jar.
BEFORE CONNECTING TO POWER
l Before connecting to the power, please check whether the type of supply and the
mains voltage match with the details given on the rating label on the appliance.
l Using for the first time, rip off all wrapping paper and plastic bags. Clean the fittings.
KNOW YOUR KITCHEN MACHINE
SPEED – Stepless Speed Regulating & Pulse Speed
After settle down the parts you need, turn on the stepless speed regulating to start
the operation.
If you want the food processor move slowly, turn the adjustment for a little.
If you need the food processor move fast, turn the adjustment for more.
There is another adjustment: pulse switch.
Page 4
Turn the pulse switch, the machine will move into the fastest speed.
Stop the pulse switch, the machine will stop moving.
USING THE PLASTIC DOUGH MIXER AND S/S CHOPPER BLADE
These 2 knife blades (Item No.7 Plastic dough mixer and item No. 8 Stainless Steel
chopper Blade) could be the most versatile of all the attachments. The length of the
processing time is different base on different food. For coarser textures use the
pulse control.
Use these 2 knife blades for cake and pastry making, chopping raw and cooked
meat, vegetables, nuts, pate, dips, pureeing soups and to also make crumbs from
biscuits and bread.
▲ For Stainless Steel chopper Blade: Not allowed to continuously use more than 3
minutes, Should cool down the motor before next operation.
▲ For Plastic dough mixer: Not allowed to continuously use more than 3 minutes,
Should cool down the motor before next operation. The Max dough could be used
is 250g dough with 160g water.
▲ Before processed, please cut the meat into 3 X 3 cm Size. Never put more than
500g such meat into the container. After 1 minute, the meat will be processed finely.
▲ Do not use the stainless steel knife blade for mixing flour.
▲ Plastic knife blade could for mixing flour, not more than 3 minutes. Should cool
down the motor before next operation.
* Always put the blade in the bowl before you start to add the ingredients.
* If you chop onions, use the pulse function a few times to prevent the onions into
too finely chopped.
* Do not let the appliance run too long when you chop (hard) cheese or chocolate.
Otherwise these ingredients become too hot, start to melt and turn lumpy.
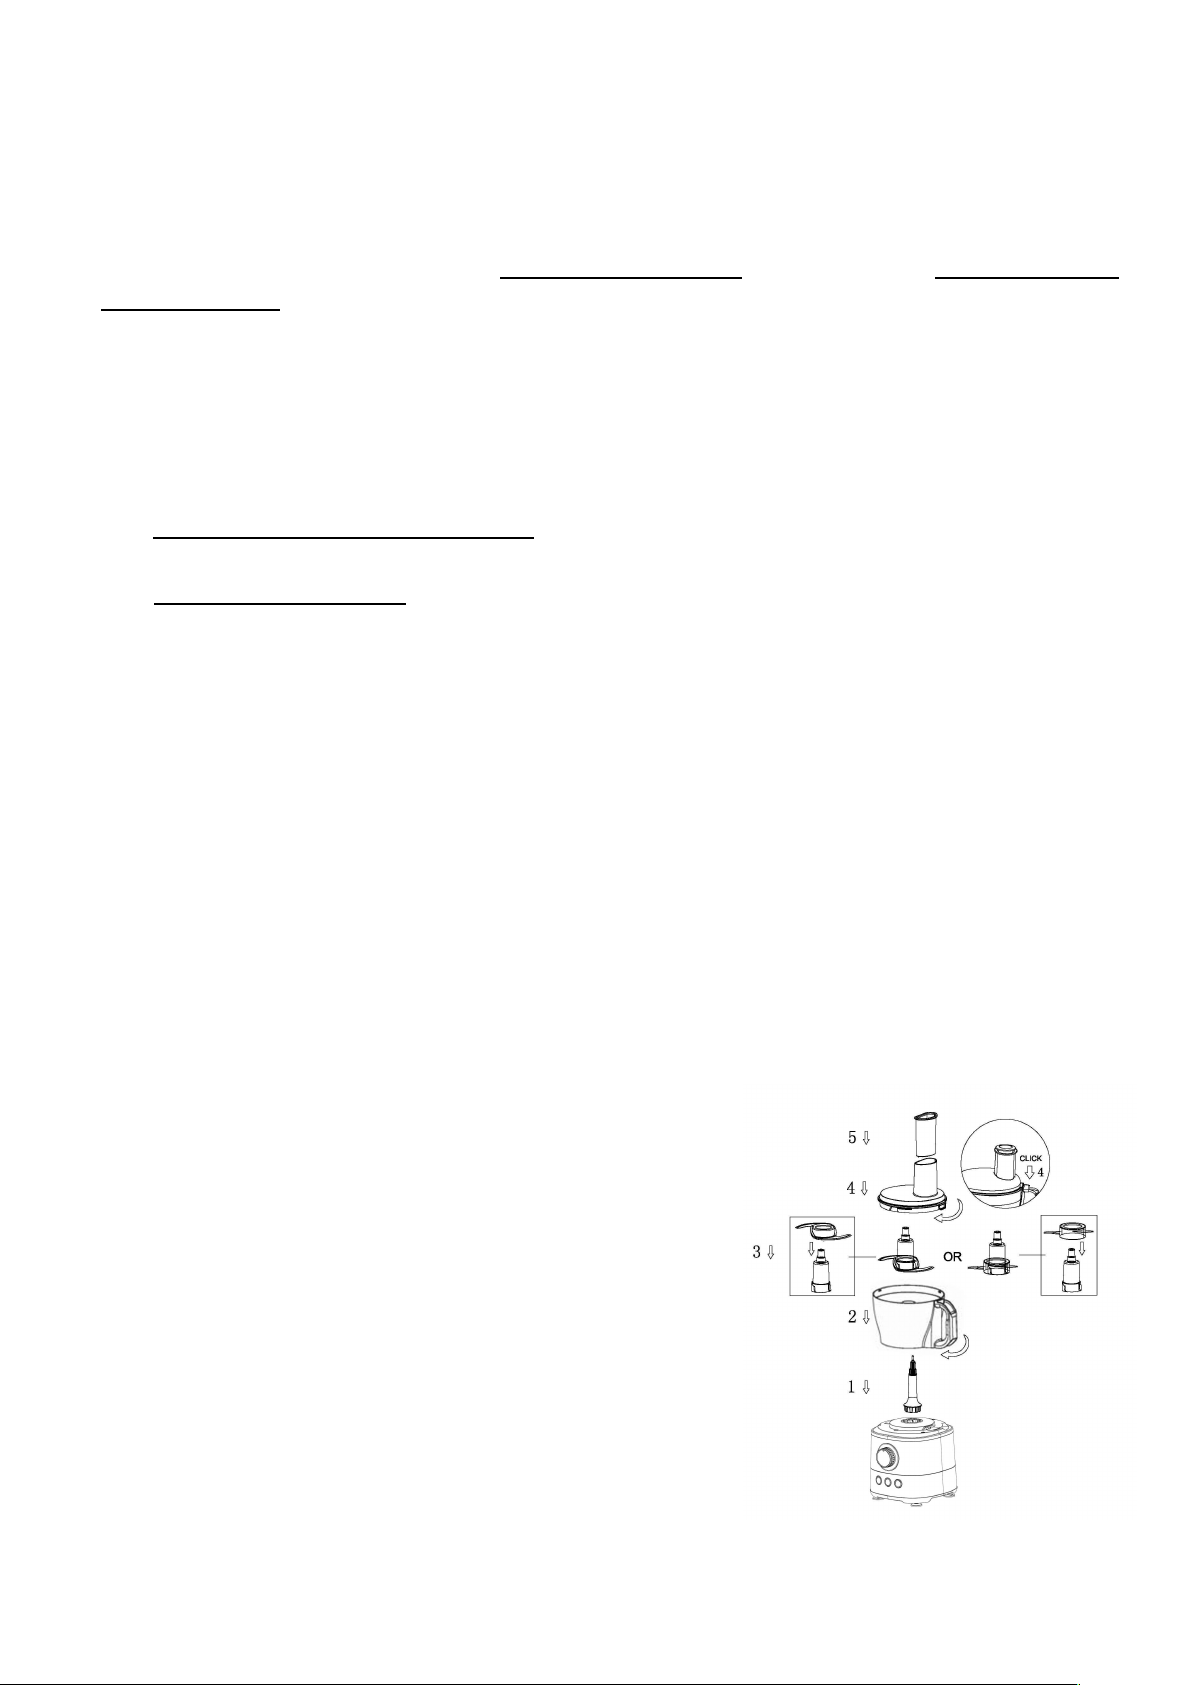
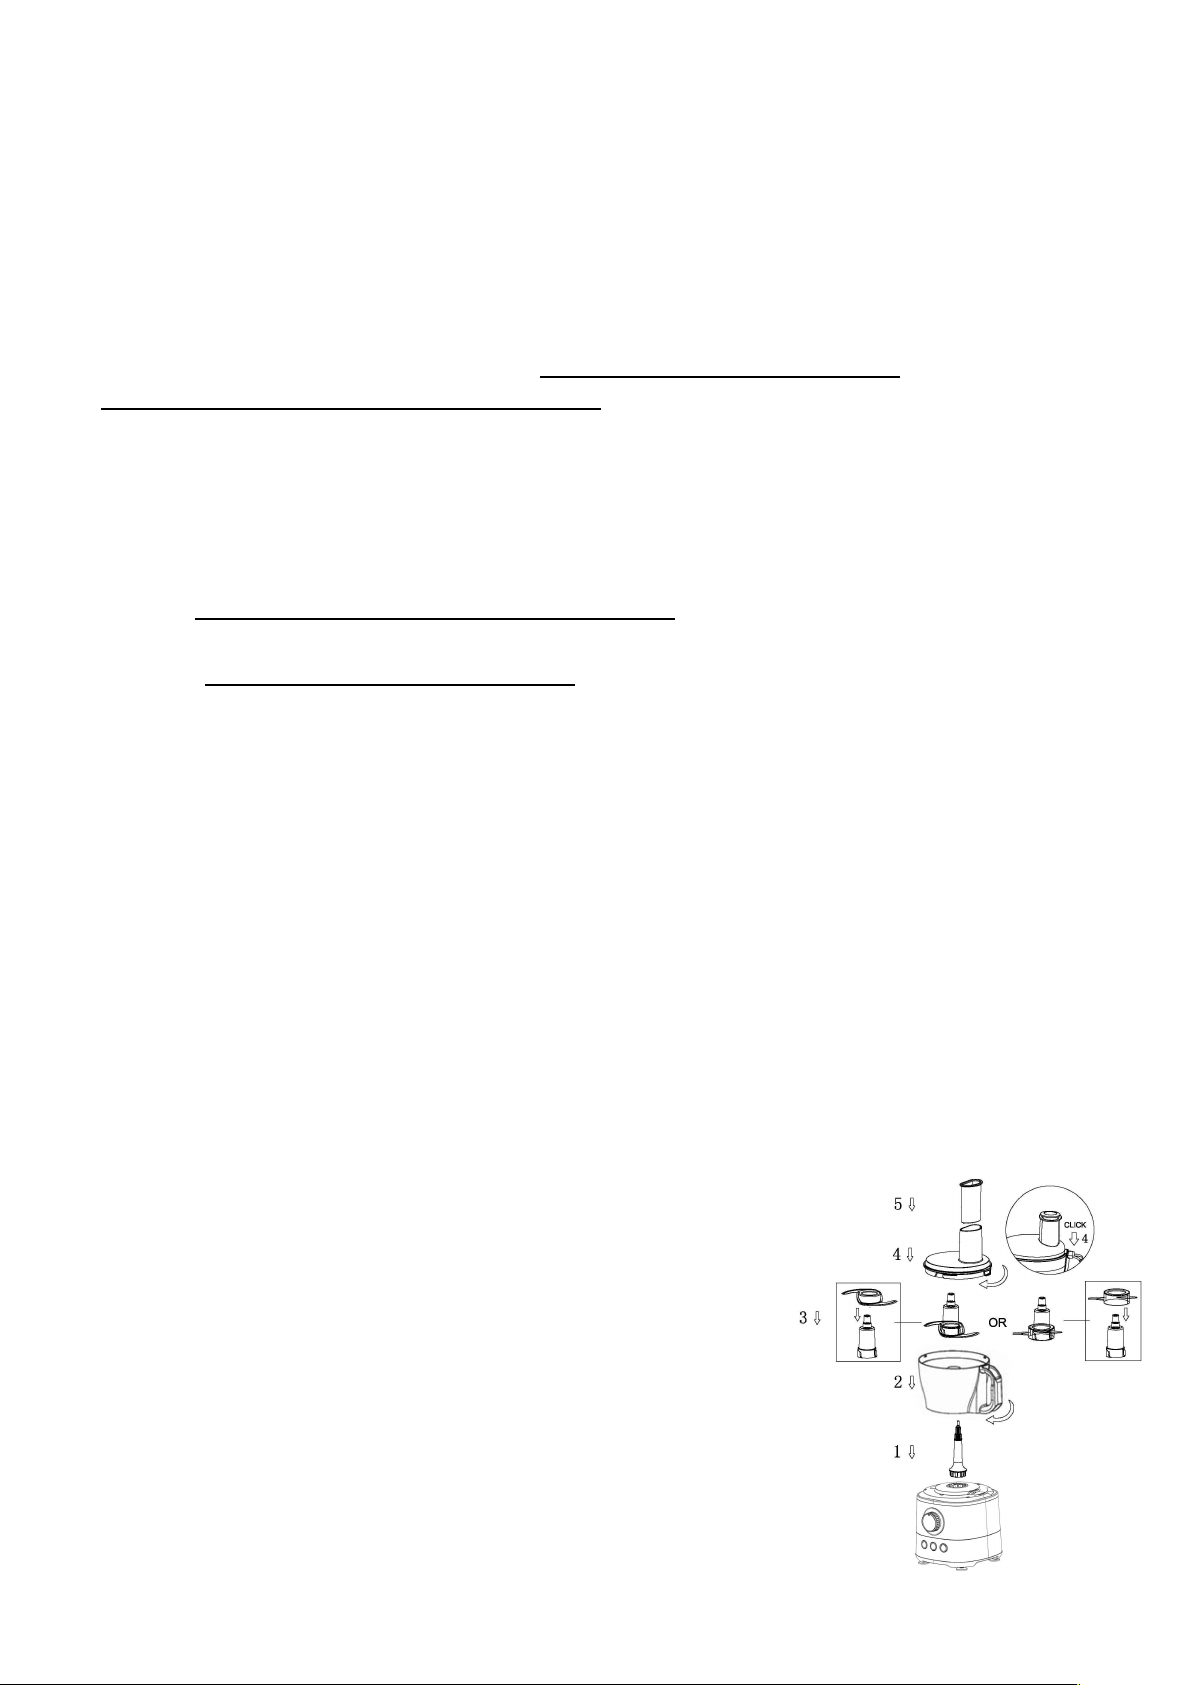
OPÉRATION:
·Follow the flows as picture in right side one step
by one step to assemble components into
machine.
·Sure the bowl in step 2 and lid in step 4 is locked
well or the machine will not work.
·After operation, you could disassemble 2 kinds
blades from Drive Shaft B for clean in opposition
against assembly way.
·Always take care of Stainless steel knife blade, it
is very sharp.
·Only open the lid to take out the food when the
blades in bowl are already stopped.
·1.2 L Bowl and 2.0 L Bowl are both available for
this function.
Page 5
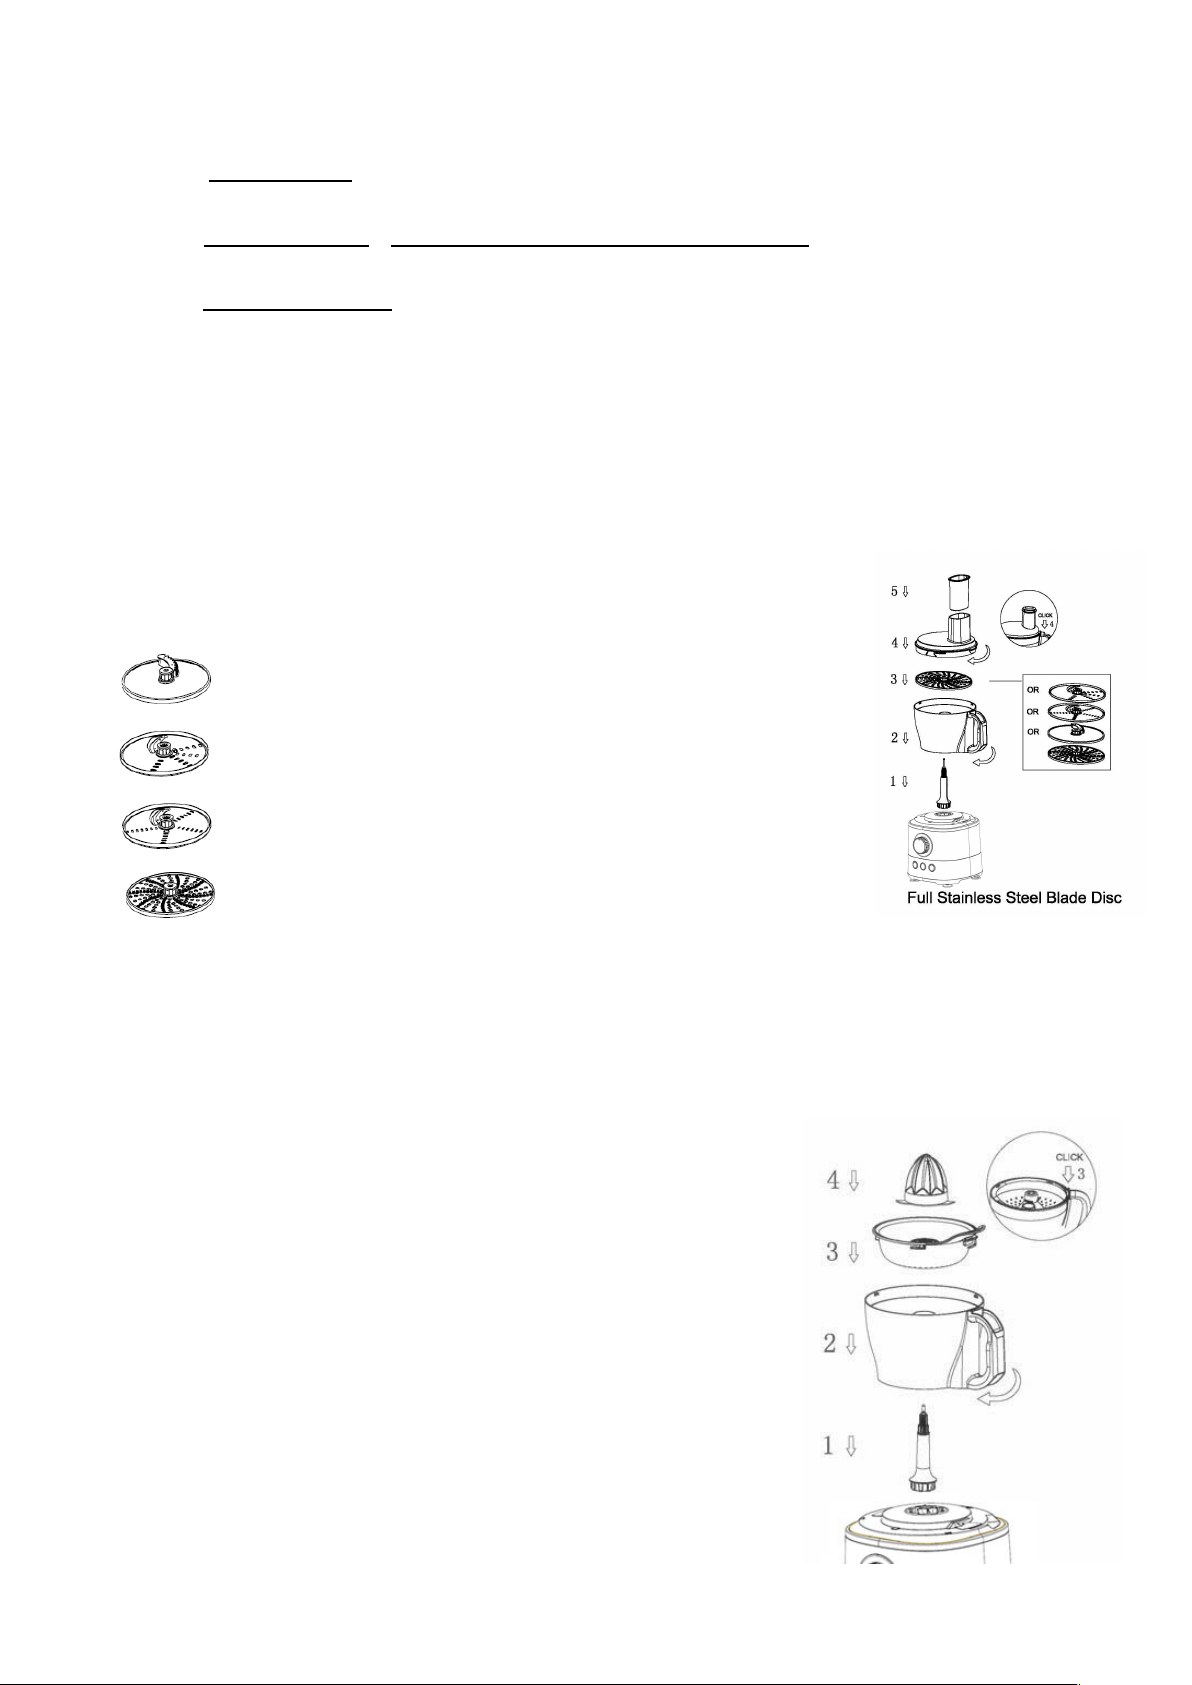
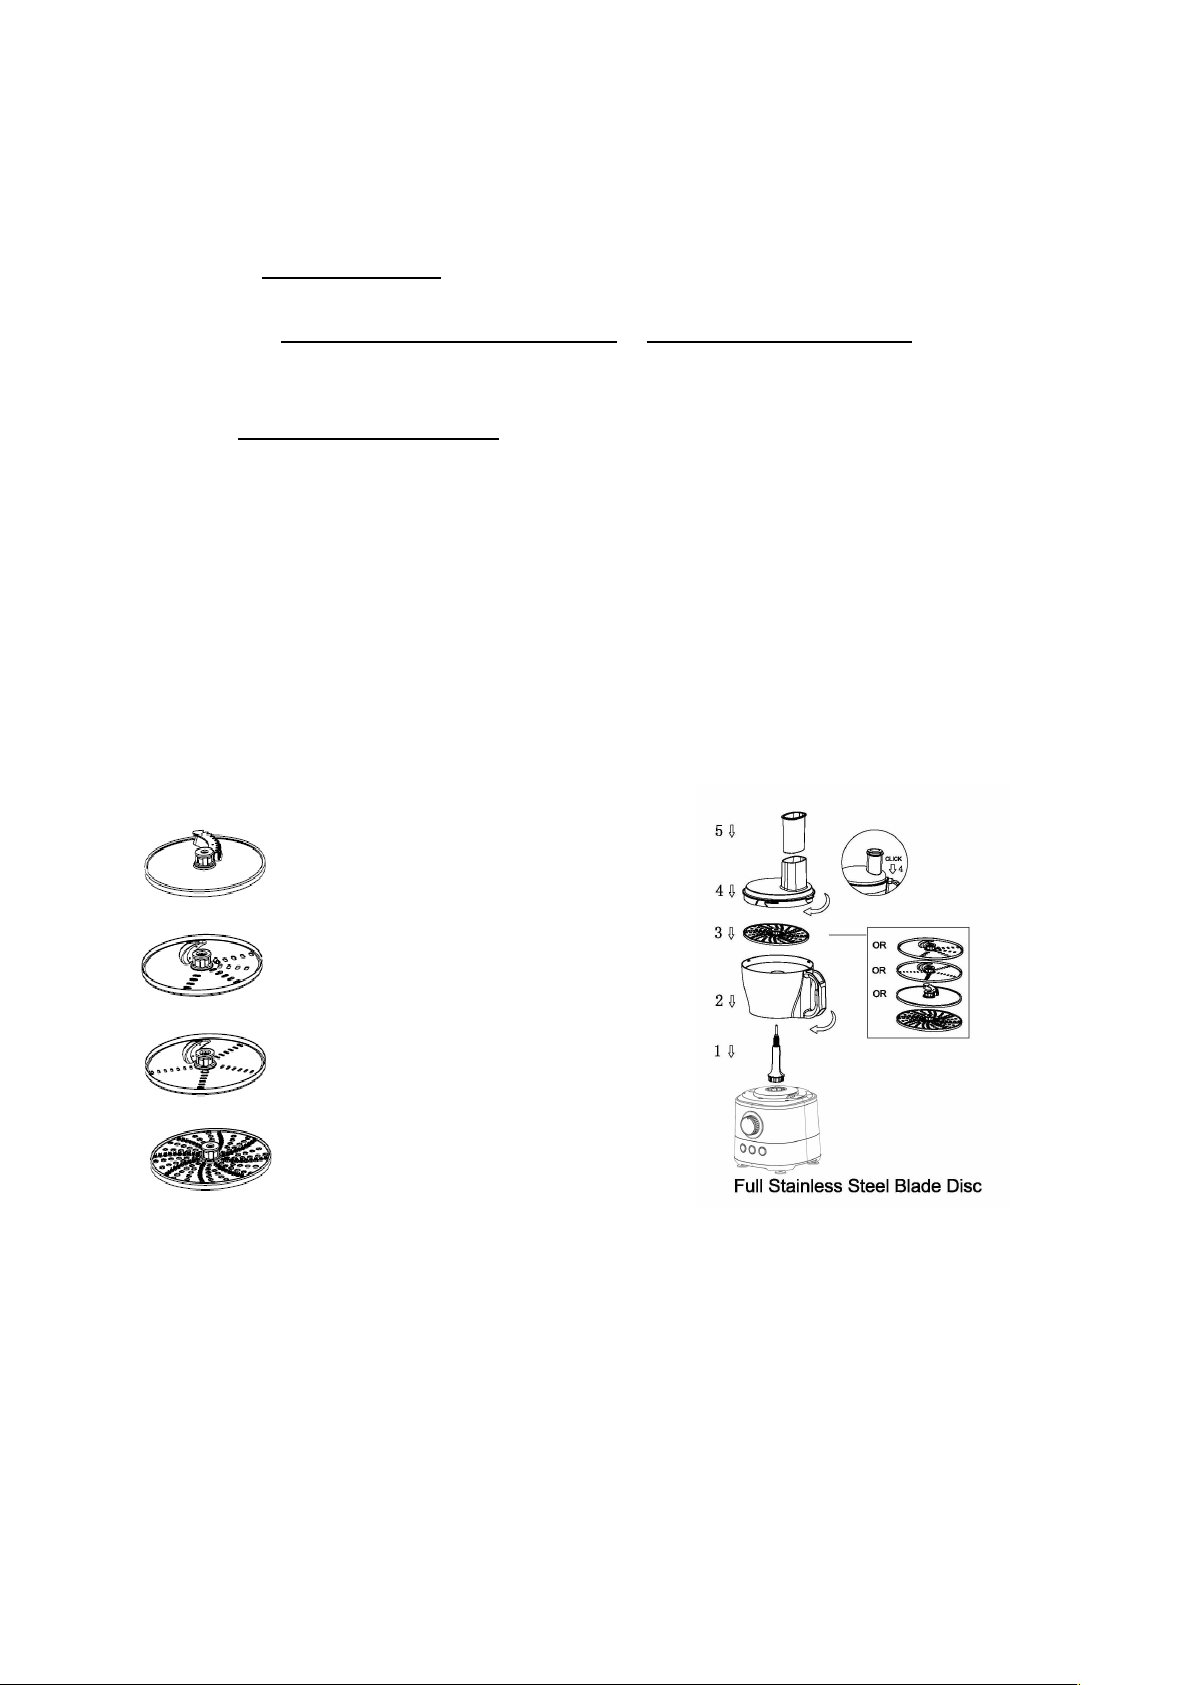
French Fried Potato
Julienne Disc
Shredder Disc
2 in 1 blade:
Rough Slicer & Julienne Disc
2 in 1 blade:
Fine Slicer & Julienne Disc
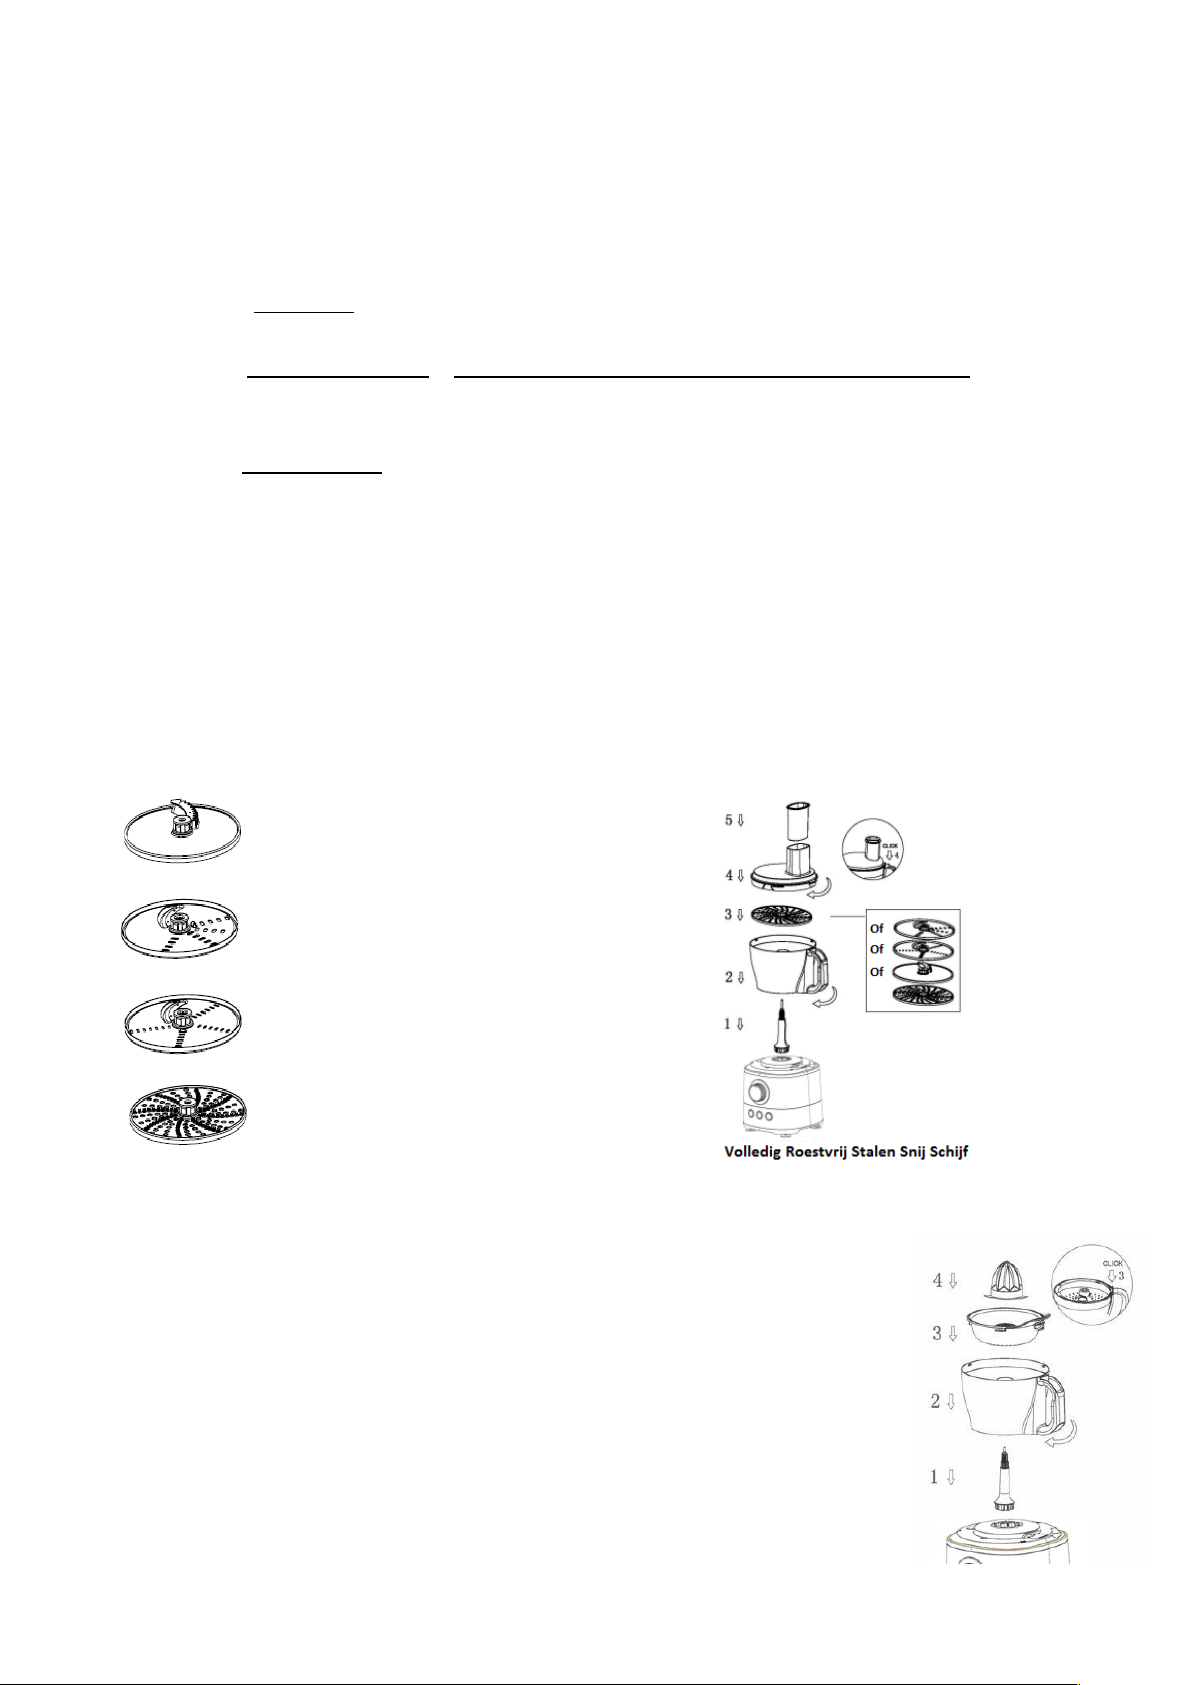
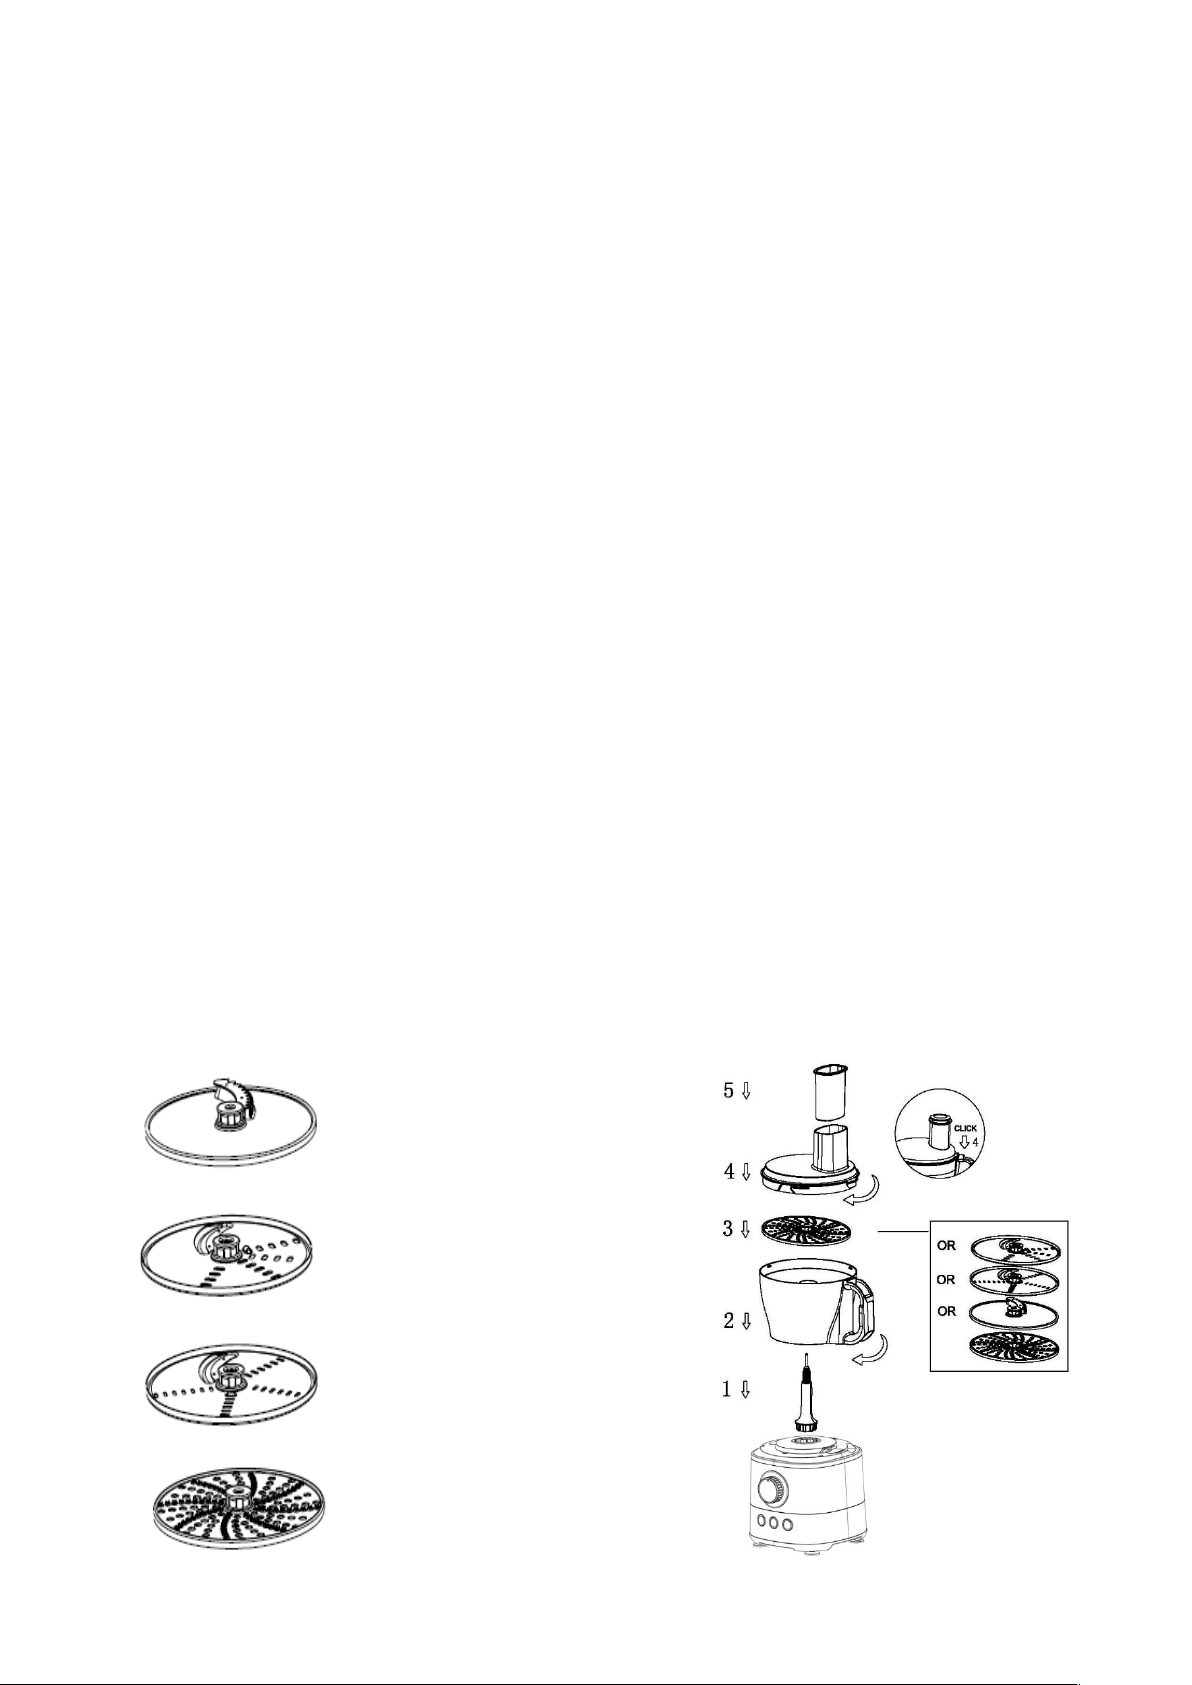
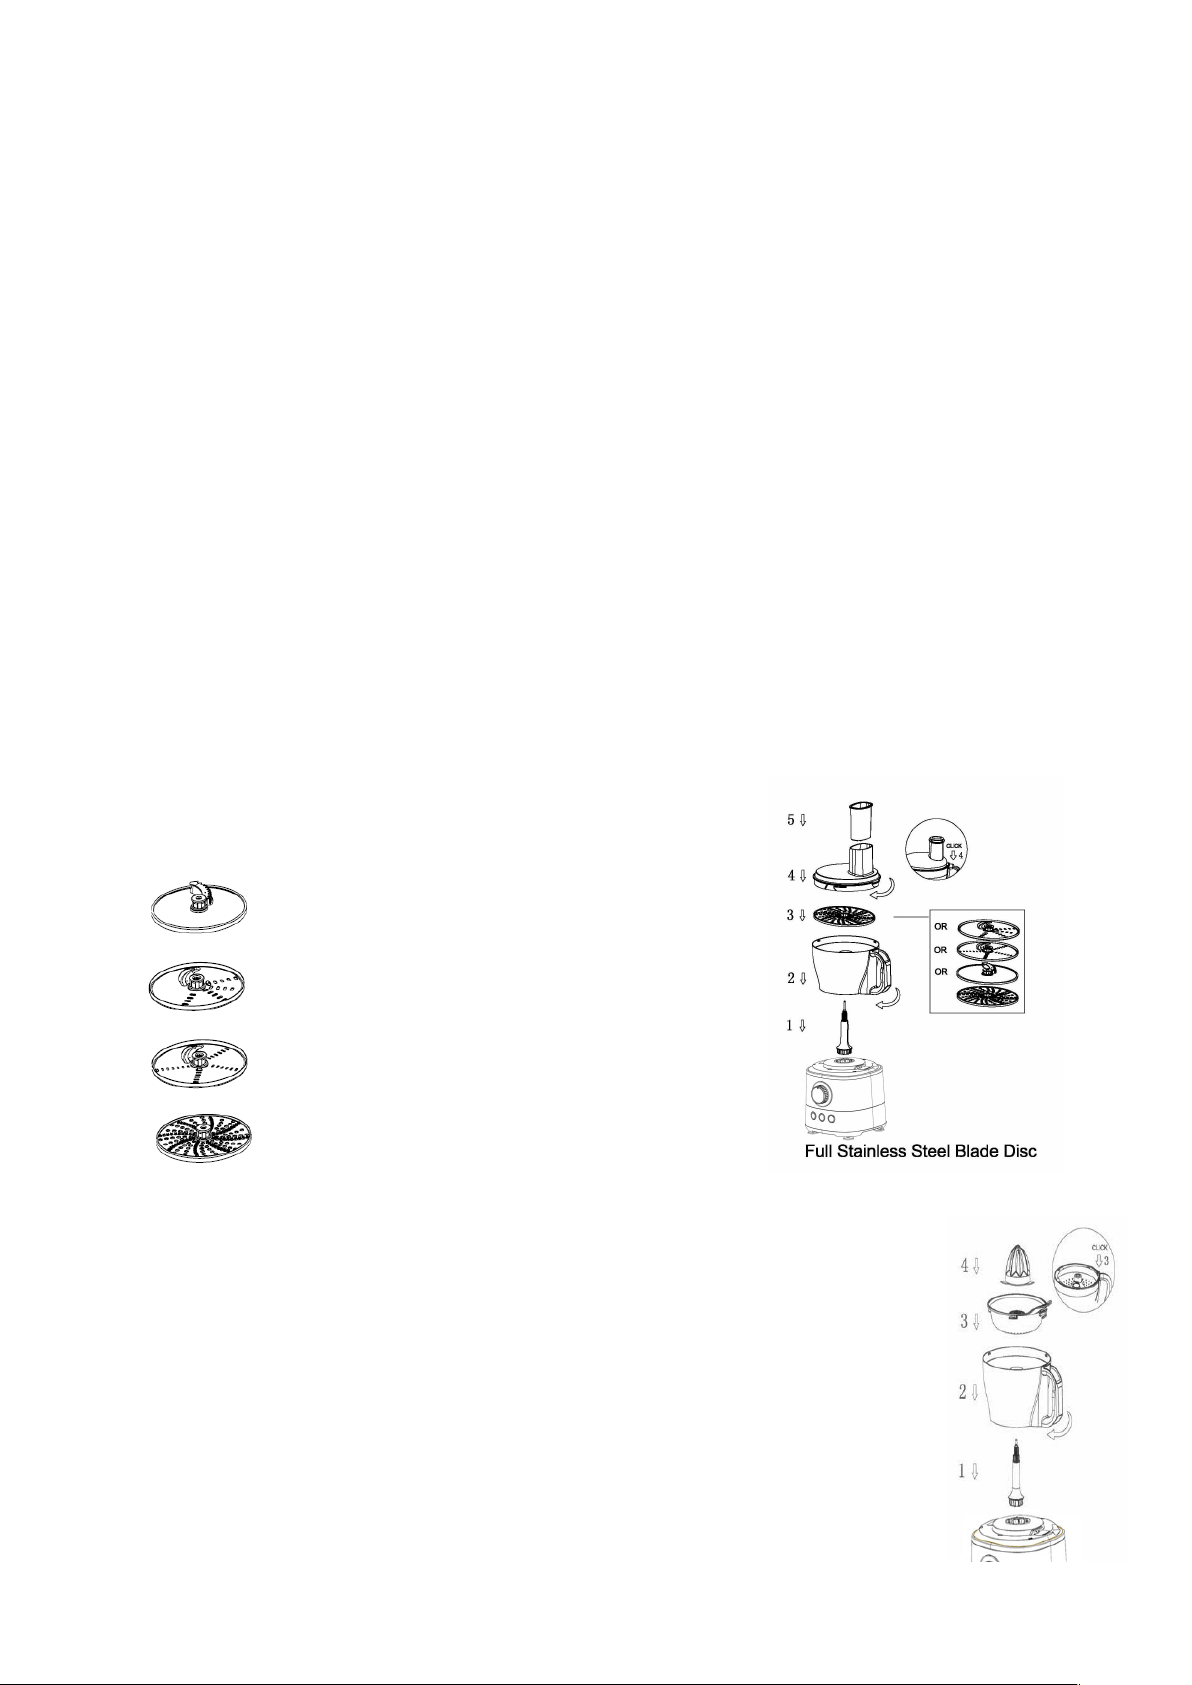
USING THE SHREDDER / SLICER / JULIENNE DISC
Use the Slicer Disc for cheese, carrots, potatoes, cabbage, cucumber, courgette,
beetroot and onions.
Use the Julienne Disc / French Fried Potato Julienne Disc for Julienne style French
fries potatoes; firm ingredients for salads, garnishes, casseroles and stir fries.
Use the Shredding Disc for cheese, carrots, potatoes and foods of a similar texture.
▲Not allowed to continuously use more than 4 minute each time, no more than 5
times and then cool down the motor before next operation. But suggest to pay
attention on the container capacity. Once the food come to max line of container,
need to stop operation and pour out the food from container.
▲Switch on and push down evenly with the Pushers - never put your fingers in the
feed tube.
OPERATION FOR FULL STAINLESS STEEL BLADE DISC:
·Blades disc details:
·Follow the flows as picture in right side one step by one step to assemble
components into machine.
·Always take care of blade disc, it is very sharp.
·This function is only for 2.0 L Bowl.
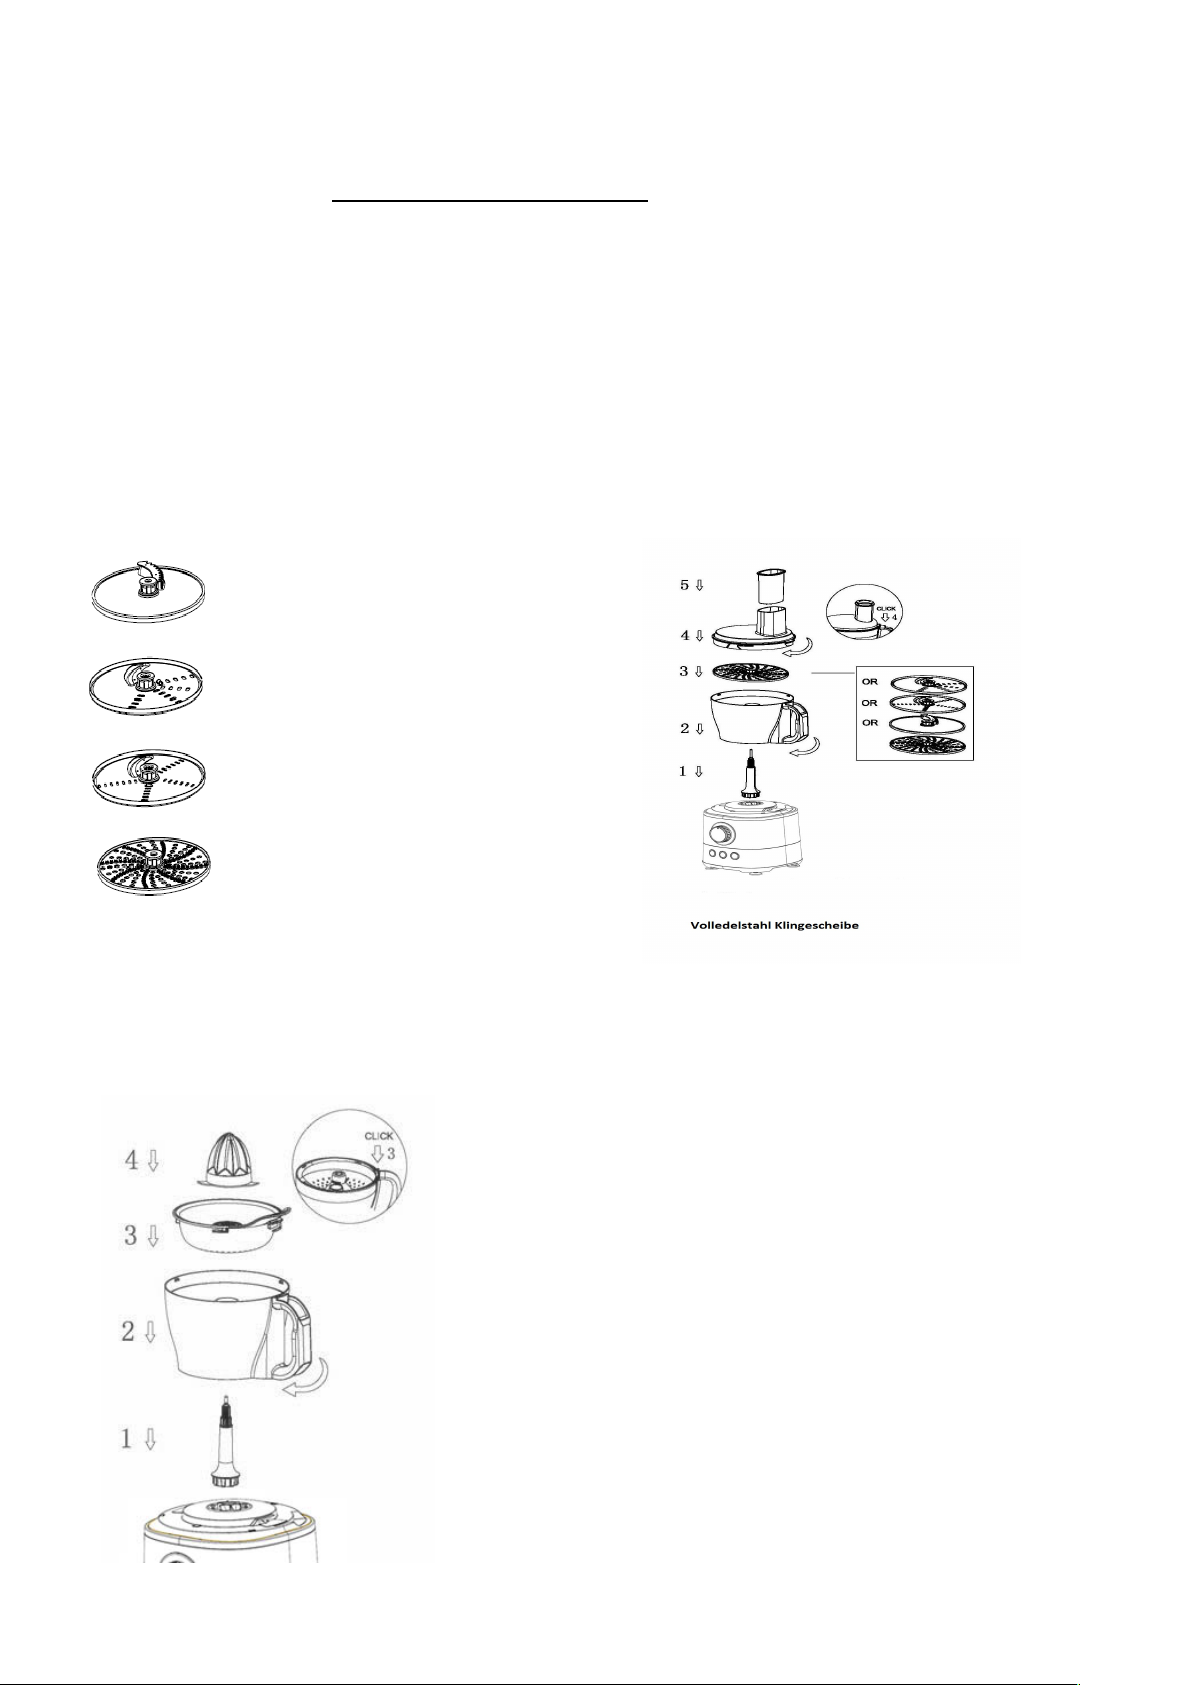
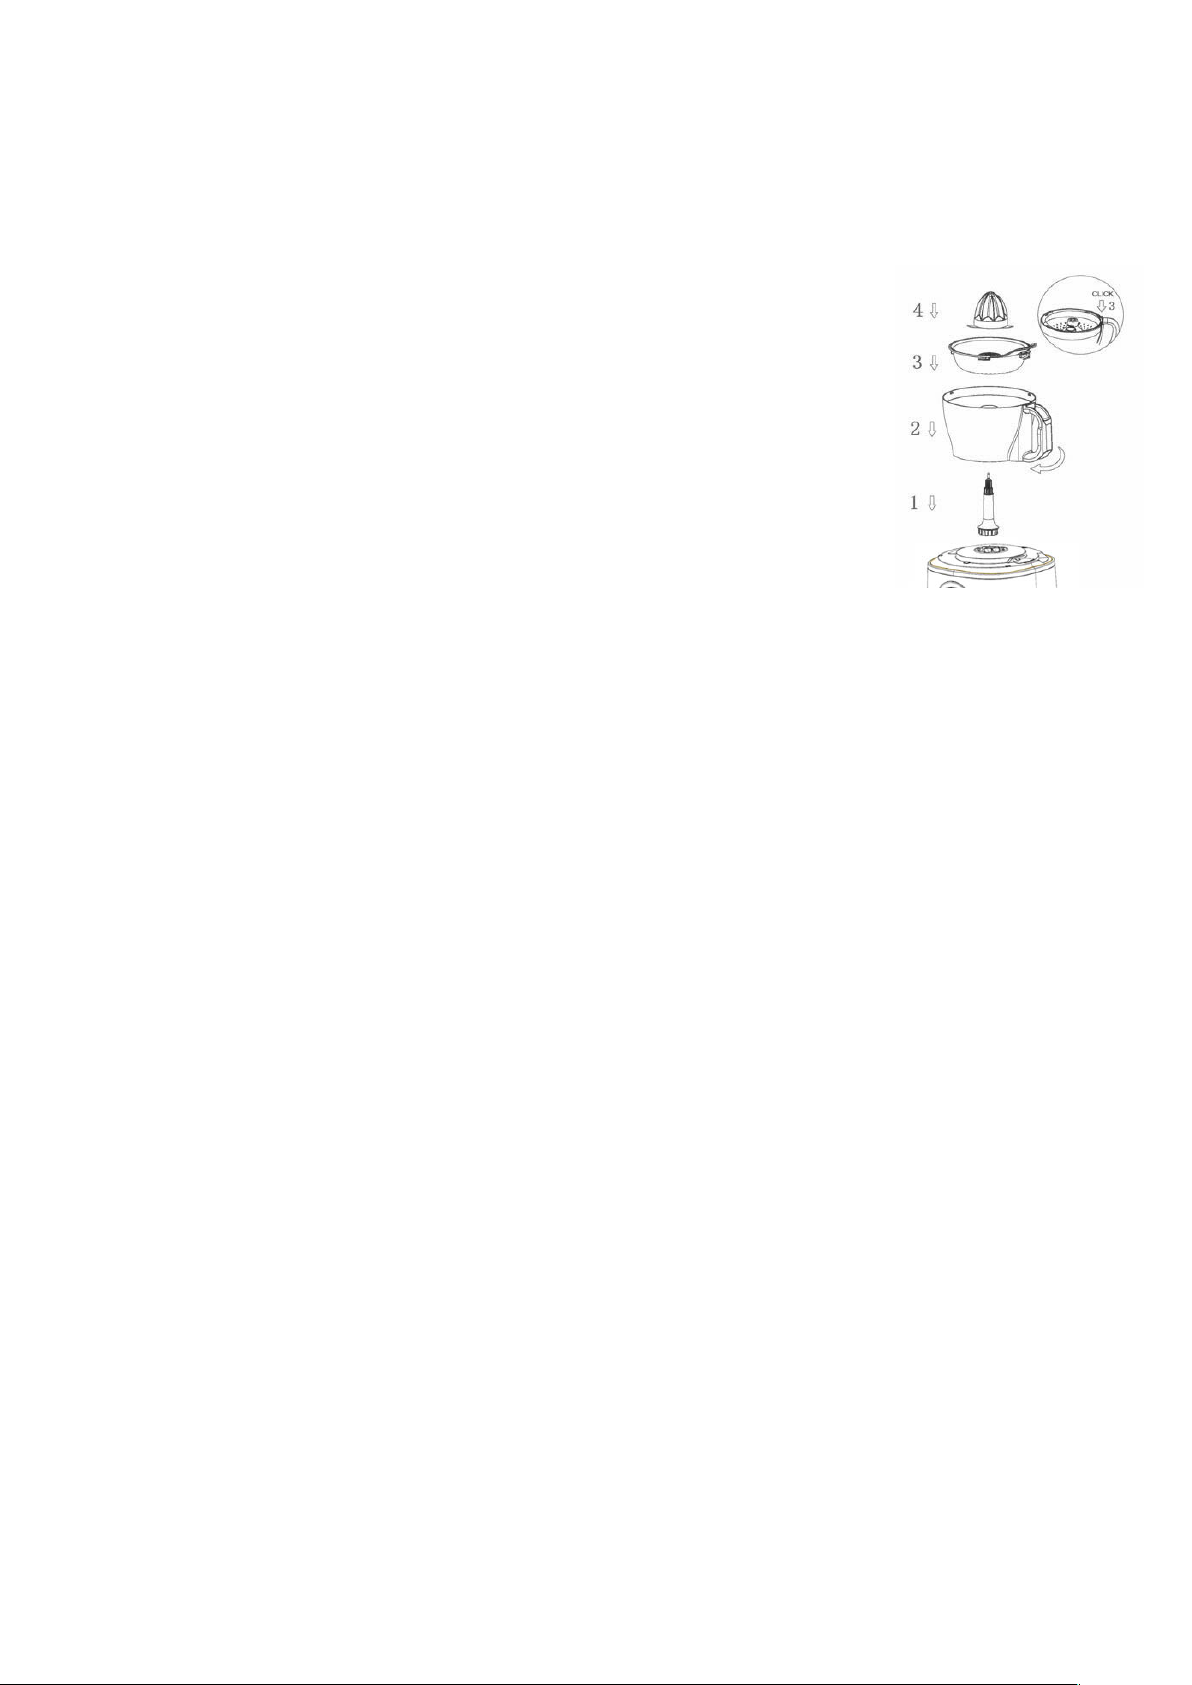
USING THE CITRUS JUICER
·Use this citrus juicer to squeeze the juice from citrus
fruits (e.g. oranges, lemons, limes and grapefruits).
▲Not allowed to continuously use more than 500g
juicer each time, not Allowed to continuously use more
than 4 minutes each time. No more than 5 times and
then cool down the motor before next operation.
· Pay attention on the container capacity. Once the food
come to max line of container, need to stop operation
and pour out the food from container.
· Besides, Suggest Stop pressing from time to time to
remove the pulp from the sieve.
·Follow the flows as picture in right side one step by one
Page 6

step to assemble components into machine.
·Use the lowest speed to squeeze the juice in case of splash.
·1.2 L Bowl and 2.0 L Bowl are both available for this function.
CLEANING
l Before cleaning remove the power cord from the socket.
l Never immerse the housing with motor in water!
l Do not use any sharp or abrasive detergents.
l Only a damp rinsing cloth should be used to clean the outside of
the housing.
l Components that have come into contact with food can be
cleaned in soapy water.
l Allow the parts to dry thoroughly before reassembling the device.
NOISE
We hereby declared that our product have a working noise level more than
80dB(A) but less than 85dB(A). We suggest wearing ear protection while
operating the appliance.
ENVIRONMENT
CAUTION:
Do not dispose of this product as it has with other household products.
There is a separation of this waste product into communities, you will need
to inform your local authorities about the places where you can return this
product. In fact, electrical and electronic products contain hazardous
substances that have harmful effects on the environment or human health
and should be recycled. The symbol here indicates that electrical and electronic
equipment should be chosen carefully, a wheeled waste container is marked with
a cross.
Adeva SAS / H.Koenig Europe - 8 rue Marc Seguin - 77290 Mitry Mory - France
www.hkoenig.com - sav@hkoenig.com - contact@hkoenig.com - Tél: +33 1 64 67 00 05
Page 7

FRANÇAIS
INSTRUCTIONS GÉNÉRALES DE SÉCURITÉ
Lisez attentivement les instructions d’utilisation avant d’employer
l’appareil et gardez-les en lieu sûr.
l Cet appareil est uniquement à usage domestique.
l Ne plongez jamais le robot dans un liquide et ne le placez pas
près de rebords contondants. Ne le maniez pas avec les mains
mouillées. Si l’appareil est humide ou mouillé, débranchez-le
immédiatement
l Cet appareil peut être utilisé par des enfants à partir de 8 ans et
des personnes possédant des capacités physiques, sensorielles
ou mentales réduites, ou encore un manque d’expérience et de
connaissance, seulement si elles ont reçu une surveillance ou
des instructions concernant l’usage de l’appareil en toute
sécurité et compris les risques encourus.
l Les enfants ne doivent pas jouer avec l’appareil. Il ne doit pas
être utilisé par les enfants. Conservez le robot et son câble
d’alimentation à l’écart des enfants.
l Le robot doit toujours être débranché s’il n’est pas utilisé et avant
de l’assembler, de le démonter ou de le nettoyer.
l Si le câble d’alimentation est abîmé, il doit être remplacé par le
fabricant ou son agent, ou encore une personne qualifiée afin
d’éviter tout risque.
l Gardez les doigts à l’écart des parties mobiles et des éléments
de l’appareil. Ne placez jamais vos doigts dans les engrenages.
l Employez uniquement des pièces détachées d’origine.
l Pour la sécurité de vos enfants, placez les emballages (sacs
plastiques, boîtes, polystyrène, etc.) hors de leur portée.
l Ne gênez pas le fonctionnement des interrupteurs de sécurité.
l Placez la machine sur une surface lisse, plane et stable.
l N’employez jamais vos doigts ou un objet comme une spatule
pour enfoncer les ingrédients dans le tube d’alimentation
pendant que l’appareil fonctionne.
l Faites très attention quand vous manipulez les lames ou les
éléments coupants. Soyez particulièrement attentif lorsque vous
Page 8
1
Bloc moteur
9
Spatule
2
Axe d’entrainement
10
Cuve du presse agrume
3
Bol
11
Cône du presse agrume
4
Couvercle
12
Disque à frites en acier inoxydable
5
Poussoir du tube d’alimentation
13
Disque rapeur fin julienne en acier
inoxydable
6
Axe d’entrainement B amovible
14
Disque hachoir en acier inoxydable
7
Couteau à pétrir en plastique
15
Disque rapeur épais julienne en
acier inoxydable
8
Couteau S/S de hachoir
les retirez du bol ou que vous le videz, ou bien que vous les
nettoyez.
l Attendez que l’appareil s’arrête avant d’enlever le couvercle ou
le bol.
l Ne dépassez pas le niveau maximum indiqué sur le bol.
AVANT D’EFFECTUER LE BRANCHEMENT
l Avant de brancher l’appareil, merci de vérifier si le type de courant et le voltage
correspondent aux indications de l’étiquette.
l Si vous l’utilisez pour la première fois, enlevez tous les emballages et nettoyez les
pièces d’assemblage.
DESCRIPTION DE VOTRE ROBOT DE CUISINE
VITESSE – Régulation de la vitesse en continu & Vitesse maximale
Après avoir assemblé les éléments dont vous avez besoin, allumez la régulation de
la vitesse en continu pour commencer l’opération.
Si vous désirez que le robot tourne lentement, ajustez un petit peu le réglage.
Page 9
Si vous désirez que le robot tourne rapidement, ajustez davantage le réglage.
Il existe un autre réglage à l’aide du bouton-poussoir
Appuyez sur le bouton-poussoir, le robot tournera à la vitesse maximale.
Détendez le bouton-poussoir, le robot s’arrêtera.
UTILISATION DU COUTEAU À PÉTRIR EN PLASTIQUE ET DU COUTEAU S/S
DE HACHOIR
Ces deux couteaux (élément No.7 couteau à pétrir en plastique et élément No. 8
couteau de hachoir en acier inoxydable) sont les composants les plus polyvalents
de tous. La durée de l’opération est variable en fonction de la nourriture. Pour des
textures plus épaisses, utilisez la vitesse maximale.
Utilisez ces couteaux pour faire de la pâtisserie, pour hacher la viande crue ou
cuite, les légumes, les noix, les pâtes, les sauces, les soupes épaisses et aussi
pour réduire le pain et les biscuits en miettes.
▲ Pour le couteau de hachoir en acier inoxydable : Ne l’utilisez pas plus de 3 minutes,
puis laissez le moteur refroidir avant une prochaine opération.
▲ Pour le couteau à pétrir en plastique : Ne l’utilisez pas plus de 3 minutes, puis
laissez le moteur refroidir avant une prochaine opération. La quantité maximale de
pâte autorisée est de 250g avec 160g d’eau.
▲ Avant de hacher la viande, coupez-la en dés de 3cm de côté. Ne mettez pas plus
de 500g de viande dans le bol. Après 1mn, la viande sera hachée finement.
▲ Ne pas utiliser le couteau de hachoir pour mélanger la farine.
▲ Le couteau en plastique sert à mélanger la farine, mais pas plus de 3 minutes, puis
laissez le moteur refroidir avant une prochaine opération.
* Toujours disposer le couteau dans le bol avant d’y mettre les ingrédients.
* Si vous hachez des oignons, pressez le bouton-poussoir juste quelques fois pour
ne pas les hacher trop fin.
* Ne laissez pas fonctionner le robot trop longtemps quand vous hachez du fromage
dur ou du chocolat car sinon les ingrédients se réchauffent, commencent à fondre
et deviennent grumeleux.
OPÉRATION:
·Suivez l’ordre d’assemblage comme indiqué sur la
figure de droite pas à pas.
·Assurez-vous que le bol en 2 et le couvercle en 4 sont
bien verrouillés ou sinon l’appareil ne fonctionnera pas.
·Après l’opération, vous pourrez démonter les 2
couteaux de l’axe d’entrainement B amovible pour les
nettoyer, dans le sens inverse de celui de
l’assemblage.
·Faites bien attention quand vous manipulez le
couteau de hachoir qui est très coupant.
Page 10
Disque à frites
Disque hachoir
Couteau 2 en 1 :
Disque rapeur épais julienne
Couteau 2 en 1 :
Disque rapeur fin julienne
·N’enlevez le couvercle pour retirer la nourriture que lorsque le couteau s’est arrêté.
·Le bol d’1,2l et celui de 2l sont adaptés pour cette fonction.
UTILISATION DU HACHOIR / DU RAPEUR / DU DISQUE POUR JULIENNE
Employez le disque rapeur pour le fromage, les carottes, les patates, les choux, le
concombre, la courgette, la betterave et les oignons.
Employez les disques rapeur fin julienne / rapeur épais julienne pour la julienne
style frites ; pour des ingrédients résistants destinés aux salades, aux garnitures et
aux fritures.
Utilisez le couteau de hachoir pour le fromage, les carottes, les patates et les
aliments de texture similaire.
▲Ne pas faire fonctionner en continu plus de 4 minutes chaque fois, pas plus de 5
fois, puis laissez le moteur refroidir avant l’opération suivante. Faites attention à la
capacité du bol. Une fois que la nourriture atteint la limite supérieure du bol, il faut
stopper le robot et vider le contenu.
▲Allumez puis enfoncez de manière continue les ingrédients avec le poussoir; ne
jamais mettre vos doigts dans le tube d’alimentation.
MODE OPÉRATOIRE AVEC LES DISQUES EN ACIER INOXYDABLE:
·Détails des disques :
·Suivez l’ordre d’assemblage comme indiqué sur la figure de droite pas à pas.
·Faites bien attention au couteau qui est très coupant.
·Cette fonction n’est disponible que pour le bol de 2l.
UTILISATION DU PRESSE AGRUME
·Employez ce presse agrume pour presser les citrons, les oranges et les
pamplemousses.
Ne pas faire fonctionner en continu avec plus de 500g de jus à chaque fois, ne pas
faire fonctionner en continu plus de 4 minutes. A chaque fois, pas plus de 5 fois,
puis laissez le moteur refroidir avant l’opération suivante.
Page 11

·Faites attention à la capacité du bol. Une fois que la
nourriture atteint la limite supérieure du bol, il faut stopper
le robot et vider le contenu.
· En outre, nous vous suggérons de stopper le pressage de
temps à autre pour enlever la pulpe du filtre.
·Suivez l’ordre d’assemblage comme indiqué sur la figure
de droite pas à pas.
·Sélectionnez la vitesse la plus lente pour éviter d’écraser
le fruit.
·Cette fonction est disponible pour les bols de 1,2l et 2l.
ENTRETIEN
l Avant de nettoyer le robot, débranchez-le de
la prise de courant.
l Ne mettez jamais le bloc moteur dans l’eau.
l N’employez pas de détergent agressif.
l N’utilisez qu’un chiffon humide pour nettoyer la surface du bloc.
l Les éléments qui ont été en contact avec les aliments peuvent
être nettoyés avec de l’eau savonneuse.
l Laissez bien sécher les éléments avant de les réassembler.
BRUIT
Nous déclarons que notre appareil produit un niveau sonore supérieur à 80dB(A)
mais inférieur à 85dB(A). Nous vous suggérons de porter un casque de protection
pendant l’emploi du robot.
ENVIRONNEMENT
ATTENTION :
Vous ne devez pas vous débarrasser de cet appareil avec vos déchets
ménagers. Un système de collecte sélective pour ce type de produit est
mis en place par les communes, vous devez vous renseigner auprès de
votre mairie afin d'en connaître les emplacements. En effet, les produits
électriques et électroniques peuvent contenir des substances
dangereuses qui ont des effets néfastes sur l'environnement ou la santé
humaine et doivent être recyclés. Le symbole ci-contre indique que les
équipements électriques et électroniques font l'objet d'une collecte sélective, il
représente une poubelle sur roues barrée d'une croix.
Adeva SAS / H.Koenig Europe - 8 rue Marc Seguin - 77290 Mitry Mory - France
www.hkoenig.com - sav@hkoenig.com - contact@hkoenig.com - Tél: +33 1 64 67 00 05
Page 12

DEUTSCH
ALLGEMEINE SICHERHEITSHINWEISE
Lesen Sie bitte alle Anweisungen sorgfältig durch, bevor Sie das
Gerät benutzen und bewahren Sie diese als künftige Referenz
auf.
l Dieses Gerät ist ausschließlich für die Haushaltsnutzung
geeignet.
l Tauchen Sie bitte die Maschine nie in Flüssigkeiten und
verwenden Sie diese nicht auf scharfen Kanten. Bedienen Sie
das Gerät nicht mit nassen Händen. Wenn das Gerät feucht oder
nass wird, ziehen Sie direkt den Stecker.
l Das Gerät kann durch Kinder ab 8 Jahren und über und
Personen mit eingeschränkten physischen, sensorischen oder
geistigen Fähigkeiten oder mangels Erfahrung und Wissen
benutzt werden, wenn sie beaufsichtigt werden oder erhielten
Anweisungen, wie das Gerät zu benutzen ist und kennen die
damit angebundenen Gefahren.
l Kinder dürfen mit dem Gerät nicht spielen. Das Gerät darf nicht
von Kindern bedient werden. Bewahren Sie das Gerät und sein
Kabel außer Reichweite von Kindern auf.
l Trennen Sie immer den Mixer von dem Netzstecker, wenn es
unbeaufsichtigt wird oder vor Zusammenbau, Ausbau oder
Reinigung.
l Wenn das Stromkabel beschädigt ist, darf es nur vom Hersteller,
einer von ihm beauftragen Werkstatt oder einer ähnlich
qualifizierten Person ersetzt werden, um Gefährdungen zu
vermeiden.
l Halten Sie Ihre Finger von beweglichen Teilen und Werkzeugen
fern. Platzieren Sie Ihre Finger etc. nie in dem
Scharniermechanismus.
l Verwenden Sie nur originalle Ersatzteile.
l Um Kindersicherheit zu garantieren, Bewahren Sie bitte alle
Verpackungen (Plastiktüten, Kästen, Styropor etc.) außer
Reichweite von Kindern auf.
l Beeinträchtigen Sie die Sicherheitsschalter nicht.
Page 13

l Platzieren Sie die Maschine auf einer ebenen, flachen und
stabielen Arbeitsfläche.
l Benutzen Sie nie Ihre Finger oder einen Gegenstand (z. B. einen
Spachtel), um Zutaten den Zuführschlauch hinunterzudrücken,
während das Gerät im Betrieb ist.
l Seien Sie bitte vorsichtig, wenn Sie die Schneiden oder Einsätze
bedienen. Seien Sie besonderes aufmerksam, wenn Sie diese
aus der Schüssel oder dem Glas entnehmen, wenn Sie die
Schüssel oder das Glas entleeren oder wenn Sie diese reinigen.
Die Schneidkanten sind sehr scharf.
l Warten Sie, bis die beweglichen Teile nicht mehr laufen, bevor
Sie den Deckel der Schüssel oder des Glases entfernen.
l Überschreiten Sie bitte die maximale Menge nicht, die auf der
Schüssel oder dem Mixer-Glas angezeigt ist.
VOR DEM ANSCHIEßEN
l Bevor Sie das Gerät anschließen, vergewissern Sie sich bitte, ob die Netzspannung
und Stromversorgung mit allen auf dem Typenschild des Gerätes angegebenen
Spezifikationen übereinstimmen.
l Vor dem ersten Gebrauch, entfernen Sie das ganze Verpackungspapier und die
Plastiktüten. Reinigen Sie alle Armaturen.
Page 14

1
Motorgehäuse Einheit
9
Spachtel
2
Antriebswelle
10
Zitruspresse-Grundkörper
3
Schüssel
11
Zitruspresse-Laufrad
4
Schüsseldeckel
12
Volledelstahl Pommes Frites Schneider
5
Zuführschlauch-Schieber
13
Volledelstahl Feinschneider und Julienne
6
Abnehmbare Antriebswelle B
14
Volledelstahl Zerkleinerungsscheibe
7
Plastik Teigknetmaschine
15
Volledelstahl Grobschneider und Julienne
8
Volledelstahl Häckslermesser
KENNEN SIE IHRE KÜCHENMASCHINE
SPEED – Stufenlos Geschwindigkeitsregulation & Pulsgeschwindigkeit
Nachdem alle benötigten Teile eingebaut sind, schalten Sie die stufenlose
Geschwindigkeitsregulation an, um die Operation zu starten.
Wenn Sie möchten, dass die Küchenmaschine langsam arbeitet, drehen Sie die
Einstellung ein wenig.
Wenn Sie möchten, dass die Küchenmaschine schnell arbeitet, drehen Sie die
Einstellung etwas mehr.
Es gibt noch eine Einstellung: Pulsschalter.
Machen Sie den Pulsschalter, um die schnellste Geschwindigkeit einzusetzen.
Machen Sie den Pulsschalter aus, um die Maschine zu stoppen.
NUTZUNG VON DER PLASTIK TEIGKNETMASCHINE UND VOLLEDELSTAHL
HÄCKSLERMESSER
Diese 2 Messerklingen ( Artikel No.7 Plastik Teigknetmaschine und Artikel No. 8
Volledelstahl Häckslermesser) sind unter allen Anlagen wahrscheinlich meist
vielseitig einsetzbar. Die Länge der Bearbeitungszeit ist unterschiedlich und hängt
von den verschiedenen Lebensmitteln ab. Für gröbere Texturen benutzen Sie die
Pulskontrolle.
Page 15

Benutzen Sie diese 2 Messerklingen für die Anfertigung von Kuchen und Gebäck,
das Zerkleinern von rohem oder gekochtem Fleisch, für Gemüse, Nüsse, Pasteten,
Dips, um Suppen zu pürieren und Kekse oder Brot zu bröseln.
▲ Für Volledelstahl Häckslermesser: Es ist nicht gestattet, es mehr als 3 Minuten
durchlaufend zu benutzen. Den Motor vor der nächsten Operation abkühlen lassen.
▲ Für Plastik Teigknetmaschine: Es ist nicht gestattet, sie mehr als 3 Minuten
durchlaufend zu benutzen.Den Motor vor der nächsten Operation abkühlen lassen.
Die maximale Teigportion beträgt 250 g Teig und 160 g Wasser.
▲ Vor dem Gebrauch, schneiden Sie bitte das Fleisch in 3x3 cm Stücke. Legen Sie
nie mehr als 500 g in den Behälter. Nach 1 Minute wird das Fleisch fein verarbeitet
sein.
▲ Verwenden Sie die volledehlstein Messerklinge nicht, um Mehl zu mischen.
▲ Die Plastik- Messerklinge darf zum Vermischen von Mehl benutzt werden, aber
nicht länger, als 3 Minuten. Den Motor vor der nächsten Operation abkühlen lassen.
* Platzieren Sie die Klinge immer in der Schüssel, bevor Sie die Zutaten
hinzufügen.
* Beim Zerkleinern von Zwiebeln verwenden Sie die Pulsfunktion, damit die
Zwiebeln nicht zu klein geschnitten werden.
* Lassen Sie das Gerät nicht zu lange laufen, wenn Sie (harten) Käse oder
Schokolade hacken. Ansonsten werden diese Zutaten zu heiß, fangen an zu
schmelzen und werden klumpig.
BEDIENUNG:
- Folgen Sie auf den Bildern gezeigte Anweisungen
Schritt für Schritt, um die Bestandteile in die
Maschine zu montieren.
- Vergewissern Sie sich, dass die Schüssel aus dem
Schritt 2 und der Deckel aus dem Schritt 4 richtig
verriegelt sind, sonst wird die Maschine nicht
starten.
- Nach dem Gebrauch können Sie die 2
verschiedenen Klingen von der Antriebswelle B
zum Reinigen demontieren, indem Sie es gegen die
Montage-Richtung drehen.
- Achten Sie bitte immer auf die VolledelstahlMesserklinge, diese ist sehr scharf.
- Öffnen Sie den Deckel, um das Lebelsmittel zu entnehmen, nur wenn die Klingen
in der Schüssel schon angehalten haben.
- Die 1.2 L Schüssel und 2.0 L Schüssel sind für diese Funktion verfügbar.
NUTZUNG DES ZERKLEINERS/ FEINSCHNEIDER/ JULIENNE- SCHEIBE
Benutzen Sie die Feinschneider-Scheibe für Käse, Karotten, Kartoffeln, Kohl,
Gurken, Zucchini, Bete und Zwiebel.
Benutzen Sie die Julienne-Scheibe/ Pommes Frites Julienne-Scheibe für Julienne-
Page 16
Pommes Frites
Julienne- Scheibe
Zerkleinerungsscheibe
2 in 1 Klinge:
Grobschneider & Julienne-Scheibe
2 in 1 Klinge:
Fineschneider & Julienne- Scheibe
Art Pommes Frites; feste Zutaten für Salate, Beilagen, Aufläufe und gedünste
Speisen.
Benutzen Sie die Zerkleinerungsscheibe für Käse, Karotten, Kartoffeln und
Lebensmitteln von ähnlicher Textur.
▲Es ist nicht gestattet, das Gerät länger als 4 Minuten pro ein Mal zu benutzen.
Nicht mehr als 5 Mal in Folge, danach den Motor vor der nächsten Operation
ankühlen lassen. Achten Sie bitte auf die Behälterkapazität. Sobald das
Lebensmittel die Max. Markierung erreicht, muss die Operation angehalten werden,
um das Essen aus dem Behälter auszugießen.
▲Schalten Sie das Gerät an und drücken Sie das Lebensmittel gleichmäßig mit
dem Schieber hinunter- setzen Sie ihre Finger nie in den Zuführschlauch.
OPERATION VON VOLLEDELSTAHL- MESSERTELLER:
-Messerteller-Einzelheiten
- Folgen Sie den Bilder-Anweisungen auf
der rechten Seite Schritt für Schritt, um die Bestandteile in das Gerät zu montieren.
- Achten Sie bitte immer auf den Messerteller , dieser ist sehr scharf.
- Diese Funktion ist nur für die 2.0 L Schüssel geeignet.
NUTZUNG DER ZITRUSPRESSE
- Nutzen Sie diese Zitruspresse, um den Saft aus
Zitrusfrüchten auszupressen.
▲Es ist nicht gestatten, mehr als 500 g Früchte
andauernd zu verwenden, oder das Gerät länger als
4 Minuten nacheinander zu bedienen. Benutzen Sie
es nicht mehr, als 5 Mal in Folge, danach lassen
Sie den Motor vor der nächsten Operation abkühlen.
- Achten Sie bitte auf die Behälterkapazität. Sobald die
Lebensmittel die Max. Markierung erreicht, muss die
Operation angehalten werden, um das Essen aus dem
Behälter auszugießen.
- Außerdem, halten Sie die Presse ab und zu an, um
Page 17

das Fruchtfleisch aus dem Sieb zu entfernen.
- Folgen Sie den Bilder-Anweisungen auf der rechten Seite Schritt für Schritt, um
die Bestandteile in das Gerät zu montieren.
- Benutzen Sie die niedrigste Geschwindigkeitseinstellung, um das Spritzen zu
vermeiden.
- Die1.2 L Schüssel und 2.0 L Schüssel sind für diese Funktion verfügbar.
REINIGUNG
l Vor der Reinigung, entnehmen Sie das Netzkabel aus der
Steckdose.
l Tauchen Sie nie das Gehäuse mir dem Motor in Wasser!
l Verwenden Sie bitte keine scharfen und scheuernden
Reinigungsmittel.
l Ausschließlich ein feuchtes Wischtuch darf für die Reinigung der
Außenfläche benutzt werden.
l Bestandteile, die mit Lebensmitteln in Kontakt kamen, können in
Seifenwasser gereinigt werden.
l Erlauben Sie den Teilen zu trocknen, bevor Sie diese in das
Gerät erneut montieren.
LÄRM
Wir erklären hiermit, dass unser Produkt über ein Arbeitsgeräusch von mehr als
80dB(A), aber weniger als 85dB(A) verfügt. Wir empfehlen, beim Bedienen des
Gerätes Gehörschutz zu tragen.
UMWELT
ACHTUNG:
Werfen Sie nicht dieses Produkt, wie es mit anderen
Haushaltsprodukten hat. Es gibt eine Mülltrennungs von diesem Produkt
in Gemeinden, Sie müssen Ihre lokalen Behörden über die Orte, wo man
dieses Produkt zurückgeben können zu informieren. In der Tat enthalten
elektrische und elektronische Produkte gefährliche Stoffe, die schädliche
Auswirkungen auf die Umwelt oder die menschliche Gesundheit haben
und sollte recycelt werden. Das Symbol hier darauf hinweisen, dass elektrische
oder elektronische Geräte sollten sorgfältig ausgewählt werden, ist ein fahrbarer
Abfallbehälter mit einem Kreuz markiert.
Adeva SAS / H.Koenig Europe - 8 rue Marc Seguin - 77290 Mitry Mory - France
www.hkoenig.com - sav@hkoenig.com - contact@hkoenig.com - Tél: +33 1 64 67 00 05
Page 18

NEDERLANDS
ALGEMENE VEILIGHEID INSTRUCTIES
Lees zorgvuldig de handleiding voordat u het apparaat gaat
gebruiken en bewaar de handleiding voor toekomstige
referentie.
l Dit apparaat is alleen voor huishoudelijk gebruik.
l Dompel dit apparaat nooit onder in een vloeistof en kijk uit met
scherpe randen. Gebruik het apparaat niet met natte handen. Als
het apparaat nat of vochtig is, haal meteen de stekker eruit.
l Dit apparaat kan gebruikt worden door kinderen van 8 jaar en
ouder en door personen met beperkte geestelijke of lichamelijke
capaciteiten, of met een gebrek aan ervaring en kennis, zolang
ze toezicht krijgen of instructies voor het veilig gebruik van dit
apparaat en de bijbehorende gevaren begrijpen.
l Kinderen mogen niet met dit apparaat spelen. Dit apparaat mag
niet worden gebruikt door kinderen. Houd het apparaat en de
stroomkabel uit de buurt van kinderen.
l Altijd de stekker uit het stopcontact halen als het apparaat
onbeheerd wordt achtergelaten en voor het in elkaar zetten, uit
elkaar halen of het schoonmaken.
l Als de stroomkabel beschadigd is, moet het worden vervangen
door de fabrikant, een servicemonteur of een gelijkwaardig
gekwalificeerd persoon om gevaren te vermijden.
l Houd u vingers weg van bewegende delen en aangesloten
hulpmiddelen. Nooit uw vingers en dergelijke in de aandrijving
steken. // Gebruik alleen originele reserve onderdelen.
l Voor de veiligheid van uw kinderen, houd alle
verpakkingsmaterialen (plastic zakken, dozen en piepschuim
etc.) buiten hun bereik.
l Rommel niet met veiligheidsschakelaars.
l Plaats het apparaat op een glad, vlak en stabiel werkplek.
l Gebruik nooit uw vingers of een object (zoals een spatel) om
ingrediënten door de vulopening te duwen als het apparaat in
werking is.
l Wees heel voorzichtig als u met de messen omgaat. Wees
Page 19
1
Motor Basis Unit 9 Spatel
2
Aandrijving
10
Citrus Pers Basis Unit
3
Schaal
11
Citrus Pers Loper
4
Schaal Deksel
12
Volledig Roestvrij Stalen Friet aardappel snijder
5
Vulopening Drukker
13
Volledig Roestvrij Stalen Fijne Snijder en
Julienne
6
Verwijderbare Aandrijving B
14
Volledig Roestvrij Stalen Rasp Schijf
7
Plastic deeg mixer
15
Volledig Roestvrij Stalen Grove Snijder en
Julienne
8
S/S snij blad
extreem voorzichtig als u ze verwijdert uit de schaal of kan, als u
de schaal of kan leeg maakt of als u ze schoon maakt. De
snijranden zijn erg scherp.
l Wacht met het verwijderen van de deksel van de schaal of kan
totdat alle beweegbare delen zijn gestopt.
l Nooit meer inhoud in de schaal of kan doen dan dat erop staat
aangegeven.
VOORDAT U HET APPARAAT AANSLUIT
l Voordat u de het apparaat aansluit, controleer dan eerst of de spanningsbron
overeenkomt met de data die staan aangegeven op het typeplaatje.
l Voor het eerste gebruik, verwijder al het inpakmateriaal en plastic zakken. Maak de
aansluitingen schoon.
l
KEN UW KEUKENMACHINE
SNELHEID – Traploze Snelheid Regelsnelheid & Pulserende Snelheid
Na het plaatsen van de benodigde onderdelen, schakel de traploze regelsnelheid
in om te beginnen.
Page 20

Als u de keukenmachine langzaam wilt laten draaien, draait u een klein beetje aan
de knop.
Als u de keukenmachine snel wilt laten draaien, draait u meer aan de knop.
Er is nog een andere instelling: pulserende knop.
Schakel de pulserende knop in, de machine zal gaan draaien in de snelste stand.
Schakel de pulserende knop uit, de machine zal stoppen met draaien.
HET GEBRUIK VAN DE PLASTIC DEEG MIXER EN HET S/S MES BLAD
Deze 2 messen bladen (Item No.7 Plastic deeg mixer en item No.8 Roestvrij Stalen
snij blad) kunnen de meest veelzijdige hulpstukken zijn. De lengte van het proces
is afhankelijk van het type voedsel. Voor grovere texturen gebruik de pulserende
stand.
Gebruik deze 2 messen voor cake en deeg, het snijden van rauw en gekookt vlees,
groentes, noten, paté, dipsaus, pureren van soep en ook voor het maken van
paneermeel van brood en beschuit.
▲ Voor Roestvrij Stalen Snij Blad: Het is niet toegestaan het langer dan 3 minuten te
gebruiken, daarna moet de motor eerst afkoelen voor volgend gebruik.
▲ Voor Plastic deeg mixer: Het is niet toegestaan het langer dan 3 minuten te
gebruiken, daarna moet de motor eerst afkoelen voor volgend gebruik. De
maximale hoeveelheid deeg dat gebruikt kan worden is 250gr deeg met 160gr
water.
▲ Voor het verwerken, snij het vlees in stukken van 3 X 3 cm grootte. Doe nooit meer
dan 500gr dit soort vlees in de houder. Na 1 minuut zal het vlees fijn gehakt zijn.
▲ Gebruik het roestvrij stalen snij blad niet voor het mixen van bloem.
▲ Het plastic mes blad kan worden gebruikt voor het mixen van bloem, maar niet
langer dan 3 minuten. Altijd de motor laten afkoelen voor het volgende gebruik.
* Altijd eerst het snijblad in de schaal aanbrengen voor het toevoegen van
ingrediënten.
* Als u uien snijdt, gebruik dan de pulserende functie een aantal keer om te
voorkomen dat ze te fijn worden gesneden.
* Laat het apparaat niet te lang draaien als u (harde) kaas of chocolade snijdt.
Anders kunnen de ingrediënten te warm worden, smelten en samenklonteren.
GEBRUIK:
·Volg de richtingen zoals aangegeven in de afbeelding
aan de rechterkant, stap voor stap om alles te
assembleren.
·Controleer dat de schaal in stap 2 en de deksel in stap
4 goed gesloten zijn anders zal het apparaat niet
werken.
·Na gebruik kunt u de 2 snijbladen verwijderen van
aandrijving B om ze schoon te maken door ze tegen de
assembleer richting in te draaien.
·Wees altijd voorzichtig met het Roestvrij stalen
Page 21
Gebakken Aardappel
Julienne Schijf
Rasp Schijf
2 in 1 mes:
Grove Snijder & Julienne
2 in 1 mes:
Fijne Snijder & Julienne Schijf
snijblad, het is erg scherp.
·Alleen de deksel openen om het voedsel eruit te halen als de messen gestopt zijn
met draaien.
·1.2 L Schaal en2.0 L Schaal kunnen allebei worden gebruikt voor deze functie.
GEBRUIK VAN DE RASP / SLICER / JULIENNE SCHIJF
Gebruik het Snijblad voor kaas, wortels, aardappels, kool, komkommer, courgette,
rode bieten en uien.
Gebruik de Julienne Schijf / Friet Gebakken Aardappel Julienne Schijf voor friet in
Julienne stijl; stevige ingrediënten voor een salade, garnering, ovenschotels en
stevige frietjes.
Gebruik de Rasp Schijf voor kaas, wortels, aardappels en voedsel met vergelijkbare
textuur.
▲Het is niet toegestaan langer dan 4 minuten te draaien en niet meer dan 5 keer,
laat de motor dan afkoelen voor het volgende gebruik. Let op de maximale
capaciteit van de houder. Als het voedsel tot de maximale indicatie van de houder
komt, stop het proces en schenk wat voedsel uit de houder.
▲Schakel het apparaat in en druk het voedsel erin met de drukker - nooit je vingers
in de vulopening steken.
GEBRUIK VAN HET VOLLEDIG ROESTVRIJ STALEN Snij Schijf:
·Snij schijf details:
·Volg de richtingen zoals aangegeven in de afbeelding aan de rechterkant, stap
voor stap om de onderdelen te assembleren in het apparaat.
·Altijd voorzichtig zijn met de mes schijf, het is erg scherp.
·Deze functie is er alleen voor de 2.0 L Schaal.
GEBRUIK VAN DE CITRUS PERS
·Gebruik deze citrus pers om het sap uit citrus vruchten te
persen (zoals sinaasappels, citroenen, limoenen en grapefruits)
▲Het is niet toegestaan om meer dan 500g sap per keer te
persen, het is niet toegestaan om langer dan 4 minuten per keer
te persen en niet meer dan 5 keer omdat de motor moet afkoelen
voor het volgende gebruik.
Page 22

·Let op de capaciteit van de houder. Als het voedsel tot de max van
de houder komt, stop het proces en schenk het voedsel uit de houder.
·Verder, stop af en toe om het vruchtvlees te verwijderen van de zeef.
·Volg de richtingen zoals aangegeven in de afbeelding aan de
rechterkant, stap voor stap om de onderdelen te assembleren in het
apparaat.
·Gebruik de laagste snelheid om te persen als het spettert.
·1.2 L Schaal en2.0 L Schaal kunnen allebei worden gebruikt voor deze functie.
SCHOONMAKEN
l Voor het schoonmaken, verwijder de stekker uit het stopcontact.
l Laat nooit water in de behuizing lopen!
l Gebruik geen scherpe of bijtende schoonmaakmiddelen.
l Alleen een vochtige zachte doek gebruiken bij het schoonmaken
van de behuizing.
l Onderdelen die in contact zijn gekomen met voedsel kunnen
worden schoongemaakt in een sopje.
l Laat de onderdelen goed opdrogen voordat u het apparaat weer
assembleert.
GELUID
Hierbij verklaren we dat ons product een werkend geluidsniveau heeft van meer
dan 80dB(A) maar minder dan 85dB(A). Wij bevelen aan om gehoorbescherming
te dragen tijdens gebruik van dit apparaat.
MILIEU
ATTENTIE:
Dit apparaat mag niet met uw ander huishoudelijke toestellen worden
verwijdert. Dit product moet op een geselecteerde stortplaats verwijdert
worden. U kunt bij de gemeente een indiceerde plaats aanvragen.
Elektrisch en elektronische producten kunnen gevaarlijke stoffen inhouden
die schadelijk zijn voor mensen en het milieu en moet recycled worden. Het
symbool aan de kant geeft aan dat het een elektrisch en elektronisch toestel is en
zijn dus artikelen van een selectieve collectie. Het beeld geeft een afvalbak met
een X teken aan.
Adeva SAS / H.Koenig Europe - 8 rue Marc Seguin - 77290 Mitry Mory - France
www.hkoenig.com - sav@hkoenig.com - contact@hkoenig.com - Tél: +33 1 64 67 00 05
Page 23

ESPANOL
INSTRCCIONES GENERALES DE SEGURIDAD
Lea atentamente las instrucciones de uso antes de poner el
aparato en funcionamiento y guarde este manual de
instrucciones para consultas futuras.
l Este aparato está diseñado únicamente para usos domésticos.
l Nunca sumerja el aparato en ningún líquido y mantenga su cable
de alimentación lejos de bordes afilados. No manipule el aparato
con las manos mojadas. Si el aparato está húmedo o se ha
mojado, desenchúfelo del tomacorriente inmediatamente.
l Este aparato puede ser utilizado por niños de 8 años o más y
personas con discapacidad física, sensorial o motora, o con falta
de experiencia y conocimiento siempre que sean supervisados
o hayan sido previamente instruidos en el uso seguro del aparato
y entiendan los peligros involucrados.
l Los niños no deben jugar con el aparato. Este aparato no debe
ser utilizado por niños. Mantenga el aparato y su cable de
alimentación fuera del alcance de los niños.
l Siempre desenchufe el aparato del tomacorriente cuando no
esté en uso o esté desatendido y también antes de montarlo,
desmontarlo o limpiarlo.
l Si el cable de alimentación está dañado, deberá ser
reemplazado por el fabricante, su agente de servicios o una
persona de calificación similar para evitar riesgos potenciales.
l Mantenga sus dedos alejados de las piezas móviles y accesorios
encajados. Nunca coloque los dedos en el mecanismo de la
bisagra.
l Utilice únicamente piezas de repuesto originales.
l Para garantizar la seguridad de sus hijos, mantenga todo el
material de embalaje (bolsas de plástico, cajas, poliestireno,
etc.) fuera de su alcance.
l No obstruya los cierres de seguridad.
l Siempre utilice el aparato sobre una superficie de lisa, plana y
estable.
l Nunca use sus manos ni cualquier otro objeto (por ejemplo, una
Page 24

1
Base del motor
9
Espátula
2
Eje
10
Tamiz del exprimidor de cítricos
3
Recipiente
11
Exprimidor giratorio
4
Tapa del recipiente
12
Disco cortador de papas fritas a la francesa
5
Empujador de alimentos
13
Disco rebanador fino y Juliana
6
Eje desmontable para las cuchillas
14
Disco rallador
7
Cuchilla mezcladora de plástico
15
Disco rebanador grueso y Juliana
8
Cuchilla picadora de acero inoxidable
espátula) para empujar alimentos por el tubo de alimentación
mientras el aparato esté en funcionamiento.
l Tenga extremo cuidado al manipular las cuchillas o los discos,
especialmente al sacarlos del recipiente, al vaciar el contenido
del mismo o cuando vaya a lavarlos. La cuchilla y los discos son
muy afilados.
l Espere a que las piezas móviles dejen de funcionar antes de
retirar la tapa del recipiente.
l No exceda la capacidad máxima indicada en el recipiente de su
procesador de alimentos.
ANTES DE ENCHUFAR EL APARATO AL TOMACORRIENTE
l Antes de conectar el aparato a la red eléctrica, verifique que el enchufe sea
compatible con el tomacorriente y que la tensión coincida con la indicada en la
placa de características del aparato.
l Antes de utilizar el aparato por primera vez, retire todo el material de embalaje y
las bolsas de plástico. Debe limpiar todos los accesorios
DESCRIPCIÓN DEL PROCESADOR DE ALIMENTOS
Page 25

VELOCIDAD - Regulador de velocidad continuo / Pulso de velocidad
Después de montar las piezas necesarias para su propósito, gire el regulador de
velocidad en el sentido de las manecillas del reloj para iniciar el proceso.
Si necesita aumentar la velocidad de procesamiento, gire un poco más el
regulador. Si desea disminuir la velocidad de procesamiento, gire el regulador en
sentido contrario.
Hay otro ajuste de velocidad: Botón de pulso (P).
Presione el botón de pulso, el procesador de alimentos funcionará a la velocidad
máxima. Libere el botón de pulso, el procesador de alimentos dejará de funcionar.
USO DE LA CUCHILLA MEZCLADORA Y LA CUCHILLA PICADORA
Estas dos cuchillas (accesorios 7: Cuchilla mezcladora de plástico y 8: Cuchilla
picadora de acero inoxidable) podrían ser los accesorios más versátiles de su
Procesador de Alimentos. El tiempo de procesamiento es diferente para los
diferentes tipos de alimento. Para obtener texturas más gruesas haga uso del botón
de pulso.
Utilice estas 2 cuchillas para procesar masas de pastelería y repostería, para picar
carne cruda y cocida, verduras, nueces, pastas, especias, hacer puré y también
para rallar pan o galletas.
▲ Para la cuchilla picadora: No se debe utilizar continuamente por más de 3 minutos,
debe esperar a que se enfríe el motor antes de la siguiente operación.
▲ Para la cuchilla mezcladora: No se debe utilizar continuamente por más de 3
minutos, debe esperar a que se enfríe el motor antes de la siguiente operación. La
cantidad de mezcla máxima admisible es 250 g de masa con 160 g de agua.
▲ Antes de iniciar el proceso, corte la carne en trozos pequeños de 3 x 3 cm. Nunca
ponga más de 500 g de carne en el recipiente. Después de 1 minuto, la carne ya
está finamente procesada.
▲ No utilice la cuchilla picadora de acero inoxidable para mezclar harina.
▲ Puede utilizar la cuchilla mezcladora de plástico para mezclar harina, por no más
de 3 minutos. Deje enfriar el motor antes de la siguiente operación.
• Siempre monte la cuchilla en el recipiente antes de empezar a añadir los
ingredientes.
• Si pretende cortar cebollas, use la función de pulso varias veces para evitar que
las cebollas queden demasiado picadas.
• No prolongue el procesamiento de queso (duro) o chocolate demasiado tiempo. De
lo contrario, estos pueden sobrecalentarse al punto de
derretirse y se vuelven grumos.
MONTAJE DE LAS CUCHILLAS:
• Siga los pasos tal y como se muestran en la figura de al
lado para ensamblar los componentes de su Procesador
de Alimentos para utilizar las cuchillas.
• Asegúrese de que en los pasos 2 y 4, el recipiente y la tapa
del recipiente, respectivamente, queden bien ajustados y
Page 26
Disco cortador de papas fritas
a la francesa y Juliana.
Disco rallador
Disco 2 funciones en 1:
Rebanador grueso y Juliana
Disco 2 funciones en 1:
Rebanador fino y Juliana
bien cerrados, de lo contrario el Procesador no funcionará.
• Después del uso, puede desmontar ambos tipos de cuchilla del eje desmontable
para efectuar su limpieza, siempre siguiendo el procedimiento inverso al utilizado
para el montaje.
• Siempre sea precavido al manipular la cuchilla picadora de acero inoxidable, es
muy afilada.
• Nunca abra la tapa del recipiente para sacar los alimentos procesados hasta que
las cuchillas no estén completamente detenidas.
• Este procedimiento es válido para ambos tipos de recipiente, de 1.2 L y 2.0 L.
USO DE LOS DISCOS RALLADOR/ REBANADOR/ JULIANA
• Utilice el disco rebanador para picar queso, zanahoria, papas, col, pepino,
calabaza, remolacha y cebolla.
• Utilice el disco cortador de papas fritas o disco Juliana para cortar papas al estilo
francés o a la Juliana; preparar ingredientes para ensaladas, guarniciones, guisos
y papitas fritas.
• Utilice el disco rallador para picar queso, zanahoria, papas y otros alimentos de
textura similar.
▲ No use el Procesador de Alimentos continuamente por más de 4 minutos y
tampoco más de 5 veces consecutivas. Deje enfriar el motor antes de la siguiente
operación.
▲ Esté atento a la capacidad del recipiente, si los alimentos llegan al nivel máximo
indicado en el recipiente, debe detener la operación y verter el exceso de alimento
del recipiente.
▲ Encienda el Procesador y empuje los alimentos uniformemente con los
empujadores – Nunca introduzca sus dedos en el tubo de alimentación.
MONTAJE DE LOS DISCOS:
Descripción de los discos:
Page 27
l Siga los pasos tal y como se muestran en la figura de al lado para ensamblar los
componentes de su Procesador de Alimentos para utilizar los discos.
l Siempre sea precavido al manipular los discos ya que son muy afilados.
l Este procedimiento es válido solamente para el recipiente de 2.0 L.
USO DEL EXPRIMIDOR DE CÍTRICOS
Utilice este exprimidor giratorio para extraer el jugo de los
cítricos (por ejemplo: naranjas, limones, limas, toronjas o
pomelos).
▲ No use el Procesador de Alimentos para exprimir más de 500
g de cítricos de forma continua ni durante más de 4 minutos,
tampoco lo haga más de 5 veces consecutivas. Deje enfriar el
motor antes de la siguiente operación.
l Esté atento a la capacidad del recipiente, si el jugo llega al nivel
máximo indicado en el recipiente, debe detener la operación y
verter el jugo del recipiente.
l Se recomienda que pare de exprimir regularmente para retirar la pulpa del tamiz.
l Siga los pasos tal y como se muestran en la figura de al lado para ensamblar los
componentes de su Procesador de Alimentos para utilizar el exprimidor de cítricos.
l Use la velocidad mínima para exprimir el jugo de sus cítricos y evitar salpicaduras.
l Este procedimiento es válido para ambos tipos de recipiente, de 1.2 L y 2.0 L
LIMPIEZA
l Antes de proceder con la limpieza, desenchufe el cable de
alimentación del tomacorriente.
l ¡Nunca sumerja la base del motor en agua ni en cualquier otro
líquido!
l No use detergentes fuertes o abrasivos para lavar los
accesorios.
l Para limpiar el exterior de la base del motor use apenas un paño
suave húmedo.
l Los accesorios que entran en contacto directo con los alimentos
se pueden lavar con agua jabonosa.
l Deje que las piezas se sequen completamente antes de volver
a ensamblar el aparato.
RUIDO
Declaramos que nuestro producto funciona con un nivel de ruido superior a 80 dB
(A), aunque inferior a 85 dB (A). Recomendamos el uso de protectores auditivos
para utilizar este Procesador de Alimentos.
Page 28

MEDIO AMBIENTE
ATENCIÓN:
No se deshaga de este producto como lo hace con otros productos del
hogar. Existe un sistema selectivo de colecta de este producto puesto en
marcha por las comunidades, debe de informarse en su ayuntamiento
acerca de los lugares en los que puede depositar este producto. De hecho,
los productos eléctricos y electrónicos pueden contener substancias
peligrosas que tienen efectos nefastos para el medio ambiente o para la salud
humana y deben ser reciclados. El símbolo aquí presente indica que los equipos
eléctricos o electrónicos deben de ser cuidadosamente seleccionados, representa
un recipiente de basura con ruedas marcado con una X.
Adeva SAS / H.Koenig Europe - 8 rue Marc Seguin, 77290 Mitry-Mory, France
www.hkoenig.com - sav@hkoenig.com - contact@hkoenig.com - Tél: +33 1 64 67 00 05
Page 29

ITALIANO
NORME GENERALI DI SICUREZZA
Leggere attentamente le istruzioni prima di mettere in funzione
l'apparecchio e conservare le istruzioni per riferimento futuro.
l Questo apparecchio è solo per uso domestico.
l Non immergere la macchina in qualsiasi liquido e non poggiarla
su bordi taglienti. Non utilizzare l'apparecchio con le mani
bagnate. Se l'apparecchio è umido o bagnato, staccare
immediatamente la spina.
l Questo apparecchio può essere utilizzato da bambini di età
superiore agli 8 anni e da persone con capacità fisiche, sensoriali
o mentali ridotte o con mancanza di esperienza e conoscenza se
sono controllate o sono state istruite all'uso dell'apparecchio in
modo sicuro e ne comprendono i pericoli coinvolti.
l I bambini non devono giocare con l'apparecchio. Questo
apparecchio non deve essere utilizzato da bambini. Mantenere
l'apparecchio e il cavo fuori dalla portata dei bambini.
l Scollegare sempre il robot dalla rete se viene lasciato incustodito
e prima di montarlo, smontarlo o effettuare la pulizia.
l Se il cavo di alimentazione è danneggiato, deve essere sostituito
dal produttore o da un suo agente di servizio o da una persona
qualificata per evitare rischi.
l Tenete le dita lontano dalle parti mobili e strumenti montati .Mai
mettere le dita nel meccanismo a cerniera.
l Utilizzare solo ricambi originali.
l Al fine di garantire la sicurezza dei vostri bambini, si prega di
tenere tutti gli imballaggi (sacchetti di plastica, scatole,
polistirolo, ecc) fuori dalla loro portata.
l Non interferire con eventuali interruttori di sicurezza.
l Posizionare la macchina su una superficie di lavoro liscia, piana
e stabile.
l Non usare mai le dita o un oggetto (ad esempio una spatola) per
spingere gli ingredienti lungo il tubo di alimentazione mentre
l'apparecchio è in funzione.
l Fare molta attenzione quando si maneggiano lame o inserti.
Page 30

1
Unità corpo motore
9
Spatola
2
Albero di trasmissione
10
Unità spremiagrumi
3
Ciotola
11
Spremiagrumi
4
Coprire la ciotola
12
Tag li a pa ta ti ne f ri tt e i n Ac ci ai o
inossidabile
5
Alimentazione Tubo Pusher
13
Affettatrice e Julienne in Acciaio
6
Albero motole staccabile B
14
Disco Triturazione Acciaio
7
impastatrice di plastica
15
affettatrice a Julienne in acciaio grezzo
8
Lama S / S
Prestare particolare attenzione quando si rimuove la ciotola o il
vasetto, quando si svuota la ciotola o il vasetto e quando li si
pulisce. I loro bordi sono molto taglienti.
l Attendere fino a quando le parti in movimento si fermano prima
di rimuovere il coperchio del contenitore o vasetto.
l Non superare il livello massimo indicato sulla ciotola o sul vasetto
del frullatore.
PRIMA DI ACCENDERLO
l Prima di collegare il robot alla rete, si prega di verificare se il tipo di alimentazione
e la tensione di rete combacino con i dati riportati sulla targhetta posta
sull'apparecchio.
l Quando lo si utilizza per la prima volta, strappare tutta la carta e i sacchetti di
plastica da imballaggio. Pulire i raccordi.
CONOSCENZA DELLA ROBOT DA CUCINA
Page 31

VELOCITA '- Regolazione di velocità continua & velocità a percussione
Dopo aver assemblato le parti necessarie, accendere la regolazione continua della
velocità per avviare l'operazione.
Se si desidera che rallentare il robot da cucina, rettificare la velocità
Se è necessario velocizzare il robot da cucina, aumentare la velocità.
C'è un altro tipo di regolazione Interruttore di impulso.
Avviare l'interruttore di impulso, la macchina si sposterà nella velocità più veloce.
Fermare l'interruttore di impulso, la macchina si ferma.
UTILIZZO DEL MIXER PASTA IN PLASTICA E LAMA S / S
Queste lame di coltello 2 (No.7 voce impastatrice di plastica e la voce No. 8 lama
in acciaio inox Potrebbe essere il più versatile di tutti gli accessori. La lunghezza
del tempo di elaborazione è differente in base al cibo. Per le texture grossolane
utilizzare il controllo degli impulsi.
Utilizzare queste 2 lame per le torte e per la pasticceria, tagliare cibi crudi e cotti a
base di carne, verdure, frutta secca, patè, salse, zuppe dopo averli passati al
setaccio e per ricavare briciole da biscotti e pane.
▲ Per la Lama in Acciaio inossidabile: Non è consentito usarla continuamente più di
3 minuti, si dovrebbe far raffreddare il motore prima operazione successiva.
▲ Per impastatrice di plastica: Non è consentito usala continuamente più di 3 minuti,
si dovrebbe raffreddare il motore prima operazione successiva. L'impasto Max che
può essere utilizzato è di 250g di impasto e di 160g di acqua
▲ Prima di lavorarla si prega di tagliare la carne in pezzi da 3 x 3 cm .Non mettere
mai più di 500g di carne nel contenitore. Dopo 1 minuto, la carne verrà tritata
finemente.
▲ Non usare la lama del coltello in acciaio inox per la farina .
▲ LA lama del coltello di plastica può essere utilizzata per la farina, per non più di 3
minuti. Si dovrebbe far raffreddare il motore prima operazione successiva.
* Mettere sempre la lama nella ciotola prima di iniziare di aggiungere gli ingredienti.
* Se tritate le cipolle, utilizzare la funzione di impulso un paio di volte per evitare
che le cipolle siano tritate troppo finemente.
* Non lasciare l'apparecchio in funzione troppo a lungo quando si trita formaggio o
cioccolato (duro). In caso contrario, questi ingredienti
diventano troppo caldi, iniziano a sciogliersi e formano
grumi.
OPERAZIONE:
·Seguire i flussi come nell’immagine nel lato destro
passo dopo passo per assemblare i componenti nella
macchina.
·Assicurarsi che la ciotola al punto 2 e il coperchio al
punto 4 vegano bloccati bene o la macchina non
funziona.
Page 32
Patate fritte
Julienne
2 in 1 lama:
Affettatrice & Julienne
Lama 2 in 1 :
Affettatrice & Disco Julienne
Disco Trituratore
·Dopo l'operazione, bisogna smontare 2 tipi lame dall’albero motore B per la pulizia
in senso opposto a quello di montaggio
·Fare attenzione alla lama in acciaio inossidabile, è molto forte.
·Aprire il coperchio per prendere il cibo solo quando le lame nella ciotola ssi ono
già fermate.
·I contenitori 1.2 L e 2.0 L sono entrambi disponibili per questa funzione.
UTILIZZO DEL DISCO TRINCIATRICE / AFFETTATRICE / JULIENNE
Utilizzare il disco affettatrice per il formaggio, carote, patate, cavoli, cetrioli,
zucchine, barbabietole e cipolle.
Utilizzare il Disco Julienne per patatine fritte o a Julienne; ingredienti solidi per
insalate, contorni, casseruole e patatine fritte di ogni tipo
Utilizzare il disco trinciatrice per formaggio, carote, patate e cibi di consistenza
simile.
▲Non è consentito usare continuamente per più di 4 minuti ogni volta, non più di 5
volte e raffreddare il motore prima operazione successiva Si suggerisce si prestare
attenzione sulla capacità del contenitore. Una volta che il cibo raggiunge òa linea
di massima di contenitore, è necessario arrestare il funzionamento e versare il cibo
dal contenitore.
▲Accendere e spingere verso il basso in modo uniforme con l’apposito attrezzo non mettere le dita nel tubo di alimentazione.
OPERAZIONE PER DISCO LAMA IN ACCIAIO:
·Lame dettagli del disco:
·Seguire i flussi come nell’immagine a lato destro passo doopo passo per
assemblare i componenti nella macchina.
·Fare sempre attenzione alla lama, è molto forte.
·Questa funzione è solo per la ciotola da 2.0 L .
UTILIZZO DELLO SPREMIAGRUMI
·Utilizzare questo spremiagrumi per spremere il succo di agrumi
(ad esempio arance, limoni, lime e pompelmi).
▲Non è consentito usare continuamente per più di 500g di agrumi
per volta. Non è consentito usare continuamente per più di 4 minuti
per volta. Non usare per più di 5 volte e poi raffreddare il motore
prima dell’operazione successiva.
Page 33

· Prestare attenzione sulla capacità del contenitore. Una volta che il cibo arriva
alla linea di massima del contenitore, è necessario arrestare il funzionamento e
versare il
cibo dal contenitore.
· Inoltre, di fermarsi di volta in volta per rimuovere la
polpa dal setaccio.
·Seguire i flussi come immagine a lato destro passo dopo passo per assemblare i
componenti nella macchina.
·Usare la velocità minima per spremere il succo in caso di spruzzi.
·Le ciotole da 1.2 L e 2.0 L sono entrambi disponibili per questa funzione.
PULIZIA
l Prima della pulizia rimuovere il cavo di alimentazione dalla presa
di corrente.
l Non immergere mai il corpo motore in acqua!
l Non utilizzare detergenti abrasivi o taglienti.
l Solo un panno umido deve essere utilizzato per pulire l'esterno
dell'alloggiamento.
l I componenti che sono venuti a contatto con gli alimenti possono
essere lavati in acqua saponata.
l Lasciare asciugare completamente le parti prima di rimontare il
dispositivo.
RUMORE
Si dichiara che il nostro prodotto ha un livello di rumore di lavoro superiore agli 80
dB (A), ma inferiore a 85 dB (A). Vi proponiamo di indossare protezioni per le
orecchie durante il funzionamento dell'apparecchio.
AMBIENTE
ATTENZIONE:
Non gettare quest’ apparecchio tra i rifiuti domestici. Per questo tipo di
prodotti è fornito dai comuni un sistema di raccolta e ritiro in zona ed è
quindi un dovere informarsi per conoscere il giusto smistamento del rifiuto.
Infatti, i prodotti elettrici ed elettronici possono contenere sostanze
pericolose che hanno effetti dannosi sull’ambiente o sulla nostra salute e
quindi devono essere riciclati. Il simbolo al lato indica che le apparecchiature
elettriche ed elettroniche fanno parte di una raccolta selettiva e differenziata
(rappresentata da un bidone su due ruote sbarrato da una croce.
Adeva SAS / H.Koenig Europe - 8 rue Marc Seguin - 77290 Mitry Mory - France
www.hkoenig.com - sav@hkoenig.com - contact@hkoenig.com - Tél: +33 1 64 67 00 05
V3
 Loading...