

Page 1

Instruction manual
Manuel d'utilisation
Bedienungsanleitung
Handboek
Manual de Utilización
Manuale d’uso
KOL6012
Portable Air Conditioner
Climatiseur Portable
Mobile Kilmaanlage
Draagbare Air Conditioner
Aire acondicionado portátil
Condizionatore portatile
Page 2

ENGLISH
Thank you very much f or selecting t his new m odel of Por table Air Co nditio ner, please read this Use an d
Care Manual carefully before installing and us ing this appliance. Pl ease keep this Use and C are Man ual
properly for future reference.
Safety Instructions
Electrical Specifications
1. All wiring must comply with local and national electrical codes and be installed by a qualified
electrician. If you have any questions regarding to the following instructions, contact a qualified
electrician.
2. The unit must be installed in accordance with national wiring regu lations. Check avail able power
supply and resolve any wiring problems before installation and operation of this unit.
3. For your safety and protection, this unit is grounded through the power cord plug when plugging into
a matching wall outlet. If you are not sure whether the wall outlet in your home are properl y grounded,
please consult an elec trician. If supply cord is damaged, it m ust be replaced by the manufact urer, its
service agent or similarly qualified person in order to avoid any hazards.
4. This appliance is not intended for people(including children)with reduc ed physical, sensory or
mental capabilities, or lack of experience and knowle dge, unless they have been gi ven supervision or
instruction concerning use of the appliance by a person responsible for their safety. Young children
should be supervised to ensure that they do not play with the appliance.
WARNING:
To reduce the risk of fire, electr ical shock or injur y when using your air conditio ner, follow these bas ic
precautions:
Do not use this unit in wet environment, like outdoor or bathroom etc., indoor use only.
Do not remove ground prong.
Do not use an adapter.
Do not use an extension power cord.
Never share the power outlet with other appliances.
Never connect or disconnect the power plug with wet hands, to avoid electric shocks.
Never turn off the unit by unplugging.
Unplug air conditioner before servicing.
Never dismantle, repair or modify the unit without authorization to avoid body injury or property
damage, be sure it repaired by manufacturer or professionals.
Never put any objects into the unit.
Never cover or obstruct air inlet or outlet to prevent overheating.
Never hit or shake the unit to prevent damage.
Never spray water or place the unit near water to prevent electric shocks.
Never place the unit near gas appliances, fire or flammable liquids.
Need two or more people to move and install air conditioner.
Page 3

Do not let children play near the unit.
If the power cord is damaged, it must be replaced with an after-sales service to avoid any danger.
Cautions
Keep the unit at least 1 meter away from TV or radios to avoid electromagnetic interference.
Do not expose the unit under direct sun light to avoid surface color fading.
Do not tilt the unit for more than 35 degrees or upside-down while transporting.
Place the unit on a flat surface and upright with less than 5 degrees inclination.
Keep the drain hose in good condition without flexure then connect with unit.
The unit operates more efficiently in certain room locations (Installation and Adjustment).
Empty the condensed drainage pan before putting the unit in storage to prolong the unit lifetime end
of the season.
Do not use chemical solvents (e.g. Benzene, alcohol-glazer) to clean the unit surface, do not scratch
or damage the unit.
Make sure to cut off the power before disassembling or installing the filter.
Remark: Do not use this unit in cooling mode if the ambient temperature is higher than 35℃.
Features and Identification of Parts
1. Features
New appearance with compact design, more luxury and upscale.
Remote control & Panel c ontrol with LCD display and touch screen mak es your operation m ore
accessible.
The unit is with cooling, fan, dehumidifying, and sleep functions.
Air outlet is upwards, auto swing of horizontal louver and cover air outlet window when stop working,
to avoid dust into unit, vertical louvers can be manually adjusted.
Humanized built-in remote control compartment, easy storage.
Handles with cut-point design, make the whole unit more humanized.
Power cord holder and universal socket can well protect the power cord.
High position of exhaust air outlet, easy assembly and venting quickly.
Intelligent, environmental-friendly and energy saving with self-evaporative cooling system.
24-hour Timer function, unique on/off reminding music.
3-minute delay re-starting protection to compressor and other multiple protection functions.
Page 4

2. Identification of Parts
1. Front panel
2. Remote control receiving window
3. Control panel
4. Top panel
5. Horizontal louver
6. Right decoration board
7. Upper filter assembly of back panel
8. Remote control compartment
9. Left decoration board
10. Power cord
11. Winding-pillar
12. Lower filter assembly of back panel
13. Drain cover
14. Universal whe el
15. Filter assembly of side panel
16. Protective grid
17. Fastener
18. Handle
19. Round connector of exhaust hose
20. Exhaust hose
21. Adapter of exhaust hose
22. Window kits
Operations and Settings
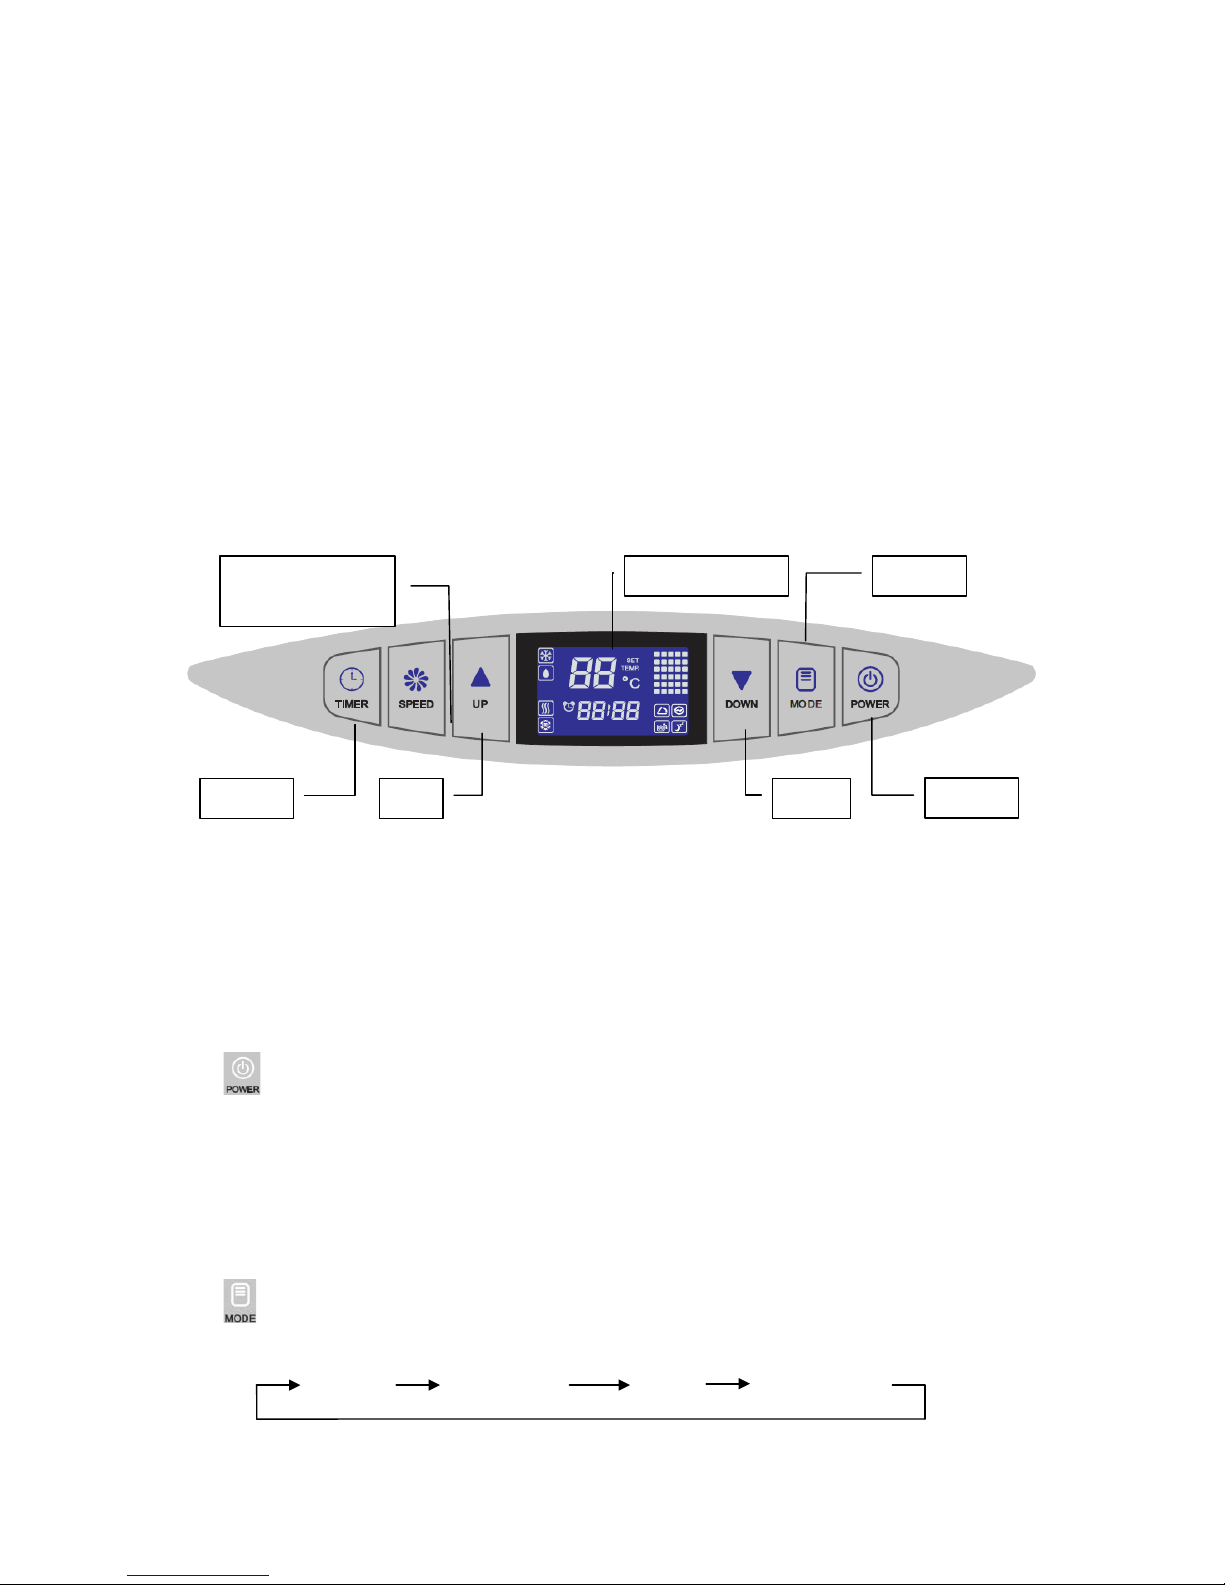
1. Control Panel
This section explains proper mobile air conditioner operation.
Slant Panel of Adapter
Page 5

2. Control Panel Operation
This unit is with Cooling, Heating, Dehumidifying, Fan and Energy Conversation & Sleep modes
operations.
1) Energize the Unit: Plug in and all icons in LCD display window will light up for 2 seconds and
reminding music will be on , then LCD d ispla y windo w will s how am bient tem per ature wit h range 5 35℃ (41-95℉),unit is standby for operation.
2)
:Touch this key to turn on the unit, rem inding m usic is sounded, and unit runs under cool ing
mode automaticall y with set tem perature 22℃(72℉), fan runs in medium speed. Touch this key
again, unit will be off and reminding music will sound.
A. When unit is on, LCD display window will show ambient temperature, fan starts running and air outlet
window will open automatically.
B. When unit is off, all parts stop working, air outlet window will close automatically.
3)
:
Touch this key to switch and select un it w orking mode you want, a ll modes turn as below f or
your confirmation.
COOL DEHUMIDIFY FAN Energy Conversation
Operating
Modes
COOL
Temperature
Setting Range
16℃--30℃(60℉
--86℉)
DEHUMIDIFY
----- -----
FAN
----- -----
Energy
Conversation
Temperature
Setting Range
16℃--30℃(60℉
--86℉)
4) and
:
A. T ouch
or to increase or decrease the temperature 1℃or 1℉ by pressing once.
B. Touch
or over 2 seconds to continuous ly increase or decreas e the temperature num ber by
0.5 second interval, temperature setting range is 16~30℃/60~86℉。
C. Touch
and together in same tim e to convert Celsius degrees and Fahrenhei t degrees. (℃
Fan Speed
Timer
Up
Display Window
Down
Mode
Power
Page 6

←→℉ transition).
D. T ouch
or in TIMER status to adjust time setting.
5)
:
touch this key to change fan running speed to High speed 、Medium speed or Low speed.
。
A. Under COOL
and FAN modes, fan running speed can be adjusted by below order,
B. Under TRY
mode, fan will be forced to run at low speed , temperature can’t be adjusted.
C. Fan speed will be unc hanged if unit operated bet ween COOL and Fan modes, that m eans if fan
running at low speed u nder FAN mode, the fan spee d will k eep sam e when unit c hanged to CO OL
mode; if fan running at high speed under COOL mode, it would keep sam e when unit chang ed to
FAN mode.
D. Fan will be forced running at low speed under Dehumidify and Sleep modes and fan speed can’t be
adjusted.
6)
:
Touch this key to set unit auto turn-on /turn-off time, to check or cancel time setting.
A. T his unit is des igned with 2 4-hour timer,
first two digits are f or hours 00-24, and last two
digits are for minutes 00-60. Y ou can increase or decrease half an hour each time by touching
or
to finish hour and minute setting.
B. You can set unit AUTO OFF time when it is running. Or set unit AUTO ON time when unit is standby.
Once timer setting is OK,
will be lighting till the time you set is over and will be
off.
C. You can touch
again to re-set time when TIMER f unction is on. The TIMER is s ubject to the
final time setting. And TIMER would be ineffective and
would be off if any operation from
control panel or remote control to turn on or turn off the unit.
+ : Start SLEEP Function by touching + in the same time under COOL or HEAT
mode,
in LCD screen will be on; re-touch + to stop “Sleep” function, will be off.
Sleep function will be ineffective under FAN or DEHUMIDIFY mode.
7) + :Turn on or turn off Auto-Swing by touching + . Horizontal louvers will swing
automatically when unit starts working, touch
+ together to turn off auto-swing, in LCD
screen will be off. Re-touch
+ together to turn on auto-swing, in LCD screen will be on
again.
Page 7

8) Other functions
A. Energy saving:Background light in LCD screen will light up for 10 seconds then automatically off if
you touch any key when unit is energized or background light is off.
B. Auto-clean
:Unit will start and keep three minutes before off under COOL, D EHUMIDIFY
modes.
C. Energy Conversation: Low energy consumption under Energy Conversation mode.
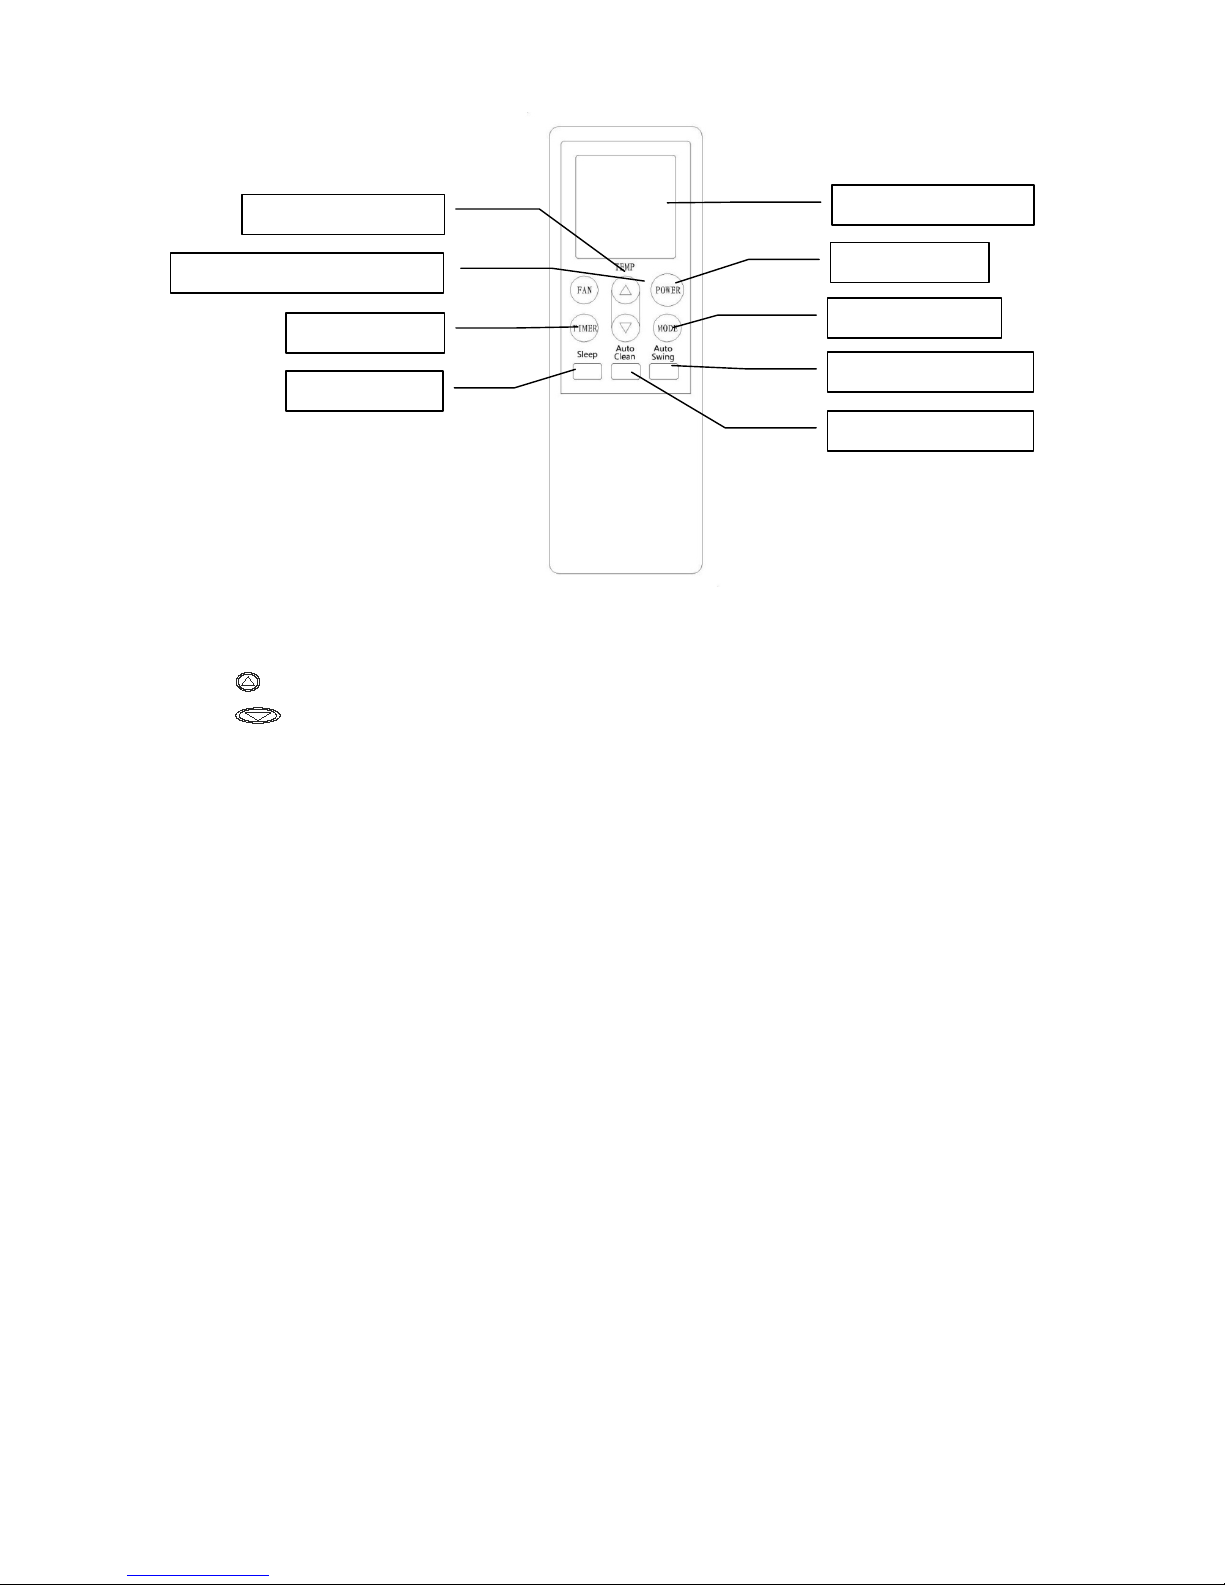
3. Remote Control Operation
1) Power: Press this button to start the unit when it is energized or stop the unit when it is in operation.
2) Mode: Press this button to select operation mode.
3)
: Press this button to increase room temperature and timer setting.
4)
: Press this button to decrease room temperature and timer setting.
5) Fan: Press this button to select fan speed in sequence: Low → Medium → High.
6) Auto-Swing: Press this button to turn on or turn off auto-swing function.
7) Sleep: Press th is button to select or ca ncel sleep mode (on ly effective under cooling operation or
energy conversation modes).
8) Timer: press this button to set AUTO-ON and AUTO-OFF time. Time can be adjusted between
0.5-24 hours. It jumps by 0.5 hour interval within 5 hours, and 1 hour interval over 5 hours, set time
will flash 5 times on screen then confirm the setting.
Before using your remote, install the AAA batteries into remote control.
1) Press and glide the battery cover on the back of the remote control, then you can remove the cover.
2) Insert two ne w alkaline AAA batteries into the b attery compartment, be ing sure to note the proper
polarity.
Reattach the battery cover, making sure the locking tab clicks into place.
Up and down button
Fan speed button
Timer button
Sleep button
LCD display window
Power button
Mode button
Auto-swing button
Auto-clean button
Be sure to note proper
polarity of batteries
Page 8

Notes:
Use alkaline batteries only. Do not use rechargeable batteries.
When replace batter ies, always replace bot h batteries with new batt eries, do not mix old and ne w
batteries.
If the air conditioner will not be us ed for an extend ed period of time, remove the batteries from the
remote control.
4. Remote Control Storage
1) Insert remote controller into built-in compartment in left side of unit, and push it gently for closure.
2) Press the lower part of built-in compartment gently to open it and take out remote controller.
Note: In order to avoid losing the remote control, please put the remote control inside of the storage
place when you not use it.
WARNING
If the liquid from the batteries gets onto your skin or clothes, wash it well with clean water, do not use
the remote control if the batteries have any leakage.
If you eat the liquid from the batteries, brush your teeth and see doctor. The chemicals in batteries
could cause burns or other health hazards.
Remote Control Hold direction
Open and Close Direction
Remote Control
Remote Control Box
Page 9

Installation & A dj ustment
1. Installation
Notes:
Keep this mobile air-conditioner in upright position at least 2 hours before first installation.
This air-conditioner may be moved indoor conveniently; keep the unit in upright position while
moving it. The air-conditioner shall be placed at flat surface.
Do not install or operate this air-conditioner in bathroom or other wet environments.
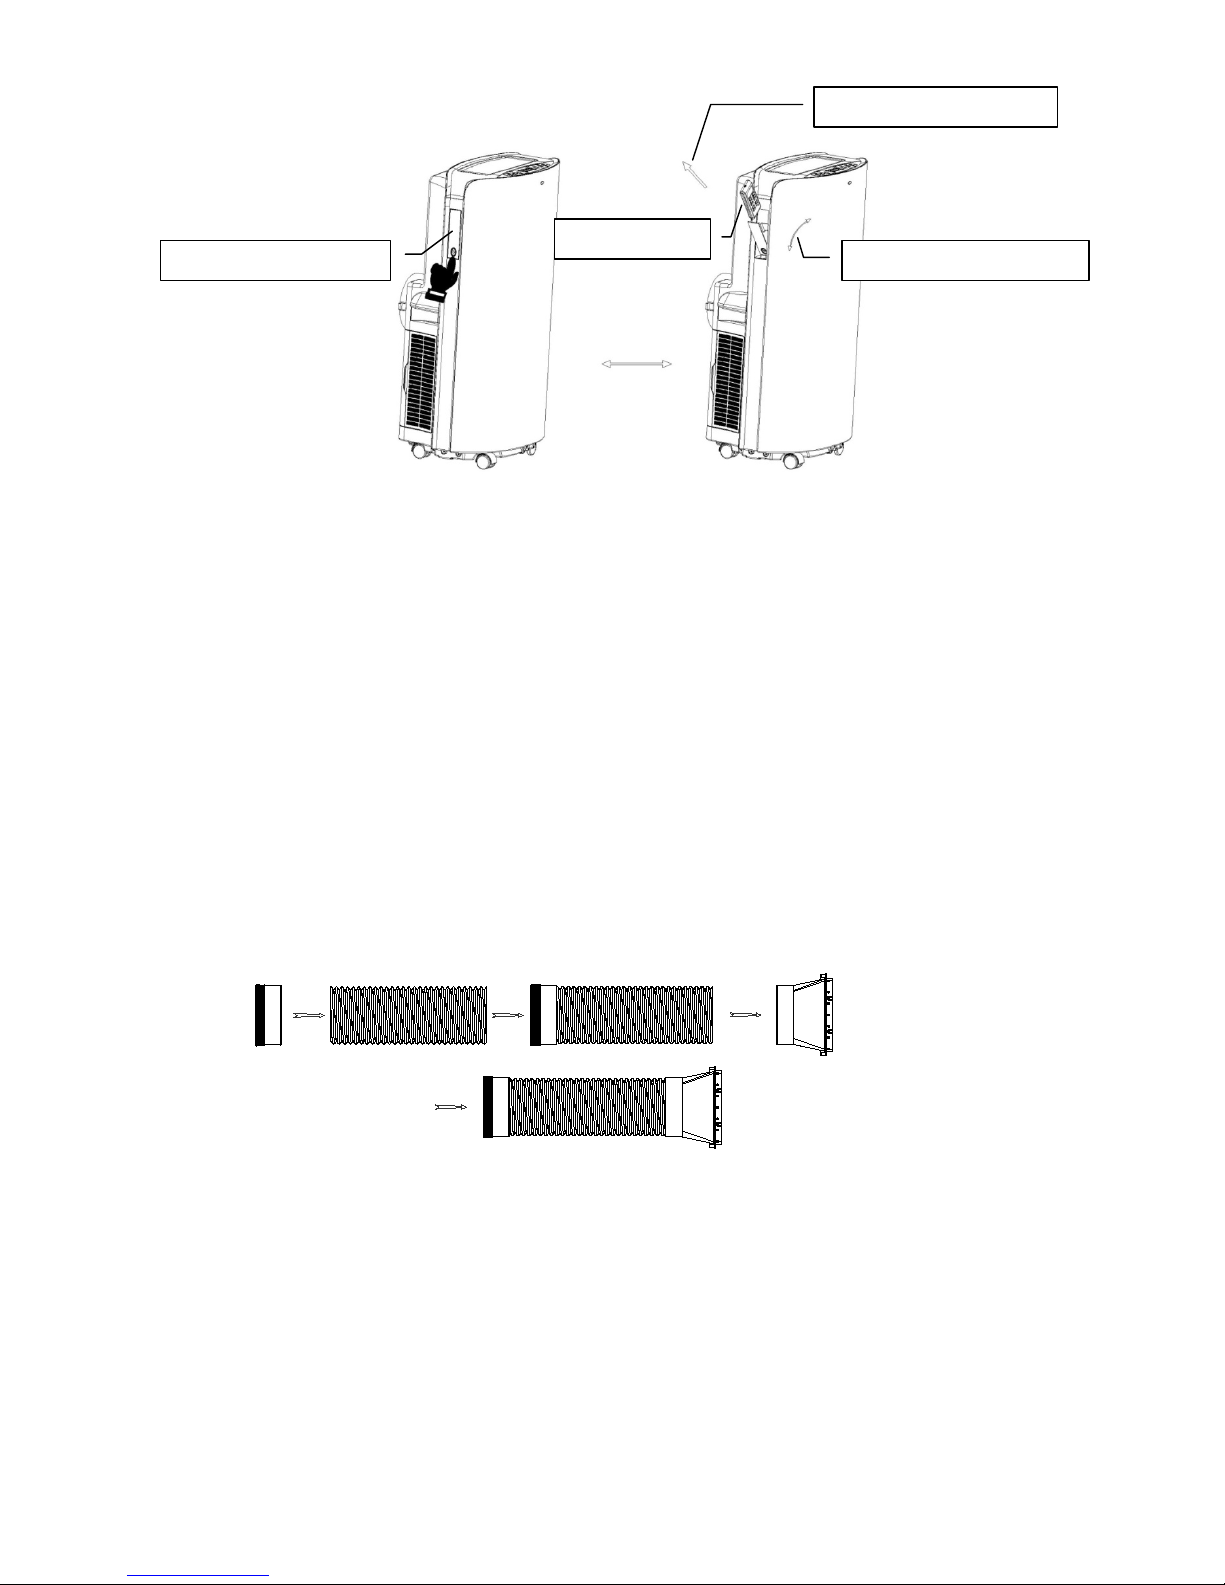
1) Installation of exhaust hose assembly and its adapter.
A. Take out the exhaust hose and its connector and adapter, to remove the plastic bag.
B. Extend one end of exhaust hose, screw the end without slot of round connector onto it with
anticlockwise direction at least 3 laps.
C. Extend another end of exhaust hose, screw th e adapter onto it with anticlockwise direction at
least 3 laps.
Note: Screw round connector and adapter into right position, at least 3 laps, to keep good connection
of exhaust hose assembly.
2) Installation of exhaust hose assembly to main unit.
Put front end of exhaust hose assem bly onto jugged position of exhaust air outlet at back panel,
fasteners will lock the exhaust hose assembly.
Note:
Keep the right direction of slant side of adapter, for ease installation of window seal-plate.
Keep exhaust hose connected in good position.
3) Installation of window seal-plate
A. Make the window half open, put the seal-plate into window, either in vertical or horizontal position.
Fastener
Slot
Exhaust Hose - Assembly
Page 10

B. Extend s ea l pla te par ts and adj us t it t o t he length of windo w, keep both e nds t o meet window edge,
fix it with screws then.
Note:
Keep two ends of window seal-plate to meet the window edges well, to assure seal effect.
Turn the screw in good position.
4) Installation of the unit
A. Move the unit with the exhaust hose assembly installed in front of window and keep the unit at least
50cm away from the walls or other objects.
B. Install the recta ngle en d of exhaust hose assembly into the corresponding r ec tangle hol e in win dow
seal-plate assembly, fix it with screw and close the window.
Note:
Slide the adapter do wn war ds and assur e adapt er installed in goo d pos iti on.
Assure the slant panel direction to match seal-plate dir ec tion .
Exhaust h ose cannot be bent or with flexure hi gher tha n 45°, in order to keep go od ventilat ion
of exhaust hose.
Page 11

Important notes:
The exhaust hose is 280mm-1500mm long and this length is determined based on the specification
of the air-conditioner (s). Do not use prolonged the hose or replace it with other different hoses as
this may affect the functions of the air-conditioner. The exhaust hose must be smooth or it may lead
air-conditioner overheat and damage.
Drainage Instruction
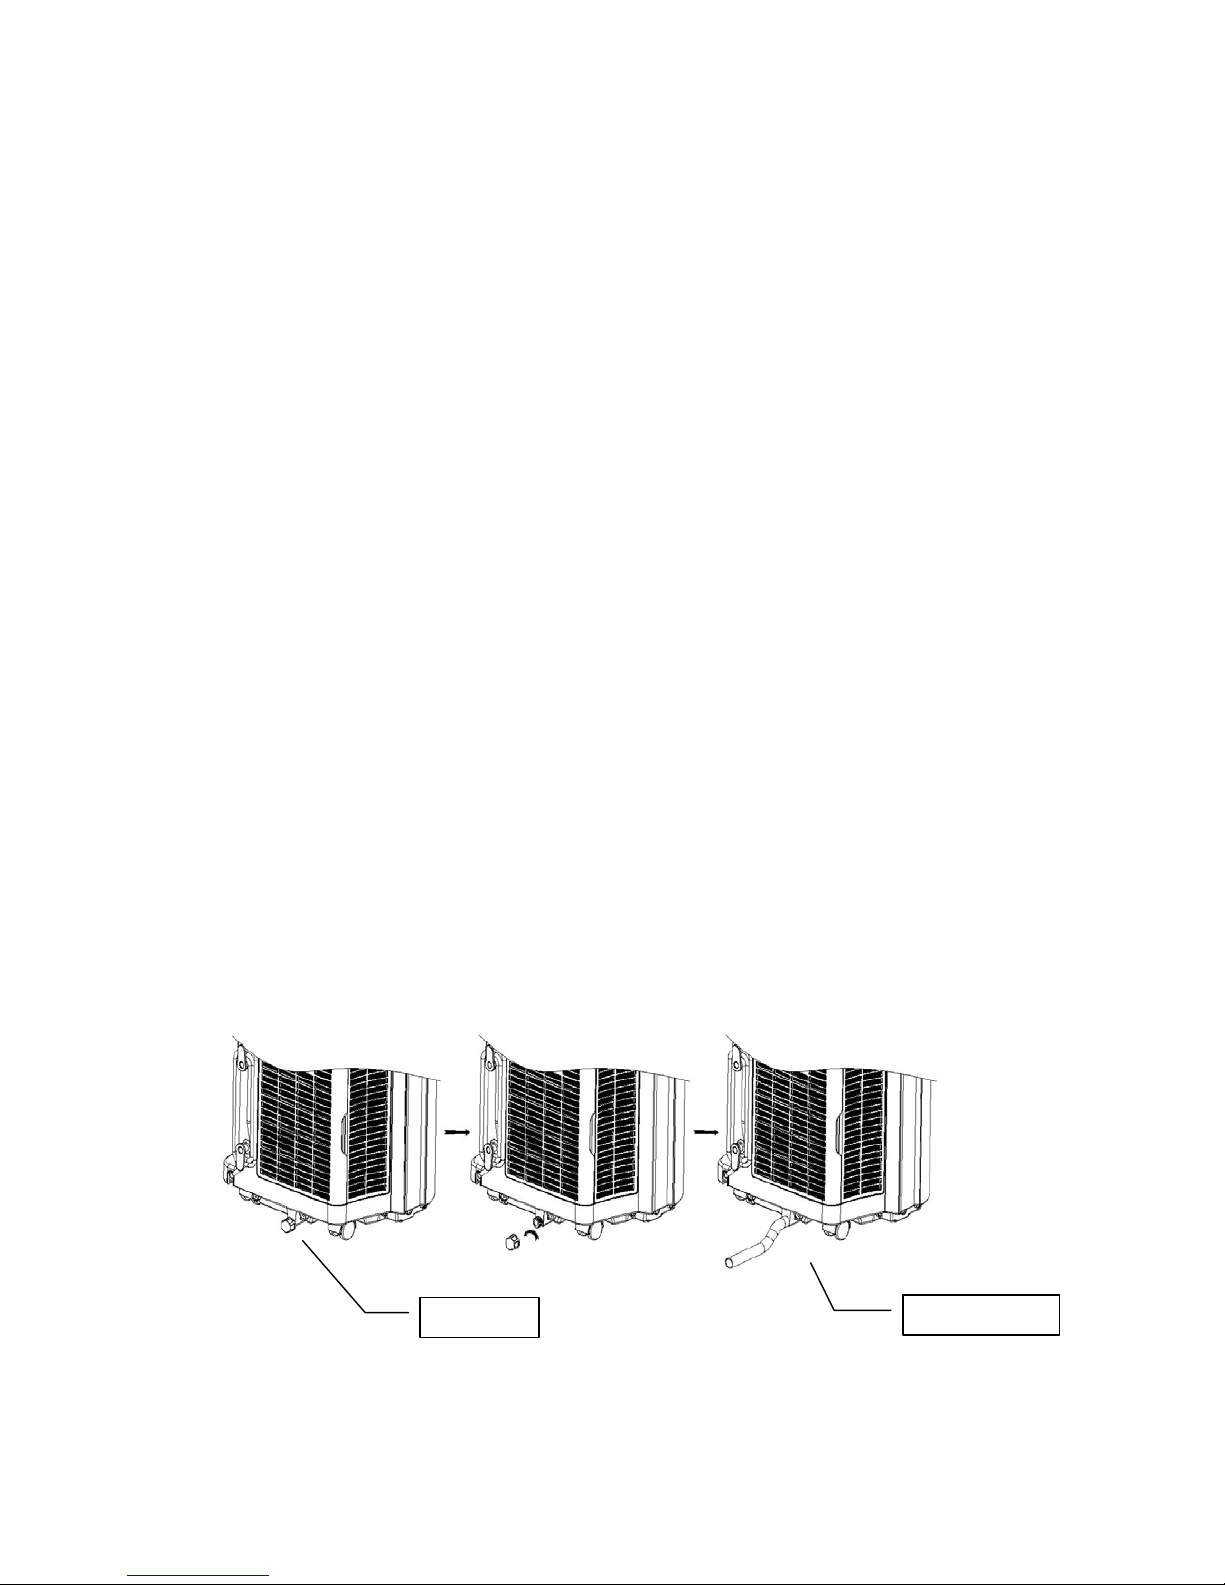
1. Manual drainage:
1) Once the unit shuts down upon water-full, turn off the unit and then unplug.
2) Put the tray below the water outlet at the back of the unit.
3) Screw off the drain cover, unplug the water stopper for water flow into the tray.
4) Plug in stopper and screw the drain cover tightly onto water outlet after drainage.
Notes:
Protect the drain cover and water stopper properly.
Move the unit carefully to avoid the leakage it is necessary .
Tilt the unit slightly backwards when draining.
Block the drain hole as soon as possible before the tray is full if it cannot hold all water in the unit to
prevent the water leakage and wet the floor or carpet.
Water stopper and drain c o ver must be tightly installe d , to av oi d n e w co nde ns ate t o wet th e f loor or
carpet when the unit re-starts working.
2. Continuous drainage
1) Screw off the drain-cover & unplug the water stopper.
2) Connect drain-hole with φ12mm drain hose, as deep as possible to avoid leakage.
3) Pull the drain hose to bathroom or outdoor.
Notes:
Drain hose must be installed when there’s no water in the tray.
It is suggested that n ot to use conti nuous drainag e when unit is in COOL mode, to ensure enough
water recycle in the unit to enhance the system cooling effects.
Put the drain hose i n an inaccessible place, not higher tha n drainage hole and keep drain hose
straight without any flexure.
Keep the drain cover and its stopper properly when continuous drainage is adopted.
Drain Cover
Drain hose
Page 12

Multiple protection functions
1. Anti-frozen protection function
Under COOL mode, when the compressor continuousl y runs o v er 10 minutes, if tube tem per atur e
is ≦2℃/36℉ for 20 seconds, the a nti-frozen protec tion function will be o n, E4 will be shown o n
LCD display, compressor and water wheel motor will stop working, but upper fan remains
running; If tube temper atur e≧8℃/46℉, the unit will stop anti-frozen protection and r ecover t o the
original working condition. Compressor will re-start working with 3 minutes delay for protection.
2. Water-full safety alarm and shut –off protection function
When the water volume exceeds its alarm level in chassis, warning sounds automatically and
water-full icon
is lighting in LCD disp lay, you need to drain the condensate and re-start the
unit. (For m ore information about h ow to drain, refer t o the “Drainage I nstruction” please). If the
unit is not shut down m anually, the unit will recover to the original operati ng status automaticall y
once the water is fully drained. Or connect the power to re-start the unit again.
3. Delay protection function of compressor
This unit offers restart protection to compressor. Except that the compressor may start immediately
when the unit is energized first time, there is 3-minute delay re-start protection after compressor is
shut down.
Maintenance and Service
Note: Be sure to turn off the unit and pull out the plug before maintain or send to service center.
1. Surface cleaning
1) Clean the un it surface with wet soft cloth and do not use chemical so lvents such as alcohol and
gasoline to avoid any damage to unit.
2) Clean the dirty air outlet or louvers with wet soft cloth and detergent.
3) Any chemical solvent is prohibited to use for unit cleaning or put such things near the unit for a long
time.
4) Any thinner, alcohol-glazer or other similar solvents is prohibited for unit cleaning.
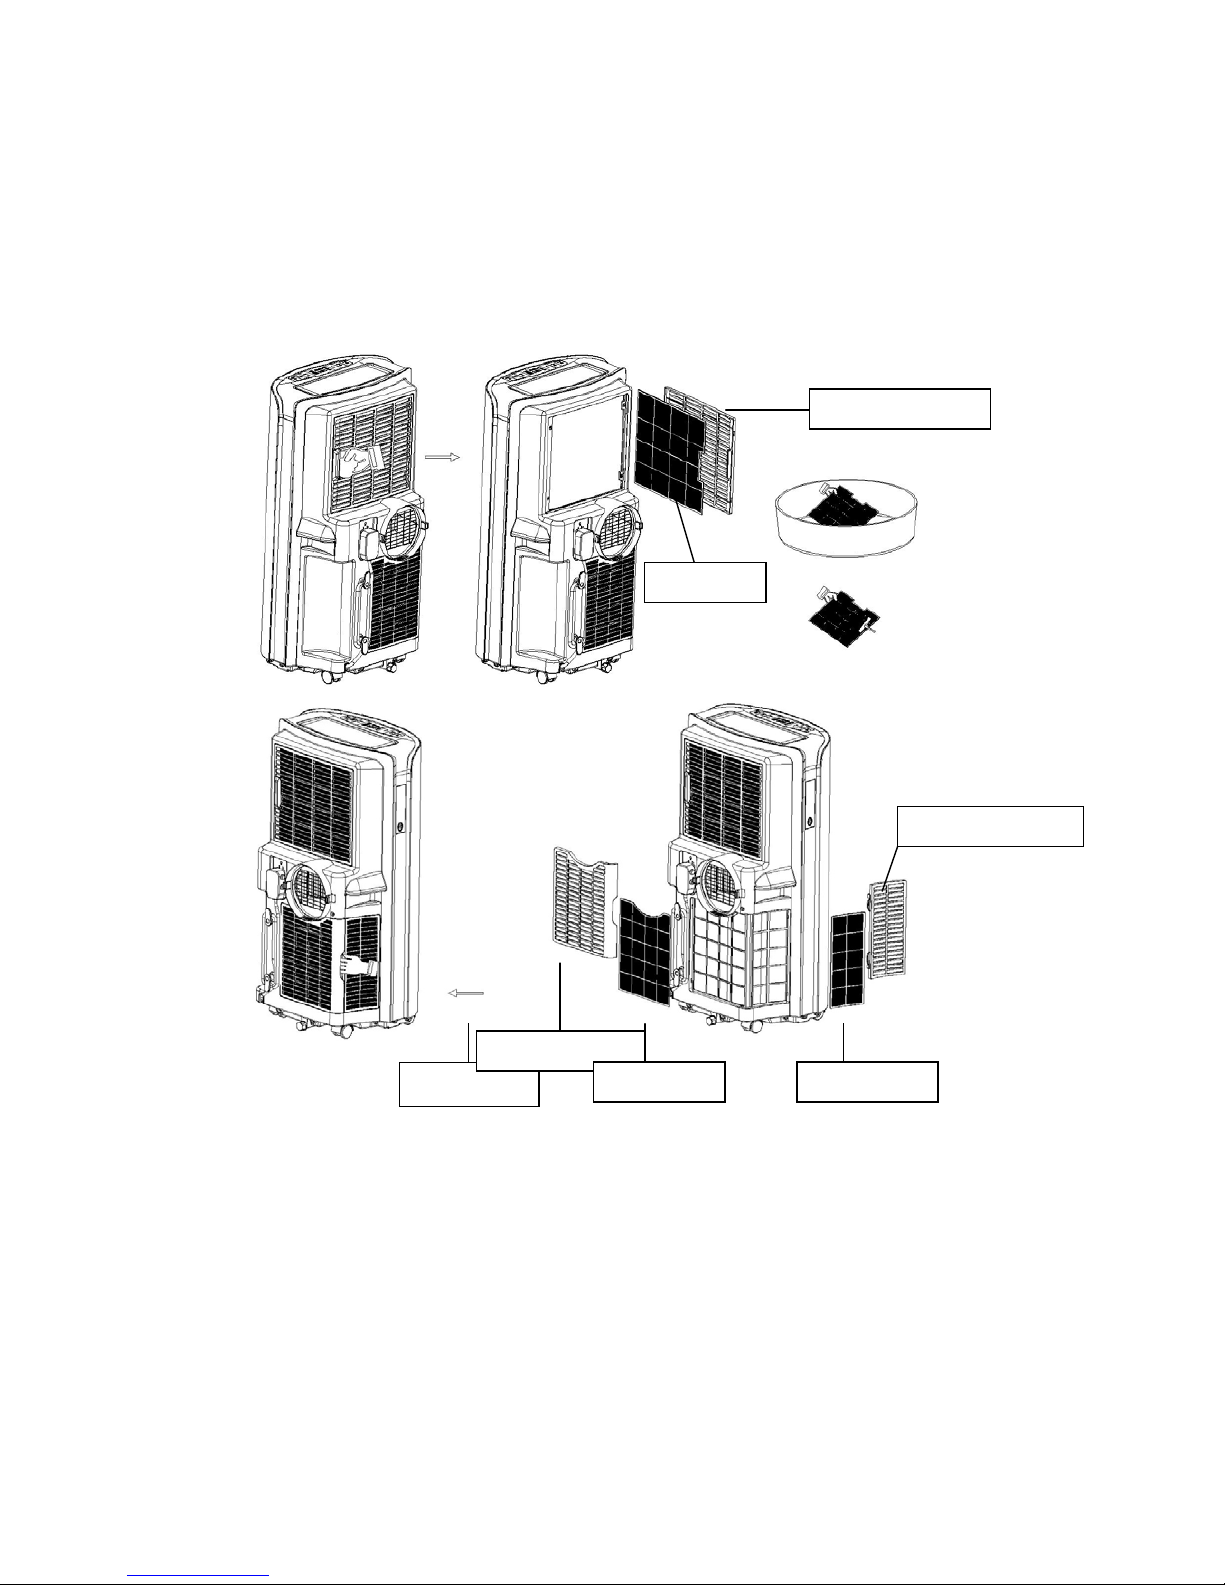
2. Filter cleaning
Clean the filter once every two weeks, or it would influence the unit function if filter clogged with dust .
1) How to clean filter
A. Grip the filter handle and pull it out gently in correct direction.
B. Clean the dirty particles in filter by cleaner if it is necessary.
C. Immerse and wash the f ilter gently into warm water (abou t 40℃) mixed with ne utral cleaner,
and then rinse and dry them thoroughly in the shade.
Notes:
Pull out the filter gently.
Removal of filter at bac k panel is at priority then for the filter at side panel, to avo id any twist or
damage to filter.
Page 13

Do not squash the mesh.
Do not hit the mesh with sharp objects or brush.
3. Installation of the filter
Aim the end of the filter toward slot then push filter gently into slot.
Notes:
Be sure to install the filter to side panel then for the filter to back panel.
Install the filter with opposite direction of removal.
Install the filter into place gently to avoid any damage to filter.
4. End of Season Storage
1) Screw off the dr ain c over and pull out th e sto pper to d rain co ndens ate water completely. (Note: the
tilt angle of the unit must be≦30
).
2) Keep unit running in fan mode f or half day to dry inside of unit c ompletely to prevent from going
moldy.
3) Turn off the unit, pull out plug then wr ap the power cord around the wire-winding pillar, insert the
plug into the universa l fixing ho le at the b ack panel of the unit , install the water stopper and drai n
cover.
Upper Filter
Upper Filter frame
Push direction
Lower filter frame
Lower filter
Side filter
Side filter frame
Page 14

4) Remove the heat exhaust hose assembly, clean and keep it properly.
Notes:
Hold the exhaust hose assembly with both hands when removal.
Push the fasteners aside on exhaust air outlet using your thumbs, then pull out exhaust hose
assembly.
5) Pack the air-conditioner properly with soft plastic bag and put it in dry place with appropriate
dust-proof measures, and keep the unit away from children.
6) Ta ke out the batteries from the remote control and keep it properly.
Note:
Assure the unit is stored in a dry place. All accessories of the unit shall be protected together properly.
Troubleshooting
Please check the unit and suggestions below before asking for professional service, but never
dismantle or repair the unit by yourself, it may cause harm to you and your property.
Trouble Cause Remedy
The unit fails to
start up
Power supply failure
Connect the unit to a live socket and
turn it on.
Water-full and its icon lighting Drain the water stored in the unit.
Ambient temperature too low
or low high
It is recommended to use this unit
between 7-40℃
The room temperature is lower
than the set temperature in
cooling mode or higher
temperature in heating mode
Change the set temperature
Bad cooling
effects
There is direct sunlight Close the window curtain
The doors and windows are
open, the room is crowded or
there are other heat sources
Close the door and window, remove
other heat sources, and add new
air-conditioners
Dirty filter Clean or replace the filter mesh
Air inlet or air outlet clogged Remove the obstruction
High noise level
The unit is being placed at
uneven surface.
Put the unit at a flat and firm place
(may reduce noise)
The compressor
does not work
Initiation of overheat
protection.
Wait until the temperature decrease,
the unit will re-start automatically
The remote
control does not
work
Too long distance
Bring the remote control close to the
air-conditioner and ensure airs at
signal receptor on unit.
The remote control didn’t aim
at signal receptor on unit.
The batteries have no
electricity
Replace the batteries
“CH01” code
displays
Room temperature sensor
failure
Check the room temperature sensor
and related circuits
“CH02” code
displays
Tube temperature sensor
failure
Check the tube temperature sensor
and related circuits
“E4” code
displays
Anti-freeze protection
Restore the functions automatically
once anti-freeze protection is over.
Page 15

Displays
Water tank in chassis is full
Drain the condensate and re-start the
unit
Appendix
Power Supply V~, Hz 220~240,50
Cooling Capacity
Btu/h 12,000
W 3,520
Refrigerant/Charge /g R410A/560
Rated Input Cooling W 1,350
Rated Current Cooling A 6.20
Moisture Removal L/h 1.4
Air Circulation m³/h 430
Noise
High dB(A) 55
Middle dB(A) 53
Low dB(A) 50
Body Size W×H×D mm 471×850×355
Package Size W×H×D mm 540×888×398
Net Weight/Gross Weight kg 33.5 /37.5
Application Area ㎡ 16~22
Fuse Parameter
Type: FSD or 50F
Voltage: 250V
Current: 3.15A
Page 16

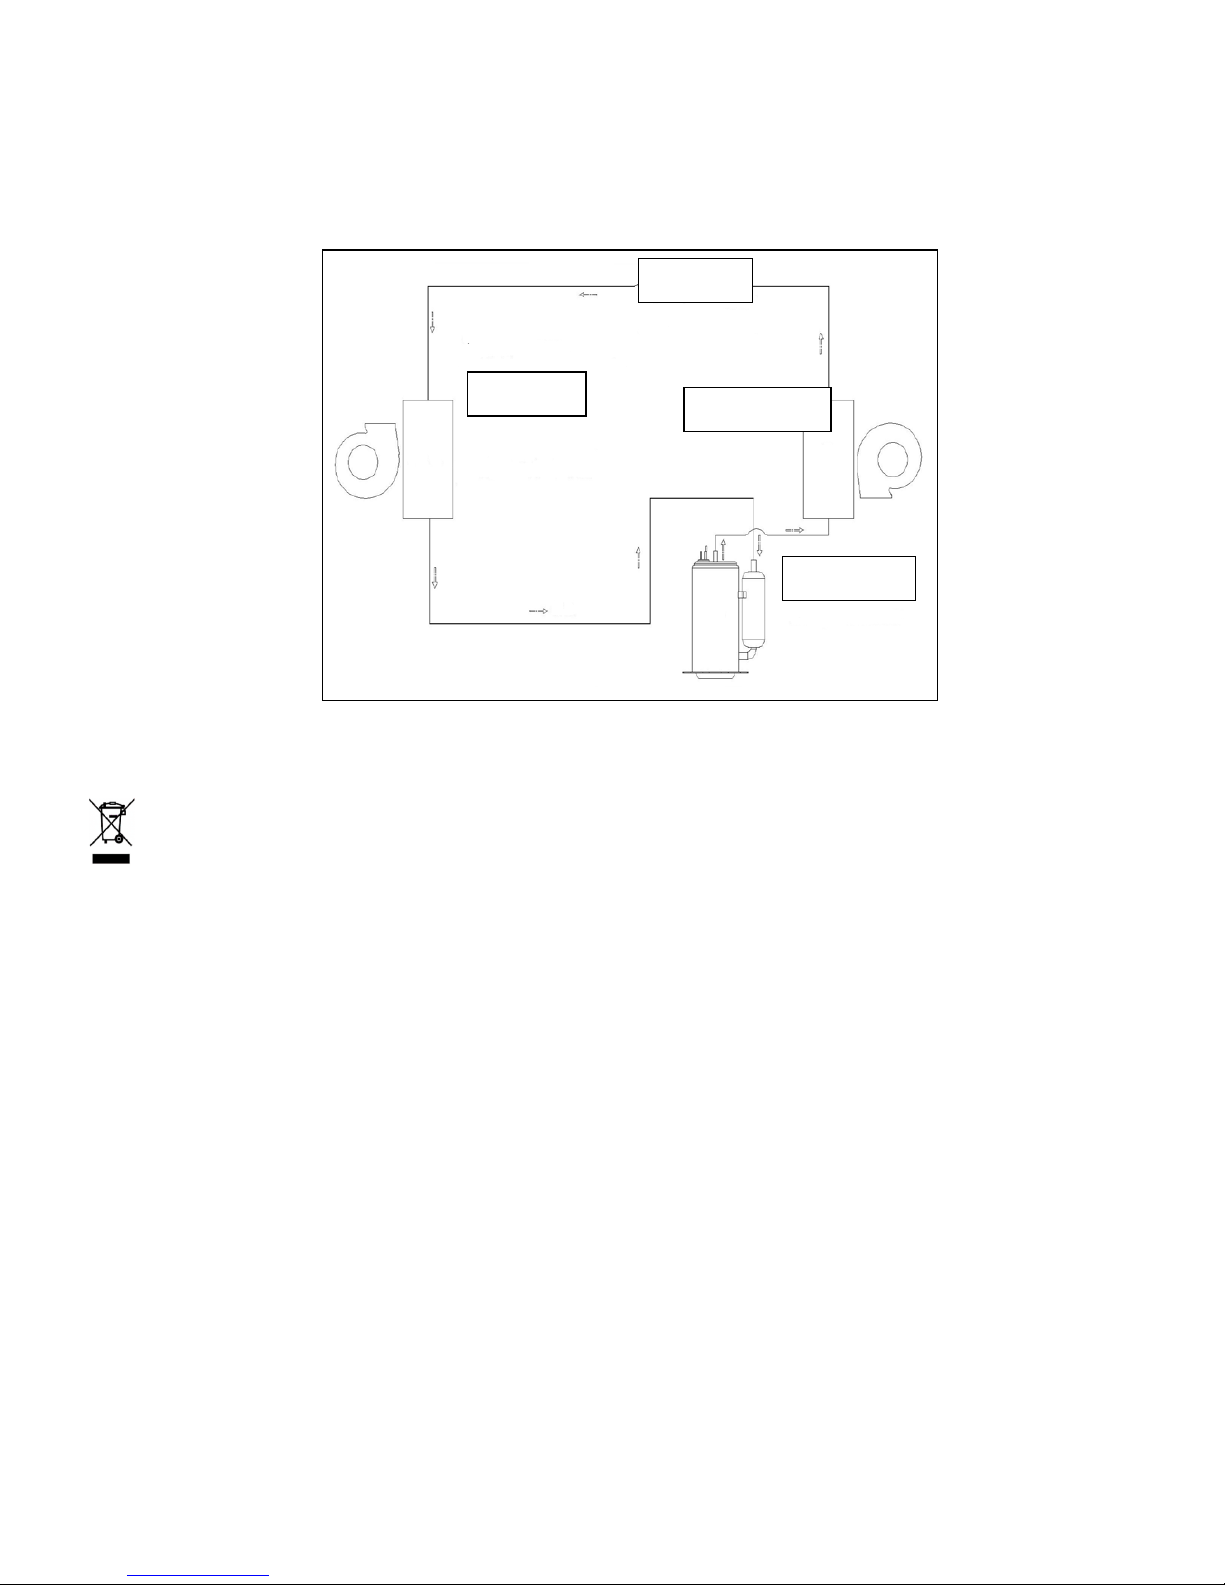
Schematic diagram of the air-conditioner
For specific technical parameters of the model, refer to rating label on the product.
ENVIRONMENT
CAUTION :
Do not dispose of this product as it has with other household products. There is a
separation of this waste product into communities, you will need to inform your local
authorities about the places where you can return this product. In fact, electrical and
electronic products contain hazardous substances that have harmful effects on the
environment or human health and should be recycled. The symbol here indicates that
electrical and electronic equipment should be chosen carefully, a wheeled waste container
is marked with a cross.
Manufactured and imported : Adeva SAS 8 rue Marc Seguin 77290 Mitry-Mory FRANCE
www.hkoenig.com - contact@hkoenig.com - Tel 01 64 67 00 01
Evaporator
Condenser
Compressor
Capillary
Page 17

FRANÇAIS
Merci d´avoir choisi notre climatiseur portable, lisez attentivement ce manuel avant de l´utiliser et
conservez-le afin de pouvoir vous y référer en cas de besoin.
Instructions de sécurité
Caractéristiques électr iques
1. L´appareil doit être com pat ible avec votre installati on électrique et i nsta llé par un pr ofes sionnel qualifié.
En cas de doute quan t aux instructions de ce m anuel, contactez un électricien qui sera capable de vous
conseiller.
2. Respectez les règles de sécurité en vigueur lors de l´installation de l´appareil. Vérifiez que l ´appareil est
compatible avec votre installation électrique.
3. Pour votre sécurité, cet appareil est connecté à un fil de terre qu´il est conseillé de connecter à une prise
compatible. Si vous n´êtes pas sûr que la prise est connectée à la terre, faites le vérifier par un électricien. Si
le câble d´alimentatio n est endommagé, n´utilise z surtout pas l´appareil et f aites remplacer le câble par le
fabricant ou un réparateur agréé pour faire en sorte que la réparation se fasse en toute sécurité.
4. Cet appareil n'est pas dest iné à être utilisé par des pers onnes présent ant des capac ités réduit es sur le
plan physique, mental ou sensoriel ou b ien manquant d'expérience ou de connaissance, (y compris les
enfants), sauf s'il le ur a été dem andé de surve iller ou si el les ont eu des instructions concernant l'utilisatio n
de l'appareil par une personne responsable de leur sécurité. Les enfants doivent être surveillés pour
s'assurer qu'ils ne jouent pas avec l'appareil.
AVERTISSEMENTS:
Pour réduire le risque d´incendie, électrocution ou blessure pendant son utilisation, suivez à tout moment les
instructions ci-dessous :
Ne jamais utiliser dans un environnement humide (en extérieur ou dans une salle de bain, etc)
L´appareil est uniquement prévu pour être utilisé en intérieur.
N´enlevez pas la branche de mise à la terre.
N´utilisez pas un adaptateur.
N´utilisez pas de rallonge.
La prise de courant doit être exclusivement à l´appareil.
Ne jamais brancher ou débrancher le courant avec des mains mouillées ou hum ides pour éviter les
électrocutions.
Ne jamais débrancher l´appareil en tirant sur la prise.
Débranchez l´appareil avant de commencer l´entretien.
Ne jamais démonter, réparer ou modifier l´appareil pour éviter de vous blesser ou d´endommager
l´appareil ; faites intervenir un professionnel.
Ne jamais insérer un objet dans l´appareil.
Ne jamais couvrir l´appareil ou obstruer les ventilations pour éviter la surchauffe.
Ne jamais frapper ou secouer l´appareil pour éviter de l´endommager.
Ne pas pulvériser l´appareil avec de l´eau ou tout autre liquide pour éviter tout risque d´électrocution.
Ne pas placer l´appareil près d´un appareil au gaz, une source de feu ou bien près de substances
inflammables.
Déplacez l´appareil à deux pour éviter de vous blesser ou bien de l´endommager.
Page 18

Ne laissez pas les enfants jouer trop près de l´appareil.
Si le cordon d'alim entation est endom magé, il doit être remplacé a uprès d'un Se rvice après-v ente afin
d'éviter tout danger.
Précautions
Utilisez l´air conditionné à un mètre minimum de la télévision pour éviter les interférences.
Ne laissez pas l´appareil exposé à la lumière directe du soleil pour éviter toute décoloration.
Ne pas pencher l´appareil à plus de 35 degrés ou à l´envers pour le déplacer.
Placez l´appareil sur une surface plane propre et avec mois de 5 degrés d´inclinaison.
Gardez le tuyau d´évacuation bien dégagé, ne pas le plier ou l´encombrer.
L´appareil est plus effic ace lorsque insta llé dans la positio n la plus adéquate, vois les conseils f ournis
dans ce manuel.
Videz le réservoir avant de ranger l´appareil pendant une période de temps prolongée ou une fois la
saison passée.
Ne pas utilise de solvants (Benzène, alcool, etc.) pour nettoyer la surface de l´appareil.
Les produits abrasifs pourraient rayer l´appareil.
Débrancher l´appareil avant de manipuler le filtre.
Note: ne pas utiliser de la fonction d´air conditionné par températures supérieures à 35℃.
Caractéristiques et composants
1. Caractéristiques
Nouvelle apparence avec un design compacte, plus luxueux et haut de gamme.
Télécommande, panneau de control avec affichage LCD et écran tactile pour un control facile.
L´appareil est équipé d´un programme de refroidissement de l´air, d´un ventilateur, un déshumidificateur
et un mode veille.
La sortie d´air a trois pos itions : vertica le, oscillatoire et horizontale. Vous pouvez ferm er la sortie d´air
pour éviter l´accumulation de poussière.
Télécommande intégrée avec un compartiment pour la ranger.
Poignées ergonomiques permettant une bonne prise en main.
Le support permet de ranger le câble d´alimentation et le garder en parfait état.
La position de l´évacuation rend le montage facile et la ventilation rapide.
Intelligent, écologique et économique pour préserver l´environnement grâce à l’auto-évaporation du
système de refroidissement.
Horloge de 24-hour avec alarme musicale.
Start différé (3 minutes).
Page 19

2. Composants
1. Panneau frontal
2. Censeur télécommande
3. Panneau de contrôle
4. Panneau supérieur
5. Persienne horizontale
6. Panneau décoratif droit
7. Filtre supérieur
8. Rangement de la télécommande
9. Panneau décoratif gauche
10. Câble d´alimentation
11. Rembobinage
12. Filtre infé r ie ur
13. Cache de l´évacuation
14. Roue univers elle
15. Accès latéral au filtre
16. Grille protectrice
17. Fermoir
18. Poignée
19. Connecteur de l´évacuation d´eau
20. Tuyau d´évacuation
21. Adaptateur du tuyau d´évacuation
22. Ouverture
Adaptateur
Page 20

Programmes et réglages
1. Panneau de contrôle
Cette section explique comment utiliser l´appareil.
2. Panneau de contrôle
Modes : refroidissement, chauffage, déshumidificateur, ventilateur économie d´énergie et veille.
1) Allumer l´appareil: toutes les icones s´allument sur l´écran LCD pendant 2 seconds et l´alarme
sonne, l´écran LCD affiche une température comprise entre 5 et 35℃ (41-95℉).
2) :Touchez ce bouton pour allumer l´appareil, l´larme sonore retenti, le mode refroidissement se
déclenche automatiquement avec une température par défaut de 22℃(72℉), et le ventilateur sur
vitesse moyenne. Appuy ez sur le bouton à nouveau, l´appareil s´éteint.
A. Quand l´appareil est allumé, l´écran LCD affiche la température ambiante, le ventilateur se
déclenche et la sortie d´air s´ouvre automatiquement.
B. Quand l´appareil est éteint, les composants s´arrêtent et l´évacuation d´air se ferme.
3)
:
Appuyer sur ce bouton pour modifier le mode, ils s´affichent dans l´ordre ci-dessous.
FROID DESHUMIDIFIER FAN Conversation d´énergie
Modes
FROID
Température
16℃--30℃
(60℉--86℉)
DESHUMIDIFIER
----- -----
VENTILATEUR
----- -----
Conservation
d´Energie
Température
16℃--30℃
(60℉--86℉)
4) et
:
A. Appuyer sur ou pour augmenter ou baisser la température de 1℃ ou 1℉.
B. Maintenir ou appu yé pendant 2 secondes pour baiss er ou augmenter la température de
manière continue par interv all es de 0.5 secondes entre 16~30℃ / 60~86℉。
Vitesse du ventilateur
Horloge
Plus
Panneau d´affichage
Moins
Mode
Power
Page 21

C. Appuyez simultanément sur et pour permuter entre degrés Celsius et Fahrenheit.
(℃←→℉ transition).
D. Appuyez sur ou en mode TIMER pour ajuster la m inuterie.
5)
:
Appuyez sur cette touche pour changer la vitesse du ventilateur. Rapide 、Moyenne
Lente.
A. Modes froid et ventilateur : ajustez la vitesse du ventilateur selon l´ordre ci-dessous :
B. Mode es sai : le ventilateu r est forcé de travailler à la vitesse minim um , la température ne
peut être ajustée
C. La vitesse du ventilateur ne changera pas si vous permutez entre les modes froid et ventilateur, si le
ventilateur fonctionnait à vitesse minimum en mode ventilateur, il fonctionnera à la même vitesse en
mode froid, si le ventilateur fonctionne a haute vitesse en mode froid, il fonctionnera à haute vitesse
en mode ventilateur.
D. Le ventilateur est forcé de travailler à la vitesse minimum en mode de Déshumidification et Veille. La
vitesse ne pourra pas être changée.
6)
:
Appuyer sur ce bouton pour activer et désactiver le TIMER ou annuler les réglages.
A. L’appareil est éq uipé d´une horloge de 24h, les deux premier s chiffres r eprésentent les
heures (00-24), et les 2 autres affichent les minutes (00-60). Vous pouvez régler l´horloge par
tranche de 30 minutes en m aintenant les boutons ou bien minute p ar pressions répétées sur les
touches et/ou .
B. Vous pouvez programmer l´arrêt automatique de l´appareil en activant la fonction AUTO OFF quand
l´appareil est allum é. Et vous pouvez auss i pro gr am m er le démarrage automatiq ue d e l´a pp ar ei l e n
activant la fonction AUTO ON lorsqu´il est éteint. Une fois le TIMER programmé, l´icone
restera allumée jusqu´à ce que le temps réglé soit écoulé avant de s´éteindre.
C. Vous pouvez appuyer sur le bouton à nouveau pour le program mer à nouveau. L´horloge
prendre en compte le dern ier réglage. L´horloge pe ut être désactivée et l´icone éteinte
depuis le panneau de control et avec la télécommande.
+ : Démarrer la fonction Veille en appuyant simultanément sur + que ce soit
en mode Froid ou en Ventilateur, l´icône s´affichera sur l´écran LCD; appuyez à nouvea u
simultanément sur + pour désactiver le mode veille, l´icone disparait. Le mode veille
ne fonctionne pas en mode ventilateur et déshumidificateur.
7) + :Activez et désactivez l´oscillation automatique du ventilateur. + : les persiennes
Page 22

horizontal oscilleront lorsque vous allumerez l´appareil, appuyez simultanément sur +
pour arrêter l´oscillation automatique, l´icône disparaît de l´écran LCD. Si vous appuyez
simultanément sur
+ pour allumer l´oscillation automatique, l´icône s´affiche sur
l´écran LCD.
8) Autres fonctions/modes
A. Economie d´énergie:l´éclairage de l´écran LCD s´éteint au bout de 10 secondes si vous appuyez
sur un bouton pendant que l´appareil est allumé.
B. Netto yage automatique :L´icône s´affiche pendant 3 avant la fin des modes F roid et
Déshumidifier.
C. Basse consommation: consomme moins d´énergie pendant le mode basse consommation.
3. Mode d´emploi de la télécomm ande
1) ON/OFF: Pressez ce bouton pour allumer ou éteindre l´appareil.
2) Mode: Pressez pour sélectionner le mode.
3)
: Pressez le bouton pour augmenter le température et l´horloge.
4)
: Pressez le bouton pour diminuer le température et l´horloge.
5) Ventilateur: Pressez le bouton pour sélectionner la vitesse du ventilateur dans la séquence
suivante: Bas → Medium → Haute.
6) Oscillation automatique: Pressez le bouton pour activer et désactiver l´oscillation automatique.
7) Veille: Pressez le bo uton pour activer e t désactiv er la fonc tion veille (d isponib le uniquem ent avec
les modes refroidissement et économie d´énergie).
8) Timer : appuyez sur ce bouton pour déclencher la fonction automatique AUTO-ON et
AUTO-OFF. Cette fonction peut être programmée entre 30 m inutes et 24 heures . Pour un
Boutons plus et moins
Vitesse du ventilateur
Bouton Horloge
Bouton veille
Écran LCD
Bouton ON/OFF
Bouton Mode
Bouton Oscillation automatique
Bouton nettoyage automatique
Page 23

fonctionnement de la c limatisation d’une durée inférieure ou égale à 5h, le choix de son
activation se fait par tranche de 30 minutes. Pour un fonctionnement de la climatisation d’une
durée supérieure à 5h, le choix de son activation se fait par tranche de 1h. Choisissez
l’intervalle, l’écran clignotera 5 fois pour la confirmation.
Avant d´installer les piles AAA dans la télécommande.
1) Appuyez et faites glisser le couvercle du compartiment à piles, à l´arr ière de la télécommande
pour la retirer.
2) Insérez deux piles alcalines AAA dans le compartiment, en respectant la polarité.
Refermez le couvercle jusqu´à entendre un click confirmant la fermeture.
Notes:
Utilisez uniquement des piles alcalines, les batteries rechargeables ne sont pas compatibles.
Remplacez toujours les deux piles, ne pas laisser une pile usée avec la nouvelle.
Si vous ent endez ne pas utiliser l´air conditionné p endant une lo ngue période d e temps, enleve z
les piles de la télécommande.
4. Rangement de la télécommande
1) Insérez la télécommande dans le compartiment prévu à cet effet sur le côté de l´appareil et
refermez-le.
2) Pressez la petite porte du com partim ent de rangement pour l´ouvrir et retirer la télécom mande.
Note: Afin d´éviter de perdre la télécommande, assurez-vous de toujours la remettre dans son
compartiment de rangement lorsque vous ne vous en servez pas.
ATTENTION
Si le liquide des piles venait à se renverser et couler sur votre peau, ou vos vêtements, rincez à
abondamment à l´eau claire, et n´utilisez pas la télécommande.
Si vous veniez à ingérer le liquide des piles, lavez vos dents et consultez un docteur d´urgenceLes
produits chimiques peuvent être nocifs.
Attention à la polarité des
piles
Page 24

Installation & Réglages
1. Installation
Notes :
Laisser l´air conditionnel à la verticale pendant au moins 2 heures avant de l´installer.
Cet appareil peut se déplacer facilement, maintenez le à la verticale pendant que vous le déplacez.
Utilisez-le sur une surface stable et plane
Ne pas utiliser dans la salle de bain ou toute autre pièce humide.
1) Comment installer le tuyau d´évacuation.
A. Sortez le tuyau d´évacuation et son connecteur du sac plastique.
B. Étendez le tuyau d´évacuation et vissez l´extrémité dans le sens inverse des aiguilles d´une
montre au moins trois tours.
C. Étendez l´autre extrém ité du tuyau d´évacuation et vissez l´embout dans le sens inverse des
aiguilles d´une montre au moins trois tours.
Note: Vissez l´extrémité ronde et l´adaptateur sur l´appareil et tournez au moins 3 tours pour le fixer
en place.
Pour retirer la télécommande
Pour ouvrir et fermer
Télécommande
Compartiment de rangement
pour la télécommande
Page 25

2) Fixation du tuyau d´évacuation.
Fixez le tuyau d´évacuation assemblé sur le support prévu à cet effet à l´arrière de l´appareil.
Note:
Garder le côté à angle droit pour le fixer à la fenêtre.
Gardez le tuyau d´évacuation correctement placé sur le support de fenêtre.
3) Installation du support de fenêtre.
A. Entrouvrez la fenêtre, placez le support de fenêtre à la verticale ou à l´horizontal e.
B. Ajustez le support en place et vissez le en place.
Note:
Faites en sorte que le support soit bien calé de part et d´autre de la fenêtre.
Serrez le écrous en place.
4) Installez l´appareil.
A. Rapprochez le tuyau d´évacuation de la fenêtre et gardez l´appareil à une cinquantaine de
centimètres du mur ou d´autres objets.
Support
Encoche
Tuyau d´évacuation assemblé
Page 26

B. Installez la partie rectangul aire du tuyau d´évac uation sur le support d e fenêtre, fixez-le a vec les
écrous fournis et fermez la fenêtre.
Note:
Assurez vous que le support est correctement calé et n’en bouge pas.
Ajustez bien le support à la fenêtre pour qu´elle puisse bien fermer.
Ne pas plier le tuyau d´évacuatio n à plus de 45° pour assur er une bonne év ac uat ion de l´ai r.
Notes importantes:
Le tuyau d´évacuation mesure 280mm de large et 1500mm de long, ça longueur est adaptée à l´air
conditionné. N´utilisez pas de rallonge sur le tuyau d´évacuation et ne le remplacez pas par un autre
tuyau d´évacuation, il pourrait ne pas être adapté et affecter l´efficacité de l´appareil. L´évacuation
doit être facile et naturelle, sans encombre.
Instructions pour l´évacuation de la condensation
Évacuation manuelle:
1) Une fois le réservoir plein l appareil s’éteint, débranchez –le.
2) Tirez le tiroir anti goutte à l’arrière de l´appareil.
3) Videz l´eau dans le tiroir anti-goutte.
4) Refermez soigneusement pour éviter les fuites.
Notes:
Déplacez l´appareil avec soin pur éviter de renverser de l´eau.
Penchez l´appareil vers l´arrière si besoin pour éviter les fuites.
Arrêtez l´évacuation de l´eau avant que le tiroir ne soit rempli. Le tiroir ne peut contenir toute l´eau
du réservoir, vous devrez vous y prendre à plusieurs fois.
Page 27

Vérifiez que l´évacuation et bien refermée pour éviter les fuites une fois que l´appareil ne
redémarre.
2. Evacuation continue
1) Dévissez l´évacuation.
2) Connectez un tuyau de φ12mm.
3) Laisser déverser dans un lavabo ou vers l´extérieur.
Notes:
Installer le tuyau d´évacuation quand le réservoir est vide.
Il est déconseillé d´utiliser le drainage continu lorsque vous êtes en mode FROID, pour faciliter le
refroidissement.
Placez le tu yau d´évacuation dans une position stab le et sans l´enrouler, pas plus haut que la
sortie d´évacuation.
Surveiller l´évacuation à tout moment.
Fonctions multiples
1. Mode anti-gel
En mode FROID, lorsque le compresseur fonctionne pendant plus de 10 minutes, si le tuyau est à
moins de ≦2℃/36℉ pendant 20 secondes, le mode anti-gel se déclenche. E4 s´affiche à l´écran
LCD et le compresseur s´arrête. Si le tuyau est à ≧8℃/46℉, le mode anti-gel se coupe. Le
compresseur reprend au bout de 3 minutes.
2. Mode de réservoir plein
Lorsque le niveau de l´eau est haut, une alarme vous prévient et l´icone s´affiche sur l´écran
in LCD. Il est nécessaire d´évacuer l´eau et réinitialiser l´appareil. Si vous ne redémarrez pas
l´appareil, le mode encle nché avant l´affichage du dr ainage, repren dra une fois le rés ervoir vide.
Mode de sécurité pour protéger le compresseur.
L´appareil redém arre pour protég er le c om pres seur. Le compress eur peut dém ar rer à l´ allum age,
il peut y a voir un délai de 3 minutes avant de redémarrer le compresseur.
Entretien et nettoyage
Évacuation
Tuyau d´évacuation
Page 28

Note: Toujours débrancher l´appareil avant l´entretien.
1. Nettoyage de l´extérieur de l´appareil.
1) Nettoyez l´extérieur de l´appareil av ec un ch iffon doux et très légèrem ent hum ide. Ne p as uti liser
de solvants (alcool, essence, etc) pour éviter les dommages.
2) Nettoyer les sorties d´air avec un chiffon et du détergent doux.
3) Ne pas mettre des solvants à proximité de l´appareil.
4) Ne pas mettre des solvants en contact avec l´appareil.
2. Nettoyage du filtre
Nettoyer le filtre toutes les deux semaines pour éviter de l´encombrer de poussière.
Comment nettoyer le filtre
A. Retirez le filtre en tirant sur la poignée.
B. Nettoyer le filtre avec un peu de détergent.
C. Immergez le filtre dans l´eau savonneuse et tiède (40℃
) rincez et séchez soigneusement
.
Notes:
Retirez le filtre avec précaution.
Le filtre à l´arrière de l´appareil doit être retiré avant le filtre latéral.
Ne pas écraser le grillage du filtre.
Ne pas utiliser d´objet coupant sur le grillage.
Filtre supérieur
Grille du filtre
Direction de pousse
Grille du Filtre inférieur
Filtre inférieur
Filtre lateral
Grille du filtre lateral
Page 29

3. Installation du filtre
Poussez le filtre jusqu´à ce qu´il s´enclenche en place.
Notes:
Assurez-vous d´installer le filtre latéral avant le filtre arrière
Installer le filtre dans le sens opposé de celui dans lequel vous l´avez retiré.
Soyez soigneux pour installer le filtre afin de ne pas l´abimer.
4. Rangement hors-saison
1) Retirez toute l´eau du réservoir. (Note: Penchez à un angle de≦30
).
2) Laissez le ventilateur tourner pendant une demi journée pour sécher l´appareil.
3) Éteignez l´appareil, enlevez l a prise et enroulez le câble.
4) Retirez le tuyau d´évacuation.
Notes:
Attention à ne pas laiss er c oul er de lé au du tuyau lorsque vo us le démont e z.
Ouvres les persiennes pour laisser passer l´air.
5) Couvrez l´appareil avec u n sac plastique et gardez dans un endroit sec et hors de portée des
enfants.
6) Enlevez les piles de la télécommande.
Note:
Gardez l´appareil dans un endroit sec. Tous les accessoires doivent être rangés dans un endroit sec et
propre.
Dépannage
Essayez une des sol utions ci-dessous en cas de prob lèm e, si cela n e suffit pas portez l´a pparei l à un
professionnel pour le réparer.
Problème Cause Solution
L´appareil ne
démarre pas
La prise ne marche pas
Branchez l´appareil sur une prise
active.
Le réservoir est plein Évacuez l´eau.
Température ambiante trop
basse ou trop haute
Utilisez l´appareil avec une
température ambiante entre 7 et 40℃
La température de la pièce es t
plus basse que celle
sélectionnée en mode
refroidissement ou plus haute
en mode chauffage
Changez la température
Basse efficacité
de
refroidissement
Exposition au soleil Fermez la fenêtre
Les fenêtres son ouvertes, la
pièce est encombrée ou il y a
trop de sources de chaleur.
Dégagez les alentours de l´appareil et
fermez les fenêtres
Filtre sale Nettoyer le filtre
Prise d´air bouchée Dégagez la prise d´air
Appareil bruyant
L´appareil st sur une surface
instable.
Placez l´appareil sur une surface plane
et stable
Page 30

Le compresseur
ne fonctionne
pas
Mode de sécurité –
anti-surchauffe.
Attendez que la température descende
et le compresseur redémarrera
La
télécommande
ne fonctionne
pas
Trop loin
Rapprochez la télécommande de
l´appareil
Le signal n´est pas dirigé vers
le capteur
Plus de piles Remplacez les piles
“CH01” s´affiche Mauvaise lecture de la
température de la pièce
Vérifiez les senseurs
“CH02” s´affiche Mauvaise lecture de la
température du tuyau
Vérifiez les senseurs
“E4” s´affiche
Protection anti-gel
L´appareil reprendra normalement une
fois le mode anti-gel sera fini.
s´affiche
Le réservoir est plein
Videz le réservoir et redémarrez
l´appareil
Informations
Puissance V~, Hz 220~240,50
Capacité de Refroidissement
Btu/h 12,000
W 3,520
Refroidissement /Puissance /g R410A/560
Apport Refroidissement W 1,350
Courant Refroidissement A 6.20
Anti-humidité L/h 1.4
Circulation de l´air m³/h 430
Bruit
Haut dB(A) 55
Moyen dB(A) 53
Bas dB(A) 50
Dimensions de
l´appareil
W×H×D mm 471×850×355
Dimensions du
packaging
W×H×D mm 540×888×398
Poids Net/Poids brut kg 33.5 /37.5
Surface d´utilisation ㎡ 16~22
Page 31
Paramètre fusible
Type: FSD ou 50F
Voltage: 250V
Courant: 3.15
Schéma diagramme de lair-conditionné
Pour des spécificités techniques sur l´appareil, consultez l´étiquette de l´appareil.
ENVIRONNEMENT
ATTENTION :
Vous ne devez pas vous débarrasser de cet appareil avec vos déchets ménagers. Un système
de collecte sélective pour ce type de produit est mis en place par les communes, vous devez
vous renseigner auprès de votre mairie afin d'en connaître les emplacements. En effet, les
produits électriques et électroniques peuvent contenir des substances dangereuses qui ont
des effets néfastes sur l'environnement ou la santé humaine et doivent être recyclés. Le
symbole ci-contre indique que les équipements électriques et électroniques font l'objet d'une
collecte sélective, il représente une poubelle sur roues barrée d'une croix.
Fabriqué pour et importé par : Adeva SAS 8 rue Marc Seguin 77290 Mitry-Mory FRANCE
www.hkoenig.com - contact@hkoenig.com - Tél. 01 64 67 00 01
Evaporateur
Condensateur
Compresseur
Capillaire
Page 32
DEUTSCH
Vielen Dank, dass Sie sich für dieses neue M odell der mobilen Klim aanlage ent schieden haben . Bitte
lesen Sie vor der ersten Inbetriebnahme diese Bedienungsanleitung sorgfältig durch. Bitte bewahren Sie
die Bedienungsanleitung immer zum Nachschlagen auf.
Sicherheitshinweise
Elektrische Vorgaben
1. Alle Stromleitungen müssen den lokalen und nationalen Vorschriften entsprechen und von
einem qualifizierten Elektrofachmann installiert worden sein. Wenn Sie Fragen zur der
nachstehenden Anleitung haben, kontaktieren Sie bitte einen Elektrofachmann.
2. Das Gerät muss in Übereinstimmung mit den nationalen Vorschriften für elektrische Anlagen
installiert werden. Über prüf en S ie d ie verf ügbar e Str o mversorgung und lösen Sie all e Prob leme der
Stromleitungen vor der Installation und dem Betrieb dieses Geräts.
3. Zu Ihrer Sicherheit und Schut z, wird diese Einheit durch das Ansc hließen des Netzkabels in eine
passende Steckdose geerd et. Wenn Sie nicht sicher si nd, ob die Stec kdosen in I hrem Haus richtig
geerdet sind, wenden S ie sich bitte an einen E lektrofachmann. Nehm en Sie kein Gerät m it einem
defekten Netzkabel in Betr ieb. Defekte Kabel müssen vom Hersteller, dessen Kundendienst oder
einer ähnlich qualif i zierte n Pers on ers et zt werde n, um eventu el le Gefahr e n zu ver meiden.
4. Dieses Gerät ist nicht für Personen (einschließlich Kindern) mit eingeschränkten physischen,
sensorischen oder ge istigen Fäh igkeiten oder M angel an Erf ahrung und W issen geeign et und darf
von diesen nur unter Beaufsichtigung oder mit Hilfe einer für die Sicherheit verantwortlichen Person
bedient werden. Kleine Kinder müssen beaufsichtigt werden und dürfen nicht mit dem Gerät
spielen.
WARHINWEIS:
Um Feuer, Stromschlag oder Verletzungen während des Gebrauchs Ihrer Klimaanlage zu vermeiden,
folgen Sie diesen Vorsichtsmaßnahmen:
Verwenden Sie dieses Gerät nicht in der Nähe v on Wasser oder S pritzwass er, z.B. im Freien,
Pool, Badewanne oder Dusche, etc., nur für Innenanwendung.
Entfernen Sie nicht den Erdungsstift.
Verwenden Sie keinen Adapter.
Verwenden Sie kein Verlängerungsk abel oder Vielfach st eckerleisten.
Teilen Sie nie die Steckdose mit anderen Geräten.
Stecken Sie den Netzstecken nie mit nassen Händen ein- oder aus, um Stromschläge zu
vermeiden.
Schalten Sie das Gerät nie durch Ziehen des Stromkabels aus.
Das Gerät darf bei sämtlichen Arbeiten am Gerät (Reinging etc.) nicht an einer Steckdose
angeschlossen sein.
Zerlegen, Reparieren oder ändern Sie das Gerät niemals ohne Genehmigung, um
Körperverletzungen oder Sachschäden zu vermeiden. Lassen Sie es nur vom Hersteller oder
qualifizierten Fachkräften reparieren.
Page 33

Stecken Sie niemals irgendwelche Gegenstände in das Gerät.
Wegen Überhitzungsgefahr des Geräts, bedecken oder blockieren Sie niemals den Luftein-
oder auslass.
Das Gerät nicht schlagen oder schütteln.
Sprühen Sie nie Wasser auf das Gerät bzw. stellen Sie es nicht in der Nähe von Wasser auf, um
Stromschläge zu vermeide n.
Stellen Sie das Gerät niemals in der Nähe von Gasgeräten, Feuer oder brennbaren Flüssigkeiten
auf.
Sie benötigen zwei oder mehrere Personen um die Klimaanlage zu bewegen oder zu installieren .
Lassen Sie Kinder nicht in der Nähe des Gerätes spielen.
Wenn das Netzkabel beschädigt ist, muss es mit einem Kundendienst ersetzt werden, um Gefahren
zu vermeiden.
Warnung:
Zur Vermeidung von elektromagnetischen Störungen, halten Sie das Gerät mindestens 1
Meter von TV oder Radio entfernt.
Setzen Sie das Gerät nicht direktem Sonnenlicht aus, um das Verblassen der Oberfläche zu
verhindern.
Kippen Sie das Gerät nicht mehr als 35 Grad und transportieren Sie es immer aufrecht.
Stellen Sie das Gerät immer auf einer geraden Oberfläche mit nicht mehr als 5% Neigung und
aufrecht auf.
Halten Sie den Abflussschlauch immer in gutem Zustand ohne ihn zu verbiegen und schließen ihn
dann an das Gerät an.
Das Gerät arbeitet in bestimmten Raumverhältnissen effizienter (Inbetriebnahme und Behebung).
Entleeren Sie den Entwässerungstopf bevor Sie das Gerät am Ende der Saison verstauen um so
die Lebensdauer zu verlängern.
Verwenden Sie für die Reinigung des Gehäuses auf keinen Fall chemische Lösungsmittel (z.B.
Benzol, Alkohol), kratzen oder beschädigen Sie nicht das Gerät.
Bitte versichern Sie sich, dass das Gerät von der Stromzufuhr getrennt ist, bevor Sie den Filter ab-
oder anmontieren.
Hinweis: Verwenden Sie das Gerät nicht im Kühlbetrieb, wen n die Umgebungstemperatur über 35 ºC
liegt.
Ausstattung und Beschreibung der Bestandteile
1. Ausstattung
Neues kompaktes Design, mehr Luxus und gehobene Klasse.
Die Fernbedienung & das Bedienfeld mit LED-Display und T astbildschirm erleichtern den Betrieb.
Das Gerät ist mit einer Kühlungs-, Lüftungs-, Entfeuchtungs- und Schlaffunktion ausgestattet.
Luftaustritt immer nach oben, die horizontalen Lamellen bewegen sich automatisch, die vertikalen
Lamellen können händisch verstellt werden. Der Luftauslass für das Fenster muss nach Gebrauch
bedeckt werden, damit kein Staub eintritt.
Page 34

Eingebautes Fach für die Aufbewahrung der Fernbedienung, einfache Lagerun g.
Griffe mit Cut-Point-Design machen das Gerät benutzerfreundlicher.
Die Kabelhalterung und die Universalsteckdose schützen das Netzkabel.
Hohe Positionierung des Luftauslasses, einfache Montage und schnelle Lüftung.
Ein intelligentes, umweltfreundliches und energiesparendes Kühlsystem mit Selbstverdampfung.
24-Stunden Timer-Funktion, Signalton zur Erinnerung für das Ein- und Ausschalten.
3-minütige Verzögerung bei erneutem Start zum Schutz des Kompressors und viele andere
Schutzfunktionen.
1. Beschreibung der Bestandteile
1. Frontplatte
2. Empfangsfenster Fernbedienung
3. Bedienfeld
4. Obere Abdeckung
Slant Panel of Adapter
Page 35
5. Horizontale Lamellen
6. Abdeckung rechte Seite
7. Oberer Luftfilter Rückseite
8. Fach für Fernbedienung
9. Abdeckung linke Seite
10. Netzkabel
11. Wickelsäule
12. Unterer Filter Rückseite
13. Verschluss für Kondensatöffnung
14. Rad
15. Seitliche Filter
16. Schutzgitter
17. Verschluss
18. Griff
19. Runder Anschluss Abluftschlauch
20. Abluftschlauch
21. Adapter von Abluftschlauch
22. Ausrüstungen für Fenster
Bedienung und Einrichtung
1. Bedienfeld
Dieser Abschnitt erklärt den richtigen Gebrauch der mobilen Klimaanlage.
2. Verwendung des Bedienfeldes
Das Gerät ist mit einer Kühlungs-, Lüftungs-, Entfeuchtungs- und Schlaffunktion ausgestattet.
1) Schließen Sie das Gerät an: St ecken Sie den Net zstecker in die Steckdose und al le Symbole des
LED-Display leuchten f ür 2 Sekunden auf und ein Ton ertönt. Danach zeigt das LED-Display die
Umgebungstemperatur im Bereich von 5-35º C (41-95ºF) an. Das Gerät ist bereit für den Betrieb.
2)
:Drücken Sie diese Taste zum Einschalten des Geräts, Ton ertönt. Das Gerät läuft automatisch
im Kühlmodus mit der Temperatur von 22℃ (72℉), Lüfter läuft auf mittlerer Geschwindigkeit.
Drücken Sie erneut die Taste um das Gerät auszuschalten. T on ertönt.
A. Ist das Gerät eingeschaltet, zeigt das LED-Display die Umgebungstemperatur an, der Lüfter
beginnt zu laufen und der Luftauslassfenster öffnet sich automatisch.
B. Ist es ausgeschaltet, stoppen alle Teile, die Luftauslassfenster schließen sich automatisch.
3)
:
Drücken Sie diese Taste und wählen Sie den gewün schten Modus aus. Durch mehrm aliges
Drücken der T aste wechseln Sie den Modus wie folgt.
KÜHLEN ENTFEUCHTEN LÜFTEN Energieeinsparung
Geschwindigkeit
Lüfter
Timer
Up
Display
Down
Mode
Power
Page 36

Betriebs-
Modus
KÜHLEN
Temperatur
Einstellbereich
16℃--30℃(60
℉--86℉)
ENTFEUCHTEN
----- -----
LÜFTEN
----- -----
Energieeinsparung
Temperatur
Einstellbereich
16℃--30℃(60
℉--86℉)
4) and
:
A. Drücken Sie oder um die Temperatur zu erhöhen oder zu verringern 1℃ oder 1℉ durch
einmaliges Drücken.
B. Halten Sie oder für mehr als 2 Sekunden gedrück t in einem 0,5 Sekunden Interval l um
die Temperatur und der Temperatur Einstellbereich liegt bei 16~30℃/60~86℉.
C. Drücken Sie und beide gleichzeitig um die Grad-Celsius auf Fahrenheit um zustellen.
(℃←→℉ Umstellung).
D. Drücken Sie oder im TIMER Modus um die Uhr einzustellen.
5)
:
Drücken Sie diese Taste um die Lüftungsgeschwindigkeit auf die höchste Geschwindigkeit 、
mittlere Geschwindigkeit oder niedrige Geschwindigkeit
einzustellen.
A. Unter KÜHL und LÜFTUNGS- Modus, kann die Lüftergeschwindigkeit in nachstehender
Reihenfolge eingestellt werden,
B. Unter TROCKEN Modus, läuft der Lüfter auf niedriger Geschwindigkeit , die Temperatur
kann nicht verstellt werden.
C. Die Lüftergeschwindigkeit bleibt unverändert solange das Gerät zwischen KÜHL- und
Lüftungsmodus läuft. D. h. wenn der Lüfter auf niedriger Geschwindigkeit im LÜFTUNGS-Modus
läuft, bleibt die Lüf tergeschwind igkeit gleich, wenn a uf den KÜH L-Modus um gestellt wird; wenn
der Lüfter auf hoher Geschwind igkeit im KÜHL-Modus läuft, würde sie gleic h bleiben, wenn auf
den LÜFTUNGS-MODUS ge wechs elt wir d.
D. Der Lüfter läuft automatisch auf niedriger Geschwindigkeit, wenn der Entfeuchtungs- oder
Schlafmodus eingestellt ist und der Lüf ter kann nicht v ers tellt werden.
6)
:
Drücken Sie diese Taste um das Gerät automatisch ein- oder auszuschalten, die Zeit zu
überprüfen oder die Zeiteins tellung zu lösche n.
Page 37

A. Dieses Gerät ist mit einem 24-Stunden Timer ausgestattet, die ersten beiden Ziffern
stehen für die Stunden 00-24 und die letzten beiden Ziffern für die Minuten 00-60. Durch
Drücken der oder Tasten können Sie jeweils ei ne halbe Stu nde er höhen oder verr ingern
und die Stunden- und Minuteneinstellung be end en.
B.
Sie können während das Gerät in Betrieb ist, eine AUTO OFF -Zeit einstellen . Oder eine AUTO
ON-Zeit einstellen wenn s ic h das G er ät im Sta ndbymodus befindet. Sobald die Timereinstellu ng
OK ist, wird es solange aufleuchten bis die eingestellte Zeit abgelaufen ist und
sich ausschalten.
C. Sie können die -Taste erneut drücken um die Zeit zu lösc hen während die T IMER-Funktion
eingeschaltet ist. Der TIMER dient zur Einstellung der endgültigen Zeit. Der TIMER wird
deaktiviert und ausgeschaltet sobald am Bedienfeld oder über die Fernbedienung das
Gerät ein-oder ausgeschaltet wird.
+ : Startet die SCHLAF-Funktion durch gleichzeitiges Drücken von + im
KÜHL-oder HEIZ-Modus, scheint auf der LED-Anzeige auf; durch erneutes Drücken von
+
stoppt die “Schlaf”-Funktion, erlischt auf der Anzeige. Die Schlaf-Funktion wird im
LÜFTUNGS- oder ENTFEUCHTUNGS-Modus deaktivert.
7) + :Schaltet das automatische Schwingen ein oder aus durch Drücken von + . Die
horizontalen Lamellen schwingen automatisch wenn das Gerät zu laufen beginnt. Drücken Sie
+ gleichzeitig um das automatische Schwingen auszuschalten, erlischt auf der
LED-Anzeige. Drück en Sie erneut
+ gleichzeitig um das automatische Schwingen
einzuschalten, scheint wieder auf der LED-An ze ige a uf .
8) Andere Funktionen
A. Energiesparen: Das Hinter grundlicht auf dem LED-Displa y leuchtet für 10 Sekunden auf
und schaltet sich danac h automatisch aus sobald Sie eine be liebige Taste drücken wenn
das Gerät eingeschaltet ist oder das Hintergrundlicht ausgeschaltet ist.
B. Automatisches Reinigen :Das Gerät startet und läuft für drei Minuten, im KÜHL
und ENTFEUCHTUNGSMODUS, bevor es sich ausschaltet.
C. Energieeinsparung: Niedriger Energiever brauc h unter Energ ie einsparungsmodus.
Page 38
3. Fernbedienung
1) Power: Drücken Sie diese Taste zum Ein- und Ausschalten des Gerätes.
2) Mode: Drücken Sie diese Taste zur Auswahl der verschiedenen Funktionen.
3)
: Drücken Sie diese Taste zur Erhöhung der Raumtemperatur und Zeit.
4)
: Drücken Sie diese Taste zur Verringerung der Raumtemperatur und Zeit.
5) Fan: Drücken Sie diese Taste zur Auswahl der Lüftergeschwindigkeit in der Reihenfolge:
Low (Niedrig) → Medium(Mittel) → High (Hoch).
6) Automatisches Schwingen: Drücken Sie diese Taste zum Ein- oder Ausschalten der
automatischen Schwing-Funktion.
7) Sleep: Drücken Sie diese Taste zum Ein- und Aussc halten des Sch lafmodus ( nur bei KÜHL-oder
ENERGIEEINSPAR-Modus möglich).
8) Timer: Drücken Sie diese Taste um die Zeit automatisch ein- (AUTO-ON) oder automatisch
auszuschalten (AUTO-OFF). Die Zeit kann zwischen 0,5 bis 24 Stunden gewählt werden. Sie
springt in 0,5 Stunden Intervallen bis zu 5 Stunden, ab 5 Stunden in 1 Stunden Intervallen; die
eingestellte Zeit blinkt 5-mal auf dem Display, dann ist die Einstellung bestätigt.
Bevor Sie die Fernbedienung benutzen, legen Sie AAA Batterien ein.
1) Drücken Sie zuerst den Deckel und s chieben Sie ihn an der Rück seite der Fern bedienung, da nn
können Sie den Deckel abnehmen.
2) Legen Sie zwei neue alkalische AAA Batterien in das Batteriefach ein und achten Sie auf die
richtige Polarität.
Geben Sie den Deckel wieder auf die Fernbedienung und vergewissern Sie sich, dass die
Verriegelungslasche richtig einrastet.
Up and down Taste
Lüftergeschwindigkeits-Taste
Timer Taste
Sleep T aste
LCD Anzeige
Power Taster
Mode Taste
Auto-swing Taste
Auto-clean Taste
Page 39

Anmerkungen:
Benutzen Sie nur alkalische Batterien. Verwenden Sie keine wieder aufladbaren Batterien.
Wenn Sie die Batterien austauschen, ersetzen Sie immer beide Batterien gegen neue
Batterien und mischen Sie nicht Alte mit Neuen.
Wird die Klimaanlage für einen längeren Zeitraum nicht benutzt, entfernen Sie die Batterien
aus der Fernbedienung.
4. Aufbewahrung der Fernbedienung
1) Legen Sie die Fernbedienung i n das Einbaufac h in der linken Seite des Gerät es ein und
drücken Sie es sanft zum Schließen.
2) Drücken Sie den unteren Teil des integrierte Einbaufachs sanft um es zu öffnen und
nehmen Sie die Fernbedienung heraus.
Anmerkung: Damit die Fernbedienung nicht verloren geht, geben Sie sie immer in das Fach wenn Sie
sie nicht verwenden.
WARNUNG
Kommt die Flüssigkeit aus den Batterie n m it der Haut oder Kle id ung in Ber ühr un g , wasc hen Sie es gut
mit sauberem Wasser ab. Verwenden Sie die Fer nbedienung nicht, wenn die Batterien aus laufen.
Wenn Sie die Flüssigkeit aus den Batterien essen, putzen Sie sich die Zähne und suchen Sie einen
Arzt auf. Die Chemikalien in den Batterien können Verbrennungen oder andere
Gesundheitsgefährdun gen verur s ac hen.
.
Vergewissern Sie sich, dass Sie die Batterien
mit der richtigen Polarität eingelegt haben.
Page 40
Inbetriebnahme & Einstellugen
1. Inbetriebnahme
Hinweise:
Die mobile Klimaanlage muss vor der ersten Inbetriebnahme mindestens 2 Stunden auf
seinem Platz aufrecht stehen.
Diese Klimaanlage kann bequem drinnen bewegt werden; halten Sie das Gerät immer in
aufrechter Position wenn Sie es bewegen. Die Klimaanlage muss auf einem ebenen
waagrechten Untergrund stehen.
Die Klimaanlage soll nicht im Badezimmer oder feuchten Umgebungen aufgestellt bzw.
verwendet werden.
1) Montage des Abluftschlauches und seine Adapter.
A. Nehmen Sie den Abluftschlauch und seine Aufsätze und Adapter heraus und entfernen Sie das
Plastik.
B. Ziehen Sie an einem Ende des Abluftschlauches , schrauben Sie das Ende mit dem runden
Anschluss (ohne den Schlitz) gegen den Uhrzeigersinn mit mindestens 3 Umdrehungen fest.
C. Ziehen Sie an dem anderen Ende des Abluftschlauches und schrauben Sie den Adapter gegen
den Uhrzeigersinn mit mindestens 3 Umdrehungen fest.
Anmerkung: Drehen den runden Anschluss und den Adapter in die richtige Position,
mindestens 3 Umdrehungen, damit der Abluftschlauch gut verbunden ist. .
Richtung für Fernbedienung
Richtung für Öffnen/Schließen
Fernbedienung
Box für Fernbedienung
Page 41

2) Anschluss des Abluftschlauches an dem Gerät.
Setzen Sie das vor dere En de des Abluf tsc hlauches an de n Luf tauslas s auf der Rück s eite, der
Verschluss schließt den Abluftschlauch fest.
Hinweis:
Halten Sie die sc hräge Seite des Adapters i n die r ichtige Ric htung, für e ine einf ache Monta ge
der Fensterdichtungsschiene.
Halten Sie den Abluftschlauch in einer guten Positi on v erbun den.
3) Anschluss der Fensterdichtungsschiene
A. Öffnen Sie das Fenster zur Hälfte, legen Sie die Fensterdichtungsschiene in das
Fenster, entweder in vertikaler oder horizontaler Position.
B. Verlängern Sie die Dichtungsplatten und passen Si e s ie an die Län ge des F enst er s an
bis beide Enden anstehen und schrauben Sie sie fest.
Hinweis:
Vergewissern Sie sich, dass die beiden Enden der Dichtungsplatte bei den Fensterkanten
anstehen um ein korrekte Abdichtung zu erlangen.
Drehen Sie die Schraube n f est .
2. Inbetriebnahme des Gerätes
A. Bewegen Sie das Gerät m it dem angeschlossenen Abl uf ts c hlauch vor ein Fenster und
halten Sie einen Mindestabstand von 50cm zu einer Wand oder anderen
Gegenständen ein.
Verschluss
Schlitz
Luftauslass- Bausatz
Page 42

B. Stecken Sie das rechteckige Ende des Abluftschlauches in das in der
Fensterdichtungsschiene vorgeseh ene Loch u nd sc hraube n Sie es fes t und s chli eßen
Sie das Fenster.
Hinweis:
Schieben Sie den Ada pter nach unten und vergew issern Sie sich, dass er richtig ange bracht
ist.
Vergewissern Sie sich, dass die Richtung der schrägen Platte mit der Dichtungsplatte
übereinstimmt. .
Der Ablufts chlauch darf nic ht geknickt werden oder nur bis maximal 45º geb ogen werden um
eine gute Belüftung zu gewährleisten.
Wichtige Hinweise:
Der Abluftschlauch ist 280mm-1500mm lang und ist die festgelegte Länge für diese
Klimaanlage(n). Der Abluftschlauch darf nicht verlängert oder durch einen anderen Schlauch ersetzt
werden, da dies den Betrieb der Klimaanlage beeinträchtigen könnte. Der Abluftschlauch muss glatt
sein, da es sonst zu einer Überhitzung oder Schaden am Gerät führen kann.
Anleitung für Entwässerung
1. Manuel le Ent wäs ser ung :
1) Schaltet sich das Ger ät aufgr und vollen W asser tanks ab, schalten Sie es aus und ziehen
Sie den Netzstecker aus der Steckdose.
Page 43
2) Stellen Sie eine Schale unter den Wasserauslass auf der Rückseite des Gerätes.
3) Drehen Sie den Verschluss des Ablaufs auf und ziehen Sie den Stöpsel damit das Wasser
in die Schale läuft.
4) Nach der Entwässerung, stecken Sie den Stöpsel wieder an und drehen Sie den
Verschluss an dem Wasserabfluss fest.
Hinweis:
Schützen Sie den Verschluss und Wasserstopfen richtig.
Bewegen Sie das Gerät vorsichtig um ein Auslaufen zu verhindern.
Neigen Sie das Gerät bei der Entwässerung leicht nach hinten.
Schliessen Sie den Wasserauslass bevor die Schale voll ist, damit kein Wasser überläuft und
der Boden oder Teppich nass wird.
Stellen Sie sicher, dass der Stöpsel und Verschluss richtig fest sitzen, damit kein Konse nswasser
ausläuft wenn das Gerät erneut in Betrieb genommen wird.
2. Dauerdrainage
1) Drehen Sie den Verschluss auf & ziehen Sie den Stöpsel aus dem Wasserablauf.
2) Stecken Sie einen Schlauch von φ12mm so tief als möglich in den Wasserauslass um
ein Auslaufen zu verhindern.
3) Verlegen Sie den Schlauch bis in das Badezimmer oder ins Freie.
Hinweis:
Der Abwassers chlauch muss angeschlossen w erden, wenn sich kein Wasser mehr in der Sc hale
befindet. .
Es empfiehlt sich, keine Dauerdrainage zu verwenden wenn das Gerät im KÜHL-Modus läuft um zu
gewährleisten, dass genug Wasser zum Recyceln vorhanden ist und die Kühlungswirkung
verbessert.
Geben Sie den Schlauch an eine unzugängliche Stelle, nicht höher als der Wasserablauf und
vergewissern Sie sich, dass er gerade und nicht gebogen ist.
Bewahren Sie den Verschluss und Stöpsel sicher auf solange Sie die Dauerdrainage anwenden.
Drain Cover
Abwasserschlauch
Page 44

Mehrere Schutzfunktionen
1. Anti-Frost-Schutz
Im KÜHL-Modus, wenn der Kompressor kontinuierlich mehr als 10 Minuten läuft und die
Temperatur des Schlauches ≦2℃/36℉ für über 20 Sekunden beträgt, schaltet sich der
Anti-Frost-Schutz ein und a uf der Anzeige sc heint E4. D er Kompress or und der Wasserradm otor
stoppen aber der obere Lüfter ist weiterhin in Betrieb; liegt die Temperatur des Schlauchs
≧8℃/46℉, schaltet sich der Anti-Frost-Schutz aus und geht auf den ursprünglichen Betrieb zurück.
Der Kompresser schaltet sich aus Sicherheitsgründen erst nach 3 Minuten wieder ein.
2. Alarmfunktion bei vollem Wassertank und Abschalt-Schutzfunktion
Erreicht das Wass ervolumen seine maximale Ka pazität im Gehäuse, ertö nt ein Warnsignal und
leuchtet auf der Anzeige das Wasser-voll-Symbol auf und Sie müss en die Entwässerung
durchführen und danach das Gerät erneut einschalten. (Für mehr Information zu der
Entwässerung, lesen Sie bitte die “ Anleitung zur Entwäss erung”). W urde das Gerät nicht m anuel l
abgeschaltet, stellt das Gerät die ursprünglichen Einstellungen nach der Entwässerung wieder
automatisch her. Oder schließen Sie das Gerät erneut an das Stromnetz an.
3. Kompressor-Schutzfunktion
Das Gerät verfügt über eine Kompressorschutzfunktion beim Wiederanlauf. Nach dem
Ausschalten besteht eine 3-minütige Verzögerung bis sich der Kompressor wieder erneut
einschaltet, außer das Gerät wurde das erste Mal in Betrieb genommen, dann startet er sofort.
Erhaltung und Wartung
Hinweis: Vergewissern Sie sich, dass das Gerät ausgeschaltet und Sie den Stecker aus der der
Steckdose gezogen haben, bevor Sie es warten oder zum Kundendienst senden.
1. Reinigung der Oberfläche
1) Reinigen Sie die Ob erfläche m it einem feuchten weic hen Tuch und verwende n Sie keine
chemischen Lösungsmittel wie Alkohol oder Benzin um Schäden zu vermeiden.
2) Reinigen Sie den vers chmutzen Luftauslass oder die Lüf tungsgitter mit einem feuchten
weichen Tuch und Reinigungsmittel.
3) Verwenden Sie unter keinen Um ständen jegliche Art von chem ischen Lösungs mitteln für
die Reinigung des Gerätes und bewahren Sie solche nicht in der Nähe des Geräts auf.
4) Benutzen Sie keine Verdünner, Benzin, Politur oder ähnliche Chemikalien für die
Reinigung.
2. Reinigung der Filter
Reinigen Sie die Filter alle zwei Wochen, da ansonsten die Filter mit Staub verstopft werden können
und dadurch die Effizienz des Geräts beeinträchtigt wird.
1) Anleitung zur Reinigung der Filter
A. Ziehen Sie den Filterrahmen an dem Griff sanft in die richtige Richtung heraus.
B. Entfernen Sie die Schmutzpartikel am Filter wenn nötig mit einem Reiniger.
C. Reinigen Sie die Filter vorsichtig unter warmem Wasser (ca. 40º mit neutralem
Page 45
Reinigungsmittel und spülen Sie sie gut aus und lassen Sie sie an einem schattigen Platz
trocknen.
Anmerkungen:
Ziehen Sie den Filter vorsichtig heraus.
Nehmen Sie imm er zuerst die Filter auf der Rücks eite heraus und danac h die seitlichen F ilter um
eine Verbiegung oder Beschädigung an den Filtern zu vermeiden.
Zerdrücken Sie nicht das Netz.
Berühren Sie das Netz nicht mit scharfen Gegenständen oder Bürsten.
3. Einsetzen der Filter
Richten Sie das Ende des Filters in Richtung des Schlitzes und drücken Sie den Filter vorsichtig in den
Schlitz.
Anmerkungen:
Vergewissern Sie sich, dass Sie zuerst die s eitlich en Filt er einse tzen un d danac h den Fi lter auf der
Rückseite.
Montieren Sie die Filter in der entgegengesetzten Reihenfolge als beim Ausbau.
Setzen Sie die Filter vorsichtig ein um Schäden zu vermeiden.
Oberer Filter
Oberer Filterrahmen
Zieh-Richtung
Unterer Filterrahmen
Unterer Filter
Seitlicher Filter
Seitlicher Filterrahmen
Page 46

4. Lagerung nach der Saison
1) Drehen Sie den Verschluss des Abl aufs auf und ziehen Sie d en Stopfen um das gan ze
Kondenswasser zu entleeren. (Hinweis: der Neigungswinkel des Gerätes sollte ≦30 sein).
2) Lassen Sie das Gerät für ei nen halb en Tag im Lüftungsmodus laufen um das G erät innen
ganz zu trocknen und Schimmel zu verm eiden.
3) Schalten Sie das Gerät aus und ziehen Sie den Netzstecker aus der Steckdose und
wickeln Sie das Net zkabel um die W ickelsäule auf , stecken Sie den Stec ker in das Universal loch
auf der Rückseite des Gerätes, geben Sie den Stopfer auf den Auslass und drehen Sie den
Verschluss fest.
4) Entfernen Sie den Wärmeabzugsschlauch, reinigen Sie ihn und lagern Sie ihn richtig.
Anmerkungen:
Halten Sie den Abluftschlauch bei der Entfernung mit beiden Händen.
Schieben Sie die Verschlüsse am Luftauslassmit ihren Daumen zur Seite, dann ziehen Sie den
Schlauch heraus.
5) Verpacken Sie die Klimaanlage in einem weichen Plastik und lagern Sie sie an einem
trockenen Ort und schützen Sie sie vor Staub und halten Sie sie vor Kinder fern.
6) Nehmen Sie die Batter ien aus der Fer nbe dienu ng un d bewahr en Sie sie ordnungsgemäß
auf.
Hinweis:
Vergewissern Sie sich, dass das Gerät an einem trockenen Ort gelagert ist. Alle Zubehörteile sollen
zusammen mit dem Gerät geschützt werden.
Fehlerbehebung
Konsultieren Sie bitte zuerst das Gerät und diese Vorschläge bevor Sie bei einem
Kundendienst anfragen, aber versuchen Sie niemals das Gerät selbst zu zerlegen oder reparieren, da
dies zu Schäden am Gerät und Ihrem Eigentum führen kann.
Anzeichen
Mögliche Ursachen
Lösung
Das Gerät schaltet sich nicht
ein
Feller in der
Stromzufuhr
Stecken Sie das Gerät an eine
Steckdose und schalten Sie es
ein.
Wassertank voll und
das Symbol leuchtet
auf
Lassen Sie das Kondenswasser
im Gerät ab.
Umgebungstemperatur
zu niedrig oder zu hoch
Es wird empfohlen das Gerät
bei T emperarturen zwischen
7-40
℃
zu verwenden
Die Raumtemperatur ist
niedriger als die
Ändern Sie die
Temperatureinstellung
Page 47
eingestellte Temperatur
des Kühlmodos oder
höher als die
eingestellte Temperatur
im Heizmodus
Ungenügender Kühleffekt
Es fällt direkte
Sonnenstrahlung ein
Schließen Sie die Vorhänge am
Fenster
Die Fenster und Türen
sind offen, es befinden
sich viele Personen im
Raum oder es gibt
andere Wärmequellen
Schließen Sie die Fenster und
Türen, entfernen Sie die
Wärmequellen und fügen Sie
eine neue Klimaanlage hinzu
Schmutziger Filter
Reinigen oder wechseln Sie
das Filternetz
Luftein-oder Auslass ist
verstopft
Entfernen Sie das Hindernis
Hoher Lärmpegel
Das Gerät ist auf einer
unebenen Oberfläche
aufgestellt
Stellen Sie das Gerät auf eine
ebene und feste Oberfläche
(sollte den Lärm reduzieren)
Der Kompressor funktioniert
nicht
Start des
Überhitzungsschutzes
Warten Sie bis die Temperatur
sinkt, das Gerät schaltet sich
automatisch wieder ein
Die Fernbedienung funktioniert
nicht
Zu lange Distanz
Bringen Sie die Fernbedienung
näher an die Klimaanlage und
vergewissern Sie sich, dass sie
zu dem Signalempfänger am
Gerät gerichtet ist.
Die Fernbedienung
zielt nicht zum
Empfänger am Gerät
Die Batterien sind leer
Ersetzen Sie die Batterien
“
CH01” Code wird angezei gt
Ausfall
Raumtemperatursensor
Prüfen Sie den
Raumtemperatursensor und die
zugehörigen Schaltungen
“
CH02” Code wird angezeigt
Ausfall
Rohrtemperatursensor
Prüfen Sie den
Rohrtemperatursensor und die
zugehörigen Schaltungen
“
E4” Code wird angezeigt
Anti-Frost-Schutz
Die vorangehenden Funktionen
werden wieder hergestellt
Page 48

sobald der Anti-Frostschutz
sich abschaltet.
Displays
Wassertank im
Gehäuse ist voll
Lassen Sie das Kondenswasser
ab und schalten Sie das Gerät
erneut ein
Anhang
Netzspannng V~, Hz 220~240,50
Kühlleistung
Btu/h 12,000
W 3,520
Kühlmittel/Menge /g R410A/560
Leistungsaufnahme Kühlung W 1,350
Nennstrom Kühlung A 6.20
Feuchtigkeitsaustritt L/h 1.4
Luftzirkulation m³/h 430
Lärm
Hoch dB(A) 55
Mittel dB(A) 53
Niedrig dB(A) 50
Abmessungen W×H×D mm 471×850×355
Verpackungsgrösse W×H×D mm 540×888×398
Nettogewicht/Bruttogewicht kg 33.5 /37.5
Anwendungsbereich ㎡ 16~22
Strom Parameter
Typ: FSD or 50F
Spannung: 250V
Strom: 3.15A
Page 49

Schematisches Diagramm der Klimaanlage
Bestimmte technische Parameter des Modells finden Sie auf dem Typenschild auf dem
Produkt.
UMWELT
ACHTUNG :
Werfen Sie nicht dieses Produkt, wie es mit anderen Haushaltsprodukten hat. Es gibt
eine Mülltrennungs von diesem Produkt in Gemeinden, Sie müssen Ihre lokalen
Behörden über die Orte, wo man dieses Produkt zurückgeben können zu informieren.
In der Tat enthalten elektrische und elektronische Produkte gefährliche Stoffe, die
schädliche Auswirkungen auf die Umwelt oder die menschliche Gesundheit haben
und sollte recycelt werden. Das Symbol hier darauf hinweisen, dass elektrische oder
elektronische Geräte sollten sorgfältig ausgewählt werden, ist ein fahrbarer
Abfallbehälter mit einem Kreuz markiert.
Hergestellt und importiert : Adeva SAS 8 rue Marc Seguin 77290 Mitry-Mory FRANCE
www.hkoenig.com - contact@hkoenig.com - Tel. 01 64 67 00 01
Verdampfer
Kondensator
Kompressor
Kapillare
Page 50

NEDERLANDS
Hartelijk dank voor het kiezen van dit nieuwe model van de Draag bar e Air Conditioner, lees voor gebruik
en onderhoud zorgvuldig deze handleiding door. Bewaar de handleiding goed voor toekomstig gebruik.
Veiligheidsinstructies
elektrische specificaties
1. Alle bedrading moet voldoen aan de lokale en nationale elektrische codes en geïnstalleerd
worden door een el ektricien. Als u vragen heef t over de volgende instructi es contact op met een
elektricien.
2. Het apparaat moet in overeenstemming met de nationale regels voor bedrading worden
geïnstalleerd. Check beschikbare voeding en eventuele problemen met de bedrading voor de
installatie en de werking van dit toestel op te lossen.
3. Voor uw veiligheid en bescherming, is dit toestel geaard via de stekker wanneer de stekker in een
passend stopcontact. Als u niet zeker weet of het stopcontact in uw huis goed geaard zijn, neem dan
contact op met een elek tricien. Als netsnoer beschadigd is , moet het worden vervangen door de
fabrikant, zijn vertegenwoordiger of een ander bevoegd persoon om eventuele gevaren te
vermijden.
4. Dit apparaat is niet bedoeld voor personen (inclusief kinderen) m et verminderde lichamelijke,
zintuiglijke of geest elijk e verm ogens , of gebr ek aan ervari ng en kennis, tenzij ze onder toezich t staan of
worden geïnstrueerd over het gebruik van het apparaat werd gegeven door een persoon die
verantwoordelijk is voor hun veiligheid. Jonge kinderen moeten onder toezicht staan om ervoor te zorgen
dat ze niet met het apparaat spelen.
WAARSCHUWING:
Om het risico van brand, el ektrische schokken of verwondingen bij het gebruik van uw airconditione r, de
volgende elementaire voorzor gsmaatregelen:
Gebruik dit apparaat niet t e gebruiken in voch tige omgevin g, zoals alleen buit en of badkam er
enz., Gebruik binnenshuis.
Laat aardpen niet verwijderen.
geen adapter gebruiken.
Gebruik geen verlengstuk snoer.
Deel nooit het stopcontact met andere apparaten.
aansluiten of loskoppelen van de stekker met natte handen, om elektrische schokken te
vermijden nooit.
Zet nooit het apparaat door de stekker.
Trek de stekker van de airconditioner voordat u onderhoud.
ontmantelen Nooit, r epareren of het toestel te wijzigen zonder toes temming aan het licha am
van letsel of materiële schade te voorkomen, moet u laten repareren door de fabrikant of professionals.
nooit plaats geen voorwerpen in het apparaat.
Dek luchtinlaat of uitlaat om oververhitting te voorkomen nooit af.
hit of schud het apparaat om beschadiging te voorkomen nooit.
Spuit nooit water of plaats het apparaat in de buurt van water om elektrische schokken te
Page 51

voorkomen.
Plaats het apparaat nooit in de buurt van gastoestellen, brand of brandbare vloeistoffen.
Behoefte twee of meer mensen te bewegen en te installeren air conditioner.
Laat kinderen niet spelen in de buurt van het apparaat.
Als het netsnoer beschadigd is, moet het wor den vervangen d oor een after-sales service om
elk gevaar te voorkomen.
Waarschuwingen
Houd het apparaat m instens 1 meter uit de buurt van TV of radio's voor elektromagnetisc he
interferentie te voorkomen.
Stel het toestel niet bloot in direct zonlicht aan de oppervlakte kleurvervaging te voorkomen.
Gebruik het apparaat niet kantelen voor meer dan 35 graden of ondersteboven tijdens het
transport.
Plaats het toestel op een vlakke ondergrond en rechtop met minder dan 5 graden helling.
Houd de afvoerslang in goede staat zonder buiging sluit met unit.
Het apparaat werkt efficiënter in bepaalde kamer locaties (installatie en inbedrijfstelling).
Leeg de gecondenseerde drainage pan voordat het apparaat opgeslagen op het apparaat
levensduur einde van het seizoen te verlengen.
Gebruik geen chemische oplosmiddelen (bijvoorbeeld benzeen, alcohol-Glazer) om het
apparaat oppervlak schoon te maken, niet krabben of het toestel beschadigen.
Zorg ervoor dat de stroom af te snijden Voor de demontage en montage van de filter.
Let op: Gebruik dit apparaat ni et te gebruiken in k oelbedrijf als de omgevingstem peratuur hoger is da n
35 ℃.
Functies en beschrijving onderdelen
1. Eigenschappen
Nieuwe verschijning met compact design, meer luxe en chique.
Afstandsbediening & Pan el best urin g met LCD-scherm en touch sc r een maakt uw bedrijf m eer
toegankelijk.
Het apparaat is met koeling, ventilator, ontvochtigen, en slapen functies.
Air outlet is boven, autoswing horizontale lamellen en het deksel luchtuitlaat raam toen stoppen
met werken, om stof in de unit te voorkomen, kan de verticale lamellen handmatig worden aangepast.
Gehumaniseerde ingebouwde afstandsbediening compartiment, makkelijk op te bergen.
stelen met cut-point ontwerpen, maken het geheel meer gehumaniseerd.
Stroomkabel houder en universele aansluiting kan goed beschermen de stroomkabel.
Hoge positie van de luchtuitlaat, eenvoudige montage en snel te ontluchten.
Intelligent, milieu-vriendelijk en energiebesparing met self-verdampingskoeling systeem.
24-uurs timerfunctie, unieke aan / uit herinneren muziek.
3 minuten vertrag ing re-start bescherming aa n de compressor en andere m eerdere functies
bescherming.
Page 52

1. Beschrijving van de onderdelen
1. Voorste paneel
2. Afstandsbediening ontvanger
3. Controle paneel
4. Bovenste paneel
5. Horizontale ventilatiekoepel
6. Rechter decoratieve bord
7. Bovenste filter van het achterpaneel
8. Afstandsbediening compartiment
9. Linker decoratieve bord
10. Stroom kabel
11. Opwindpilaar
12. Onderste filter van het achterpaneel
13. Putdeksel
14. Universal wiel
15. Filter samenst el van zijpa n eel
16. Beschermend rooster
17. Sluiting
18. Handvat
19. Ronde connector van uit laatslang
20. Uitlaatslang
21. Adapter van uitlaatslang
22. Raam afdichting
Paneel van de adapter
Page 53

Werking en Instellingen
1. Controle Paneel
Dit gedeelte legt de juiste werking van de mobiele airconditioner uit.
2. Controle paneel werking
Dit apparaat heeft k oeling, verwarming, Ontvochtiger, Ventilator en Energie besparing & Slaap m ode
operaties.
1) Energize de Eenheid: Plug in en alle pictogrammen in LCD-display licht op gedurende 2 seconden en
herinneren muziek op, dan LCD display zal de omgevingstemperatuur tonen met een bereik 5-35 ℃
(41-95 ℉), eenheid standby is voor gebruik.
2) : Druk op d eze toets voor het inschakelen v an het toestel, h erinnert de m uziek klinkt, en de unit
draait onder automatisc h koelbedrijf met ingestelde tem peratuur 22 ℃ (72 ℉), ventil ator draait in de
gemiddelde snelheid. Druk op deze toets, zal app araat uit en herinneren muziek zal klinken.
A. Wanneer unit is ingesch akeld, zal LCD displa y omgevingstem peratuur laten zien, ve ntilator b egint t e
lopen en luchtuitlaat venster wordt automatisch geopend.
B. Bij het apparaat is uitgeschakeld, alle onderdelen stoppen met werken, zal luchtuitlaat venster
automatisch sluiten.
1)
:
Druk op deze toets om over te schakelen en selecteer unit werkmodus je wilt, alle standen te
zetten, zoals hieronder uw bevestig in g.
KOELEN ONTVOCHTIGEN VENTILATOR ENERG IE BE SPARING
Gebruiksmethoden
KOELEN
Temoeratuur
Instelling
16℃--30
℃(60℉
--86℉)
ONTVOCHTIGEN
----- -----
VENTILATOR
----- -----
ENERGIE
BESPARING
Temperatuur
instelling
16℃--30
℃(60℉
--86℉)
Snelheid
Timer
Omhoog
Display scherm
Omlaag
Modus
Aan
Page 54

2) en
:
A. Dr uk op of om de temperatuur te verhogen of t e verlagen per 1℃of 1℉ d oor eenmaal t e
drukken.
B. Druk op of gedurende 2 seconden om de temperatuur te doen afnemen of te doen
toenemen met 0,5 seconden interval. Het temperatuur instellingsbereik is 16~30℃/60~86℉。
C. Druk op en tegelijk om Celsius te verruilen voor Fahrenheit of andersom(℃←→ ℉
transitie).
D. Druk op of in TIMER modus om de tijd instellingen aan te passen.
3)
:
Druk op deze knop om het apparaat in te stellen op hoge sne lhei d 、Gem iddelde s nelhe id
of Lage snelheid. 。
A. Onder KOELING en VENTILATOR modes, kan de snelheid van de ventilator worden
aangepast door onderstaande sc hema,
B. Onder TRY mode, dient de ventilator op lage snelheid te draaien , temperatuur kan niet
worden aangepast.
C. Ventilator snelheid wordt niet aa ngepast in de mode KOELING en de VENT ILAT IE modes , dat
betekent dat als de ventilator draait op lage snelheid onder VENTILATOR-modus, zal de
ventilatorsnelheid het zelfde te houden wanneer het apparaat verand erd in KOELING-modus; Als
ventilator draait op hoge s nelheid onder KOELING-modus, zou het zelfde t e houden wanneer het
apparaat veranderd in VENTILATOR-modus.
D. Ventiatoren zullen worden gedwongen op lage s nelheid te draaien in de ONTVOCHTIGINGS en
SLAAP modus.
6)
:
Druk op deze toets om de timer aan of uit te zetten, of om de instellingen van de timer te
controleren of te wijzigen.
A. Dit apparaat is uitgerust met een 24-uurs timer, Eerste twee nullen staan voor uren -
00-24, en de la atste twee c ijfers staan voor m inuten 00-59. Je kan telkens een half uur er bij zette n
met de knop of om de instellingen te eindigen.
B. Je kan het apparaat automatisch uitschakelen (AUTO OFF) in de instellingen. Zet apparaat op
AUTO ON in standby wanneer de timer juist is ingesteld. zal oplichten tijdens het
instellen en daarna automatisch uitschakelen .
C. Door opnieuw op te drukkenin de TIMER setting zal de laatste ingestelde timer oplichten.
Det timer is dan uitges chakeld als via het controle pane el of de afstandsbe diening het
apparaat wordt uitgeschakeld.
Page 55

+ : Start SLAAP functie door tegelijk op + te drukken in de KOEL of VERWARM
modus, in LCD scherm zal opneuw indrukken van deze knoppen + leiden tot het
uitschakelen van de “SLAAP” functie, . Slaap functie werkt niet in de ONTVOCHTIGINGS
modus en de VENTILATOR modus.
7) + :Stel het automatisch draaien in + . Horizontale flanken zullen automatisch
draaien wanneer de unit begint met werken, druk op
+ samen om dit weer uit te schakelen,
het LCD scherm is dan uit te zien. Druk opnieuw op
+ om dit weer in te schak el en,
waarna het LCD scherm weer aan gaat.
8) Andere functies
A. Energiebesparing: Achtergrond licht in LCD scherm `al 10 seconden verlichten en daarna
automatisch uitschakelen – wordt weer ingeschakeld nadat een willekeurig knop wordt ingedrukt.
B. Auto-schoonmaak :Apparaat zal starten en blijft drie minuten alvorens uit te schakelen in
de KOELING en ONTVOCHTIGINGS modus.
C. Energiebesparing: Laag energieverbruik in de Energiebesparingmodus.
3. Besturing van afstandsbediening
1) Vermogen: Druk op deze toets om het apparaat te starten wanneer deze wordt bekrachtigd
of stop het toestel wanneer het in werking is.
2) Modus: Druk op deze knop om de werking te selecteren.
3): druk op deze knop om de kamertemperatuur en de timer te verhogen.
4): druk op deze knop om de kamertemperatuur en de timer instelling te verlagen.
5) Fan: Druk op deze knop om de ventilatorsnelheid te selecteren: Laag → Medium → High.
Hoog en laag knoppen
Ventilator snelheid knop
Timer knop
Slaap knop
LCD display
Aan knop
Modus knop
Auto-draai knop
Auto-schoonmaak knop
Page 56
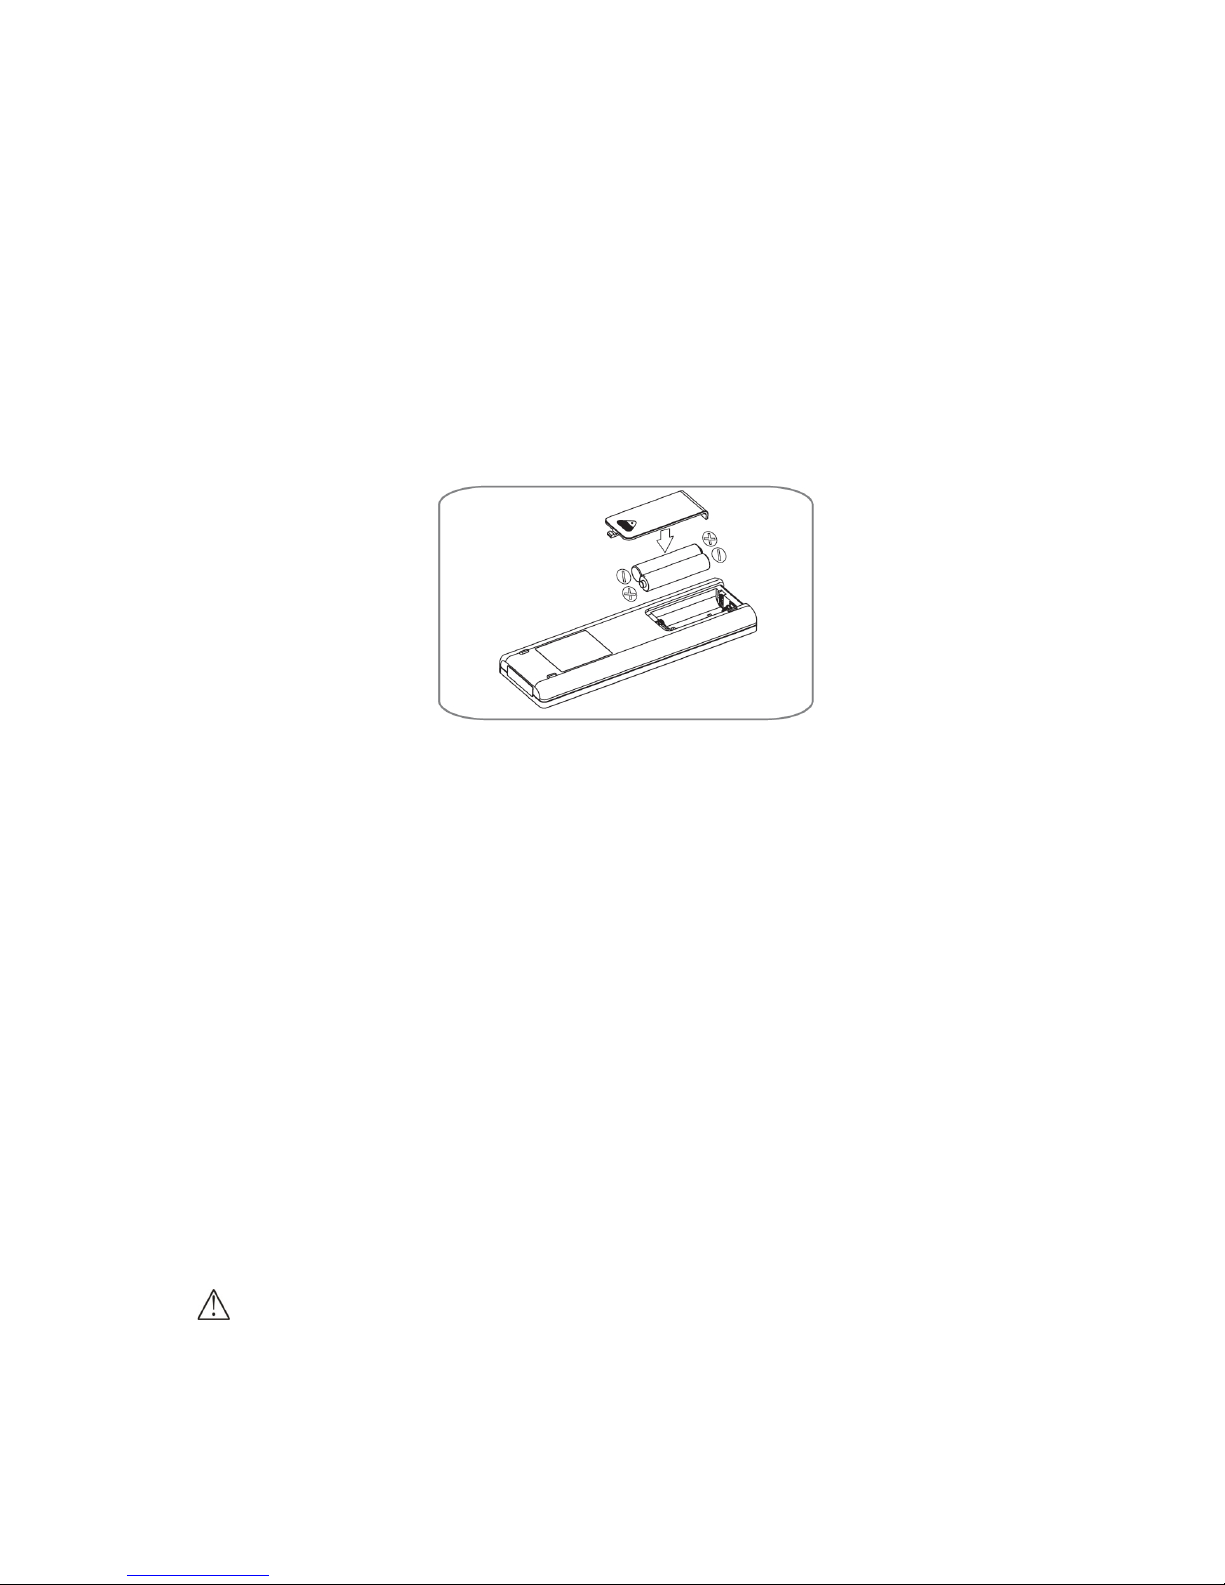
6) Auto-Swing: druk op deze knop om te zetten of uit te schakelen auto-swing-functie.
7) Slaap: Druk op deze knop om te selecteren of de slaapstand (werkt alleen onder koeling of
energie gesprek modi) te annuleren.
8) Timer: druk op deze knop om AUTO-ON en AUTO-OFF tijd in te stellen. De tijd kan worden
ingesteld tussen 0,5-24 uur. Het springt met 0,5 uur interval binnen 5 uur en 1 uur interval van meer
dan 5 uur, zal de ingestelde tijd 5 keer knipperen op het scherm en bevestig de instelling.
Voor het gebruik van uw afstandsbediening, installeert u de AAA-batterijen in de afstandsbediening.
1) Druk op en glijden het batterijklepje aan de achterkant van de afstandsbediening, dan kunt
u het deksel te verwijderen.
2) Plaats t wee nie uwe alkali ne AAA-b atterijen in het batterijc ompartim ent, waarbij u de ju iste
polariteit mee.
Bevestig de batterijklep, zorg ervoor dat de tab vergrendeling vastklikt.
Opmerkingen:
• G ebruik alleen alkaline batterijen. Geen opl aad bar e ba tterij en gebr u ik en.
• Als de b atterijen te vervangen, a ltijd beide batterijen vervang en door nieuwe batterijen, geen
oude en nieuwe batterijen.
• Als de airconditioner niet wordt gebruikt voor een langere tijd, verwijder dan de batterijen uit de
afstandsbediening.
4. Afstandsbediening opberging
1) Plaats de afstandsbediening in de ingebouwde compartiment in de linker kant van de unit, en
duw hem zachtjes voor sluiting.
2) Druk op het onderste gedeelte van de ingebouwde compartiment voorzichtig om het te openen
en uit te nemen afstandsbediening.
Let op: Om te voorkomen dat het verlies van de afstandsbediening, zorg er dan voor de
afstandsbediening binnenkant van de opslagplaats als je het niet gebruiken.
WAARSCHUWING
Indien de vloeistof uit de accu's krijgt op uw huid of kleding, was het goed met schoon water, hoeft de
afstandsbediening niet als de batterijen lekken.
Als u de vloeistof uit de accu's te eten, je tanden poetsen en te zien arts. De chemicaliën in batterijen
kunnen brandwonden of andere gevaren voor de gezondheid veroorzaken.
Page 57

Installatie & Aanpassing
1. Installation
Notes:
Keep this mobile air-conditioner in upright position at least 2 hours before first installation.
This air-conditioner may be moved indoor conveniently; keep the unit in upright position while
moving it. The air-conditioner shall be placed at flat surface.
Do not install or operate this air-conditioner in bathroom or other wet environments.
1) Installation of exhaust hose assembly and its adapter.
A. Neem de afvoerslang en de connector en de adapter, om de plastic zak te verwijderen.
B. Breid het ene uiteinde van de uitlaat slang, schroef het uiteinde zonder slot van de connector op
het met tegen de klok in ten minste 3 ronden.
C. Uitbreiding van een ander einde van de uitlaat slang, schroef de adapter op het met tegen de
klok in ten minste 3 ronden.
Opmerking: Schroef connector en de adapter in de juiste positie, tenminste 3 ronden, om een goede
aansluiting van de uitlaat slang te houden.
Afstandsbediening richting
Open en Sluit richting
Afstandsbediening
Controle box afstandsbediening
Page 58

2) Installatie van uitlaatgassen slang naar hoofdunit.
Zet voorkant van uit laat gas s lang op juiste pos itie van de afge voerde luc ht uitlaat aan achter zijde,
zal bevestigingsmiddelen de afvoerslang bekistingslot.
Let op:
Houd de juiste richting van de schuine kant van de adapter, voor eenvoudige
installatie van raam afdichtplaat.
Houd uitlaatslang in een goede positie verb ond en.
3) Installatie van raam afdichtplaat
A. Maak het raam half open, zet de afdichtplaat in venster, zowel in verticale of horizontale positie.
B. Verleng afdichting plaatdelen en aan te passen aan de lengte van het venster, houden beide
uiteinden om het venster rand te ontmoeten, zet deze vast met schroeven dan.
Notitie:
Houd beide uiteinden van raam afdichtplaat om de randen van een venster goed te
ontmoeten, afdichtende werking te verzekeren.
Draai de schroef in een goede positie.
4) Installatie van de unit
A. Plaats het toestel met de uitlaat slang voor venster geïnstalleerd en houdt het apparaat ten
minste 50 cm afstand van de muren of andere voorwerpen.
B. Installeer de rechthoek einde van uitlaatgassen slang in de overeenkomstige rechthoekig gat in het
venster seal-plate assembly, bevestig het met de schroef en het venster te sluiten.
Verbinder
Slot
Uitlaat assemblage
Page 59
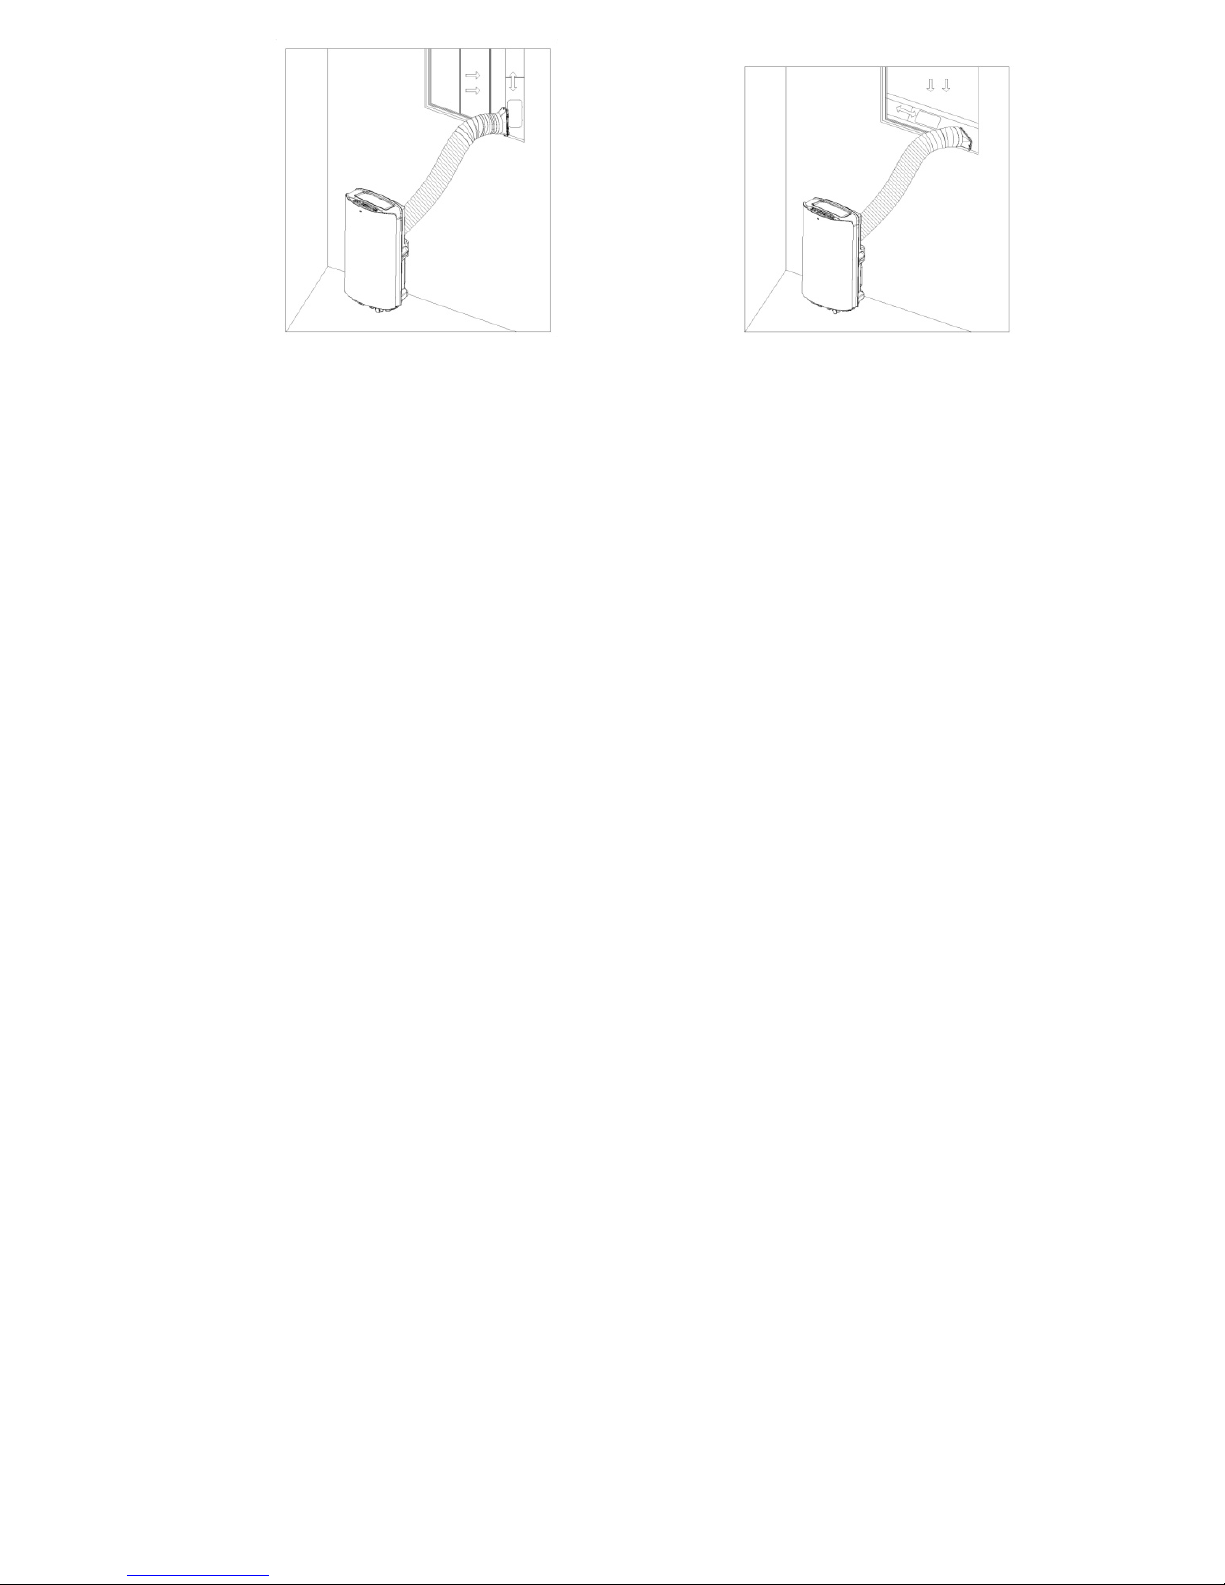
Notitie:
Schuif de adapter omlaag en verzekeren adapter in goede positie geïnstalleerd.
Assure het paneel richting schuin naar seal-plate richting aan te passen.
Uitlaatslang kan niet worden gebogen of buiging groter dan 45 °, om een goede
ventilatie van uitlaatslang houden.
Belangrijke aantekeningen:
De uitlaat slang 280mm-1500mm lang en deze lengte wordt bepaald op basis van de specificatie
van de air-conditioner (s). Weet verlengde de slang niet gebruiken of te vervangen door andere
verschillende slangen, omdat dit de functies van de airconditioner kunnen beïnvloeden. De uitlaat
slang moet glad zijn of het kan airco oververhitting en schade leiden.
Drainage Instructie
1. Handmatige drainage:
1) Als de unit uitgeschakeld upon-water vol, schakelt het toestel en trek.
2) Plaats de bak onder de waterafvoer aan de achterzijde van het apparaat.
3) Schroef de putdeksel, de stekker uit het water stop voor de waterstroom in de lade.
4) Sluit stopper en schroef de putdeksel stevig op waterafvoer na drainage.
Opmerkingen:
Bescherm de putdeksel en water stop naar behoren.
Verplaats het apparaat voorzichtig om de lekkage is het noodzakelijk te vermijden.
Kantel het apparaat iets naar achteren bij het aftappen.
Blokkeer de afvoer gat zo spoedig mogelijk voor de lade vol als het niet al het water in het
apparaat om het water lekkage te voorkomen en nat de vloer of tapijt kan houden.
Water stop en putdeksel moet stevig worden geïnstalleerd, om nieuwe condensaat aan de
vloer of tapijt nat wanneer het apparaat opnieuw begint te voorkomen.
2. Continu drainage
1) Schroef de afvoer-deksel en de stekker uit het water stop.
2) Sluit de afvoer-gat met φ12mm afvoerslang, zo diep mogelijk om lekkage te voorkomen.
3) Trek de afvoerslang naar de badkamer of buiten.
Opmerkingen:
Page 60
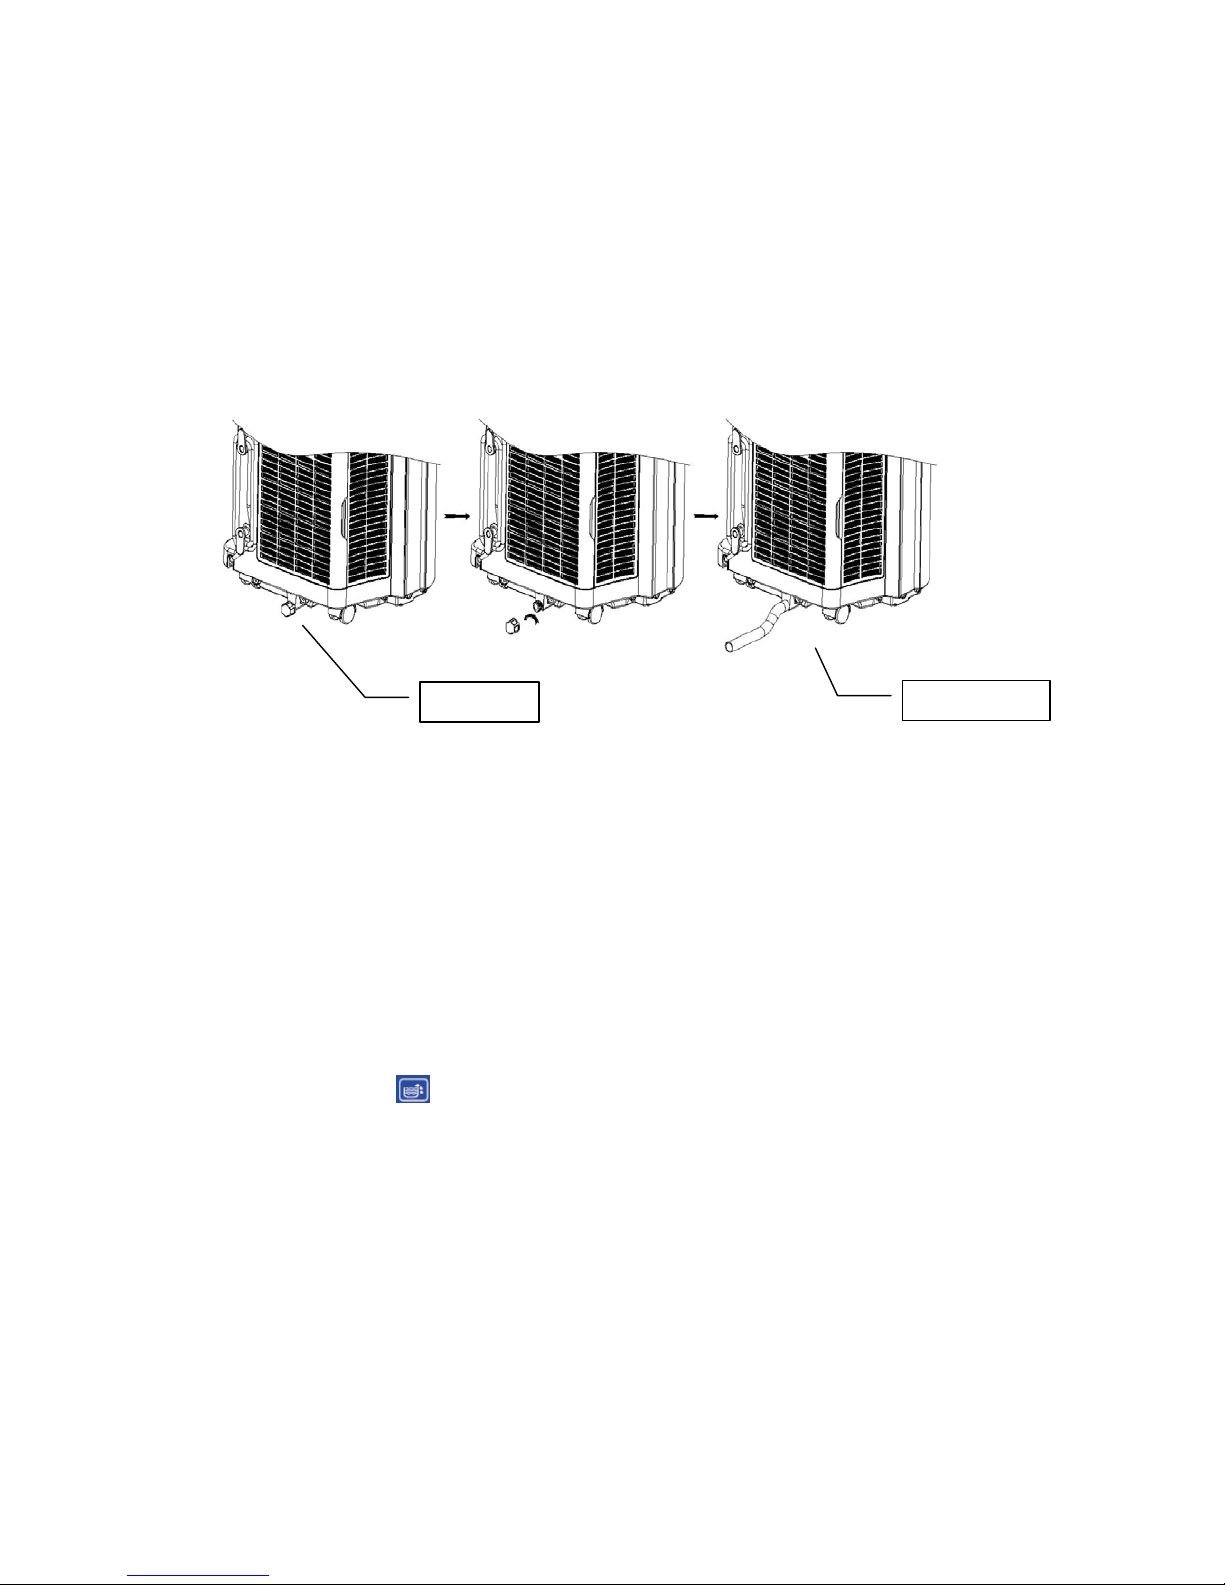
• afvoerslang moet worden geïnstalleerd als er geen water in de lade.
• Gesuggereerd wordt dat niet continue drainage gebruiken wanneer het apparaat in
KOELEN, voldoende water recycle waarborgen in het toestel om de systeemkoeling
effecten versterken.
• Pla ats de afvoersla ng in een ontoeg ankelijke plek , niet hoger d an drainage gat e n houden
afvoerslang recht zonder enige buiging.
• Houd het putdeksel en de stopper naar behoren wanneer continue drainage wordt
goedgekeurd.
Meerdere beveiligingsfuncties
1. Anti-frozen beschermingsfunctie
Onder COOL-modus, als de compressor draait continu meer dan 10 minuten, als buistemperatuur is
≦ 2 ℃ / 36 ℉ gedurende 20 seconden, zal de beveiligingsfunctie anti-be vroren op zijn, zal E4
worden getoond op het LCD-scherm, compressor en water wheel motor zal stoppen met werken, maar
de bovenste ventilator blijft lopen; Als buistemperatuur ≧ 8 ℃ / 46 ℉, zal het apparaat stoppen met
anti-bevroren beschermen en te herstellen in de oorspronkelijke staat. Compressor zal opnieuw begint
te werken met 3 minuten vertraging voor de bescherm ing.
2. Water-volledige veiligheid alarm en sloot -off beveiligingsfunctie
Wanneer het volume water het alarmniveau in chassis overschrijdt, waarschuwing klinkt automatisch
en met water vol icoon ve r lichti ng in LCD-display, moet u het condenswater af te voeren en
opnieuw op te starten van het apparaat. (Voor meer informatie over hoe om uit te lekken, wordt
verwezen naar de "Drainage Instruction" aub). Als het toestel niet naar beneden met de hand wordt
uitgeschakeld, zal het apparaat te herstellen naar de oorspronkelijke bedrijfstoestand automatisch
wanneer het water volledig is afgevoerd. Of sluit de kracht om weer opnieuw te beginnen met het
apparaat
3. Vertraging beveiligingsfunctie van de compressor
Dit apparaat biedt herstart bescherming compressor. Behalve dat de compressor onmiddellijk kan
beginnen wanneer het apparaat wordt bekrachtigd eerste keer, is er 3 minuten vertraging re-start
bescherming na de compressor naar beneden is uitgeschakeld.
Drain Cover
Drain hose
Page 61

Onderhoud en Service
Opmerking: Zorg ervoor dat het toestel uit te schakelen en trek de stekker voordat handhaven of te
sturen naar service center.
1. Oppervlaktereiniging
1) Reinig het apparaat oppervlak met een natte zachte doek en gebruik geen chemische
oplosmiddelen zoals alcoh ol en benzine om schade aan eenheid te voorkomen.
2) Maak de luchtuitlaat of lamellen vuil met natte zachte doek en wasmiddel.
3) Een chemisch oplosmiddel is verboden om te gebruiken voor unit reinigen of zet zulke dingen in
de buurt van het toestel voor een lange tijd.
4) Elke thinner, alcohol-Glazer of andere soortgelijke oplosmiddelen is verboden unit reinigen.
2. Filter schoonmaken
Reinig het filter eens per twee weken, of het zou de functie-eenheid te beïnvloeden als filter
verstopt met stof.
1) Hoe filter te reinigen
A. Pak de filter te behandelen en trek het voorzichtig in de juiste richting.
B. Maak de vuile deeltjes in het filter door schonere als het nodig is.
C. Dompel en was het filter voorzichtig in warm water (circa 40 ℃) gemengd met een
neutraal reinigingsmiddel, en spoel en droog ze grondig in de schaduw.
Opmerkingen:
Trek het filter voorzichtig.
Verwijdering van filter op achterpaneel is op prioriteit dan voor het filter aan zijpaneel, om
eventuele twist of schade aan filter te voorkomen.
Laat het gaas niet pletten.
Raak niet het gaas met scherpe voorwerpen of borstel.
Page 62
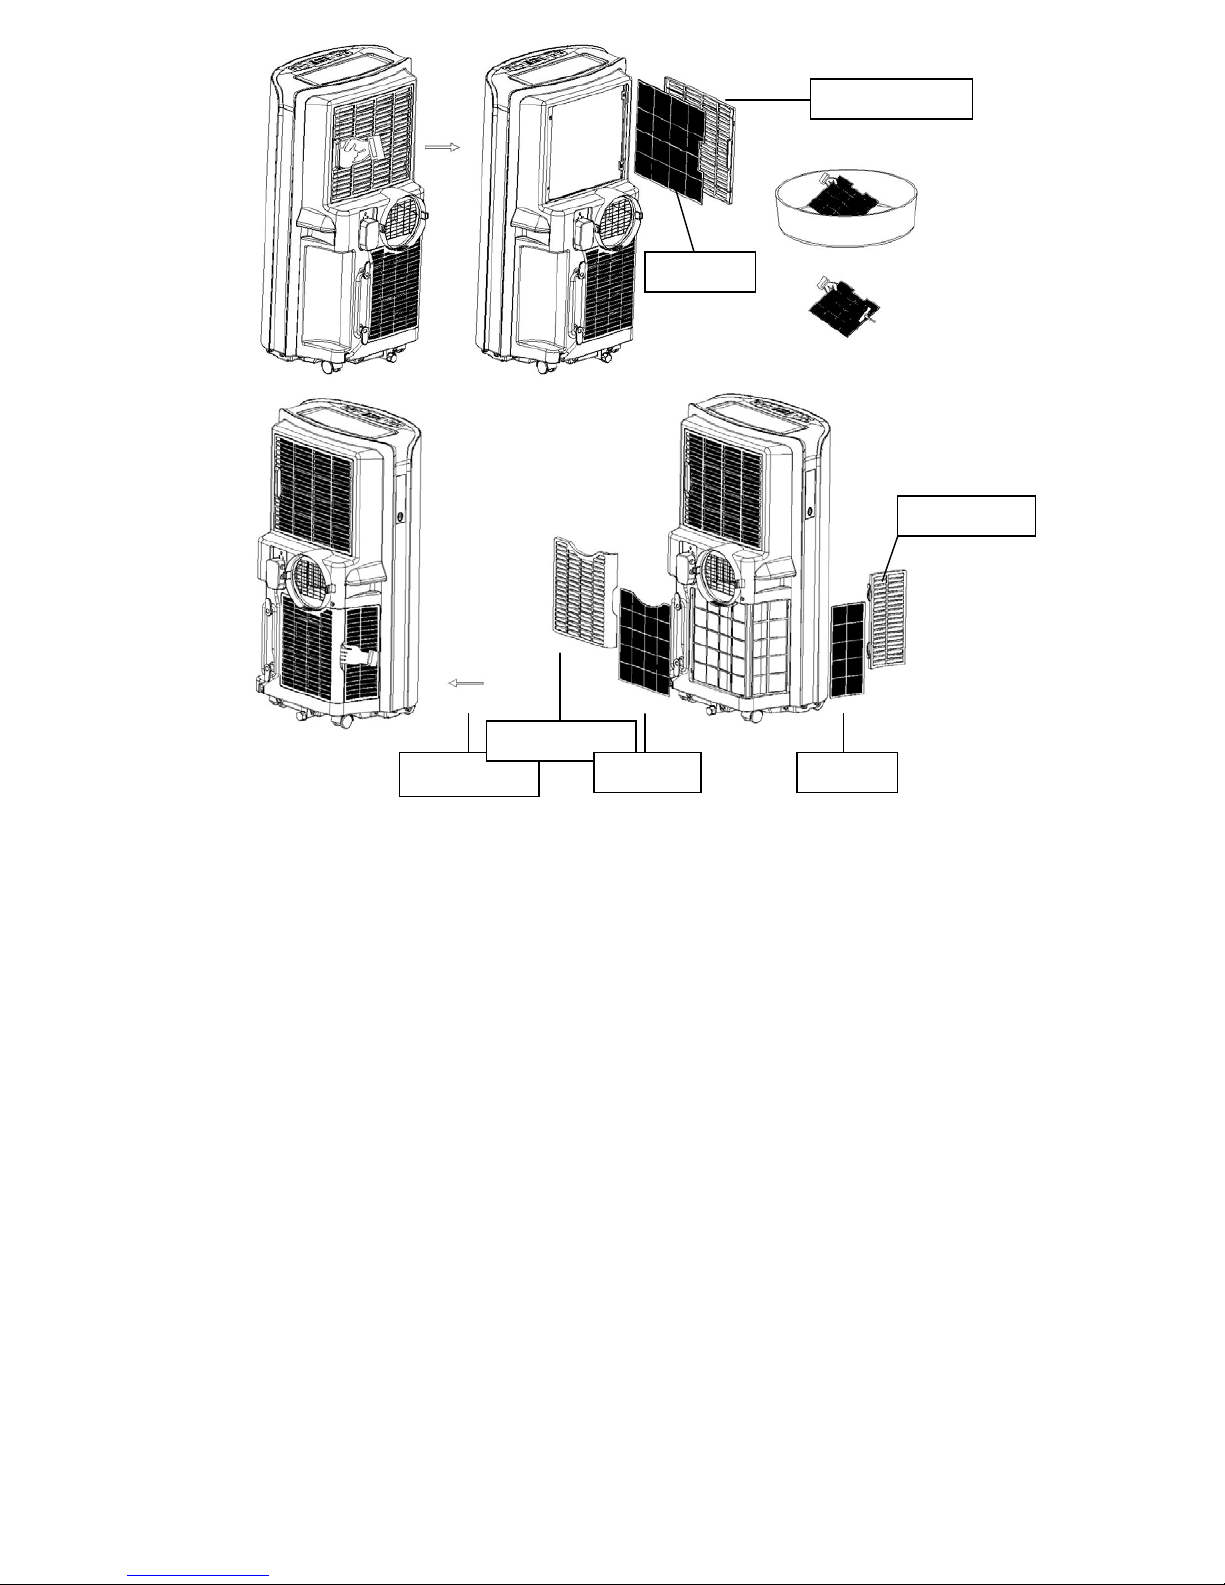
3. Installatie van het filter
Richt het uiteinde van de filter in de richting slot duw filter voorzichtig in de sleuf.
Opmerkingen:
• Zorg ervoor dat het filter aan zijpaneel installeer dan voor het filter aan paneel terug.
• Installeer het filter met de tegenovergestelde richting van de verwijdering.
• Installeer het filter op zijn plaats voorzichtig om schade aan filter te voorkomen.
4. Seizoen Einde Storage
1) Schroef de putdeksel en trek de stop op om condenswater volledig weglopen. (Let op: de
hellingshoek van het apparaat moet ≦ 30).
2) Houd unit draaiende ventilator modus voor een halve dag te drogen binnenkant van de eenheid
volledig om te voorkomen dat uit te gaan schimmelen,
3) Zet het toestel, trek de stekker wikkel het snoer rond de draad kronkelende pijler, steek de stekker in
de universele bevestiging gat aan de achterkant van het apparaat, installeert het water stop en
afvoerrooster.
4) Verwijder de warmte uitlaat slang, schoon en bewaar het goed.
Opmerkingen:
• Houd de uitlaat slang met beide handen bij de verhuizing.
• Druk de sluitingen opzij op luchtuitlaat met uw duimen, trek afvoerslang montage.
Upper Filter
Upper Filter frame
Push direction
Lower filter frame
Lower filter
Side filter
Side filter frame
Page 63
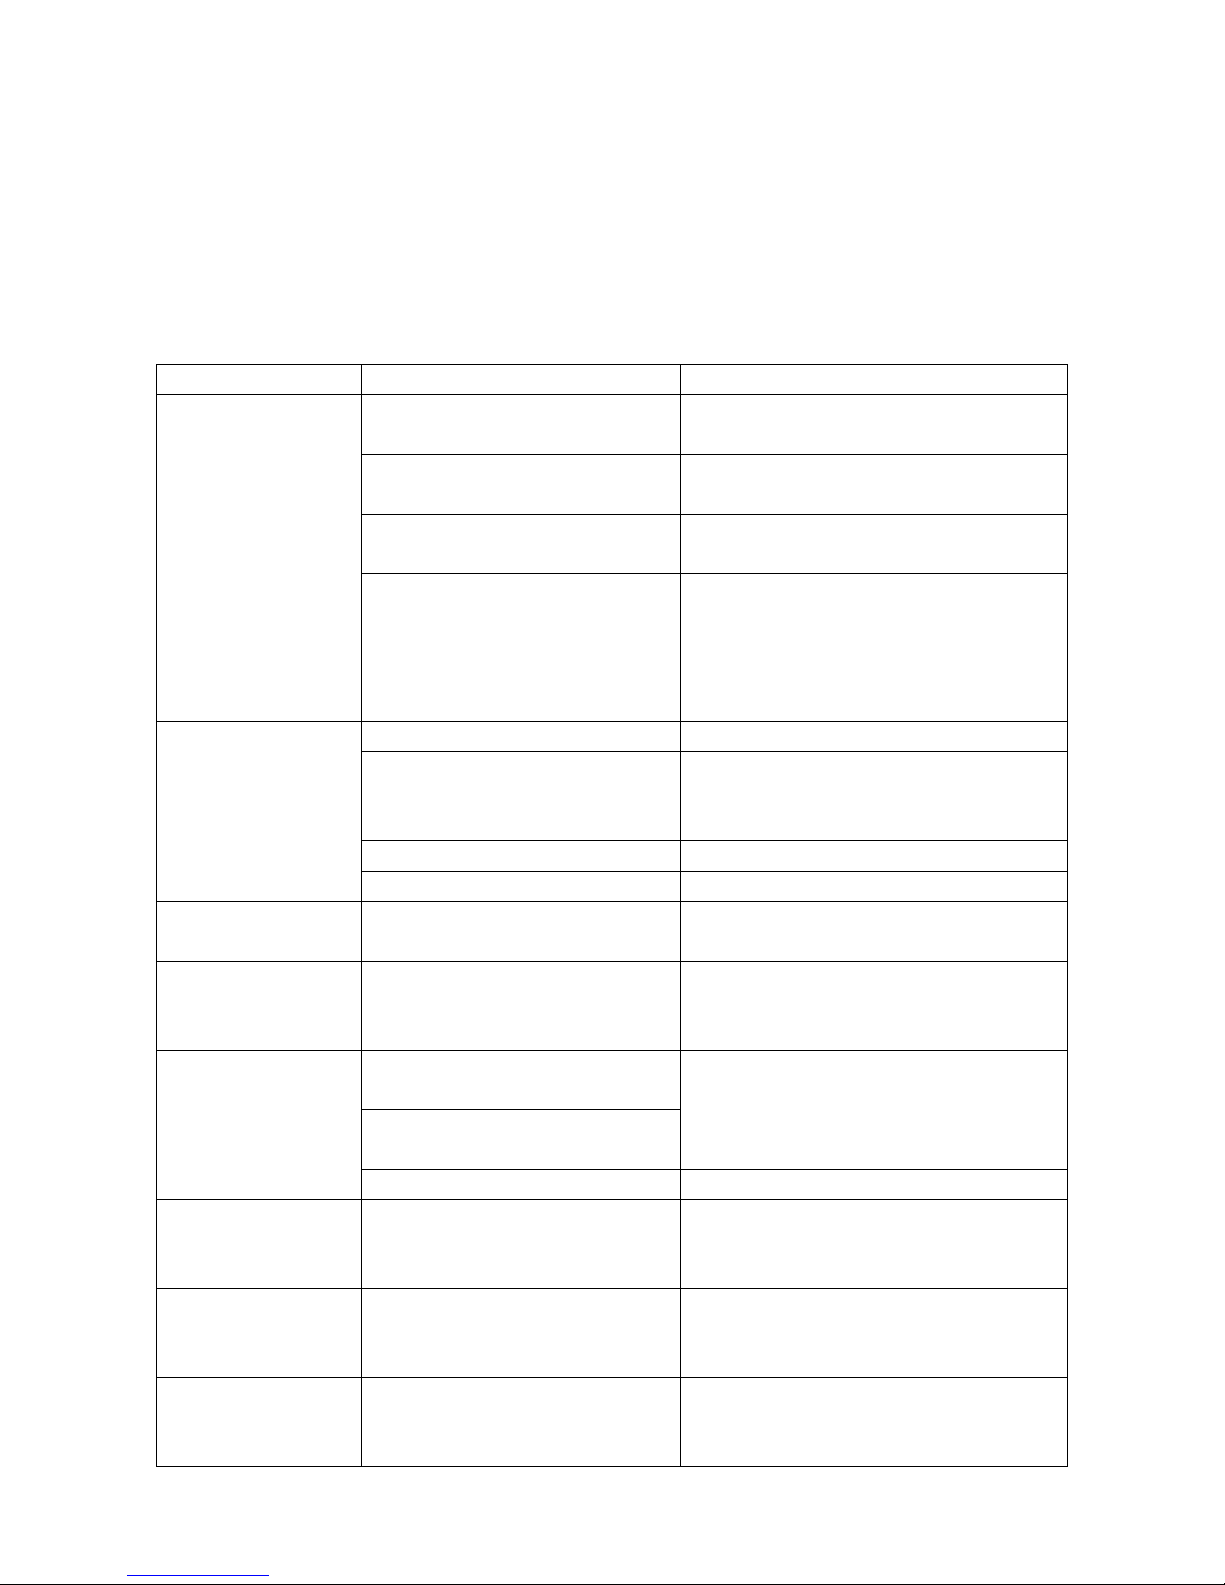
5) Verpak de airconditioner correct met zachte plastic zak en zet het in droge plaats met de nodige
stofdicht maatregelen, en houd het apparaat uit de buurt van kinderen.
6) Verwijder de batterijen uit de afstandsbediening en bewaar het goed.
Notitie:
Verzeker het apparaat wordt opgeslagen in een droge plaats. Alle accessoires van het apparaat
tezamen goed beschermd.
Probleemoplossing
Controleer het apparaat e n suggesti es hieronder v oordat vraagt om profes sionele service, m aar nooit
openmaken of het toestel zelf te repareren, kan schade veroorzaken aan u en uw woning.
Probleem Oorzaak Oplossing
Het apparaat
start niet juist op
Geen stroomtoevoer
Verbind het apparaat aan een
stopcontact en zet deze opnieuw aan.
Water is vol en icoon brandt
Haal het opgeslagen water uit het
apparaat.
Omgevingstemoeratuur is te
laag of te hoog
Het wordt aangeraden dit apparaat
tussen 7-40℃ te gebruiken
De kamertemperatuur is lager
dan de ingestelde
koeltemperatuur of hoger dan
de ingestelde
verhittingstemperatuur
Wijzig de temperatuurinstelling
Foute
koeleffecten
Direct zonlicht Doe het raamgordijn dicht
De deuren en ramen zijn open,
de kamer is te vol of er zijn
andere hitte bronnen
Sluit ramen en deuren, verwijder
andere hittebronnen en plaats
meerdere luchtkoelers
Vuil filter Verschoon of vervang de filter
Luchtin- of uitlaat verstopt Verwijder de verstopping
Veel lawaai
Het apparaat staat op een
oneven ondergrond
Plaats het apparaat op een vlakke en
schone ondergrond
De compressor
werkt niet
Begin van
oververhittingbescherming
Wacht tot de kamer temperatuur is
gedaald. Het apparaat start
automatisch opnieuw
De
afstandsbedienin
g doet het niet
Te verre afstand tot het
apparaat
Gebruik de afstandbediening dicht bij
het apparaat en zorg ervoor dat er
goed op de ontvanger wordt gericht.
De afstandsbediening is niet
goed op de ontvanger gericht
De batterijen zijn leeg Vervang de batterijen
“CH01” code
wordt
weergegeven
Kamer temperatuur faalt
Controleer de kamertemperatuur
sensor en het aangrenzende circuit
“CH02” code
wordt
weergegeven
Tube temperatuur sensor faalt
Controleer de tubetemperatuur sensor
en het aangrenzende circuit
“E4” code wordt
weergegeven Anti-vries bescherming
Herstel de instellingen automatisch
wanneer anti-vries berscherming
voorbij si
Page 64

Wordt
weergegeven
Watertank in de chassis is vol
Laat het water weglopen en herstart
het apparaat
Appendix
Stroom toevoer V~, Hz 220~240,50
Koel capaciteit
Btu/h 12,000
W 3,520
Koelmiddel/Charge /g R410A/560
Nominaal
ingansvermogen
Koeling W 1,350
Nominale
stroom
Koeling A 6.20
Vochtverwijderaar L/h 1.4
Lucht circulatie m³/h 430
Geluid
Hoog dB(A) 55
Middel dB(A) 53
Laag dB(A) 50
Afmetingen W×H×D mm 471×850×355
Pakket grootte W×H×D mm 540×888×398
Netto gewicht/Marginaal ge wic ht kg 33.5 /37.5
Gebruikruiimte ㎡ 16~22
Fuse Parameter
Type: FSD or 50F
Voltage: 250V
Gelijkstroomspanning: 3.15A
Page 65

Schematische diagram van de air-conditioner
For specifieke technische parameters van het model, kunt u terecht bij het ratinglabel het
product.
MILIEU
ATTENTIE :
Dit apparaat mag niet met uw ander huishoudelijke toestellen worden verwijdert. Dit product
moet op een geselecteerde stortplaats verwijdert worden. U kunt bij de gemeente een
indiceerde plaats aanvragen. Elektrisch en elektronische producten kunnen gevaarlijke stoffen
inhouden die schadelijk zijn voor mensen en het milieu en moet recycled worden. Het symbool
aan de kant geeft aan dat het een elektrisch en elektronisch toestel is en zijn dus artikelen van
een selectieve collectie. Het beeld geeft een afvalbak met een X teken aan.
Geproduceerd en geïmporteerd door : Adeva SAS 8, Rue Marc Seguin 77290, Mitry-Mory FRANKRIJK
www.hkoenig.com - contact@hkoenig.com – Telefoon: 01 64 67 00 01
Bevochtiger
Condensator
Compressor
Capillaire
Page 66

ESPAÑOL
Muchas gracias por selecc ionar este nuevo modelo d e aire acondicionado por tátil, lea este Manual de
Uso y Cuidado antes de instalar y utilizar este aparato. Guarde este Manual de Uso y Cuidado
correctamente para referencia futura.
Instrucciones de seguridad
Especificaciones eléctricas
1. Todo el cableado debe cumplir con los códigos eléctricos locales y nacionales y deben ser
instalados por un el ectricista calificado. Si usted tiene alguna pregunta con r especto a las siguientes
instrucciones, póngase en contacto con un electricista calificado.
2. La unidad debe ser instalada de acuerdo con las regulaciones nacionales de cableado. Compruebe
la fuente de conexión qu e tiene y res uelva cualqu ier problem a de cableado antes de la instalación y el
funcionamiento de la unidad.
3. Para su ma yor seguridad y protecció n, esta unidad está conectada a tierr a a través del cable de
conexión al momento de conectarlo con una toma de corriente. Si no está seguro de si la toma de
corriente que tiene en s u hogar está conectado a tierra, consulte con un electricista. Si el cable de
alimentación está dañado, debe ser reemplazado por el fabricante, su agente de servicio o una persona
igualmente capacitada a fin de evitar cualquier tipo de peligro.
4. Esta unida no está destinada par a personas (incluid os niños) con c apac idades f ísicas , sensor iales
o mentales reducidas o con falta de ex periencia y co nocimiento sobre e l uso de esta m isma, a menos
que hayan recibido la supervisión o instrucciones relativas sobre el uso de este aparato de parte de una
persona responsable de su seguridad. Los niños pequeños deben ser supervisados para asegurarse de
que no jueguen con el aparato.
ADVERTENCIA:
Para reducir el ries go de incendio, descarga eléctrica o lesiones a l utilizar su acondicion ador de aire,
siga estas precauciones básicas:
No utilice esta unidad en un ambiente húmedo, ni la use al aire libre o en el baño, etc.
No quite el terminal de tierra.
No utilice ni una clase de adaptador.
No utilice ni un tipo de extensión para el cable de conexión.
Nunca comparta la toma de corriente con otros aparatos.
Nunca conecte o desconecte el cable de conexión de la toma de corriente con las manos mojadas,
para así poder evitar descargas eléctricas.
Nunca desconecte la unidad tirando del cable de conexión.
Desconecte el aire acondicionad o antes de cualquier mantenimiento.
Nunca desmontar, reparar o m odificar la unidad sin autorización, para así poder e vitar lesiones o
daños materiales o al dispositivo, as egúrese de qu e sea reparado por el fabric ante o algún pr ofesional
capacitado.
Nunca coloque objetos dentro de la unidad.
No cubra ni obstruya la entrada o salida de aire para evit ar el sobrec a lent amiento.
Page 67

Nunca sacuda o golpee la unidad, así podrá evitar futuros daños a esta.
Nunca rocié agua o coloque la unidad cerca de agua u otro líquido para evitar descargas eléctricas.
Nunca coloque el aparato cerca de aparatos que funcionen a gas, fuego o líquidos inflamables.
Se necesitan 2 o más persona para mover e instalar el aparato de aire ac on dici o nado .
No permita que los niños jueguen cerca de la unidad.
Si el cable de alim entación es tá dañado , debe ser sus tituido por un ser vicio post -venta par a evitar
cualquier peligro.
Precauciones
Mantener la unidad al menos a 1 metro de distancia de la televisión o radio para evitar la
interferencia electromagnética.
No coloque la unidad bajo la luz directa del sol para evitar la pérdida de color de la superficie.
No incline la unidad durante más de 35 grados o al revés mientras está siendo transportado.
Coloque la unidad sobre una superficie plana y vertical, con menos de 5 grados de inclinación.
Mantenga la manguera de drenaje en bue nas cond iciones sin f lexión a cont inuac ión, conectar con
la unidad.
La unidad funciona de m anera más eficiente en cierto de lugares de la habitación (instalac ión y
ajuste)
Vaciar la bandeja de condesados antes de poner la unidad en el almacenamiento para prolongar la
vida útil de la unidad al final de la temporada.
No utilice solventes químicos (por ejemplo, benceno, alcohol) para limpiar la superficie de la unidad
y así no dañe ni raye la unidad.
Asegúrese de cortar la energía antes de desmontar o instalar el filtro.
Observación: No utilice esta unidad en modo frío si la temperatura ambiente es superior a 35 ℃.
Características e identificación de partes
1. Características
Nueva apariencia con un diseño compacto, más lujos y de alto nivel.
El control remoto a distanci a y el pan el de control d e pantalla LCD y la panta lla táctil hac e que s u
funcionamiento se más accesible.
La unidad cuenta con funciones de enfriamiento, ventilador, deshumidificación y funciones de
descanso.
La salida de aire es hacia arriba, la oscilación automática horizontalmente y la ventana de salida de
aire cuando deja de func ionar, para evitar que se acum ule polvo en la unidad las rejillas verticales se
pueden ajustar manualmente.
Control remoto ergonómico incorporado para fácil almacenamiento .
Mangos con diseño de punto de corte, hacen que toda la unidad sea más ergonómica.
El soporte del cable de conexión y el enchufe universal pueden proteger el cable de conexión.
Salida de aire en una posición alta, de fácil montaje y ventilado rápido.
Inteligente, respetuoso del medio ambiente y ahorra energía con el sistema de enfriamiento
evaporador (auto-energía).
Page 68
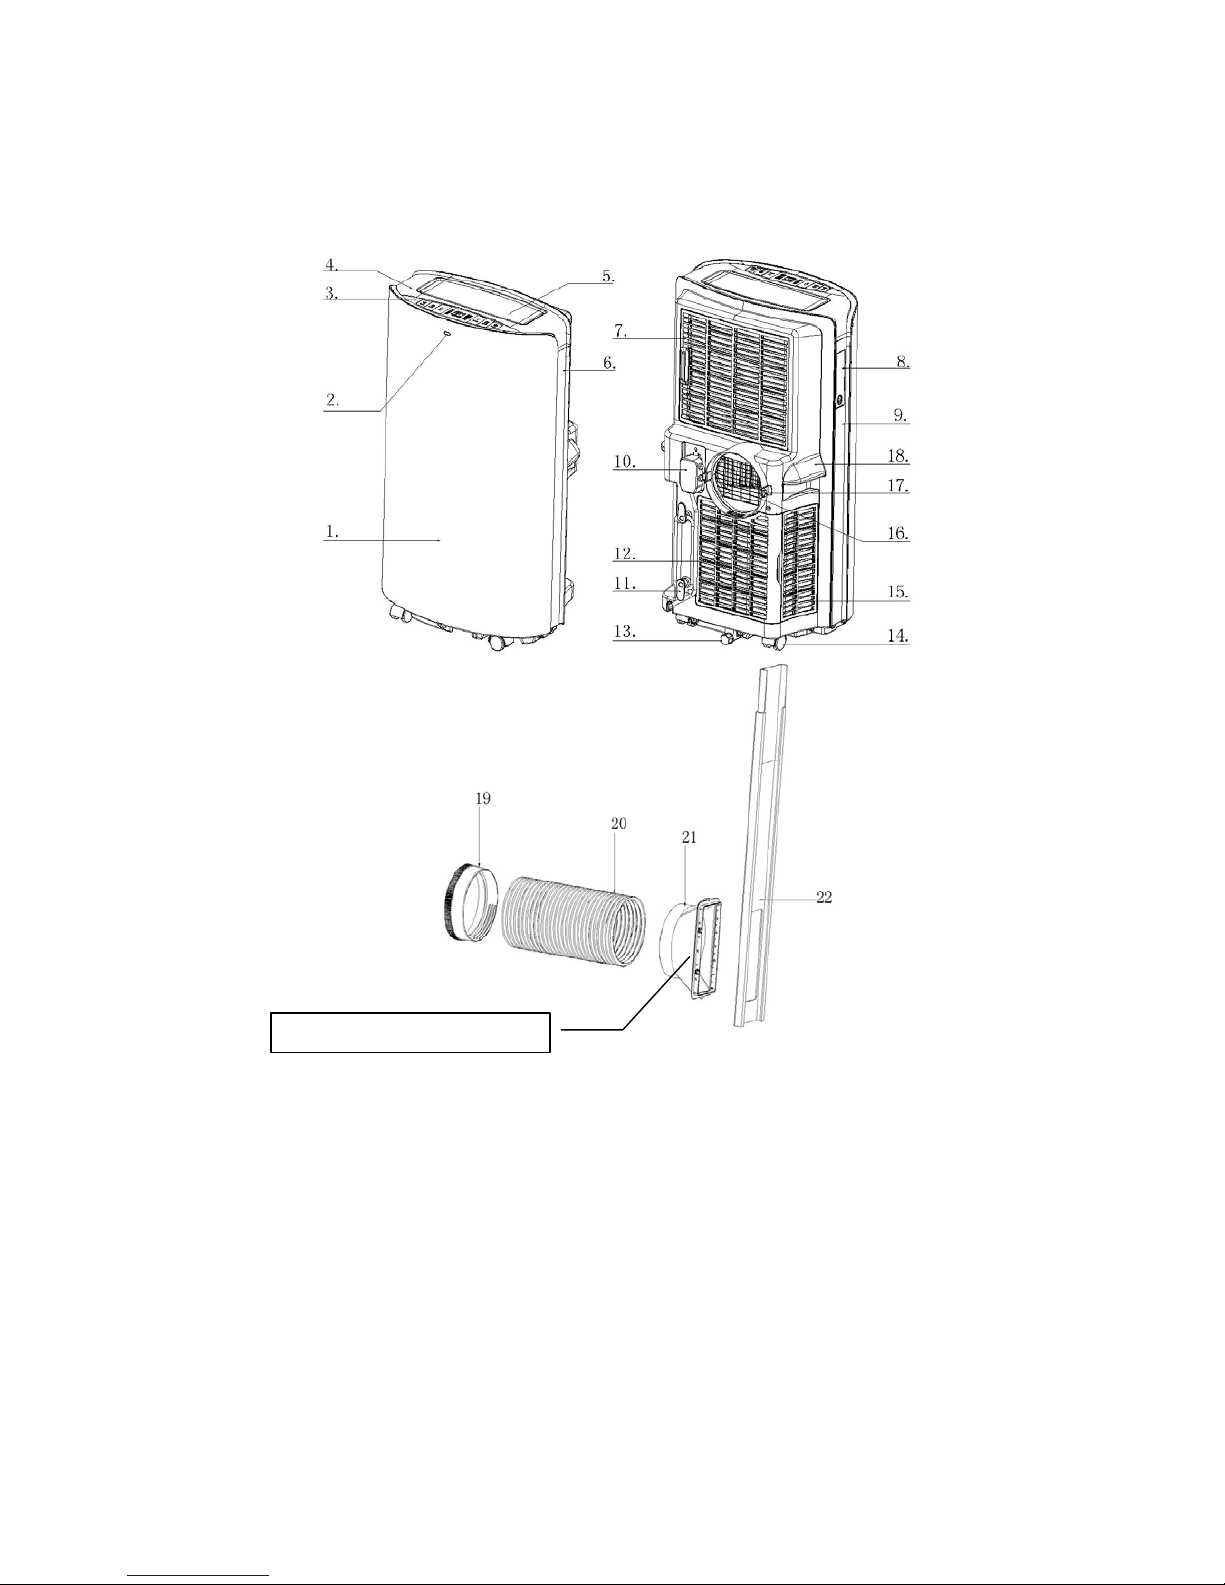
Cuenta con la función de temporizador de 24 horas, único con un sonido recordatorio de encendido
y apagado.
3-minutos de retraso en proceso de reinicio, protector del compreso y otras funciones de protección
múltiple.
2. Identificación de las partes
1. Panel frontal
2. Control remoto de la ventana de recepción
3. Panel de control
4. Panel superior
5. Persiana horizontal
6. Tablero de decoración derecho
7. Conjunto de filtro superior del panel posterior
8. Compartimiento del control remoto
9. Tablero de decoración izquierdo
10. Cable de conexión
11. Soporte del cable
12. Conjunto inferior del filtro del panel trasero
13. Cubierta de drenaje
14. Rueda universal
15. Conjunto de filtro del panel lateral
16. Reja de protección
17. Sujetador
18. Mango
19. Conector redondo del tubo de escape
20. Manguera de escape
21. Adaptador de la manguera de escape
22. Kits de la ventana
Panel de inclinación del adaptador
Page 69
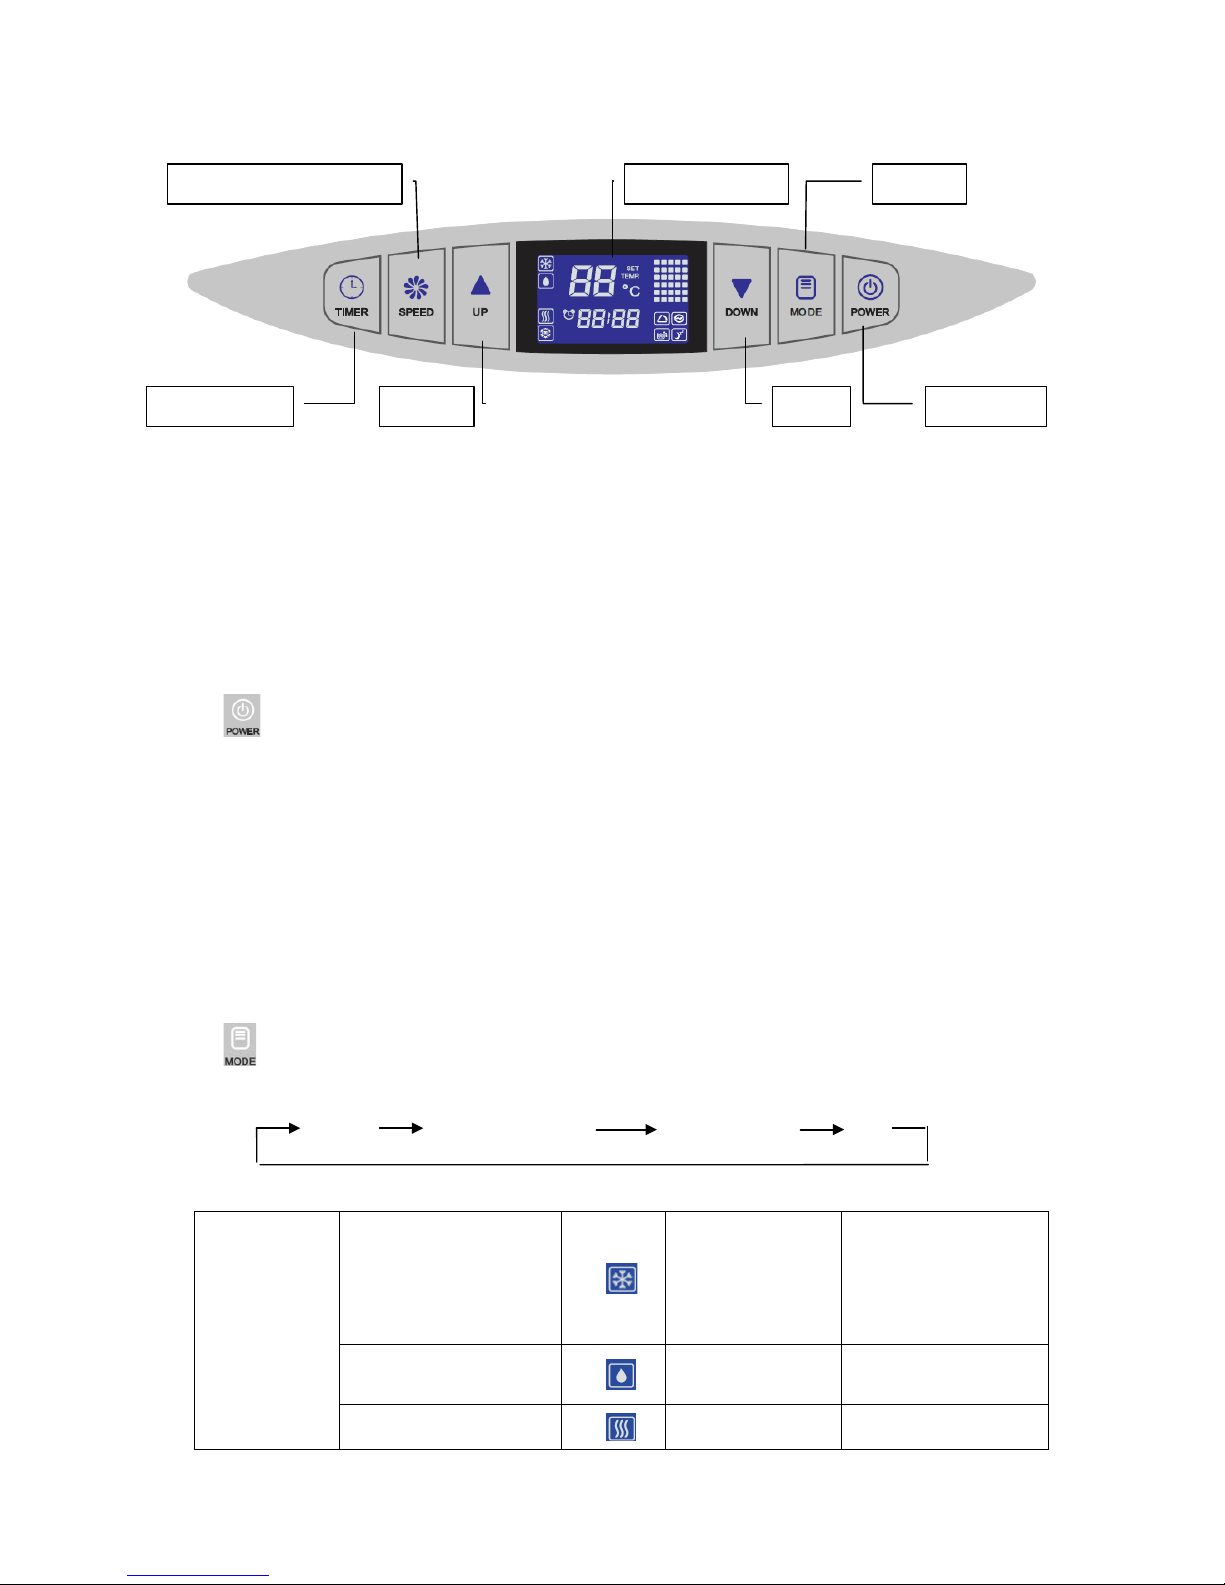
Operaciones y ajustes
1. Panel de control
En esta sección se explica el funcionamiento adecuado del aire acondicionado móvil.
2. Panel de control de operaciones
Esta unidad cuenta con las opciones de refrigeración, calefacción, deshumidificación, ventilación y
conservación de energía y modo de descanso.
1) Active la unidad: Enchuf e y todos los iconos e n la ventana d e visualizac ión del LCD se il uminarán
durante 2 segundos y la música de encendido se escuchará, a continuación, la pantalla LCD
mostrará la temperatura a mbiente con rango de 5 - 35 ℃ (41-95 ℉), la unidad se quedará en
modo de espera, hasta la siguiente operación.
2) :Toque esta tecla para encender la u nidad, la música de encend ido sonará y la unidad se
activará en modo de refrigeración de forma automática con la temperatura de ajuste 22 ℃ (72 ℉),
el ventilador funci onará en velocidad media. Toque es t a tecla de nuevo y la unidad se apagar á y la
música de apagado sonará.
A. Cuando la unidad está encendida, la pantalla LCD mostrará la temperatura ambiente, a
continuación se pondrá en marcha el ventilador y la ventana de salida de aire se abrirá
automáticamente.
B. Cuando la unidad está apagada, todas las partes dejan de funcionar, la ventana de salida de aire se
cerrará automáticamente.
3)
:
Pulse esta tecla para cambiar y seleccionar e l modo en que desea qu e la unidad de opere,
todos los modos se muestran abajo para su confirmación.
FRÍO DESHUMIDIFICAR VENTILADOR CONSERVACIÓN DE
- ENERGÍA
Modos de
operación
FRÍO
Temperatura
Rango de
ajuste
16℃--30℃
(60℉--86℉)
DESHUMIDIFICAR
----- -----
VENTILADOR
----- -----
Velocidad del ventilador
Temporizador
Subir
Pantalla LCD
Bajar
Modo
Encendido
Page 70

CONSERVACIÓN
DEENERGÍA
Temperatura
Rango de
ajuste
16℃--30℃
(60℉--86℉)
4) y
:
A. Presione o para aumentar o disminuir la temperatura 1 ℃ o ℉ 1 pulsando una vez.
B. Presione o más de 2 segundos para aumentar o disminuir el número de la temperatura por
intervalos de 0,5 segundos de form a continua, el ran go de ajus te de la tem peratura es de 16 ~ 30 ℃ /
60 ℉ ~ 86.
C. Presione y juntos en vez de convertir grados Celsius y grados Fahrenheit. (℃ ← → ℉
transición).
D. Presione o en el temporizador para ajustar la configuración del tiempo.
5)
:
tocar esta tecla para cambiar la velocidad de l ventilador en funcionam iento a alta v elocidad
、velocidad media o velocidad baje. 。
A. Bajo los modos FRÍO y VENTILADOR , la velocidad de funcionamiento del ventilador
puede ser ajustada por el siguiente orden,
B. Bajo el modo SECO , el ventilador se verá obligado a funcionar a baja velocidad , la
temperatura no puede modificarse.
C. La velocidad del ventilador no se cambiará si la unidad opera entre los modos de ventilador y fresco,
eso significa que si el ventilador funciona a baja velocidad en el modo FAN (ventilador), la velocidad
del ventilador mantendrá misma cuando la unidad cambia al modo COOL (frío); Si el ventilador está
funcionando a alta velocid ad bajo el modo CO OL (frío), mantendrá las m isma velocidad cuand o la
unidad cambie al modo FAN (ventilador).
D. El ventilador s e verá obligado a f uncionar a baja velocida d en los modos de deshumidificación y
suspensión y la velocidad del ventilador no se puede ajustar.
6)
:
Pulse esta tecla para establecer el tiempo de funcionamiento del dispos iti v o y para activar
automáticamente el modo de encendido / a pag ado y para comprobar o cancelar el ajuste de tiempo.
A. Es ta unidad está diseñada con un temporizador de 24 horas,
los primeros dos dígitos
son para las horas 00-24, y los dos últimos dígitos corresponden a los minutos 00-60. Puede
aumentar o disminuir media hora cada vez que toque o para determinar hora y ajuste de
los minutos.
B. Pue de configurar la unidad de tiem po auto apagado cuando está en f uncionamiento. O ajustar la
Page 71

unidad AUTO tiempo cuando la unidad está en espera. Una vez que el ajuste del temporizador está
bien, la l uz estará encen dida hasta que el tiem po que ha ya ele gido se a gote
y se apagará automáticamente.
C. Puede presionar nuevamente para reiniciar el tiempo cuando el temporizador este encendido.
El temporizador se quedará con la configuración de la hora final. El temporizador será ineficaz
y debe apagarse desd e el panel de control o con el control rem oto si desea apagar o
encender la unidad.
+ : Inicie la función DESCANSO presionando + al mismo tiempo en los modos
FRÍO o CALOR, en la pantalla LCD aparecerá, re-touch (tocar nuevamente) + para
detener el modo DESCANSO, y se apagara. El modo DESCANSO será ineficaz cuando la
unidad se encuentre en modo VENTILADOR o DESHUMIDIFICACION.
7) + :Activar o desactivar el modo Auto- oscilación presionando + . Las rejas
horizontales giraran automáticamente cuando la unidad comiese a funcionar, presione
+
a la misma vez para apagar el modo auto-oscilación, la pantalla LCD se apara. Presione
nuevamente
+ a la misma vez para activar el modo auto-oscilación, la pantalla LCD
se encenderá nuevamente.
8) Otras funciones
A. Ahorr o de energía: la luz de fondo e n la pantalla LCD se iluminará d urante 10 segun dos y luego
automáticamente si se toca un botón la luz de fondo se apagara automáticamente.
B. Auto-limpieza :La unidad empezara en los modos FRIO y DESHUMIDIFICACION la
unidad seguirá por tres minutos antes de apagarse.
C. Conservación de la Energía: la unidad tendrá un bajo consumo de energía en el modo de
conservación de la energía.
3. Funcionamiento del control remoto
Page 72

1) Encendido: Pulse este botón para iniciar la unidad cuando está cargada o parar la unidad cuando
está en funcionamiento.
2) Modo: Pulsar este botón para seleccionar el modo de operación.
3)
: Pulse este botón para aumentar la temperatura ambiente y ajuste del temporizador.
4)
: Pulsar este botón para disminuir la temperatura ambiente y ajuste del temporizador.
5) Ventilador: Presione este botón para seleccionar la velocidad del ventilador en secuencia: Bajo →
Medio → Alto.
6) Auto-Oscilación: Presione este botón para encender o apagar la función de auto-oscilación.
7) Descanso: Presion e este botón para seleccionar o c a nc elar e l modo de suspensión (s ólo ef ectivo
bajo la operación de enfriamiento o de modelos de conservación de la energía).
8) Temporizador: presione este botón para ajustar el modo AUTO-encendido AUTO apagado. El
tiempo se puede ajustar entre 0,5-24 horas. Salta por intervalo de 0,5 horas a 5 horas, y el
intervalo de 1 hora en 5 horas, ajustar la hora parpadeará 5 veces en la pantalla y luego confirmar
el ajuste.
Antes de utilizar el mando a distancia, instale las pilas AAA en el control remoto.
1) Empuje y deslice la tapa de la bat er ía en l a parte posterior del mando a d istanc i a, a c ontin uaci ón ,
se puede quitar la tapa.
2) Introducir dos nuevas baterías alcalinas AAA en el compartimiento de las pilas, prestando
atención a la polaridad correcta.
Vuelva a colocar la tapa de la batería, asegurándose de que la lengüeta de bloqueo encaje
en su sitio.
Botón subir y bajar
Botón de velocidad de ventilador
Botón temporizador
Botón de descanso
Pantalla LCD
Botón de encendido
Botón de modo
Botón de auto-oscilación
Botón de auto-limpieza
Page 73
Notas:
Utilice solamente pilas alcalinas. No utilice pilas recargables.
Cuando reemplace las baterías, siempre reemplace ambas pilas por pilas nuevas, no mezcle pilas
viejas y nuevas.
Si no va a u tilizar el acondicion ador de aire durante u n período prolongado d e tiempo, retire las
pilas del mando a distancia.
4. Almacenamiento del control remoto
1) Inserte el mando a distancia en el compartimento int egrado en el la do izquierdo de la unidad, y
empuje suavemente para el cierre.
2) Presione la parte inferior del compartimento integrado con suavidad para abrirlo y sacar el mando
a distancia.
Nota: Con el fin de evitar la pérdida del mando a distancia, por favor ponga el mando a distancia en el
interior del lugar de almacenamiento cuando no lo usa.
ADVERTENCIA
Si el líquido de las pilas entra en la piel o la ropa, lavar bien con agua limpia, no utilice el mando a
distancia si las pilas tienen alguna fuga.
Si usted come el líquido de las baterías, cepillarse los dientes y ver al médico. Los productos químicos
de las pilas podrían causar quemaduras u otros peligros para la salud.
Asegúrese de anotar la
polaridad correcta de las
pilas
Sostenedor del control remoto
Page 74
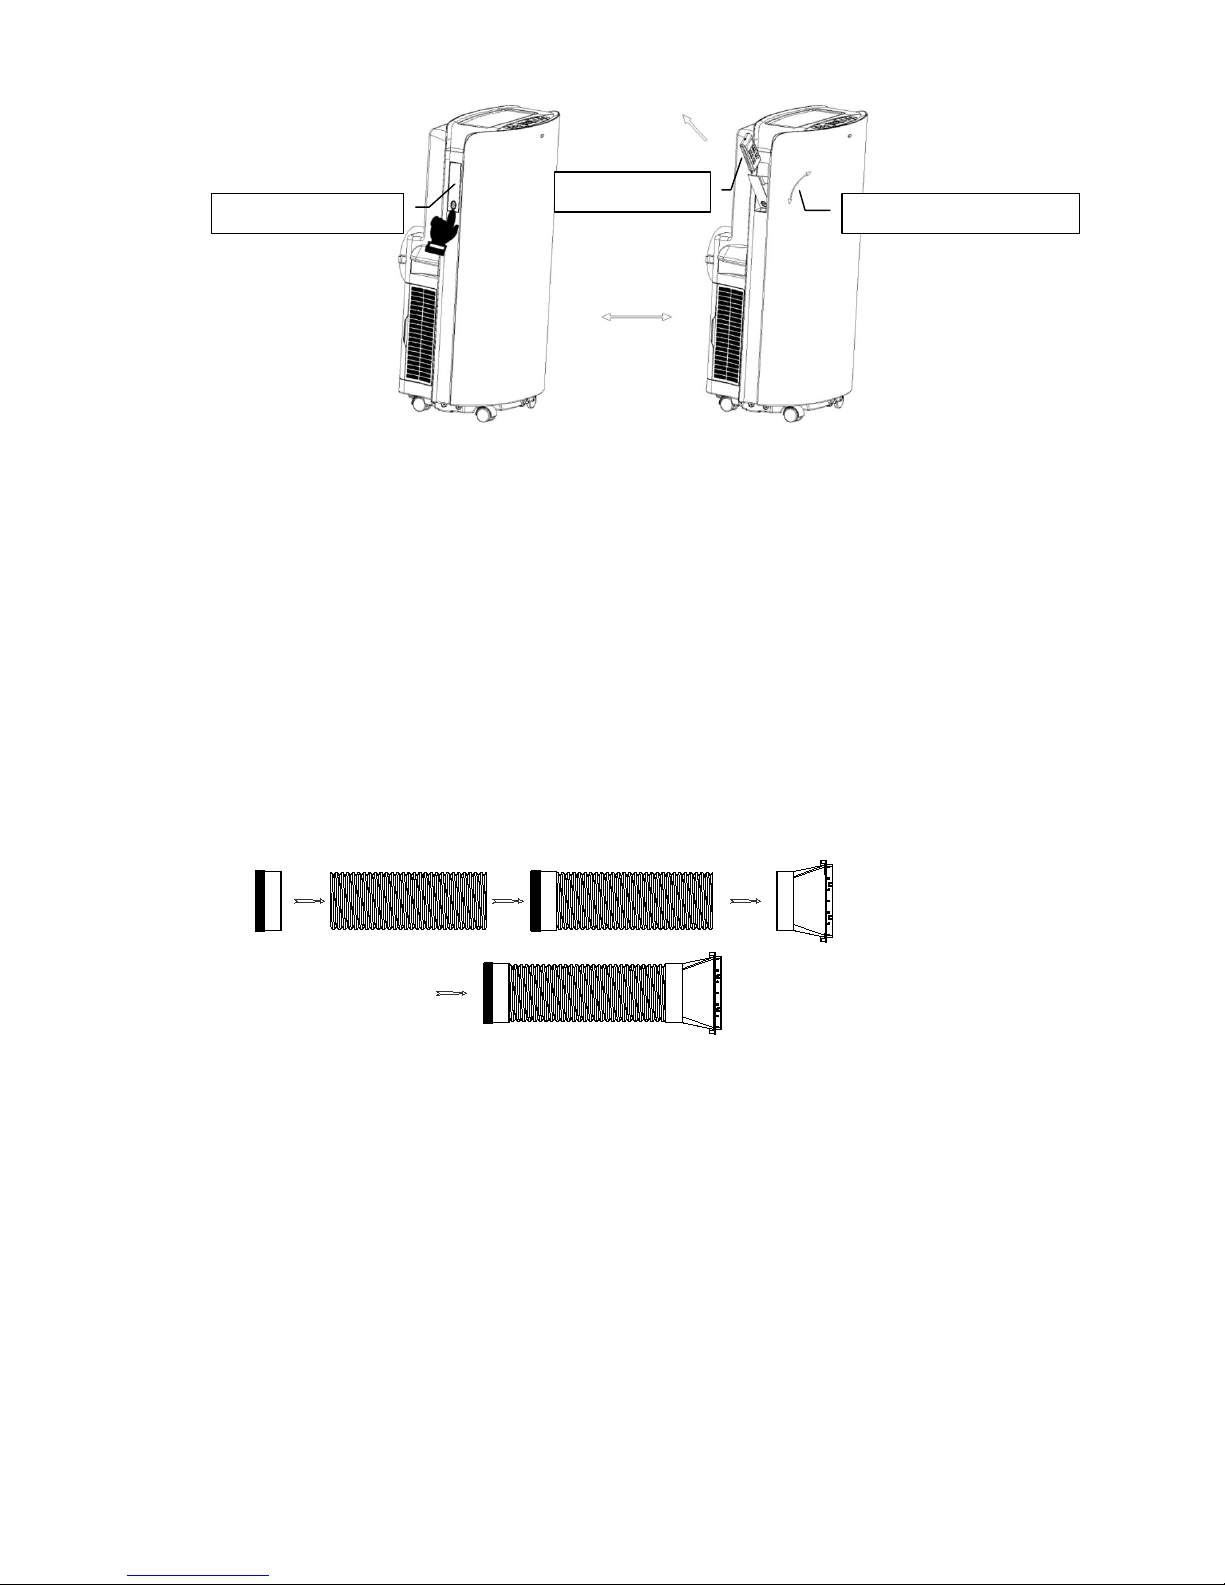
1. Instalación y Ajuste
2. Instalación
Notas:
Manteng a este aparato de aire acondicionad o móvil en posic ión vertical al m enos 2 horas antes
de la primera instalación.
Este acondic ionador de aire se puede m over convenientemente dentro del hog ar; mantener la
unidad en posición vertical mientras se mueve. El acondicionador de aire se coloca en la
superficie plana.
No instalar o utilizar el acondicionador de aire en el baño u otros ambientes húmedos.
1) La instalación del conjunto de la manguera de escape y su adaptador.
A. Retire el tubo de salida, su conector y adaptador, para quitar la bolsa de plástico.
B. Extender un extremo del tubo de escape, atornillar el final sin dejar espacio del conector
redondo en sentido anti horario con al menos 3 vueltas.
C. Extender otro extrem o de la manguer a de escape, atornille el adaptad or en sent ido anti horar io
con al menos 3 vueltas.
Nota: Atornille el conector redondo y el adaptador en su posición correcta, al menos 3 vueltas, para
mantener una buena conexión del conjunto de la manguera de escape.
2) Instalación del conjunto de la manguera de escape a la unidad principal.
Dirección de apertura y cierre
Control remoto
Caja del control remoto
Page 75

Ponga el ex tremo delantero de l conjunto de la manguera de escape en la posición d e salida de
aire en e l panel posterior, elementos se suj etaran, se bloqueará el conjunto de l a manguera de
escape.
Nota:
Mantener la dirección correcta del lado inclinado del adaptador, para facilitar la instalación de
la ventana de sello-placa.
Mantenga la manguera de escape conectada en una buena posición.
A. Instalación de la venta na d el sello-placa
B. Coloque la ventana entreabierta , ponga el sello de l a placa en la ventana, ya sea en posición
vertical u horizontal.
C. Extienda las par tes de la placa de sello y ajuste a la longitud de la vent ana, mantenga ambos
extremos para cubrir los bordes de la ventana, fijar con tornillos a continuación.
Nota:
Mantener los dos extremos de la ventana de sello-placa para cubrir los bordes de la ventana y así
asegurar el sellado.
Girar el tornillo en una Buena posición.
A. Ins tal ac ión de la unida d
B. Mue va la unidad con el conjunto de la manguera d e escape instalada de lante de la ventana y
mantenga la unidad al menos a 50 cm de las paredes u otros objetos.
Cierre
Espacio
Ensamblado de manguera de escape
Page 76
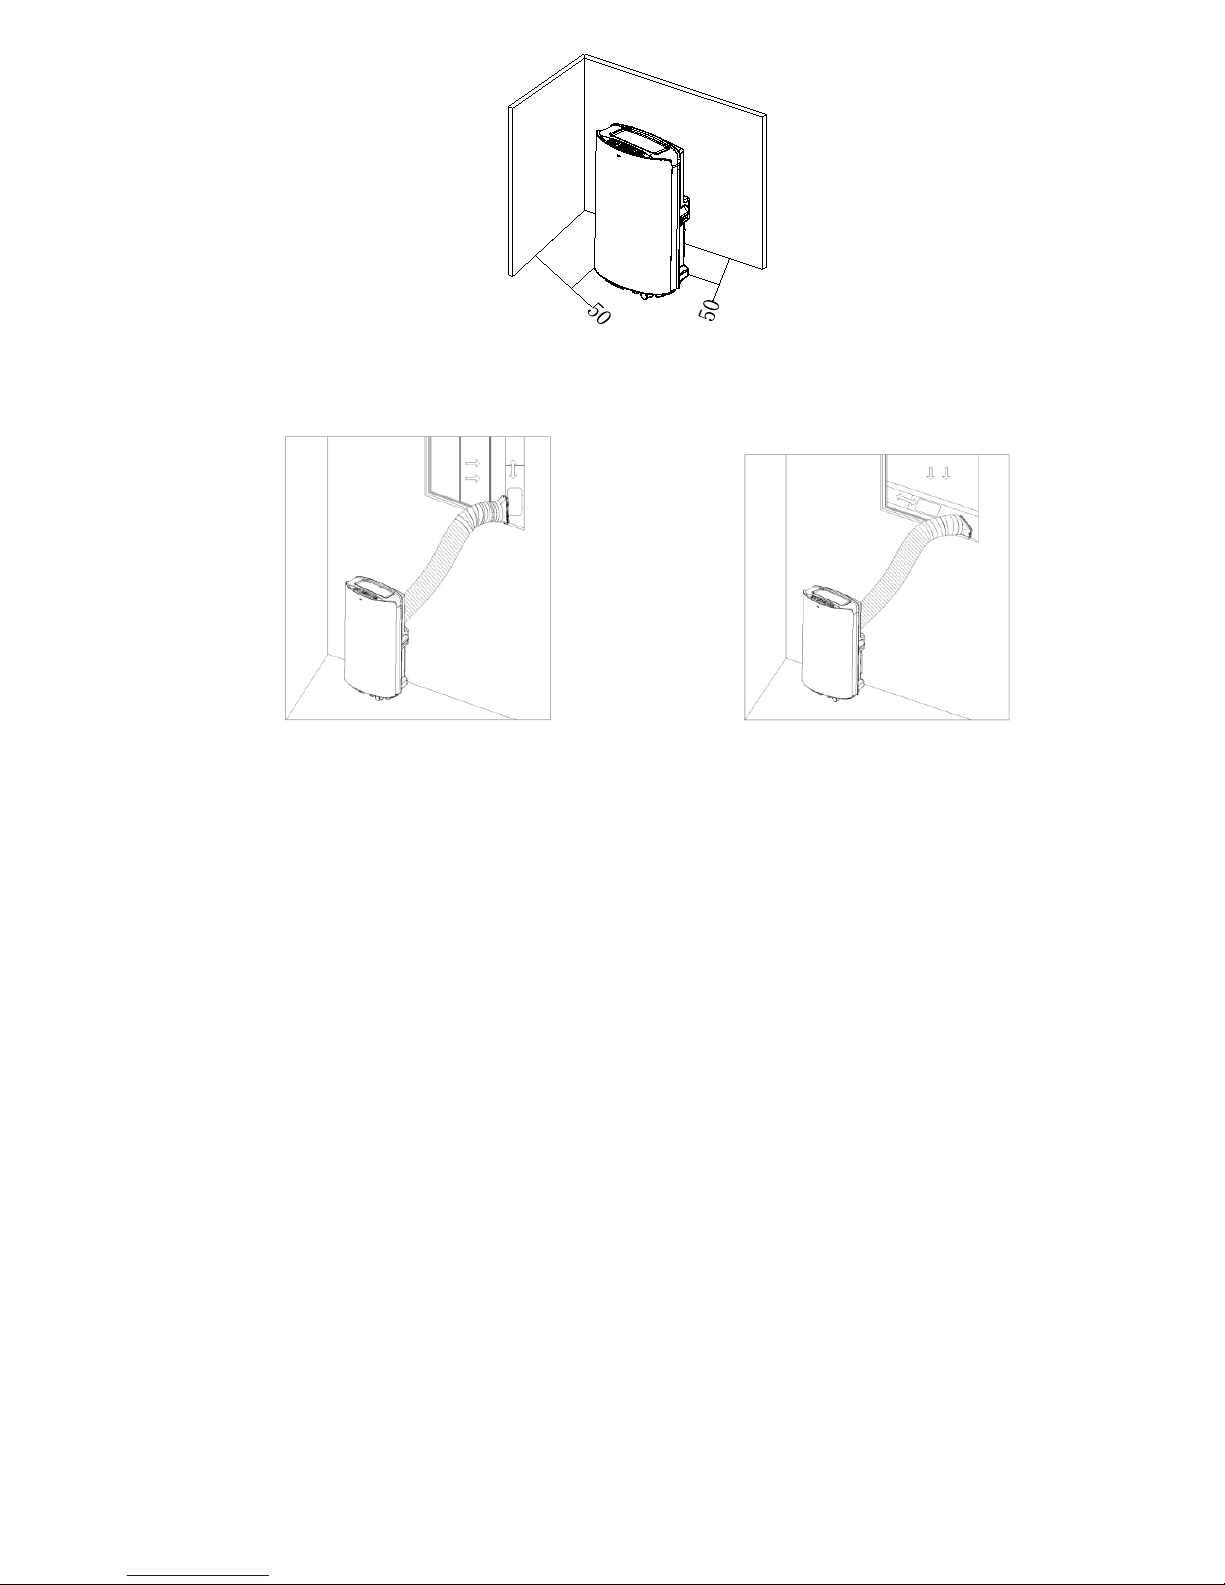
C. Instalar el extrem o rectangular del c onjunto de la m anguera de escape en el orifici o rectangular
correspondiente al conjunto de la ventana de sello-placa, fijarlo con el tornillo y cerrar la ventana.
Nota:
Deslice hacia abajo el adaptador y asegure el adaptador instalado en buena posición.
Asegure la dirección de inclinación del panel para que coincida con la dirección del sello-placa.
La manguera de escape no puede ser do blada o se flexionad a a un ángulo super ior de 45 °,
con el fin de mantener una buena ventilación del tubo de escape.
Notas importantes:
La manguera de escape es de 280 mm-1500 mm de largo y esta longitud se determina en base a la
especificación del acondicionador de aire (s). No utilice la manguera prolongada y no la sustituya
por otras mangueras diferentes ya que esto puede afectar a las funciones del acondicionador de
aire. El tubo de escape debe ser liso o puede causar que acondicionador de aire se sobrecaliente o
sufra algún daño con el tiempo.
1. Instrucción de drenaje
2. Manual de drenaj e :
1) Una vez que la unidad se deshaga del agua por completo, apague la unidad y desenchufe.
2) Coloque la bandeja debajo de la salida de agua en la parte posterior de la unidad.
3) Destornille la tapa de drenaje, desconecte el tapón de agua para que el caiga agua en la bandeja.
4) Coloque el tapón y ponga firmemente el tornillo en la tapa la salida de agua después del drenaje.
Page 77
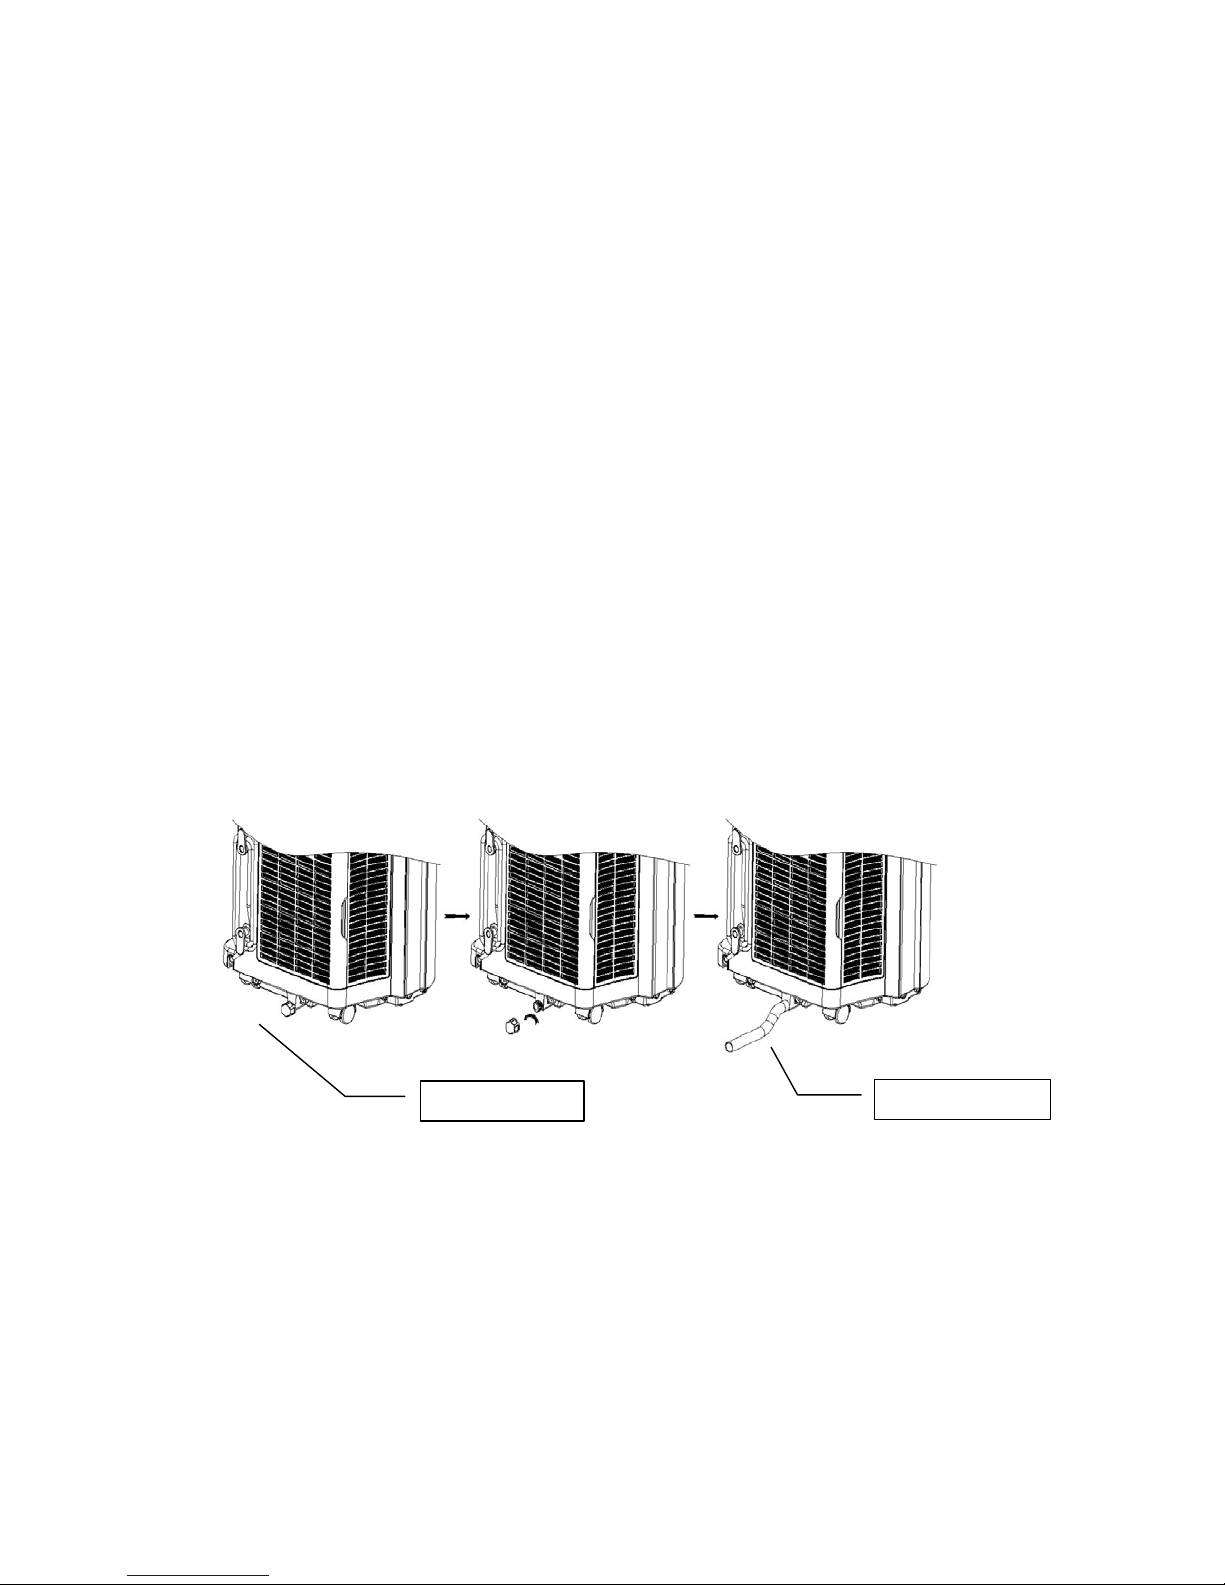
Notas:
Proteger la cubierta de drenaje y el tapón de agua adecuadamente.
Mover la unidad con cuidado para evitar las fugas innecesarias.
Incline la unidad ligeramente hacia atrás durante el drenaje.
Bloquee el orificio de drena je tan pront o com o sea pos ible antes d e que la bandej a se llene y no
podrá contener toda el agua en la unidad, así se evitara la fuga de agua y no se mojara el suelo o
la alfombra.
El tapón de drenaje de agua y la cubierta deb en quedar completam ente ajus tados , para evitar la
condensación y no se humedezca el suelo o la alfombra cuando la unidad vuelva a ser encendida.
3. Drenaje continuo
1) Desatornille el desagüe de la cubiert a y descon ect e el tapón de agua.
2) Conecte el orificio de drenaje con la manguera de drenaje φ12mm, lo más profundo posible para
evitar fugas.
3) Tire de la manguera de drenaje al baño o al aire libre.
Notas:
La manguera de drenaje debe ser instalada cuando no haya agua en la bandeja.
Se sugiere qu e no utilice el drenaje c ontinuo cuando la unidad está en modo frío, para poder
reciclar suficiente agua en la unidad para mejorar los efectos del sistema de refrigeración.
Coloque la manguera de drenaje en un lugar inaccesible y mantenga la manguera de desagüe
directamente sin ningún tipo de flexión.
Mantener la tapa de drenaje y su tapón correctamente cuando se utiliza el drenaje continuo.
1. Múltiples funciones de protección
2. Función de protección Anti/congelado
Bajo el modo FRÍO, cuando el compresor funciona continuamente durante 10 minutos, si la
temperatura del tubo es ≦ 2 ℃ / 36 ℉ durante 20 segundos, la función de protección
anti-congelado se encenderá, en la panta lla LED se mostrara E4 y el compresor y motor de la
rueda de agua dejara de funcionar, pero el ventilador superior permanecerá en funcionamiento; Si
la temperatura del tubo de ≧ 8 ℃ / 46 ℉, la unidad detendrá la protección anti-congelado y
Cubierta de drenaje
Manguera de drenaje
Page 78

volverá a la condición de trabajo original. El compresor volverá a empezar a trabajar con 3
minutos de retardo para la protección.
3. La alarma de seguridad que avisa del exceso de agua y la protección de apagado
Cuando el volumen de ag u a es superior, la advertencia sonara de forma automática y el icono de
agua se iluminara en la pantalla LCD, para eso es necesario drenar la condensación y
volver a encender la un idad. (Para obt ener más información acer ca de cómo drenar, consulte la
sección "Instrucción de drenaje", por favor). Si la unidad no se a paga manualmente, la unidad
comenzara a funcionar de forma automática una vez que el agua se agote por completo. O
conecte nuevamente el cable de conexión para volver a encender la unidad.
4. Función de protección de retardo del compresor
Esta unidad ofrece pr otección contra reinicio del compresor. Excepto que el compresor puede
empezar inmediatam ente c uando la un idad s e ac tiva por pr im era vez, exist e un a protec ci ón de 3
minutos de retraso después de volver a iniciar el compresor se apaga.
Mantenimiento y servicio
Nota: Asegúrese de apagar la unidad y desconecte el enchufe antes de mantener o enviar a un centro
de servicio.
1. Limpieza de la superficie
1) Limpiar la superf icie de la unidad con u n paño suave y húmedo y no use disol ventes químicos
como el alcohol o la gasolina para evitar cualquier daño a la unidad.
2) Limpiar la salida de aire sucio o rejillas de ventilación con un paño suave húmedo y detergente.
3) Se prohíbe el uso de cua lq uier s o lv ente químico para la limpie za o po ner pr o duc t os similares a la
unidad por un largo tiempo.
4) Cualquier disolvente, a lcohol u otros disol ventes s im ilares están pr ohi bidos par a la lim pie za de la
unidad.
2. Limpieza de filtro
Limpiar el filtro una vez cada dos semanas, de otra forma el polvo acumulado influirá en el
funcionamiento de la unidad.
1) Como limpiar el filtro
A. Agarre el mango del filtro y tire de él con suavidad en la dirección correcta.
B. Limpie las partículas de suciedad en el filtro de limpieza si es necesario.
C. Sumergir y lavar el filtro suavemente en agua caliente (alrededor de 40 ℃
) m e zclada c
neutro, y luego enjuague y seque a fondo en la sombra.
Notas:
Tire suavemente el filtro.
La eliminación del filtro del panel posterior es prioridad, retire el panel lateral, para evitar cualquier
daño.
No aplastar la malla.
No golpear la malla con objetos afilados o cepillo.
Page 79
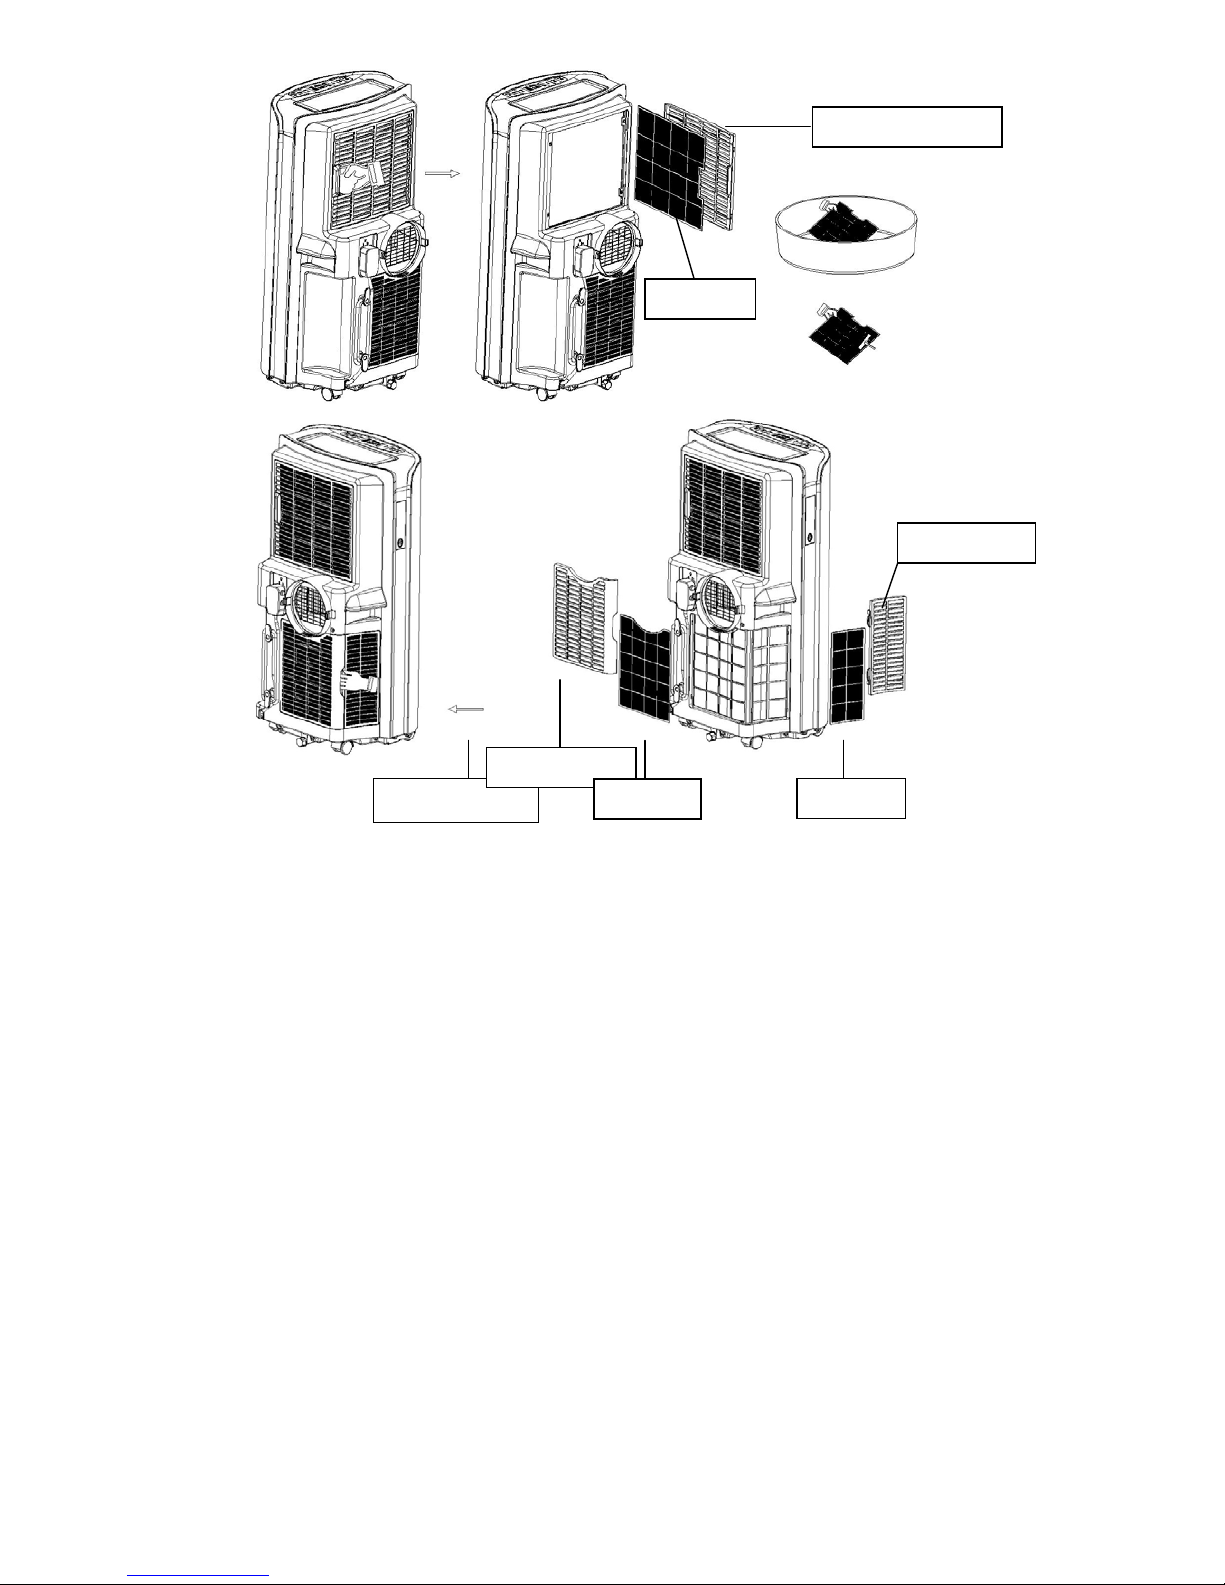
3. Instalación del filtro
Apunte el extremo del filtro hacia la ranura y luego empuje el filtro suavemente en la ranura.
Notas:
Asegúrese de instalar el filtro de panel lateral y luego el filtro del panel trasero.
Instalar el filtro con dirección opuesta.
Instalar el filtro en su sitio con cuidado para evitar cualquier daño al filtrar.
4. Fin de la temporada de almacenamiento
1) Destornille la tapa de drenaje y extraiga el tapón para drenar el agua conde nsada por c ompleto.
(Nota: el ángulo de inclinación de la unidad debe ser ≦ 30).
2) Mantenga la unidad funcionando en el modo de ventilación por medio día para secar el interior de
la unidad completamente para evitar que aparezca moho.
3) Apague la unidad, retire e l enchufe y luego e nvuelva el cab le de alimentac ión alrededor del pilar
de alambre de cuerda auto mática, inserte el tapón e n el orificio de fijac ión universal en el pane l
posterior de la unidad, instale el tapón de agua y la cubierta de desagüe.
4) Retire el conjunto de la manguera de escape de calor, manténgalo limpio adecuadamente.
Filtro alto
Marco de filtro superior
Dirección de
Bajo el marco del
Filtro
Filtro lateral
Marco del filtro
Page 80

Notas:
Sujete el conjunto de la manguera de escape con ambas manos.
Empuje los sujetadores a un lado de salida de aire con los pulgares, luego extraiga el conjunto de
la manguera de escape.
5) Empaque el acondicionador de aire adecuadamente con una bolsa de plástico blando y colóquelo
en un lugar seco con las m edi das ad ec uad as a prue b a de polvo y mantenga la u nid ad a lej ad a de
los niños.
6) Retire las pilas del mando a distancia y guárdelo apropiadamente.
Nota:
Asegurar y almacene la unidad en un lugar seco. Todos los accesorios de la unidad deberán estar
protegidos y almacenados juntos de manera adecuada.
Solución de problemas
Por favor, compruebe la unidad y las sugerencias a continuación antes de solicitar un servicio
profesional, pero nunca d esm onte o repar e la unidad usted mism o, puede caus ar daño a uste d y a su
propiedad.
Problema Causa Solución
La unidad falla al
iniciar
La Fuente eléctrica se
interrumpe
Conectar la unidad a una toma de
corriente activa y vuelva a encenderlo .
Se visualiza el icono de exceso
de agua
Escurrir el agua almacenada en la
unidad.
Temperatura ambiente
demasiado baja o poco alta
Se recomienda utilizar esta unidad
entre 7-40 ℃
La temperatura ambiente es
más baja que la temperatura
establecida en el modo de
refrigeración o temperatura
más elevada en el modo de
calefacción
Cambiar la temperatura establecida
Mal efecto de
enfriamiento
La luz solar le da directamente
a la unidad
Cerrar la cortina de la ventana
Las puertas y ventanas están
abiertas, la habitación está
llena o hay otras fuentes de
calor
Cierre la puerta y la ventana, eliminar
otras fuentes de calor, y añadir nuevos
aparatos de aire acondicionado
El filtro está sucio
Limpiar o reemplazar los filtros de
malla
la entrada o salida de aire
están obstruidos
Eliminar la posible obstrucción
Alto nivel de
ruido
La unidad está colocada en
una superficie desigual.
Ponga la unidad en un lugar plano y
firme (puede reducir el ruido)
El compresor no
funciona
Se inicia la protección contra el
sobrecalentamiento.
Espere hasta que la temperatura
descienda, la unidad se reiniciará
automáticamente
El mando a La distancia es muy larga Llevar el control remoto cerca del
Page 81

distancia no
funciona
El mando a distancia no tiene
como objetivo al receptor de
señal en la unidad.
acondicionador de aire y asegurar que
el receptor tenga señal en la unidad.
Las baterías no tienen
electricidad
Cambie las baterías
"CH01"
visualizaciones
de códigos
Fallo del sensor de
temperatura en la habitación
Revise el sensor de temperatura y
circuitos relacionados
"CH02"
visualizaciones
de códigos
fallo del sensor de temperatura
del tubo
Compruebe el sensor de temperatura
del tubo y circuitos relacionados
visualizaciones
de códigos "E4" Se activa el protector de
Anti-congelación
Restaurar las funciones
automáticamente una vez que la
protección anticongelante ha
terminado.
se
visualiza
El tanque de agua está lleno
Drenar el Condensado y Reiniciar La
Unidad
Apéndice
Fuente de alimentación V~, Hz 220~240,50
Capacidad de enfriamiento
Btu/h 12,000
W 3,520
Refrigerante / carga /g R410A/560
entrada
clasificada
Enfriamiento W 1,350
Calificación
actual
Enfriamiento A 6.20
Eliminación de humedad L/h 1.4
Circulación del aire m³/h 430
Ruido
Alto dB(A) 55
Medio dB(A) 53
Bajo dB(A) 50
Tamaño
corporal
W×H×D mm 471×850×355
Tamaño del W×H×D mm 540×888×398
Page 82

paquete
Peso bruto peso Neto kg 33.5 /37.5
Área de aplicación ㎡ 16~22
Fusible de parámetros
Tipo: FSD o 50F
Voltaje: 250V
Corriente: 3.15A
Diagrama esquemático del aparato de aire acondicionado
Para los parámetros técnicos específicos del modelo, consulte la etiqueta de clasificación del
producto.
MEDIO AMBIANTE
ATENCIÓN :
No se deshaga de este producto como lo hace con otros productos del hogar. Existe un
sistema selectivo de colecta de este producto puesto en marcha por las comunidades, debe
de informarse en su ayuntamiento acerca de los lugares en los que puede depositar este
producto. De hecho, los productos eléctricos y electrónicos pueden contener substancias
peligrosas que tienen efectos nefastos para el medio ambiente o para la salud humana y
deben ser reciclados. El símbolo aquí presente indica que los equipos eléctricos o
electrónicos deben de ser cuidadosamente seleccionados, representa un recipiente de basura
con ruedas marcado con una X.
Fabricado e importado por : Adeva SAS 8 rue Marc Seguin 77290 Mitry-Mory FRANCE
www.hkoenig.com - contact@hkoenig.com - Tel. 01 64 67 00 01
Evaporador
Condensador
Compresor
Tubo capilar
Page 83

ITALIANO
La ringraziamo per aver scelto questo nuovo model lo di condizionatore portatile; s i prega di leggere
questo manuale con cur a e attenzione prima di insta llare e utilizzare questo appar ecchio. Si prega di
conservare questo manuale in un luogo sicuro per ogni riferimento futuro.
Istruzioni sulla sicurezza
Specifiche elettriche
1. Tutto il cablaggio deve essere conf orme alle normative elettriche locali e na zionali e l’apparecchio
deve essere installato da un tec nico qualificato. Se avete qualsiasi dom anda riguardante le seguenti
istruzioni, contattare un elettricista qualificato.
2. L'apparecchio deve essere installato in conformità con le normative di cablaggio nazionali. Controllare
l'alimentazione dispo nibile e risolvere eventuali probl emi di cablaggio prima di installar e e mettere in
funzione questa unità.
3. Per la vostra sicurezza e protezione, l'unità è dotata di messa a terra attraverso il cavo di
alimentazione, quand o si collega a una pres a dotata di mess a a terra. Se non si è sicur i che la presa
della vostra casa disponga di una f unzionant e mes sa a terra, si prega di consu ltare un elettricis ta. Se i l
cavo di alimentazione è da nneggi ato, dev e esser e sostitui to dal prod uttor e, dal suo c entro d i assist enza
o da una persona qualificata in modo da evitare ogni pericolo.
4. Questo apparecchio non è destinato a persone (compresi i bambini) con ridotte capacità fisiche,
sensoriali o mentali, o mancanza di esperien za e c o no s c en za, a meno che non siano contr ol lat i o is truit i
all'uso dell'apparecchio da una persona responsabile della loro sicurezza. I bambini devono essere
sorvegliati per assicurarsi che non giochino con l'apparecchio.
AVVERTENZE:
Per ridurre il rischio di incendi, scosse elettriche o lesioni quando si utilizza il condizionatore d'aria,
seguire queste precauzioni di base:
Non utilizzare l'apparecchio in ambienti umidi, come bagni o all’aperto, ecc.; utilizzarlo solo in casa.
Non rimuovere la messa a terra.
Non utilizzare un adattatore.
Non utilizzare prolunghe.
Non condividere la stessa presa di corrente adoperata con altri apparecchi.
Non collegare o scollegare la spina di alimentazione con le mani bagnate, per evitare scosse
elettriche.
Non spegnere mai l'unità scollegando direttamente il cavo.
Spegnere l’apparecchio e scollegare la spina prima della sua manutenzione o pulizia.
Non smontare, riparare o m odificare l'unità sen za autorizzazione, onde evitare lesioni del corpo o
danni alle cose, accertarsi che queste operazioni vengano eseguita dal produttore o da
professionisti.
Non inserire oggetti nell'unità.
Non coprire o ostruire le prese o le uscite d'aria per evitare il surriscaldamento.
Non colpire o scuotere l'apparecchio per evitare danni.
Page 84

Non spruzzare acqua o posizionare l'unità in prossimità di fonti d’acqua per evitare scosse elettriche.
Non posizionare l'apparecchio in prossimità di appar ecc hi a gas, fiamme o liquidi infiammabili.
Si ha bisogno di due o più persone per spostare e installare il condizionatore.
Non lasciare che i bambini giochino in prossimità dell'unità.
Se il ca vo di alimentazione è danneggi ato, deve essere sostituito con un servizio post-vendita per
evitare ogni pericolo.
Precauzioni
Mantenere l'unità ad almeno 1 metro di distanza dal televisore e dalla radio per e vitare interf erenze
elettromagnetiche.
Non esporre l'unità sotto la luce diretta del sole per evitare che il colore della superficie sbiadisca.
Non inclinare l'unità per più di 35 gradi e non capovolgerle durante il trasporto.
Posizionare l'unità su una superficie piana e verticale con meno di 5 gradi di inclinazione.
Mantenere il tubo di scarico in buone condizioni, senza fletterlo, quindi collegare con l'unità.
L'unità funziona in modo più efficiente in certi luoghi anziché altri (installazione e regolazione).
Svuotare il vassoio di drenaggio condensato prima di conservare l’apparecchio a fine stagione al fine
di prolungare la durata dell’unità.
Non usare solventi chimici (ad esempio benzene, ecc.) per pulire la superficie dell'unità, non graffiare
o danneggiare l'unità.
Assicurarsi di togliere l'alimentazione prima di smontare o installare il filtro.
Nota: Non utilizzare l'appar ec chio in m odalità di raffreddam ento s e la tem peratur a am biente è sup eriore
a 35°C.
Caratteristiche e Identificazione delle parti
1. Caratteristiche
Nuovo aspetto con un design compatto, più lussuoso e di alto livello.
Il telecomando e il pannello di controllo con display LCD e touchscreen rendono il funzionamento più
accessibile.
L'unità è dotata di modalità di raffreddamento, ventilazione, deumidificazione, e funzioni “sleep”
(sonno).
L’uscita d’aria è verso l'alto, oscillazione automatica, del deflettore orizzontale e copertura delle
uscite dell'aria quando l’apparecchio smette di lavorare, per evitare la polvere nell’unità, delle feritoie
verticali possono essere regolate manualmente.
Compartimento integrato per conservare il telecomando che sarà facile da riporre.
Maniglie con cut-point, rendono l'intera unità a misura d’uomo.
Il dispositivo è dotato di un vano di conservazione del cavo di alimentazione e della presa in grado di
proteggerli.
Alta posizione di uscita dell'aria di scarico, facilità di montaggio e sfiato rapido.
Intelligente, rispettoso dell'ambiente e fa risparmiare energia grazie al sistema di raffreddamento con
auto-evaporazione.
Funzione timer di 24 ore, originali segnali acustici di on/off.
Ritardo di 3 minuti per riavviare la protezione del compressore e multiple funzioni di protezione.
Page 85

2. Componenti dell’apparecchio
1. Pannello frontale
2. Remote control receiving window
3. Pannello di controllo
4. Pannello superiore
5. Feritoia orizzontale
6. Bordo di decorazione destro
7. Gruppo filtro superiore del
pannello posteriore
8. V ano Telecomando
9. Bordo di decorazione sinistro
10. Cavo di alimentazione
11. Avvolgi-cavo
12. Gruppo filtro inferiore del pannello
poposteriore
13. Copertura scarico
14. Rotella universale
15. Assemblaggio del filtro del pann el lo lat eral e
16. Griglia di protezione
17. Chiusura
18. Maniglia
19. Connettore ton do del tub o di scaric o
20. Tubo di scarico
21. Adattatore del tubo di scarico
22. Kit finestre
Adattatore inclinato per
pannello
Page 86
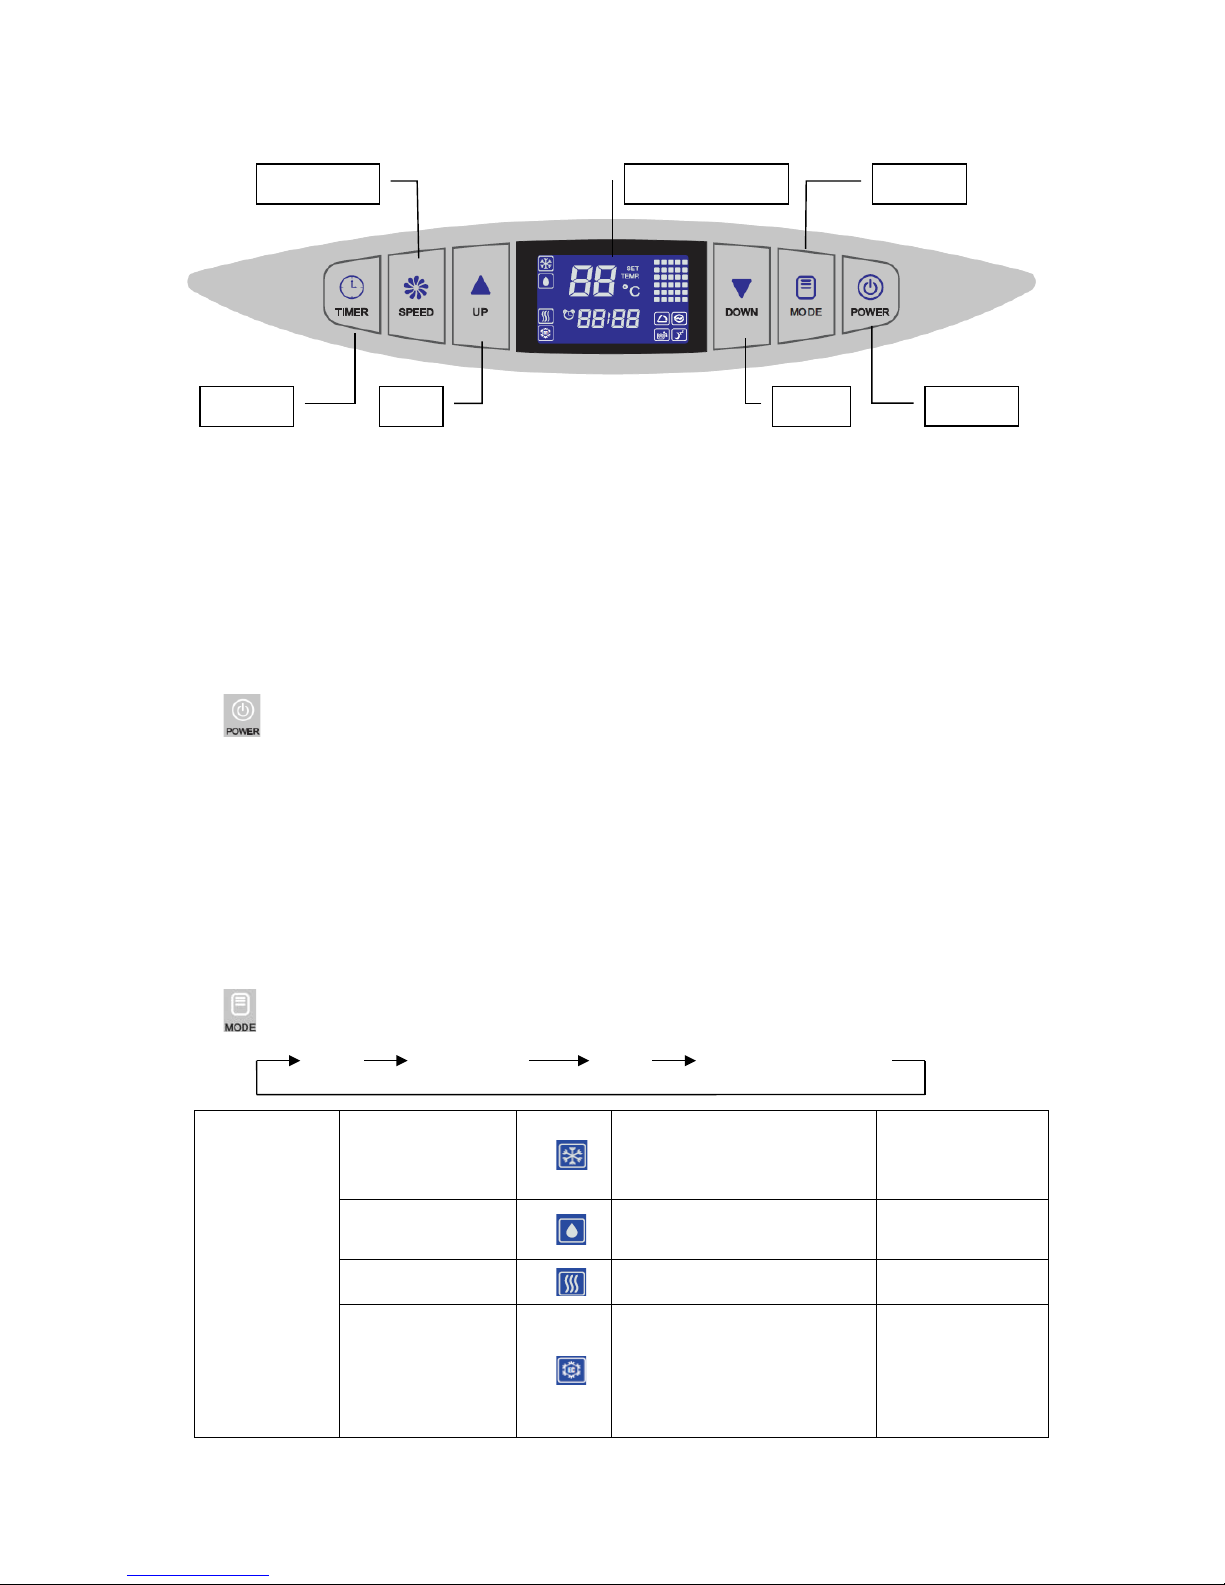
Operazioni e impostazioni
1. Pannello di controllo
Questa sezione illustra il corretto funzionamento del condizionatore d'aria.
2. Operazioni del pannello di controllo
Questa unità è dotata dei seguenti modi di operazione: raffreddamento, riscaldamento, deumidificazione,
dialogo tra ventilazione e conservazione e modalità “sleep”.
1) Alimentazione dell'un ità: Collega ndo l’apparecchio tu tte le icone nella f inestra del dis pla y a crista lli
liquidi si illum inano per 2 secondi insieme a un segna le sonoro. Dopo, il display LCD mos trerà la
temperatura ambient e con un intervallo di 5-35°C (41-95°F); a questo punto l’unità è in standb y
pronta per il funzionamento.
2) :Premere questo tasto per accendere l'apparecchio, il segnale musicale si attiva e l'unità
funziona in modalità r affreddamento con temperatura im postata automaticamente a 22°C (72°F),
con la ventola che gira a velocità m edia. Premendo nuovamente questo tas to, l'unità si spegne
attivando nuovamente il segnale musicale.
A. Quando l'unità è accesa, il display LCD visualizzerà la temperatura ambiente; la ventola inizia a girare
e la finestra di uscita dell'aria si aprirà automaticamente.
B. Quando l'unità è s penta, t utte l e parti s mettono di fun zionare, la finestra di u scita del l'aria si chiude
automaticamente.
3)
:
Toccare questo tasto per passare da una modalità all’altra seguendo questo ordine.
COOL DEHUMIDIFY FAN Energy Conversation
Modalità
operative
COOL
Temperatura
Impostazioni intervallo
16°C—30°C
(60°F—86°F)
DEHUMIDIFY
----- -----
FAN
----- -----
Energy
Conversation
Temperatura
Impostazioni intervallo
16°C—30°C
(60°F—86°F)
Speed
Timer
Up
Display
Down
Mode
Power
Page 87

4) e
:
A. Premere o per aumentare o diminuire di un 1°C o 1°F ogni volta che si preme un pulsante.
B. Premere o più di 2 s econdi per aum entare o d iminuire la temperatura con intervalli di 0,5.
campo di regolazione della temperatura è 16~30°C/60~86°F.
C. Premere e insieme a stesso tempo per convertire i gradi Celsius e gradi Fahrenheit.
(°C←→ °Fconversione).
D. Premere o sul TIMER per regolare le impostazioni sul tempo.
5)
:
premere questo tasto per cambiare la velocità della ventola nelle funzioni: Velocità alta 、
Velocità media o Velocità bassa .
A. Con le modalità COOL e FAN , la velocità di funzionamento della ventola può essere
regolata come segue,
B. Con la modalità TRY , la ventola sarà impostata a funzionare a bassa velocità , e la
temperatura non potrà essere regolata.
C. La velocità della vento la sarà invariata se l'unità funzionerà tra le m odalità COOL e FAN. Questo
comporta che se la ventola è in funzione a velocità bassa, cambiando la funzione, la ventola
continuerà alla stessa velocità.
D. La ventola funzioner à a bassa velocit à in m odalità di deum idificazione e “Sleep” e la velocità dell a
ventola non può essere regolata.
6)
:
Premere questo tasto per impostare l'unità di accensione/spegnimento automatico; per
controllare o annullare l’impostazione dell'ora.
A. Q uesto apparecchio è stato proget tato con il timer di 24 ore, prime due cifre sono per
ore 00-24, e le ultime due cifre sono per i minuti 00-60. È possibile aumentare o diminuire a intervalli
di mezz'ora con i tasti o o per finire le impostazione delle ore e dei minuti.
B. È possibile impostare il tempo dell’autospegnimento quando l’apparecchio è in esecuzione o
impostare il tem po di a utoa c c ens ione quando l'unità è in s ta ndby. Una volta che le impostazioni de l
timer sono OK, il tim er sarà illuminato fino al raggiung imento del tempo im postato e il
quadro si spegnerà.
C. Premendo nuovamente il tasto per reimpostare il tempo quando la funzione TIMER è accesa.
Il TIMER è soggetto alla impostazione del tempo finale. Il TIMER sarà inefficace e il quadro
sarà spento se qualsiasi operazione accenderà o spegnerà l’apparecchio dal pannello di
controllo o dal telecomando.
Page 88

+ : Inizia funzione SLEEP premendo + allo stesso tempo sotto COOL o HEAT,
lo scermo a cristalli liquidi si accenderà, ripremere + per fermare la funzione "Sleep",
sarà spento. La funzione “Sleep” sarà inefficace in modalità di deumidificazione o FAN
(ventola).
7) + :Attivare o disattivare Auto-oscillazione premendo + .. Le feritoie orizzontali
oscillano automaticamente quando l'unità inizia a lavorare, premere
+ insieme per
disattivare l'auto-oscillazione, l’icona sullo schermo LCD si spegne. Ripremere
+
insieme per accendere l’ auto-oscillazione, in LCD schermo sarà di nuovo.
8) Altre funzioni
A. Risparmio energetico: la luce di sfondo dello schermo LCD si illuminerà per 10 secondi e poi
automaticamente si speg ne se si tocca un t asto quando l'unità è collegata o la luce di sfondo è
spenta.
B. Auto-pulizia :l’ apparecchio comincia e m antiene tre minuti prima di spegner si con le
modalità COOL e deumidificatore.
C. Risparmio energetico: basso consumo energetico in modalità risparmio energetico.
3. Operazioni con il telecomando.
1) Alimentazione: premere questo pulsante per a vviar e l' unit à qu and o è collegata o spegnerla quando
è in funzione.
2) Modalità: Premer e questo pulsa nte per sele zio nare la modalità di funzionamento.
3)
: Premere questo pulsante per aumentare la temperatura della stanza e impostare il timer.
Tasti Up e Down
Velocità ventola
Timer
Sleep
Display LCD
Interruttore
Modalità
Auto-oscillazione
Auto-pulizia
Page 89

4) : premere questo pulsante per diminuire la temperatura ambiente e impostare il timer.
5) Fan: premere questo pulsante per selezionare la velocità della ventola in sequenza: Bassa →
Media → Alta.
6) Auto-Swing (oscillazione): premere questo pulsante per attivare o disattivare la funzione di
auto-oscillazione.
7) SLEEP: prem ere questo pulsante per selezionare o annullare la modalità “sleep” ( valido solo in
modalità di raffreddamento o di dialogo di energia).
8) Timer: premere questo pulsante per impostare AUTO-ON (autoaccensione) e il tempo di
AUTO-OFF (autospegnimento). Il tempo può essere regolato da 0.5-24 ore. Si va da intervalli di 0,5
quando si imposta entro le 5 or e, super at e le 5 or e gli i nter val li sar an no d i 1 ora. Il tempo im postato
lampeggia 5 volte sullo schermo, quindi confermare l'impostazione.
Prima di utilizzare il telecomando, inserire le batterie AAA nel telecomando.
1) Premere e scivolare il coperc hio delle batterie sul retro del tel ecomando, è possibile rimuovere il
coperchio.
2) Inserir e due nuo ve batt erie alcal in e AAA nel vano batterie, accertandosi della corretta polarità.
Rimontare il coperchio della batteria, facendo attenzione che la linguetta di bloccaggio scatti in
posizione.
Note:
Utilizzare solo batterie alcaline. Non utilizzare batterie ricaricabili.
Quando si sostituiscono le batterie, sostituire sempre entrambe le batterie con batter ie nuo ve , no n
mischiare batter i e vecc hie e nuove.
Se non si intende utilizzare il condizionat ore d'aria per un lungo periodo di tempo, r imuovere le
batterie dal telecomando.
4. Come conservare il telecomando
1) Inserire il telecomando nel vano integrato nel lato sinistro dell'unità, e spingere delicatamente per la
chiusura.
2) Premere la parte inferiore del vano delicatamente per aprirlo ed estrarre il telecomando.
Nota: Al fine di evitare di perderlo, quando non lo si utilizza, si prega di mettere il telecomando
all'interno dell’apposito vano integrato.
AVVERTENZA
Se il liquido delle batterie entra in contatto con la pelle o con gli indumenti, lavare bene con acqua pulita,
Accertarsi della corretta
polarità delle batterie
Page 90

non utilizzare il telecomando se le batterie hanno perdite.
Se si ingerisce il liquido dalle batterie, lav ars i i denti e consultare un medico. Le sostanze chimiche
delle batterie potrebbero causare scottature o altri pericoli per la salute.
Installazione e regolazione
1. Installazione
Note:
Tenere questo condizionatore d'aria in posizione verticale almeno 2 ore prima della prima
installazione.
Questo condi zionatore d'ar ia può esser e spostato con venientemente in de ntro casa; tenere l'unità
in posizione verticale durante lo spostamento. Il condizionatore deve essere posto su una superficie
piana.
Non installare o utili zzar e q ues to condi zi ona tore d' aria in bagn o o in altri am bient i umidi.
1. Installazione di assemblaggio del tubo di scarico e il suo adattatore.
A. Estrarre il tubo di scarico e il suo connettore e adattatore, per rimuovere il sacchetto di plastica.
B. Estendere un’estremità del tubo di scarico, svitare l’estremità senza fessura del connettore circolare
su di esso facendo almeno 3 giri in senso ant ior ari o.
C. Estendere l'altra estremità del tubo di scarico, avvitare l'adattatore su di esso in senso antiorario con
almeno 3 giri.
Nota: avvitare il connettore tondo e l’adattatore a destra, per almeno 3 giri, per mantenere una buona
connessione di assemblaggio al tubo di scarico.
2. Installazione di assemblaggio tubo di scarico all'unità principale.
Direzione del telecomando
Direzioni apertura e
chiusura
Telecomando
Vano telecomando
Page 91

Mettere l’estremità anteriore del blocco del tubo di scarico sull’uscita dell'aria del pannello
posteriore; gli elementi di fissaggio potranno così bloccare il gruppo del tubo di scarico.
Nota:
Mantenere la giusta direzione del lat o inclinato dell’adattatore, per una f acile installazione sulla
finestra con una piastra sigillata.
Mantenere il tubo di scarico collegato in buona posizione.
3. Istallazione della piastra sigillata
A. Tenere la finestra socchiusa, mettere la piastra sigillata nella finestra, o in posizione verticale o
orizzontale.
B. Estendere le parti della piastra sigill ata e regolarla alla lun ghezza della finestra, far in modo che
entrambe le estremità tocchino il bordo della finestra, poi, fissare con le viti.
Nota:
Assicurarsi che le due estremità del la piastra sigillata siano sta bilmente in contatto con i bor di
della finestra, per assicurare la tenuta stagna.
Avvitare in un buona posizione.
4. Installazione dell’apparecchio
A. Spos tar e l'u ni tà c on i l gru ppo del tubo di s car ico installato davanti al la f in est ra e mantenere l'unità
ad almeno 50 centimetri di distanza dalle pareti o da altri oggetti.
chiusura
Slot
Blocco tubo di scarico
Page 92

B. Installare l’estremità del rettangolo del gruppo del tubo di scarico nel foro corrispondente al
rettangolo nel blocco della piastra si gi llata, fissarlo con la vite e chiudere la finestra.
Nota:
Far scorrere l’adattatore verso il basso e assicurarsi che l’adattatore sia installato correttamente.
Assicurarsi che la direzione del pannello inclinato sia conforme la direzione della piastra sigillata.
Il tubo d i scarico non può ess ere pieg ato con una flession e s uper ior e a 45°, al f in e di mantenere
una buona ventilazione del tubo di scarico .
Note importanti:
Il tubo di scarico è lungo 280 millimetri-1500 millimetri e questa lunghezza è determinata in base
alle specifiche del condizionatore d'aria (s). Non usare tubi prolunga e non sostituire questo tubo
con altri diversi, poiché questo può influenzare le funzioni del climatizzatore. Il tubo di scarico deve
essere liscio o può portare al surriscaldamento e causare danni.
Istruzioni sul drenaggio
1. drenaggio manuale:
1) Una volta che l'unità si spegne perché il serbatoio è pieno, spegnere l'unità e scollegare.
2) Inserire il vassoio sotto l'uscita dell'acqua sul retro dell'unità.
3) Svitare il coperchio di scarico, scollegare il tappo dell'acqua per il flusso di acqua nel cassetto.
4) Collegare il tappo e avvitare saldamente il coperchio di scarico all’uscita dell’acqua dopo il
drenaggio.
Page 93

Note:
Proteggere il coperchio di scarico ed il tappo correttamente.
Spostare attentamente l'unità per evitare perdite.
Inclinare l'apparecchio leggermente all'indietro quando si drena.
Per evitare la fuoriuscita d’acqua e bagnare il pavimento, bloccare il foro di scarico appena
possibile prima che il vassoio sia pieno se non può contenere tutta l’acqua nell'unità.
Il tappo dell'acqua e il c operchio di scar ico devono essere s aldamente insta llati, per ev itare nuovi
condensamenti e bagnare il pavimento o la moquette quando l'unità si riavvia.
2. Drenaggio continuo
1) Svitare il coperchio dello scarico e scollegare il tappo dell'acqua.
2) Collegare il foro di scarico con il tubo di scarico da φ12mm, il più profondamente possibile per
evitare perdite.
3) Mettere il tubo di scarico in bagno o all’aperto.
Note:
Il tubo di scarico deve essere installato quando non c'è acqua nel vassoio.
Si suggerisce di non utilizzare il drenaggio continuo quando l'unità è in modalità di raffreddamento,
al fine di garantire il sufficiente riciclo d’acqua nell'unità, per migliorare l’efficacia del
raffreddamento.
Mettere il tubo di scarico in un luogo inaccessibile, non più in alto del foro di drenaggio e
mantenere il tubo di scarico dritto senza alcuna flessione.
Mantenere i l coperchio di scarico e il s u o ta ppo c orr ett amente quando viene eseguito il drenaggio
continuo.
Funzioni di protezione multipla
1. Funzione di protezione Anti-congelamento
In modalità di raffreddamento, quando il compressore funziona continuamente per più di 10 minuti,
se la temperatura del tubo è ≦ 2°C / 36°F per 20 secondi, la funzione di protezione
anti-congelamento entrerà in funzione e il codice E4 verrà visualizzato sul display LCD. Il
Coperchio drenggio
Tubo drenaggio
Page 94

compressore e la ruota del motore ad acqua s metterà di funzionare, ma il ventilator e superiore
rimarrà in es ecuzione; Se la temper atura del tubo è ≧ 8°C/ 46°F, l'apparecchio si arresterà e la
protezione anti-congelamento recupererà la condizione di lavoro originale. Il compressore rinizierà
a lavorare con 3 minuti di ritardo per via de lla protezione.
2. Funzione di protezione per livello massimo d’acqua - Allarme e spegnimento automatico
Quando il volume d'acqu a supera il livello di allarme nel telaio , si attiverà automaticamente un
avviso e l'icona livello max acqua si accenderà sul display LCD, se ciò accade, è necessario
scaricare la condensa e ria vviare l'unità. (Per ult eriori inform azioni su come svuotare, s i prega di
far riferimento al le "istruzio ni sul drenaggio“). Se l'unit à non viene spenta manualmente, essa si
riprenderà automaticamente allo stato di funzionamento originale una volta che l'acqua è
completamente scarica. Oppure collegare l'alimentazione per riavviare nuovamente l'unità.
3. Funzione di protezione per ritardo compressore
Questa unità offre una protezione per il riavvio del compressore. A accezione del fatto che il
compressore può ini ziare immediatam ente quando l'unità è collegata per la prima volta, ci sono
sempre 3 minuti di ritardo del compressore prima che si riaccenda quando viene spento.
Manutenzione e assistenza
Nota: Assicurarsi di spegnere l'apparecchio e staccare la spina prima di esegu ire manutenzione o
inviare l’apparecchio a un centri di assist en za.
1. Pulizia superficie
1) Pulire la super ficie d ell'un ità c on un p anno m or bido bagnat o e no n utili zzare s olventi chim ici come
alcool e benzina per evitare danni all'unità.
2) Pulire lo scarico dell'aria sporco o le feritoie con un panno morbido umido e detersivo.
3) È vietato l’uso di qua lsiasi solv ente chimic o non solo per la pulizi a dell'unità ma anche disporli in
prossimità dell'apparecchio per un lungo periodo.
4) Qualsiasi diluente o solvente è vietato per la pulizia dell'unità.
2. Pulizia del filtro
Pulire il filtro una volta ogni due settimane, o si potrebbe influenzare l’efficacia dell’apparecchio nel
caso in cui il filtro fosse ostruito dalla polvere.
1) Come pulire il filtro
A. Afferrare la maniglia del filtro ed estrarla delicatamente nella direzione corretta.
B. Pulire le particelle di sporco sul filtro se necessario.
C. Immergere e lavare delicatamente il filtro in acqua calda (circa 40°C) miscelata con un
detergente neutro, quindi risciacquare e asciugare all'ombra
.
Note:
Estrarre il filtro delicatamente.
La rim ozione del filtro s ul pannello post eriore è prior itario rispetto al panne llo laterale, per evitare
qualsiasi torsione o danni a filtro.
Non schiacciare la maglia.
Non colpire la rete con oggetti appuntiti o pennelli.
Page 95

3. Installazione del filtro
Puntare la fine del filtro verso la fessura per poi spingere delicatamente il filtro nella fessura.
Note:
Assicurarsi di installare prima il filtro sul pannello laterale e poi su quello posteriore.
Installare il filtro con direzioni opposte a quelle della rimozione.
Installare il filtro al suo posto con delicatezza per evitare danni al filtro.
4. Come conservare l’apparecchio a fine stagione
1) Svitare il coperchio di scarico ed estrarre il tappo per drenare completamente l'acqua di condensa.
(Nota: l'angolo di inclinazione del gruppo deve essere ≦ 30).
2) Tenere l’unità in fun zione in modalit à ventilator e per me zza giornata in m odo che tutto si asciughi
completamente all'interno dell’unità evitando la creazione di muffa.
3) Spegnere l'unità, staccare la spina poi avvolgere il cavo di alimentazione attorno al pilastro del filo
a carica automatica, inserire la spina nel foro di fissaggio universale sul pannello posteriore
dell'unità, installare il tappo di scarico dell'acqua e la copertura.
4) Rimuovere il gruppo del tubo di scarico, pulire e conservare in modo corretto.
Note:
Tenere il gruppo del tubo di scarico con entrambe le mani durante la rimozione.
Filtro
superiore
Telaio filtro superiore
Premere
direzione
Telaio filtro
Filtro inferiore Filtro laterale
Telaio del filtro
laterale
Page 96

Spingere le chiusure di fissaggio sull’uscita dell'aria con i pollici, quindi estrarre il blocco del tubo di
scarico.
5) Riporre il condizionatore d'aria correttamente dentro un sacchetto di plastica morbida e metterlo in
luogo asciutto e con adeguate misure a prova di polvere, e tenere l'unità lontana dai bambini.
6) Estrarre le batterie dal telecomando e conservarlo correttamente.
Nota:
Assicurarsi che l'unità sia conservata in un luo go asciutto. Tutti gli accessori devono essere custoditi
insieme correttamente.
Risoluzione dei problemi
Si prega di contr ollare l'unit à e i suggerimenti d i seguito pr ima di ric hiedere un se rvizio prof essionale,
ma mai smontare o riparare l'unità da soli, poiché potrebbe caus are danni a persone o cose.
Problema Causa Soluzione
L’apparecchio
non si accende
mancanza di alimentazione Collegare l'unità a una presa
funzionante e accenderla.
Livello max d’acqua raggiunto,
si accende la spia e l’icona
corrispondente
Drenare l'acqua immagazzinata
nell'unità.
La temperatura ambiente è
troppo bassa o troppo alta
Si consiglia di utilizzare
quest’apparecchio in ambienti tra i
7-40°C
La temperatura ambiente è
inferiore alla temperatura
impostata in modalità di
raffreddamento o la
temperatura è superiore a
quella impostata in modalità
riscaldamento
Cambiare la temperatura impostata
L’apparecchio
non raffredda a
sufficienza
C’è luce diretta del sole Chiudere la tenda della finestra
Le porte e le finestre sono
aperte, la sala è affollata o ci
sono altre fonti di calore
Chiudere la porta e la finestra,
rimuovere le altre fonti di calore, e
aggiungere nuovi condizion ator i d'ar ia
Filtro sporco Pulire o sostituire la rete del filtro
ingresso o uscita dell'aria
intasati
Rimuovere l'ostacolo
L’apparecchio fa
troppo rumore
L'unità è stata posizionata su
una superficie irregolare.
Mettere l'unità su una superfice piana e
solida (può ridurre il rumore)
Il compressore
non funziona
Avvio di protezione termica. Attendere la diminuzione della
temperatura, l'unità si riavvia
automaticamente
Il telecomando
non funziona
Troppo distanza Portare il telecomando in prossimità
del condizionatore d'aria e garantire un
minimo d’aria tra ricevitore e il segnale
sull'unità.
Il telecomando non mirava al
ricevitore del segnale
sull'unità.
Page 97

Le batterie non hanno energia
elettrica
Sostituire le batterie
Sul display
appare il codice
“CH01”
Problema del sensore della
temperatura della stanza
Controllare il sensore della
temperatura della stanza e i circuiti
connessi
Sul display
appare il codice
“CH02”
Problema del sensore della
temperatura del tubo
Controllare il sensore della
temperatura del tubo e i circuiti
connessi
Sul display
appare il codice
“E4”
Protezione anti-gelo L’apparecchio si ripristina
automaticamente quando la protezione
antigelo è finita.
Sul display
appare l’icona
Il serbatoio dell'acqua nello
chassis è pieno
Scaricare la condensa e ri-avviare
l'unità
Appendice
Potenza V~, Hz 220~240,50
Capacità di raffreddamento
Btu/h 12,000
W 3,520
Refrigerante/carica /g R410A/560
Ingresso
nominale
Raffreddamento W 1,350
Corrente
nominale
Raffreddamento A 6.20
Rimozione dell’umidità L/h 1.4
Circolazione aria m³/h 430
Rumore
Alto dB(A) 55
Medio dB(A) 53
Basso dB(A) 50
Dimensioni
dell’apparecchio
W×H×D mm 471×850×355
Dimensioni
dello scatolo
W×H×D mm 540×888×398
Peso netto/Peso lordo kg 33.5 /37.5
Page 98
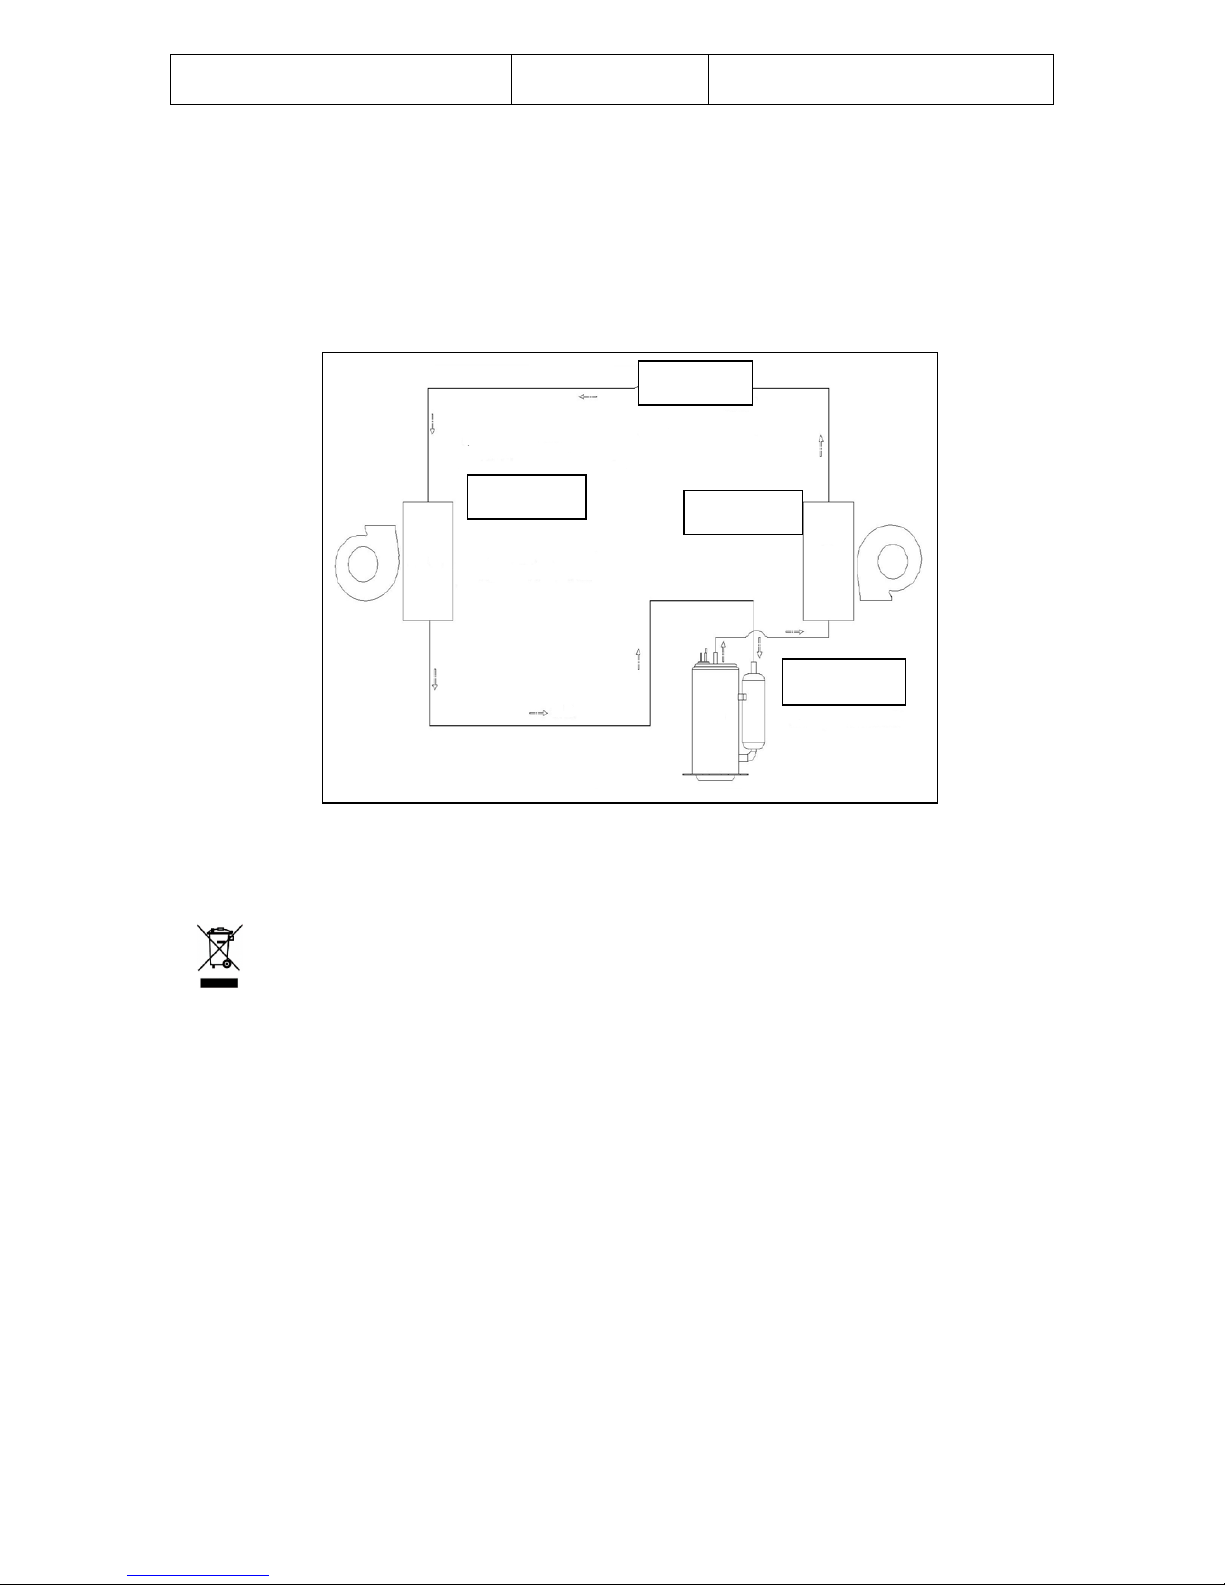
Area di applicazione ㎡ 16~22
Parametro del fusibile
Tipo: FSD or 50F
Voltaggio: 250V
Corrente: 3.15A
Schema del condizionatore
Per i parametri tecnici specifici del modello, consultare l'etichetta sul prodotto.
AMBIANTE
ATTENZIONE :
Non gettare quest’ apparecchio tra i rifiuti domestici. Per questo tipo di prodotti è
fornito dai comuni un sistema di raccolta e ritiro in zona ed è quindi un dovere
informarsi per conoscere il giusto smistamento del rifiuto. Infatti, i prodotti elettrici ed
elettronici possono contenere sostanze pericolose che hanno effetti dannosi
sull’ambiente o sulla nostra salute e quindi devono essere riciclati. Il simbolo al lato
indica che le apparecchiature elettriche ed elettroniche fanno parte di una raccolta
selettiva e differenziata (rappresentata da un bidone su due ruote sbarrato da una
croce.
Prodotto e importato da : Adeva SAS 8 rue Marc Seguin 77290 Mitry-Mory FRANCE
www.hkoenig.com - contact@hkoenig.com - Tel. 01 64 67 00 01
Evaporatore
Condensator
Compressore
Capillare
 Loading...