

Page 1

INSTRUCTION MANUAL
MANUEL D'UTILISATION
BEDIENUNGSANLEITUG
MANUAL DE USARIO
MANUALE D’USO
KB12
ICE CUBE MAKER
Page 2

DANGER
!
WARNING
ENGLISH
INSTRUCTION MANUAL
It is important that you read these instructions before using your portable ice maker and we
strongly recommend that you keep them in a safe place for future reference.
Your safety and the safety of others are very important.
We have provided many important safety messages manual and your appliance.
Always read and obey all safety massages.
This is the safety alert symbol:
!
All safety messages will follow the safety alert symbol and the word “DANGER” or “WARNING”.
These words mean:
You can be killed or seriously injured if you don’t immediate follow instructions.
All safety messages will tell you what the potential hazard is, tell you how to reduce the chance
of injury, and tell you what can happen if the instructions are not followed.
When using electrical appliances, basic safety precautions should be followed to reduce the
risk of fire, electric shock, and injury to persons or property. Read all instructions before using
any appliance.
Do not operate this,or any other appliance with a damaged cord.
If the supply cord is damaged, it must be replaced by the manufacturer or its service agent
or a similarly qualified person in order to avoid a hazard.
This ice-maker must be positioned so that the plug is accessible .
Connect to properly polarized outlets only. No other appliance should be plugged into the
same outlet. Be sure that the plug is fully inserted into the receptacle.
Do not run the power cord over carpeting or other heat insulators. Do not cover the cord.
Keep cord away from traffic areas, and do not submerge in water.
We do not recommend the use of an extension cord, as it may overheat and become a risk
of fire. If you must use an extension cord, use No. 0.75mm2 minimum size and rated no
less than 16A/250V~ with a plug.
Unplug the ice maker before cleaning or making any repairs or servicing.
Exercise caution and use reasonable supervision when appliance is used near children.
Do not use your ice-maker outdoors. Place the ice-maker away from direct sunlight and
TABLE OF CONTENTS IMPORTANT SAFETY INSTRUCTIONS
!
Page 3

make sure that there is at least 10mm of space between the back of your unit and wall.
Keep a minimum distance of 10mm on each side of your unit free.
Do not use other liquid to make the ice-cube other than water.
Do not clean your ice maker with flammable fluids. The fumes can create a fire hazard or
explosion.
Do not tip over.
If the ice maker is brought in from outside in wintertime, give it a few hours to warm up to
room temperature before plugging it in.
This appliance is not intended for use by persons (including children) with reduced
physical, sensory or mental capabilities, or lack of experience and knowledge, unless they
have been given supervision or instruction concerning use of the appliance by a person
responsible for their safety.
Children should be supervised to ensure that they do not play with the appliance.
● Please according to local regulations regarding disposal of the appliance for its flammable
blowing gas. Before you scrap the appliance, please take off the doors to prevent children
trapped.
WARNING: This appliance must be earthed.
IMPORTANT:
The wires in this mains lead are colored in accordance with the following code:
Green or Green with a strip yellow: Grounding
Blue: Neutral
Brown: Live
To avoid a hazard due to instability of the appliance, it must be placed at an even or flat
surface.
Page 4

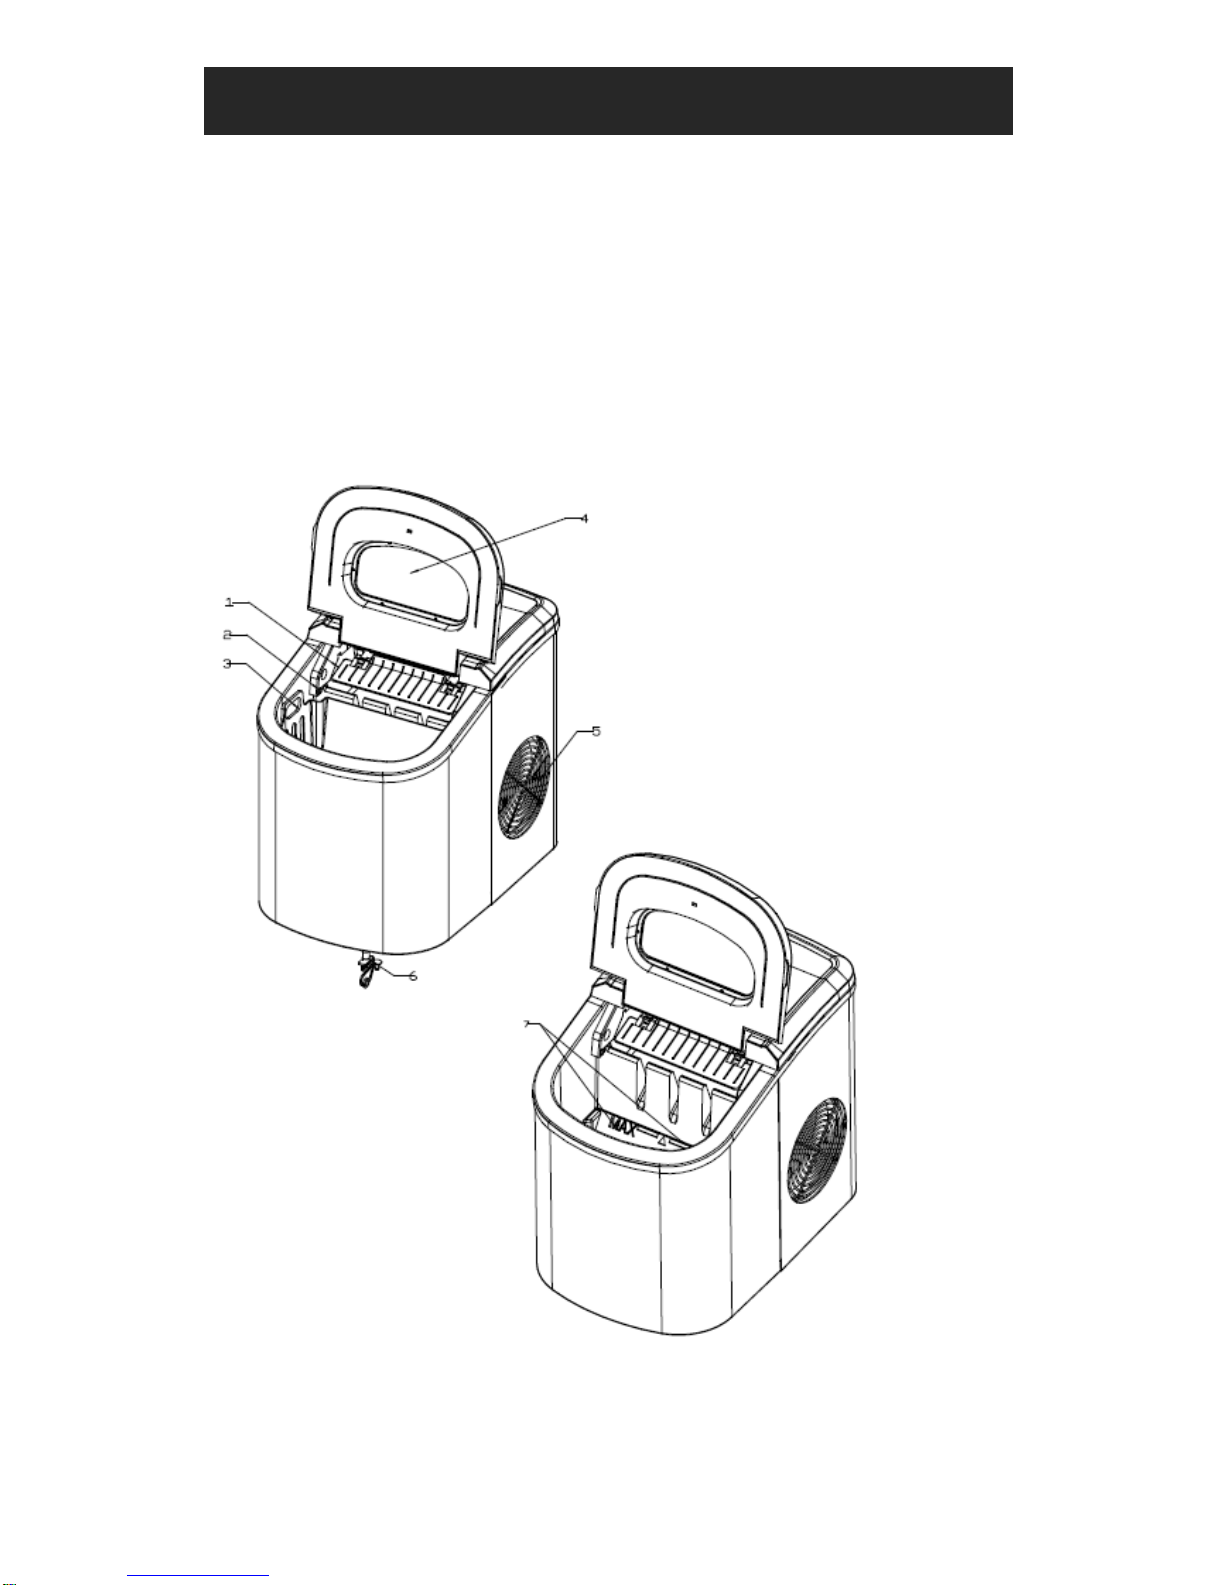
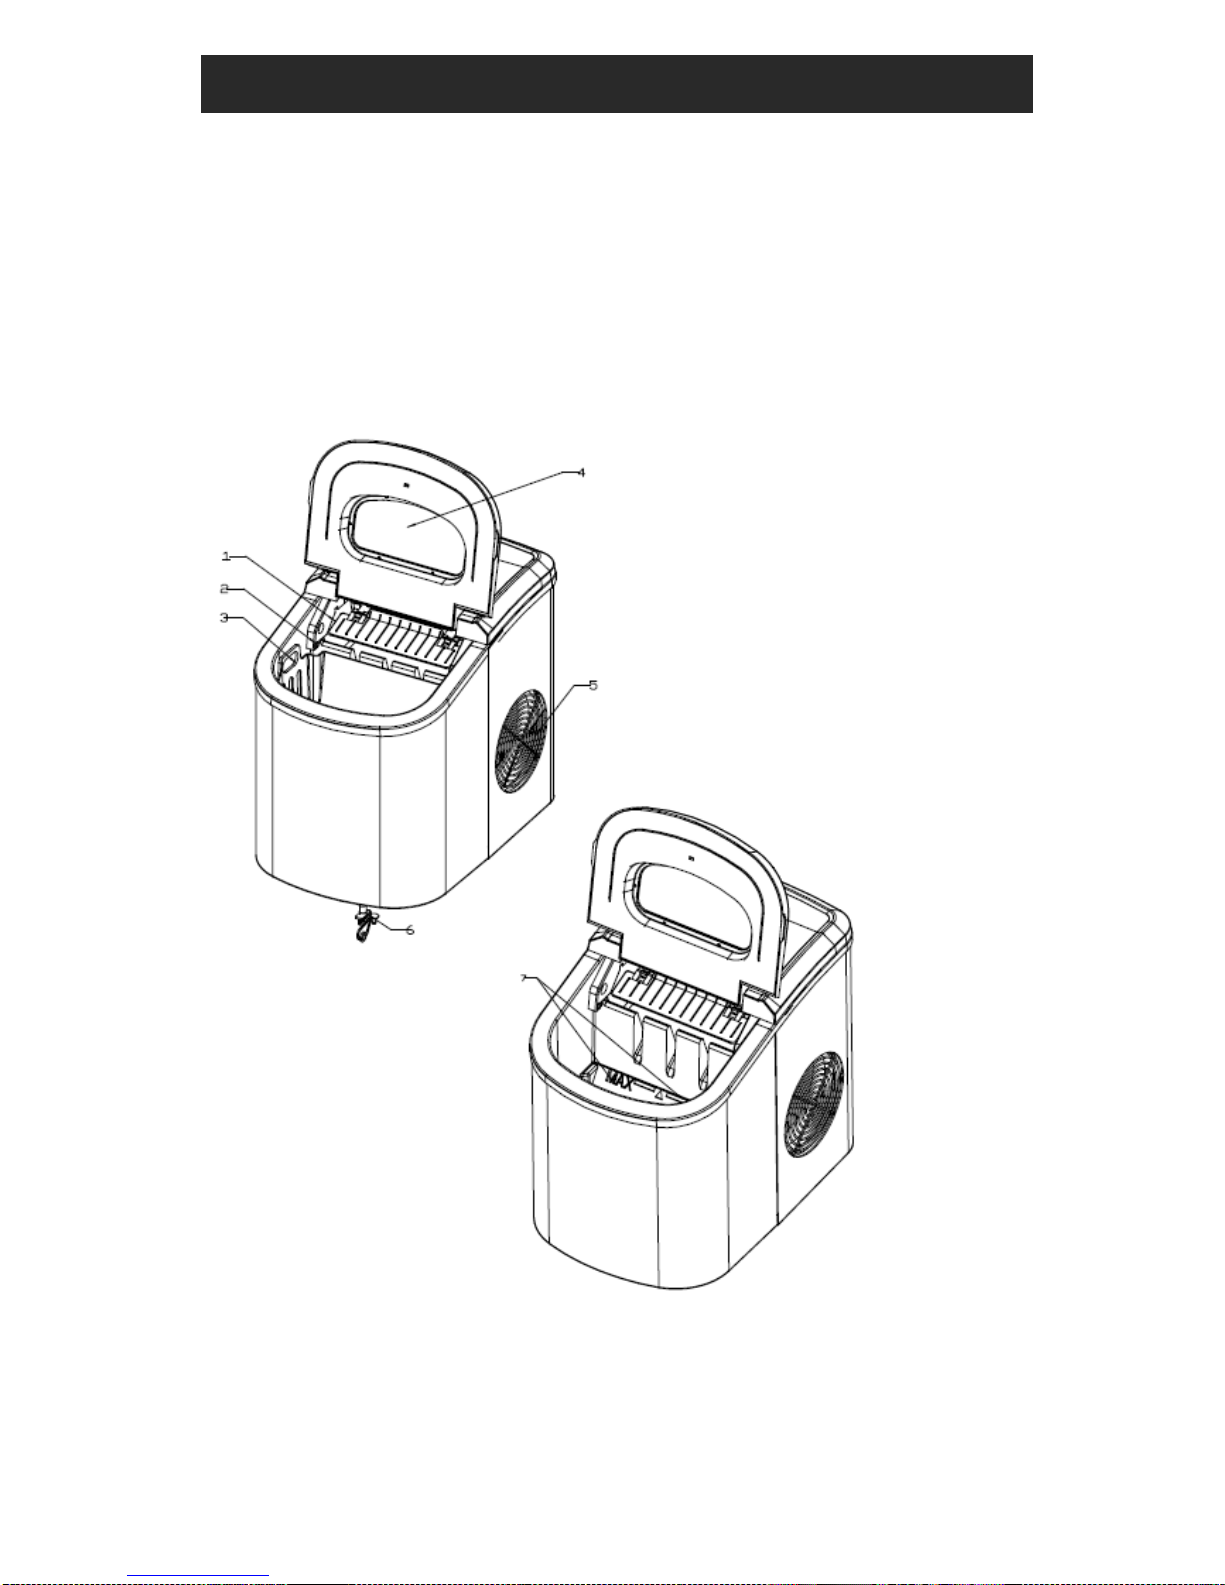
General instruction
1. Ice scoop.
2. Ice full sensor
3. Ice basket
4. Top cover with transparent window
5. Air outlet
6. Water drain cap: at front btm side of the unit.
7. MAXIMUM WATER LEVEL: ▲
Remove the ice basket, you can see the water level mark.
GETTING TO KNOW YOUR UNIT
Page 5

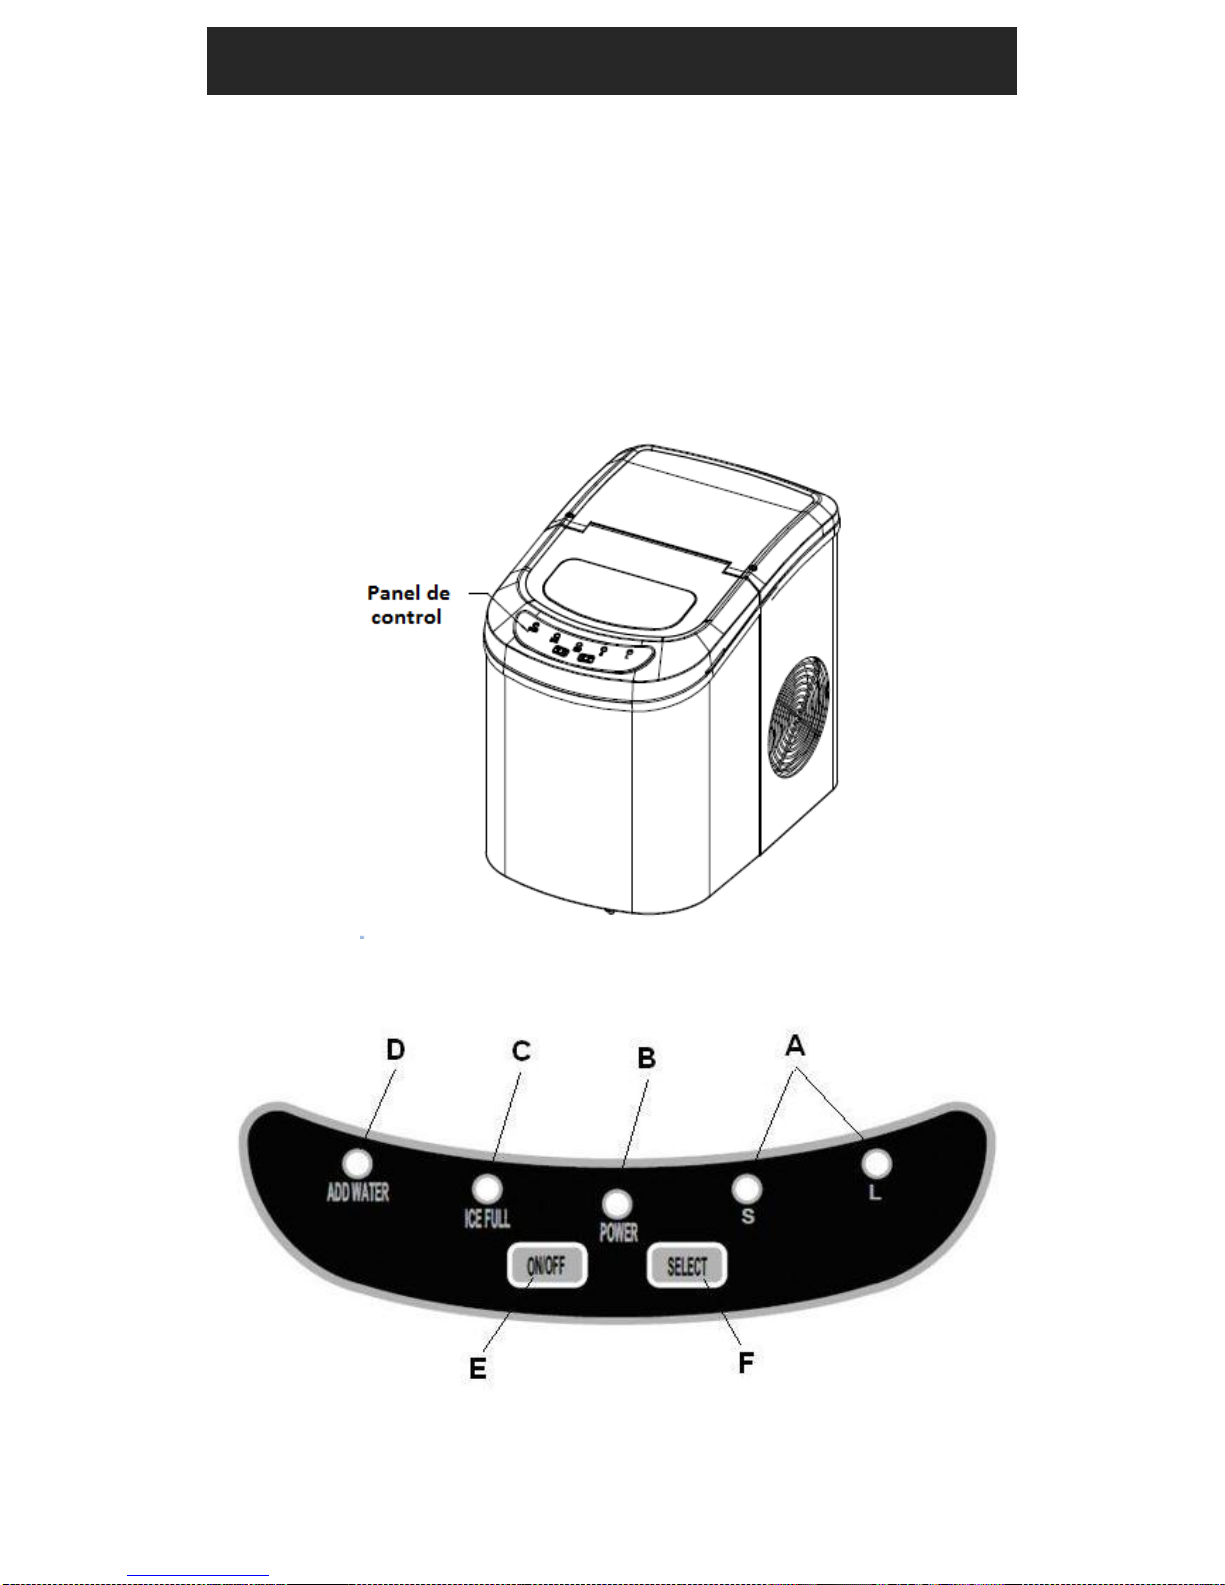
Position of control panel & function
Control Panel: Easy to use, visible functions touch display setting.
A. Selected ice size displaying: Small and Large.
B. Power indicator
C. Ice-Full indicator
D .Water shortage indicator
E. Button to turn on/off the unit.
F. Button to select ice cube size.
OPERATING PROCEDURES & MAINTENANCE
Page 6

DANGER
UNPACKING YOUR ICE MAKER
1. Remove the exterior and interior packaging. Check if ice basket and ice scoop inside. If any
parts are missing, please contact our customer service.
2. Remove the tapes for fixing ice shovel, ice basket & ice scoop. Clean the tank & ice basket.
3. Put the ice maker on a level & flat counter top without direct sunlight and other sources of
heat (i.e.: stove, furnace, radiator). Maker sure that there is at least 10cm gap between the
back & LH/RH sides with the wall.
4. Allow one hour for the refrigerant fluid to settle before plugging the ice maker in.
5. The appliance must be positioned so that the plug is accessible.
WARNING: fill with potable water only. Only use drinking water.
CONNECTING YOUR ICE MAKER
* Improper use of the grounded plug can result in the risk of electrical shock. If the
power cord is damaged please call our customer service.
1. This unit should be properly grounded for your safety. The power cord of this appliance is
equipped with a grounding plug which mates with standard grounding wall outlets to
minimize the possibility of electric shock.
2. Plug your appliance into an exclusive, properly installed, grounding wall outlet. Do not
under any circumstances, damage the grounding means of the plug under any
circumstances. Any questions concerning power and/or grounding should be directed
toward a certified electrician.
3. This appliance requires a standard 220-240Volt, 50Hz electrical outlet with good grounding
means.
CCLLEEAANNIINNGG AANNDD MMAAIINNTTAAIINNIINNGG YYOOUURR IICCEE MMAAKKEER
R
Before using your ice maker, it is strongly recommended to clean it thoroughly.
1. Take out the ice basket.
2. Clean the interior with diluted detergent, warm water and a soft cloth.
3. Then use the water to rinse the inside parts, and drain out the water by unplugging the
drain cap on front bottom side.
4. The outside of the ice maker should be cleaned regularly with a mild detergent solution and
warm water.
5. Dry the interior and exterior with a clean soft cloth.
6. When the machine is not to be used for a long time, drain water completely & dry the
interior.
!
Page 7

1. Open the cover, remove the ice basket and pour water into tank.
Keep water level below the MAXIMUM water level mark.
2. Press “ON/OFF” button on the control panel to begin the ice making cycle.
3. Select the ice cube size by pressing the “SELECT” button. If the room temperature is lower
than 15℃, it is recommended to select small ice cube in order to avoid ice sticking together.
4. The ice making cycle lasts approx. 6 to 13 minutes, depending on seletion of ice cube size
and the room temperature. The recommended room temperature is 10℃ to 43℃
5. If water pump can’t inject water, the ice maker will stop automatically, and the “Add Water”
indicator will be on.Press “ON/OFF” button, fill water up to the max. water level mark and
press “ON/OFF” button again to turn on the unit again.Allow the refrigerant liquid inside the
compressor at least 3 minutes to settle before restarting.
6. The unit stops when the ice basket is full and the “Ice Full” indicator will be on. Warning:
Direct sunlight or sunlight reflection may cause infared sensor malfunction. If the
unit doesn’t stop even ice cubes obstruct sensor, move the unit where no sunlight.
7. Change water in the water reservoir every 24 hours to ensure a reasonable hygiene level.
If unit isn’t to be used, drain all the water and dry the tank.
USING YOUR ICE MAKER
TROUBLESHOOTING
PROBLEM
POSSIBLE CAUSE
SOLUTION:
“Add Water” indicator is
on.
Lack of Water.
Stop the ice maker, fill water, and
press “ON/OFF” button again to
restart the unit.
“Ice Full” indicator is on.
Ice is full in basket.
Remove ice from ice basket.
Continuous press “Select”
button 5 seconds, the unit
could make ice 10 cycles even
“Ice” indicator is on.
Ice cubes stick together.
The ice making cycle is too
long.
Stop the ice maker, and restart it
when the ice blocks melt. Select
the small size ice cube selection.
Water temperature in inner
tank is too low.
Replace the water. Temperature
of water recommended at 8-32℃
Ice making cycle is normal
but no ice formed.
Room temperature or
water temperature in inner
tank is too high.
The room temperature should be
10-43 ℃ , water temperature
should be 8-32℃
Refrigerant in cooling
system leaks.
Verify by a qualified technician.
Pipe in the cooling system
is blocked.
Verify by a qualified technician.
Page 8

PPrrootteeccttiioonn TTyyppee II II
CClliimmaattee TTyyppee SSNN//NN//SSTT//TT SSNN//NN//SSTT//TT
PPoowweerr 222200--224400VV//5500HHzz 222200--224400VV//5500HHzz
IIccee MMaakkiinngg CCuurrrreenntt 00..77AA 00..77AA
IIccee HHaarrvveesstt CCuurrrreenntt 11..22AA 11..22AA
RReeffrriiggeerraanntt RR113344aa//6622gg RR113344aa//6622gg
NNeett WWeeiigghhtt 99..22KKgg 99..33kkgg
VVeessiiccaanntt C
C
5
5
H
H
1100
C
C
5
5
H
H
1100
EEnncclloossuurree PPllaassttiicc SSttaaiinnlleessss
Warranty Information
– WARNING: Keep ventilation openings, in the appliance enclosure or in the built-in structure,
clear of obstruction.
– WARNING: Do not damage the refrigerant circuit.
The manufacturer provides warranty in accordance with the legislation of the customer's own
country of residence, with a minimum of 1 year (Germany: 2 years), starting from the date on
which the appliance is sold to the end user.
The warranty only covers defects in material or workmanship.
The repairs under warranty may only be carried out by an authorized service centre. When
making a claim under the warranty, the original bill of purchase (with purchase date) must be
submitted.
The warranty will not apply in cases of:
- Normal wear and tear
- Incorrect use, e.g. overloading of the appliance, use of non-approved accessories
- Use of force, damage caused by external influences
- Damage caused by non-observance of the user manual, e.g. connection to an unsuitable
mains supply or non-compliance with the installation instructions
- Partially or completely dismantled appliances
ENVIRONMENT
CAUTION :
Do not dispose of this product as it has with other household products. There is a
separation of this waste product into communities, you will need to inform your local
authorities about the places where you can return this product. In fact, electrical and
electronic products contain hazardous substances that have harmful effects on the
environment or human health and should be recycled. The symbol here indicates that
electrical and electronic equipment should be chosen carefully, a wheeled waste
container is marked with a cross.
Manufactured and imported : Adeva SAS 8 rue Marc Seguin 77290 Mitry-Mory FRANCE
www.hkoenig.com - contact@hkoenig.com - Tel 01 64 67 00 01
TECHNINCAL PARAMETERS
Page 9

FRANCAIS
Votre sécurité et celle des autres est très importante.
Toujours lire et suivre tous les messages de sécurité.
Ceci est le symbole d'alerte de sécurité:
!
Tous les messages de sécurité suivront le symbole d'alerte de sécurité et le mot "DANGER"
ou "AVERTISSEMENT".
DANGER
!
WARNING
Ces mots signifient:
Vous pouvez être gravement blessé si vous ne suivez pas ces instructions.
Tous les messages de sécurité vous diront quel est le danger potentiel et comment
réduire le risque de blessure, et ce qui peut arriver si les instructions ne sont pas
suivies.
Lorsque vous utilisez des appareils électriques, des précautions élémentaires de sécurité
doivent être suivies pour réduire le risque d'incendie, d'électrocution et de blessures.
Lisez toutes les instructions avant d'utiliser n'importe quel appareil.
Ne pas faire fonctionner ce, ou tout autre appareil avec un cordon endommagé.
Si le cordon d'alimentation est endommagé, il doit être remplacé par le fabricant ou
son agent de service ou une personne qualifiée afin d'éviter un danger.
Cette machine à glaçons doit être placée de sorte que la prise soit accessible.
branchez le à une prise correctement polarisée. Aucun autre appareil ne doit être
branché sur la même prise. Assurez-vous que la prise est entièrement insérée dans le
réceptacle.
Ne pas couvrir le cordon. Garder le cordon loin des zones de circulation, et ne pas
immerger dans l'eau.
Débranchez la machine à glaçons avant de le nettoyer ou d'effectuer des réparations
ou des opérations d’entretien.
Ne pas utiliser la machine à glaçons à l'extérieur. Placez la machine à glaçons à l'abri
du soleil et assurez-vous qu'il y ait au moins 10 mm d'espace entre l'arrière de votre
appareil et le mur. Gardez une distance minimale de 10 mm de chaque côté de votre
appareil.
Page 10

Ne pas utiliser d'autres liquides que l'eau pour faire des glaçons.
Ne pas nettoyer la machine à glace avec des liquides inflammables. Les vapeurs
peuvent créer un risque d'incendie ou d'explosion.
Ne pas renverser.
Si la machine à glaçons est apportée de l'extérieur en hiver, donnez-lui quelques
heures pour se réchauffer à la température ambiante avant de le brancher.
Cet appareil n'est pas destiné à être utilisé par des personnes (y compris les enfants)
dont les capacités physiques, sensorielles ou mentales, ou le manque d'expérience et de
connaissances, à moins qu'ils ne ont été formées et encadrées ou d'une instruction
concernant l'utilisation de l'appareil par une personne responsable de leur sécurité.
Les enfants doivent être surveillés pour s'assurer qu'ils ne jouent pas avec l'appareil.
AVERTISSEMENT: Cet appareil doit être branché à une prise terre.
IMPORTANT:
Les fils de ce cordon d'alimentation sont colorés en conformité avec le code suivant:
vert ou vert avec une bande jaune: terre
Bleu: Neutre
Marron : sous tension
Pour éviter un danger il doit être placé sur une surface plane ou plate.
Page 11

APPRENDRE A CONNAITRE VOTRE APPAREIL
Instruction générale
1. Pelle à glaçons
2. Capteur de glace pleine
3. Panier amovible
4. Capot avec fenêtre transparente
5. Sortie d'air
6. Bouchon de vidange de l'eau
7. Niveau d'eau maximum
Retirer le panier amovible pour voir la marque du niveau d'eau.
Page 12

Panneau de configuration:
Facile à utiliser, réglage visible fonctions écran tactile.
A. Deux tailles de glaçons : petits S gros L
B. Indicateur d'utilisation de l'appareil
C. Indicateur que le bac à glaçons est plein
D. Indicateur de pénurie d'eau
E. Bouton pour allumer / éteindre l'appareil.
F. Bouton pour sélectionner la taille des glaçons.
Page 13

Déballage de votre machine à glaçons
1. Retirez l’emballage extérieur et intérieur. Vérifiez que le panier à glace et que la
pelle à glaçons soient à l'intérieur. Si des pièces sont manquantes, s'il vous plaît
communiquer le à notre service clientèle.
2. Retirez les bandes de fixation de la pelle à glaçons, panier amovible... Nettoyez le
réservoir et panier amovible avant utilisation.
3. Mettez la machine à glaçons à un niveau plat, sans lumière directe du soleil et
d'autres sources de chaleur (ex: cuisinière, four, radiateur). Faites qu'il y est un
écart de 10cm au moins entre l'arrière de l'appareil et le mur et de même pour les
côtes.
4. Laissez le fluide réfrigérant reposer une heure avant de brancher la machine à
glace.
5. L'appareil doit être placé de sorte que la prise soit accessible.
AVERTISSEMENT: remplir avec de l'eau potable.
CONNEXION DE VOTRE MACHINE À GLAÇONS
NGER
Une mauvaise utilisation de la prise peut entraîner le risque de choc électrique. Si le
cordon d'alimentation est endommagé s'il vous plaît communiquer le a notre service
clientèle.
Cet appareil doit être relié à la terre par sécurité. Le cordon d'alimentation de cet
appareil est équipé d'une prise à trois broches qui correspond aux prises murales
à trois broches standard pour minimiser le risque d'électrochoc.
Branchez votre appareil à une prise murale reliée à la terre, convenablement
installée et qui lui sera réservée exclusivement. En aucun cas vous ne devez couper
ni enlever la troisième broche (terre) du câble d'alimentation. Pour toute question
concernant l'alimentation électrique et/ou la prise de terre, adressez-vous à un
électricien certifié.
Cet appareil exige une prise électrique standard 220-240 volt, 50 Hz à trois broches
reliée à la terre.
NETTOYAGE ET ENTRETIEN DE VOTRE MACHINE À GLAÇONS
Avant d'utiliser votre machine à glaçons, il est fortement recommandé de la nettoyer
soigneusement.
1. Sortez le panier à glaçons.
2. Nettoyez l'intérieur avec un détergent dilué, de l'eau tiède et un linge doux.
3. Ensuite, utilisez l'eau pour rincer les parties internes puis drainez-la en enlevant
le bouchon du drain situé sur le côté.
NETTOYAGE ET ENTRETIEN
Page 14

4. Il faut régulièrement nettoyer la machine à glace avec une solution détergente
douce et de l'eau tiède.
5. Séchez l'intérieur et l'extérieur avec un linge doux.
6. Si la machine ne doit pas être utilisée pendant longtemps, enlevez le bouchon du
drain pour extraire complètement l'eau du réservoir.
COMMENCER A FABRIQUER DES GLACONS
1. Ouvrez le couvercle, retirer le panier de la glace et verser de l'eau dans le réservoir.
Maintenir le niveau d'eau en dessous de la marque de niveau d'eau maximal.
2. Appuyez sur "ON / OFF" sur le panneau de commande pour commencer le cycle de
fabrication de glace.
3. Sélectionnez la taille des glaçons en appuyant sur le bouton "SELECT". Si la température
ambiante est inférieure à 15 ℃, il est recommandé de sélectionner cube de glace de petite
taille afin d'éviter la glace collent ensemble.
4. Le cycle de fabrication de glace dure env. 6 à 13 minutes, en fonction de la taille de
sélection cube de glace et la température ambiante. La température ambiante
recommandée est de 10 ℃ à 43 ℃
5. Si la pompe à eau ne peut pas injecter de l'eau, la machine à glaçons s'arrête
automatiquement, et le "Ajouter de l'eau" indicateur sera allumé. Appuyez sur "ON / OFF",
remplissez d'eau jusqu'à la température max. marque le niveau d'eau et appuyez sur "ON /
OFF" nouveau sur le bouton pour allumer l'appareil à nouveau. Laisser le liquide réfrigérant
à l'intérieur du compresseur au moins 3 minutes à régler avant de redémarrer.
6. L'appareil s'arrête lorsque le panier est plein de glace et de la "glace complet" indicateur
sera allumé. Avertissement: la lumière du soleil directe ou reflets du soleil peut entraîner un
dysfonctionnement du capteur à infrarouge. Si l'appareil ne s'arrête pas, même des cubes
de glace obstacle capteur, déplacer l'unité, où aucune lumière du soleil.
7. Changez l'eau dans le réservoir d'eau toutes les 24 heures pour assurer un niveau
d'hygiène raisonnable.
Si l'unité ne doit pas être utilisé, vidanger toute l'eau et sécher le réservoir.
DÉPANNAGE
PROBLEME
CAUSE POSSIBLE
SOLUTION
Le symbole "pénurie
d'eau" s'allume
Pas assez d'eau
Arrêtez la machine à glace,
versez de l'eau et réappuyez
sur le bouton “ON/OFF” pour
redémarrer l'appareil
L'indicateur que le bac à
glaçons est plein s'allume
Trop de glace
Enlevez de la glace du
panier à glaçons
Les glaçons collent
ensemble
Le cycle de production de
glace est trop long
Arrêtez la machine à glace et
redémarrez-la quand les
glaçons commenceront à
fondre. Sélectionnez la taille
de glaçons Petite
Page 15
La température de l'eau
dans le réservoir est trop
basse
Changez l'eau dans le
réservoir. Il vaut mieux régler
la température de l'eau entre
7°C et 32°C
Le cycle de production de
glace est normal, mais
aucun glaçon n'est
produit
La température ambiante
ou la température de
l'eau dans le réservoir est
trop élevée
Faites fonctionner la machine
à glace à moins de 32°C et
versez-y une eau plus froide
Fuite de liquide
réfrigérant
Faites vérifier par un
technicien qualifié
La tuyauterie du système
de refroidissement est
bouchée
Faites vérifier par un
technicien qualifié
Modèle
KKBB1122
KKBB1122
Classe électrique II
II
Classe climatique
SSNN//NN//SSTT//T
T
SSNN//NN//SSTT//TT
Voltage
222200--224400VV//5500HHz
z
222200--224400VV//5500HHzz
Fabrication de glaçons
00..77A
A
00..77A
A
FFaabbrriiccaattiioonn ddee ggllaaççoonnss mmaaxx
11..22A
A
11..22A
A
Refrigerant
RR113344aa//6622g
g
RR113344aa//6622gg
Poids net
99..22KKg
g
99..33kkg
g
VVeessiiccaanntt
CC
5
5
H
H
110
0
C
C
5
5
H
H
110
0
MMaattéérriieel
l
Plastique
Inoxydable
Environnement
Fabriqué pour et importé par : Adeva SAS 8 rue Marc Seguin 77290 Mitry-Mory FRANCE
www.adeva-import.com - contact@adeva-import.com - Tél. 01 64 67 00 01
Page 16

IMPORTANT SAFETY
INSTRUCTIONS
DEUTSCH
Ihre Sicherheit und die Sicherheit der anderen Leute ist sehr wichtig.
Lesen Sie immer die Sicherheitshinweise gut durch und folgen Sie alle Anweisungen.
Das ist ein Sicherheitssymbol:
!
Alle Sicherheitshinweise werden von einem der folgenden Woerter angewiesen : "DANGER"
oder "WARNING".
DANGER
!
WARNING
Diese Woerter bedeuten :
Sie koennen getoetet werden oder sich schwer verletzen.
Alle Sicherheitshinweise geben an welches die Gefahr ist und wie die vermeidet
werden kann.
WICHITIGE SICHERHEITSHINWEISE
Page 17

Wenn Sie elektrische Geraete benutzen empfehlen wir das Sie alle Anweisungen und
besonders die Sicherheits Anweisungen vorsichtig durchlesen. Es besteht Elektroschock,
Verletzungs und Todesgefahr wenn Sie die Anwesiugen nicht beruecksichtigen.
Benutzen Sei das Geraet nicht wenn das Kabel beschaedigt ist.
Wenn das Netzkabel beschaedigt ist muss es von einem
autorisierten Techniker ausgewechselt werden.
Die Eismaschine so Gestellt sein das mann einfach an die
Steckdose greiffen kann.
Die Steckdose muss den technischen Daten der Eismaschine
entsptrechen und kein anderes Geraet darf an die selbe
Steckdose eingesteckt werden.
Das Kabel sollte nicht auf einem Teppich oder isolaztions material
sein. Decken Sei das Kabel nicht, lassen sie es nicht ins Wasser
tauchen und es sollte einfach zu greifen sein.
Wir empfehlen es nicht ein Verlaengerungskabel zu benutzen.
Diese koennte uberheitzen und zu brandt Gefahr fuehren. Wenn
sie jedoch ein Verlaengerungskabel benutzen muessen, benuetzen
ein mit folgenden Date: N°0.75mm2, 16A/250V ~.
Stecken Sie das Geraet aus bevor sie es reinigen oder warten.
Bewachen Sie kinder wenn Sie in der naehe der Eismaschine sind.
Benutzen Sie das Geraet nicht im freien. Es sollte nicht unter
direkten Sonnenlicht stehen und eine minimale distanz von 10mm
sollte an den Seiten un hinter der maschine und Wand sein.
Benutzen Sie keine andere Sustanz als Wasser um Eiswuerfell zu
machen.
Reinigen Sie die Maschine nicht mit Scheuermitteln oder
entzuendbaren Fluessigkeiten.
Die Eismaschine nicht umdrehen. (auf den Kopf)
Wenn die Eismaschine aus dem kalten freien kommt, lassen Sie
sie einige Minuten stehen so dass sie wieder auf Raumtemperatur
kommt bevor Sie sie wieder ins Stromnetz stecken.
Dieses Geraet ist nicht fuer die Handhabung von Behinderten
Personnen oder Kindern hergestellt. Es sollte immer eine Person
dabei sein die fuer die benutzung der Maschine autorisiert ist.
Kinder sollten ueberwacht werden so das si nicht mit der
Eismaschine spielen.
Entsprechend der lokalen Entsorgungsrichtlinien, wegen dem Gas
und der entzuendbaren Materialien sollte das Geraet wie
hingewisen wird entsorgt werden.
HINWEIS : Dieses Geraet muss an eine Steckdose mit Erdung gesteckt werden.
WICHTIG:
Die elektrischen Kaebel sind folgenderweise gefaerbt :
Gruen oder Gruen mit einer gelben Linie: ERdungskabel
Blau: Neutral
Braun: Positiv
Das Geraet sollte auf eine ebene Flaeche gestellt werden.
VORBEREITUNG DER EISMASCHINE
Page 18
Generelle Hinweise :
1. Eisschauffel
2. Eishalter
3. Eisbehaelter
4. Deckel mit Fenster
5. Lueftungs gitter
6. Entleerung Oeffnung
7. Maximaler Wasserpegel : ▲
Entfernen sie de Eisbahealterund Sie konnen den Maximalen Wasserpegel : ▲ sehen
LERNENE SIE IHR GERAET KENNEN
Page 19

Bedienfeld
Das Bedienfeld und die Konfiguration : Einfach zu benutzen, und Touchscreen.
A. Einige Eiswuerfel Groessen, kleine und grosse.
B. Ein/Aus Indikator
C. Eiswuerfel fertig Indikator
D. Wassermangel Indikator
E. Ein/Aus Knopf
F. Knopf um die groesse der Eiswuerfel zu wahelen.
Page 20

Auspacken der Eismaschine
1.Entfernen Sie die Verpackung der Eismaschine, aussen und innen. Vergewissern Sie sich
das alle Teile vorhanden sind, wenn nicht melden sie es sofort dem Kundendienst.
2.Entfernen sie die heftungsbaender, Eisbehaelter und andere Teile und reinigen sie den
Behaelter.
3.Setzen Sie die Esimaschine auf eine ebene und stabile Flaeche, ohne direktes Sonnelicht
oder andere waerme Quellen. Vergewissern sie sich das die Maschine eine minimale Distanz
von 100mm hinten und an den Seiten zur Wand hat.
4.Lassen Sie die Maschine 1 Stunde stehen so das das Kaeltemittel sich stabilisiert, bevor
Sie sie ans Stromnetz schliessen.
5. Das Geraet sollte ain eine Steckdose angeschlossen werden die einfach erreicht werden
kann.
HINWEIS: Fuellen Sie die Eismaschine mit Wasser. Benutzen Sie nur Trinkwasser.
ANSCHLIESSEN DER EISMASCHINE
! DANGER
*eine schlechte Handhabung der Steckdose oder des Steckers kann einen Elektroschock
verursachen. Wenn das Netzkabel beschaedigt ist verbinden Sie sich sofort mit dem
Kundendienst.
1.Diese Geraet muss auf eine korrekte weise auf den Boden Gestellt wrden. Das Netzkabel
ist mit einem normalen Stecker fuer Steckdosen ausgestattet, so das die elektroschockgefarh
vermindert wird.
2.Schliessen Sied as Geraet nur an perfekt funktionierende Steckdosen.
3.Diese Geraet braucht eine Spannung von 220-240Volt, 50Hz
REINIGUNG UND WARTUNG DER EISMACHINE
Bevor Sie die Eismaschine verwenden wird es empfohlen Die Maschine grunedlich zu
reinigen.
1. Entfernen Sie den Eisbehaelter.
2. Reinigen sie die Innenseite der Eismaschine mit warmen Wasser, einem sanften
Renigungsmittel und einem feuchten Tuch.
3.Danach waschen Sie es mit Wasser aus, leeren Sie den Behaelter in dem Sie die
Entleerungsoefnung aufschrauben.
WARTUNG & GEBRAUCH
Page 21

4.Die Aussenseite der Maschine kann regelmaessig mit einem Sanften Reinigunsmittel und
warmen Wasser gereinigt werden.
5.Trocknen Sie die Maschine von aussen und innene mit einem sauberen und trockenen
Tuch.
6.Wenn die Maschine waehredn laengerer Zeit nicht benutzt wird, leeren sie den Behaelter
und trockene sie alles.
GEBRAUCH DER EISMASCHINE
1.Oeffnen Sie den Deckel, entfernen Sie den Eisbehaelter und geben Sei Wasser ins
Reservoir, Nicht mehr als Max Wasser einfuellen.
2.Druecken Sie auf „ON/OFF“ un die Eisvorbereitung zu beginnen.
3.Wahelen Sie die groesse der Eiswuerfel uf dem Knopf „SELECT“. Falls die Raum
Temperatur tiefer als 15℃ ist, wird es empfohlen kleinere Eiswurfel zu machen um zu
vermeiden das diese sich zusammenkleben.
4.Die Eiswuerfel vorbereitung dauerte ungefaehr 6 bis 13 minuten, je nach groesse der
Eiswuerfel und Raum Temperatur. Die empfohlene Raumtemperatur ist von 10 ℃ bis 43 ℃.
5.Wenn Die Wasserpumpe kein Wasser mehr pumpt haelt Sie automatisch an. Das
Wassermengel Licht leuchtet auf. Druecken Sie auf „ON/OFF“ und fuellne Sie die Maschine
mit Wasser. Machen Sei das Geraet wieder an.
6.Das Geraet haelt an wenn Die Eiswuerfel voll sind„ICE FULL“. HINWEIS: Das direkte
Sonnenlicht kann den infrarot Sensor beeintraehctigen und die Maschine haelt nicht an wenn
die Eiswuerfel fertig sind. In diesem Falle machen Sie die Maschine manuell aus und setzen
Sie die in eine neue Stelle ohne Sonnenlicht.
7.Wechseln Sie das Wasser alle 24Stunden um sicher zu sein das das Wasser higienisch
und sauber ist.
Falls das Geraet nicht benutzt wird, leeren Sie die Maschine und trocken Sie alle Teile.
Page 22

USING YOUR
ICE MAKER
PROBLEM
MOEGLICHE URSACHE
LOESUNG
"Wasser nachfuellen“ Licht is
an
Kein Wasser
Machen Sei die Maschine aus
und fuellen Sie Wasser nach.
Danach machen Sie die
Maschine wieder an.
"ICE FULL" ist an
Das Eis ist fertig in der
Eisschaufel
Entferene Sie das Eis auf der
Eisschaufel. Druecken Sie
waherend 5 Sek. « Select » Die
maschine koennte Wahrend 10
Zyklen Eismachen auch wenn
ICE FULL an ist.
Die Eiswuerfel kleben
zusammen
Der herstellungs zyklus ist
zu lang.
Wahelen Sei kleinere Eiswuerfel
herstellung.
Die Wasser Temperatur ist
zu schwach.
Wechseln Sei das Wasser .
Geben Wasser in einer
Temperatur von 8-32 ℃ ein.
Eiszyklus normal aber keine
Eisherstellung
Die Raumteperatur oder
Temperatur im inneren Der
Eismaschine ist zu hoch.
Die Raumtemperatur solte
zwischen 10-43 ℃ sein, und die
Wassertemperatur zwischen 8
Kuehlungsmittel geht raus.
Zum autorisierten Techniker
bringen.
Schlauch ist blockiert
Zum autorisierten Techniker
bringen.
PROBLEMBEHEBUNG
Page 23

Model KKBB1122
KKBB1122
type de protection II
II
Kllima Typ SSNN//NN//SSTT//TT
SSNN//NN//SSTT//TT
Spannung 222200--224400VV//5500HHzz
222200--224400VV//5500HHzz
Eisherstellung
00..77A
A
00..77AA
EEiiss eerrnnttee 11..22A
A
11..22AA
Kuhleng mittel RR113344aa//6622gg
RR113344aa//6622gg
Nettogewicht 99..22KKgg
99..33kkgg
VVeessiiccaannt
t
CC
5
5
H
H
110
0
C
C
5
5
H
H
110
0
HHuueellllee
Kunststoff EEddeellssttaahhll
- VORISCHT : Lassen Sie die Oeffnungen des Geraetes immer offen. arder les
ouvertures de ventilation, dans l'enceinte appareil ou dans la structure intégrée, libre
de toute obstruction.
- ACHTUNG : Beschaedigen Sie nicht das Kuhlungsmittel gehaeuse.
Umwelt
ACHTUNG:
Werfen Sie nicht dieses Produkt, wie es mit anderen Haushaltsprodukten hat. Es gibt eine
Mülltrennungs von diesem Produkt in Gemeinden, Sie müssen Ihre lokalen Behörden über
die Orte, wo man dieses Produkt zurückgeben können zu informieren. In der Tat enthalten
elektrische und elektronische Produkte gefährliche Stoffe, die schädliche Auswirkungen auf
die Umwelt oder die menschliche Gesundheit haben und sollte recycelt werden. Das Symbol
hier darauf hinweisen, dass elektrische oder elektronische Geräte sollten sorgfältig
ausgewählt werden, ist ein fahrbarer Abfallbehälter mit einem Kreuz markiert.
Hergestellt und importiert: Adeva SAS 8 rue Marc Seguin 77290 Mitry-Mory FRANCE www.adeva-import.com -
contact@adeva-import.com - Tel. 01 64 67 00 01
TECHNISCHE DATEN
GARANTIE
Page 24

ESPAÑOL
Su seguridad y la de los demás es muy importante.
Siempre lea y siga todos los mensajes de seguridad.
Este es el símbolo de alerta de seguridad:
Todos los mensajes de seguridad aparecerán con este símbolo de alerta de seguridad
y la palabra "PELIGRO" o "ADVERTENCIA".
PELIGRO
! ADVERTENCIA
Estas palabras significan:
Usted puede morir o resultar seriamente lesionado si no sigue las instrucciones.
Todos los mensajes de seguridad le informaran del peligro potencial y le dirán cómo
reducir el riesgo de lesiones, y lo que puede suceder si las instrucciones no son
seguidas.
Cuando use dispositivos eléctricos, debe seguir precauciones de seguridad básicas
para reducir el riesgo de incendio, descargas eléctricas y lesiones a personas o
bienes. Lea todas las instrucciones antes de usar cualquier dispositivo.
No opere este o cualquier otro dispositivo con un cable dañado. Si el cable
de alimentación está dañado, debe ser reemplazado por el fabricante o su agente
de servicio o una persona calificada para evitar todo peligro.
La máquina de hielo debe ser colocada de manera que el enchufe sea accesible.
Conecte a un tomacorriente polarizado. Ningún otro dispositivo debe ser
conectado a la misma toma de corriente. Asegúrese de que el enchufe esté bien
conectado en el receptáculo.
No utilice el cable de alimentación sobre una alfombra u otros aisladores térmicos.
No cubra el cable.
Mantenga el cable lejos de zonas de tráfico y no lo sumerja en el agua.
No se recomienda el uso de un cable de extensión, ya que pueden
sobrecalentarse y convertirse en un peligro. Si tiene que usar un cable de extensión,
utilice el tamaño mínimo de N º 0.75mm2 y calibrado a no menos de 16A/250V ~ con
PREPARACIÓN DE SU MÁQUINA DE HIELO ANTES DE SU USO
Page 25

un tapón.
Desenchufe la máquina de hielo antes de limpiarla o hacer reparaciones o
mantenimiento.
Tenga cuidado y utilice el dispositivo razonablemente si se utiliza este dispositivo
cerca de niños.
No utilice la máquina de hielo en exteriores. Coloque la máquina de hielo fuera de
la luz del alcance de los rayos directos del sol y asegúrese de que hay al menos 10
mm de espacio entre la parte posterior del dispositivo y la pared. Deje una distancia
mínima de 10 mm a cada lado del dispositivo.
No utilice ningún líquido para hacer hielo que no sea agua.
No limpie la máquina de hielo con líquidos inflamables. Los vapores pueden crear
un incendio o explosión.
No voltear el dispositivo.
Si la máquina de hielo es usada en el exterior en invierno, darle unas pocas horas
para calentar a temperatura ambiente antes de conectarla.
Este dispositivo no está diseñado para ser utilizado por personas (incluidos niños)
con capacidades físicas, sensoriales o mentales reducidas, o con falta de experiencia
y conocimiento, a menos que sean supervisados o instruidos acerca del uso del
dispositivo por una persona responsable de su seguridad.
Los niños deben ser supervisados para asegurarse de que no jueguen con el
dispositivo.
● La eliminación de este dispositivo, por su contenido de gas inflamable, debe estar de
acuerdo con las regulaciones locales sobre la eliminación de dispositivos de este tipo.
ADVERTENCIA: Este dispositivo debe ser conectado a tierra.
IMPORTANTE:
Los cables internos del cable de alimentación están coloreados de acuerdo con el
siguiente código: verde o verde con una franja de color amarillo: Conexión a tierra
Azul: Neutral
Marrón: Positivo
Para evitar todo peligro debido a la inestabilidad del dispositivo, éste se debe colocar
sobre una superficie plana.
Page 26

Instrucciones Generales
1. Cuchara para hielo.
2. Sensor de llenado de hielo
3. Bandeja para hielo
4. Tapa con ventana transparente
5. Salida de aire
6. Tapón de drenaje del agua: lado frontal del dispositivo.
7. Nivel máximo de agua: ▲
Retire la bandeja para hielo y podrá ver la marca del nivel de agua.
CONOZCA SU DISPOSITIVO
Page 27
Posición del panel de control y su función
Panel de control: Fácil de usar, pantalla de control de las funciones.
A. Tamaño de hielo: pequeños y grandes.
B. Indicador de potencia
C. Indicador de llenado de hielo
D. Indicador de escasez de agua
E. Botón para encender / apagar el dispositivo.
F. Botón para seleccionar el tamaño de los hielos.
OPERACIÓN Y PROCEDIMIENTOS DE MANTENIMIENTO
Page 28
DESEMBALAJE de su máquina de hielo
1. Remueva el empaque exterior e interior. Compruebe que la bandeja de hielo y la
pala de hielo están en su interior. Si falta alguna pieza, póngase en contacto con
nuestro servicio al cliente.
2. Quite las tiras de sujeción de las palas, de la bandeja de hielo. Limpie el tanque de
agua y la bandeja para hielo.
3. Ponga la máquina de hielo en un mostrador plano y nivelado, sin luz directa del sol y
otras fuentes de calor (por ejemplo, estufas, hornos, fregaderos). Asegúrese de que
haya por lo menos 10 cm de distancia entre la parte posterior y los lados con la pared.
4. Deje una hora para que el refrigerante se asiente antes de conectar el dispositivo.
5. El dispositivo debe ser colocado de manera que el enchufe sea accesible.
ADVERTENCIA: llenar con agua potable.
ENCHUFE LA MÁQUINA DE HIELO
PELIGRO
* El uso inadecuado puede dar lugar a descargas eléctricas. Si el cable de
alimentación está dañado, póngase en contacto con nuestro servicio al cliente.
1. Este equipo debe estar debidamente conectado a tierra para su seguridad. El cable
de alimentación de este dispositivo está equipado con una toma de corriente de
acuerdo a las tomas de corriente estándar para reducir al mínimo la posibilidad de una
descarga eléctrica.
2. Conecte su equipo a una toma de corriente correctamente instalada.
3. La unidad requiere un estándar de 220-240 voltios y salida de 50 Hz.
LIMPIEZA Y CUIDADO DE SU MÁQUINA DE HIELO
Antes de usar su máquina de hielo, es muy recomendable limpiarla a fondo.
1. Saque la bandeja para hielo.
2. Limpie el interior con un detergente diluido, agua caliente y un paño suave.
3. A continuación, use agua para enjuagar las piezas en el interior, y vaciar el agua
quitando el tapón de drenaje en la parte frontal baja.
4. El exterior de la máquina de hielo debe limpiarse regularmente con un detergente
suave y agua tibia.
5. Seque el interior y exterior con un paño suave y limpio.
6. Cuando la máquina no vaya a ser usada por un largo período, drenar el agua y
secar completamente el interior.
1. Abra la tapa, quite la bandeja de hielo y vierta el agua en el tanque.
Mantenga el nivel de agua debajo de la marca de nivel máximo de agua.
Page 29

2. Pulse el botón "ON / OFF" en el panel de control para iniciar el ciclo de fabricación
de hielo.
3. Seleccione el tamaño de los cubos de hielo pulsando el botón "SELECT". Si la
temperatura ambiente está por debajo de 15 ℃, se recomienda seleccionar cubitos de
hielo pequeños para evitar que el hielo se pegue entre sí.
4. El ciclo de fabricación de hielo tiene una duración aprox. de 6 a 13 minutos,
dependiendo del tamaño seleccionado y la temperatura ambiente. La temperatura
ambiente recomendada es de 10 ℃ a 43 ℃.
5. Si la bomba de agua no puede inyectar agua, la máquina de hielo se detiene
automáticamente, y el indicador "agregar agua" se iluminará. Pulse el botón "ON /
OFF", llene de agua hasta el nivel máximo de agua y presione el botón "ON / OFF" de
nuevo para volver a encender el dispositivo. Deje que el líquido refrigerante en el
compresor por lo menos 3 minutos antes de reiniciar el dispositivo.
6. El dispositivo se detiene cuando la bandeja está llena de hielo y el indicador de
"lleno de hielo" se iluminará.
Advertencia: la luz directa del sol o el resplandor del sol puede causar un mal
funcionamiento del sensor de infrarrojos.
7. Cambie el agua del tanque cada 24 horas para asegurar un nivel razonable de
higiene.
Si la unidad no se va a usar, drene toda el agua y seque el tanque.
PROBLEMA
POSIBLE CAUSA
SOLUCIÓN:
El indicador de "Añadir
agua"
Falta agua
Apague la máquina de
hielo, llene con agua y
vuelva a encender el
dispositivo.
" ICE FULL" está
encendido
La bandeja de hielo está
llena
Saque el hielo de la
máquina. Mantenga
presionado el botón
"Select" durante 5
segundos.
Los hielos se pegan
La fabricación de hielo es
muy larga
Apague el dispositivo y
reinicie hasta que se
derritan los hielos, luego
seleccione la talla de
hielos pequeños.
La temperatura del agua al
interior del tanque es muy
débil.
Llene con agua,
temperatura del agua
recomendada es de 8 a 32
℃.
El ciclo de fabricación de
hielo es normal, pero no
hace hielo
La temperatura ambiente o
la temperatura del agua
del tanque es muy
elevada.
La temperatura ambiente
debe ser de entre 10 y 43
℃, la temperatura del agua
de entre 8 y 32 ℃.
Hay una fuga del
refrigerante en el sistema.
Haga revisar el dispositivo
por un técnico cualificado.
La manguera del
refrigerante está
bloqueada
Haga revisar el dispositivo
por un técnico cualificado.
SOLUCIÓN DE PROBLEMAS
Page 30

Modelo KB12 KB12
Tipo de protección I I
Tipo climático SN / N / ST / T SN / N / ST / T
Potencia 220-240V/50Hz 220-240V/50Hz
Fabricación de hielo 0.7A 0.7A
Cosecha de hielo 1.2A 1.2A
Refrigerante R134a/62g R134a/62g
Peso Neto 9.2kg 9.3kg
VVeessiiccaanntte
e
CC
5
5
H
H
110
0
C
C
5
5
H
H
110
0
Caja Plástico Acero inoxidable
- ATENCIÓN: Mantenga todas las aberturas de ventilación del dispositivo libres de
obstrucciones.
- ATENCIÓN: No dañe el circuito refrigerante.
Medio ambiente
ATENCIÓN:
No se deshaga de este producto como lo hace con otros productos del hogar. Existe
un sistema selectivo de colecta de este producto puesto en marcha por las
comunidades, debe de informarse en su ayuntamiento acerca de los lugares en los
que puede depositar este producto. De hecho, los productos eléctricos y electrónicos
pueden contener substancias peligrosas que tienen efectos nefastos para el medio
ambiente o para la salud humana y deben ser reciclados. El símbolo aquí presente
indica que los equipos eléctricos o electrónicos deben de ser cuidadosamente
seleccionados, representa un recipiente de basura con ruedas marcado con una X.
Fabricado e importado por: Adeva SAS 8 rue Marc Seguin 77290 Mitry-Mory FRANCE
www.adeva-import.com - contact@adeva-import.com - Tel. 01 64 67 00 01
Page 31

ITALIANO
La vostra sicurezza e quella degli altri sono molto importanti.
Leggere e rispettare tutti i messaggi riguardanti la sicurezza.
Questo è un simbolo di allerta sulla sicurezza:
!
Per tutti i messaggi di sicurezza seguirà il simbolo di allerta con riportata la parola
"PERICOLO" o "ATTENZIONE".
TTENZIONE
Queste parole significano:
Si rischia la vita o gravi infortuni se non si seguono le istruzioni qui riportate.
Tutti i messaggi di sicurezza indicheranno il pericolo potenziale e illustreranno
come ridurre il rischio di lesioni; ovvero cosa può accadere se le istruzioni
riportate non vengono seguite.
Prima di utilizzare elettrodomestici, osservare alcune precauzioni
basilari per ridurre il rischio di incendi, scosse elettriche o lesioni
a persone o cose. Leggere tutte le istruzioni prima di utilizzare
qualsiasi dispositivo.
Non utilizzare questo o qualsiasi altro apparecchio quando il cavo è danneggiato.
Se il cavo di alimentazione è danneggiato, esso deve essere sostituito dal
produttore o da un centro assistenza o da un tecnico qualificato, per evitare ogni
rischio. La macchina per il ghiaccio deve essere disposta in modo che la spina sia
accessibile. Collegare la spina a una presa con una corretta polarizzazione.
Nessun altro apparecchio dovrebbe essere collegato alla stessa presa.
Assicurarsi che la spina sia completamente inserita nella presa.
Non utilizzare il cavo di alimentazione su tappeti o altri isolanti termici. Non coprire
il cavo. Tenere il cavo lontano da aree trafficate e non immergerlo in acqua.
Si sconsiglia l'uso di una prolunga, perché potrebbe surriscaldarsi e diventare un
pericolo d’incendio. Se è strettamente necessario utilizzare una prolunga,
scegliere la dimensione minima n° 0.75mm2 calibrata almeno a 16A/250 V ~ con
tappo.
Scollegare la spina prima di eseguire qualsiasi operazione di manutenzione o
COME PREPARARE LA MACCHINA PER IL GHIACCIO PRIMA DI UTILIZZARLA
Page 32

riparazione.
Prestare particolare attenzione quando si utilizza l’apparecchio alla presenza di
bambini.
Non utilizzare la macchina per il ghiaccio in ambienti esterni. Disporla lontano
dalla luce diretta del sole e assicurarsi che ci siano almeno 10 mm di spazio tra la
parte posteriore dell’apparecchio e la parete. Mantenere una distanza minima di
10 mm su ciascun lato della macchina.
Non utilizzare alcun liquido diverso dall'acqua.
Non pulire la macchina per il ghiaccio con liquidi infiammabili poiché i vapori
potrebbero creare un pericolo d’incendio o esplosione.
Non rovesciare l’apparecchio.
Se l’apparecchio viene collocato in ambienti molto freddi, lasciare qualche ora per
raggiungere la temperatura ambiente prima di collegare la spina.
Questo dispositivo non è destinato all'uso da parte di persone con capacità
fisiche, mentali o sensoriali ridotte, o da persone con scarsa conoscenza (inclusi i
bambini), salvo che una persona responsabile della loro sicurezza non abbia
fornito loro le dovute indicazioni.
Sorvegliare sempre i bambini in prossimità dell’apparecchio per accertarsi che
non giochino.
Si prega gentilmente, in conformità alle normative vigenti riguardanti lo
smaltimento dei rifiuti con gas infiammabili, di rimuovere quelle parti
dell’apparecchio che potrebbero rappresentare un rischio per i bambini.
ATTENZIONE: Questo apparecchio deve essere collegato a una presa con messa a terra.
IMPORTANTE:
I fili del cavo di alimentazione sono colorati in base al seguente codice:
Verde (o verde con striscia gialla): messa a terra
Blu: Neutro
Marrone: Fase 1
Per evitare rischi dovuti all'instabilità del dispositivo, è opportuno disporre la macchina su
una superficie piatta o piana.
Page 33
IMPARARE A CONOSCERE LA PROPRIA MACCHINA
Istruzioni generali
1. Pala per ghiaccio
2. Segnalatore di riempimento ghiaccio
3. Cestello del ghiaccio
4. Coperchio con finestra trasparente
5. Uscita d’aria
6. Tappo di scarico dell’acqua: nella parte frontale dell’apparecchio.
7. Livello d’acqua massimo: ▲
Estrarre il cestello del ghiaccio, è possibile vedere il segno del livello dell'acqua.
Page 34

Posizione del pannello di controllo e funzionalità
Pannello di controllo: Facile da usare, funzioni di controllo visibili sullo schermo
touchscreen.
A. Dimensioni dei cubetti di ghiaccio: piccoli e grandi.
B. Indicatore di potenza
C. Ice-full indicatore
D. Indicatore di carenza dell’acqua
E. Pulsante per accendere/spegnere il dispositivo.
F. Pulsante per selezionare la dimensione dei cubetti.
PANNELLO DI CONTROLLO
Page 35

OPERATING PROCEDURES
& MAINTENANCE
DISIMBALLAGGIO della macchina per di ghiaccio
1. Rimuovere l'imballaggio esterno e interno. Verificare che il cestello ghiaccio e la
paletta del ghiaccio siano all'interno. In caso di parti mancanti, si prega di mettersi in
contatto con il nostro servizio clienti.
2. Rimuovere la pellicola presente sulla paletta e sul cestello. Pulire il cestello e il
serbatoio.
3. Mettere la macchina per il ghiaccio su un piano a livello, lontano dalla luce diretta
del sole e da altre fonti di calore (es. fornelli, forno, lavello). Garantire alla macchina
per il ghiaccio almeno 10 centimetri di spazio vuoto intorno a sé da ogni lato.
4. Prima di collegare l’apparecchio, lasciare un'ora in modo che la refrigerazione si
stabilizzi.
5. Il dispositivo deve essere disposto in modo che la spina sia accessibile.
ATTENZIONE: riempire con acqua potabile. Utilizzare solo acqua potabile.
COLLEGARE LA MACCHINA DEL GHIACCIO ALLA PRESA ELETTRICA
! PERICOLO
* L'uso improprio può causare il rischio di scosse elettriche. Se il cavo di
alimentazione è danneggiato, si prega di mettersi in contatto con il nostro servizio
clienti.
1. Questa apparecchiatura deve essere adeguatamente collegata a una presa con
messa a terra per la vostra sicurezza. Il cavo di alimentazione di questo apparecchio
è dotato di una spina che corrisponde alle prese a parete standard per minimizzare la
possibilità di scosse elettriche.
2. Collegare il dispositivo a una presa correttamente installata. Non danneggiare mai
in nessun modo la spina.
3. L’apparecchio richiede uno standard da 220-240Volt, uscita elettrica 50Hz dotata
di messa a terra.
PROCEDURE E OPERAZIONI DI MANUTENZIONE
PROCEDURE E OPERAZIONI DI MANUTENZIONE
Page 36

OPERATING PROCEDURES
& MAINTENANCE
PULIZIA E MANUTENZIONE DELL’APPARECCHIO
Prima di utilizzare la macchina per il ghiaccio, si raccomanda di pulirla a fondo.
1. Rimuovere il cestello del ghiaccio.
2. Pulire l'interno con un detergente diluito, acqua calda e un panno morbido.
3. Quindi utilizzare solo dell'acqua per lavare le parti interne, e svuotare l'acqua
rimuovendo il tappo di scarico sul lato basso nella parte anteriore.
4. L'esterno della macchina per il ghiaccio deve essere pulita regolarmente con un
detergente delicato e acqua tiepida.
5. Asciugare l'interno e l'esterno con un panno morbido e pulito.
6. Quando la macchina non deve essere utilizzata per un lungo periodo, svuotare
l'acqua dal serbatoio e asciugare completamente all'interno.
Page 37

USING YOUR
ICE MAKER
1. Aprire il coperchio, estrarre il cestello del ghiaccio e versare l’acqua nel serbatoio.
Mantenere il livello dell'acqua sotto il segno del livello massimo.
2. Premere l’interruttore "ON/OFF" sul pannello di controllo per iniziare il ciclo di produzione di
ghiaccio.
3. Selezionare la dimensione dei cubetti di ghiaccio premendo il pulsante "SELECT". Se la
temperatura ambiente è inferiore a 15 ℃, si consiglia di selezionare la misura piccola per
evitare che il ghiaccio si attacchi.
4. Il ciclo di produzione del ghiaccio dura ca. 6-13 minuti, secondo le dimensioni dei cubetti di
ghiaccio e la temperatura ambiente. La temperatura consigliata è di 10 ℃ a 43 ℃
5. Se la pompa dell'acqua non riesce a iniettare acqua, la macchina per il ghiaccio si arresta
automaticamente, e la spia che segnala la mancanza di acqua si accende. Premere il tasto
"ON/OFF", riempire con acqua fino al limite massimo segnalato e premere nuovamente il tasto
"ON/OFF". Lasciare riposare il liquido refrigerante all'interno del compressore per almeno 3
minuti prima del riavvio.
6. La macchina si ferma quando il cesto è pieno di ghiaccio e la spia indicante il cestello pieno
si accende. Attenzione: la luce del sole diretta o i raggi solari possono causare un
malfunzionamento del sensore a infrarossi. Se il dispositivo non si ferma, e continua la
produzione di cubetti di ghiaccio, spostare l'apparecchio in un luogo con assenza di luce solare.
7. Cambiare l'acqua nel serbatoio dell'acqua ogni 24 ore per garantire un ragionevole livello di
igiene.
Se l'apparecchio non deve essere utilizzato, svuotare e asciugare tutta l'acqua presente.
Page 38

USING YOUR
ICE MAKER
RISOLUZIONE DEI PROBLEMI
PROBLEMA
POSSIBILE CAUSA
SOLUZI ONE
La spia di “mancanza
d’acqua” si accende
Manca acqua nel
serbatoio.
Spegnere la macchina del
ghiaccio, riempire con acqua e
premere il tasto "ON/OFF" per
riavviare.
La spia del “cestello
pieno” si accende
Il cestello è pieno di cubetti
Togliere il ghiaccio dal cestello
del ghiaccio. Premere e tenere
premuto il pulsante "Select" per 5
secondi, l’apparecchiò farà 10
cicli di ghiaccio, anche se la spia
dovesse accendersi.
Il ghiaccio si incolla
Il ciclo di produzione del
ghiaccio è troppo lungo.
Arrestare la macchina del
ghiaccio, e riavviare quando i
blocchi di ghiaccio si sciolgono.
Selezionare la taglia piccola per i
cubetti di ghiaccio.
La temperatura dell'acqua
all'interno del serbatoio è
troppo bassa.
Sostituire l'acqua. La
temperatura dell'acqua
consigliata è di 8-32 ℃.
Il ciclo di produzione del
ghiaccio è normale, ma non
formano i cubetti.
La temperatura dell'acqua
all'interno del serbatoio è
troppo alta.
La temperatura ambiente
dovrebbe essere di ca. 10-43 ℃ e
la temperatura dell'acqua di ca. 832 ℃.
Ci sono delle perdite di
refrigerante.
Rivolgersi a un tecnico qualificato.
Il tubo del sistema di
raffreddamento è bloccato.
Rivolgersi a un tecnico qualificato.
Page 39

Modello
HHZZBB--1122//A
A
HHZZBB--1122//SSAA
Tipo di protezione II
II
Tipo di clima
SSNN//NN//SSTT//T
T
SSNN//NN//SSTT//T
T
Potenza
222200--224400VV//5500HHz
z
222200--224400VV//5500HHzz
Attuale produzione di ghiaccio
00..77A
A
00..77AA
RRaaccccoollttaa ddii gghhiiaacccciioo 11..22A
A
11..22AA
Refrigerante
RR113344aa//6622g
g
RR113344aa//6622gg
Peso netto
99..22KKg
g
99..33kkgg
VVeessiiccaannt
t
e (che?) CC
5
5
H
H
110
0
C
C
5
5
H
H
110
0
CCoonntteenniittoorre
e
Plastica
Inossidabile
AVVERTENZA: Tenere le aperture di ventilazione esterne e interne del dispositivo
prive di ostacoli.
- ATTENZIONE: Non danneggiare il circuito refrigerante.
Ambiente
ATTENZIONE:
Non gettare quest’ apparecchio tra i rifiuti domestici. Per questo tipo di prodotti è fornito dai
comuni un sistema di raccolta e ritiro in zona ed è quindi un dovere informarsi per conoscere
il giusto smistamento del rifiuto. Infatti, i prodotti elettrici ed elettronici possono contenere
sostanze pericolose che hanno effetti dannosi sull’ambiente o sulla nostra salute e quindi
devono essere riciclati. Il simbolo al lato indica che le apparecchiature elettriche ed
elettroniche fanno parte di una raccolta selettiva e differenziata (rappresentata da un bidone
su due ruote sbarrato da una croce.
Prodotto e importato da : Adeva SAS 8 rue Marc Seguin 77290 Mitry-Mory FRANCE
www.adeva-import.com - contact@adeva-import.com - Tel. 01 64 67 00 01
PARAMETRI TECNICI RS E CIRCUITO DI SISTEMA
 Loading...