

Page 1

Instruction manual
Manuel d'utilisation
Bedienungsanleitung
Handboek
Manual de Utilización
Manuale d’uso
HKM1028
Cooking machine
Robot culinaire
Küchenmaschine
Food Processor
Procesador de Alimentos
Robot da cucina
Page 2

English
Jug
Lid
Steaming
accessory
General Security instructions
This appliance is made for domestic usage only.
The appliance is not suitable to be used by children or physically or mentally disabled
people unless they have been instructed how to securely use the appliance or use it under
the surveillance of a fully responsible person.
Unplug the appliance before cleaning and before putting away for storage, especially if you
don´t plan to use it for a long period of time.
Should the power cable be damaged, it should be replaced by the maker or by a qualified
professional.
Do not dispose of your appliances along with the regular domestic trash. Please contact
your local town services to make sure you get rid of them appropriately and abide by the
disposal rules in place.
Do not plunge the appliance into water to avoid getting electrocuted or damaging it. Do not
let the electric parts of the appliance get in contact with water at any time, use a slightly
humid cloth to clean them.
CAUTION : the blades are extremely blunt, be very cautious when manipulating them.
Respect the food capacity of the robot: 2L.
Do not take off the lid, before making sure the robot has fully stopped, especially when
using a speed above 5.
When taking of the jug after usage, avoid touching the stainless steel part to avoid getting
burnt.
When you open the lid after usage, steam will be released, therefore make sure to not get
burnt. Avoid touching the lid while the appliance is functioning.
Always supervise children when the appliance is in usage and make sure they are aware
the appliance gets hot while in use and that they should never touch it to avoid getting burnt..
Store the robot away from children.
Use the measuring accessory when using a speed higher than 5
or when crushing ice.
Always use the robot in a flat and non slipping surface as it could
move during usage.
Always leave plenty of space around and above the robot.
Should the appliance overheat, it will automatically turn itself off.
A red light will turn on an you´ll hear a ringing alarm. (Fig1). Unplug
the robot and let it cool down for about 15 minutes without food.
INTRODUCTION
Page 3
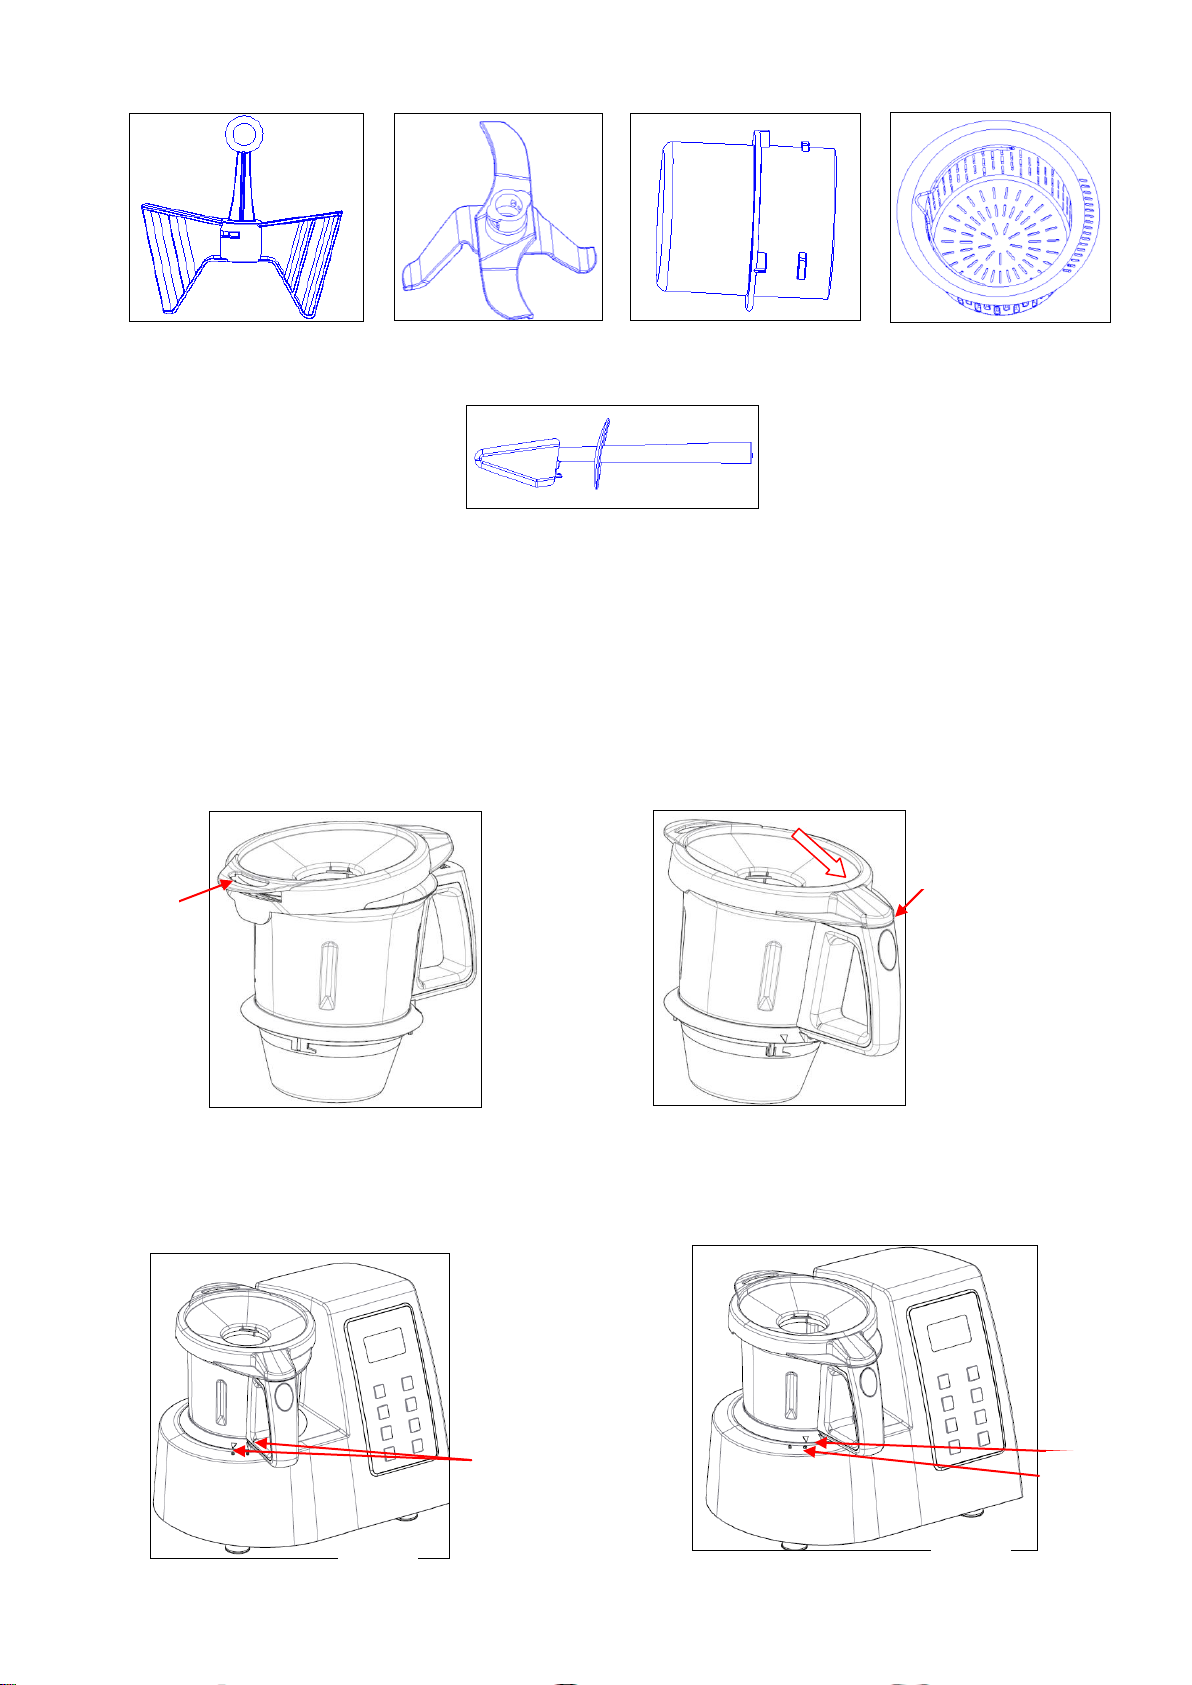
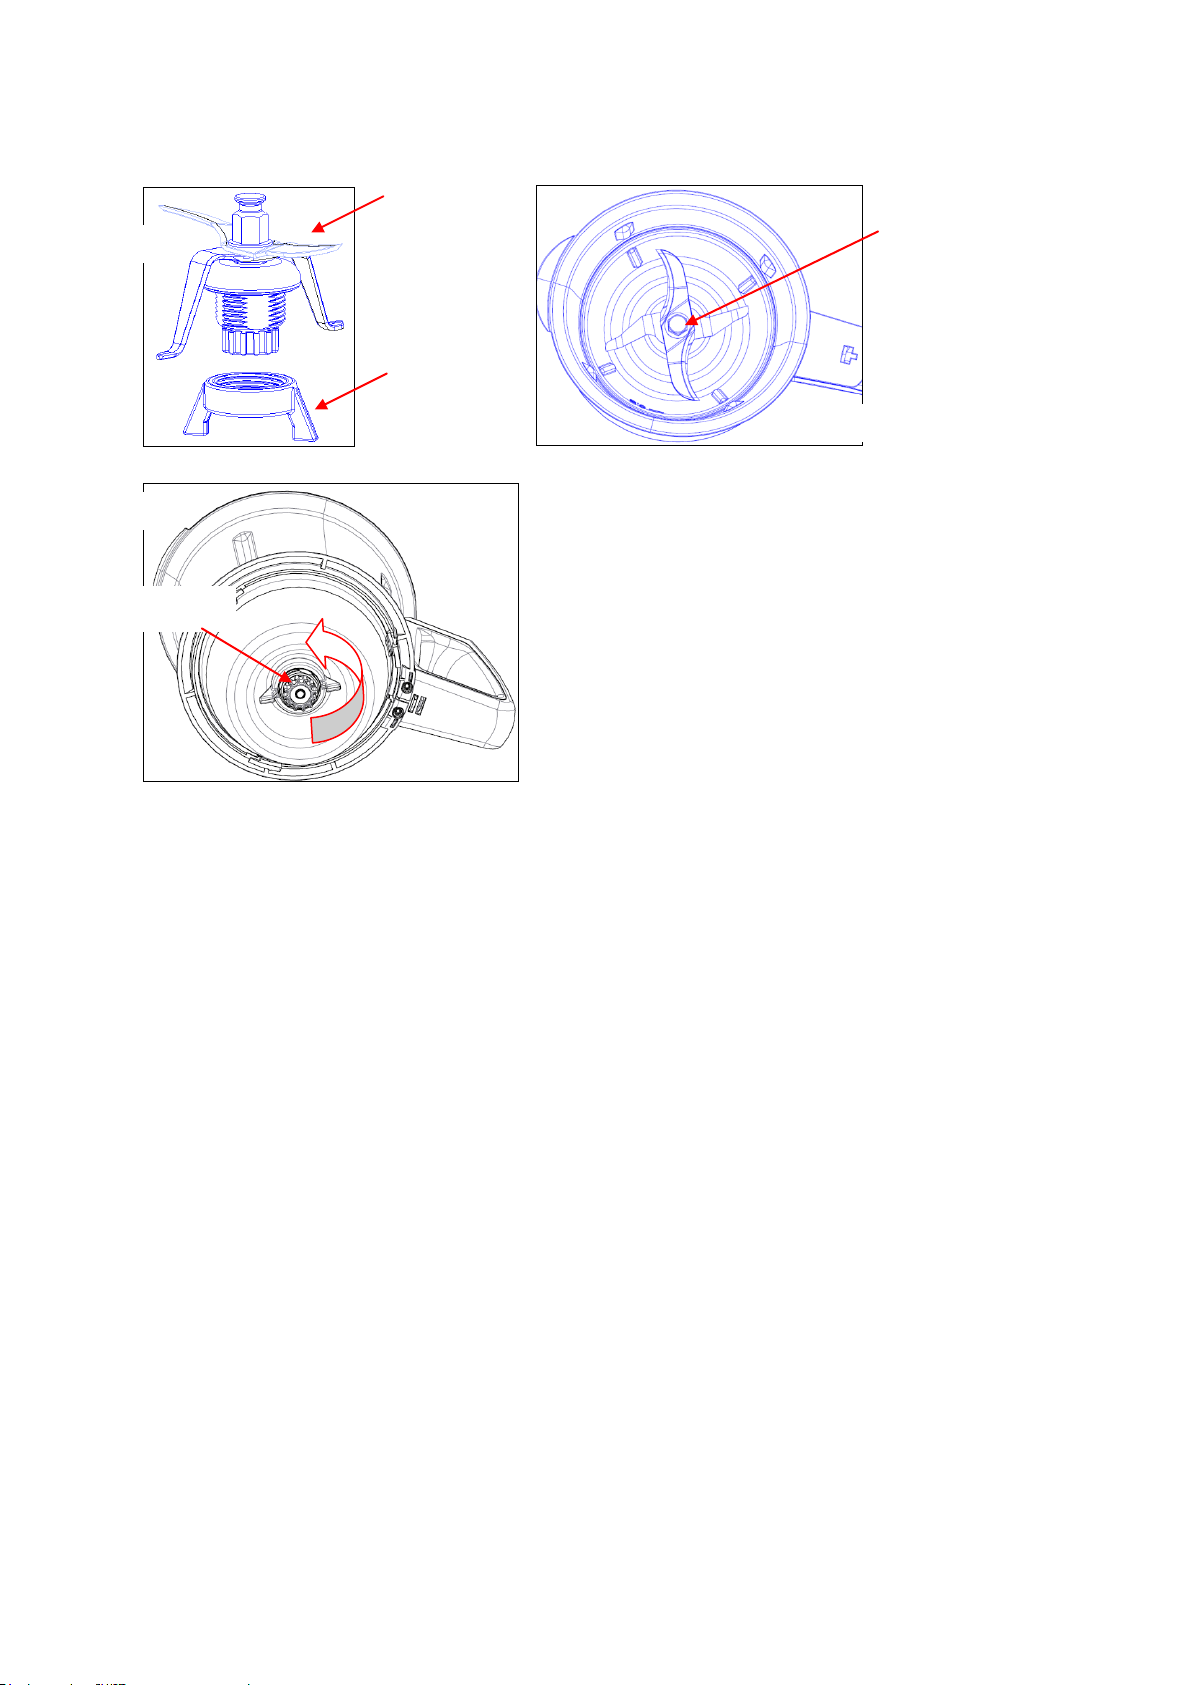
Butterfly blade
Blade guard
Measuring accessory
Basket
Spatula
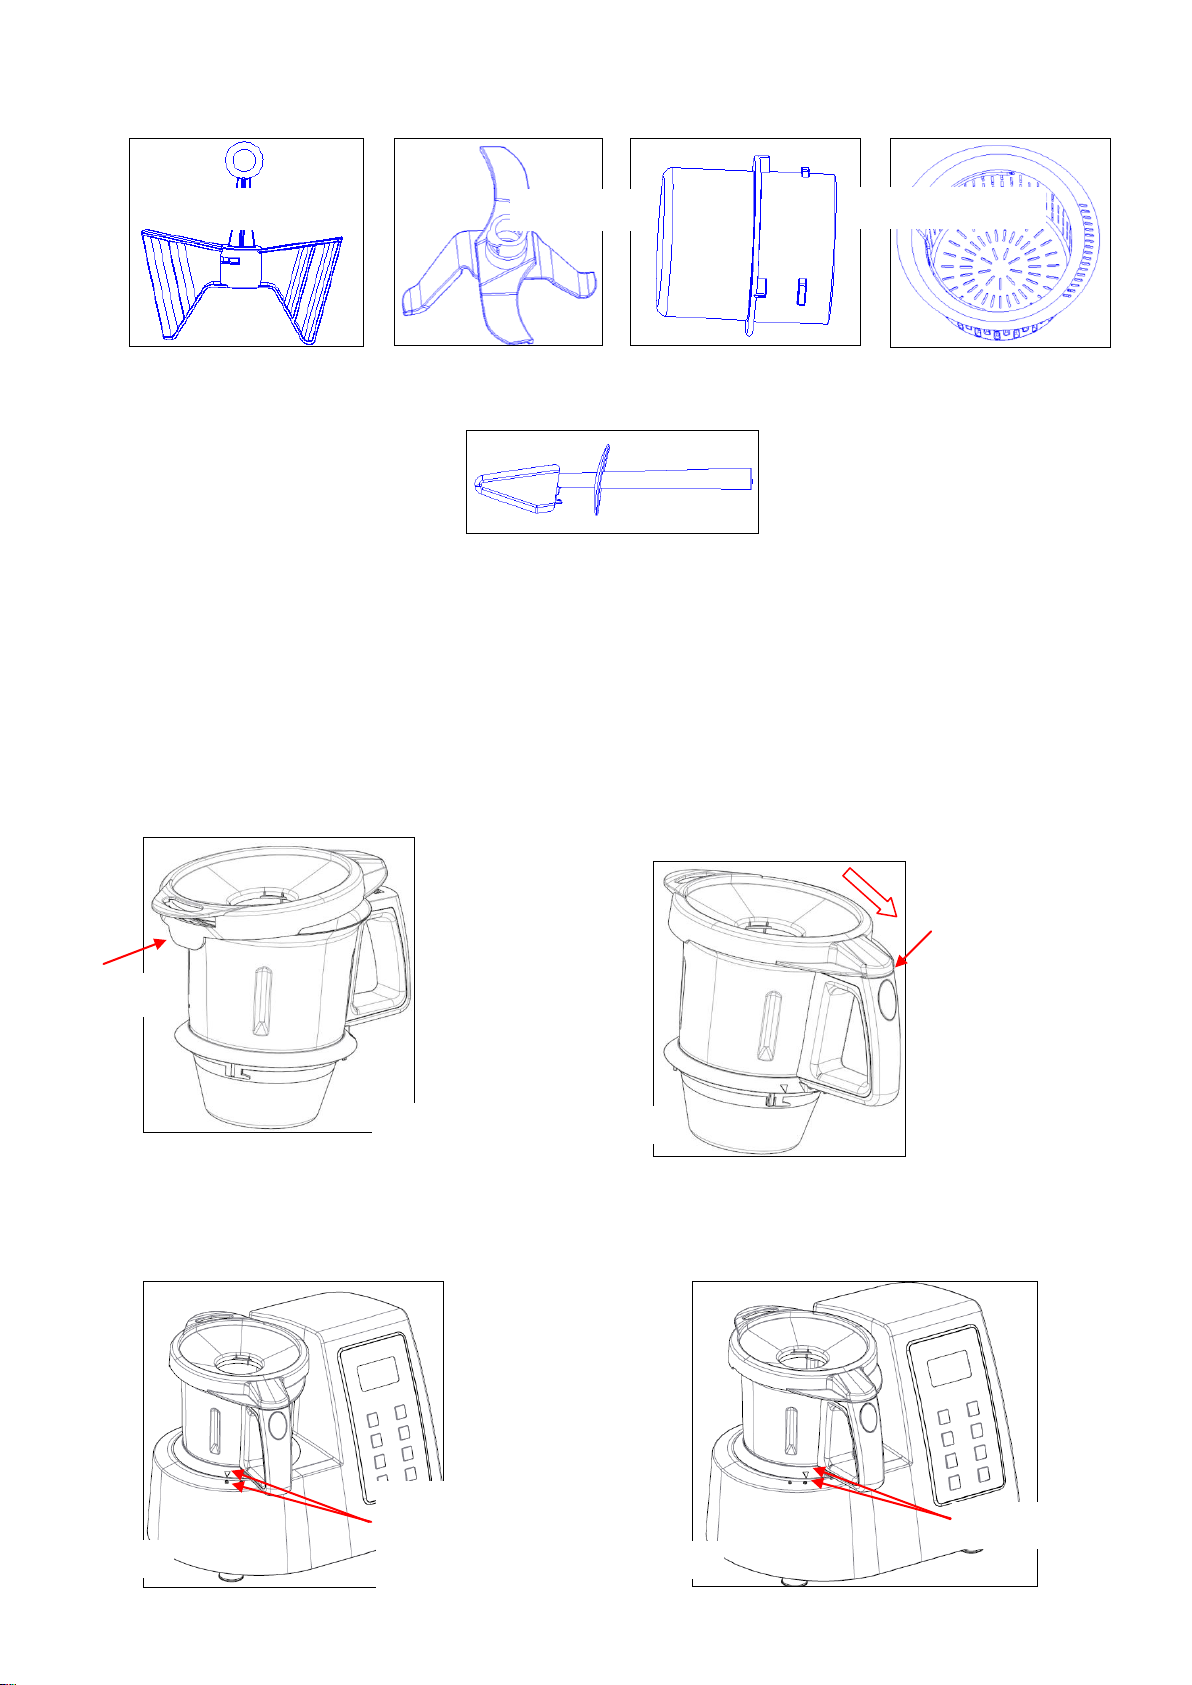
Attach here
Fig 3
Fig 4
Attach here
Fig 5
Place the jug
using the
triangle mark
over the locker
Lock
Fig 6
Instructions before usage
Clean the appliance thoroughly before using it for the first time to avoid any chemical
residues.
How to mount the jug and launch the different programs:
Place the lid over the jug as shown in (Fig 3). Close the lid and lock it in as shown in (Fig 4).
Place the jug on the robot with the handle towards the front as seen in (Fig 5). Turn the
handle anti-clockwise to lock it. (Fig 6).
Page 4
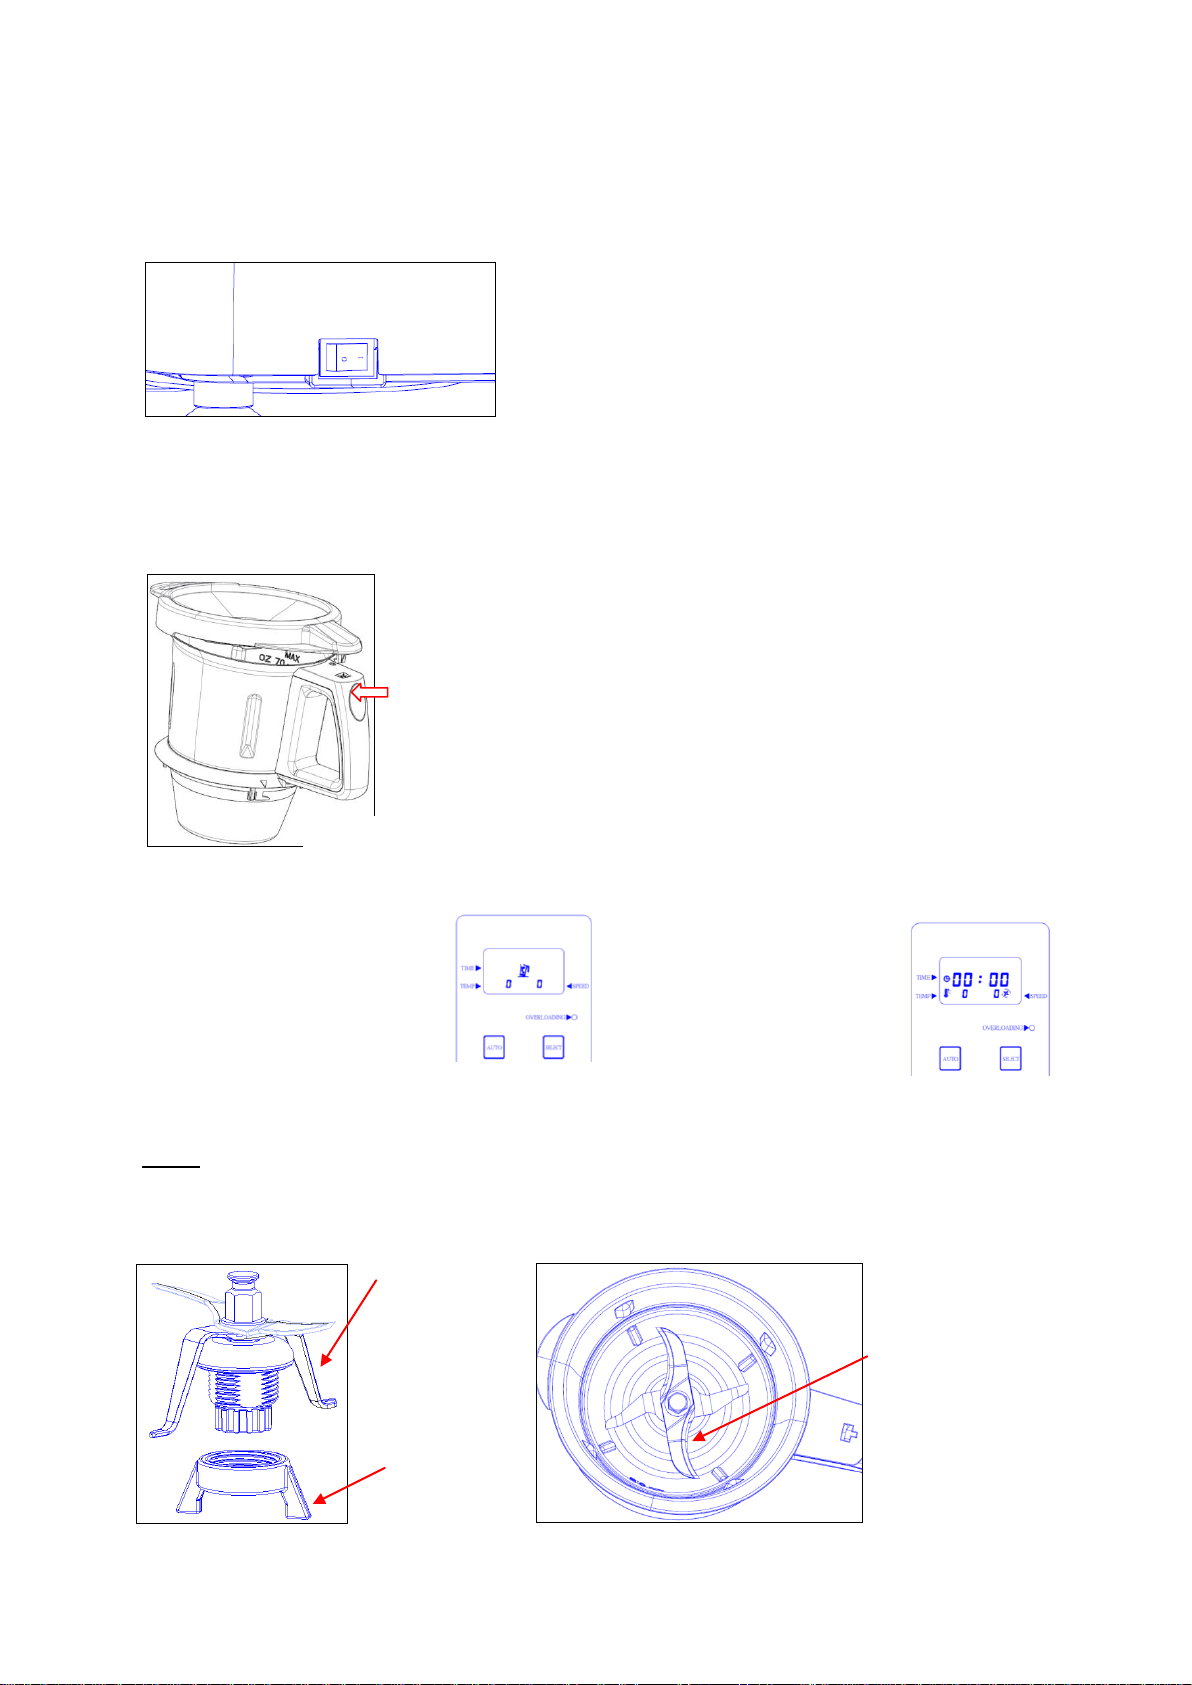
Fig 7
Fig 8
Blades
Screw
Fig 9
Circular side of the
blade guard
Fig 10
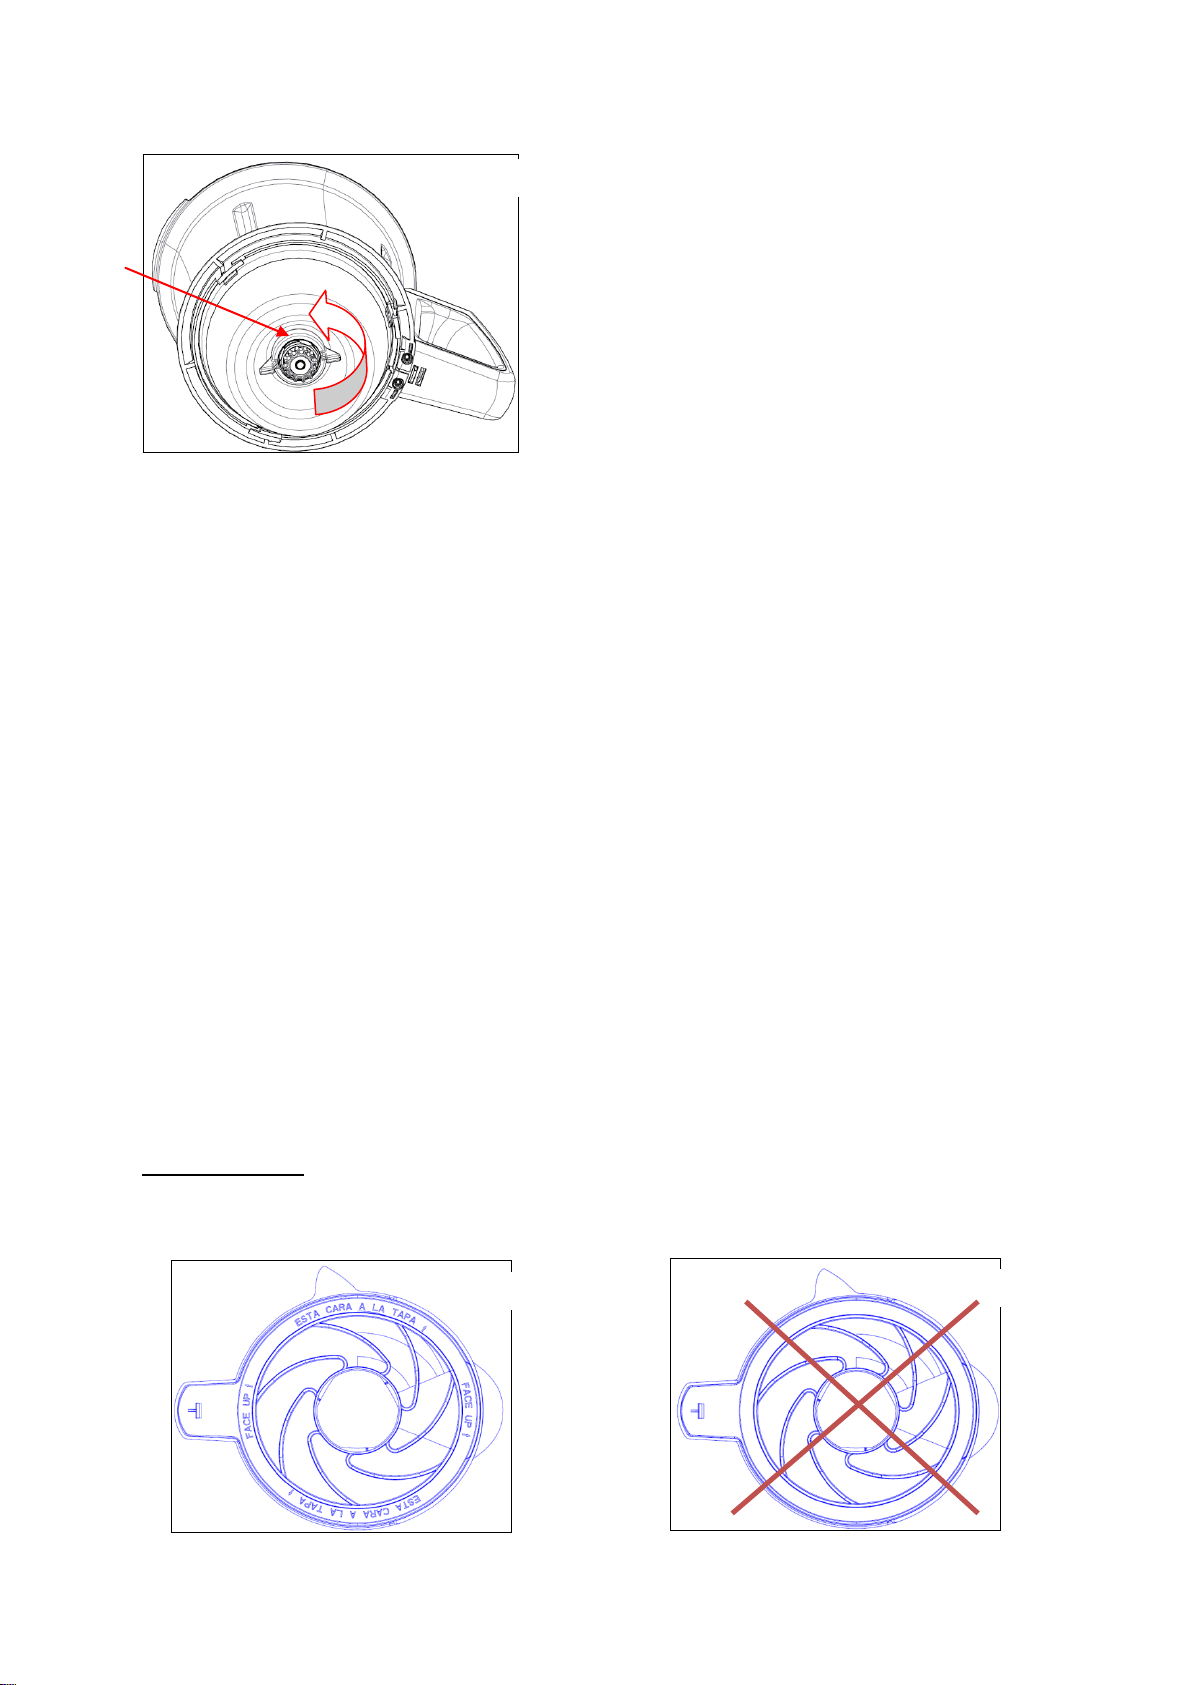
Plug the power cord into the appliance before turning it on.(Fig 7). Set the timer and the
temperature, using the command panel and press the START/STOP button.
How to use the jug :
Press the START/STOP button to turn the appliance off. Hold the jug by the handle and turn
it clockwise to unlock it as seen in figure 5. Press the handle button to unlock the lid before
taking it of (Fig 8).
LCD Screen:
Plug the power cord into the appliance
before turning it on. If the lid is
incorrectly placed or unlocked you´ll
see the following icon:
If the jug is correctly locked into
place, the screen will show the
following information:
You can only set up the timer and the temperature if the jug is properly locked.
Note : You´ll only be able to lock the jug if the lid is correctly placed.
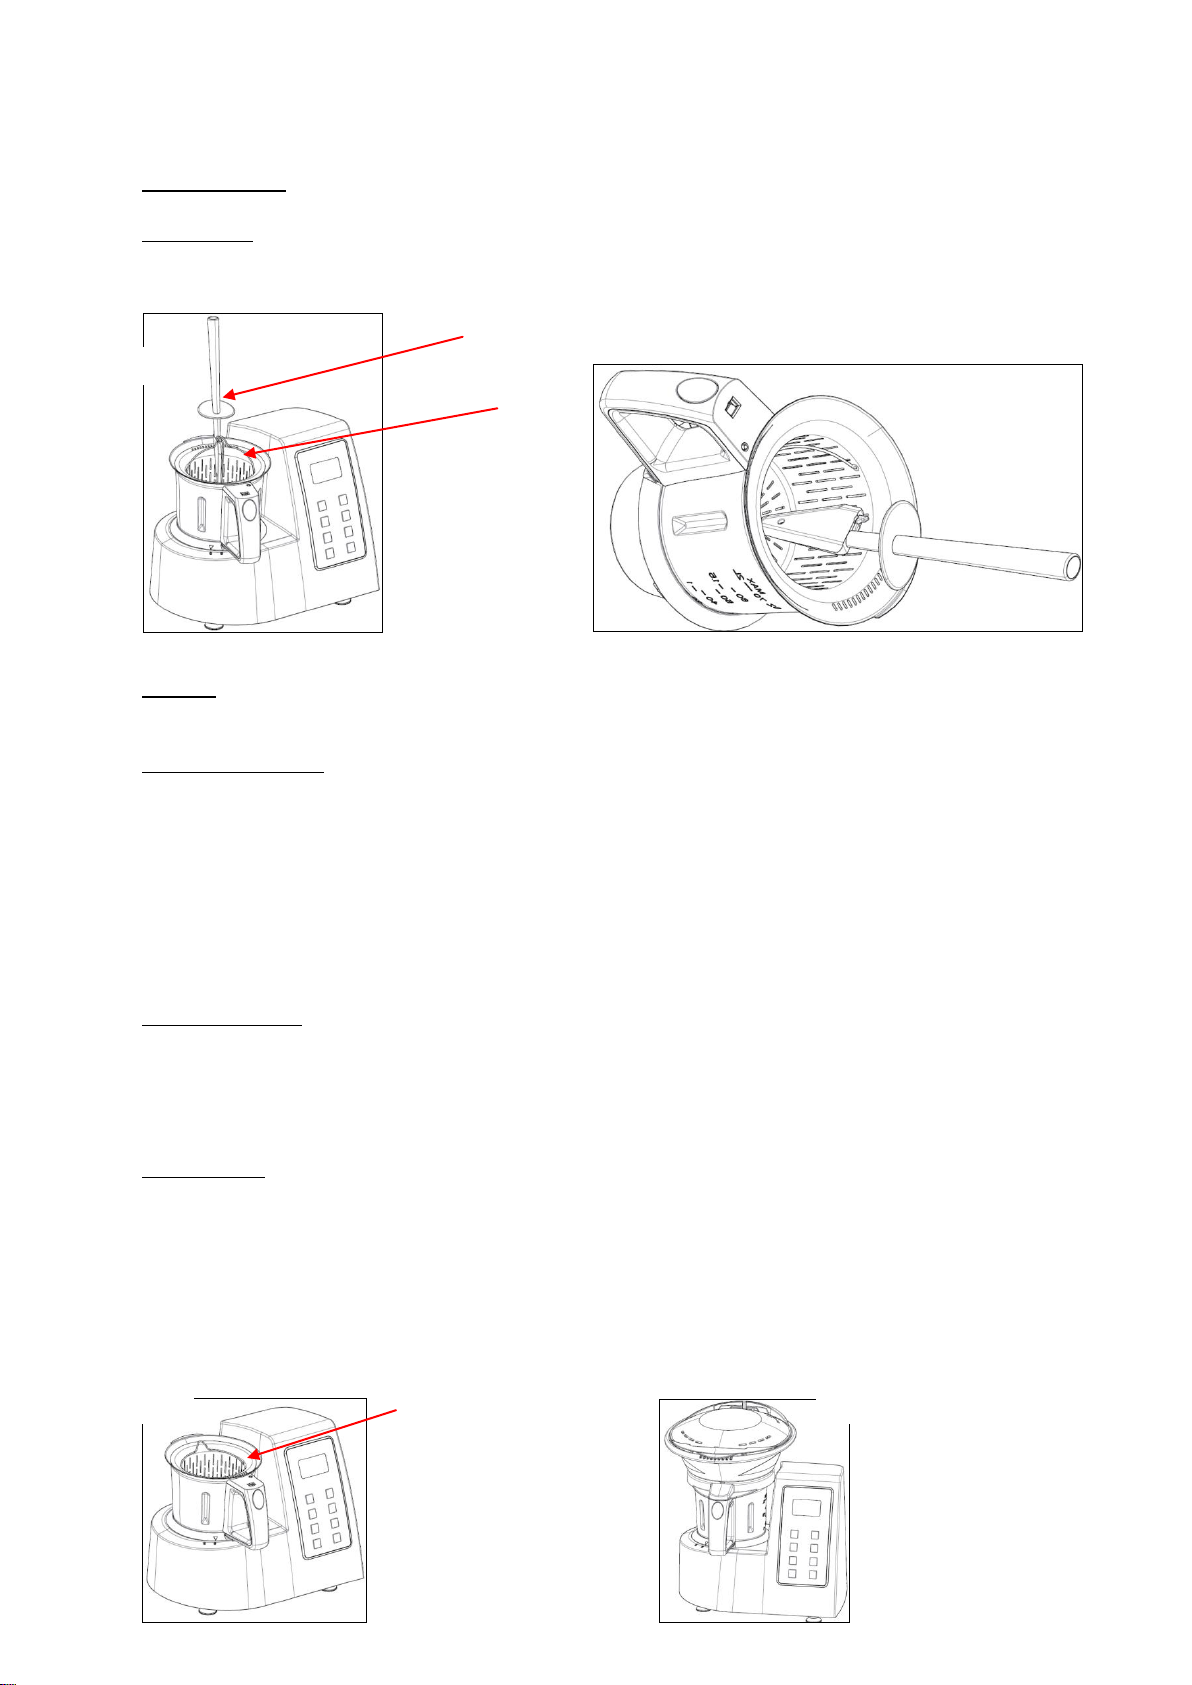
Disassembling the blades :
Place your left hand into the jug to cease the rounded side of the blade guard (Fig 10).
Page 5
Unscrew
Fig 11
Fig 13
Fig 12
With your right hand turn the screw anti-clockwise
(Fig 11).
When done, take the blades off.
Caution !! The blades are extremely sharp. Do
not touch the sharp edges when disassembling
or moving the blades to avoid getting hurt.
Assembling the blade guard :
Follow the instructions above but in the opposite way.
Usage instructions
• Always clean the appliance between each usage and between dishes.
• When heating milk or cream do not use a temperature higher than 90°C to avoid burning
the ingredients. We also recommend using speed 2 to avoid spillage and splattering.
• When mixing vegetables, we advise adding a small quantity of olive oil to help the machine
break the fibres.
• Cheese as well as some starchy vegetables can foam or burst when cooking, to avoid any
accidents, we advise adding those ingredients 3 to 5 minutes before the end of the recipe.
• The basket can be used as a sieve. When it´s hot, use the spatula to manipulate it.
• Use the spatula to push the ingredients into the basket, its disk will prevent the spatula from
getting stuck in the blades.
• If you find the jug as been left with odour residues, you can mix 250ml of water with 3 egg
shells and a lemon peel for 20 seconds at speed 6 to neutralise them.
• If the ingredients have overcooked and ended up stuck to your jug, you can soak it with
warm water and soap for a few hours before using the same mixture as above to clean it.
• When cooking rice, add a pinch of salt into the water to avoid spattering
• Do not use anymore than 1.5kgs of ingredients in total to avoid spillage.
How to use the accessories
The lid of the jug : The seal inside the lid will prevent spillage of food, soup or steam. As you
assemble the seal “ESTA CARA A LA TAPA↑, FACE UP ↑” the words should be facing you
(as in Fig 12) otherwise, the fluid could leak (Fig 13).
Page 6
Spatula
Basket
Handle
Fig 14
filter
Fig 16
Fig 15
Fig 17
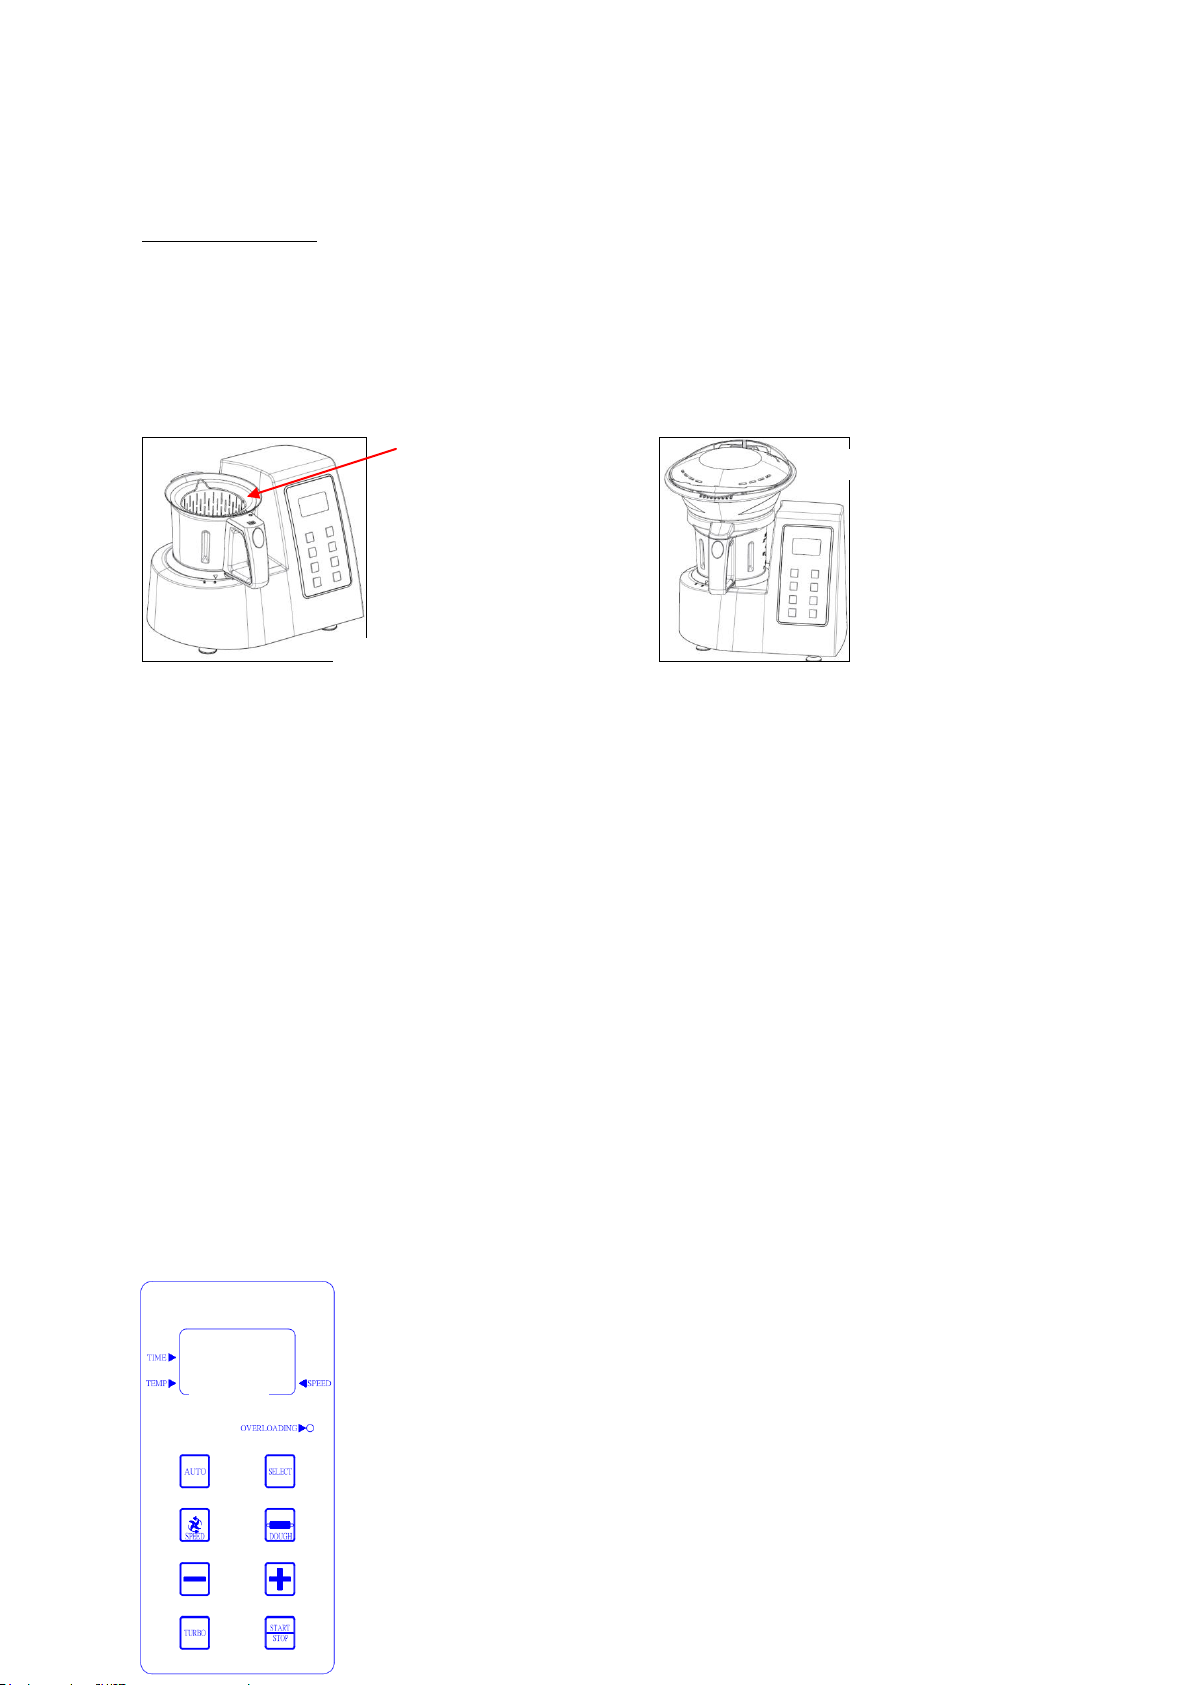
Measuring cup : Used to measure quantities of liquid food.
The Basket : multifunctional accessory. It can filter the juice of fruits and vegetables and also
cook vegetables like potatoes, tomatoes, onions, etc. It is very easy to remove. Use the
spatula to lock the basket handle (Fig 14).
Spatula: You can scrape the ingredients off the walls of the jug with the Spatula. When you
filter the juice, it can be used to hold the basket and separate the juice residues (Fig 15).
The butterfly blade : It can be used with the blade guards. The butterfly blade will ensure
better mixing and prevent sticking when you heat milk, butter or fruit sauce.
To assemble, align it with the semicircle blade guard and insert it until it covers the blade
guard, then rotate clockwise.
To dismount, grab the handle of the jug in one hand and with the other catch blade guard to
remove it.
Warning: When you use the butterfly blade, the speed of the appliance cannot exceed
4 and the maximum capacity should not exceed 1.5L.
The blade guard : Use it to mix soft or liquid ingredients. The speed of the appliance must not
exceed 4 when using it.
Important: When installing the blade guard, push hard until it clicks.
Caution: The blade guard and butterfly blade should not be used when mixing dough.
The steamer : It includes a container, a disc and a lid. It can be used to cook large amounts
of food with steam.
Caution: be careful to avoid steam burns.
Pour at least 500ml of water in the jug. If you want to use a filter, place it in the jug (Fig 16)
and put the food (such as rice or potatoes) in the filter. Then place the lid and make sure the
jug is properly engaged in the appliance.
Page 7
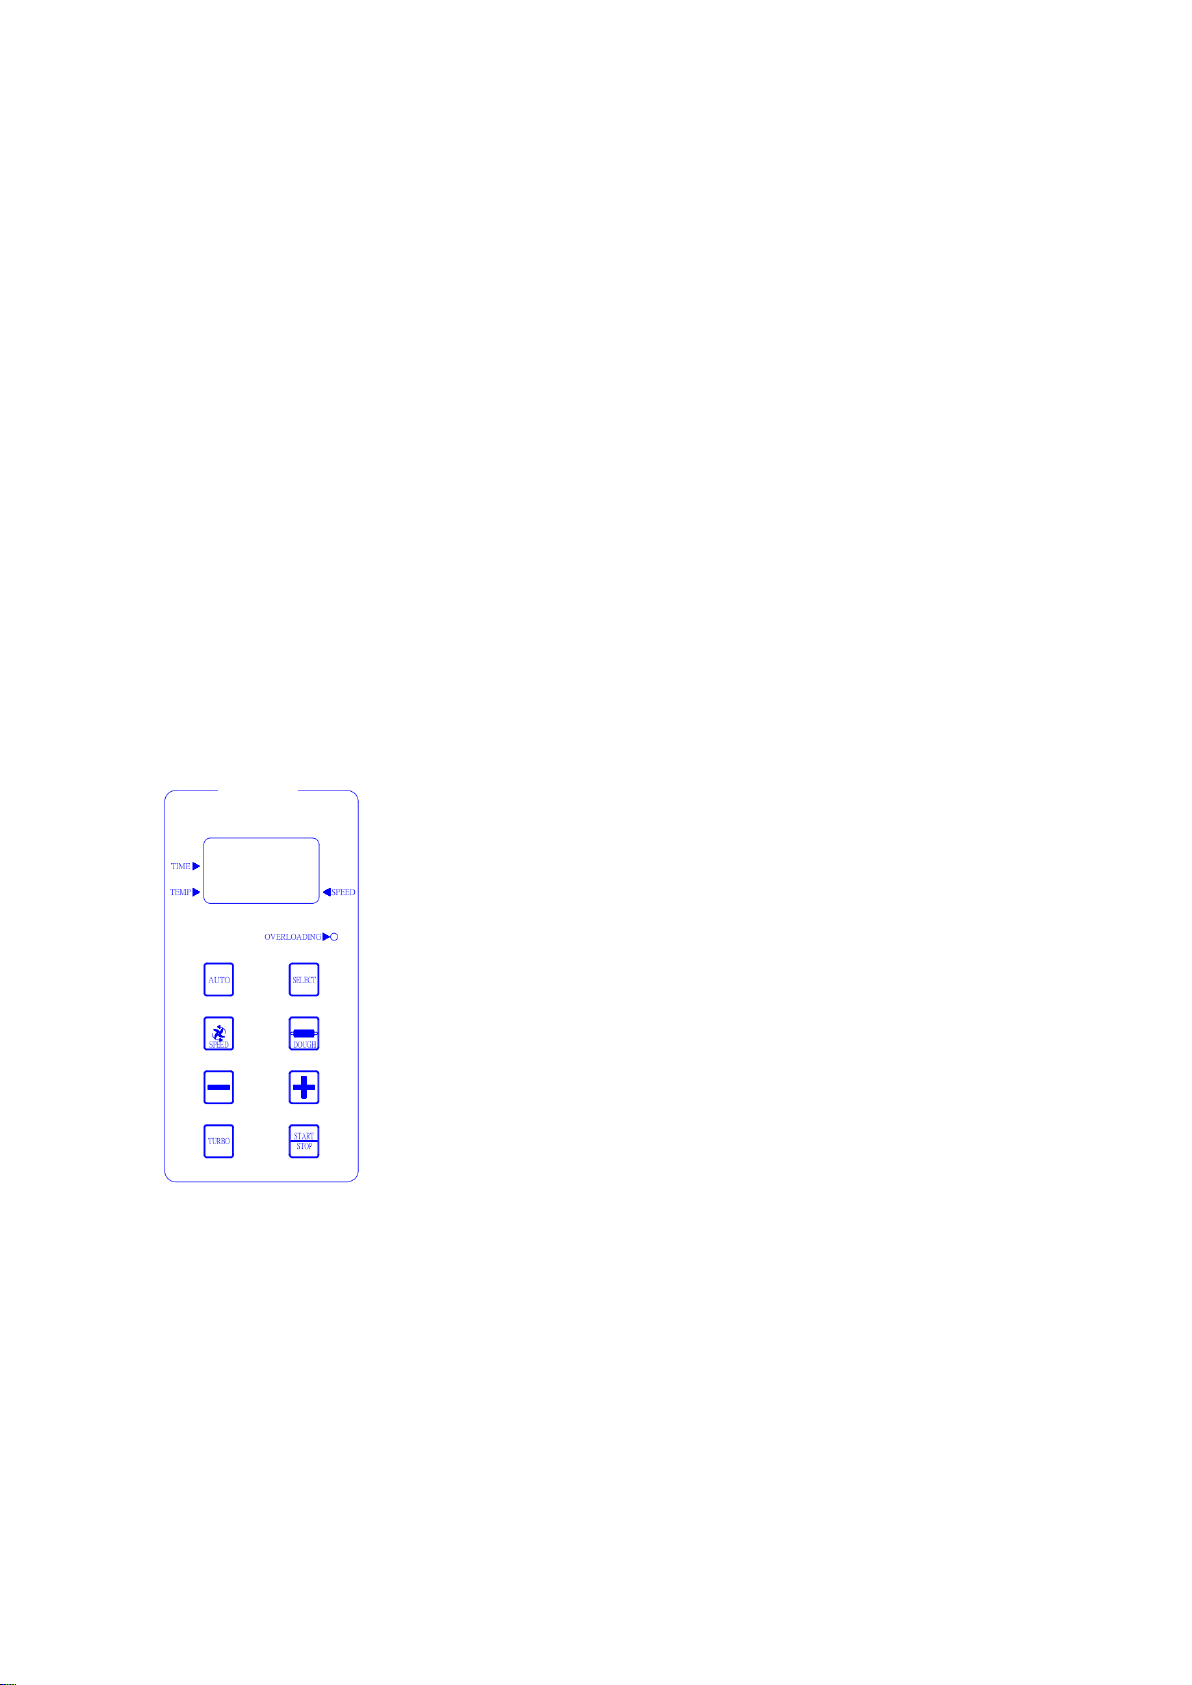
Fig 18
Correctly place the steamer on the jug by placing the slot of the cooker into the tab of the jug.
Press the button on the jug to lock the cooker. Place food in the cooker (arranging the foods
that require more cooking at the bottom and those who require the least above). If
necessary, the steam disc can be used.
Close the steamer with the lid so that the steam cannot escape (Fig 17).
Important :
• When you use the steamer, do not let the measuring accessory in the jug.
• When you use the steamer, ask your children to stay away from the appliance and inform
them of the danger.
• When you use the steamer, do not exceed speed 3. A speed greater than 3 may cause
food spillage.
Set the timer and select the temperature and speed on the control panel and press START /
STOP to start cooking.
Open the steamer by slightly leaning towards you so that the steam escapes through the
back and the water can flow into the container. Turn the lid and place it on the table. Then
take the steamer off and hold it above the jug for a few seconds to let the water cool and
flow. When the water stops flowing, place the steamer on its lid.
CONTROL PANEL
TIME : displays time
TEMP : displays temperature
SPEED : displays speed
To use the function “auto” press the AUTO button. Included: a.soup;
b.jam; c.sauce
To adjust the cooking time or the cooking temperature, use the
SELECT button and choose time or temp.
To adjust the speed of the appliance, use the SPEED button.
To work dough, use the DOUGH button.
To run the appliance at maximum speed, use the turbo button.
The + button is used to add time, increasing the temperature and /
or speed.
the - Button is used to reduce the time, reduce the temperature and
/ or the speed.
The START / STOP button is used to start and stop the appliance.
• Setting the timer:
Time is set with the TIME button. The maximum time for this appliance is 90 minutes.
Press the TIME button. When the pictogram TIME ▶ lights, press the + button to add time or
the - button to remove. If you keep pressing the + or - button, the time will be increased or
decreased rapidly.
Press the button once to add or remove 1 minute. Press the button two times in a row to add
or remove one second.
Page 8

Fig 19
• Setting the temperature :
Before you start cooking, choose the temperature. If you do not have to cook the ingredients,
go directly to the next point.
Press the TEMP. When the pictogram TEMP ▶ lights, press + to increase the temperature or
- to reduce. If you keep pressing the + or - button, the temperature will be increased or
decreased rapidly.
Press the button once to add or remove 10 °C.
The temperature of this appliance can be adjusted from 30 °C to 120 °C.
• Setting the speed of rotation of the blades :
Press the SPEED button. When the pictogram SPEED ▶ lights, press + to increase speed or
- to reduce.
Note: For mixtures, adjust the speed from 1 to 5. When you make the sauce or juice, adjust
the speed between 5 and 9.
• Start the appliance :
Press the START / STOP button. The appliance will start working. The time will begin to
count down to 0:00. Once the work is finished, the appliance will emit a beep. Press again
the START / STOP button to stop the appliance.
Important :
• When you do not choose to temperature or time but you just adjust the speed, the
appliance can be operated. Its maximum operating time is 20 minutes. After 20 minutes, the
appliance stops automatically and emits a beep to alert you.
• When using the cooking function, it is also necessary to set the time and speed. If you only
adjust the temperature but not the time or speed, the appliance will not work. When cooking
is finished, the time is 00:00. The appliance will stop heating but the blades will continue to
run for 10 minutes and stop with a beep so you do not burn the food by leaving it in the jug.
• When you choose the cooking mode, the maximum speed is 5.
• When the time reaches 0:00, the appliance will emit a beep. After 5 minutes, the appliance
will beep again if you ignore.
• Dough function (dough) :
Use this button to yeast or bread dough (the LCD will appear as in Figure 19).
Set first time and then press the button DOUGH. Then press the START / STOP button. This
function will trigger a preset program which operates in the following manner : Speed 3 for 3
seconds, stop for 4 seconds and then again speed 3 for 3 seconds, stop for 4 seconds etc …
For example, put 500gr of flour in the jug (the jug must be dry and not contain water) and
correctly place the jug on the appliance. Set the time to 3 minutes and
press the button DOUGH then the START / STOP button. The preset
program will start. At 1 minute of the end, pour 300 ml of water in the
jug. When the time reaches 0:00 you can remove dough.
Note: When using the paste function (Dough), the jug must be dry to
prevent sticking risks during mixing. Flour (cake) should not exceeded
500gr, water must not exceed 300ml and time should not exceed 3
minutes. The proportions of flour and water are 5/3. The result will be
better if you add a few drops of oil into the flour. When using a high gluten flour (for bread),
the amount of flour should not exceed 300gr.
Caution: At the end of the preparation of the dough, be careful when removing the blades to
avoid cuts. This appliance can move during the preparation of the dough. So put the
Page 9

appliance on a flat, stable, non-heating and away from the edges to prevent falls and
accidents.
• Turbo function:
No need to adjust the time and speed to use the turbo function. Continuously press the
TURBO button and the machine will run at full speed by displaying the number of seconds to
use the turbo. The appliance stops when you release the button and the time will return at
00:00. This button is used to crush hard foods like ice.
Note: This button should not be used with the dough function (Dough).
Caution: If you use the turbo function with hot food, the amount of food must not exceed
1000g. The measuring cup can be left in the lid of the jug to avoid scalding overflows.
When you use recipes:
Pay attention to the order in which you put your ingredients.
Make sure the amount of food in the jug does not exceed 2 litres.
When using the blender, make sure that the amount of food in the pitcher does not exceed
1.5 litres.
you can get better results in the order following preparation:
If you cook food, first set the time, temperature, speed and press START / STOP.
If you mix or chop food, first set the time, speed and press START / STOP.
Examples:
Cook a dish
1. Set the time to 45 minutes
2. Set the temperature to 120 °C
3. Set the speed to 3
4. Press START / STOP
Chop vegetables
1. Set the time to 30 seconds
2. Set the speed to 6
3. Press START / STOP
Crush ice (do not put more than 300gr of ice in the jug)
1. Set the time to 1 minute
2. Set the speed to 9
3. Press START / STOP
Carrot juice (do not put more than 400gr of carrots and 600ml water in the jug)
1. Set the time to 1 minute
2. Set the speed to 9
3. Press START / STOP
Grinding coffee (do not put more than 200gr of coffee beans in the jug)
1. Set the time to 2 minutes
2. Set the temperature to 9
3. Press START / STOP
Page 10
CLEANING
Before first use, the appliance should be thoroughly cleaned, accessories coming into
contact with food also.
Clean the jug and lid: Disassemble the blades and the sealing first (refer to previous
instructions).
Use hot water or a dishwasher to clean the jug and lid (do not put the blades in the
dishwasher). You can clean the spatula, butterfly blade, blade guard, filter, measuring cup,
lid, and the steamer in the same way.
Note: When there is gunk or not easily washed into the jug or accessories, use a
special detergent for stainless steel.
Clean the blades : Hold the bottom of the blade and place underwater. You can rub the
blades with a brush.
Note: Be especially careful when cleaning the blades as they are very sharp.
Clean Steamer: You can put it in the dishwasher or use a soft cloth with a little detergent.
Clean the body of the appliance : Use a soft cloth with a little detergent. Do not use water to
prevent it from seeping into the part where the engine is.
Note: Unplug the appliance before cleaning.
Note : Should the appliance overheat, it will automatically turn itself off. A red light will
turn on an you´ll hear a ringing alarm. (Fig1). Unplug the robot and let it cool down for
about 15 minutes without food.
ENVIRONMENT
CAUTION :
Do not dispose of this product as it has with other household products. There is a
separation of this waste product into communities, you will need to inform your local
authorities about the places where you can return this product. In fact, electrical and electronic
products contain hazardous substances that have harmful effects on the environment or human
health and should be recycled. The symbol here indicates that electrical and electronic equipment
should be chosen carefully, a wheeled waste container is marked with a cross.
Manufactured and imported : Adeva SAS 8 rue Marc Seguin 77290 Mitry-Mory FRANCE
www.hkoenig.com - contact@hkoenig.com - Tel 01 64 67 00 01
Page 11

Français
CONSIGNES GENERALES DE SECURITE
Cet appareil est prévu pour un usage domestique.
Cet appareil n'est pas conçu pour être utilisé par des personnes dont les capacités
physiques et / ou mentales sont diminuées. Si elles n'ont pas reçues les instructions
d'utilisation ou si ces personnes ne sont pas surveillées, il y a un risque pour leur sécurité.
Débranchez l’appareil avant de le nettoyer ou si ne vous l’utilisez pas pendant un certain
temps. Si le cordon d’alimentation est endommagé, il doit être réparé par le fabriquant ou par
une personne qualifiée.
Ne jetez pas vos appareils électriques avec les ordures ménagères. Contactez votre mairie
pour connaître les lieux de dépôts pour ce genre d’appareil.
Pour éviter tout risque de choc électrique ou d’endommager l’appareil, ne le plongez pas
directement dans l’eau. Pour le nettoyer, utilisez un chiffon humide pour frotter. Ne laissez
pas de l’eau entrer en contact avec les parties électriques du robot.
ATTENTION : les lames du robot sont très coupantes. Soyez prudent lors du démontage et
remontage.
Ne pas dépasser la capacité maximale de nourriture du robot : 2L ou 1,5L pour les
préparations avec de l’eau.
Ne retirez pas le couvercle du robot tant qu’il n’a pas cessé de mélanger, en particulier
lorsque la vitesse est supérieure à 5.
Quand le robot chauffe ou si vous voulez retirer le bol après la cuisson, ne touchez pas la
partie en acier inoxydable pour éviter tout risque de brûlure.
Lorsque vous ouvrez le couvercle du bol, de la vapeur s’échappe. Soyez prudent pour ne
pas vous brûler. Ne touchez pas le couvercle pendant la cuisson.
Les enfants doivent être surveillés pour s’assurer qu’ils ne jouent pas avec l’appareil.
Placez le robot dans un endroit hors d’atteinte des enfants. Prévenez aussi vos enfants que
l’appareil peut devenir chaud et qu’ils ne doivent pas le toucher.
Maintenez en place la tasse de mesure lorsque la vitesse est supérieure à 5 ou que vous
cassez de la glace avec la fonction turbo.
Le robot peut bouger pendant son fonctionnement. Veillez à ce
qu’il soit sur une surface plane, stable et loin des bords (40cm)
pour éviter qu’il ne tombe (risque de brûlures).
Assurez-vous de laisser assez de place au-dessus et tout autour
de l’appareil.
En cas de surchauffe, l’appareil s’arrêtera. Cependant, la lumière
rouge restera allumée et un bip se fera entendre (Fig1). Éteignez
le robot, débranchez le, retirez la nourriture et laissez refroidir
environs 15 minutes.
ACCESSOIRES
Page 12
Bol
Couvercle
Cuiseur vapeur
Papillon
Protège Lames
Tasse de mesure
Panier
Spatule
Enclenchez ici
Fig 3
Fig 4
Enclenchez ici
Fig 5
Placez le bol en
plaçant le
triangle et le
cadenas l’un
au-dessus de
l’autre
Verrouillez
comme ceci
Fig 6
AVANT PREMIÈRE UTILISATION
Avant toute chose, nettoyez bien tout l’appareil avant la première utilisation car des résidus
de fabrication peuvent être présents.
Comment placer correctement le bol et lancer les programmes :
Placez la fente du couvercle dans la languette du bol (Fig 3). Fermez ensuite le couvercle.
Verrouillez le dans la poignée du bol (Fig 4).
Placez ensuite le bol dans la machine (la poignée face à vous) (Fig 5). Prenez le bol par sa
poignée et tournez-le dans le sens contraire des aiguilles d’une montre pour le verrouiller
(Fig 6).
Page 13
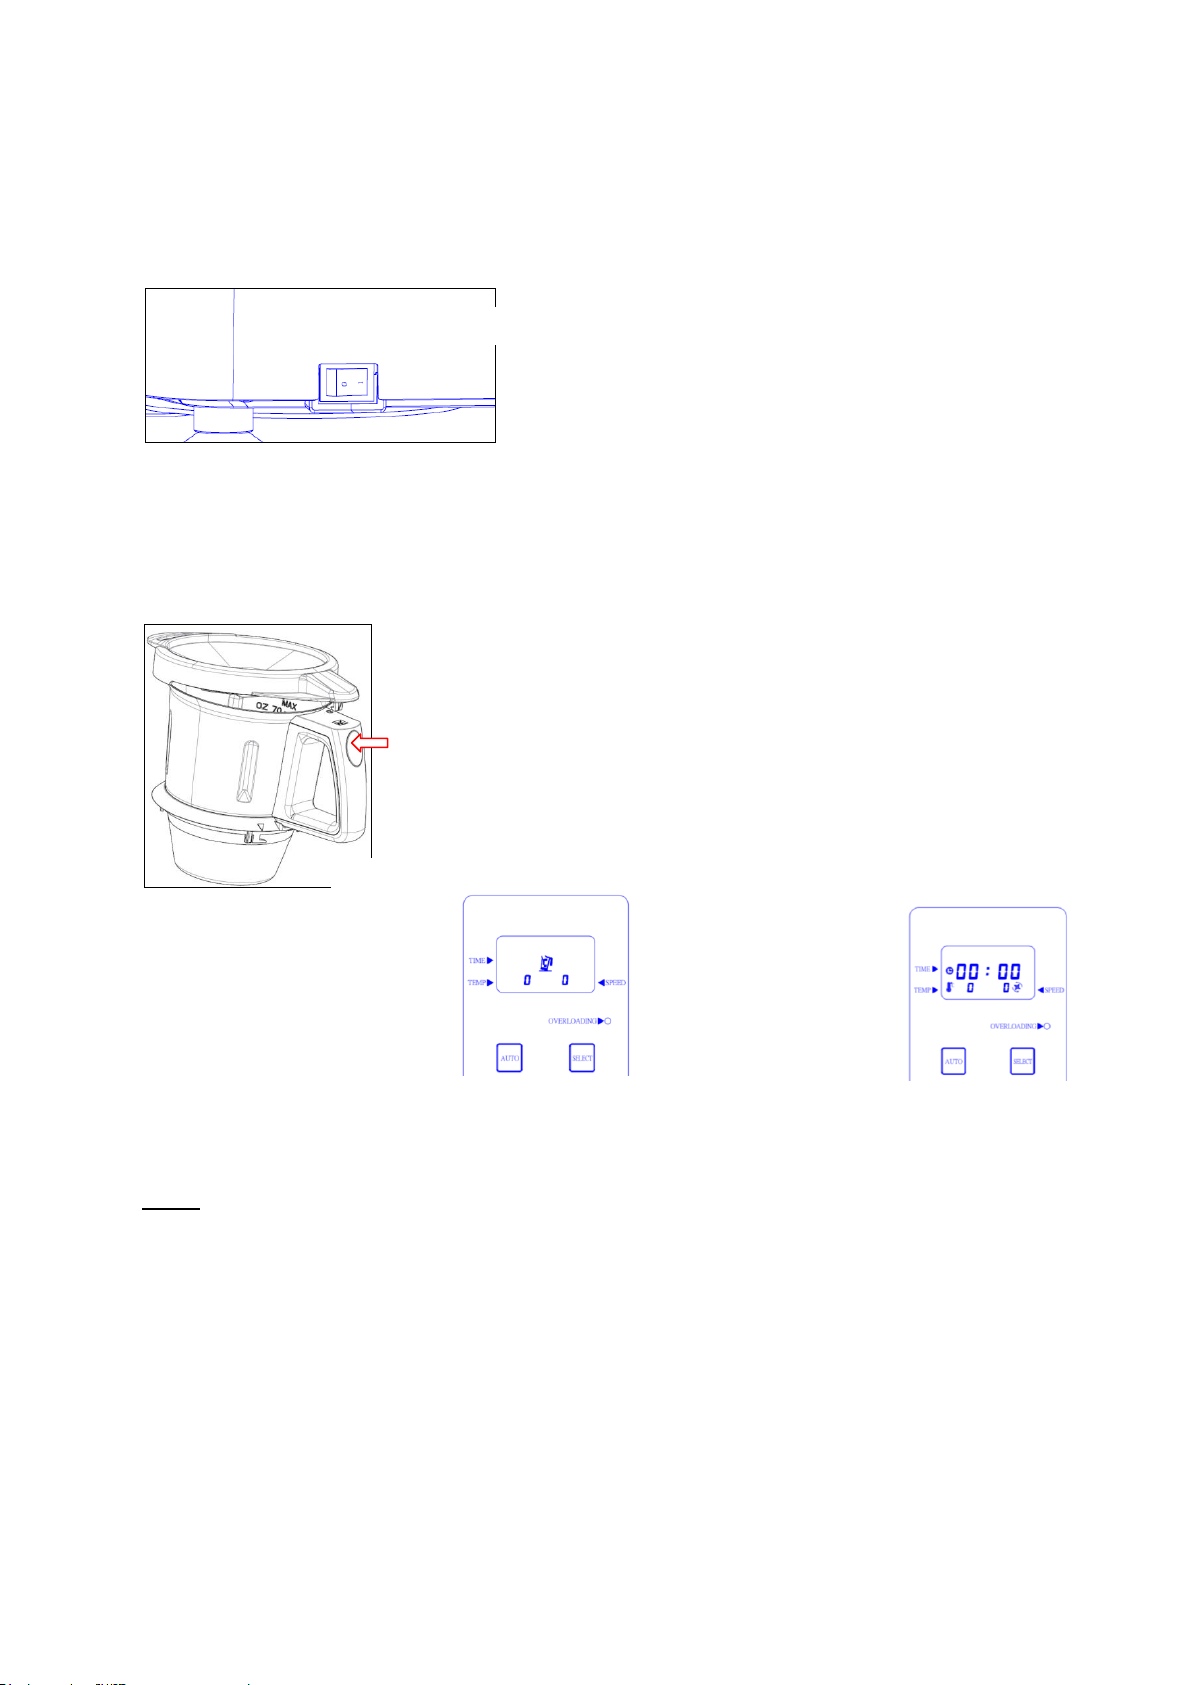
Fig 7
Fig 8
Branchez le câble d’alimentation puis allumez l’appareil (Fig 7). Réglez le temps, la
température et la vitesse sur le panneau de commande et appuyez sur START/STOP pour
lancer le robot.
Comment retirer le bol correctement :
Appuyez sur le bouton START/STOP pour arrêter le robot. Prenez ensuite le bol par la
poignée et tournez-le dans le sens des aiguilles d’une montre pour le replacer comme sur la
figure 5. Vous pouvez retirer le bol de la machine. Pressez ensuite le bouton de la poignée
du bol pour déverrouiller le couvercle (Fig 8) puis retirez-le.
Ecran LCD :
Branchez le cordon
d’alimentation. Allumez le
robot. Lorsque le bol n’est
pas correctement installé ou
Si le bol est bien en
place et correctement
verrouillé, l’écran
affichera :
qu’il est mal verrouillé dans la
machine, l’écran affichera :
Vous ne pourrez régler le temps, la température et la vitesse que si le bol est bien en place
et correctement verrouillé.
Note : Vous ne pourrez pas verrouiller le bol si le couvercle n’est pas bien en place. Ne
forcez pas pour essayer de verrouiller et vérifiez que le couvercle soit bien placé.
Désassembler les lames :
Eteignez l’appareil, débranchez-le et retirez le bol du robot. Mettez en place le protège lames
puis placez votre main gauche dans le bol jusqu’à attraper la partie en demi-cercle du
protège lames (Fig 10).
Page 14
Lames
assemblées
Écrou
Fig 9
Demi-cercle
Fig 10
Desserrez
l’écrou
Fig 11
Avec votre main droite, tournez l’écrou dans le sens
contraire des aiguilles d’une montre (Fig 11).
Lorsque c’est fait, retirez les lames assemblées
avec la main gauche.
Attention !! Les lames sont très coupantes. Ne
touchez pas directement le bord des lames pour
éviter de vous blesser. Tenez la partie
supérieure des lames lorsque vous les
remplacez ou les déplacer pour éviter de les
faire tomber et causer un accident.
Assembler le protège lames :
Faites le même processus (désassembler le protège lames) dans l’ordre inverse.
CONSEILS D’UTILISATION
• A chaque fois que vous commencez une nouvelle préparation, assurez-vous que l’appareil
et les accessoires soient propres et secs.
• Lorsque vous chauffez du lait ou de la crème, utiliser une température de 90°C peut causer
des brûlures. Nous vous suggérons d’utiliser la vitesse 2 pour mélanger et éviter de vous
brûler avec les éclaboussures.
• Ajouter une goutte d’huile d’olive lorsque vous émincez vos légumes peut aider la machine.
• Le fromage et certains féculents peuvent créer de la mousse, faire éclater certains aliments
ou provoquer des débordements. Pour éviter cela, ajoutez ces ingrédients à 3 ou 5 minutes
de la fin de la recette.
• Le panier peut être utilisé comme un tamis. Lorsqu’il est chaud, retirez-le avec la spatule.
• A l’aide de la spatule, poussez les ingrédients vers les lames. Le disque permettra d’éviter
à la spatule de se coincer dans les lames.
• Pour nettoyer le bol après avoir préparé des plats odorant, nous vous suggérons de mettre
250ml d’eau avec 3 coquilles d’œuf et une demi-peau de citron. Faites ensuite fonctionner
votre robot pendant 20 secondes à vitesse 6. Cela rendra votre bol propre et enlèvera les
mauvaises odeurs.
• Si les aliments ont trop cuit ou qu’ils brunissent, ajoutez un peu d’eau chaude avec du
savon et laissez tremper quelques heures puis répétez l’action précédente.
• Lorsque vous cuisez du riz à la vapeur, ajoutez une pincée de sel pour atténuer les
éclaboussures d’eau brûlante.
• Lorsque vous préparez des plats avec de l’eau, la quantité ne doit pas dépasser 1500ml
pour éviter les débordements.
Page 15
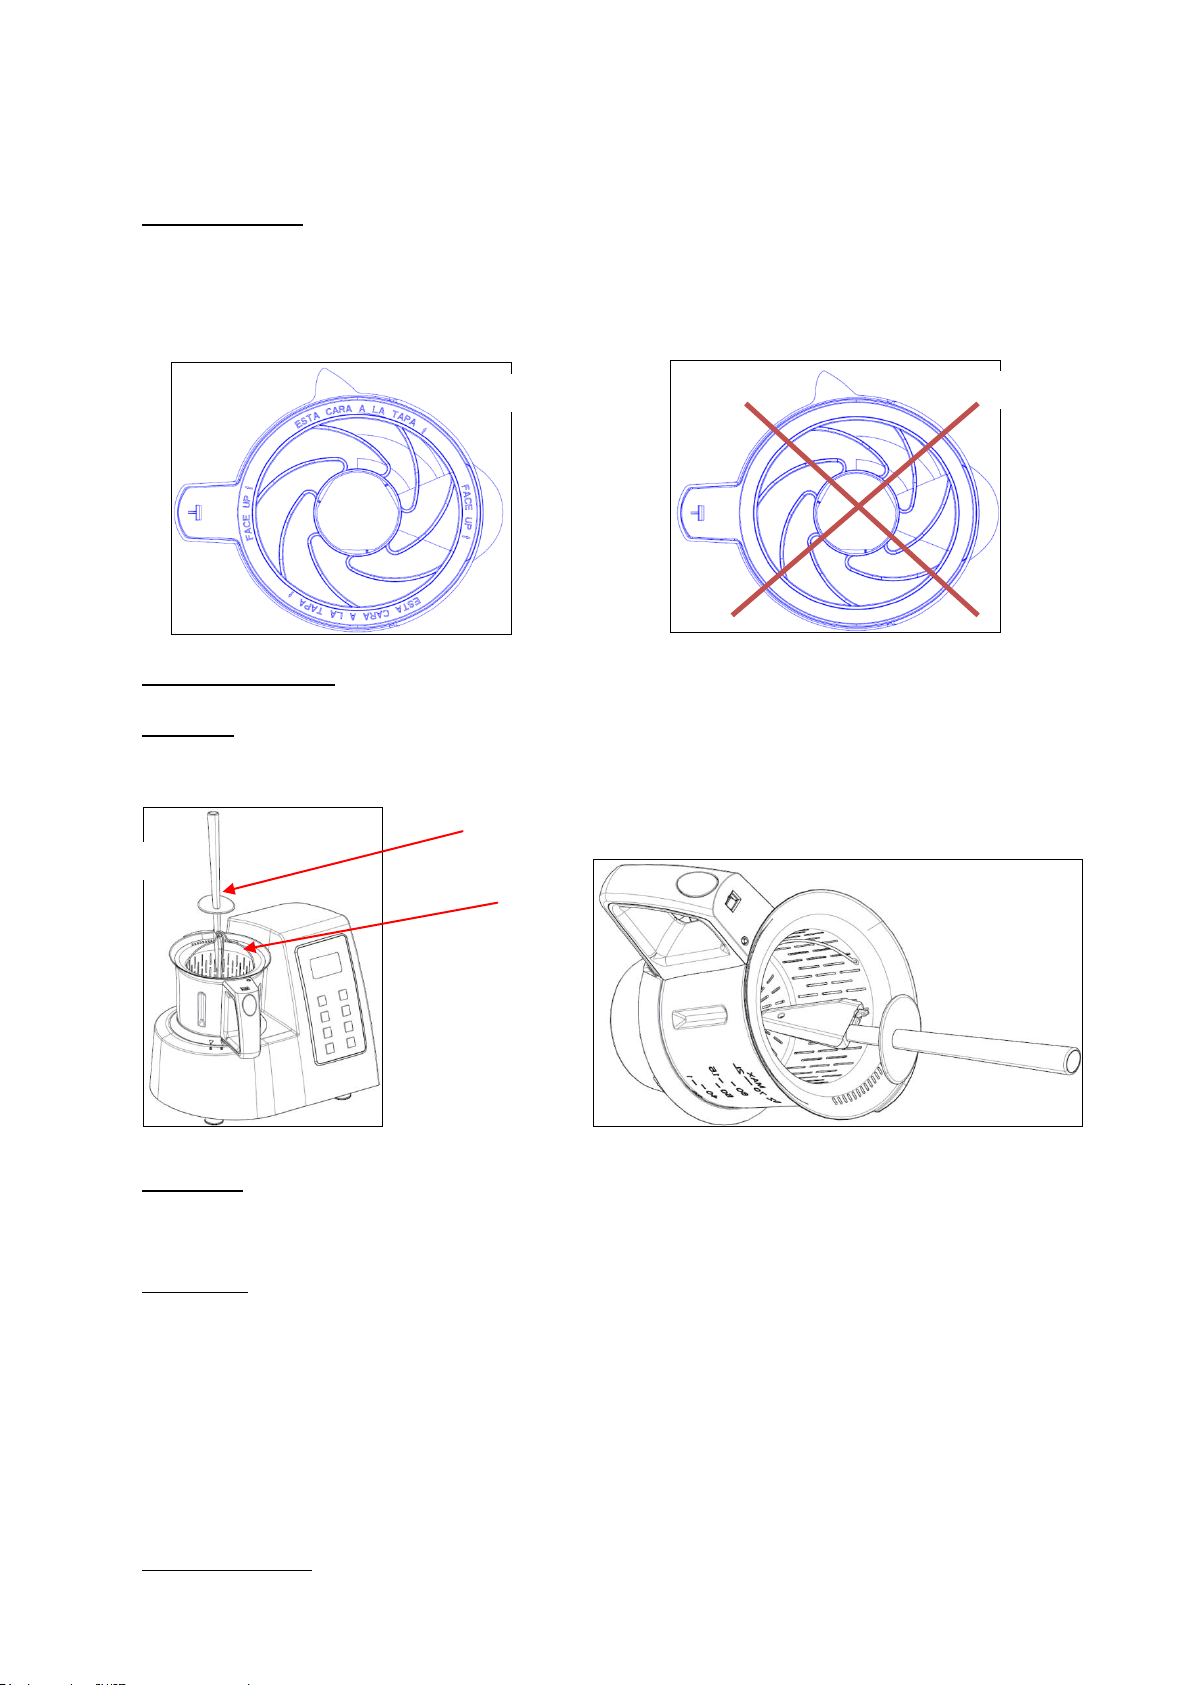
Fig 13
Spatule
Poignée
du
panier
Fig 14
Fig 15
Fig 12
UTILISATION DES ACCESSOIRES
Le couvercle du bol : Le joint d’étanchéité à l’intérieur du couvercle vous évitera tout
débordement de nourriture, soupe ou vapeur. Lorsque vous assemblez le joint d’étanchéité
“ESTA CARA A LA TAPA↑, FACE UP ↑”les mots d’avertissement doivent être face à
vous (comme sur la Fig 12) sinon, du liquide pourrait s’échapper et risquerait de vous brûler
(Fig 13).
La tasse de mesure : Sert à mesurer les quantités de nourriture liquide.
Le panier : Accessoire multifonction. Il peut filtrer le jus des fruits et des légumes et aussi
cuisiner des légumes comme les patates, tomates, oignons … Il est très simple à retirer.
Utilisez la spatule pour accrocher la partie centrale de la poignée du panier (Fig 14).
La spatule : Vous pouvez racler les ingrédients sur les parois du bol avec la spatule. Lorsque
vous filtrez du jus, elle peut être utilisée pour fixer le panier et séparer le jus des morceaux
(Fig 15).
Le papillon : Il peut être utilisé avec le protège lames. Le papillon vous assurera un meilleur
mélange et évitera le collage lorsque vous chauffez du lait, du beurre ou de la sauce aux
fruits.
Pour le monter, alignez-le avec le demi-cercle du protège lames et insérez-le jusqu’à ce qu’il
couvre le protège lames. Tournez-le ensuite dans le sens des aiguilles d’une montre.
Pour le démonter, attrapez la poignée du bol d’une main et de l’autre attraper le protège
lames pour le retirer.
Attention : Lorsque vous utilisez le papillon, la vitesse du robot ne peut excéder 4 et la
capacité maximale ne doit pas dépasser 1,5L.
Le protège lames : A utiliser pour mélanger des ingrédients mous ou liquides. La vitesse du
robot ne doit pas excéder 4 lorsque vous l’utilisez.
Important : Lorsque vous installez le protège lames, poussez fort jusqu’à entendre un clic.
Page 16
Filtre
Fig 16
Fig 17
Fig 18
Attention : le protège lames et le papillon ne doivent pas être utilisés lorsque vous
mélangez de la pâte.
Le cuiseur vapeur : Il inclut un récipient, un disque et un couvercle. Il peut être utilisé pour
cuire de grandes quantités de nourriture à la vapeur.
Attention : Restez prudent pour éviter les brûlures dues à la vapeur.
Versez au moins 500ml d’eau dans le bol. Si vous voulez utiliser un filtre, placez-le dans le
bol (Fig 16) et mettez la nourriture (comme le riz ou les patates) dans le filtre. Placez ensuite
le couvercle et assurez-vous que le bol est bien enclenché dans la machine.
Placez correctement le cuiseur vapeur sur le bol en plaçant la fente du cuiseur dans la
languette du bol. Appuyez sur le bouton du bol pour verrouiller le cuiseur. Placez ensuite la
nourriture dans le cuiseur (en plaçant les aliments qui demandent le plus de cuisson au fond
et ceux qui en demandent le moins au-dessus). Si nécessaire, le disque vapeur peut être
utilisé.
Fermez le cuiseur vapeur avec son couvercle (Fig 17). La vapeur ne pourra pas s’échapper.
Important :
• Lorsque vous utilisez le cuiseur vapeur, ne laissez pas la tasse de mesure dans le bol.
• Lorsque vous utilisez le cuiseur vapeur, demandez à vos enfants de rester loin de l’appareil
et informez-les du danger.
• Lorsque vous utilisez le cuiseur vapeur, ne dépassez pas la vitesse 3. Une vitesse
supérieure à 3 peut entrainer un débordement des aliments.
Réglez le temps, la température et la vitesse sur le panneau de contrôle et appuyez sur
START/STOP pour lancer la cuisson.
Ouvrez le couvercle du cuiseur vapeur en le penchant légèrement vers vous de sorte que la
vapeur s’échappe par l’arrière et que l’eau puisse couler dans le récipient. Tournez le
couvercle et posez-le sur la table. Prenez ensuite le cuiseur vapeur et maintenez-le audessus du bol quelques secondes pour laisser l’eau refroidir et s’écouler. Lorsque l’eau ne
coule plus, posez le cuiseur vapeur sur son couvercle.
UTILISATION DU PANNEAU DE CONTROLE
TIME : affiche le temps
TEMP : affiche la température
SPEED : affiche la vitesse
Pour utiliser la fonction "AUTO" appuyez sur la touche AUTO. Inclus:
a.soupe; b.confiture; c.sauce
Pour régler le temps de cuisson ou la température de cuisson, utilisez
le bouton SELECT et choisissez TIME ou TEMP.
Pour régler la vitesse du robot, utilisez le bouton SPEED.
Pour travailler de la pâte, utilisez le bouton DOUGH.
Pour faire fonctionner le robot à vitesse maximale, utilisez le bouton
TURBO.
Page 17

Le bouton + sert à ajouter du temps, augmenter la température et/ou la vitesse.
Fig 19
Le bouton - sert à réduire le temps, diminuer la température et/ou la vitesse.
Le bouton START/STOP sert à lancer et arrêter le robot.
• Réglage du temps :
Se règle avec le bouton TIME. Le temps maximal de cet appareil est de 90min.
Appuyez sur le bouton TIME. Lorsque le picto TIME ▶ s’allume, appuyez sur le bouton + pour
ajouter du temps ou le bouton - pour en enlever. Si vous restez appuyé sur le bouton + ou - ,
le temps sera augmenté ou diminué rapidement.
Appuyez sur le bouton une fois permet d’ajouter ou d’enlever 1 minute. Appuyez sur le
bouton 2 fois de suite permet d’ajouter ou d’enlever 1 seconde.
• Réglage de la température :
Avant de commencer la cuisson, choisissez la température. Si vous n’avez pas besoin de
cuisson, allez directement au point suivant.
Appuyez sur le bouton TEMP. Lorsque le picto TEMP ▶ s’allume, appuyez sur + pour
augmenter la température ou sur – pour la réduire. Si vous restez appuyez sur le bouton +
ou -, la température augmentera ou diminuera rapidement.
Appuyez sur le bouton une fois permet d’ajouter ou d’enlever 10°C.
La température de cet appareil peut être réglée de 30°C à 120°C.
• Réglage de la vitesse des rotations des lames :
Appuyez sur le bouton SPEED. Lorsque le picto SPEED ▶ s’allume, appuyez sur + pour
augmenter la vitesse ou sur – pour la réduire.
Remarque : pour les mélanges, ajustez la vitesse entre 1 et 5. Lorsque vous faites de la
sauce ou des jus de fruits, ajustez la vitesse entre 5 et 9.
• Lancer le robot :
Appuyez sur le bouton START/STOP. La machine commencera à travailler. Le temps
commencera alors à compter à rebours jusqu’à 00:00. Une fois le travail terminé, la machine
émettra un Bip. Appuyez de nouveau sur le bouton START/STOP pour arrêter le robot.
Important :
• Lorsque vous ne choisissez pas de température ni de temps mais que vous réglez
seulement la vitesse, le robot peut être mis en marche. Son temps maximal de
fonctionnement est de 20 minutes. Après 20 minutes, le robot s’arrête automatiquement et
émet un Bip pour vous avertir.
• Lorsque vous utilisez la fonction cuisson, il est nécessaire de régler aussi le temps et la
vitesse. Si vous ne réglez que la température mais pas le temps ni la vitesse, le robot ne
marchera pas. Lorsque la cuisson est finie, le temps affiche 00:00. Le robot arrêtera de
chauffer mais les lames dans le bol continueront de tourner pendant 10 minutes et
s’arrêteront avec un Bip pour vous éviter de brûler la nourriture en la laissant dans le bol.
• Lorsque vous choisissez le mode cuisson, la vitesse maximale sera 5.
• Lorsque le temps arrive à 00:00, le robot émettra un Bip. Après 5 minutes, le robot sonnera
de nouveau si vous l’ignorez.
• Fonction pâte (dough) :
Utilisez ce bouton pour faire de la levure ou de la pâte à pain (l’écran LCD s’affichera comme
sur la fig 19).
Réglez en premier lieu le temps et appuyez ensuite sur le bouton DOUGH. Pressez ensuite
le bouton START/STOP. Cette fonction déclenchera un programme préétabli qui fonctionne
de la manière suivante : Vitesse 3 pendant 3 secondes, arrêt pendant 4 secondes puis de
nouveau vitesse 3 pendant 3 secondes, arrêt pendant 4 secondes etc …
Par exemple, mettez 500g de farine dans le bol (le bol doit être sec et ne
doit pas contenir d’eau) et placez correctement le bol sur le robot. Réglez
le temps sur 3 minutes et appuyez sur le bouton DOUGH puis sur le
bouton START/STOP. Le programme préétabli se lancera. A 1 minute de
Page 18

la fin, versez 300ml d’eau dans le bol. Lorsque le temps arrive à 00:00 vous pouvez retirer la
pâte.
Remarque : Lorsque vous utilisez la fonction pâte (Dough), le bol doit être sec pour éviter les
risques de collage pendant le mélange. La farine (pour gâteau) ne doit pas excédée 500g,
l’eau ne doit pas excéder 300ml et le temps ne doit pas dépasser 3 minutes. Les proportions
de la farine et de l’eau sont 5/3. Le résultat sera meilleur si vous ajoutez quelques gouttes
d’huile dans la farine. Lorsque vous utilisez de la farine forte en gluten (pour le pain), la
quantité de farine ne doit pas excéder 300g.
Attention : A la fin de la préparation de la pâte, soyez prudent en retirant les lames pour ne
pas vous couper. Cette machine peut bouger pendant la préparation de la pâte. Placez donc
le robot sur une surface plane, stable, non chauffante et loin des bords pour éviter les chutes
et les accidents.
• Fonction turbo :
Pas besoin de régler le temps et la vitesse pour utiliser la fonction turbo. Appuyez
continuellement sur le bouton TURBO et la machine fonctionnera à vitesse maximale en
affichant le nombre de secondes d’utilisation du turbo. Le robot s’arrête lorsque vous
relâchez le bouton et le temps reviendra à 00:00. Ce bouton est utile pour écraser des
aliments durs comme les glaçons.
Note : Ce bouton ne doit pas être utilisé avec la fonction pâte (Dough).
Attention : Si vous utilisez la fonction turbo avec de la nourriture chaude, la quantité de
nourriture ne devra pas excéder 1000g. La tasse de mesure peut être laissée dans le
couvercle du bol pour éviter de vous ébouillanter avec les débordements.
Lorsque vous utilisez des recettes :
Soyez attentif à l’ordre dans lequel vous mettez vos ingrédients.
Assurez-vous que la quantité de nourriture dans le bol ne dépasse pas 2 litres.
Lorsque vous utilisez le blender, assurez-vous que la quantité de nourriture dans le bol ne
dépasse pas 1,5 litre.
Vous pouvez obtenir de meilleurs résultats en respectant l’ordre de préparation suivant :
Si vous cuisinez des aliments : réglez d’abord le temps, la température la vitesse et appuyez
sur START/STOP.
Si vous mélangez ou hachez des aliments : réglez d’abord le temps, la vitesse et appuyez
sur START/STOP.
Exemples :
Cuisiner un plat
1. Réglez le temps à 45 min
2. Réglez la température à 120°C
3. Réglez la vitesse sur 3
4. Appuyez sur START/STOP
Hacher des légumes
1. Réglez le temps à 30 secondes
2. Réglez la vitesse sur 6
3. Appuyez sur START/STOP
Écraser des glaçons (ne mettez pas plus de 300g de glaçons dans le bol)
1. Réglez le temps à 1 minute
2. Réglez la vitesse sur 9
3. Appuyez sur START/STOP
Jus de carotte (ne mettez pas plus de 400g de carottes et 600ml d’eau dans le bol)
1. Réglez le temps à 1 minute
2. Réglez la vitesse sur 9
3. Appuyez sur START/STOP
Page 19

Moudre du café (ne mettez pas plus de 200g de graines de café dans le bol)
1. Réglez le temps à 2 minutes
2. Réglez la température sur 9
3. Appuyez sur START/STOP
NETTOYAGE
Avant la première utilisation, la machine doit être soigneusement nettoyée, les accessoires
entrant en contact avec la nourriture également.
Nettoyer le bol et son couvercle : Désassemblez les lames et le joint d’étanchéité en premier
(référez-vous aux instructions précédentes).
Utilisez de l’eau chaude ou un lave-vaisselle pour nettoyer le bol et son couvercle (ne mettez
pas les lames au lave-vaisselle). Vous pouvez nettoyer la spatule, le papillon, le protège
lames, le filtre, la coupe de mesure, le couvercle et le cuiseur vapeur de la même manière.
Note : Lorsqu’il y a de la matière collante ou pas facile à laver dans le bol ou sur les
accessoires, utilisez un détergent spécial pour l’acier inoxydable.
Nettoyer les lames : Maintenez le bas de la lame et placez la sous l’eau. Vous pouvez frotter
les lames avec une brosse.
Note : Restez très prudent lors du nettoyage des lames car elles sont très coupantes.
Nettoyer le cuiseur vapeur : Vous pouvez le mettre au lave-vaisselle ou utiliser un linge doux
avec un peu de détergent.
Nettoyez le corps de l’appareil : Utilisez un linge doux avec un peu de détergent. N’utilisez
pas d’eau pour éviter qu’elle s’infiltre dans la partie où se situe le moteur.
Note : Débranchez l’appareil avant de le nettoyer.
Note : En cas de surchauffe, l’appareil s’arrêtera. Cependant, la lumière rouge restera
allumée et un bip se fera entendre (Fig1). Éteignez le robot, débranchez le, retirez la
nourriture et laissez refroidir environs 15 minutes.
ENVIRONNEMENT
ATTENTION :
Vous ne devez pas vous débarrasser de cet appareil avec vos déchets ménagers.
Un système de collecte sélective pour ce type de produit est mis en place par les
communes, vous devez vous renseigner auprès de votre mairie afin d'en connaître
les emplacements. En effet, les produits électriques et électroniques peuvent
contenir des substances dangereuses qui ont des effets néfastes sur l'environnement ou la
santé humaine et doivent être recyclés. Le symbole ci-contre indique que les équipements
électriques et électroniques font l'objet d'une collecte sélective, il représente une poubelle
sur roues barrée d'une croix.
Fabriqué pour et importé par : Adeva SAS 8 rue Marc Seguin 77290 Mitry-Mory FRANCE
www.hkoenig.com - contact@hkoenig.com - Tél. 01 64 67 00 01
Page 20

Deutsch
Krug
Deckel
Dampfgarer
ALLGEMEINE SICHERHEITSHINWEISE
• Das Gerät ist für den Hausgebrauch vorgesehen.
• Dieses Gerät ist nicht zur Verwendung durch Personen mit körperlichen und / oder
geistigen Behinderungen bestimmt. Wenn Sie keine Anweisungen zur Verwendung
empfangen haben, oder, wenn sie nicht überwacht werden, stellt es ein Sicherheitsrisiko dar.
• Trennen Sie das Gerät von der Steckdose bevor Sie es reinigen oder wenn Sie es für eine
Weile nicht verwenden. Wenn das Netzkabel beschädigt ist, muss es vom Hersteller oder
von einer qualifizierten Person repariert werden.
• Elektrowerkzeuge gehören nicht in den Hausmüll. Kontaktieren Sie Ihre Gemeinde für die
Standorte der Abgabe für diese Art von Gerät.
• Um einen Stromschlag oder Schäden am Produkt zu vermeiden, tauchen Sie das Gerät
nicht direkt ins Wasser. Verwenden Sie zum Reinigen ein feuchtes Tuch, um den Schmutz
ab zu reiben. Lassen Sie kein Wasser in oder an die elektrischen Teile des Geräts kommen.
• ACHTUNG: Die Messer vom Gerät sind sehr scharf. Seien Sie vorsichtig, wenn Sie es
zusammenbauen.
• Überschreiten Sie nicht die maximale Lebensmittelkapazität: 2L.
• Entfernen Sie nicht den Deckel des Gerätes, wenn Sie noch nicht fertig sind mit dem
mischen und vor allem, wenn die Geschwindigkeit größer als 5 ist.
• Wenn das Gerät heiß ist oder wenn Sie den Krug nach dem Kochen entfernen wollen,
vermeiden Sie das Edelstahlteil zu berühren, um Verbrennungen zu vermeiden.
• Wenn Sie den Deckel der Kanne öffnen, kann Dampf entweichen. Achten Sie darauf, sich
nicht zu verbrennen. Den Deckel während des Kochens nicht berühren.
• Kinder sollten beaufsichtigt werden, um sicherzustellen, dass sie nicht mit dem Gerät
spielen. Bewahren Sie das Gerät außerhalb der Reichweite von Kindern auf. Informieren Sie
Ihre Kinder, dass es heiß werden kann und sie es nicht berühren sollten.
• Halten Sie den Messbecher fest, wenn die Geschwindigkeit größer als 5 ist, oder wenn Sie
Eis mit der Turbo-Funktion zu bereiten.
• Das Gerät kann sich während des Betriebs bewegen. Stellen Sie sicher, dass es auf einer
flachen, stabilen Oberfläche und weg von den Kanten steht, um ein Herunterfallen zu
verhindern.
• Achten Sie darauf, genug Raum über und um das Gerät zu
lassen.
• Bei Überhitzung das Gerät stoppen. Allerdings wird das rote
Licht an bleiben und ein Signalton ertönt (Bild 1). Schalten Sie das
Gerät aus, ziehen Sie von der Steckdose, entfernen Sie das
Essen und lassen es etwa 15 Minuten abkühlen.
EINFÜHRUNG
Page 21

Schmetterling
Geschützte Messer
Messbecher
Schüssel
Spatel
Hier einklicken
Fig 3
Fig 4
Hier feststellen
Fig 5
Platzieren Sie den
Krug so, dass das
Dreieck und der
Punkt
übereinanderstehen
Drehen zum
Versperren
Fig 6
VOR DEM ERSTEN EINSATZ
Reinigen Sie vor der ersten Verwendung alle Geräte gründlich, da Herstellungsrückstände
vorhanden sein können.
Wie man den Krug richtig platziert und die Programme einstellt:
Legen Sie den Deckel mit dem Schlitz in die Zunge (Bild 3). Schließen Sie dann den Deckel.
Sperren Sie es im Griff der Kanne (Bild 4).
Dann legen Sie den Krug in die Maschine (der Griff nach oben) (Bild 5). Nehmen Sie den
Krug mit dem Griff und drehen Sie es in die entgegengesetzte Richtung vom Uhrzeigersinn,
bis es einrastet (Bild 6).
Page 22

Schließen Sie das Netzkabel an und schalten Sie das Gerät ein (Bild 7). Stellen Sie die Zeit,
Fig 7
Fig 8
Blattanordnung
Schraube
Fig 9
Halbkreis
Fig 10
Temperatur und Geschwindigkeit auf dem Bedienfeld ein und drücken Sie START / STOP,
um die Maschine zu starten.
Wie Sie den Krug richtig entfernen:
Drücken Sie die START / STOP-Taste, um die Maschine zu stoppen. Dann nehmen Sie den
Krug an dem Griff und drehen Sie ihn im Uhrzeigersinn, wie in Abbildung 5, dann können Sie
den Krug aus der Maschine entfernen. Dann drücken Sie die Taste am Griff der Kanne, um
den Deckel (Bild 8) zu entriegeln und abzunehmen.
LCD Bildschirm :
Stecken Sie das Netzkabel ein.
Schalten Sie die Maschine ein.
Wenn der Krug nicht richtig steht
oder nicht richtig in die Maschine
eingelegt ist, zeigt der Display:
Wenn der Krug richtig steht und
ordnungsgemäß
verriegelt ist, zeigt
der Display:
Sie können die Zeit, die Temperatur und die Geschwindigkeit nicht einstellen, wenn der Krug
nicht ordnungsgemäß verriegelt ist.
Hinweis: Sie können den Krug nicht sperren, wenn die Abdeckung nicht an Ort und Stelle ist.
Bitte versuchen Sie es nicht mit Gewalt ihn zu sperren und stellen Sie sicher, das der Deckel
sicher auf seiner Position steht.
Klingen demontieren :
Geben Sie Ihre linke Hand in den Krug, um den halbkreisförmigen Abschnitt des
Klingenschutzes (Bild 10) zu nehmen.
Drehen Sie die Mutter mit
der rechten Hand gegen den
Page 23

Lösen der
Mutter
Fig 13
Fig 12
Uhrzeigersinn (Bild 11).
Wenn Sie fertig sind, entfernen Sie die Blattanordnung
mit der linken Hand.
Warnung !! Die Messer sind sehr scharf. Den Rand
der Flügel nicht berühren, um Verletzungen zu
verhindern. Halten Sie die Spitze der Blätter, wenn
man sie ersetzen oder verschieben möchte nach
unten um einen Unfall zu vermeiden.
Montieren der geschützten Klingen:
Wiederholen Sie dasselbe Verfahren (Demontage der Blattschutz) in umgekehrter
Reihenfolge.
GEBRAUCHSANWEISUNG
• Jedes Mal, wenn Sie ein neues Gericht beginnen, stellen Sie sicher, dass das Gerät und
alle Teile sauber und trocken sind.
• Beim Erhitzen von Milch oder Sahne, verwenden Sie eine Temperatur von 90 ° C es kann
zu Verbrennungen führen. Wir schlagen vor, mit einer Geschwindigkeit von 2 und zu
mischen, um sich nicht mit Spritzern zu verbrennen.
• Fügen Sie einen Tropfen Olivenöl hinzu, wenn Sie Ihr Gemüse hacken, dies kann der
Maschine helfen.
• Käse und einige Lebensmittel können Schaum erzeugen, der eine Überschwemmungen
verursachen kann. Um dies zu vermeiden, fügen Sie die Zutaten 3 oder 5 Minuten vor dem
Ende des Rezeptes zu.
• Der Korb kann als Sieb verwendet werden. Wenn er heiß ist, entfernen Sie es mit einem
Spachtel.
• Mit einem Spachtel die Zutaten in die Messer schieben. Die Scheibe wird verhindern, dass
der Spachtel in den Klingen steckenbleibt.
• Reinigen Sie den Krug nach der Zubereitung von duftenden Gerichten, dafür empfehlen wir
Ihnen 250ml Wasser mit 3 Eierschalen und einer halben geschälten Zitrone aufzusetzen.
Dann stellen Sie Ihre Maschine 20 Sekunden lang mit der Geschwindigkeit 6 ein. Dies wird
denKrug reinigen und Gerüche entfernen.
• Wenn Essen verkocht oder verbrannt ist, nehmen Sie ein wenig heißes Wasser mit Seife
und lassen Sie es ein paar Stunden einweichen, dann wiederholen Sie den vorherigen
Vorgang.
• Wenn das Reiskochen Dampf erzeugt, fügen Sie eine Prise Salz hinzu, um zu verhindern,
dass das heiße Wasser überkocht.
• Bei der Zubereitung der Speisen mit Wasser, sollte die Füllmenge 1500g nicht
überschreiten um ein Überläufen zu vermeiden.
VERWENDUNG DES ZUBEHÖRES
Der Deckel des Bechers: Die Dichtung im Deckel soll ein Verschütten von Lebensmitteln,
Suppe oder Dampf verhindern. Montieren Sie das Siegel "ESTA CARA Tapa ↑, ↑ GESICHT
UP" Sie (wie in 12), ansonsten kann die Flüssigkeit
auslaufen (Bild 13).
Page 24

Spatel
Schüsselgriff
Fig 14
Filter
Fig 16
Fig 15
Fig 17
Messbecher: Benutzen, um die Mengen von flüssigen Lebensmitteln zu messen.
Schüssel : multifunktionales Zubehör. Es kann den Saft von Früchten und Gemüse filtern,
sowie auch Gemüse wie Kartoffeln, Tomaten, Zwiebeln kochen ... Es ist sehr einfach zu
entfernen. Verwenden Sie den Spatel, um den zentralen Teil der Schüssel (Bild 14) zu
leeren.
Spachtel: Sie können die Zutaten auf den Seiten der Schüssel mit einem Spachtel
abkratzen. Wenn Sie den Saft filtern, kann zum Halten der Käfig eingesetzt werden und dann
die Saftstücke getrennt werden (Bild 15).
Schmetterling: Es kann mit dem Blattschutz verwendet werden. Der Schmetterling wird eine
bessere Durchmischung erzielen, wenn Sie Milch, Butter oder Fruchtsauce erwärmen.
Zum Montieren, richten Sie sie mit dem Halbkreis im Klingenschutz aus und legen Sie sie
ein, bis sie den Blattschutz abdeckt. Dann drehen Sie sie es in die Richtung vom
Uhrzeigersinn.
Zum Demontieren, greifen Sie den Griff der Kanne in der einen Hand und mit der anderen
entfernen Sie den Blattschutz.
Warnung: Wenn Sie Gas verwenden, kann die Geschwindigkeit der Maschine nicht
größer als 4 und die maximale Kapazität sollte 1.5L nicht überschreiten.
Schutzklingen: Verwenden Sie sie um weiche oder flüssige Zutaten zu mischen. Die
Geschwindigkeit der Maschine darf nicht mehr als 4 sein, wenn Sie es verwenden.
Wichtig: Bei der Installation des Klingenschutz, drücken Sie hart, bis es einrastet.
Achtung: Der Messerschutz und Schmetterling sollte nicht beim Mischen von Teig
verwendet werden.
Der Dampfer: Es umfasst einen Behälter, eine Scheibe und eine Abdeckung. Es kann
verwendet werden, um große Mengen von Lebensmitteln mit Dampf zu kochen.
Achtung: Seien Sie vorsichtig, um Verbrennungen durch Dampf zu vermeiden.
Gießen mindestens 500 ml Wasser in die Schüssel. Wenn Sie einen Filter verwenden, legen
Sie es in den Krug (Bild 16) und legen Sie die Lebensmittel (wie Reis oder Kartoffeln) die Sie
in den Filter möchten. Dann legen Sie den Deckel drauf und stellen sicher, dass der Krug
richtig in der Maschine sitzt.
Page 25

Fig 18
Um den Dampfer korrekt auf der Schüssel zu platzieren, stecken Sie den Schlitz in die
Öffnung der Schüssel. Drücken Sie die Taste, um den es zu sperren. Legen Sie die
Lebensmittel in die Schüssel (Lebensmittel die mehr kochen müssen bitte am Boden
anordnen). Wenn nötig, kann das Dampf-Programm verwendet werden.
Schließen Sie den Dampfer mit dem Deckel (17). Der Dampf kann nicht entweichen.
Wichtig:
• Bei Verwendung des Dampfers, lassen Sie den Messbecher in der Schüssel.
• Bei Verwendung des Dampfers, sollten Ihre Kinder von der Maschine entfernt bleiben und
über die Gefahren informiert werden.
• Bei Verwendung des Dampfers, darf die Geschwindigkeit 3 nicht überschritten werden.
Geschwindigkeiten über 3 können zu einem Überlaufen von Lebensmitteln führen.
Stellen Sie die Zeit, Temperatur und Geschwindigkeit auf dem Bedienfeld ein und drücken
Sie START / STOP, um mit dem Kochen zu beginnen.
Öffnen Sie den Dampfer leicht, so dass der Wasserdampf durch den Rücken in den Behälter
fließen kann. Drehen Sie den Deckel und legen Sie ihn auf den Tisch. Dann nehmen Sie die
Dampfer und halten ihn ein paar Sekunden über den Krug, damit das Wasser abkühlen und
abtropfen kann. Wenn das Wasser aufhört zu fließen, legen Sie den Dampfer auf den
Deckel.
GRBAUCH DER SCHALTFLÄCHE
TIME : Zeitanzeige
TEMP : Temperaturanzeige
SPEED : Geschwindigkeitsanzeige
So verwenden Sie die "AUTO" Funktion drücken Sie die Taste AUTO.
Inklusive a.soupe; b.confiture; c.sauce
Zum Einstellen der Garzeit oder Kochtemperatur, verwenden Sie die
SELECT-Taste und wählen Sie TIME oder TEMP.
Zum Einstellen der Geschwindigkeit, verwenden Sie die SPEEDTaste.
Um Teig zu verarbeiten, verwenden Sie den Teig-Taste.
Um die Maschine auf maximaler Geschwindigkeit laufen zu lassen,
verwenden Sie die Turbo-Taste.
Die + Taste wird verwendet, um die Zeit, die Temperatur und / oder
die Geschwindigkeit zu erhöhen.
Die - Taste wird verwendet, um die Zeit, die Temperatur und / oder die
Geschwindigkeit zu reduzieren.
Die START / STOP-Taste dient zum Starten und Stoppen der Maschine.
• Einstellen der Zeit :
Die Zeit wird mit der TIME-Taste eingestellt. Die maximale Zeit für dieses Gerät beträgt
90min.
Drücken Sie die TIME-Taste. Wenn die TIME Lampe ▶ leuchtet, drücken Sie die Taste +, um
Zeit hinzuzufügen oder die – Taste um Zeit zu vermindern. Wenn Sie die Taste + oder halten, wird die Zeit schnell erhöht oder verringert.
Drücken Sie die Taste einmal, 1. Minute hinzuzufügen oder zu entfernen. Drücken Sie die
Taste zweimal in Folge zum Hinzufügen oder Entfernen einer Sekunde.
• Einstellen der Temperatur :
Bevor Sie mit dem Kochen beginnen, wählen Sie die Temperatur. Wenn Sie nicht kochen
möchten, gehen Sie direkt zum nächsten Punkt.
Drücken Sie die TEMP. ▶ Wenn die TEMP Lampe leuchtet, drücken Sie +, um die
Temperatur zu erhöhen oder -, um sie zu verringern. WennSie die Taste + oder - halten, wird
die Temperatur schnell steigen oder fallen.
Page 26

Fig 19
Drücken Sie die Taste einmal um 10 Grad hinzuzufügen oder zu entfernen.
Die Temperatur kann von 30 ° C bis 120 ° C eingestellt werden,
• Einstellen der Drehgeschwindigkeit der Klingen:
Drücken Sie die SPEED-Taste. Wenn die SPEED Lampe ▶ leuchtet, drücken Sie +, um die
Geschwindigkeit zu erhöhen oder -, um sie zu verringern.
Hinweis: Für Gemische, passen Sie die Geschwindigkeit von 1 bis 5 an. Wenn Sie Saucen
oder Saft zubereiten, passen Sie die Geschwindigkeit zwischen 5 und 9 an.
• Starten der Maschine :
Drücken Sie die START / STOP-Taste. Die Maschine beginnt zu arbeiten. Die Zeit beginnt
zu zählen, bis 0:00 Uhr. Sobald sie fertig ist, piept die Maschine. Drücken Sie erneut die
START / STOP-Taste, um sie zu stoppen.
Wichtig :
• Wenn Sie keine Temperatur oder Zeit wählen, sondern nur die Geschwindigkeit anpassen,
kann die Maschine gestartet werden. Seine maximale Laufzeit beträgt 20 Minuten. Nach 20
Minuten stoppt die Maschine automatisch und gibt einen Signalton, um Sie zu warnen.
• Wenn Sie die Kochfunktion benutzen, ist es auch notwendig, die Zeit und die
Geschwindigkeit einzustellen. Wenn Sie nur die Temperatur, aber nicht die Zeit oder die
Geschwindigkeit einstellen, wird die Maschine nicht starten. Wenn das Kochen beendet ist,
beträgt die Zeit 00:00 Uhr. Die Maschine stoppt zu heizen, aber die Blätter in dem Krug
drehen sich weiterhin für 10 Minuten und stoppen mit einem Piep Ton, so dass Sie sich nicht
verbrennen, wenn Sie das Essen aus dem Krug nehmen.
• Bei der Auswahl des Kochmodus ist die Maximalgeschwindigkeit 5.
• Wenn die Zeit 0:00 erreicht, wird die Maschine einen Signalton abgeben. Nach 5 Minuten
wird es wieder klingen, wenn Sie es nicht ausstellen.
• Funktion Teig :
Verwenden Sie diese Taste, um Hefe-oder Brotteig zu machen (die LCD-Leuchte wird wie in
Abbildung 19 angezeigt).
Drücken Sie als erstes die TIME-Taste und dann die Teig-Taste. Dann drücken Sie die
START / STOP-Taste. Diese Funktion wird ein voreingestelltes Programm auslösen, das wie
folgt funktioniert : Geschwindigkeit 3 für 3 Sekunden, stoppen bei 4 Sekunden und dann
wieder beschleunigen, 3 für 3 Sekunden, stoppen bei 4 Sekunden etc ...
Geben Sie zum Beispiel 500 g Mehl in den Krug (der Krug muss
trocken sein und darf kein Wasser enthalten) und platzieren Sie
den Krug auf der Maschine. Stellen Sie die Zeit bis 3 Minuten ein
und drücken Sie die Teig- Taste und die START / STOP-Taste.
Das voreingestellte Programm startet. Wenn noch eine 1 Minute
übrig ist gießen Sie 300 ml Wasser in den Krug. Wenn die Zeit
0:00 erreicht können Sie den Teig entfernen.
Hinweis: Wenn Sie die Teig-Funktion benutzen, muss der Krug
trocken sein, um ein Risiko vom Anhaften des Teiges beim
Mischen zu verhindern. Das Mehl (für Kuchen) sollte 500g nicht
überschritten, das Wasser sollte 300ml nicht überschreiten und die Zeit sollte nicht länger
sein als 3 Minuten. Die Anteile an Mehl und Wasser ist 5/3. Das Ergebnis wird besser sein,
wenn Sie ein paar Tropfen Öl zu dem Mehl hinzufügen. Bei der Verwendung von hohen
Anteilen an Gluten im Mehl (für Brot), sollte die Menge an Mehl 300 g nicht überschreiten.
Achtung: Seien Sie am Ende der Zubereitung des Teiges vorsichtig, beim Entfernen der
Blätter, um Schnittverletzungen zu vermeiden. Diese Maschine kann sich während der
Vorbereitung des Teiges bewegen. Platzieren Sie die Maschine auf einer flachen, stabilen,
nicht-heizende Oberfläche und weg von Rändern, um Stürze und Unfälle zu vermeiden.
• Turbo Funktion :
Es ist nicht notwendig die Zeit anzupassen und zu beschleunigen, um die Turbo-Funktion zu
verwenden. Drücken Sie die Turbo-Taste kontinuierlich läuft die Maschine auf voller
Page 27

Geschwindigkeit und zeigt die Anzahl der Sekunden an. Die Maschine stoppt, wenn Sie die
Taste loslassen und die Zeit wird auf 00:00 Uhr zurückgesetzt. Diese Taste wird verwendet,
um harte Lebensmittel wie Eis zu zerdrücken.
Hinweis: Diese Schaltfläche sollte nicht mit der Teig-Funktion verwendet werden.
Warnung: Wenn Sie die Turbo-Funktion mit warmen Speisen verwenden, darf die Menge der
Lebensmittel 1000g nicht überschreiten. Der Messbecher kann im Deckel der Kanne
gelassen werden, um Verbrühungen durchs Überlaufen zu vermeiden.
Wenn Sie Rezepte verwenden :
Achten Sie auf die Reihenfolge, in der Sie Ihre Zutaten zufügen.
Stellen Sie sicher, dass die Menge der Lebensmittel in dem Krug nicht mehr als 2 Liter
betragen.
Bei der Verwendung des Mixers, stellen Sie sicher, dass die Menge der Lebensmittel in dem
Krug 1,5 Liter nicht überschreiten.
Sie können bessere Ergebnisse erzielen, wenn Sie in der Reihenfolge der einhalten:
Wenn Sie Lebensmittel kochen : Stellen Sie zuerst die Uhrzeit, Temperatur und
Geschwindigkeit ein und drücken Sie dann START / STOP.
Wenn Sie Lebensmittel mischen oder zerhacken wollen : Stellen Sie zuerst die Zeit und
Geschwindigkeit ein und drücken Sie START / STOP.
Beispiele:
Ein Gericht kochen
1 Stellen Sie die Zeit auf 45 min
2 Stellen Sie die Temperatur auf 120 ° C
3 Stellen Sie die Geschwindigkeit auf 3
4 Drücken Sie START / STOP
Gemüse hacken
1 Stellen Sie die Zeit auf 30 Sekunden
2 Stellen Sie die Geschwindigkeit auf 6
3 Drücken Sie START / STOP
Crushed Eis (geben Sie nicht mehr als 300 g Eis in den Krug)
1 Stellen Sie die Zeit auf 1 Minute
2 Stellen Sie die Geschwindigkeit auf 9
3 Drücken Sie START / STOP
Karottensaft (geben Sie nicht mehr als 400 g Karotten und 600 ml Wasser in den Krug)
1 Stellen Sie die Zeit auf 1 Minute
2 Stellen Sie die Geschwindigkeit auf 9
3 Drücken Sie START / STOP
Mahlen von Kaffee (geben Sie nicht mehr als 200 g Kaffeebohnen in den Krug)
1 Stellen Sie die Zeit auf 2 Minuten
2 Stellen Sie die Temperatur auf 9
3 Drücken Sie START / STOP
Page 28

REINIGUNG
Vor dem ersten Gebrauch sollte die Maschine und das Zubehör, das mit Lebensmitteln in
Kontakt kommt, gründlich gereinigt werden.
Reinigen Sie die Kanne und den Deckel: Demontieren Sie erst die Klingen und das Siegel
(siehe oben).
Verwenden Sie heißes Wasser oder eine Spülmaschine, die Kanne und Deckel (lieber die
Messer in der Spülmaschine) reinigen. Sie können die Spachtel, Schmetterling, Laubschutz,
Filter zu reinigen, Messbecher, Deckel, und lassen Dampf in der gleichen Weise.
Hinweis: Wenn es Schmiere gibt oder es nicht einfach ist den Krug oder das Zubehör
zu reinigen, benutzen Sie ein spezielles Reinigungsmittel für Edelstahl.
Reinigen der Klingen: Halten Sie die Klingen unten fest und legen Sie sie unter Wasser. Sie
können die Blätter mit einer Bürste abputzen.
Hinweis: Seien Sie besonders vorsichtig bei der Reinigung der Klingen, da sie sehr
scharf sind.
Reinigen des Dampfgarers : Sie können es in die Spülmaschine stellen oder ein weiches
Tuch mit etwas Spülmittel verwenden um ihn zu reinigen.
Reinigen des Körper der Maschine: Verwenden Sie ein weiches Tuch mit etwas Spülmittel.
Verwenden Sie kein Wasser, um zu verhindern, dass es in dem Bereich, wo sich der Motor
befindet, nicht einsickert.
Hinweis: Trennen Sie das Gerät vor der Reinigung von der Steckdose.
Hinweis: Bei Überhitzung das Gerät stoppen. Allerdings wird das rote Licht an bleiben
und ein Signalton ertönt (Bild 1). Schalten Sie das Gerät aus, ziehen Sie von der
Steckdose, entfernen Sie das Essen und lassen es etwa 15 Minuten abkühlen.
UMWELT
ACHTUNG :
Werfen Sie nicht dieses Produkt, wie es mit anderen Haushaltsprodukten hat. Es
gibt eine Mülltrennungs von diesem Produkt in Gemeinden, Sie müssen Ihre
lokalen Behörden über die Orte, wo man dieses Produkt zurückgeben können zu
informieren. In der Tat enthalten elektrische und elektronische Produkte gefährliche Stoffe,
die schädliche Auswirkungen auf die Umwelt oder die menschliche Gesundheit haben und
sollte recycelt werden. Das Symbol hier darauf hinweisen, dass elektrische oder
elektronische Geräte sollten sorgfältig ausgewählt werden, ist ein fahrbarer Abfallbehälter mit
einem Kreuz markiert.
Hergestellt und importiert : Adeva SAS 8 rue Marc Seguin 77290 Mitry-Mory FRANCE
www.hkoenig.com - contact@hkoenig.com - Tel. 01 64 67 00 01
Page 29

Nederlands
ALGEMENE VEILIGHEIDSINSTRUCTIES
Dit apparaat is enkel bedoeld voor huishoudelijk gebruik.
Dit apparaat dient niet gebruikt te worden door mensen met een fysieke of mentale
handicap, Indien zij geen instructies hebben ontvangen of indien zij niet begeleid worden,
lopen zij risico op verwondingen.
Schakel het apparaat uit alvorens het schoonmaken of indien u een langere tijd geen
gebruik gaat maken van het apparaat. Indien de stroomkabel is baeschadigd, dient deze
gerepareerd te worden door de fabrikant of door een hiervoor gekwalificeerd persoon.
Gooi het apparaat nooit gezamelijk met uw gewone huishoudelijke afval weg. Neem
contact op met uw gemeente voor een geschikte weggooi-methode.
Om allé risico’s tot elektrische schokken of beschadiging van het apparaat te voorkomen,
dompelt u het apparaat nooit onder in water. Voor het schoonmaken van het apparaat
gebruikt u een vochtige doek. Zorg ervoor dat water in contact komt met elektrische
aansluitingen van het apparaat.
ATTENTIE: de messen van het apparaat zijn zeer scherp. Wees voorzichtig bij het
demonteren en instellen van het apparaat.
Overschrijd nooit de maximale voedsel capaciteit van het apparaat : 2L.
• Verwijder het deksel niet van het apparaat als deze aan het mengen is ; vooral niet
wanneer de snelheid hoger is dan 5.
• Wanneer het apparaat warm is of of als u de messen na het koken wilt verwijderen, dient u
uit te kijken dat u zich niet verbrand aan het roestvrijstalen gedeelte van het apparaat.
• Wanneer u de deksel van het apparaat wilt openen, ontsnapt er stoom. Let er daarom op
dat u zich niet verbrandt. Raak het deksel niet aan tijdens het koken.
• Kinderen moeten onder toezicht staan om er zeker van te zijn dat ze niet met het apparaat
spelen. Plaats het apparaat op een locatie buiten het bereik van kinderen. Licht uw kinderen
in over het feit dat het apparaat als deze in werking is heet wordt, en daarom niet aangeraakt
moet worden.
• Houd uw hand op de maatbeker wanneer de snelheid hoger is dan 5, of als u het ijs met
behulp van de turbo-functie wenst te breken.
• Het apparaat kan niet verplaatst worden tjdens gebruik. Zorg ervoor dat het apparaat op
een vlakke, stabiele ondergrond en uit de buurt van de randen geplaatst is. Dit om te
voorkomen dat het apparaat valt.
• Zorg ervoor dat u voldoende ruimte over laat boven en rondom het
apparaat.
• In geval van oververhitting, zal het apparaat stoppen. Echter, het rode
lampje zal aanblijven en een pieptoon klinkt (fig 1). Zet het apparaat uit,
trek de stekker uit het stopcontact, verwijder het eten uit het apparaat
en laat deze gedurende de période van 15 minuten afkoelen.
INTRODUCTION
Page 30

Pitcher
Deksel
Stomer
Vlindermessen
Messen
beschermer
Maatbeker
Opvangbakje
Spatel
Hier draaien
Fig 3
Fig 4
Hier draaien
Fig 5
Fig 6
VOOR HET EERSTE GEBRUIK
Maak voor gebruik het apparaat grondig schoon, dit omdat in sommige gevallen losse
materie van het productieproces in het apparaat aanwezig kan zijn.
Hoe de pitcher correct te plaatsen en programma’s te selecteren
Plaats de deksel op de juiste wijze op de pitcher (Fig 3). Sluit vervolgens het deksel. Sluit het
handvat onder het deksel (Fig 4).
Plaats dan de pitcher in het apparaat (het handvat naar u toe gedraaid) (Fig 5). Neem de
pitcher bij het handvat en draai deze in de tegenovergestelde richting (met de klok mee) om
deze te vergrendelen (Fig 6).
Page 31

Vergendel zoals
hier aangegeven
Fig 7
Fig 8
Geplaatste
messen
De as
Fig 9
Halve cirkel
Sluit de kabel aan en zet het apparaat aan (Fig 7). Stel de tijd, temperatuur en snelheid in
op het bedieningspaneel en druk op START / STOP om het apparaat te starten.
Hoe de pitcher correct te verwijderen :
Druk op de START / STOP-knop om het apparaat te stoppen. Vervolgens neemt u de pitcher
bij de handgreep en draait u deze naar naar links om deze te vervangen zoals aangegeven
in figuur 5, u kunt de pitcher uit het apparaat verwijderen. Druk vervolgens op de knop op
het handvat van de pitcher om het deksel (Fig 8) te ontgrendelen en verwijder deze.
LCD Scherm :
Zet het apparaat aan.
Wanneer de pitcher niet
correct is geïnstalleerd of
deze niet goed in de
machine is geplaatst, toont
het display:
Indien de pitcher goed is geplaatst in
het apparaat is het volgende op de
display af te lezen.
U kunt de tijd, de temperatuur en de snelheid niet instellen indien de pitcher niet goed
geplaatst is.
Let op: U kunt de pitcher niet herplaatsen indien de deksel niet goed is geplaatst. Gebruik
geen kracht om de pitcher juist te monteren, maar herplaats de deksel.
Demonteren van de messen :
Plaats uw linkerhand in de pitcher naar het halfronde deel van de beschermkap (Fig 10) op
te vangen.
Page 32

Fig 10
Draai de
moer
Fig 11
Met uw rechterhand, draait u de moer tegen de klok
in (Fig 11).
Wanneer dit gedaan is verwijderd u de messen met
uw linkerhand.
Waarschuwing !! De messen zijn zeer scherp.
Raak de rand van de messen niet aan om letsel
te voorkomen. Houd de bovenkant van de
messen richting u wanneer u ze vervangt of
verplaatst om te vermijden dat de scherpe
onderkant verwondingen veroorzaakt.
Hoe de messenbescherming te monteren :
Hetzelfde proces in omgekeerde volgorde.
GEBRUIKSAANWIJZING
• Elke keer dat u een nieuw gerecht bereidt, zorgt u ervoor dat het apparaat en alle
onderdelen schoon en droog zijn.
• Indien u bij het verwarmen van melk of room een temperatuur van 90 ° C gebruikt, is er
gevaar voor brandwonden. Deze temperatuur kan brandwonden veroorzaken. We raden u
aan om maximal op snelheid 2 te mixen om brandwonden te voorkomen.
• Voeg een druppel olijfolie toe wanneer u groenten hakt, dit zorgt voor een beter hakproces.
• Kaas en sommige zetmelen kunnen schuim creëren, waardoor u moet blazen om te
voorkomen dat de voeding zal overstromen. Om dit te voorkomen, voegt u deze ingredienten
pas de laatste 3 tot 5 minuten van het kookproces toe.
• Het opvangbakje kan worden gebruikt als een zeef. Warm voedsel, verwijdert u met een
spatel uit het bakje.
• Met behulp van een spatel, duwt u de ingrediënten in de mesbladen. De schijf voorkomt dat
het spatel niet vast komt te zitten in de bladen.
• Om de pitcher na het bereiden van geurige gerechten te reinigen, raden wij u aan om
250ml water, 3 eierschalen en een halve citroenschil in de pitcher te doen. Zet vervolgens
uw apparaat op snelheid 6 gedurende 20 seconden. Dit zal de geuren doen verdwijnen.
• Als voedsel overgaar of licht verbrand zijn, voegt u een beetje warm water met zeep toe en
laat u dit een paar uur inweken. Vervolgens past u de hier bovengenoemde
schoonmaakmethode toe.
• Bij het bereiden van rijst door te stomen, voegt u een snufje zout toe aan het warme water.
Dit zal spatten voorkomen.
• Bij het bereiden van gerechten met water, mag de hoeveelheid voedsel niet groter zijn dan
1500g om overstromen te voorkomen.
GEBRUIK VAN DE ASSECOIRES
Het deksel van de pitcher: De afdichting in het deksel zal morsen van voedsel, soep of stoom
voorkomen. De woorden "ESTA CARA DE TAPA ↑, ↑ FACE UP" moeten leesbaar zijn als de
deksel is geplaatst (Fig 12) anders kan de vloeistof gaan lekken (Fig 13).
Page 33

Fig 13
Spatel
Centrale
deel
apparaat
Fig 14
Fig 15
Fig 12
Maatbeker: Wordt gebruikt om de hoeveelheden vloeibaar voedsel af te meten.
Opvangbakje: Een multifunctionele accessoire. Het kan het sap van fruit en groenten filteren,
maar ook groenten zoals aardappelen, tomaten, uien koken ... Het is zeer eenvoudig te
verwijderen. Gebruik de spatel om het centrale deel van het apparaat te verbinden (Fig 14).
Spatel: U kunt de ingrediënten van de zijkanten van de pitcher met een spatel schrapen. Bij
het filteren van sap, kan de spatel gebruikt worden om de vrucht vast te houden en het sap
effectief af te scheiden (Fig 15).
Vlindermessen: Wordt gebruikt met de beschermkap gemonteerd. De vlindermessen zullen
zorgen voor een betere menging en voorkomen dat bij het verwarmen van melk, boter of fruit
saus dat stukken blijven plakken.
Om de beschermkap te monteren, draait u het apparaat een halve cirkel totdat de deksel
gesloten is.
Om de vlindermessen te verwijderen pakt u het handvat van de kan in de ene hand en de
pakt u met de andere met de messenbeschermer de vlindermessen.
Waarschuwing: Wanneer u de vlindermessen gebruikt, kan de snelheid van de robot
niet hoger zijn dan 4 en de maximale capaciteit is dan 1,5 liter.
Messenbeschermer: Gebruik om te mengen zachte of vloeibare ingrediënten. De snelheid
van de robot mag niet hoger dan 4 zijn.
Belangrijk: Bij het installeren van de beschermkap dient u hard te drukken tot u een klik
hoort.
Let op: De beschermkap en vlinder mag niet worden gebruikt bij het mengen van het
deeg.
De stomer: Bestaat uit een beker, een schijf en een cover. Het kan worden gebruikt om grote
hoeveelheden voedsel te stomen.
Waarschuwing: Wees voorzichtig om verbranding door stoom te voorkomen.
Giet ten minste 500 ml water in de pitcher. Als u een filter wilt gebruiken, plaatst u deze in de
pitcher (Fig 16) en plaatst u het eten (zoals rijst of aardappelen) in het filter. Plaats
vervolgens het deksel en zorg ervoor dat de pitcher goed in het apparaat is bevestigd.
Page 34

Filtre
Fig 16
Fig 17
Fig 18
Correct plaatsen van de stomer op de pitcher door het plaatsen van het slot van de stomer in
het tabblad van de pitcher. Druk op de knop om de stomer vast te zetten. Plaats het voedsel
in de stomer (voedingsmiddelen die langer dienen te koken op de bodem en
voedingsmiddelen die minder lang dienen te koken boven). Indien nodig kan het stoomfilter
worden gebruikt.
Sluit de stoompan met deksel (Fig 17). De stoom kan zo niet ontsnappen.
Belangrijk:
• Bij gebruik van de stomer, laat u de maatbeker in de pitche.
• Bij gebruik van de stomer, is het belangrijk dat kinderen uit de buurt van het apparaat
blijven. Licht hen daarom in over het gevaar.
• Bij gebruik van de stomer kan de gebruikte snelheid niet hoger zijn dan de snelheid 3.
Hogere snelheden kan het overstromen van voedsel veroorzaken.
Stel de tijd, temperatuur en snelheid in op het bedieningspaneel en druk op START / STOP
om te beginnen met koken.
Open de stomer door deze enigszins naar u toe te leunen, op deze manier ontsnap de stoom
door de achterkant en kan het water in het reservoir stromen. Draai het deksel los en zet de
stomer op de tafel. Vervolgens neemt u de stomer en houdt u deze boven de pitcher
gedurende een paar seconden. Dit zodat het water kan afkoelen en uitlekken. Wanneer het
water stopt met stromen, plaatst u de stomer weer op de pitcher.
GEBRUIK VAN HET CONTROLE PANEL
TIME: Geeft de tijd weer
TEMP: geeft de temperatuur weer
SPEED: Geeft de snelheid weer
Om de "AUTO" functie op de toets AUTO gebruiken. Inclusief a.soupe;
b.confiture; c.sauce
Om de kooktijd of koken temperatuur aan te passen, gebruikt u de
SELECT-knop en selecteer TIME of TEMP.
Om de snelheid van de robot aan te passen, gebruikt u de SPEED
knop.
Om met deeg te werken, gebruikt u de DOUGH knop.
Om het apparaat op maximale snelheid in te stellen, gebruikt u de Turbo
knop.
De + knop wordt gebruikt om tijd, temperatuur en / of snelheid te laten toenemen.
- knop wordt gebruikt om tijd, temperatuur en / of snelheid te verminderen.
De START / STOP-knop wordt gebruikt voor het starten en stoppen van het apparaat.
• Instellen van de tijd:
De tijd wordt ingesteld met de TIME-knop. De maximale tijd voor dit apparaat is 90min.
Page 35

Fig 19
Druk op de TIME knop. Wanneer het pictogram TIME verlicht, drukt u op de + knop om de
tijd te doen toenemen of op de – knop om deze te verminderen. Als je blijft drukken op de +
of - knop, zal tijd worden verhoogd toe- of afnemen.
Druk eenmaal op de knop voor een toename of vermindering van 1 minuut. Druk twee keer
om een rij toe te voegen of druk één seconde op de knop om deze te vewijderen.
• Instellen van de temperatuur:
Voordat u met koken begint, kiest u de temperatuur. Als u niet hoeft te koken, gaat u direct
naar het volgende punt.
Druk op de TEMP. Wanneer het pictogram TEMP verlicht, drukt u op + knop om de
temperatuur te verhogen of om deze te verlagen. Als u blijft drukken op de + of - knop, zal de
temperatuur sneller stijgen of dalen.
Druk eenmaal op de knop om 10 graden toe te voegen of te verwijderen.
De temperatuur van dit toestel kan worden ingesteld van 30 ° C tot 120 ° C.
• Pas de snelheid van de rotatie van de messen:
Druk op de SPEED-knop. Wanneer het pictogram SPEED verlicht, drukt u op + knop om
de snelheid te verhogen of op de -knop om deze te verlagen.
Opmerking: Voor mengsels, kan de snelheid van 1 tot 5 gebruikt worden. Wanneer u saus of
sap wenst te maken, kan de snelheid tussen de 5 en 9 gebruikt worden.
• Start het apparaat:
Druk op de START / STOP-knop, begint de machine te werken. De tijd zal beginnen af te
tellen tot 00:00. Zodra het opstarten is voltooid, zal de machine dit aangeven door middel
van een geluidssignaal. Druk nogmaals op de START / STOP-knop om het apparaat te
stoppen.
Belangrijk:
• Als u niet kiest voor de temperatuur of tijd, maar je gewoon de snelheid aan te passen, kan
het apparaat worden gestart. De maximale looptijd is 20 minuten. Na 20 minuten stopt het
apparaat automatisch, en geeft deze een geluidssignaal om u te waarschuwen.
• Bij gebruik van de bereidingsfunctie, is het noodzakelijk om de tijd en de snelheid in te
stellen. Als je alleen de temperatuur instelt, maar niet de tijd of de snelheid, zal het apparaat
niet werken. Wanneer het koken klaar is, staat de tijd op 0:00. Het apparaat zal stoppen met
verwarmen, maar de messen in de pitcher zullen 10 minuten blijven doorgaan en stoppen
met een pieptoon. Dit zodat u zichzelf niet verbrandt het voedsel in de pitcher.
• Bij het selecteren van de bakwijze, is de maximale snelheid 5.
• Als de tijd 0:00 bereikt, zal de robot een pieptoon geven. Na 5 minuten, zal de robot weer
klinken u deze niet heeft gehoord.
• Functie deeg (DOUGH):
Gebruik deze knop om gist of brooddeeg te bereidden (het LCDscherm laat hetgeen zien dat is weergegeven in Fig 19).
Stel eerst de tijd in en druk vervolgens op de knop DOUGH. Druk
vervolgens op de START / STOP-knop. Deze functie zal een
vooraf ingesteld programma instarten dat als volgt werkt :
Snelheid 3 voor 3 seconden, stopt 4 seconden en dan weer
versnellen tot snelheid 3 gedurende 3 seconden, stopt 4 seconden
etc ...
Voorbeeld : Voeg 500g bloem toe in de pitcher (de pitcher moet droog zijn en geen water
bevatten) en plaats de pitcher op de juiste wijze op het apparaat. Stel de tijd in op 3 minuten
en druk de START / STOP-knop in. Het vooraf ingestelde programma zal starten.
Gedurende 1 minuut, giet u 300 ml water in de kruik. Wanneer de tijd 0:00 bereikt, kunt u het
deeg verwijderen.
Opmerking: Bij het gebruik van de pasta-functie (DOUGH), moet de werper droog zijn om het
risico tot kleven tijdens het mixen te voorkomen. Meel (voor cake) wordt niet overschreden
500g, mag niet groter zijn dan 300 ml water en de tijd mag niet meer dan 3 minuten. De
verhoudingen van bloem en water is 5/3. Het resultaat zal beter zijn als je een paar druppels
Page 36

olie toe voegt aan de bloem. Bij gebruik van de hoge gluten bloem (voor brood), moet de
hoeveelheid meel niet meer zijn dan 300 g.
Waarschuwing: Aan het einde van de bereiding van het deeg, dient u voorzichtig te zijn bij
het verwijderen van de messen om verwondingen te voorkomen. Het apparaat kan bewegen
tijdens de bereiding van het deeg. Plaats het apparaat daarom op een vlakke, stabiele
ondergrond, zonder verwarming in de buurt en uit de buurt van de randen. Dit om valpartijen
en ongevallen te voorkomen.
• Turbo functie:
Geen behoefte om de tijd aan te passen maar wel een hogere snelheid gebruiken, gebruik
dan de turbo functie. Druk continu op de TURBO-knop en laat de machine draaien op volle
snelheid door het weergeven aantal seconden de turbo te gebruiken. De robot stopt zodra u
de knop loslaat en de tijd zal terugkomen tot 00:00. Deze knop wordt gebruikt om hard
voedsel te breken, zoals ijs.
Opmerking: Deze knop dient niet te worden gebruikt met de pasta-functie (DOUGH).
Waarschuwing: Als u de turbo functie met warm eten gebruikt, moet de hoeveelheid voedsel
niet meer dan 1000g zijn. De maatbeker kan worden achtergelaten in het deksel van de
pitcher om brandwonden door overstroming.
Bij het gebruik van recepten:
Let op de volgorde waarin u uw ingrediënten toevoegd.
Zorg ervoor dat de hoeveelheid voedsel in de werper niet meer dan 2 liter is.
Bij gebruik van de blender, zorgt u ervoor dat de hoeveelheid voedsel in de werper niet meer
dan 1,5 liter is.
U kunt betere resultaten in de volgorde na de bereiding krijgen:
Als je eten kookt, eerst de tijd instellen, dan de temperatuur en snelheid, daarna drukt u op
START / STOP.
Als je voedsel wenst te hakken, eerst de tijd, snelheid instellen en dan op START / STOP
drukken.
Voorbeelden:
Schotel koken
1 Stel de tijd in op 45 min
2 Stel de temperatuur in op 120 ° C
3 Zet de snelheid op 3
4 Druk op de START / STOP knop
Hak groenten
1 Stel de tijd in op 30 seconden
2 Zet de snelheid op 6
4 Druk op de START / STOP knop
IJs breken (doe er niet meer dan 300 g van het ijs in de werper)
1 Stel de tijd in op 1 minuut
2 Zet de snelheid op 9
4 Druk op de START / STOP knop
Wortelsap (doe er niet meer dan 400 g wortelen en 600ml water in de kruik)
1 Stel de tijd in op 1 minuut
2 Zet de snelheid op 9
4 Druk op de START / STOP knop
Het malen van koffie (doe er niet meer dan 200 gram koffiebonen in de werper)
1 Stel de tijd in tot 2 minuten
2 Stel de temperatuur in tot 9
4 Druk op de START / STOP knop
Page 37

SCHOONMAKEN
Voor het eerste gebruik moet de machine grondig gereinigd worden. Ook wanneer het
apparaat in contact is gekomen met voedsel dient deze gereinigd te worden.
Reinig de kan en deksel: Demonteer de bladen en het hoofdapparaat (zie de beschrijving
hierboven).
Gebruik warm water en een vaatwasser om de pitcher en het deksel schoon te maken (de
messen kunnen niet in de vaatwasser). U kunt de spatel, vlindermessen, opvangbakje, filter ,
maatbeker, deksel en stomer op dezelfde manier schoon maken.
Opmerking: Wanneer er smurrie of niet gemakkelijk schoon te maken voedsel in de
pitcher is geweest, gebruik dan een speciaal wasmiddel voor roestvrij staal.
Reinig de messen: Houd de onderkant van het blad vast en houd deze onder water. U kunt
de bladen schoon wrijven met een borstel.
Let op: Wees voorzichtig bij het schoonmaken van de messen, ze zijn erg scherp.
Stomer schoonmaken: Kan in de vaatwasser of met een zachte vochtige doek met een
beetje afwasmiddel.
Reinig het apparaat: Gebruik een zachte doek met een beetje afwasmiddel. Gebruik geen
water. Dit om te voorkomen dat water doorsijpelt in het motorgedeelte van het apparaat.
Let op: Ontkoppel het apparaat uit het stopcontact alvorens het reinigen.
Let op: In geval van oververhitting, zal het apparaat stoppen. Echter, het rode lampje
zal aanblijven en een pieptoon klinkt (fig 1). Zet het apparaat uit, trek de stekker uit het
stopcontact, verwijder het eten uit het apparaat en laat deze gedurende de période van
15 minuten afkoelen.
MILIEU
ATTENTIE :
Dit apparaat mag niet met uw ander huishoudelijke toestellen worden verwijdert. Dit product
moet op een geselecteerde stortplaats verwijdert worden. U kunt bij de gemeente een
indiceerde plaats aanvragen. Elektrisch en elektronische producten kunnen gevaarlijke stoffen
inhouden die schadelijk zijn voor mensen en het milieu en moet recycled worden. Het symbool aan de
kant geeft aan dat het een elektrisch en elektronisch toestel is en zijn dus artikelen van een selectieve
collectie. Het beeld geeft een afvalbak met een X teken aan.
Geproduceerd en geïmporteerd door : Adeva SAS 8, Rue Marc Seguin 77290, Mitry-Mory FRANKRIJK
www.hkoenig.com - contact@hkoenig.com – Telefoon: 01 64 67 00 01
Page 38

Español
INSTRUCCIONES GENERALES DE SEGURIDAD
• Este dispositivo está diseñado para uso doméstico.
• Este dispositivo no está diseñado para su uso por personas con capacidades físicas
y / o mentales disminuidas. Si estas personas han recibido instrucciones para su uso o
si no son supervisadas, existe un riesgo para su seguridad.
• Desenchufe la unidad antes de limpiarla o si no la usará por un tiempo. Si el cable de
alimentación está dañado, debe ser reparado por el fabricante o por una persona
calificada.
• No deseche los dispositivos eléctricos junto con la basura doméstica. Comuníquese
con su consejo local para saber donde están los puntos limpios para este fin.
• Para evitar descargas eléctricas o daños en el producto, no sumerja este dispositivo
en agua o cualquier otro líquido. Para limpiar, utilice un paño húmedo para fregar. No
permita que el agua entre en contacto con las partes eléctricas del dispositivo.
• ADVERTENCIA: Las cuchillas son muy afiladas. Tenga cuidado al retirarlas o
ensamblarlas.
• No exceda la capacidad máxima del robot de cocina: 2L.
• No retire la tapa del robot cuando está aún en funcionamiento, especialmente cuando
la velocidad es superior a 5.
• Cuando el robot está caliente o si desea retirar el recipiente después de la cocción,
no toque la pieza de acero inoxidable para evitar quemarse.
• Cuando se abre la tapa de la jarra, sale vapor. Tenga cuidado de no quemarse. No
toque la tapa durante la cocción.
• Los niños deben ser supervisados para asegurarse de que no jueguen con el
aparato. Coloque el robot en un lugar fuera del alcance de los niños. Comunique a sus
hijos que el aparato puede calentarse mucho y no deben de tocarlo.
• Mantenga la taza de medir en su lugar cuando la velocidad es superior a 5, o si
desea romper hielo con la función turbo.
• El robot puede moverse durante la operación. Asegúrese de
que está ubicado en una superficie plana, estable y lejos de
los bordes para evitar que se caiga.
• Asegúrese de dejar suficiente espacio por encima y
alrededor de la unidad.
• En caso de sobrecalentamiento, la unidad se detendrá. Sin
embargo, la luz roja permanecerá encendida y sonará un
pitido (Fig. 1). Apague el dispositivo, desenchúfelo, retire la
comida y deje enfriar unos 15 minutos.
INTRODUCCIÓN
Recipiente Tapa Dispositivo de
cocción a vapor
Page 39

Asegure aquí
Asegure aquí
Fig. 3
Fig. 4
Coloque el
recipiente en
esta posición
asegurándose
que quede bien
emplazado.
Fig 5
Fig. 6
Asegúrelo de
esta manera
Acelerador Protector de las cuchillas Taza de medir Cesta
Espátula
ANTES DEL PRIMER USO
Antes que nada, limpiar a fondo todo el equipo antes de usarlo por primera vez ya que
los residuos de la fabricación aún pueden estar presentes.
Cómo colocar correctamente la jarra y ejecutar los programas:
Coloque la tapa de la ranura en la lengüeta del lanzador (Fig. 3). A continuación, cierre
la tapa y asegúrela en el mango de la jarra (Fig. 4).
A continuación, coloque la jarra en la máquina (el mango hacia usted) (Figura 5).
Tome la jarra por el asa y gírela hacia la derecha para que encaje (figura 6).
Page 40

Conecte el cable de alimentación y encienda el dispositivo (fig. 7). Configure la hora, la
Fig. 7
Fig. 8
Cuchillas
ensambladas
Tuerca
Semicírculo
Fig. 10
Fig. 9
temperatura y la velocidad en el panel de control y pulse START / STOP para iniciar el
robot.
Cómo quitar el recipiente correctamente:
Presione el botón START / STOP para detener el robot. Luego tome el recipiente por
el asa y gírelo a la izquierda para retirarlo como se muestra en la Figura 5, puede
ahora quitar el recipiente de la máquina. A continuación, pulse el botón en el mango de
la jarra para desbloquear la tapa (Fig. 8) y retirarla.
Pantalla LCD:
Conecte el cable de
alimentación. Encienda el
robot. Cuando el
recipiente no está bien
instalado o no se ha
insertado correctamente en la
máquina, la pantalla muestra:
Si el recipiente está en su sitio y
bien asegurado, la pantalla muestra:
No se puede establecer el tiempo, la temperatura y la velocidad si el recipiente no está
en su sitio y bien asegurado.
Nota: No se puede bloquear el recipiente si la tapa no está en su lugar. No utilice la
fuerza para tratar de asegurarla, asegúrese de que la tapa encaje firmemente en su
lugar.
Desmontar las cuchillas:
Coloque la mano izquierda en el recipiente para coger la parte semicircular de la
protección de la hoja (Fig. 10).
Page 41

Desenrosque
la tuerca
Fig 13
Fig 12
Fig. 11
Con la mano derecha, gire la tuerca en
sentido contrario a las agujas del reloj (figura
11).
Cuando haya terminado, retire el conjunto de
las cuchillas con la mano izquierda.
¡Advertencia! Las cuchillas están muy
afiladas. No toque el borde de las cuchillas
para evitar lesiones. Sujete la parte
superior de las láminas cuando las mueva
o reemplace para evitar accidentes.
Montaje del protector de las cuchillas:
Haga el mismo proceso (desmontar el protector de las cuchillas) en orden inverso.
INSTRUCCIONES DE USO
• Cada vez que use el robot de cocina para preparar una nueva receta, asegúrese de
que la unidad y todas las piezas estén limpias y secas.
• Al calentar la leche o crema, usar una temperatura de 90 ° C puede causar
quemaduras. Sugerimos utilizar la velocidad 2 y mezclar para evitar quemarse con
salpicaduras.
• Agregar una gota de aceite de oliva cuando pica verduras puede ayudar a la
máquina.
• El queso y algunos almidones pueden crear espuma, procesar ciertos alimentos
puede causar que los ingredientes se derramen. Para evitar esto, añada estos
ingredientes a 3 o 5 minutos antes de terminar el proceso de preparación de estas
recetas.
• La cesta se puede utilizar como un colador. Cuando esté caliente, puede usar la
espátula para retirarla.
• Con la ayuda de una espátula, empuje los ingredientes hacia las cuchillas. El disco
evita que la espátula quede atascada en las cuchillas.
• Para limpiar el recipiente después de preparar platos con olores fuertes, le sugerimos
usar 250 ml de agua con 3 cáscaras de huevo y la mitad de una cáscara de limón.
Luego deje que su robot funcione por 20 segundos a velocidad 6. Esto hará que el
recipiente no tenga rastro de olores.
• Si la comida se ha cocinado demasiado o quemado, añada un poco de agua caliente
con jabón y deje en remojo unas horas y luego repetir la acción anterior.
• Al cocinar arroz al vapor, añada una pizca de sal para evitar las salpicaduras de agua
caliente.
• En la preparación de platos con agua, la cantidad no debe superar los 1500 g para
evitar que los ingredientes se derramen.
USO DE LOS ACCESORIOS
La tapa del recipiente: El sello dentro de la tapa sirve evitar el derrame de la comida,
sopa o la salida de vapor. A medida que ensamble el sello " ESTE LADO DE LA TAPA
↑, FACE UP ↑ " las palabras de advertencia deben estar orientados hacia usted (como
en la figura 12) de lo contrario, el líquido puede
salirse (figura 13).
Page 42

Fig 14
Mango
de la
cesta
Espátula
Fig 15
Filtro
Fig 16
Fig 17
Taza de medición: Se utiliza para medir las cantidades de alimentos líquidos.
Cesta: Accesorio multifuncional. Puede filtrar el jugo de frutas y verduras y también
cocinar verduras como patatas, tomates, cebollas... Es muy fácil de quitar. Utilice la
espátula para colgar la parte central del asa de la cesta (Fig 14).
Espátula: Usted puede raspar los ingredientes en los lados de la jarra con una
espátula. Cuando se filtra el jugo, puede usarse para fijar la cesta y separar los trozos
restantes en el jugo (Fig. 15).
Acelerador: Puede ser utilizado con el protector de la hoja. El acelerador asegurará
una mejor mezcla y evitará que se pegue cuando se calienta la leche, la mantequilla o
salsa de frutas.
Para el montaje, colóquelo con la protección de la hoja semicircular e insértela hasta
que cubra la protección de las cuchillas. A continuación, gírelo en el sentido de las
agujas del reloj.
Para desmontar, tome el asa de la jarra con una mano y con la otra sujete el
acelerador para quitarlo.
Advertencia: Cuando se utiliza el acelerador, la velocidad del robot no puede ser
superior a 4 y la capacidad máxima no debe exceder de 1,5 l.
Protector de las cuchillas: Se utiliza para mezclar ingredientes blandos o líquidos. La
velocidad del robot no debe superar el nivel 4 cuando usted lo utiliza.
Importante: Al instalar el protector de las cuchillas, empuje con fuerza hasta que haga
clic.
Atención: El protector de las cuchillas y el acelerador no se deben utilizar
cuando se mezcla pasta.
Cocina a vapor: Incluye un contenedor, un disco y una tapa. Se puede utilizar para
cocinar grandes cantidades de alimentos con vapor de agua.
Atención: Tenga cuidado para evitar quemaduras generadas por el vapor.
Vierta al menos 500 ml de agua en el recipiente. Si desea utilizar un filtro, colóquelo en
el recipiente (figura 16) y ponga la comida (como arroz o patatas) en el filtro. A
continuación, coloque la tapa y asegúrese de que el recipiente se coloque
correctamente en el dispositivo.
Page 43

Fig 18
Coloque correctamente el dispositivo a vapor sobre el recipiente ajustando la ranura
de la olla en la pestaña del recipiente. Pulse el botón para bloquear el dipositivo a
vapor. Coloque la comida en la dispositivo (la organización de los alimentos es la
siguiente: los que requieren más cocción en la parte inferior y los que requieren menor
cocción arriba). Si es necesario, el disco de vapor se puede utilizar.
Con la ayuda de la tapa (figura 17) el vapor de agua no podrá escapar.
Importante:
• Cuando se utiliza el dispositivo a vapor, no deje la taza de medir en el recipiente.
• Cuando se utiliza el dispositivo a vapor, mantenga a los niños alejados del dispositivo
e hágales saber que puede ser peligroso acercarse al robot de cocina.
• Cuando se utiliza el dispositivo a vapor, no exceda la velocidad 3, una velocidad
superior a 3 puede causar un derramamiento de los alimentos.
Configure la hora, la temperatura y la velocidad en el panel de control y pulse START /
STOP para empezar a cocinar.
Abra la tapa ligeramente inclinada hacia usted para que el vapor se escapa por la
parte trasera y el agua puede fluir dentro del recipiente. Gire la tapa y póngala sobre la
mesa. Luego tome el dispositivo a vapor y manténgalo sobre el recipiente unos
segundos para permitir que el agua se enfríe y drene. Cuando el agua deja de fluir,
coloque el dispositivo a vapor sobre su tapa.
USO DEL PANEL DE CONTROL
TIME: Muestra el tiempo
TEMP: muestra la temperatura
VELOCIDAD: Muestra la velocidad
Para utilizar la función "AUTO" función pulse el botón AUTO.
Incluye a.soupe; b.confiture; c.sauce
Para ajustar el tiempo de cocción o la temperatura de cocción,
utilice el botón SELECT y seleccione TIME o TEMP.
Para ajustar la velocidad del robot, utilice el botón SPEED.
Para trabajar la masa, utilice el botón DOUGH.
Para hacer funcionar el robot a la velocidad máxima, utilice el
botón TURBO.
El botón + se utiliza para agregar tiempo, aumentar la temperatura
y / o la velocidad.
- Botón se utiliza para reducir el tiempo, reducir la temperatura y /
o la velocidad.
El botón START / STOP se utiliza para iniciar y detener el robot.
• Ajuste de la hora:
Se establece con el botón TIME. El tiempo máximo es de 90 minutos.
Pulse el botón TIME. Cuando el pictograma TIEMPO ▶ se encienda, pulse el botón +
para añadir tiempo o el botón - para disminuirlo. Si mantiene pulsado el botón + o -, el
tiempo se puede aumentar o disminuir rápidamente.
Pulse el botón una vez para agregar o quitar 1 minuto. Pulse el botón dos veces
seguidas para agregar o quitar un segundo.
• Ajuste de la temperatura:
Antes de empezar a cocinar, elegir la temperatura. Si usted no tiene que cocinar, ir
directamente al siguiente punto.
Pulse el botón TEMP. Cuando el pictograma TEMP ▶ se ilumine, pulse + para
aumentar la temperatura o - para disminuirla. Si mantiene pulsado el botón + o -, la
temperatura aumentará o disminuirá rápidamente.
Page 44

Fig. 19
Pulse el botón una vez para agregar o quitar 10° C.
La temperatura de este dispositivo se puede ajustar desde 30 ° C a 120 ° C.
• Ajuste la velocidad de rotación de las cuchillas:
Presione el botón SPEED. Cuando el pictograma VELOCIDAD▶ se enciende, pulse +
para aumentar la velocidad o - para disminuirla.
Nota: Para las mezclas, ajuste la velocidad de 1 a 5 Cuando usted hace salsas o
zumos, ajuste la velocidad entre 5 y 9.
• Inicie el robot de cocina:
Presione el botón START / STOP. La máquina comenzará a trabajar. El tiempo
comenzará a contar hacia atrás hasta 0:00. Una vez que el trabajo está terminado, la
máquina emitirá un pitido. Pulse de nuevo el botón START / STOP para detener el
robot.
Importante:
• Cuando usted no elige la temperatura o el tiempo, sólo la velocidad, el robot se
puede iniciar. Su duración máxima es de 20 minutos. Después de 20 minutos, el robot
se detiene automáticamente y emite un pitido para avisarle que ha terminado.
• Cuando se utiliza la función de cocción, también es necesario para establecer la hora
y la velocidad. Si sólo ajusta la temperatura, pero no el tiempo o la velocidad, el robot
no funcionará. Una vez finalizada la cocción, el tiempo es 00:00. El robot dejará de
calentar, pero las cuchillas en el recipiente continuarán funcionando durante 10
minutos y se detendrán con un pitido para que no se queme la comida en el recipiente.
• Al seleccionar el modo de cocción, la velocidad máxima es 5.
• Cuando el tiempo llegue a 0:00, el robot emitirá un pitido. Después de 5 minutos, el
robot vuelve a sonar si usted lo ignora.
• Función de masa (dough):
Utilice este botón para levadura o masa de pan (la pantalla LCD aparecerá como en la
Figura 19).
Primero configure el tiempo y luego pulse el botón DOUGH. A continuación, pulse el
botón START / STOP. Esta función activará un programa preestablecido que funciona
de la siguiente manera: velocidad 3 durante 3 segundos, se detiene durante 4
segundos y luego otra vez la velocidad 3 durante 3 segundos, se vuelve a detener
durante 4 segundos, etc.
Por ejemplo, poner 500 g de harina en el recipiente (el
recipiente debe de estar seco y no contener agua) y
correctamente colocarlo en el robot. Ajuste la hora a 3 minutos
y pulse el botón DOUGH y el botón START / STOP. El
programa preestablecido empezará. A 1 minuto restante, vierta
300 ml de agua en el recipiente. Cuando el tiempo llegue a 0:00
puede quitar la masa.
Nota: Cuando se utiliza la función para masa (Masa), el
recipiente debe estar seco para evitar los riesgos de fricción
durante la mezcla. Harina (para pastel) no debe superar los 500g, el agua no debe
superar los 300 ml y el tiempo no debe exceder los 3 minutos. Las proporciones de
harina y agua son de 5/3. El resultado será mejor si se añade unas gotas de aceite en
la harina. Cuando se utiliza la harina de alto contenido de gluten (para pan), la
cantidad de harina no debe exceder los 300 g.
Advertencia: Al final de la preparación de la masa, tenga cuidado al retirar las cuchillas
para evitar cortes. Esta máquina se puede mover durante la preparación de la masa.
Coloque el robot en una superficie estable, que no se caliente, que sea plana y lejos
de bordes para evitar caídas y accidentes.
• Función Turbo:
No hay necesidad de configurar el tiempo o la velocidad al usar la función turbo.
Presione continuamente el botón TURBO y la máquina funcionará a la máxima
velocidad mostrando en la pantalla el número de segundos durante los cuales se ha
Page 45

usado la función turbo. El robot de cocina se detiene cuando se suelta el botón y el
tiempo que se muestra en la pantalla LCD volverá a mostrar: 00:00. Este botón se
utiliza especialmente para triturar alimentos duros como el hielo.
Nota: Este botón no se debe utilizar con la función para masa (Dough).
Advertencia: si utiliza la función turbo con comida caliente, la cantidad de alimento no
debe exceder 1000g. La taza de medición se puede dejar en la tapa del recipiente
para evitar quemaduras o que los ingredientes se derramen.
Cuando usted prepare recetas:
Preste atención al orden en que usted agrega los ingredientes.
Asegúrese de que la cantidad de comida en el recipiente no exceda los 2 litros.
Al usar la licuadora, asegúrese de que la cantidad de alimentos en el recipiente no
supere los 1,5 litros.
Usted puede obtener mejores resultados respetando el siguiente orden de
preparación:
Si usted prepara alimentos, primero ajuste la hora, la temperatura y la velocidad y
después presione START / STOP.
Si usted desea mezclar o picar alimentos, primero ajuste la hora y la velocidad y
después presione START / STOP.
Ejemplos:
Cocinar un plato
1. Ajuste el tiempo a 45 min
2. Ajuste la temperatura a 120 ° C
3. Ajuste la velocidad al nivel 3
4. Pulse el botón START / STOP
Picar verduras
1. Ajuste el tiempo a 30 segundos
2. Ajuste la velocidad al nivel 6
3. Pulse el botón START / STOP
Para triturar hielo (no ponga más de 300 g de hielo en el recipiente)
1. Ajuste el tiempo a 1 minuto
2. Ajuste la velocidad al nivel 9
3. Pulse el botón START / STOP
Para hacer jugo de zanahoria (no ponga más de 400 g de zanahorias y 600 ml de
agua en el recipiente)
1. Ajuste el tiempo a 1 minuto
2. Ajuste la velocidad al nivel 9
3. Pulse START / STOP
Para moler café (no ponga más de 200 g de granos de café en el recipiente)
1. Ajuste el tiempo a 2 minutos
2. Ajuste la temperatura al nivel 9
3. Pulse el botón START / STOP
Page 46

LIMPIEZA
Antes del primer uso, la máquina y los accesorios que entran en contacto con los
alimentos se deben de limpiar a fondo.
Limpieza de la jarra y la tapa: Desmontar las cuchillas y el sello primero (vea las
instrucciones anteriores).
Use agua caliente o un lavavajillas para limpiar la jarra y la tapa (no ponga las
cuchillas en el lavavajillas). Usted puede limpiar la espátula, el acelerador, el protector
de las cuchillas, el filtro, la taza de medir, la tapa y el dispositivo de cocción a vapor de
la misma manera.
Nota: Cuando hay suciedad o restos que no se lavan fácilmente en la jarra o
accesorios, utilice un detergente especial para acero inoxidable.
Limpieza de las cuchillas: Sujete la parte inferior de las cuchillas y colóquelas en el
agua. Usted puede frotar las cuchillas con un cepillo.
Nota: Tenga especial cuidado al limpiar las cuchillas, ya que están muy afiladas.
Limpieza del dispositivo de cocción a vapor: Usted puede ponerlo en el lavavajillas o
utilizar un paño suave con un poco de detergente.
Limpieza del cuerpo del dispositivo: Utilice un paño suave con un poco de detergente.
No utilice agua para evitar que se filtre en la parte donde se encuentra el motor.
Nota: Desenchufe la unidad antes de limpiarla.
Nota: En caso de sobrecalentamiento, la unidad se detendrá. Sin embargo, la luz
roja permanecerá encendida y sonará un pitido (Fig. 1). Apague el dispositivo,
desenchúfelo, retire la comida y deje enfriar unos 15 minutos.
MEDIO AMBIANTE
ATENCIÓN :
No se deshaga de este producto como lo hace con otros productos del hogar. Existe un
sistema selectivo de colecta de este producto puesto en marcha por las comunidades,
debe de informarse en su ayuntamiento acerca de los lugares en los que puede depositar este
producto. De hecho, los productos eléctricos y electrónicos pueden contener substancias
peligrosas que tienen efectos nefastos para el medio ambiente o para la salud humana y deben
ser reciclados. El símbolo aquí presente indica que los equipos eléctricos o electrónicos deben
de ser cuidadosamente seleccionados, representa un recipiente de basura con ruedas marcado
con una X.
Fabricado e importado por : Adeva SAS 8 rue Marc Seguin 77290 Mitry-Mory FRANCE
www.hkoenig.com - contact@hkoenig.com - Tel. 01 64 67 00 01
Page 47

Italiano
Caraffa
Pentola a vapore
Coperchio
NORME GENERALI DI SICUREZZA
Questo dispositivo è stato progettato per uso domestico.
Questo dispositivo non è destinato per essere utilizzato da persone con capacità fisiche
e/o mentali ridotte se non hanno ricevuto istruzioni per l'uso o se non vengono monitorate,
poiché vi è un rischio per la loro sicurezza.
Scollegare l'unità prima di pulirla o se non si utilizza per un po'. Se il cavo di alimentazione
è danneggiato, esso deve essere riparato dal produttore o da una persona qualificata.
Non gettare le apparecchiature elettriche insieme ai rifiuti domestici. Si prega di contattare
il vostro comune e informarsi sulle disposizioni relative allo smistamento per questo tipo di
dispositivi.
Per evitare scosse elettriche o danni al prodotto, non immergere l’apparecchio
direttamente in acqua. Per la pulizia, utilizzare un panno umido. Non permettere all'acqua
di entrare in contatto con le parti elettriche dell’apparecchio.
ATTENZIONE: Le lame dell’apparecchio sono molto taglienti. Prestare attenzione durante
la rimozione e il rimontaggio.
Non superare la capacità massima per gli alimenti: 2L.
Non rimuovere il coperchio del robot durante la miscelazione, soprattutto quando la
velocità è superiore a 5.
Quando il robot si riscalda o se si desidera rimuovere la caraffa dopo la cottura, non
toccare la parte in acciaio inox per evitare di scottarsi.
Quando si apre il coperchio della caraffa, del vapore fuoriesce. Fare attenzione a non
scottarsi. Non toccare il coperchio durante la cottura.
I bambini devono essere sorvegliati per assicurarsi che non giochino con l'apparecchio.
Disporre il robot in un luogo fuori dalla portata dei bambini. Prestare attenzione affinché
anche i vostri bambini non tocchino l’apparecchio quando è caldo.
Tenere il bicchiere graduato quando la velocità è superiore a 5,
o se si rompe il ghiaccio con la funzione turbo.
Il robot può muoversi durante il funzionamento. Assicurarsi che
esso sia riposto su una superficie piana e stabile e lontano dai
bordi per evitare che cada. Assicurarsi di lasciare sufficiente
spazio sopra e intorno all'unità.
In caso di surriscaldamento, l'apparecchio si arresta. Tuttavia, la
luce rossa rimane accesa e viene emesso un segnale acustico
(Figura 1). Spegnere il dispositivo, scollegarlo, togliere il cibo e
lasciar raffreddare per circa 15 minuti.
INTRODUZIONE
Page 48

Girare qui
Proteggi-ame
Cestello
Fig 5
Posizionare la
caraffa mettendo
il triangolo e una
cadena
sopra l'altra
Bloccare in
questo modo
Farfalla
Misurino
Spatola
Girare qui
Fig 3
Fig 4
Fig 6
PRECEDENTEMENTE AL PRIMO UTILIZZO
Prima di ogni altra cosa, pulire accuratamente tutti gli accessori, poiché potrebbero esserci
residui.
Come inserire correttamente la caraffa ed eseguire i programmi:
Mettere la fessura del coperchio nella linguetta della caraffa (Fig 3). Quindi chiudere il coperchio.
Bloccare nel manico della caraffa (Figura 4).
Poi collocare la caraffa nel motore (il manico rivolto verso di voi) (Figura 5). Prendere la
brocca per la maniglia e ruotare in senso antiorario per bloccarlo (Fig 6).
Page 49

Collegare il cavo di alimentazione e accendere l’apparecchio (Figura 7). Impostare l'ora, la
Lame
assemblate
Fig 7
Fig 8
Dado
Fig 9
Semicerchio
Fig 10
temperatura e la velocità sul pannello di controllo e premere START / STOP per avviare il
robot.
Come rimuovere correttamente la caraffa:
Premere il pulsante START / STOP per spegnere il robot. Poi prendere la caraffa per la
maniglia e ruotare in senso orario come in Figura 5, è ora possibile rimuovere la brocca dalla
macchina. Quindi premere il pulsante sul manico della brocca per sbloccare il coperchio
(Figura 8) e rimuoverlo.
Schermo LCD:
Collegare il cavo di
alimentazione. Accendere il
robot. Quando la caraffa non è
installata o inserita
correttamente nella macchina,
Se la caraffa è
correttamente bloccata al
suo posto, il display
mostrerà:
sul display apparirà:
Non è possibile impostare l'ora, la temperatura e la velocità se la caraffa non è stata bloccata
correttamente al suo posto.
Nota: Non è possibile bloccare la caraffa se il coperchio non è a posto. Non usare la forza
per cercare di bloccare e assicurarsi che il coperchio sia saldamente in posizione.
Smontare le lame:
Inserire la mano sinistra nella brocca per prendere la parte semicircolare della protezione
delle lame (Figura 10).
Page 50

Con la mano destra, girare il dado in senso
Fig 11
Fig 13
Fig 12
antiorario (Figura 11).
Al termine, rimuovere il gruppo lame con la mano
sinistra.
Attenzione! Le lame sono molto affilate. Non
toccare il bordo delle pale per evitare lesioni.
Tenere la parte superiore delle lame quando si
sostituiscono o si spostano per evitare di farle
cadere e causare incidenti.
Montare la protezione della lama :
Ripetere lo stesso processo (“smontare le lame”) in ordine inverso.
CONSIGLI PER L'USO
• Ogni volta che si avvia un nuovo piatto, assicurarsi che l'unità e tutti i componenti siano
puliti e asciutti.
• Per riscaldare latte o panna, utilizzando una temperatura di 90°C si possono provocare
ustioni. Si consiglia di utilizzare la velocità 2 e mescolare per evitare di scottarsi con gli
spruzzi.
• Quando si tagliano le verdure, aggiungere una goccia di olio d'oliva, può aiutare la
macchina.
• Il formaggio e alcuni amidi possono creare schiuma, far esplodere alcuni alimenti o
traboccare. Per evitare questo, aggiungere questi ingredienti a 3 o 5 minuti prima dalla fine
della ricetta.
• Il cestello può essere usato come un setaccio. Quando si riscalda, rimuoverlo con una
spatola.
• Utilizzando una spatola, spingere gli ingredienti nelle lame. Il disco impedirà alla spatola di
rimanere bloccata nelle lame.
• Per pulire la caraffa dopo la preparazione di piatti con un forte odore, si consiglia di mettere
250 ml di acqua con 3 gusci d'uovo e mezza buccia di limone. Poi mettere in funzione il robot
per 20 secondi a velocità 6. Questo rimuoverà gli odori dalla brocca.
• Se il cibo è stato cotto troppo o è stato bruciato, aggiungere un po' di acqua calda con
sapone e lasciare in ammollo qualche ora e poi ripetere l'azione precedente.
• Per evitare spruzzi d'acqua calda, durante la cottura del riso al vapore, aggiungere un
pizzico di sale.
• Quando si preparano piatti con l'acqua, per evitare che trabocchi, la quantità non deve
superare i 1500g.
UTILIZZO DI ACCESSORI
Il coperchio della caraffa: La tenuta all'interno del coperchio impedisce la fuoriuscita di cibo,
zuppa o vapore. Durante il montaggio le scritte sulla guarnizione "ESTA CARA LA TAPA ↑,
FACE UP↑" devono trovarsi di fronte a voi (come in figura 12) in caso contrario, il liquido
potrebbe fuoriuscire (Figura 13).
Page 51

Misurino: Utilizzato per misurare la quantità di liquidi alimentari.
Maniglia
del
cestello
Spatola
Fig 14
Filtro
Fig 16
Fig 15
Fig 17
Il cestello: Accessorio multifunzionale. Può filtrare il succo di frutta e verdura e anche
cucinare verdure come patate, pomodori, cipolle, ecc. È molto semplice da rimuovere.
Utilizzare la spatola per arrivare alla parte centrale del manico del cestello (Figura 14).
La spatola: gli ingredienti possono raschiare le pareti del cestello con la spatola. Quando si
filtra il succo, essa può essere utilizzata per fissare il cestello e separare i pezzi dal succo
(Fig 15).
La farfalla: Può essere usata con il proteggi-lame. La farfalla garantirà una migliore
miscelazione ed eviterà che le pietanze si attacchino quando si riscalda il latte, il burro o la
salsa di frutta.
Per il montaggio, allinearla con la protezione della lama a semicerchio e inserirla fino a
coprire la protezione della lama stessa. Poi ruotare in senso orario.
Per smontare, afferrare il manico della caraffa con una mano e con l'altra agguantare la
protezione della lama.
Avvertenza: Quando si usa la farfalla, la velocità del robot non può superare la
velocità 4 e la capacità massima non deve superare i 1.5L.
Il proteggi-lame: Utilizzare per miscelare ingredienti morbidi o liquidi. La velocità del robot
non deve superare 4 quando lo si utilizza.
Importante: Quando s’installa la protezione delle lame, spingere finché non scatta.
Attenzione: il proteggi-lame e la farfalla non devono essere utilizzati durante la
miscelazione dell'impasto.
Il cestello: Esso comprende un contenitore, un disco e un coperchio. Può essere usato per
cucinare grandi quantità di cibo al vapore.
Attenzione: Usare con cautela per evitare ustioni da vapore.
Versare almeno 500 ml di acqua nella brocca. Se si desidera utilizzare un filtro, inserirlo nel
boccale (Fig 16) e mettere il cibo (come il riso o patate) nel filtro. Poi mettere il coperchio e
assicurarsi che la caraffa sia correttamente inserita nella macchina.
Page 52

Disporre correttamente il cestello sulla caraffa mettendo la fessura del coperchio nella linguetta
Fig 18
della caraffa. Premere il pulsante della caraffa per bloccare il cestello. Mettere il cibo nella
pentola (disponendo gli alimenti che richiedono più cottura in fondo e quelli che richiedono il
minimo sopra). Se necessario, può essere utilizzato il disco vapore.
Chiudere la pentola a vapore con un coperchio (Figura 17). Il vapore non può fuoriuscire.
Importante:
• Quando si utilizza il vapore, non lasciare il misurino nella brocca.
• Quando si utilizza il vapore, chiedere ai vostri figli di stare lontano dall’apparecchio e
informarli del pericolo.
• Quando si utilizza il vapore, non superare la velocità 3 poiché può causare una fuoriuscita
di cibo.
Impostare l'ora, la temperatura e la velocità sul pannello di controllo e premere START /
STOP per iniziare la cottura.
Aprire il vapore leggermente e ruotare leggermente verso di voi in modo che il vapore
fuoriesca attraverso la parte posteriore e l'acqua possa fluire nel contenitore. Ruotare il
coperchio e metterlo sul tavolo. Poi prendere la pentola a vapore e tenerla sopra la caraffa
per alcuni secondi per permettere all'acqua il raffreddamento e lo scarico. Quando l'acqua
smette di fluire, porre il cestello sul suo coperchio.
PANNELLO DI CONTROLLO
TIME: indica il tempo
TEMP: indica temperatura
SPEED: indica la velocità
Per utilizzare la funzione "AUTO" funzione premere il tasto AUTO.
Include a.soupe; b.confiture; c.sauce
Per regolare il tempo di cottura o la temperatura di cottura,
utilizzare il tasto SELECT e selezionare TIME o TEMP.
Per regolare la velocità del robot, utilizzare il tasto SPEED.
Per lavorare la pasta, usare il pulsante PASTA (DOUGH).
Per far funzionare il robot alla massima velocità, utilizzare il
pulsante turbo.
Il tasto + viene usato per aggiungere il tempo, aumentando la
temperatura e/o la velocità.
Il pulsante - è utilizzato per ridurre il tempo, la temperatura e/o la
velocità.
Il tasto START / STOP viene utilizzato per avviare e arrestare il robot.
• Impostazione del tempo:
Il tempo è impostato con il tasto TIME. Il tempo massimo per questo dispositivo è 90min.
Premere il tasto TIME. Quando il simbolo ▶ TIME si illumina, premere il pulsante + per
aggiungere il tempo o il pulsante - per rimuoverlo. Se si mantiene premuto il tasto + o -, il
tempo potrà essere aumentato o diminuito rapidamente.
Premere il pulsante una volta per aggiungere o rimuovere 1 minuto. Premere il tasto due
volte di fila per aggiungere o rimuovere un secondo.
• Impostazione della temperatura:
Prima di iniziare la cottura, scegliere la temperatura. Se non bisogna cucinare, andare
direttamente al punto successivo.
Page 53

Premere il tasto TEMP. Quando il simbolo ▶TEMP si illumina, premere il tasto + per
Fig 19
aumentare la temperatura o - per diminuirla. Se si mantiene premuto il tasto + o -, la
temperatura aumenterà o diminuirà rapidamente.
Premere il pulsante una volta per aggiungere o rimuovere 10°C.
La temperatura di questa unità può essere regolata da 30°C a 120°C.
• Regolazione della velocità di rotazione delle pale:
Premere il tasto SPEED. Quando il simbolo ▶ SPEED si accende, premere il tasto + per
aumentare la velocità o - per diminuirla.
Nota: Per le miscele, regolare la velocità da 1 a 5. Quando si effettua la salsa o succo di
frutta, regolare la velocità tra 5 e 9.
• Avviare il robot:
Premere il pulsante START / STOP. La macchina inizierà a lavorare. Il tempo comincerà a
contare alla rovescia fino a quando raggiungerà 0:00. Una volta che il lavoro è finito, la
macchina emette un segnale acustico. Premere di nuovo il pulsante START / STOP per
arrestare il robot.
Importante:
• Il robot può essere avviato anche quando non si sceglie la temperatura o il tempo, ma solo
la velocità. La sua durata massima è di 20 minuti. Dopo 20 minuti, il robot si arresta
automaticamente ed emette un segnale acustico per avvisare l'utente.
• Quando si utilizza la funzione di cottura, è anche necessario impostare il tempo e la
velocità. Se si regola solo la temperatura, ma non il tempo o la velocità, il robot non funziona.
Quando la cottura è terminata, il tempo è 00:00. Il robot fermerà il riscaldamento, ma le lame
nella caraffa continueranno a funzionare per 10 minuti e si fermeranno con un segnale
acustico in modo da non bruciare il cibo lasciandolo nella brocca.
• Quando si sceglie la modalità di cottura, la velocità massima è di 5.
• Quando il tempo raggiunge 0:00, il robot emette un segnale acustico. Dopo 5 minuti, il robot
suonerà di nuovo se lo si ignora.
• Funzione pasta (dough):
Utilizzare questo pulsante per lievito o pasta di pane (il display apparirà come in Figura 19).
Impostare prima il tempo e quindi premere il pulsante DOUGH (PASTA). Quindi premere il
pulsante START / STOP. Questa funzione attiverà un programma prestabilito che funziona
come segue: Velocità 3 per 3 secondi, si ferma per 4 secondi e poi di nuovo a velocità 3 per
3 secondi, si ferma per 4 secondi e così via.
Esempio: mettere 500g di farina nella brocca (la caraffa deve
essere asciutta e non contenere acqua) e posizionare
correttamente la brocca sul robot. Impostare il tempo di 3 minuti e
premere il pulsante DOUGH (PASTA) e poi il pulsante START /
STOP. Il programma predefinito verrà avviato. A 1 minuto
rimanente, versare 300 ml di acqua nella brocca. Quando il tempo
raggiunge 0:00 è possibile rimuovere la pasta.
Nota: Quando si utilizza la funzione pasta (dough), la caraffa deve
essere asciutta per evitare rischi d’incollaggio durante la
miscelazione. La farina (per torte) non deve superare i 500 g, l'acqua non deve superare i
300 ml e il tempo non deve superare i 3 minuti. Le proporzioni di farina e acqua sono 5/3. Il
risultato sarà migliore se si aggiunge qualche goccia di olio nella farina. Quando si utilizza la
farina con alta percentuale di glutine (per il pane), la quantità di farina non deve superare i
300 g.
Attenzione: Al termine della preparazione dell'impasto, fare attenzione quando si rimuovono
le lame per evitare tagli. Questa macchina può muoversi durante la preparazione della pasta.
Page 54

Disporre l’apparecchio in modo che sia disposto su una superficie piana, stabile, non
riscaldabile e lontano dai bordi per evitare cadute e incidenti.
• Funzione turbo:
Non c'è bisogno di regolare il tempo e la velocità per utilizzare la funzione turbo. Premendo
continuamente il tasto TURBO, la macchina funzionerà a piena velocità, visualizzando il
numero di secondi per usare il turbo. Il robot si arresta quando si rilascia il pulsante e il timer
tornerà su 00:00. Questo pulsante viene usato per schiacciare cibi duri come il ghiaccio.
Nota: questo pulsante non deve essere utilizzato con la funzione per la pasta (dough).
Avvertenza: Se si utilizza la funzione turbo con cibo caldo, la quantità di cibo non deve
essere superiore a 1000 g. Il misurino può essere lasciato nel coperchio della caraffa per
evitare scottature e fuoriuscite.
Quando si seguono delle ricette:
Prestare attenzione all'ordine in cui mettete i vostri ingredienti.
Assicurarsi che la quantità di cibo nella caraffa non superi i 2 litri.
Quando si usa il frullatore, assicurarsi che la quantità di cibo nella caraffa non superi 1,5 litri.
È possibile ottenere risultati migliori nell'ordine seguente preparazione:
Se si preparano dei cibi, impostare prima l'ora, la temperatura, la velocità e poi premere il
tasto START / STOP.
Se si mescolano o tritano cibi, prima impostare l'ora, la velocità e poi premere START /
STOP.
Esempi:
Cucinare un piatto
1. Impostare il tempo di 45 min
2. Impostare la temperatura a 120°C
3. Impostare la velocità a 3
4. Premere START / STOP
Tritare le verdure
1. Impostare il tempo a 30 secondi
2. Impostare la velocità a 6
3. Premere START / STOP
Tritare il ghiaccio (non mettere più di 300 g di ghiaccio nella brocca)
1. Impostare il tempo di 1 minuto
2. Impostare la velocità a 9
3. Premere START / STOP
Il succo di carota (non mettere più di 400 g di carote e 600 ml d’acqua nella brocca)
1. Impostare il tempo di 1 minuto
2. Impostare la velocità ai 9
3. Premere START/STOP
Macinare il caffè (non mettere più di 200 g di chicchi di caffè nella brocca)
1. Impostare il tempo a 2 minuti
2. Impostare la temperatura a 9
3. Premere START/STOP
Page 55

PULIZIA
Precedentemente al primo utilizzo, la macchina deve essere pulita, così come tutti gli
accessori che vengono a contatto con il cibo.
Pulire la brocca e il coperchio: Smontare le lame e la tenuta prima (vedi istruzioni sopra).
Utilizzare acqua calda o una lavastoviglie per pulire la caraffa e il coperchio (non mettere le
lame in lavastoviglie). È possibile pulire allo stesso modo: spatola, farfalla, proteggi-lame,
filtri, misurino, coperchio e la pentola a vapore.
Nota: Quando c'è un residuo colloso o non facilmente lavabile nella brocca o sugli
accessori, usare un detergente speciale per l'acciaio inossidabile.
Pulire le pale: Tenere la parte inferiore della lama e metterla sott'acqua. Potete strofinare le
lame con un pennello.
Nota: Prestare particolare attenzione durante la pulizia delle lame in quanto sono
molto taglienti.
Pulire la pentola a vapore: Si può mettere in lavastoviglie o utilizzare un panno morbido con
un po' di detergente.
Pulire il corpo dell'apparecchio: Usare un panno morbido con un po' di detergente. Non
usare acqua per evitare che infiltrazioni nella parte in cui si trova il motore.
Nota: Scollegare l'unità prima di pulire.
Nota: In caso di surriscaldamento, l'apparecchio si arresta. Tuttavia, la luce rossa
rimane accesa e viene emesso un segnale acustico (Figura 1). Spegnere il dispositivo,
scollegarlo, togliere il cibo e lasciar raffreddare per circa 15 minuti.
AMBIANTE
ATTENZIONE :
Non gettare quest’ apparecchio tra i rifiuti domestici. Per questo tipo di prodotti è
fornito dai comuni un sistema di raccolta e ritiro in zona ed è quindi un dovere
informarsi per conoscere il giusto smistamento del rifiuto. Infatti, i prodotti elettrici ed
elettronici possono contenere sostanze pericolose che hanno effetti dannosi sull’ambiente o
sulla nostra salute e quindi devono essere riciclati. Il simbolo al lato indica che le
apparecchiature elettriche ed elettroniche fanno parte di una raccolta selettiva e differenziata
(rappresentata da un bidone su due ruote sbarrato da una croce.
Prodotto e importato da : Adeva SAS 8 rue Marc Seguin 77290 Mitry-Mory FRANCE
www.hkoenig.com - contact@hkoenig.com - Tel. 01 64 67 00 01
 Loading...