

Page 1
Ice cream maker
Turbine à glace
Eiscreme Maschine
Ijsmachine
Máquina para hacer helados
Macchina per sorbetti e gelati
HF180
Instruction manual
Manuel d'utilisation
Gebrauchsanweisung
Gebruiksaanwijzing
Manual de usuario
Manuale d’uso
Page 2

ENGLISH
This is an automatic self-refrigerated frozen ice cream & sorbet maker.
For your safety and continued enjoyment of this product, always read the instruction book carefully before using.
IMPORTANT NOTICES
When using an electrical appliance, basic safety precautions should always be followed to reduce the risk of fire,
electric shock, and/or injury, including the following:
1. Read all instructions before using.
2. Ensure the voltage is compliant with the voltage range stated on the rating label, and ensure the earthing of the
socket is in good condition.
3. If the supply cord is damaged, it must be replaced by the manufacturer or its service agent or a similarly
qualified person in order to avoid a hazard.
4. Do not upend this product or incline it over a 45℃ angle.
5. To protect against risk of electric shock, do not pour water on cord, plug and ventilation, immerse the appliance
in water or any other liquid.
6. Unplug the appliance after using or before cleaning.
7. Keep the appliance 8cm from other objects to ensure the good heat releasing.
8. Do not use the accessories which are not recommended by Manufacturer.
9. This appliance is not intended for use by persons(including children) with reduced physical, sensory or mental
capabilities, or lack of experience and knowledge, unless they have been given supervision or instruction
concerning use of the appliance by a person responsible for their safety,children should be supervised to ensure
that they do not play with the appliance.
10. Do not use the appliance close by flames, hot plates or stoves.
11. Do not switch on the power button frequently (ensure 5min. interval at least) to avoid the damage of
compressor.
12. Metal sheet or other electric objects are not allowed to be inserted into the appliance to avoid fire and short
circuit.
13. When take out the ice cream, do not knock the barrel or edge of barrel to protect the barrel from damage.
14. Do not switch on the power before install well the barrel or blender blade.
15. The initial temperature of the ingredients is 25±5℃.Do not put the ingredients into freezer for pre-freeze,
as it will easily make the blender blade blocked before the ice cream is in good condition.
16. Please do not remove the blender motor while making ice cream.
17. If you want to extend the cooling function after completing ice cream making program, the blender motor must
be removed firstly. Otherwise it will shorten the life of blender motor.
18. Do not use outdoors.
19. Never clean with scouring powders or hard implements.
20. Please keep the instruction manual.
Page 3

PARTS & FEATURES
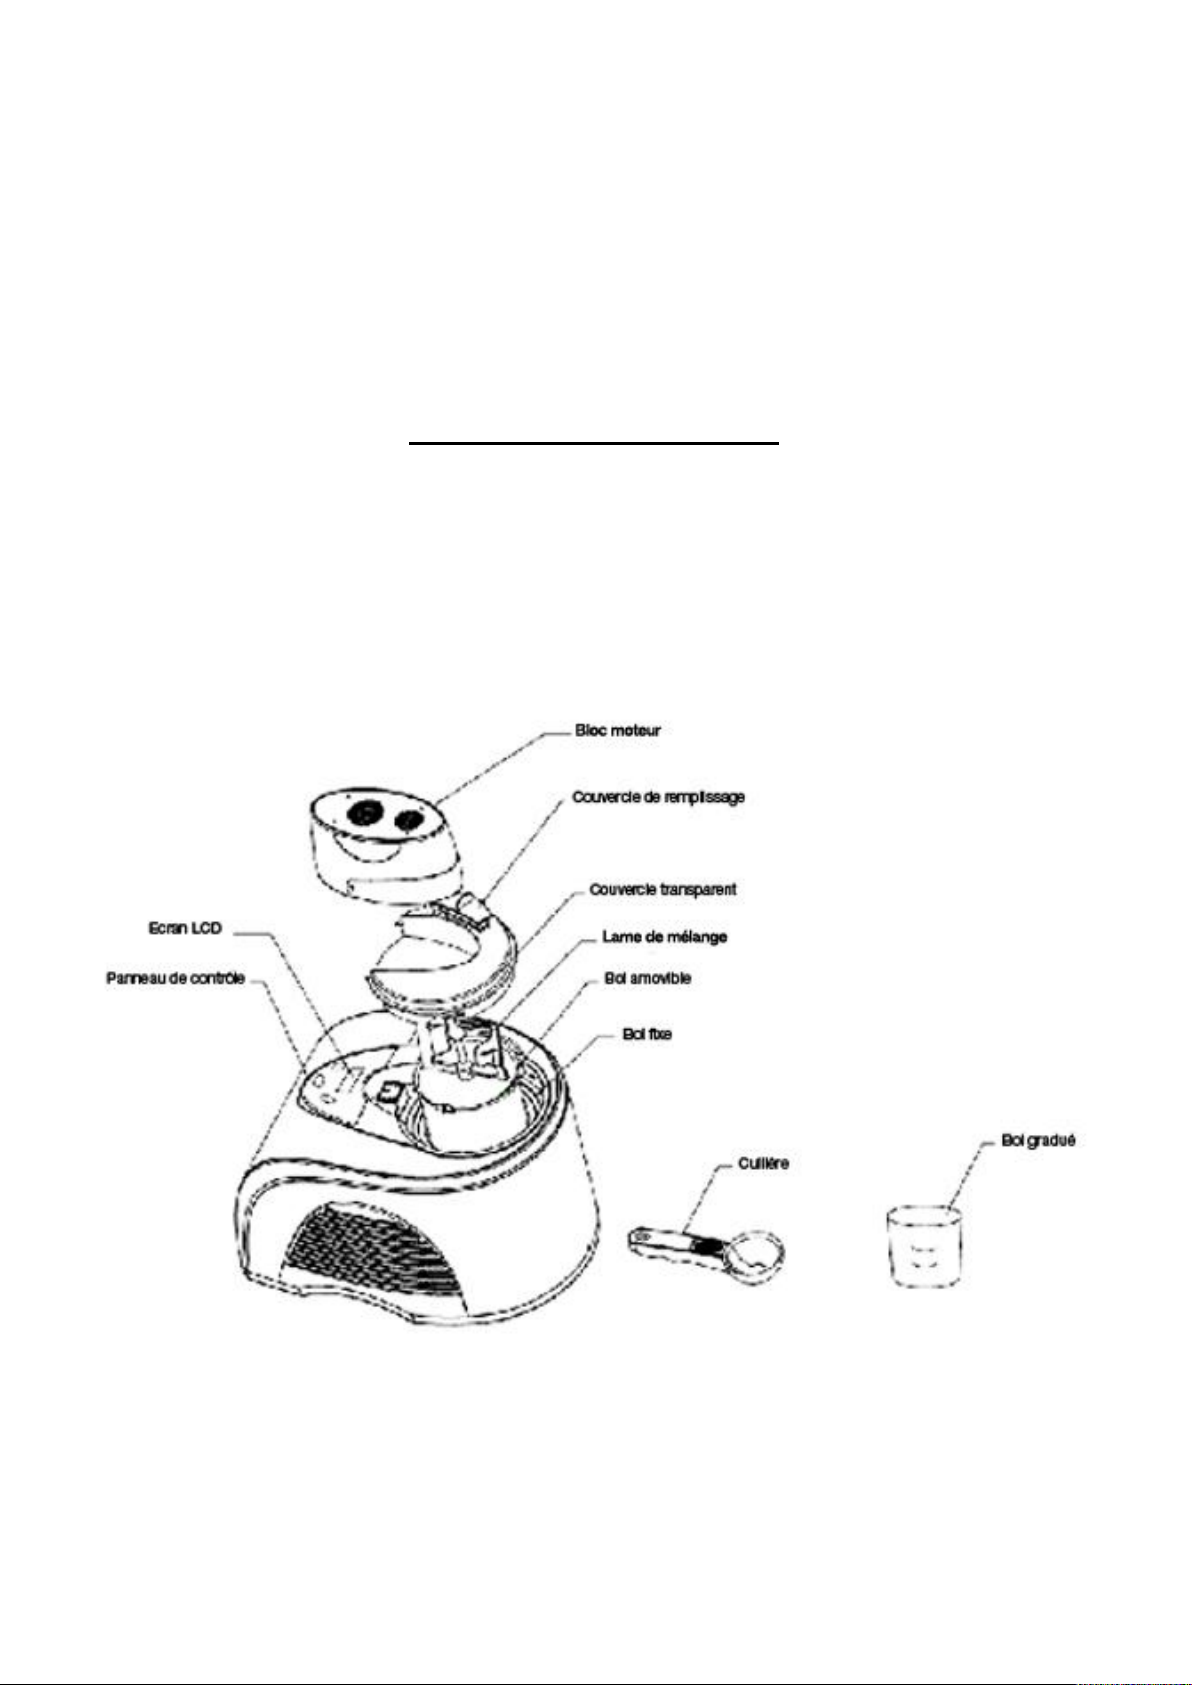
Illustration 1-Exploded View
BEFORE MAKING ICE CREAM
Cleanness
Before use, thoroughly wash all parts that will come into contact with the ice cream (including the fixed bowl,
removable bowl, mixing blade, transparent lid, refill lid, measuring cup and spoon).
Prepare recipe ingredients:
Prepare recipe ingredients from your own recipe or from the recipe booklet here, and pour the well prepared
recipe ingredients into the removable bowl. Note: You do not need to freeze the bowl for hours in a freezer in
advance, as this machine has a BUILT-IN COMPRESSOR that freezes the recipe ingredients in operation thus
ensure the output of ice cream.
Assembly
Warning: Please be sure the power cord is unplugged.
Important: Always place the Ice Cream Maker upright on a flat surface in order that the build-in COMPRESSOR
can provide best performance.
1) Put the removable bowl into the fixed bowl in the machine body.
2) Place the mixing blade into the removable bowl.
3) Install the transparent lid on top of the bowls and keep the mixing blade fitted in the center of the transparent
lid.
4) Place the refill lid onto the transparent lid.
5) Mount the blender motor onto the transparent lid and be sure the motor axis fitted into the hole in top of mixing
blade.
Page 4
START MAKING ICE CREAM
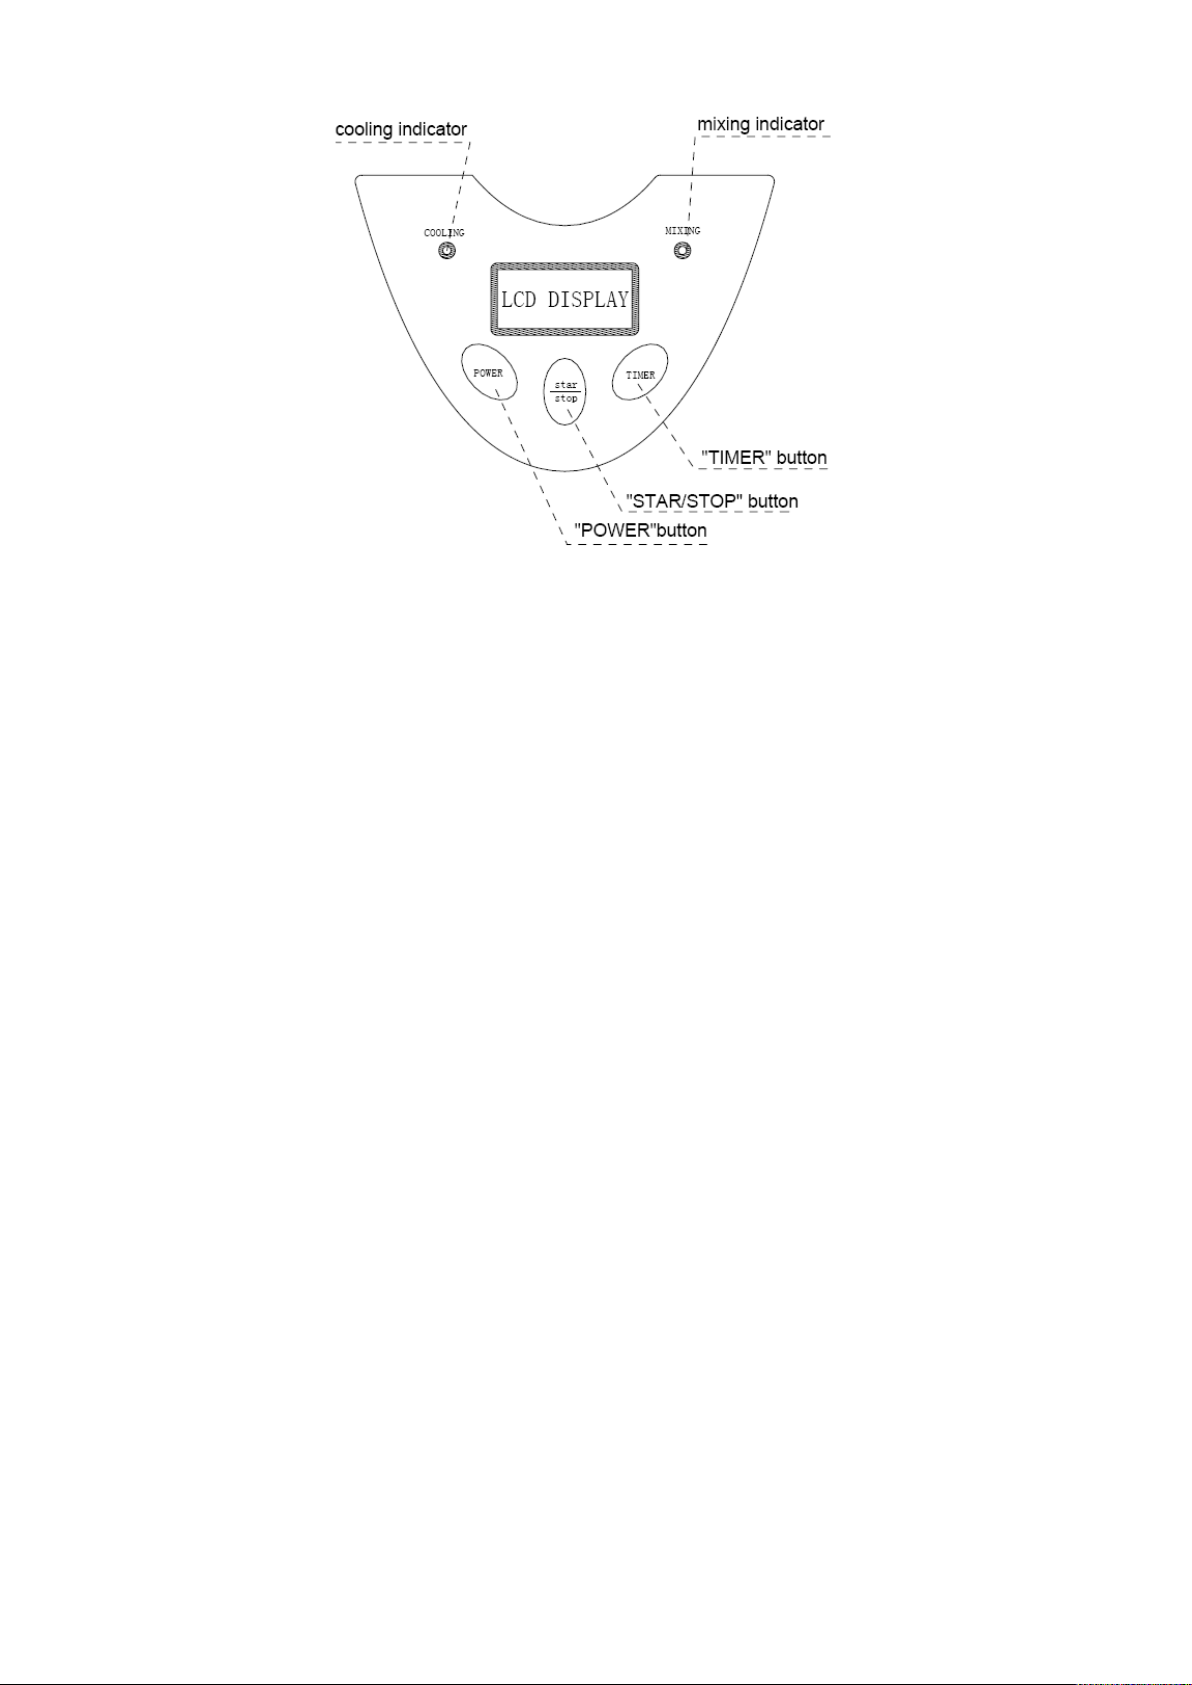
Illustration.2-Control Panel
Connect to the electricity
Check voltage to be sure that the voltage indicated on the rating label agrees with your home voltage, then plug
into the correct socket.
Operation of function buttons
[POWER] Button: After connecting with the electricity, press the [POWER] button to electrify the machine and the
LCD displays “60:00” which means the default operating time is 60 minutes.
[TIMER] Button: 10, 20, 30, 40, 50 and 60 minutes of operation time is optional and can be preset by repeatedly
pressing [TIMER] Button. You can choose different operating time to your taste. (Default operating time is 60
minutes).
[START/STOP] Button: After the time set, press the [START/STOP] button to start. It begins mixing immediately
and the GREEN indicator lights up, 2 minutes later it begins cooling and the RED indicator lights up. When the
count-down ends, the operation automatically stops and it hears 10 times of “Di Di Di” sound. The LCD displays
"00:00".
If no one seems to serve the ice cream or turn off the machine in 10 minutes, it automatically enters into a
“Extended Cooling Function” to keep the ice cream not defrosted.
Compressor self-protection function:
1) If press POWER button during ice making process, the machine will automatically begin to count down for 3 minutes. When the
countdown ends, the machine starts again, the mixing function and cooling function will start synchronously. If, during the countdown,
the POWER button is pressed again, the mixing function starts immediately, the cooling function will only start after the end of the
countdown.
If the machine suffers a power failure or is unplugged suddenly during ice cream making, there won't be the automatic countdown function.
Suggest to starting the machine after 3 minutes, otherwise it will enter into compressor self-protection status.
Extended Cooling Function
The machine runs the COOLING function(no mixing) for 10 minutes in every other 10 minutes, totally 1 hour, then
returns to the initial default status(Electrified but no operation).
[Caution]: Always remember to unplug from outlet when you serve the finished ice cream to avoid an electric
shock.
Adjusting Operations
Break off Operation: You can stop the machine by pressing the [START/STOP] Button for 3 seconds, or pressing
the [Power] button for one time whenever the machine is running.
Page 5

Operating Time Adjusting(In Operation): Whenever the machine is running, you can add the operating time by
repeatedly pressing the [TIMER] Button, 5 minutes added each pressing till it reaches the maximum 60 minutes
displayed on the LCD. The time can only be increased but can not be reduced.
Adding Time Operation (After Operating Time Finished)
When the preset time (60 minutes etc.) finishes and the machine stops and returns to the initial default statues, if
you like a harder consistency, you can once again select an operating time (10/20/30/40/50/60 minutes) by
pressing [TIMER] button, then again press the [START/STOP] button in turn, the machine will continue to run
down the time you selected and then stops and again enters into the “Extended Cooling Function” to keep the ice
cream not defrosted.
Controlling the Volume of the Ingredients
To avoid overflow and waste, please make sure that the ingredients do not exceed 80% of capacity of the
removable bowl(Ice cream expands when being formed)
STORAGE OF ICE CREAM
Remove finished ice cream into another container using a plastic scoop or a wooden spoon, do not use a metal
scoop avoiding scratch on the inside removable bowl.
NOTES
This marking indicates that this product should not be disposed with other household wastes throughout the EU.
To prevent possible harm to the environment or human health from uncontrolled waste disposal, recycle it
responsibly to promote the sustainable reuse of material resources. To return your used device, please use the
return and collection systems or contact the retailer where the product was purchased. They can take this product
for environmental safe recycling.
CREAM RECIPE MANUAL
VANILLA ICE CREAM
Makes ten 1/2-cup servings.
1 cup whole milk
3/4 cup granulated sugar
2 cups heavy cream
1 /2 teaspoons pure vanilla extract, to taste
In a medium bowl, use a hand mixer or a whisk to combine the milk and granulated sugar until the sugar is
dissolved, about 1 – 2 minutes on low speed. Stir in the heavy cream and vanilla to taste. Turn machine on, pour
mixture into freezer bowl through ingredient spout and let mix until thickened, about 50 – 60 minutes.
Nutritional analysis per serving:
Calories 239 (68% from fat) . carbo. 17g . pro 2g . fat 18g . sat. fat 11g . chol. 69mg . sod. 30mg
VARIATIONS:
Mint Chip: Omit the vanilla and replace with 1 to 1-1/2 teaspoons pure peppermint extract (to taste). Chop your
favorite 4-ounce bittersweet or semi-sweet chocolate bar into tiny uneven pieces. Add the chopped chocolate
during the last 5 minutes of mixing.
Butter Pecan: Melt 1 stick unsalted butter in a 10-inch skillet. Add 1 cup roughly chopped pecans and 1 teaspoon
kosher salt. Cook over medi-um-low heat, stirring frequently until the pecans are lightly browned. Remove from
the heat, strain (the butter will have a pecan flavor and may be reserved for another use). Allow the pecans to cool
completely. Add the toasted buttered pecans during the last 5 minutes of mixing.
Cookies & Cream: Add 3/4 cup coarsely chopped cookies or your
favorite candy (chocolate chip, Oreos., Mint Oreos., etc.) during the last 5 minutes of mixing.
BASIC CHOCOLATE ICE CREAM
Makes ten 1/2-cup servings.
1 cup whole milk
1/2 cup granulated sugar
240g or 8 ounces bittersweet or semi-sweet chocolate (your favorite),
broken into 1/2-inch pieces
3/2 cups heavy cream
1 teaspoon pure vanilla extract
Page 6

Heat the whole milk until it is just bubbling around the edges (this may be done on the stovetop or in a microwave).
In a blender or food processor fitted with the metal blade, pulse to process the sugar with the chocolate until the
chocolate is very finely chopped. Add the hot milk, process until well blended and smooth. Transfer to a medium
bowl and let the chocolate mixture cool completely. Stir in the heavy cream and vanilla to taste.
Turn the machine ON, pour mixture into freezer bowl through
ingredient spout and let mix until thickened, about 50 – 60 minutes.
Nutritional analysis per serving:
Calories 370 (60% from fat) . carbo. 34g . pro 3g . fat 25g .
sat. fat 11g . chol. 65mg . sod. 31mg
VARIATIONS:
Chocolate Almond: Add 1/2 teaspoon pure almond extract along with the vanilla. Add 1/2 - 3/4 cup chopped
toasted almonds or chopped chocolate-coated almonds during the last 5 – 10 minutes of freezing.
Chocolate Cookie: Add 1/2 - 1 cup chopped cookies during the last
5 minutes of freezing.
Chocolate Fudge Brownie: Add 1/2 - 1 cup chopped day old brownies during the last 5 minutes of freezing.
Chocolate Marshmallow Swirl: When removing the ice cream to a container for freezing, layer it with dollops of
your favorite chocolate sauce and scoops of marshmallow crème (fluff).
FRESH STRAWBERRY ICE CREAM
Makes ten 1/2-cup servings.
250g or 1 pint fresh ripe strawberries, stemmed and sliced
3/2 tablespoons freshly squeezed lemon juice
1 cup sugar, divided
1 cup whole milk
2 cups heavy cream
1 teaspoon pure vanilla extract
In a small bowl, combine the strawberries with the lemon juice and 1/3 cup of the sugar; stir gently and allow to the
strawberries to macerate in the juices for 2 hours.
In a medium bowl, use a hand mixer or a whisk to combine the milk
and granulated sugar until the sugar is dissolved, about 1 – 2 minutes on low speed. Stir in the heavy cream plus
any accumulated juices from the strawberries and vanilla. Turn the machine ON, pour mixture into freezer bowl
through ingredient spout and let mix until thickened, about 50 – 60 minutes. Add the sliced strawberries during the
last 5 minutes of freezing.
Note: this ice cream will have a “natural” appearance of very pale pink; if a deeper pink is desired, sparingly add
drops of red food coloring until desired color is achieved.
Nutritional analysis per serving:
Calories 222 (61% from fat) . carbo. 20g . pro 2g . fat 15g . sat. fat 10g . chol.57mg . sod.26mg
FRESH LEMON SORBET
Makes ten 1/2-cup servings.
2 cups sugar
2 cups water
1 cup freshly squeezed lemon juice
1 tablespoon finely chopped lemon zest *
Combine the sugar and water in a medium saucepan and bring to a boil over medium-high heat. Reduce heat to
low and simmer without stirring until the sugar dissolves, about 3 – 5 minutes. Cool completely. This is called a
simple syrup, and may be made ahead in larger quantities to have on hand for making fresh lemon sorbet. Keep
refrigerated until ready to use.
When cool, add the lemon juice and zest; stir to combine. Turn the
machine ON, pour the lemon mixture into freezer bowl through ingredient spout and mix until thickened, about 50
– 60 minutes.
When zesting a lemon or lime use a vegetable peeler to remove the colored part of the citrus rind.
Nutritional analysis per serving:
Calories 204 (0% from fat) . carbo. 52g . pro .19g . fat 0g .
sat. fat 0g . chol. 0mg . sod. 2mg
VARIATION:
Fresh Pink Grapefruit Sorbet: Substitute 1-1/2 cups freshly squeezed pink grapefruit juice for the lemon juice, and
1 tablespoon finely chopped grapefruit zest for the lemon zest. Add 1/4 cup Orgeat Syrup to the mixture (Orgeat
Syrup is used for cocktails such as a MaiTai or Scorpion and can be found with the drink mixers in most grocery
stores).
Page 7

CHOCOLATE FROZEN YOGURT
Makes ten 1/2-cup servings.
1 cup whole milk
180g or 6 ounces bittersweet or semisweet chocolate, chopped
2 cups low-fat vanilla yogurt
1/4 cup sugar
Combine the milk and chocolate in a blender or food processor fitted with the metal blade and process until well
blended and smooth, 20 – 30 seconds. Add the yogurt and sugar; process until smooth, about 15 seconds. Turn
the machine ON, pour mixture into freezer bowl through ingredient spout and let mix until thickened, about 50 – 60
minutes.
Nutritional analysis per serving:
Calories 222 (31% from fat) . carbo. 36g . pro 3g . fat 8g .
sat. fat .64g . chol. 4mg . sod. 46mg
ENVIRONMENT
CAUTION:
Do not dispose of this product as it has with other household products. There is a separation of this waste
product into communities, you will need to inform your local authorities about the places where you can
return this product. In fact, electrical and electronic products contain hazardous substances that have
harmful effects on the environment or human health and should be recycled. The symbol here indicates that
electrical and electronic equipment should be chosen carefully, a wheeled waste container is marked with a cross.
Manufactured and imported: Adeva SAS 8 rue Marc Seguin 77290 Mitry-Mory FRANCE
www.hkoenig.com - contact@hkoenig.com - Tel 01 64 67 00 01
Page 8

FRANCAIS
Consignes de sécurité
Vérifiez que la tension du réseau correspond à celle de l'appareil.
Ne jamais laisser votre appareil sans surveillance lorsqu'il est en fonctionnement.
Toujours débrancher l'appareil après utilisation et avant toute action de démontage ou
de nettoyage.
Cet appareil n’est pas prévu pour être utilisé par des personnes (y compris les enfants)
dont les capacités physiques, sensorielles ou mentales sont réduites, ou des personnes
dénuées d’expérience ou de connaissance, sauf si elles ont pu bénéficier, par
l’intermédiaire d’une personne responsable de leur sécurité, d’une surveillance ou
d’instructions préalables concernant l’utilisation de l’appareil. Il convient de surveiller les
enfants pour s’assurer qu’ils ne jouent pas avec l’appareil.
Utilisez l'appareil uniquement pour des usages domestiques et uniquement pour de
l'alimentation conformément aux indications de ce mode d'emploi.
Ne pas nettoyer au lave vaisselle mais uniquement avec de l'eau chaude savonneuse.
Ne jamais toucher les éléments en cours de fonctionnement. Prendre toutes
précautions en éloignant vos mains, cheveux, vêtements et autres accessoires.
Ne jamais retirer ou changer un élément de l'appareil lorsqu'il est en cours de
fonctionnement.
Ne jamais plonger l'appareil ou le cordon dans l'eau ou tout autre liquide. Utiliser un
chiffon humide pour le nettoyage. Ne pas utiliser l'appareil avec les mains humides.
Ne jamais dépasser le niveau de remplissage maximum (3/4 du bol) car la glace va
gonfler pendant la réfrigération.
Toujours mettre les ingrédients dans le bol amovible et jamais directement dans le
compartiment du compresseur.
Pour éviter tout risque de blessure, ne jamais introduire vos doigts ou tout autre objet
dans l'appareil lorsque celui-ci est en fonctionnement.
Ne pas installer l'appareil près d'une source de chaleur.
Toujours placer l'appareil sur une surface sèche et plane.
Ne pas utiliser l'appareil en extérieur et l'entreposer dans un endroit sec.
Ne couvrir en aucun cas les aérations du bloc moteur et du compresseur pendant le
fonctionnement.
Débrancher l'appareil avant de le nettoyer ou de le ranger. Ne pas tirer sur le cordon.
Veillez à ce qu'on ne puisse pas se prendre les pieds dans le cordon d'alimentation. Ne
pas plier ni mettre le cordon en contact avec des surfaces chaudes.
Si le cordon d’alimentation est endommagé, il doit être remplacé par le fabricant, le
centre de maintenance agréé ou toute autre personne qualifiée pour éviter tout incident.
Page 9
Vérifiez régulièrement le cordon d'alimentation ainsi que l'appareil afin d'éviter tout
dommages. En cas de dommages, veillez à ne pas utiliser l'appareil.
En cas de problèmes, merci de ne pas réparer vous même l'appareil, mais de l'envoyer
vers une personne qualifiée afin d'éviter tout accidents.
Merci de toujours utiliser l'appareil avec ses pièce d'origines.
Le fabricant ne saurait être tenu pour responsable de la mauvaise utilisation de
l'appareil. Conservez soigneusement ce manuel d'utilisation.
Description de l'appareil
Avant la première utilisation, lavez et séchez les pièces qui seront en contact avec les aliments.
Nettoyez le bloc moteur et le corps du compresseur avec un chiffon humide. Placez l'appareil
sur une surface plane et sèche.
Page 10
Préparez les ingrédients nécessaire à votre recette. Si certains ingrédients doivent être
cuits, faites-le la veille car les ingrédients introduits dans l'appareil doivent avoir
complètement refroidis.
Seuls les fruits écrasés doivent être introduits dans la préparation. Les fruits en
morceaux doivent être ajoutés uniquement à la fin de la réfrigération.
Placez les ingrédients au réfrigérateur à un température d'environ 6-8 degrés.
Versez les ingrédients froid dans le bol amovible. Ne dépassez pas le niveau maximum
(3/4 du bol) car la crème glacée prend du volume durant la préparation.
Placez le bol amovible dans l'appareil.
Positionnez la lame de mélange au centre du bol amovible.
Placez le couvercle transparent sur le bol amovible.
Placez ensuite le couvercle de remplissage puis le bloc moteur en vous assurant bien
que ces éléments soient dans le même axe que la lame de mélange.
Branchez l'appareil sur le secteur.
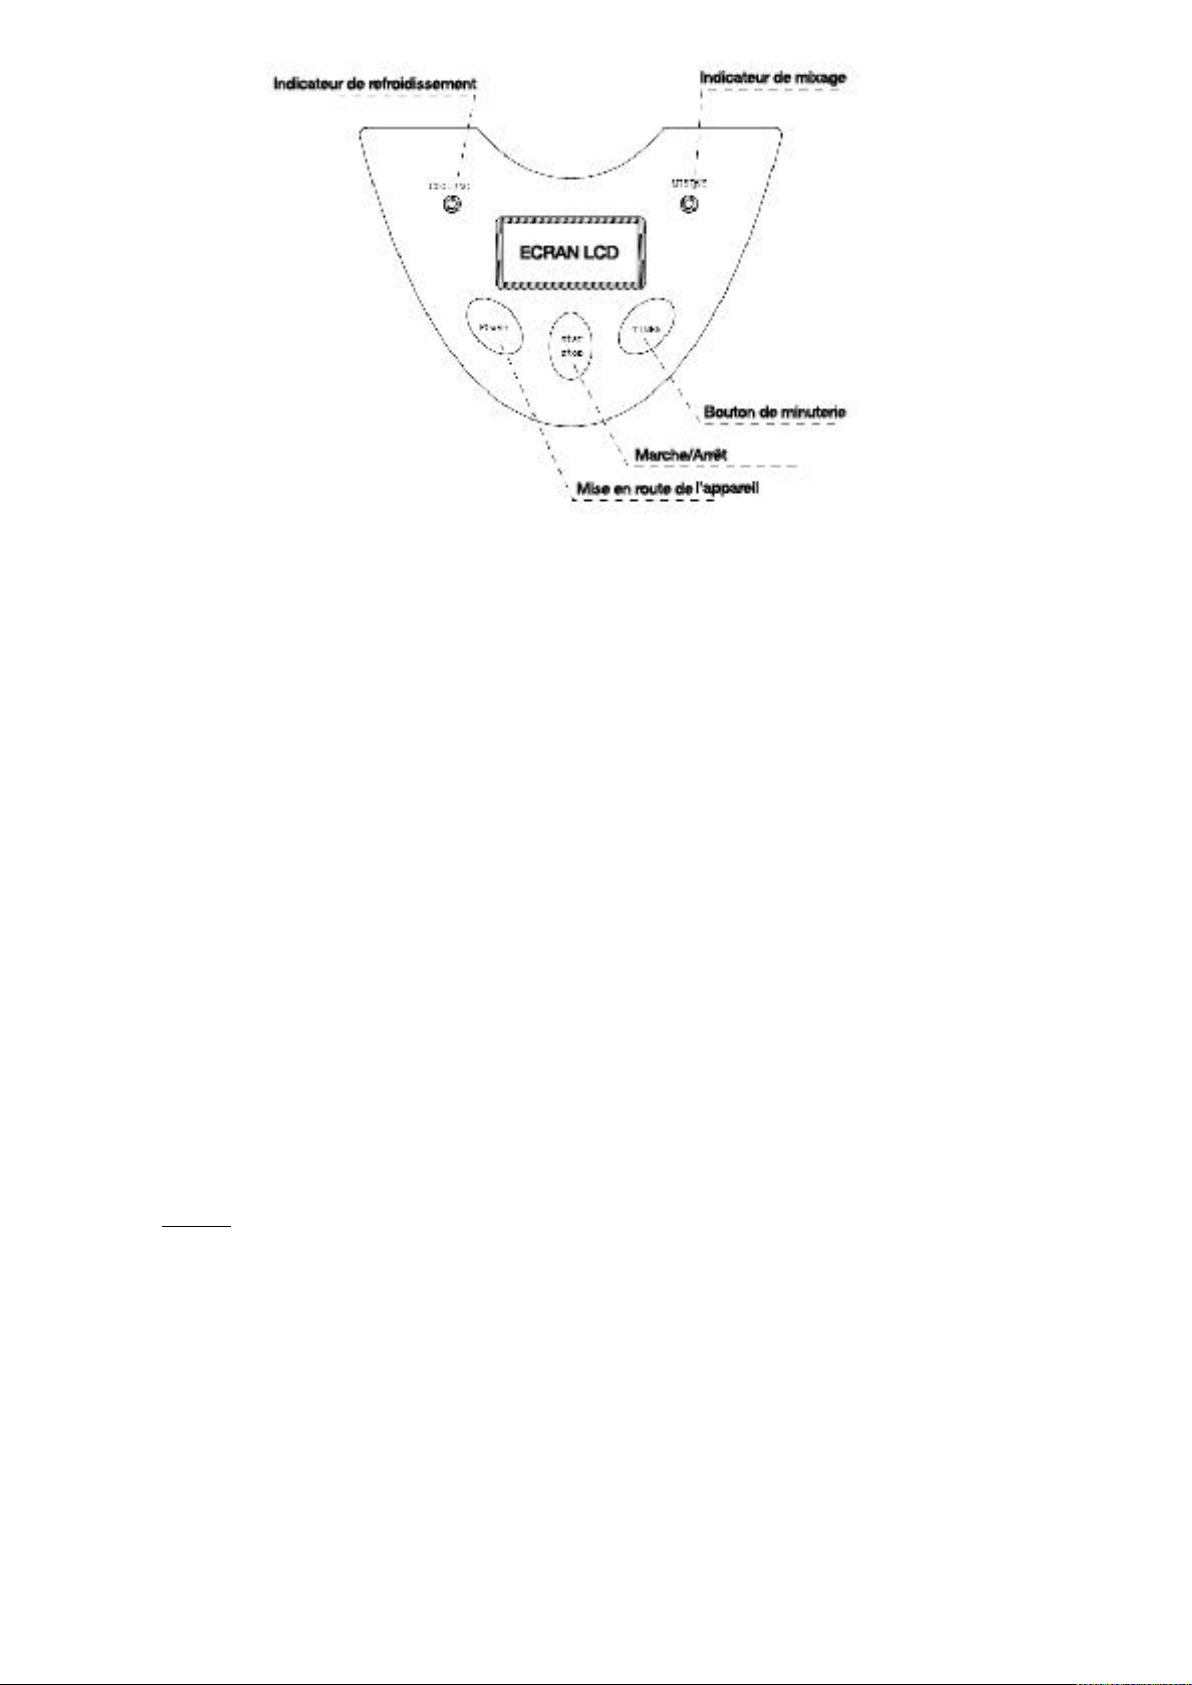
Pressez le bouton "0/1", l'écran affiche "60:00". L'appareil est prêt à fonctionner.
Sélectionnez le temps de réfrigération souhaité en appuyant sur le bouton "temps".
Appuyez sur le bouton "M/A". Après quelques secondes le mixage commence. Le
voyant vert s'allume.
Au bout de quelques minutes la réfrigération commence et le voyant rouge s'allume.
Note : la réfrigération commence par le bas. Il peut donc arriver que les pales du
mixeur soient ralenties ou s'arrêtent de tourner quand la glace commence à prendre.
La préparation peut être arrêtée à tout moment en appuyant sur le bouton "M/A" pendant
2 secondes.
Le temps de réfrigération sélectionné peut être modifié à tout moment en appuyant sur le
bouton "temps".
L'appareil s'arrête automatiquement à la fin du temps sélectionné.
L'écran affiche alors "0:00". La crème glacée peut être retirée.
Si la crème glacée est encore trop liquide, vous pouvez relancer un cycle en appuyant
sur le bouton "M/A" pendant 2 secondes. Sélectionnez le temps de préparation souhaité
en appuyant sur le bouton "temps" et appuyez de nouveau sur "M/A".
Page 11

Si la crème glacée n'est pas retirée de l'appareil dans les 10 minutes qui suivent la fin de
la préparation, la fonction de réfrigération automatique s'enclenche automatiquement
pour éviter que la glace ne fonde. Cette fonction refroidit la glace par palier de 10
minutes pendant 1 heure maximum.
Appuyez sur le bouton "0/1" pour arrêter l'appareil puis débranchez-le avant de retirer la
crème glacée.
Otez le bloc moteur, le couvercle de remplissage puis le couvercle transparent..
Soulevez le bol amovible à l'aide de son anse. Retirez ensuite la lame de mélange.
Fonction refroidissement de bouteilles
Cette fonction vous permet de refroidir rapidement des bouteilles. Retirez le bol
amovible et placez directement la bouteille dans le compartiment.
Sélectionnez un temps de réfrigération court (10 minutes) et démarrez la machine. Si
nécessaire le temps de réfrigération peut être allongé comme expliqué précédemment.
La réfrigération sera d'autant plus efficace si le hait de la bouteille est couvert d'une
bague isolante.
Nettoyage de l'appareil
Eteignez et débranchez l'appareil.
Ne nettoyez pas le corps de l'appareil, le bloc moteur et le cordon d'alimentation
directement sous l'eau.
Toutes les parties amovibles de l'appareil à l'exception du bloc moteur peuvent être
nettoyées à l'eau chaude savonneuse.
Nettoyez le corps de l'appareil et le bloc moteur avec un chiffon humide.
N'utilisez pas de produits abrasifs pour le nettoyage.
Séchez précautionneusement toutes les pièces de l'appareil avant de les ré-assembler.
Page 12
Page 13
Page 14
Fabriqué et importé par : Adeva SAS 8 rue Marc Seguin 77290 Mitry-Mory France
www.hkoenig.com – contact@hkoenig.com – Tél. : 01 64 67 00 01
Page 15

DEUTSCH
Sicherheitshinweise
Vergewissern Sie sich das die Eismaschine die selbe Spannung wie Ihr
Haushalt hat.
Lassen Sie das Geraet niemals unbeaufsichtigt wenn es in betrieb ist. Wenn
Sie es nicht benutzen stecken sie es aus. Das Geraet muss immer auf OFF
sein wenn Sie es austecken oder einstecken. Ziehen Sie nicht am Kabel,
ziehen Sie direkt am Stecker.
Dieses Geraet ist nicht fuer die Handhabung von Kindern oder behinderten
Personen. Es muss immer eine Zustaendige Person die Handhabung des
Geraetes ueberwachen.
Das Geraet nicht im Freien oder fuer Kommerziele Zwecke benutzen.
Reinigen Sie die Teile mit einem Reinigungsmittel. Benutzen Sie nicht Die
Spuelmaschine.
Behruehren Sie nicht die Maschine waehrend des funktionierens. Seien Sie
vorsichting mit Haaren, Kleidern und anderen Accesoires.
Machen Sie das Geraet aus bevor Sie die Accesoires wechseln
Um einee Stromschalg zu vermeiden benutzen Sie das Geraet nie mit
nassen Haenden und tauchen Sie es auch nie ins Wasser.
Das Geraet nicht in die Naehe von einem Gasherd, Ofen oder heisse
Oberflaeche stellen.
Positionieren Sie das Geraet auf eine stabile, ebene Flaeche.
Das Becken nicht mehr als ¾ fuellen, da die Eiscreme waechst und es
uebarlaufen koennte.
Die Zutaten immer ins Becken leeren niemals in das Kompressor
kompartiment.
Um die Verletzungsgefahr zu vermeiden stecken Sie nie die Finger in das
Geraet wenn es laueft.
Die lueftung der Maschine nie abdecken wenn Sie in betrieb ist.
Lassen Sie das Kabel nicht uber den Kuchen rand liegen und vergwissern
Sie sich das es nicht ueber eine heisse oberflaeche gelegt wird. Ziehen Sie
den Stecker nach Gebrauch aus.
Page 16

Wenn das Kabel beschaedigt ist, um Schaeden zu vermeiden, muss es von
einem autorisierten Techniker gewechselt werden.
Vergewissern Sie sich das das Geraet im guten zustand ist. Wenn nicht
dann bitte benutzen Sie das Garaet nicht.
Wenn Sie ein Problem mit dem Garaet haben bitte versuchen Sie nicht es
selber zu reparieren, senden Sie es an einen autorisierten Techniker.
Benutzen Sie das Garaet immer mit den original Teilen.
Der Hersteller is nicht verantworlich fuer schlechte Handhabung des
Garaetes. Bitte bewahren Sie die Bedienungsanleitung gut auf.
Beschreibung des Garaetes
Page 17

Bereiten sie die Zutaten fuer vor. Wenn Sie die Zutaten kochen muessen
machen Sie das den Tag vorher da die Zutaten kalt sein muessen wenn
mas die Eiscreme herstellt.
Nur verkleinerte Fruechte sollten in die Mischung eingegeben werden, die
ganzen Fruchtstuecke sollten nach der Eisherstellung eingegeben werden.
Stellen Sie die Zutaten in den Kuehlschrank in eine Temperatur von
ungefaehr 6-8 Grad Celsius.
Geben Sie die kalten Zutaten in das Becken. Fuellen Sie das Becken nicht
mehr als ¾ da die Eiscreme an volumen gewinnt
.Setzen Sie das Becken in das Kompartiment.
Legen Sie das Mischaccesoire ein.
Setzen Sie den durchsichtigen Deckel auf.
Legen Sie den anderen Decke auf und den Motor, vergewissern sie sich das
alle Teile in der selben Achse sind.
Stecken Sei das Geraet an das Stromnetz.
Druecken Sie auf den Knopf „0/1“ auf dem Bildschirm sieht man „60:00“ Das
Geraet ist nun betriebsbereit.
Waehlen Sie die gewuenschte Kuehlungszeit.
Druecken Sie auf den Knopf „M/A“ Nach einigen Sekunden beginnt die
mischung ein LED leuchtet auf.
Page 18

Nach einigen Minuten beginnt die abkuehlung und ein rotes LED leuchtet
auf.
HINWEIS: Die abkuehlung beginnt von unten, daher kann es sein das die
Mischaccesoires langsamer werden oder sich komplet still legen wenn Die
Eiscreme hergestellt ist.
Die Herstellung kann jederzeit abgestellt werden in dem man auf dem Knopf
„M/A“ waehrend 2 Sekunden drueckt.
Die Abkuehlungszeit kann veraendert werden in dem man uf den Knopf
„Temps/Zeit“ drueckt.
Das Geraet haelt ann wenn die Zeit vorueber ist.
Wenn der Bildschirm „0:00“anzeigt kann die Eiscreme rausgenommen
werden.
Wenn die Eiscreme noch zu fluessig ist, koenne Sie den Zyklus
wiederhohlen.
Wenn die Eiscreme nach 10 Minuten nicht aus dem Geraet genommen wird,
beginnt die Kuehlfunktion so das die Eiscreme nicht zerlaeuft. Maximal 1
Stunde funktioniert die Kuehlfunktion.
Druecken Sie auf den „0/1“ Knopf um das Geraet abzustellen, danach
stecken Sie es aus dem Stromnetz und dann nehmen sie die Eiscreme aus
dem Geraet.
Entfernene Sie die Deckel.
Nehmen sie das Becken aus dem Kompartiment.
Abkuehlen fuer Flaschen
Mit dieser Funktion koenne Sie Flaschen abkuehlen. Entfernene Sie das
Becken und stellen Sie die Flasche in das Kompartiment.
Waehlen Sie die gewuenschte Abkuehlzeit. Wenn noeting kann die Zeit
verlaengert werden.
Wenn die Oberseite der Flasche mit einem isolierendem tuch abgedeckt
wird, ist die abkuehlung schneller.
Page 19

Reinigung des Geraetes
Stellen Sie das Geraet aus und stecken Sie es aus dem Stromnetz.
Das Geraet, das Kabel und der Motor koenne nicht unter fliessendem
Wasser gewaschen werden.
Alle entfernbaren Teile koennen mit Wasser un Seife gewaschen werden.
Wischen Sie das Geraet mit einem feuchten tuch ab.
Benutzen Sie keine Scheuermittel.
Trocknene sie alle Teile bevor Sie das Geraet wieder benutzen.
Rezepte
Vanille Eis mit passierten Feigen
Zutaten:
-½ Liter Vollmilch -5 Eigelb
-150gr. Kristallzucker -100gr fluessige Creme fraiche
-3 Vanilleschoten -500gr. Feigen
-300gr. Puderzucker -25gr. Glukose
Zubereitung:
Legen Sie die in zweis geschnittenen Vanilleschoten in die heisse Miclh waehrend
30 Minuten. Dannach entfernen Sie die Vanilleschotten.
Schlagen Sie in einem Salatbecken die eigelb un den zucker bis sie weiss sind.
Heizen Sie die miclh bis die kocht.
Geben Sie die Creme fraiche ein un bringen sie es wieder zum kochen. Legen
waehrend Sie ruehren, die Ei und zucker mischung so schnell wie moeglich ein.
Kochen Sie waehrend 4 bis 5 minuten in dem sie mit einer Holzspachtel ruehren.
Lassen Sie es abkuehlen.
Geben Sie alles in die Eismachine un lassen Sie waehrend 30 minuten laufen.
Waschen Sie die Fruechte un trocknen sie sie und waermen Sie sie waehrend 10
Minuten im Maria Bad.
Mischen Sie die Fruechte bis sie das Fruchtfleisch eine stabile Konsistenz hat.
Geben Sie das Puderzucker und die Glukose waehrend Sie mischen.
Geben Sie die passierten Feigen auf die Eiskugeln.
Aprikosensorbet
Zutaten:
-1Kg. Aprikosen -1 gruene Zitrone
Page 20

-100gr. Puderzucker -1Lt. Siroup
Zubereitung:
Waschen Sie die Aprikosen. Legen sie die Aprokosen in den mixer bis sie ein
Aprokosenpuree haben. Geben Sie die Zitrone un den Zucker ein.
Mischen sie gut und lassen Sie alles waehrend einer Stunde ruhen.
Geben sie alles waehrend 30 minuten in die Eismaschine.
Reinette du Vignan
Zutaten fuer das Apfelsorbet:
-1Kg Reinette du Vignan Aepfel -1 Gruene Zitrone
-120gr. Puderzucker -1/2 Lt. Apfelsaft 100%
Zubereitung des Apfelsorbets:
Schaelen Sie die Aepfel und schneiden Sie sie in kleine Stuecke. Mixen sie sie bis sie
ein Apfelpuree haben.
Geben Sie den Zucker und den Zitronensaft ein, mischen Sie alles.
Heizen Sie den Apfelsaft und geben Sie ihn auf den Apfelpuree. Lassen Sie alles
abkuehlen und geben Sie die mischung in die Eiscmaschine waehrend 30 minuten.
Zutaten fuer das Zimteis:
-1/2 L. Vollmilch + 10cl -5 Eigelb
-150gr. KristallisierterZucker -100gr. Fluessige Creme Fraiche
Zubereitung des Zimteis:
Heizen Sie die 10cl Milch mite dem Zimt waehrend 20 Minuten.
Schlagen Sie das Eigelb und den zucker in einem Salatbecken.
Heizen Sie die Milch in einer Pfanne bis Sie kocht. Geben sie die Creme fraiche und
bringen Sie es wieder zum kochen.
Geben Sie so schnell wie moeglich die Eigelb und Zucker mischung ein in dem sie
ruehren.
Kochen Sie es waehrend 4-5 Minuten in dem Sie immer mit einer Holzspachtel
ruehren. Geben Sie die Zimtinfusion bei und lassen abkuehlen. Geben Si dan alles
in die Eismaschine, waehrend 20 Minuten.
Waldfrucht Sorbet
Zutaten fuer Brombeeren Sorbet:
-1Kg. Beeren -2 gruene zitronene
-100gr. Puderzucker -1/2 L. Siroup
Zubereitung des Brombeeren Sorbets:
Waschen Sie die Brombeeren un geben Sie das Puderzucker bei. Mischen sie alles
bis sie ein puree haben. Lassen Sie es waehrend einer Stunde im Kuehlschrank
abkuehlen.
Geben Sie den Siroup bei un den Zitronensaft, mischen Sie alles.
Page 21

Geben Sie die Mischung in die Eismaschine waehrend 30 minuten.
Zutaten fuer Heidelbeeren Sorbet:
-1Kg. Heidelbeeren -2 gruene zitronene
-100gr. Puderzucker -1/2 L. Siroup
Zubereitung des Heidelbeeren Sorbets:
Waschen Sie die Heidelbeeren un geben Sie das Puderzucker bei. Mischen sie alles
bis sie ein puree haben. Lassen Sie es waehrend einer Stunde im Kuehlschrank
abkuehlen.
Geben Sie den Siroup bei un den Zitronensaft, mischen Sie alles.
Geben Sie die Mischung in die Eismaschine waehrend 30 minuten.
Zutaten fuer Himbeeren Sorbet:
-1Kg. Himbeeren -2 gruene zitronene
-100gr. Puderzucker -1/2L Orangensaft
-1/2 L. Siroup
Zubereitung des Himbeeren Sorbets:
Waschen Sie die Himbeeren un geben Sie das Puderzucker, Zitronene saft un
Orangensaft bei. Mischen sie alles bis sie ein puree haben. Lassen Sie es waehrend
zwei Stunden im Kuehlschrank abkuehlen.
Geben sie das Siroup bei.
Geben Sie die Mischung in die Eismaschine waehrend 30 minuten.
Zutaten fuer die passierten Erdbeeren:
-500gr Erdbeeren -300 gr Puderzucker
-25gr. Glukose
Zubereitung der passierten Erdbeeren:
Waschen Sie die Erdbeeren. Wenn noetig heizen Sie die Erdbeeren im maria bad.
Mixen Sie biss sie ein erdbeer Puree erhalten und mischen Sie das Puderzucker
dazu.
Lakritze Eis
Zutaten:
-5 Eigelb -150 gr Kristallisiertes Zucker
-1/2L Vollmiclh + 10cl -100gr. Fluessige Creme fraiche
100gr. Fluessige Lakritze
Zubereitung:
Legen Sie die Lakritze in 10cl Milch waehrend 25 Minuten.
Schlagen Sie das Eigelb und den Zucker in einem Salatbecken.
Heizen Sie die Milch in einer Pfanne, geben Sie die Creme fraiche bei und bringne
sie es wieder zum kochen,
Geben Sie die Eigelb, Zucker mischung bei, so schnell wie moelgich waehrend sie
ruehren.
Page 22

Kochen sie alles waehrend 4-5 Minuten in dem sie mit einer Holzspachtel mischen.
Geben Sie die Lakritze infusion bei.
Lassen sie alles abkuehlen und dann geben Sie die Mischung in die Eismaschine
waehrend 30 Minuten.
ACHTUNG:
Hergestellt und importiert: Adeva SAS 8 rue Marc Seguin 77290 Mitry-Mory FRANCE
www.hkoenig.com - contact@hkoenih.com - Tel. 01 64 67 00 01
Page 23

NEDERLANDS
Veiligheidsinformatie
Controleer of de spanning van uw huis overeenkomstig is met de spanning van
het apparat.
Zet het apparaat nooit zonder toezicht in werking. Verwijder altijd de stekker na gebruik
of voordat u het gaat schoonmaken.
Dit apparaat is niet geschikt voor personen met lichamelijke of geestelijke gebreken
(inclusief kinderen) of mensen zonder ervaring, tenzij ze door een verantwoordelijk
persoon worden begeleid en instructies hebben ontvangen. Kinderen moeten onder
toezicht worden gehouden om ervoor te zorgen dat ze niet met het apparaat gaan
spelen.
Gebruik het apparaat alleen voor huishoudelijke doeleinden en alleen voor
levensmiddelen zoals voorgeschreven in deze handleiding.
Niet in de vaatwasser reinigen, alleen met warm water en zeep.
Raak de componenten tijdesn het gebruik niet aan. Neem alle voorzorgsmaatregelen en
houd handen, haar, kleding en andere accessoires uit de buurt van de componenten.
Nooit componenten verwijderen of vervangen terwijl het apparaat aan staat.
Dompel het apparaat nooit onder water of andere vloeistoffen. Gebruik een vochtig doek
om te reinigen. Gebruik het apparaat niet met natte handen.
Overschrijd nooit de maximale vulhoogte (3/4) van de kom, omdat het ijs tijdens het
maken gaat zwellen.
Plaats de ingrediӫ nten altijd in de kom nooit rechtstreeks in het compressor
compartiment.
Om letsel te voorkomen, steek nooit uw vingers of andere voorwerpen in het apparaat
als het in gebruik is.
Plaats het apparaat nooit in de buurt van een warmtebron.
Plaats het apparaat altijd op een droge, vlakke ondergrond.
Gebruik het apparaat nooit buitenshuis en sla het op een droge plaats op.
Bedek nooit de ventilatieopeningen van de motor en compressor tijdens het gebruik.
Verwijder de stekker van het apparaat voordat u het schoonmaakt of opbergt. Trek nooit
aan het kabel. Zorg ervoor dat u niet over het kabel gaat struikelen. Vouw het niet op en
laat het niet met hete oppervlakken in aanraaking komen.
Als het kabel beschadigd is, moet het door de fabrikant of de klanten service worden
vervangen om ongelukken te vermijden.
Controleer het kabel en het apparaat regelmatig om schade te voorkomen.
In het geval van problemen, probeer het apparaat nooit zelf te repareren, neem contact
op met een gekwalificeerde persoon om ongelukken te voorkomen.
Page 24

Gebruik het apparaat alleen met originele accessoires.
Motorblok
Verwijderbare deksel
Transparante deksel
Meng mes
Afneembare kom
Vaste kom
LCD Monitor
Controle paneel
Ijschep
Meetbeker
Koelings indicator
Meng Indicator
Tijd Instelling
Aan/Uit
Bedrijfstelling van het apparaat
De fabrikant kan niet veraantwordelijk worden gehouden voor misbruik van het
apparaat. Bewaar deze handleiding goed op.
Beschrijving van het apparaat
Voor dat u het apparaat voor het eerst gaat gebruiken, was en droog alle onderdelen die met
voedsel in contact gaan komen. Reinig het lichaam van de motor en de compressor met een
vochtig doek. Plaats het apparaat op een vlakke, droge ondergrond.
Page 25

Bereid de ingrediӫ nten die nodig zijn voor uw recept. Als bepaalde ingrediӫ nten gekookt
moeten worden, doe het een dag van te voren, omdat de ingrediӫ nten volledig gekoeld
in het apparaat moeten.
Alleen vruchten puree wordt voor de voorbereiding opgenomen. De fruitstukjes worden
aan het einde van de koeling toegevoegd.
Plaats de ingrediӫ nten bij een temperatuur van ongeveer 6-8 graden in de koelkast.
Giet de koude ingrediӫ nten in de kom. Overschrijdt het maximale niveau van ¾ niet,
omdat het ijs aan volume aanneemt tijdens de bereiding.
Plaats de verwijderbare kom in het apparaat.
Plaats het meng men in het midden van de verwijderbare kom.
Plaats het deksel op de kom.
Plaats vervolgens het deksel op de motorblok om te waarborgen dat de elementen in
hetzelfde mengblad terecht komen.
Sluit het apparaat aan.
Druk de knop « 0/1 » en op het display toont « 60 :00 ». Het apparaat is klaar voor
gebruik.
Druk op « Tijd » om de gewenste koeltijd te selecteren.
Druk op de « M/A » knop. Na enkele seconden begint het mengen, Het groene LED licht
op.
Na een paar minuten afkoelen, licht het rode LED op.
Opmerking : Koeling begint vanaf de bodem. Het kan dus gebeuren dat de messen van
de mixer traag worden of stoppen met draaien wanner het ijs eraan begint te trekken.
De bereiding kan op elk moment op stop worden gezet door de « M/A » knop voor 2
seconden in te drukken.
De geselecteerde koeltijd kan op elk moment worden gewijzigd door op « tijd » te
drukken.
De machine stopt automatische na de ingestelde tijd.
Als het display « 0 :00 » toont, kan het ijs worden verwijderd.
Als het ijs te vloeibaar is, kunt u de cyclus opnieuw starten door de « M/A » knop voor 2
seconden in te houden. Selecteer de gewenste bereidingstijd door op de « tijd » knop te
drukken, en druk nogmaals op « M/A ».
Als het ijs binnen tien minuten na de bereiding niet wordt verwijdert, vergrendelt het
apparaat de koelfunctie automatisch om te voorkomen dat het ijs gaat smelten.Deze
functie koelt het ijs in stappen van 10 minuten gedurende maximaal een uur.
Druk op « 0/ 1 » om het toestel te stoppen en verwijder de stekker uit het stopcontact
voordat u het ijs verwijdert.
Verwijder het motorblok, de vuldop en de transparante deksel.
Verwijder de uitneembare kom met het handgreep. Verwijder vervolgens het mengblad.
Functie voor Flessen koeling
Deze functie zorgt voor het gemakkelijke koelen van flessen. Verwijder de uitneembare
kom en plaats de fles in het compartiment.
Selecteer een korte afkoelings tijd (10 minuten) en start de machine. Indien nodig, kan
Page 26

de koeltijd worden uitgebreid.
De koeling zal effectiever zijn als de haat van de fles met een isolerende ring bedekt is.
Reiniging van het apparaat
Schakel de machine uit en verwijder de stekker.
Reinig het lichaam van het motorblok en het kabel nooit met water.
Alle verwijderbare onderdelen van het apparaat behalve het motorblok kunnen met
warm water en zeep worden gereinigd.
Reinig het lichaam en het motorblok met een vochtig doek.
Gebruik geen agressieve schoonmaakmiddelen.
Droog alle delen van het apparaat goed voordat u het opnieuw gaat monteren.
RECEPTEN
Vanille Ijs met vijgen
Ingredienten:
-½ Liter Volle Melk -5 Eierdooier
-150gr. Kristalsuiker -100gr liquid Creme fraiche
-3 Vanillestokjes -500gr. Vijgen
-300gr. Poedersuiker -25gr. Glucose
Bereiding:
Leg de in twee gedeelde vanille stokjes gedurende 30 minuten in hete melk. Verwijder daarna
de vanille stokjes.
Klop het eigeel en de suiker in een kom, tot het wit is.
Verwarm de melk totdat deze kookt.
Doe de creme fraiche erbij en breng het opnieuw aan de kook. Geef terwijl u roert het ei en
suiker mengsel so snel mogelijk bij.
Kook 4-5 minuten en roer met een houten spatel.
Laat het afkoelen.
Zet alles in de ijs machine en laat het gedurende 30 minuten werken.
Was de vruchten en droog ze, en warm ze gedurende 10 minuuten in een water bad.
Meng het fruit tot het vlees een stevige consistentie heeft. Voer de poedersuiker en glucose
erbij, terwil u mengt.
Plaats de vijgen op de ijs ballen.
Apricot sorbet
Zutaten:
-1Kg. Apricoten -1 groene citroen
-100gr. Poedersuiker -1Lt. Siroup
Bereiding:
Was de apricoten. Plaats de apricozen in de mixer en meng ze tot puree. Voeg de suiker en
citroen bij.
Meng het goed en laat het gedurende een uur rusten.
Geef alles gedurende 30 minuten in de ijsmachine.
Page 27

Coupe Reinette du Vignan
Ingrediӫ nten voor Appel sorbet:
-1Kg Reinette du Vignan Appels -1 Groene citroen
-120gr. Poedersuiker -1/2 Lt. Appelsap 100%
Bereiding:
Schil de appels en snijd ze in kleine stukjes. Meng ze tot een appel puree.
Voer de suiker en citroensap bij, meng alles.
Verhit de appelsap en voeg deze toe aan de appelmoes. Laat alles afkoelen en geef het
mengsel gedurende 30 minuten in de ijsmachine.
Ingrediӫ nten voor Kaneelijs:
-1/2 L. Volle Melk + 10cl -5 Eierdooier
-150gr. Kristal suiker -100gr. liquid Creme Fraiche
Bereiding Kaneelijs:
Verwarm 10cl van de melk met kaneel gedurende 20 minuten.
Klop de eierdooiers en de suiker in een kom.
Verwarm de melk in een pan en breng deze aan de kook. Voer de creme fraiche erbij en breng
het opnieuw aan de kook.
Voer zo snel mogelijk de eidooiers en suiker mengsels bij, tijdens het roeren.
Kook 2-5 minuten, terwijle je met een houten spatel roert. Voeg de kaneel mengsel bij en laat
het afkoelen. Voeg alles gedurende 20 minuten in de ijsmachine.
Bosvruchten Sorbet
Ingrediӫ nten voor Bosvruchten sorbet:
-1Kg. Bessen -2 Groene citroen
-100gr. Poedersuiker -1/2 L. Siroup
Bereiding Bosvruchten sorbet:
Was de bessen en voeg de poedersuiker bij. Meng alles tot een puree. Laat het gedurende een
uur in de koelkast afkoelen.
Voeg de citroensap en siroup bij en meng alles.
Voer het mengsel in de ijsmachine gedurende 30 minuten.
Ingrediӫ nten voor Bosbessen sorbet:
-1Kg. Bosbessen -2 groen citroen
-100gr. Poedersuiker -1/2 L. Siroup
Bereiding Bosbessen sorbet:
Was de bosbessen en voeg poedersuiker bij. Meng alles tot een puree. Laat het gedurende een
uur in de koelkast afkoelen.
Voeg de siroup en de citroensap bij, meng alles.
Geef het mengsel gedurende 30 minuten in de ijsmachine.
Ingrediӫ nten voor Frambozen sorbet:
-1Kg. Frambozen -2 groene citroen
-100gr. Poedersuiker -1/2L Sinaasappelsap
-1/2 L. Siroup
Bereiding Frambozen sorbet:
Was de frambozen en voeg de poedersuiker en citroensap bij. Meng alles tot een puree. Laat
het gedurende twee uur in de koelkast afkoelen.
Voeg de siroup bij.
Giet het mengsel gedurende 30 minuten in de ijsmachine.
Ingrediӫ nten voor aardbeien ijs:
Page 28

-500gr Aardbeien -300 gr Poedersuiker
ATTENTIE :
Wij raden u aan om dit product niet met het huishoudelijk afval weg
te gooien. Een selectieve inzameling voor dit soort producten wordt
door gemeenten geboden, neem contact op met uw lokale gemeente
voor meer informatie. Elektrische en elektronische producten
bevatten schadelijke stoffen die het milieu en menselijke gezondheid
kunnen beschadigen en moeten dus worden recycled. De sticker met
het kruis door een afvalbak geeft aan dat het product elektronische
of elektrische apparatuur is en alleen voor selectieve inzamelijk
geschikt is.
-25gr. Glucose
Bereiding Aardbeien ijs:
Was de aardbeien. Indien nodig, verwarm de aarbeien in een water bad.
Meng alles tot een puree en voeg de poedersuiker bij.
Zoethout Ijs
Ingrediӫ nten:
-5 Eierdooier -150 gr KristalSuiker
-1/2L Volle Melk + 10cl -100gr.liquid Creme fraiche
100gr. liquid zoethout
Bereiding:
Plaats de drop gedurende 25 minuten in 10cl melk.
Klop de eierdooiers en de suiker in een kom.
Verwarm de melk in een pan, voeg de creme fraiche bij en breng het opnieuw aan de kook.
Voeg de eierdooiers en suiker bij het mengsel, en roer zo snel mogelijk.
Kook 4-5 minuten, terwijl u alles met een houten spatel mengt.
Voeg de drop infusie bij.
Laat het mengsel afkoelen en giet het vervolgens gedurende 30 minuten in de ijsmachine.
Hersteld door : Adeva SAS 8 rue Marc Seguin 77290 Mitry-Mory FRANKRIJK
www.hkoenig.com - contact@hkoenig.com - Tél. 01 64 67 00 01
Page 29

ESPANOL
Instrucciones de seguridad
Verificar que la tensión corresponda con la del dispositivo.
No deje el dispositivo sin vigilancia cuando esté en funcionamiento. Siempre desenchúfelo
después de usarlo y antes de limpiarlo o desmontarlo.
Este dispositivo no está diseñado para ser utilizado por personas (incluidos niños) con
capacidades físicas, sensoriales o mentales reducidas o con falta de experiencia o
conocimiento, a menos que hayan recibido, a través de una persona responsable de su
seguridad, instrucciones de uso del dispositivo. Se debe supervisar a los niños para
asegurarse de que no jueguen con el dispositivo.
Utilice el dispositivo sólo para uso doméstico y sólo con alimentos según lo prescrito en
este manual.
No lavarlo en el lavavajillas, sólo lavarlo con agua tibia y jabón.
No toque los componentes durante el funcionamiento. Aleje las manos, cabello, ropa y
otros accesorios del dispositivo.
Nunca quite o cambie un elemento del dispositivo cuando está en funcionamiento.
No sumerja el dispositivo o el cable en agua u otro líquido. Use un paño húmedo para
limpiarlos. No utilice el dispositivo con las manos mojadas.
No superar nunca el nivel máximo de llenado (3/4 del vaso), porque el hielo se hincha
durante el enfriamiento.
Siempre coloque los ingredientes en el recipiente extraíble y nunca directamente en el
compartimento del compresor.
Para evitar lesiones, nunca coloque los dedos u otros objetos en el dispositivo cuando se
está usando.
No lo instale cerca de fuentes de calor.
Siempre coloque el dispositivo sobre una superficie seca y plana.
No utilice el dispositivo en exteriores y guárdelo en un lugar seco.
No cubra las rejillas de ventilación del motor y del compresor durante su uso.
Desenchufe el dispositivo antes de limpiarlo o almacenarlo. No tire del cable. Asegúrese de
que nadie pueda tropezar con el cable de alimentación. No doble o permita que el cable
toque superficies calientes.
Si el cable de alimentación está dañado, debe ser reemplazado por el fabricante, un centro
de servicio autorizado u otra persona calificada para evitar incidentes.
Compruebe regularmente el cable de alimentación y el dispositivo para evitar daños. En
caso de daños, no utilice el dispositivo.
En caso de problemas, no repare el dispositivo por su cuenta, envíelo a una persona
calificada para evitar accidentes.
Use siempre el dispositivo con sus piezas originales.
El fabricante no se hace responsable por un mal uso del dispositivo. Guarde este
manual.
Page 30

Descripción del dispositivo
Antes del primer uso, lave y seque las piezas que estarán en contacto con los alimentos. Limpiar
el bloque del motor y el cuerpo del compresor con un paño húmedo. Coloque la unidad sobre una
superficie plana y seca.
Page 31

• Prepare los ingredientes necesarios para su receta. Si ciertos ingredientes deben ser cocinados,
hágalo el día anterior ya que los ingredientes en el dispositivo deben estar completamente fríos.
• Sólo se debe introducir frutas trituradas en la preparación. Los trozos de fruta deben añadirse
sólo al final de la refrigeración.
• Coloque los ingredientes en el refrigerador a una temperatura de 6-8 grados.
• Vierta los ingredientes fríos en el recipiente removible. No exceda el nivel máximo (3/4 del vaso),
porque el helado aumenta su volumen durante la preparación.
• Coloque el vaso removible en el dispositivo.
• Coloque la hoja de mezcla en el centro del vaso removible.
• Coloque la tapa sobre el vaso removible.
• A continuación, coloque la tapa de llenado en el bloque del motor asegurándose de que estos
elementos estén en el mismo eje que la hoja de mezcla.
• Enchufe el dispositivo.
• Presione el botón "0/1", la pantalla muestra "60:00". El dispositivo está listo para funcionar.
• Seleccione el tiempo de enfriamiento deseado pulsando el botón de "tiempo".
• Presione la tecla "M / A". Después de unos segundos de comenzar el mezclado. La luz verde se
enciende.
• Después de unos minutos la refrigeración empieza y la luz roja se enciende. Nota: La
refrigeración se inicia en la parte inferior. Por lo tanto, puede suceder que las cuchillas de la
batidora se ralenticen o dejen de girar cuando el hielo empieza a formarse.
• La preparación puede ser detenida en cualquier momento pulsando la tecla "M / A" durante 2
segundos.
• El tiempo de enfriamiento seleccionado puede ser cambiado en cualquier momento pulsando el
botón "tiempo".
• El dispositivo se detiene automáticamente después del tiempo seleccionado.
• Cuando la pantalla muestra "0:00". El helado puede ser retirado.
• Si el helado aún está demasiado líquido, puede reiniciar el ciclo pulsando el botón "M/A" durante
2 segundos. Seleccione el tiempo de preparación deseado pulsando el botón "tiempo" y pulse de
nuevo "M/A".
• Si el helado no se retira de la unidad dentro de los 10 minutos siguientes al final de la
preparación, la función de enfriamiento se activa automáticamente para evitar que el helado se
derrita. Esta función enfría el helado en intervalos de 10 minutos hasta un máximo de 1 hora.
• Presione el botón "0/1" para detener el dispositivo y desenchúfelo antes de retirar el helado.
• Retire el bloque del motor, la tapa de llenado y la tapa transparente ...
• Levante el vaso removible utilizando el asa. A continuación, retire la hoja de mezcla.
Función de refrigeración de botellas
• Esta función le permite enfriar rápidamente las botellas. Retirar el vaso removible y coloque la
botella directamente en el compartimento.
• Seleccione un tiempo de enfriamiento corto (10 minutos) y arranque la máquina. Si es necesario
el tiempo de enfriamiento se puede extender como se explicó anteriormente.
• La refrigeración será más eficaz si la parte de arriba de la botella está cubierta con un anillo
aislante.
Page 32

Limpieza del dispositivo
• Apague y desenchufe el dispositivo.
• No lave el cuerpo del dispositivo, el bloque del motor y el cable de alimentación directamente
bajo el agua.
• Todas las piezas desmontables del dispositivo excepto el bloque del motor se pueden limpiar
con agua caliente y jabón.
• Limpie el cuerpo del dispositivo y el bloque del motor con un paño húmedo.
• No utilice productos de limpieza abrasivos.
• Seque cuidadosamente todas las partes del dispositivo antes de volver a montarlo.
RECETAS
HELADO DE VAINILLA CON COULIS DE HIGO
Ingredientes
- 1/2 litro de leche entera
- 150g de azúcar
- 3 gotas de vainilla
- 300g de azúcar en polvo
- 5 yemas de huevo
- 100g de crema fresca líquida
- 500g de higo
- 25g de glucosa
PREPARACIÓN
Prepare la infusión de las gotas de vainilla en leche caliente durante 1/2 hora.
En un cuenco, remoje las yemas de huevo y el azúcar en agua caliente.
Haga hervir la leche en una olla aparte.
Luego añada la crema y haga hervir. También vierta la mezcla de huevos y azúcar moviendo
rápidamente.
Caliente todo unos 4 o 5 minutos removiendo con una espátula de madera.
Deje enfriar completamente.
Vierta la preparación en la máquina de hielo y hágala funcionar por 30 minutos.
Lave las frutas. Si es necesario, ponga las frutas muy maduras en baño maría durante 10 minutos.
Licue para obtener la pulpa y añada el azúcar en polvo y la glucosa mezclando bien con la
batidora.
Page 33

Vierta el coulis sobre las bolas de helado de vainilla.
SORBETE DE ALBARICOQUE
- 1kg de albaricoque muy maduros
- 100g de azúcar en polvo
- 1 lima
- 1 litro de sirope
PREPARACIÓN
Limpie los albaricoques, quite el hueso y la piel y páselo por la batidora. Agregue la lima azúcar al gusto. Se
introduce la mezcla en el congelador hasta que esté medio cuajada.
Ponga todo en la Heladora y procese durante 30 minutos.
COPA DE MANZANA REINETA
Ponga en una copa el sorbete de manzana y el helado de canela.
Ingredientes para el Sorbete de manzana
- 1kg de manzanas reineta
- 120g de azúcar en polvo
- 1 lima
- 1/2 litros de zumo de manzana
PREPARACIÓN DEL SORBETE DE MANZANA
Pele y saque las pepas de la manzana y córtela en pedazos y haga un puré.
Añada el azúcar y el zumo de lima y mezcle todo.
Caliente el zumo de manzana y viértalo al puré. Deje enfriar completamente.
Ponga todo en la heladera y procese por 30 minutos.
Ingredientes para el helado de canela
- 1/2 litro de leche entera + 10cl
- 150g de azúcar
- 20g de canela en polvo
- 5 yemas de huevo
- 100g de crema fresca líquida
Page 34

PREPARACIÓN DEL HELADO DE CANELA
Haga una infusión de canela en 10cl de leche caliente durante 20 minutos.
Pase por agua caliente las yemas de huevo y el azúcar.
Caliente la leche en una olla hasta que hierva. Añada la crema fresca vuelva a hervir.
Vierta la mezcla de huevos y azúcar moviendo rápidamente.
Caliente todo durante 4 ó 5 minutos mezclando con una espátula de madera. Añada la infusión de
canela y deje enfriar completamente.
Vierta la preparación en la heladera y procese durante 20 minutos.
SORBETE DE FRUTAS DEL BOSQUE
Ponga en una copa el sorbete y agregue el coulis de fresa.
Ingredientes para el sorbete de moras
- 1kg de moras
- 100g de azúcar en polvo
- 2 limas
- 1/2 litro de sirope (nº1)
PREPARACIÓN DEL SORBETE DE MORA
Enjuague las moras y espolvoréelas con el azúcar en polvo y haga un puré. Deje reposar 1 hora
en el refrigerador.
Añada el sirope y el zumo de lima y mezcle.
Ponga todo en la Heladera y procese durante 30 minutos.
Ingredientes para el sorbete de arándanos
- 1kg de arándanos
- 100g de azúcar en polvo
- 2 limas
- 1/2 litro de sirope (nº1)
PREPARACIÓN DEL SORBETE DE ARÁNDANOS
Enjuague los arándonos y espolvoréelos con el azúcar en polvo y haga un puré. Deje reposar 1
hora en el refrigerador.
Añada el sirope y el zumo de lima y mezcle.
Page 35

Ponga todo en la Heladera y procese durante 30 minutos.
Ingredientes para el sorbete de frambuesas
- 1kg de frambuesas
- 1/2 litro de zumo de naranja
- 200g de azúcar en polvo
- 2 limas
- 1/2 litro de sirope (nº1)
PREPARACIÓN DEL SORBETE DE FRAMBUESAS
Mezcle las frambuesas y haga un puré. Añada el zumo de lima y el zumo de naranja con el azúcar
en polvo.
Deje reposar durante 2 horas en el refrigerador.
Añada el sirope.
Ponga todo en la Heladera y procese durante 30 minutos.
Ingredientes para el coulis de fresas
- 500g de fresas frescas
- 25g de glucosa
- 300g de azúcar en polvo
PREPARACIÓN DEL COULIS DE FRESAS
Lave las fresas y quíteles el tallo. Si es necesario, pase las fresas por baño maría durante 10
minutos
Bata para obtener la pulpa y añada el azúcar y la glucosa mientras sigue batiendo.
HELADO DE REGALIZ
Ingredientes
- 5 yemas de huevo
- 1/2 litro de leche entera + 10cl
- 100g de regaliz líquido o caramelo de regaliz
- 150g de azúcar
- 100g de crema fresca líquida
Page 36

PREPARACIÓN
Haga una infusión con el regaliz en los 10cl de leche durante 25 minutos.
En un cuenco pase el huevo y azúcar por agua caliente.
Caliente la leche en una olla hasta que hierva. Añada la crema y haga hervir nuevamente.
Vierta la mezcla sobre los huevos/azúcar removiendo rápidamente.
Cocine todo durante 4 ó 5 minutos mezclando con una espátula de madera.
Vierta la infusión de regaliz.
Deje enfriar completamente.
Ponga todo en la heladera y procese durante 30 minutos.
ADVERTENCIA:
No se deshaga de este producto como lo hace con otros productos del hogar. Existe un sistema
selectivo de colecta de este producto puesto en marcha por las comunidades, debe de informarse
en su ayuntamiento acerca de los lugares en los que puede depositar este producto. De hecho,
los productos eléctricos y electrónicos pueden contener substancias peligrosas que tienen efectos
nefastos para el medio ambiente o para la salud humana y deben ser reciclados. El símbolo aquí
presente indica que los equipos eléctricos o electrónicos deben de ser cuidadosamente
seleccionados, representa un recipiente de basura con ruedas marcado con una X.
Fabricado para e importado por: Adeva SAS 8 rue Marc Seguin 77290 Mitry-Mory FRANCE
www.hkoenig.com - contact@hkoenig.com - Tel. 01 64 67 00 01
Page 37

ITALIANO
Informazioni sulla sicurezza
Verificare che la tensione riportata sull’apparecchio sia la stessa della rete
elettrica della vostra casa.
Mai lasciare l’apparecchio incustodito durante il suo funzionamento. Scollegare
l’apparecchio prima di pulirlo o eseguire qualsiasi operazione di riparazione o
manutenzione.
Questo dispositivo non è destinato all'uso da parte di persone con capacità fisiche,
mentali o sensoriali ridotte, o da persone con scarsa conoscenza (inclusi i bambini),
salvo che una persona responsabile della loro sicurezza non abbia fornito loro le dovute
indicazioni. Sorvegliare sempre i bambini in prossimità dell’apparecchio per accertarsi
che non giochino.
Usare il dispositivo solo per usi domestici e solo per il cibo, come prescritto dal presente
manuale.
Mai lavare in lavastoviglie: per la pulizia utilizzare unicamente acqua calda e sapone.
Non toccare mai i componenti dell’apparecchio durante il funzionamento. Prendere tutte
le dovute precauzioni, tenendo lontano dalla macchina: mani, capelli, abbigliamento e
altri accessori.
Non rimuovere o modificare un elemento del dispositivo quando è in funzione.
Non immergere mai l'apparecchio o il cavo in acqua o altri liquidi. Usare un panno umido
per la pulizia. Non utilizzare l'apparecchio con le mani bagnate.
Non superare mai il livello massimo di riempimento (3/4 del contenitore), perché il
ghiaccio si gonfia durante la refrigerazione.
Versare sempre gli ingredienti nel contenitore estraibile e mai direttamente nel vano del
compressore.
Per evitare lesioni, non mettere mai le dita o altri oggetti all'interno del dispositivo
quando è in esecuzione.
Non disporre l'apparecchio in prossimità di fonti di calore.
Disporre sempre l'apparecchio su una superficie pulita e piana.
Non utilizzare l'apparecchio in ambienti esterni e conservare in un luogo asciutto.
Non coprire le prese d'aria del blocco motore e del compressore durante il
funzionamento.
Scollegare l'apparecchio prima di pulirlo o riporlo. Non tirare il cavo. Assicurarsi che non
ci sia il pericolo di inciampare sul cavo di alimentazione. Non piegare il cavo ed evitare
che entri in contatto con superfici calde.
Se il cavo di alimentazione dovesse danneggiarsi, esso dovrà essere sostituito dal
produttore, presso il centro di assistenza autorizzato o altra persona qualificata per
evitare incidenti.
Page 38

Controllare regolarmente che sia il cavo di alimentazione sia il dispositivo non
Display LCD
Pannello di
controllo
Blocco motore
Coperchio di riempimento
Coperchio trasparente
Lame per miscelazione
Contenitore estraibile
Contenitore fisso
Cucchiaio
Recipiente graduato
presentino danni. In caso di malfunzionamenti, non utilizzare il dispositivo.
In caso di problemi, vi preghiamo di non effettuare personalmente riparazioni al
dispositivo, ma inviarlo a una persona qualificata per evitare incidenti.
Si prega di utilizzare sempre l'apparecchio con i sui pezzi originali.
Il costruttore non può essere ritenuto responsabile per l'uso improprio del
dispositivo. Conservare accuratamente questo manuale.
Descrizione dell’apparecchio
Al primo utilizzo, lavare e asciugare le parti che saranno in contatto con gli alimenti. Pulire il
motore e il corpo del compressore con un panno umido. Disporre l'apparecchio su una
superficie piana e asciutta.
Page 39

Display LCD
Indicatore di raffreddamento
Indicatore di miscelazione
Tasto per il timer
Interruttore ON/OFF
Accensione dell’apparecchio
Preparare gli ingredienti necessari per la ricetta. Se alcuni ingredienti devono essere
cotti, prepararli molto prima perché tutte le pietanze che andranno nell’apparecchio
dovranno essere completamente raffreddate.
Solo frutta schiacciata dovrebbe essere introdotta durante la preparazione. La frutta in
pezzi va aggiunta solo alla fine della refrigerazione.
Mettere gli ingredienti in frigorifero a una temperatura di circa 6-8 gradi.
Versare gli ingredienti freddi nel contenitore estraibile. Non superare il livello massimo
(3/4 del recipiente), perché il gelato aumenta il suo volume durante la preparazione.
Versare gli ingredienti freddi nel contenitore rimovibile.
Disporre la lama di miscelazione al centro del contenitore estraibile.
Collocare il coperchio sul contenitore estraibile.
Quindi posizionare il coperchio di riempimento e il blocco motore assicurandosi che
questi elementi siano in asse con la lama di miscelazione.
Collegare l'apparecchio alla corrente elettrica.
Premere il tasto "0/1", il display mostrerà "60:00". L'apparecchio è pronto per il
funzionamento.
Selezionare il tempo di refrigerazione desiderato premendo il tasto pulsante "tempo".
Premere sull’interruttore “ON/OFF”. La miscelazione inizierà dopo alcuni secondi. Si
accenderà la spia verde.
Dopo pochi minuti inizierà la refrigerazione e si accenderà la spia rossa.
Nota: il raffreddamento inizia sul fondo. Può accadere quindi che le lame per la
miscelazione diventino lente o arrestino la loro rotazione quando il ghiaccio comincia a
prendere consistenza.
La preparazione può essere interrotta in qualsiasi momento premendo sull’interruttore
“ON/OFF” per 2 secondi.
Il tempo di refrigerazione selezionato può essere modificato in qualsiasi momento
premendo il tasto "tempo".
La macchina si ferma automaticamente al termine del tempo selezionato.
Sul display si visualizzerà "0:00". A questo punto il gelato può essere rimosso.
Se il gelato è troppo liquido, è possibile riavviare il ciclo premendo sull’interruttore
Page 40

“ON/OFF” per 2 secondi. Selezionare il tempo di preparazione desiderata premendo il
"tempo" e di nuovo sull’interruttore.
Se il gelato non è rimosso dalla macchina entro 10 minuti dopo la fine della preparazione,
la funzione di raffreddamento meccanico si attiva automaticamente per evitare che il
ghiaccio si sciolga. Questa funzione raffredderà il ghiaccio a intervalli di 10 minuti per
massimo 1 ora.
Premere il tasto "0/1" per arrestare la macchina e staccare la spina prima di togliere il
gelato.
Estrarre il blocco motore, il tappo di riempimento e il coperchio trasparente.
Sollevare il contenitore rimovibile tramite impugnatura. Quindi rimuovere la lama di
miscelazione.
Funzione di raffreddamento delle bottiglie
Questa funzione consente di raffreddare rapidamente le bottiglie. Rimuovere il
contenitore estraibile e inserire la bottiglia direttamente nel vano.
Selezionare un breve tempo di refrigerazione (10 minuti) e avviare la macchina. Se
necessario, il tempo di refrigerazione può essere esteso come sopra illustrato.
La refrigerazione sarà più efficace se il collo della bottiglia sarà rivestito da un anello
isolante.
Pulizia dell’apparecchio
Spegnere e scollegare la macchina.
Non pulire il corpo della macchina, il blocco motore e il cavo di alimentazione
immergendoli direttamente in acqua.
Tutte le parti rimovibili del dispositivo, tranne il blocco motore possono essere pulite con
acqua calda e sapone.
Pulire il corpo macchina e il blocco motore con un panno umido.
Non usare prodotti abrasivi.
Asciugare accuratamente tutte le parti del dispositivo prima di riassemblarle.
Page 41

RICETTE
- 1/2 litro di latte intero
- 5 tuorli d’uovo
- 150g di zucchero in polvere
- 100g di panna liquida
- 3 baccelli (stecche) di vaniglia
- 500g di fichi
- 300g di zucchero a velo
- 25g di glucosio
- 1 kg di albicocche mature
- 1 limone verde
- 100g di zucchero a velo
- 1 litro di sciroppo
GELATO ALLA VANIGLIA CON COULIS DI FICHI
Ingredienti
PREPARAZIONE
Spezzare le stecche di vaniglia in due, lasciarle in infusione nel latte caldo per circa 1/2 ora e poi
rimuoverle.
Sbattere con una frusta i tuorli d’uovo e lo zucchero in una ciotola.
Rimettere sul fornello il latte e portarlo all’ebollizione.
A questo punto, aggiungere la panna e far riprendere l’ebollizione. In seguito, versare subito tutto sulla
miscela uova/zucchero precedentemente preparata e sbattere rapidamente.
Far cuocere tutto a fuoco lento per circa 4-5 minuti e mescolare con una spatola di legno.
Lasciar raffreddare completamente.
Versare il preparato nella macchina e far mescolare per 30 minuti.
Lavare la frutta e lasciar asciugare. Se necessario, ripulire i frutti troppo maturi mettendoli a bagnomaria
per 10 minuti.
Frullare bene in modo da ottenere una polpa, aggiungere quindi lo zucchero a velo e il glucosio e
mescolare bene con una frusta.
Versare il coulis sulle palle di gelato alla vaniglia.
SORBETTO ALLE ALBICOCCHE
Ingredienti
PREPARAZIONE
Lavare e snocciolare le albicocche. Frullare la polpa fino a ottenere la consistenza di un purè. Aggiungere
il succo di limone e lo zucchero. Mescolare il tutto e lasciar riposare per un’ora in frigorifero.
Versare tutto all’interno della macchina e far mescolare per 30 minuti.
COPPA DI MELE RENETTE
Page 42

Disporre in una coppa il sorbetto alle mele e il ghiaccio. Accompagnare con qualche amaretto/bacio di
- 1 kg di mele renette
- 1 limone verde
- 120g di zucchero a velo
- 1/2 litro di succo di mela 100% frutta
- 1/2 litro di latte intero + 10 cl
- 5 tuorli d’uovo
- 150 g di zucchero in polvere
- 100 g di panna liquida
- 20 g di cannella in polvere
- 1 kg di more
- 2 limoni verdi
- 100 g di zucchero a velo
- 1/2 litro di sciroppo (n°1)
- 1 kg di mirtilli
- 2 limoni verdi
dama.
Ingredienti per il sorbetto alle mele
PREPARAZIONE DEL SORBETTO ALLE MELE
Sbucciare e snocciolare le mele e in seguito tagliarle a pezzetti. Frullarle fino a ottenere la consistenza di
un purè.
Aggiungere lo zucchero e il succo di limone, mescolare il tutto.
Far riscaldare il succo di mela e versarlo sul preparato. Lasciar raffreddare completamente.
Mettere tutto all’interno dell’apparecchio e far mescolare per 30 minuti.
Ingredienti per il gelato alla cannella
PREPARAZIONE DEL GELATO ALLA CANNELLA
Lasciare la cannella in infusione in 10 cl di latte caldo per 20 minuti.
Sbattere i tuorli d’uovo e lo zucchero all’interno di una ciotola.
Far riscaldare il latte in un pentolino e portarlo all’ebollizione. Aggiungere quindi la panna e far riprendere
l’ebollizione.
In seguito, versare immediatamente sul composto uova/zucchero, mescolando rapidamente.
Far cuocere il tutto per circa 4/5 minuti, a fuoco lento, mescolando con una spatola di legno. Aggiungere
l’infuso di cannella. Lasciare raffreddare completamente.
Versare il preparato nell’apparecchio e far mescolare per 20 minuti.
SORBETTO AI FRUTTI DI BOSCO
Disporre i 3 sorbetti all’interno di una coppa. Condire con coulis di fragole.
Ingredienti per il sorbetto alle more
PREPARAZIONE DEL SORBETTO ALLE MORE
Lavare le more e cospargerle di zucchero a velo. Mescolarle fino a raggiungere la consistenza di un purè.
Lasciar riposare per un’ora in frigorifero.
Aggiungere lo sciroppo e il succo di limone, quindi mescolare.
Mettere il tutto nell’apparecchio e lasciar mescolare per 30 minuti.
Ingredienti per il sorbetto ai mirtilli
Page 43

- 100 g di zucchero a velo
- 1/2 litro di sciroppo (n°1)
- 1 kg di lamponi
- 2 limoni verdi
- 1/2 litro di succo di arancia
- 200 g di zucchero a velo
- 1/2 litro di sciroppo (n°1)
- 500 g di fragole fresche
- 300 g di zucchero a velo
- 25 g di glucosio
- 5 tuorli d’uovo
- 150 g di zucchero in polvere
- 1/2 litro di latte intero + 10 cl
- 100 g di panna liquida
- 100 g di liquirizia liquida o a bastoncini
PREPARAZIONE DEL SORBETTO AI MIRTILLI
Frullare i mirtilli fino a raggiungere la consistenza di un purè. Aggiungere il succo di limone, il succo di
arancia e lo zucchero a velo, quindi mescolare.
Lasciar riposare per 2 ore in frigorifero.
Aggiungere lo sciroppo.
Mettere il tutto nell’apparecchio e far mescolare per 30 minuti.
Ingredienti per il sorbetto ai lamponi
PREPARAZIONE DEL SORBETTO AI LAMPONI
Frullare i lamponi fino a raggiungere la consistenza di un purè. Aggiungere il succo dei limoni, il succo di
arancia e lo zucchero a velo, quindi mescolare.
Lasciar riposare per 2 ore in frigorifero.
Aggiungere lo sciroppo.
Mettere il tutto nell’apparecchio e far mescolare per 30 minuti.
Ingredienti per il coulis di fragole
PREPARAZIONE DEL COULIS DI FRAGOLE
Lavare le fragole e togliere il picciolo. Se necessario, ripulire i frutti troppo maturi mettendoli per 10 minuti
a bagnomaria in un pentolino.
Frullarle bene, in modo da ottenere una polpa e aggiungere quindi lo zucchero a velo e il glucosio,
mescolando bene con una frusta.
GELATO ALLA LIQUIRIZIA
Ingredienti
PREPARAZIONE
Lasciare la liquirizia in infusione in 10 cl di latte per 25 minuti. Se si utilizza la liquirizia in bastoncini,
servirsi di uno chinois (colino a forma conica e in acciaio).
Sbattere i tuorli d’uovo e lo zucchero in una ciotola.
Far riscaldare il latte in un pentolino portandolo all’ebollizione. Aggiungere la panna e far riprendere
l’ebollizione.
Page 44

In seguito, versare immediatamente sul composto uova/zucchero, mescolando rapidamente.
ATTENZIONE:
Non gettare questo apparecchio tra i rifiuti domestici. Per questo tipo di
prodotti è fornito dai comuni un sistema di raccolta e ritiro in zona ed è
quindi un dovere informarsi per conoscere il giusto smistamento del
rifiuto. Infatti, i prodotti elettrici ed elettronici possono contenere
sostanze pericolose che hanno effetti dannosi sull’ambiente o sulla
nostra salute e quindi devono essere riciclati. Il simbolo al lato indica che
le apparecchiature elettriche ed elettroniche fanno parte di una raccolta
selettiva e differenziata (rappresentata da un bidone su due ruote
sbarrato da una X).
Far cuocere il tutto per circa 4/5 minuti, a fuoco lento, mescolando con una spatola di legno. Versare
l’infuso di liquirizia caldo.
Lasciar raffreddare completamente.
Versare il tutto nell’apparecchio e far mescolare per 30 minuti.
Fabricato e importato da: Adeva SAS 8 rue Marc Seguin 77290 Mitry-Mory FRANCIA
www.hkoenig.com - contact@hkoenig.com - Tel. 01 64 67 00 01
 Loading...