

Page 1

Instruction manual
Manuel d'utilisation
Bedienungsanleitung
Handboek
Manual de Utilización
Manuale d’uso
GR70
CONTACT GRILL
GRILL
PARRILLA DE CONTACTO
GRIGLIA A CONTATTO
Page 2

!
Page 3

!
ENGLISH
INSTRUCTIONS MANUEL
IMPORTANT SAFEGUARDS
When using electrical products, always follow basic safety precautions, including the
following:
READ ALL INSTRUCTIONS BEFORE USE.
WARNING — To reduce the risk of fire, electric shock, or
serious personal injury:
1. Use only on AC 220-240 Volt, 50/60 Hz. Use only for
household.
2. Do not touch hot surfaces. Use the Handle.
3. Do not immerse the Power Cord, Plug, or Base in
water/liquid.
4. Unplug the Power Cord from the electrical outlet when
the product is not in use and before cleaning it. Allow to
cool before putting on or taking off parts.
5. Do not use attachments not recommended for use with
this product by the product manufacturer. Attachments
may become hot during use, so allow them to cool before
handling.
6. Do not place the product on or near a hot gas or electric
burner, or in a heated oven.
7. Use extreme caution when moving a product containing
hot oil or other hot liquids.
8. Do not leave unattended while in use.
9. Do not plug or unplug the product into/from an electrical
outlet with a wet hand.
10. Take proper precautions to prevent the risk of burns,
fire, or other personal or property damage, as this
product generates heat during use.
11. If the product falls into water, immediately unplug it
from the electrical outlet.
Page 4

!
12. Do not touch or reach into the water.
13. Use in a well-ventilated area. Keep at least 4-6 inches
of space on all sides to allow adequate air circulation.
14. Do not operate this appliance if it has a damaged cord
or plug, if it is not working properly or if it has been
damaged or dropped. If the supply cord is damaged, it
must be replaced by the manufacturer or its service agent
or a similarly qualified person in order to avoid a hazard.
15. This product has no user-serviceable parts. Do not
attempt to examine or repair it yourself. Only qualified
service personnel should perform any servicing; take the
product to the appliance repair shop of your choice for
inspection and repair.
16. This device is not intended for use by persons with
reduced capacity on the physical, mental or sensory or
lack of experience and knowledge (including children),
unless they have had instructions to use the appliance by
a person responsible for their safety use of the appliance
and understand the hazards involved. Children should be
supervised to ensure they do not play with the device.
17. Keep the appliance and its cord out of reach of children
less than 8 years.
18. This appliance is not intended to be operated by means
of external timer or separate remote-control system.
19. Caution, hot surface. [symbol IEC 604175041(2002-10)]
20. This appliance is intended to be used in household and
similar applications such as:
• Staff kitchen areas in shops, offices and other working
environments;
• Farm houses;
• By clients in hotels, motels and other residential type
environments;
• Bed and breakfast type environments.
Page 5

!
CAUTION — To reduce the risk of personal injury:
- This product is intended solely for indoor, non-
commercial, non-industrial, household use in
cooking/heating food for human consumption. Do not
use the product outdoors or for any other purpose.
- Do not allow the Power Cord to hang where it may be
tripped over or pulled(e.g., over the edge of a table or
counter), and do not allow the Cord to touch hot surfaces.
- Always wear protective oven mitts or heat-resistant
gloves when using this product and use utensils.
- To disconnect from the electrical outlet, pull directly on
the Plug; do not pull on the Power Cord.
- Always use the product on a flat, level, stable, heat-
resistant surface.
SPECIAL INSTRUCTIONS:
- A short power-supply cord is provided to reduce the risk
resulting from becoming entangled in or tripping over a
longer cord. Extension cords are available and may be
used if care is exercised in their use. If an extension cord
is used:
- The marked electrical rating of the extension cord must
be at least as great as that of the product;
- The cord should be arranged so that it will not drape over
the countertop or tabletop where it can be pulled on by
children or tripped over unintentionally;
- The extension cord must be a grounding-type 3-wire
cord.
Page 6

!
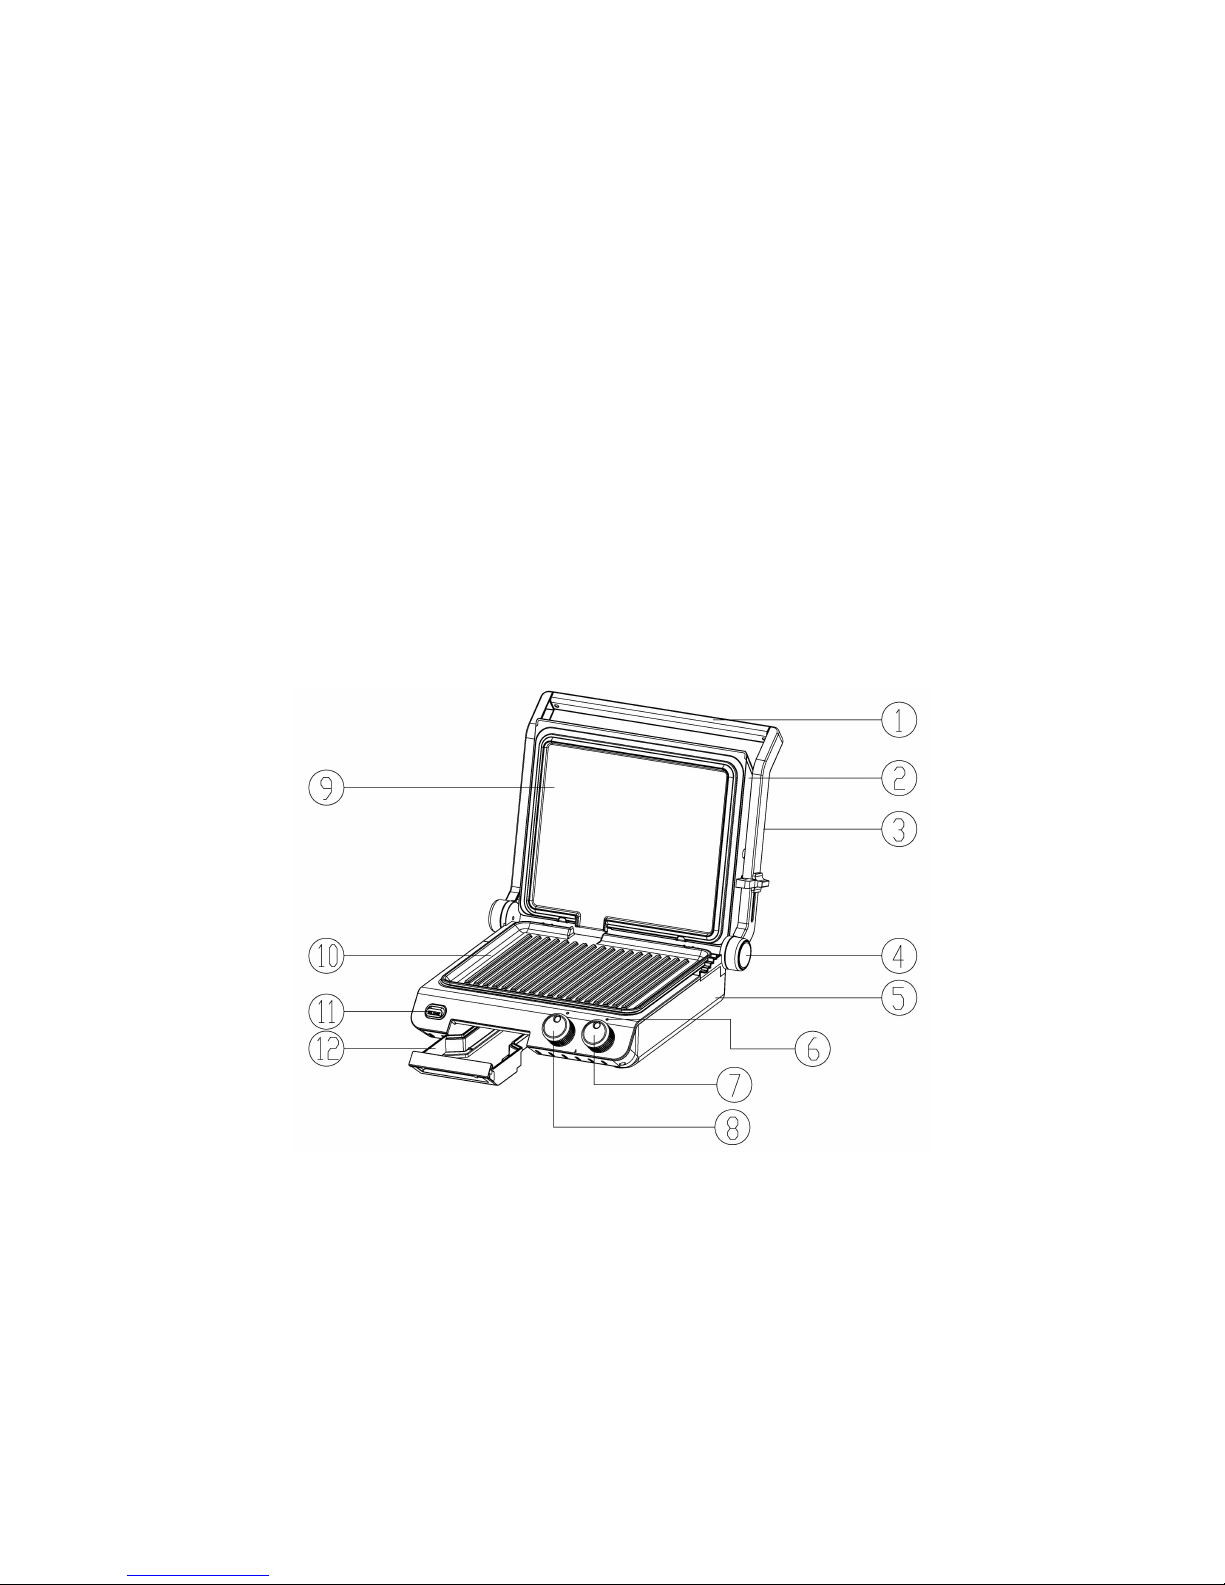
PARTS IDENTIFICATION
1. handle 8. Timer knob
2. Upper cover 9. Upper grill
3. Handle right 10. Lower grill
4. Handle cover plate 11. button
5. Base 12. Oil plate
6. Led cover
7. Thermostat knob
BEFORE FIRST USE
Press the Upper Plate Release Button to remove the upper Grill Plate and then press the Lower
Plate Release Button to remove the lower Grill Plate. Clean the Grill Plates, the Drip Cups, and the
Scraper/Cleaning Tool in warm, soapy water; rinse and let dry. These parts may also be washed in
an automatic dishwasher. NEVER IMMERSE THE BASE INTO OR EXPOSE IT TO WATER.
Reinsert the upper and lower Grill Plates into their respective positions before use. See the
“Inserting/Changing Plates” subsection below for detailed instructions.
NOTE: When using the Grill Plates for the first time, spray or apply a thin layer of cooking oil onto
the nonstick surfaces of the Plates with a paper towel in order to season the nonstick surface. As
necessary, reapply a thin layer of cooking oil throughout the life of the Plates to maintain best
nonstick performance.
Page 7

!
To Assemble
Place the product on a clean, flat, level, stable, heat-resistant surface with at least 4-6 inches of
space on all sides to allow adequate air circulation.
Positioning the Upper Housing:
1. Closed/Heating Position: The Upper Housing is closed and rests on the Base. Use this position
when starting/heating the product and when grilling most foods.
2. Open Position: The Upper Housing is open. Place
the Product in this position when starting to use
the Grill function, and when grilling certain foods
in which the upper Grill Plate is not appropriate,
such as pizza or fish. Lift the Handle until the
Upper Housing is at about a 90°angle.
3. Flat Position: The
Upper Housing is open and level with the Base, creating
two cooking surfaces.
Use the product in this position when grilling
larger amounts of food.
To flatten, pull upon the Hinge Release and push
the Handle down.
Inserting/Changing Plates:
Slide the notches in the rear of the lower Grill Plate into the retaining hooks, then press down
on the front of the plate to snap it into place. Repeat to attach the upper Grill Plate.
HOW TO USE
WARNING: The Grill Plates and metal surfaces of the Upper Housing and Handle will become very
hot during use. To avoid a burn hazard, wear protective oven mitts or heat-resistant gloves when
using and touch only the black portion of the Handle.
NOTICE: Use only heat-resistant wooden, plastic, or silicone utensils to add/remove food. Do not
use a metal utensil as it may scratch the surface of the item.
NOTE: During the initial use this item may emit some light smoke. This is normal and will subside
with further use.
!
Hinge&&&&&&&
Release&
!
Page 8

!
Contact Grill:
Use to cook burgers, boneless or thin pieces of meat and fish, and vegetables. In the “Closed”
position, food will cook quickly since both sides cook at the same time.
- Set the product to the “Closed” position and plug the power cord into a standard electrical
outlet. The Power Indicator will illuminate red, indicating power is on.
- Place a Drip Cup below the drip spout.
- Turn the Temperature Control to the desired setting, as listed below
Setting
Temperature
min
close
max
425℉(230℃)
NOTE: It may take up to seven minutes to reach the selected cooking temperature. The Ready
Indicator will illuminate green when the product is ready for cooking and will alternate on and
off during cooking, indicating the product is maintaining the selected cooking temperature.
1. Place food onto the lower Grill Plate and lower the upper Grill Plate onto the food (the “Closed”
position). The upper Grill Plate will self-adjust to the thickness of the food. If cooking items in
which the upper Grill Plate is not needed, such as kebabs or fish, leave the product in the
“Open” position.
NOTE: If cooking more than one piece of food at a time, food items should be similar in
thickness to ensure the upper Grill Plate rests evenly on the food for even cooking.
2. When cooking is completed, remove food, unplug the product from the electrical outlet, and
allow the product to cool (at least 30 minutes) before moving, disassembling, or cleaning it.
CAUTION: Always unplug the product from the electrical outlet when cooking is complete and
when the product is not in use.
Panini Press:
Use upper and lower Grill Plates in the “Closed” position to grill any combination of ingredients (for
example, vegetables, meats, and cheeses) layered between two pieces of bread or a folded
tortilla/pita.
1. Follow steps 1 through 3 in the “Contact Grill” section, above.
2. Place food on the Lower Grill Plate and lower the upper Grill Plate onto the food. The Upper
Housing will self-adjust to the thickness of the food.
NOTE: If cooking more than one piece of food at a time, food items should be similar in thickness
to ensure the upper Grill Plate rests evenly on the food for even cooking.
3. When cooking is completed, remove food, unplug the product from the electrical outlet, and
allow the product to cool (about 30 minutes) before moving, disassembling, or cleaning it.
Page 9

!
CAUTION: Always unplug the product from the electrical outlet when cooking is complete and
when the product is not in use.
Flat Grill:
Using the product in the “Flat” position doubles the cooking surface area and allows cooking of
items with different thicknesses simultaneously, or cooking foods on different plates to avoid
combining flavors. Use for cooking French toast, hash browns, open face sandwiches, and kebabs.
1. Set the product to the “Flat” position and plug the power cord into a standard electrical outlet.
The Power Indicator will illuminate red, indicating power is on.
2. Use both Drip Cups when cooking in the Flat position.
3. Turn the Temperature Control to the desired setting.
NOTE: It may take up to eight minutes to reach the selected cooking temperature. The Ready
indicator will illuminate green when the product is ready for cooking. The Ready indicator will
alternate on and off during cooking, indicating the product is heating to maintain the selected
cooking temperature.
4. Place food onto the Grill Plates.
5. When cooking is completed, remove food, unplug the product from the electrical outlet, and
allow the product to cool (about 30 minutes) before moving, disassembling, or cleaning it.
CAUTION: Always unplug the product from the electrical outlet when cooking is complete and
when the product is not in use.
Page 10

!
CLEANING AND CARE
WARNING: Always make sure the product is unplugged
from the electrical outlet and allowed to completely cool
before relocating, disassembling, or cleaning it.
NOTICE: Do not use harsh or abrasive cleaners or pads to
clean the product.
1. After completely cooling, gently remove the Drip Cups
and discard contents.
2. Remove any leftover food from the Grill Plates using the
Scraper/Cleaning Tool.
3. Clean the Grill Plates, Drip Cups, and Scraper/Cleaning
Too in warm, soapy water; rinse and let dry. These parts
may also be washed in an automatic dishwasher.
WARNING: Do not immerse the Base into or expose it to
water or other liquids.
4. Wipe the Upper Housing and Base with a water-
dampened sponge and dry with a soft cloth or paper
towel.
5. Store the product in a cool, dry location.
ENVIRONMENT
CAUTION:
Do not dispose of this product as it has with other household products. There is a separation of this
waste product into communities, you will need to inform your local authorities about the places where
you can return this product. In fact, electrical and electronic products contain hazardous substances that
have harmful effects on the environment or human health and should be recycled. The symbol here indicates
that electrical and electronic equipment should be chosen carefully, a wheeled waste container is marked with a
cross.
Adeva SAS / H.Koenig Europe - 8 rue Marc Seguin - 77290 Mitry Mory – France
www.hkoenig.com - sav@hkoenig.com - contact@hkoenig.com - Tél: +33 1 64 67 00 01
Page 11

!
FRANÇAIS
MANUEL D'UTILISATION
MESURES DE SÉCURITÉ IMPORTANTES
Lorsque vous utilisez des appareils électriques, respectez les précautions de base,
notamment ce qui suit :
LIRE TOUTES LES INSTRUCTIONS AVANT
UTILISATION
ATTENTION — Afin de réduire le risque d’incendie, une
électrocution ou une blessure sérieuse :
1. Employez uniquement du courant alternatif 220-240
volts, 50/60 Hz. Usage domestique seulement.
2. Ne touchez pas les surfaces chaudes. Utilisez la poignée.
3. N'immergez pas le cordon d'alimentation, la fiche ou le
grill dans de l'eau ou autre liquide.
4. Débranchez le cordon d'alimentation de la prise
électrique lorsque le grill n'est pas utilisé et avant de le
nettoyer. Laissez-le refroidir avant de monter/démonter
des pièces.
5. N'utilisez pas d'accessoires qui ne soient pas
recommandés par le fabricant de l’appareil. Les
accessoires peuvent devenir chauds pendant l'utilisation.
Laissez-les refroidir avant de les manipuler.
6. Ne placez pas le grill sur ou près d'un brûleur à gaz ou
électrique ou dans un four chaud.
7. Soyez extrêmement prudent lorsque vous déplacez
quelque chose contenant de l'huile chaude ou tout autre
liquide chaud.
8. Ne laissez pas le grill sans surveillance pendant
l'utilisation.
9. Ne branchez/débranchez pas le grill avec les mains
mouillées.
10. Prenez les précautions nécessaires pour éviter tout
Page 12

!
risque de brûlure, d’incendie ou d’autres dommages
personnels ou matériels, car ce produit génère de la
chaleur lors de son utilisation.
11. Si le produit tombe dans l'eau, débranchez-le
immédiatement de la prise de courant.
12. Ne tentez pas de le récupérer dans l'eau.
13. Utilisez le grill dans des zones bien ventilées. Gardez
au moins 10-15 cm d’espace de chaque côté pour
permettre une circulation d’air adéquate.
14. N’utilisez pas cet appareil si le cordon d'alimentation
ou la fiche est endommagée, s'il ne fonctionne pas
correctement, s'il est abimé ou s’il est tombé. Si le
cordon d'alimentation est endommagé, il doit être
remplacé par le fabricant, son réparateur ou une
personne de même qualification afin d'éviter tout
accident.
15. Ce produit ne contient aucune pièce réparable par
l'utilisateur. N'essayez pas d'examiner ou de réparer
vous-même l’appareil. Seul le personnel de maintenance
qualifié est habilité à effectuer une réparation. Apportez
le grill à l’atelier de réparation de votre choix pour son
inspection et sa réparation.
16. Cet appareil n'est pas destiné à être utilisé par des
personnes ayant une capacité réduite sur le plan
physique, mental ou sensoriel ou ayant un manque
d'expérience et de connaissances (y compris les
enfants), à moins qu'elles n'aient reçu des instructions
pour utiliser l'appareil de la part d'une personne
responsable de leur sécurité. et compris les dangers
encourus. Les enfants doivent être surveillés afin de
s'assurer qu'ils ne jouent pas avec le grill.
17. Tenez l'appareil et son cordon à distance des enfants
de moins de 8 ans.
18. L'appareil n'est pas conçu pour fonctionner avec une
Page 13

!
minuterie externe ou bien un système à télécommande.
19. Attention surface chaude. [symbole IEC 604175041 (2002-10)]
20. Cet appareil est destiné à être utilisé dans un cadre
domestique et dans des lieux similaires tels que :
• les cuisines du personnel dans les magasins, les
bureaux et autres environnements de travail ;
• les exploitations agricoles ;
• par les clients dans les hôtels, les motels et les autres
lieux à caractère résidentiel.
• Les hébergements de type chambres d’hôtes.
MISE EN GARDE - Pour réduire les risques de blessures :
- Ce produit est exclusivement destiné à un usage
domestique et à l'intérieur d’un bâtiment non commercial
et non industriel, pour la cuisson ou le chauffage
d'aliments destinés à la consommation humaine.
N'utilisez pas le grill à l'extérieur ou à d'autres fins.
- Ne laissez pas le cordon d'alimentation pendre à des
endroits où quelqu’un pourrait le tirer par mégarde (par
exemple, au bord d'une table ou d'un comptoir), et ne
laissez pas le cordon être en contact avec des surfaces
chaudes.
- Portez toujours des gants de protection ou résistants à la
chaleur lorsque vous utilisez ce produit et utilisez des
ustensiles.
- Pour débrancher le grill d'une prise électrique, tirez
directement sur la prise ; ne tirez pas sur le cordon
d'alimentation.
- Utilisez toujours le grill sur une surface plane, stable et
résistante à la chaleur.
Page 14
!
INSTRUCTIONS SPÉCIALES
- Un cordon électrique court est fourni pour réduire le
risque de s'emmêler ou de trébucher sur un long cordon.
Des rallonges sont disponibles et peuvent être utilisées
avec prudence. En cas d'utilisation d'une rallonge :
- Les caractéristiques électriques de la rallonge doivent
être au moins aussi élevées que celles du produit.
- Le cordon d'alimentation doit être positionné de manière
à ce qu'il ne soit pas enroulé sur le comptoir ou sur la
table où des enfants pourraient le tirer ou trébucher
dessus involontairement.
- La rallonge doit posséder 3 fils pour être reliée à la terre.
IDENTIFICATION DES ÉLÉMENTS
1. Poignée
2. Couvercle supérieur
3. Partie droite de la poignée .
4. Protection de la poignée
5. Base du grill
6. Voyant lumineux
7. Thermostat
8. Minuterie
9. Plaque supérieure du grill
10. Plaque inférieure du grill
11. Bouton
12. Bac d’huile
Page 15

!
AVANT LA PREMIÈRE UTILISATION
Appuyez sur le bouton de déblocage de la plaque supérieure pour la retirer de la base, puis
appuyez sur le bouton de dégagement de la plaque inférieure pour la retirer de la base. Nettoyez
les plaques de gril, les bacs d'égouttement et le grattoir dans de l'eau chaude savonneuse; rincez
et laissez sécher. Ces éléments peuvent également être lavés dans un lave-vaisselle automatique.
NE JAMAIS IMMERGER LA BASE DU GRILL DANS L'EAU OU LA MOUILLER.
Replacez les plaques supérieure et inférieure dans leur position respective avant d’utiliser le grill.
Voir le paragraphe intitulé : «Montage / Changement des plaques» ci-dessous pour des instructions
détaillées.
REMARQUE : Lorsque vous utilisez les plaques du gril pour la première fois, vaporisez ou appliquez
une fine couche d'huile de cuisson sur les surfaces anti-adhésives des plaques. Si nécessaire,
réappliquez une fine couche d'huile de cuisson pendant toute la durée de vie des plaques afin de
conserver les propriétés anti-adhésives.
Assemblage :
Placez le produit sur une surface propre, plane, stable et résistante à la chaleur avec au moins 10
à 15 cm d'espace sur les côtés pour permettre une circulation d'air adéquate.
Positionnement de la partie supérieure :
1. Position fermée: la partie supérieure est
rabaissée et repose sur la base. Respectez cette position
lors du préchauffage du grill et quand vous
grillez des aliments.
2. Position ouverte : la partie supérieure est relevée. Respectez
cette position quand vous chargez le gril et lors de la cuisson
de certains aliments pour lesquels la plaque supérieure n'est pas
appropriée, comme la pizza ou le poisson. Soulevez la poignée
jusqu’à ce que la partie supérieure soit à un angle d'environ 90 °.
3. Position à plat: le grill est entièrement ouvert et à niveau
avec la base, pour créer deux surfaces de cuisson.
Utilisez le grill dans cette position lorsque vous désirez
Griller de plus grandes quantités de nourriture.
Pour adopter cette position, tirez sur le loquet de la
charnière et poussez la poignée vers le bas.
Montage / Changement des plaques :
Faites glisser les encoches situées à l'arrière de la plaque inférieure dans les crochets de
retenue de la base, puis appuyez sur l'avant de la plaque pour l'encliqueter. Répétez l'opération
pour fixer la plaque de gril supérieure.
!
Libération de la
charnière
!
Page 16

!
MODE D’EMPLOI
ATTENTION : Les plaques du gril et les surfaces métalliques de la partie supérieure et de la
poignée deviennent très chaudes pendant l'utilisation. Pour éviter tout risque de brûlure, portez
des gants de protection ou résistants à la chaleur et ne touchez que la partie noire de la poignée.
REMARQUE : Utilisez uniquement des ustensiles en bois, en plastique ou en silicone résistant à
la chaleur pour déposer /enlever des aliments. N'utilisez pas d'ustensile en métal car il pourrait
rayer les surfaces.
REMARQUE : Lors de la première utilisation, l’appareil peut émettre une légère fumée. Ceci est
normal et disparaîtra au bout de quelque temps.
Grill
Utilisez-le pour griller des hamburgers, des morceaux de viande et de poisson désossés ou fins,
ainsi que des légumes. En position «Fermé», les aliments grillent rapidement car les deux côtés
cuisent en même temps.
- Placez le grill sur la position «Fermé» et branchez le cordon d’alimentation sur une prise
électrique standard. Le voyant lumineux s'allume en rouge, indiquant que l'appareil est sous
tension.
- Placez un bac sous le bec d'égouttement.
- Tournez le thermostat sur la température souhaitée, comme indiqué ci-dessous.
Réglage
Température
min
fermer
max
230°C
REMARQUE : Sept minutes peuvent être nécessaires pour atteindre la température de cuisson
sélectionnée. Le voyant « Ready » s'allume en vert lorsque le grill est prêt pour la cuisson et
s'allume et s'éteint en alternance pendant la cuisson, indiquant que le produit maintient la
température de cuisson sélectionnée.
1. Placez les aliments sur la plaque inférieure du gril et abaissez la plaque supérieure sur les
aliments (position «Fermé»). La plaque supérieure du gril s'ajuste automatiquement à
l'épaisseur de la nourriture. Si vous cuisinez des aliments pour lesquels la plaque supérieure
n'est pas nécessaire, telles que des brochettes ou du poisson, laissez le grill en position
«Ouvert».
REMARQUE: Si vous cuisinez plusieurs morceaux à la fois, leur épaisseur doit être similaire
pour que la plaque supérieure du gril repose sur tous les aliments afin que la cuisson soit
uniforme.
2. Une fois la cuisson terminée, retirez les aliments, débranchez le cordon de la prise électrique et
Page 17

!
laissez le grill refroidir (au moins 30 minutes) avant de le déplacer, de le démonter ou de le
nettoyer.
MISE EN GARDE: Débranchez toujours le cordon de la prise murale lorsque la cuisson est
terminée et que vous n’utilisez plus le grill.
Presse à paninis
Utilisez les plaques de gril supérieure et inférieure en position «Fermé» pour griller toute
combinaison d’aliments (par exemple, légumes, viandes et fromages) en couches entre deux
tranches de pain ou une tortilla / pita pliée en deux.
1. Suivez les étapes 1 à 3 du paragraphe : «Grill» ci-dessus.
2. Placez les aliments sur la plaque inférieure du gril et abaissez la plaque supérieure sur les
aliments. La partie supérieure s'ajustera automatiquement à l'épaisseur de la nourriture.
REMARQUE: Si vous cuisinez plusieurs morceaux à la fois, leur épaisseur doit être similaire
pour que la plaque supérieure du gril repose sur tous les aliments afin que la cuisson soit
uniforme.
3. Une fois la cuisson terminée, retirez les aliments, débranchez le cordon de la prise électrique et
laissez le grill refroidir (environ 30 minutes) avant de le déplacer, de le démonter ou de le
nettoyer.
MISE EN GARDE: Débranchez toujours le cordon de la prise murale lorsque la cuisson est
terminée et que vous n’utilisez plus le grill.
Grill à plat
L'utilisation du grill en position à plat double la surface de cuisson et permet de cuire simultanément
des aliments d'épaisseurs différentes ou de cuire des aliments destinés à des plats différents pour
éviter de mélanger les saveurs. Utilisez cette position pour les toasts, les pommes de terre
rissolées, les sandwichs ouverts et les brochettes.
1. Disposez le grill sur la position à plat et branchez le cordon d’alimentation dans une prise
électrique standard. Le voyant d'alimentation s'allume en rouge, indiquant que l'appareil est
sous tension.
2. Utilisez les deux bacs d'égouttement lorsque vous cuisinez à plat.
3. Tournez le thermostat à la température désirée.
REMARQUE : Cela peut prendre jusqu'à sept minutes pour atteindre la température de cuisson
sélectionnée. Le voyant « Ready » s'allume en vert lorsque le grill est prêt pour la cuisson. Puis
il s'allume et s'éteint en cours de cuisson, indiquant que le grill maintient la température de
cuisson sélectionnée.
4. Placez les aliments sur les plaques du gril.
5. Une fois la cuisson terminée, retirez les aliments, débranchez le cordon de la prise électrique et
Page 18

!
laissez le grill refroidir (environ 30 minutes) avant de le déplacer, de le démonter ou de le
nettoyer.
MISE EN GARDE : Débranchez toujours le cordon de la prise murale lorsque la cuisson est
terminée et que vous n’utilisez plus le grill.
NETTOYAGE ET ENTRETIEN
ATTENTION : Assurez-vous toujours que l’appareil soit
débranché de la prise murale et qu’il ait complètement
refroidi avant de le déplacer, de le démonter ou de le
nettoyer.
REMARQUE : N'utilisez pas de nettoyants corrosifs ou
d’éponges abrasives pour nettoyer le grill.
1. Une fois complètement refroidi, retirez doucement les
bacs et jetez le contenu.
2. Enlevez les restes de nourriture des plaques à l'aide du
grattoir.
3. Nettoyez les plaques, les bacs d'égouttement et le
grattoir dans de l'eau tiède savonneuse; rincez et laissez
sécher. Ces éléments peuvent également être lavés dans
un lave-vaisselle automatique.
AVERTISSEMENT : Ne plongez pas la base du grill dans
l'eau ou tout autre liquide et ne la mouillez pas.
4. Essuyez la partie supérieure et la base avec une éponge
imbibée d’eau et séchez-les avec un chiffon doux.
5. Rangez l’appareil dans un endroit frais et sec.
ENVIRONNEMENT
ATTENTION :
Vous ne devez pas vous débarrasser de cet appareil avec vos déchets ménagers. Un système de collecte
sélective pour ce type de produit est mis en place par les communes, vous devez vous renseigner auprès de
votre mairie afin d'en connaître les emplacements. En effet, les produits électriques et électroniques peuvent
contenir des substances dangereuses qui ont des effets néfastes sur l'environnement ou la santé humaine et doivent
être recyclés. Le symbole ci-contre indique que les équipements électriques et électroniques font l'objet d'une collecte
sélective, il représente une poubelle sur roues barrée d'une croix.
Adeva SAS / H.Koenig Europe - 8 rue Marc Seguin - 77290 Mitry Mory - France
www.hkoenig.com - sav@hkoenig.com - contact@hkoenig.com - Tél: +33 1 64 67 00 01
Page 19

!
DEUTSCH
INSTRUCTIONS MANUAL
IMPORTANT LIFEGUARDS
When using electrical products, always follow basic safety precautions, including the
following:
READ ALL INSTRUCTIONS BEFORE USE.
WARNING — To reduce the risk of fire, electric shock, or
serious personal injury:
1. Use only on AC 220-240 Volt, 50/60 Hz. Use only for
household.
2. Do not touch hot surfaces. Use the Handle.
3. Do not immerse the Power Cord, Plug, or Base in
water/liquid.
4. Unplug the Power Cord from the electrical outlet when
the product is not in use and before cleaning it. Allow to
cool before putting on or taking off parts.
5. Do not use attachments not recommended for use with
this product by the product manufacturer. Attachments
may become hot during use, so allow them to cool before
handling.
6. Do not place the product on or near a hot gas or electric
burner, or in a heated oven.
7. Use extreme caution when moving a product containing
hot oil or other hot liquids.
8. Do not leave unattended while in use.
9. Do not plug or unplug the product into/from an electrical
outlet with a wet hand.
10. Take proper precautions to prevent the risk of burns,
fire, or other personal or property damage, as this
product generates heat during use.
11. If the product falls into water, immediately unplug it
from the electrical outlet.
12. Do not touch or reach into the water.
13. Use in a well-ventilated area. Keep at least 4-6 inches
Page 20

!
of space on all sides to allow adequate air circulation.
14. Do not operate this appliance if it has a damaged cord
or plug, if it is not working properly or if it has been
damaged or dropped. If the supply cord is damaged, it
must be replaced by the manufacturer or its service agent
or a similarly qualified person in order to avoid a hazard.
15. This product has no user-serviceable parts. Do not
attempt to examine or repair it yourself. Only qualified
service personnel should perform any servicing; take the
product to the appliance repair shop of your choice for
inspection and repair
16. This device is not intended for use by persons with
reduced capacity on the physical, mental or sensory or
lack of experience and knowledge (including children),
unless they have had instructions to use the appliance by
a person responsible for their safety use of the appliance
and understand the hazards involved. Children should be
supervised to ensure they do not play with the device.
17. Keep the appliance and its cord out of reach of children
less than 8 years.
18. This appliance is not intended to be operated by means
of external timer or separate remote-control system
19. Caution, hot surface. [symbol IEC 60417-
5041(2002-10)]
20. This appliance is intended to be used in household and
similar applications such as:
• Staff kitchen areas in shops, offices and other working
environments;
• Farm houses;
• By clients in hotels, motels and other residential type
environments;
• Bed and breakfast type environments.
Page 21

!
CAUTION — To reduce the risk of personal injury:
- This product is intended solely for indoor, non-
commercial, non-industrial, household use in
cooking/heating food for human consumption. Do not
use the product outdoors or for any other purpose.
- Do not allow the Power Cord to hang where it may be
tripped over or pulled(e.g., over the edge of a table or
counter), and do not allow the Cord to touch hot surfaces.
- Always wear protective oven mitts or heat-resistant
gloves when using this product and use utensils.
- To disconnect from the electrical outlet, pull directly on
the Plug; do not pull on the Power Cord.
- Always use the product on a flat, level, stable, heat-
resistant surface.
SPECIAL INSTRUCTIONS:
- A short power-supply cord is provided to reduce the risk
resulting from becoming entangled in or tripping over a
longer cord. Extension cords are available and may be
used if care is exercised in their use. If an extension cord
is used:
- The marked electrical rating of the extension cord must
be at least as great as that of the product;
- The cord should be arranged so that it will not drape over
the countertop or tabletop where it can be pulled on by
children or tripped over unintentionally;
- The extension cord must be a grounding-type 3-wire
cord.
Page 22

!
PARTS IDENTIFICATION
1. handle
2. Upper cover
3. Handle right
4. Handle cover plate
5. Base
6. Led cover
7. Thermostat knob
8. Timer knob
9. Upper grill
10. Lower grill
11. Button
12. Oil plate
BEFORE FIRST USE
Press the Upper Plate Release Button to remove the upper Grill Plate and then press the Lower
Plate Release Button to remove the lower Grill Plate. Clean the Grill Plates, the Drip Cups, and the
Scraper/Cleaning Tool in warm, soapy water; rinse and let dry. These parts may also be washed in
an automatic dishwasher. NEVER IMMERSE THE BASE INTO OR EXPOSE IT TO WATER.
Reinsert the upper and lower Grill Plates into their respective positions before use. See the
“Inserting/Changing Plates” subsection below for detailed instructions.
NOTE: When using the Grill Plates for the first time, spray or apply a thin layer of cooking oil onto
the nonstick surfaces of the Plates with a paper towel in order to season the nonstick surface. As
necessary, reapply a thin layer of cooking oil throughout the life of the Plates to maintain best
nonstick performance.
To Assemble
Place the product on a clean, flat, level, stable, heat-resistant surface with at least 4-6 inches of
space on all sides to allow adequate air circulation.
Page 23

!
Positioning the Upper Housing:
1. Closed/Heating Position: The Upper Housing is
closed and rests on the Base. Use this position
when starting/heating the product and when
grilling most foods.
2. Open Position: The Upper Housing is open. Place
the Product in this position when starting to use
the Grill function, and when grilling certain foods
in which the upper Grill Plate is not appropriate,
such as pizza or fish. Lift the Handle until the
Upper Housing is at about a 90°angle.
3. Flat Position: The
Upper Housing is open and level with the Base,
creating two cooking surfaces.
Use the product in this position when grilling
larger amounts of food.
To flatten, pull upon the Hinge Release and push
the Handle down.
Inserting/Changing Plates:
Slide the notches in the rear of the lower Grill Plate into the retaining hooks, then press down
on the front of the plate to snap it into place. Repeat to attach the upper Grill Plate.
HOW TO USE
WARNING: The Grill Plates and metal surfaces of the Upper Housing and Handle will become very
hot during use. To avoid a burn hazard, wear protective oven mitts or heat-resistant gloves when
using and touch only the black portion of the Handle.
NOTICE: Use only heat-resistant wooden, plastic, or silicone utensils to add/remove food. Do not
use a metal utensil as it may scratch the surface of the item.
NOTE: During the initial use this item may emit some light smoke. This is normal and will subside
with further use.
Contact Grill:
Use to cook burgers, boneless or thin pieces of meat and fish, and vegetables. In the “Closed”
position, food will cook quickly since both sides cook at the same time.
- Set the product to the “Closed” position and plug the power cord into a standard electrical
!
Hinge&&&&&&&
Release&
!
Page 24

!
outlet. The Power Indicator will illuminate red, indicating power is on.
- Place a Drip Cup below the drip spout.
- Turn the Temperature Control to the desired setting, as listed below
Setting
Temperature
min
close
max
425℉(230℃)
NOTE: It may take up to seven minutes to reach the selected cooking temperature. The Ready
Indicator will illuminate green when the product is ready for cooking and will alternate on and
off during cooking, indicating the product is maintaining the selected cooking temperature.
1. Place food onto the lower Grill Plate and lower the upper Grill Plate onto the food (the “Closed”
position). The upper Grill Plate will self-adjust to the thickness of the food. If cooking items in
which the upper Grill Plate is not needed, such as kebabs or fish, leave the product in the
“Open” position.
NOTE: If cooking more than one piece of food at a time, food items should be similar in
thickness to ensure the upper Grill Plate rests evenly on the food for even cooking.
2. When cooking is completed, remove food, unplug the product from the electrical outlet, and
allow the product to cool (at least 30 minutes) before moving, disassembling, or cleaning it.
CAUTION: Always unplug the product from the electrical outlet when cooking is complete and
when the product is not in use.
Panini Press:
Use upper and lower Grill Plates in the “Closed” position to grill any combination of ingredients (for
example, vegetables, meats, and cheeses) layered between two pieces of bread or a folded
tortilla/pita.
1. Follow steps 1 through 3 in the “Contact Grill” section, above.
2. Place food on the Lower Grill Plate and lower the upper Grill Plate onto the food. The Upper
Housing will self-adjust to the thickness of the food.
NOTE: If cooking more than one piece of food at a time, food items should be similar in thickness
to ensure the upper Grill Plate rests evenly on the food for even cooking.
3. When cooking is completed, remove food, unplug the product from the electrical outlet, and
allow the product to cool (about 30 minutes) before moving, disassembling, or cleaning it.
CAUTION: Always unplug the product from the electrical outlet when cooking is complete and
when the product is not in use.
Page 25

!
Flat Grill:
Using the product in the “Flat” position doubles the cooking surface area and allows cooking of
items with different thicknesses simultaneously, or cooking foods on different plates to avoid
combining flavors. Use for cooking French toast, hash browns, open face sandwiches, and kebabs.
1. Set the product to the “Flat” position and plug the power cord into a standard electrical outlet.
The Power Indicator will illuminate red, indicating power is on.
2. Use both Drip Cups when cooking in the Flat position.
3. Turn the Temperature Control to the desired setting.
NOTE: It may take up to eight minutes to reach the selected cooking temperature. The Ready
indicator will illuminate green when the product is ready for cooking. The Ready indicator will
alternate on and off during cooking, indicating the product is heating to maintain the selected
cooking temperature.
4. Place food onto the Grill Plates.
5. When cooking is completed, remove food, unplug the product from the electrical outlet, and
allow the product to cool (about 30 minutes) before moving, disassembling, or cleaning it.
CAUTION: Always unplug the product from the electrical outlet when cooking is complete and
when the product is not in use.
Page 26

!
CLEANING AND CARE
WARNING: Always make sure the product is unplugged
from the electrical outlet and allowed to completely cool
before relocating, disassembling, or cleaning it.
NOTICE: Do not use harsh or abrasive cleaners or pads to
clean the product.
1. After completely cooling, gently remove the Drip Cups
and discard contents.
2. Remove any leftover food from the Grill Plates using the
Scraper/Cleaning Tool.
3. Clean the Grill Plates, Drip Cups, and Scraper/Cleaning
Too in warm, soapy water; rinse and let dry. These parts
may also be washed in an automatic dishwasher.
WARNING: Do not immerse the Base into or expose it to
water or other liquids.
4. Wipe the Upper Housing and Base with a water-
dampened sponge and dry with a soft cloth or paper
towel.
5. Store the product in a cool, dry location.
UMWELT
ACHTUNG:
Werfen Sie nicht dieses Produkt, wie es mit anderen Haushaltsprodukten hat. Es gibt eine Mülltrennungs
von diesem Produkt in Gemeinden, Sie müssen Ihre lokalen Behörden über die Orte, wo man dieses
Produkt zurückgeben können zu informieren. In der Tat enthalten elektrische und elektronische Produkte
gefährliche Stoffe, die schädliche Auswirkungen auf die Umwelt oder die menschliche Gesundheit haben und
sollte recycelt werden. Das Symbol hier darauf hinweisen, dass elektrische oder elektronische Geräte sollten
sorgfältig ausgewählt werden, ist ein fahrbarer Abfallbehälter mit einem Kreuz markiert.
Adeva SAS / H.Koenig Europe - 8 rue Marc Seguin - 77290 Mitry Mory - France
www.hkoenig.com - sav@hkoenig.com - contact@hkoenig.com - Tél: +33 1 64 67 00 01
Page 27

!
DEUTSCH
BEDIENUNGSANLEITUNG
WICHTIGE SICHERHEITSHINWEISE
Während der Nutzung von elektrischen Geräten, befolgen Sie immer grundliegende
Sicherheitsvorkehrungen, einschließlich die folgenden:
LESEN SIE ALLE ANWEISUNGEN VOR DEM
GEBRAUCH.
WARNUNG- Um das Risiko eines Brandes, eines
Stromschlages oder einer schweren Körperverletzung zu
vermeiden:
1. Benutzen Sie das Gerät ausschließlich mit AC 220-240
Volt, 50/60 Hz. Ausschließlich für die
Haushaltsnutzung geeignet.
2. Berühren Sie die heißen Flächen nicht. Benutzen Sie
den Griff.
3. Tauchen Sie nie das Stromkabel, den Stecker oder die
Grundlage in Wasser/Flüssigkeiten.
4. Ziehen Sie den Stecker aus der Steckdose, wenn das
Produkt nicht benutzt wird, und während der
Reinigung. Lassen Sie es abkühlen, bevor Sie Teile
abbauen oder montieren.
5. Benutzen Sie kein Zubehör, das nicht von dem
Hersteller für dieses Produkt empfohlen worden ist.
Das Zubehör kann während der Nutzung heiß werden.
Deswegen lassen Sie dieses abkühlen, bevor Sie es
berühren.
6. Platzieren Sie das Gerät nicht auf/ in der Nähe von
einem heißen Gas- oder Elektrobrenner, oder in einem
erhitzten Ofen.
7. Seien Sie besonders vorsichtig, wenn Sie das Gerät
bewegen, wenn es heißes Öl und andere heiße
Flüssigkeiten beinhaltet.
8. Bei Nichtgebrauch, lassen Sie das Gerät nicht
Page 28

!
unbeaufsichtigt.
9. Schließen Sie das Gerät nicht an, oder ziehen Sie nicht
den Stecker aus der Steckdose mit nassen Händen.
10. Treffen Sie ausreichende Vorsichtsmaßnamen, um
das Risiko einer Verbrennung, eines Brandes, oder
einer anderen Körperverletzung und
Sachbeschädigung zu vermeiden, während das Gerät
bei der Nutzung Hitze erzeugt.
11. Wenn das Produkt in Wasser fällt, ziehen Sie
unverzüglich den Stecker aus der Steckdose.
12. Das Gerät darf nicht mit Wasser in Berührung
kommen.
13. Benutzen Sie das Gerät in einem gut belüfteten
Raum. Lassen Sie mindestens 4-6 Zoll Abstand von
allen Seiten, um eine angemessene Luftzirkulation zu
ermöglichen.
14. Bedienen Sie das Gerät nicht, wenn das Kabel oder
der Stecker beschädigt ist, das Gerät nicht richtig
funktioniert, beschädigt oder fallen gelassen wurde.
Wenn das Stromkabel beschädigt ist, muss es von
dem Hersteller, seinem Dienstleister oder einer ähnlich
qualifizierten Person ersetzt werden, um Gefahren zu
vermeiden.
15. Es befinden sich keine durch den Anwender zu
wartenden Teile in dem Produkt. Versuchen Sie nicht,
dieses selbstständig zu untersuchen oder zu
reparieren. Ausschließlich qualifiziertes
Bedienungspersonal darf jegliche Wartungen am Gerät
durchführen.
16. Dieses Gerät ist nicht dafür bestimmt, durch
Personen mit eingeschränkten physischen,
sensorischen oder geistigen Fähigkeiten oder mangels
Erfahrung und Wissen (einschließlich Kinder) benutzt
zu werden, es sei denn sie erhielten Anweisungen, wie
Page 29

!
das Gerät zu benutzen ist, von der für ihre Sicherheit
zuständigen Person und kennen die damit
verbundenen Gefahren. Kinder müssen beaufsichtigt
werden, um sicherzustellen, dass sie mit dem Gerät
nicht spielen.
17. Halten Sie das Gerät und sein Kabel außer
Reichweite von Kindern unter 8 Jahren.
18. Das Gerät ist nicht dafür geeignet, durch einen
externen Timer oder eine separates
Fernbedienungssystem bedient zu werden.
19. Achtung, heiße Fläche. [symbol IEC 604175041(2002-10)]
20. Das Gerät ist für die Haushaltsnutzung und
ähnliche Anwendungsbereiche bestimmt, wie zum
Beispiel:
• Küchenbereiche in Geschäften, Büros und anderen
Arbeitsumgebungen;
• Bauernhäuser;
• Bei Kunden in Hotels, Motels, und anderen
Wohnumgebungen;
• Bed und Breakfast Einrichtungen;
ACHTUNG – Um das Risiko einer Körperverletzung zu
verringern:
- Dieses Produkt ist ausschließlich geeignet für eine
Indoor-Nutzung, nicht gewerbliche Zwecke und die
Haushaltsnutzung zum Zubereiten/ Erhitzen von
Lebensmitteln für den menschlichen Konsum. Benutzten
Sie das Produkt nicht draußen oder zu keinem anderen
Zweck.
- Lassen Sie das Stromkabel nicht dort hängen, wo man
darüber stolpern kann oder wo es gezogen werden kann
(z.B. über die Kante eines Tisches oder einer Theke), und
lassen Sie das Kabel nicht mit heißen Flächen in
Page 30

!
Berührung kommen.
- Tragen Sie immer schützende oder hitzebeständige
Ofenhandschuhe, wenn Sie das Gerät oder das Zubehör
benutzen.
- Um das Gerät von der Steckdose zu trennen, ziehen Sie
unmittelbar am Stecker; ziehen Sie nicht an der
Steckdose.
- Benutzen Sie das Gerät immer auf einer flachen, geraden,
stabilen, hitzebeständigen Fläche.
BESONDERE ANWEISUNGEN:
- Ein kurzes Stromkabel wird zur Verfügung gestellt, um
das Risiko, sich in das Kabel zu verwickeln oder über ein
längeres Kabel zu stolpern zu minimieren.
Verlängerungskabel sind verfügbar und dürfen mit
Vorsicht benutzt werden. Wenn ein Verlängerungskabel
benutzt wird:
- Die angegebenen Stromanforderungen auf dem
Verlängerungskabel müssen mindestens genau so hoch
sein wie diese von dem Produkt;
- Das Kabel muss so platziert werden, dass es nicht von
einer Arbeitsplatte oder einer Tischplatte runterhängt, wo
es von Kindern gezogen werden kann oder eine
versehentliche Stolpergefahr darstellen kann;
- Das Verlängerungskabel muss ein Erdungstyp mit 3
Drähten darstellen.
Page 31

!
TEILEBESCHREIBUNG
1. Griff
2. Obere Abdeckung
3. Griff rechts
4. Griffabdeckung
5. Grundlage
6. LED Abdeckung
7. Thermostat-Drehknopf
8. Timer-Drehknopf
9. Oberer Grill
10. Unterer Grill
11. Knopf
12. Öl-Schüssel
VOR DER ERSTEN NUTZUNG
Drücken Sie auf den Auslöseknopf von der oberen Platte, um die obere Grillplatte zu entfernen,
und dann drücken Sie auf den Auslöseknopf von der unteren Platte, um die untere Grillplatte zu
entnehmen. Reinigen Sie die Grillplatten, die Tropfschalen, und den Spachtel/ das
Reinigungswerkzeug in warmem, seifigem Wasser; spülen Sie diese ab und lassen Sie diese
trocknen. Diese Teile können auch in einer automatischen Spülmaschine gespült werden.
TAUCHEN SIE DIE GRUNDLAGE NIE IN WASSER ODER SETZEN SIE DIESE NICHT WASSER
AUS.
Montieren Sie die obere und die untere Grillplatten erneut in die Ausgangspositionen vor der
Nutzung. Dafür wenden Sie sich zu dem untenstehenden Abschnitt „Platten
einsetzen/austauschen“ für detaillierte Anweisungen.
HINWEIS: Während der ersten Nutzung der Grillplatten, tragen Sie eine dünne Schicht von dem
Speiseöl auf die Antihaft-Oberflächen von den Platten auf mit einem Papiertuch, um die Antihaft-
Page 32

!
Beschichtung zu würzen. Wenn nötig, wiederholen Sie den Vorgang mit einer dünnen Ölschicht
während der gesamten Lebensdauer der Platten, um ihre beste Antihaft-Leistung
aufrechtzuerhalten.
Montage
Platzieren Sie das Produkt auf einer sauberen, flachen, hitzebeständigen Ebene mit mindestens 46 Zoll Raum von allen Seiten, um eine angemessene Luftzirkulation zu erlauben.
Platzierung von dem oberen Gehäuse:
1. Geschlossene/Erhitzungs- Position: Das obere Gehäuse ist geschlossen und sitzt auf der
Grundlage. Benutzen Sie diese Position, wenn Sie das Gerät starten/erhitzen, und wenn Sie die
meisten Gerichte grillen.
2. Offene Position: Das obere Gehäuse ist geöffnet. Platzieren Sie
das Gehäuse in diese Position, wenn Sie anfangen, die Grillfunktion zu
benutzen, und wenn Sie bestimmte Lebensmittel grillen, für die die obere
Grillplatte nicht passend ist, wie z. B. Pizza oder Fisch. Heben Sie den Griff,
bis das obere Gehäuse in einem 90° Winkel steht.
3. Flache Position: Das obere Gehäuse ist offen
und befindet sich auf einer Ebene mit der Grundlage,
wodurch dort zwei Flächen entstehen.
Benutzen Sie das Produkt in dieser Position, wenn Sie
größere Essensmengen grillen.
Um diese zu ebnen, ziehen Sie an der Scharnier-Auslösung
und drücken Sie den Griff runter.
Platten einsetzen/austauschen
Lassen Sie die Kerben in die Rückseite von der unteren Grillplatte in die Befestigungshaken gleiten,
danach drücken Sie die Vorderseite der Platte runter bis diese einrastet. Wiederholen Sie den
Vorgang, um die obere Grillplatte zu befestigen.
NUTZUNGSWEISE
WARNUNG: Die Grillplatten und Metallflächen von dem oberen Gehäuse und Griffen werden
während der Nutzung sehr heiß. Um eine Verbrennungsgefahr zu vermeiden, tragen Sie während
der Nutzung schützende oder hitzebeständige Handschuhe, und fassen Sie ausschließlich an die
schwarzen Stellen des Griffes.
ANMERKUNG: Benutzen Sie ausschließlich hitzeresistentes Zubehör aus Holz, Plastik, oder
Silikon, um das Lebensmittel hinzuzufügen oder zu entnehmen. Benutzen Sie keine Utensilien aus
Metall, da diese die Fläche des Produktes zerkratzen können.
!
Scharnier-
Auslösung&
Page 33

!
HINWEIS: Während des ersten Gebrauchs kann dieses Gerät etwas Rauch abgeben. Dies ist
normal und wird bei der weiteren Nutzung verschwinden.
Kontaktgrill:
Wird benutzt, um Burger, dünne oder knochen- bzw. grätenlose Stücke von Fleisch, Fisch und
Gemüse zuzubereiten. In der „Geschlossenen“ Position wird das Gericht schnell zubereitet, da die
beiden Seiten gleichzeitig betätigt werden.
- Stellen Sie das Produkt in die „Geschlossene“ Position und Stecken Sie das Stromkabel in
eine normale Steckdose ein. Die Stromanzeige wird rot leuchten, was bedeutet, dass das
Gerät angeschlossen ist.
- Platzieren Sie die Tropfschale unter dem Tropfausguss.
- Drehen Sie den Temperaturregler auf die gewünschte Einstellung, wie unten angegeben:
Einstellung
Temperatur
min
geschlossen
max
425℉(230℃)
HINWEIS: Es kann bis zu sieben Minuten dauern, bis das Gerät die gewählte Kochtemperatur
erreicht hat. Die Ready-Anzeige wird grün leuchten, wenn das Produkt bereit zum Kochen ist,
und wird während des Grillens zwischen „an“ und „aus“ pendeln, was bedeutet, dass das Gerät
die gewählte Zubereitungstemperatur aufrechterhält.
1. Platzieren Sie die Lebensmittel auf der untere Grillplatte und legen Sie die obere Grillplatte auf
das Gericht ab (die „geschlossene“ Position). Die obere Grillplatte wird sich an die Schichtdicke
des Fleisches anpassen. Wenn Sie die Lebensmittel vorbereiten, bei denen die obere Grillplatte
nicht notwendig ist, wie z. B. Kebabs oder Fisch, lassen Sie das Produkt in der
„offenen“ Position.
HINWEIS: Wenn Sie auf einmal mehr als ein Stück zubereiten, müssen die Lebensmittel gleich
dick sein, um sicherzustellen, dass die obere Grillplatte gleichmäßig auf den Lebensmitteln
verteilt ist, für eine gleichmäßige Zubereitung.
2. Wenn der Kochvorgang abgeschlossen ist, entfernen Sie die Lebensmittel, trennen Sie das
Gerät vom Netz und lassen Sie das Produkt abkühlen (für mindestens 30 Minuten) bevor Sie
dieses bewegen, abbauen oder reinigen.
ACHTUNG: Ziehen Sie das Gerät immer vom Netz, wenn der Kochvorgang abgeschlossen ist,
und wenn das Gerät nicht benutzt wird.
Page 34

!
Panini Press:
Benutzen Sie die obere und untere Grillplatten in der „Geschlossenen“ Position, um alle
Zutatenkombinationen zu grillen (zum Beispiel, Gemüse, Fleisch- und Käsesorten), die zwischen
zwei Brotscheiben oder einer gefalteten Tortilla/Pita platziert sind.
1. Befolgen Sie die Schritte 1 bis 3 in dem Kontaktgrill-Abschnitt oben.
2. Platzieren Sie die Lebensmittel auf der unteren Grillplatte und legen Sie die obere Grillplatte auf
das Gericht ab. Die obere Grillplatte wird sich an die Schichtdicke des Fleisches anpassen.
HINWEIS: Wenn Sie auf einmal mehr als ein Stück zubereiten, müssen die Lebensmittel gleich
dick sein, um sicherzustellen, dass die obere Grillplatte gleichmäßig auf den Lebensmitteln
verteilt ist, für eine gleichmäßige Zubereitung.
3. Wenn der Kochvorgang abgeschlossen ist, entfernen Sie die Lebensmittel, trennen Sie das
Gerät vom Netz und lassen Sie das Produkt abkühlen (für mindestens 30 Minuten) bevor Sie
dieses bewegen, abbauen oder reinigen.
ACHTUNG: Trennen Sie das Gerät immer vom Netz, wenn der Kochvorgang abgeschlossen
ist, und wenn das Gerät nicht benutzt wird.
Flat Grill:
Die Nutzung des Produktes in der „Flat“ Position verdoppelt die Kochfläche und erlaubt, die
Lebensmittel von unterschiedlicher Dicke gleichzeitig zuzubereiten, oder Lebensmittel auf
verschiedenen Platten zu kochen, um das Vermischen von Aromen vorzubeugen. Nutzen Sie
dieses, um ein French Toast, Röstis, belegte Brote oder Kebabs zuzubereiten.
1. Stellen Sie das Produkt in die „Flat“ Position ein und schließen Sie das Stromkabel an einer
normalen Steckdose an. Die Stromanzeige wird rot leuchten, was bedeutet, dass das Gerät
angeschlossen ist.
2. Benutzen Sie beide Tropfschalen, wenn Sie in der „Flachen“ Position kochen.
3. Drehen Sie die Temperaturkontrolle auf die gewünschte Einstellung.
HINWEIS: Es kann bis zu 8 Minuten dauern, bis das Gerät die gewählte Kochtemperatur
erreicht. Die Ready-Anzeige wird grün leuchten, wenn das Produkt zum Kochen bereit ist. Die
Ready-Anzeige wird während des Grillens zwischen „an“ und „aus“ pendeln, was bedeutet,
dass das Gerät die gewählte Zubereitungstemperatur aufrechterhält.
4. Platzieren Sie die Lebensmittel auf den Grillplatten.
Wenn der Kochvorgang abgeschlossen ist, entfernen Sie die Lebensmittel, trennen Sie das
Gerät vom Netz und lassen Sie das Produkt abkühlen (für mindestens 30 Minuten) bevor Sie
dieses bewegen, abbauen oder reinigen.
ACHTUNG: Trennen Sie das Gerät immer vom Netz, wenn der Kochvorgang abgeschlossen
ist, und wenn das Gerät nicht benutzt wird.
Page 35

!
REINIGUNG UND PFLEGE
WARNUNG: Stellen Sie immer sicher, dass das Produkt
von der Steckdose getrennt ist und lassen Sie dieses
komplett abkühlen, bevor Sie es bewegen, ausbauen oder
reinigen.
HINWEIS: Benutzen Sie keine harten oder aggressiven
Reinigungsmittel oder Pads, um das Produkt zu reinigen.
1. Nach der vollständigen Abkühlung entfernen Sie
vorsichtig die Tropfschalen und entsorgen Sie die Inhalte.
2. Entfernen Sie die Essensreste von den Grillplatten
mithilfe eines Spachtels/Reinigungswerkzeugs.
3. Reinigen Sie die Grillplatten, die Tropfschalen, den
Spachtel/ das Reinigungswerkzeug in warmem, seifigem
Wasser; spülen Sie diese ab und lassen Sie diese
trocknen. Diese Teile dürfen auch in einer automatischen
Spülmaschine gereinigt werden.
WARNUNG: Tauchen Sie die Grundlage nicht in Wasser
oder andere Flüssigkeiten.
4. Wischen Sie das obere Gehäuse und die Grundlage mit
einem mit Wasser befeuchteten Schwamm ab und
trocknen Sie dieses mit einem weichen Tuch oder einem
Papiertuch.
5. Lagern Sie das Produkt an einem kühlen, trockenen Ort.
UMWELT
ACHTUNG:
Werfen Sie nicht dieses Produkt, wie es mit anderen Haushaltsprodukten hat. Es gibt eine Mülltrennungs
von diesem Produkt in Gemeinden, Sie müssen Ihre lokalen Behörden über die Orte, wo man dieses
Produkt zurückgeben können zu informieren. In der Tat enthalten elektrische und elektronische Produkte
gefährliche Stoffe, die schädliche Auswirkungen auf die Umwelt oder die menschliche Gesundheit haben und
sollte recycelt werden. Das Symbol hier darauf hinweisen, dass elektrische oder elektronische Geräte sollten
sorgfältig ausgewählt werden, ist ein fahrbarer Abfallbehälter mit einem Kreuz markiert.
Adeva SAS / H.Koenig Europe - 8 rue Marc Seguin - 77290 Mitry Mory - France
www.hkoenig.com - sav@hkoenig.com - contact@hkoenig.com - Tél: +33 1 64 67 00 01
Page 36

!
NEDERLANDS
GEBRUIKERSHANDLEIDING
BELANGRLIJKE VEILIGHEIDSREGELS
Bij het gebruik van elektrische apparaten altijd de basisvoorzorgsmaatregelen voor de
veiligheid opvolgen, waaronder de volgende:
LEES ALLE INSTRUCTIES VOOR GEBRUIK.
WAARSCHUWING — Om het risico op vuur, elektrische
schok of persoonlijke verwonding te verkleinen:
1. Alleen gebruiken op AC 220-240 Volt, 50/60 Hz. Alleen
voor huishoudelijk gebruik.
2. Raak geen hete oppervlakken aan. Gebruik de
handgreep.
3. Niet de stroomkabel, stekker of basis in water of een
vloeistof onderdompelen.
4. Haal de stekker uit het stopcontact als het product niet
gebruikt wordt en ook voor het schoonmaken. Laat het
eerst afkoelen voordat uw onderdelen verwijdert, en voor
het schoonmaken van het apparaat.
5. Gebruik geen accessoires die niet worden aanbevolen bij
gebruik van dit product door de fabrikant van het
product. Accessoires kunnen heet worden tijdens
gebruik, laat ze daarom afkoelen voor u ze vastpakt.
6. Plaats het apparaat niet op of bij een hete gas- of
elektrisch fornuis of in een hete oven.
7. Wees uitermate voorzichtig bij het verplaatsen van een
apparaat met hete olie of andere hete vloeistoffen.
8. Laat het apparaat niet onbeheerd achter als deze in
gebruik is.
9. Niet de stekker met natte handen in het stopcontact
Page 37

!
stoppen of deze eruit halen.
10. Neem de juiste voorzorgsmaatregelen om het risico op
verbrandingen, vuur of andere persoonlijke of materiële
schade te voorkomen, aangezien dit apparaat warmte
produceert tijdens gebruik.
11. Als dit product in het water valt, meteen de stekker uit
het stopcontact trekken.
12. Raak het water niet aan.
13. Gebruik het in een goed geventileerde ruimte. Houd
minimaal 10-15 centimeter ruimte aan alle zijden voor
voldoende luchtstroom.
14. Niet het apparaat gebruiken als deze een beschadigde
kabel of stekker heeft, als het niet goed werkt of
beschadigd of gevallen is. Als de stroomkabel
beschadigd is, moet het worden vervangen door de
fabrikant, een onderhoudsmonteur of een gelijkwaardig
gekwalificeerd persoon om gevaren te vermijden.
15. Dit apparaat heeft geen onderdelen die gebruikers
kunnen onderhouden. Probeer het apparaat niet zelf te
repareren. Alleen gekwalificeerd personeel mag
onderhoud uitvoeren; breng het apparaat naar een
werkplaats naar uw keuze voor inspectie en reparaties.
16. Dit apparaat is niet bedoeld voor gebruik door
personen met beperkte lichamelijke, mentale of
zintuigelijke capaciteit of een gebrek aan ervaring en
kennis (waaronder kinderen), tenzij ze instructies hebben
gehad over het gebruik van dit apparaat door een
persoon die verantwoordelijk is voor hun veiligheid en ze
de gevaren begrijpen. Kinderen moeten onder toezicht
worden gehouden, om te verzekeren dat ze niet met het
apparaat spelen.
Page 38

!
17. Houd het apparaat en de stroomkabel uit de buurt van
kinderen jonger dan 8 jaar.
18. Het apparaat is niet bedoeld om gebruikt te worden
met een externe timer of een apart besturingssysteem.
19. Waarschuwing, heet oppervlak. [symbool IEC
60417-5041(2002-10)]
20. Dit apparaat is bedoeld voor huishoudelijk gebruik en
voor dergelijke situaties zoals:
• Personeelsruimtes in winkels, kantoren en andere
werkomgevingen;
• Jeugdherbergen;
• Bij cliënten in hotels, motels en andere
woonomgevingen;
• Bed & breakfast-omgevingen.
WAARSCHUWING — Om het risico op verwondingen te
verkleinen:
- Dit product is alleen bedoeld voor niet-commercieel, niet-
industrieel, huishoudelijk gebruik in huis voor het
bereiden/verwarmen van eten voor menselijke
consumptie. Gebruik het apparaat niet buiten of voor een
ander doel.
- Laat de stroomkabel niet ergens hangen waar erover
gestruikeld of aan getrokken kan worden (bv. over de
rand van een tafel of aanrecht), en laat de kabel geen hete
oppervlakken aanraken.
- Draag altijd beschermende ovenwanten of
hittebestendige handschoenen bij het gebruik van dit
product en gebruik het juiste keukengerei.
- Om de verbinding met het stroomnet te verbreken altijd
aan de stekker trekken; trek niet aan de stroomkabel.
Page 39

!
- Gebruik het product altijd op een egaal, vlak, stabiel,
hittebestendig oppervlak.
SPECIALE INSTRUCTIES:
- Er is een korte stroomkabel geleverd om te vermijden
verstrikt te raken of te struikelen over een lange kabel.
Verlengkabels mogen gebruikt worden als dit zorgvuldig
gebeurt. Als een verlengkabel wordt gebruikt:
- Moet de aangegeven elektrische rating van de
verlengkabel minimaal overeenkomen met de rating van
het apparaat;
- De kabel moet zo geplaatst worden dat het niet over een
tafel of aanrecht hangt waar kinderen eraan kunnen
trekken of per ongeluk erover kunnen struikelen;
- De verlengkabel moet voorzien zijn van een aardedraad.
Page 40

!
ONDERDELENLIJST
1. handgreep
2. Bovenste behuizing
3. Handgreep rechts
4. Handgreepscharnier
5. Basis
6. LED-afdekking
7. Thermostaatknop
8. Timerknop
9. Bovenste grill
10. Onderste grill
11. Knop
12. Olieplaat
VOOR HET EERSTE GEBRUIK
Druk op de deblokkeerknop voor de voor de bovenste grillplaat en verwijder deze, druk vervolgens
op de deblokkeerknop voor de onderste grillplaat en verwijder deze ook. Maak de grillplaten,
drupbakjes en de schraper/schoonmaakhulp schoon in warm sopwater; spoel ze af en laat ze
drogen. Deze onderdelen mogen ook worden afgewassen in een vaatwasser. NOOIT DE BASIS
ONDERDOMPELEN IN OF BLOOTSTELLEN AAN WATER.
Plaats de bovenste en onderste grillplaten weer terug op hun plek voor gebruik. Lees de
'Plaatsen/vervangen platen’-sectie voor duidelijke instructies.
OPMERKING: Als de grillplaat voor het eerst gebruikt word, spuit of plaats een dun laagje kookolie
op een anti-aanbaklaag van de platen met een papieren doek om de laag te laten inwerken. Indien
Page 41

!
noodzakelijk vaker een laagje kookolie aanbrengen op de platen voor de beste anti-aanbakprestaties.
Assemblage
Plaats het product op een schoon, vlak, egaal, stabiel, hittebestendig oppervlak met minimaal 1015 centimeter ruimte rondom voor een correcte luchtcirculatie.
Plaatsing van de bovenste behuizing:
1. Gesloten/Bereid-stand: De bovenste behuizing is
gesloten en rust op de basis. Gebruik deze stand
bij het opstarten/opwarmen van het product en
bij het grillen van voedsel.
2. Open stand: De bovenste behuizing staat open. Plaats
het product in deze stand als u
de grillfunctie gaat gebruiken en bij het grillen van voedsel
waar de bovenste grill niet gebruikt wordt,
zoals pizza of vis. Til de handgreep omhoog tot
de bovenste behuizing in ongeveer een 90° hoek staat.
3. Platte stand: De bovenste behuizing staat helemaal open
en ligt gelijk met de basis,
zo zijn er twee grilloppervlakken.
Gebruik het product in deze stand bij het grillen
van grotere hoeveelheden voedsel.
Om het plat te leggen dient u aan de scharniervergrendeling
te trekken en de handgreep naar beneden te duwen.
Plaatsen/vervangen platen:
Schuif de inkepingen achterin de onderste grillplaat in de houders, druk vervolgens de voorkant
van de plaat naar beneden om deze vast te zetten. Plaats op dezelfde manier de bovenste
grillplaat.
!
Scharnier-&
vergrendeling&
!
Page 42

!
HET GEBRUIK
WAARSCHUWING: De grillplaten en de metalen oppervlakken van de behuizing en de handgreep
zullen erg heet worden tijdens gebruik. Om gevaar op verbranding te vermijden, draag ovenwanten
of hittebestendige handschoenen tijdens gebruik en raak alleen het zwarte stuk van de handgreep
aan.
OPMERKING: Gebruik alleen hittebestendige, houten, plastic of siliconen keukengerei om voedsel
te plaatsen/verwijderen. Gebruik geen metalen keukengerei omdat dit voor krassen kan zorgen.
OPMERKING: Tijdens het eerste gebruik kan dit apparaat wat rook produceren. Dit is normaal en
zal afnemen bij verder gebruik.
Contactgrill:
Voor het bereiden van hamburgers, dun vlees zonder bot of vis zonder graat en groente. In de
'Gesloten’-stand zal het voedsel sneller bereid worden omdat beide zijden worden bereid.
- Plaats het product in de 'Gesloten’-stand en steek de stekker in een standaard stopcontact.
De hoofdindicator zal rood oplichten, wat aangeeft dat het apparaat in werking is.
- Plaats een druipbeker onder de druiptuit.
- Draai de temperatuurinstelling naar de gewenste stand, zoals hieronder aangegeven
Stand
Temperatuur
min
uit
max
425℉(230℃)
OPMERKING: Het kan tot zeven minuten duren voordat de geselecteerde
bereidingstemperatuur is bereikt. De klaarindicator zal groen oplichten als het product klaar is
om voedsel te bereiden en zal aan- en uitgaan tijdens de bereiding, wat aangeeft dat het product
de geselecteerde bereidingstemperatuur vasthoudt.
1. Plaats het voedsel op de onderste grillplaat en plaats de bovenste grillplaat op het voedsel (de
'Gesloten’-stand). De bovenste grillplaat zal zichzelf aanpassen aan de dikte van het voedsel.
Bij het bereiden van voedsel waarbij de bovenste grillplaat niet nodig is, zoals bij kebab of vis,
laat deze dan in de 'Open’-stand staan.
OPMERKING: Bij het bereiden van meerdere stukken voedsel in één keer dient het voedsel
even dik te zijn om te verzekeren dat de grillplaat overal gelijk op het voedsel rust voor een
gelijke bereiding.
2. Als de bereiding klaar is, verwijder het voedsel, haal de stekker uit het stopcontact en laat het
product afkoelen (minimaal 30 minuten) voor het verplaatsen, de demontage of het
schoonmaken.
WAARSCHUWING: Altijd de stekker uit het stopcontact halen als het bakken is afgelopen en
het apparaat niet meer gebruikt wordt.
Paninigrill:
Gebruik de bovenste en onderste grillplaten in de 'Gesloten’-stand om een combinatie van
ingrediënten te grillen (zoals groente, vlees en kaas) tussen twee stukken brood of een opgevouwen
tortilla/pita.
1. Volg stappen 1 tot 3 in de 'Contactgrill’-sectie hierboven.
2. Plaats het voedsel op de onderste grillplaat en plaats de bovenste grillplaat op het voedsel. De
bovenste behuizing zal zichzelf aanpassen aan de dikte van het voedsel.
OPMERKING: Bij het bereiden van meerdere stukken voedsel in één keer dient het voedsel
even dik te zijn om te verzekeren dat de grillplaat overal gelijk op het voedsel rust voor een gelijke
bereiding.
3. Als de bereiding klaar is, verwijder het voedsel, haal de stekker uit het stopcontact en laat het
product afkoelen (ongeveer 30 minuten) voor het verplaatsen, de demontage of het
Page 43

!
schoonmaken.
WAARSCHUWING: Altijd de stekker uit het stopcontact halen als het bakken is afgelopen en
het apparaat niet meer gebruikt wordt.
Platte grill:
Het gebruik van het product in de 'Platte’ stand verdubbelt het bereidingsoppervlak en staat de
gelijktijdige bereiding toe van items met verschillende diktes, of het bereiden van verschillend
voedsel op verschillende platen zodat de smaken zich niet vermengen. Gebruik deze voor French
toast, hash browns, open sandwiches en kebab.
1. Plaats het product in de 'Open’-stand en steek de stekker in een standaard stopcontact. De
hoofdindicator zal rood oplichten, wat aangeeft dat het apparaat in werking is.
2. Gebruik beide drupbekers bij het gebruik van de Platte stand.
3. Draai de temperatuurinstelling naar de gewenste stand.
OPMERKING: Het kan acht minuten duren voordat de geselecteerde bereidingstemperatuur is
bereikt. De klaarindicator zal groen oplichten als het product klaar is voor de bereiding. De
klaarindicator zal aan- en uitgaan tijdens de bereiding, dat geeft aan de het product aan het
opwarmen is om de geselecteerde bereidingstemperatuur.
4. Plaats voedsel op de grillplaten.
5. Als de bereiding klaar is, verwijder het voedsel, haal de stekker uit het stopcontact en laat het
product afkoelen (ongeveer 30 minuten) voor het verplaatsen, de demontage of het
schoonmaken.
WAARSCHUWING: Altijd de stekker uit het stopcontact halen als het bakken is afgelopen en
het apparaat niet meer gebruikt wordt.
SCHOONMAKEN EN ONDERHOUD
WAARSCHUWING: Altijd controleren dat het apparaat niet
meer is aangesloten op het lichtnet en laat deze helemaal
afkoelen voor het herplaatsen, de demontage en voor het
schoonmaken.
OPMERKING: Gebruik geen agressieve of bijtende
schoonmaakmiddelen of sponzen om het product schoon
te maken.
1. Nadat deze helemaal is afgekoeld, voorzichtig de
drupbakjes verwijderen en de inhoud weggooien.
2. Verwijder achtergebleven van de grillplaten met de
schraper/schoonmaakhulp.
3. Maak de grillplaten, drupbakjes en de
schraper/schoonmaakhulp schoon in warm sopwater;
spoel ze af en laat ze drogen. Deze onderdelen mogen
ook worden afgewassen in een vaatwasser.
Page 44

!
WAARSCHUWING: Niet de basis onderdompelen in of
blootstellen aan water of een andere vloeistof.
4. Veeg de bovenste behuizing en de basis met een
vochtige spons af en droog deze met een zachte
(keuken)doek.
5. Bewaar het apparaat op een koele, droge plek.
MILIEU
ATTENTIE:
Dit apparaat mag niet met uw ander huishoudelijke toestellen worden verwijdert. Dit product moet op
een geselecteerde stortplaats verwijdert worden. U kunt bij de gemeente een indiceerde plaats
aanvragen. Elektrisch en elektronische producten kunnen gevaarlijke stoffen inhouden die schadelijk zijn
voor mensen en het milieu en moet recycled worden. Het symbool aan de kant geeft aan dat het een
elektrisch en elektronisch toestel is en zijn dus artikelen van een selectieve collectie. Het beeld geeft een afvalbak
met een X teken aan.
Adeva SAS / H.Koenig Europe - 8 rue Marc Seguin - 77290 Mitry Mory - France
www.hkoenig.com - sav@hkoenig.com - contact@hkoenig.com - Tél: +33 1 64 67 00 01
Page 45

ESPANOL
MANUAL DE INSTRUCCIONES
INSTRUCCIONES DE SEGURIDAD IMPORTANTES
Cuando utilice productos eléctricos, siga siempre las precauciones de seguridad básicas,
incluidas las siguientes:
LEA TODAS LAS INSTRUCCIONES ANTES DE USAR EL
APARATO.
ADVERTENCIA — Para reducir el riesgo de incendio,
descarga eléctrica o lesiones personales graves:
1. Use solamente un AC 220-240 Volt, 50/60 Hz. Solo para
uso doméstico.
2. No toque las
superficies calientes. Utilice la manija.
3. No sumerja el cable de alimentación, el enchufe o la base
en agua o cualquier otro líquido.
4. Desenchufe el cable de alimentación del toma corriente
cuando el aparato no esté en uso y antes de limpiarlo.
Deje que se enfríe antes de poner o quitar partes.
5. No utilice otros accesorios que no sean los
recomendados específicamente para el uso con este
aparato o los vendidos por su fabricante. Los accesorios
pueden calentarse durante el uso, deje que se enfríen
antes de manipularlos.
6. No coloque el aparato sobre o cerca de una hornilla, ya
sea de gas o eléctrica, ni sobre o dentro de un horno o
cualquier otro artefacto que produzca calor.
7. Tome cuidado al mover un aparato que contenga aceite
caliente u otros líquidos calientes.
8. No deje el aparato desatendido mientras esté en uso.
9. No enchufe/desenchufe el aparato al/del tomacorriente
con las manos mojadas.
Page 46

10. Este aparato genera calor durante el uso, tome las
precauciones adecuadas para evitar quemaduras,
incendios u otros daños personales o materiales.
11. Si el aparato cae al agua, desenchúfel
o
inmediatamente del tomacorriente.
12. No intente tocarlo ni alcanzarlo dentro del agua.
13. Utilice el aparato en un local con buena ventilación.
Deje por lo menos 4-6 pulgadas de espacio libr
e
alrededor de todo el aparato para permitir que el aire
circule con facilidad.
14. No utilice este aparato si su cable de alimentación o el
enchufe están dañados, o si no está funcionando com
o
debería, se ha caído, está en mal estado o se ha mojado
con agua u otros líquidos. Si el cable de alimentación
está deteriorado, este debe ser remplazado por el
fabricante, su personal técnico o un especialista similar
para evitar riesgos potenciales.
15. Este aparato no tiene partes reparables por el usuario.
No intente examinarlo o repararlo usted mismo. Solo el
personal calificado debe realizar cualquier servicio; ll
eve
el aparato al taller de reparación de electrodomésticos de
su elección para inspección y reparación.
16. Este aparato no está concebido para ser utilizado por
personas (incluyendo niños) con discapacidad física,
sensorial o motora, o con falta de experiencia
y
conocimiento, a menos que sean supervisadas o hayan
sido instruidas en el uso de este por una persona
responsable por su seguridad. Los niños deben ser
supervisados para garantizar que no jueguen con el
aparato.
17. Mantenga el aparato y su cable de alimentación fuera
del alcance de los niños menores de 8 años.
Page 47

18. El aparato no está diseñado para ser operado a través
de un temporizador externo ni por un sistema de control
remoto
.
19. Precaución, superficie caliente. [símbolo
IEC 60417-5041(2002-10)]
20. Este aparato está diseñado para para el uso interno
en
el hogar y actividades similares, tales como:
• Personal de áreas de cocina en tiendas, oficinas y otros
entornos de trabajo;
• Casas de campo;
• Por clientes en hoteles, moteles y otros entornos
de
tipo residencial;
• Ambientes de alojamientos que ofrecen desayuno.
PRECAUCIÓN — Para reducir el riesgo de lesiones
personales:
- Este aparato está concebido para el uso interno en el
hogar con fines no comerciales y no industriales,
apenas
para cocinar/calentar alimentos para consumo humano.
No utilice el aparato a la intemperie o para cualquier otro
propósito.
- No permita que el cable de alimentación cuelgue por
donde se pueda tropezar o arrastrarlo de alguna maner
a
(por ejemplo, sobre el borde de una mesa o mostrador),
y no permita que el cable toque superficies calientes.
- Siempre use guantes protectores de horno o resistentes
al calor cuando use este aparato y utensilios.
- Para desconectarlo del tomacorriente, tire directament
e
del enchufe, nunca del cable de alimentación.
- Utilice siempre el aparato sobre una superficie plana,
nivelada, estable y resistente al calor.
Page 48

INSTRUCCIONES ESPECIALES:
- Se proporciona un cable de alimentación corto par
a
reducir el riesgo resultante de enredarse o tropezar con
un cable más largo. Los cables de extensión est
án
disponibles y pueden usarse tomando cuidado. Si se
utiliza un cable de extensión:
n La capacidad de corriente del cable de extensión
debe
ser como mínimo la misma que la indicada en el
aparato.
n Acomode el cable de extensión de modo que
no
cuelgue sobre el mostrador o la mesa donde los niños
se puedan tropezar o tirar del mismo accidentalmente.
n El cable de extensión debe ser un cable de 3 hilos
con
conexión a tierra.
Page 49

!
IDENTIFICACIÓN DE LAS PARTES
1. Manija
7. Control de temperatura
2. Cubierta superior
8. Temporizador
3. Manija derecha
9. Placa superior
4. Clavija de la placa superior
10. Placa inferior
5. Base
11. Botón de ENCENDIDO/APAGADO
6. Indicador LED
12. Placa de aceite
ANTES DEL PRIMER USO
Presione el botón de liberación de la placa superior para quitar la placa superior y luego presione
el botón de liberación de la placa inferior para quitar la placa inferior. Limpie las placas de la parrilla,
las tazas de goteo y la herramienta de raspado y limpieza con agua tibia y jabonosa; Enjuague y
deje secar. Estas piezas también pueden lavarse en un lavaplatos automático. NUNCA SUMERJA
LA BASE EN AGUA.
Vuelva a insertar las placas superior e inferior de la parrilla en sus respectivas posiciones antes de
usar el aparato. Consulte la subsección “Inserción/cambio de placas” a continuación para obtener
instrucciones detalladas.
NOTA: Cuando use las placas de la parrilla por primera vez, rocíe o aplique una capa delgada de
aceite de cocina sobre las superficies antiadherentes de las placas con una toalla de papel. Según
sea necesario, aplique el aceite de cocina para alargar la vida útil de las placas antiadherentes y
mantener un mejor rendimiento.
Page 50

Ensamblaje
Coloque el aparato sobre una superficie plana, nivelada, estable y resistente al calor, con al menos
4-6 pulgadas de espacio libre alrededor de todo el aparato para permitir que el aire circule con
facilidad.
Colocando a carcasa superior:
1. Posición cerrada/calentamiento: la carcasa superior
está cerrada y descansa sobre la base. Use esta posición
al calentar y al asar los alimentos.
2. Posición abierta: la carcasa superior está abierta.
Coloque el aparato en esta posición cuando use
la función Parrilla, y al asar ciertos alimentos
en los que la placa superior de la parrilla no es adecuada,
como pizza o pescado. Levante la manija hasta que la carcasa superior
forme un ángulo de aproximadamente 90 °.
3. Posición plana: La carcasa superior está abierta y
nivelada con la base, creando dos superficies para cocinar.
Use el producto en esta posición cuando ase grandes
cantidades de alimentos. Para aplanar, tire de la liberación
de la bisagra y empuje la manija hacia abajo.
Inserción/cambio de placas:
Deslice las ranuras en la parte posterior de la placa inferior de la parrilla en los ganchos de
retención, luego presione la parte delantera de la placa para que encaje en su lugar. Repita la
operación para colocar la placa superior de la parrilla.
COMO USAR SU PARRILLA
ADVERTENCIA: Las placas de la parrilla, las superficies metálicas de la carcasa superior y la
manija se calentarán mucho durante el uso. Para evitar el riesgo de quemaduras, use guantes de
horno o guantes resistentes al calor y toque solo la parte negra de la manija.
AVISO: Utilice utensilios de madera, plástico o silicona resistentes al calor para agregar/quitar
alimentos. No utilice utensilios de metal ya que pueden rayar la superficie del aparato.
OBSERVACIÓN: Es posible que sienta olor a quemado o salga algo de humo al usar la parrilla por
primera vez. Esto es normal y disminuirá con el uso posterior.
Parrilla de contacto:
- Se usa para cocinar hamburguesas, trozos carnes deshuesados o delgados, pescados, y
verduras. En la posición "Cerrada", los alimentos se cocinarán rápidamente ya que ambos
lados cocinan al mismo tiempo.
Liberación&de&
la&bisagra&
Page 51

!
1. Coloque la parrilla en la posición "Cerrada" y conecte el cable de alimentación a un
tomacorriente estándar. El indicador LED se iluminará en rojo, indicando que la parrilla está
encendida.
2. Coloque una taza de goteo debajo de la boquilla de goteo.
3. Gire el control de temperatura a la configuración deseada, como se indica a continuación.
OBSERVACIÓN: Puede tardar hasta siete minutos en alcanzar la temperatura de cocción
seleccionada. El indicador LED se iluminará en verde cuando el producto esté listo para cocinar,
el mismo se activará y desactivará alternativamente durante la cocción, lo que indica que el
producto mantiene la temperatura de cocción seleccionada.
1. Coloque los alimentos en la placa inferior de la parrilla y baje la placa superior sobre los
alimentos (posición "Cerrada"). La placa superior de la parrilla se ajustará automáticamente al
grosor de los alimentos. Si va a cocinar alimentos que no necesitan la placa superior de la
parrilla, como brochetas o pescado, deje la misma en la posición "Abierta".
OBSERVACIÓN: Si cocina diferentes piezas de alimentos a la vez, asegúrese de que los mismos
tengan un grosor similar para garantizar que la placa superior de la parrilla se apoye igualmente
sobre todos para una cocción uniforme.
1. Cuando finalice la cocción, retire los alimentos, desenchufe la parrilla del tomacorriente y deje
que se enfríe (al menos 30 minutos) antes de moverla, desmontarla o limpiarla.
PRECAUCIÓN: Siempre desenchufe su parrilla del tomacorriente cuando la cocción esté completa
y cuando la misma no esté en uso.
Parrilla de prensa
Use las placas superior e inferior de la parrilla en la posición "Cerrada" para asar cualquier
combinación de ingredientes (por ejemplo, verduras, carnes y quesos) en capas entre dos piezas
de pan o una tortilla/pita doblada.
4. Siga los pasos 1 a 3 de la sección "Parrilla de contacto", explicados arriba.
5. Coloque los alimentos en la placa inferior de la parrilla y baje la placa superior sobre ellos. La
carcasa superior se ajustará automáticamente al grosor de los alimentos.
OBSERVACIÓN: Si cocina diferentes piezas de alimentos a la vez, asegúrese de que los mismos
tengan un grosor similar para garantizar que la placa superior de la parrilla se apoye igualmente
sobre todos para una cocción uniforme.
Cuando finalice la cocción, retire los alimentos, desenchufe la parrilla del tomacorriente y deje que
se enfríe (al menos 30 minutos) antes de moverla, desmontarla o limpiarla.
PRECAUCIÓN: Siempre desenchufe su parrilla del tomacorriente cuando la cocción esté completa
y cuando la misma no esté en uso.
Parrilla plana:
El uso de la parrilla en la posición “Plana” duplica el área de la superficie de cocción y permite
Ajustes
Temperatura
mín.
cerrada
máx.
425℉ (230℃)
Page 52

!
cocinar alimentos con grosores diferentes simultáneamente, o cocinar alimentos en diferentes
platos para evitar la combinación de sabores. Se usa para preparar tostadas francesas, papitas
fritas, sándwiches abiertos y brochetas.
6. Coloque su parrilla en la posición “plana” y enchufe el cable de alimentación a un tomacorriente
estándar. El indicador LED se iluminará en rojo, indicando que la parrilla está encendida.
7. Use ambas tazas de goteo cuando cocine en la posición plana.
8. Gire el control de temperatura a la configuración deseada.
OBSERVACIÓN Puede tardar hasta ocho minutos en alcanzar la temperatura de cocción
seleccionada. El indicador LED se iluminará en verde cuando el producto esté listo para cocinar,
el mismo se activará y desactivará alternativamente durante la cocción, lo que indica que el
producto mantiene la temperatura de cocción seleccionada.
9. Coloque los alimentos en las placas de la parrilla.
10. Cuando finalice la cocción, retire los alimentos, desenchufe la parrilla del tomacorriente y deje
que se enfríe (al menos 30 minutos) antes de moverla, desmontarla o limpiarla.
PRECAUCIÓN: Siempre desenchufe su parrilla del tomacorriente cuando la cocción esté completa
y cuando la misma no esté en uso.
LIMPIEZA Y MANTENIMIENTO
ADVERTENCIA: Siempre desenchufe su parrilla del
tomacorriente y deje que se enfríe completamente antes de
moverla, desmontarla o limpiarla.
PRECAUCIÓN: No utilice limpiadores o estropajos
ásperos o abrasivos para limpiar la parrilla.
1. Después de enfriar por completo, retire suavemente las
tazas de goteo y deseche el contenido.
2. Retire cualquier alimento sobrante de las placas de la
parrilla utilizando la herramienta de raspado y limpieza.
3. Limpie las placas de la parrilla, las tazas de goteo y la
herramienta de raspado y limpieza con agua tibia y
jabonosa; Enjuague y deje secar. Estas piezas también
pueden lavarse en un lavaplatos automático.
Page 53

!
ADVERTENCIA: No sumerja la base en agua o cualquier
otro líquido
4. Limpie la carcasa superior y la base con una esponja
humedecida con agua y seque con un paño suave o una
toalla de papel.
5. Almacene su parrilla en un lugar fresco y seco.
MEDIO AMBIENTE
ATENCIÓN:
No se deshaga de este producto como lo hace con otros productos del hogar. Existe un sistema
selectivo de colecta de este producto puesto en marcha por las comunidades, debe de informarse en
su ayuntamiento acerca de los lugares en los que puede depositar este producto. De hecho, los
productos eléctricos y electrónicos pueden contener substancias peligrosas que tienen efectos
nefastos para el medio ambiente o para la salud humana y deben ser reciclados. El símbolo aquí presente indica
que los equipos eléctricos o electrónicos deben de ser cuidadosamente seleccionados, representa un recipiente
de basura con ruedas marcado con una X.
Adeva SAS / H.Koenig Europe - 8 rue Marc Seguin, 77290 Mitry-Mory, France
www.hkoenig.com - sav@hkoenig.com - contact@hkoenig.com - Tél: +33 1 64 67 00 01
Page 54

!
ITALIANO
MANUALE DI ISTRUZIONI
MISURE DI SICUREZZA IMPORTANTI
Quando si usano prodotti elettrici, seguire sempre alcune precauzioni di sicurezza, tra cui le
seguenti:
LEGGERE TUTTE LE ISTRUZIONI PRIMA DELL'USO.
AVVERTIMENTO-Per ridurre il rischio di incendi, scosse
elettriche, o lesioni personali gravi:
1. Utilizzare solo su corrente a AC 220-240 Volt, 50/60
Hz. Utilizzare solo per uso domestico.
2. Non toccare le superfici calde. Utilizzare la maniglia.
3. Non immergere il cavo di alimentazione, la spina, o la
base in acqua / liquidi.
4. Scollegare il cavo di alimentazione dalla presa elettrica
quando il prodotto non è in uso e prima di pulirlo.
Lasciare raffreddare l’apparecchio prima di inserire o
togliere delle parti.
5. Non utilizzare accessori non consigliati dal produttore per
l'utilizzo con questo prodotto. Gli accessori possono
surriscaldarsi durante l'uso, lasciarli raffreddare prima
dell'uso.
6. Non posizionare il prodotto sopra o vicino a fornelli a gas
o elettrici, o in un forno caldo.
7. Fare estrema attenzione durante lo spostamento di un
prodotto contenente olio caldo o altri liquidi caldi.
8. Non lasciare l’apparecchio incustodito durante l’utilizzo.
9. Non collegare o scollegare il prodotto da una presa
elettrica con le mani bagnate.
10. Prendere le dovute precauzioni per prevenire il rischio
di ustioni, incendi o altri danni alle persone in quanto
questo prodotto genera calore durante l'uso.
11. Se il prodotto cade in acqua, scollegarlo
immediatamente dalla presa elettrica.
12. Non toccarlo mentre è in acqua.
Page 55

!
13. Utilizzare in un'area ben ventilata. Mantenere almeno 46 pollici di spazio su tutti i lati per consentire un'adeguata
circolazione dell'aria.
14. Non utilizzare l'apparecchio se il cavo o la spina sono
danneggiati, se non funziona correttamente, se è stato
danneggiato o è caduto. Se il cavo di alimentazione è
danneggiato, deve essere sostituito dal produttore, da un
suo agente servizio o da una persona qualificata per
evitare rischi.
15. Questo prodotto non ha parti riparabili dall'utente. Non
tentare di esaminarlo o ripararlo da soli. Solo personale
qualificato dovrebbe eseguire ogni tipo di intervento;
portare il prodotto presso un centro di assistenza a vostra
scelta per l'ispezione e la riparazione.
16. Questo dispositivo non è destinato all'uso da parte di
persone con ridotte capacità sul piano fisico, mentale o
sensoriale o senza esperienza e conoscenza (compresi i
bambini), a meno che non siano stati istruiti all’uso
l'apparecchio da una persona responsabile della loro
sicurezza e comprendano i pericoli connessi. I bambini
devono essere sorvegliati per assicurarsi che non
giochino con l'apparecchio.
17. Mantenere l 'apparecchio e il cavo fuori dalla portata
dei bambini con meno di 8 anni.
18. Questo apparecchio non è destinato ad essere
azionato mediante timer esterno o da un sistema di
comando a distanza.
19. Attenzione superficie calda. [Simbolo IEC 604175041 (2002-10)]
20. Questo apparecchio è destinato ad essere utilizzato in
situazioni domestiche e similari, quali:
• aree cucina del personale di negozi, uffici e altri
ambienti di lavoro;
• Case coloniche;
• Con clienti in alberghi, motel e altri ambienti di tipo
residenziale;
• Bed and Breakfast.
Page 56

!
ATTENZIONE- Per ridurre il rischio di lesioni personali:
- Questo prodotto è destinato esclusivamente, ad un uso
domestico interno, non industriale, non commerciale, per
la cottura o il riscaldamento di alimenti per il consumo
umano. Non utilizzare il prodotto all'aperto o per qualsiasi
altro scopo.
- Non permettere che il cavo di alimentazione penda
causando il pericolo di potervici inciampare o che possa
essere accidentalmente tirato (ad esempio, oltre il bordo
di un tavolo o di un banco), e non permettere che il cavo
venga a contatto con superfici calde.
- Indossare sempre guanti da forno protettivi o guanti
termici durante l'uso e utilizzare i giusti utensili.
- Per scollegare dalla presa elettrica, tirare direttamente
sulla spina; non tirare il cavo di alimentazione.
- Utilizzare sempre il prodotto su una superficie piana e
piatta, stabile e resistente al calore.
ISTRUZIONI SPECIALI:
- La confezione prevede un cavo di alimentazione corto
per ridurre il rischio derivante dal rimanere impigliati o all’
inciampare su un cavo più lungo. Le prolunghe sono
disponibili e possono essere utilizzate, prestando
estrema attenzione nel loro uso. Se si utilizza una
prolunga:
- Il voltaggio riportato sulla prolunga deve essere almeno
pari a quello del prodotto;
- Il cavo dovrebbe essere posto in modo che non sporga
dal piano di lavoro o da tavolo in cui può essere tirato da
bambini o ci si possa inciamparci;
- La prolunga deve avere massa a terra con cavo a 3 fili.
Page 57

!
L'IDENTIFICAZIONE DELLE PARTI
1. Maniglia
2. Coperchio superiore
3. Maniglia destra
4. Copertura maniglia
5. Base
6. Copertura LED
7. Manopola termostato
8. Manopola Timer
9. Griglia superiore
10. Griglia inferiore
11. Pulsante
12. Piastra Olio
PRIMA DEL PRIMO UTILIZZO
Premere il pulsante di rilascio della piastra superiore per rimuovere griglia superiore e quindi
premere il pulsante della piastra inferiore per rimuovere la piastra inferiore del Grill. Pulire le piastre
Grill, le Coppe a goccia, e gli oggetti per la pulizia in acqua calda e sapone; risciacquare e lasciare
asciugare. Queste parti possono anche essere lavate in una lavastoviglie automatica. MAI
immergere o esporre la base all'acqua.
Reinserire le piastre griglia superiore ed inferiore nelle rispettive posizioni prima dell'uso. Vedere la
sezione “Inserimento/Cambio Piastre” di seguito per le istruzioni dettagliate.
NOTA: Quando si usano le piastre grill per la prima volta, spruzzare o applicare un sottile strato di
olio da cucina sulle superfici antiaderenti delle piastre con un tovagliolo di carta per preparare la
superficie antiaderente. Se necessario, riapplicare un sottile strato di olio da cucina per tutta la vita
delle piastre per mantenere prestazioni antiaderenti ottimali.
Assemblaggio
Page 58

!
Posizionare il prodotto su una superficie piana e pulita, piatta, stabile, resistente al calore con
almeno 4-6 pollici di spazio su tutti i lati per consentire un'adeguata circolazione dell'aria.
Posizionamento l'alloggiamento superiore:
1. Chiuso / Posizione Riscaldamento: l'alloggiamento superiore è
chiuso e poggia sulla base. Utilizzare questa posizione
all'avvio / riscaldamento del prodotto e per
grigliare la maggior parte dei cibi.
2. Posizione aperta: l'alloggiamento superiore è aperto. Porre
il Prodotto in questa posizione quando si inizia a usare
la funzione Grill e per grigliare alcuni alimenti
in cui l’utilizzo della griglia piastra superiore non è appropriato,
come la pizza o il pesce. Sollevare la maniglia fino a quando il
Chassis superiore si trova ad un angolo di circa 90 °.
3. Posizione aperta: Il
Chassis superiore è aperto e a livello con la base,
a creare due superfici di cottura.
Utilizzare questa posizione quando si desidera grigliare
grandi quantità di cibo.
Per appiattire la piastra, tirare sulla cerniera di rilascio
e spingere la maniglia verso il basso.
Inserimento / sostituzione piastre:
Far scorrere le tacche nella parte posteriore della piastra inferiore nei ganci di fissaggio, quindi
premere sulla parte anteriore della piastra per farla scattare in posizione. Ripetere l'operazione
per fissare la piastra grill superiore.!
UTILIZZO
AVVERTIMENTO:L e Piastre Grill e le superfici metalliche della custodia superiore e la maniglia
diventano molto calda durante l'uso. Per evitare il rischio di ustioni, indossare guanti da forno di
protezione o guanti resistenti al calore durante l’utilizzo e toccare solo la parte nera della maniglia.
AVVISO: Utilizzare solo utensili in plastica, legno o silicone resistenti al calore per aggiungere /
rimuovere cibo. Non utilizzare utensili in metallo in quanto potrebbero graffiare la superficie del
prodotto.
NOTA: Durante l'uso iniziale, l’apparecchio può emettere un po' di fumo. Questo è normale e si
scomparirà man mano che si utilizza l’apparecchio stesso.
!
Cerniera&di&
rilascio&
!
Page 59

!
Griglia a Contatto:
Utilizzare per cuocere hamburger, senza osso, pezzi sottili di carne, pesce e verdure. Nella
posizione “Chiusa”, il cibo si cuoce velocemente in quanto entrambi i lati piastrano
contemporaneamente.
- Impostare il prodotto in posizione “chiusa” e inserire il cavo di alimentazione in una presa
elettrica standard. L'indicatore di alimentazione si illuminerà di rosso, ad indicare che
l’apparecchio è acceso.
- Collocare una tazza sotto il beccuccio di scolo.
- Ruotare la manopola della temperatura sull'impostazione desiderata, come elencato di
seguito
Impostazione
Temperatura
min
spento
max
425℉(230℃)
NOTA: Potrebbero essere necessari fino a sette minuti per raggiungere la temperatura di
cottura selezionata. La spia si illumina di verde quando l’apparecchio è pronto per la cottura e
alternerà on e off durante la cottura, indicando che il prodotto sta mantenendo la temperatura
di cottura selezionata.
1. Posizionare il cibo sulla piastra inferiore e abbassare la piastra grill superiore sul cibo (in
posizione “chiusa”). La Piastra grill superiore si auto-regola in base allo spessore del cibo. Se
non è necessaria la piastra griglia superiore, come nella cottura di kebab o pesce, lasciare il
prodotto in posizione “aperta”.
NOTA: Se si desidera cuocere più di un pezzo di cibo alla volta, gli alimenti dovrebbero avere
spessori simili, per garantire che la griglia superiore poggi uniformemente sul cibo per una
cottura uniforme.
2. Quando la cottura è completata, rimuovere gli alimenti, scollegare il prodotto dalla presa
elettrica e lasciare raffreddare il prodotto (almeno 30 minuti) prima dello smontaggio o della
pulizia.
ATTENZIONE: scollegare sempre il prodotto dalla presa elettrica quando la cottura è completa
e quando il prodotto non è in uso.
Piastra Panini:
Usare la griglia superiore ed inferiore in posizione “chiusa” per grigliare qualsiasi tipo di ingredienti
(per esempio, verdure, carni e formaggi) che si trovano tra due pezzi di pane o una tortilla/pita
piegata.
Page 60

!
1. Seguire i passaggi da 1 a 3 nella sezione “Griglia a contatto”, di cui sopra.
2. Posizionare il cibo sulla piastra inferiore e abbassare la piastra grill superiore sul cibo. La piastra
superiore si auto-regola in base allo spessore del cibo.
NOTA: Se si desidera cuocere più di un pezzo di cibo alla volta, i prodotti alimentari dovrebbero
avere lo stesso spessore per garantire che la griglia superiore poggi uniformemente sul cibo per
una cottura uniforme.
3. Quando la cottura è completata, rimuovere gli alimenti, scollegare il prodotto dalla presa
elettrica e lasciare raffreddare il prodotto (circa 30 minuti) prima di passare allo smontaggio o
alla pulizia.
ATTENZIONE: scollegare sempre il prodotto dalla presa elettrica quando la cottura è completa
e quando il prodotto non è in uso.
Griglia Aperta:
Utilizzando il prodotto nella posizione “aperta” raddoppia la superficie di cottura e consente la
cottura di articoli con differenti spessori, contemporaneamente, o la cottura dei cibi in diverse
piastre per evitare che i sapori si mischino. Utilizzare per la cottura di French toast, patate fritte,
panini aperti, e kebab.
1. Impostare il prodotto in posizione “aperta” e inserire il cavo di alimentazione in una presa
elettrica standard. L'indicatore di alimentazione si illuminerà di rosso, ad indicare che
l’apparecchio è acceso.
2. Usare entrambe le coppette di scolo quando si cuoce in posizione piana.
3. Ruotare la manopola della temperatura sull'impostazione desiderata.
NOTA: Possono essere necessari fino a otto minuti per raggiungere la temperatura di cottura
selezionata. La spia “Pronto” si illumina di verde quando il prodotto è pronto per la cottura.
L'indicatore “Pronto” alternerà on e off durante la cottura, indicando l’apparecchio sta
mantenendo la temperatura di cottura selezionata.
4. Mettete il cibo sulle piastre Grill.
5. Quando la cottura è completata, rimuovere gli alimenti, scollegare il prodotto dalla presa
elettrica e lasciare raffreddare il prodotto (circa 30 minuti) prima di passare allo smontaggio
o alla pulizia.
ATTENZIONE: scollegare sempre il prodotto dalla presa elettrica quando la cottura è
completa e quando il prodotto non è in uso.
Page 61

!
PULIZIA E MANUTENZIONE
AVVERTIMENTO: Assicurarsi sempre che il prodotto sia
scollegato dalla presa elettrica e si sia raffreddato
completamente prima di spostarlo, smontarlo o pulirlo.
AVVISO: Non utilizzare detergenti o tamponi abrasivi
troppo aggressivi per pulire il prodotto.
1. Dopo il completo raffreddamento, rimuovere
delicatamente le vaschette di gocciolamento e svuotarne
il contenuto.
2. Rimuovere eventuali avanzi di cibo dalle griglie
utilizzando l’apposito strumento.
3. Pulire le piastre Grill, le coppette di scolo ed il raschietto
in acqua calda e sapone; risciacquare e lasciare
asciugare. Queste parti possono anche essere lavate in
una lavastoviglie automatica.
ATTENZIONE: non immergere o esporre la base
dell’apparecchio all'acqua o ad altri liquidi.
4. Pulire l'alloggiamento superiore e la base con una spugna
inumidita con acqua e asciugare con un panno morbido
o un tovagliolo di carta.
5. Conservare il prodotto in un luogo fresco e asciutto.
AMBIENTE
ATTENZIONE:
Non gettare quest’ apparecchio tra i rifiuti domestici. Per questo tipo di prodotti è fornito dai comuni un
sistema di raccolta e ritiro in zona ed è quindi un dovere informarsi per conoscere il giusto smistamento
del rifiuto. Infatti, i prodotti elettrici ed elettronici possono contenere sostanze pericolose che hanno effetti
dannosi sull’ambiente o sulla nostra salute e quindi devono essere riciclati. Il simbolo al lato indica che le
apparecchiature elettriche ed elettroniche fanno parte di una raccolta selettiva e differenziata (rappresentata da
un bidone su due ruote sbarrato da una croce.
Adeva SAS / H.Koenig Europe - 8 rue Marc Seguin - 77290 Mitry Mory - France
www.hkoenig.com - sav@hkoenig.com - contact@hkoenig.com - Tél: +33 1 64 67 00 01
 Loading...