

Page 1

Instruction manual - Manuel d'utilisation
Bedienungsanleitung - Handboek
Manual de Utilización - Manuale d’uso
GR20
Page 2
6
7
1
2
4
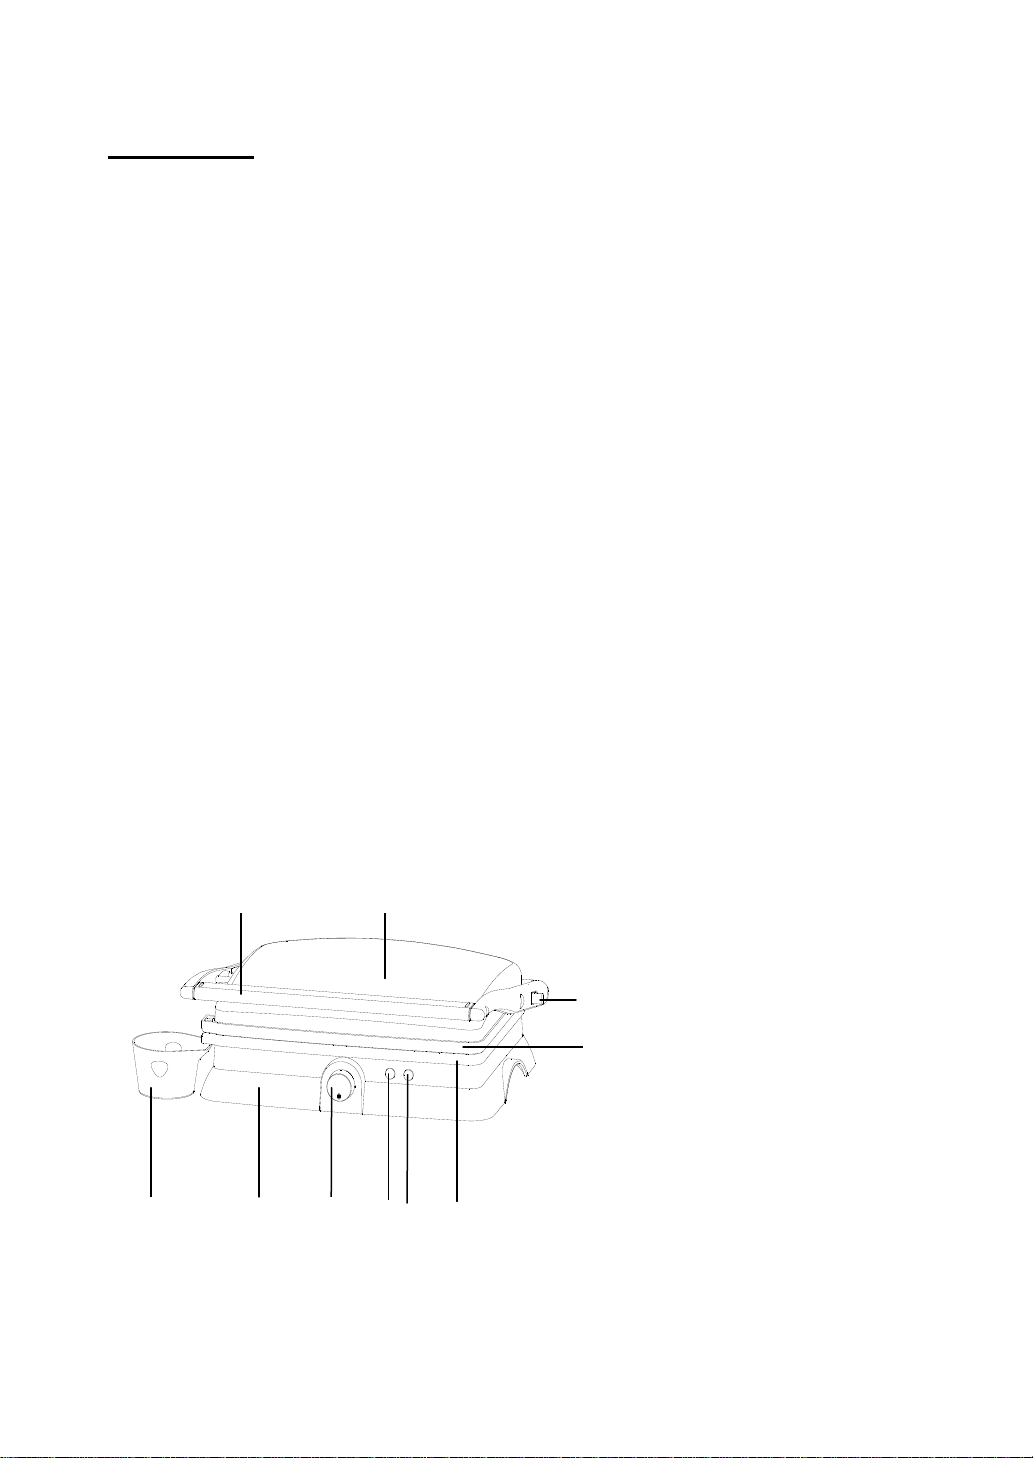
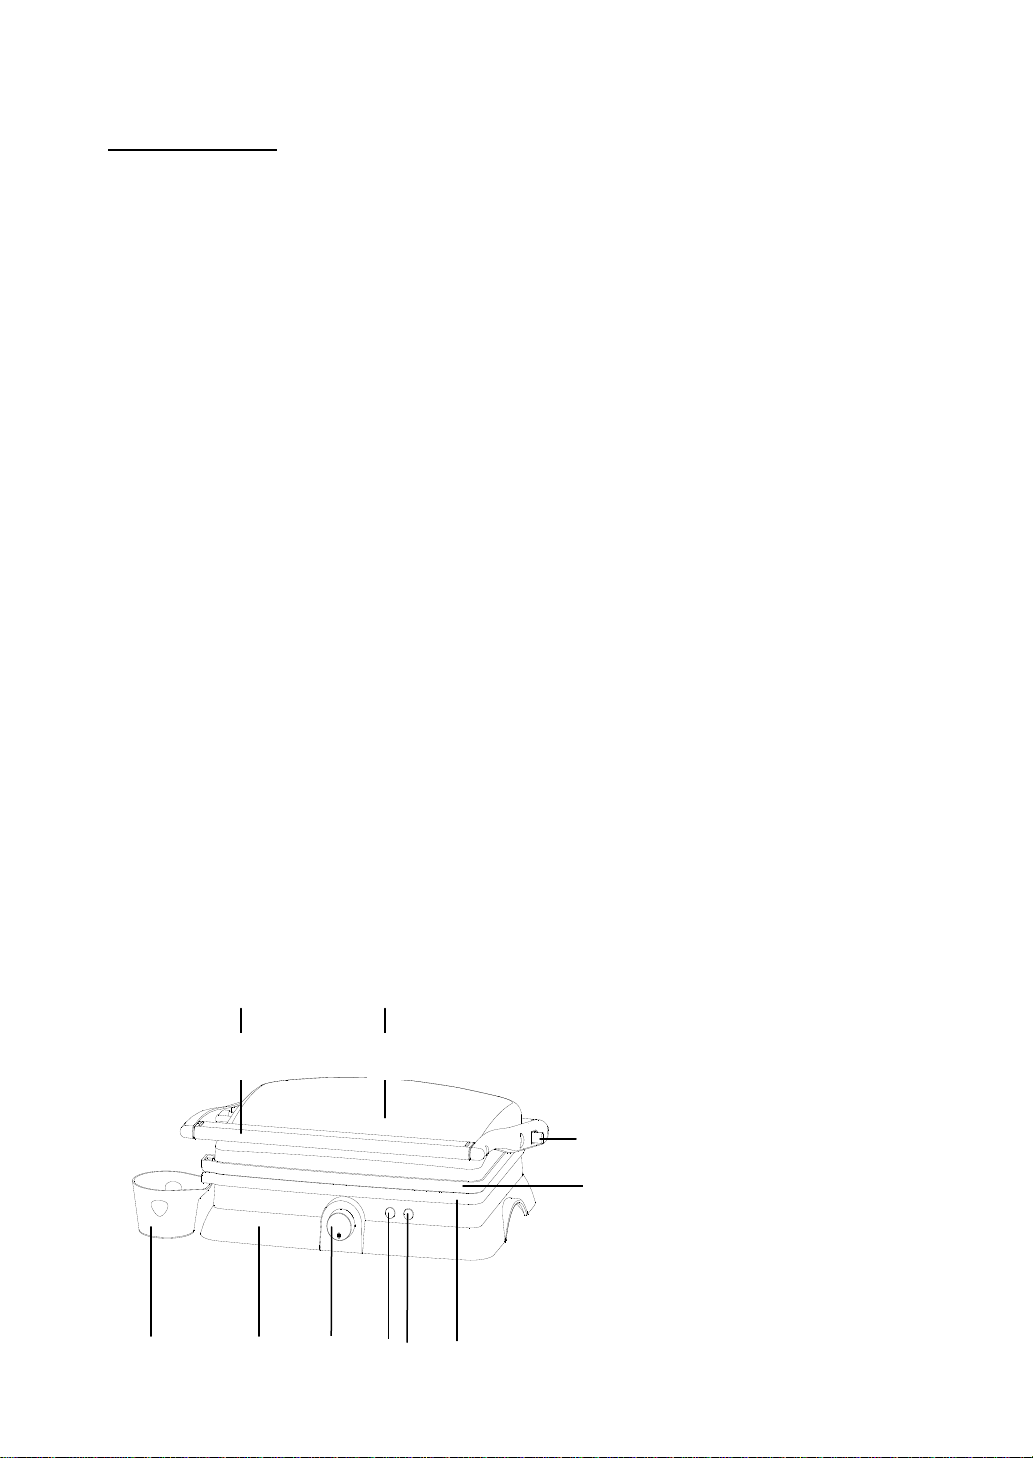
11. Handle
12. Upper Housing
13. Hinge Release Lever
14. Upper Non-stick Plate
15. Bottom Non-stick Plate
16. Ready Light (Green)
17. Power Light (Red)
18. Thermostat Knob
19. Bottom Housing
20. Oil Tray
5 8 9
10
3
ENGLISH
IMPORTANT SAFEGUARDS
• READ ALL INSTRUCTIONS
• Use only on AC 220-240 Volt, 50/60 Hz. Use only for household.
• Do not touch hot surfaces. Use handles and knob.
• To protect against risk of electric shock, do not immerse the cord, plug or cooking unit in water or any other
liquid.
• Close supervision is necessary when any appliance is used by or near children.
• Unplug from outlet when not in use and before cleaning. Allow to cool before putting on or taking off parts,
and before cleaning appliance.
• Do not operate any appliance with a damaged has malfunctioned or has been damaged in any manner. In
order to avoid the risk of an electric shock, never try to repair the Press Grill yourself. Take it to an authorized
service station for examination and repair. An incorrect reassembly could present a risk of electric shock
when the Press Grill is used.
• The use of accessory attachments not recommended by the manufacturer may result in fire, electrical
shock, or risk of injury to persons.
• Do not use outdoors or for commercial purposes.
• Do not let power cord hang over the edge of the table or counter, or touch hot surfaces.
• Do not place on or near a hot gas or electric burner or heated oven.
• Unplug the unit when finished using.
• Extreme caution must be exercised when moving an appliance.
PARTS IDENTIFICATION
Page 3
BEFORE FIRST USE
• Read all instructions carefully and keep them for future reference.
• Remove all packaging
• Clean the Cooking Plates by wiping a sponge or cloth dampened in warm water.
DO NOT IMMERSE THE UNIT AND DO NOT RUN WATER DIRECTLY ONT THE COOKING SURFACES.
• Dry with a cloth or paper towel.
• For best results, lightly coat the cooking plates with a little cooking oil or cooking spray.
Notice: When your Grill Toaster is heated for the first time, it may emit slight smoke or odor. This is
normal with many heating appliances. This does not affect the safety of your appliance.
HOW TO USE
• Set the Grill Toaster Temperature Control to your desired setting. At first, try a setting in the max.
You may later adjust it lower or higher according to your preference.
• Close the Grill Toaster and plug it into the wall outlet, you will notice that the power and ready light will
come on, indicating that the Grill Toaster has begun preheating.
• It will take approximately 5 minutes to reach baking temperature, the ready light will
goes off.
• Open the Grill Toaster, put the sandwich, meat or other foods on the bottom
cooking plate.
• Close the Grill Toaster. The ready light will go on again.
• Cook for about 3 to 8 minutes, the ready light goes off again, or until golden brown,
adjusting the time to suit your own individual taste.
• When the foods is cooked use the handle to open the lid. Remove the foods with the
help of a plastic spatula. Never use metal tongs or a knife as these can cause damage to the non-stick
coating of the cook plates.
• Once you are finished cooking, disconnect the plug from
the wall outlet and leave unit open to cool.
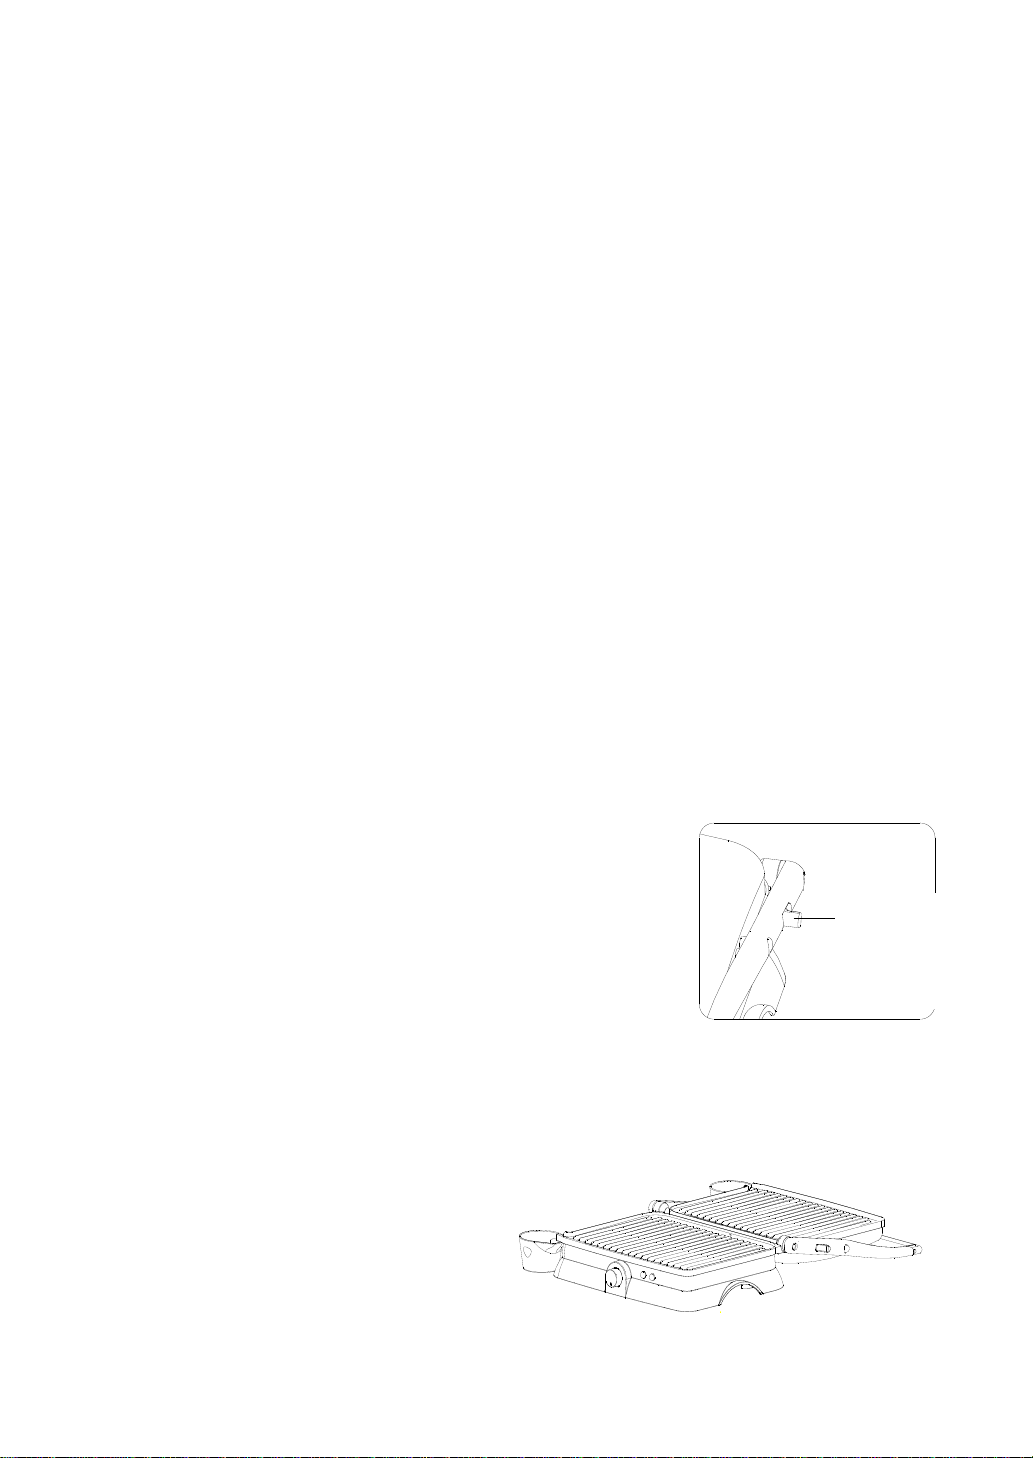
USE AS OPEN GRILL
• Place Grill Toaster on a clean flat surface where you
intend to cook. The Grill Toaster can be positioned in flat
position.
• Upper plate/cover is level with lower plate/base. The
upper and lower plates line up to create one large cooking surface. The Grill Toaster to this position, locate
the hinge release lever on the right arm.
• With you left hand on the handle, use your right hand to slide the lever toward you. Push the handle back
until the cover rests flat on the counter. The unit will stay in this position until you lift the handle and cover to
return it to the closed position.
• Use the Grill Toaster as an open grill to cook burgers, steak, poultry (we do not recommend cooking
bone-in chicken, since it does not cook evenly on an open grill), fish and vegetables.
• Cooking on the open grill is the most versatile method of using the Grill Toaster. In the open position, you
have double the surface area for grill.
• You have the option of cooking different types of foods on separates without combining their flavors, or
cooking large amounts of the same type of food. The open position also accommodates different cuts of
meat with varying thicknesses, allowing you to cook each piece to you liking.
Page 4

CLEANING AND CARE
• Always unplug the Grill Toaster and allow it to cool before cleaning. The unit is easier to clean when slightly
warm. There is no need to disassemble Grill Toaster for cleaning. Never immerse the Grill Toaster in water or
place in dishwasher.
• Wipe cooking plates with a soft to remove food residue. For baked on food residue squeeze some warm
water mixed with detergent over the food residue then clean with a non abrasive plastic scouring pad or
place wet kitchen paper over the grill to moisten the food residue.
• Do not use anything abrasive that can scratch or damage the non-stick coating.
• Do not use metal utensils to remove your foods, they can damage the non-stick surface.
• Wipe the outside of the grill toaster with a damp cloth only. Do not clean the outside with any abrasive
scouring pad or steel wool, as this will damage the finish. Do not immerse in water or any other liquid.
• Do not place in the dishwasher.
• Remove and empty the drip tray after each use and wash the tray in warm, soapy water. Avoid the use of
scouring pads or harsh detergents as they may damage the surface.
Rinse and dry thoroughly with a clean, soft cloth and replace.
STORAGE
• Always unplug the Grill Toaster before storage.
• Always make sure the Grill Toaster is cool and dry before string.
• The power cord can be wrapped around the bottom of base for storing.
CAUTION:
Do not dispose of this product as it has with other household products. There is a separation of this
waste product into communities, you will need to inform your local authorities about the places where
you can return this product. In fact, electrical and electronic products contain hazardous substances
that have harmful effects on the environment or human health and should be recycled. The symbol
here indicates that electrical and electronic equipment should be chosen carefully, a wheeled waste
container is marked with a cross.
Manufactured for and imported by ADEVA SAS 8 rue Marc Seguin – 77290 MITRY-MORY – FRANCE
Tél. (+ 33) 1.64.67.00.01 – Fax : (+ 33) 1.64.67.00.05 contact@hkoenig.com - www.hkoenig.com
Page 5
7 6 1 2
4
1. Poignée
2. Logement supérieur
3. Levier de déblocage des
charnières
4. Plaque anti-adhésive supérieure
5. Plaque anti-adhésive inférieure
6. Voyant Prêt (vert)
7. Voyant Marche (rouge)
8. Bouton du thermostat
9. Logement inférieur
10. Collecteur d'huile
5 8 9
10
3
FRANCAIS
PRÉCAUTIONS IMPORTANTES
• LISEZ TOUTES LES INSTRUCTIONS
• N'utilisez l'appareil que sur du courant AC 220-240 Volt, 50/60 Hz. Ne l'utilisez que pour un usage
domestique.
• Ne touchez pas les surfaces chaudes. Utilisez les poignées et le bouton tournant.
• En raison du risque d'électrochoc, n'immergez pas le cordon, la prise ni l'appareil dans l'eau ni tout autre
liquide.
• Cet appareil n’est pas prévu pour être utilisé par des personnes (y compris les enfants) dont les
capacités physiques, sensorielles ou mentales sont réduites, ou des personnes dénuées d’expérience ou de
connaissance, sauf si elles ont pu bénéficier, par l’intermédiaire d’une personne responsable de leur sécurité,
d’une surveillance ou d’instructions préalables concernant l’utilisation de l’appareil. Il convient de surveiller
les enfants pour s’assurer qu’ils ne jouent pas avec l’appareil.
• Débranchez l'appareil quand vous ne l'utilisez pas et avant de le nettoyer. Laissez-le refroidir avant d'y
rajouter ou d'en retrancher des pièces, et avant de le nettoyer.
• Ne faites pas fonctionner un appareil avec un cordon endommagé, avec un mauvais fonctionnement ou
qui a été endommagé d'une manière ou une autre. Pour prévenir tout risque d'électrocution, n'essayez
jamais de réparer le grill vous-même. Apportez-le chez un réparateur agrée pour examen et réparation.
Un remontage incorrect pourrait représenter un risque d'électrochoc quand vous utiliserez le grill.
• Le fabricant déconseille l'utilisation d'attaches supplémentaires. Il pourrait en résulter un incendie, un
électrochoc ou un risque de blessures aux personnes.
• Ne l'utilisez pas à l'extérieur ni pour un usage commercial.
• Ne laissez pas le câble électrique pendre sur le coin de la table ni toucher une surface chaude.
• Ne le placez pas sur ni près d'un brûleur électrique ou à gaz ni d'un four chaud.
• Débranchez l'appareil après utilisation.
• Un soin extrême doit être exercé quand on déplace l'appareil
• Si le cordon d’alimentation est endommagé, il doit être remplacé par le fabricant, le centre de
maintenance agréé ou toute autre personne qualifiée pour éviter tout incident.
IDENTIFICATION DES PIÈCES
Page 6
Levier de
déblocage
des
AVANT LA PREMIÈRE UTILISATION
• Lisez toutes les instructions avec précautions et conservez-les pour vous y référer ultérieurement
• Enlevez les emballages
• Nettoyez les plaques de cuisson en passant une éponge ou un linge trempé dans l'eau tiède.
N'IMMERGEZ PAS L'APPAREIL ET NE FAITES PAS COULER D'EAU DIRECTEMENT SUR LES
SURFACES DE CUISSON.
• Séchez-le avec un linge ou une feuille de papier.
Note : Quand vous faites chauffer le grill pour la première fois, il se peut qu'il émette une légère
fumée ou odeur. C'est normal avec de nombreux appareils de cuisson. Cela n'affecte pas la sécurité
de votre appareil.
COMMENT L'UTILISER
• Réglez le contrôle de température du grill au réglage que vous désirez. La première fois, essayez un
réglage au maximum. Plus tard, vous pourrez le régler plus bas ou plus haut selon votre préférence.
• Fermez le grill et branchez-le à la prise murale. Vous noterez que les voyants Marche et Prêt s'allument,
indiquant que le préchauffage du grill a commencé.
• Il lui faudra environ 5 minutes pour atteindre la température de cuisson. Le voyant Prêt s'éteint.
• Ouvrez le grill, placez le sandwich, la viande ou tout autre aliment sur la plaque de cuisson inférieure.
• Fermez le grill. Le voyant Prêt se rallume.
• Faites cuire environ 3 à 8 minutes - le voyant se ré-éteint - ou, jusqu'à obtenir une couleur bronzée.
Réglez le temps de cuisson selon votre goût.
• Quand les aliments sont cuits, utilisez la poignée pour ouvrir le couvercle. Enlevez les aliments à l'aide
d'une spatule en plastique thermorésistant. N'utilisez jamais de pinces métalliques ni de couteaux : ils
peuvent endommager le revêtement anti-adhérant des plaques de cuisson.
• Une fois la cuisson terminée, débranchez l'appareil et laissez-le ouvert pour refroidir.
UTILISEZ COMME UN GRILL OUVERT
• Placez le grill sur une surface plane et propre pour faire la cuisine. Vous
pouvez positionner le grill à plat.
• La plaque supérieure / couvercle est au même niveau que la plaque
inférieure / base. Les plaques supérieures et inférieures s'alignent pour
former une grande surface de cuisson. Une fois le grill dans cette
position, repérez le levier de déblocage des charnières à droite.
• Avec la main gauche sur la poignée, utilisez votre main droite pour faire
glisser le levier vers vous. Poussez la poignée en arrière jusqu'à ce que
le couvercle repose à plat. L'appareil restera dans cette position jusqu'à
ce que vous souleviez la poigner et le couvercle pour le ramener en position fermée.
• Utilisez le grill comme un grill ouvert pour cuire des hamburgers, des steaks, de la volaille, du poisson et
des légumes.
• Cuire à grill ouvert est la méthode la plus polyvalente d'utilisation du grill. En position ouverte, vous avez
deux fois plus de surface pour griller.
• Vous pouvez cuire différents types
d'aliments sur les deux plaques sans
mélanger leurs saveurs, ou cuire de grandes
quantités du même type d'aliment. La
position ouverte s'accommode de différentes
découpes de viande avec des épaisseurs
variées, ce qui vous permet de cuisiner
chaque morceau comme vous aimez.
Page 7

NETTOYAGE ET ENTRETIEN
• Il faut toujours débrancher le grill et le laisser refroidir avant de le nettoyer. L'appareil est plus facile à
nettoyer quand il est tiède. Il n'est pas nécessaire de le démonter pour le nettoyer. Ne jamais l'immerger
dans l'eau ni le placer au lave-vaisselle.
• Essuyez les plaques de cuisson avec un linge doux pour enlever les résidus alimentaires. Pour les
résidus alimentaires cuits, passez un peu d'eau tiède mêlée de détergent sur les résidus puis nettoyez
avec une éponge en plastique non-abrasive ou placez du papier absorbant de ménage humide sur le grill
pour humidifier les résidus.
• N'utilisez rien d'abrasif qui puisse rayer ou endommager le revêtement anti-adhérant.
• N'utilisez pas d'ustensiles en métal pour enlever les aliments : ils peuvent endommager la surface
anti-adhérente.
• N'essuyez l'extérieur du grill qu'avec un linge humide uniquement. Ne nettoyez pas l'extérieur avec un
tampon abrasif ni de la laine d'acier : ils endommageraient le fini. Ne jamais l'immerger dans l'eau ni dans
aucun autre liquide.
• Ne le mettez pas au lave-vaisselle.
• Enlevez et videz le collecteur d'huile après chaque utilisation et lavez-le à l'eau chaude savonneuse.
Évitez d'utiliser des tampons abrasifs ou des détergents agressifs : ils pourraient endommager la surface.
Rincez et séchez à fond avec un linge propre et doux et remettez-le en place.
STOCKAGE
• Débranchez toujours le grill avant de le ranger.
• Assurez-vous toujours que le grill est froid et sec avant de l'emballer.
• Vous pouvez enrouler le câble d'alimentation autour de la base pour le stockage.
Fabriqué pour et importé par : Adeva SAS 8 rue Marc Seguin 77290 Mitry-Mory FRANCE
www.adeva-import.com - contact@adeva-import.com - Tél. 01 64 67 00 01
Page 8

DEUTSCH
WICHTIG VORSICHTSMASSNAHMEN
• LESEN SIE ALLE ANLEITUNGEN
• Benutzen Sie dieses Gerät nur mit AC 220-240 V, 50/60 Hz. Dieses Gerät ist nur für den häuslichen
Gebrauch.
• Berühren Sie keine heißen Oberflächen. Verwenden Sie die Griffe und Knopf Thermostat.
• Aufgrund des Schocks Risiko, nicht tauchen Netzkabel, Stecker oder Gerät niemals in Wasser oder
anderen Flüssigkeiten.
• Ziehen Sie bei Nichtgebrauch und vor jeder Reinigung. Lassen Sie vor der Installation oder Entfernen von
Teilen und vor der Reinigung abkühlen.
• Verwenden Sie nicht den Grill mit einem beschädigten Netzkabel, wenn der Grill hat eine Fehlfunktion
erlitten oder bereits in der einen oder anderen beschädigt. Zur Vermeidung von Stromschlag, versuchen Sie
nicht zu reparieren den Grill selber. Vorzugsweise bringen Sie es zu einem autorisierten Service-Center
überprüft und repariert werden. Eine falsche Installation kann zu einem Kurzschluss führen, wenn Sie den
Grill wieder verwenden.
• Der Hersteller empfiehlt nicht den Einsatz von zusätzlichen Elementen. Dies könnte zu Feuer, Stromschlag
oder Verletzungsgefahr ergeben.
• Verwenden Sie nicht den Grill im Freien, und nicht kommerziellen Gebrauch gestattet.
• Das Kabel darf nicht über die Tischkante hängen oder heiße Flächen berühren.
• Stellen Sie nicht das Gerät auf oder neben Gas-oder Elektroherden, oder einem heißen Ofen.
• Ziehen Sie nach dem Gebrauch.
• Seien Sie vorsichtig, wenn Sie das Gerät bewegen wollen.
BEZEICHNUNG DER TEILE
1. Griff
2. Das obere Gehäuse
3. Lever zum Lösen der
Scharniere
4. Obere Kühlergrill
5. untere Kühlergrill
6. Bereit-LED (grün)
7. Power-LED (Rot)
8. Thermostat-Taste
9. Gehäuseunterteil
10. Ölsammler
Page 9

VOR DEM ERSTEN GEBRAUCH
• Lesen Sie alle Anweisungen sorgfältig und bewahren Sie sie für späteres Nachschlagen auf.
• Entfernen Sie die Verpackung
• Reinigen Sie das Kochfeld mit einem Schwamm oder Tuch mit warmem Wasser.
TAUCHEN SIE DAS GERÄT UND NICHT FALLEN LASSEN WASSER DIREKT AUF DIE KOCHFLÄCHE.
• Wischen Sie das Gerät mit einem Tuch oder Papier.
Hinweis: Beim Heizen der Grill zum ersten Mal, dass dieses Problem kann eine leichte Rauch-Geruch
sein. Das ist ganz normal in vielen Kochgeräten. Dies wird keine Auswirkungen auf die Sicherheit
des Geräts.
GEBRAUCHSANWEISUNG
• Stellen Sie die Temperatur des Grills auf das gewünschte Niveau. Das erste Mal versuchen eine maximale
Temperatur. Anschließend können Sie eine niedrigere oder höhere, nach
Ihren Wünschen.
• Schließen Sie den Grill und Stecker in eine Steckdose. Sie werden
feststellen, dass die Lichter der Vorbereitung und leuchtet, was anzeigt,
dass Vorheizen des Grills wird gestartet.
• Es dauert etwa 5 Minuten zum Kochen Temperatur erreichen. An dieser
Stelle wendet sich die Bereit-LED off.
• Öffnen Sie den Grill, und legen die Sandwiches,
Fleisch oder andere Lebensmittel Kochen auf dem
Grill unten.
• Schließen Sie den Grill. Die Bereit-LED leuchtet
auf.
• Cook für etwa 3-8 Minuten - die Bereit-LED
schaltet sich aus - oder lassen Sie es, bis eine braune Farbe zu kochen. Passen Garzeit abschmecken.
• Wenn die Nahrung gekocht wird, verwenden Sie den Hebel zum Öffnen des Deckels. Nehmen Sie
Lebensmittel mit einem Kunststoff-Spatel ist hitzebeständig. Verwenden Sie niemals Metallhaken oder
Messer, können sie Schäden Antihaft-Grillroste.
• Sobald Sie fertig sind Kochen, schalten Sie den Grill und lassen Sie sie offen zu kühlen.
FÜR DIE VERWENDUNG DER GRILL IM FREIEN (Lever zum Lösen der Scharniere)
• Platzieren Sie den Grill auf einer ebenen Fläche zum Kochen. Sie können den Grill auf dem Boden Platz.
• Der obere Kühlergrill / Deckel ist die gleiche Ebene wie die unteren Kühlergrill / base. Die oberen und
unteren Grills Linie bis bilden eine große Grillfläche. Sobald der Grill ist in dieser Position, suchen Sie den
Hebel auf der rechten Scharnier.
• Mit dem Griff in seine linke Hand, mit der rechten Hand an den Hebel zu bewegen. Drücken Sie den Griff
nach hinten, bis die Oberseite ist flach. Das Gerät wird in Kraft bleiben, bis Sie den Deckel heben, um in der
Nähe zurückzukehren.
• Verwenden Sie einen offenen Grill zum Kochen Hamburger, Steaks, Hähnchen, Fisch und Gemüse.
• Kochen mit dem offenen Grill ist vielseitiger Nutzung des Netzes. Wenn öffnen, haben Sie eine Fläche
Page 10

doppelt so groß für das Kochen.
• Sie können verschiedene Lebensmittel auf dem Grill ohne Vermischung Aromen kochen, oder kochen
großer Mengen des gleichen Typs von Lebensmitteln. Die offene Position ist in der Lage verschiedene
Fleischsorten mit unterschiedlichen Dicken, mit dem Sie jedes Stück nach Ihren Wünschen kochen können.
REINIGUNG UND PFLEGE
• Immer muss der Grill ziehen und lassen Sie vor dem Reinigen abkühlen lassen. Das Gerät ist leichter zu
reinigen, wenn es warm ist. Keine Notwendigkeit, für die Reinigung zu zerlegen. Nicht in Wasser eintauchen
oder in die Spülmaschine geben.
• Reinigen Sie den Grill mit einem weichen Tuch, um Speisereste zu entfernen. Für gekochte Speisereste,
verbringen Sie ein wenig warmem Wasser mit Spülmittel gemischt und dann mit einem trockenen, sauberen
Kunststoff-Schwamm, nicht-abrasive, oder anders gesagt einen feuchten Papiertuch auf den Grill, um den
Rückstand zu befeuchten.
• Verwenden Sie keine Scheuermittel, dass Kratzer oder Schäden an der Antihaft-Beschichtung kann.
• Verwenden Sie keine Metall-Utensilien auf Nahrung zu entfernen, da diese die Antihaft-Oberfläche
beschädigen können.
• Reinigen Sie die Außenseite des Grills nur mit einem leicht feuchten Tuch. Reinigen Sie nicht die
Außenseite mit einem Scheuermittel oder Stahlwolle, dass die Oberfläche angreifen und beschädigen
können. Tauchen Sie nicht in Wasser oder andere Flüssigkeiten.
• Stellen Sie ihn nicht in die Spülmaschine.
• Entfernen und das Öl ablassen pan nach jedem Gebrauch und Waschen mit warmem Wasser und Seife.
Verwenden Sie keine Scheuermittel oder scharfen Reinigern, könnten diese die Oberfläche beschädigen.
Spülen und trocknen mit einem weichen, sauberen Tuch und legte es wieder an.
LAGERUNG
• Ziehen Sie immer den Grill vor der Lagerung.
• Achten Sie darauf, den Grill ist kalt und trocken sein, bevor die Sicherung es.
• Sie können die Schnur um die Basis für die Lagerung zu wickeln.
UMWELT
ACHTUNG:
Werfen Sie nicht dieses Produkt, wie es mit anderen Haushaltsprodukten hat. Es gibt eine
Mülltrennungs von diesem Produkt in Gemeinden, Sie müssen Ihre lokalen Behörden über
die Orte, wo man dieses Produkt zurückgeben können zu informieren. In der Tat enthalten
elektrische und elektronische Produkte gefährliche Stoffe, die schädliche Auswirkungen
auf die Umwelt oder die menschliche Gesundheit haben und sollte recycelt werden. Das
Symbol hier darauf hinweisen, dass elektrische oder elektronische Geräte sollten sorgfältig ausgewählt
werden, ist ein fahrbarer Abfallbehälter mit einem Kreuz markiert.
Hergestellt und importiert: Adeva SAS 8 rue Marc Seguin 77290 Mitry-Mory FRANCE www.adeva-import.com - contact@adeva-import.com -
Tel. 01 64 67 00 01
Page 11

NEDERLANDS
7 6
1
2
4
1.Hendel
2.Hogere Huisvesting
3.Hendel voor het vrijgeven van
scharnieren
4.Superieure Anti-lijm plaque
5.Inferieur Anti-lijm plaque
6.Voltooing Indicateur (groen)
7.Voor verwarmind Indicateur (rood)
8.Thermostaat knop
9.Inferieur Huisvesting
10.Olie zamelaar
5 8 9
10
3
BELANGRIJKE VOORZORG
• LEES DE INSTRUCTIES
• Gebruik dit apparaat niet op zijn momenteel spanning AC 220-240 Volt, 50/60 Hz. Dit apparaat
is voor huishoudelijk gebruik.
• Raak de heette oppervlakte niet aan. Gebruik de hendels of de schakelaar.
• om risico van elektrische shock te vermijden, dompel het kabel of het apparaat nooit onder
water of andere vloeistoffen.
• Dit apparaat is niet ontworpen voor mensen met fysieke, mentale of sensorisch problemen, of mensen
zonder ervaring (bijvoorbeeld kinderen), tenzij ze onder toezicht worden gehouden.
• ls het apparaat niet functioneert omdat het kabel beschadigt is of het apparaat op een andere manier
beschadigt is. Om risico van elektrische shock the vermijden, probeer nooit de grill zelf te repareren.
Breng het naar een geschikt reparateur om het te laten onderzoeken. De foute herstelling van de grill
brengt risico van elektrische shock bij het gebruik van de grill.
• De fabrikant adviseert u om geen extra bevestigingsmiddelen te gebruiken. Dit kan risico van elektrische
shock, brandt of blessures brengen.
• Gebruik het apparaat niet buiten of binnen een commercieel praktijk.
• laat het kabel niet in aanraking komen met een heette oppervlakte en laat het niet van het aanrecht
slingeren.
• Plaats het apparaat niet op of dichtbij een gas fornuis of oven.
• Koppel het apparaat los na dat u het gebruikt.
• als u het apparaat wilt verplaatsen moet dat met uitermate voorzichtigheid gebeuren
• Als het kabel wordt beschadigt, moet u het op een post-sale basis service vervangen om schade te
vermijden.
IDENTIFICEREN VAN DE DELEN
Page 12

Hendel om
scharnieren
vrij te geven.
VOOR HET EERSTE GEBRUIK
• Lees al de instructies en bewaar dit boekje voor verder gebruik.
• Verwijder de verpakking
• Maak de kookplaat schoon gebruikend een vochtig doekje of linnen.
DOMPEL HET APPARAAT NIET ONDER WATER EN LAAT OOK GEEN WATER DIRECT
OVER DE KOOKPLAAT LOPEN.
• Droog het met linnen of keukenrol.
Nota: Als u de grill voor de eerste keer opwarmt kan er rook of een
raar luchtje emitteren. Dit is normaal en be?nvloedt de veiligheid van
uw apparaat niet.
HET GEBRUIK
•Stel de temperatuur van u grill vast op gewenste temperatuur. Bij het
eerste gebruik, test en pass de temperatuur tot het maximum aan. Later
kunt u de temperatuur hoog of laag aanpassen zo als u wenst.
• Maak de grill dicht en koppel het aan de kookplaat. U zal zien dat de
Voorverwaming Indicateur op zal steken om te laten zien dat de grill is
begonnen met opwarmen.
• Het zal rond 5 minuten duren voordat het de temperatuur voor het koken
heeft bereikt. De Voltooiing Indicateur zal opsteken.
• Open de grill en plaats u boterham, vlees of even welk ander eten op de
kookplaat.
• Maak de grill dicht. De Voorverwamings indicateur zal opsteken.
• Kook gedurende 3 tot 8 minuten tot dat de voltooiing indicateur opsteekt
of het eten licht bruin is. Controleer de temperatuur na u voorkeur.
• Als het eten klaar is, gebruik de hendel om de grill te openen. Verwijder
het eten gebruikend een hittebestendig spatel. Gebruik nooit metalen grepen
of messen. Ze kunnen de anti-lijm laag beschadigen.
• Als u klaar bent met koken, koppel het apparaat los en laat en geopend afkoelen.
GEBRUIK ALS OPEN GRILL
• Plaats de grill op een even oppervlak en maak het voor het gebruik
schoon. U kunt de grill plat gebruiken.
• De Hooge plaat/deksel is op de zelfde laag als de lagere plaat/base.
Hogere en lagere platen richten gelijk om een grootte oppervlakte
voor koken te formeren. Zodra de grill in positie is, vindt de hendel en
geef de scharnieren rechts vrij.
• Met de linker hand op de hendel, gebruik u rechtse hand om de
hendel naar u te schakelen. Duw de hendel zodat de deksel plat rust.
Het apparaat zal in deze positie verblijven zodat u de hendel en de
deksel gemakkelijk in gesloten positie kan brengen.
• Gebruik de grill als open grill om hamburgers, steaks, gevogelte, vis en groenten te koken.
• Om met open grill te koken is de meest gebruikte manier van deze grill. In geopende positie
heeft u twee keer zoveel kook oppervlakte om te koken.
Page 13

• U kunt divers eten koken op twee platen
zonder smaken te mixen, of grootte
hoeveelheden van het zelfde eten koken. De
geopende positie past zich aan op
verschillende dikte en staat u toe om u vlees
zo te koken als u het wilt.
SCHOONMAAK EN ONDERHOUD
• Het is noodzakelijk de grill los te koppelen en af te laten koelen voor dat u het
schoon gaat maken. Het apparaat is makkelijker om schoon te maken als het licht bevochtigt is. Het is
niet noodzakelijk om het apparaat uit elkaar te halen om het schoon te maken. Dompel het nooit onder
water en plaats het niet in de vaatwasser.
• Veeg de kookplaat met een linnen doekje af om eten overblijfsels te verwijderen. Als de eten overblijfselen
erg plakken, gebruik een beetje wasmiddel en een vochtige spons of keukenrol om het makkelijker
schoon te krijgen.
• Gebruik nooit iets dat schuurt omdat het de anti-lijm laag kan beschadigen.
• Gebruik geen metalen onderwerpen om eten te verwijderen. Het kan de anti-lijm laag beschadigen.
• Maak de buitenkant van grill alleen met een linnen doekje schoon. Gebruik nooit een schorsend spons, of
metaal. Dat zal de grill beschadigen. Dompel het apparaat nooit in water onder of vloeistoffen.
• Plaats het niet in de vaatwasser
• Verwijder de olie zamelaar na elk gebruik en maak het in zeep water schoon.Gebruik geen schorsend
spons of agressief wasmiddel ze kunnen de oppervlakte beschadigen. Spoel af en droog zorgvuldig met
een linnen doek en plaats het terug.
OPSLAG
•Koppel de grill los voordat u het gaat arrangeren.
• Controleer altijd dat de grill schoon en droog is voordat u het opslaat
• U kunt het kabel om de base rollen voor de opslag.
Milieu
ATTENTIE:
Dit apparaat mag niet met uw ander huishoudelijke toestellen worden verwijdert. Dit
product moet op een geselecteerde stortplaats verwijdert worden. U kunt bij de gemeente
een indiceerde plaats aanvragen. Elektrisch en elektronische producten kunnen
gevaarlijke stoffen inhouden die schadelijk zijn voor mensen en het milieu en moet
recycled worden. Het symbool aan de kant geeft aan dat het een elektrisch en
elektronisch toestel is en zijn dus artikelen van een selectieve collectie. Het beeld geeft een afvalbak met
een X teken aan.
Geproduceerd en geïmporteerd door : Adeva SAS 8, Rue Marc Seguin 77290, Mitry-Mory FRANKRIJK
www.adeva-import.com - contact@adeva-import.com – Telefoon: 01 64 67 00 01
Page 14

ESPANOL
PRECAUCIONES IMPORTANTES
• LEA TODAS LAS INSTRUCCIONES
• Use este dispositivo sólo con corriente AC 220-240 V, 50/60 Hz. Sólo se debe de usar para uso doméstico.
• No toque las superficies calientes. Utilice las asas y el botón de termostato.
• Debido al riesgo de cortocircuito, no sumerja el cable, enchufe o el dispositivo en agua u otros líquidos.
• Desenchufe el dispositivo cuando no esté en uso y antes de limpiarlo. Deje que se enfríe antes de montar
o desmontar piezas y antes de limpiarlo.
• Este producto no está destinado a ser utilizado por personas con capacidad reducida en el plano físico,
mental o sensorial, o con falta de experiencia o conocimiento, (incluyendo niños), a menos que se les haya
pedido supervisarlo o han sido instruidos en el uso del dispositivo por una persona responsable de su
seguridad. Los niños deben ser supervisados para asegurarse de que no jueguen con el aparato.
• No utilice el dispositivo con un cable de alimentación dañado, si ha sufrido un mal funcionamiento o ha
sido dañado de una manera u otra. Para evitar cualquier riesgo de cortocircuito, no intente reparar la parrilla
usted mismo. Preferiblemente llévela a un centro de servicio autorizado para que sea revisada y reparada.
Un montaje incorrecto puede llevar a un cortocircuito cuando vuelva a utilizar la parrilla.
• El fabricante no recomienda el uso de elementos adicionales. Esto podría resultar en incendio,
cortocircuito o riesgo de lesiones personales.
• No use el dispositivo al aire libre o para un uso comercial.
• No deje que el cable de alimentación cuelgue del borde de una mesa o que toque superficies calientes.
• No coloque este dispositivo sobre o cerca de hornillas de gas o eléctricas o de un horno caliente.
• Desenchufe el dispositivo después de usarlo.
• Tenga mucho cuidado cuando quiera desplazar el dispositivo.
• Si el cable de alimentación está dañado, debe ser sustituido por el servicio post venta para evitar cualquier
peligro
Page 15

IDENTIFICACIÓN DE LAS PIEZAS
1. Asa
2. Carcasa superior
3. Palanca para liberar las bisagras
4. Parrilla anti adhesiva superior
5. Parrilla anti adhesiva inferior
6. Luz de Preparado (Verde)
7. Luz de Marcha (Roja)
8. Botón de termostato
9. Carcasa inferior
10. Colector de aceite
ANTES DEL PRIMER USO
• Lea todas las instrucciones cuidadosamente y guárdelas para referencias futuras
• Retire el embalaje
• Limpie las placas de cocción con una esponja o paño humedecido con agua tibia.
NO SUMERJA EL DISPOSITIVO Y NO DEJE CAER AGUA DIRECTAMENTE SOBRE LAS SUPERFICIES
DE COCCIÓN.
• Seque el dispositivo con un paño o una hoja de papel.
Nota: Cuando caliente la parrilla por primera vez, puede que esta
emita un poco de humo o ligero olor. Esto es muy normal en muchos
aparatos de cocción. Esto no afectará la seguridad de su dispositivo.
MODO DE EMPLEO
• Ajuste el control de temperatura de la parrilla al nivel deseado. La primera
vez, intente un ajuste al máximo. Después, Ud. puede establecer un nivel inferior o superior de acuerdo a su
preferencia.
• Cierre la parrilla y conéctela a la toma de corriente. Usted notará que las luces de preparado y de marcha
se iluminan, lo que indica que el precalentamiento de la parrilla está empezando.
• Se tarda unos 5 minutos para llegar a la temperatura de cocción. En este punto la luz de preparado se
apaga.
• Abra la parrilla, coloque los bocatas, carne u otros tipos de alimentos en la parrilla de cocción inferior.
• Cierre la parrilla. La luz de preparado se volverá a encender.
• Dejar cocer unos 3-8 minutos – la luz de preparado se volverá a apagar - o bien, déjela cocer hasta
obtener un color bronceado. Ajuste el tiempo de cocción a su gusto.
Page 16

• Cuando la comida se cocine, utilice la palanca para abrir la tapa. Saque la comida con una espátula de
plástico resistente al calor. Nunca use ganchos de metal o cuchillos, estos pueden dañar la capa
antiadherente de las parrillas de cocción.
• Una vez terminada la cocción, desconecte la unidad y déjela abierta para que se enfríe.
PARA USAR COMO PARRILLA AL AIRE LIBRE
• Coloque la parrilla sobre una superficie plana y limpia para cocinar. Puede colocar la parrilla en el suelo.
• La parrilla superior / cubierta se encuentra al mismo nivel que la parrilla inferior / base. Las parrillas
superior e inferior de alinean para formar una gran
superficie de cocción. Una vez que la parrilla está
en esta posición, busque la palanca de liberación
de las bisagras de la derecha.
• Con el mango en la mano izquierda, use su mano
derecha para desplazar la palanca hacia usted.
Empuje el asa hacia atrás hasta que la tapa quede plana. El dispositivo se mantendrá en esa posición hasta
que usted vuelva a levantar la cubierta para cerrarla.
• Utilice la parrilla de forma abierta para cocinar hamburguesas, filetes, pollo, pescado y verduras.
• Cocinar con la parrilla abierta es el uso más versátil de la parrilla. Cuando está abierta, usted dispone de
una superficie dos veces más grande para cocinar.
• Usted puede cocinar diferentes tipos de alimentos en las parrillas sin mezclar los sabores, o cocinar
grandes cantidades del mismo tipo de alimento. La posición abierta tiene capacidad para varios cortes de
carne con diferentes grosores, lo que le permite cocinar cada pieza a su gusto.
LIMPIEZA Y MANTENIMIENTO
• Siempre ha de desenchufar la parrilla y dejar que se enfríe antes de limpiarla. El dispositivo es más fácil
de limpiar cuando está tibio. No hay necesidad de desmontarlo para limpiarlo. No lo sumerja nunca en agua
ni lo coloque en el lavavajillas.
• Limpie las parrillas con un paño suave para eliminar los residuos de comida. Para los residuos de
alimentos cocidos, pase un poco de agua tibia mezclada con detergente y luego seque con una esponja de
plástico limpia y no abrasiva; o en su defecto ponga una toalla de papel mojada en la parrilla para
humedecer el residuo.
• No utilice ningún tipo de abrasivos que puedan rayar o dañar la capa antiadherente.
• No use utensilios de metal para remover la comida ya que estos pueden dañar la superficie antiadherente.
• Limpie el exterior de la parrilla sólo con un paño húmedo. No limpie el exterior con una esponja abrasiva o
lana de acero que puedan dañar el acabado. No lo sumerja en agua u otros líquidos.
• No lo coloque en el lavavajillas.
• Retire y vacíe el colector de aceite después de cada uso y lávelo con agua caliente y jabón. No utilice
abrasivos o detergentes fuertes, estos podrían dañar su superficie.
Enjuague y seque con un paño suave y limpio y vuelva a ponerlo en su lugar.
Page 17

ALMACENAMIENTO
• Desenchufe siempre la parrilla antes de su almacenamiento.
• Asegúrese siempre de que la parrilla esté fría y seca antes de asegurarla.
• Se puede enrollar el cable alrededor de la base para guardarla.
Medio ambiente
ATENCIÓN:
No se deshaga de este producto como lo hace con otros productos del hogar. Existe un
sistema selectivo de colecta de este producto puesto en marcha por las comunidades,
debe de informarse en su ayuntamiento acerca de los lugares en los que puede depositar
este producto. De hecho, los productos eléctricos y electrónicos pueden contener
substancias peligrosas que tienen efectos nefastos para el medio ambiente o para la
salud humana y deben ser reciclados. El símbolo aquí presente indica que los equipos eléctricos o
electrónicos deben de ser cuidadosamente seleccionados, representa un recipiente de basura con ruedas
marcado con una X.
Fabricado e importado por : Adeva SAS 8 rue Marc Seguin 77290 Mitry-Mory FRANCE
www.adeva-import.com - contact@adeva-import.com - Tel. 01 64 67 00 01
Page 18

7 6
1
2
4
1. Manico
2. Superficie superiore
3. Leva di sblocco
4. Piastra superiore
antiaderente
5. Piastra inferiore
antiaderente
6. Spia verde (griglia
pronta per la cottura)
7. Spia rossa (di
funzionamento)
8. Manopola termostato
9. Superficie inferiore
10. Raccoglitore d’olio
5 8 9
10
3
ITALIANO
PRECAUZIONI IMPORTANTI
• LEGGERE TUTTE LE ISTRUZIONI
• Utilizzare l’apparecchio solo su circuiti di corrente AC 220-240 Volt, 50/60 Hz. Utilizzare solo per uso
domestico.
• Non toccare le superfici calde. Utilizzare le maniglie e i pomelli appositi.
• A causa del rischio di scosse elettriche, non immergere cavo, spina o apparecchio in acqua o altri liquidi.
• Scollegare l'unità dalla presa elettrica quando non è in uso e prima della pulizia. Lasciar raffreddare
prima di aggiungere o rimuovere pezzi e prima di pulirlo.
• Questo dispositivo non è destinato all'uso da parte di persone con ridotta capacità fisiche,
mentali o sensoriale o mancanza di esperienza (compresi i bambini), a meno che non è stato chiesto
di controllare o sono stati istruiti sull'uso del dispositivo da una persona responsabile della loro
sicurezza.
• Non utilizzare l’apparecchio quando il cavo è danneggiato, con malfunzionamenti o presenta qualsiasi
altro danno. Per evitare scosse elettriche, non tentare di riparare la griglia da soli. È consigliabile recarsi
presso un centro di assistenza autorizzato per l'esame e la riparazione. Il riassemblaggio non corretto
potrebbe causare scosse elettriche durante l'utilizzo del grill.
• Il produttore sconsiglia l'uso di dispositivi di fissaggio supplementari perché potrebbero provocare
incendi, scosse elettriche o lesioni personali.
• Non utilizzare l’apparecchio in luoghi esterni o a uso commerciale.
• Non lasciare che il cavo elettrico resti appeso in un angolo del tavolo o che tocchi superfici calde.
• Non posizionare l’apparecchio sopra o vicino un fornello a gas o elettrico o un forno caldo.
• Spegnere e staccare la spina dopo l’utilizzo.
• Usare la massima prudenza quando si deve spostare l’apparecchio.
• Se il cavo di alimentazione è danneggiato, deve essere sostituito da un centro di assistenza per evitare
ogni pericolo.
• IDENTIFICAZIONE DEI COMPONENTI
Page 19

Leva di
sblocco
OPERAZIONI PRELIMINARI AL PRIMO USO
Leggere attentamente tutte le istruzioni e conservarle per ogni riferimento futuro;
Rimuovere l'imballaggio;
Pulire le piastre tramite una spugna o un panno bagnato con acqua tiepida.
NON IMMERGERE MAI L’APPARECCHIO NELL’ACQUA O VERSARE DIRETTAMENTE ACQUA SUL
PIANO DI COTTURA.
Asciugare con un panno di cotone o di carta.
Nota: quando il grill è messo in funzione per la prima volta, può emettere un leggero odore di fumo.
Non preoccuparsi, in quanto è un fenomeno che si manifesta con quasi tutti gli apparecchi per la
cottura, e ovviamente non incide in nessun modo sulla sicurezza.
COME UTILIZZARE
Impostare il controllo della temperatura della griglia sulla posizione desiderata. Al primo utilizzo,
impostare la temperatura al massimo. Successivamente, è possibile impostarlo in base alle proprie
preferenze.
Chiudere la griglia e collegare la spina a una presa elettrica. Si potrà notare che le spie (verde e gialla) si
accenderanno, indicando che il preriscaldamento della griglia è iniziato.
La griglia impiega circa 5 minuti per raggiungere la temperatura di cottura, ovvero quando la spia verde
si spegne.
Aprire la griglia, mettere il panino, la carne o gli altri alimenti sulla piastra inferiore.
Chiudere la griglia. La spia verde si riaccende.
Cuocere per circa 3-8 minuti, o quando la luce verde si rispegne, o fino a quando il cibo non presenta
una doratura. Regolare il tempo di cottura a piacere.
Quando il cibo è cotto, utilizzare la maniglia per aprire il coperchio. Togliere gli alimenti con una spatola
di plastica resistente al calore. Non utilizzare mai pinze o altri oggetti metallici o coltelli perché possono
danneggiare il rivestimento antiaderente della piastra.
Una volta che la cottura è terminata, spegnete l’apparecchio e lasciatelo aperto a raffreddare.
COME UTILIZZARE LA GRIGLIA APERTA
Per utilizzare la griglia aperta, disporla su una superficie piana e pulita per
cucinare.
La piastra superiore deve essere posta allo stesso livello della piastra
inferiore a formare un’unica superficie di cottura.
Una volta che le piastre sono allineate, individuare la leva di sblocco sulla
destra.
Impugnare il manico con la mano sinistra e con quella destra premere la
leva di sblocco verso l’interno. Spingere la maniglia fino a quando le
piastre non si allineino. L’apparecchio resterà fisso in quella posizione.
Per tornare alla posizione iniziale, impugnare il manico e portare il coperchio in posizione di chiusura.
Utilizzare la griglia aperta per cuocere hamburger, bistecche, pollo, pesce e verdure.
Cuocere a griglia aperta permette un uso
più versatile della griglia. Una volta aperta,
infatti, si ha una superficie di cottura due
volte più grande.
Con la griglia aperta sarà possibile
cucinare diversi cibi senza mischiare i
sapori, o cucinare grandi quantità dello
stesso cibo. La griglia aperta inoltre può
contenere tagli di carne più grandi e con spessori differenti. Questa soluzione permetterà di cucinare
ogni tipo di cibo a proprio piacimento.
Page 20

PULIZIA E MANUTENZIONE
Scollegare sempre la presa elettrica e lasciar raffreddare la griglia prima di pulirla. L'apparecchio è più
facile da pulire quando è caldo. Non c'è bisogno di smontare l’apparecchio per la pulizia. Non immergere
in acqua o mettere in lavastoviglie.
Pulire le piastre con un panno morbido per rimuovere i residui di cibo. Per i residui incrostati, passare un
po' d’acqua tiepida mescolata con poco detergente. Poi pulire con una spugna non abrasiva o con un
panno di carta per inumidire l’incrostazione.
Non utilizzare mai prodotti abrasivi che possano graffiare o danneggiare il rivestimento antiaderente
delle piastre.
Non utilizzare mai utensili di metallo per rimuovere gli alimenti in quanto possono graffiare o danneggiare
il rivestimento antiaderente delle piastre.
Pulire l'esterno della griglia con un panno umido. Non pulire la parte esterna con una spugnetta abrasiva
o lana d'acciaio per non danneggiare le finiture. Non immergere in acqua o altri liquidi.
Non lavare mai in lavastoviglie.
Rimuovere e svuotare il raccoglitore d’olio dopo ogni utilizzo e lavarlo con acqua calda e sapone. Non
utilizzare spugne abrasive o detergenti aggressivi che possano danneggiare la superficie. Poi lavarlo e
asciugarlo accuratamente con un panno pulito e morbido e rimetterlo a posto.
CONSERVAZIONE
Scollegare sempre la spina prima di conservare la griglia.
Verificare sempre che la griglia sia fredda e asciutta prima di conservarla.
È possibile avvolgere il cavo intorno alla base per la conservazione.
AMBIENTE
ATTENZIONE:
Non gettare quest’ apparecchio tra i rifiuti domestici. Per questo tipo di prodotti è fornito
dai comuni un sistema di raccolta e ritiro in zona ed è quindi un dovere informarsi per
conoscere il giusto smistamento del rifiuto. Infatti, i prodotti elettrici ed elettronici possono
contenere sostanze pericolose che hanno effetti dannosi sull’ambiente o sulla nostra
salute e quindi devono essere riciclati. Il simbolo al lato indica che le apparecchiature
elettriche ed elettroniche fanno parte di una raccolta selettiva e differenziata (rappresentata da un bidone su
due ruote sbarrato da una croce.
Prodotto e importato da : Adeva SAS 8 rue Marc Seguin 77290 Mitry-Mory FRANCE
www.adeva-import.com - contact@adeva-import.com - Tel. 01 64 67 00 01
 Loading...