

Page 1
Instruction manual
Manuel d'utilisation
Bedienungsanleitung
Handboek
Manual de Utilización
Manuale d’uso
GFX180
Rottary waffle
Gaufrier Réversible
Reversible Waffel
Draagbar Wafelijzer
Gofrera Reversible
Piastra per Waffle Reversibile
Page 2

ENGLISH
IMPORTANT SAFEGUARDS
• READ ALL INSTRUCTIONS
• Use only on AC 230 Volt, 50/60 Hz. Use only for household.
• Do not touch hot surfaces. Use handles .
• To protect against risk of electric shock, do not immerse the cord, plug or cooking unit in water or any
other liquid.
• Close supervision is necessary when any appliance is used by or near children.
• Unplug from outlet when not in use and before cleaning. Allow to cool before putting on or taking off
parts, and before cleaning appliance.
• Do not operate any appliance with a damaged has malfunctioned or has been damaged in any manner.
In order to avoid the risk of an electric shock, never try to repair the Waffle Maker yourself. Take it to an
authorized service station for examination and repair. An incorrect reassembly could present a risk of
electric shock when the Waffle Maker is used.
• The use of accessory attachments not recommended by the manufacturer may result in fire, electrical
shock, or risk of injury to persons.
• Do not use outdoors or for commercial purposes.
• Do not let power cord hang over the edge of the table or counter, or touch hot surfaces.
• Do not place on or near a hot gas or electric burner or heated oven.
• Unplug the unit when finished using.
• Do not use appliance for other than intended use.
• Do not intend to operate by means of an external timer or separate remote-control system.
• Extreme caution must be exercised when moving an appliance containing hot oil or other hot liquids.
• To disconnect, turn control to OFF setting, then remove plug form wall outlet.
• DO NOT HEAT WITHOUT THE INSTALLED PLATES,AND IT CAN DAMAGE THE THERMAL FUSE
BECAUSE OF THE EXCESS TEMPERATURE
WARNING: TO REDUCE THE RISK OF FIRE OR ELECTRIC SHOCK, ONLY AUTHORIZED
PERSONNEL SHOULD DO REPAIRS.
SAVE THESE INSTRUCTIONS
FOR HOUSEHOLD USE ONLY
SPECIAL CORD SET INSTRUCTIONS
A short power-supply cord is provided to reduce the risks resulting from becoming entangled in or tripping
over a longer cord. Longer extension cords are available and may be used if care is exercised in their use.
If a long extension cord is used, the marked electrical rating of the extension cord should be at least as
great as the electrical rating of the appliance, and the longer should be arranged so that it will not drape
over the countertop or tabletop where it can be polled on by children or animals, or tripped over.
NOTICE
This appliance has a polarized plug (one blade is wider than the other) to reduce the risk of electric shock.
This plug will fit in a polarized outlet only one way. If the plug does not fit still does not fit, contact a
qualified electrician. Do not modify the plug in any way.
Page 3
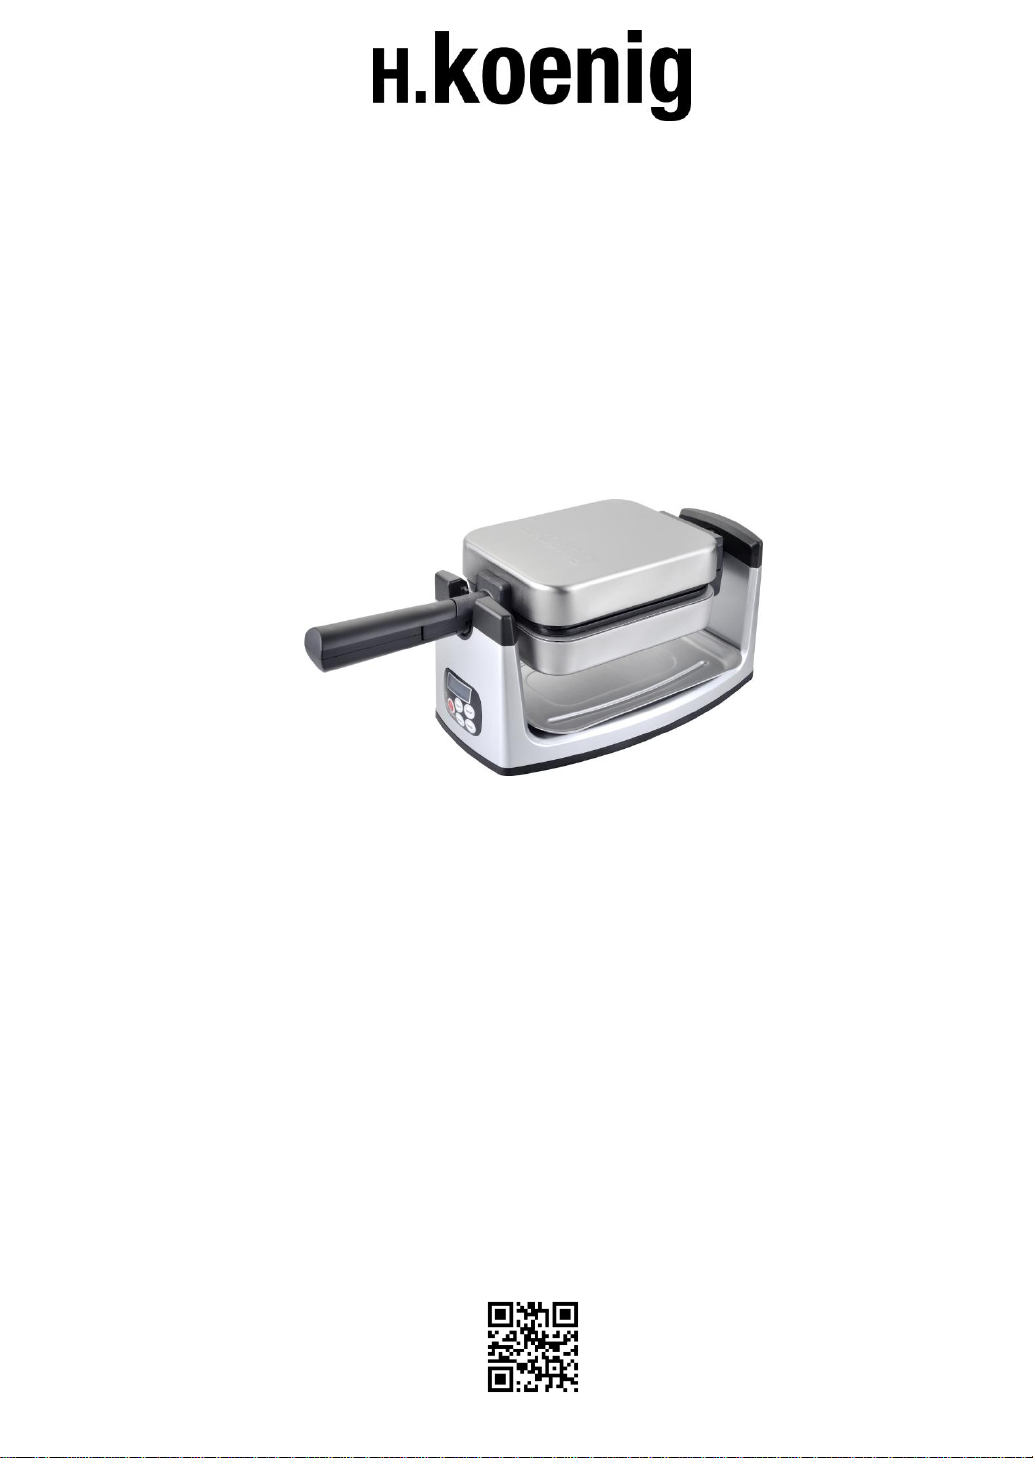
DESCRIPTION OF PARTS
1. Operation control panel
2. Press Button
3. Upper non-stick coating plate
4. Push Button
5. Folding Handle
6. Upper Housing
7. Upper non-stick coating plate
8. Housing Base
1
5
7
3
8
9
1
2
3
5 6 7
8
2
9. Oil tray
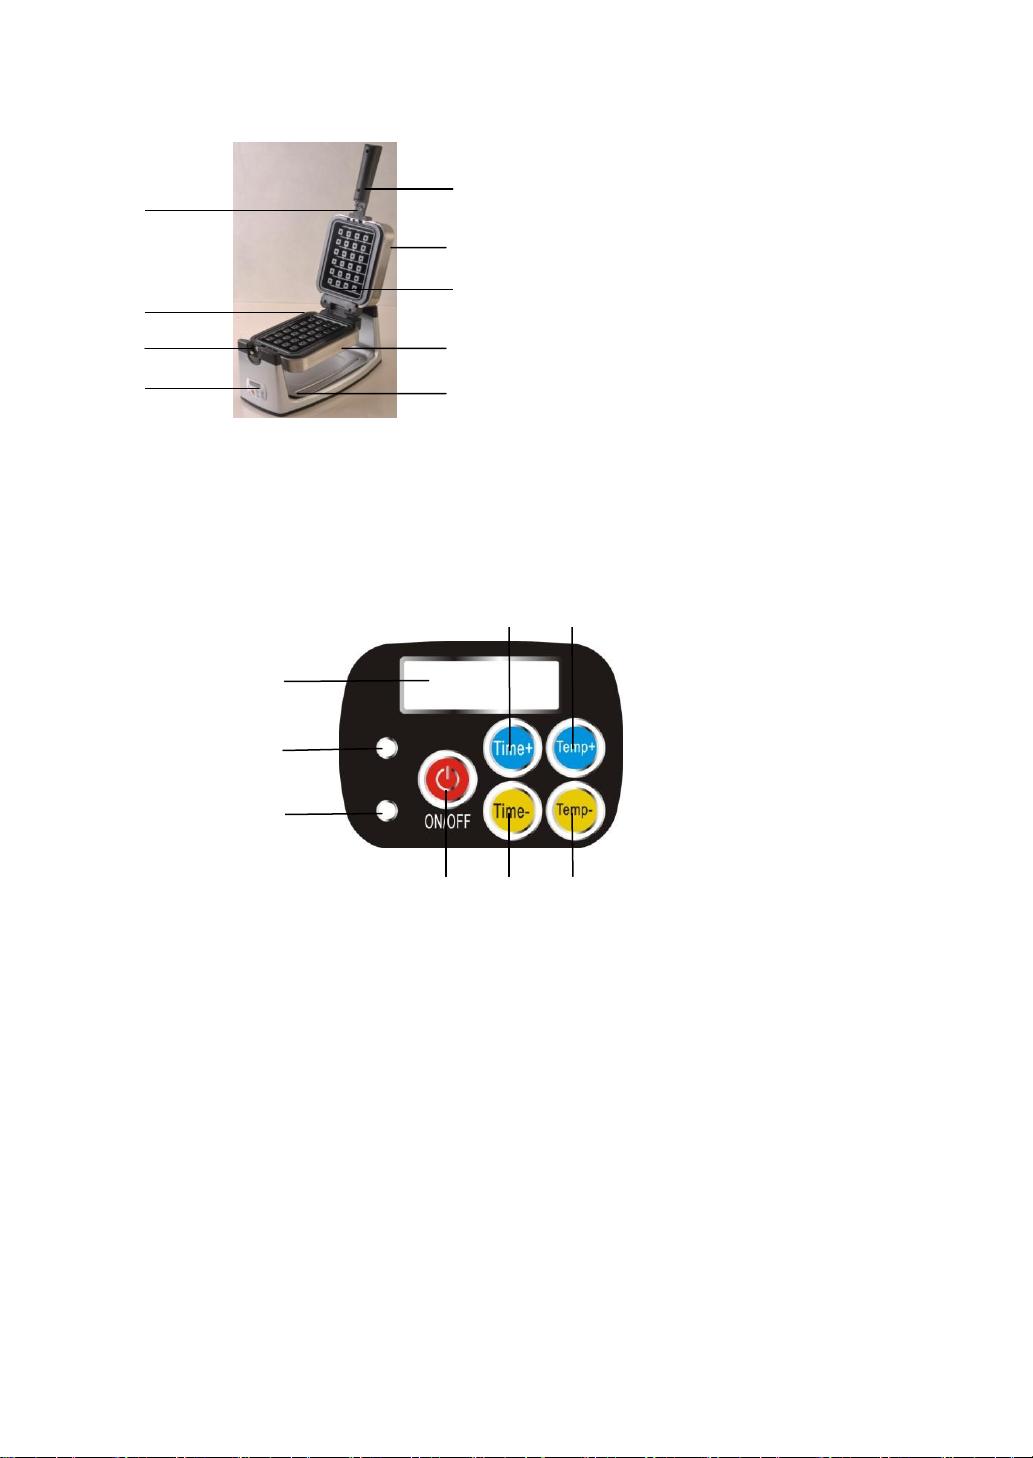
DESCRIPTION OF
OPERATION CONTROL PANEL
1. ON/OFF: On/Off Button
2. Power Light
3. Adjustable Light
4. LCD window
5. Time Button(+)
6. Time Button(-)
7. Temperature (+)
8. Temperature(-)
BEFORE FIRST USE
• Read all instructions carefully and keep them for future reference.
• Remove all packaging.
• Clean the Cooking Plates by wiping with a sponge or cloth dampened in warm water.
DO NOT IMMERSE THE UNIT
AND DO NOT RUN WATER DIRECTLY ONTO THE COOKING SURFACE.
Page 4

• Dry with a cloth or paper towel.
• Lightly coat the cooking plates with a little cooking oil or a cooking spray.
NOTE: When your Rotary Waffle Maker is heated for the first time, it may emit slight smoke or odor. This
is normal with many heating appliances. This does not affect the safety of your appliance. However, it may
affect the flavor of the first set of waffles prepared in your waffle maker, and it is recommended that you
discard these.
DO NOT IMMERSE THE HEATING BODY OF THE ROTARY WAFFLE MAKER IN WATER
OR ANY OTHER LIQUID!
HOW TO USE
• Press on/off button(red/power light, and blue/adjust light), after one long ring, the LCD display reads
190℃ with the moving letter “C” , the machines starts to preheat. When plate temperature reaches 190℃,
you can notice the“C” stops to move and it reads 03:30 on the LCD display. During the preheating process,
time/temperature button do not work. And the LCD display is shut off if no operation for the
time/temperature button within 20 minutes
• After the preheating, you can press the time/temperature button, and LCD reads 03:30~04:00 ~04:30
~05:00~04:30 ~04:00~03:30 & 190℃~200℃~210℃~220℃~230℃~220℃~210℃~200℃~190℃. If no operation for
the button within 5 seconds, the machine exit and save automatically
• After the setting, it works to count down as the set time and temperature with the adjust light “off”. The
working finishes after the three long rings. The working time and temperature scope can be adjusted
during the working process ,and time increases/decreases 30 seconds, and temperature
increases/decreases 10℃
• After the set working ends, it keeps to heat as the set temperature. and it is standby model if no more
operation within 20 minutes with one long ring. And the LCD reads 120℃,and it keeps 5 seconds.
•During the standby model, LCD/adjust light is shut off, and power light keeps on. If it is reused after the
press to the on/off button, the machines re-starts to preheat, and you can bake the waffle as your further
operation..
• Once the waffles cooked, carefully remove them from the waffle maker with a non-metallic utensils.
Never touch the cooking surface with sharp, pointy or metal objects. This could damage the no-stick
surface.
• Once you are finished cooking, disconnect the plug from the wall outlet and leave the waffle maker
open to cool.
HELPFUL HINTS
• Do not over mix batter or waffles will be tough. Stir batter only until large lumps of dry ingredients
disappear.
• The optimal amount of batter to produce a full-shaped waffle, without overflowing, will vary with different
waffle batters. Pouring batter from a measuring cup will help you gauge how much batter to use each time.
Fill bottom grid of waffle maker with enough batter to cover peak areas of the grid about ¾ to 1 cup.
• For more evenly shaped waffles, spread thick batters to outer edge of grid, using a heat proof rubber
spatula or other non-metallic utensil before closing lid.
• To retain crispness, let the baked waffles cool on a wire rack to prevent steam from accumulating
underneath.
• When serving several waffles at one time, keep waffles hot and crisp by placing on a rack in a
preheated 200°F oven until ready to serve.
• Already cooled waffles can be re-warmed and re-crisped, individually, by returning to hot waffle maker.
Set the color of Waffle 1 or 2. Place waffle on grid so grooves match up; close lid and heat for 1 to 2
minutes, watching carefully to prevent burning.
• Baked waffles freeze well. Cool completely on wire rack. Store in plastic freezer bag or in covered
Page 5

container, separating waffles with wax paper. Reheat frozen waffles in toaster oven, oven or toaster until
hot and crisp.
We tested for you GFX180.
Here are our tips to make delicious waffles:
Turn the camera 220 °,
Once hot product, pour the batter, close and return,
Cook for 2 minutes, then turn and cook for another 2 minutes
Open and return the waffle (put down the waffle up), close, and cook for 1 min,
Turn and cook for a further 1 min,
Put the product in the original direction and open your waffle is ready to eat!
Cooking time varies depending on the temperature of the dough and the following selected ingredients.
CLEANING AND CARE
• Push the button(4) or Press the button(2), and you can take the plate for the clearance. Always unplug
the waffle maker and allow it to cool before cleaning. There is no need to disassemble the waffle maker for
cleaning. Never immerse the waffle maker in water or place in dishwasher.
• Brush away any loose crumbs from the grooves. Wipe grids clean with a paper towel, absorbing any oil
or butter that might be down in the grooves of the grid. You can also wipe grids with a damp cloth. Do not
use anything abrasive that can scratch or damage the non-stick coating.
• Wipe the outside of the waffle maker with a damp cloth only. Do not clean the outside with any abrasive
scouring pad or steel wool, as this will damage the finish. A little metal polish suitable for stainless steel
may be used occasionally on the top housing. Do not immerse in water or any other liquid.
• Do not place in the dishwasher.
• Should any batter become baked onto the grids, pour a little cooking oil onto the hardened batter. Let sit
5 minutes to soften batter, then wipe off with a paper towel or soft cloth.
• Do not use metal utensils to remove your waffles, they can damage the non-stick surface.
STORAGE
• Always unplug the Waffle Maker before storage.
• Always make sure the Waffle Maker is cool and dry before string.
• The power cord can be wrapped around the bottom of base for storing.
Page 6

RECIPES
11½ cups all-purpose flour 3 large eggs, separated
½ cup cornstarch 2 tbsp. granulated sugar
2 tbsp. cornmeal (optional) 1¾ cups milk
1 tbsp. baking powder ½ tsp. pure vanilla extract
1 tsp. salt ½ cup (1 stick) unsalted butter, melted
In large bowl, sift or whisk together flour, cornstarch, cornmeal, baking powder and salt to blend
thoroughly; set aside. In mixer bowl, beat egg whites until soft peaks form. Add sugar; continue beating
just until stiff peaks form; set aside. Whisk together egg yolks, milk and vanilla. Using rubber spatula, stir
milk mixture into flour mixture, blending just until dry ingredients are moistened. (There should still be
small lumps; do not over mix). Stir in melted butter. Fold in beaten egg whites until combined. Pour batter
onto hot, greased waffle maker and bake.
Makes about 5½ cups batter
Waffle Tip: Cornstarch makes the waffles crisper. If you don’t have cornstarch, you could still make great
waffles by omitting cornstarch and increasing flour to 2 cups. Bake as directed.
Toasted Pecan & Cranberry Waffles
Sprinkle chopped pecans onto bottom grid of hot, greased waffle maker.
Pour batter over pecans. Sprinkle dried cranberries over batter.
Close waffle maker and bake as directed.
2 For 15 waffles
240g flour, 2 eggs + 1 egg yolk , ½ vanilla pod , 30g caster sugar , 1 pinch of salt, 70g butter , 18 ml milk ,
15 g yeast , 12 cl of cream , sugar, oil to grease the waffle iron .
Preparation time: 20 minutes + 1:30 rest .
Cooking time: 4 minutes per waffle.
Sift the flour and pour into a large bowl .
Break the eggs into a bowl and beat them .
Slit ½ vanilla pod in half and , using the tip of a knife , get all the small seeds that are inside. Add the
beaten eggs with the sugar and a pinch of salt. You can keep the pods in a closed bowl of granulated
sugar and use it for other recipes .
Cut the butter into cubes in a bowl , put it in the microwave for 30 seconds at 600W to melt .
Let cool milk , dilute it yeast, pour into a hole in the flour well. Add the beaten eggs and cream , stirring
with a wooden spatula. Add melted butter and mix until a smooth dough . Cover the bowl with a clean
kitchen towel and let dough rise at least 1:30 at room temperature.
Heat the waffle iron . Brush it lightly with oil over the entire surface.
Pour a small amount of pasta on a blister surfaces ensuring that it is well distributed . Close the waffle iron
and return it immediately to spread the batter evenly over the other side. Cook for 2 minutes , then invert
the waffle iron . Cook for 2 minutes. Turn out the waffle and repeat .
When all the waffles are cooked and tiédies , sprinkle with icing sugar.
3 This waffle recipe another , richer in butter and cream , is realized with a white whipped egg , but without
yeast. Rest time is shorter.
Page 7

10 waffles :
3 eggs , 80g butter , 8 cups milk , 25 cl of liquid cream, 150g sifted flour , 25g caster sugar , salt. Electric
mixer.
Preparation 15 minutes + 30 minutes of rest.
Cut the butter into cubes in a bowl. Put it in the microwave at 600W 30 seconds just to melt . Put it aside.
Separate the yolks from white eggs , putting the whites in a bowl and keeping the yellow separately in a
cup or glass . Pour 1 tablespoon of sugar on white . Start whipping slowly , accelerate : whites are
mounted when the trace of white on the whips is very apparent and they do not take off the walls of the
bowl.
Pour the flour into a separate bowl , make a hollow in the center ( a "sink" ) , put a pinch of salt, remaining
sugar , yolks, milk, cream and melted butter . Mix well with a wooden spatula until a homogeneous
mixture.
You can also mix these ingredients in a food processor and run at low speed with a dough knife . Then pull
out the food processor bowl .
With a spatula , then stir in a third of the egg white until stiff , then gently , the remaining two thirds .
Refrigerate 30 minutes.
To cook the waffles , follow the previous recipe .
ENVIRONMENT
CAUTION:
Do not dispose of this product as it has with other household products. There is a separation of this
waste product into communities, you will need to inform your local authorities about the places where
you can return this product. In fact, electrical and electronic products contain hazardous substances
that have harmful effects on the environment or human health and should be recycled. The symbol
here indicates that electrical and electronic equipment should be chosen carefully, a wheeled waste
container is marked with a cross.
Manufactured and imported: Adeva SAS 8 rue Marc Seguin 77290 Mitry-Mory FRANCE
www.hkoenig.com - contact@hkoenig.com - Tel 01 64 67 00 01
Page 8

FRANCAIS
PRECAUTIONS IMPORTANTES
• LISEZ LE MODE D´EMPLOI
• Usage domestique uniquement et sur courant AC 230 Volt, 50/60 Hz.
• Ne pas toucher les surfaces chaudes à main nues, protégez vos main avec des maniques .
• Pour éviter le risque d´électrocution, ne mettez pas le câble, la prise ou l´appareil en contact avec de
l´eau ou tout autre liquide.
• Les enfants ne doivent jamais utiliser l´appareil sans supervision.
• Débranchez l´appareil lorsqu´il n´est pas en service et avant de le nettoyer. Laissez refroidir l´appareil
avant de le démonter ou bien le nettoyer.
• Ne jamais utiliser avec un ou des éléments endommagés. Pour éviter les risques d´électrocution, ne
jamais essayer de réparer le gaufrier vous mêmes. Déposez le chez un réparateur agréé. Un montage
incorrect peut provoquer des électrocutions.
• L´utilisation d´accessoires non recommandés par le fabricant peut induire des risque d´incendie,
électrocution ou blessure.
• Ne pas utiliser à l´extérieur ou bien à des fins commerciales.
• Ne pas laisser le cordon suspendu au dessus d'un plan de travail ou en contact avec des surfaces
chaudes.
• Ne pas placer l´appareil à proximité d´un point de gaz, une plaque électrique.
• Débranchez l´appareil lorsque vous avez fini de l´utiliser.
• Ne pas utiliser l´appareil pour tout autre usage que celui prévu.
• Ne pas relier l´appareil à un système de minuterie ou de commande à distance.
• Soyez extrêmement prudent lorsque vous manipulez un appareil contenant de l´huile ou tout autre
liquide chaud.
• Pour éteindre, placez l´indicateur sur OFF, puis débranchez la prise.
• NE PAS FAIRE CHAUFFER SANS QUE LES PLAQUES SOIENT INSTALLEES CELA POURRAIT
ENDOMMAGER LE FUSIBLE THERMIQUE A CAUSE DE LA FORTE TEMPERATURE.
ATTENTION: POUR REDUIRE LE RISQUE D¨INCENDIE OU D¨ELECTROCUTION SEUL UN
REPARATEUR AGREE DOIT INTERVENIR SUR L´APPAREIL.
GARDEZ CE MODE D´EMPLOI
USAGE DOMESTIQUE UNIQUEMENT.
INSTRUCTIONS
Un câble court est fourni pour réduire les risques de trébuchement et des accidents en résultant. Des
extensions sont disponibles et doivent être utilises avec précaution. Si vous choisissez d´utiliser une
rallonge, choisissez en une qui respecte le voltage de l´appareil. Assurez vous de bien plier le câble pour
éviter que celui-ci pende et que les enfants ou animaux risquent de tirer dessus.
NOTE
Cette appareil dispose d´une prise polarisée, dont une branche est plus large que l´autre. Ce genre de
prises ne peut être branchée que dans un sens sur une prise polarisée. En cas de problème pour
brancher la prise, contactez un électricien et ne modifiez jamais les prises vous-même.
Page 9
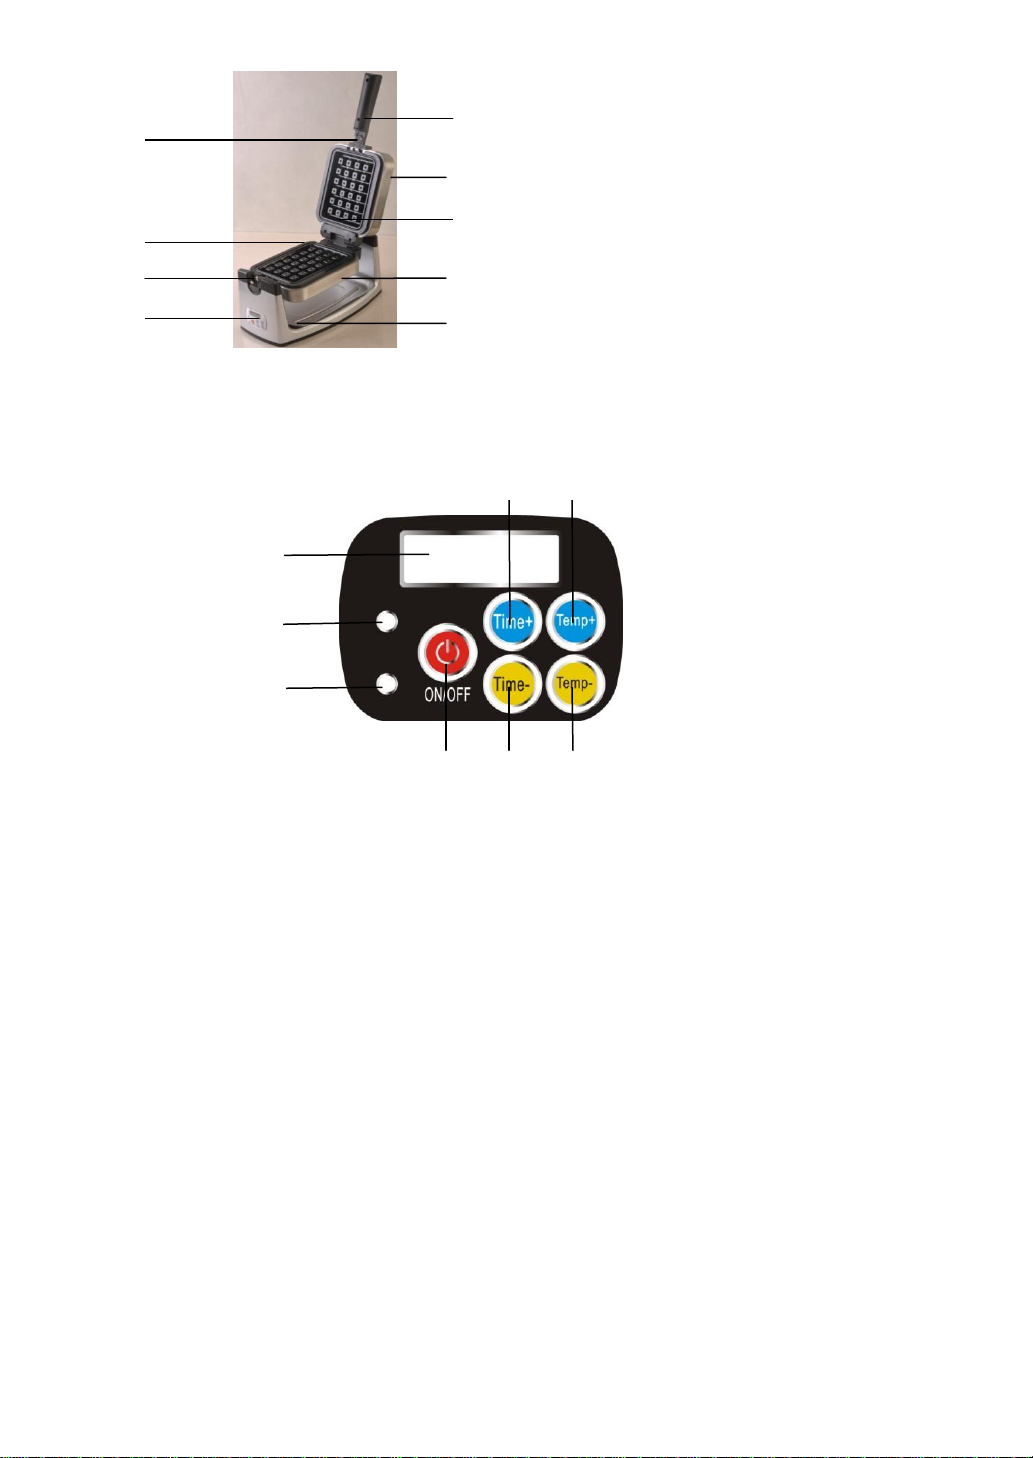
1. Panneau de contrôle
2. Bouton poussoir
3. Plaque antiadhésive supérieure
4. Bouton poussoir
5. Manche pliable
6. Protection supérieure
7. Plaque antiadhésive inférieure
8. Base
1
5
7
3
8
9
1 2 3 5 6
7
8
2
DESCRIPTION
9. Réceptacle à huile
DESCRIPTION DU PANNEAU DE CONTROL
1. ON/OFF: Bouton On/Off
2. Témoin lumineux
3. Lumière réglable
4. Écran LCD
5. Temps (+)
6. Temps (-)
7. Température (+)
8. Température(-)
AVANT LA PREMIERE UTILISATION
• Lisez attentivement le mode de l´emploi et gardez le pour vous y référer en cas de besoin.
• Déballez le gaufrier entièrement.
• Nettoyez les plaques de cuisson avec une éponge ou bien un chiffon humide.
NE PAS IMMERGER L´APPAREIL ET NE VERSEZ PAS DE LIQUIDE DIRECTEMENT SUR LES
• Séchez la surface avec un chiffon doux et sec ou avec du papier absorbant.
• Couvrez la plaque avec un peu de huile.
NOTE: Quand le gaufrier est chauffé pour la première fois, il se peut qu´il émette un peu de fumée et
d'odeur. Ceci est normal et n´affecte pas la sécurité d´utilisation de l´appareil. Cependant ceci peut
affecter la saveur de vos premières gaufres et de ce fait on vous conseille de ne pas les consommer.
NE PAS IMMERGER L´APPAREIL DANS DE L´EAU OU TOUT AUTRE LIQUIDE!
PLAQUES.
Page 10

CONSEILS D´UTILISATION
• Pressez le bouton on/off, après une longue sonnerie l´écran LCD affichera 190℃ avec un C clignotant,
l´appareil commence à préchauffer. L C arrêtera de clignoter lorsque la température atteindra 190℃ et
l´écran affichera 03:30. Pendant le préchauffage les boutons de température et temps ne fonctionnent pas.
L´écran LCD s´éteint si vous ne touchez pas les boutons temps et température pendant 20 minutes.
• Après le mode de préchauffage, vous pouvez presser les boutons de temps et de température, l´écran
LCD affichera: 03:30 ~ 04:00 ~ 04:30 ~ 05:00 ~ 04:30 ~ 04:00 ~ 03:30 & 190℃ ~ 200℃ ~ 210℃ ~ 220℃ ~ 230℃
~ 220℃ ~ 210℃ ~ 200℃ ~ 190℃. Si on ne touche pas le bouton pendant 5 secondes, l´appareil se réinitialise et
sauvegarde automatiquement.
• Une fois programmé, l´appareil est prêt pour la cuisson et la lumière du bouton on/off s´éteint. L´appareil
s´arrête une fois que les 3 sonneries longues retentissent. Le temps et la température peuvent être
ajustés en marche, temps augmente ou diminue de 30 secondes, et la température augmente ou diminue
de 10℃.
• Une fois le programme terminé, l´appareil continue de chauffer à la température indiquée et s´éteindra
après 20 minutes d'inactivité avec une longue sonnerie, l´écran LCD 120℃ de température pendant 5
secondes.
• En standby l´écran LCD et le bouton ajuster s´éteindront alors que le témoin on/off restera allumé. Si
vous l´utilisez l'appareil repart et vous pouvez reprendre la cuisson des gaufres.
• Une fois les gaufres cuites, retires les avec des ustensiles non métalliques. Ne jamais toucher les
surfaces de cuisson avec des outils pointus, coupants ou en métal car cela pourrait endommager les
surfaces.
• Une fois la cuisson terminée, débranchez l´appareil retirez la prise et laissez l´appareil ouvert pour qu'il
refroidisse.
CONSEILS UTILES
• Ne pas trop mélanger la pâte ou vos gaufres seront dures. Mixer jusqu´à obtenir une pâte homogène.
• La quantité optimale de pâte pour la confection d'une gaufre bien formée dépend des pâtes. L'utilisation
d'une mesure peut vous aider à déterminer la quantité adéquate. Remplissez la plaque inférieure jusqu'à
recouvrir le moule, cela requiert 3/4 à 1 tasse.
• Pour des gaufres joliment moulées, faites légèrement déborder la pâte à l'aide d'une spatule non
métallique. pour cela elle doit avoir une consistance légèrement épaisse.
• Pour des gaufres bien croustillantes, assurez-vous de les poser sur une grille afin d'éviter la formation
d'humidité en dessous.
• Pour servir des gaufres bien croustillantes, conservez les au chaud sur la grille du four à
90°C moment de les servir.
• Vois pouvez rendre le croustillant à os gaufres en les réchauffant dans le gaufrier 1 à 2 minutes. Placez
la gaufre dans l'appareil et laissez chauffer 1 à 2 minutes tout en surveillant pour éviter de la brûler.
• Les gaufres se congèlent bien. Laissez le refroidir complètement avant de les mettre dans un sac
à congeler séparées par du papier de cuisson. Réchauffez-les encore congelées dans un four en mode
gril jusqu'à ce qu'elles soient bien chaudes et croustillantes.
Page 11

Nous avons testé pour vous le GFX180.
Voici nos conseils pour réaliser de délicieuses gaufres :
Mettre l'appareil sur 220°,
Une fois le produit chaud, verser la pâte, fermez et retournez,
Laissez cuire pendant 2 minutes puis retournez et laisser cuire de nouveau 2 minutes,
Ouvrez et retournez la gaufre (mettre le bas de la gaufre vers le haut), refermez, et laissez cuire 1 min,
Retournez et laissez cuire de nouveau 1 min,
Remettez le produit dans le sens initial et ouvrez, votre gaufre est prête à être dégustée !
Le temps de cuisson varie selon la température de la pâte et suivants les ingrédients choisis.
NETTOYAGE ET ENTRETIEN
• Pressez le bouton (4) ou (2) et vous pourrez retirer la plaque pour la laver. Toujours éteindre l'appareil et
le débrancher avant de le laisser refroidir pour le nettoyer. Ne jamais placer le reste de l'appareil dans
l'eau ou le lave-vaisselle.
• Nettoyez l'appareil avec une brosse pour éliminer les miettes. Passez un papier absorbant pour éliminer
le gras. Me jamais rien utiliser qui soit abrasif et risque de rayer les surfaces.
• Nettoyez l'extérieur avec un chiffon humide et éviter les matières abrasive pour le pas rayer les surfaces.
Un peu de produit pour polir l'acier inoxydable peut être utilisé de temps en temps sur la partie supérieure
de l'appareil. Ne jamais immerger dans de l'eau ou tout autre liquide.
• Ne peut être lavé au lave-vaisselle.
• Si de la pâte reste collée aux plaques, imbibez d'huile, laisser tremper quelques minutes et nettoyer à
l'aide d'un chiffon.
• Ne pas utiliser d'ustensiles en métal au risque de rayer les surfaces.
RANGEMENT
• Toujours débrancher l'appareil avant de le ranger.
• Assurez vous que l'appareil est froid et sec avant de le garder.
• Vous pouvez enrouler le câble au tour de la base de l'appareil.
Page 12

RECETTES
1 -
1½ tasse de farine 3 grands œufs, jaunes et blancs dissociés
½ tasse de Maïzena 2 cuillères à dessert de sucre granulé
2 cuillères à dessert de semoule de maïs (optionnel) 1¾ tasse de lait
1 cuillère à dessert de levure ½ cuillère à dessert d'extrait de vanille
1 cuillère à dessert de sel ½ tasse de beurre sans sel (1/2 brique)
Dans un grand bol mélangez la semoule de maïs, la farine, la maïzena, la levure et le sel. Bien mélanger
et réservez. Dans un autre bol ou au mixeur, faites monter les blancs d'œuf en neige bien ferme. Ajoutez
le sucre et continuer à battre jusqu'à ce que la meringue forme des pics puis réservez. Mélangez les
jaunes, la vanille et le lait. Avec une spatule, ajouter le mélange liquide au mélange sec et mélangez
jusqu'à ce que les ingrédients secs soit bien humidifiés. Ajoutes le beurre fondu avant de rajouter les
blancs en veillant à ne pas les casser. La pâte est prête! Vous obtenez à peu près 5 tasses et demi de
pâte.
Astuce: la maïzena rend les gaufres plus croustillantes, si vous n'en avez pas remplacez la par deux
tasses de farine.
Gaufres aux noix de pecan grillées et aux airelles.
Saupoudrez la plaque inférieure de noix de pékan ou d'airelles avant de verser la pâte et cuire
normalement.
Vous pouvez bien sur essayer d'autres graines et fruits sec pour varier les plaisirs !
2 -
Pour 15 gaufres
240g de farine, 2 œufs + 1 jaune d’œuf, ½ gousse de vanille, 30g de sucre en poudre, 1 pincée de sel,
70g de beurre, 18 cl de lait, 15g de levure de boulanger, 12 cl de crème fraîche, sucre glace, huile pour
graisser le gaufrier.
Préparation : 20 minutes + 1h30 de repos.
Cuisson : 4 minutes par gaufre.
Tamisez la farine et versez-la dans un grand saladier.
Cassez les œufs dans un bol et battez-les.
Fendez la ½ gousse de vanille en deux et, avec la pointe d’un couteau, récupérez toutes les petites
graines qui se trouvent à l’intérieur. Ajoutez-les aux œufs battus avec le sucre et la pincée de sel. Vous
pouvez garder les gousses dans un bol fermé de sucre semoule et l’utiliser pour d’autres recettes.
Découpez le beurre en dés dans un bol ; placez-le au micro-ondes 30 secondes à 600W pour le faire
fondre.
Faites tiédir le lait, diluez-y la levure, versez le tout dans un puits creusé dans la farine. Incorporez les
œufs battus et la crème fraîche en remuant avec une spatule en bois. Ajoutez le beurre fondu et
Page 13

mélangez jusqu’à obtention d’une pâte bien lisse. Couvrez le saladier d’un torchon propre et laissez lever
la pâte au minimum 1h30 à température ambiante.
Faites chauffer le gaufrier. Badigeonnez-le légèrement d’huile sur toute la surface.
Versez une petite quantité de pâtes sur une des surfaces alvéolées en veillant à ce qu’elle soit bien
répartie. Refermez le gaufrier et retournez-le aussitôt afin de répartir la pâte régulièrement sur l’autre face.
Laissez cuire 2 minutes, puis retournez à nouveau le gaufrier. Laissez cuire encore 2 minutes. Démoulez
la gaufre et répétez l’opération.
Quand toutes les gaufres sont cuites et tiédies, saupoudrez-les de sucre glace.
3 -
Cette autre recette de gaufre, plus riche en beurre et en crème, se réalise avec un blanc d’œuf monté en
neige, mais sans levure. Le temps de repos est donc plus bref.
Pour 10 gaufres :
3 œufs, 80g de beurre, 8 cl de lait, 25 cl de crème liquide, 150g de farine tamisée, 25g de sucre poudre,
sel. Batteur électrique.
Préparation 15 minutes + 30 minutes de repos.
Découpez le beurre en dés dans un bol. Mettez-le au micro-ondes à 600W 30 secondes, juste pour le
faire fondre. Mettez-le de côté.
Séparez le blanc du jaunes des œufs, en mettant les blancs dans un saladier et en gardant les jaunes à
part dans une tasse ou un verre. Versez 1 cuillerée à soupe de sucre sur les blancs. Commencez à
fouetter lentement, accélérez : les blancs sont montés quand la trace du blanc sur les fouets est très
apparente et qu’ils ne décollent pas des parois du saladier.
Versez la farine dans un autre saladier, faites un creux au centre (un «puits»), mettez-y une pincée de sel,
le reste de sucre, les jaunes, le lait, la crème et le beurre fondu. Mélangez bien avec une spatule en bois
jusqu’à obtenir un mélange homogène.
Vous pouvez aussi mélanger ces ingrédients au robot et le faire tourner à vitesse lente avec un couteau à
pâte. Sortez ensuite le bol du robot.
Avec une spatule, incorporez ensuite un tiers du blanc d’œuf battu en neige, puis, délicatement, les deux
tiers restants. Mettez au réfrigérateur 30 minutes.
Pour cuire les gaufres, suivez la recette précédente.
ENVIRONNEMENT
Fabriqué pour et importé par : Adeva SAS 8 rue Marc Seguin 77290 Mitry-Mory FRANCE
www.hkoenig.com - contact@hkoenig.com - Tél. 01 64 67 00 01
Page 14

DEUTSCH
WICHTIGE SICHERHEITSHINWEISE
• LESEN SIE ALLE HINWEISE GUT DURCH
• BENUTZEN Sie nur AC 230 Volt, 50/60 Hz. In Ihrem Hasulhalt.
• Behrueren Sie nicht die heissen Oberflaechen, Benutzen Sie nur die Griffe.
• Um die elektroschockgefhar zu vermeiden, tauchen Sie das Geraet icht ins Wasser oder ander
Fluessigkeiten.
• Wenn Kinder in der Naehe sind muessen die Uberwahct warden um einene Unfall zu vermeiden.
• Stecken Sie das Kabel aus dem Stecker wenn das Geraet nicht im Gebrauch ist und bevor Sie es
reinigen oder Warten.
• Benuten Sie das Geraet nicht wenn es beschaedigt wurde. Um einen Elektroschock zu vermeiden
versuchen Si nicht das Geraet selber zu reparieren. Bringen sie e simmer zu einem autorisierten
Techniker.
• Benutzen Sie keine Zubehoerteile, es wird vom Hersteller nicht empfohlen. Es kann Brandgefahr
bestehen.
• Benutzen Sie das Geraet nicht im Freiene oder fuer Kommerzielle Zwecke.
• Lassen Sie das Kabel nicht ueber Kanten haengen oder heisse Oberflaechen behruehren.
• Stellen Sie das Gareat nicht in die naehe vom Ofen oder Herd.
• Ziehen Sie den Stecker aus wenn sie es nicht mehr benutzen.
• Benutzen Sie das Geraet nicht fuer andere Zwecke als fuer die die es hergestellt wurde.
• Benutzen Sie keinne timmer oder externen Stromzaehler.
• Seien sie orallem vorsichtig wenn Sie das Geraet von einem Platz zum anderen bewegen.
• Um den Stcker auszuzehen, Machen sie das Geraet zuerst aus, OFF. Dann koenne sie den Stecker aus
der Dose nehemen.
• NICHT Hitze OHNE DIE PLATTEN INSTALLIERTE ES KANN DIE THERMISCHE FUSE WEGEN DER
HOHEN TEMPERATURBESTÄNDIGKEIT AUS.
ACHTUNG: UM DIE ELEKTROSCHOCKGEFAHR ZU VERMEIDEN DUERFEN NUR AUTORISIERTE
TECHNIKER DAS GERAET REPARIEREN.
BEWAHREN SIE DIE BEDIENUNGANLEITUNG FUER SPAETERE
ZWECKE GUT AUF. NUR IM HAUSHALT ZU GEBRAUCHEN
SPEZIELLE KABEL HINWEISE
Es wird ein kurzes Kabel mitgeliefert um zu vermeiden das das Kabel sich verwickelt und brandgefhar
verursacht. Es gibt laengere Kabel und diese duerfen gebraucht werde. Mann muss aber sehr vorsichtig
sein und diese Kabel muessen den Technischen Vorschriften des Geraetes entsprechen. Vermeiden Sie
das das Kabel ueber die Oberflaechen haengt und dass es von Kinder oder haustieren heruntergozogen
wird.
HINWEIS
Das Geraet hat einen polarisierten Stecker um Elektroschockgefahr zu vermeiden. Der Stecker
funkzioniert nur mit einer polarisierten Steckdose. Falls e simmer noch nicht funkzioniert dann
kontaktieren Sie einene Techniker.
Page 15

BESCHREIBUNG DER TEILE
1. Bedienung Bedienfeld
2. Taste
3. Obere Antihaftbeschichtung Platte
4. Push Button
5. Klappgriff
6. Gehäuseoberteil
7. Obere Antihaftbeschichtung Platte
8. Gehäuse Grundplatte
9. Oelbehaelter
1
5
7
3
8
9
1 2 3
5
6
7
8
2
BESCHREIBUNG DES BEDIENFELDES
1. ON / OFF: Ein / Aus-Taste
2. Power Light
3. Einstellbare Licht
4. LCD-Fenster
5. Zeit-Taste (+)
6. Zeit-Taste (-)
7. Temperatur (+)
8. Temperatur (-)
VOR DEM ERSTEN GEBRAUCH
• Lesen Sie die Bedienunsanweisung und bewahren Sie die fuer spaetere Zwecke gut auf.
• Entfernene Sie die ganze Verpackung.
• Reinigen Sie die Kochoberflaechen gut mit eineme feuchten Tuch oder Schwamm.
TAUCHEN SIE DAS GERAET NIEMALS INS WASSER UND LASSEN ISE ES AUCH NICHT UNTER
FLIESSENDEM WASSER.
• Trockenen Sie es mit einem trockenen Tuch oder Papier serviette.
• Geben sie ein wennig Kochoel auf die Kochoberflaechen.
HINWEIS: Wenn Sie das Waffeleisen zum ersten mal benutzen ist es moeglich das es ein bisschen
raucht oder riecht. Das ist mit vielen Geraet normal. Es is t nicht gefaehrlich kann aber den Geschmack
der ersten Waffel beeinflussen, daher entfehlen wir das Sie die entsorgen.
TAUCHEN SIE DAS GERAET NIEMALS INS WASSER UND LASSEN ISE ES AUCH NICHT UNTER
FLIESSENDEM WASSER.
Page 16

WIE BENUTZ MANN DAS GERAET
• Drücken Sie die ON / OFF-Taste (rot / Power-LED, und blau / justieren Licht), nach einem langen Ring,
gibt das LCD-Display 190 an ℃ mit dem blinkenden Buchstaben "C", die Maschinen beginnt die
Vorwärmung. Wenn die Platte die Temperatur 190 ℃ erreicht, können Sie feststellen, das "C" hält sich zu
blinken, und es liest 03.30 auf dem LCD-Display. Während des Vorwärmungs Prozesses, keine Zeit /
Temperatur-Taste nicht funktioniert. Und der LCD-Anzeige wird ausgeschaltet, wenn kein Betrieb für die
Zeit / Temperatur-Taste geschlossen innerhalb von 20 Minuten
• Nach dem Vorheizen können Sie die Zeit / Temperatur-Taste und LCD liest 3.30 ~ 4.00 ~ 4.30 ~ 5.00 ~
4.30 ~ 4.00 ~ 3.30 & 190 ℃ ~ 200 ℃ ~ 210 ℃ ~ 220 ℃ ~ 230 ℃ ~ 220 ℃ ~ 210 ℃ ~ 200 ℃ ~ 190 ℃. Wenn keine
Bedienung der Taste innerhalb von 5 Sekunden, verlassen Sie die Maschine und speichern automatisch
• Nach der Einstellung, arbeitet es abwärts zu zählen als die eingestellte Zeit und Temperatur mit der
Bediensoftware Licht "aus". Die Arbeit endet nach den drei langen Ringen. Die Verarbeitungszeit und
Temperatur Bereich kann während des Arbeitsprozesses angepasst werden, und die Zeit verringert /
erhöht 30 Sekunden und die Temperatur erhöht / verringert 10 ℃
• Nach Ablauf der eingestellten Arbeit endet, hält sie als die eingestellte Temperatur zu erhitzen. und es ist
Standby-Modell, wenn nicht mehr Betrieb innerhalb von 20 Minuten mit einem langen Ring. Und liest das
LCD 120 ℃, und es hält 5 Sekunden gedrückt.
• Während des Standby-Modell wird LCD / einstellbare Licht abgeschaltet und Macht Licht hält an. Wenn
es nach dem Druck auf den Ein / Aus-Taste wiederverwendet, die Maschinen wieder beginnt
vorzuwärmen, und Sie können die Waffel als weiteren Betrieb backen ..
•Sobald die Waffeln gekocht, sorgfältig entfernt sie aus dem Waffeleisen mit einem nicht-metallischen
Utensilien. Berühren Sie niemals die Kochfläche mit scharfen, spitzen oder metallischen Gegenständen.
Dies könnte die nicht-haftende Oberfläche.
•Sobald Sie mit dem Kochen fertig sind, ziehen Sie den Stecker aus der Steckdose und lassen Sie das
Waffeleisen offen gelassen.
HILFSREICHE TIPS
• Uebermixen Sie die mischung nicht da die Waffeln hart sein warden. Mischen Sie nur bis es keine
Klumpen mehr hat.
• Um die optimale Menge Mischung zu haben wird es von mischung zu mischung varieren. Fuellen sie
alle Zonene des Waffelblechs, geben Sie ungeaehr 2/4 – 1 Tasse Mischung ein.
• Um ebene Waffeln zu machen geben sie die Mischung mt einer Gummispachtel gut ein.
• Um knusprige Waffel zu machen lassen Sie die Waffeln auf einem Rost abkaelten um vu vermeiden das
der Dampf Sie errweicht.
• Wenn Sie mehrere Waffel servieren, lassen Sie die gemachten Waffel in einen Ofen auf 200°F um Sie
warm zu erhalten.
• Kalte Waffeln koennen wieder in Waffeleisen errwaermt warden. Tun sie die Waffel in das Eisen und
waermen Sie es auf Stufe 1 oder 2 waehrend 1-2 Minuten.
• Waffeln koene eigefroren werden. Lassen Sie die Waffel komplet abkuehlen un tun sie die Waffeln in
eine Plastikbeutel, separieren Sie die Waffeln mit Ofenpapier. Die Waffeln koenne dann im Ofen gewaermt
warden.
Page 17

Wir testeten für Sie GFX180.
Hier unsere Tipps, um leckere Waffeln machen:
Schalten Sie die Kamera 220 °,
Sobald heißen Produkt, gießen Sie den Teig, in der Nähe und zurück,
2 Minuten kochen, dann drehen und kochen für weitere 2 Minuten
Offene und Rück das Waffe (legte die Waffel oben), in der Nähe, und kochen für 1 min,
Drehen und kochen für eine weitere 1 min,
Legen Sie das Produkt in der ursprünglichen Richtung und öffnen Sie Ihre Waffel ist bereit zu essen!
Kochdauer hängt von der Temperatur des Teigs und die folgenden ausgewählten Zutaten.
REINIGUNG UND WARTUNG
• Drücken Sie die Taste (4) oder Drücken Sie die Taste (2) , und man kann die Platte für die Räumung zu
nehmen. Ziehen Sie immer das Waffeleisen und lassen Sie es vor der Reinigung abkühlen. Es gibt keine
Notwendigkeit, die Waffeleisen zur Reinigung zerlegt . Tauchen Sie das Waffeleisen in Wasser oder in der
Spülmaschine Platz .
• Bürsten Sie alle losen Krümel aus den Rillen . Wischen Gitter sauber und mit einem Papiertuch ,
absorbieren Öl oder Butter , die sich vielleicht in den Rillen des Gitters. Sie können auch wischen Gitter
mit einem feuchten Tuch . Verwenden Sie nicht alles Schleifmittel, zerkratzen oder beschädigen können
die Antihaft-Beschichtung .
• Wischen Sie die Außenseite des Waffeleisen mit einem feuchten Tuch. Reinigen Sie die Außenseite mit
einem Scheuer- Pad oder Stahlwolle, da dadurch die Oberfläche beschädigt wird. Ein wenig Metall Politur
für Edelstahl kann gelegentlich auf das obere Gehäuse verwendet werden. Nicht in Wasser oder andere
Flüssigkeiten tauchen .
• Nicht in die Spülmaschine stellen .
• Sollte ein Teig geworden auf den Gittern gebacken , gießen Sie ein wenig Speiseöl auf den gehärteten
Teig. Lassen Sie sitzen 5 Minuten zum Teig erweichen , dann wischen Sie mit einem Papiertuch oder
einem weichen Tuch.
• Verwenden Sie keine Metallgegenstände auf Ihre Waffeln zu entfernen, können sie Schäden an der
Antihaft-Oberfläche .
STORAGE
• Ziehen Sie immer das Waffeleisen vor der Lagerung.
• Achten Sie darauf, das Waffeleisen ist kühl und trocken sein, bevor Sie es versorgen.
• Das Netzkabel kann um den Boden der Basis zur Lagerung verpackt werden.
Page 18

REZEPTE
11 ½ Tassen Allzweck-Mehl 3 große Eier getrennt
½ Tasse Maisstärke 2 EL. Kristallzucker
2 EL. Maismehl (optional) 1 ¾ Tassen Milch
1 EL. Backpulver ½ TL. reinen Vanille-Extrakt
1 tsp. Salz ½ Tasse (1 Stock) ungesalzene Butter, geschmolzen
In einer großen Schüssel sieben Sie oder wischen Sie zusammen Mehl, Maisstärke, Maismehl,
Backpulver und Salz gründlich vermischen und beiseite stellen. In Rührschüssel, schlagen Eiweiß, bis
sich weiche Spitzen bilden. Zucker zugeben, weiter schlagen, gerade steif und beiseite stellen. Verquirlen
Eigelb, Milch und Vanille. Mit Gummi-Spachtel, rühren Milch-Mischung in Mehl-Mischung, Mischen,
gerade bis trockenen Zutaten angefeuchtet werden. (Es sollte noch kleine Klumpen sein, nicht über mix).
Stir in zerlassener Butter. Falten in Eischnee bis kombiniert. Den Teig auf heiße, gefettete Waffeleisen und
backen.
Ergibt etwa 5 ½ Tassen Teig
Waffel Tipp: Maisstärke macht die Waffeln schärfer. Wenn Sie noch kein Maisstärke, könnte man immer
noch machen große Waffeln durch Weglassen Maisstärke und zunehmende Mehl 2 Tassen. Backen wie
verwiesen.
Geröstete Pecan Waffeln & Cranberry
Streuen Sie gehackte Pekannüsse auf Bodenrost von heißen, gefetteten Waffeleisen.
Den Teig über Pekannüsse. Sprinkle getrocknete Cranberries über Teig.
Schließen Waffeleisen und backen wie verwiesen.
2 Für 15 Waffeln
240g Mehl , 2 Eier und 1 Eigelb, ½ Vanilleschote , 30 g Zucker , 1 Prise Salz, 70 g Butter, 18 ml Milch, 15
g Hefe , 12 cl Sahne, Zucker, Öl , um das Waffeleisen einfetten .
Zubereitungszeit : 20 Minuten + 01.30 Ruhe.
Kochzeit: 4 Minuten pro Waffel.
Das Mehl vermischen und in eine große Schüssel.
Die Eier in eine Schüssel geben und schlugen sie .
Slit ½ Vanilleschote halbieren und mit der Spitze eines Messers , bekommen alle die kleinen Samen, die
im Inneren sind . Fügen Sie die geschlagenen Eier mit dem Zucker und einer Prise Salz . Sie können die
Schoten in einer geschlossenen Schale mit Kristallzucker zu halten und sie für andere Rezepte .
Schneiden Sie die Butter in Würfel in einer Schüssel, legen Sie sie in der Mikrowelle für 30 Sekunden bei
600 Watt zu schmelzen.
Abkühlen lassen Milch, Hefe verdünnen , gießen Sie in ein Loch in das Mehl gut . Fügen Sie die
geschlagenen Eier und Sahne unter ständigem Rühren mit einem Holzspatel . In zerlassener Butter und
mischen , bis ein glatter Teig . Decken Sie die Schüssel mit einem sauberen Küchentuch und lassen Teig
mindestens 1.30 bei Raumtemperatur.
Erhitzen Sie das Waffeleisen . Bürsten Sie es leicht mit Öl über die gesamte Oberfläche .
Gießen Sie eine kleine Menge von Pasta auf einem Blister Oberflächen dafür, dass es gut verteilt ist.
Schließen Sie das Waffeleisen und senden Sie es sofort auf den Teig gleichmäßig auf der anderen Seite
verbreiten. 2 Minuten kochen , dann kehren die Waffeleisen . 2 Minuten kochen . Drehen Sie die Waffel
und zu wiederholen.
Wenn alle Waffeln gekocht und tiédies , mit Puderzucker bestreuen .
Page 19

3 Dieses Waffelrezeptanderen, reicher an Butter und Sahne, ist mit einem weißen Schlag Ei realisiert , aber
ohne Hefe. Ruhezeit ist kürzer.
10 Waffeln :
3 Eier, 80 g Butter, 8 Tassen Milch, 25 cl flüssige Sahne , 150g gesiebte Mehl , 25g Zucker , Salz.
Elektromixer .
Vorbereitung 15 Minuten + 30 Minuten Pause .
Schneiden Sie die Butter in Würfel in einer Schüssel. Legen Sie es in der Mikrowelle bei 600 Watt 30
Sekunden , nur um zu schmelzen. Legen Sie es beiseite.
Trennen Sie das Eigelb aus weißen Eiern, setzen die Weißen in eine Schüssel geben und in eine Tasse
oder Glas getrennt halten die gelb. Gießen Sie 1 Esslöffel Zucker auf weiß. Starten Sie peitschen langsam
beschleunigen : Weißen montiert sind , wenn die Spur von weiß auf den Peitschen ist sehr offensichtlich,
und sie nehmen nicht von den Wänden der Schüssel.
Das Mehl in einer separaten Schüssel , einen in der Mitte hohl (eine " Senke" ) , legte eine Prise Salz,
restlichen Zucker , Eigelb, Milch, Sahne und Butter . Gut mischen mit einem Holzspatel , bis eine
homogene Mischung .
Sie können auch diese Zutaten zu mischen in einer Küchenmaschine und führen bei geringer
Geschwindigkeit mit einem Teig Messer. Dann ziehen Sie die Küchenmaschine Schüssel.
Mit einem Spatel , dann rühren in einem Drittel der Eiweiß steif schlagen , dann vorsichtig , die restlichen
zwei Drittel . Kühlen Sie 30 Minuten.
Um die Waffeln zu kochen , folgen Sie den vorherigen Rezept.
UMWELT
ACHTUNG:
Werfen Sie nicht dieses Produkt, wie es mit anderen Haushaltsprodukten hat. Es gibt eine
Mülltrennungs von diesem Produkt in Gemeinden, Sie müssen Ihre lokalen Behörden über die
Orte, wo man dieses Produkt zurückgeben können zu informieren. In der Tat enthalten
elektrische und elektronische Produkte gefährliche Stoffe, die schädliche Auswirkungen auf die
Umwelt oder die menschliche Gesundheit haben und sollte recycelt werden. Das Symbol hier
darauf hinweisen, dass elektrische oder elektronische Geräte sollten sorgfältig ausgewählt
werden, ist ein fahrbarer Abfallbehälter mit einem Kreuz markiert.
Hergestellt und importiert: Adeva SAS 8 rue Marc Seguin 77290 Mitry-Mory FRANCE
www.hkoenig.com - contact@hkoenig.com - Tel. 01 64 67 00 01
Page 20

NEDERLANDS
BELANGRIJKE VEILIGHEIDSMAATREGELEN
• LEES DE INSTRUCTIES
• Gebruik alleen op AC 230 Volt, 50/60 Hz. Alleen voor huidhoudelijk grebuik.
• Raak noooit heete oppervlakken aan. Gebruik altijd de hendels .
• Om u eigen tegen elekrische schokken te beschermen, dompel het cabel, de stekker of het apparaat
zelf nooit onder water of andere vloeistoffen.
• Kinderen moeten onder toezicht worden gehouden als het apparaat in gebruik is.
• Ontkoppel het apparaat wanneer het niet in gebruik is, voordat u het schoon gaat maken of uit elkaar
haalt.
• Gebruik het apparaat niet als het beschadigd is of niet goet werkt. Om het risico van elektrische
schokken te voorkomen, probeer nooit het Waffel Ijzer zelf te repareren. Breng het naar een herkende
service centrum om het te laten maken. De onjuiste montage vaqn het apparaat kan het risico van
elektrische schokkken betekenen, wanneer het Waffel Ijzer opnieuw wordt gebruikt.
• Het gebruik van toebehoor dat niet door de fabrikant werd aanbevolen, kan in elektrische schokk, letsel
en ongelukken resulteeren.
• Gebruik het apparaat niet buitenshuis of voor commercïele doeleinden.
• Laat het kabel nooit van het aanrecht of de tafel slingeren. Laat het nooit met heete oppervlakken in
aanraking komen.
•.Plaats het Waffel Ijzer nooit in de buurt van het gas fornuis of een verwarmde oven.
• Ontkoppel het apparaat als u het niet meer gaat gebruiken.
• Gebruik het apparaat alleen voor de doeleinden voor die het ontworpen werd.
• Gebruik het apparaat nooit met behulp van een timer of een afstandbediening.
• U dient uiterst voorzichtig te zijn als u het apparaat met heete olie of vloeistoffen verplaatst.
• Om te ontkoppelen, schakel het apparaat uit en verwijder de stekker van het stopcontact.
• VERMIJD HITTE ZONDER DE PLATEN ZIJN GEÏNSTALLEERD KAN HET DE THERMISCHE
ZEKERING SCHADE DOOR DE HOGE TEMPERATUUR.
WAARSCHUWING: OM HET RISICO VAN ELEKTRISCHE SCHOKKEN TE VOORKOMEN, MOET HET
APPARAAT DOOR EEN ERKENDE SERVICE CENTRUM GEREPAREERT WORDEN.
BEWAAR DEZE INSTRUCTIES
ALLEEN VOOR HUISHOUDELIJK GEBRUIK
SPECIAALE INSTRUCTIES VOOR HET KABEL
Om het risico van struikelen het verstrikt raken van lange kabels te voorkomen, werd dit apparaat met een
korte kabel voorzien. Er zijn grotere lengtes beschikbaar, als u er met zorg gebruik van maakt. Als u een
verlengsnoer gebruikt, moet de spanning daarvan minstens even hoog zijn als het apparaat. Hoe langer
het is om zo belangrijker is het om ervoor te zorgen dat het niet van het aanrecht slingert en door kinderen
en dieren over gestruikelt kan worden.
LET OP
Dit apparaat werd met een gepolariseerde stekker voorzien (een blad is breeder dan de andere) om het
risico van elektrische schokken te verminderen. Deze stekker past maar op een manier in een
gepolariseerde contactdoos. Als de stekker niet pas, neem contact op met een erkende elektricien.
Probeer de stekker op geen enkele manier te wijzigen.
Page 21

BESCHRIJVING VAN DE ONDERDELEN
1. Bedieningspaneel
2. Druk knop
3. Opper anti-plak laag plaat
4. Druk knop
5. Opvouwbare handgreep
6. Bovenste behuizing
7. Onderste anti-plak laat plaat
8. Behuizingssokkel
1
5
7
3
8
9
1 2 3
5 6 7
8
2
9. Olie blad
BESCHRIJIVING CONFIGURATIESCHERM
1. ON/OFF: Aan/Uit Schakelaar
2. Power licht
3. Aanpassbar licht
4. LCD venster
5. Tijd knop (+)
6. Tijd knop (-)
7. Temperatuur(+)
8. Temperatuur(-)
Voor het eerste gebruik
• Lees de instructies zorgvuldig en houd deze op voor toekomstig gebruik.
• Verwijder de verpakking.
• Reinig de kook plaat met warm water en een zachte spons of doek.
DOMPEL HET APPARAAT NOOIT ONDER WATER EN GIET NOOIT WATER DIREKT OP DE KOOK
PLAAT
• Droog met een zachte doek.
• Smeer de bakplaten met een beetje olie of kook spray.
LET OP: Wanneer u uw Waffel Ijzer voor het eerste keer gebruikt, kan het lichte rook en een geur afgeven.
Dit is normaal en heeft geen invloed op de veiligheid van uw toestel. Het kan echter invloed hebben op de
smaak van uw eerste set van waffles bereid in uw waffel ijzer. In dit geval, raden wij aan om deze weg te
gooien.
DOMPEL HET APPARAAT NOOIT ONDER WATER OF ANDERE VLOEISTOFFEN.
FUNCTIE
Page 22

• Druk de aan/uit knop (rood/power light, blauw/aanpasbaar licht), na een piepend geluid, geeft de LCD
scherm 190℃ met de bewegende letter “C” aan, en het apparaat begint op te warmen. Wanneer de plaat
190℃ bereikt, stop de “C” met knipperen, en geeft het LCD scherm 03:30 aan. Tijdens het
voorverwarmen, werkt de tijd/temperatuur knop niet. Het LCD scherm schakelt uit zodra de temperatuur
werd bereikt.
• Na de voorverwarming, kunt u de tijd/temperatuur knop drukken, en de LCD scherm geeft 03:30~04:00
~04:30 ~05:00~04:30 ~04:00~03:30 & 190℃~200℃ ~210℃ ~220℃~230℃ ~220℃~210℃~200℃
~190℃. Als er binnen 5 seconden geen functie wordt ingesteld, worden de gegevens automatisch
opgeslagen.
• Na het instelling, kunt u de tijd en temperatuur instellen met het aanpasbaare licht “uit”. Het process
eindigd na drie lange piep geluiden. De tijd en temperatuur kan tijdens het kookproces aangepast worden,
en de tijd kan 30 sekonden verlaagt/verhoogt worden, en de temperatuur stijgt/daalt 10℃
• Na het process, wordt de ingestelde temperatuur gehouden 20 minuten na operatie op standby
gehouden. Het LCD scherm geeft 120℃ aan en wordt 5 sekonden gehouden.
• Met de standby functie, wordt het LCD/instelbare licht uitgeschakeld, en het power licht blijft aan. Als het
aan/uit knop nogmaals wordt gebruikt, begint de machine op te warmen, en u kunt verder waffels maken
• Zodra de waffels gaar zijn, verwijder deze voorzichtig met een niet-metalen onderwerp. Gebruik nooit
scherpe, puntige of metalen voorwerpen,dit kan de anti-plak laag beschadigen.
• Zodra u klaar bent met koken, verwijder de stekker uit het stopcontat en laat het waffel ijzer geopend
afkoelen.
HANDIGE TIPS
• De deeg niet over mengen anders worden de waffels hard. Roer de deeg tot grote broken en droge
ingrediӫnten glad zijn.
• De optimale hoeveelheid deeg om een volle waffel te produceren,zonder dat deze overstromen, zal met
verschillende waffel recepten variӫren. Als u de deeg van een maatbeker giet, helpt dit om te bepalen
hoeveel u elke keer moet gebruiken. Vul de onderste plaat van het waffel ijzer met genoeg deeg om de
piekeinden te bestrijken, ongeveer ¾ tot 1 kopje.
• Voor gelijkmatig gevormde waffels, verspreid het deeg tot aan de buiten rand van het grid met behulp
van een hittebestendige rubberen spatel of een andere niet metalen voorwerp, en sluit de deksel.
• Om de waffels knapperig te houden, laat de gebakkene waffels op een rooster afkoelen om te
voorkomen dat stoom eronder vormt.
• Als u meerdere waffels maakt, houd waffels warm door ze op een rek in een voorverwarmde oven op
200°F te houden, totdat ze klaar zijn om te serveren.
• Waffels die al afgekoeld zijn kunnen opgewarmd worden, door ze nog een keer op het waffel ijzer te
plaatsen. Suit de deksel en verwarm deze 1 of 2 minuten, en zorg dat ze niet verbranden.
• Gebakkene waffels kunnen goed bevroren worden. Laat de waffels op een rooster helemaal afkoelen.
Pak deze in een plastic diepvries zak of een container, en scheid deze met vetvrij papier.Om de bevrorene
waffels op te warmen,
REINIGING EN ONDERHOUD
• Druk knop (4) en knop (2), en u kunt de plaat eruit halen. Schakel het waffel ijzer uit en laat het afkoelen
voordat u het schoonmaakt. Het is niet nodig om het waffel ijzer te demonteren voordat u het reinigd.
Dompel het waffel ijzer nooit onder water of in de vaatwasser.
• Borstel alle losse kruimels uit de groeven. Veeg rosters schoon met keukenrol of een handdoek om olie
of boter te absorberen. U kunt de roosters met een vochtig doek reinigen. Gebruik geen scheurende
middelen anders kunt u de anti-plak laag krassen en beschadigen.
• Veeg de buitenkant van het waffel ijzer met een vochtig doek. Reinig de buitenkant nooit met
schuursponsjes, staalwol of andere schuurende middelen. Metal polish is geschickt om het roestvast staal
boven de behuizing te reinigen. Dompel het apparaat nooit onder water of andere vloeistof.
• Plaats het apparaat nooit in de vaatwasser.
Page 23

• Mocht er deeg op het rooster plakken, giet een beetje olie op de verharde besalg. Laat deze 5 minuten
intrekken en veek met keukenrol af.
• Gebruik geen metalen voorwerpen om uw waffels te verwijderen, dit kan de anti-plak laag beschadigen.
Wij testten voor u GFX180.
Hier zijn onze tips om heerlijke wafels te maken:
Draai de camera 220 °,
Eenmaal warm product, giet het beslag, te sluiten en terug,
2 minuten koken, draai om en bak nog 2 minuten
Open en de terugkeer van de wafel (zette de wafel boven), in de buurt, en bak gedurende 1 minuut,
Draai je om en bak nog 1 min.,
Plaats het product in de oorspronkelijke richting en open je wafel is klaar om te eten!
Koken varieert afhankelijk van de temperatuur van het deeg en de volgende geselecteerde ingrediënten.
OPSLAG
• Ontkoppel het apparaat voordat u het opslagt.
• Laat het apparaat afkoelen voordat u het opslagt.
• Het kabel kan rond de basis gerolt worden voor het opslag.
RECEPTEN
11½ kop bloem 3 grote eieren, gedeeld
½kop cornstarch 2 tl. suiker
2 tl. maismeel (optioneel) 1¾ kop melk
1 tl bakpoeder ½tl. vanilla extract
1 tl. salt ½ cup (1 stick )boter, gesmolten
Meng meel, maismeel, bakpoeder en zout;zet het op zij. Meng eiwitten tot het schuimt. Voeg suiker bij, tot
zich stijve pieken vormen. Klop de eidooiers, melk en vanilla. Gebruik een rubberen spatel, roer melk
mengsel met de bloemmengsel, en mix deze tot ze vochtig zijn. (Er moeten nog kleine klompjes zijn, niet
overmengen). Roer de gesmolten boter in. Vouw de opgeklopte eiwitten erin tot deze gecombineerd zijn.
Giet het besalg op een hete, ingevette waffel ijzer.
Maakt ongeveer 5½ koppen deeg
Waffel Tip: Maismeel maakt de waffels knapperiger. Als u geen maismeel hebt, kunt u ook lekkere waffels
maken door 2 koppen meer bloem te gebruiken.
Toasted Pecan & Cranberry Waffels
Strooi gehakte pecannoten op het onderste rooster van de hete, ingevette waffel ijzer. Giet de deeg erover.
Strooi gedroogde cranberries in het deeg. Sluit het waffel ijzer zoals aangegeven.
2 Voor 15 wafels
240g bloem, 2 eieren + 1 eierdooier , ½ vanillestokje , 30 g basterdsuiker , 1 snufje zout , 70 g boter , 18
ml melk , 15 g gist , 12 cl room, suiker, olie om het wafelijzer in te vetten .
Bereidingstijd : 20 minuten + 1:30 rust .
Bereidingstijd : 4 minuten per wafel.
Zeef de bloem en giet het in een grote kom .
Breek de eieren in een kom en klop ze .
Page 24

Slit ½ vanillestokje doormidden en , met behulp van de punt van een mes , krijgen alle kleine zaadjes die
er in zitten . Voeg de losgeklopte eieren met de suiker en een snufje zout . U kunt de peulen in een
gesloten kom van kristalsuiker en gebruiken voor andere recepten .
Snijd de boter in blokjes in een kom , zet het in de magnetron gedurende 30 seconden bij 600W te
smelten .
Laat afkoelen melk , verdun het gist , giet het in een kuiltje in de bloem ook. Voeg de geklopte eieren en
room, roeren met een houten spatel . Voeg de gesmolten boter toe en mix tot een glad deeg . Dek de kom
af met een schone theedoek en laat rijzen ten minste 01:30 op kamertemperatuur .
Verwarm het wafelijzer . Bestrijk het lichtjes met olie over het gehele oppervlak .
Giet een kleine hoeveelheid pasta op een blister oppervlakken ervoor te zorgen dat het goed wordt
verdeeld . Sluit het wafelijzer en onmiddellijk terug te sturen naar het beslag gelijkmatig over de andere
kant te verspreiden. 2 minuten koken , dan keren de wafelijzer . 2 minuten laten koken . Blijken de wafel
en herhaal .
Wanneer alle wafels worden gekookt en tiédies , bestrooi met poedersuiker .
3 Dit wafelrecept ander , rijker in boter en room , wordt gerealiseerd met een witte opgeklopte ei , maar
zonder gist . Rusttijd korter is.
10 wafels :
3 eieren , 80 g boter , 8 kopjes melk , 25 cl vloeibare room , 150 g gezeefde bloem , 25 g basterdsuiker ,
zout . Elektrische mixer .
Voorbereiding 15 minuten + 30 minuten rust .
Snijd de boter in blokjes in een kom . Zet het in de magnetron op 600W 30 seconden gewoon te smelten .
Zet het opzij .
Scheid de dooiers van witte eieren , waardoor het wit in een kom en het houden van afzonderlijk het geel
in een beker of glas . Giet 1 eetlepel suiker op wit. Begin langzaam zweepslagen , versnellen : blanken
zijn gemonteerd wanneer de sporen van wit op de zwepen is zeer duidelijk en ze niet de wanden van de
kom opstijgen .
Giet de bloem in een aparte kom , maak een holte in het centrum ( een " sink" ) , zet een snufje zout , de
resterende suiker , eidooiers , melk , room en gesmolten boter . Meng goed met een houten spatel tot een
homogeen mengsel .
U kunt deze ingrediënten te mengen in een keukenmachine en draaien op lage snelheid met een mes
deeg . Trek vervolgens de keukenmachine kom.
Met een spatel , roer er dan een derde van het eiwit stijf , dan voorzichtig , de overige twee derde . Koel
30 minuten .
Om de wafels koken , volg dan de vorige recept.
MILIEU
ATTENTIE:
Dit apparaat mag niet met uw ander huishoudelijke toestellen worden verwijdert. Dit product moet op een
geselecteerde stortplaats verwijdert worden. U kunt bij de gemeente een indiceerde plaats aanvragen.
Elektrisch en elektronische producten kunnen gevaarlijke stoffen inhouden die schadelijk zijn voor mensen
en het milieu en moet recycled worden. Het symbool aan de kant geeft aan dat het een elektrisch en
elektronisch toestel is en zijn dus artikelen van een selectieve collectie. Het beeld geeft een afvalbak met
een X teken aan.
Geproduceerd en geïmporteerd door : Adeva SAS 8, Rue Marc Seguin 77290, Mitry-Mory FRANKRIJK
www.hkoenig.com - contact@hkoenig.com – Telefoon: 01 64 67 00 01
Page 25

ESPANOL
INSTRUCCIONES DE SEGURIDAD
• LEA TODAS LAS INSTRUCCIONES
• Utilice sólo un voltaje de AC 230, 50/60 Hz. y utilice el dispositivo únicamente para uso doméstico.
• No toque las superficies calientes. Use las asas.
• Para protegerse contra el riesgo de una descarga eléctrica, no sumerja el cable, enchufe o la unidad de
cocción en agua o cualquier otro líquido.
• Se requiere supervisión cuando este dispositivo es utilizado por o cerca de niños.
• Desenchufe del tomacorriente cuando no esté en uso y antes de limpiarlo. Deje que se enfríe antes de
colocar o quitar piezas y antes de limpiarlo.
• No utilice el dispositivo si tiene un mal funcionamiento o ha sido dañado de alguna manera . Con el fin
de evitar el riesgo de una descarga eléctrica, no trate nunca de reparar la gofrera usted mismo. Llévelo a
un centro de servicio autorizado para su revisión y reparación. Un montaje incorrecto puede provocar una
descarga eléctrica.
• El uso de accesorios no recomendados por el fabricante puede causar incendios, descargas eléctricas o
riesgo de lesiones a las personas.
• No lo utilice en exteriores o con fines comerciales.
• No permita que el cable de alimentación cuelgue del borde de mesas o mostradores, ni que toque
superficies calientes.
• No lo coloque sobre o cerca de una hornilla de gas o eléctrica o un horno caliente.
• Desenchufe el dispositivo cuando haya terminado de usarlo.
• No utilice el dispositivo para usos distintos al indicado.
• No utilice un temporizador externo o un sistema de control remoto separado con este dispositivo.
• Debe tener especial cuidado al mover un dispositivo que contenga aceite u otros líquidos calientes.
• Para apagar, gire el control a la posición OFF y luego desenchufe el dispositivo.
• NO CALIENTE SIN LAS PLACAS SE INSTALAN PUEDE DAÑAR LA FUSIBLE TERMICO DEBIDO A
LA ALTA TEMPERATURA
ADVERTENCIA: PARA REDUCIR EL RIESGO DE INCENDIO O DESCARGA ELÉCTRICA , SÓLO
PERSONAL AUTORIZADO DEBE HACER LAS REPARACIONES.
GUARDE ESTAS INSTRUCCIONES
SÓLO PARA USO DOMÉSTICO
INSTRUCCIONES ESPECIALES PARA EL CABLE
El dispositivo está provisto de un cable de alimentación corto para reducir los riesgos resultantes de
enredarse o tropezarse con un cable más largo. Hay cables de extensión más largos disponibles y
pueden utilizarse si se tiene cuidado en su uso. Si se utiliza un cable de extensión , la clasificación
eléctrica marcada en el cable de extensión debe ser por lo menos tan alta como la clasificación eléctrica
del dispositivo y debe acomodarse de modo que no cuelgue de mostradores o mesas donde pueda ser
jalado por niños o animales, o que causen un tropiezo.
NOTA
Este dispositivo tiene un enchufe polarizado (una pata es más ancha que la otra) para reducir el riesgo de
descargas eléctricas. Este enchufe entrará en un tomacorriente polarizado de una sola manera. Si el
enchufe no encaja, comuníquese con un electricista calificado. No modifique el enchufe de ninguna
manera.
Page 26

DESCRIPCIÓN DE LAS PIEZAS
1
5
6
7
3
8
9
2
4
1. Panel de control
2. Botón de presión
3. Placa antiadherente inferior
4. Botón de presión
5. Mango plegable
6. Cubierta superior
7. Placa antiadherente superior
8. Cubierta base
9. Bandeja de aceite
1 2 3
4
5
6
7
8
DESCRIPCIÓN DEL PANEL DE CONTROL
1 . ON / OFF: Botón On / Off
2 . Luz de encendido
3 . Luz ajustable
4 . Pantalla LCD
5 . Botón del tiempo (+ )
6 . Botón del tiempo (- )
7 . Temperatura ( + )
8 . Temperatura ( - )
ANTES DEL PRIMER USO
• Lea todas las instrucciones cuidadosamente y guárdelas para consultarlas en el futuro.
• Retire todo el embalaje.
• Limpie las placas de cocción , limpiando con una esponja o paño humedecido con agua tibia.
NO SUMERJA EL DISPOSITIVO
Y NO PONGA AGUA DIRECTAMENTE SOBRE LA SUPERFICIE DE COCCIÓN.
• Secar con un paño o toalla de papel.
• Cubra ligeramente las placas de cocción con un poco de aceite de cocina o aceite en spray.
NOTA: Cuando el dispositivo se calienta por primera vez, puede emitirse un ligero humo u olor. Esto es
normal en muchos dispositivos de calentamiento. Esto no afecta a la seguridad de su equipo. Sin
embargo, puede afectar el sabor de la primera serie de gofres preparados, y se recomienda que se
deshaga estos.
MODO DE EMPLEO
• Pulse el botón de encendido / apagado (rojo / luz de encendido y azul / luz de ajuste), después de un
¡NO SUMERJA EL DISPOSITIVO EN AGUA O CUALQUIER OTRO LÍQUIDO!
Page 27

timbre largo, la pantalla LCD muestra 190 ℃ con la letra "C " en movimiento, el dispositivo comienza a
precalentar . Cuando la temperatura de la placa llega a 190 ℃, se puede observar que la "C " deja de
moverse y se lee 03:30 en la pantalla LCD. Durante el proceso de precalentamiento, el botón de tiempo /
temperatura no funciona. Además, la pantalla LCD se apaga si no se hace uso del botón de tiempo /
temperatura en 20 minutos.
• Después del precalentamiento , puede pulsar el botón de tiempo / temperatura, y la pantalla LCD
mostrará 3:30 ~ 04:00 ~ 04:30 ~ 05:00 ~ 04:30 ~ 04:00 ~ 03:30 & 190 ℃ ~ 200 ℃ ~ 210 ℃ ~ 220 ℃ ~
230 ℃ ~ 220 ℃ ~ 210 ℃ ~ 200 ℃ ~ 190 ℃. Si no hay ninguna operación para el botón dentro de 5
segundos, la máquina de sale y guarda automáticamente.
• Después de la configuración, funciona la cuenta atrás con el tiempo programado y la temperatura con la
luz de ajuste "off". La preparación termina. El tiempo de preparación y la temperatura pueden ser
ajustados durante el proceso de cocción y el tiempo aumenta / disminuye 30 segundos, y la temperatura
aumenta / disminuye 10 ℃.
• Una vez finalizada la configuración, se mantiene al calor y la temperatura programada y se queda en
stand by si no hay ninguna operación en 20 minutos con un timbrado largo. La pantalla LCD mostrará 120
℃, y se mantiene por 5 segundos.
• En el modo de espera, la luz LCD de ajuste está apagada y la luz de encendido se mantiene encendida.
Si se vuelve a utilizar el dispositivo se precalentará para preparar sus gofres.
• Una vez que los gofres estén listos, retírelos con cuidado del dispositivo con utensilios no metálicos.
Nunca toque la superficie de cocción con algo afilado, puntiagudo u objetos metálicos . Esto podría dañar
la superficie antiadherente.
• Una vez que haya terminado de cocinar, desenchufe el dispositivo y déjelo enfriar.
CONSEJOS ÚTILES
• No sobre mezcle la masa o los gofres quedarán duros. Revuelva la masa sólo hasta que los grandes
trozos de ingredientes secos desaparecen.
• La cantidad óptima de la masa para hacer un gofre, sin derramarlo, varía con diferentes batidoras.
Verter la mezcla con una taza de medir le ayudará a medir la cantidad a utilizar cada vez. Llene la
cubierta inferior del dispositivo con la suficiente masa para cubrirlo todo, alrededor de ¾ de 1 taza.
• Para obtener gofres perfectos, extienda bien la masa, usando una espátula de goma a prueba de calor u
otro utensilio no metálico antes de cerrar la tapa.
• Para mantenerlos crujientes, deje que los gofres se enfríen sobre una rejilla para evitar que el vapor se
acumule debajo.
• Al momento de servir varios gofres a la vez, mantenga los gofres calientes y crujientes, colocándolos
sobre una rejilla en un horno precalentado a 200° F hasta que esté listo para servir.
• Los gofres que ya se enfriaron pueden ser recalentados y hacer que sean crujientes nuevamente,
individualmente, colocándolos en el dispositivo y caliéntelos durante 1 ó 2 minutos, observando
cuidadosamente para prevenir que se quemen.
• Los gofres horneados se congelan bien. Deje enfriar completamente sobre una rejilla. Guarde en una
bolsa de plástico para congelar o en un recipiente cubierto, separando los gofres con papel encerado.
Vuelva a calentar los gofres congelados en un horno tostador, horno o tostadora hasta que estén
calientes y crujientes.
LIMPIEZA Y CUIDADO
• Presione el botón ( 4 ) o el botón ( 2 ), y podrá sacar la placa para limpiarla. Desenchufe siempre el
dispositivo y deje que se enfríe antes de limpiarlo. No hay necesidad de desmontar el dispositivo para su
limpieza. No sumerja nunca el dispositivo en agua ni lo introduzca en el lavavajillas.
• Cepille las migas sueltas de las ranuras. Limpie las rejillas con una toalla de papel, que absorba
cualquier aceite o mantequilla que podrían estar en las ranuras de la rejilla. También puede limpiar las
rejillas con un paño húmedo. No utilice ningún producto abrasivo que pueda rayar o dañar el
recubrimiento antiadherente.
• Limpie el exterior del dispositivo con un paño húmedo. No limpie el exterior con ningún estropajo
abrasivo o lana de acero ya que esto dañará el acabado. Un poco de brillo para metal adecuado para el
Page 28

acero inoxidable se puede utilizar de vez en cuando en la carcasa superior. No lo sumerja en agua u otro
líquido.
• No coloque en el lavavajillas.
• Si la masa se pega en la cubierta, vierta un poco de aceite de cocina sobre la masa endurecida. Deje
reposar 5 minutos para ablandar la masa, luego limpie con una toalla de papel o un paño suave.
• No use utensilios metálicos para retirar los gofres, ya que pueden dañar la superficie antiadherente.
Probamos para ti GFX180.
Aquí están nuestros consejos para hacer deliciosos gofres:
Encienda la cámara 220 °,
Una vez que el producto caliente, vierta la masa, cierre y cambio,
Cocine por 2 minutos, luego dé vuelta y cocine durante otros 2 minutos
Abrir y devolver el gofre (waffle sofocar la up), cerrar y cocinar durante 1 minuto,
Dar vuelta y cocinar durante 1 min,
Coloque el producto en la dirección original y abre tu waffle está listo para comer!
El tiempo de cocción varía dependiendo de la temperatura de la masa y los siguientes ingredientes
seleccionados.
ALMACENAMIENTO
• Desenchufe siempre el dispositivo antes de su almacenamiento.
• Siempre asegúrese de que el dispositivo esté frío y seco.
• El cable de alimentación se puede envolver alrededor de la parte inferior de la base para su
almacenamiento.
RECETAS
11 ½ tazas de harina
½ taza de maicena
2 cdas. harina de maíz (opcional )
1 cda. polvo de hornear
1 cdta. sal
En un tazón grande, bata la harina, maicena, harina de maíz, polvo de hornear y sal. En un tazón, bata
las claras de huevo hasta el punto de nieve. Añadir el azúcar, seguir batiendo hasta el punto de nieve.
Batir las yemas de huevo, la leche y la vainilla. Usando una espátula de goma, revolver la mezcla de
leche y la mezcla de harina, mezclando sólo hasta que se humedezcan los ingredientes secos. (Deben de
quedar pequeños bultos; no sobre mezclar). Agregue la mantequilla derretida. Agregue las claras de
huevo batidas hasta que se mezclen. Vierta la mezcla sobre gofrera caliente y previamente engrasada y
hornear .
Hace alrededor de 5 ½ tazas de masa
Consejo: La maicena hace que los gofres más crujientes. Si usted no tiene maicena, puede hacer
buenos gofres sin maicena aumentando 2 tazas de harina. Hornee según las instrucciones.
Gofres de nueces y arándanos tostados
Espolvorear las nueces picadas en la cubierta inferior de la gofrera engrasada caliente.
Vierta la mezcla sobre las nueces. Espolvorear arándanos secos sobre la mezcla .
Cierre la gofrera y hornee según las indicaciones.
2 Durante 15 gofres
Harina 240g , 2 huevos + 1 yema de huevo , ½ vaina de vainilla , 30 g de azúcar en polvo , 1 pizca de sal
, la mantequilla 70g , 18 ml de leche , 15 g de levadura , 12 cl de nata , azúcar, aceite para engrasar el
molde para gofres .
3 huevos grandes, separados
2 cucharadas de azúcar granulada
1 ¾ tazas de leche
½ cucharadita extracto de vainilla
½ taza (1 barra) de mantequilla sin sal, derretida
Page 29

Tiempo de preparación : 20 minutos + 1:30 de descanso .
Tiempo de cocción: 4 minutos por galleta .
Tamizar la harina y verter en un tazón grande.
Rompa los huevos en un bol y batirlos .
Hendidura ½ vaina de vainilla por la mitad y , con la punta de un cuchillo, obtener todas las pequeñas
semillas que están dentro. Añadir los huevos batidos con el azúcar y una pizca de sal. Puede mantener
las vainas en un recipiente cerrado de azúcar granulada y utilizarlo para otras recetas.
Corte la mantequilla en cubos en un bol, poner en el microondas durante 30 segundos a 600W para fundir
Deje enfriar la leche , diluir la levadura , verter en un agujero en la harina también. Añadir los huevos
batidos y la nata , removiendo con una espátula de madera . Añadir la mantequilla derretida y mezclar
hasta obtener una masa suave. Cubra el recipiente con un paño de cocina limpio y dejar crecer la masa
por lo menos 1:30 a temperatura ambiente.
Calentar la plancha de gofres . Cepille ligeramente con el aceite por toda la superficie .
Vierta una pequeña cantidad de pasta en un blister superficies asegurando que está bien distribuida .
Cierre la waflera y devuélvala inmediatamente para ampliar la masa en forma pareja sobre el otro lado.
Cocine por 2 minutos y luego invertir el molde para gofres . Cocine por 2 minutos. Apaga el waffle y
repetir .
Cuando todos los gofres se cocinan y se tiédies , espolvorear con azúcar glas.
3 Esta receta de gofres otra , más rica en mantequilla y crema, se realiza con un huevo batida blanca, pero
sin levadura. El tiempo de descanso es más corto.
10 galletas :
3 huevos, mantequilla 80g , 8 tazas de leche , 25 cl de nata líquida, 150 g de harina tamizada , 25 g de
azúcar en polvo , sal. Mezclador eléctrico .
Preparación 15 minutos + 30 minutos de descanso.
Corte la mantequilla en cubos en un tazón. Póngalo en el microondas a 600 W 30 segundos acaba de
fundir . Ponga a un lado.
Separar las yemas de los huevos blancos , poniendo las claras en un bol y mantener la amarilla por
separado en una taza o vaso . Vierta 1 cucharada de azúcar en blanco. Iniciar batir lentamente , se
aceleran: los blancos se montan cuando el rastro de blanco en los látigos es muy evidente y no se
despegue de las paredes del recipiente.
Vierta la harina en un bol aparte , hacer un hueco en el centro (un " sumidero" ) , poner una pizca de sal ,
el azúcar restante , las yemas , la leche , la nata y la mantequilla derretida . Mezclar bien con una
espátula de madera hasta obtener una mezcla homogénea.
También se pueden mezclar estos ingredientes en un procesador de alimentos y correr a baja velocidad
con un cuchillo la masa. Luego saque el recipiente del procesador de alimentos.
Con una espátula, luego añada una tercera parte de la clara de huevo a punto de nieve , luego
suavemente , los dos tercios restantes . Refrigere 30 minutos .
Para cocinar las galletas, seguir la receta anterior.
MEDIO AMBIANTE
ATENCIÓN:
No se deshaga de este producto como lo hace con otros productos del hogar. Existe un sistema selectivo
de colecta de este producto puesto en marcha por las comunidades, debe de informarse en su
ayuntamiento acerca de los lugares en los que puede depositar este producto. De hecho, los productos
eléctricos y electrónicos pueden contener substancias peligrosas que tienen efectos nefastos para el
medio ambiente o para la salud humana y deben ser reciclados. El símbolo aquí presente indica que los
equipos eléctricos o electrónicos deben de ser cuidadosamente seleccionados, representa un recipiente
de basura con ruedas marcado con una X.
Fabricado e importado por : Adeva SAS 8 rue Marc Seguin 77290 Mitry-Mory FRANCE
www.hkoenig.com - contact@hkoenig.com - Tel. 01 64 67 00 01
Page 30

ITALIANO
IMPORTATI MISURE DI SICUREZZA
• LEGGI TUTTE LE ISTRUZIONI
• Usa solo prese di corrente AC 230 Volt, 50/60 Hz. Utilizzare solo per uso domestico.
• Non toccare superfici calde. Usa i manici.
• Per evitare il rischio di scosse elettriche, non immergere il cavo, la spina o le unità di cottura in acqua o
altri liquidi.
• Occorre una stretta sorveglianza quando l’apparecchio viene utilizzato in presenza di bambini.
• Staccare la spina dalla presa di corrente quando l’apparecchio non è in uso e prima della pulizia.
Lasciare raffreddare prima di inserire o rimuovere pezzi e prima della pulizia dell'apparecchio.
• Non utilizzare alcun apparecchio se la macchina non funziona correttamente o se è stata danneggiata
in qualsiasi modo. Al fine di evitare il rischio di scosse elettriche, non provare a riparare il Waffle Maker.
Portarlo in un centro di assistenza autorizzato per il controllo e la riparazione. Un rimontaggio errato
potrebbe comportare il rischio di scosse elettriche quando si usa il Waffle Maker.
• L'uso di accessori non raccomandati dal produttore potrebbe provocare incendi, scosse elettriche, o il
rischio di lesioni alle persone.
• Non utilizzare all'aperto o per scopi commerciali.
• Non lasciare il cavo di alimentazione pendere dal bordo del tavolo o del banco, o che tocchi superfici
calde.
• Non posizionare sopra o vicino a gas, fornelli elettrici o forno riscaldato.
• Scollegare l'unità quando finito di utilizzare.
• Non utilizzare l’apparecchio per un uso diverso da quello previsto.
• Non operare per mezzo di un timer esterno o di un sistema di comando a distanza separato.
• Estrema cautela quando si sposta l’apparecchio contenente olio caldo o altri liquidi caldi.
• Per spegnerla, premi il tasto di controllo OFF, quindi stacca la spina dalla presa di corrente.
• NON CALORE SENZA LE PIASTRE SONO INSTALLATI POTREBBE DANNEGGIARE IL FUSIBILE
TERMICO A CAUSA DELL 'ALTA TEMPERATURA
ATTENZIONE: PER RIDURRE IL RISCHIO DI INCENDI O SCOSSE ELETTRICHE, CONSULTA IL
PERSONALE AUTORIZZATO PER FARE RIPARAZIONI.
CONSERVARE QUESTE ISTRUZIONI
SOLO PER USO DOMESTICO
CAVO SPECIALE ISTRUZIONI
E' fornito un cavo di alimentazione corto per ridurre i rischi derivanti dal rimanere impigliati o di inciampare
su un cavo più lungo. Cavi più lunghi sono disponibili e possono essere utilizzati, ma con molta attenzione.
Se si utilizza una prolunga, la sua conducibilità elettrica deve essere almeno quanto quella
dell'apparecchio, e più è lunga, più deve essere ordinata in modo che non appoggi sopra il piano di lavoro
o sul tavolo dove può essere toccata da bambini o animali, o sulla quale si possa inciampare.
AVVISO
Questo apparecchio è dotato di una spina polarizzata (uno spinotto più largo dell'altro) per ridurre il rischio
di scosse elettriche. Questa spina può essere inserita in una presa polarizzata in un solo verso. Se la
spina non entra nella presa, contattare un elettricista qualificato. Non modificare la spina in alcun modo.
Page 31

DESCRIZIONE DELLE PARTI
1. Pannello di controllo
2. Pulsante
3. Piastra antiaderente inferiore
4. Pulsante
5. Manico pieghevole
6. Parte superiore dell’apparecchio
7. Piastra antiaderente superiore
8. Base dell’apparecchio
1
5
7
3
8
9
1
2
3
5
6
7
8
2
9. Vaschetta per l’olio
DESCRIZIONE DEL PANNELLO DI CONTROLLO
1. ON/OFF: Pulsanti On/Off
2. Luce di accensione
3. Luce regolabile
4. Display LCD
5. Pulsante tempo (+)
6. Pulsante tempo (-)
7. Temperatura (+)
8. Temperatura (-)
PRIMA DEL PRIMO UTILIZZO
• Leggere attentamente tutte le istruzioni e conservarle per un riferimento futuro.
• Rimuovere tutti gli imballaggi.
• Pulire le piastre di cottura strofinando con una spugna o un panno inumidito in acqua calda.
NON IMMERGERE L'APPARECCHIO E NON FAR SCORRERE L'ACQUA DIRETTAMENTE SULLE
PIASTRE DI COTTURA.
• Asciugare con un panno o un tovagliolo di carta.
• Lubrificare leggermente le piastre di cottura con un po’ di olio da cucina o con uno spray da cucina.
NOTA: Quando riscaldate il Waffle Maker per la prima volta, potrebbe emettere fumo od odore. Questo è
normale per molti apparecchi che vanno riscaldati. Ciò non pregiudica la sicurezza del vostro apparecchio.
Tuttavia, può influenzare il sapore della prima serie di cialde preparate e si consiglia di smaltirle.
NON IMMERGERE LA PARTE CALDA DEL ROTARY WAFFLE MAKER IN ACQUA O
ALTRI LIQUIDI!
Page 32

MODALITA’ D’USO
• Premere il tasto on/off (rosso/luce di accensione, e la luce blu/regolabile), dopo un lungo squillo, il
display LCD leggerà 190 °C con la lettera "C" lampeggiante, l'apparecchio inizierà a pre-riscaldarsi.
Quando la temperatura della piastra raggiungerà i 190 °C, la "C" smetterà di lampeggiare e sul display
LCD si leggerà 03:30. Durante il processo di pre-riscaldamento, i pulsanti del tempo e della temperatura
non funzioneranno. Il display LCD si spegnerà se non verrà fatta alcuna operazione per i pulsanti tempo /
temperatura in 20 minuti.
• Dopo il pre-riscaldamento, si può premere il pulsante tempo / temperatura, e il display LCD leggerà
03:30 ~ 04:00 ~ 04:30 ~ 05:00 ~ 04:30 ~ 04:00 ~ 03:30 e 190°C ~ 200°C ~ 210°C ~ 220°C ~ 230°C ~
220°C ~ 210°C ~ 200v ~ 190°C. Se non viene fatta alcuna operazione sul pulsante entro 5 secondi,
l'apparecchio si spegne e salva automaticamente.
• Dopo l'impostazione, inizia il conto alla rovescia a seconda di come sono stati impostati il tempo e la
temperatura, con la luce regolabile "OFF". Quando il processo termina sentirai tre lunghi squilli. Il tempo di
lavoro e la temperatura possono essere regolati durante il processo di lavorazione, il tempo con
aumento/diminuzione di 30 secondi, e la temperatura con aumento/diminuzione di 10°C.
• Dopo aver terminato di impostare la macchina, essa inizia a riscaldare a seconda della temperatura
impostata. L'apparecchio entra in stand-by dopo 20 minuti con un lungo squillo se non si effettua alcuna
operazione. Il display segna 120°C, e si conserva cinque secondi.
• Quando l'apparecchio è in stand-by, la luce LCD / regolabile è spenta e la luce di accensione resta
accesa. Se viene riutilizzato, premi il pulsante on/off, la macchina riparte a pre-riscaldare, e puoi cuocere
la cialda.
• Una volta che le cialde sono cotte, rimuovile con cura con utensili non metallici. Non toccare mai la
superficie di cottura con oggetti taglienti, appuntiti o metallici. Questo potrebbe danneggiare la superficie
antiaderente.
• Una volta che avete finito di cucinare, scollegare la spina dalla presa di corrente e lasciare la macchina
aperta a raffreddare.
SUGGERIMENTI UTILI
• Non mescolare troppo la pastella o la cialda verrà dura. Mescola solo fino a quando non ci sono più i
grumi.
•La quantità ottimale di pastella per fare una cialda a piena forma, senza traboccare, cambia a seconda
della pastella. Versando la pastella in una tazza per misurarla ti aiuterà a valutare quanta usarne di volta
in volta. Versa sulla griglia inferiore dell'apparecchio abbastanza pastella per coprire tutti i punti della
piastra.
• Per ottenere waffles più uniformi, versa una quantità maggiore di pastella nei bordi esterni della piastra,
usa una spatola di gomma per testare il calore o un altro utensile che non sia di metallo, prima di chiudere
l'apparecchio.
• Per mantenere la loro freschezza, lasciare le cialde a raffreddare su una gratella per evitare l'accumulo
di vapore.
• Al momento di servire le cialde, perché siano calde e croccanti, riscaldale a 200 ° C in un forno
pre-riscaldato, fino al momento di servirle.
• Cialde già raffreddate possono essere riscaldate e rese croccanti, individualmente, rimettendole
nell'apparehio. Imposta il colore della macchina 1 o 2. Metti la cialda sulla griglia in modo che combacino
le scanalature, chiudere il coperchio e riscalda per 1 o 2 minuti, controllando con attenzione per evitare
che si brucino.
• Le cialde cotte possono essere congelate. Falle raffreddare completamente su una gratella. Conservare
in congelatore dentro un sacchetto di plastica o in un contenitore coperto, separandole con carta oleata.
Riscaldate cialde in un tostapane o in forno fino a che siano calde e croccanti..
PULIZIA E MANUTENZIONE
• Premere il pulsante (4) o il pulsante (2), e si può prendere la piastra per pulirla. Scollegare sempre la
macchina per cialde e lasciarla raffreddare prima di pulirla. Non vi è alcuna necessità di smontare
l’apparecchio per la pulizia. Non immergere mai la macchina in acqua o metterla in lavastoviglie.
• Spazzolare via le briciole dalle scanalature. Pulire le griglie con un tovagliolo di carta, assorbire tutto
l'olio o il burro che potrebbe essere rimasto nelle scanalature della griglia. È anche possibile pulire le
griglie con un panno umido. Non utilizzare sostanze abrasive che possano graffiare o danneggiare il
rivestimento antiaderente.
• Pulire l'esterno della macchina per cialde con un panno umido. Non pulire l'esterno con qualsiasi panno
Page 33

abrasivo o lana d'acciaio, per non danneggiare la finitura. Un po’ di smalto in metallo adatto per l'acciaio
inossidabile può essere utilizzato occasionalmente sulla parte superiore. Non immergere in acqua o altri
liquidi.
• Non mettere in lavastoviglie.
• Qualora ci fossero residui di pastella cotta sulla griglia, versare un po' di olio da cucina sulla pastella
indurita. Lasciate riposare 5 minuti per ammorbidire la pastella, poi asciugare con un tovagliolo di carta o
un panno morbido.
• Non usare utensili metallici per rimuovere le cialde, possono danneggiare la superficie antiaderente.
Abbiamo testato per voi GFX180.
Ecco i nostri consigli per rendere deliziose cialde:
Accendere la fotocamera a 220 °,
Prodotto una volta caldo, versare la pastella, chiudere e ritorno,
Cuocere per 2 minuti, poi girare e cuocere per altri 2 minuti
Aprire e restituire la cialda (mettere giù la cialda alto), chiudere e cuocere per 1 min,
Girare e cuocere per un ulteriore 1 min,
Mettere il prodotto nella direzione originale e aprire il waffle è pronto da mangiare!
Tempo di cottura varia a seconda della temperatura della pasta e seguenti ingredienti selezionati.
CONSERVAZIONE
• Scollegare sempre il Waffle Maker prima di metterlo via.
• Assicurarsi sempre che il Waffle Maker sia freddo e asciutto prima di riporlo nel suo contenitore.
• Il cavo di alimentazione può essere avvolto intorno alla parte inferiore della base.
Page 34

RICETTE
11 ½ tazza di farina 3 uova grandi, separate
½ tazza di amido di mais 2 cucchiai di zucchero semolato
2 cucchiai di farina di mais (opzionale) 1 ¾ tazza di latte
1 cucchiaio di lievito in polvere ½ cucchiaino di estratto di vaniglia puro
1 cucchiaino di sale ½ tazza di burro non salato, fuso
In una ciotola grande, setaccia insieme la farina, l’amido di mais, la farina di mais, il lievito e il sale fino a
mischiarli completamente, e mettere da parte. In un’altra ciotola, battere i bianchi d'uovo a neve.
Aggiungere lo zucchero, continuare a battere, e mettere da parte. Sbattere insieme i tuorli, il latte e la
vaniglia. Utilizzando una spatola di gomma, mescolare il latte nella miscela di farina, mescolando solo fino
a quando gli ingredienti secchi vengono inumiditi (se ci fossero dei grumi, non mescolare ulteriormente).
Incorporate il burro fuso. Aggiungere gli albumi montati a neve fino a quando non si ottiene un composto
compatto. Versare sulla piastra calda, unta con dell'olio o spray e cuocere.
Prepara circa 5 ½ tazze di pastella
Suggerimento: l'amido di mais rende le cialde croccanti. Se non hai l'amido di mais, puoi comunque
ottenere delle ottime cialde aggiungendo 2 tazze di farina in più. Cuocere come indicato.
Waffles di noci pecan tostate & mirtilli rossi
Cospargere di noci tritate il fondo della griglia calda, unta con dell'olio.
Versare la pastella. Versare i mirtilli secchi sopra la pastella.
Chiudere la macchina e cuocere come indicato.
2 Per 15 cialde
240g di farina , 2 uova + 1 tuorlo d'uovo , ½ baccello di vaniglia , zucchero semolato 30 g , 1 pizzico di
sale , 70g di burro , 18 ml di latte , 15 g di lievito , 12 cl di panna , zucchero, olio per ungere la cialde .
Tempo di preparazione : 20 minuti + riposo 01:30 .
Tempo di cottura : 4 minuti per waffle .
Setacciate la farina e versare in una ciotola capiente .
Rompere le uova in una ciotola e batterli .
Slit ½ baccello di vaniglia a metà e , con la punta di un coltello , ottenere tutti i piccoli semi che si trovano
all'interno . Aggiungere le uova sbattute con lo zucchero e un pizzico di sale . È possibile mantenere i
baccelli in una ciotola chiusa di zucchero semolato e utilizzarlo per altre ricette .
Tagliare il burro a cubetti in una ciotola, mettere nel forno a microonde per 30 secondi a 600W a
sciogliersi.
Lasciate latte fresco , diluire il lievito , versare in un buco nella farina bene . Aggiungere le uova sbattute e
panna , mescolando con una spatola di legno . Aggiungere il burro fuso e mescolare fino ad ottenere una
pasta liscia . Coprite la ciotola con un canovaccio pulito e lasciate la pasta aumento di almeno 1:30 a
temperatura ambiente .
Riscaldare il ferro da cialde . Spazzolare leggermente con olio su tutta la superficie .
Versare una piccola quantità di pasta su una superficie blister assicurando che sia ben distribuito .
Chiudere il ferro da cialde e tornare immediatamente a diffondere la pastella uniformemente sopra l'altro
lato . Cuocere per 2 minuti , quindi capovolgere il ferro da cialde . Cuocere per 2 minuti . Sformare la
cialda e ripetere .
Quando tutte le cialde sono cotti e tiédies , spolverare con zucchero a velo .
Page 35

3 Questa ricetta waffle un altro , più ricco di burro e panna , è realizzata con un uovo sbattuto bianco , ma
senza lievito . Tempo di riposo è più breve .
10 cialde :
3 uova , burro 80 g , 8 tazze di latte , 25 cl di panna liquida , 150 g di farina setacciata , lo zucchero
semolato 25 g , sale. Miscelatore elettrico.
Preparazione 15 minuti + 30 minuti di riposo .
Tagliare il burro a dadini in una ciotola . Mettere nel forno a microonde a 600W 30 secondi solo a
sciogliersi . Mettete da parte.
Separare i tuorli dagli uova bianche , mettendo i bianchi in una ciotola e mantenendo il giallo
separatamente in una tazza o bicchiere . Versate 1 cucchiaio di zucchero bianco . Inizia frustate
lentamente , accelerano : i bianchi sono montati quando la traccia di bianco sulle fruste è molto evidente e
non tolgono le pareti della ciotola.
Versate la farina in una ciotola a parte , fare un incavo al centro (un " sink " ) , mettere un pizzico di sale ,
lo zucchero rimasto , i tuorli , il latte , la panna e il burro fuso . Mescolare bene con una spatola di legno
fino a quando un impasto omogeneo .
Si può anche mescolare questi ingredienti in un frullatore e correre a bassa velocità con un coltello pasta.
Poi tirare fuori la ciotola food processor .
Con una spatola , poi mescolate in un terzo del bianco d'uovo a neve , poi delicatamente , i restanti due
terzi . Refrigerare 30 minuti.
Per cuocere le cialde , seguire la ricetta precedente .
AMBIANTE
ATTENZIONE:
Non gettare quest’ apparecchio tra i rifiuti domestici. Per questo tipo di prodotti è fornito dai
comuni un sistema di raccolta e ritiro in zona ed è quindi un dovere informarsi per conoscere il
giusto smistamento del rifiuto. Infatti, i prodotti elettrici ed elettronici possono contenere
sostanze pericolose che hanno effetti dannosi sull’ambiente o sulla nostra salute e quindi
devono essere riciclati. Il simbolo al lato indica che le apparecchiature elettriche ed elettroniche
fanno parte di una raccolta selettiva e differenziata (rappresentata da un bidone su due ruote
sbarrato da una croce.
Prodotto e importato da : Adeva SAS 8 rue Marc Seguin 77290 Mitry-Mory FRANCE
www.hkoenig.com - contact@hkoenig.com - Tel. 01 64 67 00 01
 Loading...