

Page 1
Manuel d'utilisation
Instructions manual
Bedienungsanleitung
Handboek
Manual de Utilización
Manuale d’uso
FO18
Four Electrique
Electric Oven
Elektro-Ofen
Elektrische Oven
Horno Eléctrico
Forno Elettrico
Page 2

ENGLISH
IMPORTANT SAFETY INSTRUCTIONS
When using your Toast Oven, basic safety precautions should always be
observed, including the following:
1. Read all instructions.
2. Do not touch hot surfaces. Always use handles or
knobs.
3. Close supervision is necessary when any appliance
is used by or near children.
4. To protect against electric shock, do not immerse
cord, plug or any parts of the oven in water or any
other liquids.
5. Do not let cord hang over edge of table or counter,
or touch hot surfaces.
6. Do not operate appliance with damaged cord or
plug or after the appliance malfunctions or has
been damage in any manner. Return appliance to
the nearest authorized service facility for
examination, repair or adjustment.
7. The use of accessory attachments not
recommended by the appliance manufacturer may
cause hazard or injury.
8. Do not place on or near a hot gas or electric
burner.
9. When operating the oven, keep at least four inches
of free space on all sides of the oven to allow for
adequate air circulation.
10. Unplug from outlet when not in use and before
cleaning. Allow to cool before putting on or taking
off parts, and before cleaning.
11. To disconnect, turn the time control to OFF, then
remove the plug. Always hold the plug, and never
pull the cord.
12. Extreme caution must be used when moving a drip
pan containing hot oil or other hot liquids.
13. Do not cover any part of the oven with metal foil.
This may cause the oven to overheat.
14. Use extreme caution when removing the tray, racks
or disposing of hot grease or other hot liquids.
15. Do not clean the inside of the oven with metal
scouring pads, pieces can break off the pad and
touch electrical parts, creating a risk of electric
shock.
16. Over sized foods or metal utensils must not be
inserted in a toaster oven as they may create a fire
or risk of electric risk.
17. A fire may occur if the oven is covered or touching
flammable material, including the
curtains,draperies,walls, and the like, when in
operation. Do not store any item on top of the
appliance when in operation.
18. Extreme cautions should be exercised when using
cooking or baking containers constructed of
anything other than metal or ovenproof glass.
19. Be sure that nothing touches the top or bottom
elements of the oven.
20. Do not place any of the following materials in the
oven: cardboard, plastic, paper , or anything similar.
21. Do not store any materials other than
manufacturer’s recommended accessories in this
oven when not in use.
22. Always wear protective, insulated oven gloves
when inserting or removing items from the hot
oven.
23. This appliance has a tempered, safety glass door.
The glass in stronger than ordinary glass and more
resistant to breakage. Tempered glass can still
break around edges. Avoid scratching door surface
or nicking edges.
24. This appliance is OFF when the Timer Control
button is in the “OFF” position.
25. Do not use outdoors.
26. Do not use appliance for other than intended use.
Page 3
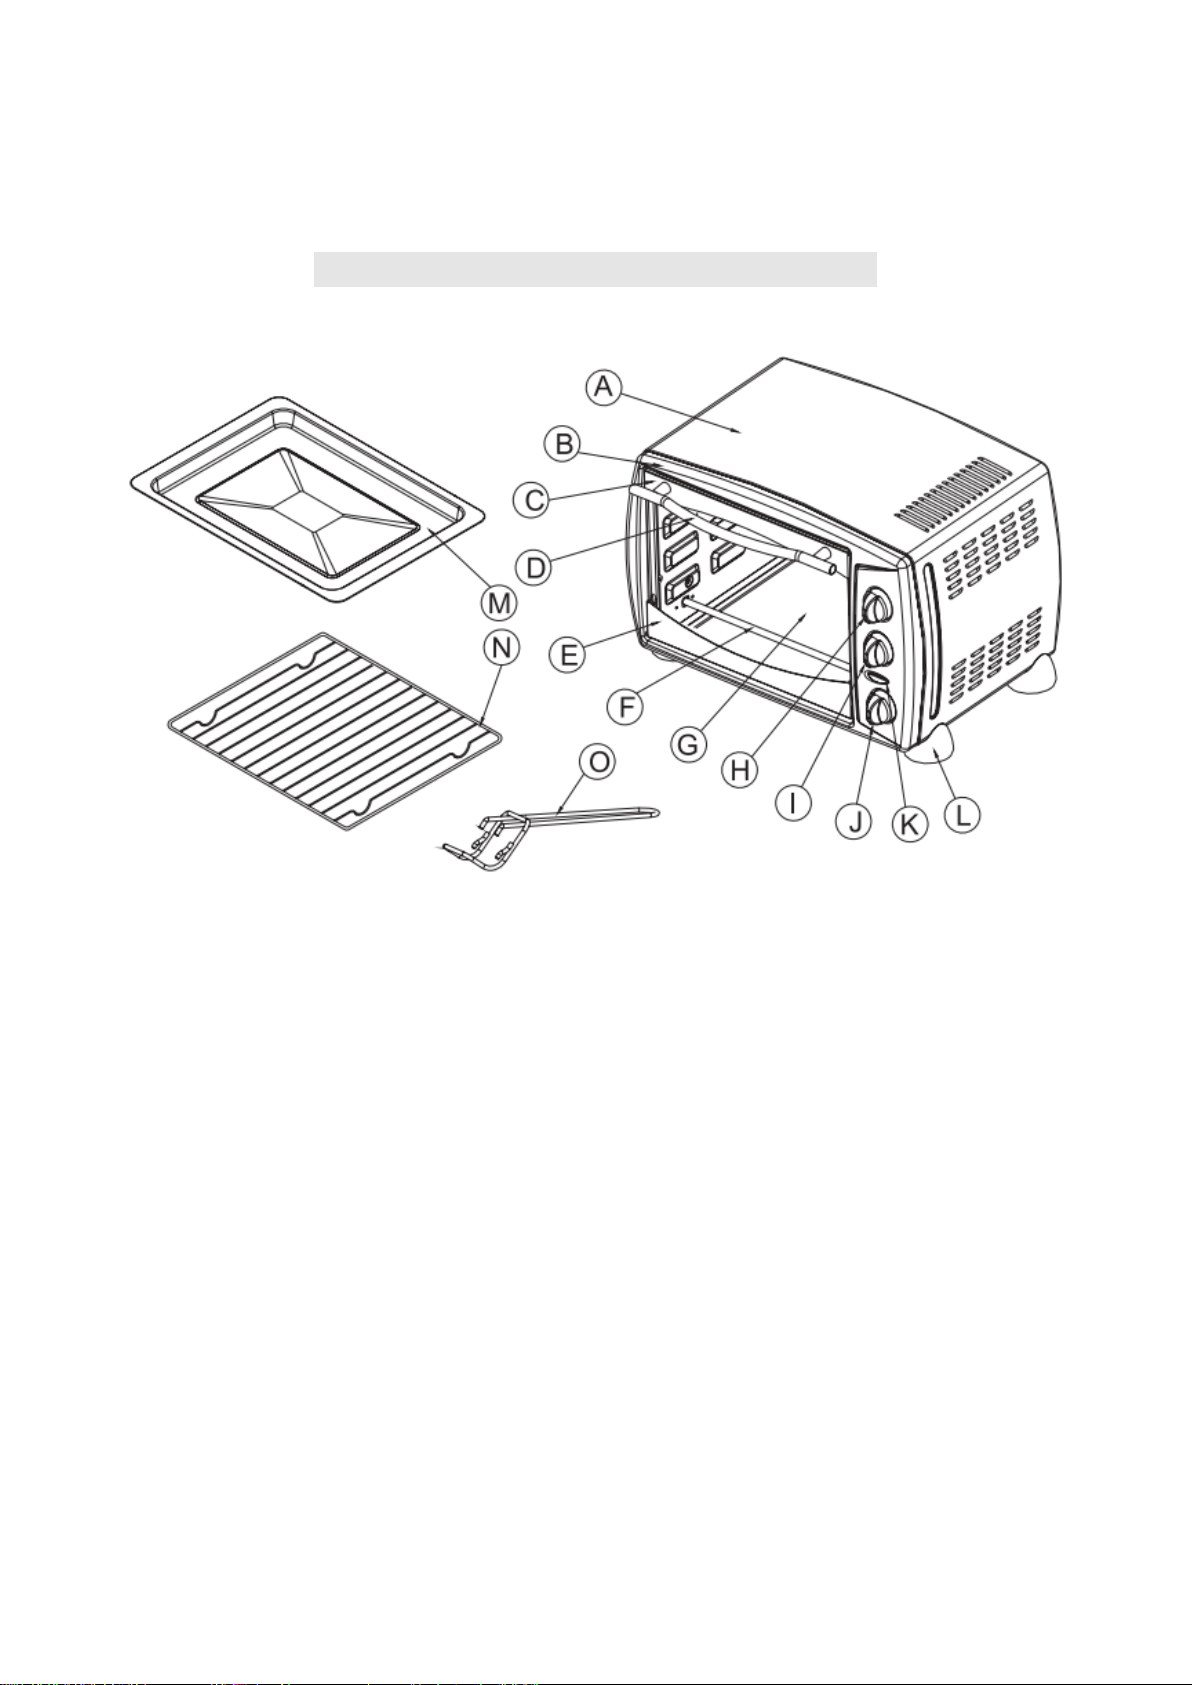
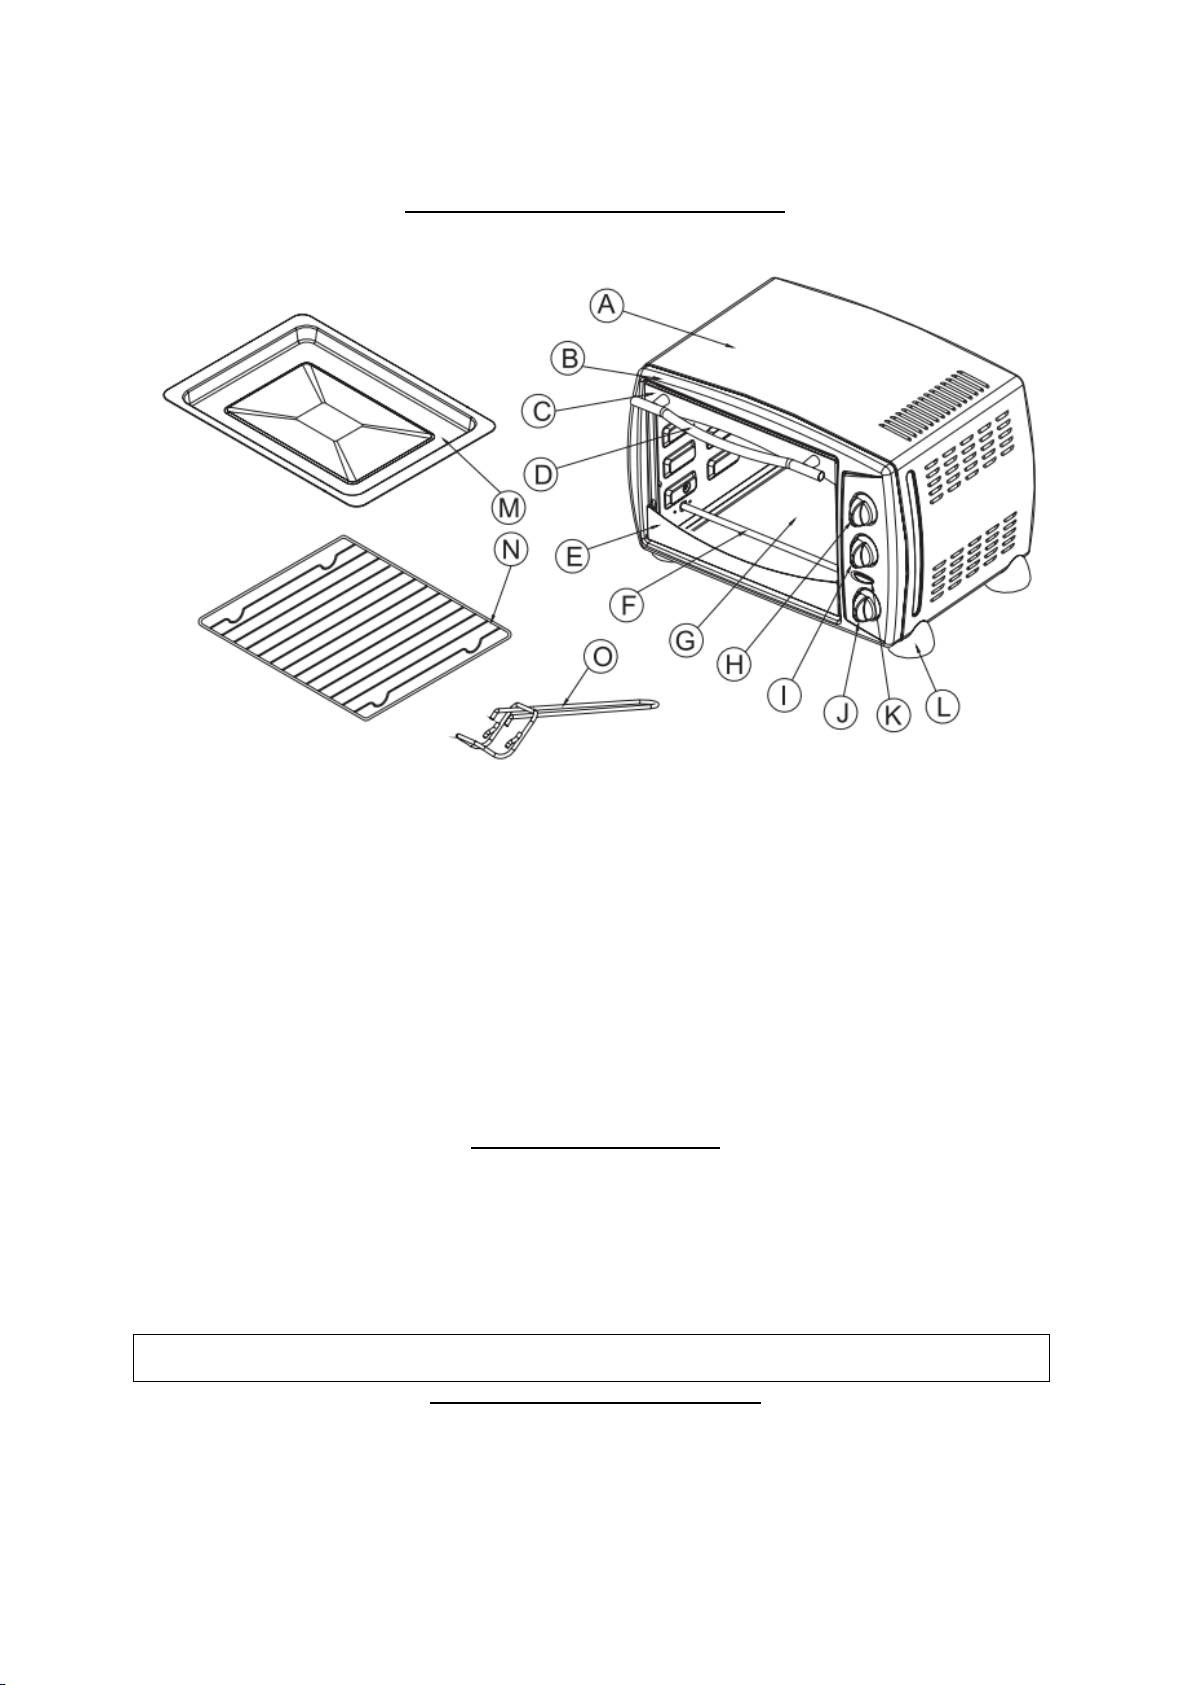
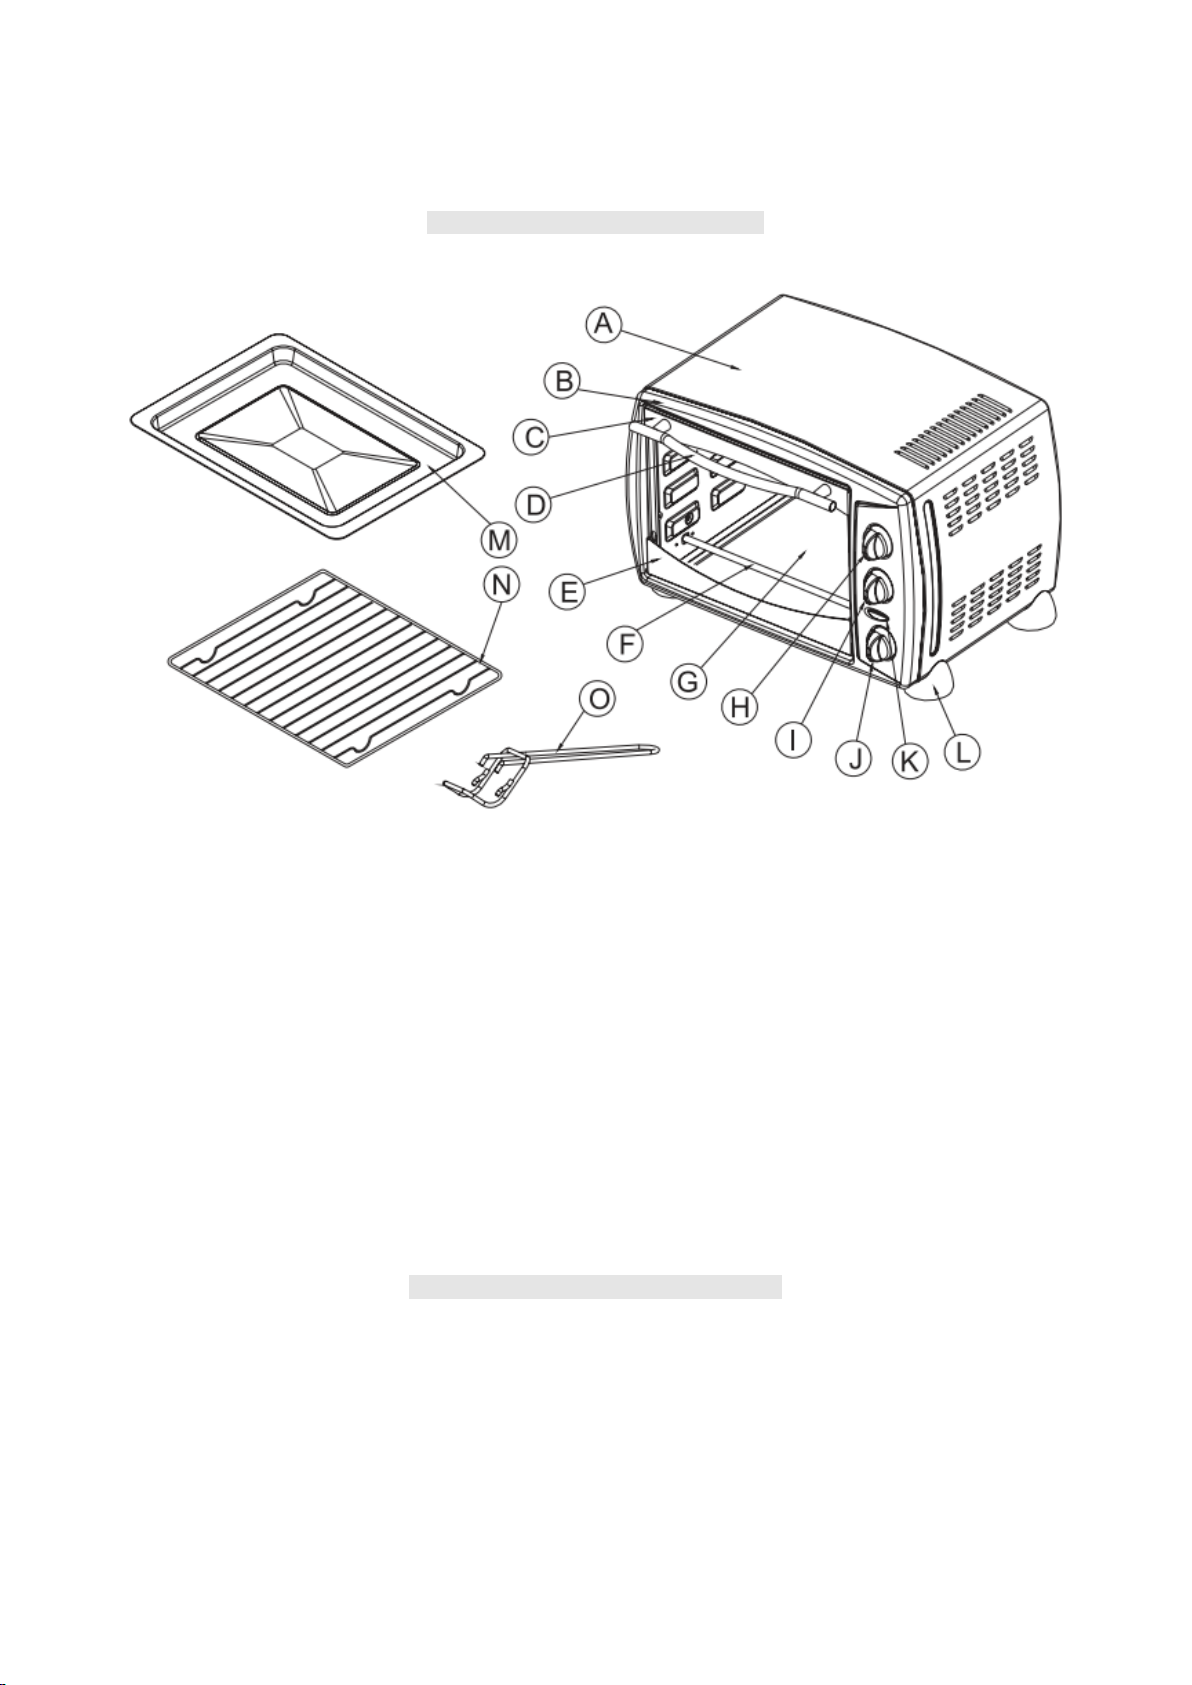
MAIN COMPONENT:
SAVE THESE INSTRUCTIONS
For Household Use Only
Getting To Know Your New Electric Oven
A: Housing
B: Front Plate
C: Upper Door Frame
D: Handle
E: Lower door fame
F: Lower heating element
G:Glass Door
H:Temperature Control Knob
I: Function Control Knob
J:Timer Control Knob
K:Indicator Light Cover
L: Foot
M: Bake Tray
N:Wire Rack
O: Tray Handle
Page 4
Read all the sections of this booklet and follow all the instructions carefully.
Please Note: Initial start-up operation may result in minimal smell and smoke (about 15
minutes). This is normal and harmless. It is due to burning of the
protective substance applied to the heating elements in the factory.
WARNING: TO AVOID RISK OF INJURY OR BURNS,DO NOT TOUCH
HOT SURFACES WHEN OVEN IS IN USE.ALWAYS USE
OVEN MITTS.
CAUTION: Always use extreme care when removing bake tray, wire rack
or a any hot container from a hot oven. Always use the rack
handle, or an oven mitt when removing hot items from the
oven.
Before using your Electric oven
▲Before using your toaster oven for the first time, be sure to:
1. Read all of the instruction included in this manual.
2. Make sure that the oven is unplugged and the Time control is in the “OFF” position.
3. Wash all the accessories in hot, soapy water or in the dishwasher.
4. Thoroughly dry all accessories and re-assemble in oven, plug oven into outlet and you are ready to use
your new toaster oven.
5. After re–assembling your oven, we recommend that you run it at the highest temperature (230℃)on the
toast function for approximately 15 minutes to eliminate any packing residue that may remain after
shipping. This will also remove all traces of odor initially present.
Using your Electric oven
Using your new oven
Please familiarize yourself with the following oven functions and accessories prior to first use:
● Temperature Control: choose the desired temperature from 100℃ to 230℃ for baking broiling or
toasting.
● Function Control: this oven is equipped with four positions for a variety of cooking needs;
◇Four stages switch heating selector: Off/Broil/Bake/Toast
Off.
Broil: For broiling fish, steak, poultry, pork chops, etc.(upper heating)
Bake: For cakes, pies, cookies, poultry, beef, pork, etc. (lower heating)
Toast: For bread, muffins, frozen waffles, pizza ,etc. (upper & lower heating )
● Timer Control: when you turn activate the timer segment of the control, turn to the right ( clockwise) to
toast or use as a timer. This function also has a bell rings at the end of the programmed
time.
● Power light: It’s illuminated whenever the oven is turned on.
● Bake Tray: For use in broiling and roasting meat, poultry, fish and various other foods. Also to be used
when using the rotisserie to catch the drippings.
● Tray Handle: Allows you to pick up the wire rack, and bake tray when they are hot.
Page 5
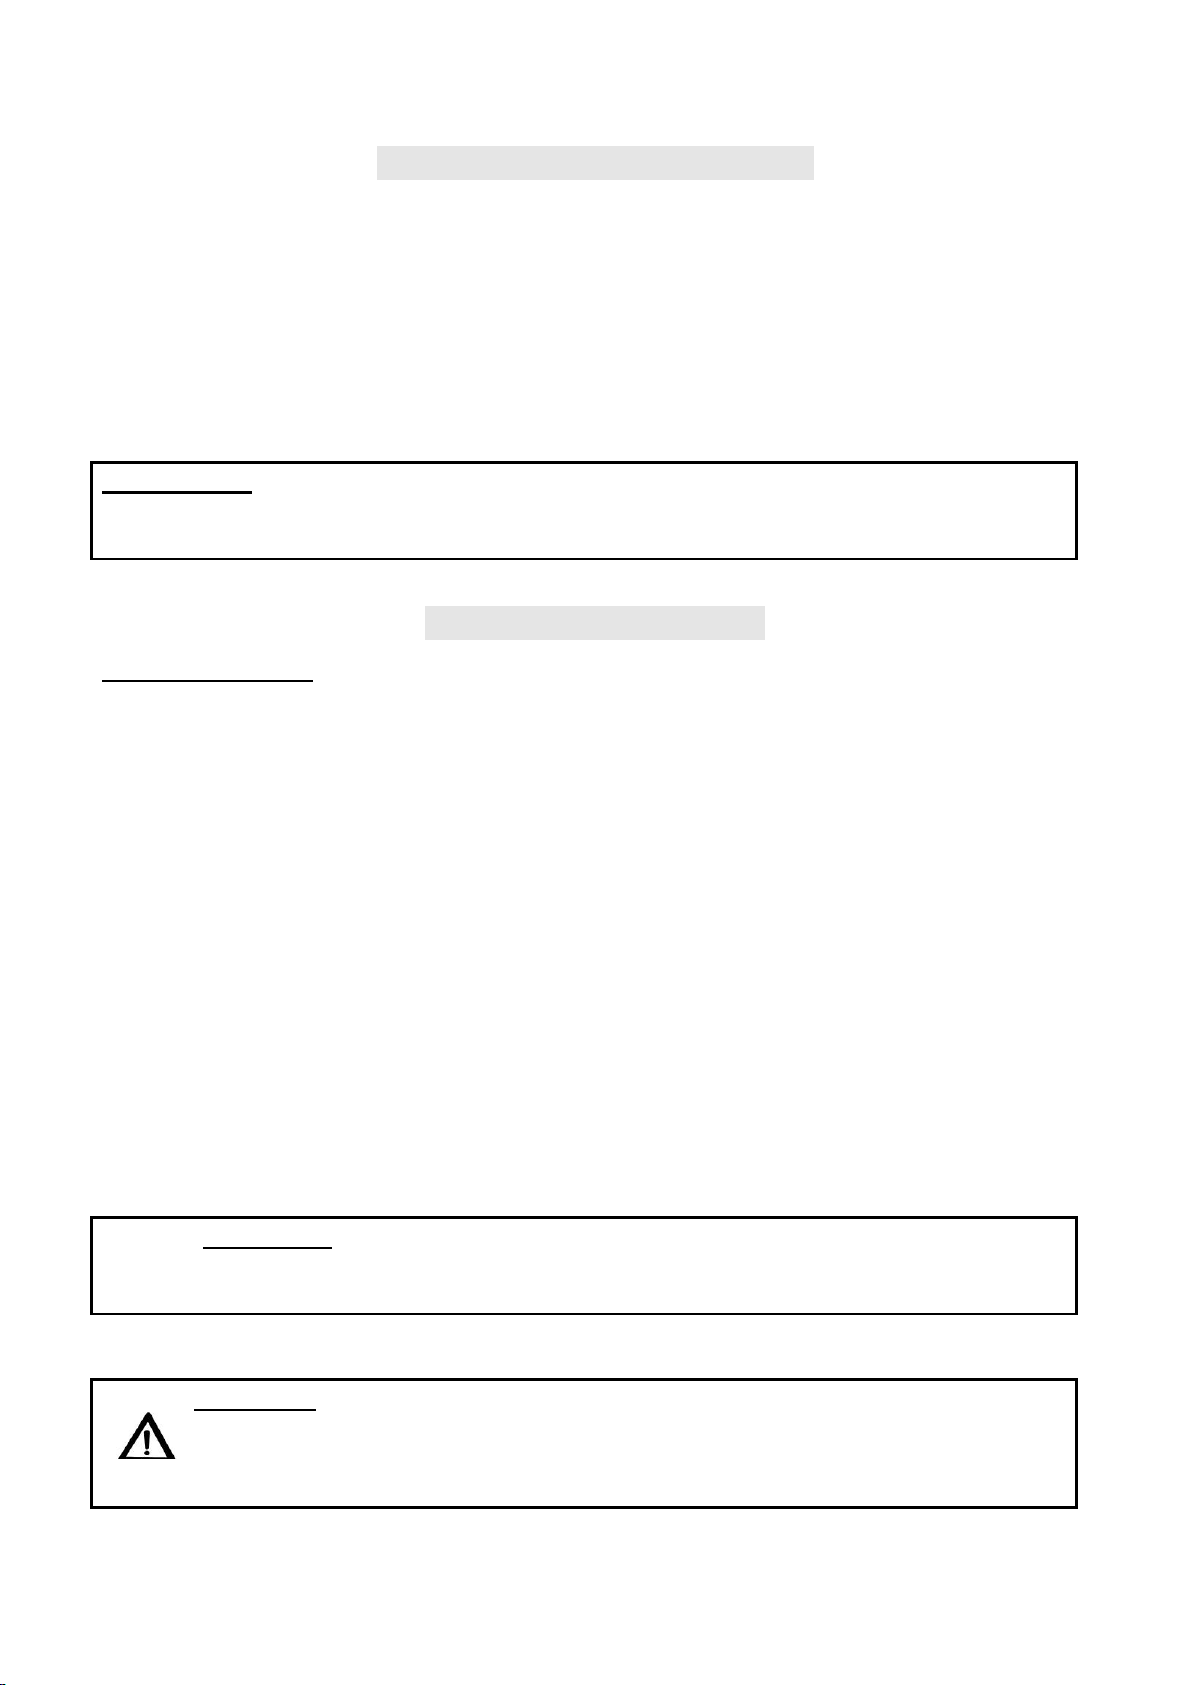
BROIL
MEAT
OVEN TEMP
COOKING TIME
RIB STEAK
200℃
25-30 min
T-BONE STEAK
200℃
25-30 min
HAMBURGER
200℃
25-28 min
PORK CHOPS
200℃
40-45 min
LAMB CHOPS
200℃
30-40 min
CHICKEN LEGS
200℃
30-35 min
FISH FILETS
180℃
20-25 min
SALMON STEAKS
180℃
20-25 min
Note: All broiling times are based on meats at refrigerator temperature .
Frozen meats may take considerably longer. Therefore, use of a
meat thermometer is highly recommended.
For best results, it is recommended that your preheat the oven for 15 minutes on 230℃.
Operation
Set the temperature Control Knob to 230℃.
Turn function control to and Preheat the oven.
Place the wire rack on the bake tray.
Place food on the wire rack and slide into the top rack.
Food should be placed as close as possible to the top heating element without touching it.
Set temperature control to appropriate temperature.
Brush food with sauces or oil, as desired.
Turn time control .
It is advisable to leave the door slightly ajar
Turn food over midway through the prescribed cooking time.
When broiling is complete, turn the time control to “OFF”.
Broiling Guide
Cooking results may vary. Adjust these times to your individual requirements. Also, check often
during broiling to avoid overcooking.
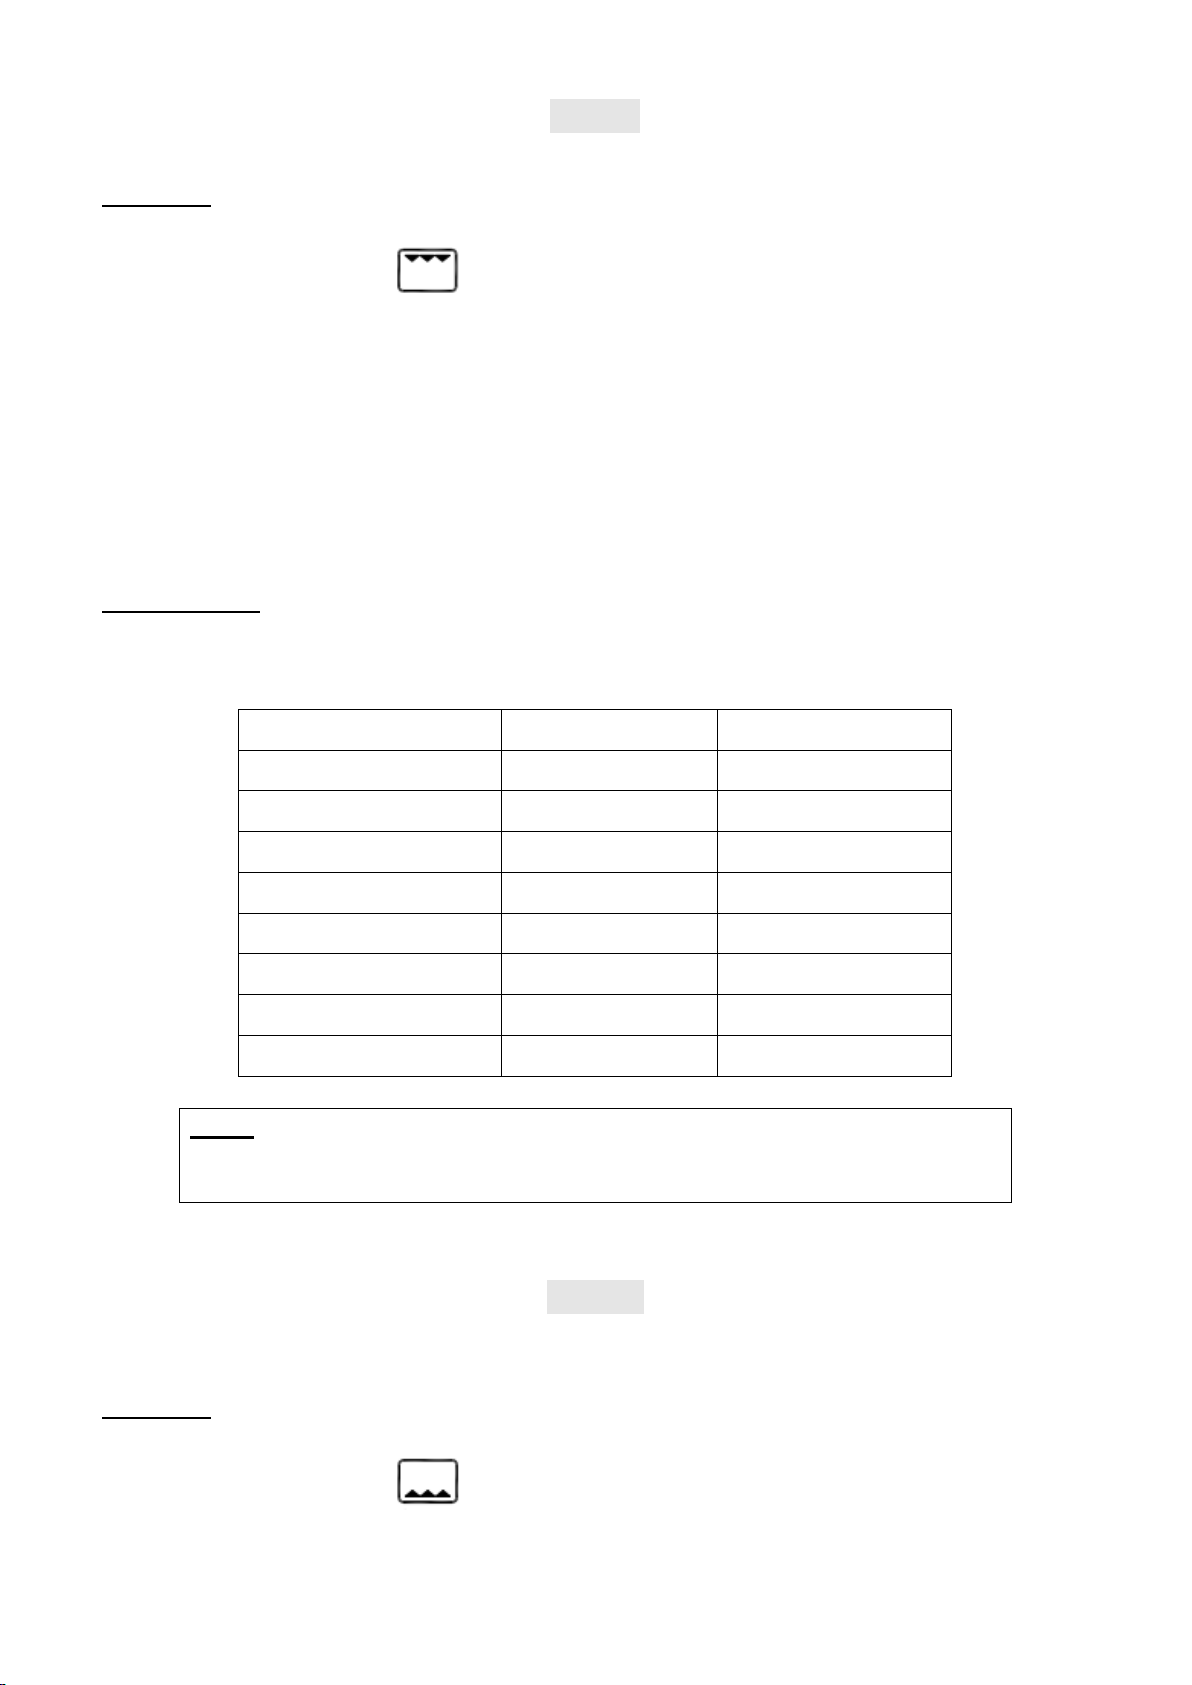
Baking
Please note that the BAKE function uses only the bottom heating elements. For best results, it is
recommended that you preheat the oven for 15 minutes on 230℃.
Operation
Set the temperature Control Knob to 230℃.
Turn function control to . Then Preheat the oven.
Place the wire rack on the lowest or middle rack support guide.
Place food on the wire rack and slide into the rack.
Page 6
Food should be placed as close as possible to the lower heating element without touching it.
CAUTION: Always use extreme care when removing bake tray, wire rack
or a any hot container from a hot oven. Always use the rack
handle, or an oven mitt when removing hot items from the
oven.
Warning: Be sure to unplug the oven and allow it to cool before cleaning.
Set temperature control to appropriate temperature.
Brush food with sauces or oil, as desired.
Turn time control .
It is advisable to leave the door slightly ajar
Turn food over midway through the prescribed cooking time.
When BAKE is complete, turn the time control to “OFF”.
Positioning of the Wire Racks
Cookies – Use bottom and middle Support Guides.
Layer Cakes – Use bottom Support Guide only (bake one at a time).
Pies – Use bottom and middle Support Guides.
Toasting
Please note that the TOAST function uses all the heating elements. Large capacity oven allows for toasting
4 to 6 slices of bread,6 muffins, frozen waffles or frozen pancakes. When toasting only 1or 2 items, place
food on the bake rack in the center of the oven.
Operation
Set the Temperature Control Knob to 230℃.
Turn the function control knob to
Place food to be toasted on the wire rack.
Turn the time control knob.
Bell will ring to signal the end of the toast cycle.
Note: Wire Rack should be positioned in the middle of the oven with the indentations pointing
down.
Care & Cleaning
Any spattering that occurs while cooking and comes into contact with the continuous coating is oxidized
while the oven is in operation. If desired, wipe the walls with a damp sponge, cloth or nylon scouring pad
and mild detergent. DO NOT USE STEEL WOOL SCOURING PADS,ABRASIVE CLEANERS OR
SCRAPE THE WALLS WITH A METAL UTENSIL,AS ALL OF THESE METHODS MAY DAMAGE THE
CONTINUOUS CLEAN COATING.
All accessories should be washed in hot soapy water or can be cleaned in a dishwasher. The door can be
wiped with a damp sponge and wiped dry with a paper or cloth towel. Clean the outside with a damp
sponge. DO NOT USE AN ABRASIVE CLEANER AS IT MAY DAMAGE THE EXTERIOR FINISH.
DO NOT USE AN ABRASIVE CLEANER OR STEEL WOOL SCOURING PAD ON THE DRIP PAN AS IT
MAY DAMAGE THE PORCELAIN ENAMEL FINISH.
LET ALL PARTS AND SURFACES DRY THOROUGHLY PRIOR TO PLUGGING OVEN IN AND USING.
Page 7

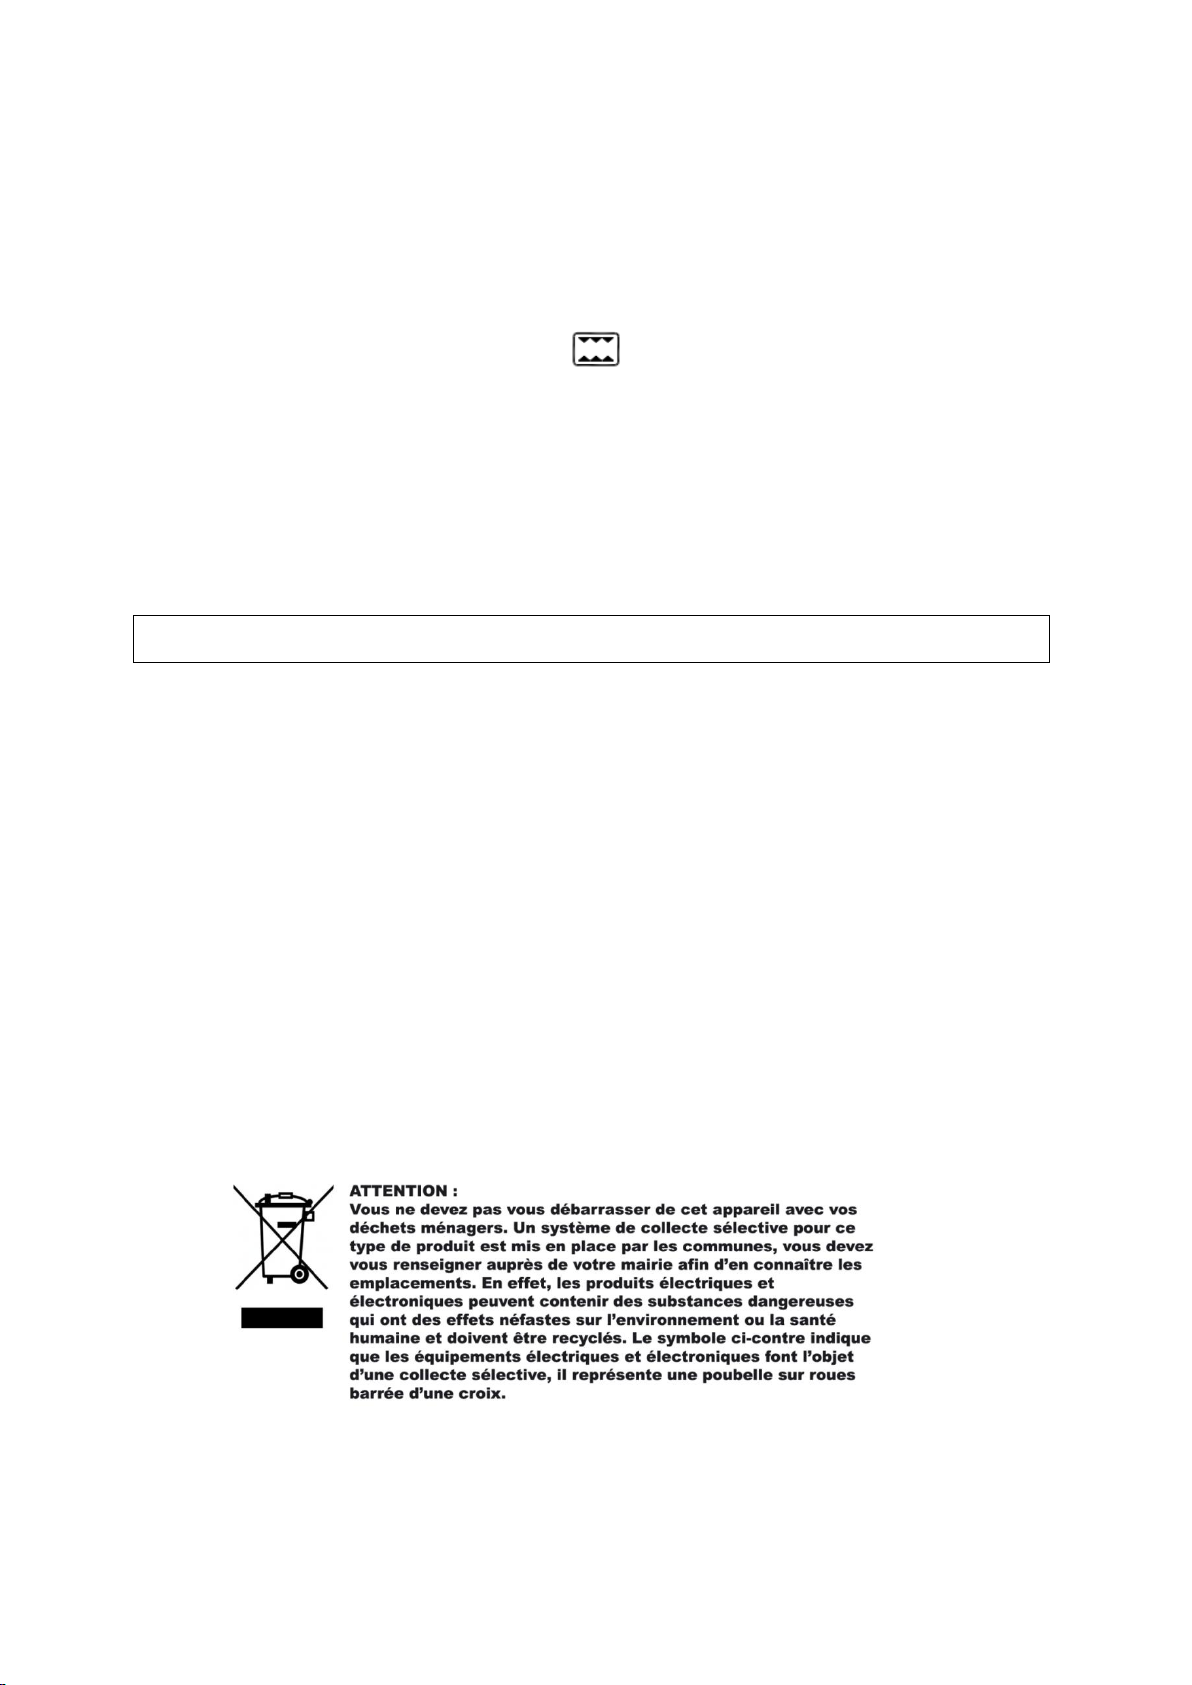
ENVIRONMENT
CAUTION :
Do not dispose of this product as it has with other household products. There is a separation of this
waste product into communities, you will need to inform your local authorities about the places
where you can return this product. In fact, electrical and electronic products contain hazardous substances
that have harmful effects on the environment or human health and should be recycled. The symbol here
indicates that electrical and electronic equipment should be chosen carefully, a wheeled waste container is
marked with a cross.
Manufactured and imported: Adeva SAS 8 rue Marc Seguin 77290 Mitry-Mory FRANCE
www.hkoenig.com - contact@hkoenig.com - Tel 01 64 67 00 01
Page 8

FRANCAIS
RECOMMANDATIONS DE SECURITE IMPORTANTES.
Lorsque vous utilisez votre four-grill il est recommandé de veiller à votre sécurité, en suivant des
mesures de prévention dont voici une liste non exhaustive :
1. Lisez le mode d’emploi
2. Ne pas toucher les surfaces chaudes.
Toujours utiliser des maniques.
3. Toujours surveiller les enfants lorsque le
four est en marche.
4. Ne jamais mettre le cordon
d’alimentation, la prise ou toute autre partie
de l’appareil avec du liquide.
5. Ne jamais laisser le cordon
d’alimentation pendre au dessus d’un plan de
travail ou une table, un enfant pourrait tirer
dessus et faire ainsi tomber sur lui l’appareil.
6. Ne jamais se servir de l’appareil si le
cordon d’alimentation ou la prise sont
endommagés et faites alors réparer l’appareil
par un réparateur agréé.
7. L’utilisation d’accessoires non
recommandés par le fabricant peut être
dangereuse et provoquer des blessures.
8. Ne pas utiliser près d’une source de gaz.
9. Lorsque le four est allumé, laissez au
moins 20cm d’espace libre tout au tour pour
permettre à l’air chaud de circuler librement.
10. Débranchez et laissez refroidir l’appareil
avant de le nettoyer.
11. Placez le minuteur sur off avant de
débrancher la prise de courant sans bien sur
jamais tirer sur le cordon d’alimentation mais
en tenant fermement la prise.
12. Soyez particulièrement prudent lorsque
vous déplacez des récipients contenant des
jus de cuisson ou de l’huile chauds.
13. Ne jamais couvrir les parties du four ou
accessoires de papier aluminium car ceci
pourrait provoquer la surchauffe de l’appareil.
14. Ne pas nettoyer le four avec des
éponges abrasives et métalliques, des
résidus pourraient s’en détacher et provoquer
des chocs électriques.
15. Ne pas cuire des aliments trop grands
dans le four au risque de provoquer des
incendies.
16. Il y a des risques de feu lorsque le four
est recouvert de matériaux inflammables tels
que des rideaux, draperies, etc. Ne pas
entreposer des objets sur le four pendant son
fonctionnement.
17. Soyez particulièrement prudent lorsque
vous utilisez des plats en tout autre matériau
que le verre et le métal.
18. Assurez-vous que ni les aliments ni les
accessoires ne touchent les parodies
supérieures et inférieures du four pendant la
cuisson.
19. Ne pas mettre dans le four des objets
composés des matériaux suivants: carton,
plastique, papier ou quoi que ce soit de ce
genre.
20. Ne pas entreposer d'accessoires non
recommandés pas le constructeur dans le
four, même quand il n'est pas utilisé.
21. Servez-vous de maniques pour mettre et
sortir quoi que ce soit du four lorsqu'il est
chaud.
22. La porte du four est faite en verre trempé
sécurisé pour réduire le risque de casse, bien
que les coins soient toujours plus fragiles.
Évitez également de nettoyer celle-ci avec
des matériaux abrasifs pour éviter de la rayer.
23. Le four est éteint lorsque le témoin de
temps est sur OFF
24. Ne pas utiliser en extérieur
25. Ne pas détourner l'usage de l'appareil.
CONSERVEZ CE MODE D'EMPLOI
Page 9
Appareil prévu pour un usage domestique exclusivement.
Note: cette opération peut provoquer des odeurs de brûlé et légère fumée qui sont tout à fait
normales.
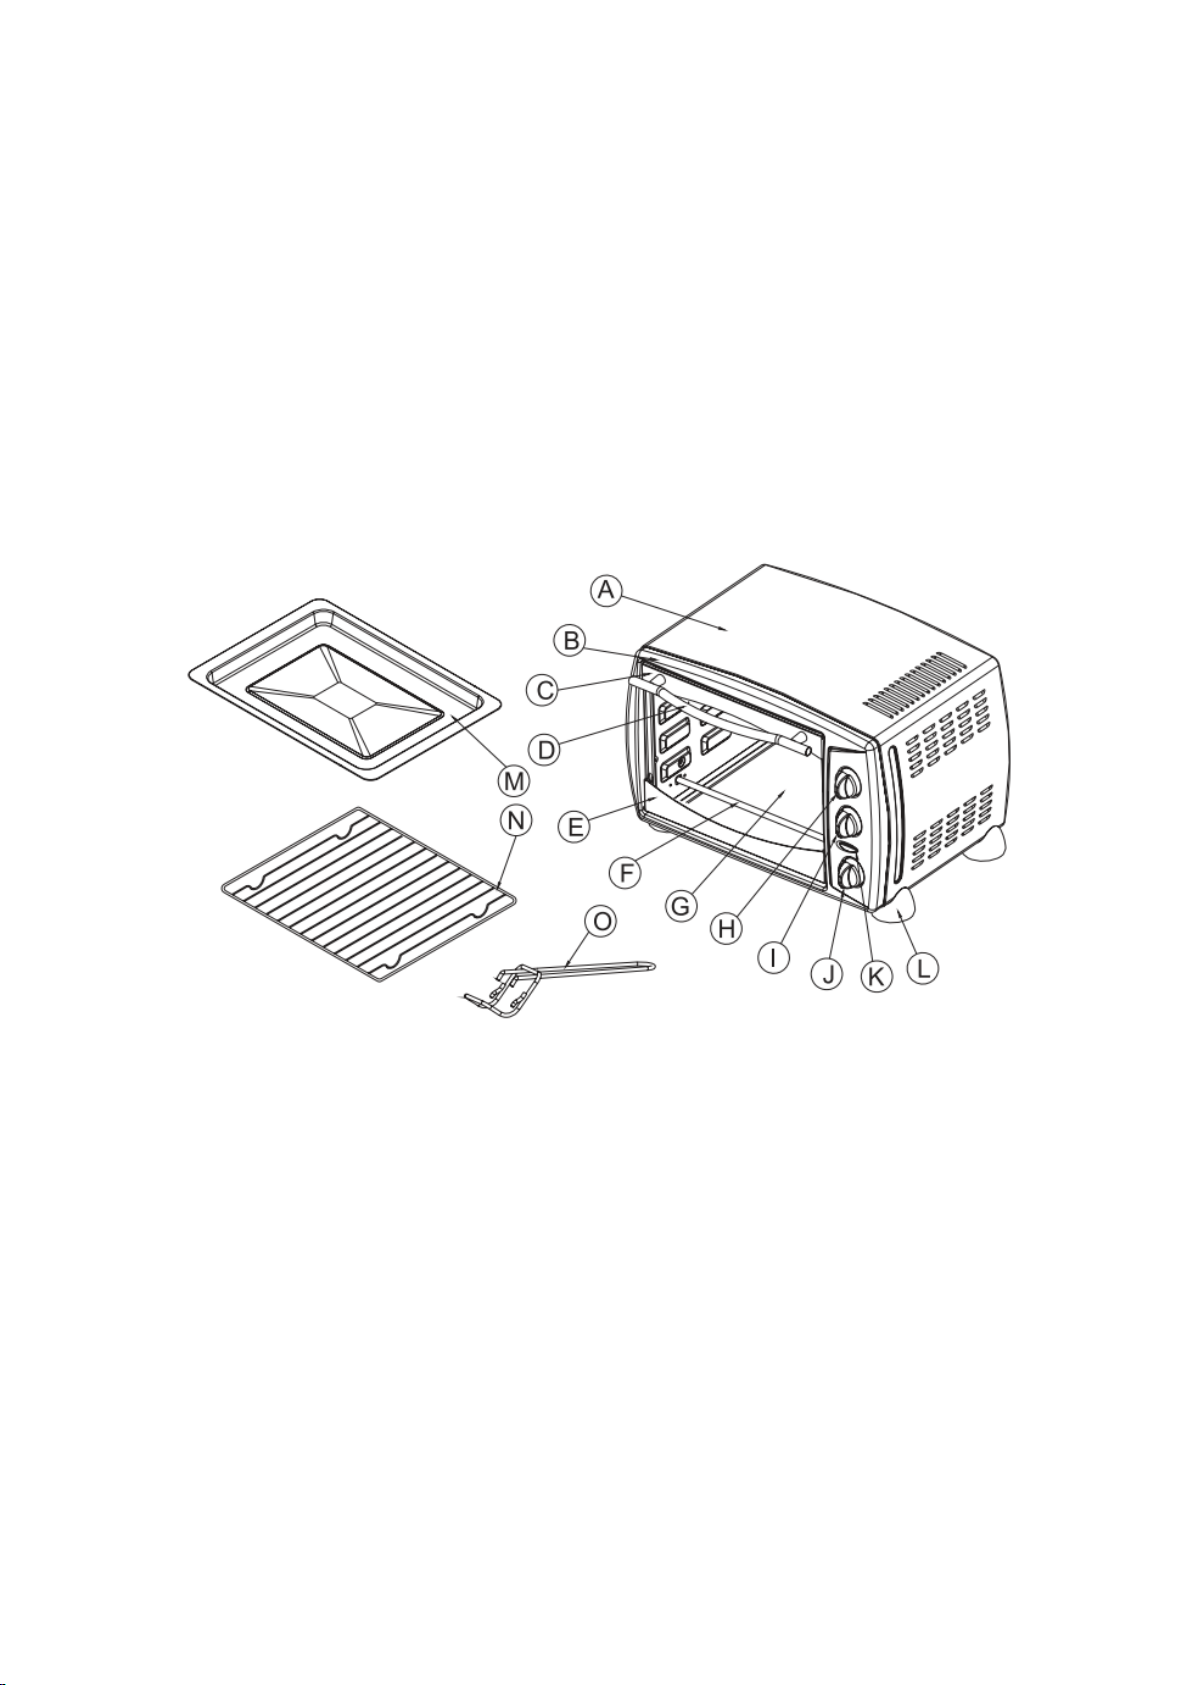
Composants principaux:
Connaître votre nouveau four électrique
A: protection extérieure
B: porte
C: rebord supérieur de la porte
D: poignée
E: partie inférieure de la porte
F: dispositif chauffant inférieur
G: porte vitrée
H: bouton de contrôle de température
Lisez attentivement ce mode d'emploi et suivez ces instructions scrupuleusement.
Avant d'utiliser votre four:
1. Lisez le mode d'emploi
2. Assurez vous que le four et débranché et le bouton de contrôle du temps de cuisson sur OFF
3. Lavez les accessoires avec de l'eau chaude et savonneuse ou bien au lave vaisselle.
4. Séchez les accessoires avec un chiffon propre avant de les replacez dans le four.
5. Avant la première utilisation, nous vous recommandons de le faire tourner à vide, à température
maximale, en mode grill, pendant approximativement 15mins pour éliminer tout résidu de production
ou odeur.
Utilisation de votre four électrique:
Familiarisez-vous avec les différentes parties et accessoires de votre four avant de l’utiliser.
I: bouton de contrôle du mode de cuisson
J: bouton de contrôle du temps de cuisson
K: témoin d'allumage
L: pied
M: lèchefrite
N: grille
O: pince (pour manipuler le lèchefrite)
Page 10
●Bouton de contrôle de température
ATTENTION : pour des raisons de sécurité ne pas toucher le four sans maniques pour éviter
les brulures et toujours manipuler les accessoires avec extrême précaution.
Choisissez la température désirée entre 100 et 230 degrés Celsius.
●Bouton de contrôle du mode de cuisson
Propose quatre options: OFF / Cuisson avec chaleur venant du dessus / Cuisson avec chaleur venant
du dessous / Cuisson avec source de chaleur supérieure et inferieure simultanées.
Cuisson avec chaleur venant du dessus:
Cuisson de poissons, viande de bœuf, volaille, viande de porc, etc. (Dispositif de chauffe supérieur)
Cuisson avec chaleur venant du dessous:
Cuisson de gâteaux, tartes, biscuits, viande de bœuf, volaille, viande de porc, etc. (Dispositif de
chauffe inferieur)
Cuisson avec source de chaleur supérieure et inferieure simultanées :
Cuisson de pain, muffins, pizza, etc. (Dispositifs de chauffe inferieur et supérieur)
Bouton de contrôle du temps de cuisson
Tourner le dispositif vers la droite (dans le sens des aiguilles d’une montre) pour le régler. Un son de
cloche retentira à la fin du cycle.
Témoin d’allumage
Allumé quand le four est en marche.
Lèchefrite
Pour poser tout type de récipient servant à la cuisson des aliments.
Pince
Pour saisir et manipuler la lèchefrite sans danger de brulure.
Cuisson avec chaleur venant du dessus: (Dispositif de chauffe supérieur)
Pour de meilleurs résultats, toujours préchauffer le four pendant 15 minutes à 230 degrés.
1. Réglez la température sur 230 degrés
2. Mettez le mode de cuisson sur l’icône :
3. Placez la grille sur la lèchefrite
4. Placez les aliments sur la grille.
5. Placez la lèchefrite en position haute.
6. Les aliments doivent être placés aussi haut que possible sans toucher le dispositif de chauffe
supérieur.
7. Réglez la température selon vos besoins.
8. Badigeonnez les aliments de l’assaisonnement choisi.
9. Réglez le temps de cuisson selon les besoins.
10. Vous pouvez laisser la porte du four légèrement entrouverte si vous le souhaitez.
11. Pensez à retourner les aliments en milieu de cuisson.
12. Une fois la cuisson terminée, placez le bouton de contrôle du temps de cuisson sur off.
Page 11

Guide de Cuisson
Viande
Température de cuisson
Temps de cuisson
Steak de bœuf
200 degrés
25-30 minutes
Steak d’épaule de bœuf
200 degrés
25-30 minutes
Steak haché
200 degrés
25-28 minutes
Côtelettes de porc
200 degrés
40-45 minutes
Côtelettes d’agneau
200 degrés
30-40 minutes
Cuisses de poulet
200 degrés
30-35 minutes
Filets de poisson
180 degrés
20-25 minutes
Steaks de saumon
180 degrés
20-25 minutes
Note: Le temps de cuisson est calculé pour des aliments sortant du réfrigérateur, non congelés, de
ce fait il est préférable d'utiliser un thermomètre de cuisson et d’ajuster le temps de cuisson en
fonction.
ATTENTION : pour des raisons de sécurité ne pas toucher le four sans maniques pour éviter
les brulures et toujours manipuler les accessoires avec extrême précaution.
La cuisson de la viande peut varier, veuillez adapter ces durées de cuisson à vos besoins et
surveillez régulièrement la cuisson.
Cuisson avec source de chaleur venant de dessous:
Pour de meilleurs résultats, toujours préchauffer le four pendant 15 minutes à 230 degrés.
1. Réglez la température sur 230 degrés
2. Mettez le mode de cuisson sur l’icône :
3. Placez les aliments sur la grille.
4. Glissez la grille vers l’intérieur du four.
5. Les aliments doivent être placés aussi près que possible sans toucher le dispositif de chauffe
inférieur.
6. Réglez la température selon vos besoins.
7. Badigeonnez les aliments de l’assaisonnement choisi.
8. Réglez le temps de cuisson selon les besoins.
9. Vous pouvez laisser la porte du four légèrement entrouverte si vous le souhaitez.
10. Pensez à retourner les aliments en milieu de cuisson.
11. Une fois la cuisson terminée, placez le bouton de contrôle du temps de cuisson sur off.
Positions de la grille :
Pour des biscuits : utiliser les positions moyenne et basse.
Pour des gâteaux, utiliser la position basse.
Tartes : Utiliser la position moyenne.
Page 12
Cuisson au grill
Attention : Assurez-vous que le dispositif est débranché et laissez le refroidir avant tout
nettoyage
La fonction grill, utilise tous les dispositifs de chauffe simultanément. On peut faire griller 4 à 6
tranches de pain, 6 muffins, des gaufres congelées, etc. Si vous mettez à griller des quantités
moindres, placez bien la grille dans la lèchefrite en position moyenne.
1. Réglez la température sur 230 degrés
2. Mettez le mode de cuisson sur l’icône :
3. Placez les aliments sur la grille.
4. Réglez le temps de cuisson selon les besoins.
5. Un son de cloche retentira à la fin de la cuisson.
NB : placez la grille de façon à ce que la partie lisse soit vers le haut.
Entretien et nettoyage
Toute éclaboussure devrait être oxydée pendant la cuisson, ceci étant dit vous pouvez nettoyer les
parois du four avec un chiffon humide.
Ne pas nettoyer le four avec des éponges abrasives et métalliques, des résidus pourraient s’en
détacher et provoquer des chocs électriques mais aussi endommager les parois autonettoyantes.
Nettoyer les accessoires avec de l’eau savonneuse ou au lave vaisselle.
La porte peut être nettoyée avec un chiffon humide sans utiliser d’éponges abrasives pour ne pas
rayer le verre.
De même, évitez les produit et matériaux abrasifs pour le nettoyage de la lèchefrite car cela pourrait
endommager son traitement anti adhérant.
Toujours bien sécher l’intégralité du four et des accessoires après le nettoyage.
ENVIRONNEMENT
Fabriqué pour et importé par : Adeva SAS 8 rue Marc Seguin 77290 Mitry-Mory FRANCE
www.hkoenig.com - contact@hkoenig.com - Tél. 01 64 67 00 01
Page 13

DEUTSCH
WICHTIGE SICHERHEITSHINWEISE
Während des Gebrauchs Ihres Ofen’s müssen Sie den Standard-Sicherheitsmassnahmen folgen:
1. Lesen Sie alle Instruktionen.
2. Fassen Sie nie heisse Oberflächen an.
Gebrauchen Sie immer die Griffel oder knöpfe.
3. Wenn das Gerät in der Nähe von Kindern
verwendet wird, müssen Kinder genau
beobachtet werden.
4. Zum Schutz gegen ekektrischen schock,
tauchen Sie das Kabel, den Stecker oder andere
Teile des Backofents niemals unter wasser oder
andere Flüssigkeiten.
5. Lassen Sie das Kabel Nie vom Tisch oder vom
anrecht schlingen.
6. Verwenden Sie das Gerät nie wenn das Kabel
oder der Stecker beschädigt ist oder wenn das
Gerät Fehlfunktionen anzeigt. Bringen Sie das
Gerät zum nächsten Service Zentrum zur
Überprüfung, reperation oder Einstellung.
7. Die Verwendung von Zubehör das nicht vom
Hersteller empfohlen wurde, können zu
Gefahren und Verletzungen leiten.
8. Platzieren Sie den Ofen nicht in der nähe von
Gas- oder Elektro Brenner.
9. Halten Sie bis zumindest vier zentimeter abstand
von allen seiten des Ofens um für
ausreichende Luftzirkulation zu sorgen.
10. Entfernen Sie den stecker, wenn das Gerät
gereinigt wird oder es nicht in Gebrauch ist.
Entfernen Sie das Zubehör und lassen Sie es vor
dem Reinigen abkühlen.
11. Drehen Sie den Zeitregler auf OFF und
entfernen Sie den Stecker. Entfernen Sie das
den stecker immer über der Steckdose, nie am
Kabel ziehen.
12. Extreme Vorsicht ist geboten, wenn Sie die
Tropfschale mit dem Öl oder anderen
Flüssigkeiten entfernen.
13. Bedecken Sie nie teile des Ofens mit Metallfolie.
Dies kann zu Überhitzung führen.
14. Seien sie äusserst vosichtig wenn Sie die schale,
das Tablar oder heisses Fett oder andere heisse
Flüssigkeiten von dem Ofen entfernen.
15. Reinigen Sie das Innere des Ofens niet mit
Stahlwolle, stücke können abbrechen und
elektrische Teile berühren. Dies kann
elektrischen schock verursachen.
16. Zu grosses Lebensmittel oder
Metallgegenstände dürfen nicht in dem Ofen
installiert werden, dies kann zu Brand oder
Stromschlag führen.
17. Wenn der Ofen abgedeckt ist oder brennbares
Material berührt, einschlieβlich Gardinen,
Vorhänge und dergleichen, kann dies zu Brand
führen. Legen Sie keine Gegenstände während
des Gebrauchs auf den Ofen.
18. Seien Sie extreme vorsichtig mit Kochen oder
Backen in Behältern die nicht aus Metall oder
feuerfestem Glas hergestellt sind.
19. Stellen Sie sicher dass nichts die oberen oder
unteren Elemente des Ofen’s berühren.
20. Platzieren Sie keines der volgenden
Gegenstände in den Ofen: Karton, Kunststoff,
Papier, etc.
21. Bewahren Sie keine Zubehörteile oder andere
Materialen im Ofen wenn er nicht benutzt wird,
ausser es wurde von dem Hetsteller empfohlen.
22. Tragen Sie immer Schutzkleidung, isolierte
Topflappen beim Einsetzen und Entfernen
heisser Elemente aus dem Ofen.
23. Dieses Gerät wurde mit einer gehärteten
Sichertheitsglas Tür ausgestattet. Das Glas ist
stärker als normales Glas und bruchfest.
Gehärtetes Glas kann immer noch an den
Ränden brechen. Vermeiden Sie das Verkratzen
der Oberfläche der Tür oder geknikkte Kanten.
24. Dieses great ist ausgeschaltet wenn der Timer
auf OFF steht.
25. Gebrauchen Sie das Gerät nie auβer Haus.
26. Verwenden Sie das Gerät nur für was es
bestimmt ist.
Page 14
1
BEWAHREN SIE DIESE ANLEITUNG
HAUPTBESTANDTEIL:
Nur für Gebrauch im Haushalt
Lernen Sie Ihren Elektro-Ofen kennen
A: Gehäuse
B: Frontplatte
C: Oberer Türrahmen
D: Griff
E: Unterster Türrahmen
F: Unterster Wiederstand
G:Glas Tür
H:Temperaturregler
I: Funktionsschalter
Lesen Sie alle Abschnitte dieser Broschüre aufmerksam durch und befolgen Sie alle Anweisungen.
Zum ersten Einsatz Ihres Elektro-Ofens
▲Bevor Sie Ihren Elektro-Ofen erstmals Gebrauchen, müssen Sie:
1. Alle Anweisungen in diesem Handbuch aufmerksam lesen.
2. Sicher stellen dass Ihr Ofen nicht angeschlossen ist und der Zeitregler auf “OFF” steht.
3. Alle Zubehören in heissem wasser oder der Geschirrspülmaschine waschen.
4. Trocknen Sie das Zubehör und bringen Sie es im Ofen wieder zusammen, schlieβen Sie den Backofen auf
der Steckdose an, Sie sind bereit für Ihren neuen Ofen.
5. Wenn der Backofen wieder zusammengebaut ist, empfehlen wir Ihnen den Ofen auf der höchsten Temperatur
(230℃) für etwa 15 Minuten laufen zu Lassen um Verpackungs Rückstand zu beseitigen. Dies wird auch alle
J:Zeitregler
K:Kontrolleuchte
L: Fuβ
M: Back Blatt
N:Gitter
O: Blatt hebel
Page 15

2
spuren van anfänglichem Geruch entfernen.
Hinweis: Beim ersten mal kann ein minimaler Geruch und rauch (ca. 15 Minuten) folgen. Das ist normal und
harmlos und wird durch die Verbrennung des Schutzmaterials die auf den Heizelementen
angebracht sind verursacht.
WARNUNG: Um die Gefahr von Verletzungen zu reduzieren und Verbrennungen zu vermeiden,
fassen Sie nie heisse Oberflächen an, tragen Sie immer Topflappen.
HINWEIS: Seien Sie extreme vorsichtig wenn sie das Back blatt, gitter oder heisse Behälter aus
dem Ofen entfernen. Tragen Sie immer Topflappen.
Verwendung Ihres Elektro-Ofens
Die Verwendung Ihres neuen Ofens
Machen Sie sich vertraut mit den folgenden Backofen Funktionen und Zubehören, bevor Sie den Ofen erstmals
Vewenden:
● Temperatur Kontrolle: Wählen Sie die gewünschte Temperatur von 100℃ bis 230℃ zum Backen, Grillen oder
Braten .
● Funktion Kontrolle: Dieses Gerät ist mit vier Positionen für eine Vielzahl von Koch Bedürfnissen
ausgestattet.
◇Vier Phasen Wärmesektor: Aus/Grill/Bakcen/Braten
Aus
Grill: Für Rindfleisch, Geflügel, Schweinefleisch, etc (Oberes Heizen)
Backen: Für Gebäck, Kuchen, Kekse, Geflügel, Rind, Schwein, etc (Unterhitze)
Braten: Für Brot, muffins, gefrorene Waffeln, Pizza, etc (oberste und unterste Wärme)
● Zeitregler: Drehen Sie den Zeitregler nach rechts für die Verwendung als Zeitregler beim Braten. Diese
Funktion läutet am ende der Eingestellten Zeit.
● Anzeige Licht: Das Licht geht an wenn der Backofen eingeschaltet wird.
● Back Blatt: Zum Grillen von Fleisch, Fisch, Geflügel und anderen Lebensmitteln. Auβerdem kann die
Grillvorrichtung Fett einsammeln.
● Blatt Griff: Ermöglicht das einfache entfernen und einsetzen wenn der Ofen heiss ist.
GRILL
Für die besten Ergebnisse empfehlen wir Ihen den Ofen 15 Minuten bei 230℃ Vor zu heizen.
FUNKTION
Drehen Sie den Temperaturregler auf 230ºC.
Drehen Sie die Funktions kontrolle auf um den Ofen vor zu heizen.
Platzieren Sie das gitter und Back blatt.
Legen Sie das Essen auf das Gitter und platzieren Sie es auf die oberste lade.
Essen sollte so nah wie möglich an dem oberen Heizelement sein ohne es zu berühren.
Drehen Sie den Temperaturregler auf die gewünschte Temperatur.
Verteilen Sie Öl oder Soβen auf dem Essen, so wie gewünscht.
Drehen Sie den Zeitregler .
Es wird empfholen die Tür ein wenig offen zu lassen.
Wenden Sie das Grillgut nach der Hälfte der Zeit, so wie in der Kochanleitung beschrieben.
Wenn das Grillen fertig ist, drehen Sie den Zeitregler auf “OFF”.
Page 16

3
Brat Anleitung
FLEISCH
OFEN TEMP
KOCH ZEIT
STEAK
200℃
25-30 min
T-BONE STEAK
200℃
25-30 min
HAMBURGER
200℃
25-28 min
SCHWEINEKOTELETTS
200℃
40-45 min
LAMMKOTELETTS
200℃
30-40 min
HÄHNCHENSCHENKEL
200℃
30-35 min
FISCHFILET
180℃
20-25 min
LACHS STEAKS
180℃
20-25 min
HINWEIS: Kochzeiten sind auf Fleisch auf Kühlschrank Temperatur basiert. Gefrorenes
Fleisch kann durchaus länger dauern. Daher wird die Verwendung eines
Fleischthermometers empfohlen.
Hinweis: Seien Sie extreme vorsichtig wenn sie das Back Blatt, gitter oder heisse container
entfernen. Verwenden Sie immer den Griff oder Topflappen um warme Speisen aus
dem Backofen zu entfernen.
Die Koch Ergebnisse können variieren. Stellen Sie den Zeitregler auf Ihre individuellen Bedürfnisse ein.
Überprüfen Sie das Essen häufig während der Röstung um das Überkoch zu verhindern.
Backen
Bitte beachten Sie dass Back Funktion nur die unterste behitzung verwendet. Für die besten Ergebnisse
empfehlen wir Ihnen, den Ofen für 15 Minuten bei 230℃ vor zu heizen.
VERWENDUNG
Drehen Sie den Temperaturregler auf 230℃.
Drehen Sie den Funktions knopf auf . Heizen Sie den Ofen vor.
Platzieren Sie das Gitter auf die mittelste lade.
Legen Sie das Essen auf das Gitter und schieben Sie es in die Lade.
Lebensmittel sollte möglichst nahe an der Bodenheizung sein ohen es zu berühren.
Drehen Sie den Temperaturregler auf die gewünschte Temperatur.
Verteilen Sie Öl oder Soβen auf dem Essen sowie gewünscht.
Drehen Sie den Zeitregler .
Es ist ratsam die Tür ein wenig offen zu lassen.
Wenden Sie das Essen zur hälfte der Koch zeit so wie in der Anleitung angegeben.
Sobald das Backen fertig ist, die Funktions kontrolle auf “OFF” stellen.
Die Platzierung des Gitters
Kekese – Gebrauchen Sie das unterste und mittelste gitter.
Kuchen – Gebrauchen Sie das unterste gitter (Backen Sie nach und nach)
Gebäck – Gebrauchen Sie das unterste und mittelste gitter
Page 17

4
Warnung: Schalten Sie das Gerät aus und lassen Sie es abkühlen bevor Sie es reinigen.
Toasten
Bitte beachten Sie, dass das Toasten alle Heizelemente verwendet. Der Ofen mit groβer Kapazität ermöglicht
das Toasten von 4-6 Scheiben Brot, 6 muffins, gefrorene Waffeln oder gefrorene Pfannkuchen. Beim Toasten 1
oder 2 dinge, legen Sie das Essen auf ein Back Blatt in die Mitte des Offens.
VERWENDUNG
Drehen Sie den Temperaturregler au230℃.
Draai de functie knop op
Platzieren Sie das Essen auf das Gitter.
Drehen Sie den Zeitregler.
Es läutet sobald das Toasten fertig ist.
Hinweis: Das Gitter muss in der Mitte des Ofens platziert werden, mit den Kerben nach unten.
Reinigung und Unterhalt
Spritzer die während des Kochens auftreten und mit der Beschichtung in Kontakt kommen werden oxidiert
während der Ofen in Betrieb ist. Wenn gewünscht, wischen Sie die Wände mit einem feuchtem Schwamm, Tuch
oder Nylon und mildem Reinigungsmittel. Verwenden Sie NIE Stahlwolle, Scheuerschwämme und kratzen Sie
die Wände niemals mit metallischen Gegenständen, damit beschädigen Sie die Beschichtung.
Alle Zubehöre müssen in heiβem Seifenwasser oder in der Spülmaschine gereinigt werden. Die Tür kann mit
einem feuchtem Schwamm und mit Papier oder einem Küchentuch abgewischt werden. Reinigen Sie das
Gehäuse mit einem feuchtem Schwamm. Verwenden Sie keine Scheuermittel, da diese die Oberfläche
beschädigen können.
VERWENDEN SIE KEINE SCHEUERMITTEL ODER STAHLWOLLENSCHWÁMME AUF DEM LECK BLATT,
DAMIT BESCHÄDIGEN SIE DIE BESCHICHTUNG. LASSEN SIE ALLE TEILE UND FLÄCHEN TROCKNEN
BEVOR SIE DEN BACKOFEN WIEDER VERWENDEN.
UMWELT
ACHTUNG :
Werfen Sie nicht dieses Produkt, wie es mit anderen Haushaltsprodukten hat. Es gibt eine
Mülltrennungs von diesem Produkt in Gemeinden, Sie müssen Ihre lokalen Behörden über
die Orte, wo man dieses Produkt zurückgeben können zu informieren. In der Tat enthalten elektrische
und elektronische Produkte gefährliche Stoffe, die schädliche Auswirkungen auf die Umwelt oder die
menschliche Gesundheit haben und sollte recycelt werden. Das Symbol hier darauf hinweisen, dass
elektrische oder elektronische Geräte sollten sorgfältig ausgewählt werden, ist ein fahrbarer
Abfallbehälter mit einem Kreuz markiert.
Hergestellt und importiert: Adeva SAS 8 rue Marc Seguin 77290 Mitry-Mory FRANCE
www.hkoenig.com - contact@hkoenig.com - Tel. 01 64 67 00 01
Page 18

NEDERLANDS
BELANGRIJKE VEILIGHEIDSINSTRUCTIES
Tijdens het gebruik van uw Toast oven, moet u altijd de standard veiligheidsmaatregelen in acht nemen,
waaronder de volgende:
1. Lees alle instructies.
2. Raak nooit hete oppervlakken aan. Gebruik altijd
de handgrepen of knoppen.
3. Wanneer het apparaat in de buurt van kinderen
wordt gebruikt, is nauw toezicht nodig.
4. Ter bescherming tegen elektrische schokken,
dompel het kabel, de stekker of andere
onderdelen van de oven nooit onder water of
andere vloeistoffen.
5. Laat het kabel nooit van de tafel of het aanrecht
slingeren.
6. Gebruik het apparaat nooit als het kabel of de
stekker beschadigd is of als het apparaat
storingen aangeeft. Brend het apparaat naar het
dichtsbijzijnde service centrum voor onderzoek,
reparative of aanpassing.
7. Het gebruik van accessoires die niet door de
fabricant worden aanbevolen kunnen tot gevaar
of letsel leiden.
8. Plaats het apparaat niet in de buurt van heet gas
of een elektrische brander.
9. Houd tenminste vier centimeter vrije ruimte aan
alle zijden van de oven om voor voldoende
luchtcirculatie te zorgen bij het bedienen van de
oven.
10. Verwijder de stekker uit het stopcontact wanneer
u deze niet gebruikt of als het gereinidg wordt.
Laat het apparaat afkoelen voordat u onderdelen
verwijdert of het schoon gaat maken.
11. Zet ze tijdcontrole op OFF en verwijder de
stekker om los te koppelen. Verwijder het kabel
altijd via de stekker nooit via de snoer.
12. Uiterste voorzichtigheid wordt aanbevolen bij het
verplaatsen van de lekbak met hele olie of
andere vloeistoffen.
13. Bedek nooit een deel van de oven met
metaalfolie. Dit kan tot oververhitting leiden.
14. Wees uiterst voorzichtig bij het verwijderen van
de lade, rekken of afvoeren van heet vet of
andere hete vloeistoffen.
15. Reinig de binnenkant van de oven niet met
metalen schuursponsjes, stukken kunnen
afbreken en elektrische onderdelen aanraken.
Dit kan leiden tot elektrische schok.
16. Extra groot voedsel of metalen gereedschappen
mogen niet in een broodrooster oven worden
geplaatst omdat deze tot brand of gevaar van
elektrische schok kunnen leiden.
17. Als de oven bedekt is of brandbaar material
aanraakt, met inbegrip van gordijnen,
draperieӫ n, muren en dergelijke,kan dit tot
brand leiden. Plaats geen onderwerpen op de
oven tijdens gebruik.
18. Wees uiterst voorzichtig met kook of bak
containers die niet van metal of ovenvast glas
zijn gemaakt.
19. Zorg ervoor dat niets de bovenste of onderste
elementen van de oven aanraakt.
20. Plaats geen van de volgende materialen in de
oven: karton, plastic, papier of iets dergelijks.
21. Bewaar geen andere materialen of accessoires
in de oven wanneer deze niet wordt gebruikt, als
ze niet door de fabricant worden aanbevolen.
22. Draag altijd beschermende, geïsoleerde
ovenwanten bij het plaatsen en verwijderen van
items uit de hete oven.
23. Dit apparaat is voorzien van een geharde
veiligheidsglas deur. Het glas is sterker dan
gewoon glas en bestand tegen breuk. Gehard
glas kan nog steeds rond de randen breken.
Vermijd krassen op de deuroppervlak of
geknikkte randen.
24. Dit apparaat is UIT wanneer de timercontrole op
OFF staat.
25. Gebruik het apparaat nooit buitenshuis.
26. Gebruik het apparaat alleen voor wat het
bestemd is.
Page 19

1
BEWAAR DEZE INSTRUCTIES
MAIN COMPONENT:
Alleen voor huishoudelijk gebruik
Leer uw elektrische oven kennen
A: Behuizing
B: Frontplaat
C: Bovenste deur frame
D: Hendel
E: Onderste deur frame
F: Onderste weerstand
G:Glazen deur
H:Temperatuur controle knop
I: Functie controle knop
Lees alle delen van dit boekje zorgvuldig en volg alle aanwijzingen.
Voor het eerste gebruik van uw elektrische oven
▲Voordat u uw broodrooster oven voor de eerst keer gebruikt, moet u:
1. Lees alle instructies in deze handleiding.
2. Zorg ervoor dat de oven niet is aangesloten en de tijd controle op “OFF” staat.
3. Was alle accessoires in heet water en zeep of in de vaatwasmachine.
4. Droog alle accessoires en haal ze weer bij elkaar in de oven, sluit de oven op het stopcontact aan en u bent
klaar om uw nieuwe broodrooster oven te gebruiken.
5. Als u uw oven opnieuw heeft gemonteerd, raden wij u aan de toast functie op de hoogste temperatuur te
draaien (230℃) voor ongeveer 15 minuten om het verpakkingsmateriaal residu na het verscheppen te
elimineren. Ditz al ook alle sporen van geur die in eerste instantie aanwezig zijn verwijderen.
J:Timercontrole knop
K:Indicatie licht
L: Voet
M: Bak blad
N:Rooster
O: Blad hendel
Page 20
2
Let op: De eerste inbedrijfstelling kan in minimale geur en rook (ongeveer 15minuten) resulteren. Dit is
normaal en ongevaarlijk en komt door de verbranding van de beschermende stof aangebracht
op de verwarmingselementen in de fabriek.
WAARSCHUWING: OM HET RISICO VAN LETSEL OF BRANDWONDEN TE VOORKOMEN,
RAAK NOOIT HETE OPPERVLAKKEN AAN WAANEER U DE OVEN GEBRUIKT.
GEBRUIK ALTIJD OVENWANTEN.
LET OP: Wees altijd uiterst voorzichtig bij het verwijderen van het bak blad, rooster of hete
container van de hete oven. Gebruik altijd het handvat of een ovenwant om hete
items uit de oven te verwijderen.
Het gebruik van uw elektrische oven
Het gebruik van uw nieuwe oven
Maak uwzelf vertrouwd met de volgende ovenfuncties en toebhoren voor dat u de oven voor het eerst gebruikt:
● Temperatuur Controle: kies de gewenste temperatuur van 100℃ tot 230℃ voor het bakken, grillen of
roosteren.
● Functie Controle: Dit apparaat is voorzien van vier posities voor een verscheidenheid aan kook behoeften:
◇Vier fasen schakelaar verwarmings sector: Uit/Grill/Bakken/Roosteren
Uit
Grill: Voor het grillen van vis, biefstuk, gevogelte, karbonades, enz.(boven verwarming)
Bakken: Voor gebak, taarten, koekjes, gevogelte, rundvlees, varkensvlees, enz. (onderste
verwarming)
Roosteren: Voor brood, muffings, bevroren wafels, pizza, etc (boven & onder verwarming)
● Timer Controle: Als u de timer naar rechts draait om als timer of voor het roosteren te gebruiken. Deze functie
heeft ook een bel aan het einde van de ingestelde tijd.
● Indicatie licht:
● Bak blad: Voor het roosteren van vlees, vis, gevogelte, en andere voedingsmiddelen. Kan ook worden
gebruikt bij het draaispit om het vet op te vangen.
● Tray Hendel: Hiermee kunt u het blad of het rooster van de oven verwijderen als ze warm zijn.
GRILL
Voor de beste resultaten is het raadzam om de oven gedurende 15 minuten op 230℃ voor te verwarmen.
FUNCTIE
Draai de temperatuur knop op 230℃.
Draai de functie controle op om de oven voor te verwarmen.
Plaats het bak blad en rooster erin.
Plaats het voedsel op het rooster en zet het op het bovenste rek.
Voedsel moet zo dichtbij mogelijk bij het bovenste verwarmingselement geplaatst worden zonder het aan te
raken.
Draai de temperatuur knop op de gewenste temperatuur.
Spreid olie of sausen over het voedsel, zoals gewenst
Draai de timer controle .
Het is raadzam om de deur op een kier te laten.
Draai het voedsel halverwege om zoals in de kooktijd voorbeschreven.
Page 21

3
Als het grillen klaar is, draai de timer op “OFF”
VLEES
OVEN TEMP
KOOK TIJD
RIB STEAK
200℃
25-30 min
T-BONE STEAK
200℃
25-30 min
HAMBURGER
200℃
25-28 min
VARKENSKOTELETTEN
200℃
40-45 min
LAMSKOTELETJES
200℃
30-40 min
KIPPENPOTEN
200℃
30-35 min
VISFILET
180℃
20-25 min
ZALMMOTEN
180℃
20-25 min
LET OP: Rooster tijden zijn gebaseerd op vlees op koelkasttemperatuur. Bevroren vlees
kan behoorlijk langer duren. Daarom wordt het gebruik van een vleesthermometer
aanbevolen.
Roosteren gids
De resultaten van koken kunnen afwijken. Zet de timer op uw individuele wensen. Controleer het
voedsel vaak tijdens het roosteren om overkoken te voorkomen.
Bakken
Houd er rekening mee dat de bak functie alleen van de onderste verwarmingselementen gebruik maakt. Voor de
beste resultaten is het raadzaam dat u de oven gedurende 15 minuten op 230℃ voor verwarmt.
GEBRUIK
Draai de temperatuur knop op 230℃.
Draai de functie knop op . Verwarm de oven.
Plaats het rooster op de laagste of middelste rek.
Plaats het voedsel op het rooster en glijd deze in het rek.
Voedsel moet zo dicht mogelijk bij de onderste verwarmingselement worden geplaatst zonder het aan te
raken.
Draai de temperatuur controle op de gewenste temperatuur.
Sprijd olie of sausen over het voedsel zoals gewenst.
Draai de timer controle .
Het is raadzaam om de deur op een kier te laten.
Draai het voedsel halverwege om zoals voorgeschreven in de kooktijd.
Zodra u klaar bent met bakken draai de functie knop op “OFF”
Plaatsing van het rek
Cookies – Gebruik het onderste en middelste rek.
Taart – Gebruik het onderste rek (bak ze en voor een).
Pastei – Gebruik het onderste en middelste rek.
Page 22

4
LET OP: Wees altijd uiterst voorzichtig bij het verwijderen van het bak blad, rooster of hete
container van de hete oven. Gebruik altijd het handvat of een ovenwant om hete
items uit de oven te verwijderen.
Waarschuwing: Koppel het apparaat los en laat het afkoelen voordat u het reinigd.
Roosteren
Houd er rekening mee dat de toast functie alle verwarmingselementen gebruikt. De oven van grote capaciteit
zorgt voor het roosteren van 4 tot 6 sneetjes brood, 6 muffings, bevroren wafels of bevroren pannenkoeken. Bij
het roosteren van slechts 1 of 2 dingen, plaats het voedsel op de bak rek in het centrum van de oven.
GEBRUIK
Draai de temperatuur knop op 230℃.
Draai de functie knop op
Plaats het voedsel op het blad.
Draai de timer knop.
De bell gaat zodra het toasten klaar is.
Let op: Het rooster moet in het midden van oven worden geplaats met de inkepingen naar beneden.
Reinging en onderhoud
Elke spatten die tijdens het koken optreden en met de coating in aanraking komt wordt geoxideerd terwijl de
oven in bedrijf is. Indien gewenst, veeg de muren met een vochtige spons, doek of nylon schuursponsje een een
mild schoonmaakmiddel. Gebruik GEEN staalwol, schuursponsjes, schuurmiddelen en schraap de wanden
NOOI met een metalen voorwerp, omdat ze de coating zullen beschadigen.
Alle accessoires moeten in heet water en zeep worden gewassen en kunnen ook in de vaatwasmachine
gereinigd worden. De deur kan met een vochtige spons worden afgeveegd en met papier of een theedoek
worden gedroogd. Reinig de buitenkant met een vochtige spons. GEBRUIK GEEN SCHUURMIDDELEN omdat
dit de afwerking kan beschadigen.
GEBRUIK GEEN SCHUURMIDDEL OF STAALWOL SCHUURSPONSJES OP HET LEK BLAD, HET KAN DE
AFWERKING BESCHADIGEN. LAAT ALLE ONDERDELEN EN OPPERVLAKKEN GRONDIG DROGEN
VOOR DAT U DE OVEN OPNIEUW GEBRUIKT.
MILIEU
ATTENTIE :
Dit apparaat mag niet met uw ander huishoudelijke toestellen worden verwijdert. Dit product moet op
een geselecteerde stortplaats verwijdert worden. U kunt bij de gemeente een indiceerde plaats
aanvragen. Elektrisch en elektronische producten kunnen gevaarlijke stoffen inhouden die schadelijk zijn voor
mensen en het milieu en moet recycled worden. Het symbool aan de kant geeft aan dat het een elektrisch en
elektronisch toestel is en zijn dus artikelen van een selectieve collectie. Het beeld geeft een afvalbak met een X
teken aan.
Geproduceerd en geïmporteerd door : Adeva SAS 8, Rue Marc Seguin 77290, Mitry-Mory FRANKRIJK
www.hkoenig.com - contact@hkoenig.com – Telefoon: 01 64 67 00 01
Page 23

ESPANOL
INSTRUCCIONES IMPORTANTES DE SEGURIDAD
Cuando use este horno, asegúrese de seguir las precauciones básicas de seguridad, entre ellas las
siguientes:
1. Lea todas las instrucciones.
2. No toque las superficies calientes. Siempre
utilice las asas o las perillas.
3. Es necesario una supervisión cercana cuando
el dispositivo es usado por o cerca de niños.
13. No cubra ninguna parte del horno con papel
de aluminio. Esto puede causar que el horno se
sobrecaliente.
14. Tenga mucho cuidado al quitar la bandeja,
la rejilla o al desechar la grasa caliente u otros
líquidos calientes.
4. Para protegerse contra una descarga
eléctrica, no sumerja el cable, el enchufe ni
ninguna pieza del horno en agua o cualquier
otro líquido.
5. No permita que el cable quede colgando del
borde de la mesa o mostrador, ni que toque
superficies calientes.
6. No utilice el dispositivo con el cable o enchufe
dañado, después de un mal funcionamiento o si
ha sido dañado de alguna manera. Devuelva el
dispositivo al centro de servicio autorizado más
cercano para su revisión, reparación o ajuste.
7. El uso de accesorios no recomendados por el
fabricante del dispositivo puede causar peligros
o daños a personas o cosas a su alrededor.
8. No coloque el dispositivo sobre o cerca de
hornillas de gas o eléctricas.
9. Al utilizar el horno, mantenga al menos diez
centímetros de espacio libre en todos los lados
del horno para permitir la circulación del aire
adecuadamente.
10. Desenchufe del tomacorriente cuando no
esté en uso y antes de limpiarlo. Deje que se
enfríe antes de poner o quitar piezas y antes de
limpiarlo.
11. Para desconectar, gire el control de tiempo a
OFF y luego retire el enchufe. Siempre sujete el
enchufe y no tire nunca del cable.
15. No limpie el interior del horno con estropajos
metálicos, esto podría romper y tocar partes
eléctricas, creando un riesgo de descarga
eléctrica.
16. Los alimentos de gran tamaño o utensilios
de metal no deben ser introducidos en un horno
tostador, ya que pueden crear un riesgo de
incendio o de corto circuito.
17. Puede ocurrir un incendio si el horno está
cubierto o en contacto con materiales
inflamables, incluyendo las cortinas, persianas,
paredes y similares, durante su funcionamiento.
No colocar nada sobre el aparato cuando esté
en funcionamiento.
18. Extremas precauciones deben de ser
tomadas en cuenta al utilizar recipientes para
cocinar u hornear hechos de cualquier cosa que
no sea de metal o de vidrio resistente al calor.
19. Asegúrese de que nada toque los elementos
superiores e inferiores del horno.
20. No coloque ninguno de los siguientes
materiales en el horno: cartón, plástico, papel, o
algo similar.
21. No almacene ningún material que no sean
los accesorios recomendados por el fabricante
en este horno cuando no esté en uso.
22. Use siempre guantes protectores al insertar
o retirar elementos del horno caliente.
12. Debe tener mucho cuidado al mover una
bandeja que contenga aceite caliente u otros
líquidos calientes.
23. Este dispositivo tiene una puerta templada,
vidrio de seguridad. El vidrio en más fuerte que
el vidrio ordinario y más resistente a roturas. Sin
embargo, el vidrio templado se puede romper
por los bordes. Evite arañar la superficie de la
puerta o muescas en los bordes.
Page 24
24. Este dispositivo está apagado cuando el
botón de control de temporizador está en la
posición "OFF".
GUARDE ESTAS INSTRUCCIONES
SÓLO PARA USO DOMÉSTICO
Conozca su nuevo horno eléctrico
COMPONENTES PRINCIPALES:
25. No lo use al aire libre.
26. No utilice el dispositivo para otro uso distinto
al indicado.
A: Carcasa
B: Placa frontal
C: Marco superior de la puerta
D: Mango
E: Marco inferior de la puerta
F: Elemento de calentamiento inferior
G: Puerta de vidrio
H: Perilla de control de temperatura
Lea todas las secciones de este manual y siga todas las instrucciones cuidadosamente.
Antes de utilizar el horno eléctrico
▲ Antes de utilizar el horno tostador por primera vez, asegúrese de:
I: Perilla de control de función
J: Perilla de control de tiempo
K: Luz de encendido
L: Patas
M: Bandeja de hornear
N: Parrilla
O: Mango para parrillas
Page 25
1. Lea todas las instrucciones incluidas en este manual.
Nota: La primera puesta en marcha puede resultar en un mínimo olor y humo (unos 15
minutos). Esto es normal e inofensivo. Es debido a la quema de la sustancia protectora que se
aplica a los elementos de calentamiento en la fábrica.
ADVERTENCIA: PARA EVITAR TODO RIESGO DE LESIONES O QUEMADURAS, NO
TOQUE LAS SUPERFICIES CALIENTES DEL HORNO CUANDO ESTÉ EN USO, SIEMPRE
USE GUANTES DE COCINA.
2. Asegúrese de que el horno esté desconectado y que el control de tiempo está en la
posición "OFF".
3. Lave todos los accesorios con agua caliente y jabón o en el lavavajillas.
4. Seque completamente todos los accesorios y vuelva a montarlos en el horno, enchúfelo y ya
está listo para usar su nuevo horno tostador.
5. Después de volver a montar el horno, se recomienda que se ejecute el horno en la
temperatura más alta (230 ℃) en la función Tostar durante aproximadamente 15 minutos para
eliminar cualquier resto de embalaje que pueda quedar después del envío. Esto también
eliminará todos los rastros de olor presente inicialmente.
Uso del horno eléctrico
Por favor familiarícese con las siguientes funciones del horno y los accesorios antes de usarlo
por primera vez:
● Control de Temperatura: elegir la temperatura deseada entre 100 ℃ a 230 ℃ para asar a la
parrilla, para hornear o para el tostado.
● Función de Control: Este horno está equipado con cuatro posiciones para una variedad de
necesidades de cocción;
◇ Cuatro opciones de selección: Off / Asado / Horneado / Tostado
Off.
Asado: Para asar pescado, carne, pollo, chuletas de cerdo, etc. (calentamiento superior)
Horneado: Para pasteles, tartas, galletas, pollo, carne de cerdo, etc. (calentamiento inferior)
Tostado: Para pan, muffins, gofres congelados, pizza, etc. (Calentamiento superior e
inferior)
● Control de tiempo: para activar el temporizador, gírelo a la derecha para tostar o usar como
temporizador. Esta función también tiene una campana que suena en la hora programada.
● Luz de encendido: Se ilumina cuando el horno está encendido.
● Bandeja de horneado: Para usarse en el asado de carne, pollo, pescado y varios otros
alimentos. También se utiliza cuando se usa el asador para recoger las gotas que caen.
● Mango para bandeja: Permite recoger la parrilla y la bandeja de hornear cuando están
calientes.
Page 26

ATENCIÓN: Tenga siempre mucho cuidado al quitar la bandeja de hornear,
parrilla o un recipiente cualquiera de un horno caliente. Siempre use el mango
para parrilla, o un guante para horno cuando retire elementos calientes del
horno.
CARNE
TEMPERATURA DEL
HORNO
TIEMPO DE COCCIÓN
FILETE
200℃
25-30 min
T-BONE STEAK
200℃
25-30 min
HAMBURGESA
200℃
25-28 min
CHULETA DE CERDO
200℃
40-45 min
CHLETA DE CORDERO
200℃
30-40 min
PIERNAS DE POLLO
200℃
30-35 min
FILETES DE PESCADO
180℃
20-25 min
FILETE DE SALMÓN
180℃
20-25 min
ASADO
Para obtener los mejores resultados, se recomienda precalentar el horno durante 15 minutos a
230 ℃.
Operación
Ajuste la perilla de control de temperatura a 230 ℃.
Encienda la función de control a y precaliente el horno.
Coloque la parrilla sobre la bandeja de hornear.
Coloque los alimentos sobre la parrilla y deslícela en la rejilla superior.
La comida debe colocarse lo más cerca posible del calentador superior sin tocarlo.
Ajuste el control de temperatura a la temperatura apropiada.
Bañe, con una brocha, los alimentos con salsas o aceite, según lo desee.
Configure el control de tiempo.
Es recomendable dejar la puerta entreabierta
Voltee los alimentos a la mitad del tiempo de cocción establecido.
Cuando el asado ha terminado, apague el controlador de tiempo, girándolo a la
posición Off.
Guía para asado
Los resultados de cocción pueden variar. Ajuste estos tiempos a sus necesidades
individuales. Además, verifique los alimentos con frecuencia durante el asado para evitar
la sobre cocción.
Page 27

Nota: Todos los tiempos de asado están basados en carnes a la temperatura de la
nevera. Las carnes congeladas puede tardar mucho más tiempo. Por lo tanto, el uso de
un termómetro para carnes es muy recomendable.
ATENCIÓN: Tenga siempre mucho cuidado al quitar la bandeja de hornear, parrilla o un
recipiente cualquiera de un horno caliente. Siempre use el mango para parrilla, o un
guante para horno cuando retire elementos calientes del horno.
Horneado
Tenga en cuenta que la función BAKE sólo utiliza los elementos de calentamiento inferiores.
Para obtener mejores resultados, se recomienda precalentar el horno durante 15 minutos a 230
℃.
Operación
Ajuste la perilla de control de temperatura a 230 ℃.
Coloque el control de función a . Luego precaliente el horno.
Coloque la parrilla en la rejilla de apoyo inferior o media.
Coloque los alimentos sobre la parrilla.
La comida debe colocarse lo más cerca posible al calentador inferior, pero sin tocarlo.
Ajuste el control de temperatura a la temperatura apropiada.
Bañe, con una brocha, los alimentos con salsas o aceite, según lo desee.
Configure el control de tiempo.
Es recomendable dejar la puerta entreabierta.
Voltee los alimentos a la mitad del tiempo de cocción establecido.
Cuando el horneado ha terminado, apague el controlador de tiempo, girándolo a la
posición Off.
Posicionamiento de las parrillas
Galletas - Use la parte inferior y media de soporte.
Pastel en capas - Use sólo la parte inferior de soporte (hornee uno a la vez).
Tartas - Use la parte inferior y media de soporte.
Tostado
Tenga en cuenta que la función TOAST utiliza todos los elementos de calefacción. El horno de
gran capacidad permite tostar 4 a 6 rebanadas de pan, 6 magdalenas, gofres congelados o
panqueques congelados. Al tostar sólo 1 o 2 piezas, colóquelas en la parrilla central del horno.
Operación
Ajuste el botón de control de temperatura a 230 ℃.
Gire la perilla de control a la función .
Coloque los alimentos a tostar en la parrilla.
Configure el control de tiempo.
Page 28

La campana sonará para indicar el final del ciclo de tostado.
Advertencia: Asegúrese de desenchufar el horno y deje que se enfríe antes de limpiarlo.
Nota: La parrilla debe ser colocada en el centro del horno con las muescas mirando hacia
abajo.
Cuidado y limpieza
Cualquier salpicadura que se produce durante la cocción y que entra en contacto con el
revestimiento continuo se oxida mientras el horno está en funcionamiento. Si lo desea, limpie
las paredes con una esponja húmeda o un paño de nylon y un detergente suave. NO UTILICE
ESTROPAJOS DE METAL, LIMPIADORES ABRASIVOS Y NO RASPE LAS PAREDES CON
UN UTENSILIO DE METAL, YA QUE TODOS ESTOS MÉTODOS PUEDEN DAÑAR EL
REVESTIMIENTO.
Todos los accesorios deben lavarse con agua caliente y jabón o se pueden lavar en el
lavavajillas. La puerta se puede limpiar con una esponja húmeda y secar con una toalla de
papel o un paño. Limpie el exterior con una esponja húmeda. NO USE UN LIMPIADOR
ABRASIVO YA QUE PODRÍA DAÑAR EL ACABADO EXTERIOR.
NO USE UN LIMPIADOR ABRASIVO O ESTROPAJOS DE METAL EN LA BANDEJA DE
GOTEO YA QUE PODRÍA DAÑAR EL ACABADO DE PORCELANA ESMALTADA.
DEJE TODAS LAS PARTES Y SUPERFICIES SECAR COMPLETAMENTE ANTES DE
CONECTAR Y USAR EN EL HORNO.
MEDIO AMBIANTE
ATENCIÓN :
No se deshaga de este producto como lo hace con otros productos del hogar. Existe un
sistema selectivo de colecta de este producto puesto en marcha por las comunidades,
debe de informarse en su ayuntamiento acerca de los lugares en los que puede depositar este
producto. De hecho, los productos eléctricos y electrónicos pueden contener substancias
peligrosas que tienen efectos nefastos para el medio ambiente o para la salud humana y deben
ser reciclados. El símbolo aquí presente indica que los equipos eléctricos o electrónicos deben
de ser cuidadosamente seleccionados, representa un recipiente de basura con ruedas marcado
con una X.
Fabricado e importado por : Adeva SAS 8 rue Marc Seguin 77290 Mitry-Mory FRANCE
www.hkoenig.com - contact@hkoenig.com - Tel. 01 64 67 00 01
Page 29

ITALIANO
IMPORTANTI ISTRUZIONI DI SICUREZZA
Quando si utilizza questo apparecchio, dovrebbero sempre essere osservate delle precauzioni di sicurezza,
come le seguenti:
1. Leggere tutte le istruzioni.
2. Non toccare le superfici calde. Usare sempre le
apposite maniglie e pomelli.
3. Prestare la massima attenzione quando un
qualsiasi apparecchio viene utilizzato da o in
presenza di bambini.
4. Al fine di proteggersi da scosse elettriche, non
immergere il cavo, la spina o qualsiasi altra parte
del forno in acqua o altri liquidi.
5. Non lasciare che il cavo penda dal bordo del
tavolo o del bancone o che entri in contatto con
superfici calde.
6. Non utilizzare l’apparecchio se il cavo o la spina
sono danneggiati o dopo un malfunzionamento
del prodotto o quando presenta qualsiasi tipo di
danno. Portare l’apparecchio presso il più vicino
centro assistenza autorizzato per un controllo,
una riparazione o una modifica.
7. L’uso di accessori non raccomandati dal
produttore può causare pericolo o lesioni.
8. Non posizionare l’apparecchio vicino o su fornelli
elettrici o a gas.
9. Quando l’apparecchio è in funzione, mantenere
almeno dieci centimetri di spazio libero su tutti i
lati del forno per consentire la circolazione
dell'aria.
10. Staccare la spina dalla presa di corrente quando
l’apparecchio non è in uso e prima della pulizia.
Lasciar raffreddare prima di inserire o rimuovere
pezzi e prima di pulirlo.
11. Per scollegare, ruotare la manopola del timer su
OFF, quindi rimuovere la spina. Afferrare sempre
la spina e non tirare mai il cavo.
12. Si deve prestare estrema attenzione quando si
sposta un recipiente contenente olio caldo o altri
liquidi caldi.
13. Non coprire nessuna parte del forno con fogli di
alluminio. Ciò può provocare il surriscaldamento
del forno.
14. Prestare la massima attenzione quando si
rimuovono le griglie, i ripiani o quando si
eliminano grasso caldo o altri liquidi caldi.
15. Non pulire la parte interna del forno con spugne
metalliche, poiché alcuni pezzi possono
staccarsi e toccare i componenti elettrici,
provocando il rischio di scosse.
16. Cibi di grandi dimensioni o utensili di metallo non
devono essere inseriti in un forno elettrico, in
quanto potrebbero provocare un incendio o
scosse elettriche.
17. È possibile che si verifichi un incendio se il forno
è coperto o entra in contatto con materiale
infiammabile, comprese tende, drappeggi, pareti,
e simili, mentre è in funzione. Non posare alcun
oggetto sopra l'apparecchio quando è in
funzione.
18. Esercitare estrema cautela quando si utilizzano i
contenitori per la cottura o teglie da forno
realizzati con materiale diverso dal metallo o dal
vetro a prova di forno.
19. Assicurarsi che nulla tocchi i componenti che
costituiscono la parte superiore e la parte
inferiore del forno.
20. Non riporre nessuno dei seguenti materiali
all’interno del forno: cartone, plastica, carta, o
simili.
21. Non riporre materiali diversi dagli accessori
raccomandati dal produttore all’interno di questo
forno quando non è in uso.
22. Durante l'inserimento o la rimozione di qualsiasi
elemento dal forno caldo, indossare sempre
indumenti protettivi e guanti da forno isolanti.
23. Questo apparecchio dispone di una porta a vetro
temperato sicura. Essa è costituita da un vetro
più forte di quello comune e più resistente alla
rottura. Il vetro temperato può comunque
lesionarsi intorno ai bordi. Evitare di graffiare la
superficie della porta o di scalfirne i bordi.
24. Questo apparecchio è spento quando il timer è in
posizione "OFF".
25. Non utilizzare in ambienti esterni.
26. Non utilizzare l’apparecchio per usi diversi da
quelli previsti.
Page 30

1
CONSERVARE QUESTE ISTRUZIONI
COMPONENTI PRINCIPALI:
Solo per uso domestico
Conoscere il proprio nuovo forno elettrico
A: Alloggiamento
B: Lastra frontale
C: Cornice superiore dello sportello
D: Maniglia
E: Cornice inferiore dello sportello
F: Resistenza riscaldante inferiore
G: Sportello in vetro
H: Manopola di controllo della temperatura
I: Manopola di controllo delle funzioni
Leggere e seguire attentamente tutte le istruzioni di questo libretto.
J: Timer
K: Spia luminosa
L: Piede
M: Vassoio
N: Griglia
O: Maniglia per il vassoio
Page 31
2
Prima di cominciare a utilizzare il forno elettrico
Nota Bene: è possibile che la prima volta che l’apparecchio viene messo in funzione, si crei un leggero odore
di fumo (per circa 15 minuti). Questo è normale e innocuo ed è dovuto alla combustione della
sostanza protettiva applicata in fabbrica agli elementi riscaldanti.
ATTENZIONE: PER EVITARE RISCHI DI LESIONI O USTIONI, NON TOCCARE LE SUPERFICI
CALDE QUANDO IL FORNO È IN USO. USARE SEMPRE I GUANTI DA FORNO.
ATTENZIONE: prestare sempre la massima attenzione durante la rimozione del vassoio, della
griglia o di un qualsiasi contenitore caldo proveniente da un forno caldo. Utilizzare
sempre la maniglia, o un guanto da forno, quando si rimuovono elementi caldi dal
forno.
▲Prima di utilizzare il proprio forno elettrico per la prima volta, assicurarsi di:
1. Leggere tutte le istruzioni incluse in questo manuale.
2. Assicurasi che il forno sia scollegato e che il timer sia in posizione “OFF”.
3. Lavare tutti gli accessori in acqua calda e sapone o in lavastoviglie.
4. Asciugare accuratamente tutti gli accessori e assemblarli all’interno del forno, collegare la spina alla presa
elettrica e si è pronti a utilizzare il nuovo forno tostapane.
5. Dopo aver assemblato nuovamente il proprio forno, si raccomanda di portarlo alla massima temperatura
(230°C) e di impostare la funzione per tostare per circa 15 minuti, al fine di eliminare ogni residuo della
confezione che potrebbe rimanere in seguito alla spedizione. Questo servirà anche a eliminare tutti gli odori
che si sentono inizialmente.
Come utilizzare il forno elettrico
Usare il nuovo forno
Si prega di familiarizzare con le seguenti funzioni del forno e con i seguenti accessori prima di utilizzare
l'apparecchio per la prima volta:
● Controllo della temperatura: scegliere la temperatura desiderata da 100°C a 230°C per infornare, grigliare o
tostare.
● Controllo delle funzioni: questo forno è dotato di quattro posizioni per diverse necessità di cottura;
◇ Quattro stadi di riscaldamento: Off / Grigliare / Infornare / Tostare
Off.
Grigliare: per la cottura alla griglia di pesce, bistecche, pollo, braciole di maiale, ecc. (riscaldamento
superiore)
Infornare: per torte, crostate, biscotti, pollo, manzo maiale, ecc (riscaldamento inferiore)
Tostare: per pane, muffin, cialde, pizza, ecc. (riscaldamento superiore e inferiore)
● Timer: quando si attiva il timer, ruotare la manopola verso destra (in senso orario) per tostare o usarlo come
un timer. Questa funzione prevede anche il suono di un campanello alla fine del tempo programmato.
● Spia luminosa: si illumina ogni volta che il forno è acceso.
● Vassoio: serve a cuocere e arrostire carne, pollo, pesce e vari altri alimenti. Serve inoltre quando si usa il
girarrosto per raccogliere la colatura.
● Maniglia per il vassoio: consente di sollevare la griglia e il vassoio quando sono caldi.
Page 32

3
CUCINARE ALLA GRIGLIA
CARNE
TEMPERATURA
DEL FORNO
TEMPO D COTTURA
COSTATA DI MANZO
200°C
25-30 min
BISTECCA FIORENTINA
200°C
25-30 min
HAMBURGER
200°C
25-28 min
BRACIOLE DI MAIALE
200°C
40-45 min
COSTOLETTE DI
AGNELLO
200°C
30-40 min
COSCE DI POLLO
200°C
30-35 min
FILETTI DI PESCE
180°C
20-25 min
TRANCI DI SALMONE
180°C
20-25 min
Nota: Tutti i tempi di cottura indicati si riferiscono a carni a temperatura di frigorifero. Carni
congelate potrebbero richiedere molto più tempo. Pertanto, l’uso di un termometro per
la carne è altamente raccomandato.
Per ottenere i migliori risultati, si raccomanda di preriscaldare il forno per 15 minuti a 230℃.
Funzionamento
Impostare la temperatura a 230°C.
Impostare sulla funzione e preriscaldare il forno.
Posizionare la griglia sul vassoio.
Posizionare gli alimenti sulla griglia e farli scivolare in cima alla griglia.
Gli alimenti dovrebbero essere posizionati il più possibile vicino alla resistenza riscaldante superiore senza
toccarla.
Impostare la temperatura corretta.
Aggiungere sul cibo olio o salse, secondo i propri gusti.
Ruotare la manopola del timer.
Si consiglia di lasciare lo sportello socchiuso.
Girare gli alimenti a metà del tempo di cottura previsto.
Quando la cottura è completa, ruotare la manopola del timer su “OFF”.
Guida per cucinare alla griglia
I risultati della cottura possono variare. Regolare il timer in base alla seguente tabella e in base alle
proprie esigenze. Inoltre, controllare spesso la cottura al fine di evitare che il cibo si bruci.
Infornare
Si prega di notare che la funzione INFORNARE ricorre solo alla guarnizione riscaldante superiore. Per i migliori
risultati, si raccomanda di preriscaldare il forno per 15 minuti a 230°C.
Funzionamento
Impostare la temperatura a 230°C.
Impostare sulla funzione . Dunque preriscaldare il forno.
Riporre la griglia sul sostegno più basso o in posizione media.
Page 33

4
Posizionare gli alimenti sulla griglia e farli scivolare sulla griglia.
ATTENZIONE: prestare sempre la massima attenzione durante la rimozione del vassoio, della
griglia o di un qualsiasi contenitore caldo proveniente da un forno caldo.
Utilizzare sempre la maniglia, o un guanto da forno, quando si rimuovono
elementi caldi dal forno.
Attenzione: assicurarsi di scollegare il forno e lasciarlo raffreddare prima di pulirlo.
Gli alimenti dovrebbero essere posizionati il più possibile vicino alla resistenza riscaldante inferiore senza
toccarla.
Impostare la temperatura corretta.
Aggiungere sul cibo olio o salse, secondo i propri gusti.
Ruotare la manopola del timer.
Si consiglia di lasciare lo sportello socchiuso.
Girare gli alimenti a metà del tempo di cottura previsto.
Quando la cottura è completa, ruotare la manopola del timer su “OFF”.
Posizionamento della griglia
Cookies – Usare le resistenze superiore e media.
Torte a strati – Usare la resistenza superiore (infornare una torna alla volta).
Dolci – Usare le resistenze superiore e media.
Tostare
Si prega di notare che la funzione TOSTARE ricorre a tutti gli elementi riscaldanti. Un forno dalle larghe capacità
consente di tostare 4 o 5 fette di pane, 6 muffin, cialde o frittelle congelati. Quando si tostano solo 1 o 2 alimenti,
posizionare il cibo sulla griglia al centro del forno.
Funzionamento
Impostare la temperatura a 230°C.
Impostare sulla funzione .
Posizionare sulla griglia gli alimenti che devono essere tostati.
Ruotare la manopola del timer.
Un campanello suonerà per segnalare il termine del ciclo di tostatura.
Nota: La griglia dovrebbe essere posizionata al centro del forno con le dentellature rivolte verso il basso.
Pulizia e manutenzione
Qualsiasi schizzo che si verifica durante la cottura ed entra in contatto con il rivestimento viene ossidato
mentre il forno è in funzione. È possibile pulire le pareti con una spugna umida, un panno o una paglietta di
nylon e un detergente delicato.
NON USARE PAGLIETTE IN LANA DI METALLO, DETERGENTI ABRASIVI O GRATTARE LE PARETI CON
UTENSILI IN METALLO, POICHÉ TUTTI QUESTI METODI POSSONO DANNEGGIARE IL RIVESTIMENTO
DEL FORNO.
Tutti gli accessori dovrebbero essere lavati in acqua calda con sapone o in lavastoviglie. Lo sportello può essere
pulito con una spugna umida e asciugato con un tovagliolo di carta o un panno. Pulire la parte esterna con una
spugna umida. NON UTILIZZARE DETERGENTI ABRASIVI CHE POTREBBERO DANNEGGIARE LE
RIFINITURE ESTERNE.
Page 34

5
NON UTILIZZARE DETERGENTI ABRASIVI O RETINE IN ACCIAIO SUL CONTENITORE PER LO
SGOCCIOLAMENTO, POICHÉ CIÒ PUÒ DANNEGGIARE LO SMALTO DELLA RIFINITURA IN
PORCELLANA.
LASCIARE CHE TUTTE LE PARTI E SUPERFICI SI ASCIUGHINO COMPLETAMENTE PRIMA DÌ
COLLEGARE IL FORNO E DI USARLO.
AMBIANTE
ATTENZIONE :
Non gettare quest’ apparecchio tra i rifiuti domestici. Per questo tipo di prodotti è fornito dai
comuni un sistema di raccolta e ritiro in zona ed è quindi un dovere informarsi per conoscere
il giusto smistamento del rifiuto. Infatti, i prodotti elettrici ed elettronici possono contenere sostanze
pericolose che hanno effetti dannosi sull’ambiente o sulla nostra salute e quindi devono essere riciclati.
Il simbolo al lato indica che le apparecchiature elettriche ed elettroniche fanno parte di una raccolta
selettiva e differenziata (rappresentata da un bidone su due ruote sbarrato da una croce.
Prodotto e importato da : Adeva SAS 8 rue Marc Seguin 77290 Mitry-Mory FRANCE
www.hkoenig.com - contact@hkoenig.com - Tel. 01 64 67 00 01
 Loading...