

Page 1
Espresso Coffee Machine
Machine à Café Expresso
Espressomaschine
Espresso Koffie Machi ne
Máquina para Café Espresso
Macchina per Caffè Espresso
EXP350
Instruction Manual
Mode d´emploi
Bedienungsanleitung
Gebruiksaanwijzing
Manual de Instrucciones
Manuale d’uso
ENGLISH
*IMPORTANT SAFEGUARDS
:
Before using machine always carefully read and comply with all these
instructions. We cannot accept any responsibility for the consequences of
improper use.
1. Check voltage to be sure that the voltage indicated on the name plate
agrees with your voltage.
2. This appliance has been incorpor ated wit h a gro unded pl ug. Pl ease ens ure
the wall outlet in your house is well earth ed.
3. Close supervision is necessary when the appliance is used by people.
Place the machine out of the reach of children and persons with limited
capabilities.
4. Do not place on or near a hot gas or electric burner or in a heated oven.
5. Unplug from outlet when not in use and before cleaning. Allow to cool
before putting or taking of f parts, and before cleanin g t he appliance.
6. Do not operate any appliance with a damaged cord or plug or after the
appliance malfunctions, or has been damaged in any manner. Return
appliance to the nearest authorized service facility for examination, repair
or adjustment.
7. The use of accessory attachment not recommended by the appliance
manufacturer may result in fire, electr ic shock, or injury to persons.
8. Be careful to ensure that the power cable does not become trapped and
does not rub against sharp edges.
9. Do not let the cord hang over the edge of a table or counter, or touch hot
surfaces.
10. Do not touch any hot parts. Use t he handle of the funnel.
11. To protect against fire, elect ric shock a nd injury to per sons, do not imm erse
cord, plugs, or body of machine in water or ot her liquid.
12. It must be protected against freezing c onditions.
13. Please fill up no more than 1.7L to upper MAX mark, when pure water in
Page 2
water tank.
14. Contrary to common belief , the best pressure for the preparation of
espresso coffee is between 8 and 12 bar. 15 bar is the maximum pressure
of the unit.
The complexity of making an es press o i s to h av e the ideal fine ness of gr ind
that will reach a pressure of 8 to 12 bar and get t he best taste of coffee.
If the grind is not fine enough, pressure will be low and the coffee will flow
too rapidly, whereas if the grind is too fine the press ure will be too high and
the coffee will flow very slowly.
15. The tamping of the coffee is also important in the preparation of espresso ,
and for regulating the pressure of the machine.
16. If you do not have coffee grinder , you can find special espresso coffee in
store or ask specific grind to your coffee roaster.
17. Once the fault, defect or machine dr op cause d by su spicious de fect, unp lug
the power plug immediately, do not operat e on t he problem machine.
18. Do not use outdoors.
19. SAVE THESE INSTRUCTIONS FOR YOUR REFFERENCE.
20. This device is not intended for use by per son s with r educ ed c ap acity on t he
physical, mental or sensory or lack of exper ience an d know ledge (i nc luding
children), unless he has them was asked to monitor or if they have had
instructions on the use of the appliance by a person responsible for their
safety. Children should be supervised to ensure they do not play with the
device.
21. If the power cord is damaged, it must be replaced with an after-sales
service to avoid any danger.
HOUSEHOLD USE ONLY
Accessories:
Warning:
The machine must use grinding coffee powder and only for
making coffee, coffee drinks, heating milk , other
non-standard use will possible cause the machine not
working.
A. FOR THE FIRST USE
1. Move the coffee maker from the package, and check the accessories
according to the list.
2. Clean all the detachable co mpo nents
3. Operation the appliance accordin g t o t he s ect ion of “B” and “C” (no coffee
powder in filter). Repeat 2-3 times.
Page 3
B. MAKE ESPRESSO COFFEE
1. Open the lid, take out water tank, and pour appropriate water into tank. Do
not exceed the MAX capacity ;
2. Put back the water tank and close the l id;
3. Connect power plug, press power b ut t on, then machine will automatically
pump water about 2s, and coffee indicator and steam indicator a lways light
on, then coffee indicator is flashing and the machine start preheating, coffee
indicator will light on and then preheati ng f inished after 2min;
4. Take out filter holder, pour appropr iate c offee powder into the filter with coffee
spoon, then press the coffee powder tightly;
5. Lock the filter holder into the group head
6. Put cup(s) under coffee out let;
7. Start brew in g by pressing coffee button;
8. Remove filter holder , knock it out and clean it w ith hot w ater imme diat ely, and
lock it again for next use.
Note: Check frequently the water level in the tank. Refil l if necessary.
Do not use hands to touch the hot surfaces of machine, especi al ly
brewing outlet, steam nozzle wh en u se m achine.
C. FROTHING MILK/ MAKE CAPPUCCINO
1. Prepare espresso first w ith a large enough cup according to p ar t “ B. M AKE
ESPRESSO COFFE.
2. Use whole, fresh cold milk out of the frid ge( 8℃-10℃), and pour 1/3 milk in
cup.
Note: Use a stainless st eel cup, and cup diameter should not less t han
70 ± 5mm, due to the volume of milk will increase after frothing.
3. Press steam button, it starts preheating, and steam indicator is flashing, then
wait for lamp lights on;
4. Put a stainless steel cup under steam nozzle;
5. Open knob, release steam, make the steam nozzle floating on the surface of
milk, and adjust the height of steel cup to froth milk;
6. Remove product when finished, turn off the knob, and Pour the frothed milk
into the espresso prepared; now t he c appuccino is ready.
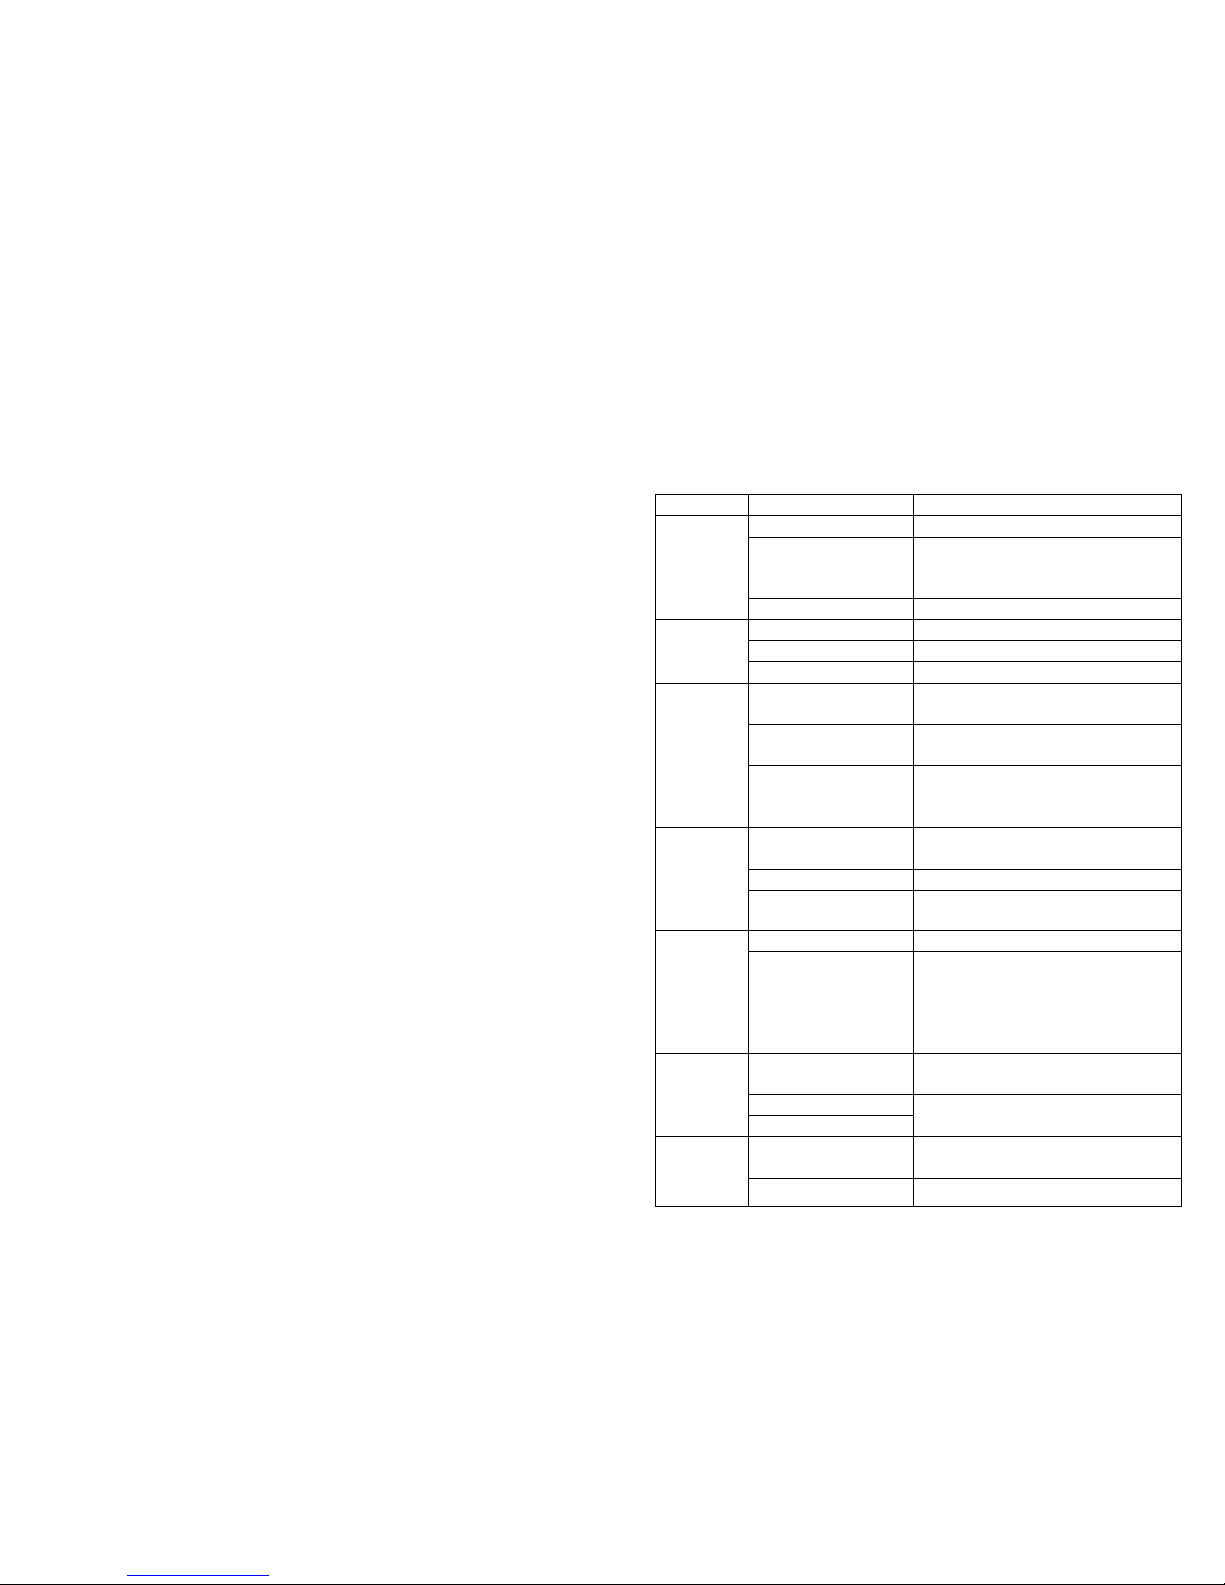
TROULBE SHOOTING
Problem
Cause/Result
Solution
No water
comes out
Water tank is empty
Pour water in water tank
The input voltage or
frequency is inconsistent
with nameplate
Make sure the voltage and frequency is
consistent with the nameplate
machine malfunctions
please contact with the authorized service
No steam is
generated
steam nozzle clogged
Clean steam nozzle
Water tank is empty
Pour water in water tank
Machine malfunctions
please contact with the authorized service
Coffee runs
out around
the edge of
the filter
holder
Too much coffee in filter
clean the filter, then pour appropriate coffee
powder
There is coffee in the seal
under group head
Clean the seal under group head
Implementation of the
above operation
problems still exist
please contact with the authorized service
Coffee
comes out
too slow or
no coffee
comes out
coffee grind is too fine,
and clogged filter
With thicker coffee powder
Filter holes are blocked
Brush / clean the filter
Water tank is not inserted Insert the water tank in place
There is
water
leakage on
the bottom of
coffee
machine
Drip tray is filled up
Please clean the drip tray
Machine malfunctions please contact with the authorized service
Machine is
not working
The power outlet is not
plugged well.
Plug the power cord into a wall outlet
correctly,
NTC is short circuit
please contact with the authorized service
Machine malfunctions
The steam
cannot froth.
Steam indicator is
flashing
Wait steam indicator lights on.
The container is too big Use high and narrow cup or garland cup
Page 4

or the shape is not fit
used skimmed milk Use whole milk
*If you have not been able to solve the problem, contact customer support in your country
Note: Purge steam to clean st eam nozzle after use, warning hot surface.
D. MAKE HOT WATER
1. Put a stainless steel cont ainer under steam nozzle;
2. Open knob after coffee indicator always lights on, and then hot water is
ejected from the steam nozzle;
3. Close knob when the desired amount is reached.
Note: Check frequently the water level in the tank. Refil l i f necessar y.
Do not touch the hot surfaces of the machine with hands,
especially brewing outlet, steam nozzle when use machine.
E. HEATING LIQUID
1. Use a stainless steel cup, pour col d liquid to 1/2 cup;
Note: Cup diameter sh ould not less than 70 ± 5mm.
2. Press steam button, it start preheating, and steam indicator is flashing, then
wait for lamp lights on;
3. Put cup under steam nozzle;
4. Turn on the knob, release steam,let the steam nozzle is inserted into the
liquid;
5. Turn off the knob when the desired temperature is reached.
Note: When steam is stopped, clean the steam nozzle immediately, and
release the liquid i n the pipe , to pr ev ent the l iq ui d s ca li ng, bec aus e
the surface temperature of steam pipe is very high when in use, be
careful not to be scalded.
INDICATOR TIPS
Coffee
Indicator
Steam
Indicator
Cause Solution
Flashing Lights on Power on
/
Flashing Lights off
Pre-heating
coffee
/
Lights on Lights off
Coffee
Pre-heating
finished
/
Lights off Flashing
Pre-heating
Steam
/
Lights off Lights on
Pre-heating
finished
/
Flashing Lights off
Temperature is
too high
Wait temperature naturally
fall or press coffee button
boil water to cooling
Flashing Flashing
NTC is open
circuit or short
circuit
Please contact with the
authori
zed service facility
for repairing.
Flashing Lights off
Making hot water
too long
Turn off the knob
Lights off Flashing
Making coffee for
too long
Turn off the knob
Page 5

*CLEAN AND MAINTENANCE
1. The machine has to be switched off and cooled down.
2. Clean housing with damp cloth.
Note: Do not use abrasive sponges and detergents or solvents.
Do not immerse the machine into water.
3. Clean steam outlet, confirm there is no b lockage.
4. Brush the outlet and the seal under the gr oup head;
5. Rinse with hot water to dissolve any coffee bean oil residue.
6. Clean all the detachable attachments in the water and dry thoroughly.
*
CLEANING MINERAL DEPOSITS
1. The machine builds up lime scale deposits over time, and you need descale
the machine 2-3 months;
2. Pour water and descale in water t an k up to MAX c ap ac ity (wat er and desca le
ratio is 4:1, follow the instruction of d esca le. P lease use “hou seh old des cale” ,
or you can use the citric acid replace descale (water and citric acid ratio is
100:3).
3. Lock the filter holder (no coffee powder) into the group head. According to
part “B” MAKE ESPRESSO COFFEE.
4. Press coffee button, then make about 150ml coffee after coffee indicator
always lights on, turn off coffee button and turn on steam button, then open
knob after steam indicator always li ghts on, release steam about 2min and
turn off the knob, then make desc ales dep osit in the machin e at least 15m in.
5. Repeat the steps 4 for 3 times;
6. Press coffee button to brew coffee until there is no descale left;
7. Make coffee again(no c of f ee p owder), repe at t he step s 4 for 3 t imes ( no n eed
wait for 15 min), then brewing until no wat er is le f t in the boiler;
8. Repeat the step 7 at least 3 times to make sur e the piping is cleanly.
*ENVIRONMENT
CAUTION :
Do not dispose of this product as it has with other h ousehold pr oduct s. There
is a separation of this waste product into communities, you will need to
inform your local authorities about the places where you can return this
product. In fact, electrical and electronic products contain hazardous
substances that have harmful effects on the environment or human health
and should be recycled. The symbol here indicates that electrical and
electronic equipment should be chosen carefully, a wheeled waste
container is marked with a cross.
Manufactured and imported : Adeva SAS 8 rue Marc Seguin 77290 Mitry-Mory FRANCE
www.hkoenig.com - contact@hkoenig.com - Tel 01 64 67 00 01
Page 6

FRANCAIS
*CONSEILS IMPORTANTS:
Lisez ces instructions avant d´utiliser la machine. Le fabricant ne pourra être
tenu responsable pour tout dommage ou blessure causés des suites d´une
utilisation inadéquate.
1. Vérifiez que le voltage de votre installation électrique respecte les
caractéristiques de l´appareil.
2. Cet appareil est équipé d´une pri se ter re. Assurez-vous d ´utiliser une prise
terre.
3. Toujours superviser l´appareil pendant son utilisation. Pl acez la machine
hors de portée des enfants.
4. Ne pas placer trop près d´une source de chaleur.
5. Débranchez la prise, si vous n´avez pas l´intent ion de l´util iser pendant une
période prolongée.
6. Ne jamais utiliser l´appareil avec un câble endommagé. Consultez le SAV
avant de l´utiliser à nouveau.
7. Il est déconseillé d´utiliser des access oires non approuvés par le fabr ica nt.
8. Évitez de plier ou endommager le câb le.
9. Ne pas laisser le câble suspendre afin d´éviter qu´un enfant tire dessus et
fasse tomber l´appareil.
10. Ne jamais toucher les parties chaud es .
11. Ne jamais immerger l´appareil ou le câb le dans l´eau ou tout autre liquide.
12. Éviter les températures extrême s .
13. Ne pas remplir plus de 1.7L ou au-delà du niveau MAX.
14. Contrairement à des idées reçues, la meilleure pression pour la réalisation
d’un expresso se situe entre 8 et 12 bars et non 15 bars qui est la pression
maximum de l’appareil. La complexité de l’élaboration d’un expresso
consiste à avoir la finesse de mouture idéale qui permettra d’atteindre une
pression de 8 à 12 bars et avoir la meilleure qualité de café.
Si la mouture n’est pas assez fine la pression sera basse et le café
s’écoulera trop rapidement , alors que si la mouture est trop fine la pression
sera trop élevée et le café s’écoulera t r ès lentement.
15. Le tassage du café est également important dans la préparation de
l’expresso, et pour la régulation de la pression de la machine.
16. Si vous ne disposez pas de broyeur à café, vous pouvez trouver dans le
commerce des cafés spécial expresso ou demander à votre torréfacteur
une mouture de café spécifique.
17. En cas de disfonctionnement, débranchez l´appareil et consultez le SAV.
18. Ne pas utiliser en extérieur.
19. CONSERVEZ CE MAN U EL.
20. Cet appareil n'est pas destiné à être utilisé par des personnes présentant
des capacités réduites sur le plan physique, mental ou sensoriel ou bien
manquant d'expérience ou de connaissance, (y compris les enfants), sauf
s'il leur a été demandé de surveiller ou si elles ont eu des instructions
concernant l'utilisation de l'appareil par une personne responsable de leur
sécurité. Les enfants doivent être surveillés pour s'assurer qu'ils ne jouent
pas avec l'appareil.
21. Si le cordon d'alimentation est endommagé, il doit être remplacé auprès
d'un Service après-vente afin d'éviter tout danger.
Page 7

Accessoires:
Avertissement: Uti l iser du café moulu. Ne pas utiliser la machine pour
tout autre utilisation que celle pr évu, ceci pourrait
l´endommager
.
A. Pour la premi ère ut ilisation
1. Retirez la machine de la boite et vérifier que tous les accessoires sont bien
fournis.
2. Nettoyez tous les accessoires
3. Utilisez la machine selon les conseils des sections “B” et “C” (sans mettre de
café dans le filtre). Répétez 2 à 3 fois.
B. Préparez du café expresso
1. Retirez le couvercle du réservoir et remplissez-le sans dépasser le niveau
maximum.
2. Replacez le réservoir.
3. Branchez la prise et pressez le bouton O N/ O FF. La machine pompera de
l´eau pendant 2s, et le témoin lumineux de la vapeur s´allume et le témoin
du café clignote pendant que la machin e chauffe pendant 2min avant de se
fixer.
4. Remplissez le filtre de la quantité adéquate de café avec la cuillère et
pressez-le.
5. Placez le filtre en place.
6. Placez la tasse sous l´opercule
7. Pressez le bouton café;
8. Une fois le café prêt, ôtez le filtre et tapez fermement avant de le laver.
Note: Vérifiez le niveau d´eau régulièrement. Remplissez quand
nécessaire.
Ne touchez pas les parties métalliques de la machine car celles-ci
peuvent brûler.
C. Mousse de Lait et Cappuccino
1. Préparez un expresso dans une tasse assez grande pour la préparation du
cappuccino selon les instructions de l a s ect i on B.
2. Utilisez 1/3 de tasse de lait entier froid (8℃-10℃).
Note: Il est préférable d´utiliser une tasse en acier inoxydable et gardez
à l´esprit le fait que le lait remplira la tasse une fois mousseux.
3. Presse le bouton vapeur, le préchauffage commence, le témoin vapeur
arrêtera de clignoter une fois la températ ure idéale est atteinte.
4. Placez la tasse en acier sous l´embout vapeur;
5. Tournez le bouton pour faire sortir la vapeur d´eau, en laissant l´embout à la
surface du lait.
6. Tournez le robinet une fois l´effet désiré obtenu avant de verser la mousse de
lait dans votre expresso.
Page 8
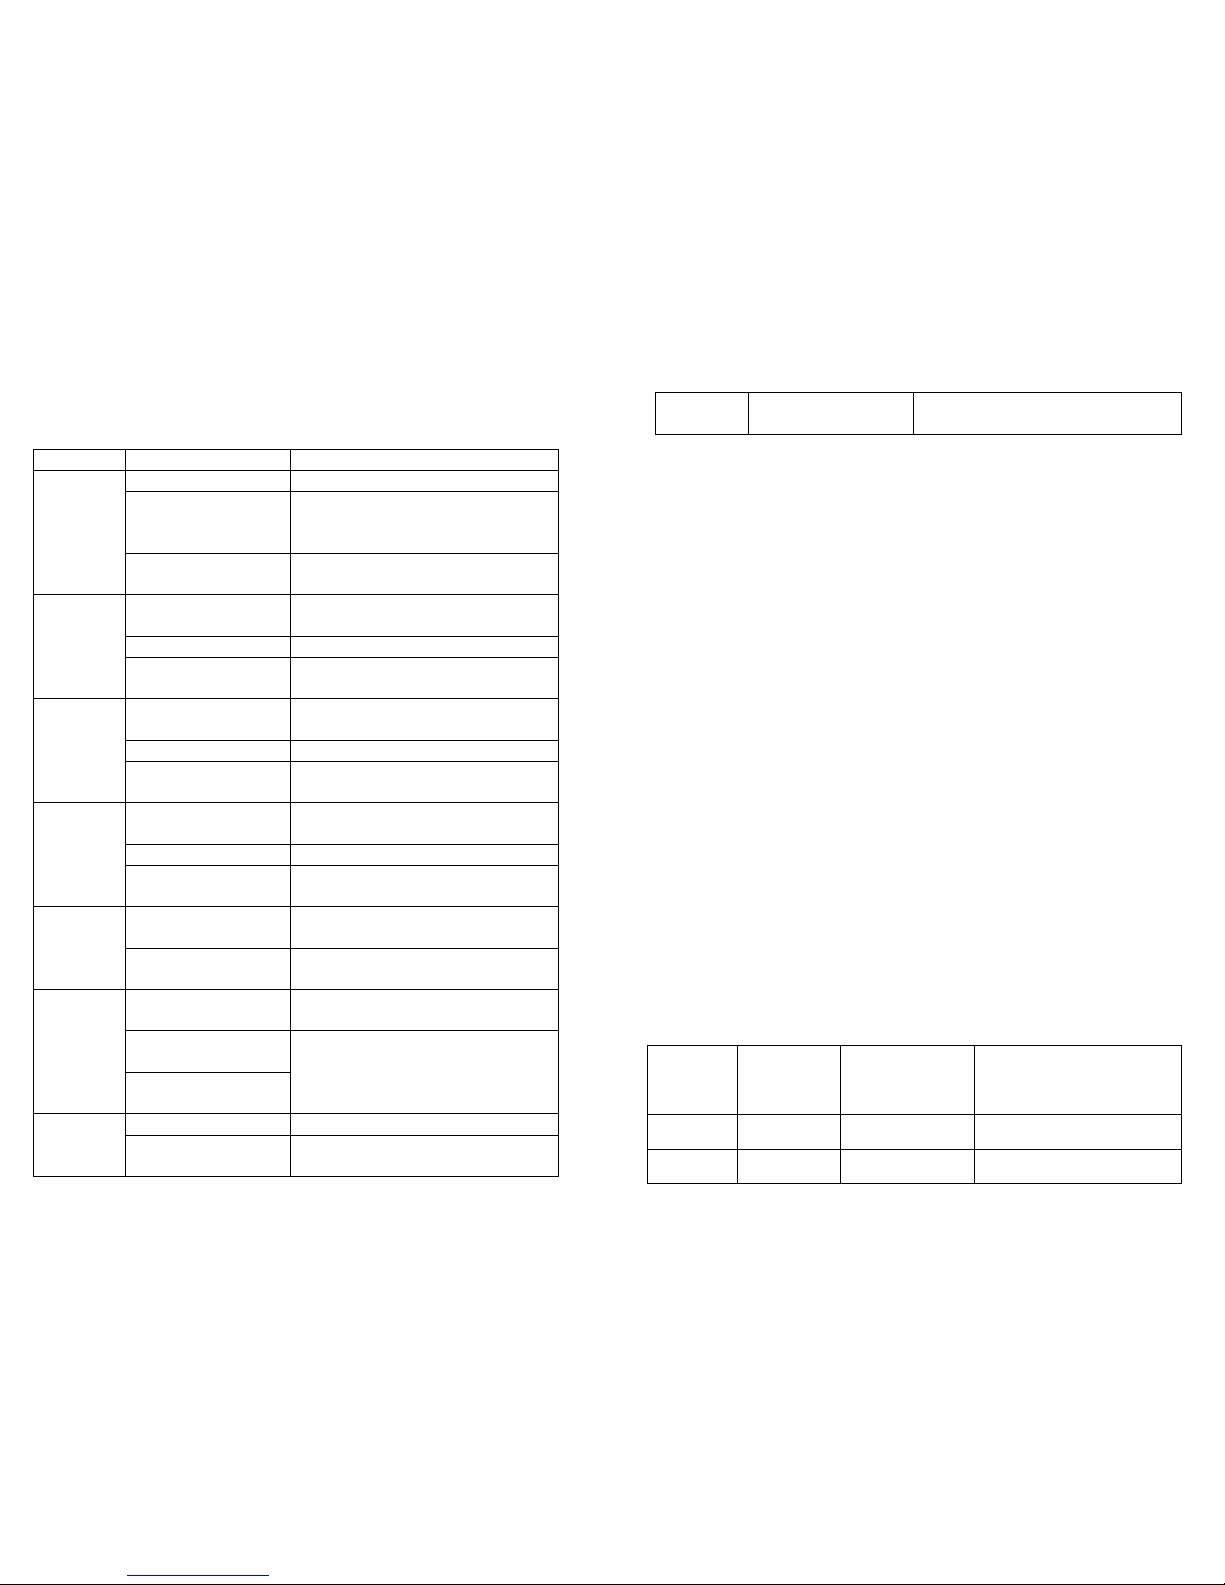
DEPANNAGE
Problème
Cause/Effet
Solution
L´eau ne
s´écoule pas
Le réservoir est vide
Verser de l´eau dans le réservoir
Le voltage électrique
n´est pas suffisant pour
l´appareil
Révisez le voltage requis
La machine ne fonctionne
pas correctement
Contactez le SAV
Pas de
vapeur
Le robinet à vapeur est
bouché
Nettoyez le robinet à vapeur
Le réservoir est vide
Versez de l´eau dans le réservoir
La machine ne fonctionne
pas correctement
Contactez le SAV
Du café
s´échappe
du filtre
Trop de café dans le filtre
Nettoyez le filtre et versez la quantité
adéquate de café
Il y a du café sur le joint
Nettoyez le joint du filtre
Les conseils si dessus ne
résolvent pas le problème
Contactez le SAV
Le café sort
trop
lentement ou
pas du tout
La mouture du café est
trop fine
Utilisez un mouture moins fine
Le filtre est bouché
Nettoyez le filtre
Le réservoir n´est pas
bien placé
Placez le réservoir correctement
De l´eau
coule sous
l´appareil
Le bac de récupération
est plein
Videz et nettoyer le réservoir sous la tasse
La machine ne fonctionne
pas correctement
Contactez le SAV
La machine
ne
fonctionne
pas
La prise n´est pas bien
branchée
Branchez la prise correctement
La machine a
court-circuité
Contactez le SAV
La machine ne fonctionne
pas correctement
La vapeur ne
fait pas
mousser le
Le témoin vapeur clignote
Attendez que le témoin soit fixe
Le récipient est trop
grand ou inadapté
Utilisez un récipient haut et étroit
lait Vous avez utilisé du lait
écrémé
Utilisez du lait entier
*SI le problème ne se résout pas avec les conseils ci-dessus, contactez le SAV
Note: Purgez la vapeur pour nettoyer le robinet vapeur.
D. CHAUFFER DE L´EAU
1. Placez un récipient en acier inoxydable
2. Tournez le bouton une fois le témoin vapeur fixe
3. Fermer le bouton une fois le niveau désiré obtenu.
Note: Vérifier le niveau de réservoir régulièrement et remplir en cas de
besoin.
Ne pas toucher les parties chaudes av ec vos mains.
E. CHAUFFER UN LIQUIDE FROID
1. Placez un récipient en acier inoxydable à m oitié plein;
Note: Ne pas utiliser un récipient de moins de 7cm de rayon.
2. Tournez le bouton une fois le témoin vapeur fixe
3. Placez le robinet dans le récipient et lais sez l´embout à la surface du liquide
4. Fermer le bouton une fois le niveau désiré obtenu.
5. Vérifiez que la température vous sat isfait
Note: Après chaque utilisation, purgez le robinet v a peur pour le
nettoyer.
Conseils
Témoin de
café
Témoin
vapeur
Cause Solution
Clignote S´allume Power on
/
Clignote S´éteint
Préchauffage en
/
Page 9
cours
S´allume S´éteint
Préchauffage
terminé
/
S´éteint Clignote
Préchauffage en
cours
/
S´éteint S´allume
Préchauffage
terminé
/
Clignote S´éteint
La température
est trop élevée
Attendez que l´appareil
refroidisse
Clignote Clignote
L´appareil a
court-circuité
Contactez le SAV
Clignote S´éteint
Surchauffe de
l´appareil
Éteignez l´appareil
S´éteint Clignote
Surchauffe de
l´appareil
Éteignez l´appareil
NETTOYAGE ET ENTRETIEN
1. Débranchez et laissez refroidir la mac hine.
2. Nettoyer la machine avec un chiffon légèrement
Note: Ne pas utiliser de produits ou matériaux abrasifs.
Ne jamais plonger la machine dans l ´ eau.
3. Nettoyez le robinet vapeur.
4. Nettoyez l ´opercule.
5. Rincez à l´eau chaude les traces grasses.
6. Nettoyez les accessoires et séchez-les méticuleusement.
*
DÉTARTRAGE
1. Il est conseillé de détartrer la machine tous les 2 à 3 mois.
2. Versez de l´eau dans le réservoir au niveau maximum, avec ¼ de détartrant.
3. Placez le filtre à café (sans café) selon les c onseils de la section “B”.
4. Faites couler 150ml d´eau une fois le témoin café fixe et tournez le bouton
vapeur. Relâchez la vape ur pendant 2min pour détartrer la machine pendant
15 minutes.
5. Répétez 3 ou 4 fois.
6. Pressez le bouton café pour faire couler l´eau;
7. Faites couler l´eau (sans café) 3 ou 4 fois à la suite ou jusqu´à ce que le
réservoir soit vide.
8. Répétez l´étape 7 plusieurs fois jusqu’à ce que ce soit parfaitement propre.
ENVIRONNEMENT
ATTENTION :
Vous ne devez pas vous débar r as ser de cet appareil avec vos déchets
ménagers. Un système de collecte sélective pour ce type de produit est m is
en place par les communes, vous devez vous renseigner auprès de votre
mairie afin d'en connaître les emplacements. En effet, les produits
électriques et électroniques peuvent contenir des substances dangereuses
qui ont des effets néfastes sur l'environnement ou la santé humaine et
doivent être recyclés. Le symbole ci-contre indique que les équipements
électriques et électroniques font l'objet d'une collecte sélective, il représente
une poubelle sur roues barrée d'une croix.
Fabriqué pour et importé par : Adeva SAS 8 rue Marc Seguin 77290 Mitry-Mory FRANCE
www.hkoenig.com - contact@hkoenig.com - Tél. 01 64 67 00 01
Page 10

DEUTSCH
*WICHTIGE SICHERHEITSHINWEISE:
Lesen und beachten Sie die Anweisungen immer sorgfältig, bevor Sie die
Maschine benutzen. Wir übernehmen keine Verantwortung für die Folgen
unsachgemäßer Anwendung.
1. Überprüfen Sie die Spannung, um sicherzustellen, dass die auf dem
Typenschi ld an gegebene Spannung mit Ihrer Spannung übereinstimmt.
2. Das Gerät hat einen geerdeten Stecker integriert. Bitte stellen Sie sicher,
dass die Steckdose in Ihrem Haus gut geerdet ist.
3. Sorgfältige Aufsicht ist notwendig, wenn das Gerät von Menschen genutzt
wird. Stellen Sie das Gerät außerhalb der Reichweite von Kindern und
Menschen mit begrenzten Fähig keiten.
4. Stellen Sie das Gerät nicht auf oder neben heißen Gas- oder
Elektrobrenner oder in einen beheiz t en O fe n.
5. Ziehen Sie den Stecker aus der Steckdose, wenn es ni cht in Gebrauch ist
und vor der Reinigung. Lassen Sie vor der Inbetriebnahme oder dem
Abbau von Teilen und vor der Reinigung das Gerät abkühle n.
6. Verwenden Sie kein Gerät mit beschädi gtem Netzkabel oder Stecker oder
wenn das Gerät nicht richtig funktioniert oder in irgendeiner Weise
beschädigt wurde. Bringen Sie das Gerät zu dem nächsten Fachhändler
zur Überprüfung, Reparatur oder Einstellung.
7. Die Verwendung von Zubehör, das nicht vom Gerätehersteller empfohlen
wird, kann einen Brand, Stromschlag oder Personenschäden zur Folge
haben.
8. Seien Sie vorsichtig, um sicherzustellen, dass das Netzkabel nicht
eingeklemmt wird und nicht an scharfen Kanten scheuert.
9. Lassen Sie das Kabel nicht über die Kante eines Tisches oder einer
Arbeitsplatte hängen oder heiße O berflächen berühren.
10. Berühren Sie keine heißen Teile. Verwenden Sie den Griff des Trichters.
11. Um sich vor Feuer, St romschl ägen und Verletzungen zu schützen, tauchen
Sie das Kabel, den Stecker , oder den Körper der Masch ine nicht in Wa sser
oder andere Flüssigkeiten.
12. Es muss vor Frost beschütz t wer den.
13. Bitte füllen Sie nicht mehr als 1,7 Liter bis zur oberen Marke MAX, wenn
Sie reines Wasser in de n Wassertank füllen.
14. Entgegen der weit verbreiteten Meinung, ist ein Druck zwischen 8 und 12
bar für die optimale Zubereitung von Espresso am besten geeignet. Die
maximale Druckerzeugung dieses G er ät es liegt bei 15 bar.
Die Komplexität liegt hier dabei, den optimalen Mahlgrad der Kaffeebohnen
zu finden, um den erforderlichen Druck von 8-12 bar zu gewährleisten.
Ist die Kaffeebohne zu grob gemahlen, so wird nicht genug Druck beim
Durchlaufen des Was sers aufgebaut, und dieses fließt zu schnell, während
bei einem zu feinen Mahlgrad der Druck zu hoch ist und das Wasser zu
langsam fließt. Darüber hinaus ist es auch von Bedeutung, wie fest das
Pulver in den Siebträger gepresst wird.
15. Wenn Sie keine Kaffeemühle haben, lassen Sie sich von ihrem
Kaffeeröster oder bei ihrem Kaffeespezialisten beraten.
16. Wenn es zu einem Fehler, Mangel oder Maschinentropfen durch einen
Defekt verursacht kommt, ziehen Sie sofort den Netzstecker, verwenden
Sie das Gerät nicht mehr mit dem Probl em.
17. Nicht im Freien verwenden.
18. BEWAHRE N SIE DIE SE ANLEITUNG GUT AUF.
19. Dieses Gerät ist nicht für die Nutzung durch Personen mit eingeschränkter
Kapazität auf der körperlichen, geistigen oder sensorischen oder
mangelnder Erfahrung und W issen (einschließlich Kinder), es sei denn, er
hat sie wurde gebeten, zu überwachen oder, wenn sie Anweisungen auf
dem Einsatz des Gerätes durch eine für ihre Sicherheit zuständige Person
hatte. Kinder sollten beaufsichtigt werden, um sicherzustellen, dass sie
nicht mit dem Gerät spielen.
20. Wenn das Netzkabel beschädigt ist, muss es mit einem Kundendienst
ersetzt werden, um Gefahren zu vermeiden.
Page 11

NUR FÜR DEN HAUSGEBRAUCH
Zubehör:
Achtung: Die Maschine muss zum Mahl en von K aff epulv er und nur zum
Machen von Kaffe, Kaffee-Getränken, Erwärmen von Milch,
andere Nicht-Standard-Anwendu ngen sind nicht möglich und
bewirken, dass das Gerät nicht mehr funktioniert.
A. VOR DEM ERSTEN GEBR AUCH
1. Nehmen Sie die Kaffeemaschine aus der Verpackung, und überprüfen Sie
das Zubehör nach der Liste.
2. Reinigen Sie alle abnehmbaren Teile.
3. Betreiben Sie das Gerät nach dem Abschnitt "B" und "C" (kein Kaffeepulver
im Filter). Wiederholen Sie dies 2-3 m al.
B. ESPRESSO ZUBEREITUNG
1. Öffnen Sie den Dec kel, entneh men Sie den Wa ssertank und füllen Sie ihn mit
Wasser. Übersteigen Sie nicht die MAX Kapazität;
2. Setzen Sie den Wasserbehälter wieder ein und schließen den Deckel;
3. Stecken Sie den Netzstecker ein, dr ücken Sie die Power-Taste, dann wird die
Maschine automatisch ca. 2s Wasser pumpen, die Kaffee-Anzeige und der
Dampfindikator leuchtet immer auf, dann blinkt die Kaffee-Anzeige und die
Maschine starten das Vorheizen, Kaffee-Anzeige leuchtet auf, nach 2m in ist
das Vorheizen abgeschlossen;
4. Nehmen Sie den Filterhalter, geben Sie geeignetes Kaffeepulver m it einem
Kaffeelöffel in den Filter, drücken Sie dann das Kaffeepulver fest;
5. Den Filterhalter wieder in den Kop f v er r iegeln.
6. Stellen Sie Tassen unter den Kaffeauslauf;
7. Starten Sie das Kochen indem Sie den Kaffeknopf drücken;
8. Entfernen Sie den Filterhalter, klopfen Sie ihn aus und reinigen Sie ihn sofort
mit heißem Wasser, und verriegeln Sie ihn wieder für den nächsten Einsat z.
Hinweis: Überprüfen Sie regelmäßig de n Wasserstand im Tank.
Gegebenenfalls nachfüllen. Benutzen Sie nicht Ihre Hände, um die heißen
Oberflächen der Maschi ne zu berü hre n, v or alle m den Kaffe ausl a uf,
Steckdose, Dampfdüse, wenn Sie die Maschine ben utzen.
C. AUFSCHÄUMEN VON MILCH / CAPPUCCINO
1. Bereiten Espresso z uerst mit eine m ausre ichend gr oßen Tass e wie in Te il "B“
zu. Machen Sie Espresso Kaffee.
2. Verwenden Sie volle, frische kalte Milch aus dem Kühlschrank (8 ℃ -10 ℃),
und gießen Sie 1/3 Milch in die Tasse.
Hinweis: Verwenden Sie einen Becher aus rostfreiem Stahl, und
Topfdurchmesser sollte nicht weniger als 70 ± 5 mm sein, da die
Milchmenge nach de m Aufschäumen zunimmt.
3. Drücken Sie Taste Dampf, es beginnt das Vorheizen und die Dampfanzeige
blinkt, dann warten Sie, bis Lampe auf le uchtet.
4. Setzen Sie ein rostfreien Stahl-Becher unter die Dampfdüse;
5. Öffnen Sie den Regler, geben Sie den Dampf frei, sorgen Sie dafür das die
Dampfdüse an der Oberfläche der Milch schwimmt und justieren Sie die Höhe
des Stahlbechers um den
Milchschaum zu schäumen.
6. Entfernen Sie das Produkt wenn Sie f ertig sind, schalten Sie den Knopf aus
Page 12

und gießen Sie die aufgeschäumte Milch in den v orbereiteten Espresso; Jet zt
ist der Cappuccino fertig.
FEHLERBEHEBUNG
Problem
Ursache / Folge
Lösung
Es kommt kein
Wasser
Wassertank ist leer
Gießen Sie Wasser in
Wassertank
Die
Eingangsspannung /
Frequenz ist im
Widerspruch zum
Typenschild
Achten Sie darauf, die Spannung
und Frequenz gleich ist mit dem
Typenschild
Maschinenstörungen
Wenden Sie sich bitte an einen
autorisierten Kundendienst
Es wird kein
Dampf erzeugt
Dampfdüse verstopft Dampfdüse reinigen
Wassertank leer ist
Gießen Sie Wasser in den
Wassertank
Fehlfunktion der
Maschine
Wenden Sie sich bitte an einen
autorisierten Kundendienst
Kaffee tritt um
den Rand des
Filterhalters
aus
Zu viel Kaffee im
Filter
Reinigen Sie den Filter, dann
gießen Sie das entsprechende
Kaffeepulver zu.
Der Kaffee in der
Dichtung unter der
Brühgruppe
Dichtung unter der Brühgruppe
reinigen
Durchführung der
obigen Prozedur und
die Probleme sind
noch existent.
Wenden Sie sich
bitte an einen
autorisierten Kundendienst
Kaffee kommt
zu langsam
oder gar nicht
heraus.
Kaffee ist zu fein
gemahlen und
verstopft den Filter
Verwenden Sie dickeres
Kaffeepulver
Filteröffnungen
blockiert
Filter reinigen
Wasserbehälter ist
nicht eingesetzt
Gießen Sie Wasser in
Wassertank
Wasserleckage
Tropfschale aufgef ül lt
Bitte reinigen Sie die Tropfschale
an der
Unterseite
Fehlfunktion der
Maschine
Wenden Sie sich bitte an einen
autorisierten Kundendienst
Ihr Gerät
funktioniert
nicht
Der Stecker ist nicht
gut angeschlossen.
Stecken Sie das Kabel richtig in
eine Steckdose
Kurzschluss
Wenden Sie sich bitte an einen
autorisierten Kundendienst
Fehlfunktion der
Maschine
Der Dampf
schäumt nicht
Dampfanzeige blinkt
Warten Sie bis die Dampfanzeige
aufleuchtet.
Der Behälter ist zu
groß oder die nicht
passend.
Verwenden Sie hohe und
schmale Tassen oder Becher.
Magermilch
verwendet
Verwenden Sie volle Milch
* Wenden Sie sich an einen autorisierten Kundendienst wenn Sie das Problem nicht lösen
konnten.
Hinweis: Dampfdüse nach Gebrauch reinigen, Achtung! heiße Oberfläche.
D. HEIßES WASSER KOCHEN
1. Setzen Sie einen Behälter aus rostfre iem Stahl unter die Dampfdüse;
2. Drehen Sie den Griff bis Kaffe Indikator dauerhaft aufleuchtet. Danach
kommt heißes Wasser aus der Dampfdüse
3. Schließen Sie den Griff wenn die gewünschte Menge erreicht ist
Hinweis: Überprüfen Sie regel m äßig den Wasserstand im T ank.
Gegebenenfalls nachfüllen. Berühren Sie beim Gebrauch der
Maschine nicht die he i ßen Oberflächen der Maschine mit den
Händen, vor allem ni cht den Brühausgang und die Dampfdüse.
E. HEIZFLÜSSIGKEIT
1. Setzen Sie einen Behälter aus rostfre iem Stahl unter die Dampfdüse;
Hinweis: Topfdurchmesser sollte nicht weniger als 70 ± 5 mm sein.
2. Drücken Sie Taste Dampf um zu starten. Vorheizen und Dampfanzeige blinkt,
dann warten Sie bis die Lampe aufleuchtet;
3. Setzen Sie die Tasse unter die Dampfdüse;
Page 13

4. Drücken Sie den Knopf: Dampf freilassen. Sorgen Sie dafür das die Düse in
der Flüssigkeit liegt
5. Schalten Sie den Knopf aus, wenn die gewünschte Temperat ur er reicht ist.
Hinweis: Wenn der Dampf stoppt, reinigen sie direkt die Düsen. Lassen
Sie die Flüssigkeit aus der Leitung um Flüssigkeitsskalierung zu
vermeiden, da die Oberflächentemperatur der Dampfleitung sehr
hoch bei Benutzung i st. Achten Sie darauf sich nicht zu
verbrennen.
ANZEIGE TIPPS
Kaffee
Anzeiger
Dampf
Anzeiger
Ursache Lösung
Blinkt Lichter an Power ein
/
Blinkt Lichter aus
Vorwärmen
Kaffee
/
Lichter an Lichter aus
Kaffee vorheizen
beendet
/
Lichter aus Blinkt
Vorwärmung
Dampf
/
Lichter aus Lichter an
Vorwärmung
Dampf beendet
/
Blinkt Lichter aus
Temperatur zu
hoch
Warten Sie bis die
Temperatur
sinkt oder
drücken Sie den Knopf
„Kaffee“
Blinkt Blinkt
NTC ist offen
oder Kurzschluss
Wenn Sie sich bitte an den
Fachhändler zur Reparatur
Blinkt Lichter aus
Wasser kocht zu
lange
Schalten Sie den Knopf aus
Lichter aus Blinkt
Kaffee kocht zu
lange
Schalten Sie den Knopf aus
*
SÄUBERN UND PFLEGE
1. Die Maschine muss ausgeschaltet und abgekühlt sein.
2. Reinigen Sie Gehäuse mit einem feucht en Tuch.
Hinweis: Verwenden Sie keine S cheuerschwämme, Reinigungsmittel oder
Lösungsmittel. Die Maschine nicht in Wasser ei nt auchen.
3. Beim säubern des Dampfaustrittes, acht e Sie darauf das nichts blockiert
4. Bürsten Sie die Steckdose und die Dichtung unter dem Gruppenkopf ;
5. Spülen Sie mit heißem Wasser, um jeden Kaffeebohnerückstand zu lösen.
6. Reinigen Sie alle abnehmbaren Gegenstände im Wasser und trocknen Sie
gründlich.
*
REINIGUNG MINERALISCHER ABLAGERUNGEN
1. Die Maschine baut Kalkablagerungen im Laufe der Zeit auf: Sie müssen die
Entkalkung alle 2-3 Monate durchführen;
2. Gießen Sie Wasser und Entkalker in den Wassertank bis zur max. Kapazität
(Wasser und Entkalker Verhältnis 4:1), folgen Sie den Anweisungen. Bitte
verwenden Sie "Haushalts Entkalker", alternativ können Sie auch
Zitronensäure verwenden (Wasser und Zitronensäure Verhältni s 100: 3).
3. Verriegeln Sie den Filterhalter (ohne Kaffeepulver) in der Hauptgruppe. Wie
in T eil "B" ESPRESSO ZUBER EIT U NG
4. Drücken Sie die Kaffee Taste und machen Sie 150ml Kaffee nachdem die
Anzeige leuchtet, schalten Sie die Kaffe- und die Dampftaste ab, dann
Page 14

öffnen Sie den Griff nachd em der Dam pfknopf dauer haft leucht et, lassen Sie
ca. 2 Minuten den Dampf ab und legen Sie dann den Griff wieder um, dann
entkalken Sie die Maschine mindesten 15min.
5. Wiederholen Sie Schritt 4, 3-mal;
6. Drücken Sie den Kaffee Knopf und machen Sie Kaffee nachdem kein
Entkalker mehr vorhanden ist
7. Machen Sie Kaffe (ohne Kaffeepul ver), wiederholen Sie Schritt 4, 3 mal (Sie
müssen dieses mal keine 15 Minuten warten), dann machen Sie solange
Kaffee bis kein Wasser mehr vorhanden ist
8. Wiederholen Sie Schritt 7, 3 mal um Sicherzustellen das die Leitungen
sauber sind.
*UMWELT
ACHTUNG :
Werfen Sie nicht dieses Produkt, wie es mit anderen
Haushaltsprodukten hat. Es gibt eine Mülltrennungs von diesem
Produkt in Gemeinden, Sie müssen Ihre lokalen Behörden über die
Orte, wo man dieses Produkt zurückgeben k önnen zu informieren. In
der Tat enthalten elektrische und elektronische Produkte gefährliche
Stoffe, die schädliche Auswirkungen auf die Umwelt oder die
menschliche Gesundheit haben und sollte recycelt werden. Das
Symbol hier darauf hinweisen, dass elektrische oder elektronische
Geräte sollten sorgfältig ausgewählt werden, ist ein fahrbarer
Abfallbehälter mit einem Kreuz markiert.
Hergestellt und importiert : Adeva SAS 8 rue Marc Seguin 77290 Mitry-Mory FRANCE
www.hkoenig.com - contact@hkoenig.com - Tel. 01 64 67 00 01
Page 15

NEDERLANDS
*BELANGRIJKE VEILIGHEIDSMAATREGELEN:
Voor het gebruik van de machine altijd zorgvuldig te lezen en te voldoen aan
alle instructies. We kunnen geen enkele verantwoordelijkheid voor de gevolgen
van oneigenlijk gebruik.
1. Controleer de spanning om zeker te zijn dat het op het typeplaatje
aangegeven spanning overeenkomt met uw netspanning.
2. Dit apparaat is opgenomen met een geaarde stekker. Zorg ervoor dat het
stopcontact in uw huis is goed geaard.
3. Sluit toezicht is nodig wanneer het apparaat wordt gebruikt door mensen.
Plaats het apparaat buiten het bereik van kinderen en personen met beperkte
mogelijkheden.
4. Plaats het apparaat niet op of bij een hete gas- of elektrische brander of in
een verwarmde oven.
5. Haal de stekker uit het stopcontact wanneer deze niet in gebruik is en
voordat u het schoonmaakt. Laat afkoelen alvorens of opstijgen onderdelen, en
voor het reinigen van het apparaat.
6. Gebruik geen apparaat niet met een beschadigd snoer of stekker of nadat
het apparaat defect of beschadigd is op enige wij ze. Terug apparaat naar de
dichtstbijzijnde erkende servicecentrum voor onderzoek, reparatie of
aanpassing.
7. Het gebruik van accessoires gehechtheid niet aanbevolen door de fabrikant
van het apparaat kan leiden tot brand, elektrische schokken of persoonlijk
letsel.
8. Wees voorzichtig om ervoor te zorgen dat de voedingskabel niet gevangen
worden en niet tegen scherpe randen sc huur t .
9. Laat het snoer hangen over de rand van een tafel of bar of hete
oppervlakken.
10. Gebruik geen hete onderdelen aan. M et het handvat van de trechter.
11. Ter bescherming tegen brand, elektrische schokken en persoonlijk letsel,
doe snoer, stekkers, of het lichaam van de machine niet onder in water of een
andere vloeistof.
12. Het moet worden beschermd tegen vorst.
13. Vul up niet meer dan 1.7L naar de bovenste markering MAX, als zuiver
water in de watertank.
14. Zodra de storing, defect of machine daling veroorzaakt door de verdachte
defect, trek dan de stekker onmiddel l ij k, n iet w erken op het probleem machine.
15. Niet buitenshuis gebruiken.
16. BEWAAR DEZE VO OR UW refference.
17. Dit apparaat is niet bedoeld voor gebruik door personen met beperkte
capaciteit op de fysieke, mentale of zintu iglijke of g ebrek aan erv aring en ken nis
(inclusief kinderen), tenzij hij hen heeft werd gevraagd om te controleren of als
zij instructies over het gebruik van het apparaat door een persoon die
verantwoordelijk is voor hun veiligheid hebben gehad. Kinderen moeten onder
toezicht te zorgen dat ze niet spelen met het apparaat.
18. Als het netsnoer beschadigd is, moet het worden vervangen door een
after-sales service om elk gevaar te voorkomen.
19. In tegenstelling tot conventionele wijsheid, het beste druk maken van een
espresso is tussen 8 en 12 bar en 15 bar die niet de maximale druk van het
toestel. De complexiteit van de ontwikkeling van een espresso is het ideale
maalgraad een druk van 8-12 bar wordt gerealiseerd en de beste kwaliteit van
koffie. Als de maling is niet fijn genoeg druk zal laag zijn en de koffie te snel
stromen, terwijl als de maling te fijn is zal de druk te hoog zijn en de koffie zal
heel langzaam stromen. Het aanstampen van de koffie is belangrijk bij de
bereiding van espresso, en voor het r egelen van de druk van de machine. Als u
niet beschikt over koffiemolen, vindt u in de handel van speciale espresso
koffiebrander of vraag uw specifieke koffiedik.
Page 16

ALLEEN HUIDHOUDELIJK GEBRUIK
Accessoires:
Waarschuwing : De m achine moet gebruiken vermalen koffiepoeder en
alleen voor het maken van koffie, koff i e dranken, verwarming
melk, zullen andere niet-standa ard ge bruik mogelijk veroorzaken
de machine niet werken
.
A. HET EERSTE GEBRUIK
1. Zet het koffiezetapparaat uit de verpakking en controleer de accessoires
volgens de lijst.
2. Reinig alle afneembare onderdelen
3. Gebruik de inrichting volgens de onder "B" en " C" ( geen kof fiepoe der in filter ).
Herhaal 2-3 keer.
B. ESPRESSO MAKEN
1. Open het deksel, neem watertank, en g iet de juiste water in de tank. Gebruik
de MAX capaciteit niet overschrijd en;
2. Plaats het waterreservoir en sluit het deksel;
3. Sluit de stekker, druk uit-knop, dan is de machine automatisch water te
pompen over 2s, en koffie -indicator en stoom-indicator licht altijd aan, dan
koffie knippert en de machin e t e st ar t en voorverwarmen, koffie indicator licht
op en het voorverwarmen beëindigd na 2min;
4. Neem filterhouder, giet de juiste koffiepoeder in het filter met koffie lepel, druk
dan op de koffiepoeder strak;
5. Zet de filterhouder in de groep hoofd
6. Put beker (s) onder de koffie uit l oop;
7. Start brouwen door het indrukken van de knop koffie;
8. Verwijder filterhouder, elimineer het en maak het schoon met war m wat er
onmiddellijk, en sluit het opnieuw v oor volgend gebruik.
Opmerking: Control e er regelmatig het waterpeil in de tank. Indien
nodig bijvullen. Ge en handen te gebruiken om de hete oppervlakken
van de machine aan te r a ken, vooral brouwen outlet, stoompijpje
wanneer het gebruik m achine.
C. MELK SCHUIMEN/CAPPUCCINO MAKEN
1. Bereid espresso eerst met een voldo ende grote beker overeenkomstig deel
"B. MAAK ESPRESSOKOFFIE.
2. Gebruik hele, verse koude melk uit de koelkast (8 ℃ -10 ℃), en giet 1/3 me l k
in de beker.
Opmerking: Gebruik een roestvr ijstalen beker en cup diameter mag ten minste
70 ± 5 mm, als gevolg van de hoeveelheid melk zal toenemen na
opschuimen.
3. Druk op stoom knop, begint het voorverwarmen en stoom knippert, dan
Page 17

wachten op de lamp licht op;
4. Zet een roestvrijstalen kopje ond er st oompijp;
5. Open knop, vrijgave stoom, maken de stoom nozzle drijvend op het
oppervlak van de melk, en stel de hoogte van staal cup voor het kloppen van
melk;
6. Verwijder het product als u klaar bent, schakelt u de knop, en Giet de
opgeschuimde melk in de voorbereide espres so; nu is de cappucc ino is klaar.
Opmerking: Laat stoom uit de stoompijp komen na gebruik om deze
schoon te maken. Let op heet.
PROBLEEMOPLOSSING
Probleem
Oorzaak
Oplossing
Er komt geen
water uit
Watertank is leeg
Doe water in de watertank
Het geleverde voltage is
te laag voor het apparaat
Zorg ervoor dat de voltage levering
overeenkomt met die aangegeven op het
apparaat.
Machine storing
Neem contact op met geautoriseerde
service
Er komt geen
stoom uit
Stomer is verstopt
Maak de stomer schoon
Watertank is leeg
Doe water in de watertank
Machine storing
Neem contact op met geautoriseerde
service
Koffie
overstroomt
boven de
filter uit
Teveel koffie in filter
Maak het filter schoon, voeg vervolgens
koffie poeder toe
Er zit koffie in een gleuf
van het apparaat
Maak de gleuf schoon
Bovenstaande
oplossingen boden geen
resultaat
Neem contact op met geautoriseerde
service
Koffie komt
traag uit de
machine of
Koffiepoeder is te fijn en
hebben het filter
geblokkeerd
Gebruik dikker koffiepoeder
helemaal
niet
Filter gaten zijn
geblokkeerd
Borstel/verschoon de filter
Watertank is niet
geplaatst
Plaats de watertank
Er is een
waterlekkage
onderaan het
apparaat
Lekbak is vol
Leeg de lekbak
Machine storing
Neem contact op met geautoriseerde
service
Machine
werkt niet
De stekker is niet juist
geplaatst
Plaats de stekker juist in een stopcontact
NTC is kort circuit
Neem contact op met geautoriseerde
service
Machine storing
De stoom
klopt geen
melk
Stoom indicator flikkert
Wacht to de stoomindicator brandt
De beker is te groot of de
vorm is niet juist
Gebruik een hoge en smalle beker of een
galand beker
Magere melk gebruikt Gebruik volle melk
*Als u het probleem niet heeft kunnen oplossen, neem contact op met de klantenservice in
uw land
D. WATER KOKEN
1. Gebruik Een Roestvrij stalen beker, giet Koude Vloeistof tot 1/2 kop;
OPMERKING: Kop diameter mag Ni et M ind er dan 70 ± 5 mm.
2. Druk op stoom drukt, Begint Het voorverwarmen en stoom knippert, dan
Wachten op de lamp licht op;
3. Doe kopje Onder Stoompijp;
4. Zet de knop aan, Laat stoom, Laat de stoomtuit Wordt in de Vloeistof
gestoken;
5. Zet de knop uit wanneer de Gewenst e Temperatuur is bereikt.
Opmerking: Controleer regelmatig het waterpeil in de tank. Indien nodig
bijvullen. Raak de warme oppervlakken van de machine niet wanneer het
gebruik van de machine te raken met de handen, vooral brouwen outlet,
stoompijp.
Page 18

E. VLOEISTOF VERHITTEN
1. Gebruik een roestvrij stalen beker, giet koude vloeistof tot 1/2 kop;
Opmerking: Kop diameter mag niet m inder dan 70 ± 5 mm.
2. Druk op stoom drukt, begint het voorverwarmen en stoom knippert, dan
wachten op de lamp licht op;
3. Doe kopje onder stoompijp;
4. Zet de knop, laat stoom, laat de stomer w or dt in d e vloeistof gestoken;
5. Zet de knop wanneer de gewenste te m per at uur is bereikt.
Opmerking: Control e er regelmatig het waterpeil in de tank. Indien nodig
bijvullen. Raak de warme opperv lakken van de machine niet wanneer
het gebruik van de machine te rake n m et de ha nd en, v oor al st om er
en stoompijp.
INDICATOR TIPS
Koffie
Indicator
Stoom
Indicator
Oorzaak Oplossing
Flikkert Lampje aan Stroom aan /
Flikkert Lampje uit Koffie voorverwarmen /
Lampje aan Lampje uit
Koffie voorverwarmen
voltooid
/
Lampje uit Flikkert Stoom voorverwarmen /
Lampje uit Lampje aan
Voorverwarmen
voltooid
/
Flikkert Lampje uit Te mperatuur is te hoog
Wacht tot de temperatuur daalt of
druk op de koffiezetknop om water te
koelen.
Flikkert Flikkert
NTC is open circuit of
kort circuit
Neem contact op met een
geautoriseerde reparatiedienst
Flikkert Lampje uit Te lang koffie zetten Zet de koffie knop uit
Lampje uit Flikkert Te lang koffie zetten Zet de knop uit
*SCHOONMAAK EN ONDERHOUD
1. De machine moet worden uitgesch akeld en afgekoeld.
2. Reinig behuizing met een vochtige doek.
Opmerking: schuursponsjes en w asmiddelen of oplosmiddelen.
De machine niet onder te dompelen in wat er.
3. Reinig stoomuitlaat, bevestigen dat er geen blokkade.
4. Bestrijk de uitlaat en de afdichting onder de groep hoofd;
5. Spoelen met warm water om alle koffiebonen olieresten op te lossen.
6. Reinig alle afneembare bijlagen in het w at er en afdrogen.
*
KALKAFZETTING REINIGEN
1. De machine bouwt kalkafzettingen in de tijd, en je moet de ontkalking 2-3
maanden;
2. Giet het water en ontkalken in watertank tot MAX capaciteit (water en
ontkalken verhouding 4: 1, volg de instructies van Ontkalken Gebruik
"huishoudelijke Ontkalken", of u kunt het citroenzuur gebruiken vervangen
Ontkalken (water en citroenz uur. verhouding 100: 3).
3. Zet de filterhouder (zonder kof fie po eder) in de gr oep ho o fd. Volgens deel "B"
MAAK ESPRESSO KOFFIE.
4. Druk op de knop koffie, ver volgens ongeveer 150 ml koffie na koffie indicator
altijd op, zet koffie knop en zet stoom knop, open dan de knop na stoom
indicator altijd op, laat stoom ongeveer 2 m in en zet de knop, dan maak ontkalkt
storting in de machine minstens 15 minuten.
Page 19

5. Herhaal stap 4 voor 3 keer;
6. Druk op de knop koffie om koffie te zetten tot er geen ontkalken links;
7. Maak koffie weer (geen koffie poeder), herhaalt u de stappen 4 voor 3 keer
(niet nodig te wachten op 15 min), dan is het brouwen tot er geen water
achterblijft in de ketel;
8. Herhaal stap 7 minstens 3 keer om te cont r oleren of de leidingen is netjes.
*MILIEU
ATT ENTIE :
Dit apparaat mag niet met uw ander huishoudelijke toestellen worden
verwijdert. Dit product moet op een geselecteerde stortplaats verwijdert
worden. U kunt bij de gemeente een indiceerde pl aat s aanv ragen. Ele ktrisc h en
elektronische producten kunnen gevaarl ijke stoffen inhouden die schadelijk zijn
voor mensen en het milieu en moet recycled worden. Het symbool aan de kant
geeft aan dat het een elektrisch en elektronisch toestel i s en zijn dus artikelen
van een selectieve collectie. Het bee ld geeft ee n afv alb ak met een X t eken aan.
Geproduceerd en geïmporteerd door : Adeva SAS 8, Rue Marc Seguin 77290, Mitry-Mory FRANKRIJK
www.hkoenig.com - contact@hkoenig.com – Tel efoon: 01 64 67 00 01
Page 20

ESPANOL
*PRECAUCIONES IMPORTANTES:
Antes de utilizar la máquina siempre lea cui dadosamente y cumpla con todas
estas instrucciones. No podemos aceptar ninguna responsabilidad por las
consecuencias de un uso indebido.
1. Verifique el voltaje para asegurarse de que el voltaje indicado en la pl aca
de características del aparato coin cide con la tensión usada en su hogar.
2. Este aparato tiene un enchufe incorporado con conexión a tierra.
Asegúrese de que la toma de corriente en su casa está bien conectada a
tierra.
3. Se requiere supervisión cuando el aparato es utilizado. Coloque la
máquina fuera del alcance de los niños y las personas con capacidades
limitadas.
4. No coloque sobre o cerca de una hornilla de gas o eléctrica, en un horno
caliente o fuentes de calor en general.
5. Desenchufe del tomacorriente cuando no esté en uso y antes de limpiarlo.
Deje que se enfríe antes de poner o qui tar piezas, y antes de limpiar el
aparato.
6. No opere ningún aparato con un cable o enchufe dañado o después de un
mal funcionamiento, o si se ha dañado de alguna manera. Devuelva el
aparato al centro de servicio autorizado más cercano para su revisión,
reparación o ajuste.
7. El uso de accesorios no recomendados por el fabr icant e del aparato pu ede
provocar un incendio, descargas eléctricas o lesiones a las personas.
8. Tenga cuidado para asegurarse de que el cable de alimentación no se
quede atrapado y no roce con bordes afila dos o c alientes.
9. No permita que el cable cuelgue sobre el borde de una mesa o mostrador,
ni que toque superficies calientes.
10. No toque las partes calientes. Utilice e l as a del embudo.
11. Para protegerse contra incendios, descargas eléctricas y lesiones a
personas, no sumerja el cable, los enchufes o el cuerpo de la máquina en
agua u otro líquido.
12. El aparato debe de estar protegido contra temperaturas muy bajas o de
congelamiento.
13. Por favor, rellene hasta no más de 1,7 litros de marca superior MAX,
cuando haya agua pura en el tanque de agua.
14. Al contrario de lo que pueda pensar, la mejora presión para la preparación
de un café expreso es entre 8 y 15 bares. 15 bar es es la presión máxima.
La complejidad para hacer un expreso reside en el hecho de tener una
finura de molturación ideal que alcanza una presión entre 8 y 12 bares y
para obtener el mejor gusto de café.
Si la molturación no es bastante fina, la presión será baja y el café fluirá
demasiado rápido, al contrario si la molturación es demasiada fina la
presión será demasiada alta y el café fluirá muy lentamente.
15. T a mbién la co mpactación del café es imp ortante dur ante la prepar ación de l
expreso, y para la regulación de la presi ón de l a máquina.
16. Si no tiene un molinillo de café, se puede encontrar un café expreso
especial en las tiendas o pedir granos específicos para su tostadora de
café.
17. Una vez que se ha detectado una falla, defecto o caída de la máquina
causados por defectos sospechoso, desconecte el enchufe de inmediato,
no opere la máquina si éts presente alguno de estos problemas.
18. No utilice el aparato al aire libre.
19. GUARDE ESTAS INSTRUCCIONES PARA SU REFERENCIA FUTURA.
20. Este dispositivo no está destinado a ser utilizado por personas con
capacidad reducida en lo físico, menta l o sens oria l, o falta de exp erie ncia y
conocimiento (incluidos los niños), a menos que los tiene fue el encargado
de supervisar o si han tenido instrucciones sobre el uso del aparato por
una persona responsable de su seguridad. Los niños deben ser
supervisados para asegurarse de qu e no j ueguen con el aparato.
21. Si el cable de alimentación está dañado, debe ser sustituido por un servicio
post-venta para evitar cualquier peli gro.
Page 21

SÓLO PARA USO CASERO
Accesorios:
Advertencia: La máquina debe ut i l i z ar pol vo de café molido y sólo para
hacer café, bebidas de café, calentar l eche, para otros usos no
estándar será posible que la máquina no funcione
.
A. ANTES DEL PRIMER USO
1. Saque la máquina de café del paquete y compruebe que tiene todos los
accesorios de acuerdo a la lista.
2. Limpie todos los componentes desmo nt ables.
3. Opere el aparato de acuerdo a la sección " B" y "C" (sin polvo de café en el
filtro). Repita 2-3 veces.
B. HAGA CAFÉ EXPRESSO
1. Abra la tapa, sacar el tanque de agua y vierta agua en el tanque. No exceda
la capacidad máxima;
2. Vuelva a colocar el tan que de agua en su lugar y cierre la tapa;
3. Conecte el enchufe, presione el botón de encendido, a continuación, la
máquina bombeará automática ment e el agu a so bre 2s, y el indica dor de c afé
y el indicador de vapor siempre estarán encendidos, entonces el indicad or de
café parpadea y la máquina inicia el precalentamiento, luego el indicador de
café se enciende y finalmente el precalentamiento habrá terminado después
de 2 minutos;
4. Saque la base del filtro, vierta café en polvo adecuado en el filtro con una
cuchara de café, a continuación, pres io ne el polvo de café fuertemente;
5. Coloque firmemente la base del filtr o en la s alida de café
6. Ponga las tazas debajo de la salida de café;
7. Inicie el proceso presionando el botón de café;
8. Retire la base del filtro, golpee hacia fuera y límpiela con agua caliente de
inmediato, y vuelva a colocarla de nuevo par a el próximo uso.
Nota: Compruebe con frecuencia el nivel de agua en el tan que. Vuelva a
llenar si es necesario.
No use las manos para tocar las superficies calientes de la máquina,
sobre todo la salida de café y la boquil l a de vapor cuando la
máquina está en utilización.
C. ESPUMA DE LECHE/ HACER CAPPUCCINO
1. Prepare expresso primero con una t aza grande suficiente de acuerdo con la
parte "B. HACER CAFÉ EXPRESSO".
2. Utilice leche entera fresca y fría de la never a (8 ℃ -10 ℃), y vierta 1/3 leche
en taza.
Nota: Utilice una taza de acero inoxidable, y el diámetro d e la taza no
debe de ser menos de 70 ± 5 mm, debido a su volumen la leche
aumentará después de la formación de espuma.
3. Pulse el botón de vapor, se iniciará el precalentamiento, y el indicador de
vapor parpadeará, luego esperar a que l as lu ces se enciendan;
4. Ponga una taza de acero inoxidable ba jo l a boquilla de salida de vapor;
5. Abra la perilla, deje salir el vapor, deje que la boquilla de vapor roce la leche
y ajustar la altura de la taza de acero para hacer la espuma de leche;
Page 22

6. Retire el producto cuando haya t erminado, apague la perilla, y vierte la leche
montada en el expresso ya preparado; ahora el capuchino está listo.
SOLUCIÓN DE PROBLEMAS
Problema
Causa
Solución
No sale
agua
El depósito de agua está
vacío
Vierta agua en el tanque de agua
La tensión de entrada o
la frecuencia es
incompatible con la
tensión del aparato
Asegúrese de que el voltaje y la frecuencia
es compatible con la de este aparato
Mal funcionamiento de la
máquina
Póngase en contacto con el servicio
técnico autorizado
No se
genera vapor
La boquilla de vapor está
obstruida
Limpie la boquilla de vapor
El tanque de agua está
vacío
Vierta agua en el tanque de agua
Mal funcionamiento de la
máquina
Póngase en contacto con el servicio
técnico autorizado
El café gotea
alrededor del
borde de la
base del
filtro
Demasiado café en el
filtro
Limpie el filtro, y luego vierta café en polvo
adecuado
Hay café en el sello
debajo de la salida
Limpie la zona debajo de la salida
Después de seguir todos
estos pasos los
problemas de
funcionamiento todavía
existen
Póngase en contacto con el servicio
técnico autorizado
Café sale
demasiado
lento o no
hay café
El café molido es
demasiado fino y el filtro
está obstruido
Use polvo de café más grueso
Los agujeros del filtro
están bloqueados
Cepille / limpie el filtro
El tanque de agua no
está insertado
Inserte el tanque de agua en su lugar
Hay fugas de
agua en la
La bandeja de residuos
está llena
Limpie la bandeja de residuos
parte inferior
de la
máquina
Mal funcionamiento de la
máquina
Póngase en contacto con el servicio
técnico autorizado
La máquina
no está
funcionando
La toma de corriente no
está bien conectada.
Conecte el cable de alimentación a un
enchufe de pared correctamente,
Cortocircuito
Póngase en contacto con el servicio
técnico autorizado
Mal funcionamiento de la
máquina
El vapor no
puede
espumar.
Indicador de vapor
parpadea
Espere que el indicador de vapor se
encienda.
El contenedor es
demasiado grande o su
forma no es apta
Utilice una taza más alta y estrecha
utilizó leche desnatada
Utilice leche entera
* Si usted no ha sido capaz de resolver el problema, contacte con el servicio al cliente de su
país
Nota: saque el vapor para limpiar la boquilla de vapor después de su
uso, tenga cuidado que esta superfici e puede estar muy caliente.
D. CALENTAR AGUA
1. Coloque un recipiente de acero inoxidable bajo la boquilla de vapor;
2. Abrir la perilla, el indicador de café estará siempre encendido, luego el agua
caliente será expulsada de la boquilla de vapor;
3. Cerrar la perilla cuando se alcanza la cant idad deseada.
Nota: Compruebe con frecuencia el nivel de agua en el tanque. Vuel va a
llenar si es necesario.
No toque las superficies calientes de la máquina con las manos,
sobre todo la salida de café y boquilla de vapor cuando la máquina
está en utilización.
Page 23

E. CALENTAN DO LÍQUIDOS
1. Utilice una taza de acero inoxidable, v iert a lí qui do frío a 1/2 taza;
Note: el diámetro de la copa no debe de ser menos de 70 ± 5 mm.
2. Presione el botón de vapor, se i niciará el precalentamiento, y el indicador de
vapor parpadeará, luego esperar a que las luces se enciendan;
3. Ponga la taza debajo de la boquilla de vapor;
4. Encienda la perilla de vapor, deje salir el vapor, deje que la boquilla de vapor
se introduzca en el líquido;
5. Apagar el mando cuando se alcanza la temperatura deseada.
Nota: Cuando se detiene el vapor, limpie la boquilla de vapor de
inmediato, y liberar el líquido de la boquill a, para ev i tar la escalada
de líquido, debido a que l a te mpera t ura de l a su p erf ici e del tubo de
vapor es muy alta cuando está en us o, t eng a cuidado.
CONSEJOS
Indicador
de café
Indicador de
vapor
Causa Solución
Intermitente
Luz
encendida
Encendido
/
Intermitente Lights off
Precalentamiento
de café
/
Luz
encendida
Luz
apagada
Precalentamiento
de café
terminado
/
Luz
apagada
Intermitente
precalentamiento
del vapor
/
Luz
apagada
Luz
encendida
Precalentamiento
terminado
/
Intermitente
Luz
apagada
La temperatura
es muy alta
Presione el botón de café
para enfriar la temperatura
Intermitente Intermitente
Circuito abierto o
cerrado
Por favor
contacte con el
servicio al cliente para
solucionar este problema.
Intermitente
Luz
apagada
El café se hace
durante
demasiado
tiempo
Apague el botón de café
Intermitente
Luz
apagada
El agua se
calienta durante
mucho tiempo
Apague la perilla
Luz
apagada
Intermitente
El café se hace
durante
demasiado
tiempo
Apague la perilla
*LIMPIEZA Y MANTENIMIENTO
1. La máquina tiene que estar desconectada y fría.
2. Limpie el aparato con un paño húmedo.
Nota: No utilice esponjas y detergentes o disolventes a br asivos.
No sumerja la máquina en agua.
3. Limpie la boquilla de vapor, asegúrese de que no haya obstrucciones.
4. Cepille la salida y el sello debajo de la salida;
5. Enjuague con agua caliente para disolver cualquier residuo de aceite de
grano de café.
6. Limpie todos los accesorios desmontables con agua y seque bien.
Page 24

*
LIMPIEZA DE DEPÓSI TOS MINERALES
1. La máquina acumula depósitos de cal con el tiempo y es necesario
descalcificar la máquina cada 2-3 meses ;
2. Vierta agua y descalcificador en el tanque de agua hasta la capacidad MAX
(la relación del agua y el descalcificador es de 4 : 1, siga las inst rucc iones de
descalcificación Utilice "descalcificadores caseros", o puede utilizar ácido
cítrico para reemplazar el descalcificador ( la relación entre el agua y el ácido
cítrico es de 100 : 3).
3. Asegure la base del filtro (sin café en polvo) en la salida de café. De acuerdo
con la parte "B" HAGA CAFÉ EXPRESO.
4. Pulse el botón de café, a continuación, haga café de aprox. 150 ml, el
indicador de café permanecerá con la luz encendida, luego presione
nuevamente el botón café para apagar y encienda el botón de vapor, a
continuación abra la perilla, el indicador de vapor permanecerá encendido
durante este proceso, deje salir vapor durante 2 mi nutos y apague la peri lla,
a continuación, deje que el depósito de la máquina se limpie durante al
menos 15 minutos.
5. Repita los 4 pasos 3 veces;
6. Pulse el botón de café para preparar el café hasta que no haya más
residuos;
7. Haga café de nuevo (no café en polvo), repita los 4 pasos 3 veces (no hay
necesidad de esperar durante 15 minutos), a continuación, haga café hasta
que no quede agua en la caldera;
8. Repita los 7 pasos al menos 3 veces para asegurarse de que la tubería
está completamente limpia.
*MEDIO AMBIANTE
ATENCIÓN :
No se deshaga de este producto como lo hace con otros productos del
hogar. Existe un sistema selectivo de colecta de este producto puesto
en marcha por las comunidades, debe de informarse en su ayuntamiento
acerca de los lugares en los que puede depositar este producto. De hecho, los
productos eléctricos y electrónicos pueden contener substancias peligrosas
que tienen efectos nefastos para el medio ambiente o para la salud humana y
deben ser reciclados. El símbolo aquí presente indica que los equipos
eléctricos o electrónicos deben de ser cuidadosamente seleccionados,
representa un recipiente de basura con r uedas marcado con una X.
Fabricado e importado por : Adeva SAS 8 rue Marc Seguin 77290 Mitry-Mory FRANCE
www.hkoenig.com - contact@hkoenig.com - Tel. 01 64 67 00 01
Page 25

ITALIANO
*ISTRUZIONI IMPORTANTI SULLA SICUREZZA:
Prima di utilizzare la macchina leggere attentamente e attenersi sempre a tutte
le istruzioni. Il produttore non si assume alcuna responsabilità per le
conseguenze causate da un uso impropr io dell’apparecchio.
1. Controllare la tensione per essere sicuri che il voltaggio indicato sulla
targhetta sia uguale a quello del vostr o impianto elettrico.
2. Questo apparecchio è dotato di una spina con messa a terra. Si prega di
assicurarsi che la presa di corrente nella vostra casa sia ben collegata con
la messa a terra.
3. È necessaria un'attenta supervisione quando l'apparecchio è in uso. Tenere
la macchina fuori dalla portata dei bambini e dalle persone con capacità
fisiche o sensoriali limitate.
4. Non posizionare l’apparecchio sopra o vicino a fornelli a gas o elettrici o in
un forno caldo.
5. Staccare la spina dalla presa di corrente quando l’apparecchio non è i n us o
e prima della pulizia. Lasciar raffreddar e pr ima di inserire o rimuovere pezzi
e prima di pulire l'apparecchio.
6. Non utilizzare la macchina se il cavo o la spina sono danneggiati o dopo il
cattivo funzionamento, o se l’apparecchio è stato danneggiato in qualsiasi
modo. Portare l’apparecchio al centro di assistenza autorizzato più vici no
per un controllo, riparazione o rego laz ione.
7. L'uso di accessori non consigliati dal produttore di questo apparecchio può
provocare incendi, scosse elettriche o danni alle persone.
8. Fare attenzione a garantire che il cavo di alimentazione non sia di intralcio e
non sfreghi contro spigoli appuntiti.
9. Non lasciare che il cavo penda dal bordo di un tavolo o di un bancone, o
entri in contatto con superfici calde.
10. Non toccare le parti calde. Utilizzare il manico del filtro .
11. Per evitare incendi, scosse elettriche e lesioni alle p ersone, non i mmer ger e
il cavo, la spina o il corpo della macchina in acqua o altri liquidi.
12. L’apparecchio non deve mai essere es post o a condizioni di congelamento.
13. Durante il riempimento del serbatoio, si prega di non andare oltra al
contrassegno MAX (1,7 litri).
14. Contrariamente a quanto si pensi, la pressione migliore da applicare per la
realizzazione di un espresso si fissa fra le 8 e le 12 bar e non 15 che é la
pressione massimale dell’apparecchio. La complessità dell’elaborazione di
un espresso consiste nell’avere una macinazione ideale che permetterà di
raggiungere una pressione da 8 a 12 bar e ad avere una migliore qualità di
caffé. Se la macinazione n on é abbasta nza fine la pressione sar à inferior e e
il caffé colerà troppo rapi damente, d’altro canto se la macinazione é troppo
fine la pressione sarà piu’ elevata e il caffé colerà molto lentamente.
15. La compressione del caffé é ugualmente importante nella preparazione
dell’espresso, e per la regolarizzazione della pressione della macchina.
16. Se non disponete di una macina per il caffé, potete trovare in commercio
dei caffé appositi per espresso o potete chiedere presso la vostra
torrefazione una macinazione specifica per il caffé desiderato.
17. Se l’apparecchio presenta dei malfunzionamenti, o scola acqua, staccare
immediatamente la spina; non utilizzare la macchina se presenta un
problema.
18. Non utilizzare l’apparecchio in ambienti esterni.
19. CONSERV ARE QUESTE ISTRUZIONI PER FUTURE CONSULTAZIONI.
20. Questo dispositivo non è destinato all'uso da parte di persone con ridotta
capacità sul piano fisico, mentale o sensoriale o mancanza di esperienza e
di conoscenza (compresi i bambini), a meno che non li ha è stato chiesto di
monitorare o se hanno avuto istruzioni per l'uso dell'apparecchio da una
persona responsabile della loro sicurezza. I bambini devono essere
sorvegliati per assicurarsi che non giochino con l'apparecchio.
Page 26

21. Se il cavo di alimentazione è danneggiato, deve essere sostituito con un
servizio post-vendita per ev itar e ogni p er icolo.
SOLO PER USO DOMESTICO
Accessori:
Attenzione:
La macchina deve essere utilizzata solo con caffè macinato
in polvere e solo per la preparazione di caffè, bevande al
caffè e per riscaldare il latte; altri usi non convenzionali
potrebbero non far funzionare l’apparecchio.
A. PRIMO UTILI ZZO
1. Rimuovere la macchina da caffè dalla confezione e controllare che ci siano
tutti gli accessori in base alla lista.
2. Pulire tutti i componenti rimuovibili.
3. Eseguire i passaggi della sezione "B" e "C" per 2-3 volte (senza polvere di
caffè nel filtro).
B. COME PREPARARE UN CAFFÈ ESPRESSO
1. Aprire il coperchio, estrarre il serbatoio e versare una quantità d’acqua
adeguata. Non superare il livello MAX;
2. Rimettere il serbatoio dell'acqua e chiudere il coperchio;
3. Inserire la spina nella presa, premere il tasto di accensione, quindi l a
macchina pomperà automaticam ent e acqua dopo circa 2 secondi. A questo
punto sia la spia del caffè sia quel la d el vapore resteranno accese;
successivamente la spia del caffè lampeggerà e la macchina inizierà il
preriscaldamento. Dopo, la spia del caffè resterà s empre accesa e il
preriscaldamento finirà dopo 2 minuti;
4. Estrarre i portafiltri, versare il quantitativo appropriato di caffè in polvere nel
filtro con il dosatore per caf fè, quindi pressare la polvere di caffè;
5. Fissare il portafiltro nell’unità principale;
6. Mettere la tazza o le tazze sotto l’erogatore del caffè;
7. Avviare premendo il tasto del caffè;
8. Rimuovere il portafiltro, svuotarlo del caffè us at o e pulirlo con acqua calda
subito dopo l’uso, e rifissarlo all’unità principale pronto per un uso
successivo.
Nota: Controllare frequentemente il liv el lo dell'acqua nel serbatoio.
Riempire se necessario. Non usar e l e m ani per toccare le superfici
calde della macchina, in particolar e il portafiltro e il beccuccio del
vapore quando la macchina uso.
C. COME SCIUMARE IL LATTE/PREPARARE UN
CAPPUCCINO
1. Preparare un caffè espresso in una tazza più grande seguendo le i st r uzioni
della sezione “B. COME PRE PARARE UN CAFFÈ ESPRES SO” .
2. Utilizzare latte intero fresco freddo, fuori dal frigo (8°C-10°C), e versare 1/3 di
latte in tazza.
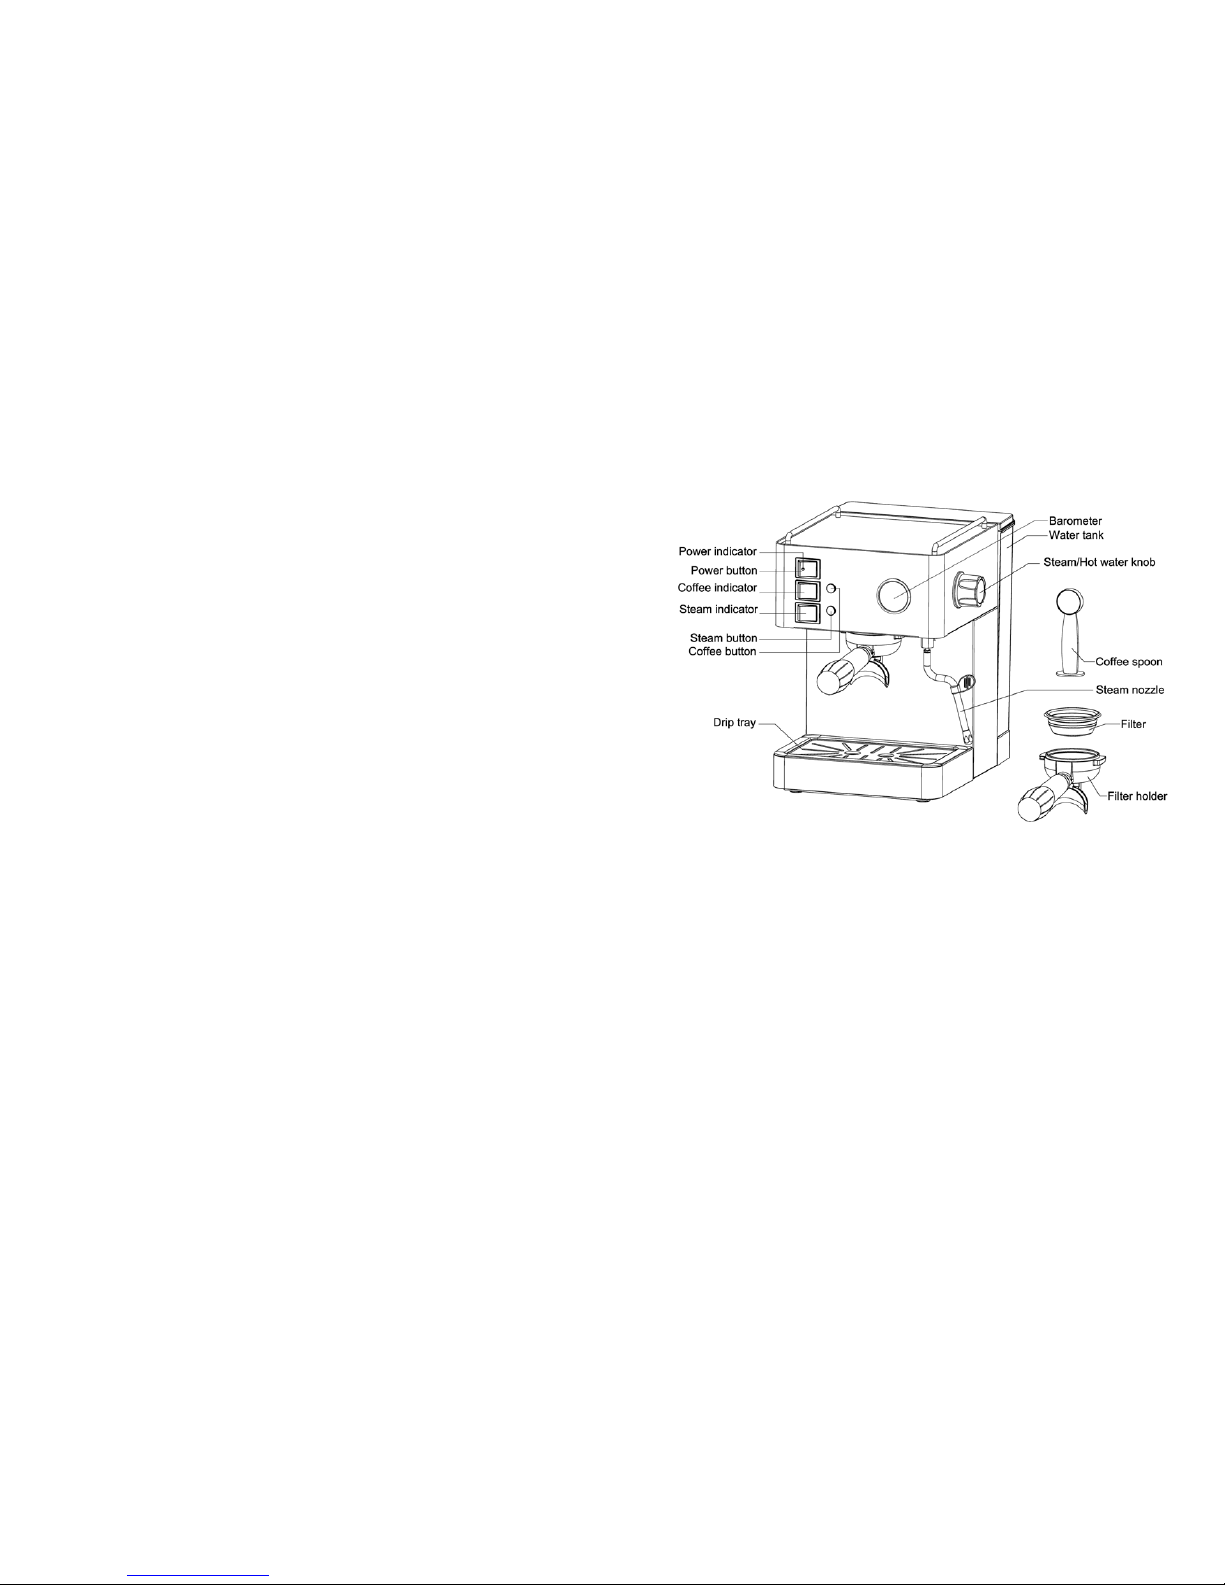
Spia di accensione
Interruttore
Spia caffè
Spia vapore
Tasto vapore
Tasto caffè
Vassoio di raccolta
Barometro
Serbatoio d’acqua
Manopola vapore/acqua calda
Dosatore caffè
Beccuccio vapore
Filtro
Portafiltro
Page 27

Nota: utilizzare un contenitore di acciaio inossidabile; il suo diametro
non dovrebbe essere meno di 70 ± 5 mm, poiché il volume di latte
aumenta dopo la formazione della schiuma.
3. Premere il tasto vapore, inizia così il preriscaldamento e la spia del vapore
lampeggia, quindi attendere che la s pi a r imanga fissa e non lampeggi più.
4. Mettere la tazza di acciaio inossidabile sotto il beccuccio del vapore.
5. Aprire la manopola, far fuoriuscire il vapore, mettere il tubo vapore sulla
superficie del latte, e regolare il contenitore d'acciaio in modo da schiumare il
latte;
6. Rimuovere il prodotto una volta terminato, chiudere la manopola e versare il
latte schiumato nel caffè espresso preparato precedentemente; ora il
cappuccino è pronto.
RISOLUZIONE DEI PROBLEMI
Problema
Causa/Risultato
Soluzione
Non esce
acqua
Il serbatoio è vuoto
Versare acqua nel serbatoio
La tensione o la
frequenza di ingresso è
incompatibile con quella
riportata sulla targhetta
Assicurarsi che la tensione e la frequenza
siano compatibili con quelle riportate sulla
targhetta
Disfunzione
dell’apparecchio
Si prega di contattare il centro di
assistenza
La macchina
non genera
vapore
L’ugello del vapore è
otturato
Pulire l’ugello del vapore
Il serbatoio è vuoto
Versare acqua nel serbatoio
Disfunzione
dell’apparecchio
Si prega di contattare il centro di
assistenza
Del caffè
fuoriesce
intorno al
bordo del
portafiltro
Troppo caffè nel filtro
Pulire il filtro e poi aggiungere la giusta
dose di caffè in polvere
C’è del caffè che
ostruisce tra il filtro e
l’unità principale
Pulire la guarnizione sotto l’unità principale
Se i problemi riportati Si prega di contattare il centro di
sopra persistono assistenza
Il caffè
fuoriesce
troppo
lentamente o
non esce per
niente
Il caffè macinato è troppo
fine e il filtro è sporco
Provare con polvere di caffè meno fine
I forellini del filtro sono
sporchi
Pulire il filtro o spennellarlo
Il serbatoio non è inserito
correttamente
Inserire correttamente il serbatoio
Ci sono dell e
perdite
d'acqua sul
fondo della
macchina
Il vassoio di raccolta è
pieno
Svuotare il vassoio di raccolta
Disfunzione
dell’apparecchio
Si prega di contattare il centro di
assistenza
L’apparecchio
non funziona
La spina non è collegata
correttamente alla presa
Collegare correttamente la spina alla presa
NTC è in corto circuito
Si prega di contattare il centro di
assistenza
Disfunzione
dell’apparecchio
Il vapore non
riesce a
schiumare il
latte
La spia del vapore sta
lampeggiando
Attendere finché non rimane ferma
Il contenitore è troppo
grande o la forma non è
conforme
Utilizzare una tazza alta e stretta o
specifica da cappuccino
Si sta utilizzando latte
scremato
Usare latte intero
** Se non siete stati in grado d i r iso lver e i l pro blema, contattare l'assistenza clienti del proprio
Paese.
Nota: dopo l'uso, far fuoriuscire del vapore in modo che pulisca il
beccuccio. Fare attenzio ne al le superfici bollenti.
D. COME RISCALDARE L’ACQUA
1. Mettere un contenitore di acciaio inox sotto i l beccuccio del vapore;
2. Aprire la manopola dopo che la spia del caffè rimane fissa, cosicché
dell'acqua calda verrà espulsa dal tubo v apor e;
3. Chiudere la manopola quando viene raggiunta la quant ità desiderata.
Page 28

Nota: Controllare frequentem ente il livello dell'acqua nel serbatoio.
Riempire se necessario. Non usar e l e m ani per toccare le superfici
calde della macchina, in particolar e i l port af i ltro e il beccuccio del
vapore quando la macchina uso.
E. RISCALDARE ALTRI LIQUIDI
1. Utilizzare un contenitore di acciaio inossidabile, versare i liquidi freddi fino a
1/2 del contenitore;
Nota: il diametro del con tenit ore non dov reb bero essere inferiore a 70 ±
5 mm.
2. Premere il tasto vapore, inizia così il preriscaldamento e la spia del vapore
lampeggia, quindi attendere che la s pi a r imanga fissa e non lampeggi più.
3. Mettere il contenitore di acciaio inossidabile sotto il beccuccio del vapor e;
4. Aprire la manopola e permettere al vapore di riscaldare il liquido;
5. Chiudere la manopola quando viene raggiunta la quantità desiderata.
Nota: Controllare frequentemente il livello dell'acqua nel serbatoio.
Riempire se necessario. Non usar e l e m ani per toccare le superfici
calde della macchina, in particolar e i l port af i ltro e il beccuccio del
vapore quando la macchina uso.
COME LEGGERE LE SPIE
Spia caffè Spia vapore Causa Soluzione
Lampeggiante Accesa Interruttore acceso
/
Lampeggiante Spenta
Preriscaldamento
caffè
/
Accesa Spenta
Preriscaldamento
caffè finito
/
Spenta Lampeggiante
Preriscaldamento
vapore
/
Spenta Accesa
Preriscaldamento
vapore finito
/
Lampeggiante Spenta
Temperatura troppo
alta
Aspettare che la
temperatura si
abbassi
naturalmente o
premere il tasto
caffè e fare in modo
che l’ac
qua si
raffreddi
Lampeggiante Lampeggiante
NTC
è in corto
circuito o circuito
aperto
Si prega di
contattare il centro
di assistenza per le
riparazioni.
Lampeggiante Spenta
Si sta riscaldando
l’acqua
per troppo
tempo
Spegnere la
manopola
Spenta Lampeggiante
Si sta preparando
caffè per troppo
Spegnere la
manopola
Page 29

tempo
*PULIZIA E MANUTENZIONE
1. La macchina deve essere spenta e lasciata raffreddare.
2. Pulire l’unità base con un panno um ido.
Nota: Non utilizzare spugne e detersivi abrasivi o solventi.
Non immergere la macchina in acqua.
3. Pulire il beccuccio del vapore e veri fic ar e che non vi siano intasamenti.
4. Spennellare l’uscita e la guarnizione poste sotto l’unità b ase;
5. Risciacquare con acqua calda per sciogliere tutti i residui dell’olio rilasciato
dai chicchi di caffè.
6. Pulire tutti i componenti rimuovib ili e asciugarli accuratamente.
*
PULIZIA DEI DEPOSITI MINERALI
1. Nel corso del tempo sulla macchina si formano dei depositi di calcare ed è
quindi necessaria una decalcificazione ogni 2-3 mesi;
2. Versare acqua e decalcificatore nel serbatoio fino al limite MAX (il rapporto
tra acqua e agente decalcificante deve essere di 4:1), oppure seguire le
istruzioni riportate sull’etichetta del vostro decalcificatore. Si prega di
utilizzare decalcificatori per uso domestico, oppure è possibile, in
sostituzione, utilizzare anche l'acido citrico (rapporto acqua e acido citrico:
100: 3).
3. Bloccare il portafiltro (senza polvere di caffè) nell’unità base e seguire quanto
riportato nella sezione "B" COME PREPARARE UN CAFFÈ ESPRESSO.
4. Premere il pulsante caffè e far fuoriuscire circa 150 ml di liquido e dopo che
la spia del caffè rimane fissa, speg nere il pulsante caffè e premere il tasto del
vapore; quando la spia del vapore rimane fissa, aprire la manopola per circa
2 minuti. Ora far scaricare la soluzione decalcificante dalla macchina per
almeno 15 minuti.
5. Ripetere il passaggio 4 per 3 volte;
6. Premere il tasto caffè e lasciar agire fino a quando non si è svuotata tutta la
soluzione decalcificante;
7. Preparare di nuovo un caffè (senza polvere di caffè), ripetere il passaggio 4
per 3 volte (ma non è necessario attendere 15 minuti), poi azionare la
macchina fino a quando il serbatoio no n s i sv uota completamente;
8. Ripetere il passaggio 7, almeno 3 volte per assicurarsi che la tubazione sia
pulita.
*AMBIANTE
ATT ENZIONE :
Non gettare quest’ apparecchio tra i rifiuti domestici. Per questo tipo di
prodotti è fornito dai comuni un sistema di rac colta e ritiro in zona ed è
quindi un dovere informarsi per conoscere il giusto smistamento del
rifiuto. Infatti, i prodotti elettrici ed elettronici possono contenere
sostanze pericolose che hanno effetti dannosi sull’ambiente o sulla
nostra salute e quindi devono essere riciclati. Il simbolo al lato indica
che le apparecchiature elettriche ed elettroniche fanno parte di una
raccolta selettiva e differenziata (rappresentata da un bidone su due
ruote sbarrato da una croce.
Prodotto e importato da : Adeva SAS 8 rue Marc Seguin 77290 Mitry-Mory FRANCE
www.hkoenig.com - contact@hkoenig.com - Tel. 01 64 67 00 01
 Loading...